- 投稿日:2021-02-26T20:40:54+09:00
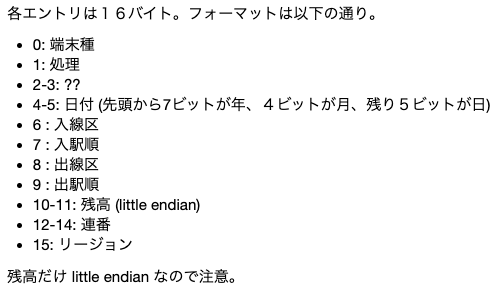
先頭から7bitが年、4ビットが月、残り5ビットが日 (Elixir)
はじめに
- Elixir楽しんでいますか

- AndroidでSuicaの履歴をみるというものを作ってみました
- 「先頭から7bitが年、4ビットが月、残り5ビットが日」、「とある2バイトが残高、ただしリトルエンディアン」こういった処理って地味にけっこうたいへんではないでしょうか
- Elixirならパターンマッチですっきり書けますのでご紹介します
- 2021/2/27に開催するautoracex #12というもくもく会の成果とします
- 以下で紹介するサイトの記事を参考にするとすぐにできました

参考にしたサイト
- AndroidアプリでNFCタグを読み書きするための基礎知識
- AndroidのNFCでSuicaの履歴を読んでみる
- 履歴を読み出すためのコマンドと取得例
- https://github.com/thinkAmi/RubotoFelicaRead/blob/acccaa6f2a513154d25b7583061ac3e517be6c68/src/net/kazzz/felica/suica/Suica.java
- 「AndroidのNFCでSuicaの履歴を読んでみる」記事で省略されている処理の実装の参考になりそうなものが書いてあります
- Felica Library > Wiki > Suica
- 履歴を読み出すためのコマンドを実行したあとに返ってくる値の仕様(構造)を有志の方がまとめてくださっています
( Felica Library > Wiki > Suica )
先頭から7bitが年、4ビットが月、残り5ビットが日
Java
    public Date getProccessDate(int date, int time) {
        int yy = date >> 9;
        int mm = (date >> 5) & 0xf;
        int dd = date & 0x1f;
        Calendar c = Calendar.getInstance();
        c.set(Calendar.YEAR, 2000 + yy);
        c.set(Calendar.MONTH, mm-1);
        c.set(Calendar.DAY_OF_MONTH, dd);

        int hh = time >> 11;
        int min = (time >> 5) & 0x3f;
        c.set(Calendar.HOUR_OF_DAY, hh);
        c.set(Calendar.MINUTE, min);
        return c.getTime();
    }
Elixir
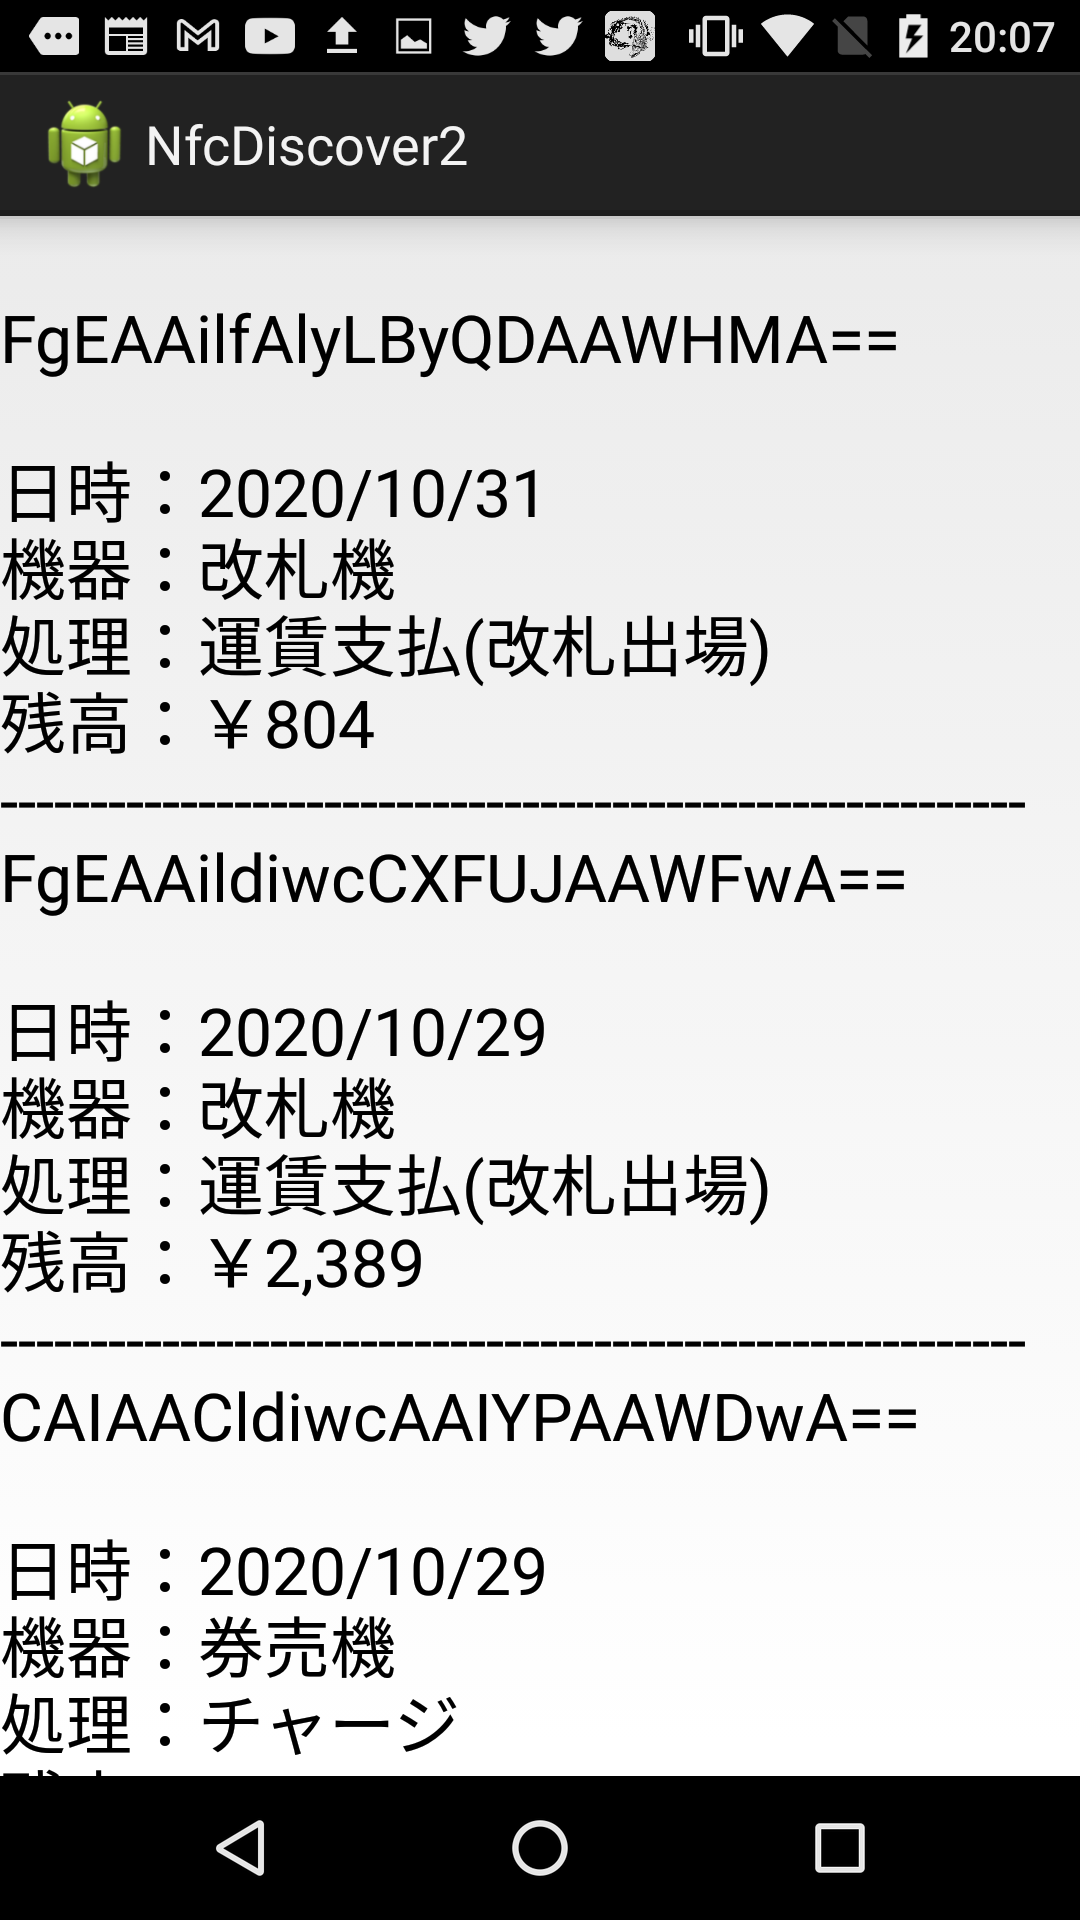
"FgEAAilfAlyLByQDAAWHMA=="は冒頭の写真でみせました表示例の最初のデータをBase64エンコードしたものであります- これを例に2020年10月31日が簡単に取り出せることを示します
iex> Base.decode64 "FgEAAilfAlyLByQDAAWHMA=="
{:ok, <<22, 1, 0, 2, 41, 95, 2, 92, 139, 7, 36, 3, 0, 5, 135, 48>>}
iex> <<_::32, year::7, month::4, day::5, _::binary>> = <<22, 1, 0, 2, 41, 95, 2, 92, 139, 7, 36, 3, 0, 5, 135, 48>>
<<22, 1, 0, 2, 41, 95, 2, 92, 139, 7, 36, 3, 0, 5, 135, 48>>
iex> year
20
iex> month
10
iex> day
31
- どうでしょうか、細かい書き方は抜きにして
7bitとか4bit、5bitを指定することでパターンマッチで値をとれます- シフトなどの演算を自分で書く必要はありません
とある2バイトが残高、ただしリトルエンディアン
Java
remain = Long.valueOf((bytesToInt(new byte[]{response[24], response[23]})));

...
    private int bytesToInt(byte[] bytes) {
        StringBuilder sb = new StringBuilder();
        for (byte b : bytes) {
            sb.append(String.format("%02X", b));
        }
        return Integer.valueOf(sb.toString(), 16);
    }
- こちらも冒頭の写真の最初のデータの残高804円が取り出せる様子を示します
Elixir
iex> <<_::80, remain::16-little, _::binary>> = <<22, 1, 0, 2, 41, 95, 2, 92, 139, 7, 36, 3, 0, 5, 135, 48>>
<<22, 1, 0, 2, 41, 95, 2, 92, 139, 7, 36, 3, 0, 5, 135, 48>>
iex> remain
804
- どうでしょうか、こちらも
16-littleという文法さえ覚えてしまえばパターンマッチ一発で値を取得できますWrapping Up

- 投稿日:2021-02-26T16:58:28+09:00
[Jetpack Compose] Jetpack Compose Beta!
What's In Beta
- ? Coroutines support
- ? Accessibility support for Talkback - support for other technologies will be in Stable
- ? Easy to use Animations, with a completely new API since alpha.
- Interoperability with Views
- Material UI Components, all with @Sampled code
- Lazy Lists - Jetpack Compose's take on RecyclerView
- DSL-based Constraint Layout
- Modifiers
- Testing
- Theming and Graphics, with easy support for Dark and Light mode
- Input and gestures
- Text and editable text
- Window management
- 投稿日:2021-02-26T14:15:47+09:00
RoomでMigration
検証環境
この記事の内容は、以下の環境で検証しています。
* Java:open jdk 1.8.0_152
* Kotlin 1.3.61
* Android Studio 3.5.3
* CompileSdkVersion:29はじめに
Androidでデータベースを扱う際、Android Jetpackに含まれているRoomを使うことにより、標準APIで実装するより簡潔に実装が出来ます。
しかし、アプリを更新していくうちにテーブルの列を変更したり、テーブルを追加したりします。
その様な更新(マイグレーション)方法について説明した記事になっています。DBの変更内容
この記事では数の様に、列の追加とテーブルの追加を行います。
※列やテーブルに特段の意味は有りません。あくまで一例と捉えてください。
DB変更前のソースコード
初めに、マイグレーションを行う前のソースコードを掲載します。
ER図と併せて確認しておくと、差分がよく分かると思います。
クラス 名or ファイル名 役割 MyEntity ・エンティティ
・テーブル定義MyDao ・@Daoアノテーション付与したDAOの定義 MyDatabase ・RoomDatabaseを継承したDatabaseクラス
・Room.BuilderでRoomDatabaseクラスをビルド
Contextクラスのプロパティを追加し、RoomDatabaseのオブジェクトを格納する※Activityやbuild.gradle、レイアウトファイルは省略します。
下記のコードを実行すると下記のようなテーブルが作成されます。
Entity
MyEntitiy.ktpackage jp.co.roommigration.entity import androidx.room.Entity import androidx.room.PrimaryKey @Entity data class MyEntity( @PrimaryKey(autoGenerate = true) val id:Int?=null, val name:String )MyDao
MyDao.ktpackage jp.co.roommigration.dao import androidx.room.Dao import androidx.room.Insert import androidx.room.Query import jp.co.roommigration.entity.MyEntity @Dao interface MyDao { @Query("select * from MyEntity") fun selectAll():List<MyEntity> @Insert fun insert(vararg entities:MyEntity) }MyDatabase
便宜上、メインスレッドでも実行できるように、ビルド時にallowMainThreadQueriesメソッドを呼び出しています。
MyDatabase.ktpackage jp.co.roommigration.db import android.content.Context import androidx.room.Database import androidx.room.Room import androidx.room.RoomDatabase import jp.co.roommigration.dao.MyDao import jp.co.roommigration.entity.MyEntity @Database(entities = [MyEntity::class], version = 1, exportSchema = false) abstract class MyDatabase : RoomDatabase() { abstract fun mydao(): MyDao companion object { private var instance: MyDatabase? = null fun getInstance(context: Context): MyDatabase = instance ?: let { Room.databaseBuilder(context, MyDatabase::class.java, "data").apply { allowMainThreadQueries() }.build() } } } val Context.database: MyDatabase get() = MyDatabase.getInstance(applicationContext)マイグレーションしてみる
公式サイトを確認すると、下記のような手順が書かれています。
androidx.room.migration.Migration という、抽象クラスを実装する。migrateメソッド内にテーブルを変更するDDLを実行する。
RoomDatabase.BuilderクラスのaddMigrationsメソッドで実装したMigration抽象クラスのオブジェクトを渡す。早速、実装してみました。やったことは、下記の3点です。
- Migration抽象クラスを実装したMIGRATION_1_2の定義
- addMigrationsメソッドの追記
- @Databaseアノテーションのentities属性に新たに追加した@Entityアノテーションを付与したクラス情報の追加とMyEntityクラスの修正
Migration抽象クラスを実装したMIGRATION_1_2の定義
val MIGRATION_1_2 = object : Migration(1, 2) { override fun migrate(database: SupportSQLiteDatabase) { database.execSQL( "CREATE TABLE Hobby (" + " id INTEGER PRIMARY KEY AUTOINCREMENT, " + " name TEXT NOT NULL " + ");") database.execSQL("alter table MyEntity add age integer default 10;") } }コンストラクタの引数2つに、マイグレーションするデータベースファイルのバージョンを指定します。
今回は1から2までのマイグレーションになります。
maigrateメソッドでは、SupportSQLiteDatabaseのオブジェクトが渡されるので、execSQLメソッドを呼び出してDDLを実行しています。addMigrationsメソッドの追記
Room.databaseBuilder(context, MyDatabase::class.java, "data").apply { allowMainThreadQueries() addMigrations(MIGRATION_1_2) }.build()addMigrationsメソッドを追加して、先程定義したMIGRATION_1_2を渡しています。
これで、ファイルのバージョンに差分が発生すると呼び出されます。
メソッドの定義を見るとpublic Builder addMigrations (Migration... migrations)となっているので、複数のバージョンのMigrationを渡しても問題なさそうですね。@Databaseアノテーションのentities属性に新たに追加した@Entityアノテーションを付与したクラス情報の追加とMyEntityクラスの修正
テーブルを追加するので、@Entityアノテーションを付与したクラスも追加しておきました。
もちろん、MyEntityテーブルに変更が発生してるので、MyEntityクラスの修正もわすれません。
※import文とpackageは省略@Database(entities = [MyEntity::class, Hobby::class], version = 2, exportSchema = false)@Entity data class Hobby ( @PrimaryKey(autoGenerate = true) val id:Int? = null, val name:String )@Entity data class MyEntity( @PrimaryKey(autoGenerate = true) val id:Int?=null, val name:String, val age:Int? )実行してみると、たしかにマイグレーションは成功しています。
ここで気になることがあります。
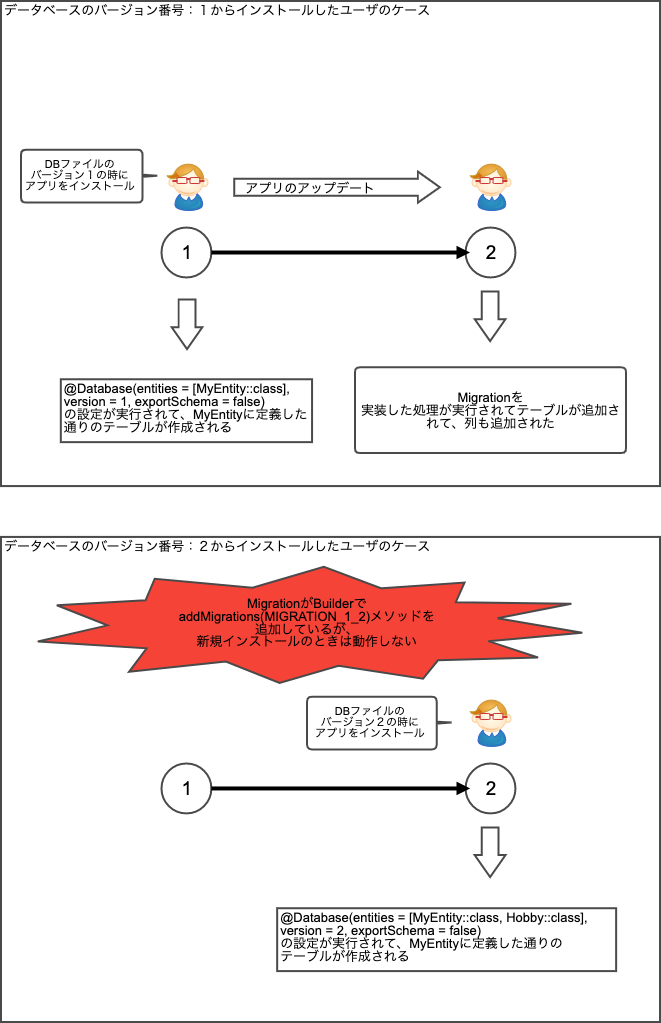
データベースファイルのバージョンが2の時に初めてインストールした時はどの様な動作をするかということです。調べてみたところ、下図のような挙動をしています。
要するに、初めてインストールした人は、@Databaseアノテーションのentities属性に記述したクラスの定義でテーブルが作成され、addMigrationsメソッドは無視されるということです。
そのため、マイグレーションで最も注意すべき事は、【Migration抽象クラスでテーブル変更した場合は、必ず@Entityアノテーションが付与されているクラスを完全一致させる必要がある】です。
本当に注意が必要ですね。
DB変更後のソースコード
最後に、修正が完了したソースコードの全貌を記載しておきます。
クラス 名or ファイル名 役割 MyEntity ・エンティティ
・テーブル定義Hobby ・エンティティ
・テーブル定義
↑NEWMyDao ・@Daoアノテーション付与したDAOの定義(今回は変更なし) MyDatabase ・RoomDatabaseを継承したDatabaseクラス
・Room.BuilderでRoomDatabaseクラスをビルド
Contextクラスのプロパティを追加し、RoomDatabaseのオブジェクトを格納する
・addMigrationsメソッドでマイグレーションを設定する
↑NEWMyEntity.kt
package jp.co.roommigration.entity import androidx.room.Entity import androidx.room.PrimaryKey @Entity data class MyEntity( @PrimaryKey(autoGenerate = true) val id:Int?=null, val name:String, val age:Int? )Hobby.kt
package jp.co.roommigration.entity import androidx.room.Entity import androidx.room.PrimaryKey @Entity data class Hobby ( @PrimaryKey(autoGenerate = true) val id:Int? = null, val name:String )MyDao.kt
package jp.co.roommigration.dao import androidx.room.Dao import androidx.room.Insert import androidx.room.Query import jp.co.roommigration.entity.MyEntity @Dao interface MyDao { @Query("select * from MyEntity") fun selectAll():List<MyEntity> @Insert fun insert(vararg entities:MyEntity) }MyDatabase.kt
package jp.co.roommigration.db

import android.content.Context
import androidx.room.Database
import androidx.room.Room
import androidx.room.RoomDatabase
import androidx.room.migration.Migration
import androidx.sqlite.db.SupportSQLiteDatabase
import jp.co.roommigration.dao.MyDao
import jp.co.roommigration.entity.Hobby
import jp.co.roommigration.entity.MyEntity

@Database(entities = [MyEntity::class, Hobby::class], version = 2, exportSchema = false)
abstract class MyDatabase : RoomDatabase() {
    abstract fun mydao(): MyDao

    companion object {

        private var instance: MyDatabase? = null

        fun getInstance(context: Context): MyDatabase = instance ?: let {
            Room.databaseBuilder(context, MyDatabase::class.java, "data").apply {
                allowMainThreadQueries()
                addMigrations(MIGRATION_1_2)
            }.build()
        }
    }
}

val Context.database: MyDatabase
    get() = MyDatabase.getInstance(applicationContext)

val MIGRATION_1_2 = object : Migration(1, 2) {
    override fun migrate(database: SupportSQLiteDatabase) {
        database.execSQL(
            "CREATE TABLE Hobby (" +
                " id INTEGER PRIMARY KEY AUTOINCREMENT, " +
                " name TEXT NOT NULL " +
                ");")

        database.execSQL("alter table MyEntity add age integer default 10;")

    }
}
まとめ
Roomを使ったマイグレーションについて説明してきました。
マイグレーションはDDL書くんだと思いつつ、注意点が多くあることがわかりました。
気をつけて実装していきましょう。

- 投稿日:2021-02-26T11:06:05+09:00
Pepper SDK入門(26) BookmarkとBookmarkStatusでTopicファイルに目印をおく??
BookmarkとBookmarkStatusでTopicファイルに印をつけよう??
BookmarkとはTopic中のタグのようなものです。Topicファイル内の好きなところにBookmarkをつけられます。
対してBookmarkStatusはBookmarkの状態を取り扱うクラスです。Bookmarkの機能の有効・無効を切り替えたり、各種イベントリスナーの設定が可能です。手引き??
Topicファイルは以下のとおりです。
topic: ~mimic_taxi()

proposal: %mimic_proposal サンタクロースと銀河鉄道、どちらを呼びますか
    u1: (サンタクロース) プレゼントを待っている靴下を探しましょう %bell_mimic
    u1: (銀河鉄道) カムパネルラに会いにいきましょう %chime_mimic^endDiscuss(taxi)
Bookmarkを取ってくる??
Topicファイルに含まれる全てのBookmarkを取得します。
Topic topic = TopicBuilder.with(qiContext)
                          .withResource(R.raw.mimic_taxi)
                          .build();
Map<String, Bookmark> bookmarks = topic.getBookmarks();
BookmarkとBookmarkStatusは1対1対応♊️?
各Bookmarkに対応するBookmarkStatusを作成します。
Bookmark bellBookmark = bookmarks.get("bell_mimic");
Bookmark chimeBookmark = bookmarks.get("chime_mimic");

//qiChatbot.bookmarkStatus(bookmark)が呼ばれるとBookmarkStatusのインスタンスを返す
bellBookmarkStatus = qiChatbot.bookmarkStatus(bellBookmark);
chimeBookmarkStatus = qiChatbot.bookmarkStatus(chimeBookmark);

bellBookmarkStatus.addOnReachedListener(() -> {
    //会話がTopic内の%bell_mimicに到達したときに呼ばれる
});

chimeBookmarkStatus.addOnReachedListener(() -> {
    //会話がTopic内の%chime_mimicに到達したときに呼ばれる
});
リスナーをポイする?
BookmarkStatusでリスナーを削除するためには、それらのBookmarkStatusを変数に保持しておいてリスナーを削除する際に再びコールすることが必要です。
//各BookmarkStatusでリスナーを削除 bellbookmarkStatus.removeAllOnReachedListeners(); chimebookmarkStatus.removeAllOnReachedListeners();Bookmarkについては、GitのMastering Bookmarkで手軽に体験ができます。以下のリンク⬇️でサンプルアプリを一部変更したものの挙動を視聴できますので、よろしければご覧ください。
https://youtu.be/IFcHiM6khlwあとがき
今回もPepperSDKforAndroidを参考に書かせていただきました。
さらに詳しい情報はBookmarkのAPIリファレンス、BookmarkStatusのAPIリファレンスを参照してみてください。次回はBaseQiChatExecutorについて書きます。Executor(ロケットエンジン)の出番はありません?
それではまた次回〜?
- 投稿日:2021-02-26T01:05:14+09:00
FlutterからCloud Firestoreのデータ取得 & データ書き込み
はじめに
Flutterを使って試しに何かネイティブアプリを作ろうと考えていた時、バックエンドの構成で迷ったため、最近流行っている
Cloud Firestoreを使ってみることにした。
そもそもFirebase自体の利用が初めてだったので、まずは簡単な読み書きのテストをしてみた。その時の内容をメモ。実施環境
- Ubuntu 18.04LTS(GCP上)
- Flutter 1.22.6
- Dart 2.10.5
- Android Studio 4.1.2
- VScode 1.53.0
手順
1.FlutterアプリにFirebaseを追加
2.Firebaseに接続するためFlutter側に設定
3.Cloud Firestoreにデータ書き込み
4.Cloud Firestoreからのデータ取得※事前準備として以下が完了している前提!
・Flutter のサンプルアプリが起動できる状態までのセットアップ。
・Firebaseのプロジェクト作成。1.FlutterアプリにFirebaseを追加
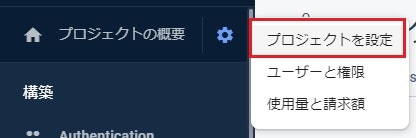
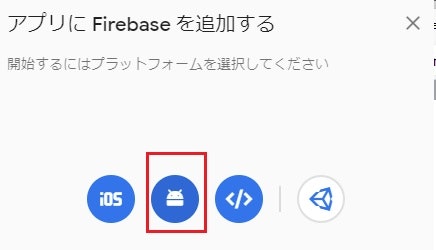
まず、Firebaseコンソールに入り、プロジェクト概要からプロジェクト設定をを開き、『アプリ追加』ボタンをクリックして、IOS、Android、Webアプリのどれかを選択する。
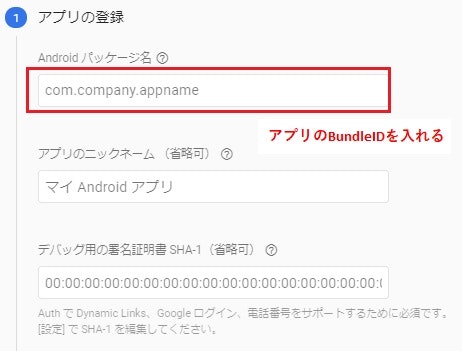
(今回のアプリは、Android Studioを使ったエミュレータをベースに開発しているたためAndroidアプリを選択)アプリ情報の入力
※BundleIDの確認、プロジェクトディレクトリ > android > app > bundle.gradleに書かれているapplicationIdでOK!設定ファイルのダウンロード(jsonファイル)と設置
手順に従うとコンソールから
jsonファイルをダウンロードできるので、それをAndroid > android > appに格納する。Firebase SDK の追加
プロジェクトディレクトリ > Android > build.gradleの中にあるdependenciesに以下の様に追記。Android>build.gradlebuildscript { ext.kotlin_version = '1.3.50' repositories { google() jcenter() } dependencies { classpath 'com.android.tools.build:gradle:3.5.0' classpath "org.jetbrains.kotlin:kotlin-gradle-plugin:$kotlin_version" // ここが追記部分! classpath 'com.google.gms:google-services:4.3.5' } } // --- 省略 ---
プロジェクトディレクトリ > Android > app > build.gradleの中にある 適用プラグインとdependenciesに以下の様に追記。Android>app>build.gradle// --- 省略 --- // 適用プラグインの追加文 apply plugin: 'com.google.gms.google-services' // --- 省略 --- // dependenciesの追加分 dependencies { ・・・ implementation platform('com.google.firebase:firebase-bom:26.5.0') } // --- 省略 ---2.Firebaseに接続するためFlutter側に設定
プロジェクトディレクトリ > pubspec.yamlを編集pubspec.yaml# --- 省略 --- dependencies: flutter: sdk: flutter # The following adds the Cupertino Icons font to your application. # Use with the CupertinoIcons class for iOS style icons. cupertino_icons: ^1.0.0 # firebase cloud_firestore: ^0.13.5 # ここが追記部分!!! # --- 省略 ---必要なパッケージをインストール
TERMINALより実行(本記事ではVScode上で実行)$ flutter pub get一旦ここで
Main.dartにimport文を追加して保存したら、flutter runを実行し、問題なくパッケージが読み込めているか確認。main.dartimport 'package:flutter/material.dart'; // ここが追記部分! Cloud Firestoreに繋ぐためのパッケージをインポート。 import 'package:firebase_core/firebase_core.dart'; import 'package:cloud_firestore/cloud_firestore.dart'; //--- 省略 ---$ flutter run ・・・ Plugin project :firebase_core_web not found. Please update settings.gradle. Plugin project :cloud_firestore_web not found. Please update settings.gradle. ・・・※上記の様なエラーが出る場合、以下の変更を行う
変更箇所①(
プロジェクトディレクトリ > Android > app > build.gradleの中にあるdefaultConfigを以下の様に編集)Android>app>build.gradle// --- 省略 --- defaultConfig { // TODO: Specify your own unique Application ID (https://developer.android.com/studio/build/application-id.html). applicationId "com.example.share_necessary_project" minSdkVersion 23 // ここが編集箇所。デフォルトは "16" になっているはず。 targetSdkVersion 29 versionCode flutterVersionCode.toInteger() versionName flutterVersionName } // --- 省略 ---変更箇所②(
プロジェクトディレクトリ > Android > app > settings.gradleの最後に追加)android>settings.gradle// --- 省略 --- // ---------↓追加↓------------------------------------- def flutterProjectRoot = rootProject.projectDir.parentFile.toPath() def plugins = new Properties() def pluginsFile = new File(flutterProjectRoot.toFile(), '.flutter-plugins') if (pluginsFile.exists()) { pluginsFile.withReader('UTF-8') { reader -> plugins.load(reader) } } plugins.each { name, path -> def pluginDirectory = flutterProjectRoot.resolve(path).resolve('android').toFile() include ":$name" project(":$name").projectDir = pluginDirectory } // ---------追加ここまで-------------------------------------ここで再度
flutter runを実行して、先程のエラーが消えるか確認3.Cloud Firestoreにデータ書き込み
ちゃんと書き込みができるか確認するため、
main.dartを以下の様に作成してflutter runを実行。
下のテストアプリではエミュレータ上で 【Save-button】をクリックすると、コレクション&ドキュメントが作成される。main.dartimport 'package:flutter/material.dart'; import 'package:cloud_firestore/cloud_firestore.dart'; void main() { runApp(TestApp()); } class TestApp extends StatelessWidget { @override Widget build(BuildContext context) { return MaterialApp( debugShowCheckedModeBanner: false, // <- Debug の 表示を OFF home: FirestoreSave(), ); } } class FirestoreSave extends StatefulWidget { @override _MyFirestorePageState createState() => _MyFirestorePageState(); } class _MyFirestorePageState extends State<FirestoreSave> { @override Widget build(BuildContext context) { return Scaffold( body: Center( child: Column( children: <Widget>[ RaisedButton( child: Text('Save-button'), onPressed: () async { // ドキュメント作成 await Firestore.instance .collection('test_collection1') // コレクションID .document() // ここは空欄だと自動でIDが付く .setData({ 'name': 'sato', 'age': 20, 'sex': 'male', 'type': ['A', 'B'] }); // データ }, ), ], ), ), ); } }Firebaseのコンソールからデータが入っているか確認
上記の通り、ドキュメントやデータが確認できたら書き込みはOK!
4.Cloud Firestoreからのデータ取得
ちゃんと読み込みがができるか確認するため、
main.dartを以下の様に作成してflutter runを実行。
下のテストアプリではエミュレータ上の 【LoadAlldocs】をクリックすると、指定したコレクション内にある全てのドキュメントのkey =nameが表示される。main.dartimport 'package:flutter/material.dart'; import 'package:cloud_firestore/cloud_firestore.dart'; void main() { runApp(TestApp()); } class TestApp extends StatelessWidget { @override Widget build(BuildContext context) { return MaterialApp( debugShowCheckedModeBanner: false, // <- Debug の 表示を OFF home: FirestoreLoad(), ); } } class FirestoreLoad extends StatefulWidget { @override _MyFirestorePageState createState() => _MyFirestorePageState(); } class _MyFirestorePageState extends State<FirestoreLoad> { // ドキュメント情報を入れる箱を用意 List<DocumentSnapshot> documentList = []; @override Widget build(BuildContext context) { return Scaffold( body: Center( child: Column( children: <Widget>[ RaisedButton( child: Text('LoadAlldocs'), onPressed: () async { // 指定コレクションのドキュメント一覧を取得 final snapshot = await Firestore.instance .collection('test_collection1') .getDocuments(); // ドキュメント一覧を配列で格納 setState(() { documentList = snapshot.documents; }); }, ), // ドキュメント情報を表示 Column( children: documentList.map((document) { return ListTile( title: Text('name:${document['name']}'), ); }).toList(), ), ], ), ), ); } }エミュレータ上でUIに表示されるのを確認できたらOK!