- 投稿日:2021-01-24T21:50:09+09:00
LinuxからAndroid(その逆も)へバックアップ
Alpineでも日本語入力Mozcが利用可能であることは確認できました。
現在は、Arch LinuxベースのManjaro Linux(xfce)に落ち着いています。
グラフィカルなインストーラー)(Calamares?)でインストール先のパーティションも手動で選べます。
日本語環境も整えやすいです。個人的にはブラウザのfirefoxがあれば、Webは一通り見れるし、動画も再生できる。Webメールのgmailも見れる。
Yahooのニュースのライブ動画もUser Agent Switcherのアドオン入れて、Windowsと同じですよ宣言しておけば、再生できます。バックアップに使うアプリ(ソフトウェア)は、
syncthing
を選択しました。P2Pらしい。無料のクラウドストレージには限度がある。クラウドまでは必要ない。アクセスするのは重たいし。
バックアップも無意識にLinuxとAndroidで同期(Sync)してくれたら、助かる。そういったニーズのアプリです。
私の場合には、スマホに取り付けたSDカードにバックアップできればなぁというケース。
Windowsもあるようです。バックアップで同期元(送信のみ)、同期先(受信のみ)も設定できて、ファイルのバージョンもとれるらしい。
そこまではチェックしてないけれど。
スマホでとった写真を、Wifiにつながったときに、自宅のPCと同期して、バックアップとる、という、私のケースの逆パターンでも、有効活用できると思います。
大きなストレージが不要なら、BOX,Dropbox,Google Driveで十分ではありますね。ポイント!
外部SDカードで、受信も可能にする場合。
アプリに付与されるパーミッションの関係か、共有フォルダを
Android/data/com.nutomic.syncthingandroid/files
フォルダ以下に指定する必要がある。パスが深くなるので、
ファイラーでホームディレクトリに設定できるものや、ホーム画面にショートカットを作れるタイプがあると便利でしょう。ファイラーで、無料で広告無しで、良かったのは
DVファイルエクスプローラー(Dovi Tools)
ホーム画面にショートカットを作成でき、タップすると、DVファイルエクスプローラーがそのパスで立ち上がる。
ただ、レビューによるとAndroid10でSDへのアクセス権限付与でうまく動作しない場合があるらしい。他には、最新バージョンはProが99円だが、
シンプルファイル管理(Simple Mobile Tools)は、ファイラーを立ち上げたときの初期パスを設定できるので、これでも良いかもしれない。
環境によって、エラーがあるようなので、Proを使うのが安心かもしれない。動作確認できるまでは、バックアップをとっときましょう。Androidのファイルシステムではsymlinkはないので、同期元にシムリンクが含まれている場合、Androido側のsyncthingは未同期になります。
同期元でtarballを展開して、シムリンクが生成されたりすると、その部分で同期ができないので、未同期と表示されます。
イレギュラーなケースなので、まずないでしょうが、バックアップができてない、と焦らないようにしましょう。
最初に一通り動作チェックを行っていれば、多分、問題なく動いてくれるでしょう。
設定すれば、ファイルのバージョンまでとってくれるらしい。(履歴?)
初期設定でAndroidではオフになってましたので、設定して、テストしてみてください。
最初のチェックは特に大切(笑)
- 投稿日:2021-01-24T14:33:43+09:00
RxJavaをAndroidのLifecycleを考慮していい感じに使いたい
RxJavaをAndroid上で扱うに当たって、LifecycleとかLiveDataとかと併せて使うと便利そうだよね。という何番煎じだか分からないネタです。
Disposableをライフサイクルに合わせて自動的にdisposeしたい
AndroidでRxJava/RxKotlinを使う場合、以下のようにonDestoryなどでDisposableのdispose処理をしないといけないのが面倒ですね。
hogeObserver
    .subscribeOn(Schedulers.io())
    .observeOn(AndroidSchedulers.mainThread())
    .subscribe({}, {})
    .addTo(compositeDisposable)
...
override fun onDestroy() {
    compositeDisposable.dispose()
}
しかし、Lifecycle系の機能を使えば自動化できそうだよねーと誰もが考えるでしょう。
安直にはこんなところでしょうか?fun Disposable.disposeOnDestroy(owner: LifecycleOwner) { if (owner.lifecycle.currentState == State.DESTROYED) { dispose() return } DisposeOnDestroy(owner, this).observe() } private class DisposeOnDestroy( private val owner: LifecycleOwner, private val disposable: Disposable ) : LifecycleEventObserver { fun observe() { owner.lifecycle.addObserver(this) } override fun onStateChanged(source: LifecycleOwner, event: Event) { if (event == Event.ON_DESTROY) { disposable.dispose() owner.lifecycle.removeObserver(this) } } }先の例だと、こんな風に使います。
hogeObserver
    .subscribeOn(Schedulers.io())
    .observeOn(AndroidSchedulers.mainThread())
    .subscribe({}, {})
    .disposeOnDestroy(this)
disposeしたいタイミングは
onDestroyではなく、onStopだという場合は、disposeOnStop()などを作ればよいでしょう。RxJavaのObservableをLiveDataに変換したい
前述のように、onDestroyでのdisposeが省略できれば十分かもしれませんが、データを受け取り、UIに反映させる、という使い方ではRxJavaよりもLiveDataを使うのが便利ですね。
そのため、RxJavaのObservableをLiveDataに変換したいという要望はよくあるでしょう。安直には
lifecycle-reactivestreamsを使って、こうでしょうか。fun <T> Observable<T>.toLiveData(): LiveData<T> = LiveDataReactiveStreams.fromPublisher(toFlowable(BackpressureStrategy.LATEST))
lifecycle-reactivestreams-ktxならPublisher.toLiveData()が使えるので以下でも良いですね。fun <T> Observable<T>.toLiveData(): LiveData<T> = toFlowable(BackpressureStrategy.LATEST).toLiveData()ReaciveStreamsを挟まないで変換したいという場合は以下のようにすれば同等でしょうか?
fun <T> Observable<T>.toLiveData(): LiveData<T> = RxLiveData(this)

private class RxLiveData<T>(
    private val observable: Observable<T>
) : LiveData<T>() {
    private var disposable: Disposable? = null

    override fun onActive() {
        disposable = observable.subscribe({
            postValue(it)
        }) {
            postValue(null)
        }
    }

    override fun onInactive() {
        disposable?.dispose()
    }
}
いずれもLifecycleに併せてdisposeも行ってくれます。
以上!
...と考えていた時期が、俺にもありました。
LiveDataReactiveStreamsも前述のRxLiveDataを使った場合も同じですが、LiveDataがActiveな状態でのみupstreamのsubscribeを行っています。つまり、inactive状態のイベントを拾うことができません。
inactive状態ってLiveDataでは状態を通知されないのでいらないようにも思いますが、MutableLiveDataの場合、inactive状態でもsetValue/postValueが可能で、inactive状態で値の更新があれば、次のonActiveのタイミングで最新の値が通知されるという仕組みになっています。つまり、stop状態で何らかの更新があれば、次のonStartで最新の値を拾いたいという用途では前述の方法では不十分ということになります。
ただそうなると、disposeするタイミングをどこにするのかとかが難しくなってくるので、ひとまずobserverがいる間はsubscribe状態で、observerがいなくなったときにdisposeすればいいんじゃない?ということで以下のようにすればよさそうです。
private class RxLiveData<T>(
    private val observable: Observable<T>
) : LiveData<T>() {
    private var disposable: Disposable? = null

    private fun ensureSubscribe() {
        if (disposable != null) return
        disposable = observable.subscribe({
            postValue(it)
        }) {
            postValue(null)
        }
    }

    override fun observe(owner: LifecycleOwner, observer: Observer<in T>) {
        super.observe(owner, observer)
        ensureSubscribe()
    }

    override fun observeForever(observer: Observer<in T>) {
        super.observeForever(observer)
        ensureSubscribe()
    }

    override fun removeObserver(observer: Observer<in T>) {
        super.removeObserver(observer)
        if (!hasObservers()) {
            disposable?.dispose()
            disposable = null
        }
    }
}
最初のdisposeOnDestroyを使えば良さそうにも思いますが、あちらはinactive状態でも通知されるという違いがあるので、UIへの反映とかに使うにはこっちの方が良いのではないかと思います。
以上です。
- 投稿日:2021-01-24T13:26:38+09:00
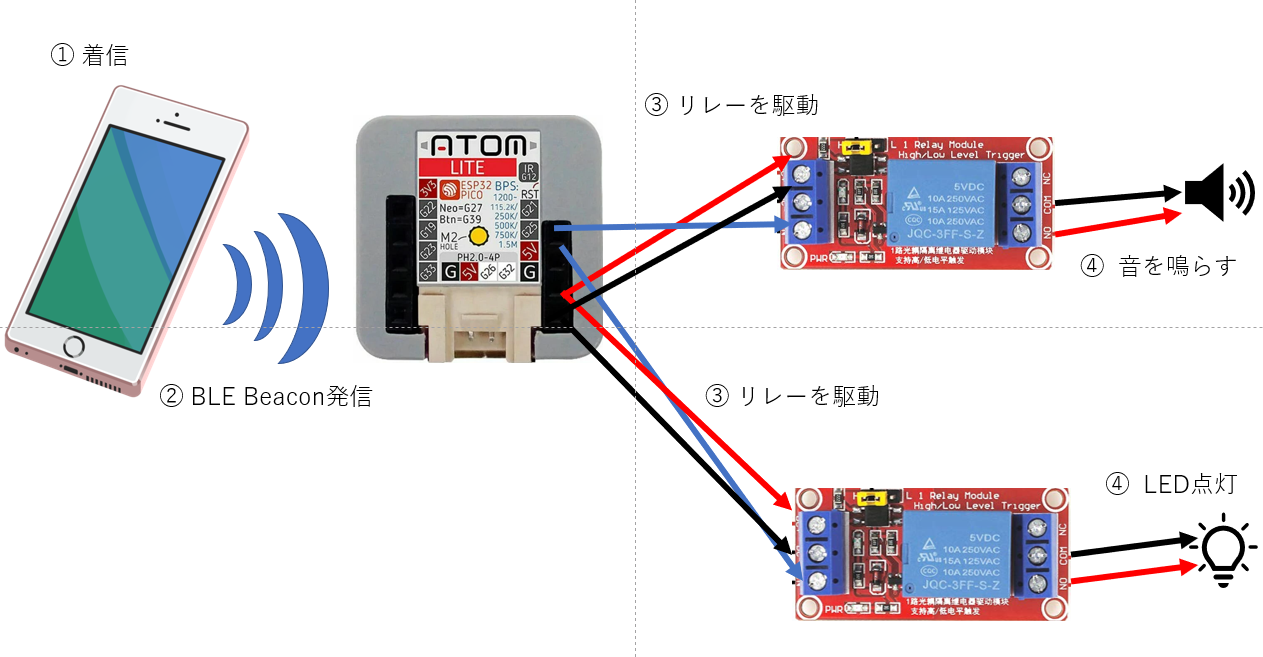
100均防犯ブザー+Atom lite+androidで着信通知デバイスを作る
ご注意
本記事にはハードウェアの改造が含まれています。またソフトウェアの実装においてセキュリティーへの考慮はほとんどしていません。なので真似して作る際のリスクは各人の判断でお願いします。
ソースコードのライセンスはMITとします。
動機
実家の父親いわく、母の耳が弱くなってスマホの着信に気づかないことが多くなって困っているとのこと。着信がわかりやすくなる機械ってないの?
調べてみた
有線電話なら
https://www.yodobashi.com/product/100000001002096313/
みたいな「リンガー」というものが割と昔からある。
しかしスマホでは1つしか見つけられなかった。
https://www.youtube.com/watch?v=HyIdrvCXAiwざっくり仕様
- 着信したら音と光でおしらせ
- 2箇所以上で使えること
- ペアリングさせたくない。切れたら復旧するのはめんどい。
- 名前は「exringer SSP-2」とする。(SSP = Sugoku Syoboi Product)
exringerシステムダイアグラム的なにか
実装
Android側
MainActivity
Permissionの設定とSharedPreferencesにMajor, Minor(今は使っていません)をセットするだけです。
MainActivity.ktclass MainActivity : AppCompatActivity() { override fun onCreate(savedInstanceState: Bundle?) { super.onCreate(savedInstanceState) setContentView(R.layout.activity_main) val lightid = getSharedPreferences("lightid", Context.MODE_PRIVATE) val major: Int = lightid.getInt("Major", 1) val minor: Int = lightid.getInt("Minor", 1) val etMajor: TextView = findViewById(R.id.etMajor) etMajor.text = major.toString() val etMinor: TextView = findViewById(R.id.etMinor) etMinor.text = minor.toString() val editor: SharedPreferences.Editor = lightid.edit() editor.putInt("calling", 0) editor.apply() // Android M Permission check if (checkSelfPermission(ACCESS_COARSE_LOCATION) != PackageManager.PERMISSION_GRANTED) { AlertDialog.Builder(this) .setTitle("BLE") .setMessage("許可?") .setPositiveButton(android.R.string.ok, null) .setOnDismissListener { requestPermissions( arrayOf(ACCESS_COARSE_LOCATION), 1 ) } .show() } } override fun onRequestPermissionsResult( requestCode: Int, permissions: Array<String?>, grantResults: IntArray ) { when (requestCode) { 1 -> { if (grantResults[0] == PackageManager.PERMISSION_GRANTED) { // Log.d(FragmentActivity.TAG, "coarse location permission granted") } else { AlertDialog.Builder(this) .setTitle("Functionality limited") .setMessage("Since location access has not been granted, this app will not be able to discover beacons when in the background.") .setPositiveButton(android.R.string.ok, null) .setOnDismissListener { } .show() } return } } } override fun onStop() { super.onStop() val lightid = getSharedPreferences("lightid", Context.MODE_PRIVATE) val editor: Editor = lightid.edit() val etMajor: TextView = findViewById(R.id.etMajor) val major: Int = etMajor.text.toString().toInt() editor.putInt("Major", major) editor.apply() val etMinor: TextView = findViewById(R.id.etMinor) val minor: Int = etMinor.text.toString().toInt() editor.putInt("Minor", minor) editor.apply() editor.putInt("calling", 0) editor.apply() }ビーコン発信
ポイントは常時待受をするためにNotificationを使うところです。
BeaconIntentService.ktclass BeaconIntentService(name: String = "BeaconIntentService") : Service() { override fun onBind(intent: Intent): IBinder? { throw UnsupportedOperationException("Not yet implemented") } override fun onStartCommand(intent: Intent?, flags: Int, startId: Int): Int { val manager = getSystemService(Context.NOTIFICATION_SERVICE) as NotificationManager val name = "Title notif" val id = "beacon_foreground" val notifyDescription = "この通知の詳細情報を設定します" if (manager.getNotificationChannel(id) == null) { val mChannel = NotificationChannel(id, name, NotificationManager.IMPORTANCE_HIGH) mChannel.apply { description = notifyDescription } manager.createNotificationChannel(mChannel) } var notification = NotificationCompat.Builder(this, id) .setSmallIcon(R.drawable.ic_launcher_background) .setContentTitle("Title") .setContentText("desc") .build() transmitBeacon(); startForeground(1, notification) return START_STICKY } private fun transmitBeacon() { val beaconParser = BeaconParser() .setBeaconLayout("m:2-3=0215,i:4-19,i:20-21,i:22-23,p:24-24") val beaconTransmitter = BeaconTransmitter(applicationContext, beaconParser) beaconTransmitter.advertiseMode = ADVERTISE_MODE_LOW_LATENCY val lightid = getSharedPreferences("lightid", Context.MODE_PRIVATE) val major: String = lightid.getInt("Major", 1).toString() val minor: String = lightid.getInt("Minor", 1).toString() val uuid = ""; val rssi = "0" val second = 3; val beacon = Beacon.Builder() .setId1(uuid) .setId2(major) .setId3(minor) .setRssi(rssi.toInt()) .setTxPower(rssi.toInt()) .setManufacturer(0x004C) .build() if( beaconTransmitter.isStarted ) { Log.d("BeaconActivity", "isStarted") return } val thread = Thread(Runnable { val lightid = getSharedPreferences("lightid", Context.MODE_PRIVATE) val editor: SharedPreferences.Editor = lightid.edit() try { while (lightid.getInt("calling", 0) == 1){ Log.d("BeaconIntentService", "calling = "+lightid.getInt("calling", 0).toString()) beaconTransmitter.startAdvertising(beacon, object : AdvertiseCallback() { override fun onStartSuccess(settingsInEffect: AdvertiseSettings) { super.onStartSuccess(settingsInEffect) //成功 Log.d("BeaconIntentService", "isStarted") } override fun onStartFailure(errorCode: Int) { //失敗 Log.d("BeaconIntentService", "failed") editor.putInt("calling", 0) editor.apply() } }) Thread.sleep((second.toInt() * 1000).toLong()) if( beaconTransmitter.isStarted ) { beaconTransmitter.stopAdvertising() Log.d("BeaconIntentService", "stoped") } } } catch (e: InterruptedException) { e.printStackTrace() if( beaconTransmitter.isStarted ) { beaconTransmitter.stopAdvertising() Log.d("BeaconIntentService", "failed") editor.putInt("calling", 0) editor.apply() } } }) thread.start() } }着信
ポイントはパーミッションをコードでセットするだけでなく、端末の設定変更が必要なところです。
(参考) https://qiita.com/kabayan/items/190936f4b71cf048c1e4
電話の着信以外の通知もコードを書けば受けとれるはずです。Incoming.ktclass IncomingCall : BroadcastReceiver() { private var ctx: Context? = null override fun onReceive(context: Context, intent: Intent?) { Log.d("IncomingCall", "Intent: $intent") ctx = context try { //TelephonyManagerの生成 val tm = context.getSystemService(Context.TELEPHONY_SERVICE) as TelephonyManager //リスナーの登録 val phoneListener = MyPhoneStateListener() tm.listen(phoneListener, PhoneStateListener.LISTEN_CALL_STATE) } catch (e: Exception) { } } /** * カスタムリスナーの登録 * 着信〜終了 CALL_STATE_RINGING > CALL_STATE_OFFHOOK > CALL_STATE_IDLE * 不在着信 CALL_STATE_RINGING > CALL_STATE_IDLE */ private inner class MyPhoneStateListener : PhoneStateListener() { override fun onCallStateChanged(state: Int, callNumber: String) { val con = ctx if (con != null) { val lightid = con.getSharedPreferences("lightid", Context.MODE_PRIVATE) val editor: SharedPreferences.Editor = lightid.edit() when (state) { TelephonyManager.CALL_STATE_IDLE -> { Log.d("IncomingCalling", "idle") editor.putInt("calling", 0) editor.apply() } TelephonyManager.CALL_STATE_RINGING -> { Log.d("IncomingCalling", "ring") editor.putInt("calling", 1) editor.apply() val intent = Intent(con, BeaconIntentService::class.java) con.startForegroundService(intent) } TelephonyManager.CALL_STATE_OFFHOOK -> { Log.d("IncomingCalling", "offhook") editor.putInt("calling", 0) editor.apply() } } } } } }Atom lite側
AndroidからのBeaconを受信しますが、Android側で設定したMajorと同じビーコンに反応します。
Atom liteのポートはG21、G25を使っています。
Beacon受信に関しては
https://qiita.com/KazuyukiEguchi/items/159e628ab9f7fcc74541
を参考にさせていただきました。
複数のAtom liteを同じコードで動かせば何台でも同時に反応します。Incoming.ino#include <BLEDevice.h> #include <BLEUtils.h> #include <BLEScan.h> #include <BLEAdvertisedDevice.h> int scanTime = 1; // スキャン完了までの秒数 int acceptMajor = 1; // 受信するMajor。これが一致するビーコンに反応します int flag = 0; class MyAdvertisedDeviceCallbacks: public BLEAdvertisedDeviceCallbacks { void onResult(BLEAdvertisedDevice advertisedDevice) { char uuid[60]; BLEAddress addr = advertisedDevice.getAddress(); int rssi = advertisedDevice.getRSSI(); std::string data = advertisedDevice.getManufacturerData(); if (data.length() == 25) { if ((data[0] == 0x4c) && (data[1] == 0x00) && (data[2] == 0x02) && (data[3] == 0x15)) { sprintf(uuid, "%02X%02X%02X%02X-%02X%02X-%02X%02X-%02X%02X-%02X%02X%02X%02X%02X%02X" , data[4], data[5], data[6], data[7], data[8], data[9], data[10], data[11], data[12], data[13] , data[14], data[15], data[16], data[17], data[18], data[19]); int major = (int)(((data[20] & 0xff) << 8) + (data[21] & 0xff)); int minor = (int)(((data[22] & 0xff) << 8) + (data[23] & 0xff)); signed char power = (signed char)(data[24] & 0xff); if (major == acceptMajor) { Serial.printf("addr=%s rssi=%d uuid=%s,major=%d,minor=%d,power=%d\n", addr.toString().c_str(), rssi, uuid, major, minor, power); flag = 1; } } } } }; void setup() { Serial.begin(115200); pinMode(21, OUTPUT); pinMode(25, OUTPUT); } void loop() { flag = 0; BLEDevice::init(""); BLEScan* pBLEScan = BLEDevice::getScan(); pBLEScan->setAdvertisedDeviceCallbacks(new MyAdvertisedDeviceCallbacks(), true); // ignore dup、set false pBLEScan->setActiveScan(true); BLEScanResults foundDevices = pBLEScan->start(scanTime); Serial.println("Scan done!"); if (flag == 1) { digitalWrite(21, HIGH); digitalWrite(25, HIGH); delay(500); digitalWrite(21, LOW); digitalWrite(25, LOW); } else { digitalWrite(21, LOW); digitalWrite(25, LOW); } }ブザー側
今回購入したブザーには2つスイッチがあり、それぞれがLEDとブザーに割り当てられています。そのスイッチ部にリレーからの配線を接続しておきます。
実際の動作
着信すると0.5秒おきに光とブザーでお知らせします。
アイデアとか
- Major値をAndoridから書き換えられるといいかなぁ。
- Minor値を使ってLEDの色変えるとかもできそう。

- 投稿日:2021-01-24T10:51:20+09:00
【Android / Kotlin】双方向 DataBinding + Clickイベント / サンプルアプリ実装
はじめに
こちらの記事にて Java で同様のサンプルアプリを作成している。
今回はその Kotlin バージョンである。双方向データバインディングとは(一方向との違い)
- 一方行データバインディング
- ViewModel などの中でデータを変更 → View に反映
- 双方向データバインディング
- ViewModel などの中でデータを変更 → View に反映
- ユーザが View でデータを変更 → ViewModel にデータの変更が反映(通知)
一方向が ViewModel などのロジックファイルから View 側への通知だけであるのに対し、
双方向ではユーザがアプリのフォームなどに値を入力したときなどに、ロジックファイルの方にも値の入力(変更)が通知される。と言うものである。なお一方向データバインディングについては 言語はJavaですがこちらで記事にしております。
※ ここで説明している ViewModel とはデータバインディングのロジックを定義してあるファイルのことを指しています。
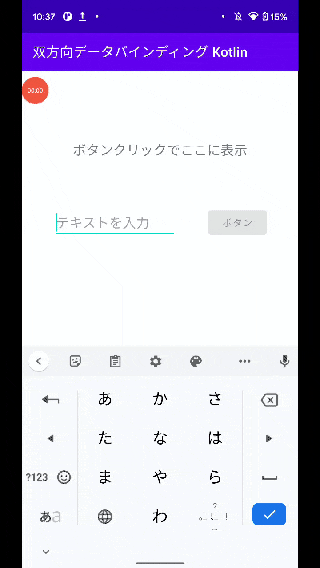
サンプルアプリの概要
こんな感じのもの↓↓
無茶苦茶画質悪くてすみません。
実装していることとしては
- フォーム入力時
- 入力されたテキストをフォーム下部にリアルタイムで表示
- ボタンアクティブにする(テキストの有無で切り替え)
- ボタンクリック時
- フォーム入力テキストを上部に表示
- フォームおよび下部のテキストを空欄に戻す(初期化する)
開発環境
- Android Studio: 4.1.1
- Build #AI-201.8743.12.41.6953283, built on November 5, 2020
- Runtime version: 1.8.0_242-release-1644-b3-6915495 x86_64
- VM: OpenJDK 64-Bit Server VM by JetBrains s.r.o
- macOS: 10.15.7
実装
DataBinding導入
build.gradleに記述を追加して DataBindingを利用できるようにする。
2箇所に記述。
Java と異なり、アノテーションを導入する記述 (kapt) が必要になるので注意が必要。
→ こちらで kapt導入について の記事も書いてます。app/build.gradleplugins { id 'com.android.application' id 'kotlin-android' id 'kotlin-kapt' // ←ここに追加 } android { compileSdkVersion 30 buildToolsVersion "30.0.3" defaultConfig { applicationId "com.android.bidirectionaldatabindingkotlin" minSdkVersion 24 targetSdkVersion 30 versionCode 1 versionName "1.0" testInstrumentationRunner "androidx.test.runner.AndroidJUnitRunner" } buildTypes { release { minifyEnabled false proguardFiles getDefaultProguardFile('proguard-android-optimize.txt'), 'proguard-rules.pro' } } compileOptions { sourceCompatibility JavaVersion.VERSION_1_8 targetCompatibility JavaVersion.VERSION_1_8 } kotlinOptions { jvmTarget = '1.8' } // ここに記述を追加 buildFeatures { dataBinding = true } } dependencies { implementation "org.jetbrains.kotlin:kotlin-stdlib:$kotlin_version" implementation 'androidx.core:core-ktx:1.3.2' implementation 'androidx.appcompat:appcompat:1.2.0' implementation 'com.google.android.material:material:1.2.1' implementation 'androidx.constraintlayout:constraintlayout:2.0.4' testImplementation 'junit:junit:4.+' androidTestImplementation 'androidx.test.ext:junit:1.1.2' androidTestImplementation 'androidx.test.espresso:espresso-core:3.3.0' }レイアウト要素をセット
まずは各要素には DataBinding の記述無しの状態で xml にのレイアウトを作成。
※
<layout></layout>だけは先に記述。
このようにレイアウトのルート要素に<layout>でくくったレイアウトファイルがあると、自動的にxmlファイル名に応じたBindingクラスが作られる。
今回: activity_main.xml => ActivityMainBindingactivity_main.xml<?xml version="1.0" encoding="utf-8"?> <layout xmlns:android="http://schemas.android.com/apk/res/android" xmlns:app="http://schemas.android.com/apk/res-auto" > <androidx.constraintlayout.widget.ConstraintLayout android:layout_width="match_parent" android:layout_height="match_parent" > <TextView android:id="@+id/click_text" android:layout_width="wrap_content" android:layout_height="wrap_content" android:textSize="20dp" app:layout_constraintStart_toStartOf="parent" app:layout_constraintTop_toTopOf="parent" app:layout_constraintEnd_toEndOf="parent" app:layout_constraintBottom_toBottomOf="parent" app:layout_constraintVertical_bias="0.15" /> <EditText android:id="@+id/input_form" android:layout_width="184dp" android:layout_height="wrap_content" android:hint="テキストを入力" android:inputType="text" android:textSize="20dp" app:layout_constraintStart_toStartOf="parent" app:layout_constraintEnd_toStartOf="@id/button" app:layout_constraintTop_toTopOf="parent" app:layout_constraintBottom_toBottomOf="parent" app:layout_constraintVertical_bias="0.3" /> <Button android:id="@+id/button" android:layout_width="wrap_content" android:layout_height="wrap_content" android:text="ボタン" app:layout_constraintStart_toEndOf="@id/input_form" app:layout_constraintEnd_toEndOf="parent" app:layout_constraintBottom_toBottomOf="@id/input_form" /> <TextView android:id="@+id/realTimeText" android:layout_width="wrap_content" android:layout_height="wrap_content" android:textSize="20dp" app:layout_constraintStart_toStartOf="@id/input_form" app:layout_constraintTop_toBottomOf="@id/input_form" android:layout_marginTop="16dp" /> </androidx.constraintlayout.widget.ConstraintLayout> </layout>DataBinding のロジック定義をするViewModelを作成する
ViewModel.kt// BaseObservableクラスを継承 class ViewModel : BaseObservable() { // ここにロジックを書いていく }MainActivityでViewModelをバインドする(紐づける)
MainActivity.ktclass MainActivity : AppCompatActivity() { override fun onCreate(savedInstanceState: Bundle?) { super.onCreate(savedInstanceState) title = "双方向データバインディング Kotlin" // ViewModel とバインディングする(紐付ける) val binding: ActivityMainBinding = DataBindingUtil.setContentView(this, R.layout.activity_main) binding.viewModel = ViewModel() } }レイアウトファイルでViewModelオブジェクトを利用できるようにする
レイアウトファイルに記述を追加
activity_main.xml<?xml version="1.0" encoding="utf-8"?> <layout xmlns:android="http://schemas.android.com/apk/res/android" xmlns:app="http://schemas.android.com/apk/res-auto" > <data> <!-- viewModelという名前でViewModelオブジェクトを登録 --> <variable name="viewModel" type="com.android.bidirectionaldatabindingkotlin.ViewModel" /> /> </data> <!-- ・・・ 省略 ・・・ -->準備が整ったのでこれから機能を実装していく。
フォーム入力でボタンアクティブにする
ViewModel
以下を記述
@get:Bindable ~ set(value)isButtonEnable()ViewModel.ktclass ViewModel : BaseObservable() { // これでフォーム入力内容(formText)の getterとsetter が同時にセットできる @get:Bindable var formText: String = "" set(value) { // fieldはformTextのこと // フォーム入力内容がformTextにセットされる field = value // View側にbuttonEnableの変更を通知(isButtonEnable()を呼ぶ) notifyPropertyChanged(BR.buttonEnable) } // フォーム(EditText)へのテキスト入力有無で、ボタン活性・非活性を制御するフラグの getter @Bindable fun isButtonEnable(): Boolean { // 入力あり:true 入力なし:false return !formText.isNullOrBlank() } }補足
Java に 比べると Kotlin は getter と setter を両方定義する際かなりシンプルに記述できる。
ViewModel.kt@get:Bindable var formText: String = "" set(value) { field = value notifyPropertyChanged(BR.buttonEnable) }↑↑ は ↓↓ こう書いたのと同じである。
ViewModel.ktprivate var formText = "" @Bindable fun getFormText(): String { return formText } fun setFormText(formText: String) { this.formText = formText notifyPropertyChanged(BR.buttonEnable) }レイアウト
以下を記述
- フォーム要素に
android:text="@={viewModel.formText}"- ボタン要素に
android:enabled="@{viewModel.buttonEnable}"activity_main.xml<!-- ・・・ 省略 ・・・ --> <!-- 「@={}」で双方向のバインディング --> <!-- ViewModelの formText定義 @get:Bindable~set(value) に対応 --> <EditText android:id="@+id/input_form" android:layout_width="184dp" android:layout_height="wrap_content" android:hint="テキストを入力" android:inputType="text" android:text="@={viewModel.formText}" ←ここを追加 app:layout_constraintStart_toStartOf="parent" app:layout_constraintEnd_toStartOf="@id/button" app:layout_constraintTop_toTopOf="parent" app:layout_constraintBottom_toBottomOf="parent" app:layout_constraintVertical_bias="0.3" /> <!-- ViewModelの isButtonEnable() に対応 --> <Button android:id="@+id/button" android:layout_width="wrap_content" android:layout_height="wrap_content" android:text="ボタン" android:enabled="@{viewModel.buttonEnable}" ←ここを追加 app:layout_constraintStart_toEndOf="@id/input_form" app:layout_constraintEnd_toEndOf="parent" app:layout_constraintBottom_toBottomOf="@id/input_form" /> <!-- ・・・ 省略 ・・・ -->処理の流れ
- View側でフォームの値を変更(入力または削除)したときに
ViewModelのformTextのset()処理が呼ばれる。- このタイミング(
formTextが変更されたタイミング)でnotifyPropertyChanged(BR.buttonEnable)によりisButtonEnable()を呼ぶ。isButtonEnable()でformTextの値があるかどうかによりbooleanを返す- View側
android:enabled="@{viewModel.buttonEnable}"にbooleanが入ってくることによりボタンの活性非活性が反映されるポイント
@={viewModel.formText}により双方向データバインディングが実現される。つまりView側でフォームの値を変更(入力または削除)したときにViewModelのformTextのset()が呼ばれるようになる。
@=ではなく@だと一方向のデータバインディングとなり、フォーム入力内容の変更が検知されずset()が呼ばれないため注意。フォーム入力内容をリアルタイム表示させる
ViewModel
以下を追加
formTextのset()内にnotifyPropertyChanged(BR.realTimeText);getRealTimeText()ViewModel.ktclass ViewModel : BaseObservable() { // これでフォーム入力内容(formText)の getterとsetter が同時にセットできる @get:Bindable var formText: String = "" set(value) { // fieldはformTextのこと // フォーム入力内容がformTextにセットされる field = value // View側にrealTimeTextの変更を通知(getRealTimeText()を呼ぶ) notifyPropertyChanged(BR.realTimeText) // View側にbuttonEnableの変更を通知(isButtonEnable()を呼ぶ) notifyPropertyChanged(BR.buttonEnable) } // フォーム入力内容をフォーム下のTextViewに反映する getter @Bindable fun getRealTimeText(): String { // return formText でも良いがわかりやすく?一旦変数に代入してから return している val realTimeText = formText return realTimeText } // フォーム(EditText)へのテキスト入力有無で、ボタン活性・非活性を制御するフラグの getter @Bindable fun isButtonEnable(): Boolean { // 入力あり:true 入力なし:false return !formText.isNullOrBlank() } }レイアウト
フォーム入力の内容をリアルタイムで表示したいTextViewに
android:text="@{viewModel.realTimeText}"を記述activity_main.xml<!-- 一部抜粋して記述 --> <!-- ViewModelの getRealTimeText() に対応 --> <TextView android:id="@+id/realTimeText" android:layout_width="wrap_content" android:layout_height="wrap_content" android:text="@{viewModel.realTimeText}" ←ここを追加 android:textSize="20dp" app:layout_constraintStart_toStartOf="@id/input_form" app:layout_constraintTop_toBottomOf="@id/input_form" android:layout_marginTop="16dp" />処理の流れ
- フォーム入力内容の変更で
formTextのset()内のnotifyPropertyChanged(BR.realTimeText);によりgetRealTimeText()が呼ばれる。getRealTimeText()の返り値がレイアウトのandroid:text="@{viewModel.realTimeText}"`に取得され表示される。ポイント
notifyPropertyChanged(BR.~)によりプロパティの変更を通知できる。
getterに@Bindable、もしくは@get:Bindableを付与する。そうすることでモジュールパッケージ内のBRクラスにデータバインディングで使用するリソースIDを持つ監視変数が作成されるため、このような記述が可能になる。詳しくはこちらを参照
BRクラスへ監視変数作成例
以下二つを記述
@get:Bindable var formText ~ set(value)@Bindable fun isButtonEnable(): BooleanBR.javapublic class BR { public static final int formText = 1; public static final int buttonEnable = 2; }ボタンクリックで テキスト表示+フォーム初期化 をさせる
ViewModel
以下を追加
- 変数
clickTextgetClickText()onButtonClick()ViewModel.ktclass ViewModel : BaseObservable() { private var clickText: String = "ボタンクリックでここに表示" // これでフォーム入力内容(formText)の getterとsetter が同時にセットできる @get:Bindable var formText: String = "" set(value) { // fieldはformTextのこと // フォーム入力内容がformTextにセットされる field = value // View側にrealTimeTextの変更を通知(getRealTimeText()を呼ぶ) notifyPropertyChanged(BR.realTimeText) // View側にbuttonEnableの変更を通知(isButtonEnable()を呼ぶ) notifyPropertyChanged(BR.buttonEnable) } // ボタンクリック時に表示するテキスト(TextView)の getter @Bindable fun getClickText(): String { return clickText } // フォーム入力内容をフォーム下のTextViewに反映する getter @Bindable fun getRealTimeText(): String { // return formText でも良いがわかりやすく?一旦変数に代入してから return している val realTimeText = formText return realTimeText } // フォーム(EditText)へのテキスト入力有無で、ボタン活性・非活性を制御するフラグの getter @Bindable fun isButtonEnable(): Boolean { // 入力あり:true 入力なし:false return !formText.isNullOrBlank() } // ボタンクリックイベント fun onButtonClick() { // clickTextにフォーム入力テキストをセット clickText = formText // formTextを初期化 formText = "" // 変更を通知 // この記述でgetClickText()が呼ばれる notifyPropertyChanged(BR.clickText) // この記述でgetFormText()が呼ばれる notifyPropertyChanged(BR.formText) } }レイアウト
以下を追加
- ボタンクリック時表示したいテキストに
android:text="@{viewModel.clickText}"- ボタンに
android:onClick="@{() -> viewModel.onButtonClick()}"activity_main.xml<!-- クリック時表示テキストを抜粋 --> <!-- ViewModel の getClickText() に対応 --> <TextView android:id="@+id/click_text" android:layout_width="wrap_content" android:layout_height="wrap_content" android:textSize="20dp" android:text="@{viewModel.clickText}" ←ここを追加 app:layout_constraintStart_toStartOf="parent" app:layout_constraintTop_toTopOf="parent" app:layout_constraintEnd_toEndOf="parent" app:layout_constraintBottom_toBottomOf="parent" app:layout_constraintVertical_bias="0.15" /> <!-- ボタン部分を抜粋 --> <!-- ViewModel の onButtonClick() に対応 --> <Button android:id="@+id/button" android:layout_width="wrap_content" android:layout_height="wrap_content" android:text="ボタン" android:enabled="@{viewModel.buttonEnable}" android:onClick="@{() -> viewModel.onButtonClick()}" ←ここを追加 app:layout_constraintStart_toEndOf="@id/input_form" app:layout_constraintEnd_toEndOf="parent" app:layout_constraintBottom_toBottomOf="@id/input_form" />ポイント
ボタンクリックしたときの処理の流れ
onButtonClick()が呼ばれるclickTextにそのときのフォーム入力内容を代入formTextに""を代入して初期化notifyPropertyChanged(BR.clickText/formText)でそれぞれの変数の変更をView側に通知getClickText()とgetRealTimeText()が呼ばれ、 View側に変数の値が反映される補足
Viewが描画される?(アクティビティとバインディングされる?)タイミングでも全ての
getterが呼ばれていた。それによりView側に変数の値が反映される。レイアウトファイル全体
activity_main.xml<?xml version="1.0" encoding="utf-8"?> <layout xmlns:android="http://schemas.android.com/apk/res/android" xmlns:app="http://schemas.android.com/apk/res-auto" > <!-- viewModelという名前でViewModelオブジェクトを登録 --> <data> <variable name="viewModel" type="com.android.bidirectionaldatabindingkotlin.ViewModel" /> </data> <androidx.constraintlayout.widget.ConstraintLayout android:layout_width="match_parent" android:layout_height="match_parent" > <TextView android:id="@+id/click_text" android:layout_width="wrap_content" android:layout_height="wrap_content" android:textSize="20dp" android:text="@{viewModel.clickText}" app:layout_constraintStart_toStartOf="parent" app:layout_constraintTop_toTopOf="parent" app:layout_constraintEnd_toEndOf="parent" app:layout_constraintBottom_toBottomOf="parent" app:layout_constraintVertical_bias="0.15" /> <EditText android:id="@+id/input_form" android:layout_width="184dp" android:layout_height="wrap_content" android:hint="テキストを入力" android:inputType="text" android:textSize="20dp" android:text="@={viewModel.formText}" app:layout_constraintStart_toStartOf="parent" app:layout_constraintEnd_toStartOf="@id/button" app:layout_constraintTop_toTopOf="parent" app:layout_constraintBottom_toBottomOf="parent" app:layout_constraintVertical_bias="0.3" /> <Button android:id="@+id/button" android:layout_width="wrap_content" android:layout_height="wrap_content" android:text="ボタン" android:enabled="@{viewModel.buttonEnable}" android:onClick="@{() -> viewModel.onButtonClick()}" app:layout_constraintStart_toEndOf="@id/input_form" app:layout_constraintEnd_toEndOf="parent" app:layout_constraintBottom_toBottomOf="@id/input_form" /> <TextView android:id="@+id/realTimeText" android:layout_width="wrap_content" android:layout_height="wrap_content" android:textSize="20dp" android:text="@{viewModel.realTimeText}" app:layout_constraintStart_toStartOf="@id/input_form" app:layout_constraintTop_toBottomOf="@id/input_form" android:layout_marginTop="16dp" /> </androidx.constraintlayout.widget.ConstraintLayout> </layout>参考
ありがとうございます!!
非常に参考にさせていただきました!!
- https://qiita.com/takaaki7/items/91d34e8bf9ad5d71ddd2
- https://developer.android.com/topic/libraries/data-binding/observability?hl=ja
最後に
データバインディングの書き方は他にも
ObservableField()を利用したものなど他にも方法があるようですが、今回はこのような方法で書きました。今後も Android開発極めるべく、勉強していきます!!
ありがとうございました!!
- 投稿日:2021-01-24T09:50:26+09:00
Kotlin Multiplatform Mobileで作ったプロジェクトで実機ビルドができない場合の対応
概要
プラグイン
Kotlin Multiplatform Mobileを利用してプロジェクトを作った際、実機ビルドができないとなった時の対応。エラー内容としては下記。
${Path}/iosApp.xcodeproj Building for iOS Simulator, but the linked and embedded framework 'shared.framework' was built for iOS.原因
AndroidとiOS側で共有されている'shared.framework'がiOS Simulator用にビルドされていて、実機では使えないという話。
FWは以下のような処理を経て生成される。
具体的にはConfigurationを基に各ターゲット向けに生成されたFWをコピーし、xcode-frameworksという名前にしている。shared/build.gradle.ktsval packForXcode by tasks.creating(Sync::class) { group = "build" val mode = System.getenv("CONFIGURATION") ?: "DEBUG" val sdkName = System.getenv("SDK_NAME") ?: "iphonesimulator" val targetName = "ios" + if (sdkName.startsWith("iphoneos")) "Arm64" else "X64" val framework = kotlin.targets.getByName<KotlinNativeTarget>(targetName).binaries.getFramework(mode) inputs.property("mode", mode) dependsOn(framework.linkTask) val targetDir = File(buildDir, "xcode-frameworks") from({ framework.outputDirectory }) into(targetDir) }Gradleタスクを呼び出しは、iOSのBuild Phaseで行われている。
問題があるのはここ。cd "$SRCROOT/.." ./gradlew :shared:packForXCode -PXCODE_CONFIGURATION=${CONFIGURATION}Xcode10で最適化のため新しいbuild systemに移行された。
その際build phaseでの設定方法やその処理内容に変更が入り、ファイルに変更がなければbuild phaseのスクリプトも実行されなくなった。詳しい変更内容は下記で確認。
そのため、
shared:packForXCodeにおいても一度Simlulator向けにビルドすると、FWは存在しているので実行されなくなる。
xcode-frameworksを削除すれば、実機向けにもビルドできるが逆も然りで、この場合Simlulator向けにビルドできなくなる${Path}/iosApp.xcodeproj Building for iOS Simulator, but the linked and embedded framework 'shared.framework' was built for iOS.対応
Build Phaseではなく、SchemaのPre-Actionsで
packForXCodeを実行する。
注意が必要なのはProvided build settings fromも変更しておくこと。

- 投稿日:2021-01-24T02:45:07+09:00
【iOS/Android】ネイティブアプリ開発をしたい人への上達マップ【初心者】
想定読者:これからネイティブアプリを開発したい人
想定読者に向けて、上達の全体像をお伝えします。
新人や駆け出しエンジニアの方が自分がどのあたりにいるか把握でき
モチベーションアップになれば幸いです。まずは入門書の前半くらい
画面のレイアウトを作れるようになる
数字や文字列を表示できるようになる
ボタンを作る
ボタンを押したら、数字が増えたり減ったりするカウンターを作れるようになる
画面遷移ができるようになる
画面遷移の時に値を渡せるようになる入門書の後半くらい
値を保存できるようになる。
値を呼び出せるようになる。
データベースにデータを保存できるようになる。
データベースからデータを読み出せるようになる。色や動きなどを実装できるようになる
結構大変になってくる
通信処理ができるようになる
エラーハンドリングができるようになるお、そろそろ実務の駆け出しくらいには行けるか?
綺麗にレイアウトを組めるようになる
(AutoLayoutなど)
デザインガイドラインを理解する
非同期通信ができるようになるアプリの審査に提出できる
権限周りが大変。プロレベル。
アーキテクチャについて詳しくなる
MVCとMVVMくらいまで
共通化ができるようになる
レイヤードアーキテクチャにて理解・実装リアクティブに動けるようにする
(RxSwiftやJetPackなど)プラスアルファ
CI/CDの構築
適切なアーキテクチャの選定
UX/UIデザインを考えた実装の可能不可能の判断
営業やデザイナーとのコミュニケーションまとめ
箇条書きですが、こんな道筋です。
結構大変になってくるレベルで挫折や、応募してくる方がいらっしゃいますが
もう少しです。どうにかリリースまで漕ぎ着けてください!
いっしょにプロのネイティブアプリエンジニアとしていいもの作りましょう!