- 投稿日:2021-01-22T22:24:56+09:00
Facebookアプリを開発するためにAndroidのデバッグ用キーのSHA1を取得したい
FacebookのSDKを使うのにSHA-1ハッシュを登録しなきゃいけない。何回もやったことあるのに毎回やり方を忘れるのでメモしておく。
開発機がMacだったらデバッグ用のandroidキーは
~/.android/debug.keystoreにあります。
キー名はandroiddebugkey、パスワードはandroidであるので、以下のコマンドを実行して、パスワードを聞かれたらandroidと入力すれば良い。keytool -exportcert -alias androiddebugkey -keystore ~/.android/debug.keystore | openssl sha1 -binary | openssl base64Warning: JKSキーストアは独自の形式を使用しています。...みたいなのが出るけど無視して、そのすぐ下の
RJQHtkdlWWkh3HTD=みたいなやつ(↑の文字列はテキトーに入力しただけで正しいキーハッシュではありません)をコピーして、Facebookの開発者ページに貼り付ける。
- 投稿日:2021-01-22T21:41:35+09:00
Googleマップのナビ音声を茜ちゃんに変える
デモ
アカネチャンカワイイヤッター
そんな高度なことはしてないですが、
ブログとか持ってなくて、他に書く場所もないのでここに書かせてください。ひつようなもの
- Android端末
- Andorid Google Map アプリ
- Andoroid ナビボイスチェンジャー アプリ
- PC (Windows)
- PC ZIP圧縮ソフト(WinRARなど)
- Android PC データ転送用ケーブル
- 【重要】茜ちゃんのめっちゃかわいい音声ファイル一式
- (ナビボイスチェンジャーでDLします)
OPPO Reno 10X Zoom (Android 10)
Google Map Ver.10.58.2 で動作確認済です
iPhoneとかでも同じ方法でできると思いますが、動作未確認ですやりかた
1. Android端末を操作し、ナビボイスチェンジャーの「音声のダウンロード」から、「茜ちゃんとドライブ(VOICEROID+琴葉茜)」をダウンロードします
Playストアから予め「ナビボイスチェンジャー」をダウンロードしてくださいね
2. ナビボイスチェンジャーの「音声のインストール」から、「茜ちゃんとドライブ(VOICEROID+琴葉茜)」をインストールします
インストールしたところで、現時点ではフォーマットが合わないので使えませんが、音声差し替え先のフォルダを作るために行います
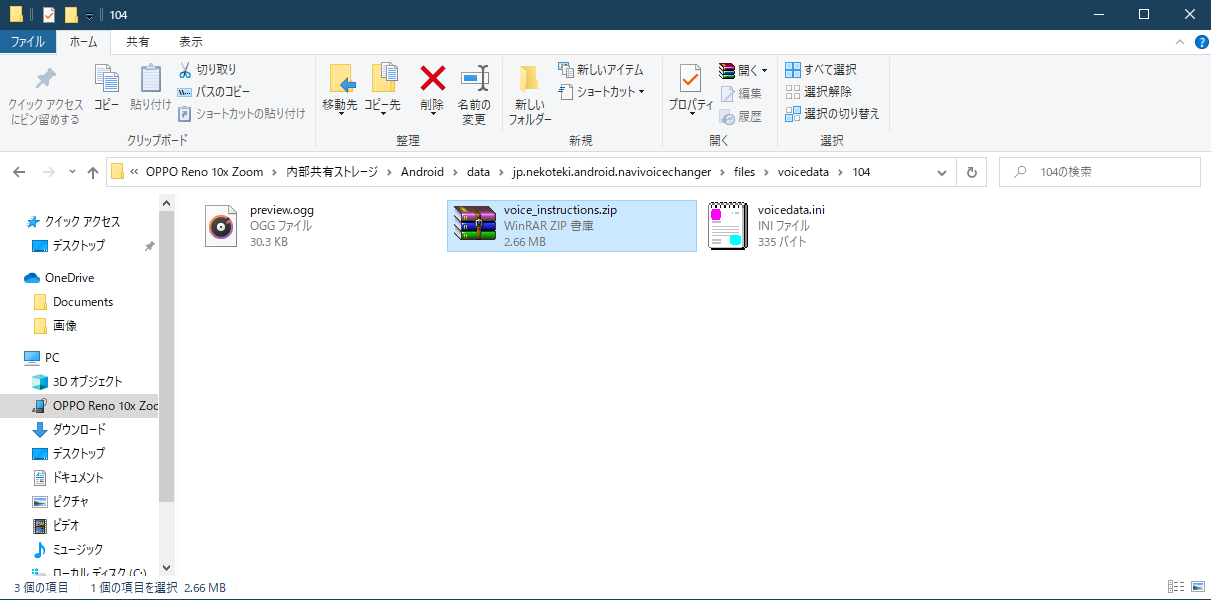
「音声のインストール」は、
Android\data\jp.nekoteki.android.navivoicechanger\files\voicedata\{id}にあるvoice_instructions.zipというファイルを
Android\data\com.google.android.apps.maps\testdata\voice\ja_JP{英数字}にコピーするということをしてるんだと思います。しらんけど。3. データ転送ケーブルでAndroid端末とPCをつなぎ、
voice_instructions.zipをPCに転送します
音声ファイルは以下のフォルダにあります
Android\data\jp.nekoteki.android.navivoicechanger\files\voicedata\{id}
↓
※「茜ちゃんとドライブ(VOICEROID+琴葉茜)」の場合、以下の場所にあります
Android\data\jp.nekoteki.android.navivoicechanger\files\voicedata\104
デスクトップとか、自分のわかるところならどこに置いてもいいです
4. PCで
voice_instructions.zipを解凍しますWinRARとかLhaplusとか、お好みのソフトで解凍してください
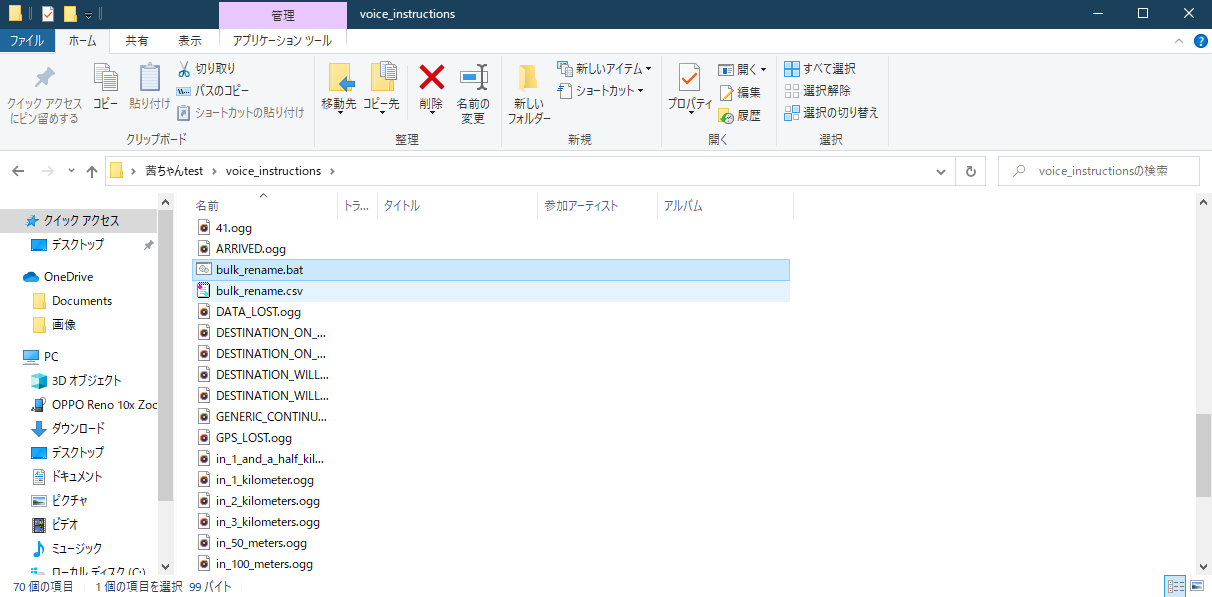
5. 解凍した「voice_instructions」フォルダの中に
bulk_rename.batとbulk_raname.csvを置きます
bulk_rename.batとbulk_rename.csvのダウンロードは以下のURLからどうぞhttps://drive.google.com/drive/folders/196dOnZMD856EQwxEBrsHMPSlu0rOPt5_
6. 「bulk_rename.bat」をダブルクリックして実行します
7. 「voice_instructions」フォルダ内にできた「outputs」フォルダの中に、
messages.xmlとmessages.plistを置きます
messages.xmlとmessages.plistのダウンロードは以下のURLからどうぞhttps://drive.google.com/drive/folders/196dOnZMD856EQwxEBrsHMPSlu0rOPt5_
messages.xmlはAndroid用、messages.plistはiOS用だと思います。
私はiOS搭載端末を持っていないのでiPhoneとかで動作確認はしてません。8. 「outputs」フォルダの中身を
voice_instructions_unitless.zipという名前で圧縮します「outputs」フォルダは含みません。
フォルダー内にあるファイルだけを全て選択→右クリック→送る→圧縮(zip形式)フォルダーとかで圧縮すればおkWinRARとかLhaplusとか、お好みのソフトで圧縮してください
9. データ転送ケーブルで、PCからAndroid端末に
voice_instructions_unitless.zipを転送します
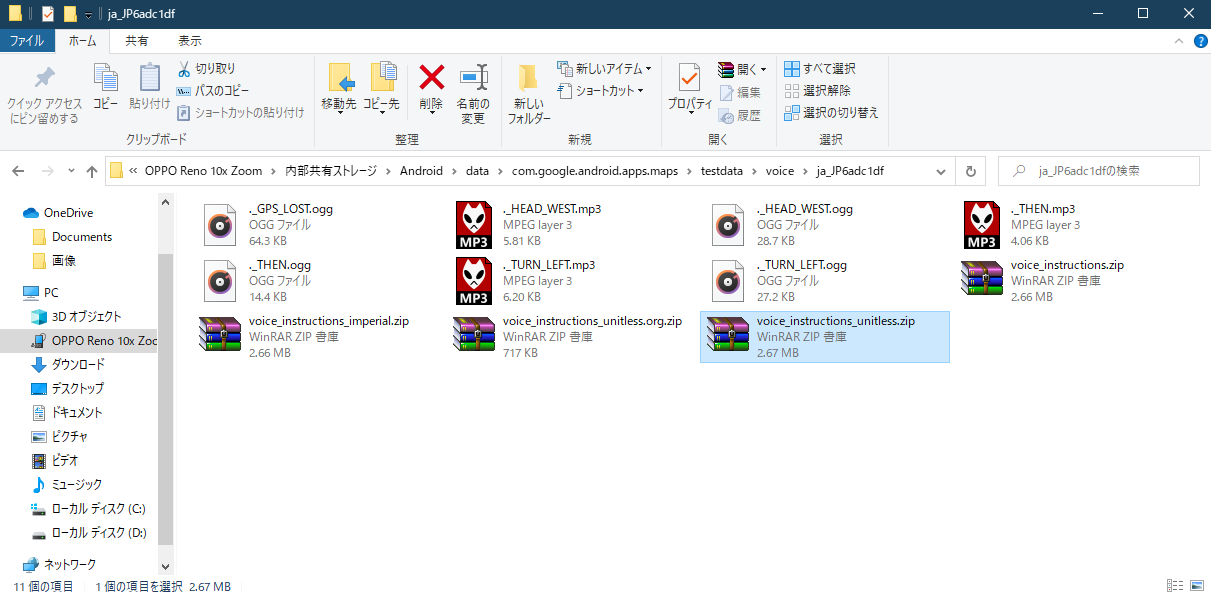
以下のフォルダに置きます
PC\{端末名}\内部共有ストレージ\Android\data\com.google.android.apps.maps\testdata\voice\ja_JP{英数字}
↓
※私の場合
PC\OPPO Reno 10x Zoom\内部共有ストレージ\Android\data\com.google.android.apps.maps\testdata\voice\ja_JP6adc1df
もし、最初から
voice_instructions_unitless.zipが置いてある場合は、上書きするか、心配なら別名にしてください
voice_instructions.zipが旧バージョンのファイルで、voice_instructions_imperial.zipが mp3形式のファイルだと思います。
多分どちらもいらないと思うけどよくわかんない?10. Android端末を操作し、「Googleマップ」アプリでナビ案内を開始します
???「さあお客様! 感動する準備をお願いします!」
以上
アカネチャンカワイイヤッター
何をしてるの?
私が今回したのは、ナビボイスチェンジャーにある古い形式の音声データとフォーマットを、
新マップでも使えるように一括でファイル名を変換するって部分ですサイトがサイトなのでプログラマーっぽいことも書きます
bulk_rename.batの内容はこんな風になってますbulk_rename.batmkdir outputs for /F "tokens=1,2 delims=," %%a in (bulk_rename.csv) do COPY %%a outputs\%%b pauseバッチファイルと同階層に
outputsフォルダを作成、
bulk_rename.csvに従い、新ファイル名に置換したものをフォルダ内にコピー出力します。音声ファイル置換対応表
bulk_rename.csvのファイル名置換対応表です。
バッチファイルを実行した時、旧ファイル名と同名のファイルを新ファイル名に置換します
「合流アリ」に対応する新ファイル名はわからなかったので「---」にしています。
誰かわかったら教えて
旧ファイル名 新ファイル名 内容 1.ogg HEAD_NORTH.ogg 北へ 2.ogg HEAD_NORTHEAST.ogg 北東へ 3.ogg HEAD_EAST.ogg 東へ 4.ogg HEAD_SOUTHEAST.ogg 南東へ 5.ogg HEAD_SOUTH.ogg 南へ 6.ogg HEAD_SOUTHWEST.ogg 南西へ 7.ogg HEAD_WEST.ogg 西へ 8.ogg HEAD_NORTHWEST.ogg 北西へ 9.ogg SLIGHT_LEFT.ogg ナナメ左へ 10.ogg SLIGHT_RIGHT.ogg ナナメ右へ 11.ogg TURN_LEFT.ogg 左へ 12.ogg TURN_RIGHT.ogg 右へ 13.ogg SHARP_LEFT.ogg おおきく左へ 14.ogg SHARP_RIGHT.ogg おおきく右へ 15.ogg SLIGHT_LEFT_ONTO_THE_RAMP.ogg ナナメ左方向 その先 高速入口 16.ogg SLIGHT_RIGHT_ONTO_RAMP.ogg ナナメ右方向 その先 高速入口 17.ogg TURN_LEFT_ONTO_RAMP.ogg 左方向 その先 高速入口 18.ogg TURN_RIGHT_ONTO_THE_RAMP.ogg 右方向 その先 高速入口 19.ogg TAKE_THE_RAMP.ogg 高速入口 20.ogg TAKE_THE_EXIT_ON_THE_LEFT.ogg 左方向 その先 高速出口 21.ogg TAKE_THE_EXIT_ON_THE_RIGHT.ogg 右方向 その先 高速出口 22.ogg TAKE_THE_EXIT.ogg 高速出口 23.ogg KEEP_LEFT_AT_THE_FORK.ogg 分岐を左方向へ 24.ogg KEEP_RIGHT_AT_THE_FORK.ogg 分岐を右方向へ 25.ogg CONTINUE_ON_THE_RAMP.ogg 分岐アリ 26.ogg ENTER_THE_ROUNDABOUT.ogg ロータリー 入口 27.ogg ROUNDABOUT_1ST_EXIT.ogg ロータリー 1番目の出口へ 28.ogg ROUNDABOUT_TAKE_2ND_EXIT.ogg ロータリー 2番目の出口へ 29.ogg ROUNDABOUT_TAKE_3RD_EXIT.ogg ロータリー 3番目の出口へ 30.ogg ROUNDABOUT_TAKE_4TH_EXIT.ogg ロータリー 4番目の出口へ 31.ogg ROUNDABOUT_TAKE_5TH_EXIT.ogg ロータリー 5番目の出口へ 32.ogg ROUNDABOUT_EXIT_INTO_THE_RAMP.ogg ロータリー から ランプ(高速)へ 33.ogg EXIT_THE_ROUNDABOUT.ogg ロータリー 出口(直進) 34.ogg CONTINUE_STRAIGHT.ogg 直進 35.ogg TAKE_THE_FERRY.ogg フェリーに乗れ 36.ogg TAKE_THE_TRAIN.ogg 電車に乗れ 37.ogg MAKE_A_UTURN.ogg Uターンしろ 38.ogg TAKE_THE_INTERCHANGE_ON_THE_LEFT.ogg 左方向 JCT(分岐をナナメ左方向) 39.ogg TAKE_THE_INTERCHANGE_ON_THE_RIGHT.ogg 右方向 JCT(分岐をナナメ右方向) 40.ogg TAKE_THE_INTERCHANGE.ogg JCT 41.ogg ---.ogg 合流アリ ARRIVED.ogg ARRIVED.ogg 目的地に到着 DATA_LOST.ogg DATA_LOST.ogg データ接続が失われました DESTINATION_ON_LEFT.ogg DESTINATION_ON_LEFT.ogg 左に目的地アリ DESTINATION_ON_RIGHT.ogg DESTINATION_ON_RIGHT.ogg 右に目的地アリ DESTINATION_WILL_BE_ON_LEFT.ogg DESTINATION_WILL_BE_ON_LEFT.ogg 目的地は左側 DESTINATION_WILL_BE_ON_RIGHT.ogg DESTINATION_WILL_BE_ON_RIGHT.ogg 目的地は右側 GENERIC_CONTINUE.ogg GENERIC_CONTINUE.ogg しばらく道なり GPS_LOST.ogg GPS_LOST.ogg GPS受信できず in_100_meters.ogg IN_100_METERS.ogg およそ100m in_150_meters.ogg IN_150_METERS.ogg およそ150m in_1_and_a_half_kilometers.ogg IN_1_AND_A_HALF_KILOMETERS.ogg およそ1.5km in_1_kilometer.ogg IN_1_KILOMETER.ogg およそ1km in_200_meters.ogg IN_200_METERS.ogg およそ200m in_2_kilometers.ogg IN_2_KILOMETERS.ogg およそ2km in_300_meters.ogg IN_300_METERS.ogg およそ300m in_3_kilometers.ogg IN_3_KILOMETERS.ogg およそ3km in_400_meters.ogg IN_400_METERS.ogg およそ400m in_500_meters.ogg IN_500_METERS.ogg およそ500m in_50_meters.ogg IN_50_METERS.ogg およそ50m in_600_meters.ogg IN_600_METERS.ogg およそ600m in_800_meters.ogg IN_800_METERS.ogg およそ800m NAVIGATION_RESUMED.ogg NAVIGATION_RESUMED.ogg 音声案内を継続します PLEASE_DESCRIBE_PROBLEM.ogg PLEASE_DESCRIBE_PROBLEM.ogg 問題の内容をお話ください THEN.ogg THEN.ogg その先 WILL_ARRIVE.ogg WILL_ARRIVE.ogg 目的地周辺 余談
誰か、ここまでの作業を全部アプリで完結するようなの作ってくれたらいいな~(小声)
2021.01.23 追記
ここまで書いといてなんですが、既にほぼ同じことをしている方がいました...
https://bowlroll.net/file/154696
まあ、SEO的に露出が増えれば役に立つ人も増えると思うんで、何も問題なければこの記事は残すことにします
おまけ
本記事とは全く関係がないですが、私は車のバックカメラをAndroidアプリで表示しています。
操作方法を説明した動画をあげてるので良ければどうぞ


- 投稿日:2021-01-22T21:37:55+09:00
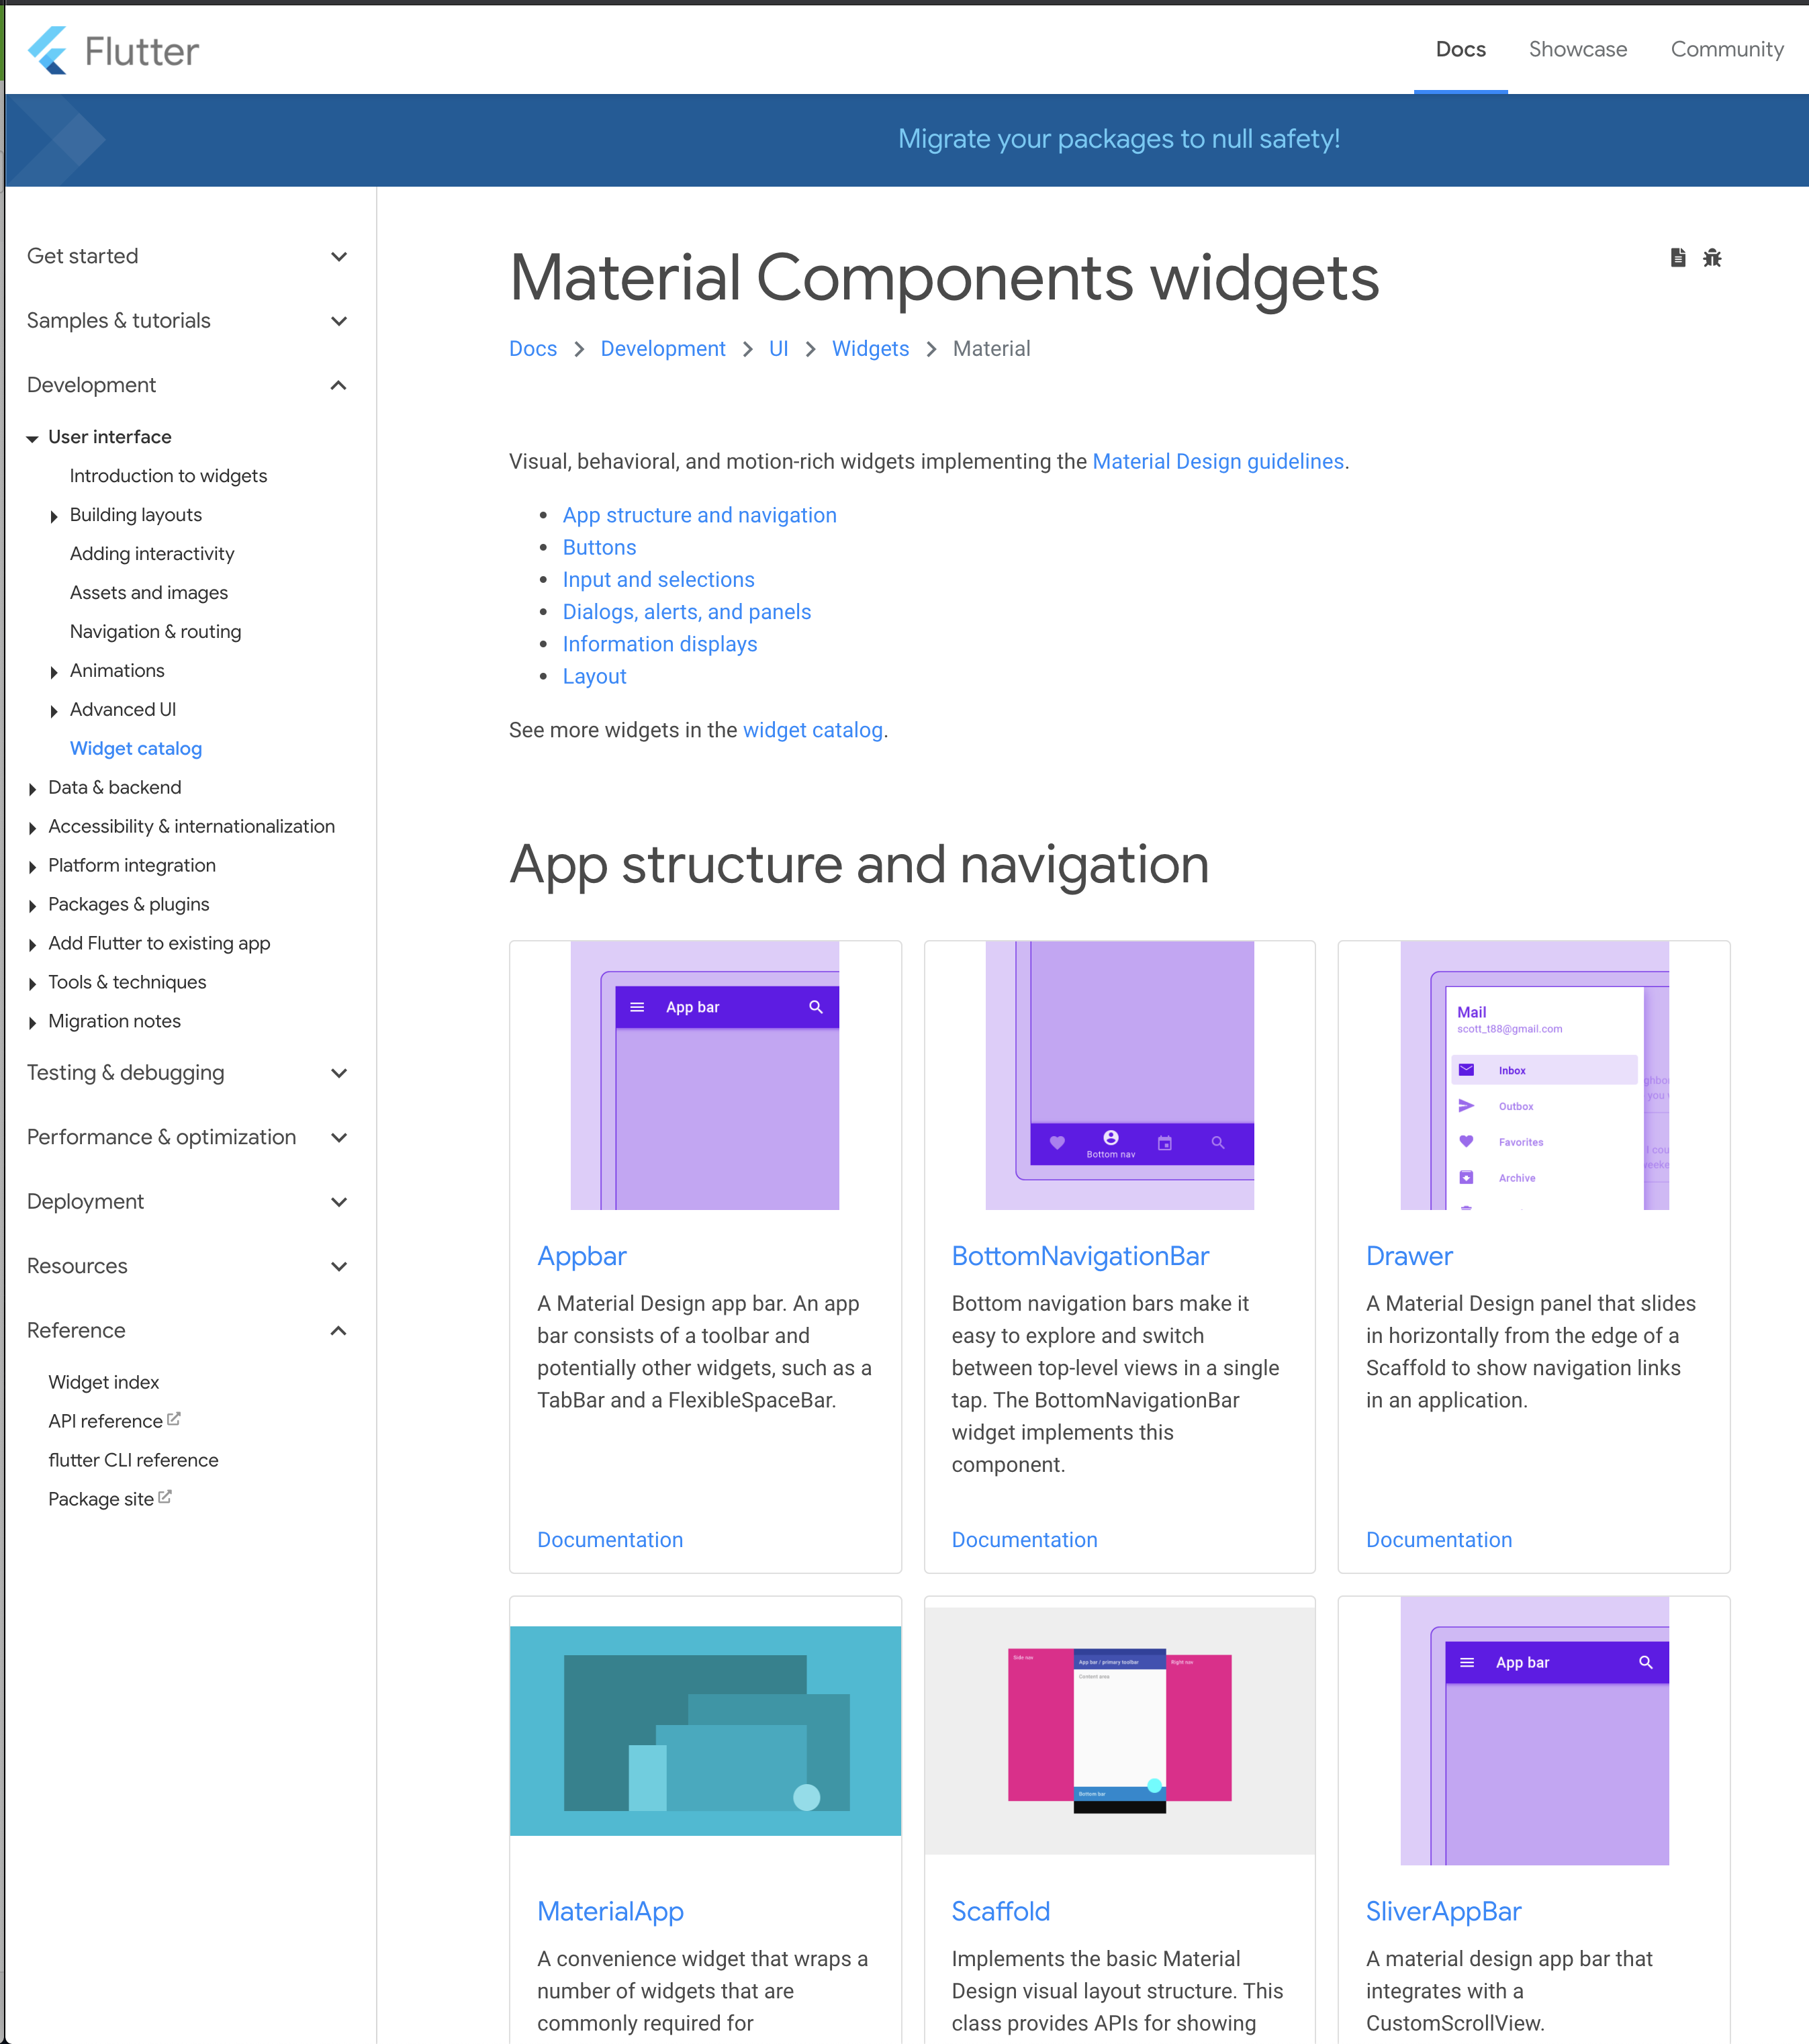
Flutterとはなんぞや。〜html、cssを見たくないけどモダンなUI組みたいあなたへ〜
お久しぶりです!やびーくでっす!
本日は、FlutterでiOSとAndroidのアプリを開発する方法についてお話しします!目次
- Flutterとは
- プログラムの一元管理
- HTML、CSSを意識しないモダンなUI構築
- 豊富なライブラリとホットリロード
- 実際に体験したい方へ
- 開発チームメンバーの声
- 参照記事
Flutterとは
FlutterはiOSとAndroid両方で動作するスマホアプリを作成するためのDart言語のフレームワークです!
一部ハードウェアに依存するコードはそれぞれjavaやobject-cなどで記載する必要がありますが、
基本的なプログラム・UIは共通化することができるので、iOSとAndroid両方のアプリケーションを作る場合のプログラムソースをほとんど一元化することができます。プログラムの一元管理
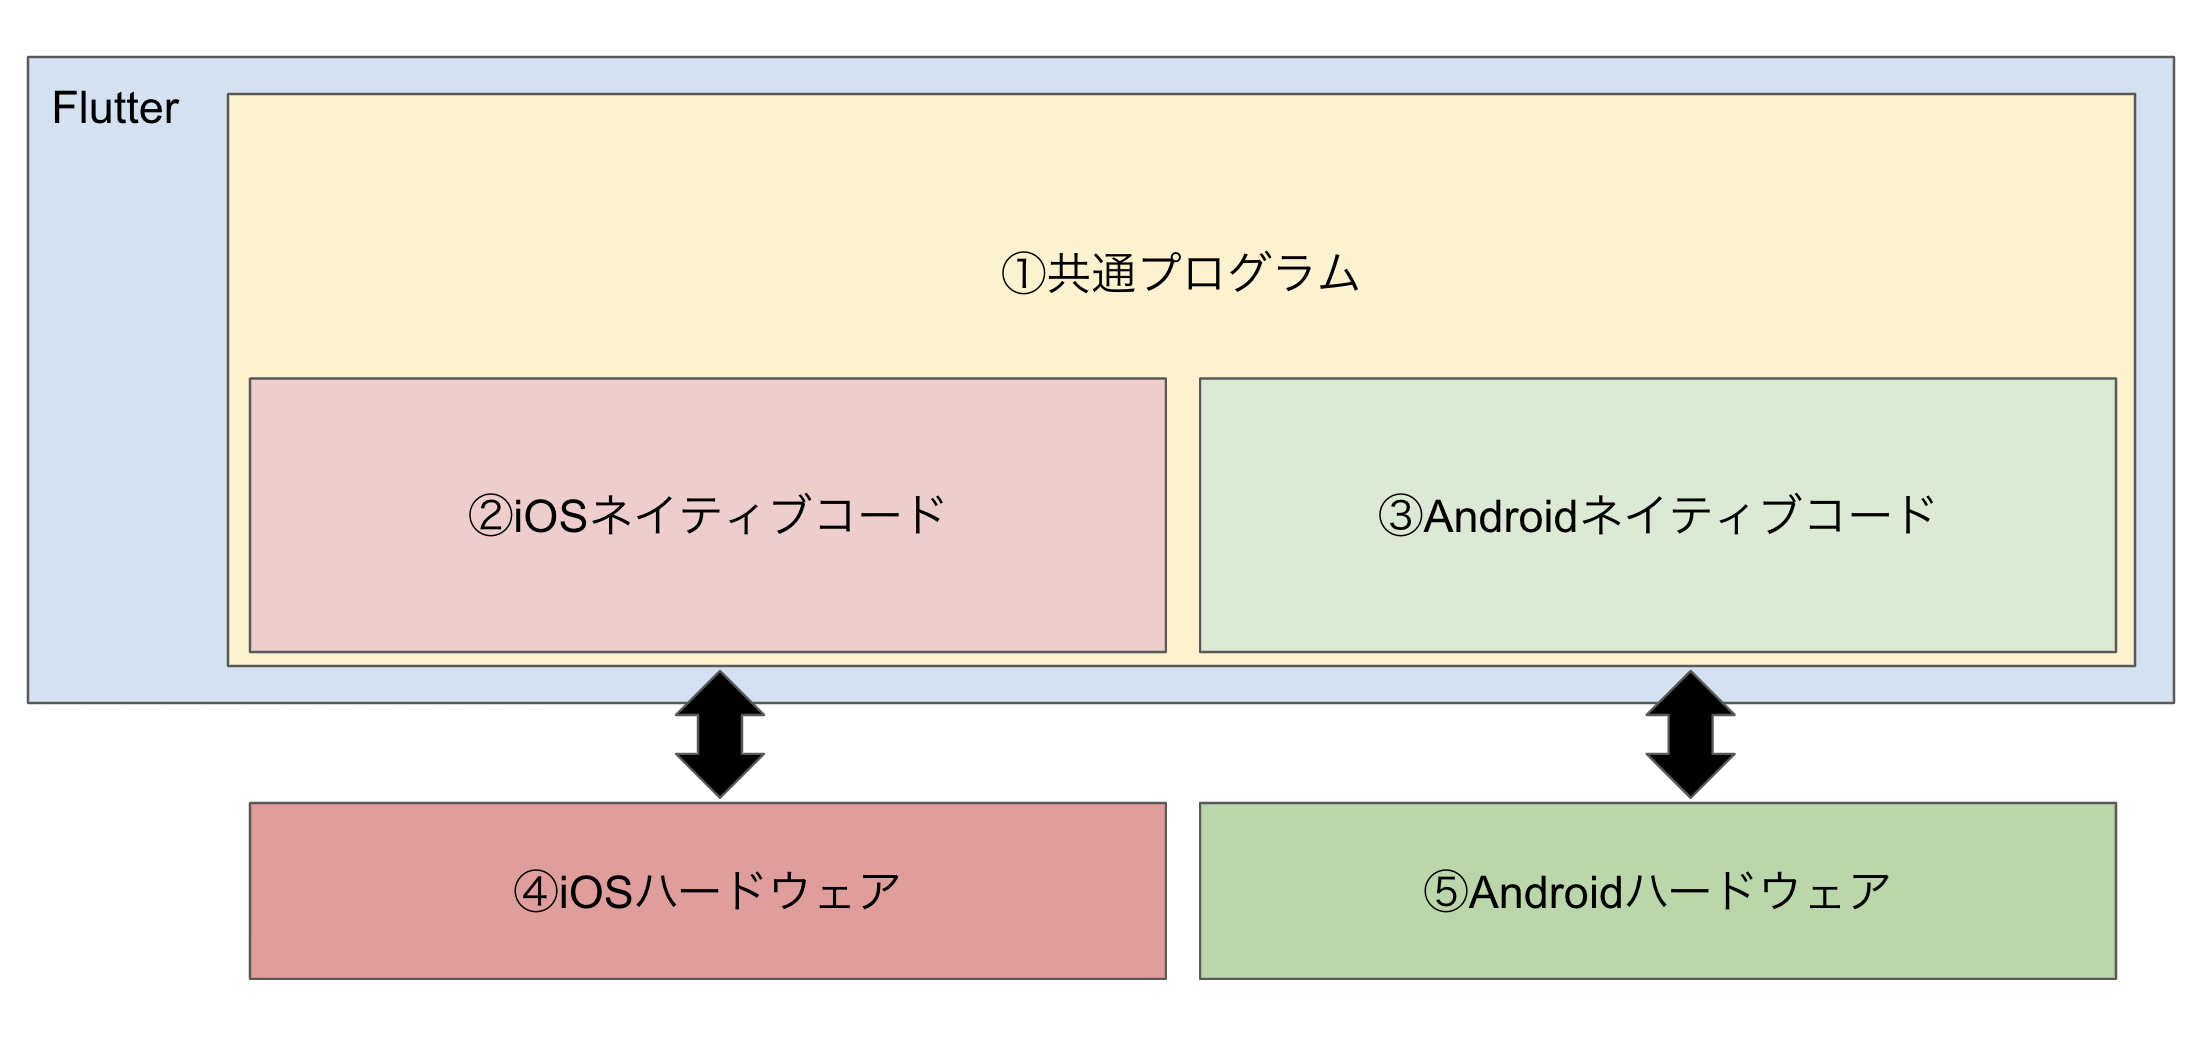
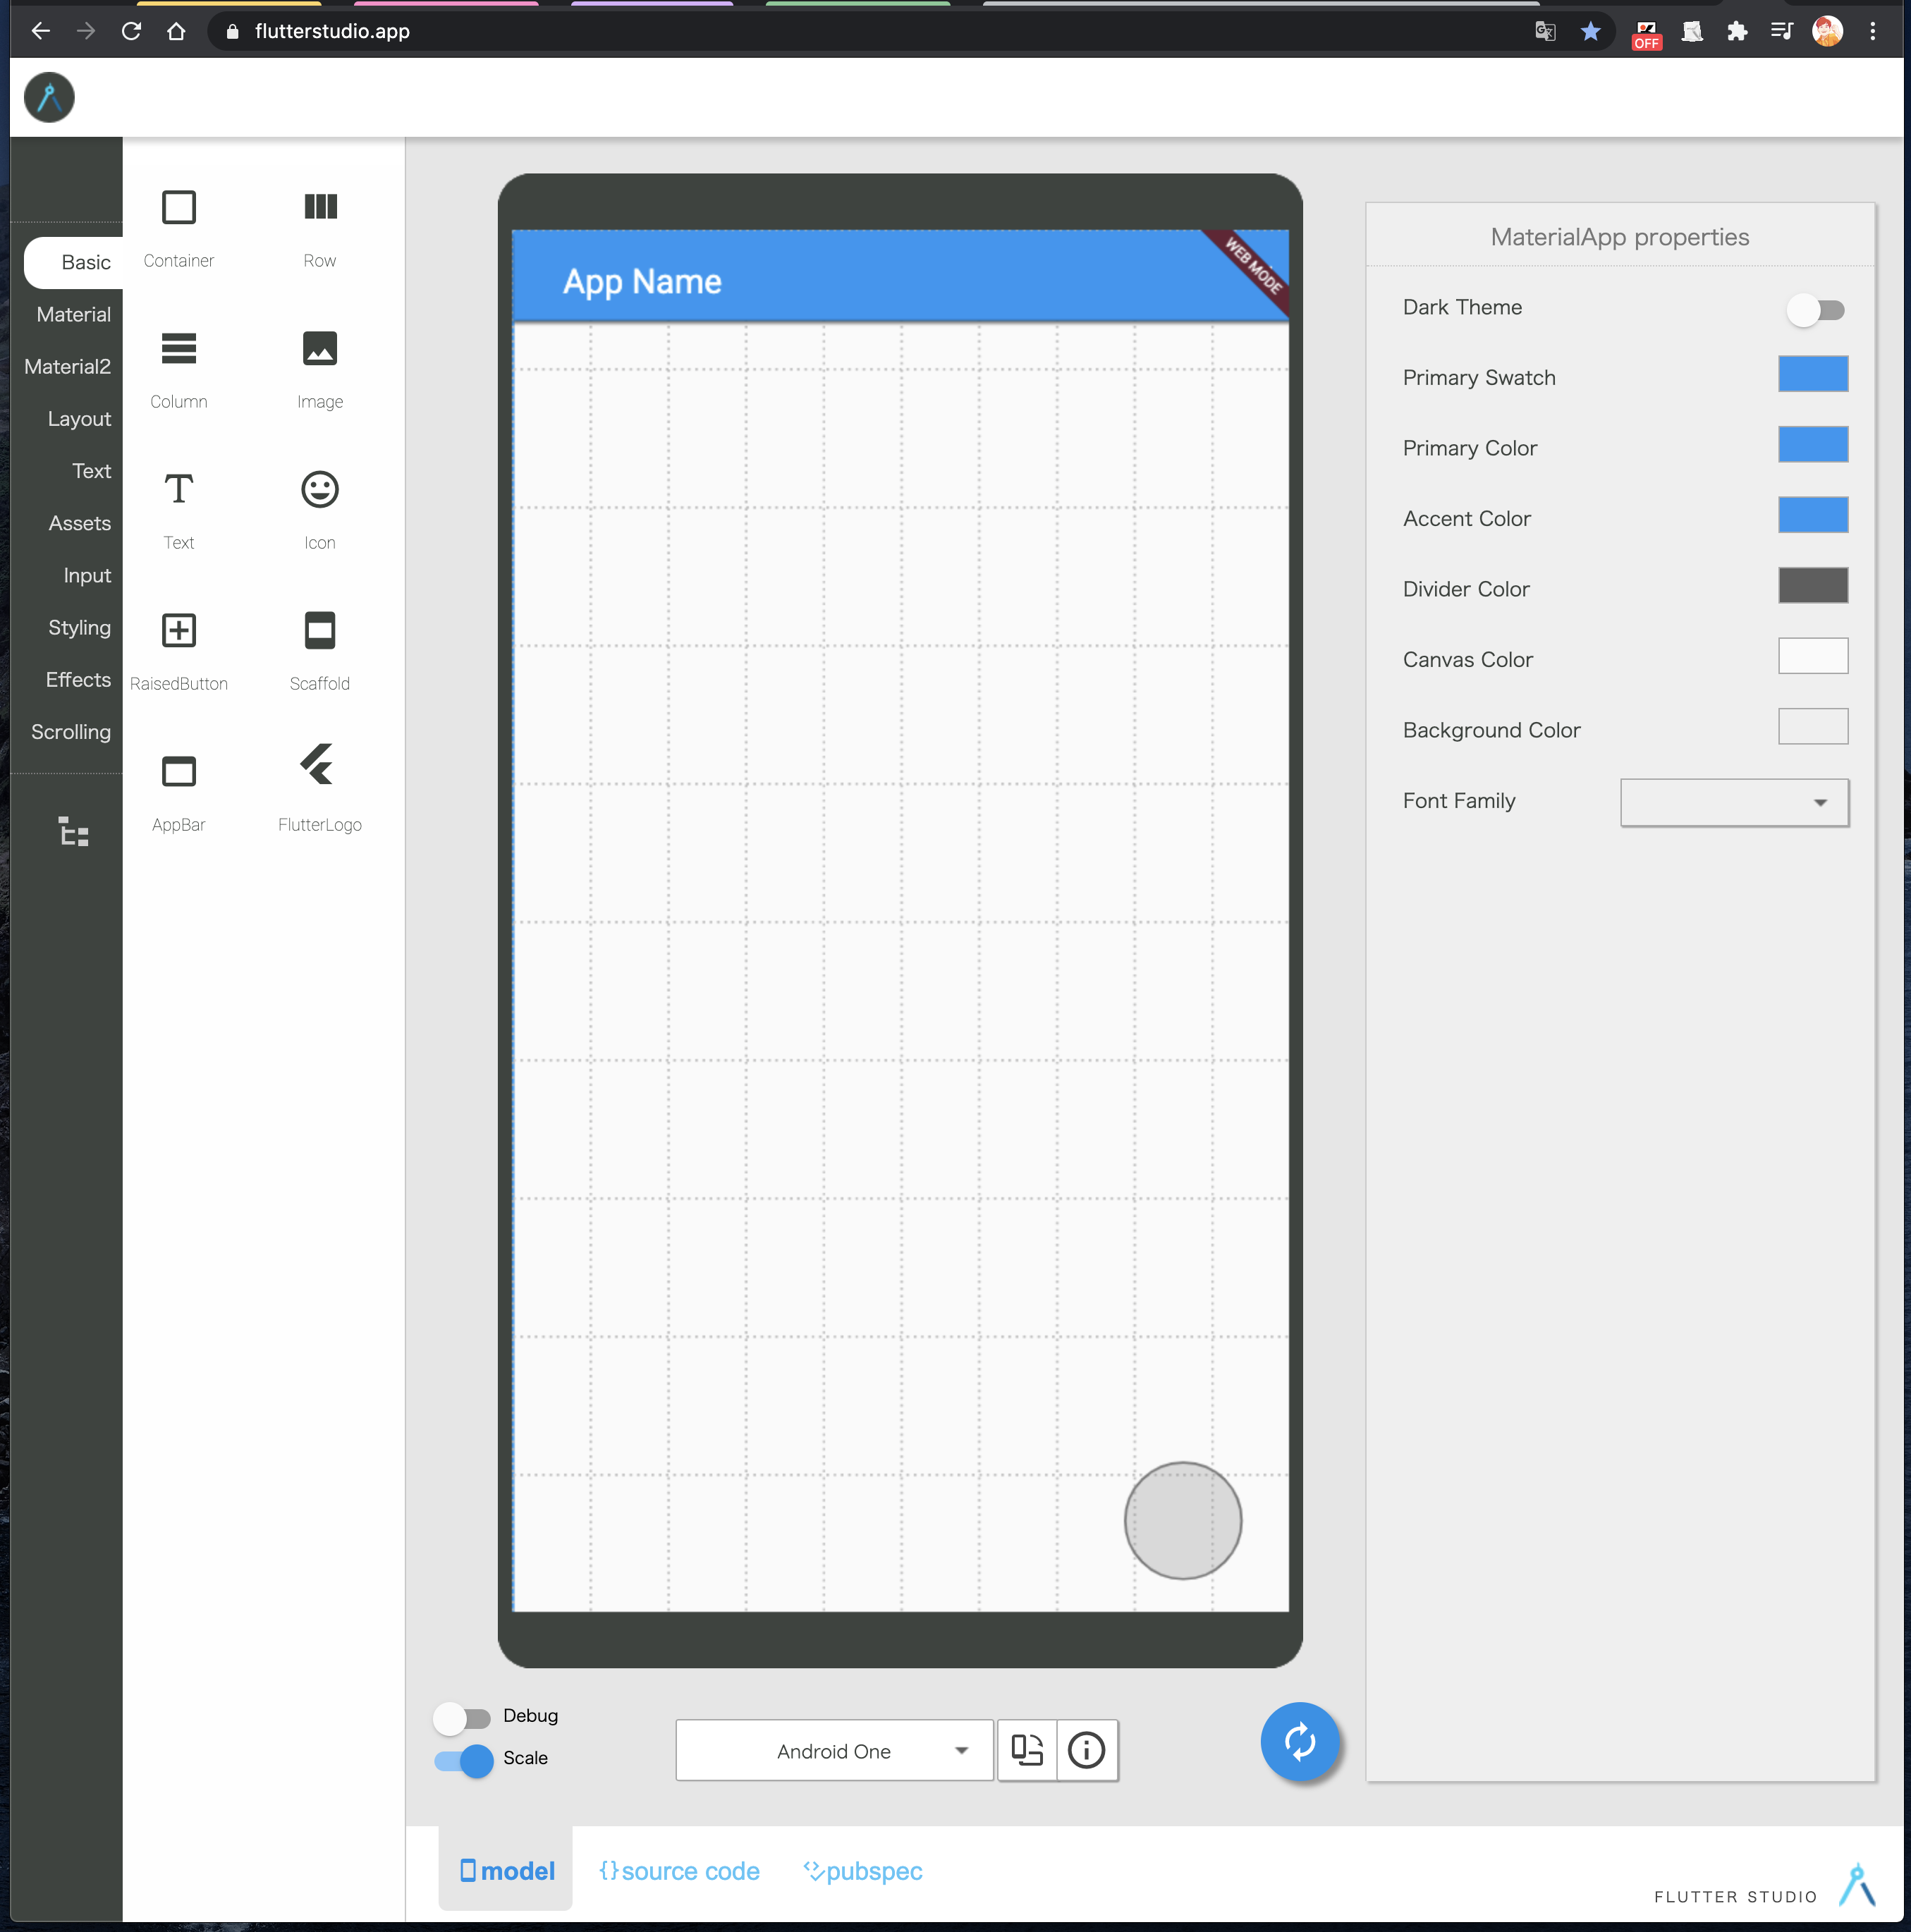
画像を元に説明します。
※あくまで触ってみて感じたイメージなので参考までに!
Flutterが担うのが①〜③の部分です。
①共通プログラム
UI、基本的なプログラムソース
②③iOSネイティブコード/Androidネイティブコード
ライブラリなどで対応できないが使用したいハードウェア機能(カメラやセンサー系など)がある場合
ライブラリは豊富にあるので基本的にはライブラリで補完できるとも言われています。実際に業務の中で、ハードウェアのセンサー部分の機能を利用しましたが、
基本的に②と③のネイティブコードは書く必要がなかったです!ネイティブコードを書く場合にも以下のように最初から2つのプラットフォーム上で動かすことを前提として、ディレクトリが構成されているのでgitなどのソース管理も楽なんです!
android/    Android用のソースフォルダ
ios/        iOS用のソースフォルダ
>>>省略
HTML、CSSを意識しないモダンなUI構築
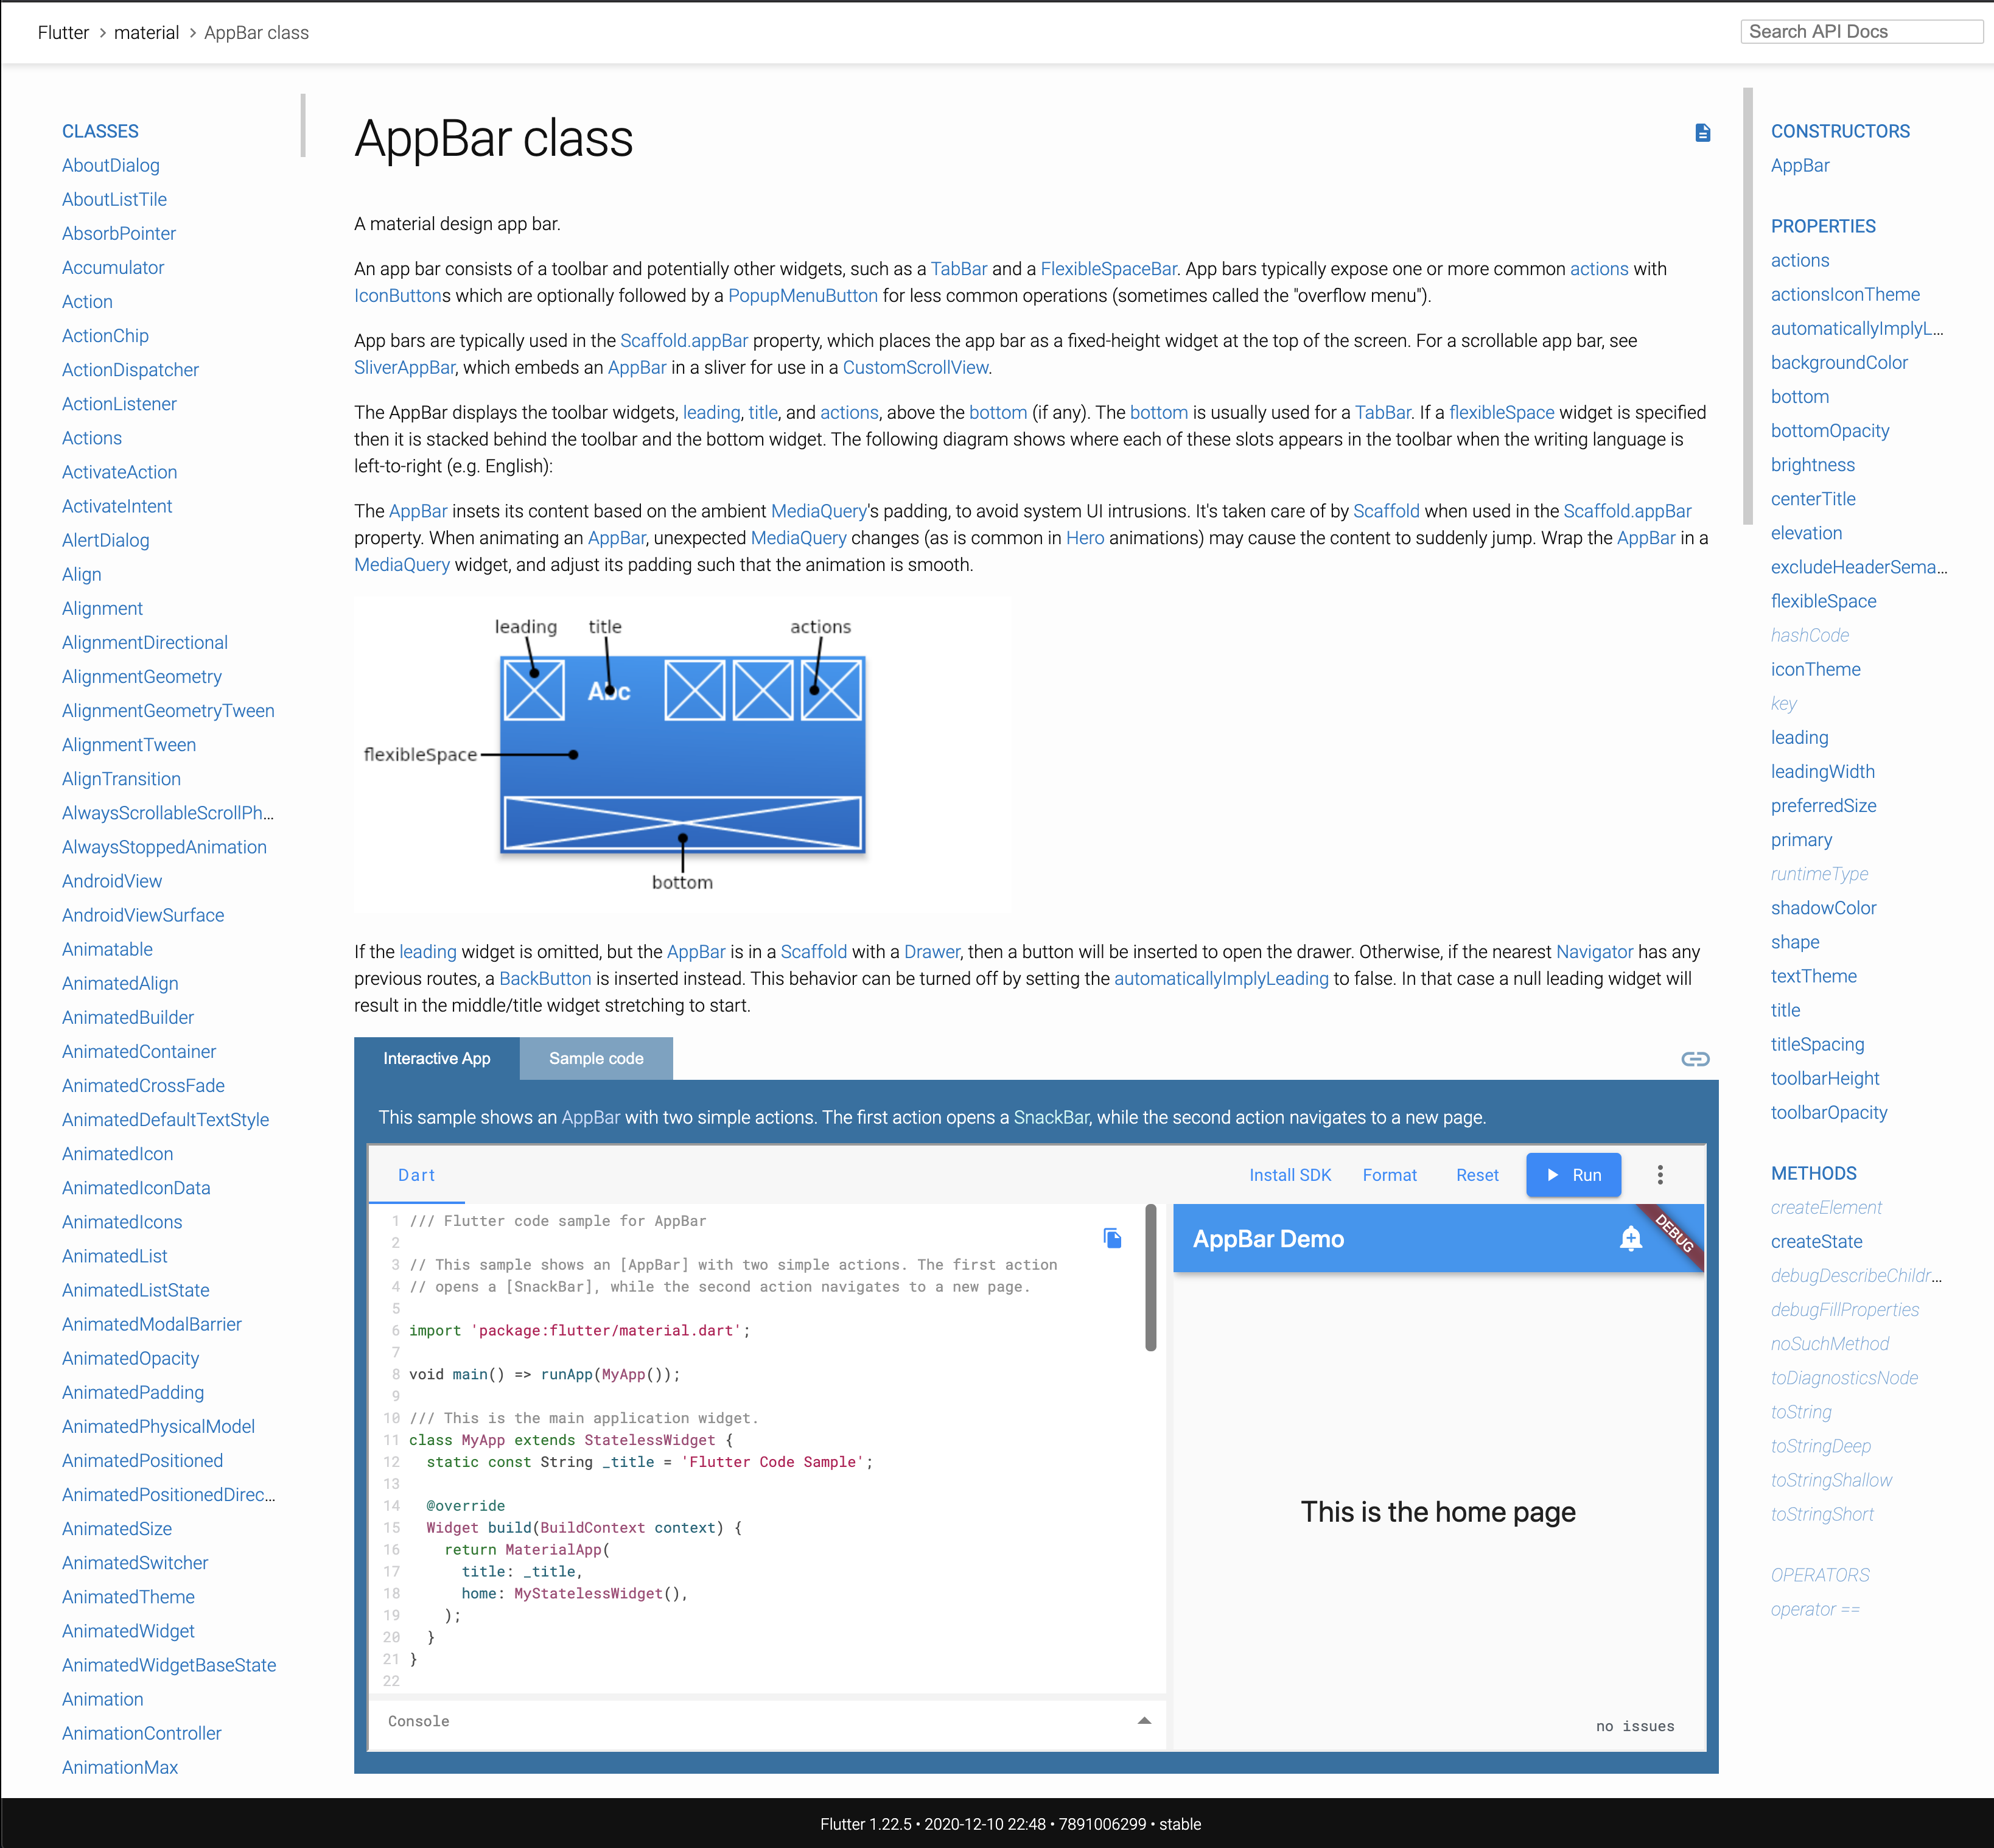
Flutterでは、Widgetという概念で、UIを構築します。
htmlやcssをあまり意識しないで、UIを構成することができます。公式サイトにマテリアルデザインのUIコンポーネントが部品として公開されていて
その部品はどの部分のものか、サンプルコードなどが準備されています。
プログラマは使用したい部品を探してサンプルコードをもとに
組み立て作業を行うだけでシンプルかつわかりやすいデザインのUIが構築できるんです!
もちろんホットリロードにも当たり前のように対応!デバッグモードであれば、簡単に設定して操作が可能です!
Flutter公式 ホットリロードについて豊富なライブラリ
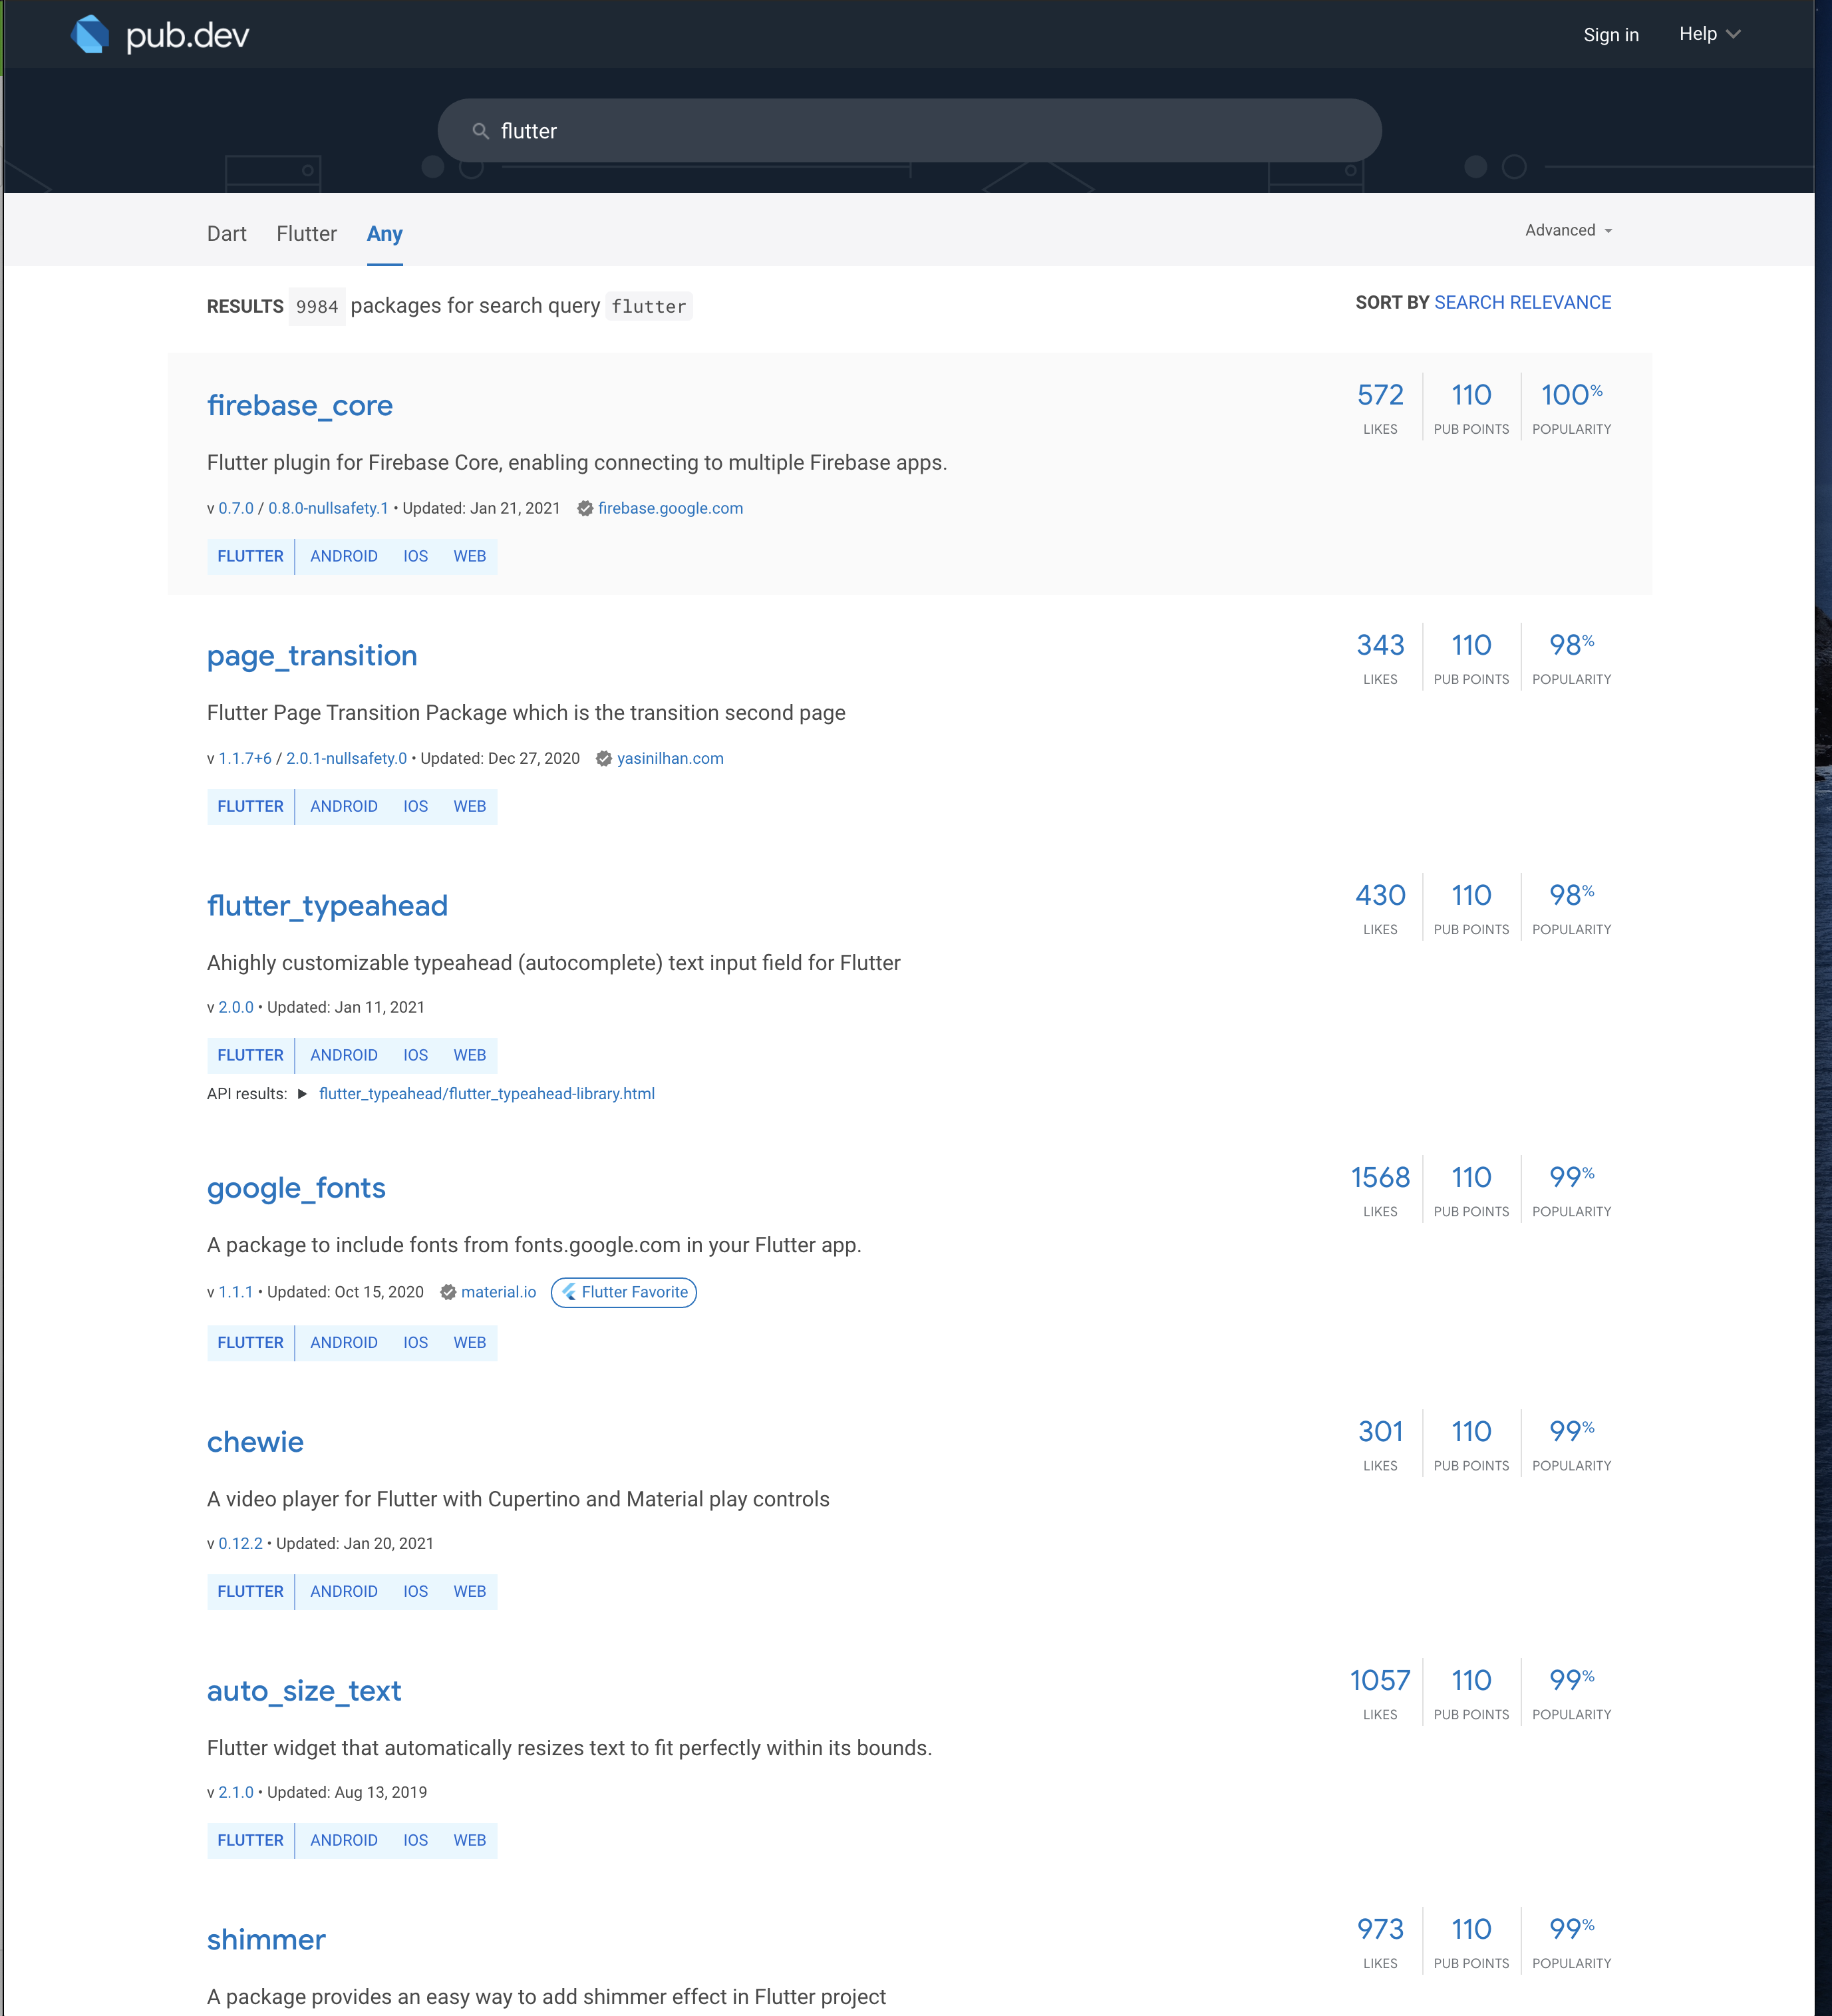
Flutterで開発してみて驚いたのが、ライブラリの豊富さ!
「加速度センサーはハードに依存するだろうから、ネイティブコード書かないといけないんだろうな〜」なんて思っていたのにあらびっくり!
ライブラリをインポートしてメソッド呼び出してすぐセンサ系の値の取得が可能でした!今はむしろどんな時にネイティブコードが必要なのか知りたくなってます(笑)
ご存知の方はそっと教えてください。実際に体験したい方へ
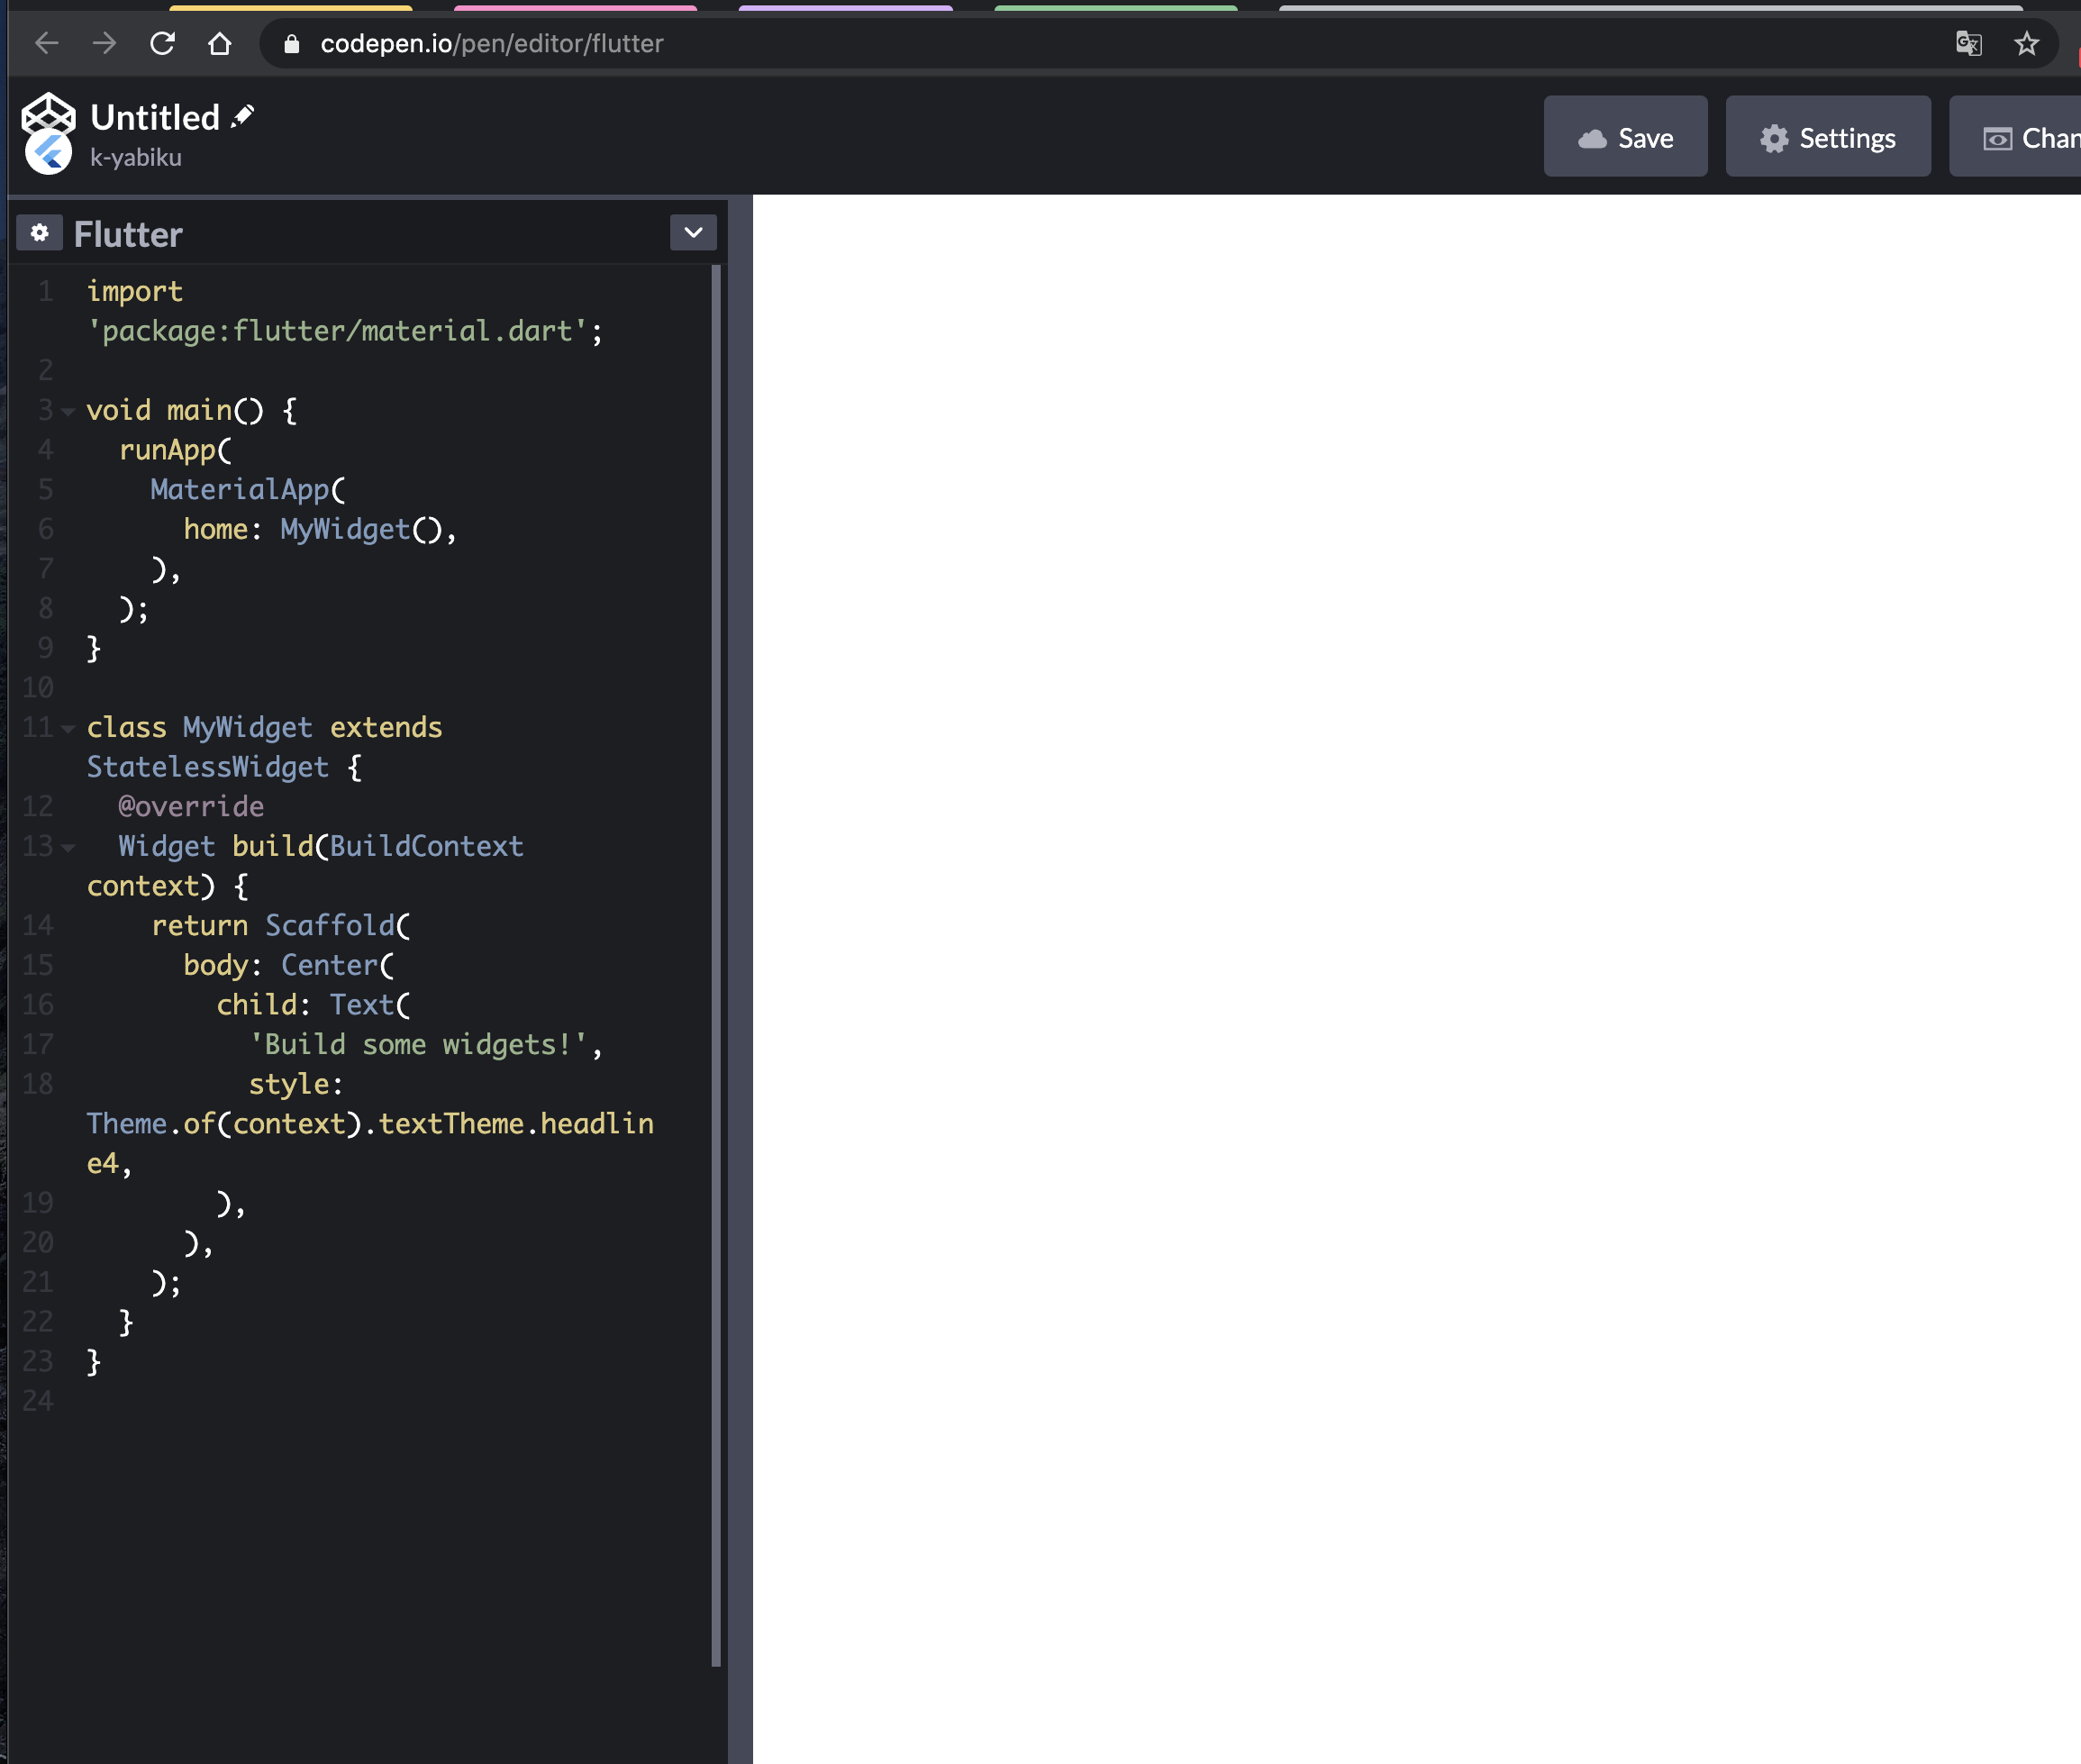
FlutterのWidgetとはなんぞやっていうのが手軽に確認できるツールも紹介しながら、CodePenのデフォルトソースはこんな感じです。
環境構築をすっ飛ばしてFlutterの雰囲気を確認可能なので、気になった方はお試しください。
FlutterのWidgetではhtmlやcssを直接書かずに、プログラムっぽく組み合わせて勝手にモダンなUIに変換してくれます!めちゃくちゃ作りやすいですね!
コードなんて書きたくない!デザインしたあと、ソースどんな感じなの?って思う方は以下のサービスでお試し!
Flutterの公式のかっちょいい動画があるので
時間がある方はぜひ見てみてください。作成できるUIイメージが具体的になると思います。チームメンバーの声と総評
最後に実際に開発に携わったメンバーからのコメントをご紹介します。
「フロントエンドの実装が苦手すぎて、作業すると眩暈がするんだけど、FlutterのWidgetは要素をしっかり指定して書いてあげれば勝手にいい感じのUI出来上がってて、めちゃくちゃ良かった!」
→Windowsアプリ開発経験多 H.Gさんフロントエンドが苦手な人でも綺麗なUIを簡単に構築できるというのはデザイナーやコーダーがいないチームにはメリットですね。
「htmlやcssに慣れている人は最初とっつきにくいかもしれないけど、理解すると扱いやすく感じた。UIが綺麗にまとまるのが良い」
→フロント6割:バックエンド4割経験者 T.Kさん逆にフロントエンドに慣れている人はWidgetの独特な書き方に慣れるまでは少し学習コストがかかるかもしれないです。
しかし、クロスプラットフォームアプリを構築する場合に、ソースの一元管理が可能なのは、それ以上のメリットもあると私は考えてます!
UI構築の際は、いろいろなツールを使って自動的にソースを生成したりするなど、工夫して利用すれば、工数削減や、デザインの統一などFlutterが提唱している恩恵をより受けることが可能だと思いますので興味のある方はぜひ調べてみてください!長くなりましたが、最後までお読みいただきありがとうございます。
1月中にさらに1本投稿予定なのでお楽しみに〜!参照記事/リンク
・Flutterを大好きになってしまうカラクリ
・Flutter公式サイト
・Flutterライブラリ集
・CodePen
・Flutter Studio
・Flutter公式Youtube
- 投稿日:2021-01-22T20:24:30+09:00
【Android / Java】双方向 DataBinding + Clickイベント サンプルアプリ
はじめに
実務案件で DataBinding を利用している。
なかなか難しい。そこで双方向 DataBinding を用いたサンプルアプリを作成しながら DataBinding について学んだ。※ 今回は Java ですが、 Kotlin でも同様のものを作成してみようと思っております。その時は改めて投稿します。
サンプルアプリの概要
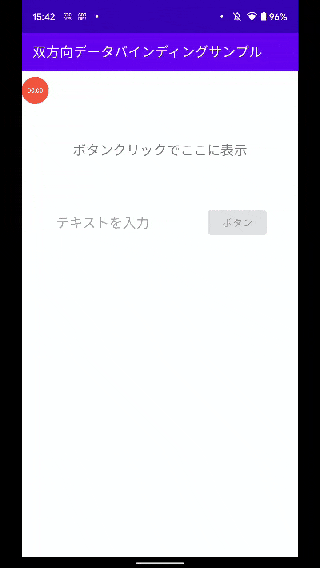
こんな感じのもの↓↓
無茶苦茶画質悪くてすみません。
実装していることとしては
- フォーム入力時
- 入力されたテキストをフォーム下部にリアルタイムで表示
- ボタンアクティブにする(テキストの有無で切り替え)
- ボタンクリック時
- フォーム入力テキストを上部に表示
- フォームおよび下部のテキストを空欄に戻す(初期化する)
開発環境
実装
DataBinding導入
build.gradleに記述を追加して DataBindingを利用できるようにする。app/build.gradleplugins { id 'com.android.application' } android { compileSdkVersion 30 buildToolsVersion "30.0.3" defaultConfig { applicationId "com.android.bidirectionaldatabindingsample" minSdkVersion 24 targetSdkVersion 30 versionCode 1 versionName "1.0" testInstrumentationRunner "androidx.test.runner.AndroidJUnitRunner" } buildTypes { release { minifyEnabled false proguardFiles getDefaultProguardFile('proguard-android-optimize.txt'), 'proguard-rules.pro' } } // ここに記述を追加 dataBinding { enabled = true } compileOptions { sourceCompatibility JavaVersion.VERSION_1_8 targetCompatibility JavaVersion.VERSION_1_8 } } dependencies { implementation 'androidx.appcompat:appcompat:1.2.0' implementation 'com.google.android.material:material:1.2.1' implementation 'androidx.constraintlayout:constraintlayout:2.0.4' testImplementation 'junit:junit:4.+' androidTestImplementation 'androidx.test.ext:junit:1.1.2' androidTestImplementation 'androidx.test.espresso:espresso-core:3.3.0' }レイアウト要素をセット
まずは各要素には DataBinding の記述無しの状態で xml にのレイアウトを作成。
※
<layout></layout>だけは先に記述。
このようにレイアウトのルート要素に<layout>でくくったレイアウトファイルがあると、自動的にxmlファイル名に応じたBindingクラスが作られる。
今回: activity_main.xml => ActivityMainBindingactivity_main.xml<?xml version="1.0" encoding="utf-8"?> <layout xmlns:android="http://schemas.android.com/apk/res/android" xmlns:app="http://schemas.android.com/apk/res-auto" > <androidx.constraintlayout.widget.ConstraintLayout android:layout_width="match_parent" android:layout_height="match_parent" > <TextView android:id="@+id/click_text" android:layout_width="wrap_content" android:layout_height="wrap_content" android:textSize="20dp" app:layout_constraintStart_toStartOf="parent" app:layout_constraintTop_toTopOf="parent" app:layout_constraintEnd_toEndOf="parent" app:layout_constraintBottom_toBottomOf="parent" app:layout_constraintVertical_bias="0.15" /> <EditText android:id="@+id/input_form" android:layout_width="184dp" android:layout_height="wrap_content" android:hint="テキストを入力" android:inputType="text" android:textSize="20dp" app:layout_constraintStart_toStartOf="parent" app:layout_constraintEnd_toStartOf="@id/button" app:layout_constraintTop_toTopOf="parent" app:layout_constraintBottom_toBottomOf="parent" app:layout_constraintVertical_bias="0.3" /> <Button android:id="@+id/button" android:layout_width="wrap_content" android:layout_height="wrap_content" android:text="ボタン" app:layout_constraintStart_toEndOf="@id/input_form" app:layout_constraintEnd_toEndOf="parent" app:layout_constraintBottom_toBottomOf="@id/input_form" /> <TextView android:id="@+id/realTimeText" android:layout_width="wrap_content" android:layout_height="wrap_content" android:textSize="20dp" app:layout_constraintStart_toStartOf="@id/input_form" app:layout_constraintTop_toBottomOf="@id/input_form" android:layout_marginTop="16dp" /> </androidx.constraintlayout.widget.ConstraintLayout> </layout>DataBinding のロジック定義をするViewModelを作成する
ViewModel.java// BaseObservableクラスを継承 public class ViewModel extends BaseObservable { // ここにロジックを書いていく }MainActivityでViewModelをバインドする(紐づける)
MainActivity.javapublic class MainActivity extends AppCompatActivity { @Override protected void onCreate(Bundle savedInstanceState) { super.onCreate(savedInstanceState); setContentView(R.layout.activity_main); setTitle("双方向データバインディングサンプル"); // Bindingインスタンスを生成 ActivityMainBinding binding = DataBindingUtil.setContentView(this, R.layout.activity_main); // ViewModelオブジェクトとバインドする(紐付ける) ViewModel viewModel = new ViewModel(); binding.setViewModel(viewModel); } }レイアウトファイルでViewModelオブジェクトを利用できるようにする
レイアウトファイルに記述を追加
activity_main.xml<?xml version="1.0" encoding="utf-8"?> <layout xmlns:android="http://schemas.android.com/apk/res/android" xmlns:app="http://schemas.android.com/apk/res-auto" > <data> <!-- viewModelという名前でViewModelオブジェクトを登録 --> <variable name="viewModel" type="com.android.bidirectionaldatabindingsample.ViewModel" /> </data> <!-- ・・・ 省略 ・・・ -->準備が整ったのでこれから機能を実装していく。
フォーム入力でボタンアクティブにする
ViewModel
以下を記述
formTextgetFormText()setFormtext()isButtonEnable()ViewModel.javapublic class ViewModel extends BaseObservable { // 代入せずにnullでも良いが今回は "" を初期値とする。 private String formText = ""; // フォーム(EditText)の入力値の getter @Bindable public String getFormText() { return formText; } // フォーム(EditText)の入力値の setter public void setFormText(String formText) { this.formText = formText; // この記述でisButtonEnable()が呼ばれる notifyPropertyChanged(BR.buttonEnable); } // フォーム(EditText)へのテキスト入力有無で、ボタン活性・非活性を制御するフラグの getter @Bindable public boolean isButtonEnable() { // 入力あり:true 入力なし:false return !TextUtils.isEmpty(formText); } }レイアウト
以下を記述
- フォーム要素に
android:text="@={viewModel.formText}"- ボタン要素に
android:enabled="@{viewModel.buttonEnable}"activity_main.xml<!-- ・・・ 省略 ・・・ --> <!-- 「@={}」で双方向のバインディング --> <!-- ViewModelの getFormText() と setFormText() に対応 --> <EditText android:id="@+id/input_form" android:layout_width="184dp" android:layout_height="wrap_content" android:hint="テキストを入力" android:inputType="text" android:text="@={viewModel.formText}" ←ここを追加 app:layout_constraintStart_toStartOf="parent" app:layout_constraintEnd_toStartOf="@id/button" app:layout_constraintTop_toTopOf="parent" app:layout_constraintBottom_toBottomOf="parent" app:layout_constraintVertical_bias="0.3" /> <!-- ViewModelの isButtonEnable に対応 --> <Button android:id="@+id/button" android:layout_width="wrap_content" android:layout_height="wrap_content" android:text="ボタン" android:enabled="@{viewModel.buttonEnable}" ←ここを追加 app:layout_constraintStart_toEndOf="@id/input_form" app:layout_constraintEnd_toEndOf="parent" app:layout_constraintBottom_toBottomOf="@id/input_form" /> <!-- ・・・ 省略 ・・・ -->処理の流れ
- View側でフォームの値を変更(入力または削除)したときに
ViewModelのsetFormText()が呼ばれる。- このタイミング(
formTextが変更されたタイミング)でnotifyPropertyChanged(BR.buttonEnable)によりisButtonEnable()を呼ぶ。isButtonEnable()でformTextの値があるかどうかによりbooleanを返す- View側
android:enabled="@{viewModel.buttonEnable}"にbooleanが入ってくることによりボタンの活性非活性が反映されるポイント
@={viewModel.formText}により双方向データバインディングが実現される。つまりView側でフォームの値を変更(入力または削除)したときにViewModelのsetFormText()が呼ばれるようになる。
@=ではなく@だと一方向のデータバインディングとなり、フォーム入力内容の変更が検知されずsetFormText()が呼ばれないため注意。フォーム入力内容をリアルタイム表示させる
ViewModel
以下を追加
setFormText()内にnotifyPropertyChanged(BR.realTimeText);getRealTimeText()ViewModel.javapublic class ViewModel extends BaseObservable { // 代入せずにnullでも良いが今回は "" を初期値とする。 private String formText = ""; // フォーム(EditText)の入力値の getter @Bindable public String getFormText() { return formText; } // フォーム(EditText)の入力値の setter public void setFormText(String formText) { this.formText = formText; // この記述でgetRealTimeText()が呼ばれる notifyPropertyChanged(BR.realTimeText); // この記述でisButtonEnable()が呼ばれる notifyPropertyChanged(BR.buttonEnable); } // フォーム(EditText)下にリアルタイムで表示するテキスト(TextView)の getter @Bindable public String getRealTimeText() { // フォーム入力されているテキストを代入して返す String realTimeText = formText; return realTimeText; } // フォーム(EditText)へのテキスト入力有無で、ボタン活性・非活性を制御するフラグの getter @Bindable public boolean isButtonEnable() { // 入力あり:true 入力なし:false return !TextUtils.isEmpty(formText); } }レイアウト
フォーム入力の内容をリアルタイムで表示したいTextViewに
android:text="@{viewModel.realTimeText}"を記述activity_main.xml<!-- 一部抜粋して記述 --> <!-- ViewModelのgetRealTimeText()に対応 --> <TextView android:id="@+id/realTimeText" android:layout_width="wrap_content" android:layout_height="wrap_content" android:text="@{viewModel.realTimeText}" ←ここを追加 android:textSize="20dp" app:layout_constraintStart_toStartOf="@id/input_form" app:layout_constraintTop_toBottomOf="@id/input_form" android:layout_marginTop="16dp" />処理の流れ
- フォーム入力内容の変更で
setFormText()内のnotifyPropertyChanged(BR.realTimeText);によりgetRealTimeText()が呼ばれる。getRealTimeText()の返り値がレイアウトのandroid:text="@{viewModel.realTimeText}"`に取得され表示される。ポイント
notifyPropertyChanged(BR.~)によりプロパティの変更を通知できる。
getterに@Bindableを付与する。そうすることでモジュールパッケージ内のBRクラスにデータバインディングで使用するリソースIDを持つ監視変数が作成されるため、このような記述が可能になる。詳しくはこちらを参照
BRクラスへ監視変数作成例
以下二つを記述
@Bindable public String getFormText()@Bindable public boolean isButtonEnable()BR.javapublic class BR { public static final int formText = 1; public static final int buttonEnable = 2; }ボタンクリックで テキスト表示+フォーム初期化 をさせる
ViewModel
以下を追加
- 変数
clickTextgetClickText()onButtonClick()ViewModel.javapublic class ViewModel extends BaseObservable { // 代入せずにnullでも良いが今回は "" を初期値とする。 private String formText = ""; // 初期値をセット private String clickText = "ボタンクリックでここに表示"; // フォーム(EditText)の入力値の getter @Bindable public String getFormText() { return formText; } // ボタンクリック時に表示するテキスト(TextView)の getter @Bindable public String getClickText() { return clickText; } // フォーム(EditText)の入力値の setter public void setFormText(String formText) { this.formText = formText; // この記述でgetRealTimeText()が呼ばれる notifyPropertyChanged(BR.realTimeText); // この記述でisButtonEnable()が呼ばれる notifyPropertyChanged(BR.buttonEnable); } // フォーム(EditText)下にリアルタイムで表示するテキスト(TextView)の getter @Bindable public String getRealTimeText() { // フォーム入力されているテキストを代入して返す String realTimeText = formText; return realTimeText; } // フォーム(EditText)へのテキスト入力有無で、ボタン活性・非活性を制御するフラグの getter @Bindable public boolean isButtonEnable() { // 入力あり:true 入力なし:false return !TextUtils.isEmpty(formText); } // ボタンクリックイベント public void onButtonClick() { // clickTextにフォーム入力テキストにセット clickText = formText; // formTextは初期化 formText = ""; // 変更を通知する // この記述でgetClickText()が呼ばれる notifyPropertyChanged(BR.clickText); // この記述でgetFormText()が呼ばれる notifyPropertyChanged(BR.formText); } }レイアウト
以下を追加
- ボタンクリック時表示したいテキストに
android:text="@{viewModel.clickText}"- ボタンに
android:onClick="@{() -> viewModel.onButtonClick()}"activity_main.xml<!-- クリック時表示テキストを抜粋 --> <!-- ViewModelのgetClickText()に対応 --> <TextView android:id="@+id/click_text" android:layout_width="wrap_content" android:layout_height="wrap_content" android:textSize="20dp" android:text="@{viewModel.clickText}" ←ここを追加 app:layout_constraintStart_toStartOf="parent" app:layout_constraintTop_toTopOf="parent" app:layout_constraintEnd_toEndOf="parent" app:layout_constraintBottom_toBottomOf="parent" app:layout_constraintVertical_bias="0.15" /> <!-- ボタン部分を抜粋 --> <!-- ViewModelのonButtonClick()に対応 --> <Button android:id="@+id/button" android:layout_width="wrap_content" android:layout_height="wrap_content" android:text="ボタン" android:enabled="@{viewModel.buttonEnable}" android:onClick="@{() -> viewModel.onButtonClick()}" ←ここを追加 app:layout_constraintStart_toEndOf="@id/input_form" app:layout_constraintEnd_toEndOf="parent" app:layout_constraintBottom_toBottomOf="@id/input_form" />ポイント
ボタンクリックしたときの処理の流れ
onButtonClick()が呼ばれるclickTextにそのときのフォーム入力内容を代入formTextに""を代入して初期化notifyPropertyChanged(BR.clickText/formText)でそれぞれの変数の変更をView側に通知getClickText()とgetRealTimeText()が呼ばれ、 View側に変数の値が反映される補足
Viewが描画される?(アクティビティとバインディングされる?)タイミングでも全ての
getterが呼ばれていた。それによりView側に変数の値が反映される。参考
https://developer.android.com/topic/libraries/data-binding/observability?hl=ja
最後に
わかりやすく書こうと頑張ってかきました。しかし、かえって冗長でわかりにくくなってしまっていたらすみません。
ご指摘やこうした方が良いなどなどありましたら気軽にコメントいただければ嬉しいです!DataBinding やっと慣れてきたかも...
冒頭にも記載しましたが、Kotlin でも同様のサンプルを作成しようと思っております。
- 投稿日:2021-01-22T20:24:30+09:00
【Android / Java】双方向 DataBinding + Clickイベント サンプル
はじめに
実務案件で DataBinding を利用している。
なかなか難しい。そこで双方向 DataBinding を用いたサンプルアプリを作成しながら DataBinding について学んだ。※ 今回は Java ですが、 Kotlin でも同様のものを作成してみようと思っております。その時は改めて投稿します。
サンプルアプリの概要
こんな感じのもの↓↓
無茶苦茶画質悪くてすみません。
実装していることとしては
- フォーム入力時
- 入力されたテキストをフォーム下部にリアルタイムで表示
- ボタンアクティブにする(テキストの有無で切り替え)
- ボタンクリック時
- フォーム入力テキストを上部に表示
- フォームおよび下部のテキストを空欄に戻す(初期化する)
開発環境
実装
DataBinding導入
build.gradleに記述を追加して DataBindingを利用できるようにする。app/build.gradleplugins { id 'com.android.application' } android { compileSdkVersion 30 buildToolsVersion "30.0.3" defaultConfig { applicationId "com.android.bidirectionaldatabindingsample" minSdkVersion 24 targetSdkVersion 30 versionCode 1 versionName "1.0" testInstrumentationRunner "androidx.test.runner.AndroidJUnitRunner" } buildTypes { release { minifyEnabled false proguardFiles getDefaultProguardFile('proguard-android-optimize.txt'), 'proguard-rules.pro' } } // ここに記述を追加 dataBinding { enabled = true } compileOptions { sourceCompatibility JavaVersion.VERSION_1_8 targetCompatibility JavaVersion.VERSION_1_8 } } dependencies { implementation 'androidx.appcompat:appcompat:1.2.0' implementation 'com.google.android.material:material:1.2.1' implementation 'androidx.constraintlayout:constraintlayout:2.0.4' testImplementation 'junit:junit:4.+' androidTestImplementation 'androidx.test.ext:junit:1.1.2' androidTestImplementation 'androidx.test.espresso:espresso-core:3.3.0' }レイアウト要素をセット
まずは各要素には DataBinding の記述無しの状態で xml にのレイアウトを作成。
※
<layout></layout>だけは先に記述。
このようにレイアウトのルート要素に<layout>でくくったレイアウトファイルがあると、自動的にxmlファイル名に応じたBindingクラスが作られる。
今回: activity_main.xml => ActivityMainBindingactivity_main.xml<?xml version="1.0" encoding="utf-8"?> <layout xmlns:android="http://schemas.android.com/apk/res/android" xmlns:app="http://schemas.android.com/apk/res-auto" > <androidx.constraintlayout.widget.ConstraintLayout android:layout_width="match_parent" android:layout_height="match_parent" > <TextView android:id="@+id/click_text" android:layout_width="wrap_content" android:layout_height="wrap_content" android:textSize="20dp" app:layout_constraintStart_toStartOf="parent" app:layout_constraintTop_toTopOf="parent" app:layout_constraintEnd_toEndOf="parent" app:layout_constraintBottom_toBottomOf="parent" app:layout_constraintVertical_bias="0.15" /> <EditText android:id="@+id/input_form" android:layout_width="184dp" android:layout_height="wrap_content" android:hint="テキストを入力" android:inputType="text" android:textSize="20dp" app:layout_constraintStart_toStartOf="parent" app:layout_constraintEnd_toStartOf="@id/button" app:layout_constraintTop_toTopOf="parent" app:layout_constraintBottom_toBottomOf="parent" app:layout_constraintVertical_bias="0.3" /> <Button android:id="@+id/button" android:layout_width="wrap_content" android:layout_height="wrap_content" android:text="ボタン" app:layout_constraintStart_toEndOf="@id/input_form" app:layout_constraintEnd_toEndOf="parent" app:layout_constraintBottom_toBottomOf="@id/input_form" /> <TextView android:id="@+id/realTimeText" android:layout_width="wrap_content" android:layout_height="wrap_content" android:textSize="20dp" app:layout_constraintStart_toStartOf="@id/input_form" app:layout_constraintTop_toBottomOf="@id/input_form" android:layout_marginTop="16dp" /> </androidx.constraintlayout.widget.ConstraintLayout> </layout>DataBinding のロジック定義をするViewModelを作成する
ViewModel.java// BaseObservableクラスを継承 public class ViewModel extends BaseObservable { // ここにロジックを書いていく }MainActivityでViewModelをバインドする(紐づける)
MainActivity.javapublic class MainActivity extends AppCompatActivity { @Override protected void onCreate(Bundle savedInstanceState) { super.onCreate(savedInstanceState); setContentView(R.layout.activity_main); setTitle("双方向データバインディングサンプル"); // Bindingインスタンスを生成 ActivityMainBinding binding = DataBindingUtil.setContentView(this, R.layout.activity_main); // ViewModelオブジェクトとバインドする(紐付ける) ViewModel viewModel = new ViewModel(); binding.setViewModel(viewModel); } }レイアウトファイルでViewModelオブジェクトを利用できるようにする
レイアウトファイルに記述を追加
activity_main.xml<?xml version="1.0" encoding="utf-8"?> <layout xmlns:android="http://schemas.android.com/apk/res/android" xmlns:app="http://schemas.android.com/apk/res-auto" > <data> <!-- viewModelという名前でViewModelオブジェクトを登録 --> <variable name="viewModel" type="com.android.bidirectionaldatabindingsample.ViewModel" /> </data> <!-- ・・・ 省略 ・・・ -->準備が整ったのでこれから機能を実装していく。
フォーム入力でボタンアクティブにする
ViewModel
以下を記述
formTextgetFormText()setFormtext()isButtonEnable()ViewModel.javapublic class ViewModel extends BaseObservable { // 代入せずにnullでも良いが今回は "" を初期値とする。 private String formText = ""; // フォーム(EditText)の入力値の getter @Bindable public String getFormText() { return formText; } // フォーム(EditText)の入力値の setter public void setFormText(String formText) { this.formText = formText; // この記述でisButtonEnable()が呼ばれる notifyPropertyChanged(BR.buttonEnable); } // フォーム(EditText)へのテキスト入力有無で、ボタン活性・非活性を制御するフラグの getter @Bindable public boolean isButtonEnable() { // 入力あり:true 入力なし:false return !TextUtils.isEmpty(formText); } }レイアウト
以下を記述
- フォーム要素に
android:text="@={viewModel.formText}"- ボタン要素に
android:enabled="@{viewModel.buttonEnable}"activity_main.xml<!-- ・・・ 省略 ・・・ --> <!-- 「@={}」で双方向のバインディング --> <!-- ViewModelの getFormText() と setFormText() に対応 --> <EditText android:id="@+id/input_form" android:layout_width="184dp" android:layout_height="wrap_content" android:hint="テキストを入力" android:inputType="text" android:text="@={viewModel.formText}" ←ここを追加 app:layout_constraintStart_toStartOf="parent" app:layout_constraintEnd_toStartOf="@id/button" app:layout_constraintTop_toTopOf="parent" app:layout_constraintBottom_toBottomOf="parent" app:layout_constraintVertical_bias="0.3" /> <!-- ViewModelの isButtonEnable に対応 --> <Button android:id="@+id/button" android:layout_width="wrap_content" android:layout_height="wrap_content" android:text="ボタン" android:enabled="@{viewModel.buttonEnable}" ←ここを追加 app:layout_constraintStart_toEndOf="@id/input_form" app:layout_constraintEnd_toEndOf="parent" app:layout_constraintBottom_toBottomOf="@id/input_form" /> <!-- ・・・ 省略 ・・・ -->処理の流れ
- View側でフォームの値を変更(入力または削除)したときに
ViewModelのsetFormText()が呼ばれる。- このタイミング(
formTextが変更されたタイミング)でnotifyPropertyChanged(BR.buttonEnable)によりisButtonEnable()を呼ぶ。isButtonEnable()でformTextの値があるかどうかによりbooleanを返す- View側
android:enabled="@{viewModel.buttonEnable}"にbooleanが入ってくることによりボタンの活性非活性が反映されるポイント
@={viewModel.formText}により双方向データバインディングが実現される。つまりView側でフォームの値を変更(入力または削除)したときにViewModelのsetFormText()が呼ばれるようになる。
@=ではなく@だと一方向のデータバインディングとなり、フォーム入力内容の変更が検知されずsetFormText()が呼ばれないため注意。フォーム入力内容をリアルタイム表示させる
ViewModel
以下を追加
setFormText()内にnotifyPropertyChanged(BR.realTimeText);getRealTimeText()ViewModel.javapublic class ViewModel extends BaseObservable { // 代入せずにnullでも良いが今回は "" を初期値とする。 private String formText = ""; // フォーム(EditText)の入力値の getter @Bindable public String getFormText() { return formText; } // フォーム(EditText)の入力値の setter public void setFormText(String formText) { this.formText = formText; // この記述でgetRealTimeText()が呼ばれる notifyPropertyChanged(BR.realTimeText); // この記述でisButtonEnable()が呼ばれる notifyPropertyChanged(BR.buttonEnable); } // フォーム(EditText)下にリアルタイムで表示するテキスト(TextView)の getter @Bindable public String getRealTimeText() { // フォーム入力されているテキストを代入して返す String realTimeText = formText; return realTimeText; } // フォーム(EditText)へのテキスト入力有無で、ボタン活性・非活性を制御するフラグの getter @Bindable public boolean isButtonEnable() { // 入力あり:true 入力なし:false return !TextUtils.isEmpty(formText); } }レイアウト
フォーム入力の内容をリアルタイムで表示したいTextViewに
android:text="@{viewModel.realTimeText}"を記述activity_main.xml<!-- 一部抜粋して記述 --> <!-- ViewModelのgetRealTimeText()に対応 --> <TextView android:id="@+id/realTimeText" android:layout_width="wrap_content" android:layout_height="wrap_content" android:text="@{viewModel.realTimeText}" ←ここを追加 android:textSize="20dp" app:layout_constraintStart_toStartOf="@id/input_form" app:layout_constraintTop_toBottomOf="@id/input_form" android:layout_marginTop="16dp" />処理の流れ
- フォーム入力内容の変更で
setFormText()内のnotifyPropertyChanged(BR.realTimeText);によりgetRealTimeText()が呼ばれる。getRealTimeText()の返り値がレイアウトのandroid:text="@{viewModel.realTimeText}"`に取得され表示される。ポイント
notifyPropertyChanged(BR.~)によりプロパティの変更を通知できる。
getterに@Bindableを付与する。そうすることでモジュールパッケージ内のBRクラスにデータバインディングで使用するリソースIDを持つ監視変数が作成されるため、このような記述が可能になる。詳しくはこちらを参照
BRクラスへ監視変数作成例
以下二つを記述
@Bindable public String getFormText()@Bindable public boolean isButtonEnable()BR.javapublic class BR { public static final int formText = 1; public static final int buttonEnable = 2; }ボタンクリックで テキスト表示+フォーム初期化 をさせる
ViewModel
以下を追加
- 変数
clickTextgetClickText()onButtonClick()ViewModel.javapublic class ViewModel extends BaseObservable { // 代入せずにnullでも良いが今回は "" を初期値とする。 private String formText = ""; // 初期値をセット private String clickText = "ボタンクリックでここに表示"; // フォーム(EditText)の入力値の getter @Bindable public String getFormText() { return formText; } // ボタンクリック時に表示するテキスト(TextView)の getter @Bindable public String getClickText() { return clickText; } // フォーム(EditText)の入力値の setter public void setFormText(String formText) { this.formText = formText; // この記述でgetRealTimeText()が呼ばれる notifyPropertyChanged(BR.realTimeText); // この記述でisButtonEnable()が呼ばれる notifyPropertyChanged(BR.buttonEnable); } // フォーム(EditText)下にリアルタイムで表示するテキスト(TextView)の getter @Bindable public String getRealTimeText() { // フォーム入力されているテキストを代入して返す String realTimeText = formText; return realTimeText; } // フォーム(EditText)へのテキスト入力有無で、ボタン活性・非活性を制御するフラグの getter @Bindable public boolean isButtonEnable() { // 入力あり:true 入力なし:false return !TextUtils.isEmpty(formText); } // ボタンクリックイベント public void onButtonClick() { // clickTextにフォーム入力テキストにセット clickText = formText; // formTextは初期化 formText = ""; // 変更を通知する // この記述でgetClickText()が呼ばれる notifyPropertyChanged(BR.clickText); // この記述でgetFormText()が呼ばれる notifyPropertyChanged(BR.formText); } }レイアウト
以下を追加
- ボタンクリック時表示したいテキストに
android:text="@{viewModel.clickText}"- ボタンに
android:onClick="@{() -> viewModel.onButtonClick()}"activity_main.xml<!-- クリック時表示テキストを抜粋 --> <!-- ViewModelのgetClickText()に対応 --> <TextView android:id="@+id/click_text" android:layout_width="wrap_content" android:layout_height="wrap_content" android:textSize="20dp" android:text="@{viewModel.clickText}" ←ここを追加 app:layout_constraintStart_toStartOf="parent" app:layout_constraintTop_toTopOf="parent" app:layout_constraintEnd_toEndOf="parent" app:layout_constraintBottom_toBottomOf="parent" app:layout_constraintVertical_bias="0.15" /> <!-- ボタン部分を抜粋 --> <!-- ViewModelのonButtonClick()に対応 --> <Button android:id="@+id/button" android:layout_width="wrap_content" android:layout_height="wrap_content" android:text="ボタン" android:enabled="@{viewModel.buttonEnable}" android:onClick="@{() -> viewModel.onButtonClick()}" ←ここを追加 app:layout_constraintStart_toEndOf="@id/input_form" app:layout_constraintEnd_toEndOf="parent" app:layout_constraintBottom_toBottomOf="@id/input_form" />ポイント
ボタンクリックしたときの処理の流れ
onButtonClick()が呼ばれるclickTextにそのときのフォーム入力内容を代入formTextに""を代入して初期化notifyPropertyChanged(BR.clickText/formText)でそれぞれの変数の変更をView側に通知getClickText()とgetRealTimeText()が呼ばれ、 View側に変数の値が反映される補足
Viewが描画される?(アクティビティとバインディングされる?)タイミングでも全ての
getterが呼ばれていた。それによりView側に変数の値が反映される。参考
https://developer.android.com/topic/libraries/data-binding/observability?hl=ja
最後に
わかりやすく書こうと頑張ってかきました。しかし、かえって冗長でわかりにくくなってしまっていたらすみません。
ご指摘やこうした方が良いなどなどありましたら気軽にコメントいただければ嬉しいです!DataBinding やっと慣れてきたかも...
冒頭にも記載しましたが、Kotlin でも同様のサンプルを作成しようと思っております。
- 投稿日:2021-01-22T20:24:30+09:00
【Android / Java】双方向 DataBinding + Clickイベント / サンプルアプリ実装
はじめに
実務案件で DataBinding を利用している。
なかなか難しい。そこで双方向 DataBinding を用いたサンプルアプリを作成しながら DataBinding について学んだ。※ 今回は Java ですが、
Kotlin でも同様のものを作成してみようと思っております。その時は改めて投稿します。
Kotlin バージョンも作成して記事にしましたのでご覧いただければ幸いです!!↓↓
【Android / Kotlin】双方向 DataBinding + Clickイベント / サンプルアプリ実装双方向データバインディングとは(一方向との違い)
- 一方行データバインディング
- ViewModel などの中でデータを変更 → View に反映
- 双方向データバインディング
- ViewModel などの中でデータを変更 → View に反映
- ユーザが View でデータを変更 → ViewModel にデータの変更が反映(通知)
一方向が ViewModel などのロジックファイルから View 側への通知だけであるのに対し、
双方向ではユーザがアプリのフォームなどに値を入力したときなどに、ロジックファイルの方にも値の入力(変更)が通知される。と言うものである。なお一方向データバインディングについてはこちらで記事にしております。
※ ここで説明している ViewModel とはデータバインディングのロジックを定義してあるファイルのことを指しています。
サンプルアプリの概要
こんな感じのもの↓↓
無茶苦茶画質悪くてすみません。
実装していることとしては
- フォーム入力時
- 入力されたテキストをフォーム下部にリアルタイムで表示
- ボタンアクティブにする(テキストの有無で切り替え)
- ボタンクリック時
- フォーム入力テキストを上部に表示
- フォームおよび下部のテキストを空欄に戻す(初期化する)
開発環境
- Android Studio: 4.1.1
- Build #AI-201.8743.12.41.6953283, built on November 5, 2020
- Runtime version: 1.8.0_242-release-1644-b3-6915495 x86_64
- VM: OpenJDK 64-Bit Server VM by JetBrains s.r.o
- macOS: 10.15.7
実装
DataBinding導入
build.gradleに記述を追加して DataBindingを利用できるようにする。app/build.gradleplugins { id 'com.android.application' } android { compileSdkVersion 30 buildToolsVersion "30.0.3" defaultConfig { applicationId "com.android.bidirectionaldatabindingsample" minSdkVersion 24 targetSdkVersion 30 versionCode 1 versionName "1.0" testInstrumentationRunner "androidx.test.runner.AndroidJUnitRunner" } buildTypes { release { minifyEnabled false proguardFiles getDefaultProguardFile('proguard-android-optimize.txt'), 'proguard-rules.pro' } } // ここに記述を追加 dataBinding { enabled = true } compileOptions { sourceCompatibility JavaVersion.VERSION_1_8 targetCompatibility JavaVersion.VERSION_1_8 } } dependencies { implementation 'androidx.appcompat:appcompat:1.2.0' implementation 'com.google.android.material:material:1.2.1' implementation 'androidx.constraintlayout:constraintlayout:2.0.4' testImplementation 'junit:junit:4.+' androidTestImplementation 'androidx.test.ext:junit:1.1.2' androidTestImplementation 'androidx.test.espresso:espresso-core:3.3.0' }レイアウト要素をセット
まずは各要素には DataBinding の記述無しの状態で xml にのレイアウトを作成。
※
<layout></layout>だけは先に記述。
このようにレイアウトのルート要素に<layout>でくくったレイアウトファイルがあると、自動的にxmlファイル名に応じたBindingクラスが作られる。
今回: activity_main.xml => ActivityMainBindingactivity_main.xml<?xml version="1.0" encoding="utf-8"?> <layout xmlns:android="http://schemas.android.com/apk/res/android" xmlns:app="http://schemas.android.com/apk/res-auto" > <androidx.constraintlayout.widget.ConstraintLayout android:layout_width="match_parent" android:layout_height="match_parent" > <TextView android:id="@+id/click_text" android:layout_width="wrap_content" android:layout_height="wrap_content" android:textSize="20dp" app:layout_constraintStart_toStartOf="parent" app:layout_constraintTop_toTopOf="parent" app:layout_constraintEnd_toEndOf="parent" app:layout_constraintBottom_toBottomOf="parent" app:layout_constraintVertical_bias="0.15" /> <EditText android:id="@+id/input_form" android:layout_width="184dp" android:layout_height="wrap_content" android:hint="テキストを入力" android:inputType="text" android:textSize="20dp" app:layout_constraintStart_toStartOf="parent" app:layout_constraintEnd_toStartOf="@id/button" app:layout_constraintTop_toTopOf="parent" app:layout_constraintBottom_toBottomOf="parent" app:layout_constraintVertical_bias="0.3" /> <Button android:id="@+id/button" android:layout_width="wrap_content" android:layout_height="wrap_content" android:text="ボタン" app:layout_constraintStart_toEndOf="@id/input_form" app:layout_constraintEnd_toEndOf="parent" app:layout_constraintBottom_toBottomOf="@id/input_form" /> <TextView android:id="@+id/realTimeText" android:layout_width="wrap_content" android:layout_height="wrap_content" android:textSize="20dp" app:layout_constraintStart_toStartOf="@id/input_form" app:layout_constraintTop_toBottomOf="@id/input_form" android:layout_marginTop="16dp" /> </androidx.constraintlayout.widget.ConstraintLayout> </layout>DataBinding のロジック定義をするViewModelを作成する
ViewModel.java// BaseObservableクラスを継承 public class ViewModel extends BaseObservable { // ここにロジックを書いていく }MainActivityでViewModelをバインドする(紐づける)
MainActivity.javapublic class MainActivity extends AppCompatActivity { @Override protected void onCreate(Bundle savedInstanceState) { super.onCreate(savedInstanceState); setContentView(R.layout.activity_main); setTitle("双方向データバインディングサンプル"); // Bindingインスタンスを生成 ActivityMainBinding binding = DataBindingUtil.setContentView(this, R.layout.activity_main); // ViewModelオブジェクトとバインドする(紐付ける) ViewModel viewModel = new ViewModel(); binding.setViewModel(viewModel); } }レイアウトファイルでViewModelオブジェクトを利用できるようにする
レイアウトファイルに記述を追加
activity_main.xml<?xml version="1.0" encoding="utf-8"?> <layout xmlns:android="http://schemas.android.com/apk/res/android" xmlns:app="http://schemas.android.com/apk/res-auto" > <data> <!-- viewModelという名前でViewModelオブジェクトを登録 --> <variable name="viewModel" type="com.android.bidirectionaldatabindingsample.ViewModel" /> </data> <!-- ・・・ 省略 ・・・ -->準備が整ったのでこれから機能を実装していく。
フォーム入力でボタンアクティブにする
ViewModel
以下を記述
formTextgetFormText()setFormtext()isButtonEnable()ViewModel.javapublic class ViewModel extends BaseObservable { // 代入せずにnullでも良いが今回は "" を初期値とする。 private String formText = ""; // フォーム(EditText)の入力値の getter @Bindable public String getFormText() { return formText; } // フォーム(EditText)の入力値の setter public void setFormText(String formText) { this.formText = formText; // この記述でisButtonEnable()が呼ばれる notifyPropertyChanged(BR.buttonEnable); } // フォーム(EditText)へのテキスト入力有無で、ボタン活性・非活性を制御するフラグの getter @Bindable public boolean isButtonEnable() { // 入力あり:true 入力なし:false return !TextUtils.isEmpty(formText); } }レイアウト
以下を記述
- フォーム要素に
android:text="@={viewModel.formText}"- ボタン要素に
android:enabled="@{viewModel.buttonEnable}"activity_main.xml<!-- ・・・ 省略 ・・・ --> <!-- 「@={}」で双方向のバインディング --> <!-- ViewModelの getFormText() と setFormText() に対応 --> <EditText android:id="@+id/input_form" android:layout_width="184dp" android:layout_height="wrap_content" android:hint="テキストを入力" android:inputType="text" android:text="@={viewModel.formText}" ←ここを追加 app:layout_constraintStart_toStartOf="parent" app:layout_constraintEnd_toStartOf="@id/button" app:layout_constraintTop_toTopOf="parent" app:layout_constraintBottom_toBottomOf="parent" app:layout_constraintVertical_bias="0.3" /> <!-- ViewModelの isButtonEnable に対応 --> <Button android:id="@+id/button" android:layout_width="wrap_content" android:layout_height="wrap_content" android:text="ボタン" android:enabled="@{viewModel.buttonEnable}" ←ここを追加 app:layout_constraintStart_toEndOf="@id/input_form" app:layout_constraintEnd_toEndOf="parent" app:layout_constraintBottom_toBottomOf="@id/input_form" /> <!-- ・・・ 省略 ・・・ -->処理の流れ
- View側でフォームの値を変更(入力または削除)したときに
ViewModelのsetFormText()が呼ばれる。- このタイミング(
formTextが変更されたタイミング)でnotifyPropertyChanged(BR.buttonEnable)によりisButtonEnable()を呼ぶ。isButtonEnable()でformTextの値があるかどうかによりbooleanを返す- View側
android:enabled="@{viewModel.buttonEnable}"にbooleanが入ってくることによりボタンの活性非活性が反映されるポイント
@={viewModel.formText}により双方向データバインディングが実現される。つまりView側でフォームの値を変更(入力または削除)したときにViewModelのsetFormText()が呼ばれるようになる。
@=ではなく@だと一方向のデータバインディングとなり、フォーム入力内容の変更が検知されずsetFormText()が呼ばれないため注意。フォーム入力内容をリアルタイム表示させる
ViewModel
以下を追加
setFormText()内にnotifyPropertyChanged(BR.realTimeText);getRealTimeText()ViewModel.javapublic class ViewModel extends BaseObservable { // 代入せずにnullでも良いが今回は "" を初期値とする。 private String formText = ""; // フォーム(EditText)の入力値の getter @Bindable public String getFormText() { return formText; } // フォーム(EditText)の入力値の setter public void setFormText(String formText) { this.formText = formText; // この記述でgetRealTimeText()が呼ばれる notifyPropertyChanged(BR.realTimeText); // この記述でisButtonEnable()が呼ばれる notifyPropertyChanged(BR.buttonEnable); } // フォーム(EditText)下にリアルタイムで表示するテキスト(TextView)の getter @Bindable public String getRealTimeText() { // フォーム入力されているテキストを代入して返す String realTimeText = formText; return realTimeText; } // フォーム(EditText)へのテキスト入力有無で、ボタン活性・非活性を制御するフラグの getter @Bindable public boolean isButtonEnable() { // 入力あり:true 入力なし:false return !TextUtils.isEmpty(formText); } }レイアウト
フォーム入力の内容をリアルタイムで表示したいTextViewに
android:text="@{viewModel.realTimeText}"を記述activity_main.xml<!-- 一部抜粋して記述 --> <!-- ViewModelのgetRealTimeText()に対応 --> <TextView android:id="@+id/realTimeText" android:layout_width="wrap_content" android:layout_height="wrap_content" android:text="@{viewModel.realTimeText}" ←ここを追加 android:textSize="20dp" app:layout_constraintStart_toStartOf="@id/input_form" app:layout_constraintTop_toBottomOf="@id/input_form" android:layout_marginTop="16dp" />処理の流れ
- フォーム入力内容の変更で
setFormText()内のnotifyPropertyChanged(BR.realTimeText);によりgetRealTimeText()が呼ばれる。getRealTimeText()の返り値がレイアウトのandroid:text="@{viewModel.realTimeText}"`に取得され表示される。ポイント
notifyPropertyChanged(BR.~)によりプロパティの変更を通知できる。
getterに@Bindableを付与する。そうすることでモジュールパッケージ内のBRクラスにデータバインディングで使用するリソースIDを持つ監視変数が作成されるため、このような記述が可能になる。詳しくはこちらを参照
BRクラスへ監視変数作成例
以下二つを記述
@Bindable public String getFormText()@Bindable public boolean isButtonEnable()BR.javapublic class BR { public static final int formText = 1; public static final int buttonEnable = 2; }ボタンクリックで テキスト表示+フォーム初期化 をさせる
ViewModel
以下を追加
- 変数
clickTextgetClickText()onButtonClick()ViewModel.javapublic class ViewModel extends BaseObservable { // 代入せずにnullでも良いが今回は "" を初期値とする。 private String formText = ""; // 初期値をセット private String clickText = "ボタンクリックでここに表示"; // フォーム(EditText)の入力値の getter @Bindable public String getFormText() { return formText; } // ボタンクリック時に表示するテキスト(TextView)の getter @Bindable public String getClickText() { return clickText; } // フォーム(EditText)の入力値の setter public void setFormText(String formText) { this.formText = formText; // この記述でgetRealTimeText()が呼ばれる notifyPropertyChanged(BR.realTimeText); // この記述でisButtonEnable()が呼ばれる notifyPropertyChanged(BR.buttonEnable); } // フォーム(EditText)下にリアルタイムで表示するテキスト(TextView)の getter @Bindable public String getRealTimeText() { // フォーム入力されているテキストを代入して返す String realTimeText = formText; return realTimeText; } // フォーム(EditText)へのテキスト入力有無で、ボタン活性・非活性を制御するフラグの getter @Bindable public boolean isButtonEnable() { // 入力あり:true 入力なし:false return !TextUtils.isEmpty(formText); } // ボタンクリックイベント public void onButtonClick() { // clickTextにフォーム入力テキストにセット clickText = formText; // formTextは初期化 formText = ""; // 変更を通知する // この記述でgetClickText()が呼ばれる notifyPropertyChanged(BR.clickText); // この記述でgetFormText()が呼ばれる notifyPropertyChanged(BR.formText); } }レイアウト
以下を追加
- ボタンクリック時表示したいテキストに
android:text="@{viewModel.clickText}"- ボタンに
android:onClick="@{() -> viewModel.onButtonClick()}"activity_main.xml<!-- クリック時表示テキストを抜粋 --> <!-- ViewModelのgetClickText()に対応 --> <TextView android:id="@+id/click_text" android:layout_width="wrap_content" android:layout_height="wrap_content" android:textSize="20dp" android:text="@{viewModel.clickText}" ←ここを追加 app:layout_constraintStart_toStartOf="parent" app:layout_constraintTop_toTopOf="parent" app:layout_constraintEnd_toEndOf="parent" app:layout_constraintBottom_toBottomOf="parent" app:layout_constraintVertical_bias="0.15" /> <!-- ボタン部分を抜粋 --> <!-- ViewModelのonButtonClick()に対応 --> <Button android:id="@+id/button" android:layout_width="wrap_content" android:layout_height="wrap_content" android:text="ボタン" android:enabled="@{viewModel.buttonEnable}" android:onClick="@{() -> viewModel.onButtonClick()}" ←ここを追加 app:layout_constraintStart_toEndOf="@id/input_form" app:layout_constraintEnd_toEndOf="parent" app:layout_constraintBottom_toBottomOf="@id/input_form" />ポイント
ボタンクリックしたときの処理の流れ
onButtonClick()が呼ばれるclickTextにそのときのフォーム入力内容を代入formTextに""を代入して初期化notifyPropertyChanged(BR.clickText/formText)でそれぞれの変数の変更をView側に通知getClickText()とgetRealTimeText()が呼ばれ、 View側に変数の値が反映される補足
Viewが描画される?(アクティビティとバインディングされる?)タイミングでも全ての
getterが呼ばれていた。それによりView側に変数の値が反映される。レイアウトファイル全体
activity_main.xml<?xml version="1.0" encoding="utf-8"?> <layout xmlns:android="http://schemas.android.com/apk/res/android" xmlns:app="http://schemas.android.com/apk/res-auto" > <!-- viewModelという名前でViewModelオブジェクトを登録 --> <data> <variable name="viewModel" type="com.android.bidirectionaldatabindingkotlin.ViewModel" /> </data> <androidx.constraintlayout.widget.ConstraintLayout android:layout_width="match_parent" android:layout_height="match_parent" > <TextView android:id="@+id/click_text" android:layout_width="wrap_content" android:layout_height="wrap_content" android:textSize="20dp" android:text="@{viewModel.clickText}" app:layout_constraintStart_toStartOf="parent" app:layout_constraintTop_toTopOf="parent" app:layout_constraintEnd_toEndOf="parent" app:layout_constraintBottom_toBottomOf="parent" app:layout_constraintVertical_bias="0.15" /> <EditText android:id="@+id/input_form" android:layout_width="184dp" android:layout_height="wrap_content" android:hint="テキストを入力" android:inputType="text" android:textSize="20dp" android:text="@={viewModel.formText}" app:layout_constraintStart_toStartOf="parent" app:layout_constraintEnd_toStartOf="@id/button" app:layout_constraintTop_toTopOf="parent" app:layout_constraintBottom_toBottomOf="parent" app:layout_constraintVertical_bias="0.3" /> <Button android:id="@+id/button" android:layout_width="wrap_content" android:layout_height="wrap_content" android:text="ボタン" android:enabled="@{viewModel.buttonEnable}" android:onClick="@{() -> viewModel.onButtonClick()}" app:layout_constraintStart_toEndOf="@id/input_form" app:layout_constraintEnd_toEndOf="parent" app:layout_constraintBottom_toBottomOf="@id/input_form" /> <TextView android:id="@+id/realTimeText" android:layout_width="wrap_content" android:layout_height="wrap_content" android:textSize="20dp" android:text="@{viewModel.realTimeText}" app:layout_constraintStart_toStartOf="@id/input_form" app:layout_constraintTop_toBottomOf="@id/input_form" android:layout_marginTop="16dp" /> </androidx.constraintlayout.widget.ConstraintLayout> </layout>参考
https://developer.android.com/topic/libraries/data-binding/observability?hl=ja
最後に
わかりやすく書こうと頑張ってかきました。しかし、かえって冗長でわかりにくくなってしまっていたらすみません。
ご指摘やこうした方が良いなどなどありましたら気軽にコメントいただければ嬉しいです!DataBinding やっと慣れてきたかも...
冒頭にも記載しましたが、
Kotlin でも同様のサンプルを作成しようと思っております。
Kotlin バージョンも作成して記事にしました!!よろしければ↓↓
【Android / Kotlin】双方向 DataBinding + Clickイベント / サンプルアプリ実装
- 投稿日:2021-01-22T20:07:41+09:00
【Android】ソフトウェアキーボードで悩むときにみる記事【EditText】
EditTextがソフトウェアキーボードで隠れるのを防ぎたい
これを使えば一発で解決するかもしれません!
android:windowSoftInputMode="adjustPan
android:windowSoftInputMode="adjustResize|stateAlwaysHidden"公式です
入力方法の表示の処理 | Android デベロッパー | Android Developersいい感じの記事です
EditTextに入力中の文字がソフトキーボードで隠れるのを防ぎたい | by Keisuke Kawajiri | URL Memo | Mediumオーバーフローでも同じようなことが書かれてます!
resize - android:windowSoftInputMode="stateAlwaysHidden|adjustPan" doesnt work on all devices - Stack Overflow検索時間が短縮できれば幸いです。
- 投稿日:2021-01-22T18:50:42+09:00
【Android】加速度センサーの情報を表示する方法
プログラミング勉強日記
2021年1月22日
加速度センサーの制度や種類、バージョンなどいろいろな情報を表示する方法を示す。Sensorクラス(センサーAPI)
Androidでは、センサーによって変換された電気信号を取得するためのセンサーAPIが提供されている。そのうちのSensorでは、各センサーに関する情報を管理する。Sensorクラスのメソッドを使って、各センサーに関する情報を取り出すことができる。
Sensorクラスのメソッド// センサーが検出できる最大値を取得するメソッド getMaximumRange() // センサーの名前を取得するメソッド getName() // センサーからの電気信号をmAで取得するメソッド getPower() // センサーの精度を取得するメソッド getResolution() // センサーの種類を取得するメソッド getType() // センサーのベンダー名を取得するメソッド getVendor() // センサーのバージョンを取得するメソッド getVersion()サンプルプログラム
MainActivity.javapackage sample; import android.app.Activity; import android.content.Context; import android.hardware.Sensor; import android.hardware.SensorEvent; import android.hardware.SensorEventListener; import android.hardware.SensorManager; import android.os.Bundle; import android.view.Menu; import android.view.MenuItem; import android.widget.TextView; import android.view.View; public class MainActivity extends Activity implements SensorEventListener { private TextView myText; private TextView textInfo; // SensorManagerインスタンス private SensorManager sma; @Override protected void onCreate(Bundle savedInstanceState) { super.onCreate(savedInstanceState); setContentView(R.layout.activity_main); myText = findViewById(R.id.my_text); textInfo = findViewById(R.id.text_info); // SensorManagerのインスタンスを取得する sma = (SensorManager)getSystemService(Context.SENSOR_SERVICE); sma.registerListener(this, sma.getDefaultSensor(Sensor.TYPE_ACCELEROMETER), SensorManager.SENSOR_DELAY_FASTEST); } // センサーの値が変化すると呼ばれる public void onSensorChanged(SensorEvent event) { double x = event.values[0]; double y = event.values[1]; double z = event.values[2]; String str = " X= " + x + "\n" + " Y= " + y + "\n" + " Z= " + z; myText.setText(str); // センサー名 StringBuffer info = new StringBuffer("Name: "); info.append(event.sensor.getName()); info.append("\n"); // ベンダー名 info.append("Vendor: "); info.append(event.sensor.getVendor()); info.append("\n"); // 型番 info.append("Type: "); info.append(event.sensor.getType()); info.append("\n"); // 最小遅れ int data = event.sensor.getMinDelay(); info.append("Mindelay: "); info.append(String.valueOf(data)); info.append(" usec\n"); // 最大遅れ data = event.sensor.getMaxDelay(); info.append("Maxdelay: "); info.append(String.valueOf(data)); info.append(" usec\n"); // レポートモード data = event.sensor.getReportingMode(); String stinfo = "unknown"; if(data == 0){ stinfo = "REPORTING_MODE_CONTINUOUS"; }else if(data == 1){ stinfo = "REPORTING_MODE_ON_CHANGE"; }else if(data == 2){ stinfo = "REPORTING_MODE_ONE_SHOT"; } info.append("ReportingMode: "); info.append(stinfo); info.append("\n"); // 最大レンジ info.append("MaxRange: "); float fData = event.sensor.getMaximumRange(); info.append(String.valueOf(fData)); info.append("\n"); // 分解能 info.append("Resolution: "); fData = event.sensor.getResolution(); info.append(String.valueOf(fData)); info.append(" m/s^2\n"); // 消費電流 info.append("Power: "); fData = event.sensor.getPower(); info.append(String.valueOf(fData)); info.append(" mA\n"); textInfo.setText(info); } // センサーの精度が変更されると呼ばれる public void onAccuracyChanged(Sensor sensor, int accuracy) { } }activity_main.xml<?xml version="1.0" encoding="utf-8"?> <androidx.constraintlayout.widget.ConstraintLayout xmlns:android="http://schemas.android.com/apk/res/android" xmlns:app="http://schemas.android.com/apk/res-auto" xmlns:tools="http://schemas.android.com/tools" android:layout_width="match_parent" android:layout_height="match_parent" tools:context=".MainActivity"> <TextView android:id="@+id/my_text" android:layout_width="343dp" android:layout_height="119dp" android:paddingLeft="30dp" android:paddingTop="25dp" /> <TextView android:id="@+id/text_info" android:layout_width="343dp" android:layout_height="119dp" android:paddingLeft="30dp" android:paddingTop="25dp" /> </androidx.constraintlayout.widget.ConstraintLayout>
- 投稿日:2021-01-22T11:44:20+09:00
カメラのないpcを使ってAndroidStudioのエミュレータでカメラをエミュレートすると、、、
金田著「はじめてのandroidプログラミング 第5版」を使って、勉強しています。
「第10章カメラアプリをつくろう」で使っているIntent.resolveActivity関数について動作を確認してみます。
本章で紹介されているコードを写経し、デスクトップPCなどカメラのない環境で実行すると、いくら撮影のボタンを押しても撮影できません。(物理的にカメラがないのだから撮影ができないのは当たり前ですが、、、)では、コード的にはどこで制限がかかっているのでしょうか?
それは、本文中(p276第6行目)にも解説されていますが、resolveActivity()関数のパラメータpackageManagerの内容を解析した結果、resolveActivity()関数がnullになっているからです。(Intentの使い方については、Android デベロッパーのドキュメントガイド一般的なインテントの項を詐称ください。そこにはresolveActivity(9関数の使用上の注意も書かれています。)
そこでコードを少し手を加えて、デバッガでプリントデバッグをして、様子を確認してみましょう。以下、本書を持っている前提で説明します。本書を使って勉強中の方、一緒に勉強しましょう。
0.前提
p279まで写経が済んでいるとします。
1.追記
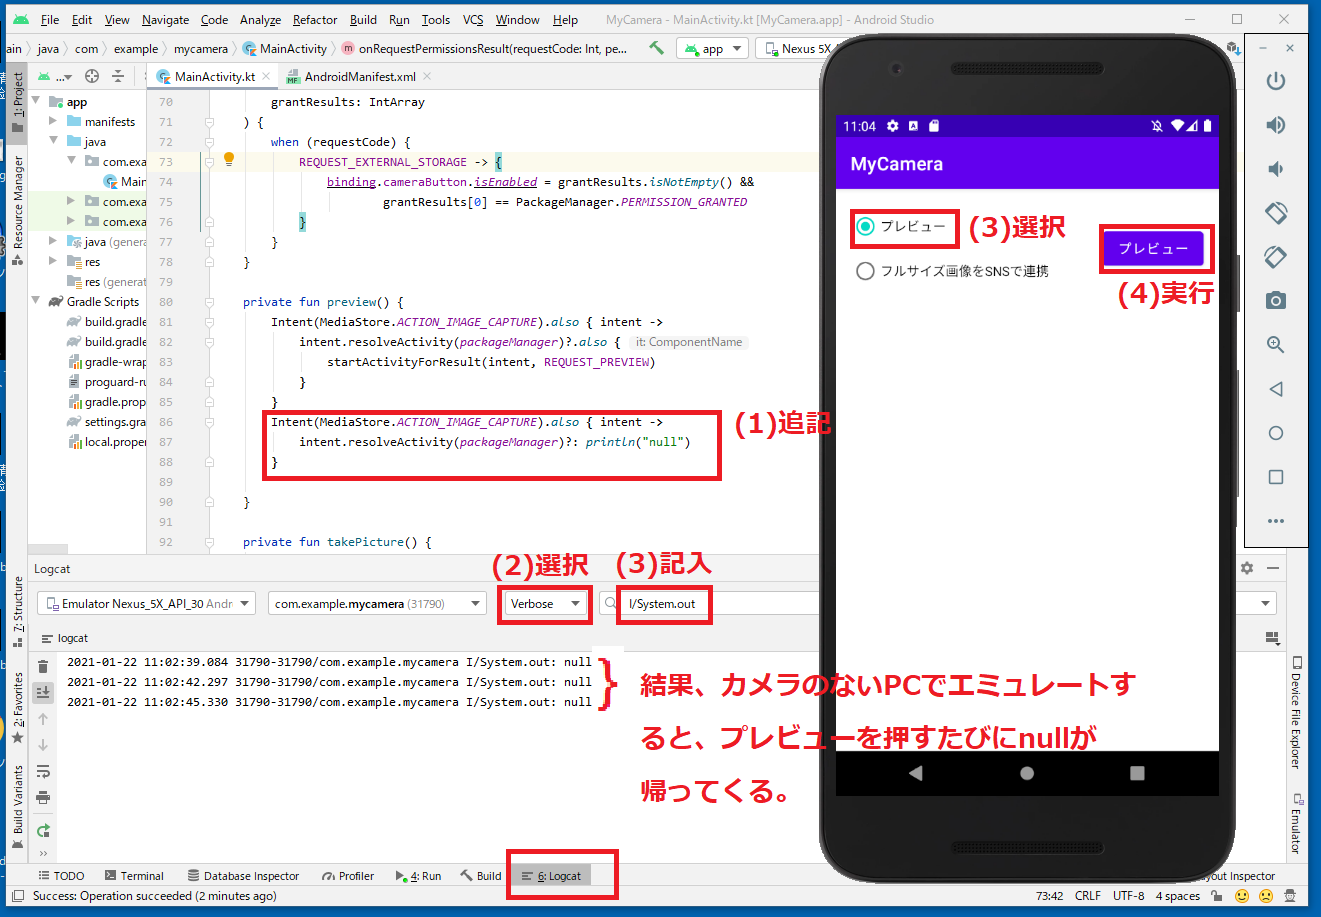
MainActivityクラスのpreview関数に以下のように3行追記します。これはintent.resolveActivity(packageManager)がnullであれば、nullを表示するコードです。(?:は、エルビス演算子。本書p122参照)
MainActicity.kt// 著作権保護のため省略 private fun preview() { Intent(MediaStore.ACTION_IMAGE_CAPTURE).also { intent -> // この3行は残す // 著作権保護のため省略 } Intent(MediaStore.ACTION_IMAGE_CAPTURE).also { intent -> // 追記(もっとスッキリとした書き方があるような気が、、、) intent.resolveActivity(packageManager)?: println("null") // 追記 } // 追記 // 著作権保護のため省略2.実行
カメラのないPCで実行します。AndroidStudio上のLogcat上でpringln文で出力されたnullの文字が確認できます。
- 投稿日:2021-01-22T08:44:08+09:00
HitTestを実施した際に、Containerが反応しない
問題
テスト環境でHitTestにてContainerを検出することを確認後、本番環境に実装を行った。
が、なぜかContainerがHitTestにて検出されない問題が発生した。解決方法
Containerのcolorに透明な色を適用することで、HitTestにて検出されるようになった。
原因
Flutter.devのContainerのページにも記載があったが、colorに何もしていない場合、ContainerはHitTestにて検出されなくなってしまうみたい。
By default, containers return false for all hit tests. If the color property is specified, the hit testing is handled by ColoredBox, which always returns true. If the decoration or foregroundDecoration properties are specified, hit testing is handled by Decoration.hitTest.
https://api.flutter.dev/flutter/widgets/Container-class.html