- 投稿日:2021-01-11T22:01:31+09:00
CodeCommitエンドポイントでPrivateサブネットからgit cloneしてみる
はじめに
- 今回は
- Privateサブネット内にある
- EC2インスタンスから
- VPCエンドポイントを使って
- AWS CodeCommitにアクセスし
- リソースを
git clone- してみます
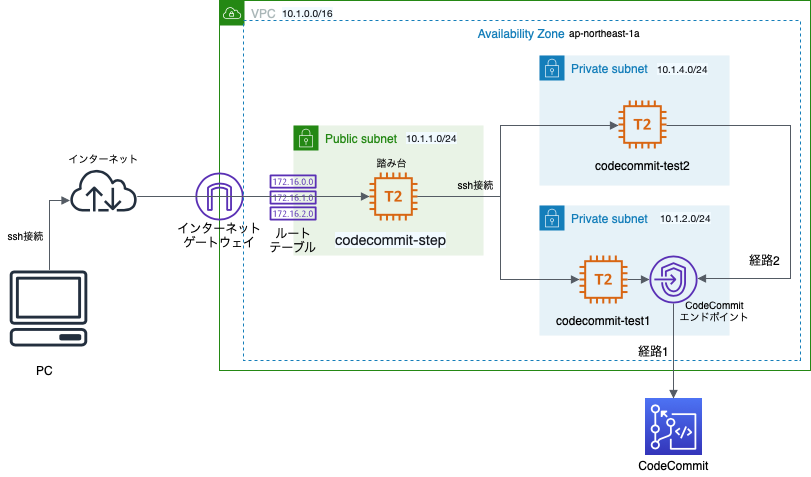
構造図
- Publicサブネット × 1
- SSHアクセス用の踏み台インスタンス × 1
- Privateサブネット × 2
- VPC(CodeCommit)エンドポイントを置くサブネット × 1
- 〃 を置かないサブネット × 1
git cloneをテストする用インスタンス × 1 ずつ
つまづきそうなところ
- セキュリティグループの設定
- インバウンド、アウトバウンドの設定を理解していないと沼る危険性があります
- 筆者は時間を溶かしました...
- 本記事では設定の目的を簡潔に添えているため、理解されていない方は一読することを推奨します
- また、間違いがありましたらご指摘ください
- IAMユーザ認証の作成
git cloneする際には「ユーザ名」と「PW」を求められます- IAMでユーザの認証情報を作成する必要があります
- ドキュメント(ステップ3)を参考にご作成ください
手順
1. ネットワークを構築する
- VPC、Publicサブネット、Privateサブネットを作ります
- 作成手順は過去記事: 「Amazon VPCでシンプルなネットワークを構築する」を参照
- VPCの「DNSホスト名」「DNS 解決」はどちらも有効
2. EC2インスタンスを生成する
- 作成手順は過去記事: 「Amazon EC2を起動し、MacのターミナルからSSH接続してみる」を参照
- セキュリティグループ以外は特筆すべき設定はなし
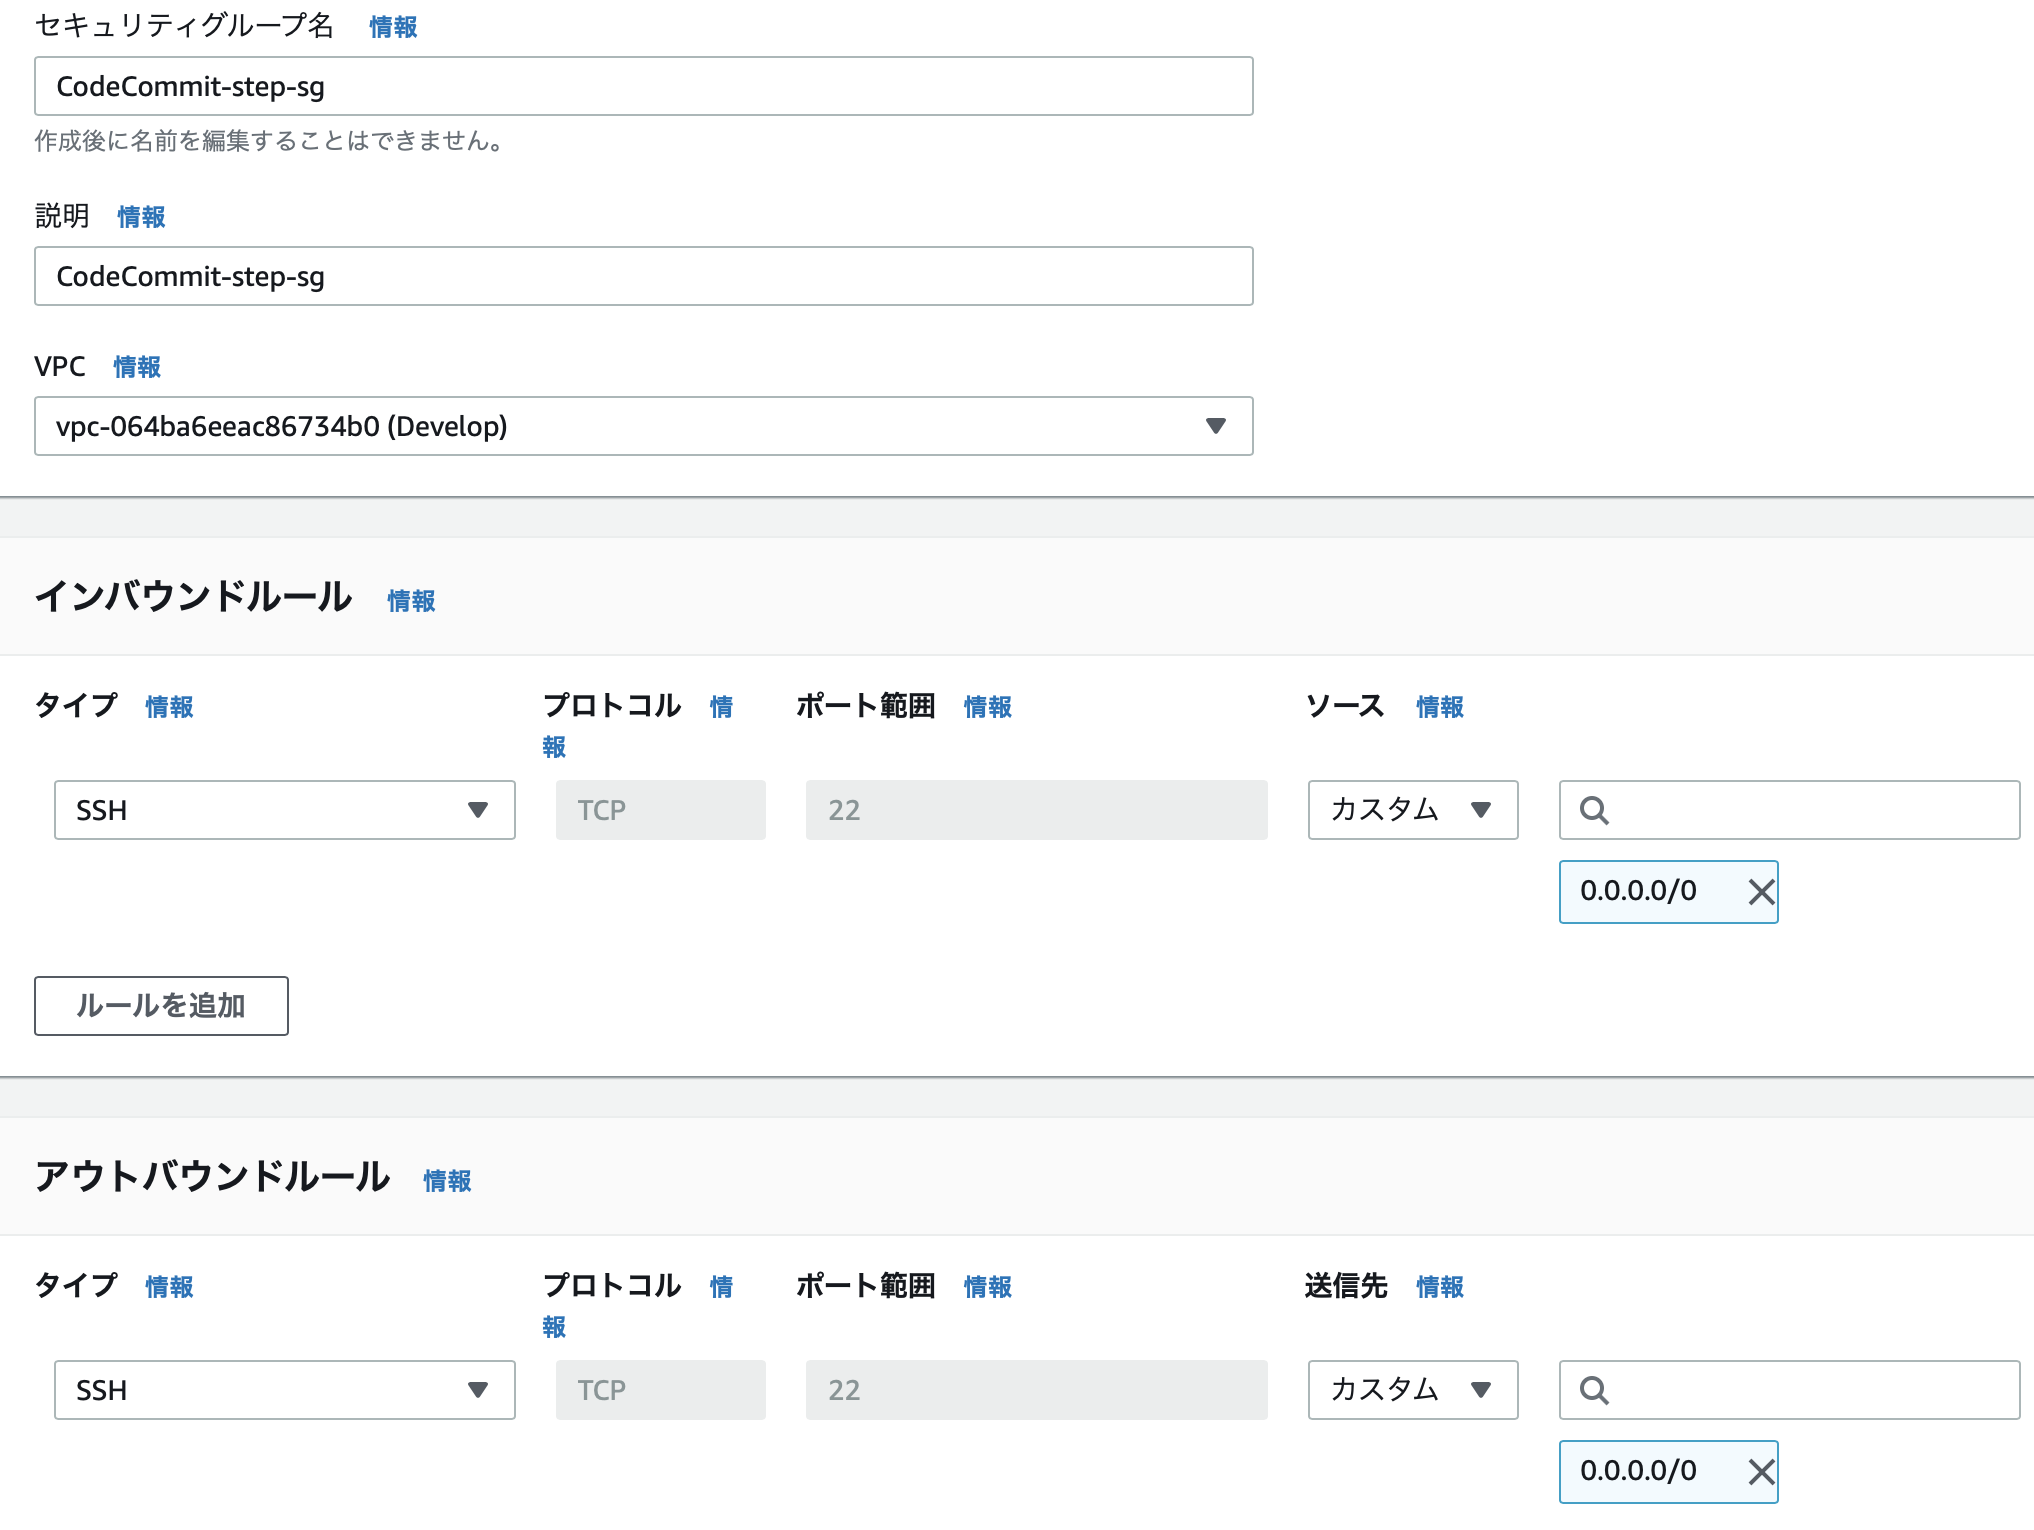
セキュリティグループ
CodeCommit-step-sg(踏み台サーバ用)
- インバウンド: SSH
- ローカルPCからのSSHアクセスを許可
- アウトバウンド: SSH
- Privateサブネット内のサーバへのSSHアクセスを許可
CodeCommit-clong-sg(git cloneテストサーバ用)
- インバウンド: SSH
- 踏み台サーバからのSSHアクセスを許可するため
- アウトバウンド: HTTPS
- HTTPSによる
git cloneを許可するため(SSHによるgit cloneがしたい場合はSSHを許可)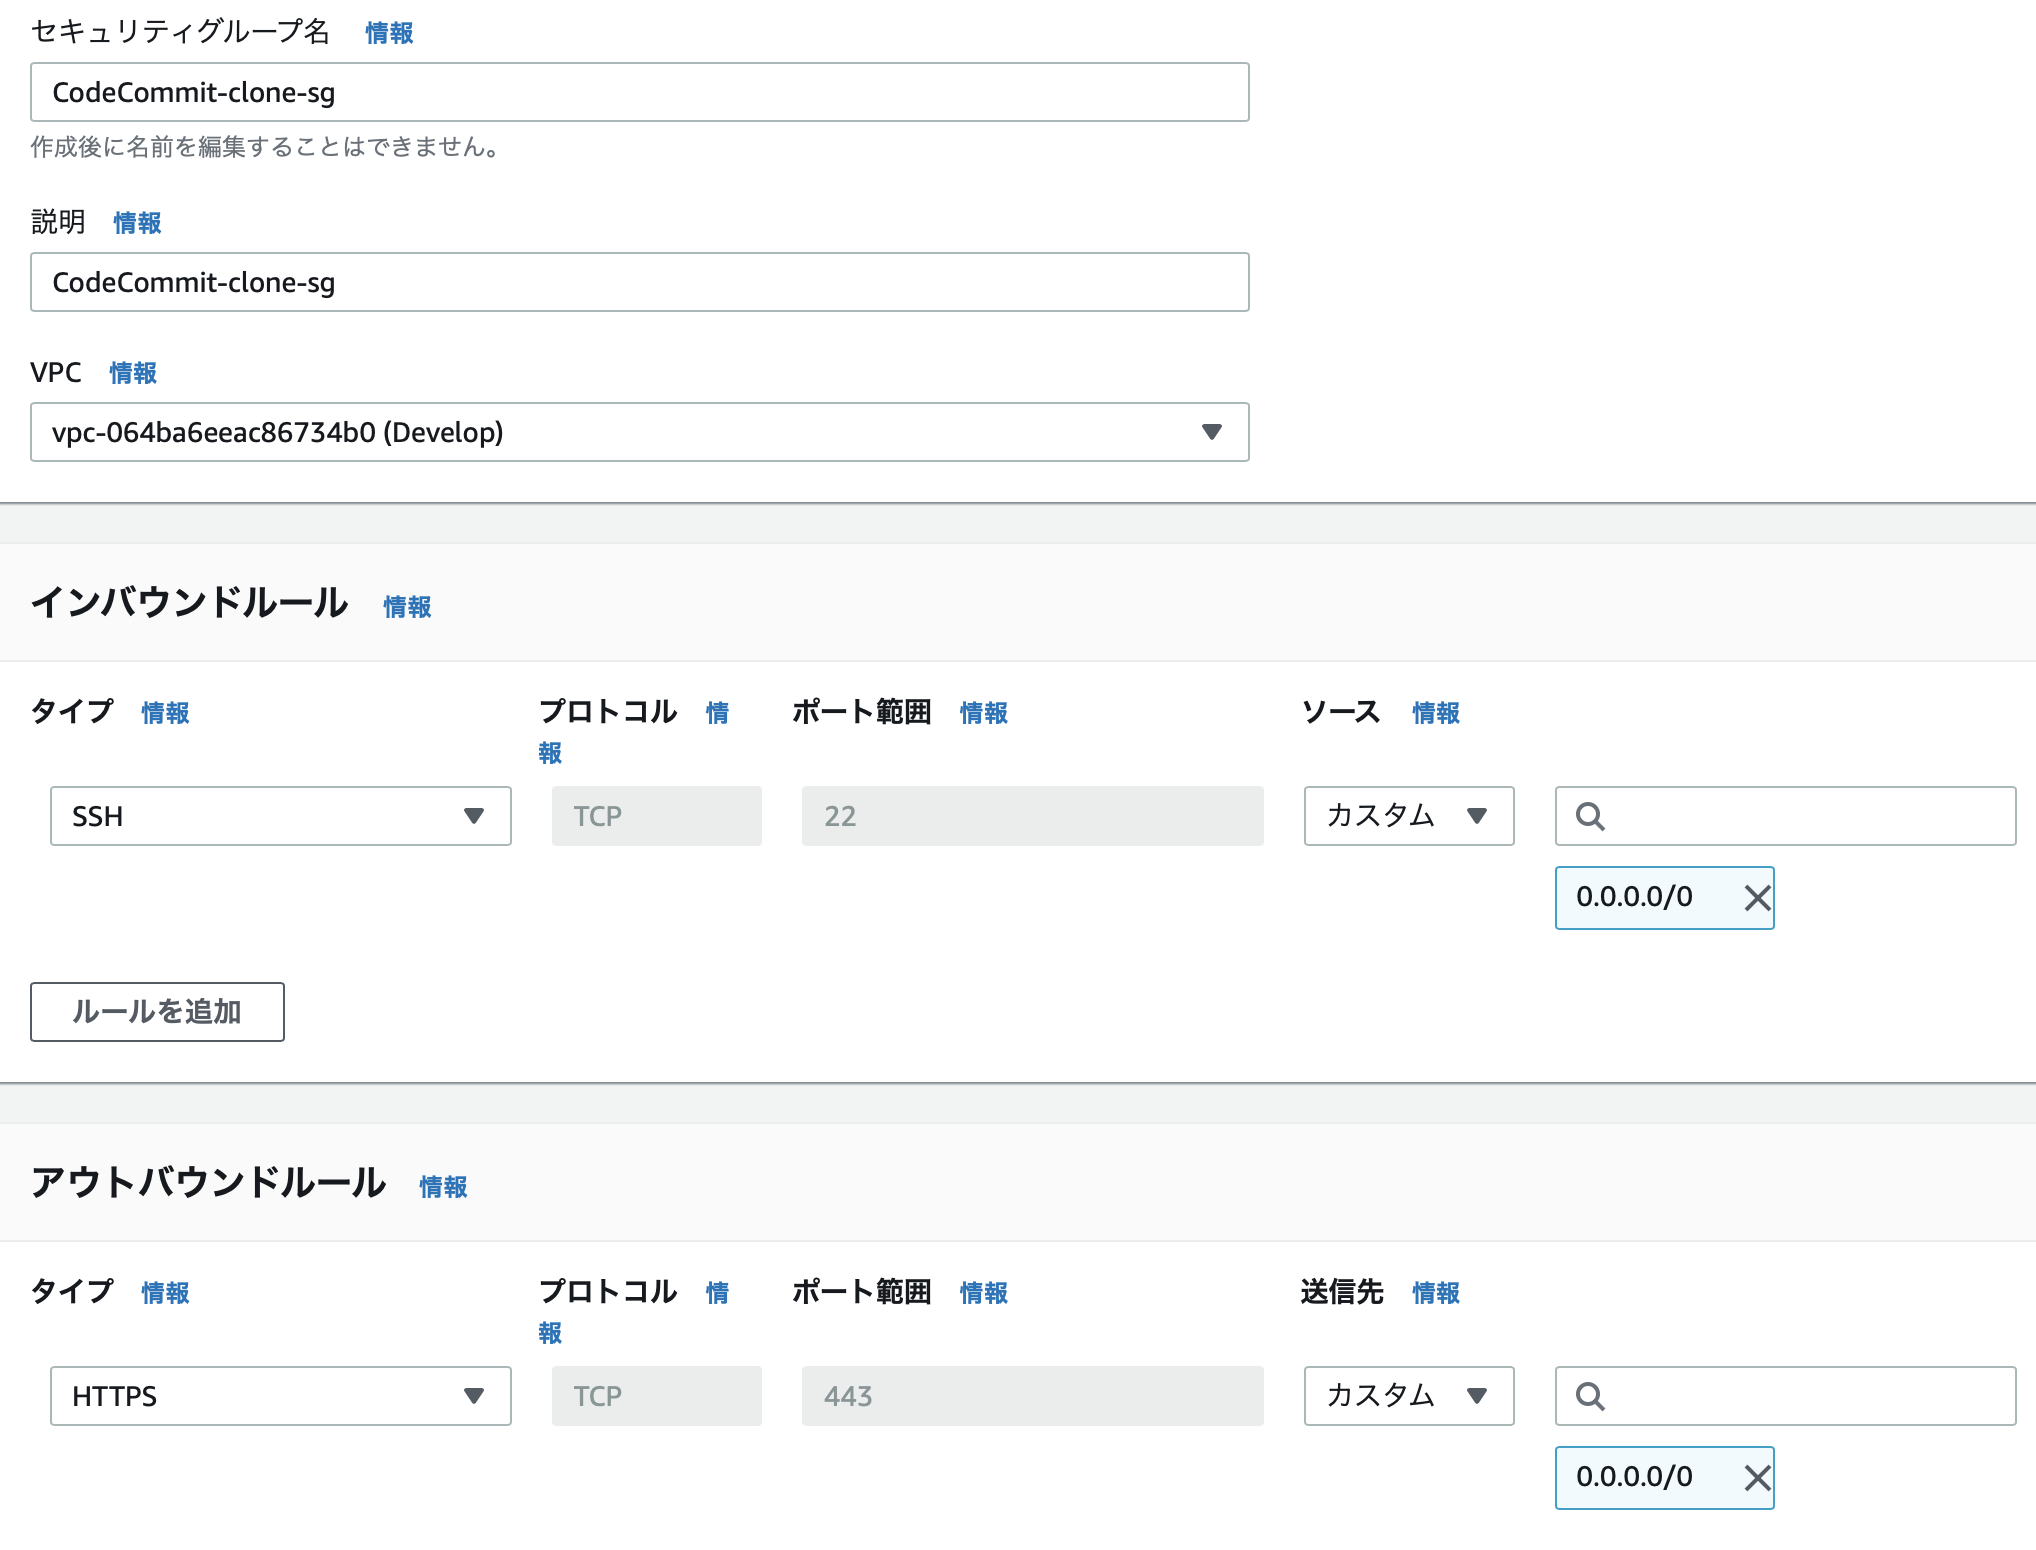
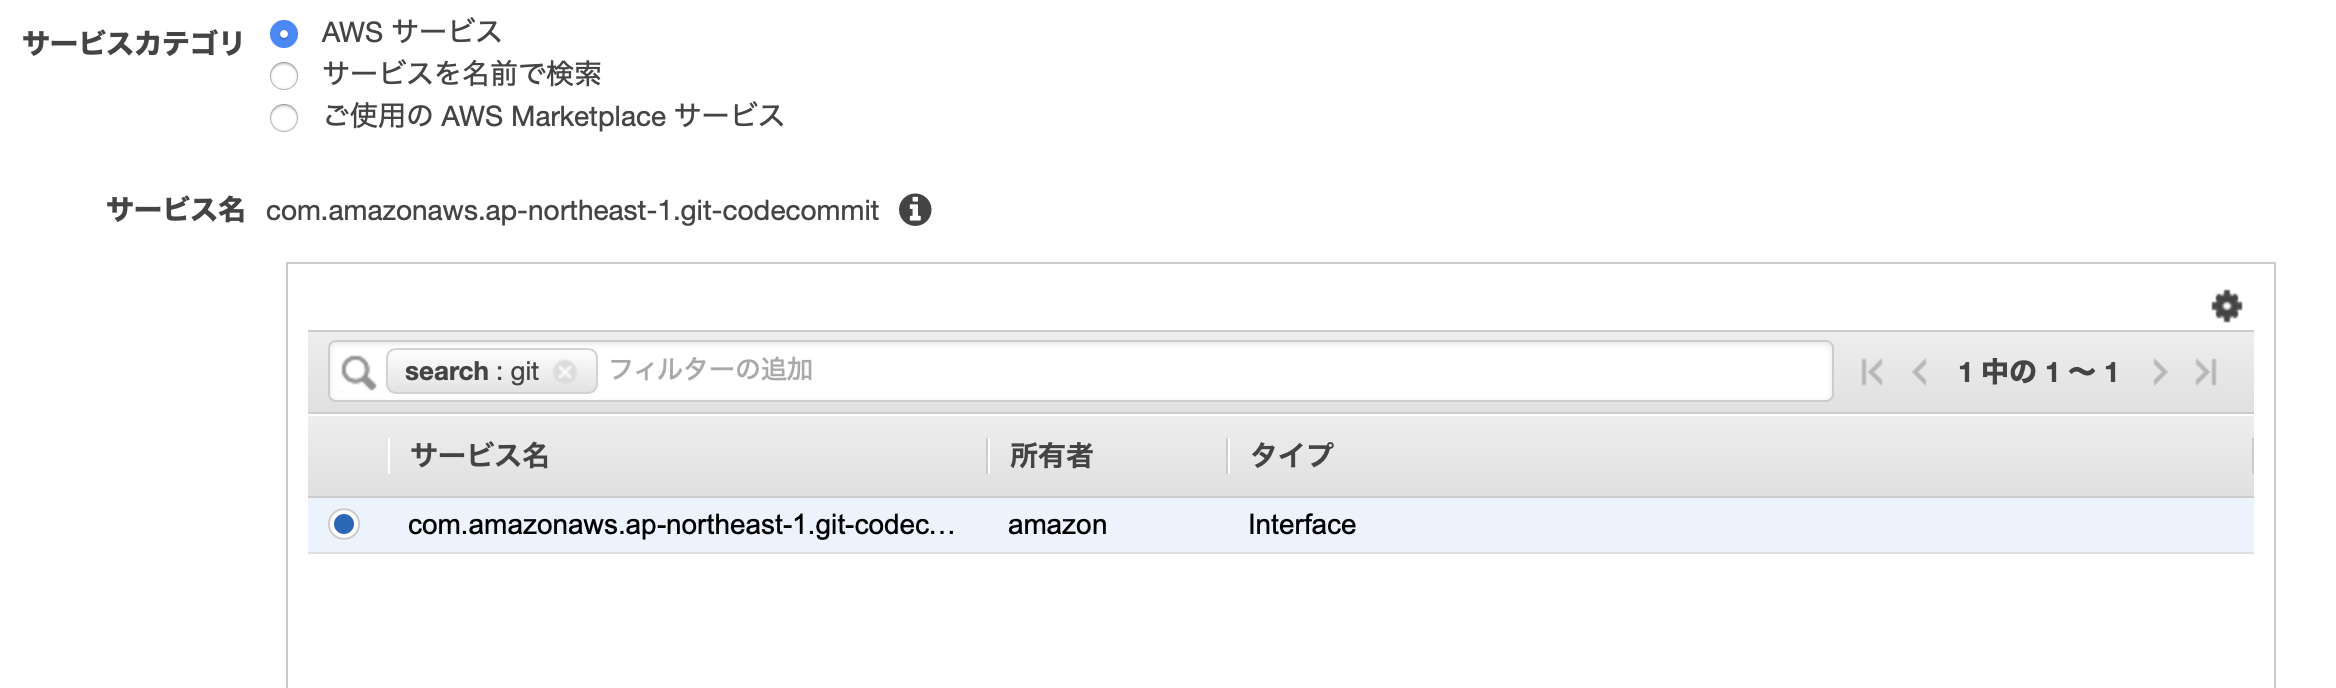
3. VPCエンドポイントを作成する
- サービスカテゴリ: AWSサービス
サービス名: com.amazonaws.ap-northeast-1.git-codecommit(
gitで検索すれば出る)
VPC: 10.1.0.0/16
サブネット: 10.1.2.0/24
Enable DNS name: 有効にする
セキュリティグループ
- インバウンド: HTTPS
- Privateサブネット内のサーバからHTTPSアクセスを許可するため
- アウトバウンド: HTTPS
- CodeCommitへの
git cloneを許可するため
4. EC2インスタンスにgitをインストールする
- Privateサブネットのインスタンスに入れていく
Amazon Linuxn 2にはExtras Library と呼ばれるパッケージ群が存在
- インターネットに繋がなくてもgit等をインストール可能
- 中身は
amazon-linux-extrasで確認可能(アウトバウンドにHTTPを追加する必要あり)いざgitを入れていく
sudo yum update -y
- 成功
sugo yum install git -y
- 応答がない...
amazon-linux-extrasから
yum installするためにはS3エンドポイントを設定する必要がある
- パッケージはS3に保存されているため
S3エンドポイントを配置する
- サービスカテゴリ: AWSサービス
- サービス名: com.amazonaws.ap-northeast-1.s3
- ルートテーブルの設定: Privateサブネットのルートテーブル
リベンジ
sudo yum install git -y
- 無事にインストール完了
5. CodeCommitにリポジトリを作る
- リポジトリを作成
- リポジトリ名、説明: endpoint-test
- ファイルの作成
- ファイル名: endpoint-test.text
- 内容: endpoint-test
6. IAMで「AWS CodeCommit の HTTPS Git 認証情報」を生成
- IAM
- ユーザー
- リポジトリを作成したユーザを選択
- 「認証情報」タブ
- 「AWS CodeCommit の HTTPS Git 認証情報」で「認証情報を生成」
- これがgit cloneの際に要求される「Username」と「Password」になる
- 保存しておく(取り扱いには注意する)
7.
git clone(HTTPS)
- [CodeCommit]
- リポジトリ → URLのクローン(HTTPS)
- [ローカルのターミナル]
- Privateサブネットのインスタンスにsshアクセス
- 踏み台サーバを経由
- [PrivateサブネットのEC2サーバ内]
git clone <CodeCommitリポジトリのHTTPS URL>
- Username, Password: 認証情報を参照して入力
- codecommit-test1、codecommit-test2のどちらも
git clone可能- 完了
おわりに
- Privateサブネット内のEC2インスタンスからVPCエンドポイントを利用して
git cloneすることができました- 理解が浅く不安な点もあるので、ご指摘等ございましたらどしどしコメントください
参考資料
- Git 認証情報を使用した HTTPS ユーザーのセットアップ
- インターフェイス VPC エンドポイント (AWS PrivateLink)
- Codecommit の VPC エンドポイント対応を確認する
- 投稿日:2021-01-11T20:58:28+09:00
Git 【ファイルへの変更を取り消す】
はじめに
これは学習用のメモになります。
1.ファイルへの変更を取り消す方法
ワークツリーからステージに変更したファイルを取り消す。
git checkout --<ファイル名>
git checkout --<ディレクトリ名>

#全変更と取り消す
git checkout --.
"-"をつけるのは、ブランチ名とファイル名が被ったときに、どちらを指しているのかGitがわからなくなるのを避けるためです。
2.ステージに追加した変更を取り消す方法
ワークツリーからの変更したファイルを
git addでステージに変更したファイルを取り消す。git reset HEAD <ファイル名> git reset HEAD <ディレクトリ名> #全変更と取り消す git reset HEAD.注意:指定した変更をステージから取り消すだけなので、ワークツリーのファイルには影響を与えない。
3.直前のコミットをやり直そう
ローカルリポジトリに誤ってコミットしてしまった時にコミットし直す際に使う。
git commit --amend注意!:リモートリポジトリにPushしたコミットはやり直したらダメ。
- 投稿日:2021-01-11T17:56:38+09:00
git restoreでファイル変更を元に戻す
はじめに
ファイルが複数削除されてしまい、
git restoreを知らずに一つ一つ作り直しコピペしてました。
ですが、このコマンドなら一瞬でした。
※git switchについても書いておこう。。。git restore
ファイルを間違えて削除した時や変更を元に戻したい時、
git resoreコマンドで戻せます。
git statusでファイルパスを確認し、git restore ファイルパスにするとそのファイルだけ元に戻せます。git status # modified: app/controllers/hoge_controller.rb git restore app/controllers/hoge_controller.rbファイルを指定しない場合
git restore .git switch
git switch -cでブランチを作成して移動出来ます。git switch -c hogeブランチ移動
git switch hoge以上です。ありがとうございました!
- 投稿日:2021-01-11T17:19:53+09:00
gradleプロジェクトでリリースバージョンとリリースノートを自動作成
背景
Javaプロジェクトを開発している時にいくつか課題があり、それぞれ以下のように解決しました。
- リリースのたびに
build.gradleのversionを書き換える必要がある -> gradleプロジェクトでバージョンを自動指定- リリースノートの作成が手間 -> GitHubのリリースノートの自動作成
上記をもう少し自動化してみようというのがこの記事の目的となります。前提として、bashコマンドを用いたスクリプトを実行するため、bashが利用できる環境であることが条件となります(
macOS Big SurとAmazon Linux 2では動作確認済み)。事前準備
grenコマンドのインストール
gren-release-notesパッケージのインストールの手順に沿ってgrenコマンドが利用できるようにします。
build.gradleの設定
nebulaプラグインを利用するため、gradleプロジェクトでバージョンを自動指定を参考に
build.gradleを設定します。GitHub CLIのインストール
GitHub CLIは、GitHub上でリリースドラフトを作成するために利用します。以下の手順でインストールと設定をします。
- 利用する環境に合わせて、Installationを参考にインストールします。
- 先ほどと同様に、個人アクセストークンを作成します。権限は
repoとread:orgにチェックを入れます。- 一度だけgh auth loginを実行して認証します。
echo {個人アクセストークンの文字列} | gh auth login --with-tokenを実行します。上記設定の後、GitHubリポジトリに移動して
gh repo viewを実行し、結果が表示されたらOKです。スクリプトの実行
https://github.com/kazntree/nebula-chain にある
release.shをリリースしたいリポジトリ内の任意の場所に置いて実行すると、新しいバージョンでリリースして、さらにプルリクエストを基にリリースノートを作成します。$ ./script/release.sh Do you want to release and publish? [y/n] y release start. Inferred project: nebula-chain-test, version: 0.4.0 > Task :release Tagging repository as 0.4.0 Pushing changes in [0.4.0] to origin BUILD SUCCESSFUL in 7s 11 actionable tasks: 10 executed, 1 up-to-date https://github.com/kazntree/nebula-chain-test/releases/tag/0.4.0 Getting gren config from local file /home/ec2-user/github/nebula-chain-test/.grenrc.yml ? - Generate release notes: =================================== ✔ Releases found: 4 ✔ Tags found: 0.4.0, 0.3.0 ✔ Pull Requests found: 1 ✔ 0.4.0 has been successfully updated! See the results here: https://github.com/kazntree/nebula-chain-test/releases/tag/0.4.0メジャーバージョンを上げたい場合は
release.sh -Prelease.scope=majorを、パッチバージョンを上げたい場合はrelease.sh -Prelease.scope=patchを指定します。release.shの説明
release.shで行っていることは、以下のとおりです。
- 事前準備が終わっているか確認する(コマンドの存在など)
- コマンド実行の確認(
yで実行)- nebulaプラグインを利用して、新しいバージョンをリリース
- GitHub CLIを利用して、GitHub上で新しいリリースノートを作成
- grenコマンドを利用して、前回リリースから取り込まれたプルリクエスト一覧をリリースノートへ上書き
- 投稿日:2021-01-11T15:31:12+09:00
勉強メモ12_ドットインストールでGitを学ぶ
★1 はじめに
・GitをSVNみたいにしか使用したことがないので、
ドットインストールを利用してGitとは何かを学びました。・OSは、CentOS7を使用しました。
★2 事前準備
#1 一般ユーザーからrootユーザーに切り替える(パスワード聞かれたらrootのパスワード入力)
[rinchome@localhost ~]$ su - root
#2 yumコマンド実施時に異常が発生する場合があるので「yum.pid」を削除
[root@localhost ~]#  rm -f /var/run/yum.pid

yum実行時のエラー内容↓↓↓
※ロックファイル /var/run/yum.pid が存在します: PID 4365 として別に実行されています。
別のアプリケーションが現在 yum のロックを持っています。終了するまで待っています...

#3 デフォルトのGitパッケージは一旦、削除する
[root@localhost ~]#  yum -y remove git
★3 Linux にVimインストール(お使いのローカル開発環境に vim がインストールされていない場合)
#1 vimをインストール
[root@localhost ~]#  yum -y install vim-enhanced
★4 Linux にGitをインストール
#1 依存関係のあるライブラリをインストール
[root@localhost ~]# yum -y install gcc curl-devel expat-devel gettext-devel openssl-devel zlib-devel perl-ExtUtils-MakeMaker autoconf
#2 Gitのダウンロード対象バージョンのURLを確認
 以下↓↓のURLからダウンロードしたいGitのバージョンを選ぶ
 https://mirrors.edge.kernel.org/pub/software/scm/git/
 今回は、「git-2.29.2.tar.gz 」をインストール
#3 Git パッケージをダウンロードするため、インストールに適切な場所に移動
[root@localhost ~]# cd /usr/local/src/
#4 サイトから Git の圧縮ファイルをダウンロード(#2で選んだGitのバージョンを指定)
[root@localhost src]# wget https://mirrors.edge.kernel.org/pub/software/scm/git/git-2.29.2.tar.gz
#5 gzファイルを解凍
[root@localhost src]# tar xzvf git-2.29.2.tar.gz
#6 解凍後、Gitのディレクトリに移動
[root@localhost src]# cd git-2.29.2/
#7 make コマンドでインストール
[root@localhost git-2.29.2]# make prefix=/usr/local all
[root@localhost git-2.29.2]# make prefix=/usr/local install
#8 Gitがインストールされたか確認
[root@localhost git-2.29.2]# git --version
git version 2.29.2
#9 rootユーザーから一般ユーザーになる
[root@localhost git-2.29.2]# exit
★5 バージョンの流れの理解
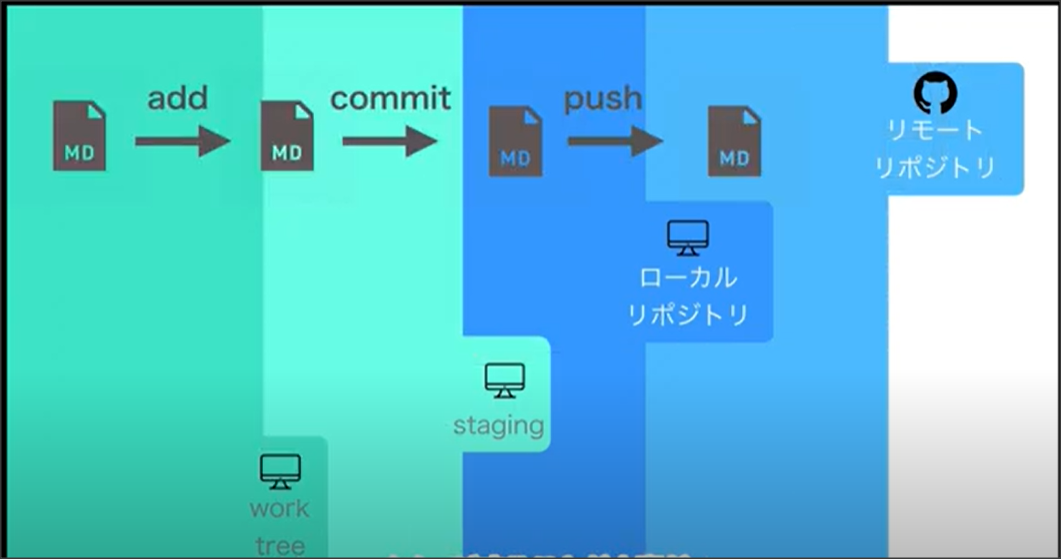
Gitは4つの領域を意識することが大事
・作業ディレクトリ(ワークツリー)
・ステージングエリア(インデックス)
・リポジトリ(ローカル)
・リポジトリ(リモート)図で例えると下記↓↓をイメージすること
★6 gitの設定について
#1 ユーザー名を設定
[rinchome@localhost ~]$ git config --global user.name "rinchome"
#2 Eメールアドレスを設定
[rinchome@localhost ~]$ git config --global user.email "rinchome@hotmail.com"
#3 色の設定 自動的に色を設定する 何も考えずに設定するなら以下を実行すればOK
[rinchome@localhost ~]$ git config --global color.ui true
#4 設定内容を確認
[rinchome@localhost ~]$ git config -l
user.name=rinchome
user.email=rinchome@hotmail.com
color.ui=true
#5 gitのヘルプを見る(下記2つのコマンドは同じ意味)
#  実行すると、manコマンドみたいな感じで内容が見れる
[rinchome@localhost ~]$ git config --help
[rinchome@localhost ~]$ git help config
★7 はじめてのコミット
#1 現在位置を確認し、ディレクトリーを移動
[rinchome@localhost ~]$ pwd
/home/rinchome
#2 「myweb」ディレクトリーを作成
[rinchome@localhost ~]$ mkdir myweb
#3 「myweb」ディレクトリーに移動
[rinchome@localhost ~]$ cd myweb/
#4 ローカルリポジトリーを新規で作成する
[rinchome@localhost myweb]$ git init
Initialized empty Git repository in /home/rinchome/myweb/.git/
#5 vimでindex.htmlを作成(作成内容は#6のcatの内容)
[rinchome@localhost myweb]$ vim index.html
#6 内容を確認
[rinchome@localhost myweb]$ cat index.html
line1

#7 index.htmlをステージングエリアに上げる
[rinchome@localhost myweb]$ git add index.html
#8 index.htmlをローカルリポジトリーに上げる
#  エディターが立ち上がるので「initial commit」と入力して保存する
[rinchome@localhost myweb]$ git commit
[master (root-commit) 30d27b2] initial commit
 1 file changed, 2 insertions(+)
 create mode 100644 index.html
#9 ログを確認する 「initial commit」ができているか確認できる
[rinchome@localhost myweb]$ git log
commit 30d27b25763a2b3f2614ced6c86b0253ad1f61ea (HEAD -> master)
Author: rinchome <rinchome@hotmail.com>
Date:   Sun Jan 3 00:21:25 2021 +0900

    initial commit
★8 gitのログを見る
#1 git logコマンドを実行する
[rinchome@localhost myweb]$ git log
commit 30d27b25763a2b3f2614ced6c86b0253ad1f61ea (HEAD -> master) →コミット時に生成されるID、一意のID
Author: rinchome <rinchome@hotmail.com>
Date:   Sun Jan 3 00:21:25 2021 +0900

    initial commit →★7でコミットしたときのメッセージ
#2 ログをコンパクトにみたい場合やざっと履歴を見たい場合は「--oneline」を利用
[rinchome@localhost myweb]$ git log --oneline
30d27b2 (HEAD -> master) initial commit
#3 変更された場所を具体的に見たい場合は、「-p」を利用
[rinchome@localhost myweb]$ git log -p
↓↓コミット情報が見れる↓↓
commit 30d27b25763a2b3f2614ced6c86b0253ad1f61ea (HEAD -> master)
Author: rinchome <rinchome@hotmail.com>
Date:   Sun Jan 3 00:21:25 2021 +0900

    initial commit
↓↓どこがどのように変更されたかが見れる↓↓
diff --git a/index.html b/index.html
new file mode 100644
index 0000000..3fdf384
--- /dev/null    → nullは何もないの意味になる
+++ b/index.html → 何もない(null)所からindex.htmlが作成されたの意味になる
@@ -0,0 +1,2 @@  →変わった行数の意味になる
+line1            →変わった内容の意味になる
+
#4 どのファイルが何か所変更されたかを見る場合は、
# 「--stat」を利用、コンパクトに見たい場合に利用
[rinchome@localhost myweb]$ git log --stat
commit 30d27b25763a2b3f2614ced6c86b0253ad1f61ea (HEAD -> master)
Author: rinchome <rinchome@hotmail.com>
Date:   Sun Jan 3 00:21:25 2021 +0900

    initial commit

 index.html | 2 ++
 1 file changed, 2 insertions(+)
★9 現在の状態を把握する
#1 ls実行
[rinchome@localhost myweb]$ ls
index.html
#2 現在のindex.htmlの内容を確認
[rinchome@localhost myweb]$ cat index.html
line1
#3 vimでindex.htmlを編集(#4の内容に変更する)
[rinchome@localhost myweb]$ vim index.html
#4 line2が追加されているのを確認
[rinchome@localhost myweb]$ cat index.html
line1
line2
#5 git statusを実行
[rinchome@localhost myweb]$ git status
↓↓現在の状態が表示され、次に何のコマンドを実行するべきかも表示される
On branch master
Changes not staged for commit:
  (use "git add <file>..." to update what will be committed)
  (use "git restore <file>..." to discard changes in working directory)
        modified:   index.html

no changes added to commit (use "git add" and/or "git commit -a")
#6 git checkoutでとりやめ
[rinchome@localhost myweb]$ git checkout -- index.html
#7 追加された内容が元に戻されている事が確認できる(line2の内容消えている)
[rinchome@localhost myweb]$ cat index.html
line1
★10 差分を確認する(git diff とgit diff --cachedの違い)
#1 git statusを見ると、現在は何も変更が入っていない状態であることが分かる
[rinchome@localhost myweb]$ git status
On branch master
nothing to commit, working tree clean
#2 index.htmlの内容を確認
[rinchome@localhost myweb]$ cat index.html
line1
#3 index.htmlに変更を加える(#4の内容にする)
[rinchome@localhost myweb]$ vim index.html
#4
[rinchome@localhost myweb]$ cat index.html
line1
line2
#5 もう一度、git statusを実行
[rinchome@localhost myweb]$ git status
On branch master
Changes not staged for commit: → stagingに上がっていないよの意味
  (use "git add <file>..." to update what will be committed)
  (use "git restore <file>..." to discard changes in working directory)
        modified:   index.html

no changes added to commit (use "git add" and/or "git commit -a")
#6 git diffは、workTreeとステージングエリアの比較ができるコマンド
[rinchome@localhost myweb]$ git diff
diff --git a/index.html b/index.html
index 3fdf384..4596df0 100644
--- a/index.html
+++ b/index.html
@@ -1,2 +1,3 @@
 line1
+line2 → line2が追加された事に関する変更箇所が確認できる
#7 ステージングエリアに上げる
[rinchome@localhost myweb]$ git add index.html
#8
[rinchome@localhost myweb]$ git status
On branch master
Changes to be committed: →まだコミットされていないよの意味になる
  (use "git restore --staged <file>..." to unstage)
        modified:   index.html
#9 git diff --cachedでまだコミットされていなくて、
#  ステージングエリアにあるものが、
#  コミットをすることでどのように変更が加えられるのかを確認できる
[rinchome@localhost myweb]$ git diff --cached
diff --git a/index.html b/index.html
index 3fdf384..4596df0 100644
--- a/index.html
+++ b/index.html
@@ -1,2 +1,3 @@
 line1
+line2
★11 gitでのファイル操作について
######### ★10実施前の状態に状態に戻す #####################
#1 index.htmlの内容を確認
[rinchome@localhost myweb]$ cat index.html
line1
line2
#2 ★10の内容から「git checkout HEAD -- 」でステージングしたファイルを
# 最後にコミットした状態に戻す。つまり編集内容は残らないようにする。
[rinchome@localhost myweb]$ git checkout HEAD -- index.html
#3 ★10の内容から元に戻ったことを確認
[rinchome@localhost myweb]$ cat index.html
line1
######### ★10実施前の状態に状態に戻した #####################
#4
[rinchome@localhost myweb]$ git status
On branch master
nothing to commit, working tree clean
#5
[rinchome@localhost myweb]$ cat index.html
line1
#6 index.htmlを編集(#7の内容にする)
[rinchome@localhost myweb]$ vim index.html
#7
[rinchome@localhost myweb]$ cat index.html
line1
line2
#8
[rinchome@localhost myweb]$ git status
On branch master
Changes not staged for commit:
  (use "git add <file>..." to update what will be committed)
  (use "git restore <file>..." to discard changes in working directory)
        modified:   index.html

no changes added to commit (use "git add" and/or "git commit -a")
#9 「git add .」で今のディレクトリーより下にあるファイルを
#  全てステージングエリアに上げる(add)ことができる
[rinchome@localhost myweb]$ git add .
#10 ステージングエリアに上がったことを確認
[rinchome@localhost myweb]$ git status
On branch master
Changes to be committed:
  (use "git restore --staged <file>..." to unstage)
        modified:   index.html
#これ以降は捕捉情報なので今回は実行しない
#11 「git rm」でファイルを消すことができる。今回実行はしない
[rinchome@localhost myweb]$ git rm index.html
#12 「git mv」でファイルを移動することができる。今回実行はしない
[rinchome@localhost myweb]$ git mv XXXXX
★12 git管理に含めない設定について
#1
[rinchome@localhost myweb]$ pwd
/home/rinchome/myweb
#2 error.logを新規作成
[rinchome@localhost myweb]$ touch error.log
#3
[rinchome@localhost myweb]$ ls
error.log  index.html
#4 .gitignoreファイルを作成し、拡張子がlogになっているものは、
#   ステージングエリアに上げない設定を入れる(#5の内容にする)
[rinchome@localhost myweb]$ vim .gitignore
#5 設定した内容を確認
[rinchome@localhost myweb]$ cat .gitignore
*.log
#6
[rinchome@localhost myweb]$ ls -la
合計 12
drwxrwxr-x.  3 rinchome rinchome   71  1月  3 12:24 .
drwx------. 18 rinchome rinchome 4096  1月  3 12:24 ..
drwxrwxr-x.  8 rinchome rinchome  166  1月  3 02:02 .git
-rw-rw-r--.  1 rinchome rinchome    6  1月  3 12:24 .gitignore
-rw-rw-r--.  1 rinchome rinchome    0  1月  3 12:24 error.log
-rw-rw-r--.  1 rinchome rinchome   13  1月  3 02:02 index.html
#7
[rinchome@localhost myweb]$ git status
On branch master
Changes to be committed:
  (use "git restore --staged <file>..." to unstage)
        modified:   index.html

Untracked files:
  (use "git add <file>..." to include in what will be committed)
        .gitignore
#8 変更を行ったものを全てステージングエリアに上げる
[rinchome@localhost myweb]$ git add .
#9 ステータスを確認すると、.gitignoreはステージングに上がっているが、
#  error.logは上がっていないことが確認できる
[rinchome@localhost myweb]$ git status
On branch master
Changes to be committed:
  (use "git restore --staged <file>..." to unstage)
        new file:   .gitignore ←.gitignoreだけ上がっている。error.logは上がっていない。
        modified:   index.html

#10 .gitignoreについて
.gitignoreファイルを配置したディレクトリーとそのサブディレクトリーで適用される
サブディレクトリーに適用したい場合は、さらにサブディレクトリーに.gitignoreファイルを配置すればよいとのこと
★13 直前のコミットを変更する(コミット履歴を増やさない)
######### ★12実施前の状態に状態に戻す #####################
#1
[rinchome@localhost myweb]$ ls
error.log  index.html
#2
[rinchome@localhost myweb]$ rm error.log
#3
[rinchome@localhost myweb]$ ls
index.html
#4
[rinchome@localhost myweb]$ ls -la
合計 12
drwxrwxr-x.  3 rinchome rinchome   54  1月  3 12:42 .
drwx------. 18 rinchome rinchome 4096  1月  3 12:24 ..
drwxrwxr-x.  8 rinchome rinchome  166  1月  3 12:27 .git
-rw-rw-r--.  1 rinchome rinchome    6  1月  3 12:24 .gitignore
-rw-rw-r--.  1 rinchome rinchome   13  1月  3 02:02 index.html
#5
[rinchome@localhost myweb]$ git log
commit 30d27b25763a2b3f2614ced6c86b0253ad1f61ea (HEAD -> master)
Author: rinchome <rinchome@hotmail.com>
Date:   Sun Jan 3 00:21:25 2021 +0900

    initial commit
#6
[rinchome@localhost myweb]$ git status
On branch master
Changes to be committed:
  (use "git restore --staged <file>..." to unstage)
        new file:   .gitignore
        modified:   index.html
#7
[rinchome@localhost myweb]$ cat index.html
line1
line2
#8 git checkout HEAD -- [ファイル名] ステージしたファイルを
#  最後にコミットした状態に戻す、つまり編集内容は残らない。
[rinchome@localhost myweb]$ git checkout HEAD -- index.html
#9 git reset [ファイル名]は、ステージングを取り下げる。編集内容は残る
#  ファイル名を指定しないと全てのステージングが取り下げられる。
[rinchome@localhost myweb]$ git reset .gitignore
#10 git statusしてもまだ.gitignoreが残ってる
[rinchome@localhost myweb]$ git status
On branch master
Untracked files:
  (use "git add <file>..." to include in what will be committed)
        .gitignore

nothing added to commit but untracked files present (use "git add" to track)
#11 rmで.gitignoreファイルを消す
[rinchome@localhost myweb]$ rm .gitignore
#12 git statusすると、git statusを見ると、現在は何も変更が入っていない状態になる
[rinchome@localhost myweb]$ git status
On branch master
nothing to commit, working tree clean
######### ★12実施前の状態に状態に戻した #####################
#13
[rinchome@localhost myweb]$ ls
index.html
#14
[rinchome@localhost myweb]$ cat index.html
line1

#15
[rinchome@localhost myweb]$ ls -al
合計 8
drwxrwxr-x.  3 rinchome rinchome   36  1月  3 15:25 .
drwx------. 18 rinchome rinchome 4096  1月  3 12:24 ..
drwxrwxr-x.  8 rinchome rinchome  166  1月  3 15:25 .git
-rw-rw-r--.  1 rinchome rinchome    7  1月  3 15:09 index.html
#16 vimで編集(#17の内容にする)
[rinchome@localhost myweb]$ vim index.html
#17
[rinchome@localhost myweb]$ cat index.html
line1
line2
#18 index.htmlをステージングに上げる
[rinchome@localhost myweb]$ git add .
#19 git commit -m "message"を使うと、vimの編集モードは出ずにメッセージを作成できる
[rinchome@localhost myweb]$ git commit -m "ライン2を追加"
[master ff45a77] ライン2を追加
 1 file changed, 1 insertion(+), 1 deletion(-)
#20
[rinchome@localhost myweb]$ git log
commit ff45a771e4dd9fb0dc2d959ee935d8694a77750f (HEAD -> master)
Author: rinchome <rinchome@hotmail.com>
Date:   Sun Jan 3 15:35:47 2021 +0900

    ライン2を追加 ←新規にコミットを確認

commit 30d27b25763a2b3f2614ced6c86b0253ad1f61ea
Author: rinchome <rinchome@hotmail.com>
Date:   Sun Jan 3 00:21:25 2021 +0900

    initial commit ←最初にしたコミットを確認
#21 index.htmlのline2にタブが入っていないので、もう一度コミットをする(--amendを利用)
[rinchome@localhost myweb]$ cat index.html
line1
line2
#22 vimで修正(#23の内容にする)
[rinchome@localhost myweb]$ vim index.html
#23 line2の前にタブを入れたことを確認
[rinchome@localhost myweb]$ cat index.html
line1
        line2
#24 ステージングエリアに上げる
[rinchome@localhost myweb]$ git add .
#25 「git commit」で上げたいところだが、大した修正ではないので、--amendでコミットをする
# 実行すると、vimの編集画面が表示されるが、そのままwqで保存する
[rinchome@localhost myweb]$ git commit --amend
[master 555bc56] ライン2を追加
 Date: Sun Jan 3 15:35:47 2021 +0900
 1 file changed, 1 insertion(+), 1 deletion(-)
#26 git logで確認すると、コミット履歴は追加されていないことが確認できる
#  履歴を残したくない場合に使う。無駄にコミット履歴が増えない
[rinchome@localhost myweb]$ git log
commit 555bc5634fd3ea63a70f9e99608521369b83ec6f (HEAD -> master)
Author: rinchome <rinchome@hotmail.com>
Date:   Sun Jan 3 15:35:47 2021 +0900

    ライン2を追加 ←ここに修正した内容が反映される、履歴は追加されない

commit 30d27b25763a2b3f2614ced6c86b0253ad1f61ea
Author: rinchome <rinchome@hotmail.com>
Date:   Sun Jan 3 00:21:25 2021 +0900

    initial commit
★14 過去のバージョンに戻る(変更してコミットしたものやステージングに上げたものを取り消すパターン)
######### ★13実施前の状態に状態に戻す #####################
#1
[rinchome@localhost myweb]$ cat index.html
line1
        line2
#2
[rinchome@localhost myweb]$ git status
On branch master
nothing to commit, working tree clean
#3 git logを確認すると、「ライン2を追加」のコミット履歴があるので、
# 直前のコミットを消したい
[rinchome@localhost myweb]$ git log
commit 555bc5634fd3ea63a70f9e99608521369b83ec6f (HEAD -> master)
Author: rinchome <rinchome@hotmail.com>
Date:   Sun Jan 3 15:35:47 2021 +0900

    ライン2を追加

commit 30d27b25763a2b3f2614ced6c86b0253ad1f61ea
Author: rinchome <rinchome@hotmail.com>
Date:   Sun Jan 3 00:21:25 2021 +0900

    initial commit
#4 直前のコミットをなかった事にするには、git reset --hard HEAD^を利用
[rinchome@localhost myweb]$ git reset --hard HEAD^
HEAD is now at 30d27b2 initial commit
#5 「ライン2を追加」のコミット履歴がなくなっていることを確認
[rinchome@localhost myweb]$ git log
commit 30d27b25763a2b3f2614ced6c86b0253ad1f61ea (HEAD -> master)
Author: rinchome <rinchome@hotmail.com>
Date:   Sun Jan 3 00:21:25 2021 +0900

    initial commit
#6 catで内容を確認 「ライン2を追加」の内容が消えていることを確認
[rinchome@localhost myweb]$ cat index.html
line1
######### ★13実施前の状態に状態に戻した #####################
#7
[rinchome@localhost myweb]$ git log
commit 30d27b25763a2b3f2614ced6c86b0253ad1f61ea (HEAD -> master)
Author: rinchome <rinchome@hotmail.com>
Date:   Sun Jan 3 00:21:25 2021 +0900

    initial commit
#8
[rinchome@localhost myweb]$ cat index.html
line1
#9 vimで編集(#10の内容にする)
[rinchome@localhost myweb]$ vim index.html
#10
[rinchome@localhost myweb]$ cat index.html
line1
line2
#11 ステージングエリアに上げる
[rinchome@localhost myweb]$ git add .
#12 「line2を追加」の分をコミット
[rinchome@localhost myweb]$ git commit -m "line 2 added"
[master 2828e6e] line 2 added
 1 file changed, 1 insertion(+)
#13 git logで確認
[rinchome@localhost myweb]$ git log
commit 2828e6e69e984357796624d5860d2451246850cc (HEAD -> master)
Author: rinchome <rinchome@hotmail.com>
Date:   Sun Jan 3 16:13:11 2021 +0900

    line 2 added

commit 30d27b25763a2b3f2614ced6c86b0253ad1f61ea
Author: rinchome <rinchome@hotmail.com>
Date:   Sun Jan 3 00:21:25 2021 +0900

    initial commit
#14
[rinchome@localhost myweb]$ cat index.html
line1
line2

#15 さらに適当な修正を加える(#16の内容にする)
[rinchome@localhost myweb]$ vim index.html
#16 適当に修正した内容を確認
[rinchome@localhost myweb]$ cat index.html
line1
line2
ggsdsfgdsfsdfhsdhs
gfdsgsfgsghtnsr
#17 ステージングエリアに上げる
[rinchome@localhost myweb]$ git add .
#18 ただし、さきほど適当に編集して、ステージングに上げた#16内容を元に戻したい
[rinchome@localhost myweb]$ git log
commit 2828e6e69e984357796624d5860d2451246850cc (HEAD -> master)
Author: rinchome <rinchome@hotmail.com>
Date:   Sun Jan 3 16:13:11 2021 +0900

    line 2 added

commit 30d27b25763a2b3f2614ced6c86b0253ad1f61ea
Author: rinchome <rinchome@hotmail.com>
Date:   Sun Jan 3 00:21:25 2021 +0900

    initial commit
#19 #16で適当に編集して、ステージングに上げた内容を元に戻したい場合は、
#  「git reset --hard HEAD」を実行
[rinchome@localhost myweb]$ git reset --hard HEAD
HEAD is now at 2828e6e line 2 added
#20 git log見ると、「line 2 added」のコミット履歴はある
[rinchome@localhost myweb]$ git log
commit 2828e6e69e984357796624d5860d2451246850cc (HEAD -> master)
Author: rinchome <rinchome@hotmail.com>
Date:   Sun Jan 3 16:13:11 2021 +0900

    line 2 added

commit 30d27b25763a2b3f2614ced6c86b0253ad1f61ea
Author: rinchome <rinchome@hotmail.com>
Date:   Sun Jan 3 00:21:25 2021 +0900

    initial commit
#21 catで見ると適当に編集した#16の内容が元に戻っていることを確認
[rinchome@localhost myweb]$ cat index.html
line1
line2

#22 更に「line 2 added」のコミット履歴を消したい
[rinchome@localhost myweb]$ git log
commit 2828e6e69e984357796624d5860d2451246850cc (HEAD -> master)
Author: rinchome <rinchome@hotmail.com>
Date:   Sun Jan 3 16:13:11 2021 +0900

    line 2 added

commit 30d27b25763a2b3f2614ced6c86b0253ad1f61ea
Author: rinchome <rinchome@hotmail.com>
Date:   Sun Jan 3 00:21:25 2021 +0900

    initial commit
#23 消したい場合は、以下↓↓①、②の2つのコマンドのどちらかを利用する
#  今回はコミットIDで実施する
#  利用するコマンド
#  ①git reset --hard HEAD^ →直前のコミットをなかった事にする。
#  コミットIDで言うと、「2828e6e69e984357796624d5860d2451246850cc」をなかった事にできる
#  ②git reset --hard コミットID ※コミットIDは7桁以上入力する(今回は全桁入力)
#  コミットIDを入力する際の注意点としては、
#  コミットID(2828e6e69e984357796624d5860d2451246850cc)を履歴から消すため、
#  今回実際に入力するコミットIDは「30d27b25763a2b3f2614ced6c86b0253ad1f61ea」になる
[rinchome@localhost myweb]$ git reset --hard 30d27b25763a2b3f2614ced6c86b0253ad1f61ea
HEAD is now at 30d27b2 initial commit
#24 logを見ると、「line 2 added」の内容が消えていることが確認できる
[rinchome@localhost myweb]$ git log
commit 30d27b25763a2b3f2614ced6c86b0253ad1f61ea (HEAD -> master)
Author: rinchome <rinchome@hotmail.com>
Date:   Sun Jan 3 00:21:25 2021 +0900

    initial commit
#25 catでline2の内容が消えている事が確認できる
[rinchome@localhost myweb]$ cat index.html
line1
★15 過去のバージョンに戻る(★14で取り消したものをもう一度戻すパターン)
#1
[rinchome@localhost myweb]$ git log
commit 30d27b25763a2b3f2614ced6c86b0253ad1f61ea (HEAD -> master)
Author: rinchome <rinchome@hotmail.com>
Date:   Sun Jan 3 00:21:25 2021 +0900

    initial commit
#2
[rinchome@localhost myweb]$ cat index.html
line1
#3 git reset --hard ORIG_HEADで戻すことができる
#  ORIN_HEADは、前回取り消されたHEADの情報が1個だけ入っている、それを利用して戻す
[rinchome@localhost myweb]$ git reset --hard ORIG_HEAD
HEAD is now at 2828e6e line 2 added
#4 logを見ると、line 2 addedが出ていることを確認できる
[rinchome@localhost myweb]$ git log
commit 2828e6e69e984357796624d5860d2451246850cc (HEAD -> master)
Author: rinchome <rinchome@hotmail.com>
Date:   Sun Jan 3 16:13:11 2021 +0900

    line 2 added

commit 30d27b25763a2b3f2614ced6c86b0253ad1f61ea
Author: rinchome <rinchome@hotmail.com>
Date:   Sun Jan 3 00:21:25 2021 +0900

    initial commit
#5 catで見ると、line2が反映されていることが分かる
[rinchome@localhost myweb]$ cat index.html
line1
line2
★16 ブランチを使う
######## ★15の実施前の状態に状態に戻す #####################
#1
[rinchome@localhost myweb]$ git log
commit 2828e6e69e984357796624d5860d2451246850cc (HEAD -> master)
Author: rinchome <rinchome@hotmail.com>
Date:   Sun Jan 3 16:13:11 2021 +0900

    line 2 added

commit 30d27b25763a2b3f2614ced6c86b0253ad1f61ea
Author: rinchome <rinchome@hotmail.com>
Date:   Sun Jan 3 00:21:25 2021 +0900

    initial commit
#2
[rinchome@localhost myweb]$ git status
On branch master
nothing to commit, working tree clean
#3
[rinchome@localhost myweb]$ cat index.html
line1
line2
#4 git reset --hardコマンドで戻す コミットIDは7桁以上入力すればよい
[rinchome@localhost myweb]$ git reset --hard 30d27b25763a2b3f2614ced6c86
HEAD is now at 30d27b2 initial commit
#5
[rinchome@localhost myweb]$ git log
commit 30d27b25763a2b3f2614ced6c86b0253ad1f61ea (HEAD -> master)
Author: rinchome <rinchome@hotmail.com>
Date:   Sun Jan 3 00:21:25 2021 +0900

    initial commit
#6
[rinchome@localhost myweb]$ cat index.html
line1
######## ★15の実施前の状態に状態に戻した #####################
#7
[rinchome@localhost myweb]$ pwd
/home/rinchome/myweb
#8 git branchで今あるブランチの一覧が見れる
[rinchome@localhost myweb]$ git branch
* master
#9 新しい機能を別途開発したい場合は、hogeという新しいブランチを作成する
[rinchome@localhost myweb]$ git branch hoge
#10
[rinchome@localhost myweb]$ git branch
  hoge
* master ← 「*」がついているのが、今いるブランチの場所になる
#11 git checkoutでhogeブランチに切り替える
[rinchome@localhost myweb]$ git checkout hoge
Switched to branch 'hoge'
#12 hogeブランチに切り替わったことを確認
[rinchome@localhost myweb]$ git branch
* hoge
  master
#13
[rinchome@localhost myweb]$ ls
index.html
#14 myscript.jsを作成、#15の内容にする
[rinchome@localhost myweb]$ vim  myscript.js
#15
[rinchome@localhost myweb]$ cat myscript.js
alert();
#16 myscript.jsをステージングエリアに上げる
[rinchome@localhost myweb]$ git add .
#17 myscript.jsをコミット
[rinchome@localhost myweb]$ git commit -m "script added"
[hoge 1870d25] script added
 1 file changed, 1 insertion(+)
 create mode 100644 myscript.js
#18 コミットを確認(hogeブランチのログを確認できる)
[rinchome@localhost myweb]$ git log
commit 1870d25dbfc58c96f4188b071bbb543c17cbe9ef (HEAD -> hoge)
Author: rinchome <rinchome@hotmail.com>
Date:   Sun Jan 3 17:43:30 2021 +0900

    script added

commit 30d27b25763a2b3f2614ced6c86b0253ad1f61ea (master)
Author: rinchome <rinchome@hotmail.com>
Date:   Sun Jan 3 00:21:25 2021 +0900

    initial commit
#19 myscript.jsがあることを確認
[rinchome@localhost myweb]$ ls
index.html  myscript.js
#20 masterブランチに切り替える
[rinchome@localhost myweb]$ git checkout master
Switched to branch 'master'
#21 git logを見ると、myscript.js追加のコミット履歴がないことを確認
[rinchome@localhost myweb]$ git log
commit 30d27b25763a2b3f2614ced6c86b0253ad1f61ea (HEAD -> master)
Author: rinchome <rinchome@hotmail.com>
Date:   Sun Jan 3 00:21:25 2021 +0900

    initial commit
#22 lsでもmyscript.jsがないことを確認できる
[rinchome@localhost myweb]$ ls
index.html
★17 ブランチをマージする(hogeブランチをmasterにマージ)
#1 ブランチの一覧を確認(masterブランチであることの確認)
[rinchome@localhost myweb]$ git branch
  hoge
* master
#2
[rinchome@localhost myweb]$ ls
index.html
#3 git mergeを利用して、★16の時にhogeで作成したmyscript.jsをmasterにマージ
[rinchome@localhost myweb]$ git merge hoge
Updating 30d27b2..1870d25
Fast-forward
 myscript.js | 1 +
 1 file changed, 1 insertion(+)
 create mode 100644 myscript.js
#4 lsすると、masterにmyscript.jsが追加されていることが確認できる
[rinchome@localhost myweb]$ ls
index.html  myscript.js
#5 git logをすると、「script added」のコミット履歴があることを確認
[rinchome@localhost myweb]$ git log
commit 1870d25dbfc58c96f4188b071bbb543c17cbe9ef (HEAD -> master, hoge)
Author: rinchome <rinchome@hotmail.com>
Date:   Sun Jan 3 17:43:30 2021 +0900

    script added

commit 30d27b25763a2b3f2614ced6c86b0253ad1f61ea
Author: rinchome <rinchome@hotmail.com>
Date:   Sun Jan 3 00:21:25 2021 +0900

    initial commit
#6
[rinchome@localhost myweb]$ git branch
  hoge
* master
#7 マージしたので、hogeブランチを削除する
[rinchome@localhost myweb]$ git branch -d hoge
Deleted branch hoge (was 1870d25).
#8 hogeブランチが削除されていることを確認する
[rinchome@localhost myweb]$ git branch
* master

下記↓↓は捕捉情報(今回は実施しない)
# git stashについて
# 作業途中でマージしようとすると、
# マージによって現在の変更内容が上書きされてしまう場合に、
# 次のようなエラーメッセージが表示されます。

Please, commit your changes or stash them before you can merge.

# この場合、先にコミットもしくは「stash」を行なわなければなりません。
# では、この「stash」とは何でしょう?
# 実は「git stash」を使うと、一時的に変更内容(コミットを実施していない内容)
# を退避させることができます。
# 「まだ作業途中なのでコミットしたくない」という場合にこの stash が使えます。
[rinchome@localhost myweb] $git stash save

# わかりやすいコメントをつけて保存することもできます。
[rinchome@localhost myweb] $git stash save "コメント"

# 退避した情報は「git stash list」で一覧表示できます。
[rinchome@localhost myweb]$ git stash list

# stash するたびに、この一覧の「上」に退避データが積み上がっていきます。
# 退避した内容は「git stash pop」で取り出すことができます。
[rinchome@localhost myweb]$ git stash pop
# 引数をつけない場合、list で表示した一番上の内容が取り出されます。
# stashとpopは例えば、ゴリゴリ開発をしていて、間違ったブランチで開発をしていた時に
# 一旦、stashで内容を退避させ、その後、ブランチを切り替えて、popを実行することで
# 今まで開発していた内容を正しいブランチの方に反映させることができます

# マージ済みのブランチ一覧を確認する方法
# masterにマージ済みのbranchの一覧を見るには、
# masterに切り替えた状態で「git branch --merged」というコマンドを実行します。
[rinchome@localhost myweb]$ git checkout master
[rinchome@localhost myweb]$ git branch --merged

# 逆に、まだmasterにマージしていないbranchの一覧を見るには
#「git branch --no-merged」を使います。
[rinchome@localhost myweb]$ git checkout master
[rinchome@localhost myweb]$ git branch --no-merged
★18 マージの衝突を解決する
######### ★17実施前の状態に状態に戻す #####################
#1
[rinchome@localhost myweb]$ git branch
* master
#2
[rinchome@localhost myweb]$ git log
commit 1870d25dbfc58c96f4188b071bbb543c17cbe9ef (HEAD -> master)
Author: rinchome <rinchome@hotmail.com>
Date:   Sun Jan 3 17:43:30 2021 +0900

    script added

commit 30d27b25763a2b3f2614ced6c86b0253ad1f61ea
Author: rinchome <rinchome@hotmail.com>
Date:   Sun Jan 3 00:21:25 2021 +0900

    initial commit
#3
[rinchome@localhost myweb]$ git status
On branch master
nothing to commit, working tree clean
#4
[rinchome@localhost myweb]$ ls
index.html  myscript.js
#5
[rinchome@localhost myweb]$ cat index.html
line1

#6 git reset --hardで直前のコミットを消す
[rinchome@localhost myweb]$ git reset --hard 30d27b25763a2b3f2614ced6c86b0253ad1f61ea
HEAD is now at 30d27b2 initial commit
#7
[rinchome@localhost myweb]$ git branch
* master
#8
[rinchome@localhost myweb]$ git log
commit 30d27b25763a2b3f2614ced6c86b0253ad1f61ea (HEAD -> master)
Author: rinchome <rinchome@hotmail.com>
Date:   Sun Jan 3 00:21:25 2021 +0900

    initial commit
#9
[rinchome@localhost myweb]$ git status
On branch master
nothing to commit, working tree clean
#10
[rinchome@localhost myweb]$ ls
index.html
#11
[rinchome@localhost myweb]$ cat index.html
line1
######### ★17実施前の状態に状態に戻した #####################
#12
[rinchome@localhost myweb]$ git branch
* master
#13
[rinchome@localhost myweb]$ git log
commit 30d27b25763a2b3f2614ced6c86b0253ad1f61ea (HEAD -> master)
Author: rinchome <rinchome@hotmail.com>
Date:   Sun Jan 3 00:21:25 2021 +0900

    initial commit
#14
[rinchome@localhost myweb]$ ls
index.html
#15
[rinchome@localhost myweb]$ cat index.html
line1
#16 git checkout -bでhogehogeブランチを作成し、
#   作成すると同時にhogehogeブランチに切り替える
[rinchome@localhost myweb]$ git checkout -b hogehoge
Switched to a new branch 'hogehoge'
#17 hogehogeブランチに切りかわっていることを確認
[rinchome@localhost myweb]$ git branch
* hogehoge
  master
#18 vimで修正(#19の内容にする)
[rinchome@localhost myweb]$ vim index.html
#19 vimでline1からline firstと修正したことを確認
[rinchome@localhost myweb]$ cat index.html
line first
#20 ステージングに上げる
[rinchome@localhost myweb]$ git add .
#21
[rinchome@localhost myweb]$ git commit -m "not 1 but first"
[hogehoge fd0c888] not 1 but first
 1 file changed, 1 insertion(+), 1 deletion(-)
#22 masterに切り替える
[rinchome@localhost myweb]$ git checkout master
Switched to branch 'master'
#23 vimで修正(#24の内容にする)
[rinchome@localhost myweb]$ vim index.html
#24 vimでline1からline 1stと修正したことを確認
[rinchome@localhost myweb]$ cat index.html
line 1st
#25 ステージングに上げる
[rinchome@localhost myweb]$ git add .
#26
[rinchome@localhost myweb]$ git commit -m "not 1 but 1st"
[master 8306537] not 1 but 1st
 1 file changed, 1 insertion(+), 1 deletion(-)
#27
[rinchome@localhost myweb]$ git branch
  hogehoge
* master
#28 hogehogeをmasterにマージする。
#  マージすると、同じ箇所を修正したのでコンフリクトが発生
[rinchome@localhost myweb]$ git merge hogehoge
Auto-merging index.html
CONFLICT (content): Merge conflict in index.html
Automatic merge failed; fix conflicts and then commit the result.
#29 ステータスを見ると、index.htmlは両方修正が入ってるからなんとかしてよ
# のメッセージが表示される
[rinchome@localhost myweb]$ git status
On branch master
You have unmerged paths.
  (fix conflicts and run "git commit")
  (use "git merge --abort" to abort the merge)

Unmerged paths:
  (use "git add <file>..." to mark resolution)
        both modified:   index.html →両方に修正が入っているよの意味

no changes added to commit (use "git add" and/or "git commit -a")
#30 vimで修正を行う(#31の内容にする)
[rinchome@localhost myweb]$ vim index.html
# index.htmlを開くと以下↓↓の状態になっている
# 意味としては、「<<<<<<< HEAD」から「>>>>>>> hogehoge」までが
# コンフリクトしているよの意味になる
# 「<<<<<<< HEAD」から「=======」がmasterの内容であり、
# 「=======」から「>>>>>>> hogehogeがhogehogeの内容になる
# だからどっちの書き方を選ぶか、もしくは正しい書き方に書き換える
<<<<<<< HEAD
line 1st
=======
line first
>>>>>>> hogehoge

#31 上記、masterの内容にするためvim index.htmlで以下↓↓の様に書き換える
line 1st
#32
[rinchome@localhost myweb]$ cat index.html
line 1st
#33
[rinchome@localhost myweb]$ git add .
#34 もう1回コミット
[rinchome@localhost myweb]$ git commit -m "conflict fixed"
[master 7e6a946] conflict fixed
#35 git log を確認。コンフリクトが解決できていることが確認できる
[rinchome@localhost myweb]$ git log
commit 7e6a94666358990b65409c662aad6387d357de7f (HEAD -> master)
Merge: 8306537 fd0c888
Author: rinchome <rinchome@hotmail.com>
Date:   Sun Jan 3 18:54:22 2021 +0900

    conflict fixed →コンフリクト解決

commit 83065370b2385ca3a182c454fa93f6ef4678662f
Author: rinchome <rinchome@hotmail.com>
Date:   Sun Jan 3 18:29:28 2021 +0900

    not 1 but 1st →masterのコミット履歴。履歴があるので、元に戻ることも可能

commit fd0c888d1bdb70035436edcb87c9bcae04eda628 (hogehoge)
Author: rinchome <rinchome@hotmail.com>
Date:   Sun Jan 3 18:26:53 2021 +0900

    not 1 but first →hogehogeのコミット履歴。履歴があるので、元に戻ることも可能

commit 30d27b25763a2b3f2614ced6c86b0253ad1f61ea
Author: rinchome <rinchome@hotmail.com>
Date:   Sun Jan 3 00:21:25 2021 +0900

    initial commit
#36 git statusも問題ないことが確認できる
[rinchome@localhost myweb]$ git status
On branch master
nothing to commit, working tree clean
★19 タグを使ってみる
######### ★18実施前の状態に状態に戻す #####################
#1 logの確認
[rinchome@localhost myweb]$ git log
commit 7e6a94666358990b65409c662aad6387d357de7f (HEAD -> master)
Merge: 8306537 fd0c888
Author: rinchome <rinchome@hotmail.com>
Date:   Sun Jan 3 18:54:22 2021 +0900

    conflict fixed

commit 83065370b2385ca3a182c454fa93f6ef4678662f
Author: rinchome <rinchome@hotmail.com>
Date:   Sun Jan 3 18:29:28 2021 +0900

    not 1 but 1st

commit fd0c888d1bdb70035436edcb87c9bcae04eda628 (hogehoge)
Author: rinchome <rinchome@hotmail.com>
Date:   Sun Jan 3 18:26:53 2021 +0900

    not 1 but first

commit 30d27b25763a2b3f2614ced6c86b0253ad1f61ea
Author: rinchome <rinchome@hotmail.com>
Date:   Sun Jan 3 00:21:25 2021 +0900

    initial commit
#2 ブランチの確認
[rinchome@localhost myweb]$ git branch
  hogehoge
* master
#3 lsで確認
[rinchome@localhost myweb]$ ls
index.html
#4 masterにマージ済みのブランチを削除するため、「git branch --delete hogehoge」を利用
# マージされていないブランチを削除したいときは「git branch -D hogehoge」を利用
[rinchome@localhost myweb]$ git branch --delete hogehoge
Deleted branch hogehoge (was fd0c888).
#5 「initial commit」の状態に戻す
[rinchome@localhost myweb]$ git reset --hard 30d27b25763a2b3f2614ced6c86b0253ad1f61ea
HEAD is now at 30d27b2 initial commit
#6 「initial commit」の状態に戻っていることを確認
[rinchome@localhost myweb]$ git log
commit 30d27b25763a2b3f2614ced6c86b0253ad1f61ea (HEAD -> master)
Author: rinchome <rinchome@hotmail.com>
Date:   Sun Jan 3 00:21:25 2021 +0900

    initial commit
#7 hogehogeブランチが消えていることを確認
[rinchome@localhost myweb]$ git branch
* master
#8
[rinchome@localhost myweb]$ git status
On branch master
nothing to commit, working tree clean
#9
[rinchome@localhost myweb]$ ls
index.html
#10
[rinchome@localhost myweb]$ cat index.html
line1
######### ★18実施前の状態に状態に戻した #####################
#11
[rinchome@localhost myweb]$ git log
commit 30d27b25763a2b3f2614ced6c86b0253ad1f61ea (HEAD -> master)
Author: rinchome <rinchome@hotmail.com>
Date:   Sun Jan 3 00:21:25 2021 +0900

    initial commit
#12 vimで編集(#13の内容にする)
[rinchome@localhost myweb]$ vim index.html
#13 line2で追加したことを確認
[rinchome@localhost myweb]$ cat index.html
line1
line2
#14
[rinchome@localhost myweb]$ git add .
#15 line2の分をコミット
[rinchome@localhost myweb]$ git commit -m "line 2 added"
[master 2233d51] line 2 added
 1 file changed, 1 insertion(+)
#16 コミットを確認
[rinchome@localhost myweb]$ git log
commit 2233d51d18ba2412391e30c5ceb0b251c15b0c71 (HEAD -> master)
Author: rinchome <rinchome@hotmail.com>
Date:   Sun Jan 3 19:22:07 2021 +0900

    line 2 added

commit 30d27b25763a2b3f2614ced6c86b0253ad1f61ea
Author: rinchome <rinchome@hotmail.com>
Date:   Sun Jan 3 00:21:25 2021 +0900

    initial commit
#17 直近のコミット(コミットID:2233d51d18ba2412391e30c5ceb0b251c15b0c71)
#  に対してタグをつけるには、「git tag v1.0」みたいに書く
[rinchome@localhost myweb]$ git tag v1.0
#18 「git tag」でタグの一覧が出る
[rinchome@localhost myweb]$ git tag
v1.0
#19 「git show v1.0」はコミットの内容
# (コミットID:2233d51d18ba2412391e30c5ceb0b251c15b0c71)が表示される
[rinchome@localhost myweb]$ git show v1.0
commit 2233d51d18ba2412391e30c5ceb0b251c15b0c71 (HEAD -> master, tag: v1.0)
Author: rinchome <rinchome@hotmail.com>
Date:   Sun Jan 3 19:22:07 2021 +0900

    line 2 added

diff --git a/index.html b/index.html
index 3fdf384..4596df0 100644
--- a/index.html
+++ b/index.html
@@ -1,2 +1,3 @@
 line1
+line2
#20 直近にコミットしたものではない
#  「コミットID:30d27b25763a2b3f2614ced6c86b0253ad1f61ea」に対してタグをつけたい場合は、
# 「git tag v0.9 30d27b25763a2b3f2614ced6c86b0253ad1f61ea」にみたいにする
[rinchome@localhost myweb]$ git tag v0.9 30d27b25763a2b3f2614ced6c86b0253ad1f61ea
#21 v0.9のタグができていることを確認
[rinchome@localhost myweb]$ git tag
v0.9
v1.0
#22
[rinchome@localhost myweb]$ git show v0.9
commit 30d27b25763a2b3f2614ced6c86b0253ad1f61ea (tag: v0.9)
Author: rinchome <rinchome@hotmail.com>
Date:   Sun Jan 3 00:21:25 2021 +0900

    initial commit

diff --git a/index.html b/index.html
new file mode 100644
index 0000000..3fdf384
--- /dev/null
+++ b/index.html
@@ -0,0 +1,2 @@
+line1
+
#23 タグの一覧を確認する
[rinchome@localhost myweb]$ git tag
v0.9
v1.0
#24 タグを削除したい場合は、「git tag -d」を使う
[rinchome@localhost myweb]$ git tag -d v0.9
Deleted tag 'v0.9' (was 30d27b2)
#25 v0.9のタグが削除されていることを確認
[rinchome@localhost myweb]$ git tag
v1.0

#「git reset」とかで戻したい場合に、コミットIDをタグ名に変えて戻すことができる
★20 エイリアスを使う
#1
[rinchome@localhost myweb]$ git status
On branch master
nothing to commit, working tree clean
#2 「git checkout」コマンドを「git co」で実行できるように設定
[rinchome@localhost myweb]$ git config --global alias.co checkout
#3 「git status」コマンドを「git st」で実行できるように設定
[rinchome@localhost myweb]$ git config --global alias.st status
#4 「git branch」コマンドを「git br」で実行できるように設定
[rinchome@localhost myweb]$ git config --global alias.br branch
#5 「git commit」コマンドを「git ci」で実行できるように設定
[rinchome@localhost myweb]$ git config --global alias.ci commit
#6 git statusをgit stで実行してみる
[rinchome@localhost myweb]$ git st
On branch master
nothing to commit, working tree clean
#7 エイリアスの設定一覧を見たい場合は、「git config -l」を実行する
[rinchome@localhost myweb]$ git config -l
user.name=rinchome
user.email=rinchome@hotmail.com
color.ui=true
alias.co=checkout
alias.st=status
alias.br=branch
alias.ci=commit
core.repositoryformatversion=0
core.filemode=true
core.bare=false
core.logallrefupdates=true
★21 共有作業を実施する
・共有リポジトリーを利用してAさんとBさんで共同で開発
・AさんとBさんのユーザーは本来は分けるが、今回は一人二役で実施する①共有リポジトリー ourweb.git(本来リモートサーバーやインターネット上に配置するもの)
・今回はローカルに別ディレクトリーを切って配置する
・共有リポジトリーのディレクトリー名は.gitとつけるのが通例になっている②Aさん→mywebディレクトリーを管理する
③Bさん→myweb2ディレクトリーを管理する
######### ★19実施前の状態に状態に戻す #####################
#1
[rinchome@localhost myweb]$ ls
index.html
#2
[rinchome@localhost myweb]$ git log
commit 2233d51d18ba2412391e30c5ceb0b251c15b0c71 (HEAD -> master, tag: v1.0)
Author: rinchome <rinchome@hotmail.com>
Date:   Sun Jan 3 19:22:07 2021 +0900

    line 2 added

commit 30d27b25763a2b3f2614ced6c86b0253ad1f61ea
Author: rinchome <rinchome@hotmail.com>
Date:   Sun Jan 3 00:21:25 2021 +0900

    initial commit
#3
[rinchome@localhost myweb]$ git status
On branch master
nothing to commit, working tree clean
#4
[rinchome@localhost myweb]$ git tag
v1.0
#5 v1.0タグを削除
[rinchome@localhost myweb]$ git tag -d v1.0
Deleted tag 'v1.0' (was 2233d51)
#6 「initial commit」まで戻す
[rinchome@localhost myweb]$ git reset --hard 30d27b25763a2b3f2614ced6c86b0253ad1f61ea
HEAD is now at 30d27b2 initial commit
#7
[rinchome@localhost myweb]$ git log
commit 30d27b25763a2b3f2614ced6c86b0253ad1f61ea (HEAD -> master)
Author: rinchome <rinchome@hotmail.com>
Date:   Sun Jan 3 00:21:25 2021 +0900

    initial commit
#8
[rinchome@localhost myweb]$ ls
index.html
#9
[rinchome@localhost myweb]$ git status
On branch master
nothing to commit, working tree clean
#10
[rinchome@localhost myweb]$ cat index.html
line1
######### ★19実施前の状態に状態に戻した #####################
#11
[rinchome@localhost ~]$ cd ../
[rinchome@localhost ~]$ pwd
/home/rinchome
#12
[rinchome@localhost ~]$ ls
myweb
#13 共有リポジトリーを作成する
[rinchome@localhost ~]$ mkdir ourweb.git
#14 cdで移動
[rinchome@localhost ~]$ cd ourweb.git/
#15 共有リポジトリーをつくるときは、「git init」だけではなく、
#   オプションで--bareというのを追加する
#   --bareを追加することで共有の意味になり、管理ファイルだけが管理される
#  ここの中ではファイルのコミットなどは基本的にしないという設定になる
[rinchome@localhost ourweb.git]$ git init --bare
Initialized empty Git repository in /home/rinchome/ourweb.git/
#16
[rinchome@localhost ourweb.git]$ cd ..
#17
[rinchome@localhost ~]$ ls
myweb  ourweb.git
#18
[rinchome@localhost ~]$ cd myweb/
#19
[rinchome@localhost myweb]$ git status
On branch master
nothing to commit, working tree clean
#20
[rinchome@localhost myweb]$ git log
commit 30d27b25763a2b3f2614ced6c86b0253ad1f61ea (HEAD -> master)
Author: rinchome <rinchome@hotmail.com>
Date:   Sun Jan 3 00:21:25 2021 +0900

    initial commit

# 続きは★22で↓↓↓↓↓↓↓↓↓↓↓↓↓↓↓↓↓↓↓
★22 ★21の続き 共有リポジトリーにPUSHする
Aさんのmyweb内容を共有リポジトリーourweb.gitに突っ込む
#1 別のリポジトリーを登録するにあたって、「git remote」を利用
# 「git remote add」 で追加するが、名前でよく使われるのがorigin
# 「git remote add origin」にして、
#  さらにその先のリポジトリーの場所(~/ourweb.git)を指定
#  最終的に「git remote add origin ~/ourweb.git」で実行
[rinchome@localhost myweb]$ git remote add origin ~/ourweb.git/
#2 「git config -l」でリモートのORIGINがここにあるよが分かる
[rinchome@localhost myweb]$ git config -l
user.name=rinchome
user.email=rinchome@hotmail.com
color.ui=true
alias.co=checkout
alias.st=status
alias.br=branch
alias.ci=commit
core.repositoryformatversion=0
core.filemode=true
core.bare=false
core.logallrefupdates=true
remote.origin.url=/home/rinchome/ourweb.git/ →これが、リモートのORIGINになる
remote.origin.fetch=+refs/heads/*:refs/remotes/origin/*
#3 共有リポジトリーに対して、今の内容pushする(押し出す)
# 「git push origin master」で共有リポジトリー(先ほど追加したorigin)に
#  向かってmasterの内容をつっこんで下さいという意味になる
[rinchome@localhost myweb]$ git push origin master
Enumerating objects: 3, done.
Counting objects: 100% (3/3), done.
Writing objects: 100% (3/3), 214 bytes | 214.00 KiB/s, done.
Total 3 (delta 0), reused 0 (delta 0), pack-reused 0
To /home/rinchome/ourweb.git/
 * [new branch]      master -> master

#4 上記を実行することでmywebの中身が共有リポジトリーに入ったことになる
#5 「git remote rm origin」みたいにやると削除もできる(今回は実行しない)
★23 ★22の続き リポジトリーの内容を共有する
やることイメージ↓↓
・共有リポジトリーの中身をBさんのmyweb2に入れる
・Bさんのmyweb2の中身でファイル(index.html)の編集を加え、共有リポジトリーにPUSH
・BさんがPUSHした内容をAさんが取り込む(pull)#1 [rinchome@localhost myweb]$ cd .. #2 [rinchome@localhost ~]$ ls myweb ourweb.git #3 cloneで共有リポジトリーの中身をmyweb2に入れる [rinchome@localhost ~]$ git clone ~/ourweb.git/ myweb2 Cloning into 'myweb2'... done. #4 myweb2に移動 [rinchome@localhost ~]$ cd myweb2 #5 [rinchome@localhost myweb2]$ ls index.html #6 Aさんがpushした「initial commit」が記録されているのが分かる [rinchome@localhost myweb2]$ git log commit 30d27b25763a2b3f2614ced6c86b0253ad1f61ea (HEAD -> master, origin/master, origin/HEAD) Author: rinchome <rinchome@hotmail.com> Date: Sun Jan 3 00:21:25 2021 +0900 initial commit #7 vimで編集(#8の内容にする) [rinchome@localhost myweb2]$ vim index.html #8 line2を追加したのを確認 [rinchome@localhost myweb2]$ cat index.html line1 line2 #9 [rinchome@localhost myweb2]$ git add . #10 Bさんコミット [rinchome@localhost myweb2]$ git commit -m "line2 added" [master be6d6d2] line2 added 1 file changed, 1 insertion(+) #11 cloneしたときにリモートの情報も引き継がれるので # そのままgit push origin masterで共有リポジトリーにpushしてくれる [rinchome@localhost myweb2]$ git push origin master Enumerating objects: 5, done. Counting objects: 100% (5/5), done. Writing objects: 100% (3/3), 248 bytes | 248.00 KiB/s, done. Total 3 (delta 0), reused 0 (delta 0), pack-reused 0 To /home/rinchome/ourweb.git/ 30d27b2..be6d6d2 master -> master #12 ログを見るとBさんがやった内容が保存されているのが確認できる [rinchome@localhost myweb2]$ git log commit be6d6d2aa0157b7964a8b4bb1489cc8ca8b34a56 (HEAD -> master, origin/master, origin/HEAD) Author: rinchome <rinchome@hotmail.com> Date: Sun Jan 3 20:56:23 2021 +0900 line2 added commit 30d27b25763a2b3f2614ced6c86b0253ad1f61ea Author: rinchome <rinchome@hotmail.com> Date: Sun Jan 3 00:21:25 2021 +0900 initial commit #13 Aさんのmywebに移動 [rinchome@localhost myweb2]$ cd ../myweb #14 Bさんがpushした内容をAさんの所に取り込む(pullで実施) [rinchome@localhost myweb]$ git pull origin master warning: Pulling without specifying how to reconcile divergent branches is discouraged. You can squelch this message by running one of the following commands sometime before your next pull: git config pull.rebase false # merge (the default strategy) git config pull.rebase true # rebase git config pull.ff only # fast-forward only You can replace "git config" with "git config --global" to set a default preference for all repositories. You can also pass --rebase, --no-rebase, or --ff-only on the command line to override the configured default per invocation. remote: Enumerating objects: 5, done. remote: Counting objects: 100% (5/5), done. remote: Total 3 (delta 0), reused 0 (delta 0), pack-reused 0 Unpacking objects: 100% (3/3), 228 bytes | 228.00 KiB/s, done. From /home/rinchome/ourweb * branch master -> FETCH_HEAD 30d27b2..be6d6d2 master -> origin/master Updating 30d27b2..be6d6d2 Fast-forward index.html | 1 + 1 file changed, 1 insertion(+) #15 ログを見るとBさんがやった内容が保存されているのが確認できる [rinchome@localhost myweb]$ git log commit be6d6d2aa0157b7964a8b4bb1489cc8ca8b34a56 (HEAD -> master, origin/master) Author: rinchome <rinchome@hotmail.com> Date: Sun Jan 3 20:56:23 2021 +0900 line2 added ← Bさんがやった内容 commit 30d27b25763a2b3f2614ced6c86b0253ad1f61ea Author: rinchome <rinchome@hotmail.com> Date: Sun Jan 3 00:21:25 2021 +0900 initial commit★24 共有時のトラブルを解決する
やることのイメージ
・AさんとBさんで同じ箇所を修正していて、
Bさんが先に修正をして、PUSHを実施
AさんはBさんが修正しているのを知らずに同じ箇所をPUSHした場合
競合が発生するので、
Aさんは一旦PULLでBさんの修正を取り入れ、
Aさんの修正が正しかったので、Aさんの内容に書き換えて、PUSHを実施する#1 Bさん側に移動 [rinchome@localhost myweb]$ cd ../myweb2 #2 [rinchome@localhost myweb2]$ ls index.html #3 vimで編集(#4の内容にする) [rinchome@localhost myweb2]$ vim index.html #4 line3というのを追加したことを確認 [rinchome@localhost myweb2]$ cat index.html line1 line2 line3 #5 Bさんの内容をステージングに上げる [rinchome@localhost myweb2]$ git add . #6 Bさんの内容をコミット [rinchome@localhost myweb2]$ git commit -m "line 3 added" [master ea954b3] line 3 added 1 file changed, 1 insertion(+) #7 Bさんの内容をPUSH [rinchome@localhost myweb2]$ git push origin master Enumerating objects: 5, done. Counting objects: 100% (5/5), done. Writing objects: 100% (3/3), 251 bytes | 251.00 KiB/s, done. Total 3 (delta 0), reused 0 (delta 0), pack-reused 0 To /home/rinchome/ourweb.git/ be6d6d2..ea954b3 master -> master #8 Aさん側に移動 [rinchome@localhost myweb2]$ cd ../myweb #9 [rinchome@localhost myweb]$ cat index.html line1 line2 #10 vimで編集(#11の内容にする) [rinchome@localhost myweb]$ vim index.html #11 line thirdというのを追加していることを確認 [rinchome@localhost myweb]$ cat index.html line1 line2 line third #12 「git commit -am」を利用して、ステージングとコミットを同時に実施 [rinchome@localhost myweb]$ git commit -am "line third added" [master b5402d7] line third added 1 file changed, 1 insertion(+) #13 Aさんの内容をPUSH、PUSHするとPUSHに失敗する # 原因は共有リポジトリーはBさんが先にPUSHしているので、 # 最初にBさんの内容をPULLしなさいのエラーメッセージが出る [rinchome@localhost myweb]$ git push origin master To /home/rinchome/ourweb.git/ ! [rejected] master -> master (fetch first) error: failed to push some refs to '/home/rinchome/ourweb.git/' hint: Updates were rejected because the remote contains work that you do hint: not have locally. This is usually caused by another repository pushing hint: to the same ref. You may want to first integrate the remote changes hint: (e.g., 'git pull ...') before pushing again. hint: See the 'Note about fast-forwards' in 'git push --help' for details. #14 こういう場合は、git pullをする。 # ただし、修正箇所が異なっている場合は問題ないが、 # 今回同じ箇所を修正しているため、コンフリクトが発生する [rinchome@localhost myweb]$ git pull origin master warning: Pulling without specifying how to reconcile divergent branches is discouraged. You can squelch this message by running one of the following commands sometime before your next pull: git config pull.rebase false # merge (the default strategy) git config pull.rebase true # rebase git config pull.ff only # fast-forward only You can replace "git config" with "git config --global" to set a default preference for all repositories. You can also pass --rebase, --no-rebase, or --ff-only on the command line to override the configured default per invocation. remote: Enumerating objects: 5, done. remote: Counting objects: 100% (5/5), done. remote: Total 3 (delta 0), reused 0 (delta 0), pack-reused 0 Unpacking objects: 100% (3/3), 231 bytes | 231.00 KiB/s, done. From /home/rinchome/ourweb * branch master -> FETCH_HEAD be6d6d2..ea954b3 master -> origin/master Auto-merging index.html CONFLICT (content): Merge conflict in index.html →コンフリクトが発生 Automatic merge failed; fix conflicts and then commit the result. #15 コンフリクトが発生するため、以下(index.html)↓↓を #line1 #line2 #<<<<<<< HEAD #line third #======= #line3 #>>>>>>> ea954b335db29f0c00494104c4b438cfdf7d59e0 #を以下(index.html)↓↓に変更する(Aさんの内容に変更する) #line1 #line2 #line third #16 vimで編集(#17の内容にする) [rinchome@localhost myweb]$ vim index.html #17 [rinchome@localhost myweb]$ cat index.html line1 line2 line third #18 ステータスとコミットを同時に実施 [rinchome@localhost myweb]$ git commit -am "conflict fixed" [master b5402d7] line third added 1 file changed, 1 insertion(+) #19 pushが成功する [rinchome@localhost myweb]$ git push origin master Enumerating objects: 8, done. Counting objects: 100% (8/8), done. Compressing objects: 100% (2/2), done. Writing objects: 100% (4/4), 379 bytes | 379.00 KiB/s, done. Total 4 (delta 1), reused 0 (delta 0), pack-reused 0 To /home/rinchome/ourweb.git/ ea954b3..27f4659 master -> master★25 ドットインストールの学習完了
★26 参考URL
https://dotinstall.com/lessons/basic_git
https://qiita.com/tomy0610/items/66e292f80aa1adc1161d
https://qiita.com/shuntaro_tamura/items/06281261d893acf049ed
https://qiita.com/hogeta_/items/33d2334c9b1919bd5120
https://qiita.com/sirone/items/2e233ab9697a030f1335
- 投稿日:2021-01-11T12:36:11+09:00
git push heroku master のエラーの解決法
herokuにpushしようとしたら、エラー起こる。
ターミナル実行コマンド% git push heroku masterコマンド結果
ターミナル! [remote rejected] master -> master (pre-receive hook declined) error: failed to push some refs to 'https://git.heroku.com/アプリケーション名.git'
なるほど、プッシュできませんでしたよ、と言うことですね。
エラー文で検索を掛け、いろいろ試してみましたが、効果はなし。。。"failed to push some refs to"とあるので、その一部とはどこなのかを検討しました。
git push heroku masterを実行すると、しばらくはつらつらと結果が印字されます。
その中に発見した赤字の部分。remote: ! remote: ! Could not detect rake tasks remote: ! ensure you can run `$ bundle exec rake -P` against your app remote: ! and using the production group of your Gemfile. remote: ! /tmp/build_f78ce664/config/boot.rb:4:in `require': cannot load such file -- bootsnap/setup (LoadError) remote: ! from /tmp/build_f78ce664/config/boot.rb:4:in `<top (required)>' remote: ! from /tmp/build_f78ce664/bin/rake:7:in `require_relative' remote: ! from /tmp/build_f78ce664/bin/rake:7:in `<main>' remote: !あきらかに上手く行ってなさそうな部分を発見しました(笑)
何やら、
- bundle exec
- Gemfile
- require
- bootsnap/setup (LoadError)
などと書いてあるのが目に止まります。
一つ一つ確かめてみたものの、良い結果にはなりませんでした。
夜中までエラーと戦っていましたが、にっちもさっちも行かなくなりました。。。最終手段、メンターに相談!!
翌朝さっそくメンターさんに相談しました。
5分で解決しました。一生忘れなさそう。(´・ω・`)
原因は、bundlerのバージョンでした。
どうやら、使用していたbundlerのバージョンは、Herokuに対応していないそう。Gemfile.lockBUNDLED WITH バンドラーバージョン記述は僕の場合一番下に書いてありました。
bundlerのバージョンを変更
以下の手順で行いました。
% gem uninstall bundler% gem install bundler -v 2.1.4今の所、
-v 2.1.4が対応しているそうです。
インストールできたら、Gemfile.lockファイルを削除します。Gemfile.lockファイルは、Gemfileの履歴を残しているファイルです。
わかりやすい記事があったので、載せておきます。
https://qiita.com/nishina555/items/1b343d368c5ecec6aecfそして、bundleのインストール
% bundle installGemfile.lockが自動生成されているのを確認してください。
Gemfile.lockBUNDLED WITH 2.1.4になっていたらOKです。
GitHubでのcommit,pushを忘れずに。
Gemfile.lockが変更されたので、GitHub Desktopからcommit,pushを行いました。
最後に、もう一度コマンドを実行してみましょう。
% git push heroku master結果
To https://git.heroku.com/アプリケーション名.git
 * [new branch]      master -> master
成功です。
さいごに
22時から始めて、2時まで戦っていました。
今まで、ある程度のエラーは自己解決してきたので、なんとかなると思っていましたが、及ばず。。。今回のエラーでは、エラー内容が直接的な表示がされていません。
SyntaxErrorとかって書かれていたら、それがどのファイルの何行目なのかって、すぐわかるじゃないですか。書いてあるので(笑)
今回はきつかったですね。仕組みとしては、エラー内容にもあった部分、
bootsnap/setup (LoadError)このbootsnapというのを、bundlerが動かしているそうで。
bundlerを設定し直してやることで、上手くいったということですね。自己解決に至らず4時間戦い、メンターに相談して5分で解決したのは、衝撃的で記憶にバッチリ残りました。
- 投稿日:2021-01-11T12:13:25+09:00
開発が進んだ親branchの内容を現在のbranchに取り込む(Source Tree)
概要
gitでは、最初にbranchを切って、子branchで作業を始めると思います。
その際、チームでgitを使って開発していると、親branchのコードが先に進んでしまっているケースがよくあると思います。
つまり、他のbranchがmergeされて、最初にbranchを切った時とはコードが変わっているケースです。
基本、子branchでそのまま開発して実装完了後に親branchにmergeすればいいのですが、
今回は、mergeする前に現在の親branchの内容を取り込んで、子branchで開発した後にmergeしたかっったので
どうすればいいか勉強した内容のメモです。前提
ここでは親branchをmaster、その子branchをfeatureとします。
最近SourceTreeを使い始めたので、そこでのやり方です。
方法
結論、masterをfeatureにmergeする。
featureで開発完了後、masterにmergeすることは日常でしたが、
なるほどその反対をすればいいわけですね!
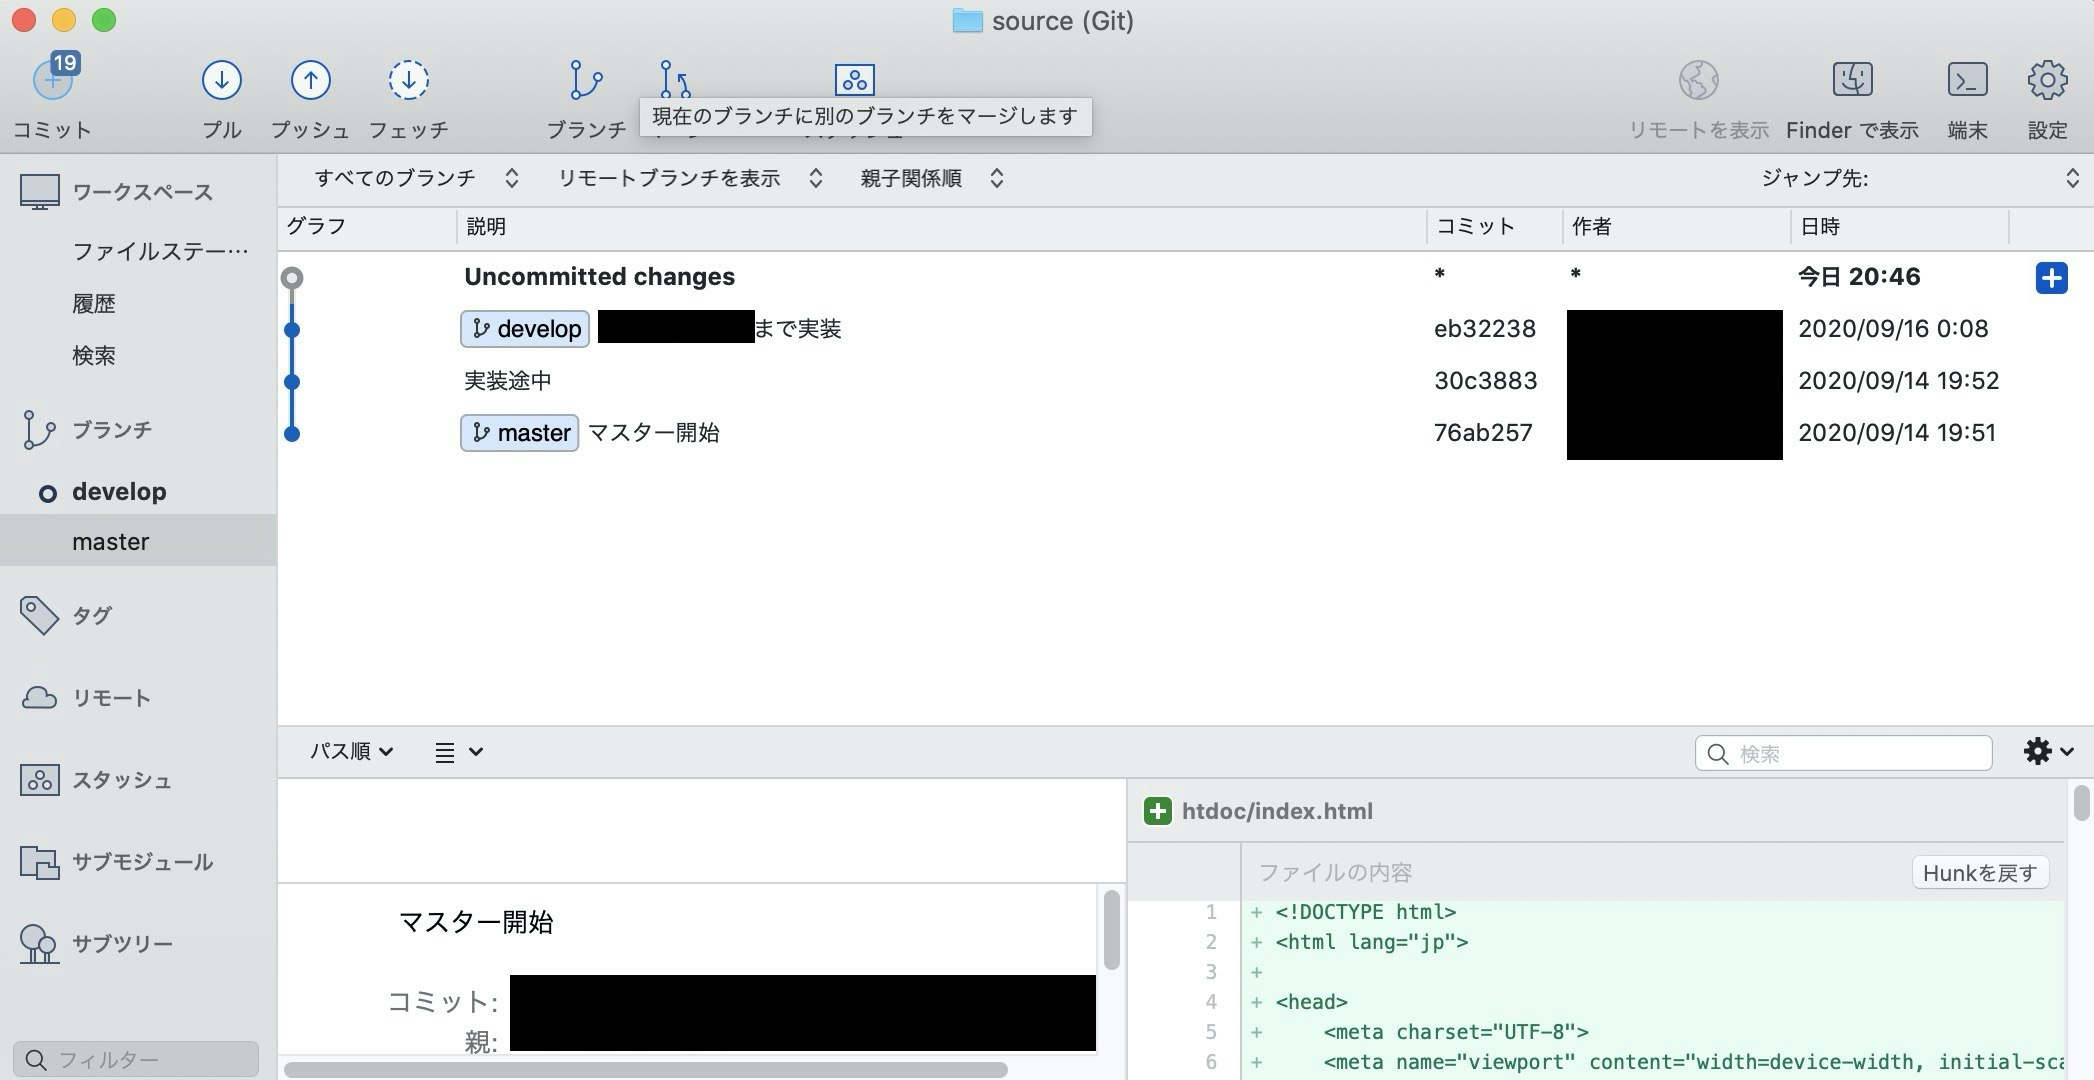
- featureブランチに
checkoutする- マージをクリック
- ログからマージのタブにて、マージさせたいブランチ(master)の
commitをクリック- OKをクリック
- 全ての変更を
commit
- コミットメッセージが自動的に作成されるのでそのまま使用すればOK (
Merge branch 'master' into feature)conflictが発生していた場合はテキストエディタなどで解消してからcommit最後に
最初勉強する前は、
rebaseだと思っていたのですが、mergeが基本みたいですね。たぶん
rebaseでもできるんでしょうが。。。。私はそもそも
rebaseした後にハードコミットするのが怖いので、
とりあえず見にくくなってもmergeでいいかなと思いました。チームで開発するようになってから、
こうやって毎日四苦八苦しながら、びびりながら、gitに向き合っています・・・汗
- 投稿日:2021-01-11T11:06:24+09:00
ひとりでなんとなくGitを使ってみよう(with SourceTree)
1 はじめに
この記事は、「Git使ってみたいけど、コマンドとかよくわからないし難しそう」って思っている人が、Gitの概要についてなんとなく理解してノーコマンドでGitを操作できるようになることを目標に書いた記事です。
内容
- 2章 Gitの基礎知識
- Git、Gitクライアントツールについて
- Git用語 リポジトリとコミットについて
- 3章 実践
- リポジトリを作成
- 1本のブランチで変更履歴をコミット
- コミットを前の状態に戻す
- 4章 補足
- コミット時と納品時の注意
この記事のゴール
- Gitの基礎を知る
- Gitが現場でどのように使われているかを理解する
- とにかくGitに触れる
- コマンド使わず、なんとなくバージョン管理ができるようになる
対象者
- 何かしらソースコードを書いている
- Gitをよく知らない
- コマンドをよく知らない
- まずはひとりでバージョン管理してみたい
コマンドを使ってGitを操作したいや、ブランチについて学びたい方は別の方の記事を読んでくださると幸いです。
2 Gitの基礎
Gitを使ってみる前に基礎の基礎をちょっとだけ覚えましょう!
2-1 そもそもGitって何者なん?
"Git とは"で検索すると、大体こんな説明文が出てきます。Gitはプログラムのソースコードなどの変更履歴を記録・追跡するための分散型バージョン管理システムである。
「......うん、全然わからん!!
」
ってなるけどちょっと待って!大丈夫です!今回は下の3つを理解しておけばOKです。
- "Git(ぎっと)" とは、ソフトウェアの名称のこと
- Gitを使うと、ソースコードなどの変更履歴を記録できるようになる
- バージョン管理の種類は、集中型と分散型の2種類があり、Gitは「分散型バージョン管理システム」を採用しているシステムなんだな。
さて、ここまででGitはバージョン管理できるシステムであることはわかりました。
2-2 バージョン管理システムの必要性
Gitが何者かわかったら、なぜ必要かを理解していきましょう。
バージョン管理システムがないとどうなる?
まずは、バージョン管理システムがない世界でソースコードを管理するとどうなるか想像しましょう。
だいたい以下の方法でソースコードのバックアップをとることが多いです。
- ソースを管理しているフォルダを丸ごと圧縮して、フォルダ名に日付やリリース情報をつけて管理
- リリースだけでなく、開発段階のコード一式もバックアップをとる
- いつ、どんな理由で、どんな変更をしたのか変更履歴を文書に残す
これだとどんな問題があるの?
こういうアナログな管理方法だと、
- 何が最新のファイルかわからなくなる
- フォルダの中のファイルを開いて比較するまで変更箇所がわからない
- 開発時のコードもバックアップ取ってないと、前のコードに戻したくなっても戻せない
- めんどくさくて誰もちゃんとした履歴文書を残さない
みたいな問題が多発します。
また、チーム開発の場合はもっと面倒なことにもなってきます。
- サーバーのとあるファイルを同時編集してしまい、保存のタイミングによっては自分の編集がパーになる
- 誰が、どのファイルを、具体的にどう修正したかわからない
- 複数人で共同編集したコードに関しては、誰か1人がAさんの編集したファイルとBさんの編集したファイルを見比べて、手作業でAさんのファイルにBさんの変更した行を足していく作業をしなければならない
という問題もつきまとってきます。
......想像しただけで相当な手間です。めんどくさいこと極まりないです。
それを解決するのが「バージョン管理システム」?
そうなんです!
ただし、バージョン管理システムも万能ではありませんので負担を軽減するくらいの認識でいましょう。
バージョン管理システムを導入すると、以下のことができるようになるので、これまで悩んできたバージョン管理の手間を軽減させることができます。
- 変更履歴を残せる
- デグレードを防げる
- ファイルを前の状態に戻すことができる
そして、今回は数あるバージョン管理システムの中から、最も使われているであろうGitを使って行きましょう
2-3 GitはCUIで操作するシステムである
突然ですが、世の中の「ソフトウェア」には、CUIとGUIの2種類が存在します。
種類 説明 例 GUI Graphical User Interfaceの略
マウスなどによってグラフィカルな画面を操作Excelなど CUI Character User Interfaceの略
文字を打ち込んで操作Mac:ターミナル
Windows:コマンドプロンプトそして肝心のGitは、CUIで操作するタイプのソフトです。
なので、ターミナルを起動して、下のようコードのように文字(コマンド)を打ち込んで操作する必要があります。
$ git init
$ git add .
$ git commit -m "Initial commit"
$ git remote add origin https://github.com/XXXX/XXXXXX.git
$ git push -u origin master
「うわ!無理!文字ばっかり!コマンドなんてわからんし難しそう!断念!」
...って思うの、ちょっと待って!そんな時は、GitをCUIではなくGUIで操作することができるGitクライアントツールというのを使ってみましょう。
2-4 Gitクライアントツール SourceTree
Gitクライアントツールとは、ターミナルなどCUIを使わず、GUIで操作することができるソフトのことです。
そのなかでも、今回は「SourceTree」というソフトを使ってGitを操作していきます。
2-5 Git用語
今回はリポジトリとコミットという用語を覚えましょう。
リポジトリ
リポジトリとは、変更履歴を保存・管理しておく場所のことです。
リポジトリには、リモートリポジトリとローカルリポジトリの2種類があり、今回扱うのはローカルリポジトリです。
種類 説明 ローカルリポジトリ 自分のPC上にある変更履歴の管理場所のこと リモートリポジトリ 場所を共有サーバーやGitHubなどに作り、複数人で共有できるようにしている管理場所のこと コミット
変更履歴をリポジトリに保存することを「コミットする」といいます。
「今日の変更コミットするか〜。」
「Bさん、昨日の変更コミットした?」
「Cさん、機能Bまで実装したらコミットしておいて」っていう風に使います。
Tips: Gitの変更履歴の保存システムについて
コミットすると、Gitは変更したファイルたちをまるごと「リポジトリ」に保存します。
これをスナップショット保存と言います。このため、ファイルの名前を変更しただけでも、コミットすればそのファイル丸ごとスナップショット保存されちゃいます。
...ということは、容量の大きいファイルをコミットするたびに、ファイルを丸ごとスナップショット保存するため、リポジトリはどんどん肥大化していきます。
リポジトリが肥大化すると、リポジトリのダウンロードに時間がかかったり、ストレージの容量を圧迫したりしてしまいます。
そのため、動画や画像、Wordファイルなどの容量が大きい非テキストファイルは、変更履歴を管理しなくても良い場合はしないという選択肢を取ると良いです。でもどうやって変更履歴を管理しないようにするの???
それは次の項目で説明しますね。
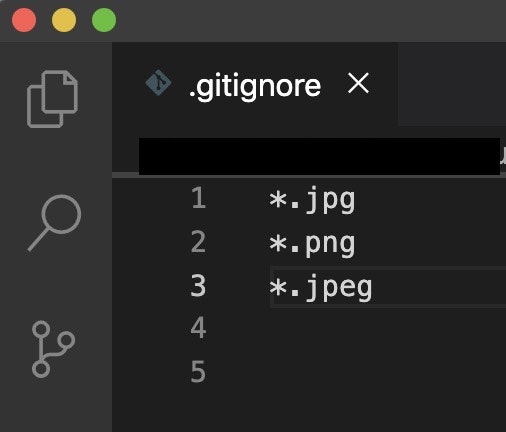
2-6 除外ファイル/フォルダを設定する
「.gitignore(ぎっといぐのあ)ファイル」に「このファイル/フォルダを無視しますよ」と記述しておけば、どのファイルが管理対象外かをGitが判断してくれるようになります。
たとえば、「拡張子がjpgのファイルはすべて変更履歴を管理しません」という設定をしたい場合は、.gitignoreファイルに「*.jpg」と追記してリポジトリ直下に置きます。
そうすることで、jpgファイルを削除しようが、ファイル名を変更しようが、差し替えようが、.gitignoreでjpgは監視するなって言われてるので、Gitはjpgの変更内容をリポジトリにコミットすることはできません。.gitignoreファイルの作成方法は、SourceTreeを使って自動作成することもできますし、手作業で作っても問題ありません。
今回はSourceTreeを使って作ってみます。2-7 まとめ
- Git
- バージョン管理システムのことで、本来はCUIで操作するシステムのこと
- Gitクライアントツール
- GUIでGitを操作できるようにしたソフトのこと
- リポジトリ
- 変更履歴を保存・管理しておく場所のこと
- コミット
- 変更履歴を保存すること
- .gitignoreファイル
- 変更を管理しないファイルやフォルダを登録するためのファイル
3 それでは、GitをSourceTreeを使って試してみましょう!
おまたせしました!さっそく手を動かします!
今回はひとりで簡単にバージョン管理を行うことを目的としていますので、「ブランチ」は使わず作業していきます。(0) 前準備
SourceTreeとGitをインストールしてください。
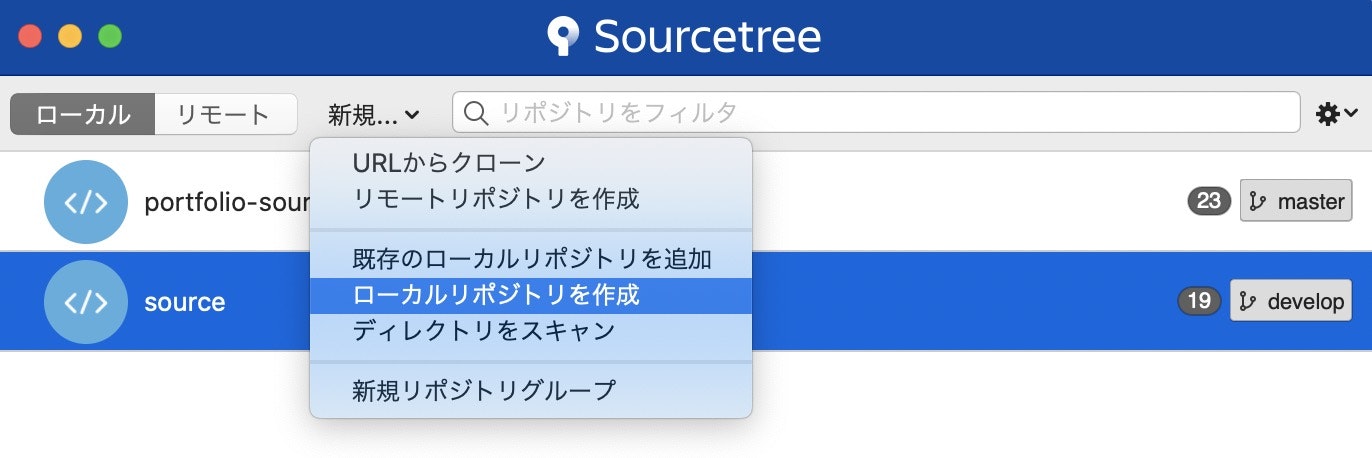
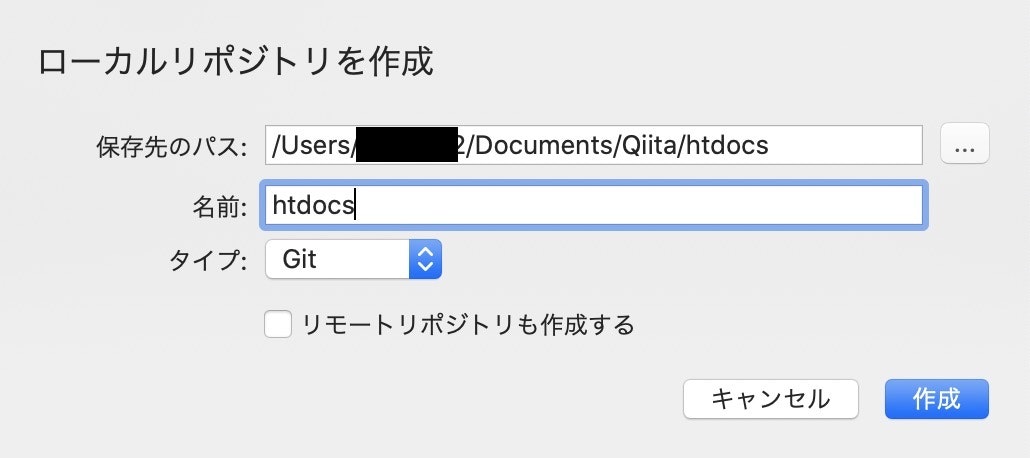
SourceTreeをインストールしている途中でGitもインストールできると思います。(1) ローカルリポジトリを作る
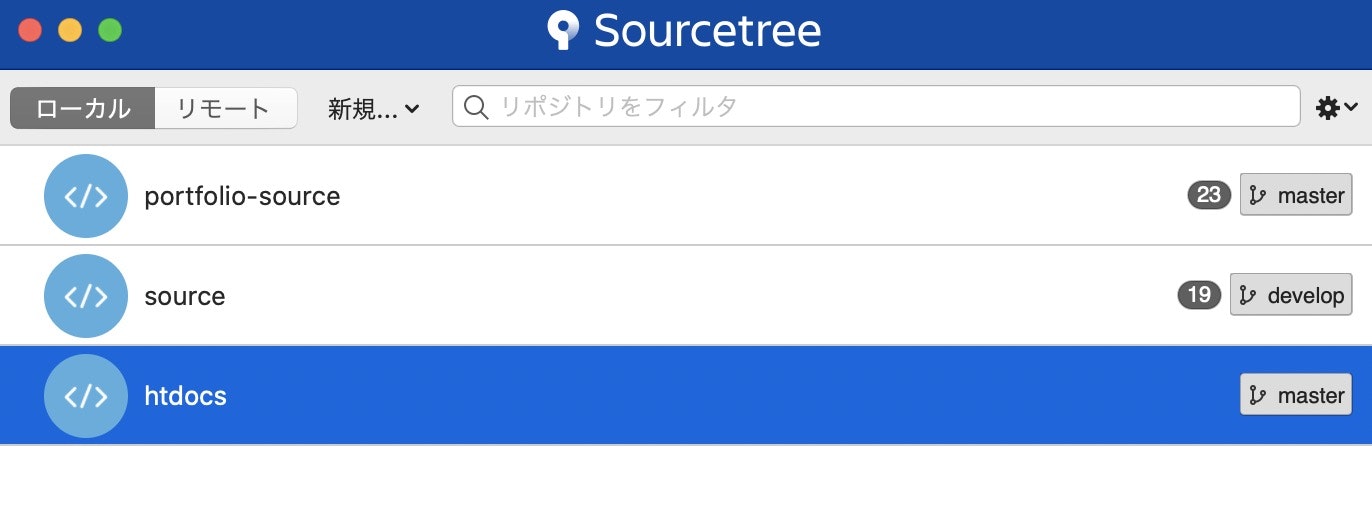
SourceTreeを起動して[新規...]をクリックして[ローカルリポジトリを作成]をクリックします。
[...]をクリックして、ソースコードを管理しているフォルダを選択して[作成]をクリックします。
そうするとリポジトリのブックマークリストに指定したフォルダ名が表示されているとおもいます。
これで正常にリポジトリを作ることができました!
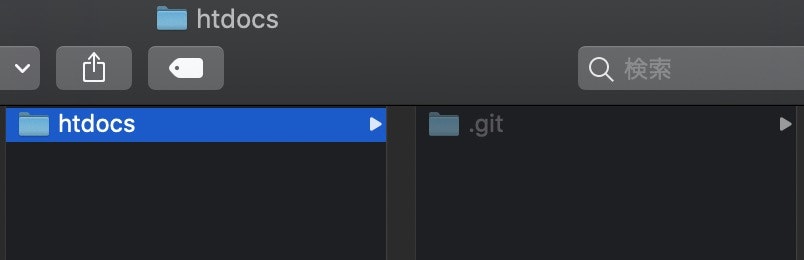
Finderでも確認してみましょう。
リポジトリを作ったフォルダをFinderで表示して、Command+Shift+.を押して、非表示ファイルも見れるようにするとと、「.git」フォルダができていることがわかるはずです。
この「.git」フォルダの中には親フォルダが「リポジトリ」として振舞うために必要なファイルが全て入っています!
そして、このフォルダを消すと、リポジトリではなくなり、変更履歴が全部消えてしまいます。
なので、間違っても削除しないよう注意してください。(2) ソースコードをフォルダに置く
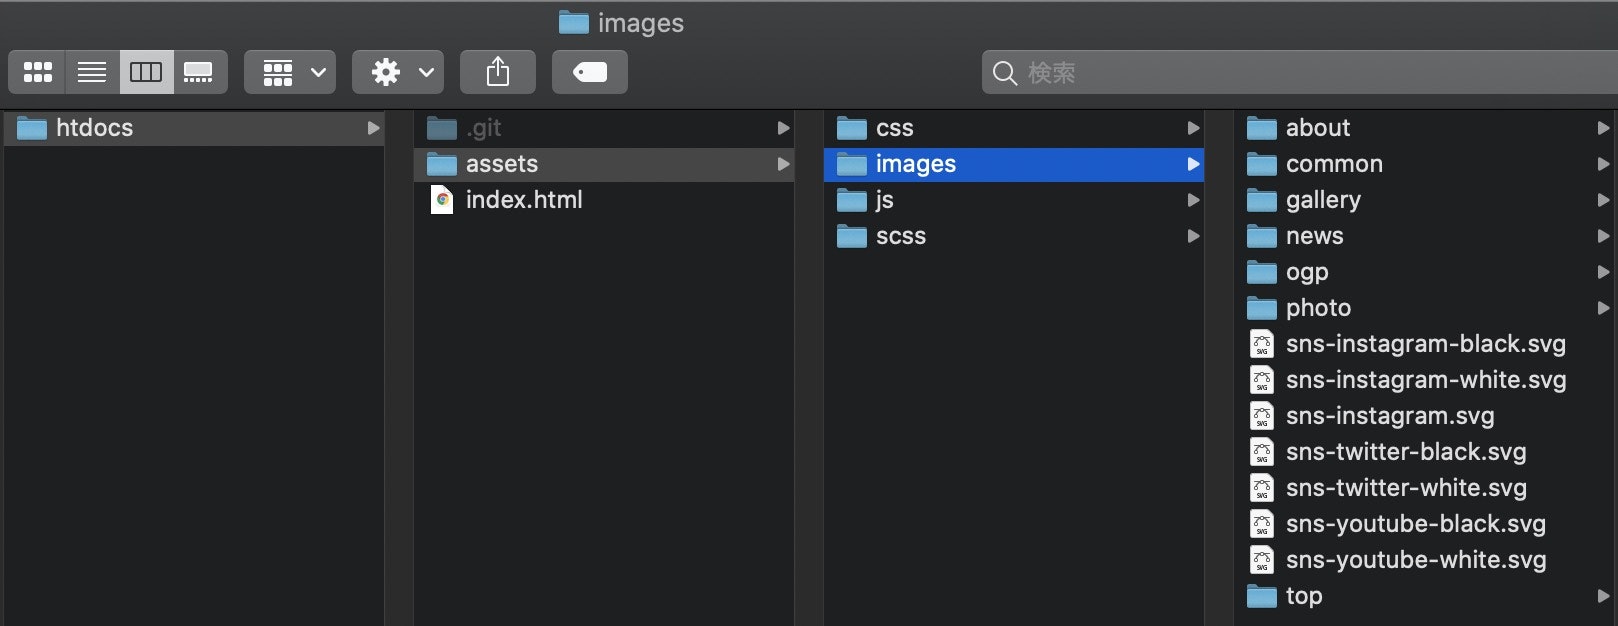
ソースコード一式をフォルダにおきましょう。
あとからファイルの追加や削除もできますので、今回はとりあえずindex.htmlと画像を管理する「assets/images」フォルダを置きました。
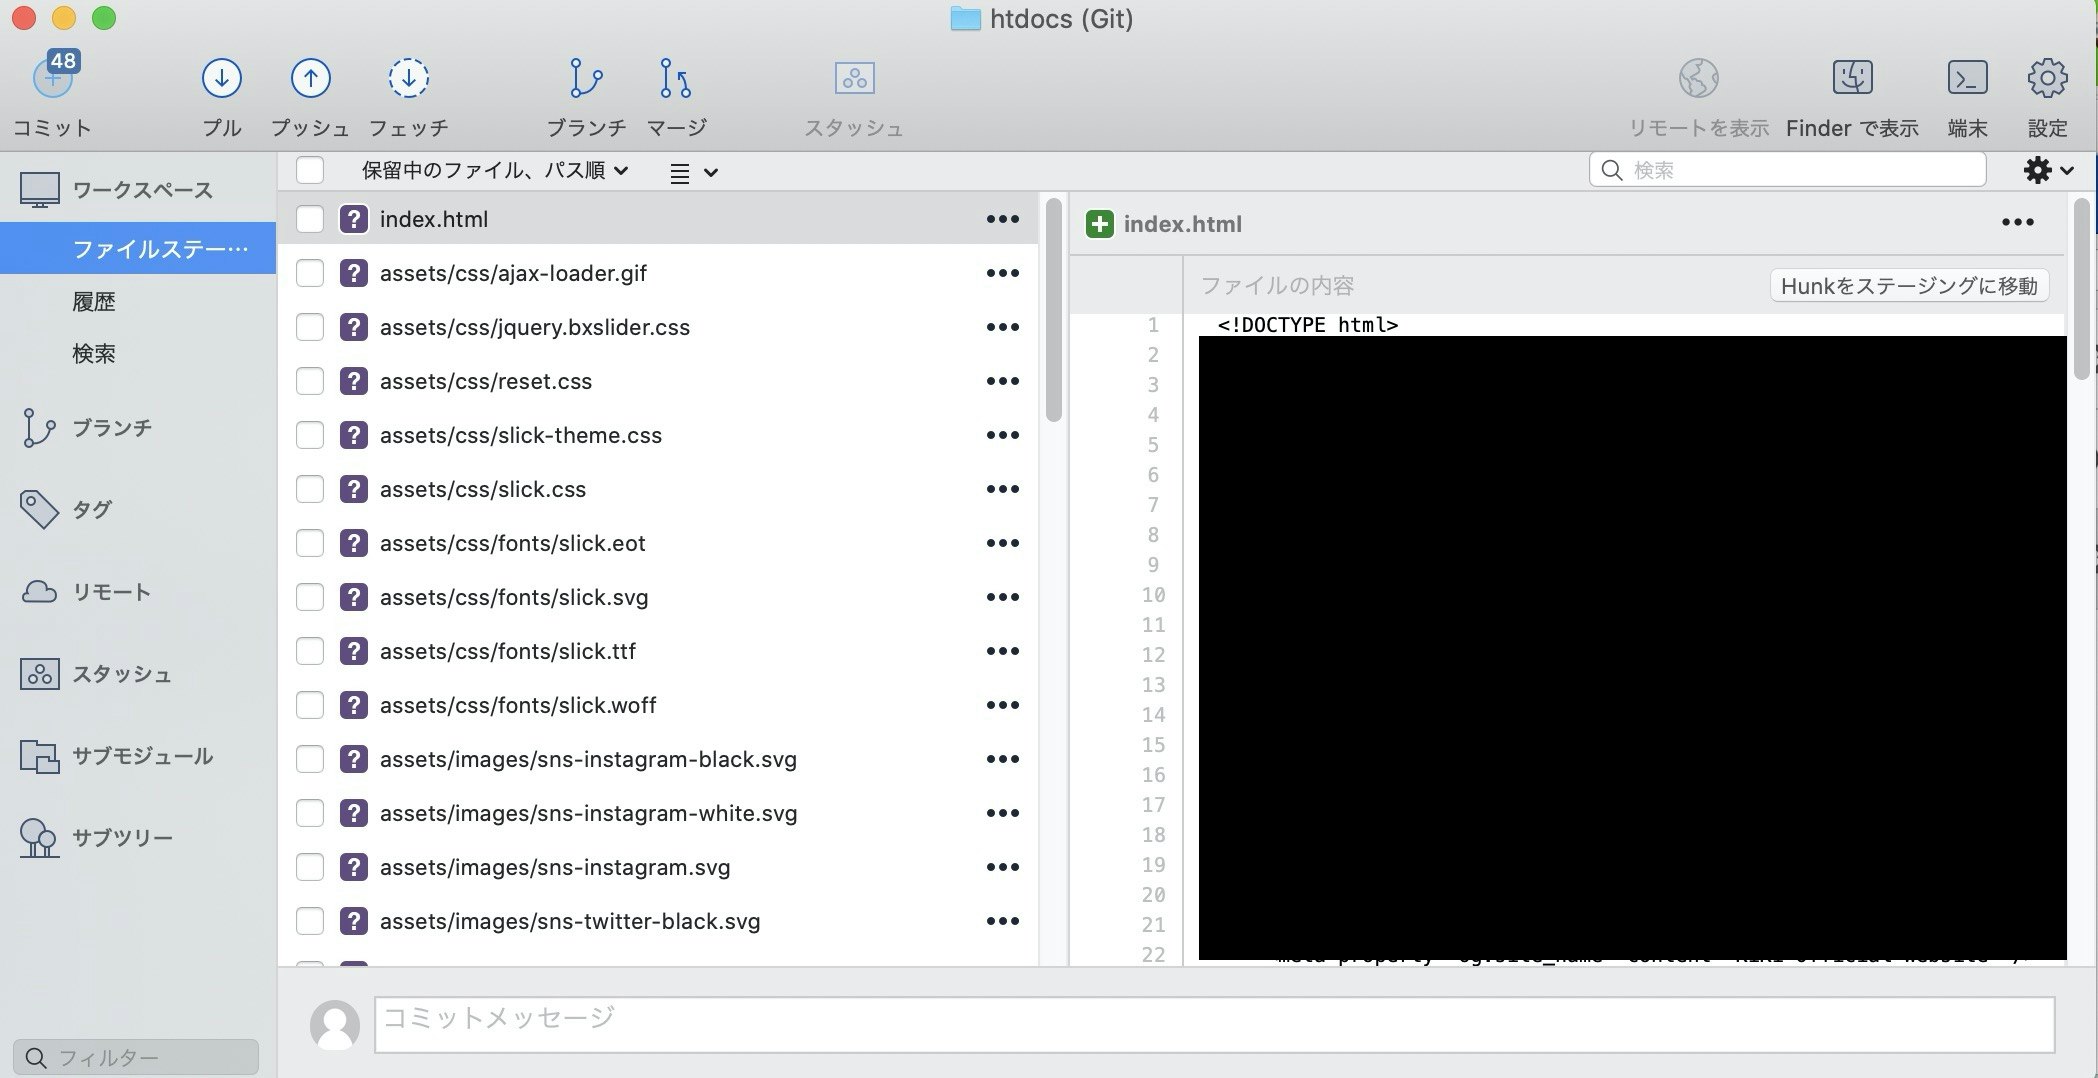
そして、SourceTreeに戻って、先ほど作ったブックマークをダブルクリックすると以下のような画面が表示されます。
左側の[ファイルステージ]タブをクリックして、コミットしていないファイル一覧を表示します。
SourceTree左側にある、3つのタブについて説明しますね。
タブ 説明 ショートカットキー ファイルステージ コミットする前のファイル一覧。ここで、コミットするファイルを選択して、コミットを実行します。 Command+1キー 履歴 コミットしてきた履歴の一覧を確認することができます。 Command+2キー 検索 コミットの検索をすることができるタブです。 Command+3キー (3) .gitignoreファイルを作る
あらかじめ管理する必要のないファイルやフォルダがあれば設定してしまいましょう。
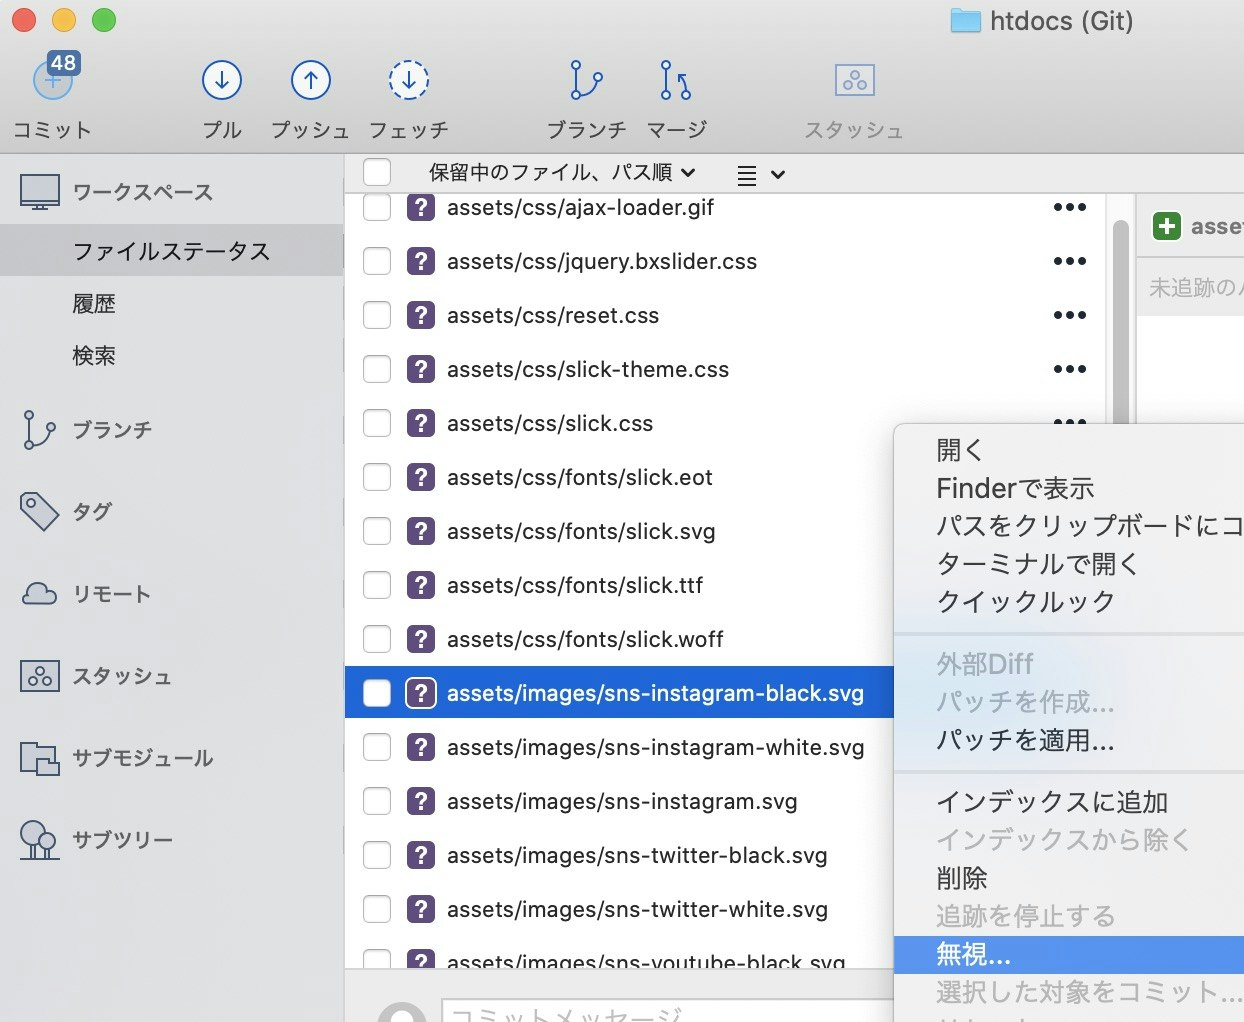
特別な理由がないかぎり、非テキストファイルやそれを扱うフォルダは.gitignoreファイルに登録すると良いでしょう。SourceTree上で画像ファイルを右クリックして、コンテキストメニューから[無視...]をクリックします。
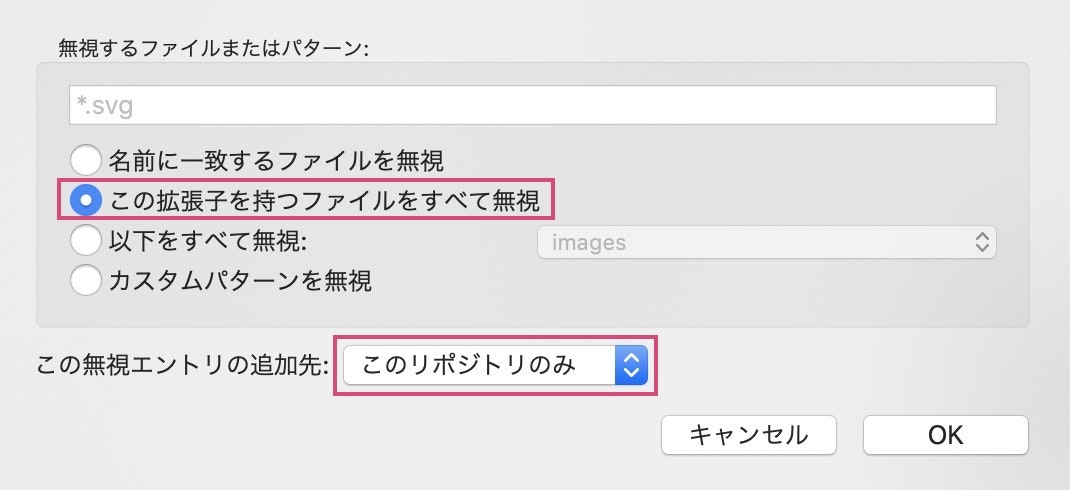
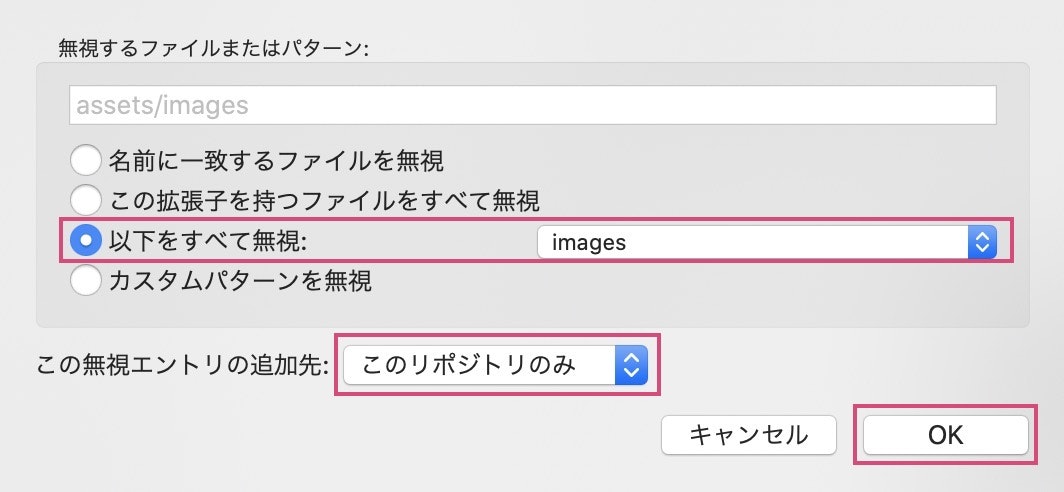
拡張子が一致するものは全て管理しない場合は[この拡張子を持つファイルをすべて無視]をクリック、フォルダごと無視する場合は[以下を全て無視]をクリックして、フォルダ名を選択します。
また、[この無視エントリの追加先]を[このリポジトリのみ]を選択して[OK]をクリックします。
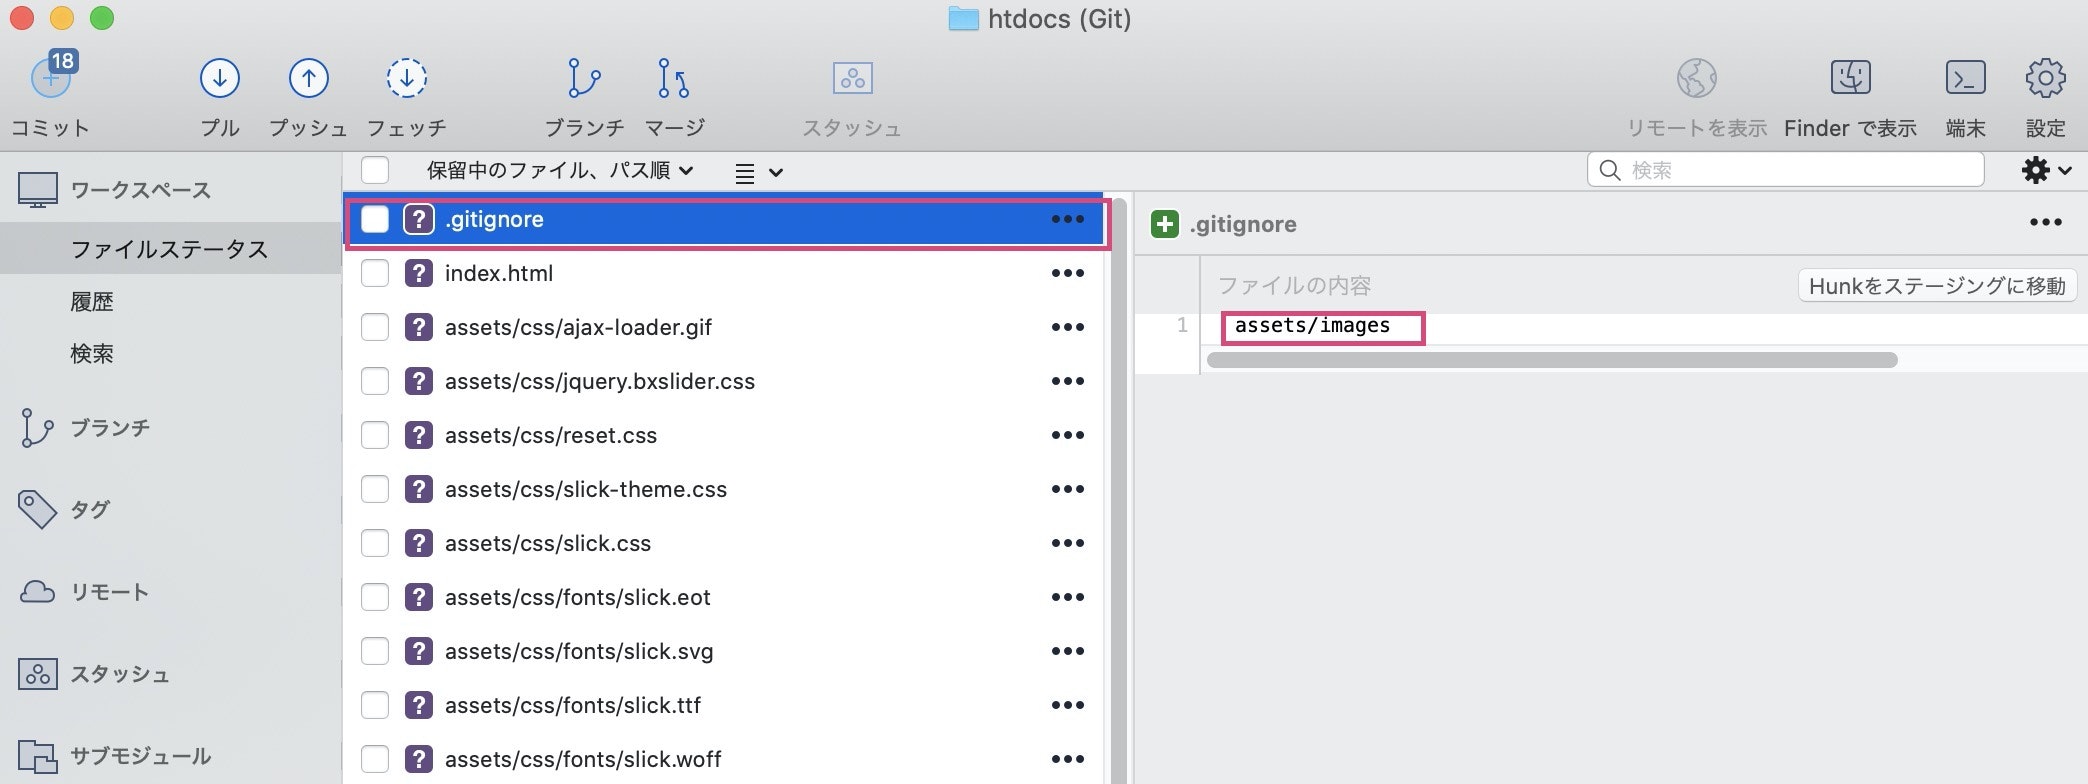
さて、SourceTreeの[ファイルステージ]タブをみてみましょう。
.gitignoreファイルが追加されていることと、設定したファイルが表示されなくなっていることが確認できますね。
これで変更履歴を無視するファイルの設定が完了した状態となります。
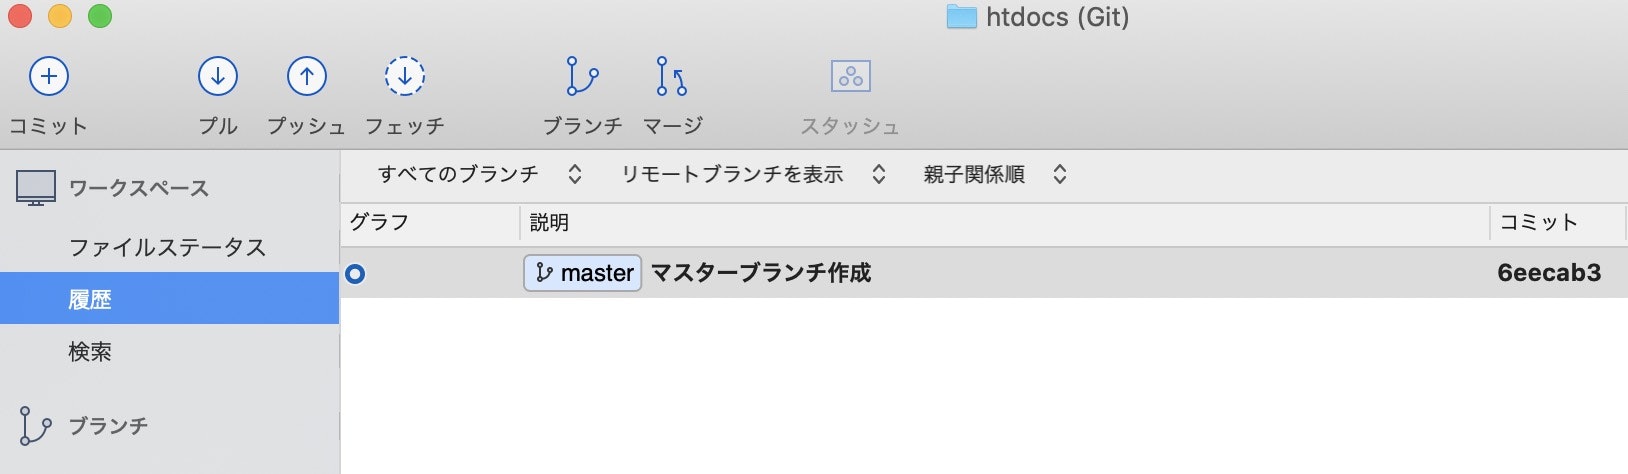
あくまで変更履歴を監視しないだけの設定なので、元ファイルがちゃんとPC上に残っていることをFinderで確認して理解しておいてください。(4) ファイルをコミットしてmasterブランチを作成する
全て選択して、コミットメッセージを書いて、[コミット]をクリックするとコミットします。
一般的な記入方法は以下の通りです。1行目:変更内容の要約(タイトル、概要、チケット番号など) 2行目:空行 3行目以降:変更した理由(内容、詳細)1行で内容がわかれば、2行目以降は省略してもいいです。
ただし、ハンバーガーメニュー修正のみなどのメッセージでは情報量として不十分です。
fix: ハンバーガーメニューが1度開いたら閉じない不具合を修正のように、ある程度詳細に書くよう心がけましょう。また、以下の記事が参考になるので、ぜひ読んでみてください。
Gitのコミットメッセージの書き方[履歴]タブを開いてみましょう。
行が1行追加されていますね。これで無事、変更履歴をリポジトリにコミットすることができました。
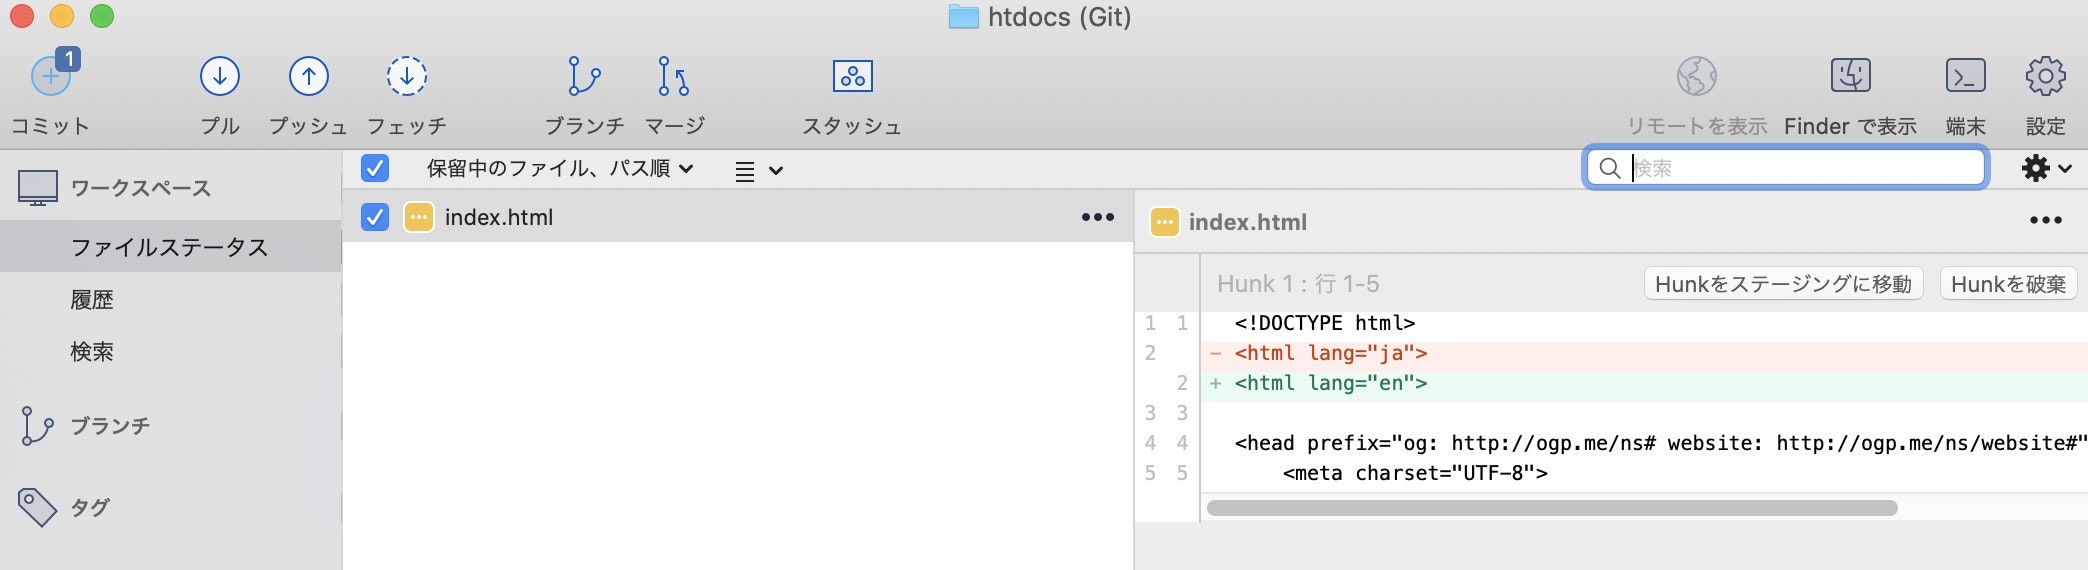
(5) ファイルを変更する
index.htmlを自分のいつも使っているソフト(Visual StudioやAtomなど)を使って、コードを編集して保存してみましょう。
今回は以下のように編集してみました。index.html<html lang="jp"> ↓ <html lang="en">そして、もう一度SourceTreeに戻り、[ファイルステージ]タブを表示してください。
真ん中の領域に変更したファイル名、右側の領域に変更箇所が表示されていると思います。
赤背景の行が変更前、緑背景の行が変更後のコードです。
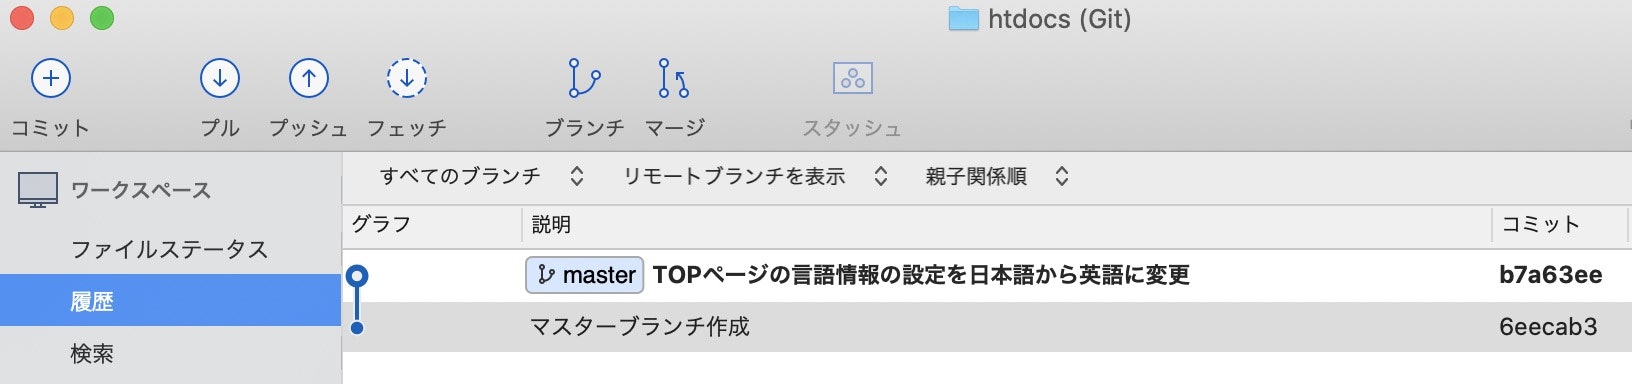
(6) コミットする
先ほどと同様にコミットメッセージを入力してコミットして、[履歴]タブを確認しましょう。
これで2回目の変更履歴をリポジトリにコミットすることができました。
これ以降は(5)と(6)の操作を繰り返していけばOKです(7) コミットを前の状態に戻す
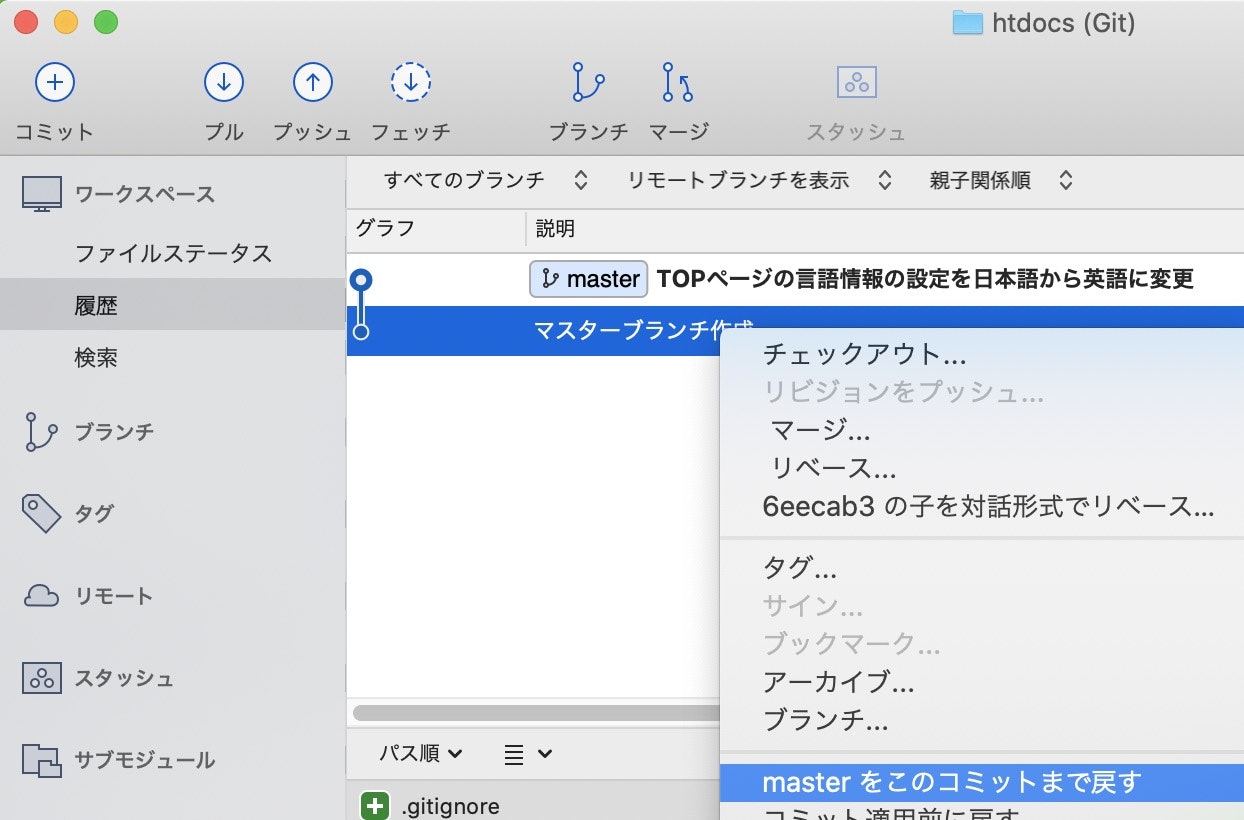
これは、「ソースコード、昨日の状態に戻したいなぁ」ってときに行う操作です。
まず、SourceTreeを開いて、[履歴]タブを表示します。
そして、どのコミットの位置まで戻したいかを探し、そのコミットの行を右クリックしてコンテキストメニューから[(ブランチ名)をこのコミットまで戻す]をクリックします。
そして、[モード]一覧から[Mixed]または[Hard]を選択して[OK]を押します。
モード 説明 Soft/Mixed ファイルに施した変更は保持したまま、コミットした事実だけを無かったことにする
※厳密にいうと両者間にも違いはありますが、今回はその説明は割愛しますHard 今までコミットしてきた変更履歴をPC上からすべて削除する これで、リポジトリの状態を前の状態に戻すことでソースコードも前の状態に戻すことが出来ました!
4 注意点
Gitを使っているときの注意点をいくつかまとめました。
コミットするときの注意点
リポジトリの肥大化を防ぐため、以下の点に注意しましょう。
1. コミット数は最小限に(1日1回または区切りのいいところでコミットするのが目安)
2. 動画やWord、Photoshopなどの非テキストファイルはなるべく.gitignoreに登録して管理しない納品時の注意
.gitフォルダや.gitignoreなどのGitの情報を納品しないでください。
- お客さんが変更履歴を覗けてしまうため
- データ容量が肥大化し、ダウンロードにものすごい時間がかかる
5 最後に
SourceTreeを使ってGitを操作してみようという今回の記事はこれにて終了です。
以下のこと、達成できましたでしょうか。
- Gitの基礎を知る
- Gitが現場でどのように使われているかを理解する
- とにかくGitに触れる
- コマンド使わず、なんとなくバージョン管理ができるようになる
もともと、この記事はデザイナーさんに向けて作成した記事でしたが、デザイナーさんでなくても誰かのお役に立てれば幸いです。


- 投稿日:2021-01-11T11:06:24+09:00
ひとりでなんとなくGitとSourceTreeを使ってみよう
今回のゴール
この記事は、以下の項目をゴールに設定しています。
なお、「ブランチ」については扱いません。
- Gitの基礎を知る
- Gitが現場でどのように使われているかを理解する
- とにかくGitに触れる
- コマンド使わず、なんとなくバージョン管理ができるようになる
対象者
この記事は以下の項目に当てはまる人を対象としています。
- 何かしらソースコードを書いている
- Gitをよく知らない
- コマンドをよく知らない
- まずはひとりでバージョン管理してみたい
Gitの基礎
Gitを使ってみる前に基礎の基礎をちょっとだけ覚えましょう!
そもそもGitって何者なん?
"Git とは"で検索すると、大体こんな説明文が出てきます。Gitはプログラムのソースコードなどの変更履歴を記録・追跡するための分散型バージョン管理システムである。
「......うん、全然わからん!!
ってなるけどちょっと待って!大丈夫ですよ!今回は下の3つを理解しておけばOKです。
- "Git(ぎっと)" とは、ソフトウェアの名称のこと
- Gitを使うと、ソースコードなどの変更履歴を記録できるようになる
- バージョン管理の種類は、集中型と分散型の2種類があり、Gitは「分散型バージョン管理システム」を採用しているシステムなんだな。
さて、ここまででGitがバージョン管理できるシステムであることはわかりました。
バージョン管理システムの必要性
Gitが何者かわかったら、なぜ必要かを理解していきましょう。
バージョン管理システムがないとどうなる?
まずは、バージョン管理システムがない世界でソースコードを管理するとどうなるか想像しましょう。
だいたい以下の方法でソースコードを保存することが多いです。
- ソースを管理しているフォルダ丸ごと圧縮して、フォルダ名に日付やリリース情報をつけて管理
- リリースだけでなく、開発段階のコード一式もバックアップをとる
- いつ、どんな理由で、どんな変更をしたのか変更履歴を文書に残す
これだとどんな問題があるの?
こういうアナログな管理方法だと、
- 何が最新のファイルかわからなくなる
- フォルダの中のファイルを開いて比較するまで変更箇所がわからない
- 開発時のコードもバックアップ取ってないと、前のコードに戻したくなっても戻せない
- めんどくさくて誰もちゃんとした履歴文書を残さない
みたいな問題が多発します。
また、チーム開発の場合はもっと面倒なことにもなってきます。
- 他の人がサーバーにあるファイルを上書きしてしまい、自分の編集がパーになる
- 誰がどのファイルを更新したかわからない
- 複数人で共同編集したコードに関しては、誰か1人がAさんの編集したファイルとBさんの編集したファイルを見比べて、手作業でAさんのファイルにBさんの変更した行を足していく作業をしなければならない
という問題もつきまとってきます。
......想像しただけで相当な手間です。めんどくさいこと極まりないです。
↓↓↓
そこでバージョン管理システム Gitの出番です。
Gitを使うことで、この手間を少しでも軽減しましょう!GitはCUIで操作するシステムである
世の中の「ソフトウェア」には、以下の2種類があるんです。
種類 説明 例 GUI Graphical User Interfaceの略
マウスなどによってグラフィカルな画面を操作Excelなど CUI Character User Interfaceの略
文字を打ち込んで操作Mac:ターミナル
Windows:コマンドプロンプトそして肝心のGitは、CUIで操作するタイプのソフトです。
なので、ターミナルを起動して、下のように文字(コマンド)を打ち込んで操作する必要があります。
$ git init
$ git add .
$ git commit -m "Initial commit"
$ git remote add origin https://github.com/XXXX/XXXXXX.git
$ git push -u origin master
「うわ!無理!文字ばっかり!コマンドなんてわからんし難しそう!断念!」
...って思うの、ちょっと待って!そんな時は、GitをCUIではなくGUIで操作することができるGitクライアントツールというのを使ってみましょう。
SourceTree
Gitクライアントツールとは、ターミナルなどCUIを使わず、GUIで操作することができるソフトのことです。
そのなかでも、今回は「SourceTree」というソフトを使ってGitを操作していきましょう。
※時と場合によってコマンドが必要になる場面もありますが、滅多に遭遇しないので安心してください。
用語1 - リポジトリ
リポジトリとは、変更履歴を保存・管理しておく場所のことです。
リポジトリには、リモートリポジトリとローカルリポジトリの2種類があり、今回扱うのはローカルリポジトリです。
種類 説明 ローカルリポジトリ 自分のPC上にある変更履歴の管理場所のこと リモートリポジトリ 場所を共有サーバーやGitHubなどに作り、複数人で共有できるようにしたリポジトリ 用語2 - コミット
変更履歴をリポジトリに保存することを「コミットする」といいます。
「今日の変更コミットするか〜。」
「Bさん、昨日の変更コミットした?」
「Cさん、機能Bまで実装したらコミットしておいて」っていう風に使います。
Tips: Gitの変更履歴の保存システムについて
コミットすると、Gitは変更したファイルたちをまるごと「リポジトリ」に保存します。
これをスナップショット保存と言います。このため、ファイルの名前を変更しただけでもスナップショット保存されちゃいます。
...ということは、容量の大きいファイルをコミットするたびに、容量の大きいファイルを丸ごとスナップショット保存するため、リポジトリはどんどん肥大化していきます。これらの理由があるため、動画や画像、Wordファイルなどの非テキストファイルは容量が大きいため、Gitリポジトリで変更履歴を管理する必要がない場合はしない方が良いということを覚えておいてください。
でもどうやって変更履歴を管理しないようにするの???
それは次の項目で説明します。除外ファイル/フォルダを設定する
「.gitignore(ぎっといぐのあ)ファイル」に「このファイル/フォルダを無視しますよ」と記述しておけば、どのファイルが管理対象外かGitが判断してくれます。
このファイルはSourceTreeを使って作ることもできますし、手作業で作っても問題ありません。
今回はSourceTreeを使って作ってみましょう。それでは、GitをSourceTreeを使って試してみましょう!
おまたせしました!さっそく手を動かします!
また、今回はひとりで簡単にバージョン管理を行うことを目的としていますので、「ブランチ」は使わず、使いません。1. ローカルリポジトリを作る
SourceTreeを起動して[新規...]をクリックして[ローカルリポジトリを作成]をクリックします。
[...]をクリックして、ソースコードを管理しているフォルダを選択して[作成]をクリックします。
そうするとリポジトリのブックマークリストに指定したフォルダ名が表示されているとおもいます。
これで正常にリポジトリを作ることができました!
Finderでも確認してみましょう。
リポジトリを作ったフォルダをFinderで表示して、Command+Shift+.を押して、非表示ファイルも見れるようにするとと、「.git」フォルダができていることがわかるはずです。
この「.git」フォルダの中には親フォルダが「リポジトリ」として振舞うために必要なファイルが全て入っています!
そして、このフォルダを消すと、リポジトリではなくなり、変更履歴が全部消えてしまいます。
なので、間違っても削除しないよう注意してください。2. ソースコードをフォルダに置く
ソースコード一式をフォルダにおきましょう。
あとからファイルの追加や削除もできますので、今回はとりあえずindex.htmlと画像を管理する「assets/images」フォルダを置きました。
そして、SourceTreeに戻って、先ほど作ったブックマークをダブルクリックすると以下のような画面が表示されます。
左側の[ファイルステージ]タブをクリックして、コミットしていないファイル一覧を表示します。
ここで、3つのタブの説明を少し説明しますね。
タブ 説明 ファイルステージ コミットする前のファイル一覧。ここで、コミットするファイルを選択して、コミットを実行します。 履歴 コミットしてきた履歴の一覧を確認することができます。 検索 コミットの検索をすることができるタブです。 3. .gitignoreファイルを作る
あらかじめ管理する必要のないファイルやフォルダがあれば設定してしまいましょう。
特別な理由がないかぎり、非テキストファイルを扱うフォルダは.gitignoreファイルに登録すると良いでしょう。SourceTree上で画像ファイルを右クリックして、コンテキストメニューから[無視...]をクリックします。
拡張子が一致するものは全て管理しない場合は[この拡張子を持つファイルをすべて無視]をクリック、フォルダごと無視する場合は[以下を全て無視]をクリックして、フォルダ名を選択します。
また、[この無視エントリの追加先]を[このリポジトリのみ]を選択して[OK]をクリックします。
さて、SourceTreeの[ファイルステージ]タブをみてみましょう。
.gitignoreファイルが追加されていることと、設定したファイルが表示されなくなっていることが確認できますね。
4. ファイルをコミットしてmasterブランチを作成する
全て選択して、コミットメッセージを書いて、[コミット]をクリックするとコミットします。
Command+2キーを押して、[履歴]タブを開いてみましょう。
行が1行追加されていますね。これで無事、変更履歴をリポジトリにコミットすることができました。
5. ファイルを変更する
index.htmlを自分のいつも使っているソフト(Visual StudioやAtomなど)を使って、コードを編集して保存みましょう。
index.html<html lang="jp"> ↓ <html lang="en">そして、もう一度SourceTreeに戻り、Command+1キーを押して[ファイルステージ]タブを表示してください。
真ん中の領域に変更したファイル名、右側の領域に変更箇所が表示されていると思います。
赤背景の行が変更前、緑背景の行が変更後のコードです。
6. コミットする→これを繰り返す
先ほどと同様にコミットメッセージを入力してコミットし、Command+2キーを押して[履歴]タブを確認しましょう。
これで2回目の変更履歴をリポジトリにコミットすることができました。
基本的には、この容量でコミットをし続ければOKです7. コミットを前の状態に戻す
「ソースコード、昨日の状態に戻したいなぁ」ってとき、ありますよね。
コミットした後でも、コードを前の状態に戻すことできます!まず、SourceTreeを開いて、[履歴]タブを表示します。
そして、どのコミットの位置まで戻したいかを探し、そのコミットの行を右クリックしてコンテキストメニューから[(ブランチ名)をこのコミットまで戻す]をクリックします。
そして、[モード]一覧から[Mixed]または[Hard]を選択して[OK]を押します。
モード 説明 Soft/Mixed ファイルに施した変更は保持したまま、コミットだけ無かったことにする
※厳密にいうと両者間にも違いはありますが、今回はその説明は割愛しますHard 今までコミットしてきた変更履歴をPC上からすべて削除する 注意点
Gitを使っているときの注意点をいくつかまとめました。
コミットするときの注意点
リポジトリの肥大化を防ぐため、以下の点に注意しましょう。
1. コミット数は最小限に(1日1回または区切りのいいところでコミットするのが目安)
2. 動画やWord、Photoshopなどの非テキストファイルはなるべく.gitignoreに登録して管理しない納品時の注意
.gitフォルダや.gitignoreなどのGitの情報を納品しないでください。
- お客さんが変更履歴を覗けてしまうため
- データ容量が肥大化し、ダウンロードにものすごい時間がかかる
最後に
以上でSourceTreeを使ってGitを操作してみようという今回の記事は終了です。
以下のこと、達成できましたでしょうか。
- Gitの基礎を知る
- Gitが現場でどのように使われているかを理解する
- とにかくGitに触れる
- コマンド使わず、なんとなくバージョン管理ができるようになる
もともと、この記事はデザイナーさんに向けて作成した記事でしたが、デザイナーさんでなくても誰かのお役に立てれば幸いです。
超ざっくりではありますが、GitとSourceTreeの使い方についての説明は以上です。
- 投稿日:2021-01-11T10:48:10+09:00
cloud9環境でgithubの初回pushができなかった話
エラー内容
・cloud9でenvironmentsを作成。
・作成時にUbuntuを選択。
・rails newでrailsアプリケーションを作成
・git関連の以下を実行$ git add -A $ git commit -m "xxx" $ git remote add origin "xxx(github上のリポジトリURL)" $ git push -u origin main error: src refspec main does not match any. error: failed to push some refs to 'https://github.com/xxx/xxx.git'このエラーでしばらく引っかかった。
解決策
ローカルリポジトリのブランチ名をmasterからmainへ変更してからpushすると解決。
なぜか??
https://www.publickey1.jp/blog/20/githubmainmastermain.html
最近、githubのデフォルトブランチが「main」に変更されている。だがcloud9でローカルリポジトリを作成(git init)するとブランチ名は(master)になっているため、エラーがでていた。
https://microayatron.com/cloud9-git/
$ git push アップロード先のリモートリポジトリ名 ローカルブランチ名
$ git push -u origin main
Gitは上流リポジトリ(この場合GitHub上のリモートリポジトリ)のうち指定がなければ同名のブランチにプッシュするようです。 もし同名ブランチがなければ勝手にリモートリポジトリに作成されます。
この
$ git push origin mainはorigin(github上のリポジトリ名)にローカルブランチ(main)をpushするよ!
という意味だけど、そもそもcloud9上でのブランチは「master」なので「mainなんてローカルブランチないよ」とエラーを返されていただけでした。
試してないが、おそらく
$ git push origin masterにしていたらエラーはでず、github上に「main」と「master」の2つのブランチが作成されていたと思われる。
git,githubの基本がわかっていなかったことが原因でした。
- 投稿日:2021-01-11T02:34:10+09:00
適当にMarkDown記法について
gitにREADME.mdをコミットして中身みたら、いろいろおかしいことに。。。
調べたらMarkDown記法なるものがあるらしい。だる。MarkDown記法ってなに?
qiitaで初めての記事です。
なんかqiitaの記事書いてる時点でMarkDown記法らしく、調べる必要ないね。以下、触ってみた。
詳 細
gitにREADME.mdをコミットしたときに、改行がされず困った。
調べたらMarkDown記法なるものが適用されているらしく、全く知らなかったので触ってみた。
詳細<details><summary>詳 細 </summary>gitにREADME.mdをコミットしたときに、改行がされず困った。 調べたらMarkDown記法なるものが適用されているらしく、全く知らなかったので触ってみた。 </details>結論
適当になんかいい感じに見た目をよくできました。
書き方が豊富すぎて、だるかったけど。
主に使うものだけに焦点をあてれば良さげ。よく詰まったときに参考にしているサイトが、こんな感じだからMarkDown記法ってよく使われてんのかなーと思った。
参考
MarkDown記法の参考にしたサイト By JOHN GRUBER Markdown: Basics.