- 投稿日:2021-01-10T23:06:59+09:00
vue.js + rails + dockerで環境構築する
ディレクトリ構成
root
 ├ Dockerfile
 ├ docker-compose.yml
 ├ Gemfile
 └ Gemfile.lock
ファイル内容
※Dockerfile

FROM ruby:2.6.5

RUN apt-get update -qq && \
    apt-get install -y build-essential \
                      libpq-dev
#yarnのインストール
RUN apt-get update && apt-get install -y curl apt-transport-https wget && \
    curl -sS https://dl.yarnpkg.com/debian/pubkey.gpg | apt-key add - && \
    echo "deb https://dl.yarnpkg.com/debian/ stable main" | tee /etc/apt/sources.list.d/yarn.list && \
    apt-get update && apt-get install -y yarn

#Nodejsをバージョン指定してインストール
RUN apt-get install -y nodejs

RUN mkdir /app
ENV APT_KEY_DONT_WARN_ON_DANGEROUS_USAGE=DontWarn
ENV APP_ROOT /app
WORKDIR $APP_ROOT

ADD ./Gemfile $APP_ROOT/Gemfile
ADD ./Gemfile.lock $APP_ROOT/Gemfile.lock

# RUN gem install bundler -v 1.3.0 (途中から追加する場合はbundlerの指定も必要)
RUN bundle install
ADD . $APP_ROOT
※docker-compose.yml version: '3' services: db: image: mysql:5.7 environment: MYSQL_ROOT_PASSWORD: password MYSQL_DATABASE: root ports: - "4306:3306" volumes: - mysql_data:/var/lib/mysql web: build: . volumes: - .:/app - gem_data:/usr/local/bundle ports: - "3000:3000" depends_on: - db tty: true stdin_open: true volumes: mysql_data: gem_data:※Gemfile source 'https://rubygems.org' gem 'rails', '6.0.3.4'※Gemfile.lockはファイルだけ作成しておけば良い。
※Rails 6.0から、Rubyのバージョンは2.5以上が必須
※バージョンが古いと何故か後でvue.jsをインストールする時にwebpackerが読み込まれない事があったのでバージョンを最新にしました。(あくまで自分の環境ですが)ここまで出来たら一旦docker-compose upでイメージとコンテナを起動させます。
$ docker-compose up↓コンテナが起動出来ているか確認
$ docker ps起動したwebコンテナに入る
$ docker exec -it webのコンテナID /bin/bashvue.jsをインストール
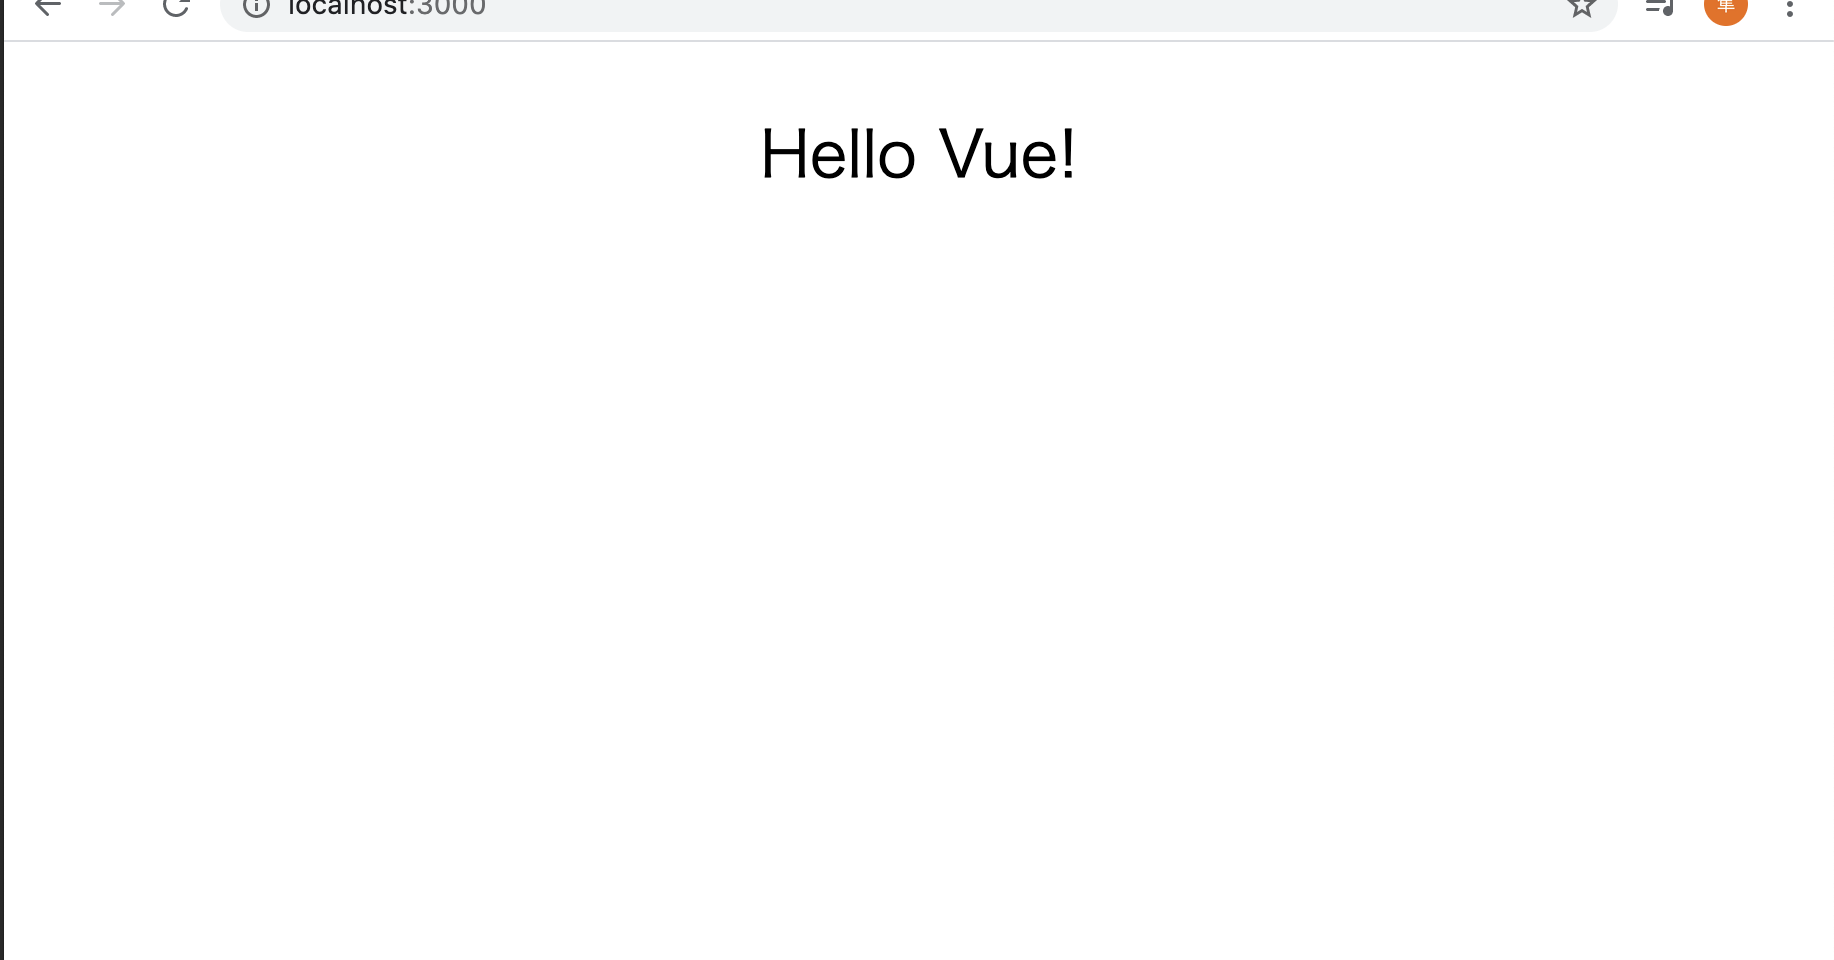
$ rails new アプリ名 --webpack=vue※一旦サーバー起動してrailsの初期画面が表示されているか確認しときます。vue.jsの表示設定はまだしてません。
$ rails s -b 0.0.0.0データベースをsqliteからmysqlへ変更する
※app/config/database.yml

# SQLite. Versions 3.8.0 and up are supported.
#   gem install sqlite3
#
#   Ensure the SQLite 3 gem is defined in your Gemfile
#   gem 'sqlite3'
#
default: &default
  adapter: mysql2
  encoding: utf8
  pool: <%= ENV.fetch("RAILS_MAX_THREADS") { 5 } %>
  username: root
  password: password # docker-compose.ymlのMYSQL_ROOT_PASSWORD
  host: db # docker-compose.ymlのservice名

development:
  <<: *default
  database: rails_development

# Warning: The database defined as "test" will be erased and
# re-generated from your development database when you run "rake".
# Do not set this db to the same as development or production.
test:
  <<: *default
  database: rails_test

production:
  <<: *default
  database: rails_production
↓gem 'sqlite3' → gem 'mysql2' に変更する
※Gemfile

source 'https://rubygems.org'
git_source(:github) { |repo| "https://github.com/#{repo}.git" }

ruby '2.6.5'

# Bundle edge Rails instead: gem 'rails', github: 'rails/rails'
gem 'rails', '~> 6.0.3', '>= 6.0.3.4'
# Use sqlite3 as the database for Active Record
gem 'mysql2'
# Use Puma as the app server
gem 'puma', '~> 4.1'
# Use SCSS for stylesheets
gem 'sass-rails', '>= 6'
# Transpile app-like JavaScript. Read more: https://github.com/rails/webpacker
gem 'webpacker', '~> 4.0'
# Turbolinks makes navigating your web application faster. Read more: https://github.com/turbolinks/turbolinks
gem 'turbolinks', '~> 5'
# Build JSON APIs with ease. Read more: https://github.com/rails/jbuilder
gem 'jbuilder', '~> 2.7'
# Use Redis adapter to run Action Cable in production
# gem 'redis', '~> 4.0'
# Use Active Model has_secure_password
# gem 'bcrypt', '~> 3.1.7'

# Use Active Storage variant
# gem 'image_processing', '~> 1.2'

# Reduces boot times through caching; required in config/boot.rb
gem 'bootsnap', '>= 1.4.2', require: false

group :development, :test do
  # Call 'byebug' anywhere in the code to stop execution and get a debugger console
  gem 'byebug', platforms: [:mri, :mingw, :x64_mingw]
end

group :development do
  # Access an interactive console on exception pages or by calling 'console' anywhere in the code.
  gem 'web-console', '>= 3.3.0'
  gem 'listen', '~> 3.2'
  # Spring speeds up development by keeping your application running in the background. Read more: https://github.com/rails/spring
  gem 'spring'
  gem 'spring-watcher-listen', '~> 2.0.0'
end

group :test do
  # Adds support for Capybara system testing and selenium driver
  gem 'capybara', '>= 2.15'
  gem 'selenium-webdriver'
  # Easy installation and use of web drivers to run system tests with browsers
  gem 'webdrivers'
end

# Windows does not include zoneinfo files, so bundle the tzinfo-data gem
gem 'tzinfo-data', platforms: [:mingw, :mswin, :x64_mingw, :jruby]
mysqlをインストール
$ bundle install$ apt-get install mariadb-client↓database.ymlの設定した内容でmysqlにアクセスできるか確認しときます。
$ mysql -u root -ppassword -h db※上の-ppasswordは -p passwordと記載するとエラーになるので注意。無事アクセスできると下のようになります。
MySQL [(none)]>

*アクセス成功した場合
↓一度ログアウトしてdatabaseを作ります
$ rake db:create↓作れたら再度mysqlにアクセスしてDBが出来ているか確認
MySQL [(none)]> show databases;
+--------------------+
| Database           |
+--------------------+
| information_schema |
| mysql              |
| performance_schema |
| rails_development  |
| rails_test         |
| sys                |
+--------------------+
6 rows in set (0.011 sec)
vue.jsを表示する
まずはwebコンテナに入った状態でvue.jsを表示するためのcontrollerとviewを作っていきます。
$ rails g controller home index※ app/views/home/index.html.erb <%= javascript_pack_tag 'hello_vue' %>
とりあえずここまでいけたら一通り完了です。
※表示されなかった場合などは一旦rails sを再起動したりすると直るかもしれません。
- 投稿日:2021-01-10T22:40:41+09:00
Vue.js の算出プロパティを使ってみた
初めに
前回に引き続きVue.jsで学んだことのアウトプットして投稿します。
算出プロパティ
- 算出プロパティの性質
何度アクセスしても、関数を再び実行することなく以前計算された結果を即時に返す
- メソッドの性質
対称的に、メソッド呼び出しは、再描画が起きると常に関数を実行
例
ここでは入力された文字を一文字ずらして表示するメソッドを算出プロパティで書いてみました。
  <div id="app">
    <input v-model="inputText" type="text">
    {{ nextAlphabet }}
  </div>
var app = new Vue({ el: '#app', data: { inputText: '' }, computed: { nextAlphabet: function() { var alphabet = 'abcdefghijklmnopqrstuvwxyz' + 'ABCDEFGHIJKLMNOPQRSTUVWXYZ' var alphabetList = alphabet.split(''); var alphabetShiftList = {}; for (let i = 0; i < alphabetList.length; i++) { alphabetShiftList[alphabetList[i]] = alphabetList[(i + 1) % 52] } alphabetShiftList[' '] = ' '; var applyShitList = this.inputText.split('').map(x => alphabetShiftList[x]); return applyShitList.join().replace(/,/g, ''); } } })
- 動作結果
参考記事
- Vue.js 日本語公式ドキュメント
https://jp.vuejs.org/v2/guide/computed.html

- 投稿日:2021-01-10T19:06:20+09:00
Vueのバージョン違いによるVue Composition APIの書き方の相違点
経緯
Vue Composition APIを学習している際、教材と書き方が少し違いエラーが発生し戸惑ったため自分の備忘録として残しておく。
Vue Composition API公式ドキュメント
https://composition-api.vuejs.org/#api-introductionVue2.x系
main.js// npm install @vue/composition-api --saveのコマンドが必要 import Vue from 'vue' import App from './App.vue' import VueCompositionAPI from '@vue/composition-api' Vue.use(VueCompositionAPI) Vue.config.productionTip = false new Vue({ render: h => h(App), }).$mount('#app')CompositionApi.vue<script> import { reactive, ref, computed, watch } from '@vue/composition-api' export default { setup() { // 処理やデータを記述 } } </script>Vue3.x系
main.jsimport { createApp } from 'vue' import App from './App.vue' createApp(App).mount('#app')CompositionApi.vue<script> import { reactive, ref, computed, watch } from 'vue' export default { setup() { // 処理やデータを記述 } } </script>
- 投稿日:2021-01-10T18:39:17+09:00
Laravel vue.js axios 500 (Internal Server Error) の解決方法
はじめに
この記事では
Laravel vue.js axiosを使って開発しているときに
500 (Internal Server Error)
のエラーに遭遇してどこで処理が止まっているのかを調べるデバック方法をまとめました。
デバック方法
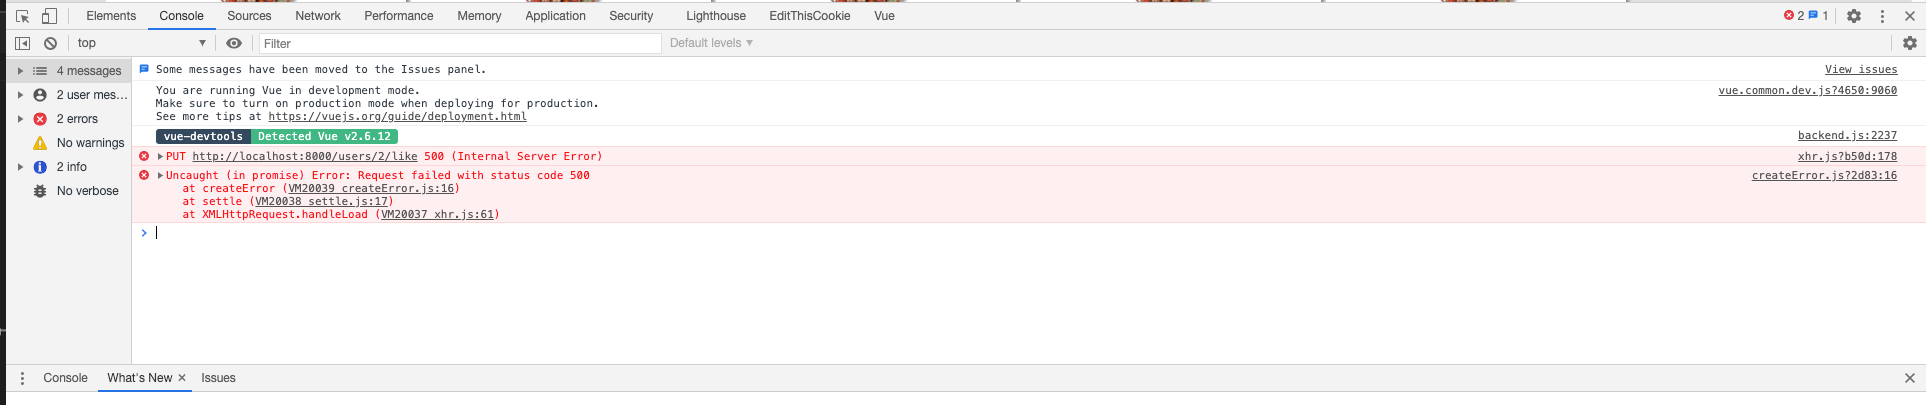
① command + option + I キーで もしくは 右クリックで「検証」ツールを開く
② consoleタブを押し,500 (Internal Server Error) が出ていることを確認する
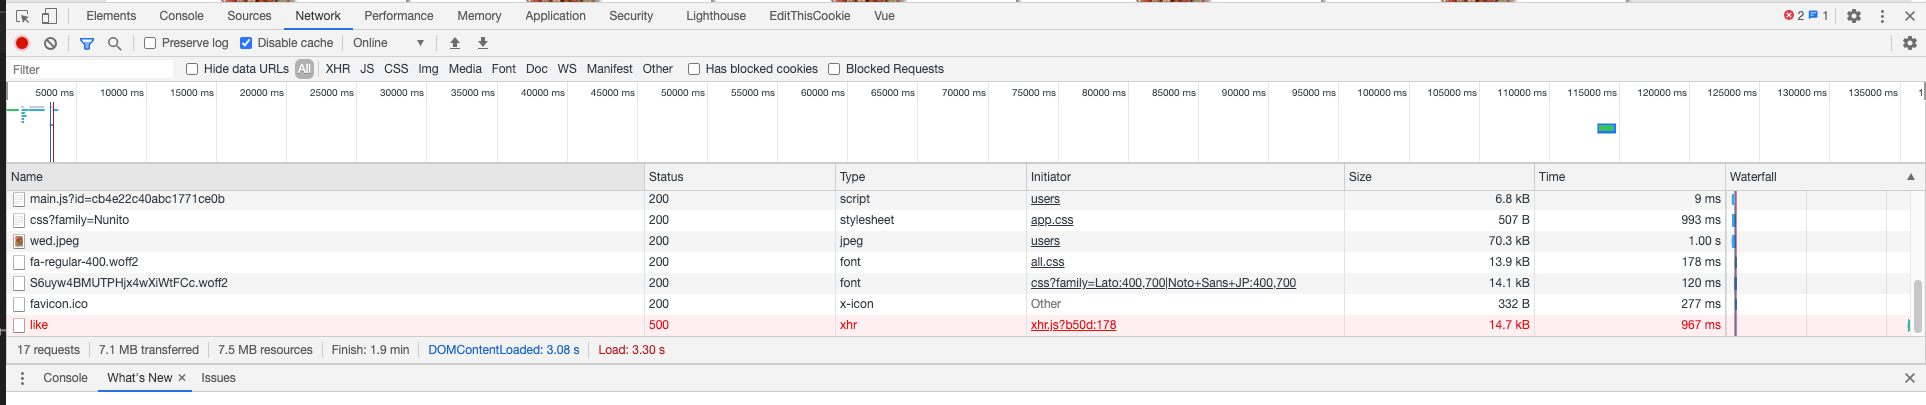
③ Networkタブを押し, 「all」の項目を押すと現在そのページで使われているファイルを確認することができます
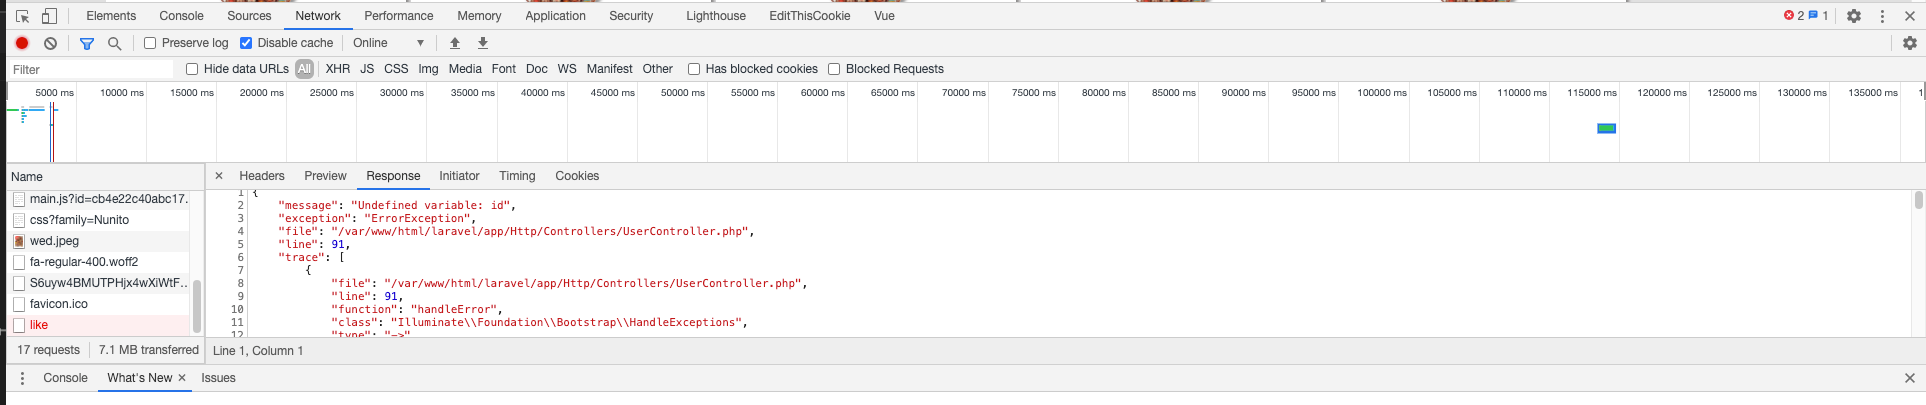
④ファイル名を選択すると 「message」のところにエラーメッセージが出力されています。
今回はidが渡っていなかったので修正したら処理が通るようになりました。
【補足】
【Vue.js】Vuejsをchromeブラウザでデバッグする方法chromeでVue.js Devtoolsをインストールします。
データの受け渡し、処理の流れを確認することができます。
おわりに
エラーが出て分からなくなることがありますが、
どこまで処理が走っているのか
どこで処理が止まっているのか
デバックをすることで、処理の流れを把握することができます。
- 投稿日:2021-01-10T18:39:17+09:00
500 (Internal Server Error) の解決方法 Laravel vue.js axios
はじめに
この記事では
Laravel vue.js axiosを使って開発しているときに
500 (Internal Server Error)
のエラーに遭遇してどこで処理が止まっているのかを調べるデバック方法をまとめました。
デバック方法
① command + option + I キーで もしくは 右クリックで「検証」ツールを開く
② consoleタブを押し,500 (Internal Server Error) が出ていることを確認する
③ Networkタブを押し, 「all」の項目を押すと現在そのページで使われているファイルを確認することができます
④ ファイル名を選択すると 「message」のところにエラーメッセージが出力されています。
今回はidが渡っていなかったので修正したら処理が通るようになりました。
【補足】
【Vue.js】Vuejsをchromeブラウザでデバッグする方法chromeでVue.js Devtoolsをインストールします。
データの受け渡し、処理の流れを確認することができます。
おわりに
エラーが出て分からなくなることがありますが、
どこまで処理が走っているのか
どこで処理が止まっているのか
デバックをすることで、処理の流れを把握することができます。
- 投稿日:2021-01-10T18:39:17+09:00
Laravel vue.js axios 500 (Internal Server Error) の解決方法
はじめに
この記事では
Laravel vue.js axiosを使って開発しているときに
500 (Internal Server Error)
のエラーに遭遇してどこで処理が止まっているのかを調べるデバック方法をまとめました。
デバック方法
① command + option + I キーで もしくは 右クリックで「検証」ツールを開く
② consoleタブを押し,500 (Internal Server Error) が出ていることを確認する
③ Networkタブを押し, 「all」の項目を押すと現在そのページで使われているファイルを確認することができます
④ ファイル名を選択すると 「message」のところにエラーメッセージが出力されています。
今回はidが渡っていなかったので修正したら処理が通るようになりました。
【補足】
【Vue.js】Vuejsをchromeブラウザでデバッグする方法chromeでVue.js Devtoolsをインストールします。
データの受け渡し、処理の流れを確認することができます。
おわりに
エラーが出て分からなくなることがありますが、
どこまで処理が走っているのか
どこで処理が止まっているのか
デバックをすることで、処理の流れを把握することができます。
- 投稿日:2021-01-10T18:27:51+09:00
Django+Vue.js の開発環境を docker-compose で構築する
これまでの経緯
- ローカルに Ubuntu Server を用意した
- そこに Docker Compose をインストールした
- Django+MySQL+nginx の開発環境を Docker Compose で構築した
- Django を AWS Fargate で動作させようとした → 失敗した
- AbstractBaseUser を継承したカスタムユーザーで E-mail ログインができるようにした
- Git で晒すとヤバい変数を django-environ と環境変数の設定で隠蔽した
- REST 化した Django の JWT 認証を dj_rest_auth に丸投げした
私にはフロントエンドがわからぬ
Microsoft が IE で Javascript をサポートし始めた時期は、20 年以上前です。そこから Web アプリ全盛の時代を迎えて、Javascript が世界で最もよく使われる言語として君臨することになろうとは、いったい誰が予想できたでしょうか。
モダンなフロントエンドなんて、私は全然わかりません。とはいえ、Web アプリを作ろうとすれば避けて通れないので、「学習コストが低い」と噂の Vue.js を使って個人開発を進めていきたいと思います。
まずは Docker で環境構築する
とにかくまったく分からんのですが、触れる環境を持たないことには話が始まらないので、適当に環境を作っていきます。
全体のディレクトリ構造
docker-compose.dev.ymlのあるプロジェクト全体のディレクトリ構造は、次のとおりです。. ├── docker-compose.dev.yml ├── Makefile ├── mysql │ ├── Dockerfile │ └── init.d ├── nginx │ ├── conf │ └── uwsgi_params ├── python │ ├── Dockerfile │ └── requirements.txt ├── src ## Django のベースディレクトリ ├── static │ ├── admin │ ├── css │ ├── img │ ├── rest_framework │ └── vendor ├── template └── vue ## ここを新しく作る └── Dockerfile
srcは、Django のベースディレクトリです。このディレクトリは、今のところこうなっています。./src ├── frontend ## Vue のベースディレクトリ │ └──・・・ ## ここに Vue 用のファイルを置きたい ├── Makefile ├── manage.py ├── octave ## バックエンド(Django)の設定ファイルがあるディレクトリ │ ├── asgi.py │ ├── __init__.py │ ├── __pycache__ │ ├── settings.py │ ├── urls.py │ └── wsgi.py └── users ## カスタムユーザーを定義したアプリ ├── admin.py ├── apps.py ├── __init__.py ├── migrations ├── models.py ├── __pycache__ ├── tests.py └── views.py
frontendは、Vue のベースディレクトリです。docker-compose でvue createすると、ここに Vue のプロジェクトが展開されるようにしたい。Docker の設定
以前に作った Django+MySQL+nginx の開発環境に Vue を加えます。
よく分からんまま
docker-compose.dev.ymlを雰囲気で書いたらこうなりました。合ってるかどうかはしらん(全文は以前の記事を見てください)docker-compose.dev.yml(抜粋)vue: build: context: ./vue dockerfile: Dockerfile restart: unless-stopped container_name: Vue networks: - django_net volumes: - ./src/frontend:/code ## これで frontend 以下にファイルが展開される - ./static:/static - ./template:/template expose: - "3000" depends_on: - pythonで、Vue 用の
Dockerfileは、こんな感じにしました。ごくシンプルです。./vue/DockerfileFROM node:15.5 WORKDIR /code RUN npm install -g @vue/cli ADD . /code/ここまで設定して、ビルドします。
$ docker-compose -f docker-compose.dev.yml buildVue のビルドって結構時間かかるのね。。
Vue のプロジェクト作成
次のコマンドで、
frontend以下に Vue のプロジェクトが新しく立ち上がります。$ docker-compose -f docker-compose.dev.yml run vue vue create .ちなみに、このコマンドは「docker-compose 上の『vue』という名前のサービスに『vue create .』を実行させる」という意味なので、「vue vue」と重複しているのは誤記ではありません。
これを実行すると、Vue から「で、今回のプロジェクト、お前はどうしたいの? 」という質問をいろいろと聞かれるのですが、よく分からんので全部 Yes!Yes!と答えておきます。
全部の質問に答えると、
frontend以下に(私にとっては)謎のファイルがいろいろとできています。GitHub のレポジトリを分ける
さて、前回の記事で Django を REST 化したので、フロントエンドとバックエンドが完全に切り離されました。なので、フロント・バックを1つのレポジトリで管理するより、分けて管理する方が後々見通しがいいはず。
また、Docker 関連ファイルはもともと独立していますし、当面いじらないはずなので、これも切り離したい。
というわけで、レポジトリを3つに分けました。
インフラ(Docker):https://github.com/hajime-f/octave_docker
バックエンド(Django):https://github.com/hajime-f/octave_backend
フロントエンド(Vue):https://github.com/hajime-f/octave_frontend作業しやすいように、インフラ→バックエンド→フロントエンドとシンボリックリンクを張っておきます。
.
├── octave_docker
│   └── src -> ../octave_backend
├── octave_backend
│   └── frontend -> ../octave_frontend
└── octave_frontend
Makefile でレポジトリの更新を自動化する
レポジトリを分けるのはいいとして、絶対に commit & push を忘れます。Vue のソースコードをいじって、Django のソースコードをいじって、Django だけ push するとか。忘れないはずがない。
というわけで、いつものように Makefile で自動化しました。
./Makefile(抜粋)commit: @echo "Running git on octave_docker" git add -A . git commit -m $(COMMENT) git push origin master cd "$(PWD)/src" && make commit $(COMMENT)./src/Makefilecommit: @echo "Running git on octave_backend" git add -A git commit -m $(COMMENT) git push origin master cd "$(PWD)/frontend" && make commit $(COMMENT)./src/frontend/Makefilecommit: @echo "Running git on octave_frontend" git add -A git commit -m $(COMMENT) git push origin master要するに、
docker-compose.dev.ymlのあるプロジェクトディレクトリで$ make commit COMMENT='**'と打てば、3つのレポジトリが同時に更新される仕組みです。かなり雑な感じもしますが、、、まあ、とりあえずこれで運用してみよう。
- 投稿日:2021-01-10T11:39:07+09:00
Rails+Vue+devise_token_authでCRUD書いてみた
はじめに
フロントエンドサーバーとバックエンドサーバーを分けて開発してみたいと思ったので
Vue.jsとRails(APIモード)でログイン機能のついたCRUD処理を書いてみました。環境
Ruby: 2.6.5
Ruby on Rails 6.0.3セットアップ
Railsプロジェクト作成
rails _6.0.3_ new devise_token_auth_api --api -d postgresql

cd devise_token_auth_api

rails db:create
Gemfile
gem "devise"
gem "devise_token_auth"
gem "rack-cors"
devise_token_auth インストール
bundle install rails g devise:install rails g devise_token_auth:install User authconfig/initializers/cors.rbRails.application.config.middleware.insert_before 0, Rack::Cors do allow do origins 'localhost:8080' resource '*', headers: :any, expose: ['access-token', 'expiry', 'token-type', 'uid', 'client'], methods: [:get, :post, :put, :patch, :delete, :options, :head] end endconfig/initializers/devise_token_auth.rbDeviseTokenAuth.setup do |config| config.change_headers_on_each_request = false config.token_lifespan = 2.weeks config.token_cost = Rails.env.test? ? 4 : 10 endUserモデル
app/models/user.rbclass User < ActiveRecord::Base devise :database_authenticatable, :registerable, :recoverable, :rememberable, :validatable include DeviseTokenAuth::Concerns::User endrails db:migrateルーティング
config/routes.rbRails.application.routes.draw do namespace :v1 do mount_devise_token_auth_for "User", at: "auth" end endAPI動作確認
今回はPostmanを使用します。
Devise_token_authの使い方は下記URLを参考にします。
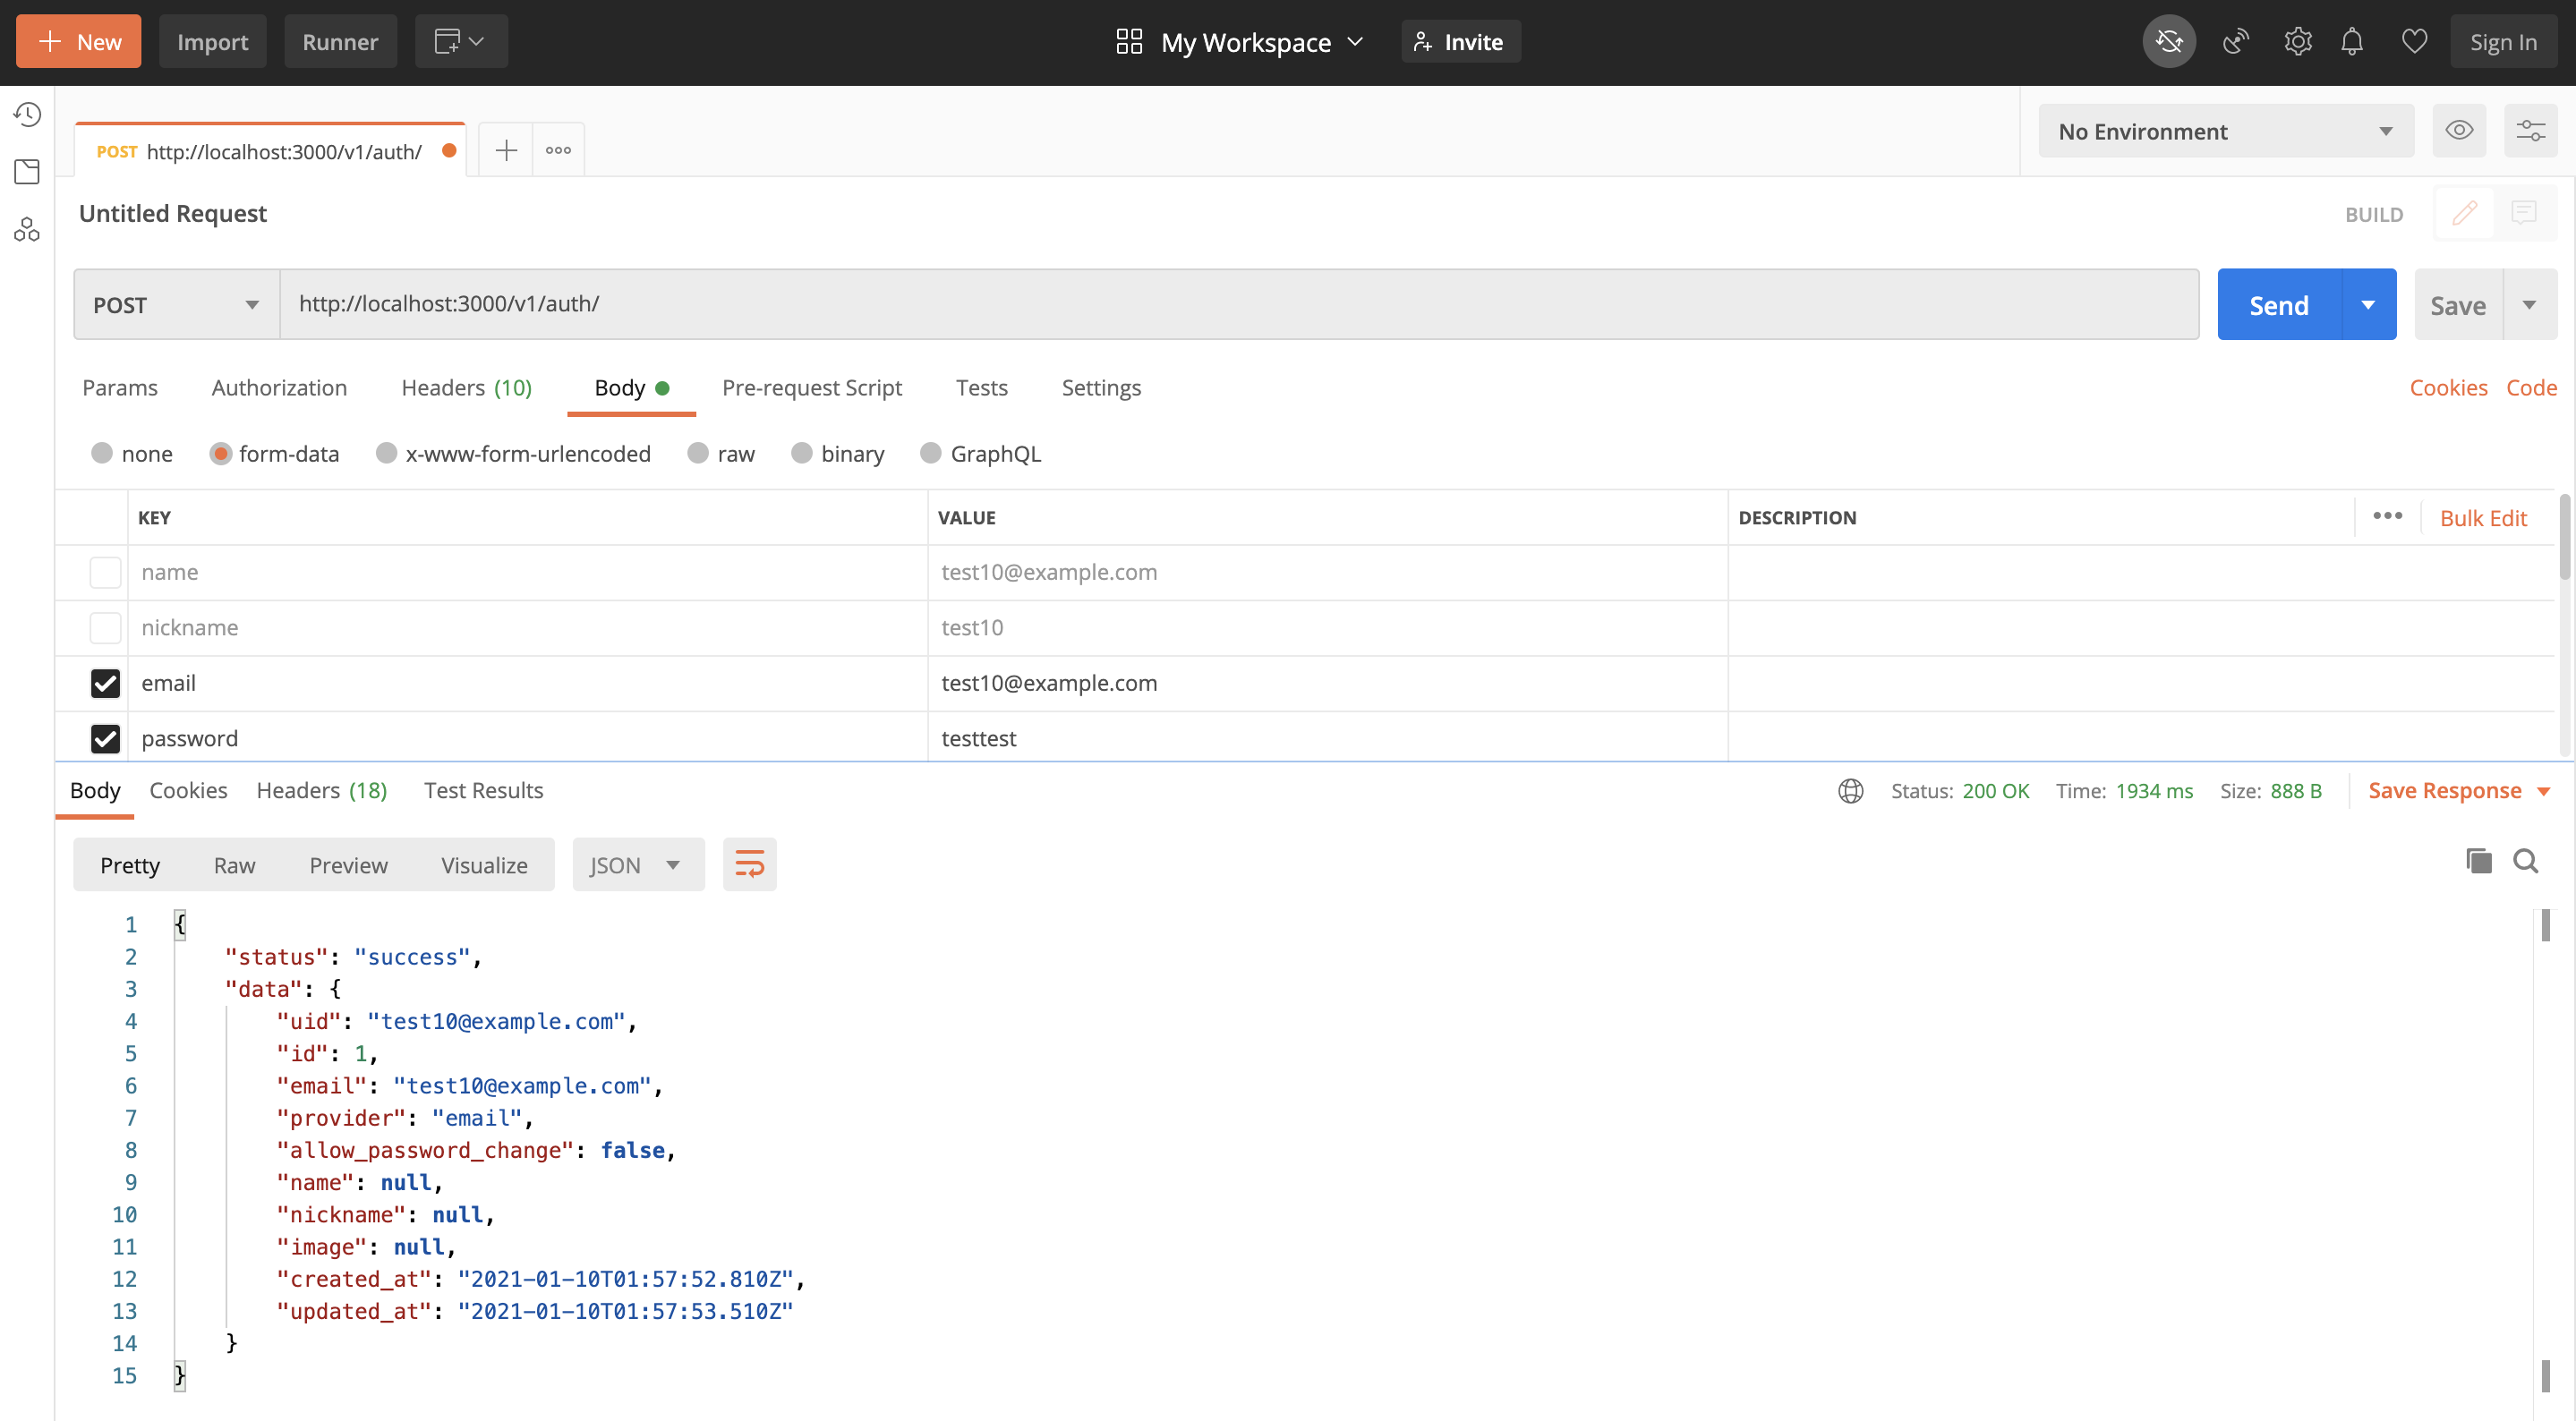
https://devise-token-auth.gitbook.io/devise-token-auth/usageサインアップ
HTTPメソッド:
POST
URL:http://localhost:3000/v1/auth/
Body:password
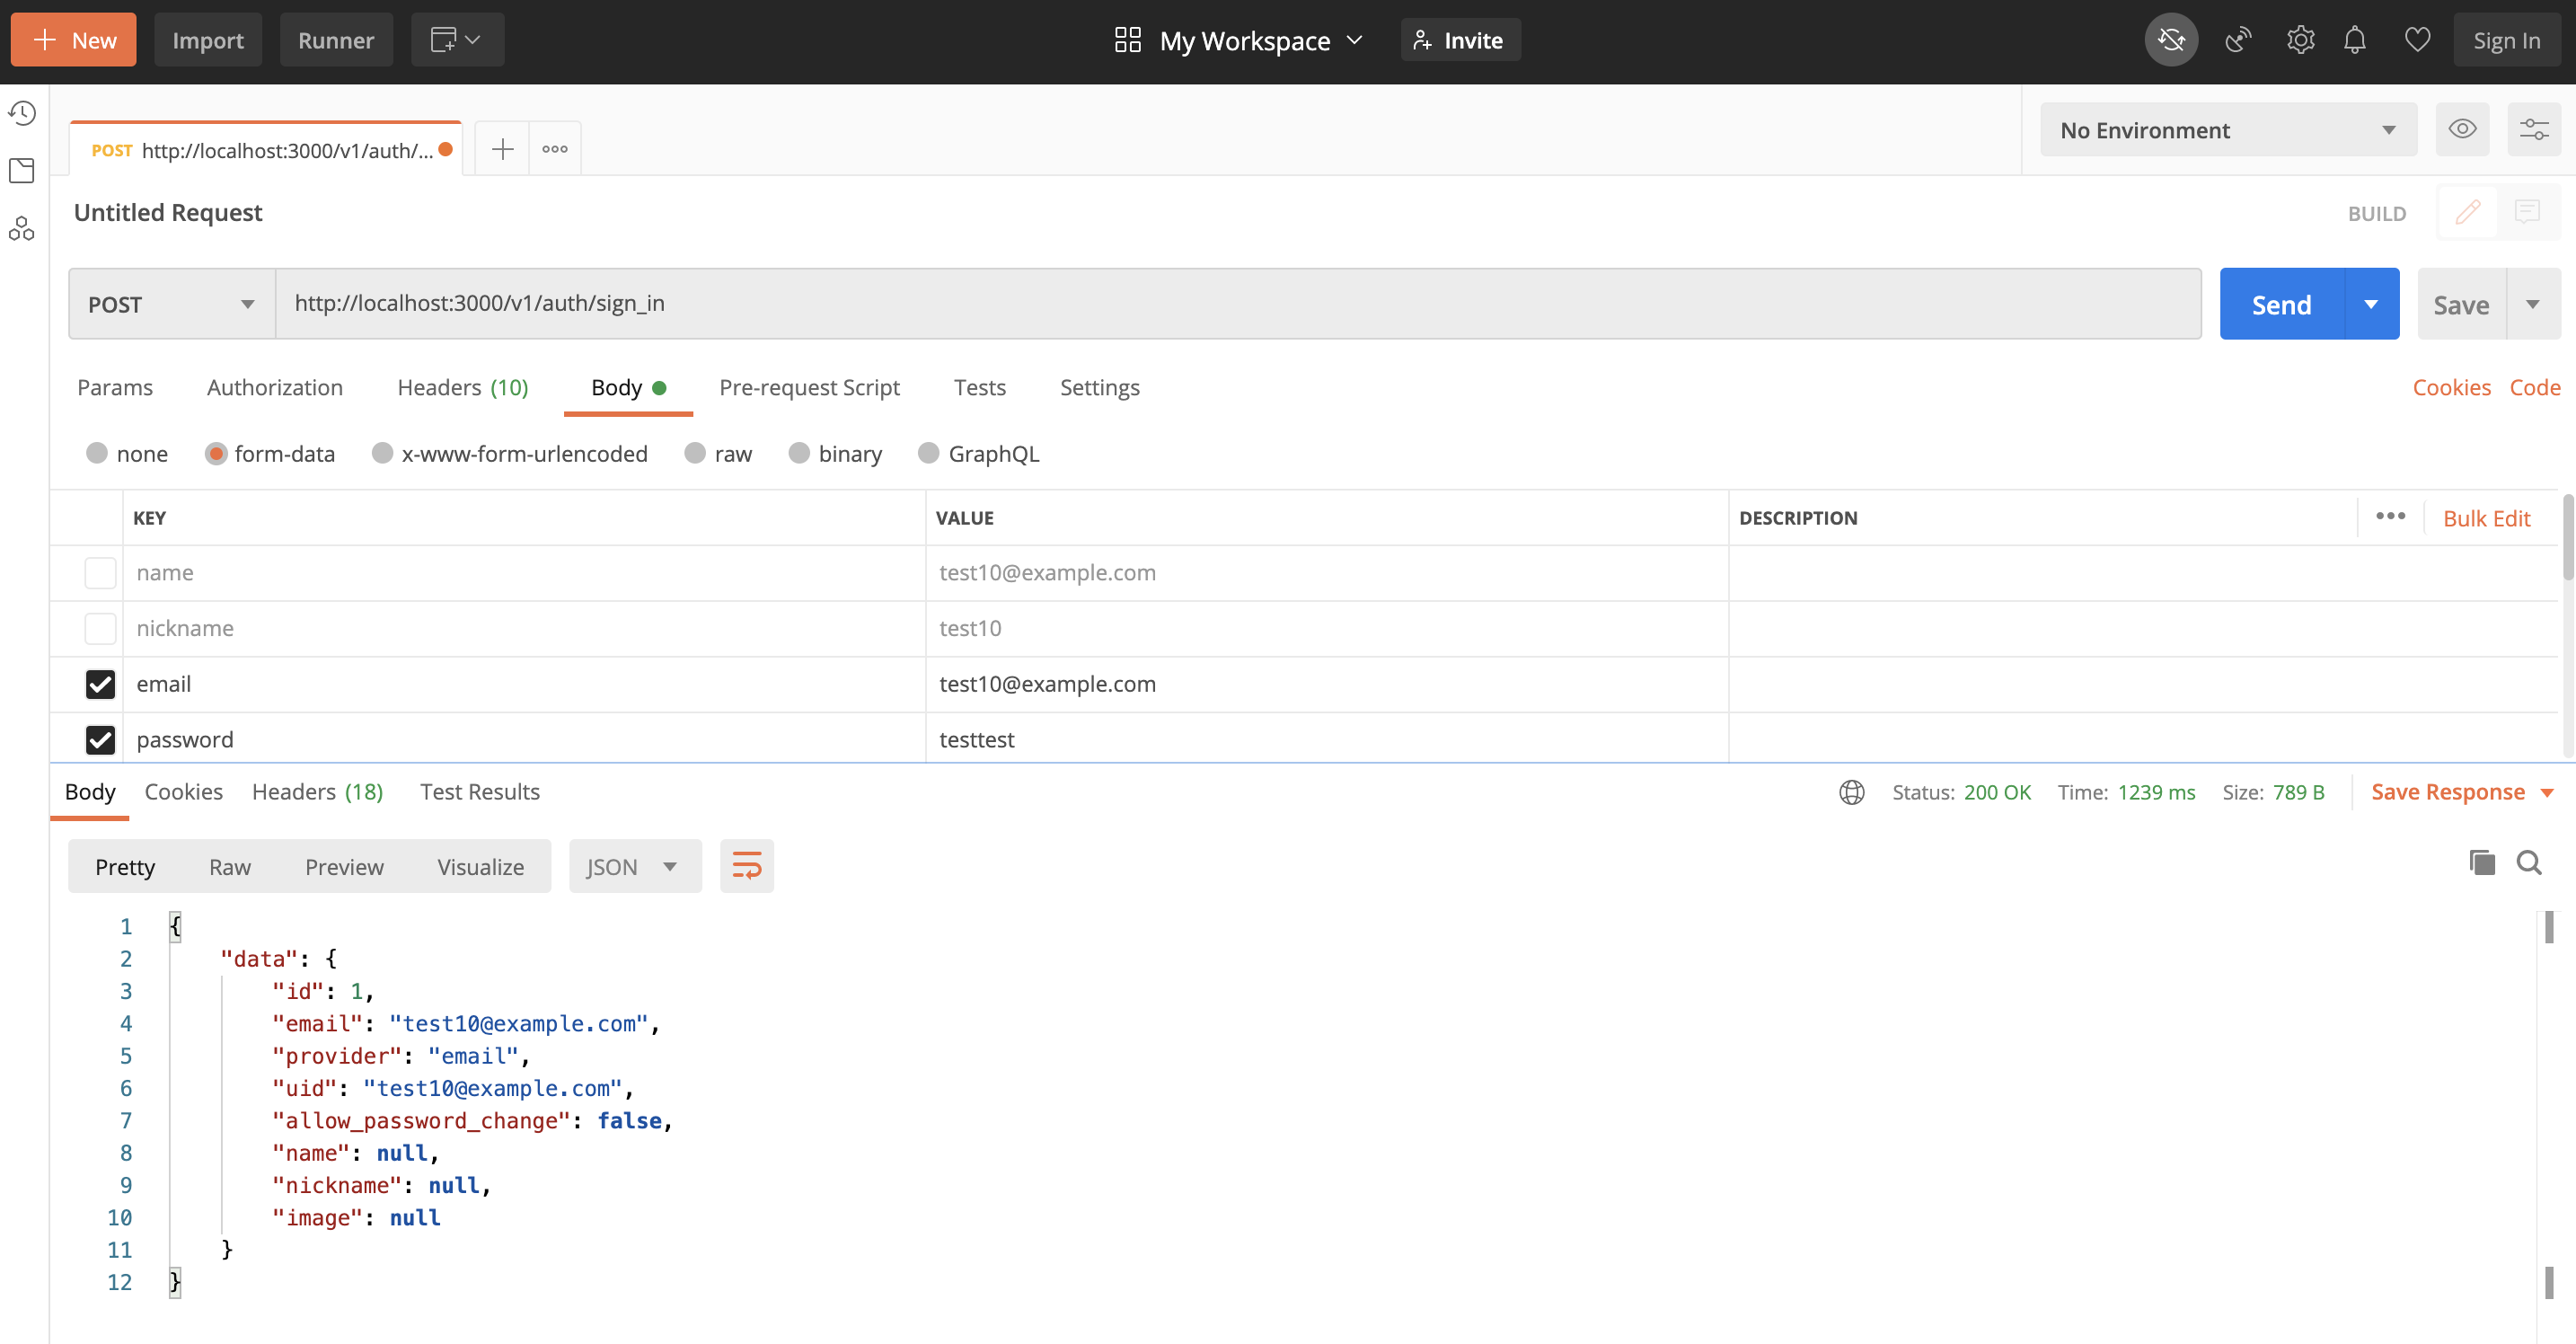
サインイン
HTTPメソッド:
POST
URL:http://localhost:3000/v1/auth/sign_in
Body:password
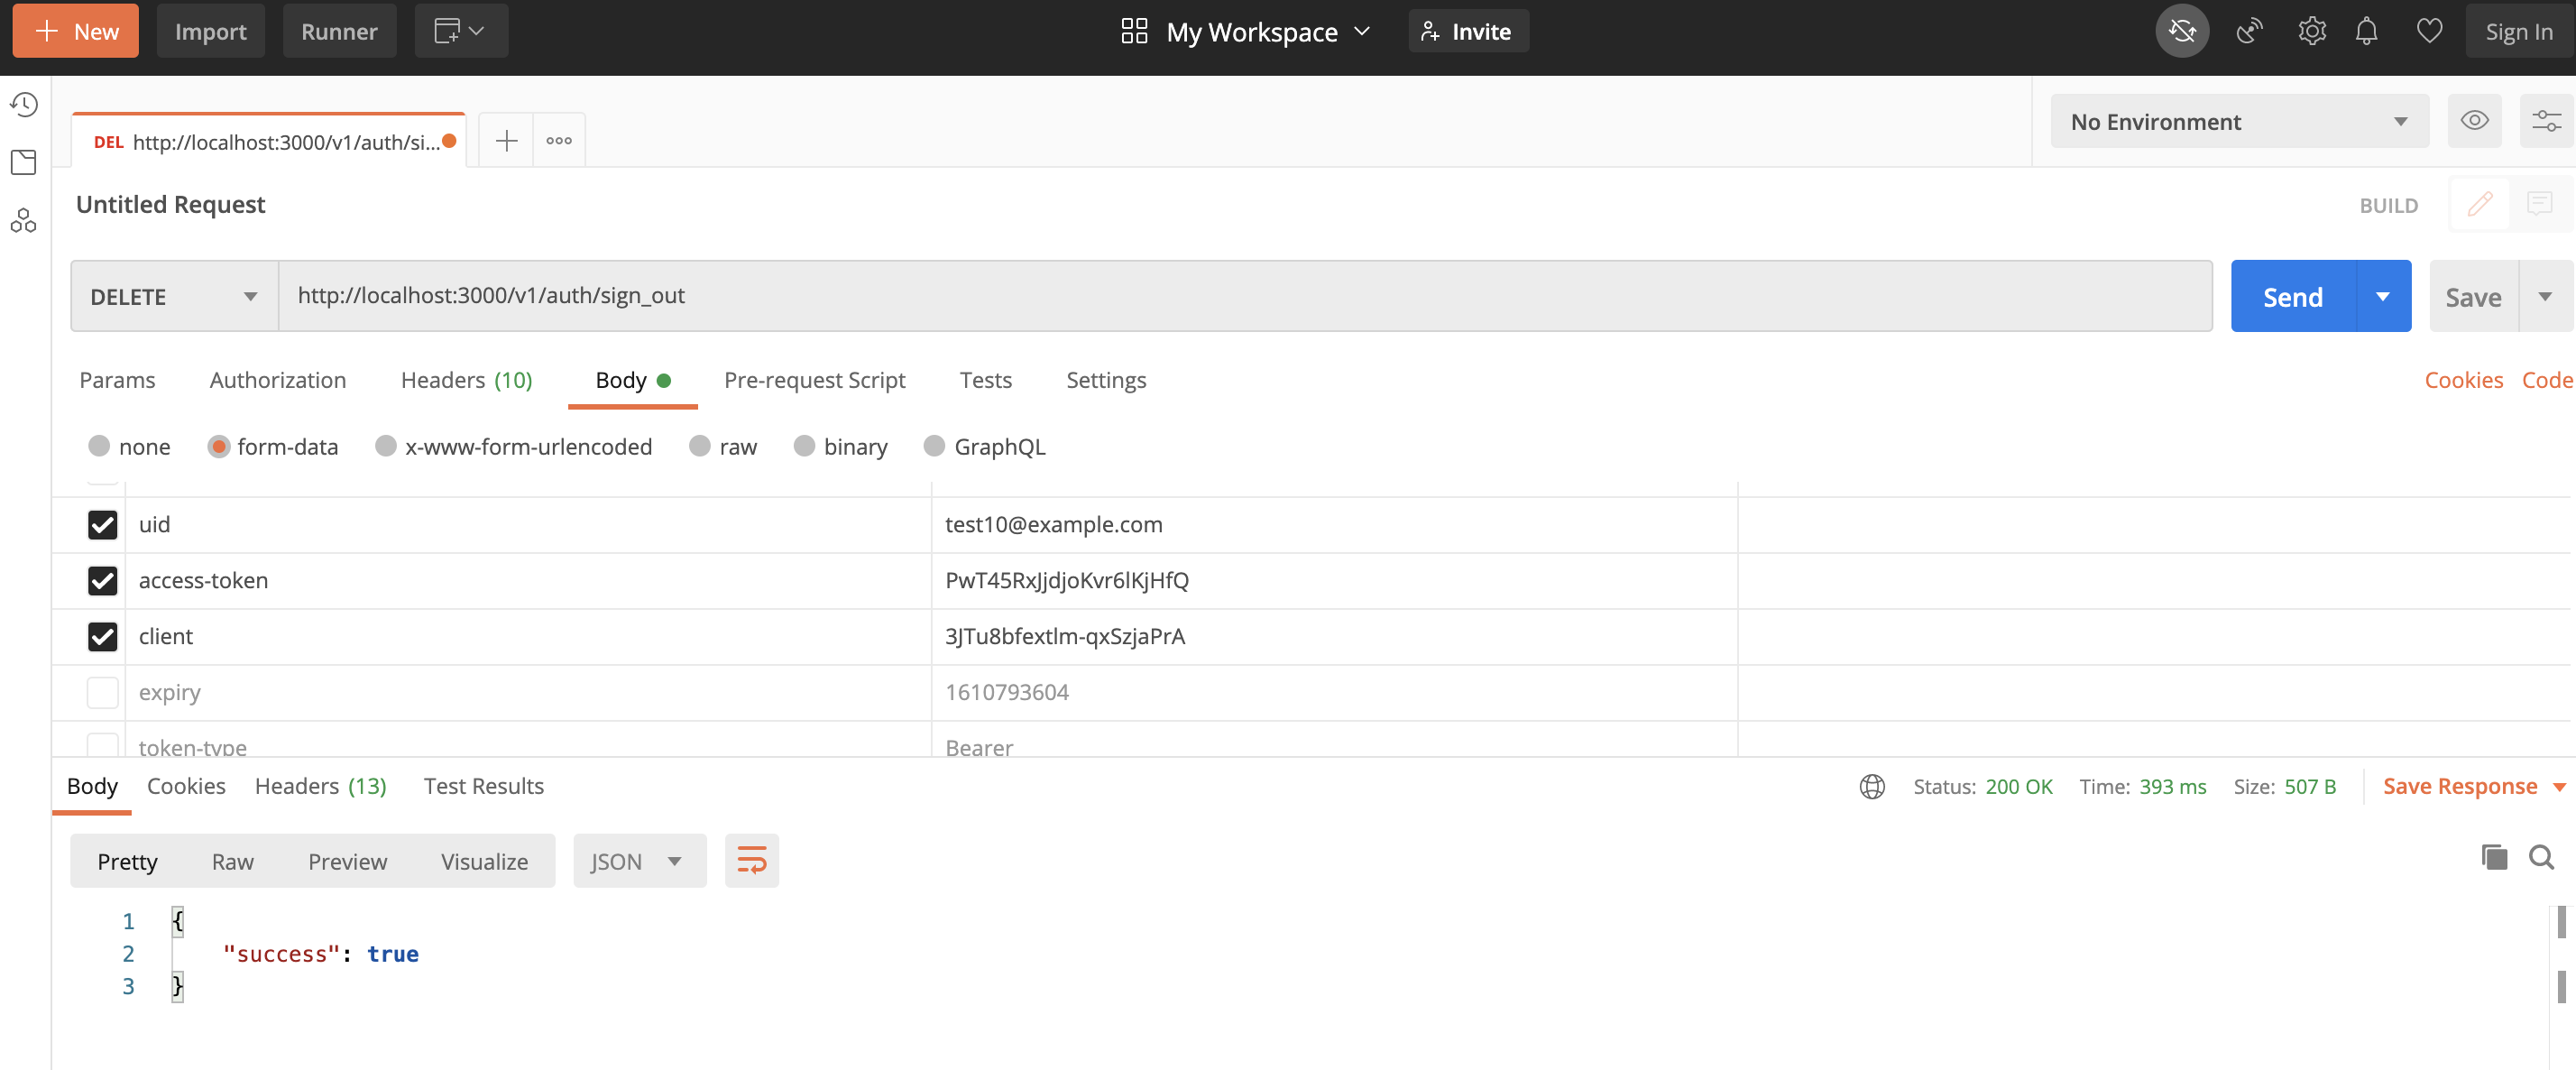
サインアウト
HTTPメソッド:
DELETE
URL:http://localhost:3000/v1/auth/sign_in
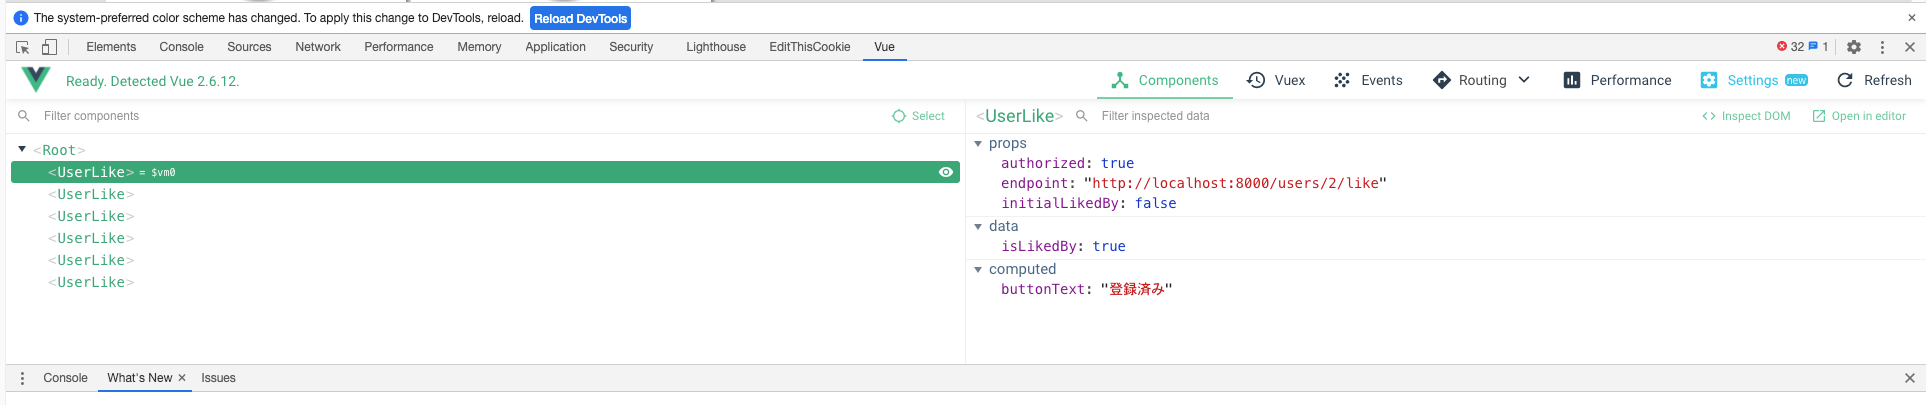
Body:uid,access-token,clientサインイン処理した際、Headersタブに必要なパラメータを確認することができます。
Vueプロジェクト作成
vue create frontend
*Default ([Vue 2] babel, eslint)を選択

cd frontend
yarn add axios

cd ..
起動コマンド
cd frontend
yarn serve
画面作成
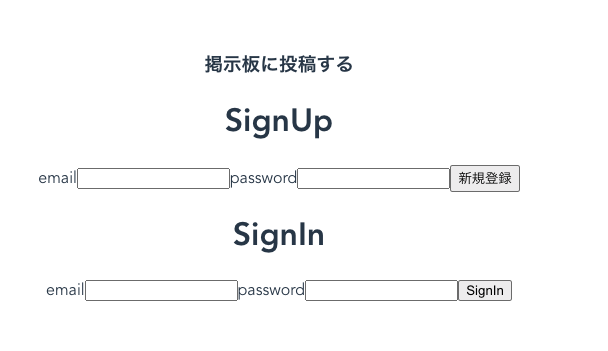
frontend/src/App.vue<template> <div id="app"> <h3>掲示板に投稿する</h3> <div v-if="client === ''"> <div> <h1>SignUp</h1> <label for="email">email</label> <input id="email" type="email" v-model="email" /> <label for="password">password</label> <input id="password" type="password" v-model="password" /> <button @click="signup">新規登録</button> </div> <div> <h1>SignIn</h1> <label for="email">email</label> <input id="email" type="email" v-model="email" /> <label for="password">password</label> <input id="password" type="password" v-model="password" /> <button @click="signin">SignIn</button> </div> </div> </div> </template> <script> import axios from "axios"; export default { data() { return { name: "", email: "", password: "", uid: "", access_token: "", client: "", title: "", content: "", tasks: [], comment: "", posts: [], }; }, methods: { signup() { axios .post("http://localhost:3000/v1/auth", { email: this.email, password: this.password, }) .then((response) => { localStorage.setItem( "access-token", response.headers["access-token"] ); localStorage.setItem("client", response.headers["client"]); localStorage.setItem("uid", response.headers["uid"]); this.access_token = response.headers["access-token"]; this.client = response.headers["client"]; this.uid = response.headers["uid"]; }); }, signin() { console.log(this.email); console.log(this.password); axios .post("http://localhost:3000/v1/auth/sign_in", { email: this.email, password: this.password, }) .then((response) => { console.log(response); localStorage.setItem( "access-token", response.headers["access-token"] ); localStorage.setItem("client", response.headers["client"]); localStorage.setItem("uid", response.headers["uid"]); this.access_token = response.headers["access-token"]; this.client = response.headers["client"]; this.uid = response.headers["uid"]; }); }, signout() { console.log(this.uid); console.log(this.access_token); console.log(this.client); axios .delete("http://localhost:3000/v1/auth/sign_out", { test: { test: "test" }, headers: { uid: this.uid, "access-token": this.access_token, client: this.client, }, }) .then((response) => { console.log(response); this.access_token = ""; this.client = ""; this.uid = ""; localStorage.removeItem("uid"); localStorage.removeItem("access-token"); localStorage.removeItem("client"); }); }, }, }; </script> <style> #app { font-family: Avenir, Helvetica, Arial, sans-serif; -webkit-font-smoothing: antialiased; -moz-osx-font-smoothing: grayscale; text-align: center; color: #2c3e50; margin-top: 60px; } </style>SignIn画面
タスク機能追加
rails g controller v1/tasks
rails g model Task
モデルの追加
db/migrate/YYYYMMDD_create_tasks.rbclass CreateTasks < ActiveRecord::Migration[6.0] def change create_table :tasks do |t| t.string :title t.text :content t.references :user t.timestamps end end endrails db:migrateルーティング
config/routes.rbRails.application.routes.draw do namespace :v1 do resources :tasks mount_devise_token_auth_for 'User', at: 'auth' end endコントローラー
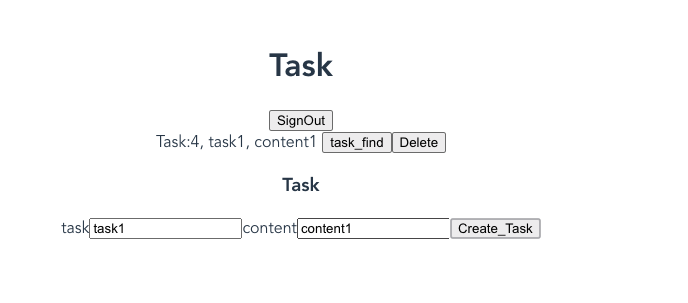
app/controllers/v1/tasks_controller.rbclass V1::TasksController < ApplicationController before_action :set_task, only: [:show] before_action :authenticate_v1_user! def index tasks = Task.where(user_id: @current_v1_user.id) render json: tasks end def create user = User.find_by(email: params[:uid]) task = Task.new(title: params[:title], content: params[:content], user_id: user.id) task.save end def show render json: @task end def update end def destroy task = Task.find(params[:id]) task.destroy render json: true end private def set_task @task = Task.find(params[:id]) end endfrontend/src/App.vue<template> <div id="app"> <div v-if="client === ''"> <div> <h1>SignUp</h1> <label for="email">email</label> <input id="email" type="email" v-model="email" /> <label for="password">password</label> <input id="password" type="password" v-model="password" /> <button @click="signup">SignUp</button> </div> <div> <h1>SignIn</h1> <label for="email">email</label> <input id="email" type="email" v-model="email" /> <label for="password">password</label> <input id="password" type="password" v-model="password" /> <button @click="signin">SignIn</button> </div> </div> <div v-if="client !== ''"> <div> <h1>Task</h1> <button @click="signout">SignOut</button> <div v-for="task in tasks" :key="task.id"> Task:{{ task.id }}, {{ task.title }}, {{ task.content }} <button @click="find_task(task.id)">task_find</button> <button @click="delete_task(task.id)">Delete</button> </div> </div> <div> <h3>Task</h3> <label for="task">task</label> <input id="task" type="text" v-model="title" /> <label for="content">content</label> <input id="content" type="text" v-model="content" /> <button @click="create_task">Create_Task</button> </div> </div> </div> </template> <script> import axios from "axios"; export default { data() { return { name: "", email: "", password: "", uid: "", access_token: "", client: "", title: "", content: "", tasks: [], comment: "", posts: [], }; }, methods: { signup() { axios .post("http://localhost:3000/v1/auth", { email: this.email, password: this.password, }) .then((response) => { localStorage.setItem( "access-token", response.headers["access-token"] ); localStorage.setItem("client", response.headers["client"]); localStorage.setItem("uid", response.headers["uid"]); this.access_token = response.headers["access-token"]; this.client = response.headers["client"]; this.uid = response.headers["uid"]; this.all_tasks(); }); }, signin() { console.log(this.email); console.log(this.password); axios .post("http://localhost:3000/v1/auth/sign_in", { email: this.email, password: this.password, }) .then((response) => { console.log(response); localStorage.setItem( "access-token", response.headers["access-token"] ); localStorage.setItem("client", response.headers["client"]); localStorage.setItem("uid", response.headers["uid"]); this.access_token = response.headers["access-token"]; this.client = response.headers["client"]; this.uid = response.headers["uid"]; this.all_tasks(); }); }, signout() { console.log(this.uid); console.log(this.access_token); console.log(this.client); axios .delete("http://localhost:3000/v1/auth/sign_out", { test: { test: "test" }, headers: { uid: this.uid, "access-token": this.access_token, client: this.client, }, }) .then((response) => { console.log(response); this.access_token = ""; this.client = ""; this.uid = ""; localStorage.removeItem("uid"); localStorage.removeItem("access-token"); localStorage.removeItem("client"); }); this.tasks = []; }, all_tasks() { axios .get("http://localhost:3000/v1/tasks", { headers: { uid: this.uid, "access-token": this.access_token, client: this.client, }, }) .then((response) => { console.log(response.data); this.tasks = response.data; }); }, find_task(task_id) { axios .get(`http://localhost:3000/v1/tasks/${task_id}`, { headers: { uid: this.uid, "access-token": this.access_token, client: this.client, }, }) .then((response) => { console.log(response); this.task = response.data; }); }, create_task() { console.log(this.uid); console.log(this.access_token); console.log(this.client); axios .post("http://localhost:3000/v1/tasks", { uid: this.uid, "access-token": this.access_token, client: this.client, title: this.title, content: this.content, }) .then((response) => { console.log(response); this.all_tasks(); }); }, delete_task(task_id) { axios .delete(`http://localhost:3000/v1/tasks/${task_id}`, { headers: { uid: this.uid, "access-token": this.access_token, client: this.client, }, }) .then((response) => { console.log(response); this.all_tasks(); }); }, }, }; </script> <style> #app { font-family: Avenir, Helvetica, Arial, sans-serif; -webkit-font-smoothing: antialiased; -moz-osx-font-smoothing: grayscale; text-align: center; color: #2c3e50; margin-top: 60px; } </style>Task画面
GitHub
https://github.com/yodev21/devise_token_auth_app終わりに
フロントエンドとバックエンドを分けた際のログイン機能がついたCRUDを実装してみて
ハマるポイントが多数あり学ぶきっかけになりました。まだまだ改善点や試したいことがあるため、今後は下記を中心に学んでいきたいと思います。
・ 複数テーブルをまたぐデータ取得機能
・ Vue Routerの導入
・ Vuexの導入参考記事
- 投稿日:2021-01-10T10:00:26+09:00
【rails6】webpackを使って手動でjsをコンパイルしながら行う開発が非常にスムーズで感動した件
webpackを使って手動でコンパイルする際の開発の進め方
componentを編集したとき
% cd frontend #webpack.config.jsが置かれているディレクトリ
% webpack #webpack.config.jsを使ってアプリで読み込むjsをbuild
とコマンドを入力することでcomponentの変更が反映される。このとき別タブでrailsのサーバーを起動しっぱなしでも問題ない。よって開発するときは
タブ1 タブ2 railsのサーバーが動いているタブ webpack.config.jsが入っているディレクトリ
componentの編集→webpackコマンドでbuildを行うといった形でタブを分けると開発がスムーズである。
componentも事前にwebpackでコンパイルしているのでrailsアプリでは出力されたjs一つを読み込むだけで済む。
ビューをrailsのviews以下のビューファイルで読み込むのと処理速度がかなり違う印象。
- 投稿日:2021-01-10T07:55:02+09:00
Vue.routerでリダイレクト時にスタックトレースが大変なことになる
vue.routerを使用して認証済以外のアカウントはログイン画面にリダイレクトさせようとしていたら下記のようなエラーが。
スタックオーバーフローしてる。
私はログイン画面にリダイレクトさせたいだけなんだ…。rooter.jsの設定(抜粋)
export default new Router({
    // モードの設定
    mode: 'history',
    routes: [
        {
            path: '/login',
            name: login,
            redirect:  '/login',
            component: login
        }
    ]
});
気付いた。
'/login'のパスで'/login'にリダイレクトさせるようにしているから、
/loginにアクセスしたら/loginにリダイレクトして…ん?
redirect: '/login',はい、要りませんね。
解決。

- 投稿日:2021-01-10T02:18:30+09:00
VueのSPAをIISで動かすときの設定メモ
VueのSPAアプリをローカルのIISで動かしたときのメモ
参考(https://www.linkedin.com/pulse/hosting-vue-js-spa-build-microsoft-iis-zainul-zain/)
1.Vue JS SPAを 'npm run build'でビルド
2./distフォルダに出力されるのでIISで/distフォルダをwebサイトに設定
3./distフォルダに「web.config」を作成
web.config<?xml version="1.0" encoding="UTF-8"?> <configuration> <system.webServer> <rewrite> <rules> <rule name="DynamicRewriteCss" stopProcessing="true"> <match url="^(.*)/js/(.*)\.js$" /> <action type="Rewrite" url="js/{R:2}.js" /> </rule> <rule name="DynamicRewriteJsMap" stopProcessing="true"> <match url="^(.*)/js/(.*)\.js.map$" /> <action type="Rewrite" url="js/{R:2}.js.map" /> </rule> <rule name="DynamicRewriteJs" stopProcessing="true"> <match url="^(.*)/css/(.*)\.css$" /> <action type="Rewrite" url="css/{R:2}.css" /> </rule> <rule name="Handle History Mode and custom 404/500" stopProcessing="true"> <match url="(.*)" /> <conditions logicalGrouping="MatchAll"> <add input="{REQUEST_FILENAME}" matchType="IsFile" negate="true" /> <add input="{REQUEST_FILENAME}" matchType="IsDirectory" negate="true" /> </conditions> <action type="Rewrite" url="index.html" /> </rule> </rules> </rewrite> <httpErrors> <remove statusCode="404" subStatusCode="-1" /> <remove statusCode="500" subStatusCode="-1" /> <error statusCode="404" path="/survey/notfound" responseMode="ExecuteURL" /> <error statusCode="500" path="/survey/error" responseMode="ExecuteURL" /> </httpErrors> <modules runAllManagedModulesForAllRequests="true"/> </system.webServer> </configuration>4.IISのアプリケーションプールの設定で.NET CLR Versionをマネージドコードなしに変更
5.下記をインストール
https://www.iis.net/downloads/microsoft/url-rewrite6.IIS再起動
※IISがでエラーを吐いたら
IISの機能の委任でハンドラーマッピングとモジュールを読み取り専用から書き込み権限も追加おわり。