- 投稿日:2021-01-09T23:43:11+09:00
react-hook-formでの値登録の処理
概要
Reactでフォームの実装をする際にバリデーションなど簡単に実装できる、react-hook-formというものがあります。使い方の概要などは、@akihiro_FEさんがReact-hook-formで簡単にバリデーションフォーム作るという記事で紹介されています。
今回はフォームで入力する値の登録処理の詳細について、少し調べてみたのでメモ書きを残しておきます。registerメソッドについて
ドキュメントのフィールドを登録するにあるとおり、入力項目のref属性にregisterをセットすることでフォームフィールドの値の収集とバリデーションが実現できます。そして、onSubmitに指定するメソッドでregisterにセットした値を取得できます。React Hook Formを使うの記事の「送信の設定」の項にある通り、「refにregisterが設定された要素のvalueが,その要素のnameがプロパティとなり,dataにオブジェクトとして渡される」仕組みとなっています。
値登録の処理
では、submit時に取得できる値の登録はどのような処理を行っているのでしょうか。参考になるのはドキュメントのrefへのアクセスが出来ない場合は?です。ref属性でのregisterメソッドを使用しない(もしくはできない)場合は、事前にregisterメソッドでプロパティ名を登録の上、
useFormで設定されているsetValueメソッドで個別に値が設定できます。
では、そのsetValueでは何をやっているかというと、こちらのドキュメントにある通り、「formStateはinputのnameをtouchedにプッシュ」とあります。最終的な状態の管理はformStateで行われていて、formStateのtouchedに「操作された全てのinputのnameの配列」が格納されています。
- 投稿日:2021-01-09T23:38:22+09:00
Rails+React+QuaggaJSを使ってバーコードスキャンしてみた
はじめに
チーム開発したい方たちと集まりRuby on RailsとReactを使ってアプリ作成しており、
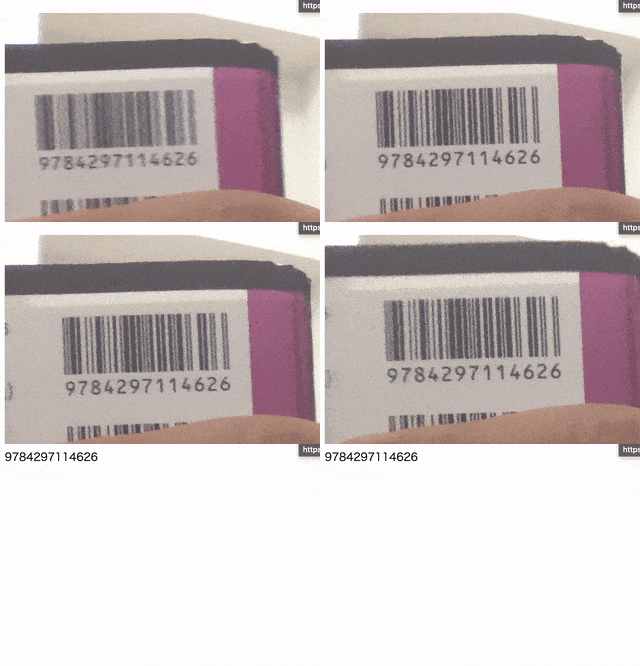
バーコード読み取り機能の実装を担当することとなったためざっくり動くところまで作ってみました。環境
- Ruby: 2.6.5
- Ruby on Rails: 6.0.3
セットアップ
rails _6.0.3_ new barcode_app -d postgresql cd barcode_app yarn add quagga rails webpacker:install rails webpacker:install:react rails generate react:installapp/javascript/components/scanners/config.json{ "inputStream": { "type": "LiveStream", "constraints": { "width": { "min": 450 }, "height": { "min": 300 }, "facingMode": "environment", "aspectRatio": { "min": 1, "max": 2 } } }, "locator": { "patchSize": "medium", "halfSample": true }, "numOfWorkers": 2, "frequency": 10, "decoder": { "readers": ["ean_reader"] }, "locate": true }app/javascript/components/scanners/Index.jsximport React, { useState } from "react"; import Scanner from "./Scanner"; const Index = () => { const [camera, setCamera] = useState(true); const [result, setResult] = useState(null); const onDetected = result => { setResult(result); setCamera(!camera) window.location.href = '/scanners/' + result }; return ( <section className="section-wrapper"> <div className="section-title"> <h1 className="section-title-text"> {camera ? <Scanner onDetected={onDetected} /> : <p>読み込み中...</p> } </h1> </div> </section> ); } export default Indexapp/javascript/components/scanners/Scanner.jsximport React, { useEffect } from "react"; import config from "./config.json"; import Quagga from "quagga"; const Scanner = props => { const { onDetected } = props; useEffect(() => { Quagga.init(config, err => { if (err) { console.log(err, "error msg"); } Quagga.start(); return () => { Quagga.stop() } }); Quagga.onProcessed(result => { var drawingCtx = Quagga.canvas.ctx.overlay, drawingCanvas = Quagga.canvas.dom.overlay; if (result) { if (result.boxes) { drawingCtx.clearRect( 0, 0, Number(drawingCanvas.getAttribute("width")), Number(drawingCanvas.getAttribute("height")) ); result.boxes .filter(function(box) { return box !== result.box; }) .forEach(function(box) { Quagga.ImageDebug.drawPath(box, { x: 0, y: 1 }, drawingCtx, { color: "green", lineWidth: 2 }); }); } if (result.box) { Quagga.ImageDebug.drawPath(result.box, { x: 0, y: 1 }, drawingCtx, { color: "#00F", lineWidth: 2 }); } if (result.codeResult && result.codeResult.code) { Quagga.ImageDebug.drawPath( result.line, { x: "x", y: "y" }, drawingCtx, { color: "red", lineWidth: 3 } ); } } }); Quagga.onDetected(detected); }, []); const detected = result => { onDetected(result.codeResult.code); }; return ( <div id="interactive" className="viewport" /> ); }; export default Scanner;はまったポイント
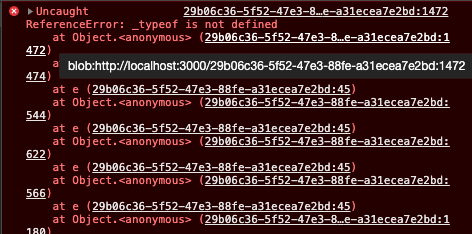
参考にした記事
https://github.com/visgl/react-map-gl/issues/874
対応箇所
config/webpack/environment.jsconst { environment } = require('@rails/webpacker') // 追記 environment.loaders.delete('nodeModules'); module.exports = environment完成
GitHub
https://github.com/yodev21/scanner_app参考記事
- 投稿日:2021-01-09T20:33:28+09:00
cannot find type definition file for 'node'. ts2688のエラー
- 投稿日:2021-01-09T12:21:12+09:00
【React】ディレクトリ構成案
注意
2021/1現在、本ディレクトリ構成にて運用中のため、適宜メリット・デメリットを追記してゆく。
また、本ディレクトリ構成での運用に不都合が発覚した場合、ディレクトリ構成は変更の可能性あり。編集履歴
- 1/9 本記事を作成
対象のシステム
客先などに提供するため実装・試験まできちんとしなければならないが、アトミックデザインにするほどでもないな〜といった感じのシステム。
以下、作成するシステムの前提を記載。
- create-react-appする
- TypeScriptで実装する
- Hooksを利用する
- Reduxは使わないがuseReducerを使う
- PresentationComponentとContainerComponentは分ける
- ユニットテストはjestを利用し、ContainerComponent、カスタムフックのC1カバレッジを100%にする
- メッセージはcomponentとは別のファイルで定義する
ディレクトリ構成案
app/
 ┗ src/
    ┠ Components/
    ┃        ┠ Presentations/  //画面表示に関するファイル
    ┃        ┗ Containers/     //ロジックに関するファイル
    ┠ Hooks/                   //カスタムフック
    ┠ Actions/                 //useReducerで利用するAction
    ┠ Models/                  //複数のコンポーネント間で共有するinterface
    ┠ Message/                 //エラーメッセージなど
    ┠ App.tsx
    ┠ index.tsx
    ┗ Tests/                   //ユニットテストに関するファイル
メリット
- ユニットテスト実行時はContainerディレクトリ、Hooksディレクトリ内のファイルを対象に行えばよい
- コンポーネント間でAction、Model(interfaceなど)を共有しやすい
- コンポーネント数がある程度大きくなっても対応できる
デメリット(課題)
- ディレクトリ構成からはPresentationComponentとContainerComponentの関連が推測できない(ファイル名によって推測するしかない)
- 投稿日:2021-01-09T12:21:12+09:00
【React】Hooks時代のディレクトリ構成案
注意
2021/1現在、本ディレクトリ構成にて運用中のため、適宜メリット・デメリットを追記してゆく。
また、本ディレクトリ構成での運用に不都合が発覚した場合、ディレクトリ構成は変更の可能性あり。編集履歴
- 1/9 本記事を作成
対象のシステム
客先などに提供するため実装・試験まできちんとしなければならないが、アトミックデザインにするほどでもないな〜といった感じのシステム。
以下、作成するシステムの前提を記載。
- create-react-appする
- TypeScriptで実装する
- Reduxは使わないがuseReducerを使う
- レンダリングとロジックを分離させるため、PresentationComponentとContainerComponentは分ける
- ユニットテストはjestを利用し、ContainerComponent、カスタムフックのC1カバレッジを100%にする
- メッセージはcomponentとは別のファイルで定義する
ディレクトリ構成案
app/
 ┗ src/
    ┠ Components/
    ┃        ┠ Presentations/  //画面表示に関するファイル
    ┃        ┗ Containers/     //ロジックに関するファイル
    ┠ Hooks/                   //カスタムフック
    ┠ Actions/                 //useReducerで利用するAction
    ┠ Models/                  //複数のコンポーネント間で共有するinterface
    ┠ Message/                 //エラーメッセージなど
    ┠ App.tsx
    ┠ index.tsx
    ┗ Tests/                   //ユニットテストに関するファイル
メリット
- ユニットテスト実行時はContainerディレクトリ、Hooksディレクトリ内のファイルを対象に行えばよい
- コンポーネント間でAction、Model(interfaceなど)を共有しやすい
- コンポーネント数がある程度大きくなっても対応できる
デメリット(課題)
- ディレクトリ構成からはPresentationComponentとContainerComponentの関連が推測できない(ファイル名によって推測するしかない)

