- 投稿日:2021-01-06T21:38:37+09:00
Dockerについて雰囲気でまとめてみる
Qiitaではわかりやすい記事がたくさんある中で、
簡単にDockerについて書こうと思います。初投稿なので甘めに見てください。Dockerとは何か
Dockerとは
コンテナ型仮想環境を作成、実行、管理の3つのプロセスを行うためのプラットフォームである。→コンテナ型仮想環境とは?
まずコンテナは、みんなが想像する船で運ぶ箱とイメージは一緒。仮想環境とは、その名の通り仮想的な環境のこと。もっとくだけて言うとパソコンの中に、環境を構築したソフトウェアがサーバーの中でひとつ宙に浮いてる。みたいなイメージですかね。それがコンテナみたいにいくつもの箱があって、それを1台のハードウェアで複数あるコンテナごとに動作、実行ができる。それがコンテナ型仮想環境。なにが便利なのかと言うと、コンテナ型仮想環境(今回はDocker)を使うことで、コンテナの中で作った環境を素早く起動することができて、かつ複数のアプリケーションを実行することができるということ。
最大の利点は、仮想的な環境を作っているので、WindowsやMacなど、異なるOSのPCから同じ条件で中身を動かせると言うこと。OSの違いによる実行環境の不具合がなくなることが嬉しいポイントではないか。ここでメリットを少しまとめてみる。
Dockerのメリットは何か
・実行環境を構築しているので、プログラムの起動が早い
・開発環境と本番環境での差をなくせる
・ファイルの共有で同じ環境を立ち上げることができる
・自信のPCの中身を構築するわけではないので、ソフトウェアのインストールなどしなくてもよいなどがある。
Dockerにまとわりつく用語集
Dockerイメージ
Dockerイメージとは、コンテナを作成するにあたって必要な「土台」を総じてこう呼ぶ。
コンテナのマトリョシカ的なイメージで、アプリケーションを実行する際に必要な設定やライブラリがまとめて入ってるもの。
これを別のサーバーに渡すとそのまま再現できる。Dockerコンテナ
Dockreイメージを作成するとコンテナになる。
このコンテナを実行すると中のDockerイメージに設定した機能を呼び起こせる。
Dockerイメージはあくまでイメージ、よし、実際にやろう!ってなるとコンテナになる。(適当)DockerHub
GitHubを想像してもらえるとわかりやすいと思う。
なんかどっかのサイトでまずはDockerHubのユーザー登録をします。みたいなところから入ったので最初は本当にわからなかったけどとりあえず登録した記憶。(騙されやすい)
Dockrerイメージは保存して自由に受け渡しができるのでそれを保存してみんなに配ってるサービス。
様々なユーザーが作ったイメージをDLして保存できるので、実行するだけでコンテナが起動できる、ライブラリと同じ感じかな。
GitHubもクローンして己のリポジトリに保存できるじゃん?そんな感じ。こういった保管の機能を持ったサービスや場所のことをレジストリというらしい。覚えよう。
Dockerエンジン
コンテナの仮想化を実際に行うために役割。
車と一緒で、箱だけあっても動力ないと進まないよね、みたいな感じだと思う。
Dockerエンジンによってコンテナ作成や起動や停止や削除などの機能が使える、程度の認識でいいと思う。Dockerデーモン
強そう。常駐型のプログラムといわれるもの。
コンテナの作成やDockerイメージの作成など、操作や命令はDockerデーモンが受け取って処理をする。
伝言ゲームの最後の人みたいな位置で、仮想化したソフトウェアの中にいる人。この人がしっかり準備してないと処理を実行してくれない。もし停止していたら起動しておく必要がある。
Dockerクライアント
クライアントソフトのこと。
Dockerコマンドをつかって指示を出す人。そのまんま。まとめ
とりあえずDockerというなの付く単語の説明だけでしたが、
学習したばかりの浅い知識なので、誤りの箇所もあるかと思います。
その際はキツめに言っていただければと思います。後日、Dockerコマンドの解説やDockerファイルやホスト型仮想化の違いなど細かい部分もまとめられればいいなと思います。
ありがとうございました。
- 投稿日:2021-01-06T20:11:47+09:00
dockerをファイル指定してビルド
docker build . -f ./docker/production/Dockerfile
- 投稿日:2021-01-06T19:49:15+09:00
【circleCI】Rails6/mysql8のProjectを自動テスト&自動コードチェック
はじめに
久しぶりにyml職人していたら、circleCIの書き方を忘れてしまったので、備忘録として残します
折角なので冗長なymlをCircleCI Orbsでスッキリさせてみました
CircleCIで設定する環境と、実際にアプリを運用する環境をできるだけ合わせることがポイント
GithubでPull Requetを作成したら、masterにマージする前に自動でビルドされてテストやリンターが走ったら便利。前提
- Githubのアカウントをもっていること、既にRailsのプロジェクトがあること
- Rspec & Rubocopが設定済みであること
- Mysqlをつかった例を説明します
開発環境
- Rails6
- Mysql8
- Docker
- AWS ecs
config.ymlの設定
?全体はこんな感じ
・commitした時とmergeした時にRspec&RUbocopが走る
・mergeしたらecsに自動デプロイ.circleci/config.ymlversion: 2.1 orbs: ruby: circleci/ruby@1.1.2 aws-ecr: circleci/aws-ecr@6.7.0 aws-ecs: circleci/aws-ecs@1.1.0 jobs: test: docker: - image: circleci/ruby:2.6.3 environment: RAILS_ENV: test RAILS_MASTER_KEY: ${RAILS_MASTER_KEY} DB_HOST: 127.0.0.1 DB_USERNAME: 'test_user' DB_PASSWORD: 'password' - image: circleci/mysql:8.0 command: --default-authentication-plugin=mysql_native_password environment: MYSQL_DATABASE: app_test MYSQL_USER: test_user MYSQL_PASSWORD: password MYSQL_HOST: 127.0.0.1 TZ: "Asia/Tokyo" steps: - checkout - ruby/install-deps - run: name: Wait for DB command: dockerize -wait tcp://127.0.0.1:3306 -timeout 1m - run: name: Database setup command: bundle exec rails db:schema:load --trace - ruby/rubocop-check - ruby/rspec-test workflows: test: jobs: - test deploy: jobs: - aws-ecr/build-and-push-image: account-url: AWS_ECR_ACCOUNT_URL region: AWS_REGION aws-access-key-id: AWS_ACCESS_KEY_ID aws-secret-access-key: AWS_SECRET_ACCESS_KEY create-repo: true dockerfile: ./docker/api/Dockerfile repo: sample-repo tag: "${CIRCLE_SHA1}" filters: branches: only: master - aws-ecs/deploy-service-update: requires: - aws-ecr/build-and-push-image family: 'sample-task' cluster-name: '${ECS_ARN}' service-name: 'sample-api' container-image-name-updates: "container=sample-container,tag=${CIRCLE_SHA1}"
circleci/ruby@1.1.2を使って諸々設定?公式に詳しいことが載ってます
circleci/ruby@1.1.2について: circleCIDeveloperorbsorbs: ruby: circleci/ruby@1.1.2今回使っているコマンド# gemのインストール - ruby/install-deps # Install gems with Bundler. # rubocopのcommand - ruby/rubocop-check # Check the code by Rubocop. You have to add `gem 'rubocop'` to your Gemfile. Enable parallelism on CircleCI for faster checking. # rspecのcommand - ruby/rspec-test # Test with RSpec. You have to add `gem 'rspec_junit_formatter'` to your Gemfile. Enable parallelism on CircleCI for faster testing.
circleci/aws-ecr@6.7.0circleci/aws-ecs@1.1.0を使って諸々設定?公式に詳しいことが載ってます
circleci/aws-ecrについて: circleCIDeveloper
circleci/aws-ecsについて: circleCIDeveloperorbsorbs: aws-ecr: circleci/aws-ecr@6.7.0 aws-ecs: circleci/aws-ecs@1.1.0今回使っているコマンド&ジョブ# 必要に応じてAWS CLIをインストールし、設定を行う。Amazon ECRにログインし、イメージをリポジトリにプッシュする。AWS_ACCESS_KEY_IDとAWS_SECRET_ACCESS_KEYの環境変数が必要です - aws-ecr/build-and-push-image: # Install AWS CLI, if needed, and configure. Log into Amazon ECR and push image to repository. Requires environment variables for AWS_ACCESS_KEY_ID and AWS_SECRET_ACCESS_KEY. We recommend these be saved in a Project # プロジェクトのデプロイ&ローリングアップデート - aws-ecs/deploy-service-update: # Update an ECS service.? jobsはtestだけ記述(今回はtest stepのみ記述下が、必要に応じてbuild stepも追加)
- プロジェクトに合わせてimageを選択
- それぞれ環境変数を設定
- database.ymlも環境変数を参照するように設定
jobsdocker: - image: circleci/ruby:2.6.3 # projectに合わせる environment: RAILS_ENV: test RAILS_MASTER_KEY: ${RAILS_MASTER_KEY} # circleCIのEnvironment Variablesにmaster.keyを追加しておく DB_HOST: 127.0.0.1 # defaultでlocalhostなのでmysqlに合わせる DB_USERNAME: 'test_user' DB_PASSWORD: 'password' - image: circleci/mysql:8.0 # projectに合わせる command: --default-authentication-plugin=mysql_native_password # v8から認証の方法が変わった為 commandで認証する environment: MYSQL_DATABASE: app_test MYSQL_USER: test_user # rootでは作成できない為、適当に定義する MYSQL_PASSWORD: password MYSQL_HOST: 127.0.0.1 # containerのhostを指定 TZ: "Asia/Tokyo"?
stepでcommandを実行
サービス起動まで待機:dockerize を使って他のコンテナ内サービス起動を待つstepssteps: - checkout - ruby/install-deps - run: name: Wait for DB command: dockerize -wait tcp://127.0.0.1:3306 -timeout 1m # dockerize を使って他のコンテナ内サービス起動を待つ - run: name: Database setup command: bundle exec rails db:schema:load --trace # migration - ruby/rubocop-check - ruby/rspec-testあとはtestのjobsに先ほど設定したtestを指定して自動でテスト&コードチェックが実行される
workflowsworkflows: test: jobs: - test? masterにmergeされたらDockerイメージをECRにpushする
- circleCIにAWSの環境変数をそれぞれ設定
deploy:
  jobs:
    - aws-ecr/build-and-push-image:
         account-url: AWS_ECR_ACCOUNT_URL
         region: AWS_REGION
         aws-access-key-id: AWS_ACCESS_KEY_ID
         aws-secret-access-key: AWS_SECRET_ACCESS_KEY
         create-repo: true
         dockerfile: ./docker/api/Dockerfile # pushしたいDockerfileを選択
         repo: sample-repo # ecrのリポジトリ名を選択
         tag: "${CIRCLE_SHA1}"
         filters:
           branches:
             only: master
? masterにmergeされたらデプロイ&ローリングアップデート
- circleCIにAWSの環境変数をそれぞれ設定
deploy- aws-ecs/deploy-service-update: requires: - aws-ecr/build-and-push-image family: 'sample-task' # ecsのタスク名 cluster-name: '${ECS_ARN}' # ecsのクラスター名 service-name: 'sample-api' # ecsのサービス名 container-image-name-updates: "container=sample-container,tag=${CIRCLE_SHA1}" # sample-containerの部分を適宜コンテナ名に変更?コミットしてみて動くか検証
?マージしてしてみて動くか検証


- 投稿日:2021-01-06T19:38:16+09:00
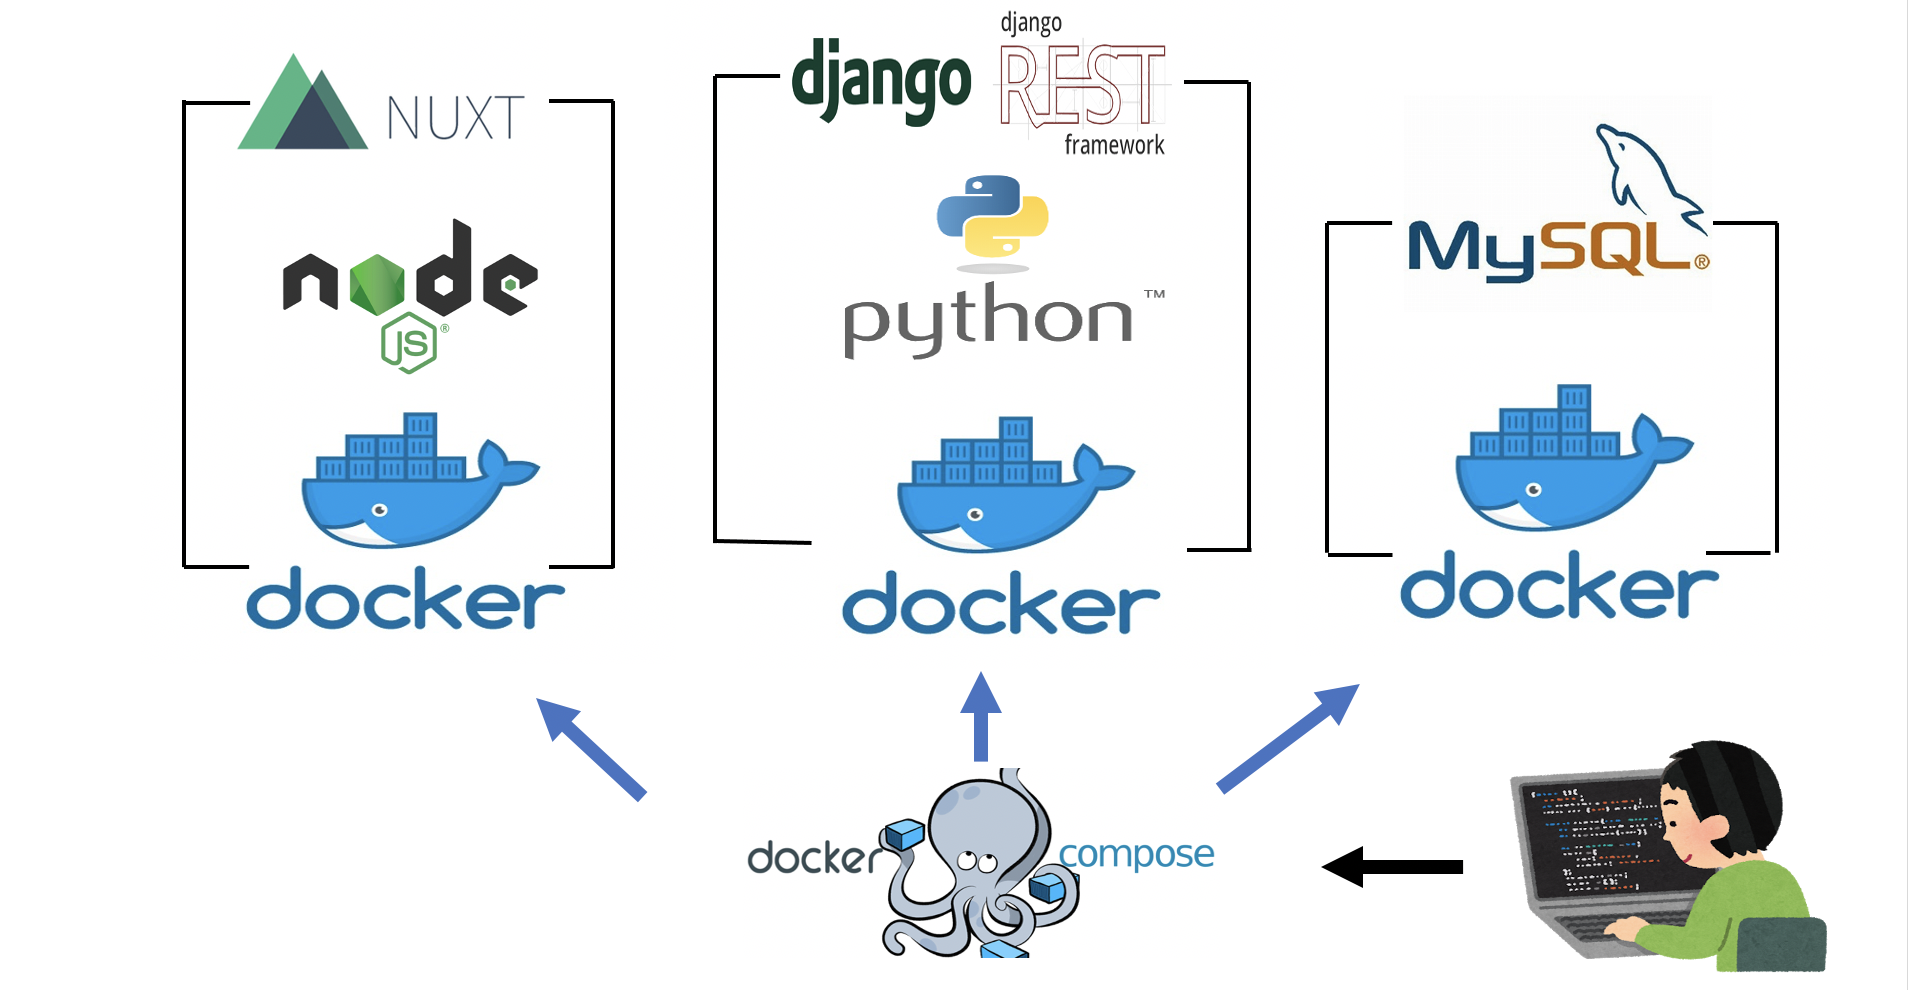
【AxiosでCRUD】Dockerを用いてNuxt.js & Djangoで実装
はじめに
本記事へのアクセスありがとうございます。
投稿主はプログラミング初心者であり、この方法が「最適解」かは分かりません。今度お仕事させて頂く実務でフロントにNuxt、バックエンドにDjangoを用いるので、全体の流れを少しでも把握するために本記事を作成しました。
同様な記事は環境構築までは確認できたのですが、せっかくならCRUD処理まで実装しようと思います。*今回のNuxtの設定はSPAで行っていきます。時間があったらSSRバージョンも執筆します。
*DBはMySQLを使用します。この記事から得られるものは?
・Dockerを用いたNuxtとDjangoの環境構築
・上記の環境でAxiosでCRUD実装(get,post,put,delete 全て扱っている記事は少ない)さっそくスタート
Dockerを用いた環境構築はこちらの記事を参考にさせて頂きました。
環境構築完了イメージです。
ディレクトリ構造
.
├─django
│  ├─manage.py
│  ├─qiitaexample
│  │   ├─settings.py
│  │   ├─urls.py
│  │   ├─wsgi.py
│  │   └─__init__.py
│  └─myapp
│      ├─migrations
│      ├─admin.py
│      ├─apps.py
│      ├─models.py
│      ├─renderers.py
│      ├─serializers.py
│      ├─tests.py
│      ├─urls.py
│      ├─views.py
│      └─__init__.py
│
├─docker-compose.yml
│
├─dockerfiles
│  ├─django_docker
│  │   ├─dockerfile
│  │   └─requirements.txt
│  └─nuxt_docker
│      └─dockerfile
│
├─mysql
│  └─conf.d
│
└─nuxt
    └─front
       └─以下略
初期段階で必要なファイル内容
docker-compose.yml
docker-compose.ymlversion: '3' services: db: image: mysql:latest restart: always container_name: mysql environment: MYSQL_ROOT_PASSWORD: test MYSQL_USER: test MYSQL_DATABASE: test MYSQL_PASSWORD: test ports: - 3306:3306 expose: - 3306 volumes: - mysqldata:/var/lib/mysql - ./mysql/conf.d:/etc/mysql/conf.d command: --default-authentication-plugin=mysql_native_password web: container_name: django build: ./dockerfiles/django_docker command: python3 manage.py runserver 0.0.0.0:8000 volumes: - ./django:/code ports: - "8000:8000" depends_on: - db front: container_name: nuxt build: ./dockerfiles/nuxt_docker tty: true volumes: - ./nuxt:/code ports: - "3000:3000" volumes: mysqldata:dockerfiles/nuxt_doceker/dockerfile
FROM node:latest

RUN mkdir -p /code

ENV NODE_ENV=development

RUN yarn install
RUN yarn add @nuxtjs/axios

WORKDIR /code

EXPOSE 3000
dockerfiles/django_doceker/dockerfile
FROM python:3.7
ENV PYTHONUNBUFFERED 1

RUN mkdir /code
WORKDIR /code

COPY requirements.txt /code/
RUN pip install --upgrade pip
RUN pip install -r requirements.txt

COPY . /code/
dockerfiles/django_doceker/requriements.txt
requriements.txtDjango djangorestframework django-webpack-loader django-cors-headers mysqlclientDjangoの設定
プロジェクトの作成
docker-composeでdbコンテナを立ち上げSqliteからMySQLの設定へと変更していきます。
> docker-compose up -d db次にdocker-composeでコンテナを立ち上げます。初回なのでbuildも行っていきます。
> docker-compose up -d --buildDjangoのプロジェクトを作ります。(プロジェクト名は任意です)
> docker-compose run web django-admin.py startproject qiitaexample .続いて、setting.pyを編集していきます。
#<DATABASESの'default'内を書き換える>

DATABASES = {
    'default': {
        'ENGINE': 'django.db.backends.mysql',
        'NAME': 'test',
        'USER': 'test',
        'PASSWORD': 'test',
        'HOST': 'db',
        'PORT': '3306',
    }
}
DATABASES変更後にDBのマイグレーションを行います。
> docker-compose run web ./manage.py migrate続いてsuperuserを作成します。
> docker-compose run web ./manage.py createsuperuser --username admin --email admin@localhost
Password: #パスワードを聞かれるので入力
Password (again): #再度入力
The password is too similar to the username.
This password is too short. It must contain at least 8 characters.
This password is too common. #パスワードが短いと警告が出る
Bypass password validation and create user anyway? [y/N]: y #yを入力
Superuser created successfully.
docker-compose up -d コマンドコンテナを全て立ち上げ、正常に動作しているか挙動を確かめます。
> docker-compose up -d

> docker ps

#3つのコンテナが動作しているはずです
・コンテナその1
・コンテナその2
・コンテナその3
django開発用サーバはポート8000で待ち受けているので、
http://localhost:8000/admin にアクセスしてみます。
表示された画面でUsername(ここではadmin)とpasswordを入力します。
すると、GroupsとUsersという2つの項目が表示されます。アプリの作成
さて、次はアプリを作成していきます。(ここではmyappという名前で作成します)
> docker-compose run web ./manage.py startapp myappsetting.pyにmyappをを追記して使用できるようにします。
/django/qiitaexample/setting.pyINSTALLED_APPS = [ 'django.contrib.admin', 'django.contrib.auth', 'django.contrib.contenttypes', 'django.contrib.sessions', 'django.contrib.messages', 'django.contrib.staticfiles', 'myapp', #追加 ]models.pyにモデルを追記していきます。
ここではStudentというモデルを作成します。
models.pyを追記後、マイグレーションをすることでMySQL上にテーブルが作成されます。/django/myapp/models.pyfrom django.db import models class Student(models.Model): name = models.CharField(max_length=100) course = models.CharField(max_length=100) rating = models.IntegerField() def __str__(self): return self.name class Meta: ordering = ['name']下記でマイグレーションを行います。
アプリを追加した場合はmakemigrationsが必要です。> docker-compose run web ./manage.py makemigrations > docker-compose run web ./manage.py migrateadmin.pyに下記を追記することで、管理画面から作成したモデルを確認できます。
/django/myapp/admin.pyfrom django.contrib import admin from .models import Student admin.site.register(Student)再び http://localhost:8000/admin/ に接続するとMYAPPとStudentが増えていることが確認できます。
GUI操作で適当にStudentを登録し、MySQLのコンテナに入り確認してみます。> docker exec -it mysql /bin/bash #MySQLコンテナに入る > mysql -u test -p #MySQL起動 Enter password: #本記事の例だとtestでログイン可能 > use test; > select * from myapp_student; #確認できたら < shift + d > でコンテナから出るDjango REST frameworkの構築
Djangoの準備ができたところで、次はDjango側にAPIを作っていきます。
まずはsetting.pyに追記していきます。(Nuxtとの通信の際に必要な処理も予め記載しておきます)/django/qiitaexample/setting.pyINSTALLED_APPS = [ 'django.contrib.admin', 'django.contrib.auth', 'django.contrib.contenttypes', 'django.contrib.sessions', 'django.contrib.messages', 'django.contrib.staticfiles', 'myapp', 'rest_framework', #追加 'corsheaders', #追加 ] MIDDLEWARE = [ 'corsheaders.middleware.CorsMiddleware', #追加 'django.middleware.security.SecurityMiddleware', 'django.contrib.sessions.middleware.SessionMiddleware', 'django.middleware.common.CommonMiddleware', 'django.middleware.csrf.CsrfViewMiddleware', 'django.contrib.auth.middleware.AuthenticationMiddleware', 'django.contrib.messages.middleware.MessageMiddleware', 'django.middleware.clickjacking.XFrameOptionsMiddleware', ] CORS_ORIGIN_WHITELIST = [ 'http://localhost:3000', ] CORS_ALLOW_CREDENTIALS = True CORS_ORIGIN_ALLOW_ALL = True'rest_framework'を追記することで、Django REST frameworkの機能を使用できるようになります。
続いて、serializer.pyとurls.py(myapp配下)を手動で新規作成します。
作成後にserializer.py、urls.py、views.pyに下記内容を追記します/django/myapp/serializers.pyfrom rest_framework.serializers import ModelSerializer from .models import Student class StudentSerializer(ModelSerializer): class Meta: model = Student fields = ['id' , 'name' ,'course' ,'rating']/django/myapp/views.pyfrom django.shortcuts import render from rest_framework.generics import ListAPIView, CreateAPIView,UpdateAPIView,RetrieveAPIView,DestroyAPIView from rest_framework.permissions import AllowAny from .models import Student from .serializers import StudentSerializer class StudentsViewSet(ListAPIView): model = Student queryset = Student.objects.all() serializer_class = StudentSerializer permission_classes = (AllowAny, ) class StudentsDetailSet(RetrieveAPIView): model = Student queryset = Student.objects.all() serializer_class = StudentSerializer permission_classes = (AllowAny, ) class StudentsCreateSet(CreateAPIView): model = Student queryset = Student.objects.all() serializer_class = StudentSerializer permission_classes = (AllowAny, ) class StudentsUpdateSet(UpdateAPIView): model = Student queryset = Student.objects.all() serializer_class = StudentSerializer permission_classes = (AllowAny, ) class StudentsDeleteSet(DestroyAPIView): model = Student queryset = Student.objects.all() serializer_class = StudentSerializer permission_classes = (AllowAny, )/django/myapp/urls.pyfrom django.urls import path from .views import StudentsViewSet, StudentsCreateSet, StudentsUpdateSet,StudentsDetailSet,StudentsDeleteSet urlpatterns = [ path('get_myapp/', StudentsViewSet.as_view()), path('get_myapp/<int:pk>/', StudentsDetailSet.as_view()), path('post_myapp/', StudentsCreateSet.as_view()), path('put_myapp/<int:pk>/', StudentsUpdateSet.as_view()), path('delete_myapp/<int:pk>/', StudentsDeleteSet.as_view()), ]qiitaexample配下のurls.pyを編集し、myapp配下のurls.pyを有効にします。
from django.contrib import admin
from django.urls import path,include
from myapp import urls

urlpatterns = [
    path('admin/', admin.site.urls),
    path('api/',include(urls))
]
Nuxt.jsの設定
始めにnuxt.jsのコンテナに入り、プロジェクトを作成します(プロジェクト名は任意です)。
yarn create nuxt-app frontを入力後の選択肢は基本全てデフォルト値を入れていますが、
今回はSPAを選択しています。> docker exec -it nuxt /bin/bash > yarn create nuxt-app front確認のために開発用サーバを動かす前に、nuxt.config.jsに追記します。
docker上でnuxt.jsを動かす際は下記が必要です。
また、ここから編集していく際にホットリロードを有効にします。
docker上で開発するためには明示的に指定が必要です。さらにaxiosの設定を追記していきます。
axiosはnode.jsで動くHTTPクライアントで、これを利用してnuxt.jsから先ほどのAPIのURLを叩きます。
前述のnuxtのdockerfileに記載してあるので、すでにコンテナにはインストール済です。
modulesに下記を追記、及びaxiosを追加します。/nuxt/front/nuxt.config.jsserver: { port: 3000, host: '0.0.0.0', }, watchers: { webpack: { poll: true } } //~略~ modules: [ '@nuxtjs/axios', ], axios: { baseURL: "http://localhost:8000" }, //~略~これでdocker上でNuxt.jsを表示させることができます
> cd front

> yarn run dev
無事Nuxt.jsの初期画面が現れればひとまず成功です。
AxiosでCRUD実装 Nuxt ⇆ Django
ここからは実際にNuxtとDjango間のデータの受け渡しについて記載していきます。
componentsの中にTestFormを新規作成します。/nuxt/front/components/TestForm.vue<template> <div> <div> <form @submit.prevent="submitForm(student)"> <div class="from-group row"> <input type="text" class="form-control col-3 mx-2" placeholder="Name" v-model="student.name" /> <input type="text" class="form-control col-3 mx-2" placeholder="Course" v-model="student.course" /> <input type="text" class="form-control col-3 mx-2" placeholder="Rating" v-model="student.rating" /> <button class="btn btn-success">Submit</button> </div> </form> </div> <div> <table class="tabel"> <thead> <th>Name</th> <th>Course</th> <th>Rating</th> </thead> <tbody> <tr v-for="student in students" :key="student.id" @dblclick="$data.student = student" > <td>{{ student.name }}</td> <td>{{ student.course }}</td> <td>{{ student.rating }}</td> <td><button @click="deleteStudent(student)">x</button></td> </tr> </tbody> </table> </div> </div> </template> <script> export default { data() { return { student: { name: "", course: "", rating: "", }, students: [], }; }, async created() { await this.getStudents(); }, methods: { submitForm(student) { //新規にPOSTする場合はcrete , 既存にデータがある場合はputメソッドを利用するように条件分岐 if (this.student.id === undefined) { this.createStudent(); } else { this.editStudent(student); } }, //データを全権取得 async getStudents() { const url = "/api/get_myapp/"; const response = await this.$axios.get(url); this.students = response.data; }, //データを新規登録 async createStudent() { await this.getStudents(); const url = "/api/post_myapp/"; this.$axios.defaults.xsrfCookieName = "csrftoken"; this.$axios.defaults.xsrfHeaderName = "X-CSRFTOKEN"; await this.$axios.post(url, { name: this.student.name, course: this.student.course, rating: this.student.rating, }); await this.getStudents(); }, //データを編集 async editStudent(student) { await this.getStudents(); const url = "/api/put_myapp/" + student.id + "/"; const modify = { name: this.student.name, course: this.student.course, rating: this.student.rating, }; await this.$axios.put(url, modify); await this.getStudents(); this.student = {}; }, //データを削除 async deleteStudent(student) { await this.getStudents(); const url = "/api/delete_myapp/" + student.id + "/"; const modify = { name: this.student.name, course: this.student.course, rating: this.student.rating, }; await this.$axios.delete(url) await this.getStudents(); }, }, }; </script>作成したTestFormを読みます。
不必要なら、template内の初期表示部分を削除してしまって構いません。/nuxt/front/pages/index.vue//追記 <div> <TestForm /> </div> -------------------- <script> import TestForm from '~/components/TestForm.vue' export default { components:{ TestForm } } </script>これでAixosでCRUD処理のコードが完成です。
最後に全てのコンテナを立ち上げて、Nuxtのコンテナでyarn run devして確認してみましょう。> docker-compose up -d > docker exex -it nuxt /bin/bash > cd front > yarn run devおわりに
お疲れ様でした。
以上でNuxt.js ⇆ Djangoのデータの連携が完成です。
個人的にはAxiosでputする時に以下のコードをurls.pyに書き忘れていて、ずっと404not foundで言われて少し苦戦しました。
解決してみれば確かに、詳細ページのurl設定を行っていないのでページが表示(一つ単位の情報を取得)できるはずもありませんでした。path('get_myapp/<int:pk>/', StudentsDetailSet.as_view()),エラーコードを読みどこがいけないのか判断、予測して実装しなければ。と改めて思いました。
余談ではありますが、DRFの理解の際に役に立ったリンクを紹介します。
Django REST framework カスタマイズ方法 - チュートリアルの補足
DRFのGeneric viewの使い方少しでもみなさんのお役に立てたら嬉しいです。
- 投稿日:2021-01-06T19:38:16+09:00
Dockerを用いてNuxt.js & Djangoで実装【AxiosでCRUD】
はじめに
本記事へのアクセスありがとうございます。
投稿主はプログラミング初心者であり、この方法が「最適解」かは分かりません。今度お仕事させて頂く実務でフロントにNuxt、バックエンドにDjangoを用いるので、全体の流れを少しでも把握するために本記事を作成しました。
同様な記事は環境構築までは確認できたのですが、せっかくならCRUD処理まで実装しようと思います。*今回のNuxtの設定はSPAで行っていきます。時間があったらSSRバージョンも執筆します。
*DBはMySQLを使用します。この記事から得られるものは?
・Dockerを用いたNuxtとDjangoの環境構築
・上記の環境でAxiosでCRUD実装(get,post,put,delete 全て扱っている記事は少ない)さっそくスタート
Dockerを用いた環境構築はこちらの記事を参考にさせて頂きました。
環境構築完了イメージです。
ディレクトリ構造
.
├─django
│  ├─manage.py
│  ├─qiitaexample
│  │   ├─settings.py
│  │   ├─urls.py
│  │   ├─wsgi.py
│  │   └─__init__.py
│  └─myapp
│      ├─migrations
│      ├─admin.py
│      ├─apps.py
│      ├─models.py
│      ├─renderers.py
│      ├─serializers.py
│      ├─tests.py
│      ├─urls.py
│      ├─views.py
│      └─__init__.py
│
├─docker-compose.yml
│
├─dockerfiles
│  ├─django_docker
│  │   ├─dockerfile
│  │   └─requirements.txt
│  └─nuxt_docker
│      └─dockerfile
│
├─mysql
│  └─conf.d
│
└─nuxt
    └─front
       └─以下略
初期段階で必要なファイル内容
docker-compose.yml
docker-compose.ymlversion: '3' services: db: image: mysql:latest restart: always container_name: mysql environment: MYSQL_ROOT_PASSWORD: test MYSQL_USER: test MYSQL_DATABASE: test MYSQL_PASSWORD: test ports: - 3306:3306 expose: - 3306 volumes: - mysqldata:/var/lib/mysql - ./mysql/conf.d:/etc/mysql/conf.d command: --default-authentication-plugin=mysql_native_password web: container_name: django build: ./dockerfiles/django_docker command: python3 manage.py runserver 0.0.0.0:8000 volumes: - ./django:/code ports: - "8000:8000" depends_on: - db front: container_name: nuxt build: ./dockerfiles/nuxt_docker tty: true volumes: - ./nuxt:/code ports: - "3000:3000" volumes: mysqldata:dockerfiles/nuxt_doceker/dockerfile
FROM node:latest

RUN mkdir -p /code

ENV NODE_ENV=development

RUN yarn install
RUN yarn add @nuxtjs/axios

WORKDIR /code

EXPOSE 3000
dockerfiles/django_doceker/dockerfile
FROM python:3.7
ENV PYTHONUNBUFFERED 1

RUN mkdir /code
WORKDIR /code

COPY requirements.txt /code/
RUN pip install --upgrade pip
RUN pip install -r requirements.txt

COPY . /code/
dockerfiles/django_doceker/requriements.txt
requriements.txtDjango djangorestframework django-webpack-loader django-cors-headers mysqlclientDjangoの設定
プロジェクトの作成
docker-composeでdbコンテナを立ち上げSqliteからMySQLの設定へと変更していきます。
> docker-compose up -d db次にdocker-composeでコンテナを立ち上げます。初回なのでbuildも行っていきます。
> docker-compose up -d --buildDjangoのプロジェクトを作ります。(プロジェクト名は任意です)
> docker-compose run web django-admin.py startproject qiitaexample .続いて、setting.pyを編集していきます。
#<DATABASESの'default'内を書き換える>

DATABASES = {
    'default': {
        'ENGINE': 'django.db.backends.mysql',
        'NAME': 'test',
        'USER': 'test',
        'PASSWORD': 'test',
        'HOST': 'db',
        'PORT': '3306',
    }
}
DATABASES変更後にDBのマイグレーションを行います。
> docker-compose run web ./manage.py migrate続いてsuperuserを作成します。
> docker-compose run web ./manage.py createsuperuser --username admin --email admin@localhost
Password: #パスワードを聞かれるので入力
Password (again): #再度入力
The password is too similar to the username.
This password is too short. It must contain at least 8 characters.
This password is too common. #パスワードが短いと警告が出る
Bypass password validation and create user anyway? [y/N]: y #yを入力
Superuser created successfully.
docker-compose up -d コマンドコンテナを全て立ち上げ、正常に動作しているか挙動を確かめます。
> docker-compose up -d

> docker ps

#3つのコンテナが動作しているはずです
・コンテナその1
・コンテナその2
・コンテナその3
django開発用サーバはポート8000で待ち受けているので、
http://localhost:8000/admin にアクセスしてみます。
表示された画面でUsername(ここではadmin)とpasswordを入力します。
すると、GroupsとUsersという2つの項目が表示されます。アプリの作成
さて、次はアプリを作成していきます。(ここではmyappという名前で作成します)
> docker-compose run web ./manage.py startapp myappsetting.pyにmyappをを追記して使用できるようにします。
/django/qiitaexample/setting.pyINSTALLED_APPS = [ 'django.contrib.admin', 'django.contrib.auth', 'django.contrib.contenttypes', 'django.contrib.sessions', 'django.contrib.messages', 'django.contrib.staticfiles', 'myapp', #追加 ]models.pyにモデルを追記していきます。
ここではStudentというモデルを作成します。
models.pyを追記後、マイグレーションをすることでMySQL上にテーブルが作成されます。/django/myapp/models.pyfrom django.db import models class Student(models.Model): name = models.CharField(max_length=100) course = models.CharField(max_length=100) rating = models.IntegerField() def __str__(self): return self.name class Meta: ordering = ['name']下記でマイグレーションを行います。
アプリを追加した場合はmakemigrationsが必要です。> docker-compose run web ./manage.py makemigrations > docker-compose run web ./manage.py migrateadmin.pyに下記を追記することで、管理画面から作成したモデルを確認できます。
/django/myapp/admin.pyfrom django.contrib import admin from .models import Student admin.site.register(Student)再び http://localhost:8000/admin/ に接続するとMYAPPとStudentが増えていることが確認できます。
GUI操作で適当にStudentを登録し、MySQLのコンテナに入り確認してみます。> docker exec -it mysql /bin/bash #MySQLコンテナに入る > mysql -u test -p #MySQL起動 Enter password: #本記事の例だとtestでログイン可能 > use test; > select * from myapp_student; #確認できたら < shift + d > でコンテナから出るDjango REST frameworkの構築
Djangoの準備ができたところで、次はDjango側にAPIを作っていきます。
まずはsetting.pyに追記していきます。(Nuxtとの通信の際に必要な処理も予め記載しておきます)/django/qiitaexample/setting.pyINSTALLED_APPS = [ 'django.contrib.admin', 'django.contrib.auth', 'django.contrib.contenttypes', 'django.contrib.sessions', 'django.contrib.messages', 'django.contrib.staticfiles', 'myapp', 'rest_framework', #追加 'corsheaders', #追加 ] MIDDLEWARE = [ 'corsheaders.middleware.CorsMiddleware', #追加 'django.middleware.security.SecurityMiddleware', 'django.contrib.sessions.middleware.SessionMiddleware', 'django.middleware.common.CommonMiddleware', 'django.middleware.csrf.CsrfViewMiddleware', 'django.contrib.auth.middleware.AuthenticationMiddleware', 'django.contrib.messages.middleware.MessageMiddleware', 'django.middleware.clickjacking.XFrameOptionsMiddleware', ] CORS_ORIGIN_WHITELIST = [ 'http://localhost:3000', ] CORS_ALLOW_CREDENTIALS = True CORS_ORIGIN_ALLOW_ALL = True'rest_framework'を追記することで、Django REST frameworkの機能を使用できるようになります。
続いて、serializer.pyとurls.py(myapp配下)を手動で新規作成します。
作成後にserializer.py、urls.py、views.pyに下記内容を追記します/django/myapp/serializers.pyfrom rest_framework.serializers import ModelSerializer from .models import Student class StudentSerializer(ModelSerializer): class Meta: model = Student fields = ['id' , 'name' ,'course' ,'rating']/django/myapp/views.pyfrom django.shortcuts import render from rest_framework.generics import ListAPIView, CreateAPIView,UpdateAPIView,RetrieveAPIView,DestroyAPIView from rest_framework.permissions import AllowAny from .models import Student from .serializers import StudentSerializer class StudentsViewSet(ListAPIView): model = Student queryset = Student.objects.all() serializer_class = StudentSerializer permission_classes = (AllowAny, ) class StudentsDetailSet(RetrieveAPIView): model = Student queryset = Student.objects.all() serializer_class = StudentSerializer permission_classes = (AllowAny, ) class StudentsCreateSet(CreateAPIView): model = Student queryset = Student.objects.all() serializer_class = StudentSerializer permission_classes = (AllowAny, ) class StudentsUpdateSet(UpdateAPIView): model = Student queryset = Student.objects.all() serializer_class = StudentSerializer permission_classes = (AllowAny, ) class StudentsDeleteSet(DestroyAPIView): model = Student queryset = Student.objects.all() serializer_class = StudentSerializer permission_classes = (AllowAny, )/django/myapp/urls.pyfrom django.urls import path from .views import StudentsViewSet, StudentsCreateSet, StudentsUpdateSet,StudentsDetailSet,StudentsDeleteSet urlpatterns = [ path('get_myapp/', StudentsViewSet.as_view()), path('get_myapp/<int:pk>/', StudentsDetailSet.as_view()), path('post_myapp/', StudentsCreateSet.as_view()), path('put_myapp/<int:pk>/', StudentsUpdateSet.as_view()), path('delete_myapp/<int:pk>/', StudentsDeleteSet.as_view()), ]qiitaexample配下のurls.pyを編集し、myapp配下のurls.pyを有効にします。
from django.contrib import admin
from django.urls import path,include
from myapp import urls

urlpatterns = [
    path('admin/', admin.site.urls),
    path('api/',include(urls))
]
Nuxt.jsの設定
始めにnuxt.jsのコンテナに入り、プロジェクトを作成します(プロジェクト名は任意です)。
yarn create nuxt-app frontを入力後の選択肢は基本全てデフォルト値を入れていますが、
今回はSPAを選択しています。> docker exec -it nuxt /bin/bash > yarn create nuxt-app front確認のために開発用サーバを動かす前に、nuxt.config.jsに追記します。
docker上でnuxt.jsを動かす際は下記が必要です。
また、ここから編集していく際にホットリロードを有効にします。
docker上で開発するためには明示的に指定が必要です。さらにaxiosの設定を追記していきます。
axiosはnode.jsで動くHTTPクライアントで、これを利用してnuxt.jsから先ほどのAPIのURLを叩きます。
前述のnuxtのdockerfileに記載してあるので、すでにコンテナにはインストール済です。
modulesに下記を追記、及びaxiosを追加します。/nuxt/front/nuxt.config.jsserver: { port: 3000, host: '0.0.0.0', }, watchers: { webpack: { poll: true } } //~略~ modules: [ '@nuxtjs/axios', ], axios: { baseURL: "http://localhost:8000" }, //~略~これでdocker上でNuxt.jsを表示させることができます
> cd front

> yarn run dev
無事Nuxt.jsの初期画面が現れればひとまず成功です。
AxiosでCRUD実装 Nuxt ⇆ Django
ここからは実際にNuxtとDjango間のデータの受け渡しについて記載していきます。
componentsの中にTestFormを新規作成します。/nuxt/front/components/TestForm.vue<template> <div> <div> <form @submit.prevent="submitForm(student)"> <div class="from-group row"> <input type="text" class="form-control col-3 mx-2" placeholder="Name" v-model="student.name" /> <input type="text" class="form-control col-3 mx-2" placeholder="Course" v-model="student.course" /> <input type="text" class="form-control col-3 mx-2" placeholder="Rating" v-model="student.rating" /> <button class="btn btn-success">Submit</button> </div> </form> </div> <div> <table class="tabel"> <thead> <th>Name</th> <th>Course</th> <th>Rating</th> </thead> <tbody> <tr v-for="student in students" :key="student.id" @dblclick="$data.student = student" > <td>{{ student.name }}</td> <td>{{ student.course }}</td> <td>{{ student.rating }}</td> <td><button @click="deleteStudent(student)">x</button></td> </tr> </tbody> </table> </div> </div> </template> <script> export default { data() { return { student: { name: "", course: "", rating: "", }, students: [], }; }, async created() { await this.getStudents(); }, methods: { submitForm(student) { //新規にPOSTする場合はcrete , 既存にデータがある場合はputメソッドを利用するように条件分岐 if (this.student.id === undefined) { this.createStudent(); } else { this.editStudent(student); } }, //データを全権取得 async getStudents() { const url = "/api/get_myapp/"; const response = await this.$axios.get(url); this.students = response.data; }, //データを新規登録 async createStudent() { await this.getStudents(); const url = "/api/post_myapp/"; this.$axios.defaults.xsrfCookieName = "csrftoken"; this.$axios.defaults.xsrfHeaderName = "X-CSRFTOKEN"; await this.$axios.post(url, { name: this.student.name, course: this.student.course, rating: this.student.rating, }); await this.getStudents(); }, //データを編集 async editStudent(student) { await this.getStudents(); const url = "/api/put_myapp/" + student.id + "/"; const modify = { name: this.student.name, course: this.student.course, rating: this.student.rating, }; await this.$axios.put(url, modify); await this.getStudents(); this.student = {}; }, //データを削除 async deleteStudent(student) { await this.getStudents(); const url = "/api/delete_myapp/" + student.id + "/"; const modify = { name: this.student.name, course: this.student.course, rating: this.student.rating, }; await this.$axios.delete(url) await this.getStudents(); }, }, }; </script>作成したTestFormを読みます。
不必要なら、template内の初期表示部分を削除してしまって構いません。/nuxt/front/pages/index.vue//追記 <div> <TestForm /> </div> -------------------- <script> import TestForm from '~/components/TestForm.vue' export default { components:{ TestForm } } </script>これでAixosでCRUD処理のコードが完成です。
最後に全てのコンテナを立ち上げて、Nuxtのコンテナでyarn run devして確認してみましょう。> docker-compose up -d > docker exex -it nuxt /bin/bash > cd front > yarn run devおわりに
お疲れ様でした。
以上でNuxt.js ⇆ Djangoのデータの連携が完成です。
個人的にはAxiosでputする時に以下のコードをurls.pyに書き忘れていて、ずっと404not foundで言われて少し苦戦しました。
解決してみれば確かに、詳細ページのurl設定を行っていないのでページが表示(一つ単位の情報を取得)できるはずもありませんでした。path('get_myapp/<int:pk>/', StudentsDetailSet.as_view()),エラーコードを読みどこがいけないのか判断、予測して実装しなければ。と改めて思いました。
余談ではありますが、DRFの理解の際に役に立ったリンクを紹介します。
Django REST framework カスタマイズ方法 - チュートリアルの補足
DRFのGeneric viewの使い方少しでもみなさんのお役に立てたら嬉しいです。
- 投稿日:2021-01-06T17:48:10+09:00
DockerでSpring Boot環境構築(2021年1月版)
Spring Bootを触れる環境を急遽準備する必要ができたので、作成したときの手順とかちょっとした考え事まとめ。
0.参考記事
Docker × Spring Boot環境構築
https://qiita.com/A-Kira/items/beaf79a0d39d9839e61eほとんどこの通りに実行しようとして、時間経過による変更値があったので、その周りを書き足した程度の提灯記事です。並行して読むほうが良いと思います。
1.筆者環境
- Windows 10 Professional(20h4)
- VSCode
- Git Bash
- Docker Desktop
このあたりの詳細については割愛します(元記事はMacだったのですがまぁ問題ないでしょう)
2.自力で作成するファイルを作成
自動生成されるファイルが多いので、元記事を端折って手動で編集するファイルだけ取り上げます。
docker-compose.yml
docker-compose.ymlversion: '3.8' services: java: image: openjdk:15-slim ports: - 8080:8080 tty: true volumes: - ./server:/srv:cached working_dir: /srv先にさっくり書いてしまうと、元記事との違いは
- versionを3.6→3.8(ここはほぼ影響なし)
- imageのバージョンを14→15(大事)後述しますが、initializrのバージョンが14から15に変わっているので、ここを元記事のままで続けるとgradleがコケます。
一応筆者個人としては、dockerhubに"openjdk:15-slim"があることを確認しての記載をしましたよという、ぶっ放し(格ゲー文脈)で書き換えたわけではないという申し訳程度のフォローを入れておきます。
https://hub.docker.com/r/amd64/openjdk/Gradleプロジェクトファイル
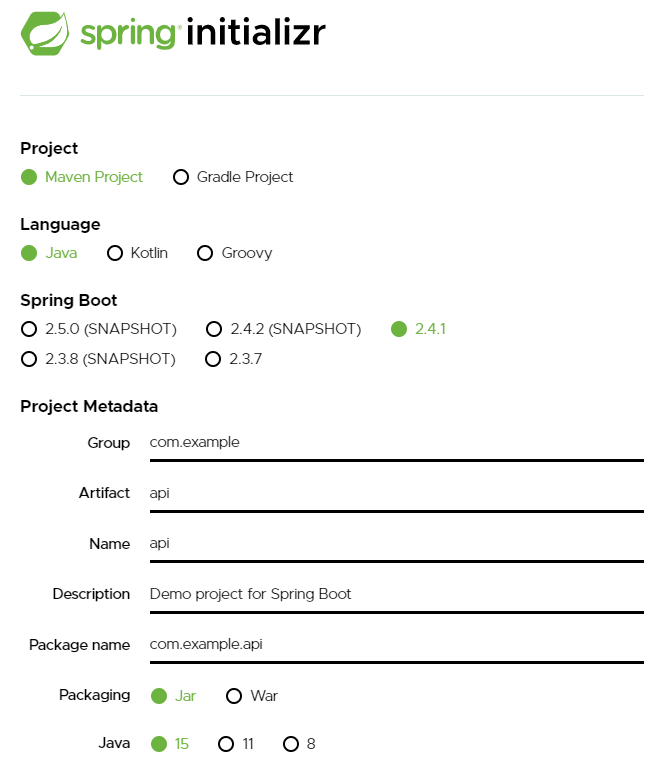
元記事と同様、spring initializrで作成し、【プロジェクトディレクトリ】/server下に展開します。
ただし、バージョン周りが当時と変わっているので、その違いのみ。
- (先に書いてますが)Javaの選択地に14がなく、最新は15になっている
- Spring Bootの選択に2.3.1がなくなっている(本手順では2.4.1を選択)
Dependenciesについては、元記事同様"Spring Web"と"Lombok"を選択しました。
プロジェクトを試験動作させるための変更
元記事と同様ですが一応。
server/src/main/java/com/example/api/ApiApplication.javaを以下のように編集。ApiApplication.javapackage com.example.api; import org.springframework.boot.SpringApplication; import org.springframework.boot.autoconfigure.SpringBootApplication; import org.springframework.web.bind.annotation.RequestMapping; import org.springframework.web.bind.annotation.RestController; @SpringBootApplication @RestController public class ApiApplication { @RequestMapping("/") public String home() { return "Hello World"; } public static void main(String[] args) { SpringApplication.run(ApiApplication.class, args); } }3.Docker起動
全く同じです。
コマンドラインから、Docker環境をビルドして
% docker-compose build
バックグラウンドでDockerを起動
% docker-compose up -d
4. Gradleのビルド
ここも全く同じです。
Javaコンテナ内に入る ※人によってwinptyは必要だったり必要なかったり
% winpty docker-compose exec java bash
gradleビルド(root@以降は各人違います。一応)
root@558036f3cbd0:/srv# sh gradlew build
先程も書きましたが、コンテナのJavaを15にしておかないと、以下のようにFailureとか言われる羽目になります(1敗)。
FAILURE: Build failed with an exception.

* What went wrong:
Execution failed for task ':compileJava'.
> Could not target platform: 'Java SE 15' using tool chain: 'JDK 14 (14)'.

* Try:
Run with --stacktrace option to get the stack trace. Run with --info or --debug
option to get more log output. Run with --scan to get full insights.

* Get more help at https://help.gradle.org

BUILD FAILED in 53s
1 actionable task: 1 executed
5.実行と動作確認
ここも全く同じ
root@558036f3cbd0:/srv# java -jar build/libs/api-0.0.1-SNAPSHOT.jar
localhost:8080にアクセスすると、先程書いたhome()が実行されて"Hello World"が表示されているはずです。
99.感想
この記事が世間的に必要かどうかはさておき、今回の程度のバージョン差異は数回コケながら自力でさっさと解決できるくらいが程々のエンジニア力だと思います(こなみかん
とはいえ想定通りにコケるとか、コケるだろうなと予想しつつ未修正のまま突っ込んで期待通りの結果を得るというのも個人的には大事だと思うので、未来にこれと同じような事態を踏んだ人は同じように試したりすると良いと思います。
- 投稿日:2021-01-06T14:51:57+09:00
macでのアプリインストール時に「ほかのインストールが完了するまでお待ちください...」と表示されて処理が進まない
- 投稿日:2021-01-06T12:49:00+09:00
簡単に作れるDockerベースのPasS - Dokkuを使いこなすための設定とプラグイン
簡単にPaaSを作れるDokkuを日常業務に、趣味にと便利に使っています。こんなことできないかな?と思って調べると、大抵はプラグインがあったりします(感謝。ただ、英語なのと情報がまとまっていないので、よく使っている設定をまとめました。
※構築はここでは書きません
サイト名が一致しない場合にエラーを返したい
デフォルトではサーバー名が一致しない場合には、一番最初にデプロイしたサイトが表示されるようです。予期しないサイトが見えると良く無いのでエラーを返すのが適切です。
/etc/nginx/conf.d/00-default-vhost.conf を以下のように作成し、nginxをリスタートします。
/etc/nginx/conf.d/00-default-vhost.confserver { listen 80 default_server; listen [::]:80 default_server; server_name _; access_log off; return 410; }http://dokku.viewdocs.io/dokku/configuration/nginx/#default-site
developブランチをデプロイしたい
通常はデプロイされるのはmasterブランチなので、git pushでmasterに上書きする方法もありますが、app毎に以下のコマンドでブランチを変更できます。
dokku git:set myapp deploy-branch develophttp://dokku.viewdocs.io/dokku/deployment/methods/git/#changing-the-deploy-branch
ホストの領域をコンテナにマウントしたい
ログ領域やイメージなど、ホスト側領域をコンテナにマウントしたい場合は以下になります。
dokku storage:mount myapp host-dir:container-dirhttp://dokku.viewdocs.io/dokku/advanced-usage/persistent-storage/
dockerイメージサイズを小さくしたい
標準ではBuildPackになっており、何も考えずにデプロイできますが、1.5GBくらいのイメージになります。サイトが多くなるとディスクを圧迫します。
Dockerfileを作れば、alpineやslim系イメージを使う事ができます。
http://dokku.viewdocs.io/dokku/deployment/methods/dockerfiles/
この時、Port Mappingを手動でする必要がある場合があります。
http://dokku.viewdocs.io/dokku/networking/port-management/
CIで自動デプロイしたい
GitLabの場合は以下のエントリーを参照ください。
plug-ins
使うと便利なプラグインの紹介です。
BASIC認証をかけたい
テストサイトなど、簡単に認証をかけたい場合に便利です。
dokku-http-auth
https://github.com/dokku/dokku-http-auth
sudo dokku plugin:install https://github.com/dokku/dokku-http-auth.gitSSL化したい
Let's Encrypt
https://github.com/dokku/dokku-letsencryptさくっとSSLを使う場合はこれですね。自動的にSSL化 & auto-renewもしてくれます。
sudo dokku plugin:install https://github.com/dokku/dokku-letsencrypt.githostnameをコンテナIDでなく、ホスト名にしたい
デフォルトではhostname=コンテナIDになってしまいます。インストールすると、特に設定不要でホストのホスト名がコンテナに渡されます。
dokku-hostname
https://github.com/michaelshobbs/dokku-hostname
sudo dokku plugin:install https://github.com/michaelshobbs/dokku-hostname.git dokku-hostname
- 投稿日:2021-01-06T10:57:59+09:00
【Docker】コマンドまとめ
◆目次
1. Dockerコマンド
1) 確認系・・・image、containerの確認
2) 作成・起動系・・・imageの作成、containerの起動
3) 作成系・・・containerからimageを作成する2. Docker Composeコマンド
1. Dockerコマンド
1) 確認系・・・image、containerの確認
コマンド 説明 docker images Hostにあるimageのリストを確認できる docker images -f dangling=true dangling image だけ表示できる **<none>となってるimageのこと ------------------------------ ------------------------------- docker ps 起動中のコンテナを表示する docker ps -a 起動の有無にかかわらず、全てのコンテナを表示する 2) 作成・起動系・・・imageの作成、containerの起動
*注意*
docker run コマンド= create + start(imageを元にcontainerを作成して起動する)
docker build コマンド= Dockerfileを元にimageを作成する
コマンド コマンド docker run <image> imageを元にcontainerを作成+起動 docker run -d <image> containerを起動後にdetachする(バックグラウンドで動かす) docker run --rm imageを元にcontainerを作成、container終了時自動的に削除 docker run -v : hostにあるファイルとcontainerのファイルをマウントする(同期させる?) docker run -it -u $(id -u):$(id -g) -v <マウント元のホストのディレクトリ>:<マウント先のディレクトリ> bash ユーザーIDを指定してマウントする **コマンドをコピペで使用する際$(全角)を半角に変更してください docker start <container> 停止中のcontainerを起動させる docker start -a <container> コンテナを起動させてデフォルトのコマンドを実行する。実行内容をみることができる。 -a... attach docker create <image> containerを停止状態でDockerfileからimageを作成 docker restart <container> 起動中のcontainerを再起動する**Stop + Start 3) 作成系・・・containerからimageを作成する
コマンド コマンド docker commit <container> <name>:<tag> containerから新しいimageを作る docker build -t <name> <directory> Docker fileからimageを作る 2. Docker Composeコマンド
$docker Composeコマンド $dockerコマンド docker-compose build docker build <build contexts> docker-compose up docker run <image> docker-compose ps docker ps docker-compose exec <service> <command> docker exec <container> <command>
$docker Composeコマンド 説明 docker-compose up --build buildしてrun docker-compose down stopしてrm (関係あるimageも全て削除してくれる) 随時更新していきます!
- 投稿日:2021-01-06T07:28:29+09:00
Docker Composeの基本とコマンド
Docker Composeとは
複数のコンテナを定義し実行するDockerアプリケーションのためのツール。YAMLファイルを使ってアプリケーションサービスを設定。主に、以下の場合に使う。
$docker runコマンドが長くなるとき- 複数のコンテナをまとめて起動するとき
YAMLファイルの書き方例
dockerのコマンドが以下の場合のYAMLファイル例。
$ docker build .
$ docker run -it -v ~/Desktop/myapp:/myapp -p 3000:3000 <image> bash
YAMLファイルは以下のとおり。
version: '3'

services:
  web:
    build: .
    ports:
      - '3000:3000'
    volumes:
      - '.:/myapp'
    tty: true
    stdin_open: true
webの命名は任意だが、webかappがよく使われる。dockerのコマンド(runオプション)とYAMLファイルの対応は以下のとおり。
dockerコマンド YAMLファイル build build: -i stdin_open: true -t tty: true -v volumes: -p ports: Docker Composeコマンド
Dockerコマンドとの対応は以下の通り。
コマンド Dockerコマンド docker-compose build docker build docker-compose up docker run docker-compose ps docker ps docker-compose exec <sevice> <command> docker exec <container> <command> docker-compose up --build buildしてrun docker-compose down stopしてrm 参考:公式ドキュメント
- 投稿日:2021-01-06T01:54:24+09:00
Raspberry Pi 3にDockerをインストールしました
参考
以下の記事を参考に、というか割とそのまんま、実行しました。
別のやり方でうまくいかずに困っていたので、大変助かりました!インストール〜設定
シェルがあるそうなので、
curlでシェルを取得します。$ curl -fsSL https://get.docker.com -o get-docker.shシェルを実行してインストールします。
こういうのを作成して、公開してくれる人がいることに、感謝の気持ちでいっぱいです。$ sudo sh get-docker.shpiユーザにDockerの実行権限を付与します。
piをdockerグループに追加します。$ sudo usermod -aG docker piDockerのバージョンを確認しておきましょう。
$ docker version
docker-composeをインストールします。$ sudo apt-get install -y libffi-dev libssl-dev $ sudo apt-get install -y python3 python3-pip $ sudo pip3 install docker-composeインストールが終わったら、バージョンを確認しておきましょう。
$ docker-compose --version無事にインストールができました。
公式の手順としては、以下が正しいのかな?
どこかで間違えたのか、うまくいかなかったけど・・・。ログ
Dockerインストール
$ sudo sh get-docker.sh
# Executing docker install script, commit: 3d8fe77c2c46c5b7571f94b42793905e5b3e42e4
+ sh -c apt-get update -qq >/dev/null
+ sh -c DEBIAN_FRONTEND=noninteractive apt-get install -y -qq apt-transport-https ca-certificates curl >/dev/null
+ sh -c curl -fsSL "https://download.docker.com/linux/raspbian/gpg" | apt-key add -qq - >/dev/null
Warning: apt-key output should not be parsed (stdout is not a terminal)
+ sh -c echo "deb [arch=armhf] https://download.docker.com/linux/raspbian buster stable" > /etc/apt/sources.list.d/docker.list
+ sh -c apt-get update -qq >/dev/null
+ [ -n  ]
+ sh -c apt-get install -y -qq --no-install-recommends docker-ce >/dev/null
+ sh -c docker version
Client: Docker Engine - Community
 Version:           20.10.2
 API version:       1.41
 Go version:        go1.13.15
 Git commit:        2291f61
 Built:             Mon Dec 28 16:18:13 2020
 OS/Arch:           linux/arm
 Context:           default
 Experimental:      true

Server: Docker Engine - Community
 Engine:
  Version:          20.10.2
  API version:      1.41 (minimum version 1.12)
  Go version:       go1.13.15
  Git commit:       8891c58
  Built:            Mon Dec 28 16:15:48 2020
  OS/Arch:          linux/arm
  Experimental:     false
 containerd:
  Version:          1.4.3
  GitCommit:        269548fa27e0089a8b8278fc4fc781d7f65a939b
 runc:
  Version:          1.0.0-rc92
  GitCommit:        ff819c7e9184c13b7c2607fe6c30ae19403a7aff
 docker-init:
  Version:          0.19.0
  GitCommit:        de40ad0
If you would like to use Docker as a non-root user, you should now consider
adding your user to the "docker" group with something like:

  sudo usermod -aG docker your-user

Remember that you will have to log out and back in for this to take effect!

WARNING: Adding a user to the "docker" group will grant the ability to run
         containers which can be used to obtain root privileges on the
         docker host.
         Refer to https://docs.docker.com/engine/security/security/#docker-daemon-attack-surface
         for more information.
Dockerバージョン確認
よく見たら、permission deniedが出ていますね。
$ docker version
Client: Docker Engine - Community
 Version:           20.10.2
 API version:       1.41
 Go version:        go1.13.15
 Git commit:        2291f61
 Built:             Mon Dec 28 16:18:13 2020
 OS/Arch:           linux/arm
 Context:           default
 Experimental:      true
Got permission denied while trying to connect to the Docker daemon socket at unix:///var/run/docker.sock: Get http://%2Fvar%2Frun%2Fdocker.sock/v1.24/version: dial unix /var/run/docker.sock: connect: permission denied
docker-composeインストール
$ sudo pip3 install docker-compose
Looking in indexes: https://pypi.org/simple, https://www.piwheels.org/simple
Collecting docker-compose
  Downloading https://files.pythonhosted.org/packages/50/7a/62f3691db4220c2783197dd97f2dddd81d41be12d21f086303d2f5bc17ef/docker_compose-1.27.4-py2.py3-none-any.whl (110kB)
    100% |████████████████████████████████| 112kB 1.5MB/s
Collecting websocket-client<1,>=0.32.0 (from docker-compose)
  Downloading https://files.pythonhosted.org/packages/4c/5f/f61b420143ed1c8dc69f9eaec5ff1ac36109d52c80de49d66e0c36c3dfdf/websocket_client-0.57.0-py2.py3-none-any.whl (200kB)
    100% |████████████████████████████████| 204kB 570kB/s
Collecting jsonschema<4,>=2.5.1 (from docker-compose)
  Downloading https://files.pythonhosted.org/packages/c5/8f/51e89ce52a085483359217bc72cdbf6e75ee595d5b1d4b5ade40c7e018b8/jsonschema-3.2.0-py2.py3-none-any.whl (56kB)
    100% |████████████████████████████████| 61kB 898kB/s
Collecting python-dotenv<1,>=0.13.0 (from docker-compose)
  Downloading https://files.pythonhosted.org/packages/32/2e/e4585559237787966aad0f8fd0fc31df1c4c9eb0e62de458c5b6cde954eb/python_dotenv-0.15.0-py2.py3-none-any.whl
Collecting texttable<2,>=0.9.0 (from docker-compose)
  Downloading https://files.pythonhosted.org/packages/06/f5/46201c428aebe0eecfa83df66bf3e6caa29659dbac5a56ddfd83cae0d4a4/texttable-1.6.3-py2.py3-none-any.whl
Collecting docopt<1,>=0.6.1 (from docker-compose)
  Downloading https://www.piwheels.org/simple/docopt/docopt-0.6.2-py2.py3-none-any.whl
Requirement already satisfied: requests<3,>=2.20.0 in /usr/lib/python3/dist-packages (from docker-compose) (2.21.0)
Collecting docker[ssh]<5,>=4.3.1 (from docker-compose)
  Downloading https://files.pythonhosted.org/packages/9f/a5/eec74d8d1016e6c2042ba31ca6fba3bba520e27d8a061e82bccd36bd64ef/docker-4.4.1-py2.py3-none-any.whl (146kB)
    100% |████████████████████████████████| 153kB 1.3MB/s
Collecting distro<2,>=1.5.0 (from docker-compose)
  Downloading https://files.pythonhosted.org/packages/25/b7/b3c4270a11414cb22c6352ebc7a83aaa3712043be29daa05018fd5a5c956/distro-1.5.0-py2.py3-none-any.whl
Collecting PyYAML<6,>=3.10 (from docker-compose)
  Downloading https://www.piwheels.org/simple/pyyaml/PyYAML-5.3.1-cp37-cp37m-linux_armv7l.whl (44kB)
    100% |████████████████████████████████| 51kB 102kB/s
Collecting cached-property<2,>=1.2.0 (from docker-compose)
  Downloading https://files.pythonhosted.org/packages/48/19/f2090f7dad41e225c7f2326e4cfe6fff49e57dedb5b53636c9551f86b069/cached_property-1.5.2-py2.py3-none-any.whl
Collecting dockerpty<1,>=0.4.1 (from docker-compose)
  Downloading https://www.piwheels.org/simple/dockerpty/dockerpty-0.4.1-py3-none-any.whl
Requirement already satisfied: six in /usr/lib/python3/dist-packages (from websocket-client<1,>=0.32.0->docker-compose) (1.12.0)
Requirement already satisfied: setuptools in /usr/lib/python3/dist-packages (from jsonschema<4,>=2.5.1->docker-compose) (40.8.0)
Collecting importlib-metadata; python_version < "3.8" (from jsonschema<4,>=2.5.1->docker-compose)
  Downloading https://files.pythonhosted.org/packages/7a/85/ac225e35048e050a6351b6f1251cdb2b6060092f2c6840aff1d6319941b1/importlib_metadata-3.3.0-py3-none-any.whl
Collecting attrs>=17.4.0 (from jsonschema<4,>=2.5.1->docker-compose)
  Downloading https://files.pythonhosted.org/packages/c3/aa/cb45262569fcc047bf070b5de61813724d6726db83259222cd7b4c79821a/attrs-20.3.0-py2.py3-none-any.whl (49kB)
    100% |████████████████████████████████| 51kB 1.8MB/s
Collecting pyrsistent>=0.14.0 (from jsonschema<4,>=2.5.1->docker-compose)
  Downloading https://files.pythonhosted.org/packages/4d/70/fd441df751ba8b620e03fd2d2d9ca902103119616f0f6cc42e6405035062/pyrsistent-0.17.3.tar.gz (106kB)
    100% |████████████████████████████████| 112kB 1.9MB/s
Collecting paramiko>=2.4.2; extra == "ssh" (from docker[ssh]<5,>=4.3.1->docker-compose)
  Downloading https://files.pythonhosted.org/packages/95/19/124e9287b43e6ff3ebb9cdea3e5e8e88475a873c05ccdf8b7e20d2c4201e/paramiko-2.7.2-py2.py3-none-any.whl (206kB)
    100% |████████████████████████████████| 215kB 1.0MB/s
Collecting zipp>=0.5 (from importlib-metadata; python_version < "3.8"->jsonschema<4,>=2.5.1->docker-compose)
  Downloading https://files.pythonhosted.org/packages/41/ad/6a4f1a124b325618a7fb758b885b68ff7b058eec47d9220a12ab38d90b1f/zipp-3.4.0-py3-none-any.whl
Collecting typing-extensions>=3.6.4; python_version < "3.8" (from importlib-metadata; python_version < "3.8"->jsonschema<4,>=2.5.1->docker-compose)
  Downloading https://files.pythonhosted.org/packages/60/7a/e881b5abb54db0e6e671ab088d079c57ce54e8a01a3ca443f561ccadb37e/typing_extensions-3.7.4.3-py3-none-any.whl
Collecting bcrypt>=3.1.3 (from paramiko>=2.4.2; extra == "ssh"->docker[ssh]<5,>=4.3.1->docker-compose)
  Downloading https://www.piwheels.org/simple/bcrypt/bcrypt-3.2.0-cp37-cp37m-linux_armv7l.whl (57kB)
    100% |████████████████████████████████| 61kB 62kB/s
Requirement already satisfied: cryptography>=2.5 in /usr/lib/python3/dist-packages (from paramiko>=2.4.2; extra == "ssh"->docker[ssh]<5,>=4.3.1->docker-compose) (2.6.1)
Collecting pynacl>=1.0.1 (from paramiko>=2.4.2; extra == "ssh"->docker[ssh]<5,>=4.3.1->docker-compose)
  Downloading https://www.piwheels.org/simple/pynacl/PyNaCl-1.4.0-cp37-cp37m-linux_armv7l.whl (605kB)
    100% |████████████████████████████████| 614kB 83kB/s
Collecting cffi>=1.1 (from bcrypt>=3.1.3->paramiko>=2.4.2; extra == "ssh"->docker[ssh]<5,>=4.3.1->docker-compose)
  Downloading https://www.piwheels.org/simple/cffi/cffi-1.14.4-cp37-cp37m-linux_armv7l.whl (346kB)
    100% |████████████████████████████████| 348kB 366kB/s
Collecting pycparser (from cffi>=1.1->bcrypt>=3.1.3->paramiko>=2.4.2; extra == "ssh"->docker[ssh]<5,>=4.3.1->docker-compose)
  Downloading https://files.pythonhosted.org/packages/ae/e7/d9c3a176ca4b02024debf82342dab36efadfc5776f9c8db077e8f6e71821/pycparser-2.20-py2.py3-none-any.whl (112kB)
    100% |████████████████████████████████| 112kB 966kB/s
Building wheels for collected packages: pyrsistent
  Running setup.py bdist_wheel for pyrsistent ... done
  Stored in directory: /root/.cache/pip/wheels/f0/b8/de/b593ad311be4eb458499d100db081e453576032272398b7ddc
Successfully built pyrsistent
Installing collected packages: websocket-client, zipp, typing-extensions, importlib-metadata, attrs, pyrsistent, jsonschema, python-dotenv, texttable, docopt, pycparser, cffi, bcrypt, pynacl, paramiko, docker, distro, PyYAML, cached-property, dockerpty, docker-compose
Successfully installed PyYAML-5.3.1 attrs-20.3.0 bcrypt-3.2.0 cached-property-1.5.2 cffi-1.14.4 distro-1.5.0 docker-4.4.1 docker-compose-1.27.4 dockerpty-0.4.1 docopt-0.6.2 importlib-metadata-3.3.0 jsonschema-3.2.0 paramiko-2.7.2 pycparser-2.20 pynacl-1.4.0 pyrsistent-0.17.3 python-dotenv-0.15.0 texttable-1.6.3 typing-extensions-3.7.4.3 websocket-client-0.57.0 zipp-3.4.0
docker-composeバージョン確認
$ docker-compose --version
docker-compose version 1.27.4, build unknown
Raspberry Pi 3の情報
$ cat /etc/debian_version
10.7
$ cat /etc/issue Raspbian GNU/Linux 10 \n \l$ lsb_release -a No LSB modules are available. Distributor ID: Raspbian Description: Raspbian GNU/Linux 10 (buster) Release: 10 Codename: buster$ uname -s Linux$ uname -m armv7l
- 投稿日:2021-01-06T00:29:16+09:00
【Rails × Docker】*エラー* Could not find gem 'mysql2 (~> 0.5)' in any of the gem sources listed in your Gemfile.
◆目的
ずっと悩んでいたDockerの課題解決に一歩近ずけたので忘却録のため、記述します!
*補足
私の場合、mysql2がないよ!というエラーが出た際、無理くり手動でmysql2を入れてみました。ですが、Gemfileのmysqlの次に記述されてるpumaがないですよ!というエラーが出たので、別の方法を探していたところwebpackerにたどり着きました。◆結論
コンテナ上で「rails webpacker:install」このコマンドを打った後、
Gemfile.lockの中身を削除して、
docker-compose up --build コマンドを打ったらコンテナが起動しました^^root@c9fe1cb41fda:/app2# rails webpacker:installエラー文
docker run コマンドを入力
mysql2がgemのどのリストを探してもないとエラーがでる。
↓↓↓
Could not find gem 'mysql2 (~> 0.5)' in any of the gem sources listed in your Gemfile.
Runbundle installto install missing gems.*初回のbuildで docker build . ではなく docker-compose コマンドでimageを作成するべきだったのかも...
ユーザー名noMBP:app2 ユーザー名$ docker run -it -v /Users/ユーザー名/Desktop/app2:/app2 -p 3000:3000 f5dc18466a56 bash
root@c1f90c58d633:/app2# rails new . --force --database=mysql --skip-bundle
 〜 省略 〜
      create  storage
      create  storage/.keep
      create  tmp/storage
      create  tmp/storage/.keep
      remove  config/initializers/cors.rb
      remove  config/initializers/new_framework_defaults_6_1.rb
       rails  webpacker:install
Could not find gem 'mysql2 (~> 0.5)' in any of the gem sources listed in your Gemfile.
Run `bundle install` to install missing gems.
仮説1 Gemfileにmysqlの記述がないのかもしれない。
catコマンドでGemfileの中身を確認
↓↓↓
Gemfileに gem 'mysql2', '~> 0.5' が存在している。git_source(:github) { |repo| "https://github.com/#{repo}.git" } ruby '2.7.2' # Bundle edge Rails instead: gem 'rails', github: 'rails/rails' gem 'rails', '~> 6.1.0' # Use mysql as the database for Active Record gem 'mysql2', '~> 0.5' # Use Puma as the app server gem 'puma', '~> 5.0' 〜 省略 〜仮説2 webpackerに問題があるのではないか。
webpackerインストールの直後にエラーが出ているため、webpackerに問題があるのではないか。
コンテナでrails sしてみるとwebpackerのエラーが出ていてwebpackerを入れてねと言われていることがわかる。
Webpacker configuration file not found /app2/config/webpacker.yml. Please run rails webpacker:install Error: No such file or directory @ rb_sysopen - /app2/config/webpacker.yml (RuntimeError)root@c9fe1cb41fda:/app2# rails s => Booting Puma => Rails 6.1.0 application starting in development => Run `bin/rails server --help` for more startup options Exiting Traceback (most recent call last): 〜 省略 〜 2: from /usr/local/bundle/gems/webpacker-5.2.1/lib/webpacker/configuration.rb:92:in `data' 1: from /usr/local/bundle/gems/webpacker-5.2.1/lib/webpacker/configuration.rb:95:in `load' /usr/local/bundle/gems/webpacker-5.2.1/lib/webpacker/configuration.rb:99:in `rescue in load': Webpacker configuration file not found /app2/config/webpacker.yml. Please run rails webpacker:install Error: No such file or directory @ rb_sysopen - /app2/config/webpacker.yml (RuntimeError)app2の中を確認→webpacker.ymlがない。
調べるとRails6以降はデフォルトでwebpackerが入っているということだったが、
なかったので、試行錯誤して入れてみることにした。①Dockerfileへ記述してもう一度 build してみる「apt-get install -y webpacker'」
E: Unable to locate package webpacker
ERROR: Service 'web' failed to build : The command '/bin/sh -c apt-get install -y webpacker' returned a non-zero code: 100ユーザー名noMBP:app2 ユーザー名$ docker-compose up --build Building web Step 1/24 : FROM ruby:2.7 ---> 7e58098089a4 Step 2/24 : ENV BUNDLER_VERSION=2.1.4 〜 省略 〜 Step 11/24 : RUN apt-get install -y webpacker ---> Running in 283d9d5a7034 Reading package lists... Building dependency tree... Reading state information... E: Unable to locate package webpacker ERROR: Service 'web' failed to build : The command '/bin/sh -c apt-get install -y webpacker' returned a non-zero code: 100②コンテナの中で以下のコマンドを実行
root@c9fe1cb41fda:/app2# rails webpacker:installDone in 153.13s.
Webpacker successfully installed ? ?成功!!
Gemfile.lockの中身を削除して docker-compose up --build を実行
無事に起動!!
web_1  | => Booting Puma
web_1  | => Rails 6.1.0 application starting in development
web_1  | => Run `bin/rails server --help` for more startup options
web_1  | Puma starting in single mode...
web_1  | * Puma version: 5.1.1 (ruby 2.7.2-p137) ("At Your Service")
web_1  | *  Min threads: 5
web_1  | *  Max threads: 5
web_1  | *  Environment: development
web_1  | *          PID: 1
web_1  | * Listening on http://0.0.0.0:3000
web_1  | Use Ctrl-C to stop
まとめ
根本的な解決には至ってないですが、なんとかコンテナを起動させることができました。
1. docker runした際、なぜWebpackerがインストールされずmysqlのエラーが出たのか。
2. 直接コンテナでコマンドを打つことで起動させることができたが、次回起動時問題ないのか上記2点引き続き調べていきたいと思います。