- 投稿日:2020-11-27T12:45:29+09:00
MVVM+Repositoryのアーキテクチャを使っています①
もくじ
・MVVM + Repositoryについて
・階層について
・DataClass実装
➡ 次回はRepositoryとViewmodel部分の実装について書きますMVVM+Repositoryとは
アーキテクチャの1つです。他にも様々なアーキテクチャがあるのだと思いますが、公式ガイドではMVVMの形式が推奨されておりますので、PeerRadioでもMVVMを使用しております。しかし、そこにRepositoryというのがくっついていますね。これはDBを扱う部分で、MVVMから分けて作っているということです(分けるのが必須ではないです)。
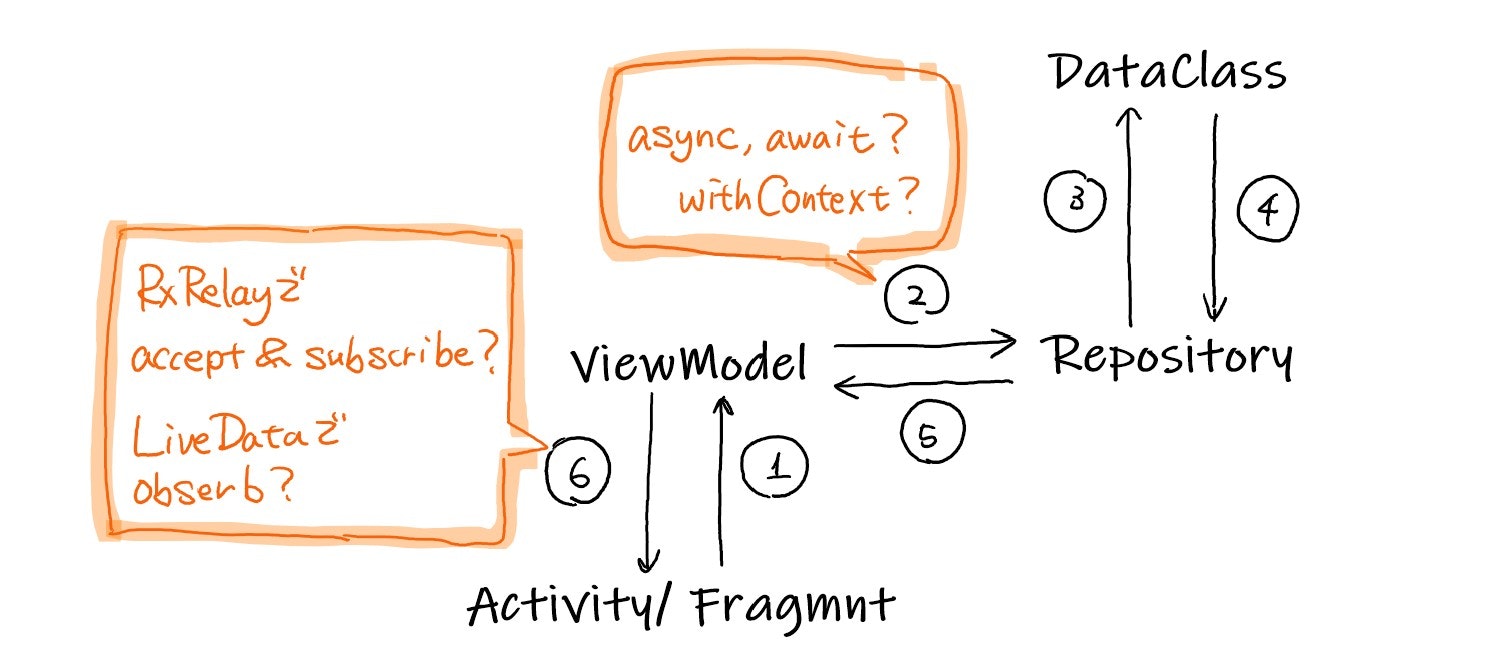
MVVM+Repositoryの登場人物とその関係性は以下の画像の通りです。
ActivityやFragmentからViewModelを呼び出し、ViewModelから非同期処理(Kotlin Coroutine)でasync{}.await()かwithContextを使ってRepositoryを呼び、RepositoryではDataClassへ行ったり来たりしつつ実際にDB(PeerRadioの場合はFirestore)へアクセスする処理を書きます。DBへアクセスした結果(取得した情報など)はViewModelへ戻り、さらに、RxJavaのRxRelayのaccept()とsubscribe()を組み合わせてActivityやFragmentでデータを受け取ります。RxJavaを利用しなくても、LiveDataのobserve()でもActivity/Fragmentでデータを受け取れます。この記事の次回以降では、図の②の「async/ awaitで非同期処理を扱う方法」と「withContextで非同期処理を扱う方法」の両方をかきます。また、図の⑥でも同様に「RxRelayでデータを受け取る方法」と「LiveDataでデータを受け取る方法」の両方を説明します。
階層
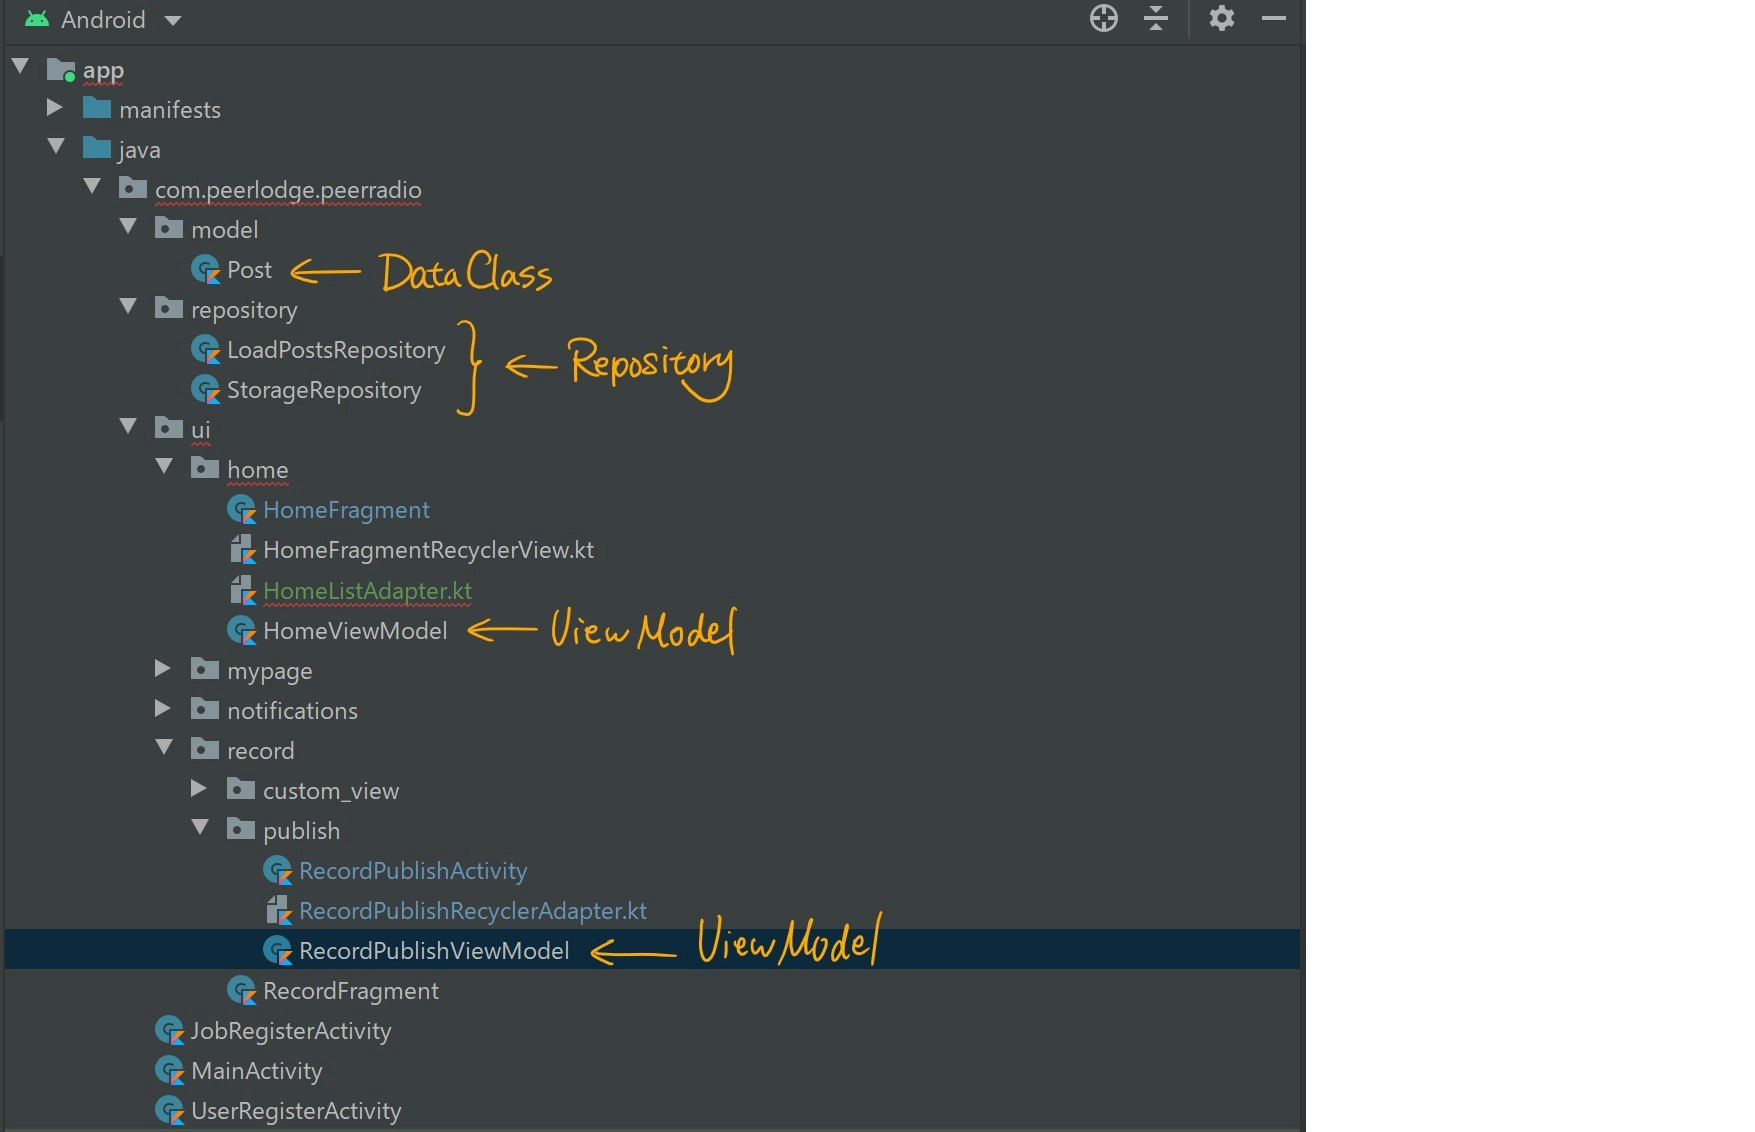
実際PeerRadioではMVVM+Repositoryがどのような階層で配置されているのかが、以下の画像で分かると思います。*今実装してるAdapterにエラーが出ていますが気にしないで行きましょう
もっと簡単に階層の概要をかくとこんなかんじです。
つまり、①modelというパッケージを作成し、そこにDataClassというファイルを格納。②repositoryというパッケージにRepositroryクラスを格納。③それ以外の普通にActivityとかFragmentとかが入っているとこにViewModelクラスも一緒に格納。こんなイメージです。DataClass実装
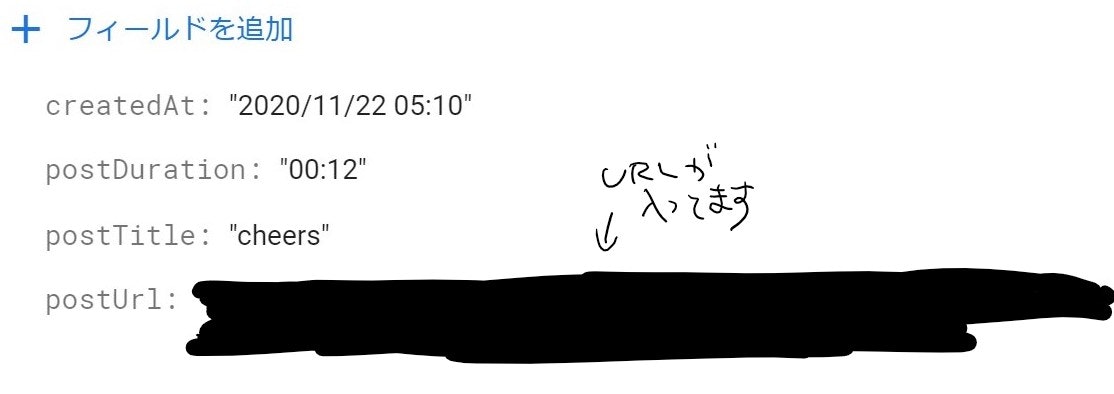
Post.ktdata class Post( val postUrl: String? = null, val postTitle: String? = null, val postDuration: String? = null, val createdAt: String? = null )DBにどんなカラムを作りたいかをかくイメージです。PeerRadioの場合はFirestoreを利用しているので、Firestoreにどんなフィールドを作りたいかをイメージしてここにかいております。
実際にFirestoreではこんな感じで作られてます。
さいごに
この記事はだいぶ長くなってしまうので、今回はDataClassまでにします。次回はRepositoryとViewModelの実装について詳しく書いていきます。よろしくおねがいします!

- 投稿日:2020-11-27T12:45:29+09:00
PeerRadioではMVVM+Repositoryのアーキテクチャを使用しております①
もくじ
・MVVM + Repositoryについて
・階層について
・DataClass実装
➡ 次回はRepositoryとViewmodel部分の実装について書きますMVVM+Repositoryとは
アーキテクチャの1つです。他にも様々なアーキテクチャがあるのだと思いますが、公式ガイドではMVVMの形式が推奨されておりますので、PeerRadioでもMVVMを使用しております。しかし、そこにRepositoryというのがくっついていますね。これはDBを扱う部分で、MVVMから分けて作っているということです(分けるのが必須ではないです)。
MVVM+Repositoryの登場人物とその関係性は以下の画像の通りです。
ActivityやFragmentからViewModelを呼び出し、ViewModelから非同期処理(Kotlin Coroutine)でasync{}.await()かwithContextを使ってRepositoryを呼び、RepositoryではDataClassへ行ったり来たりしつつ実際にDB(PeerRadioの場合はFirestore)へアクセスする処理を書きます。DBへアクセスした結果(取得した情報など)はViewModelへ戻り、さらに、RxJavaのRxRelayのaccept()とsubscribe()を組み合わせてActivityやFragmentでデータを受け取ります。RxJavaを利用しなくても、LiveDataのobserve()でもActivity/Fragmentでデータを受け取れます。この記事の次回以降では、図の②の「async/ awaitで非同期処理を扱う方法」と「withContextで非同期処理を扱う方法」の両方をかきます。また、図の⑥でも同様に「RxRelayでデータを受け取る方法」と「LiveDataでデータを受け取る方法」の両方を説明します。
階層
実際PeerRadioではMVVM+Repositoryがどのような階層で配置されているのかが、以下の画像で分かると思います。*今実装してるAdapterにエラーが出ていますが気にしないで行きましょう
もっと簡単に階層の概要をかくとこんなかんじです。
つまり、①modelというパッケージを作成し、そこにDataClassというファイルを格納。②repositoryというパッケージにRepositroryクラスを格納。③それ以外の普通にActivityとかFragmentとかが入っているとこにViewModelクラスも一緒に格納。こんなイメージです。DataClass実装
Post.ktdata class Post( val postUrl: String? = null, val postTitle: String? = null, val postDuration: String? = null, val createdAt: String? = null )DBにどんなカラムを作りたいかをかくイメージです。PeerRadioの場合はFirestoreを利用しているので、Firestoreにどんなフィールドを作りたいかをイメージしてここにかいております。
実際にFirestoreではこんな感じで作られてます。
さいごに
この記事はだいぶ長くなってしまうので、今回はDataClassまでにします。次回はRepositoryとViewModelの実装について詳しく書いていきます。よろしくおねがいします!
- 投稿日:2020-11-27T12:28:14+09:00
Androidアプリbuild without IDE
最初に
プログラミングを始めた時、C言語、JavaでHello Worldを作成したことを思い出した。
IDEがなくて、テキストエディターとコマンドラインで作成、コンパイルして実行できました。
Androidの勉強ですが、Android Studioを使って、Hello Worldのプロジェクトを作成する記事はほとんどです。
Androidアプリの構成とビルドについて、もっと深く理解するため、本編はIDEを使わなくて一からプロジェクトを作成し、実行するまで紹介します。ビルドツール
まず、Gradleをインストールします。
AndroidプロジェクトはGradleベースで複雑なビルドシステムを構築しているため、Gradleの勉強は必須になります。
https://gradle.org/releases/ にて最新バージョンのGradleをダウンロードしてインストールします。
すでにAndroid Studioで実行したことがあれば、ダウンロード、インストールしなくてもいいです。Linux、Mac: ~/.gradle/wrapper/dists Windows: ユーザーフォルダのは配下、隠しフォルダになっています環境変数の設定
下記のパスを環境変数に設定する。
Android SDK
Android SDKがインストールされていないんら、https://developer.android.google.cn/studio#downloads にて
Command line toolsをインストールします。
cmdline-toolsのbin配下にsdkmanagerを実行してSDKをインストールします。
しかし、Android Studioがインストールしたことがあれば、SDKがすでにインストールされています。プロジェクト初期化
今回はGradle 6.7でプロジェクトの初期化をおこないます。
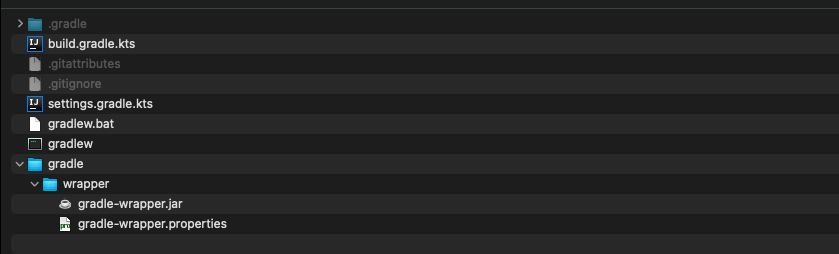
プロジェクトディレクトリにてgradle initを実施~/Projects/NoIde : gradle init Welcome to Gradle 6.7! Here are the highlights of this release: - File system watching is ready for production use - Declare the version of Java your build requires - Java 15 support For more details see https://docs.gradle.org/6.7/release-notes.html Starting a Gradle Daemon (subsequent builds will be faster) Select type of project to generate: 1: basic 2: application 3: library 4: Gradle plugin Enter selection (default: basic) [1..4] 1 Select build script DSL: 1: Groovy 2: Kotlin Enter selection (default: Groovy) [1..2] 2 Project name (default: NoIde): Test > Task :init Get more help with your project: Learn more about Gradle by exploring our samples at https://docs.gradle.org/6.7/samples BUILD SUCCESSFUL in 2m 23s 2 actionable tasks: 2 executedビルド成功したら、プロジェクトディレクトリ配下に以下のファイルを作成されます。
項目設定
- build.gradle.ktsに下記の内容を追加します。
build.gradle.ktsbuildscript { repositories { google() jcenter() } dependencies { classpath("com.android.tools.build:gradle:4.1.1") classpath("org.jetbrains.kotlin:kotlin-gradle-plugin:1.4.10") } } allprojects { repositories { google() jcenter() } } tasks.register("clean",Delete::class){ delete(rootProject.buildDir) }
- app ディレクトリを作成し、その配下、build.gradle.ktsを作成して下記の内容を追加します。
app/build.gradle.ktsimport org.gradle.kotlin.dsl.kotlin import org.gradle.kotlin.dsl.* import org.jetbrains.kotlin.config.KotlinCompilerVersion plugins { id("com.android.application") kotlin("android") kotlin("kapt") } android { compileSdkVersion(29) buildToolsVersion("30.0.0") defaultConfig { applicationId = "com.test" minSdkVersion(26) targetSdkVersion(29) versionCode = 1 versionName = "1.0" } buildTypes { getByName("release") { isMinifyEnabled = false proguardFiles("proguard-rules.pro") } } kotlinOptions { jvmTarget = "1.8" } } dependencies { implementation(kotlin("stdlib-jdk8", KotlinCompilerVersion.VERSION)) implementation("org.jetbrains.kotlin:kotlin-stdlib:1.4.10") implementation("androidx.core:core-ktx:1.3.2") implementation("androidx.appcompat:appcompat:1.2.0") }
- プロジェクトのルートディレクトリにある
settings.gradle.ktsに下記の内容を追加します。include(":app")
- プロジェクトのルートディレクトリに
gradle.propertiesを作成し、下記の内容を追加します。android.useAndroidX=true
app/src/mainディレクトリを作成して、その配下にAndroidManifest.xmlを作成します。AndroidManifest.xml<?xml version="1.0" encoding="utf-8"?> <manifest xmlns:android="http://schemas.android.com/apk/res/android" package="com.test"> <application android:label="Test App" android:theme="@style/AppTheme"> <activity android:name=".MainActivity"> <intent-filter> <action android:name="android.intent.action.MAIN" /> <category android:name="android.intent.category.LAUNCHER" /> </intent-filter> </activity> </application> </manifest>
- AndroidManifest.xmlの設定にてThemeが設定されているので、
app/src/main/res/valuesディレクトリを作成し、style.xmlを作成します。style.xml<resources> <style name="AppTheme" parent="Theme.AppCompat.Light.NoActionBar"> </style> </resources>
- パッケージディレクトリ
app/src/main/java/com/testを作成して、ソースコードMainActivity.ktを作成します。MainActivity.ktpackage com.test import androidx.appcompat.app.AppCompatActivity import android.os.Bundle class MainActivity : AppCompatActivity() { override fun onCreate(savedInstanceState: Bundle?) { super.onCreate(savedInstanceState) setContentView(R.layout.activity_main) } }
- レイアウトディレクトリ
app/src/main/res/layoutを作成して、activity_main.xmlレイアウトファイルを作成します。activity_main.xml<?xml version="1.0" encoding="utf-8"?> <androidx.constraintlayout.widget.ConstraintLayout xmlns:android="http://schemas.android.com/apk/res/android" xmlns:app="http://schemas.android.com/apk/res-auto" xmlns:tools="http://schemas.android.com/tools" android:layout_width="match_parent" android:layout_height="match_parent" tools:context=".MainActivity" > <TextView android:layout_width="wrap_content" android:layout_height="wrap_content" android:text="Hello World!" app:layout_constraintBottom_toBottomOf="parent" app:layout_constraintLeft_toLeftOf="parent" app:layout_constraintRight_toRightOf="parent" app:layout_constraintTop_toTopOf="parent" /> </androidx.constraintlayout.widget.ConstraintLayout>
- Android SDKを指定します。(事前にAndroid SDKをインストールした)
プロジェクトルートディレクトリの配下にlocal.propertiesファイルを作成して、sdkのパスを設定します。local.propertiessdk.dir=~/Library/Android/sdkビルド
Androidビルドシステムは、デフォルトでデバッグビルドタイプとリリースビルドタイプがあります。アプリを端末にインストールして確認するにはコードサインニングが必要です。(デバッグビルドタイプはSDKツールで自動的にサインニングしてくれます)
デバッグアプリをビルドするには、プロジェクのトルートディレクトリにて
./gradlew assembleDebugを実行して、成功したらapp/build/outputs/apk/debug配下にapkファイルが作成されます。
adb installを使って端末にインストールします。./gradlew installDebugでもインストールできます。~/Projects/NoIde : ./gradlew assembleDebug Starting a Gradle Daemon, 1 incompatible Daemon could not be reused, use --status for details Deprecated Gradle features were used in this build, making it incompatible with Gradle 7.0. Use '--warning-mode all' to show the individual deprecation warnings. See https://docs.gradle.org/6.7/userguide/command_line_interface.html#sec:command_line_warnings BUILD SUCCESSFUL in 17s 28 actionable tasks: 8 executed, 20 up-to-date
インストール~/Projects/NoIde : ./gradlew installDebug > Task :app:installDebug Installing APK 'app-debug.apk' on 'Samsung Galaxy S10 (preview) - 10' for app:debug Installed on 1 device. Deprecated Gradle features were used in this build, making it incompatible with Gradle 7.0. Use '--warning-mode all' to show the individual deprecation warnings. See https://docs.gradle.org/6.7/userguide/command_line_interface.html#sec:command_line_warnings BUILD SUCCESSFUL in 3s 29 actionable tasks: 1 executed, 28 up-to-date
これでビルド、インストール完了。


- 投稿日:2020-11-27T11:05:06+09:00
flutter build apk --release だけ Could not resolve all files for configuration ':releaseRuntimeClasspath'.エラー
flutter build apk --releaseのときだけ、以下のエラーが出てapkが作れない問題でハマりました。
FAILURE: Build completed with 2 failures.

1: Task failed with an exception.
-----------
* What went wrong:
Execution failed for task ':generateReleaseRFile'.
> Could not resolve all files for configuration ':releaseRuntimeClasspath'.
   > Could not find com.google.firebase:firebase-bom:25.12.0.
     Searched in the following locations:
       - https://storage.googleapis.com/download.flutter.io/com/google/firebase/firebase-bom/25.12.0/firebase-bom-25.12.0.pom
       - https://storage.googleapis.com/download.flutter.io/com/google/firebase/firebase-bom/25.12.0/firebase-bom-25.12.0.jar
     Required by:
         project :
   > Could not find com.google.firebase:firebase-core:.
     Required by:
         project :
   > Could not find androidx.annotation:annotation:1.1.0.
     Searched in the following locations:
       - https://storage.googleapis.com/download.flutter.io/androidx/annotation/annotation/1.1.0/annotation-1.1.0.pom
       - https://storage.googleapis.com/download.flutter.io/androidx/annotation/annotation/1.1.0/annotation-1.1.0.jar
     Required by:
         project :

* Try:
Run with --stacktrace option to get the stack trace. Run with --info or --debug option to get more log output. Run with --scan to get full insights.
==============================================================================

2: Task failed with an exception.
-----------
* What went wrong:
Execution failed for task ':javaPreCompileRelease'.
> Could not resolve all files for configuration ':releaseCompileClasspath'.
   > Could not find com.google.firebase:firebase-bom:25.12.0.
     Required by:
         project :
   > Could not find com.google.firebase:firebase-core:.
     Required by:
         project :
   > Could not find androidx.annotation:annotation:1.1.0.
     Required by:
         project :

* Try:
Run with --stacktrace option to get the stack trace. Run with --info or --debug option to get more log output. Run with --scan to get full insights.
==============================================================================

* Get more help at https://help.gradle.org

BUILD FAILED in 2s


The plugin firebase_core could not be built due to the issue above.
解決方法
Stackoverflowを参考に、
flutter build apk --profileを一度実行すると、--releaseでもビルドできるようになりました。謎い
追記:本当の解決方法
gradleを4.1.0から3.5.0にしたら解決しました。
使っていたFlutter 1.22.2 で新規プロジェクトを作成したら3.5.0だったので、どうやら安易に変更してはいけないようです。buildscript { dependencies { classpath 'com.android.tools.build:gradle:3.5.0' } }
- 投稿日:2020-11-27T01:03:59+09:00
[Android]Navigation Component で StartDestination を popBackStack したときの動作
はじめに
Navigation Component で StartDestination を popBackStack すると currentDestination が null になると以下に記載がある。currentDestination が null になったときの挙動について詳しくは書かれてはいなかったので調べてまとめようと思います。(本記事は Navigation Component v2.3.1 で動作確認しています。)
https://developer.android.com/guide/navigation/navigation-navigate?hl=ja#back-stack

このメソッドが false を返すと、NavController.getCurrentDestination() は null を返します。
新しいデスティネーションに移動するか、アクティビティに対して finish() を呼び出してポップを処理する必要があります。
検証環境を構築する
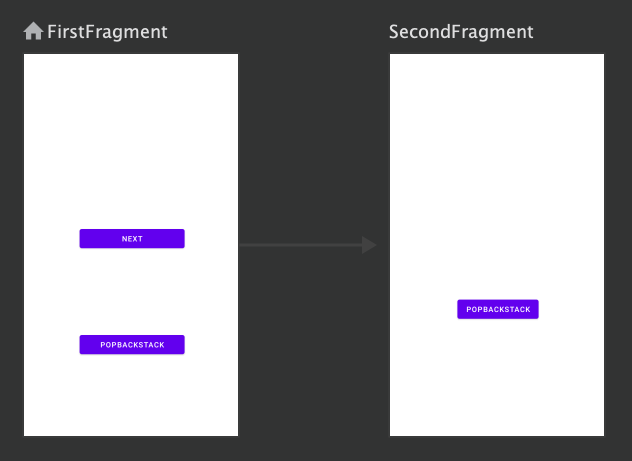
次のような FirstFragment と SecondFragment 間で遷移できるアプリを構築して検証できるようにします。
build.gradle
Navigation Component を dependencies に追加して使えるようにします。
dependencies {
    implementation "org.jetbrains.kotlin:kotlin-stdlib:$kotlin_version"
    implementation 'androidx.core:core-ktx:1.3.2'
    implementation 'androidx.appcompat:appcompat:1.2.0'
    implementation 'com.google.android.material:material:1.2.1'
    implementation 'androidx.constraintlayout:constraintlayout:2.0.4'
    implementation 'androidx.navigation:navigation-fragment-ktx:2.3.1'
    implementation 'androidx.navigation:navigation-ui-ktx:2.3.1'
    testImplementation 'junit:junit:4.+'
    androidTestImplementation 'androidx.test.ext:junit:1.1.2'
    androidTestImplementation 'androidx.test.espresso:espresso-core:3.3.0'
}
MainActivity
次のような Navigation Graph を作成して、MainActivity の にセットしてやります。
nav_graph.xml
<?xml version="1.0" encoding="utf-8"?>
<navigation xmlns:android="http://schemas.android.com/apk/res/android"
    xmlns:app="http://schemas.android.com/apk/res-auto"
    xmlns:tools="http://schemas.android.com/tools"
    android:id="@+id/nav_graph"
    app:startDestination="@id/FirstFragment">

    <fragment
        android:id="@+id/FirstFragment"
        android:name="jp.kaleidot725.sample.FirstFragment"
        android:label="@string/first_fragment_label"
        tools:layout="@layout/fragment_first">

        <action
            android:id="@+id/action_FirstFragment_to_SecondFragment"
            app:destination="@id/SecondFragment" />
    </fragment>
    <fragment
        android:id="@+id/SecondFragment"
        android:name="jp.kaleidot725.sample.SecondFragment"
        android:label="@string/second_fragment_label"
        tools:layout="@layout/fragment_second" />
</navigation>
MainActivity
class MainActivity : AppCompatActivity(R.layout.activity_main)activity_main.xml
<?xml version="1.0" encoding="utf-8"?>
<FrameLayout xmlns:android="http://schemas.android.com/apk/res/android"
    xmlns:app="http://schemas.android.com/apk/res-auto"
    xmlns:tools="http://schemas.android.com/tools"
    android:layout_width="match_parent"
    android:layout_height="match_parent"
    tools:context=".MainActivity">

    <fragment
        android:id="@+id/nav_host_fragment_content_main"
        android:name="androidx.navigation.fragment.NavHostFragment"
        android:layout_width="match_parent"
        android:layout_height="match_parent"
        app:defaultNavHost="true"
        app:layout_constraintBottom_toBottomOf="parent"
        app:layout_constraintLeft_toLeftOf="parent"
        app:layout_constraintRight_toRightOf="parent"
        app:layout_constraintTop_toTopOf="parent"
        app:navGraph="@navigation/nav_graph" />
</FrameLayout>
FirstFragment
あとは表示する FirstFragment には次の View を配置して画面遷移を操作できるようにしておく。
- 遷移状態を表す TextView
- SecondFragmnt に navigate するための Button
- FirstFragment を popBackStack するための Button
FirstFragment
class FirstFragment : Fragment(R.layout.fragment_first) {
    private val navController: NavController get() = findNavController()

    override fun onViewCreated(view: View, savedInstanceState: Bundle?) {
        super.onViewCreated(view, savedInstanceState)

        val textView = view.findViewById<TextView>(R.id.textview_first)
        textView.text = navController.currentDestination?.label ?: "NULL"

        val nextButton = view.findViewById<Button>(R.id.button_next)
        nextButton.setOnClickListener {
            navController.navigate(R.id.action_FirstFragment_to_SecondFragment)
            textView.text = navController.currentDestination?.label ?: "NULL"
        }

        val backButton = view.findViewById<Button>(R.id.button_pop_back_stack)
        backButton.setOnClickListener {
            navController.popBackStack()
            textView.text = navController.currentDestination?.label ?: "NULL"
        }
    }
}
fragment_first.xml
<?xml version="1.0" encoding="utf-8"?>
<androidx.constraintlayout.widget.ConstraintLayout xmlns:android="http://schemas.android.com/apk/res/android"
    xmlns:app="http://schemas.android.com/apk/res-auto"
    xmlns:tools="http://schemas.android.com/tools"
    android:layout_width="match_parent"
    android:layout_height="match_parent"
    tools:context=".FirstFragment">

    <TextView
        android:id="@+id/textview_first"
        android:layout_width="wrap_content"
        android:layout_height="wrap_content"
        app:layout_constraintBottom_toTopOf="@id/button_next"
        app:layout_constraintEnd_toEndOf="parent"
        app:layout_constraintStart_toStartOf="parent"
        app:layout_constraintTop_toTopOf="parent" />

    <Button
        android:id="@+id/button_next"
        android:layout_width="200dp"
        android:layout_height="wrap_content"
        android:text="@string/next"
        app:layout_constraintBottom_toTopOf="@id/button_pop_back_stack"
        app:layout_constraintEnd_toEndOf="parent"
        app:layout_constraintStart_toStartOf="parent"
        app:layout_constraintTop_toBottomOf="@id/textview_first" />

    <Button
        android:id="@+id/button_pop_back_stack"
        android:layout_width="200dp"
        android:layout_height="wrap_content"
        android:text="@string/popbackstack"
        app:layout_constraintBottom_toBottomOf="parent"
        app:layout_constraintEnd_toEndOf="parent"
        app:layout_constraintStart_toStartOf="parent"
        app:layout_constraintTop_toBottomOf="@id/button_next" />
</androidx.constraintlayout.widget.ConstraintLayout>
SecondFragment
また SecondFragment にも次の View を配置して画面遷移を操作できるようにしておく。
- 遷移状態を表す TextView
- SecondFragment を popBackStack するための Button
SecondFragment
class SecondFragment : Fragment(R.layout.fragment_second) {
    private val navController: NavController get() = findNavController()

    override fun onViewCreated(view: View, savedInstanceState: Bundle?) {
        super.onViewCreated(view, savedInstanceState)

        val textView = view.findViewById<TextView>(R.id.textview_second)
        textView.text = navController.currentDestination?.label ?: "NULL"

        val button = view.findViewById<Button>(R.id.button_pop_back_stack)
        button.setOnClickListener {
            navController.popBackStack()
            textView.text = navController.currentDestination?.label ?: "NULL"
        }
    }
}
fragment_second.xml
<?xml version="1.0" encoding="utf-8"?>
<androidx.constraintlayout.widget.ConstraintLayout xmlns:android="http://schemas.android.com/apk/res/android"
    xmlns:app="http://schemas.android.com/apk/res-auto"
    xmlns:tools="http://schemas.android.com/tools"
    android:layout_width="match_parent"
    android:layout_height="match_parent"
    tools:context=".SecondFragment">

    <TextView
        android:id="@+id/textview_second"
        android:layout_width="wrap_content"
        android:layout_height="wrap_content"
        app:layout_constraintBottom_toTopOf="@id/button_pop_back_stack"
        app:layout_constraintEnd_toEndOf="parent"
        app:layout_constraintStart_toStartOf="parent"
        app:layout_constraintTop_toTopOf="parent" />

    <Button
        android:id="@+id/button_pop_back_stack"
        android:layout_width="wrap_content"
        android:layout_height="wrap_content"
        android:text="@string/popbackstack"
        app:layout_constraintBottom_toBottomOf="parent"
        app:layout_constraintTop_toBottomOf="@id/textview_second"
        app:layout_constraintStart_toStartOf="parent"
        app:layout_constraintEnd_toEndOf="parent"/>
</androidx.constraintlayout.widget.ConstraintLayout>
SecondFragment で popBackStack したときの動作
はじめに SecondFragment で popBackStack したときの動作を確認します。FirstFragment から SecondFragment に navigate し、SecondFragment で popBackStack します。そうすると期待どおりの動作で currentDestination が FirstFragment となります。画面も問題なく FirstFragment が表示されており currentDestination と一致しています。
FirstFragment で popBackStack したときの動作
次に FirstFragment で popBackStack したときの動作を確認します。FirstFragment を表示した状態で popBackStack します。そうすると期待どおりの動作で currentDestination が NULL となります。ですが画面は FirstFragment が表示されており currentDestination と不一致しています。currentDestination が NULL となった場合には Activity を finish するか、新たな画面に遷移する必要があります。
新たな画面に遷移する際には NULL になっていることに注意が必要です。例えば次のように FirstFragment から SecondFragment への遷移を実行すると遷移元が FirstFragment ではなく NULL なので java.lang.IllegalArgumentException が発生して落ちます。なので currentDestination が NULL になっているときは遷移元が NULL である遷移方法を選んで遷移しなければなりません。
おわりに
今回調べたことを以下にまとめます。
- StartDestination で popBackStack すると currentDestination が null になるが、表示状態は startDestinaton のままになる。
- currentDestination が null になったら Activity を finish するか、 新たな画面に遷移するしかない。
- 新たな画面に遷移するときには遷移元が NULL でも大丈夫な遷移方法を選ばなければならない(遷移方法を間違えるとアプリが落ちるため)
currentDestination が NULL であるのに画面は startDestination が表示されたままになるのはわかりづらいですね。。。そもそも startDestination をプログラムから popBackStack しないというのが正常な動作だと思うので仕方がない感はありますね。
参考文献

- 投稿日:2020-11-27T00:32:43+09:00
3. Android学習 イベントリスナー編
勉強できること
Viewに対するイベントなどを検知して、それをトリガーに処理を実行できるようになる。環境
AndroidStudioのバージョン:4.0.1
言語:Javaイベントリスナーとは
スマートフォンの操作では、タップイベント、長押し、スクロール、戻るボタン操作などが発生します。
それらを検知するものがイベントリスナーです。リスナーの種類
イベントリスナーを抜粋して紹介します。
リスナー名 メソッド 詳細 クリックイベント onClick() ボタンなどのViewに対するタップ(クリックイベント)を検知する 長押しイベント onLongClick() ボタンなどのViewに対する長押しイベントを検知する ハードウェアボタンイベント onKey() ホームボタンや戻るボタン押下時を検知する 他にもViewによりスクロールや、タッチイベントなど色々なクリックリスナーが提供されています。
必要都度調べてみてください。記述例
MainActivity.javapublic class MainActivity extends AppCompatActivity { @Override protected void onCreate(Bundle savedInstanceState) { super.onCreate(savedInstanceState); setContentView(R.layout.activity_main); // ボタンタップされた内容を反映するTextView final TextView textView = (TextView)findViewById(R.id.text1); // ボタンのクリックリスナーを設定 Button button = (Button)findViewById(R.id.button); button.setOnClickListener(new View.OnClickListener() { @Override public void onClick(View view) { // ボタンクリック時にTextViewに文字を反映する textView.setText("タップしました。"); } }); // ボタンの長押しリスナーを設定 button.setOnLongClickListener(new View.OnLongClickListener() { @Override public boolean onLongClick(View view) { // ボタン長押し時にTextViewに文字を反映する textView.setText("長押ししました。"); return false; } }); } }今回はここまでとなります。
お疲れさまでした!d(´∀`)b