- 投稿日:2020-11-21T19:15:10+09:00
TensorFlow Object Detection API のつかいかた(事前学習済みモデルで推論)
記事を読めば、TensorFlow Object Detection API (推論部分)のつかいかたがわかります。
Colabでできます。
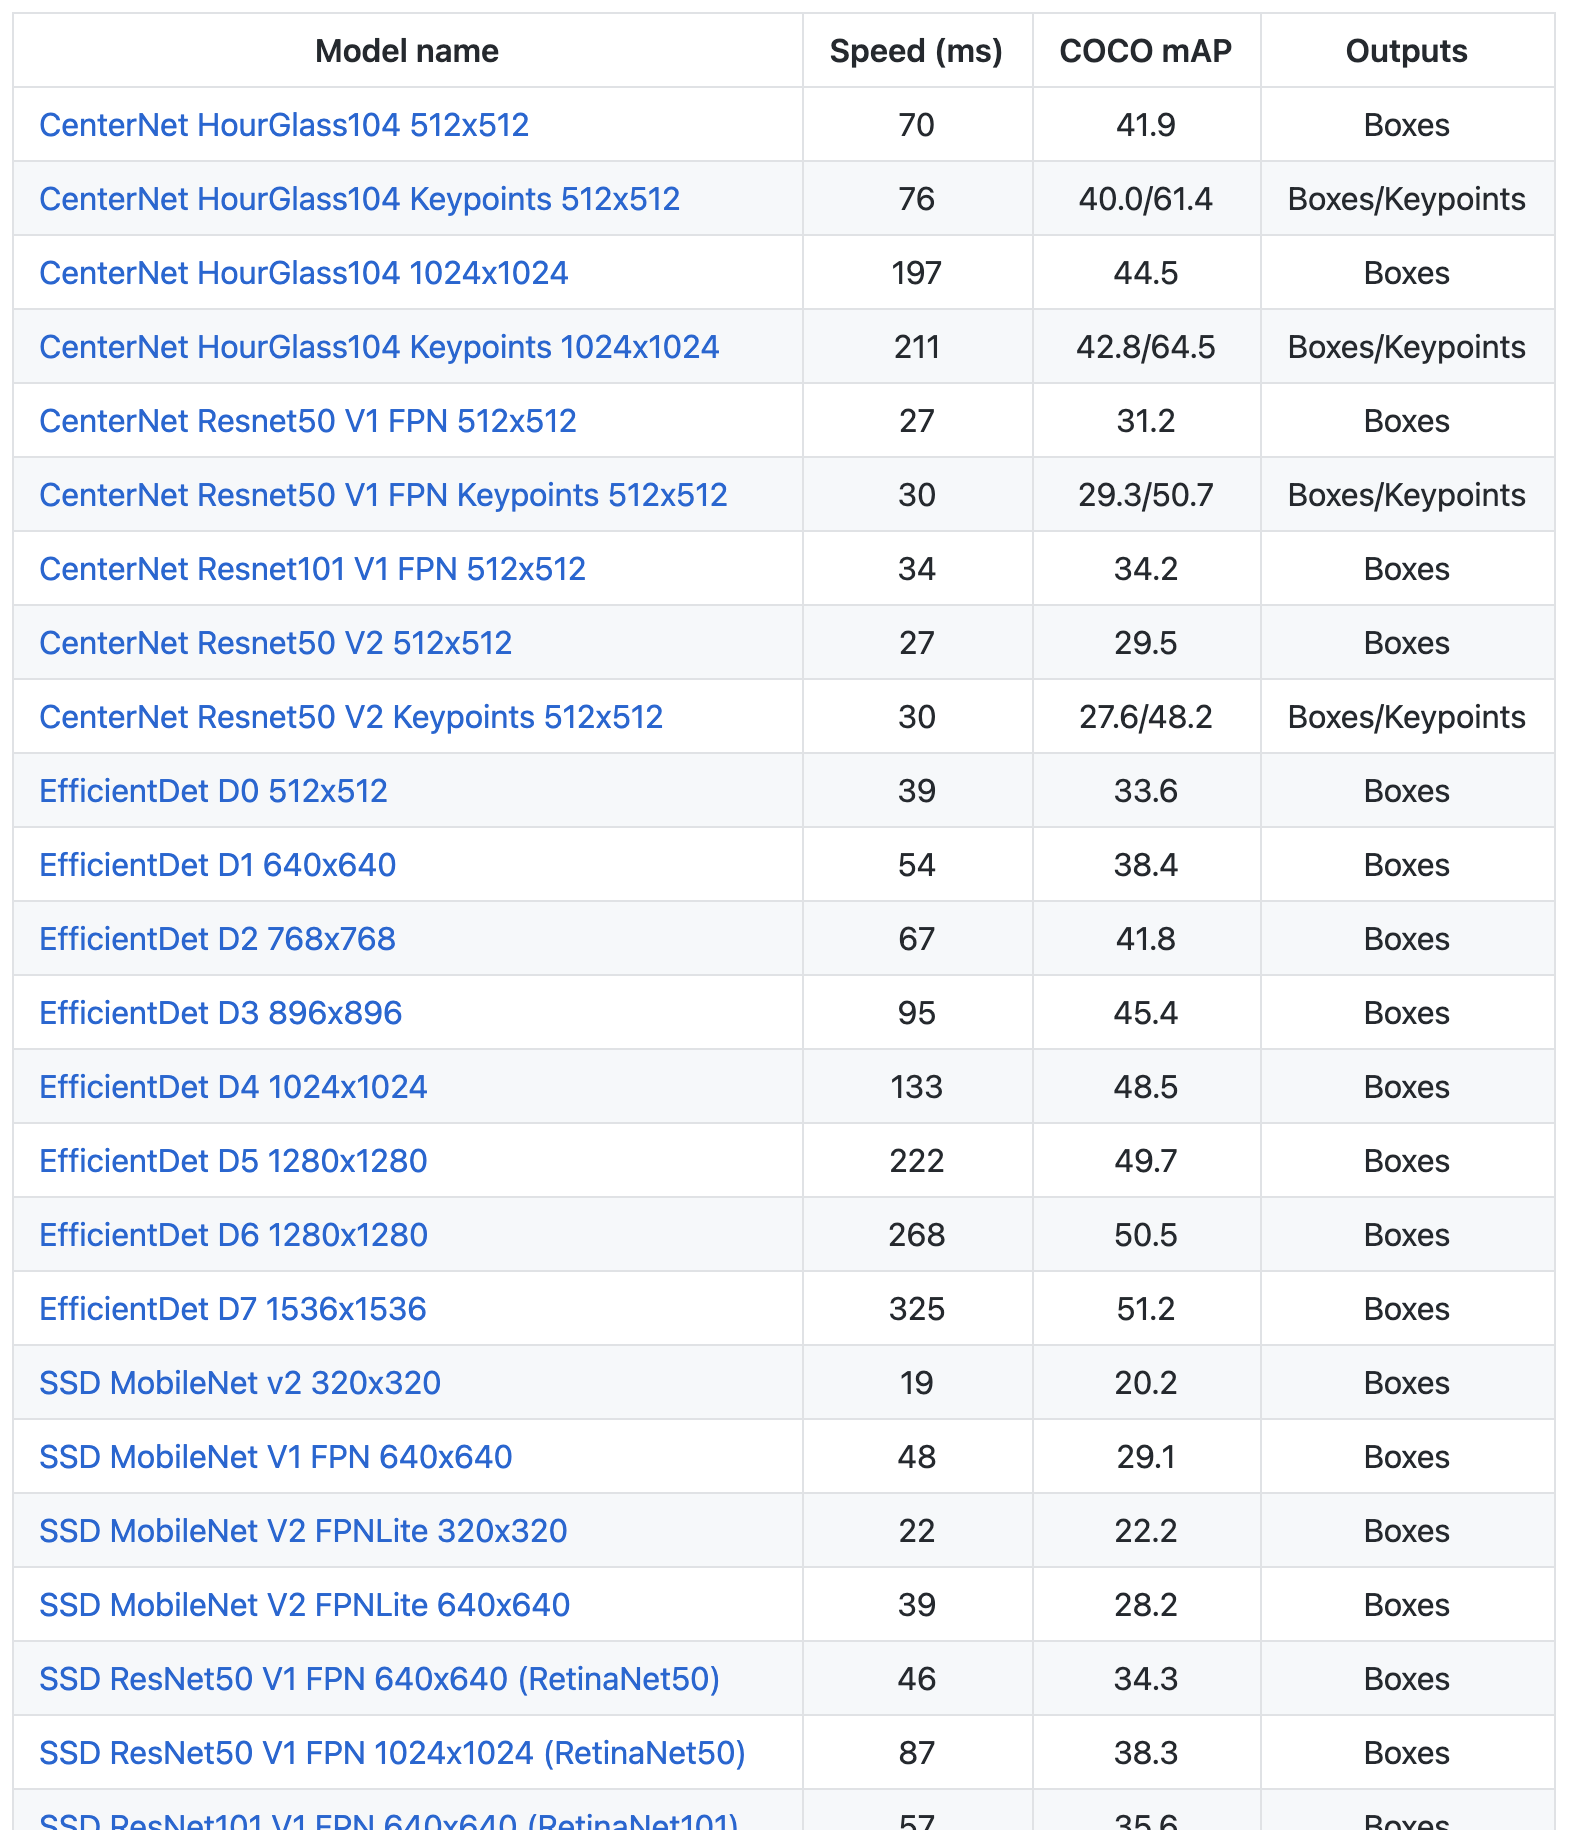
TensorFlow公式 Model Zooにはいろんな種類のモデルがあります!
手順
0.TensorFlow2をインストール
!pip install -U --pre tensorflow=="2.2.0"1.TensorFlow 公式 Models をGitHubからClone
import os
import pathlib

# 現在のディレクトリパスにmodelsが含まれていれば、そこに移動する。なければクローンする。
if "models" in pathlib.Path.cwd().parts:
  while "models" in pathlib.Path.cwd().parts:
    os.chdir('..')
elif not pathlib.Path('models').exists():
  !git clone --depth 1 https://github.com/tensorflow/models
2.Object Detection API、必要なモジュールをインストール
%%bash #bashコマンドを有効に
cd models/research/
protoc object_detection/protos/*.proto --python_out=.
cp object_detection/packages/tf2/setup.py .
python -m pip install .
3.モジュールのインポート
import matplotlib
import matplotlib.pyplot as plt

import io
import scipy.misc
import numpy as np
from six import BytesIO
from PIL import Image, ImageDraw, ImageFont

import tensorflow as tf

from object_detection.utils import label_map_util
from object_detection.utils import config_util
from object_detection.utils import visualization_utils as viz_utils
from object_detection.builders import model_builder

%matplotlib inline
4.画像読み込み関数
def load_image_into_numpy_array(path):
  """画像を読み込んでNumpy Arrayにする

  Puts image into numpy array to feed into tensorflow graph.
  Note that by convention we put it into a numpy array with shape
  (height, width, channels), where channels=3 for RGB.

  Args:
    path: the file path to the image

  Returns:
    uint8 numpy array with shape (img_height, img_width, 3)
  """
  img_data = tf.io.gfile.GFile(path, 'rb').read()
  image = Image.open(BytesIO(img_data))
  (im_width, im_height) = image.size
  return np.array(image.getdata()).reshape(
      (im_height, im_width, 3)).astype(np.uint8)
5.モデルをダウンロード
!wget http://download.tensorflow.org/models/object_detection/tf2/20200713/centernet_hg104_512x512_coco17_tpu-8.tar.gz
!tar -xf centernet_hg104_512x512_coco17_tpu-8.tar.gz
公式 Model Zoo から好きなモデルをダウンロードします。
ダウンロードURLは上記リンクのモデル名にカーソルを合わせると表示されます。
性能比較を見てるだけでたのしいですね。
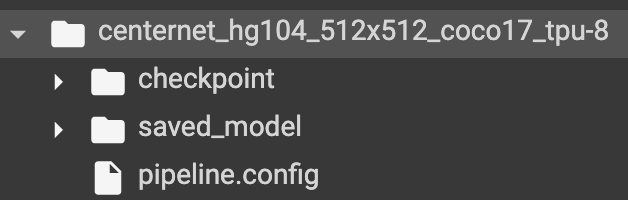
ダウンロード・解凍が完了すると、checkpoint、saved_model、pipline.configを含むフォルダが展開されます。
6.pipeline config(モデルの構成情報)を読み込んで、モデルをビルドする
#構成情報ファイルのパス。リポジトリにConfigファイルの揃ったフォルダがあるけど、微妙にモデル名が省略されていたりするので、ダウンロードしたものの方が確実?
pipeline_config = "./centernet_hg104_512x512_coco17_tpu-8/pipeline.config"
#チェックポイントのパス
model_dir = "./centernet_hg104_512x512_coco17_tpu-8/checkpoint"

#モデル構成情報読み込み
configs = config_util.get_configs_from_pipeline_file(pipeline_config)
model_config = configs['model']

#読み込んだ構成情報でモデルをビルド
detection_model = model_builder.build(
      model_config=model_config, is_training=False)

#チェックポイントから重みを復元
ckpt = tf.compat.v2.train.Checkpoint(model=detection_model)
ckpt.restore(os.path.join(model_dir, 'ckpt-0')).expect_partial()
7.モデルによる推論関数を準備
def get_model_detection_function(model):
  """Get a tf.function for detection."""

  @tf.function
  def detect_fn(image):
    """Detect objects in image."""

    image, shapes = model.preprocess(image)
    prediction_dict = model.predict(image, shapes)
    detections = model.postprocess(prediction_dict, shapes)

    return detections, prediction_dict, tf.reshape(shapes, [-1])

  return detect_fn

detect_fn = get_model_detection_function(detection_model)
8.ラベルを準備
物体検出の推論ではモデルをトレーニングをした物体ラベルが必要です。
ラベルは公式リポジトリの models/research/object_detection/data/ にあります。今回のモデルはCocoデータセットでトレーニングされているので、 mscoco_label_map.pbtxt を使います。label_map_path = './models/research/object_detection/data/mscoco_label_map.pbtxt' label_map = label_map_util.load_labelmap(label_map_path) categories = label_map_util.convert_label_map_to_categories( label_map, max_num_classes=label_map_util.get_max_label_map_index(label_map), use_display_name=True) category_index = label_map_util.create_category_index(categories) label_map_dict = label_map_util.get_label_map_dict(label_map, use_display_name=True)9.用意した画像で物体検出の実行
Colabに好きな画像をアップロードして、image_pathにそのパスを指定します。
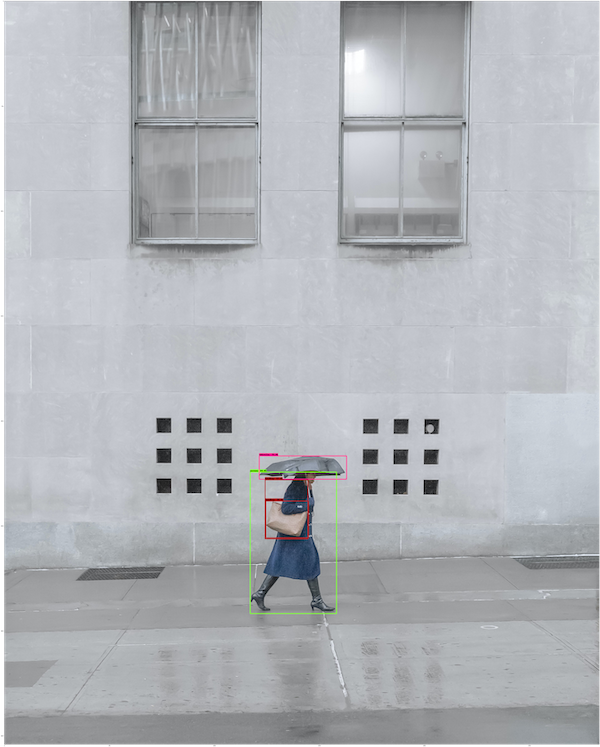
ちなみに、アルファチャネル付きの画像は3チャネルに直してから実行する必要があるっぽいです。image_dir = 'models/research/object_detection/test_images/' image_path = os.path.join(image_dir, 'image2.jpg') image_np = load_image_into_numpy_array(image_path) # Things to try: # Flip horizontally # image_np = np.fliplr(image_np).copy() # Convert image to grayscale # image_np = np.tile( # np.mean(image_np, 2, keepdims=True), (1, 1, 3)).astype(np.uint8) input_tensor = tf.convert_to_tensor( np.expand_dims(image_np, 0), dtype=tf.float32) detections, predictions_dict, shapes = detect_fn(input_tensor) label_id_offset = 1 image_np_with_detections = image_np.copy() # Use keypoints if available in detections keypoints, keypoint_scores = None, None if 'detection_keypoints' in detections: keypoints = detections['detection_keypoints'][0].numpy() keypoint_scores = detections['detection_keypoint_scores'][0].numpy() viz_utils.visualize_boxes_and_labels_on_image_array( image_np_with_detections, detections['detection_boxes'][0].numpy(), (detections['detection_classes'][0].numpy() + label_id_offset).astype(int), detections['detection_scores'][0].numpy(), category_index, use_normalized_coordinates=True, max_boxes_to_draw=200, min_score_thresh=.30, agnostic_mode=False, keypoints=keypoints, keypoint_scores=keypoint_scores, keypoint_edges=get_keypoint_tuples(configs['eval_config'])) plt.figure(figsize=(12,16)) plt.imshow(image_np_with_detections) plt.show()
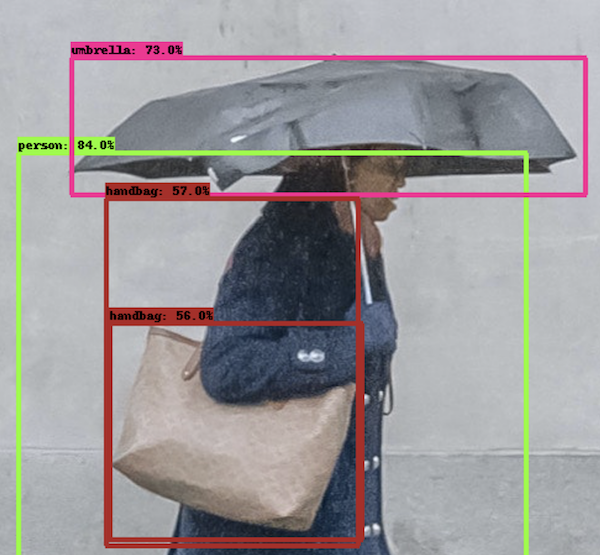
ボックス、ラベル、信頼度が表示されます。
?
お仕事のご相談こちらまで
rockyshikoku@gmail.comCore MLを使ったアプリを作っています。
機械学習関連の情報を発信しています。
- 投稿日:2020-11-21T19:15:10+09:00
TensorFlow Object Detection API のつかいかた(推論。Colabサンプル付き)
記事を読めば、TensorFlow Object Detection API (推論部分)のつかいかたがわかります。
Colabでできます。
Colabサンプル
サンプルのセルを実行していくと、TensorFlowObjectDetectionAPIが試せます。
最後のセルのImage_Pathを自前の画像のものに変えると、自前の画像で物体検出できます。
TensorFlow公式 Model Zooにはいろんな種類のモデルがあります!
手順
0.TensorFlow2をインストール
!pip install -U --pre tensorflow=="2.2.0"1.TensorFlow 公式 Models をGitHubからClone
import os
import pathlib

# 現在のディレクトリパスにmodelsが含まれていれば、そこに移動する。なければクローンする。
if "models" in pathlib.Path.cwd().parts:
  while "models" in pathlib.Path.cwd().parts:
    os.chdir('..')
elif not pathlib.Path('models').exists():
  !git clone --depth 1 https://github.com/tensorflow/models
2.Object Detection API、必要なモジュールをインストール
%%bash #bashコマンドを有効に
cd models/research/
protoc object_detection/protos/*.proto --python_out=.
cp object_detection/packages/tf2/setup.py .
python -m pip install .
3.モジュールのインポート
import matplotlib
import matplotlib.pyplot as plt

import io
import scipy.misc
import numpy as np
from six import BytesIO
from PIL import Image, ImageDraw, ImageFont

import tensorflow as tf

from object_detection.utils import label_map_util
from object_detection.utils import config_util
from object_detection.utils import visualization_utils as viz_utils
from object_detection.builders import model_builder

%matplotlib inline
4.画像読み込み関数
def load_image_into_numpy_array(path):
  """画像を読み込んでNumpy Arrayにする

  Puts image into numpy array to feed into tensorflow graph.
  Note that by convention we put it into a numpy array with shape
  (height, width, channels), where channels=3 for RGB.

  Args:
    path: the file path to the image

  Returns:
    uint8 numpy array with shape (img_height, img_width, 3)
  """
  img_data = tf.io.gfile.GFile(path, 'rb').read()
  image = Image.open(BytesIO(img_data))
  (im_width, im_height) = image.size
  return np.array(image.getdata()).reshape(
      (im_height, im_width, 3)).astype(np.uint8)
5.モデルをダウンロード
!wget http://download.tensorflow.org/models/object_detection/tf2/20200713/centernet_hg104_512x512_coco17_tpu-8.tar.gz
!tar -xf centernet_hg104_512x512_coco17_tpu-8.tar.gz
公式 Model Zoo から好きなモデルをダウンロードします。
ダウンロードURLは上記リンクのモデル名にカーソルを合わせると表示されます。
性能比較を見てるだけでたのしいですね。
ダウンロード・解凍が完了すると、checkpoint、saved_model、pipline.configを含むフォルダが展開されます。
6.pipeline config(モデルの構成情報)を読み込んで、モデルをビルドする
#構成情報ファイルのパス。リポジトリにConfigファイルの揃ったフォルダがあるけど、微妙にモデル名が省略されていたりするので、ダウンロードしたものの方が確実?
pipeline_config = "./centernet_hg104_512x512_coco17_tpu-8/pipeline.config"
#チェックポイントのパス
model_dir = "./centernet_hg104_512x512_coco17_tpu-8/checkpoint"

#モデル構成情報読み込み
configs = config_util.get_configs_from_pipeline_file(pipeline_config)
model_config = configs['model']

#読み込んだ構成情報でモデルをビルド
detection_model = model_builder.build(
      model_config=model_config, is_training=False)

#チェックポイントから重みを復元
ckpt = tf.compat.v2.train.Checkpoint(model=detection_model)
ckpt.restore(os.path.join(model_dir, 'ckpt-0')).expect_partial()
7.モデルによる推論関数を準備
def get_model_detection_function(model):
  """Get a tf.function for detection."""

  @tf.function
  def detect_fn(image):
    """Detect objects in image."""

    image, shapes = model.preprocess(image)
    prediction_dict = model.predict(image, shapes)
    detections = model.postprocess(prediction_dict, shapes)

    return detections, prediction_dict, tf.reshape(shapes, [-1])

  return detect_fn

detect_fn = get_model_detection_function(detection_model)
8.ラベルを準備
物体検出の推論ではモデルをトレーニングをした物体ラベルが必要です。
ラベルは公式リポジトリの models/research/object_detection/data/ にあります。今回のモデルはCocoデータセットでトレーニングされているので、 mscoco_label_map.pbtxt を使います。label_map_path = './models/research/object_detection/data/mscoco_label_map.pbtxt' label_map = label_map_util.load_labelmap(label_map_path) categories = label_map_util.convert_label_map_to_categories( label_map, max_num_classes=label_map_util.get_max_label_map_index(label_map), use_display_name=True) category_index = label_map_util.create_category_index(categories) label_map_dict = label_map_util.get_label_map_dict(label_map, use_display_name=True)9.用意した画像で物体検出の実行
Colabに好きな画像をアップロードして、image_pathにそのパスを指定します。
ちなみに、アルファチャネル付きの画像は3チャネルに直してから実行する必要があるっぽいです。image_dir = 'models/research/object_detection/test_images/' image_path = os.path.join(image_dir, 'image2.jpg') image_np = load_image_into_numpy_array(image_path) # Things to try: # Flip horizontally # image_np = np.fliplr(image_np).copy() # Convert image to grayscale # image_np = np.tile( # np.mean(image_np, 2, keepdims=True), (1, 1, 3)).astype(np.uint8) input_tensor = tf.convert_to_tensor( np.expand_dims(image_np, 0), dtype=tf.float32) detections, predictions_dict, shapes = detect_fn(input_tensor) label_id_offset = 1 image_np_with_detections = image_np.copy() # Use keypoints if available in detections keypoints, keypoint_scores = None, None if 'detection_keypoints' in detections: keypoints = detections['detection_keypoints'][0].numpy() keypoint_scores = detections['detection_keypoint_scores'][0].numpy() viz_utils.visualize_boxes_and_labels_on_image_array( image_np_with_detections, detections['detection_boxes'][0].numpy(), (detections['detection_classes'][0].numpy() + label_id_offset).astype(int), detections['detection_scores'][0].numpy(), category_index, use_normalized_coordinates=True, max_boxes_to_draw=200, min_score_thresh=.30, agnostic_mode=False, keypoints=keypoints, keypoint_scores=keypoint_scores, keypoint_edges=get_keypoint_tuples(configs['eval_config'])) plt.figure(figsize=(12,16)) plt.imshow(image_np_with_detections) plt.show()
ボックス、ラベル、信頼度が表示されます。
?
お仕事のご相談こちらまで
rockyshikoku@gmail.comCore MLを使ったアプリを作っています。
機械学習関連の情報を発信しています。
- 投稿日:2020-11-21T03:17:53+09:00
[TensorFlow]"ValueError: tf.function-decorated function tried to create variables on non-first call"を解決する
OptimizerやModelを入力とするtf.functionが"tried to create variables on non-first call"で死ぬ
最初のモデルコール(build)以外で変数を宣言したつもりなんてなかったとおもっていたら思わぬトラップにかかったので備忘録
前提
TensorFlow2(筆者は2.5 nightlyで確認)
tf.function内でのtf.Variableの作成は禁止
- tf.functionは基本的に一度確保したら同じメモリ領域で動作する。
- tf.Variableは新しいメモリ領域を確保して変数を生成する。
- したがって毎回新しいVariableを生成すると毎回新しいメモリを食ってしまうのでエラーがおきる。
@tf.function
def f(x):
  v = tf.Variable(1.0)
  v.assign_add(x)
  return v

with assert_raises(ValueError):
  f(1.0)
Caught expected exception <class 'ValueError'>: in user code: <ipython-input-17-73e410646579>:3 f * v = tf.Variable(1.0) /tmpfs/src/tf_docs_env/lib/python3.6/site-packages/tensorflow/python/ops/variables.py:262 __call__ ** return cls._variable_v2_call(*args, **kwargs) /tmpfs/src/tf_docs_env/lib/python3.6/site-packages/tensorflow/python/ops/variables.py:256 _variable_v2_call shape=shape) /tmpfs/src/tf_docs_env/lib/python3.6/site-packages/tensorflow/python/ops/variables.py:67 getter return captured_getter(captured_previous, **kwargs) /tmpfs/src/tf_docs_env/lib/python3.6/site-packages/tensorflow/python/eager/def_function.py:702 invalid_creator_scope "tf.function-decorated function tried to create "単なるpython変数の宣言ならよい。関数を呼び出すたびに同じメモリ領域をリサイクルして使われるので。
@tf.function
def f(x):
    v = tf.ones((5, 5), dtype=tf.float32)
    return v
# raises no error!
本題
tf.keras.models.Modelを入力としたtf.functionは思わぬエラーを引き起こす。
@tf.function
def call(model1: tf.keras.models.Model, inputs: tf.Tensor):
    return model1(inputs)


if __name__ == '__main__':
    model1 = tf.keras.Sequential([
        tf.keras.layers.Dense(16),
        tf.keras.layers.Dense(4)

    ])
    model2 = tf.keras.Sequential([
        tf.keras.layers.Dense(16),
        tf.keras.layers.Dense(4)
    ])
    inputs = tf.ones((10, 10), dtype=tf.float32)
    call(model1, inputs)  # raises no error!
    call(model2, inputs)  # raises an error! "tf.function-decorated function tried to create variables on non-first call"
ポイントはkerasのモデルは一番最初にコールされたときに重み行列などのVariableをbuildすること。
よってこのcall関数にビルドされていない2つのモデルを引数として渡すと2度めの呼び出し時に2つめのモデルの重みをビルドしようとして事故る!!解決策
# @tf.functionは直接つけない
def call(model1: tf.keras.models.Model, inputs: tf.Tensor):
    return model1(inputs)


if __name__ == '__main__':
    model1 = tf.keras.Sequential([
        tf.keras.layers.Dense(16),
        tf.keras.layers.Dense(4)

    ])
    model2 = tf.keras.Sequential([
        tf.keras.layers.Dense(16),
        tf.keras.layers.Dense(4)
    ])
    inputs = tf.ones((10, 10), dtype=tf.float32)
    # pythonでは関数もオブジェクト。それぞれのモデル専用の関数を生成する。
    model1_call = tf.function(call)
    model2_call = tf.function(call)
    model1_call(model1, inputs)
    model2_call(model2, inputs)
tf.functionは関数の定義に直接書くのをやめて各モデル専用の関数オブジェクトを生成する。デコレータとか高階関数とかってメタプログラミング的な概念はpython初心者には難しいので理由を深追いしないのが大事。
これでいける理由を知りたい人はpython デコレータ 高階関数などでぐぐるとよいとおもわれる。
まとめ
Eager ExecutionはGPU上で複雑かつstep数の多いアルゴリズムを書く場合はおそすぎて話にならないので計算効率を追求するためにtf.functionを使いたいところだがまだTF2がリリースされて間もないことやtf.functionがブラックボックスすぎることが原因で意味不明なバグに躓きがち。
今後もtf2まわりやdeeplearningまわりの知見をたくさん蓄積していくのでLGTMとフォローをお願いします!