- 投稿日:2020-11-20T19:19:36+09:00
ConstraintLayout に新しく追加された Carousel を使ってみた
ConstraintLayout 2.1.0-alpha1 に Carousel というものが導入されたので、何ができるのかとどのように使うのかを書いていきます。
(Carousel は alpha1 で入ったばかりの仕組みなので、大きく変更されることがあり得ます)Carousel の仕組み
過去に似たような実装をしたときに書いていますが、ベースのなる状態と左右に動かした状態の 3 パターンを用意しておき、アニメーションでスワイプの動きをして中身を動かしているように見せるという方法になっています。
https://qiita.com/Nabe1216/items/0ca12aa377fc7687c9c0
基本的な実装
仕組みでもあるとおり、ベースとなる状態と左右に動かした時の 3 パターンの状態を定義し、それらをアニメーションさせる感じになります。
まずは MotionLayout で使う View の定義をします。
コード
<androidx.constraintlayout.motion.widget.MotionLayout
        android:id="@+id/motionLayout"
        android:layout_width="match_parent"
        android:layout_height="match_parent"
        app:layoutDescription="@xml/carousel_scene">

        <TextView
            android:id="@+id/textView0"
            android:layout_width="100dp"
            android:layout_height="100dp"
            android:layout_marginEnd="16dp"
            android:text="textView0"
            app:layout_constraintBottom_toBottomOf="parent"
            app:layout_constraintEnd_toStartOf="@+id/textView1"
            app:layout_constraintTop_toTopOf="parent" />

        <TextView
            android:id="@+id/textView1"
            android:layout_width="100dp"
            android:layout_height="100dp"
            android:layout_marginEnd="16dp"
            android:text="textView1"
            app:layout_constraintBottom_toBottomOf="parent"
            app:layout_constraintEnd_toStartOf="@+id/textView2"
            app:layout_constraintTop_toTopOf="parent" />

        <TextView
            android:id="@+id/textView2"
            android:layout_width="150dp"
            android:layout_height="150dp"
            android:text="textView2"
            app:layout_constraintBottom_toBottomOf="parent"
            app:layout_constraintEnd_toEndOf="parent"
            app:layout_constraintHorizontal_bias="0.5"
            app:layout_constraintStart_toStartOf="parent"
            app:layout_constraintTop_toTopOf="parent" />

        <TextView
            android:id="@+id/textView3"
            android:layout_width="100dp"
            android:layout_height="100dp"
            android:layout_marginStart="16dp"
            android:text="textView3"
            app:layout_constraintBottom_toBottomOf="parent"
            app:layout_constraintStart_toEndOf="@+id/textView2"
            app:layout_constraintTop_toTopOf="parent" />

        <TextView
            android:id="@+id/textView4"
            android:layout_width="100dp"
            android:layout_height="100dp"
            android:layout_marginStart="16dp"
            android:text="textView4"
            app:layout_constraintBottom_toBottomOf="parent"
            app:layout_constraintStart_toEndOf="@+id/textView3"
            app:layout_constraintTop_toTopOf="parent" />

        <androidx.constraintlayout.widget.Guideline
            android:id="@+id/guideline"
            android:layout_width="wrap_content"
            android:layout_height="wrap_content"
            android:orientation="vertical"
            app:layout_constraintGuide_begin="100dp" />

        <androidx.constraintlayout.widget.Guideline
            android:id="@+id/guideline2"
            android:layout_width="wrap_content"
            android:layout_height="wrap_content"
            android:orientation="vertical"
            app:layout_constraintGuide_end="100dp" />

    </androidx.constraintlayout.motion.widget.MotionLayout>
今回は 4 つの TextView を並べています。
4 つの理由は今回のレイアウトの場合は 4 つまで Carousel のアイテムが一度に表示されるためです。次に MotionScene の定義をします。
コード
<?xml version="1.0" encoding="utf-8"?>
<MotionScene xmlns:android="http://schemas.android.com/apk/res/android"
    xmlns:motion="http://schemas.android.com/apk/res-auto">

    <Transition
        android:id="@+id/forward"
        motion:constraintSetEnd="@+id/next"
        motion:constraintSetStart="@id/base_state">
        <OnSwipe
            motion:dragDirection="dragLeft"
            motion:touchAnchorSide="left" />
    </Transition>

    <Transition
        android:id="@+id/backward"
        motion:constraintSetEnd="@+id/previous"
        motion:constraintSetStart="@+id/base_state">
        <OnSwipe
            motion:dragDirection="dragRight"
            motion:touchAnchorSide="right" />
    </Transition>

    <!-- ベースとなるViewの状態を定義する -->
    <ConstraintSet android:id="@+id/base_state">
        <Constraint
            android:id="@+id/textView1"
            android:layout_width="100dp"
            android:layout_height="100dp"
            android:layout_marginEnd="16dp"
            motion:layout_constraintBottom_toBottomOf="parent"
            motion:layout_constraintEnd_toStartOf="@id/guideline"
            motion:layout_constraintTop_toTopOf="parent" />
        <Constraint
            android:id="@+id/textView2"
            android:layout_width="0dp"
            android:layout_height="0dp"
            android:layout_marginStart="16dp"
            android:layout_marginLeft="16dp"
            android:layout_marginTop="16dp"
            android:layout_marginEnd="16dp"
            android:layout_marginRight="16dp"
            android:layout_marginBottom="16dp"
            motion:layout_constraintBottom_toBottomOf="parent"
            motion:layout_constraintDimensionRatio="w,1:1"
            motion:layout_constraintEnd_toEndOf="@id/guideline2"
            motion:layout_constraintHorizontal_bias="0.5"
            motion:layout_constraintStart_toStartOf="@id/guideline"
            motion:layout_constraintTop_toTopOf="parent" />
        <Constraint
            android:id="@+id/textView3"
            android:layout_width="100dp"
            android:layout_height="100dp"
            android:layout_marginStart="16dp"
            motion:layout_constraintBottom_toBottomOf="parent"
            motion:layout_constraintStart_toEndOf="@id/guideline2"
            motion:layout_constraintTop_toTopOf="parent" />
    </ConstraintSet>

    <!-- 左へスワイプした時のViewの状態を定義する -->
    <ConstraintSet android:id="@+id/next">
        <Constraint
            android:id="@+id/textView2"
            android:layout_width="100dp"
            android:layout_height="100dp"
            android:layout_marginEnd="16dp"
            android:layout_marginRight="16dp"
            motion:layout_constraintBottom_toBottomOf="parent"
            motion:layout_constraintEnd_toStartOf="@id/guideline"
            motion:layout_constraintTop_toTopOf="parent" />
        <Constraint
            android:id="@+id/textView3"
            android:layout_width="0dp"
            android:layout_height="0dp"
            android:layout_marginStart="16dp"
            android:layout_marginTop="16dp"
            android:layout_marginEnd="16dp"
            android:layout_marginBottom="16dp"
            motion:layout_constraintBottom_toBottomOf="parent"
            motion:layout_constraintDimensionRatio="1:1"
            motion:layout_constraintEnd_toStartOf="@id/guideline2"
            motion:layout_constraintStart_toEndOf="@id/guideline"
            motion:layout_constraintTop_toTopOf="parent" />
        <Constraint
            android:id="@+id/textView4"
            android:layout_width="100dp"
            android:layout_height="100dp"
            android:layout_marginStart="16dp"
            android:layout_marginLeft="16dp"
            motion:layout_constraintBottom_toBottomOf="parent"
            motion:layout_constraintStart_toEndOf="@id/guideline2"
            motion:layout_constraintTop_toTopOf="parent" />
    </ConstraintSet>

    <!-- 右へスワイプした時のViewの状態を定義する -->
    <ConstraintSet android:id="@+id/previous">
        <Constraint
            android:id="@+id/textView2"
            android:layout_width="100dp"
            android:layout_height="100dp"
            android:layout_marginStart="16dp"
            android:layout_marginTop="16dp"
            android:layout_marginBottom="16dp"
            motion:layout_constraintBottom_toBottomOf="parent"
            motion:layout_constraintStart_toStartOf="@id/guideline2"
            motion:layout_constraintTop_toTopOf="parent" />
        <Constraint
            android:id="@+id/textView3"
            android:layout_width="100dp"
            android:layout_height="100dp"
            android:layout_marginStart="16dp"
            motion:layout_constraintBottom_toBottomOf="parent"
            motion:layout_constraintStart_toEndOf="@+id/textView2"
            motion:layout_constraintTop_toTopOf="parent" />
        <Constraint
            android:id="@+id/textView1"
            android:layout_width="0dp"
            android:layout_height="0dp"
            android:layout_marginStart="16dp"
            android:layout_marginTop="16dp"
            android:layout_marginEnd="16dp"
            android:layout_marginBottom="16dp"
            motion:layout_constraintBottom_toBottomOf="parent"
            motion:layout_constraintDimensionRatio="1:1"
            motion:layout_constraintEnd_toStartOf="@id/guideline2"
            motion:layout_constraintStart_toEndOf="@id/guideline"
            motion:layout_constraintTop_toTopOf="parent" />
        <Constraint
            android:id="@+id/textView0"
            android:layout_width="100dp"
            android:layout_height="100dp"
            android:layout_marginEnd="16dp"
            motion:layout_constraintBottom_toBottomOf="parent"
            motion:layout_constraintEnd_toStartOf="@id/guideline"
            motion:layout_constraintTop_toTopOf="parent" />
    </ConstraintSet>
</MotionScene>
少し長いですが、3 パターンの View の状態を定義して、それらをアニメーションできるように
Transitionを設定しています。ここまでが準備で、ようやく本題の
Carouselの実装になります。
MotionLayoutのなかに以下を追加します。<androidx.constraintlayout.helper.widget.Carousel android:id="@+id/carousel" android:layout_width="wrap_content" android:layout_height="wrap_content" app:carousel_backwardTransition="@+id/backward" app:carousel_forwardTransition="@+id/forward" app:carousel_nextState="@+id/next" app:carousel_previousState="@+id/previous" app:carousel_firstView="@+id/textView2" app:constraint_referenced_ids="textView0,textView1,textView2,textView3,textView4" />ここでは
Carouselで使用するパラメータの設定をしています。
carousel_backwardTransition/carousel_forwardTransition
MotionSceneで設定したTransitionを設定し、それを使ってアニメーションさせます。carousel_nextState/carousel_previousState
MotionSceneで設定したConstraintSetを設定します。carousel_firstView
Carouselで真ん中に表示される View を指定します。
Carouselの定義が終わりましたが、これだけではなくコードでの設定も必要になります。val carousel = findViewById<Carousel>(R.id.carousel) carousel.setAdapter(object : Carousel.Adapter { override fun count(): Int = list.size override fun populate(view: View, index: Int) { if (view !is TextView) return val item = list[index] view.text = item.text } override fun onNewItem(index: Int) { } })
Carousel.Adapterというものがあり、これを使って Carousel の表示処理を行います。
Carousel のアイテムを追加・削除する
val carousel = findViewById<Carousel>(R.id.carousel)

mutableList.add(Hoge())
carousel.refresh()

mutableList.clear()
carousel.refresh()
Carousel.Adapterで使用しているリストを操作した後にCarousel#refreshを呼ぶと Carousel が更新されます。
また、
app:carousel_emptyViewsBehavior="invisible/gone"
をCarouselに定義することでアイテムが空の時のCarouselの表示状態を指定することができます。
Carousel の仕組み全体を提供するという感じではなく、 シンプルに
MotionLayoutを使っただけではできなかった Carousel とモデルのマッピングや、細かな表示制御のロジックを提供してくれている感じでした。リンク
- 投稿日:2020-11-20T17:07:43+09:00
Android studio:Kotlin:画面遷移
ファイル→新規→アクティビティ→からのアクティビティを作る。
Activity NameをSecondActivityなど適当につけ、中身を作る。
MainActivity.ktにまず以下をインポート
MainActivity.ktimport android.content.Intent import android.view.Viewなにかボタンを押したときに遷移する場合は以下のように記載。
場所はclass MainActivity : AppCompatActivity() { の中で override fun onCreate(savedInstanceState: Bundle?) の外。MainActivity.ktclass MainActivity : AppCompatActivity() { override fun onCreate(savedInstanceState: Bundle?){ ///いろいろー } // 実行ボタンタップ時 fun Button_Tap(view: View?){ val intent = Intent(this, SecondActivity::class.java) startActivity(intent) } }ボタンのOnClickに「Button_Tap」を紐付けする。
- 投稿日:2020-11-20T04:08:04+09:00
HELP!!【Kotlin】 端末起動時にレシーバーで受けて処理が出来ない。。教えてください。
かれこれ相当な時間を要したが、未だに解決出来ず助けて欲しいです。。。
やりたいこと: 端末起動時にアプリからローカル通知を設定し直す
Android端末は再起動すると、
セットしてたAlarmManagerの処理は揮発しちゃうんですよね。。そこで下記記事を見ていろいろやっては見たのですが
Android の AlarmManager を改めて整理してみる
does Alarm Manager persist even after reboot?アプリ起動時にレシーバーで受けるところがそもそも出来ていない様です
(レシーバーでトースト表示しにかかってますが一向に反応なし。。)プロジェクト作りなおして、端末再起動時のレシーバーでの取得部分のみ最小限でやってみたのが下記です。
AndroidManifest.xml<?xml version="1.0" encoding="utf-8"?> <manifest xmlns:android="http://schemas.android.com/apk/res/android" package="com.example.myapplication"> <uses-permission android:name="android.permission.ACTION_BOOT_COMPLETED"/> <application android:allowBackup="true" android:icon="@mipmap/ic_launcher" android:label="@string/app_name" android:roundIcon="@mipmap/ic_launcher_round" android:supportsRtl="true" android:theme="@style/AppTheme"> <activity android:name=".MainActivity" android:label="@string/app_name" android:theme="@style/AppTheme.NoActionBar"> <intent-filter> <action android:name="android.intent.action.MAIN" /> <category android:name="android.intent.category.LAUNCHER" /> </intent-filter> </activity> <receiver android:name=".BootCompletedReceiver" android:enabled="true" android:exported="false" android:process=""> <intent-filter> <action android:name="android.intent.action.BOOT_COMPLETED" /> <category android:name="android.intent.category.DEFAULT" /> </intent-filter> </receiver> </application> </manifest>BootCompletedReceiver.ktpackage com.example.myapplication import android.annotation.SuppressLint import android.content.BroadcastReceiver import android.content.Context import android.content.Intent import android.widget.Toast class BootCompletedReceiver : BroadcastReceiver() { @SuppressLint("SimpleDateFormat") override fun onReceive(context: Context, intent: Intent) { if (intent.action == "android.intent.action.BOOT_COMPLETED") { // 確認用 val toast: Toast = Toast.makeText(context, "yes", Toast.LENGTH_LONG) toast.show() Intent(context, MainActivity::class.java).apply { flags = Intent.FLAG_ACTIVITY_NEW_TASK context?.startActivity(this) } } } }これで実機で再起動したり、
こちらの記事再起動をadbコマンドで実行する
を参考にしてエミュレーターにたいして下記コマンド使ってトーストが出てくるのを期待するもいっこうに反応がありません。# am broadcast -a android.intent.action.ACTION_BOOT_COMPLETED結構時間費やしたのですが万作尽きた感じです。。情けない。
誰か助けて下さい。以上、宜しくお願い致します。
- 投稿日:2020-11-20T04:08:04+09:00
HELP!!⇒動いたなう【Kotlin】 端末起動時にレシーバーで受けて処理が出来ない。。教えてください。
かれこれ相当な時間を要したが、未だに解決出来ず助けて欲しいです。。。
やりたいこと: 端末起動時にアプリからローカル通知を設定し直す
Android端末は再起動すると、
セットしてたAlarmManagerの処理は揮発しちゃうんですよね。。そこで下記記事を見ていろいろやっては見たのですが
Android の AlarmManager を改めて整理してみる
does Alarm Manager persist even after reboot?アプリ起動時にレシーバーで受けるところがそもそも出来ていない様です
(レシーバーでトースト表示しにかかってますが一向に反応なし。。)プロジェクト作りなおして、端末再起動時のレシーバーでの取得部分のみ最小限でやってみたのが下記です。
AndroidManifest.xml<?xml version="1.0" encoding="utf-8"?> <manifest xmlns:android="http://schemas.android.com/apk/res/android" package="com.example.myapplication"> <uses-permission android:name="android.permission.ACTION_BOOT_COMPLETED"/> <application android:allowBackup="true" android:icon="@mipmap/ic_launcher" android:label="@string/app_name" android:roundIcon="@mipmap/ic_launcher_round" android:supportsRtl="true" android:theme="@style/AppTheme"> <activity android:name=".MainActivity" android:label="@string/app_name" android:theme="@style/AppTheme.NoActionBar"> <intent-filter> <action android:name="android.intent.action.MAIN" /> <category android:name="android.intent.category.LAUNCHER" /> </intent-filter> </activity> <receiver android:name=".BootCompletedReceiver" android:enabled="true" android:exported="false" android:process=""> <intent-filter> <action android:name="android.intent.action.BOOT_COMPLETED" /> <category android:name="android.intent.category.DEFAULT" /> </intent-filter> </receiver> </application> </manifest>BootCompletedReceiver.ktpackage com.example.myapplication import android.annotation.SuppressLint import android.content.BroadcastReceiver import android.content.Context import android.content.Intent import android.widget.Toast class BootCompletedReceiver : BroadcastReceiver() { @SuppressLint("SimpleDateFormat") override fun onReceive(context: Context, intent: Intent) { if (intent.action == "android.intent.action.BOOT_COMPLETED") { // 確認用 val toast: Toast = Toast.makeText(context, "yes", Toast.LENGTH_LONG) toast.show() Intent(context, MainActivity::class.java).apply { flags = Intent.FLAG_ACTIVITY_NEW_TASK context?.startActivity(this) } } } }これで実機で再起動したり、
こちらの記事再起動をadbコマンドで実行する
を参考にしてエミュレーターにたいして下記コマンド使ってトーストが出てくるのを期待するもいっこうに反応がありません。# am broadcast -a android.intent.action.ACTION_BOOT_COMPLETED結構時間費やしたのですが万作尽きた感じです。。情けない。
誰か助けて下さい。以上、宜しくお願い致します。
- 投稿日:2020-11-20T03:17:33+09:00
Gradle の Source Dependencies で Android Library を参照したら、ビルド不能になった
gradle の Source Dependencies 機能を使うと git の gradle プロジェクトをソースコードのまま参照出来て便利です。しかし、Android Library をソースコード参照したところ、ビルドが全くできなくなりました。
./gradlew assembleしても、参照先の build.gradle のタスクが一切走りません。結果として、必要なクラスが一切見つからない状態となってしまいます。どうもエラーが内部で握りつぶされているようで、--info や --stacktrace オプションを付けても原因がまったく分かりません。
調査に挫折しかけたのですが、なにかの条件(再現できない…)で偶然
SDK location not found.のエラーメッセージが流れてきたため、原因が分かりました。参照先の Android Library プロジェクトで ANDROID SDK のパスが見つからず、 Android Plugin が初期化できずに終了していたのです。解決方法
環境変数 ANDROID_SDK_ROOT に Android SDK のパスをセットしてから、ビルドすることで解決しました。
よもやま
Flutter Plugin の開発時に sourceControl を使っていたため、非常に分かりにくいことになっていました。 Flutter の場合、flutter run 時に、local.properties ファイルに ANDROID SDK のパスを自動で出力してくれるのです。が、 Source Dependencies で参照したプロジェクトからは local.properties 内容は当然見えないため、SDK が見つからない、という状態になってしまうようです。
- 投稿日:2020-11-20T00:03:56+09:00
Flutterチュートリアルを咀嚼する part1 -FlutterはWidgetまみれ-
Flutterって一つのソースを書くだけでiOSもAndroidもアプリ作ってくれるんだって
すごいなー
勉強してみよう対象のチュートリアル
https://codelabs.developers.google.com/codelabs/first-flutter-app-pt1#0
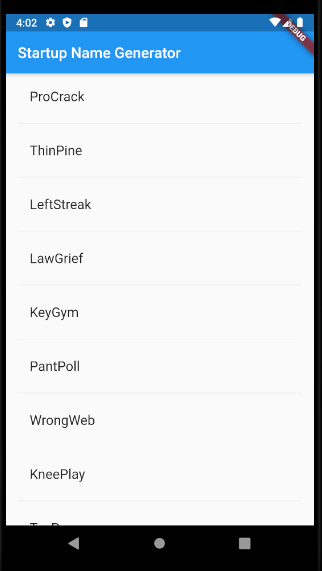
コピペしてできあがったもの
スタートアップ企業の名前をつけてあげるために単語二つの組み合わせをリスト化してくれるアプリ
ソースコード
main.dartimport 'package:flutter/material.dart'; import 'package:english_words/english_words.dart'; void main() => runApp(MyApp()); class MyApp extends StatelessWidget { @override Widget build(BuildContext context) { return MaterialApp( title: 'Startup Name Generator', home: RandomWords(), ); } } class RandomWords extends StatefulWidget { @override _RandomWordsState createState() => _RandomWordsState(); } class _RandomWordsState extends State<RandomWords> { final _suggestions = <WordPair>[]; final _biggerFont = TextStyle(fontSize: 18.0); @override Widget build(BuildContext context) { return Scaffold( appBar: AppBar( title: Text('Startup Name Generator'), ), body: _buildSuggestions(), ); } Widget _buildSuggestions() { return ListView.builder( padding: EdgeInsets.all(16.0), itemBuilder: /*1*/ (context, i) { if (i.isOdd) return Divider(); /*2*/ final index = i ~/ 2; /*3*/ if (index >= _suggestions.length) { _suggestions.addAll(generateWordPairs().take(10)); /*4*/ } return _buildRow(_suggestions[index]); }); } Widget _buildRow(WordPair pair) { return ListTile( title: Text( pair.asPascalCase, style: _biggerFont, ), ); } }順々にみていこう
import
import 'package:flutter/material.dart';
import 'package:english_words/english_words.dart';
package:flutter/material.dart
これがないと始まらないっぽい
Flutterアプリの主役たちクラス
Widget
https://api.flutter.dev/flutter/widgets/Widget-class.html
Flutterフレームワークの中心的なクラス
FlutterではほとんどのものがWidget
Widget単位でアプリが構築されていくStatelessWidget
https://api.flutter.dev/flutter/widgets/StatelessWidget-class.html
State(状態)を持たないWidget
不変(immutable)であり静的(static)
親のWidgetから引数を与えてあげることで描画される
反対はStatefulWidget※参考
https://tech-rise.net/difference-between-stateless-widget-and-stateful-widgetStatefulWidget
https://api.flutter.dev/flutter/widgets/StatefulWidget-class.html
チュートリアルの中で
Implementing a stateful widget requires at least two classes: 1) a StatefulWidget class that creates an instance of 2) a State class.
とあるように、statefulなWidgetを作るためには、②Stateクラスのインスタンスを生成する①StatefulWidgetクラスを用意する必要がある。
要はStateクラスとセットということらしい。State
https://api.flutter.dev/flutter/widgets/State-class.html
StatefulWidgetとセットになるもの。
StatefulWidgetの中でインスタンス化される。
StatefulWidgetのロジックはここで実装する。
Stateクラスの名前の頭には_(アンダーバー)をつける。BuildContext
https://api.flutter.dev/flutter/widgets/BuildContext-class.html
※参考
https://qiita.com/agajo/items/93d75aafe87bdc7b2026
https://itome.team/blog/2019/12/flutter-advent-calendar-day6/MaterialApp
https://api.flutter.dev/flutter/material/MaterialApp-class.html
マテリアルデザインアプリケーションに一般的に必要とされる多くのウィジェットをラップする便利なウィジェット。Scaffold
https://api.flutter.dev/flutter/material/Scaffold-class.html
AppBar
https://api.flutter.dev/flutter/material/AppBar-class.html
Text
https://api.flutter.dev/flutter/dart-html/Text-class.html
ListView
https://api.flutter.dev/flutter/widgets/ListView-class.html
EdgeInsets
https://api.flutter.dev/flutter/painting/EdgeInsets-class.html
Divider
https://api.flutter.dev/flutter/material/Divider-class.html
関数
runApp()
https://api.flutter.dev/flutter/widgets/runApp.html
指定されたウィジェットを膨らませて、画面に添付する。メソッド
build()
https://api.flutter.dev/flutter/dart-ui/ParagraphBuilder/build.html
Widgetの主なお仕事の一つ
Widgetをどんな内容で描画するかを決定するあたりが内包されているライブラリ
これを覚えていくことがはじめの一歩なんでしょうpackage:english_words/english_words.dart
チュートリアルの中で追加したライブラリ
よく使われる英単語を提供してくれるWordPair
generateWordPairs
main()
void main() => runApp(MyApp());実行部はここだけ
runApp()関数で引数のクラス(MyApp())を膨らませているmain()関数はdartのもの
https://dart.dev/guides/language/language-tour#the-main-function矢印(=>)構文だけど、これと同じ意味
void main() {
  runApp(MyApp());
}
MyAppクラス
class MyApp extends StatelessWidget {
  @override
  Widget build(BuildContext context) {
    return MaterialApp(
      title: 'Startup Name Generator',
      home: RandomWords(),
    );
  }
}
main()に膨らまされるウィジェット
一番大元なのでStatelessWidgetを拡張したクラスである
build()メソッドを使ってMyAppの内容を描画するMaterialAppをreturnしている
MaterialAppではタイトルとホームの内容を設定している
ホームの中身であるRandomWords()は後述RandomWords()
class RandomWords extends StatefulWidget {
  @override
  _RandomWordsState createState() => _RandomWordsState();
}

class _RandomWordsState extends State<RandomWords> {
  final _suggestions = <WordPair>[];
  final _biggerFont = TextStyle(fontSize: 18.0);
  @override
  Widget build(BuildContext context) {
    return Scaffold(
      appBar: AppBar(
        title: Text('Startup Name Generator'),
      ),
      body: _buildSuggestions(),
    );
  }

  Widget _buildSuggestions() {
    return ListView.builder(
        padding: EdgeInsets.all(16.0),
        itemBuilder: /*1*/ (context, i) {
          if (i.isOdd) return Divider(); /*2*/

          final index = i ~/ 2; /*3*/
          if (index >= _suggestions.length) {
            _suggestions.addAll(generateWordPairs().take(10)); /*4*/
          }
          return _buildRow(_suggestions[index]);
        });
  }

  Widget _buildRow(WordPair pair) {
    return ListTile(
      title: Text(
        pair.asPascalCase,
        style: _biggerFont,
      ),
    );
  }
}
大きく分けると
StatefulWidgetのRandomWords
そのStateクラスである_RandomWordsState
がある
チュートリアルが言うにはStatefulWidgetがWidgetそのもので
この中でロジックが記載されているStateクラスをインスタンス化することによってWidgetの内容をstatefulに変更しているとのこと
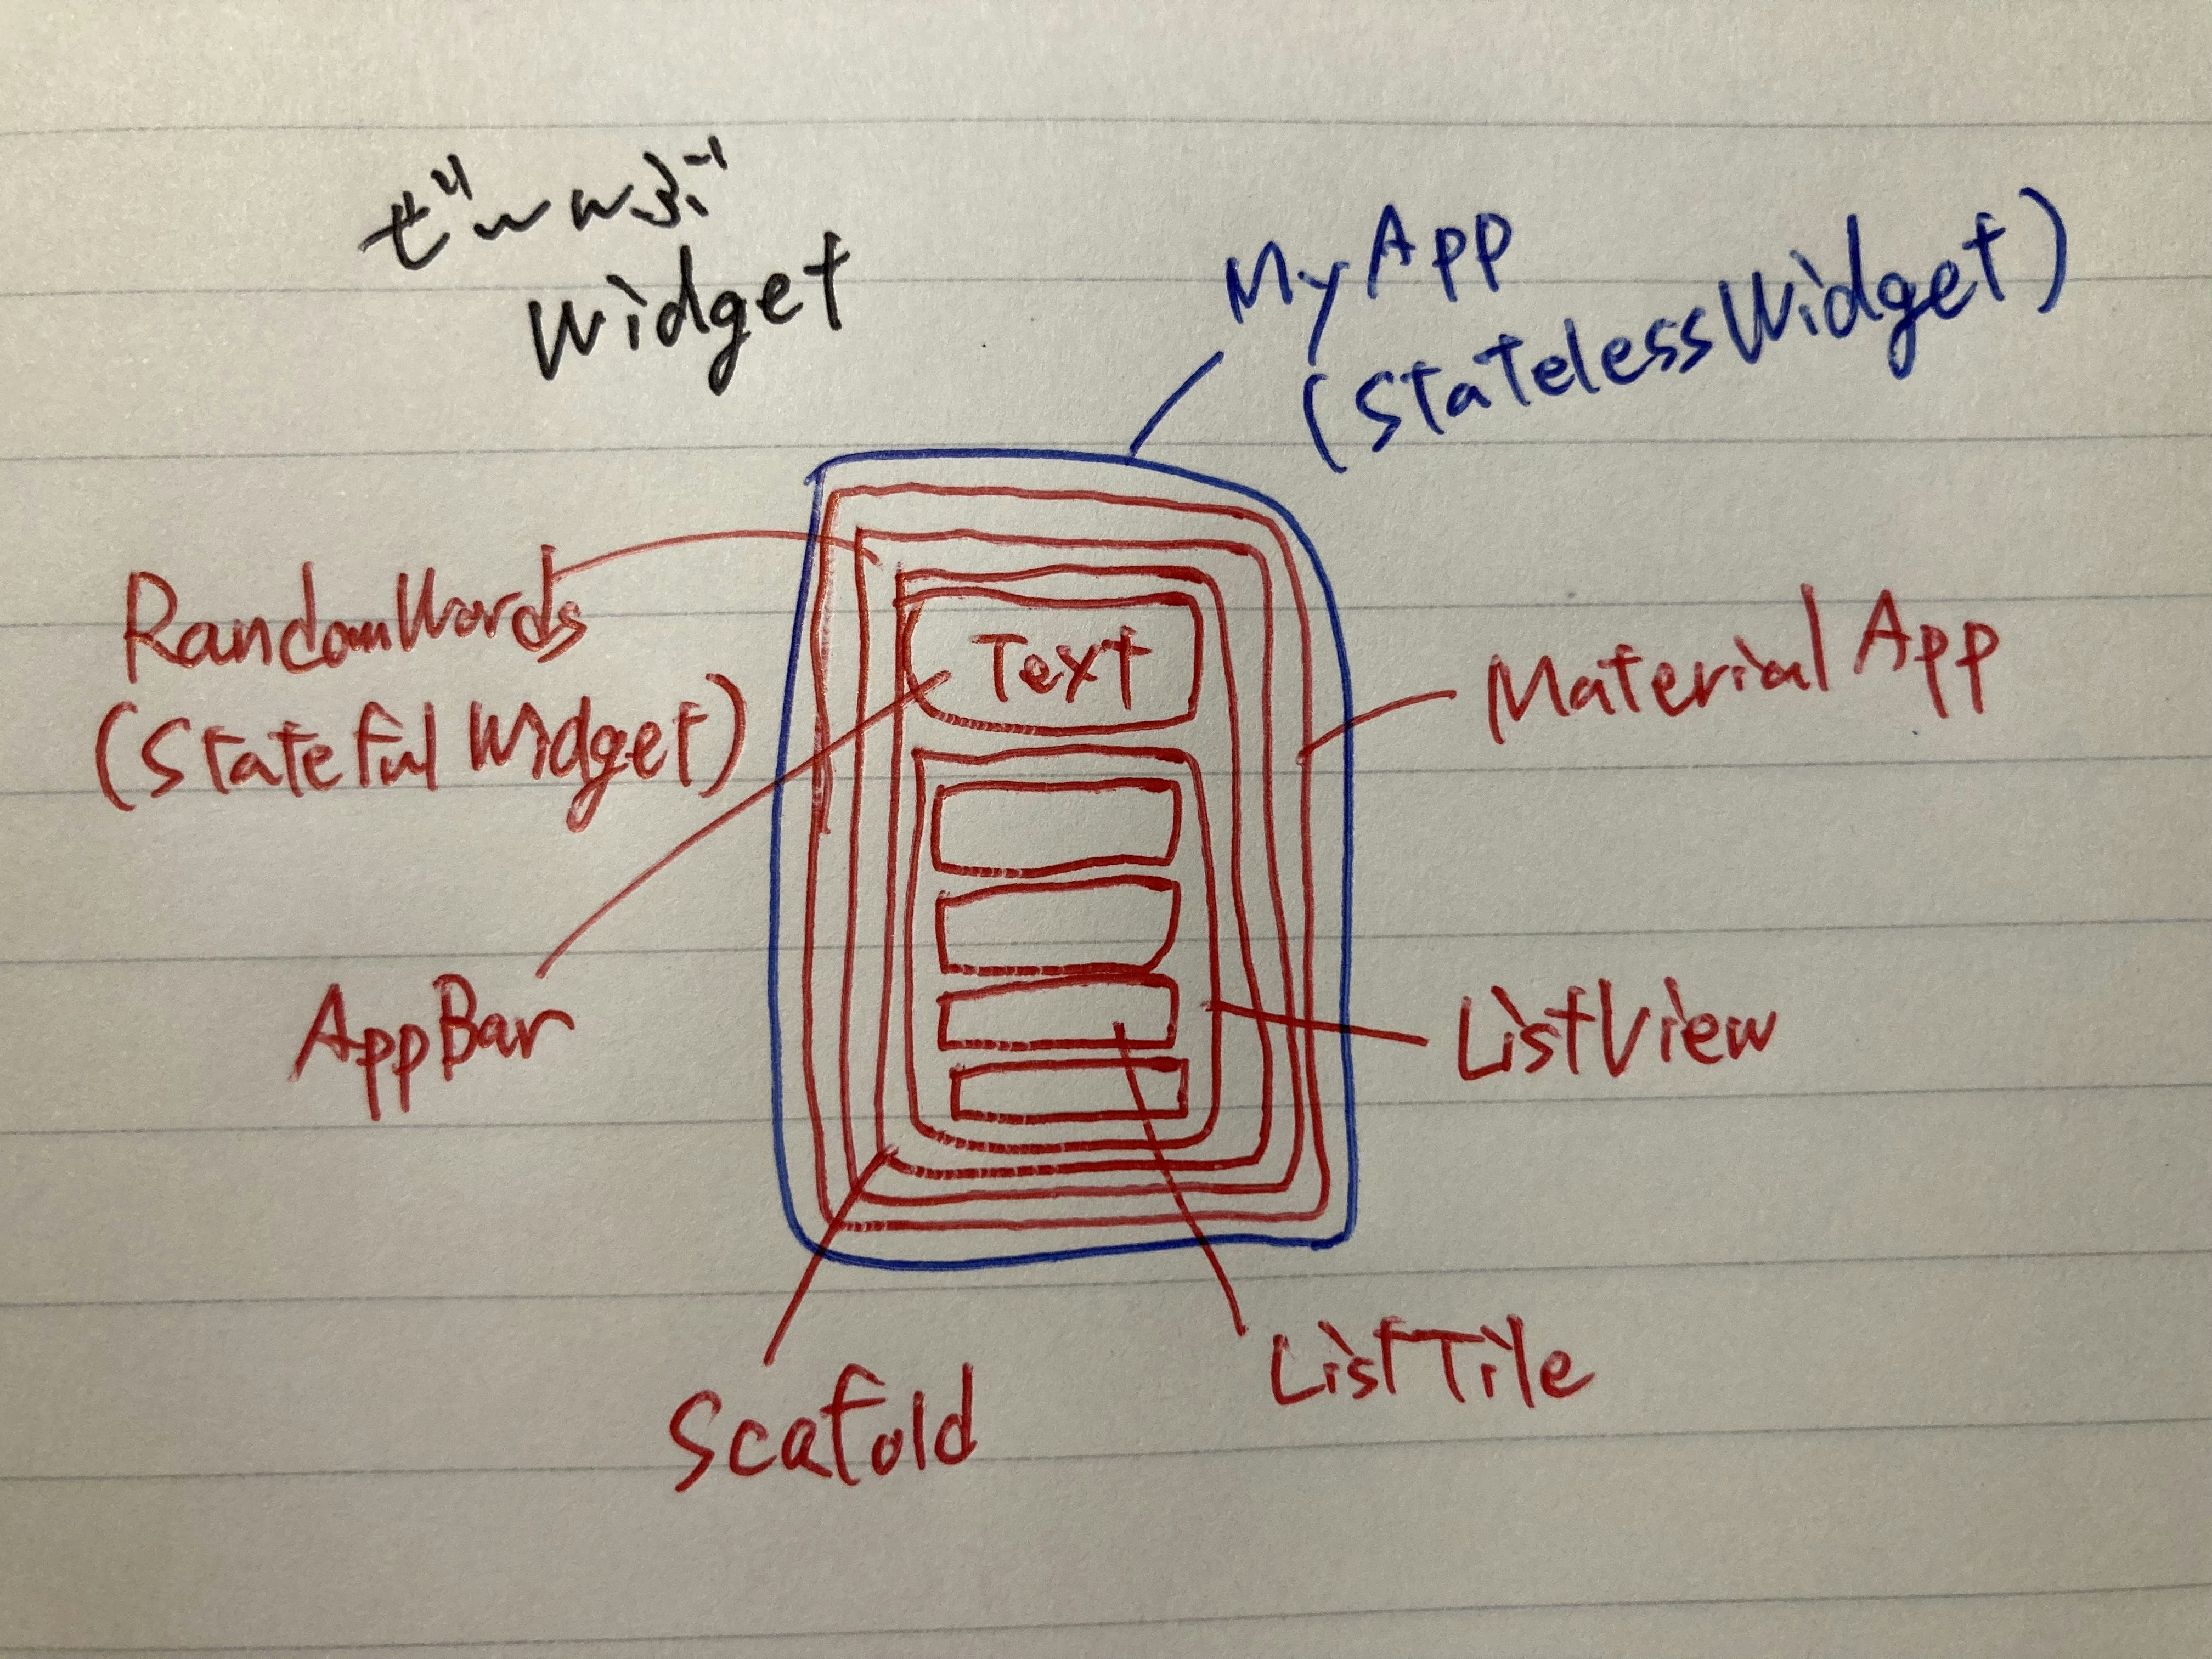
_RandomWordsStateにはランダムな単語の組み合わせを生成し、リスト形式で表示するためのロジックが記載されているFlutterではほとんど全てのものがWidgetとあるようにこのクラスにはたくさんのWidgetがある
Scaffold
AppBar
Text
ListView
ListTileそしてfunctionの戻り値も全てWidgetである
(全部についていて見落としてしまいそうだが頭についてるWidgetは戻り値の型である)
_buildSuggestions():複数行の単語ペアリストを生成する
_buildRow(WordPair pair):1行分の単語ペアリストを生成するスマホのウィジェットを組み合わせてホーム画面をお好みにしていくように
FlutterでもいろんなWidgetを組み合わせてアプリを作っていくようだ
- 投稿日:2020-11-20T00:03:56+09:00
Flutterチュートリアルを咀嚼する part1 (基本
Flutterって一つのソースを書くだけでiOSもAndroidもアプリ作ってくれるんだって
すごいなー
勉強してみよう対象のチュートリアル
https://codelabs.developers.google.com/codelabs/first-flutter-app-pt1#0
コピペしてできあがったもの
スタートアップ企業の名前をつけてあげるために単語二つの組み合わせをリスト化してくれるアプリ
ソースコード
main.dartimport 'package:flutter/material.dart'; import 'package:english_words/english_words.dart'; void main() => runApp(MyApp()); class MyApp extends StatelessWidget { @override Widget build(BuildContext context) { return MaterialApp( title: 'Startup Name Generator', home: RandomWords(), ); } } class RandomWords extends StatefulWidget { @override _RandomWordsState createState() => _RandomWordsState(); } class _RandomWordsState extends State<RandomWords> { final _suggestions = <WordPair>[]; final _biggerFont = TextStyle(fontSize: 18.0); @override Widget build(BuildContext context) { return Scaffold( appBar: AppBar( title: Text('Startup Name Generator'), ), body: _buildSuggestions(), ); } Widget _buildSuggestions() { return ListView.builder( padding: EdgeInsets.all(16.0), itemBuilder: /*1*/ (context, i) { if (i.isOdd) return Divider(); /*2*/ final index = i ~/ 2; /*3*/ if (index >= _suggestions.length) { _suggestions.addAll(generateWordPairs().take(10)); /*4*/ } return _buildRow(_suggestions[index]); }); } Widget _buildRow(WordPair pair) { return ListTile( title: Text( pair.asPascalCase, style: _biggerFont, ), ); } }順々にみていこう
import
import 'package:flutter/material.dart';
import 'package:english_words/english_words.dart';
package:flutter/material.dart
これがないと始まらないっぽい
Flutterアプリの主役たちクラス
Widget
https://api.flutter.dev/flutter/widgets/Widget-class.html
Flutterフレームワークの中心的なクラス
FlutterではほとんどのものがWidget
Widget単位でアプリが構築されていくStatelessWidget
https://api.flutter.dev/flutter/widgets/StatelessWidget-class.html
State(状態)を持たないWidget
不変(immutable)であり静的(static)
親のWidgetから引数を与えてあげることで描画される
反対はStatefulWidget※参考
https://tech-rise.net/difference-between-stateless-widget-and-stateful-widgetStatefulWidget
https://api.flutter.dev/flutter/widgets/StatefulWidget-class.html
チュートリアルの中で
Implementing a stateful widget requires at least two classes: 1) a StatefulWidget class that creates an instance of 2) a State class.
とあるように、statefulなWidgetを作るためには、②Stateクラスのインスタンスを生成する①StatefulWidgetクラスを用意する必要がある。
要はStateクラスとセットということらしい。State
https://api.flutter.dev/flutter/widgets/State-class.html
StatefulWidgetとセットになるもの。
StatefulWidgetの中でインスタンス化される。
StatefulWidgetのロジックはここで実装する。
Stateクラスの名前の頭には_(アンダーバー)をつける。BuildContext
https://api.flutter.dev/flutter/widgets/BuildContext-class.html
※参考
https://qiita.com/agajo/items/93d75aafe87bdc7b2026
https://itome.team/blog/2019/12/flutter-advent-calendar-day6/MaterialApp
https://api.flutter.dev/flutter/material/MaterialApp-class.html
マテリアルデザインアプリケーションに一般的に必要とされる多くのウィジェットをラップする便利なウィジェット。Scaffold
https://api.flutter.dev/flutter/material/Scaffold-class.html
AppBar
https://api.flutter.dev/flutter/material/AppBar-class.html
Text
https://api.flutter.dev/flutter/dart-html/Text-class.html
ListView
https://api.flutter.dev/flutter/widgets/ListView-class.html
EdgeInsets
https://api.flutter.dev/flutter/painting/EdgeInsets-class.html
Divider
https://api.flutter.dev/flutter/material/Divider-class.html
関数
runApp()
https://api.flutter.dev/flutter/widgets/runApp.html
指定されたウィジェットを膨らませて、画面に添付する。メソッド
build()
https://api.flutter.dev/flutter/dart-ui/ParagraphBuilder/build.html
Widgetの主なお仕事の一つ
Widgetをどんな内容で描画するかを決定するあたりが内包されているライブラリ
これを覚えていくことがはじめの一歩なんでしょうpackage:english_words/english_words.dart
チュートリアルの中で追加したライブラリ
よく使われる英単語を提供してくれるWordPair
generateWordPairs
main()
void main() => runApp(MyApp());実行部はここだけ
runApp()関数で引数のクラス(MyApp())を膨らませているmain()関数はdartのもの
https://dart.dev/guides/language/language-tour#the-main-function矢印(=>)構文だけど、これと同じ意味
void main() {
  runApp(MyApp());
}
MyAppクラス
class MyApp extends StatelessWidget {
  @override
  Widget build(BuildContext context) {
    return MaterialApp(
      title: 'Startup Name Generator',
      home: RandomWords(),
    );
  }
}
main()に膨らまされるウィジェット
一番大元なのでStatelessWidgetを拡張したクラスである
build()メソッドを使ってMyAppの内容を描画するMaterialAppをreturnしている
MaterialAppではタイトルとホームの内容を設定している
ホームの中身であるRandomWords()は後述RandomWords()
class RandomWords extends StatefulWidget {
  @override
  _RandomWordsState createState() => _RandomWordsState();
}

class _RandomWordsState extends State<RandomWords> {
  final _suggestions = <WordPair>[];
  final _biggerFont = TextStyle(fontSize: 18.0);
  @override
  Widget build(BuildContext context) {
    return Scaffold(
      appBar: AppBar(
        title: Text('Startup Name Generator'),
      ),
      body: _buildSuggestions(),
    );
  }

  Widget _buildSuggestions() {
    return ListView.builder(
        padding: EdgeInsets.all(16.0),
        itemBuilder: /*1*/ (context, i) {
          if (i.isOdd) return Divider(); /*2*/

          final index = i ~/ 2; /*3*/
          if (index >= _suggestions.length) {
            _suggestions.addAll(generateWordPairs().take(10)); /*4*/
          }
          return _buildRow(_suggestions[index]);
        });
  }

  Widget _buildRow(WordPair pair) {
    return ListTile(
      title: Text(
        pair.asPascalCase,
        style: _biggerFont,
      ),
    );
  }
}
大きく分けると
StatefulWidgetのRandomWords
そのStateクラスである_RandomWordsState
がある
チュートリアルが言うにはStatefulWidgetがWidgetそのもので
この中でロジックが記載されているStateクラスをインスタンス化することによってWidgetの内容をstatefulに変更しているとのこと
_RandomWordsStateにはランダムな単語の組み合わせを生成し、リスト形式で表示するためのロジックが記載されているFlutterではほとんど全てのものがWidgetとあるようにこのクラスにはたくさんのWidgetがある
Scaffold
AppBar
Text
ListView
ListTileそしてfunctionの戻り値も全てWidgetである
(全部についていて見落としてしまいそうだが頭についてるWidgetは戻り値の型である)
_buildSuggestions():複数行の単語ペアリストを生成する
_buildRow(WordPair pair):1行分の単語ペアリストを生成するスマホのウィジェットを組み合わせてホーム画面をお好みにしていくように
FlutterでもいろんなWidgetを組み合わせてアプリを作っていくようだ
- 投稿日:2020-11-20T00:03:56+09:00
Flutterチュートリアルを咀嚼する part1
Flutterって一つのソースを書くだけでiOSもAndroidもアプリ作ってくれるんだって
すごいなー
勉強してみよう対象のチュートリアル
https://codelabs.developers.google.com/codelabs/first-flutter-app-pt1#0
コピペしてできあがったもの
スタートアップ企業の名前をつけてあげるために単語二つの組み合わせをリスト化してくれるアプリ
ソースコード
main.dartimport 'package:flutter/material.dart'; import 'package:english_words/english_words.dart'; void main() => runApp(MyApp()); class MyApp extends StatelessWidget { @override Widget build(BuildContext context) { return MaterialApp( title: 'Startup Name Generator', home: RandomWords(), ); } } class RandomWords extends StatefulWidget { @override _RandomWordsState createState() => _RandomWordsState(); } class _RandomWordsState extends State<RandomWords> { final _suggestions = <WordPair>[]; final _biggerFont = TextStyle(fontSize: 18.0); @override Widget build(BuildContext context) { return Scaffold( appBar: AppBar( title: Text('Startup Name Generator'), ), body: _buildSuggestions(), ); } Widget _buildSuggestions() { return ListView.builder( padding: EdgeInsets.all(16.0), itemBuilder: /*1*/ (context, i) { if (i.isOdd) return Divider(); /*2*/ final index = i ~/ 2; /*3*/ if (index >= _suggestions.length) { _suggestions.addAll(generateWordPairs().take(10)); /*4*/ } return _buildRow(_suggestions[index]); }); } Widget _buildRow(WordPair pair) { return ListTile( title: Text( pair.asPascalCase, style: _biggerFont, ), ); } }順々にみていこう
import
import 'package:flutter/material.dart';
import 'package:english_words/english_words.dart';
package:flutter/material.dart
これがないと始まらないっぽい
Flutterアプリの主役たちクラス
Widget
https://api.flutter.dev/flutter/widgets/Widget-class.html
Flutterフレームワークの中心的なクラス
FlutterではほとんどのものがWidget
Widget単位でアプリが構築されていくStatelessWidget
https://api.flutter.dev/flutter/widgets/StatelessWidget-class.html
State(状態)を持たないWidget
不変(immutable)であり静的(static)
親のWidgetから引数を与えてあげることで描画される
反対はStatefulWidget※参考
https://tech-rise.net/difference-between-stateless-widget-and-stateful-widgetStatefulWidget
https://api.flutter.dev/flutter/widgets/StatefulWidget-class.html
チュートリアルの中で
Implementing a stateful widget requires at least two classes: 1) a StatefulWidget class that creates an instance of 2) a State class.
とあるように、statefulなWidgetを作るためには、②Stateクラスのインスタンスを生成する①StatefulWidgetクラスを用意する必要がある。
要はStateクラスとセットということらしい。State
https://api.flutter.dev/flutter/widgets/State-class.html
StatefulWidgetとセットになるもの。
StatefulWidgetの中でインスタンス化される。
StatefulWidgetのロジックはここで実装する。
Stateクラスの名前の頭には_(アンダーバー)をつける。BuildContext
https://api.flutter.dev/flutter/widgets/BuildContext-class.html
※参考
https://qiita.com/agajo/items/93d75aafe87bdc7b2026
https://itome.team/blog/2019/12/flutter-advent-calendar-day6/MaterialApp
https://api.flutter.dev/flutter/material/MaterialApp-class.html
マテリアルデザインアプリケーションに一般的に必要とされる多くのウィジェットをラップする便利なウィジェット。Scaffold
https://api.flutter.dev/flutter/material/Scaffold-class.html
AppBar
https://api.flutter.dev/flutter/material/AppBar-class.html
Text
https://api.flutter.dev/flutter/dart-html/Text-class.html
ListView
https://api.flutter.dev/flutter/widgets/ListView-class.html
EdgeInsets
https://api.flutter.dev/flutter/painting/EdgeInsets-class.html
Divider
https://api.flutter.dev/flutter/material/Divider-class.html
関数
runApp()
https://api.flutter.dev/flutter/widgets/runApp.html
指定されたウィジェットを膨らませて、画面に添付する。メソッド
build()
https://api.flutter.dev/flutter/dart-ui/ParagraphBuilder/build.html
Widgetの主なお仕事の一つ
Widgetをどんな内容で描画するかを決定するあたりが内包されているライブラリ
これを覚えていくことがはじめの一歩なんでしょうpackage:english_words/english_words.dart
チュートリアルの中で追加したライブラリ
よく使われる英単語を提供してくれるWordPair
generateWordPairs
main()
void main() => runApp(MyApp());実行部はここだけ
runApp()関数で引数のクラス(MyApp())を膨らませているmain()関数はdartのもの
https://dart.dev/guides/language/language-tour#the-main-function矢印(=>)構文だけど、これと同じ意味
void main() {
  runApp(MyApp());
}
MyAppクラス
class MyApp extends StatelessWidget {
  @override
  Widget build(BuildContext context) {
    return MaterialApp(
      title: 'Startup Name Generator',
      home: RandomWords(),
    );
  }
}
main()に膨らまされるウィジェット
一番大元なのでStatelessWidgetを拡張したクラスである
build()メソッドを使ってMyAppの内容を描画するMaterialAppをreturnしている
MaterialAppではタイトルとホームの内容を設定している
ホームの中身であるRandomWords()は後述RandomWords()
class RandomWords extends StatefulWidget {
  @override
  _RandomWordsState createState() => _RandomWordsState();
}

class _RandomWordsState extends State<RandomWords> {
  final _suggestions = <WordPair>[];
  final _biggerFont = TextStyle(fontSize: 18.0);
  @override
  Widget build(BuildContext context) {
    return Scaffold(
      appBar: AppBar(
        title: Text('Startup Name Generator'),
      ),
      body: _buildSuggestions(),
    );
  }

  Widget _buildSuggestions() {
    return ListView.builder(
        padding: EdgeInsets.all(16.0),
        itemBuilder: /*1*/ (context, i) {
          if (i.isOdd) return Divider(); /*2*/

          final index = i ~/ 2; /*3*/
          if (index >= _suggestions.length) {
            _suggestions.addAll(generateWordPairs().take(10)); /*4*/
          }
          return _buildRow(_suggestions[index]);
        });
  }

  Widget _buildRow(WordPair pair) {
    return ListTile(
      title: Text(
        pair.asPascalCase,
        style: _biggerFont,
      ),
    );
  }
}
大きく分けると
StatefulWidgetのRandomWords
そのStateクラスである_RandomWordsState
がある
チュートリアルが言うにはStatefulWidgetがWidgetそのもので
この中でロジックが記載されているStateクラスをインスタンス化することによってWidgetの内容をstatefulに変更しているとのこと
_RandomWordsStateにはランダムな単語の組み合わせを生成し、リスト形式で表示するためのロジックが記載されているFlutterではほとんど全てのものがWidgetとあるようにこのクラスにはたくさんのWidgetがある
Scaffold
AppBar
Text
ListView
ListTileそしてfunctionの戻り値も全てWidgetである
(全部についていて見落としてしまいそうだが頭についてるWidgetは戻り値の型である)
_buildSuggestions():複数行の単語ペアリストを生成する
_buildRow(WordPair pair):1行分の単語ペアリストを生成するスマホのウィジェットを組み合わせてホーム画面をお好みにしていくように
FlutterでもいろんなWidgetを組み合わせてアプリを作っていくようだ