- 投稿日:2020-11-16T23:49:03+09:00
Realm Databaseのバックアップとリストア
Realm Databaseのバックアップとリストア
あまりRealmのバックアップとリストアについての記事が見つからないので投稿します。
環境
環境 バージョン Xcode 12.0 Swift 5 MacOS Big Sur(11.0.1) Libraryディレクトリ直下にバックアップ
defaults.realm_bk_yyyy-MM-dd-hh-mm-ssというファイル名で
現在のdefaults.realm(Realm Database本体)をバックアップします。Hoge.swiftprivate func hoge() { do { let url = try FileManager.default.url(for: .libraryDirectory, in: .userDomainMask, appropriateFor: nil, create: true) let dateformater = DateFormatter() dateformater.dateFormat = "yyyy-MM-dd-hh-mm-ss" dateformater.locale = Locale(identifier: "ja_JP") let fileName = "default.realm_bk_" + dateformater.string(from: Date()) try backupLocalStore(storeBackupDirectoryURL: url, backupStoreFilename: fileName) } catch { print(error.localizedDescription) } } /// Realmを指定の場所にバックアップします。 /// - Parameters: /// - storeBackupDirectoryURL: バックアップするディレクトリを指定 /// - backupStoreFilename: バックアップするファイル名を指定 /// - Throws: エラー private func backupLocalStore(storeBackupDirectoryURL: URL, backupStoreFilename: String) throws { let backupURL = storeBackupDirectoryURL.appendingPathComponent(backupStoreFilename) do { let realm = try Realm() realm.beginWrite() try realm.writeCopy(toFile: backupURL) realm.cancelWrite() } catch { throw error } }Library直下にバックアップが作成されています。
バックアップしたファイルをリストアする
Hoge.swiftprivate func hoge() { do { var url = try FileManager.default.url(for: .libraryDirectory, in: .userDomainMask, appropriateFor: nil, create: false) url.appendPathComponent("default.realm_bk_2020-11-16-10-46-35") try realmRestore(backupFileURL: url) } catch { print(error.localizedDescription) } } /// Realmをリストアする /// - Parameter backupFileURL: バックアップファイル /// - Throws: エラー private func realmRestore(backupFileURL: URL) throws { guard let realmFileUrl = Realm.Configuration.defaultConfiguration.fileURL else { throw NSError.init(domain: "Realmのファイルパスが取得できませんでした。", code: -1, userInfo: nil) } try FileManager.default.removeItem(at: realmFileUrl) try FileManager.default.copyItem(at: backupFileURL, to: realmFileUrl) }指定したバックアップファイルでデータベースが復元されているのが確認できるはずです。
懸念事項
今回書いたサンプルコードはRealmが他でアクセスされている事を考慮できていない可能性があります。(特にリストアする時)
ただ、個人アプリ等で絶対にここではアクセスしていないと分かる場面等では利用できるかと思いますので自己責任でご利用ください?
なにかあればご質問、ご指摘お待ちしております!

- 投稿日:2020-11-16T22:32:28+09:00
[iOS] frameとboundsの違いを理解する
「frameとboundsの違いってなんやねん!」となったので調べました。
そもそもframeとboundsは
UIViewのサブクラスが持っているプロパティ。CGRectを返す。
英単語の意味的にはWeblio英和辞書によると
frame
a 窓枠.
b 額縁.
c 背景.
d (温床の)枠組み,フレーム,温床.
e (刺繍(ししゆう)などの)製作台,掛け枠.
f 複数形で(眼鏡の)枠,フレーム.
g (養蜂の取りはずし可能の)箱形のフレーム.要するに"枠"という意味(?)
bounds
1境界,限界(内); 立ち入り許可区域.
2限度,範囲; 境界線,限界という意味らしい
CGRectとは
公式ドキュメントによると
A structure that contains the location and dimensions of a rectangle.
と定義されており、
意訳すると
矩形の寸法を返す構造体となります。frameとboundsの違いは
そもそもframeとboundsが何者かがわかったので、いよいよ本題です。
frame
要素自身を基準とした相対的な座標・大きさを返すプロパティ(superviewが基準)
bounds
要素の親を基準とした相対的な座標・大きさを返すプロパティ(UIView自身が基準)
という違いがあるみたいです。
つまりどこを基準とするかが変わってくるみたいです。
サンプルコード
実際にコードを書いて検証します。
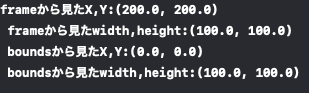
x: 200, y: 200に正岡子規の画像を配置してframeとboundsの値の違いを見ます。ViewController.swiftclass ViewController: UIViewController { override func viewDidLoad() { super.viewDidLoad() let imageView = UIImageView(image: UIImage(named: "shiki")) // 指定した座標・大きさを設定 imageView.frame = CGRect(x: 200, y: 200, width: 100, height: 100); print( "frameから見たX\(imageView.frame.minX)\n", "frameから見たY\(imageView.frame.minY)\n", "boundsから見たX\(imageView.bounds.minX)\n", "boundsから見たY\(imageView.bounds.minY)\n" ) // viewにUIImageViewを追加 self.view.addSubview(imageView) } }
この位置に正岡子規が居る時、結果は
こうなりました。
座標は親要素をframeから見ると(200, 200)の所に、要素自身を基準にboundsから見ると(0, 0)で基準によって違うに対して大きさは一緒なのが分かります。
活用例
親要素を基準に子要素の大きさを指定することが出来ます。
また、こういった場合はframeよりboundsを使うほうが良いです。boundsは要素自身を基準とした座標・大きさを持っているからです。class ViewController: UIViewController { override func viewDidLoad() { super.viewDidLoad() let imageView = UIImageView(image: UIImage(named: "shiki")) // 大きさ(親要素の半分の正方形) imageView.frame.size = CGSize(width: view.bounds.width / 2, height: view.bounds.height / 2) // 中心の座標(親要素の中心をframeから取る) imageView.center = CGPoint(x: view.bounds.width / 2, y: view.bounds.height / 2) // viewにUIImageViewを追加 self.view.addSubview(imageView) } }注意点
また、UIViewを拡大・縮小したり、回転させるとframeの値は変わりますが、boundsの値は変わりません
    override func viewDidLoad() {
        super.viewDidLoad()
        let rectangle = UIView(frame: .zero)
        rectangle.backgroundColor = .blue
        rectangle.frame.size = CGSize(width: 100, height: 200)
        rectangle.center = CGPoint(x: view.bounds.width / 2, y: view.bounds.height / 2)
        // 拡大前
        print(rectangle.frame, rectangle.bounds) // (157.0, 348.0, 100.0, 200.0) (0.0, 0.0, 100.0, 200.0)

        rectangle.transform = CGAffineTransform(scaleX: 2, y: 2)

        // 拡大後
        print(rectangle.frame, rectangle.bounds) // (107.0, 248.0, 200.0, 400.0) (0.0, 0.0, 100.0, 200.0)

        view.addSubview(rectangle)
    }
このようにスケールさせた後、frameの値は変化しているのに対して、boundsの値が変化していないことが分かります。
参考文献

- 投稿日:2020-11-16T20:19:22+09:00
【iOS】半強制アップデートの仕組みをカジュアルに実装する
はじめに
この記事では、アプリを起動したとき、新バージョンがリリースされていることをユーザに伝え、アップデートを促す仕組み(この記事では半強制アップデートと呼ぶ)の実装方法を紹介します。
強制アップデートはゲームアプリなどでよく見る仕組みです。アップデートするまでアプリを利用できなくすることで、常に最新バージョンで動かすことができます。ただ、必ずしもユーザがアップデートできる通信環境にいるとは限らないため、すぐに使いたいという時に使えないのは不便です。そういった使い勝手の観点から、僕はアップデートを促すまでに留めた半強制くらいが好みです。
さて、ユーザにインストールされているアプリのバージョンに乖離が生じると、最新機能を提供できないのはもちろんのこと、既存機能を改修しづらくなってきます。例えば、DBのマイグレーションを何世代かに渡って行っているとき、バージョンが飛んでいると思わぬバグを踏んだりします。
ユーザには常に最新バージョンを使ってもらうのが望ましく、アップデートを促す仕組みは積極的に取り入れた方が良いと考えています。
iTunes Search APIを利用した実装
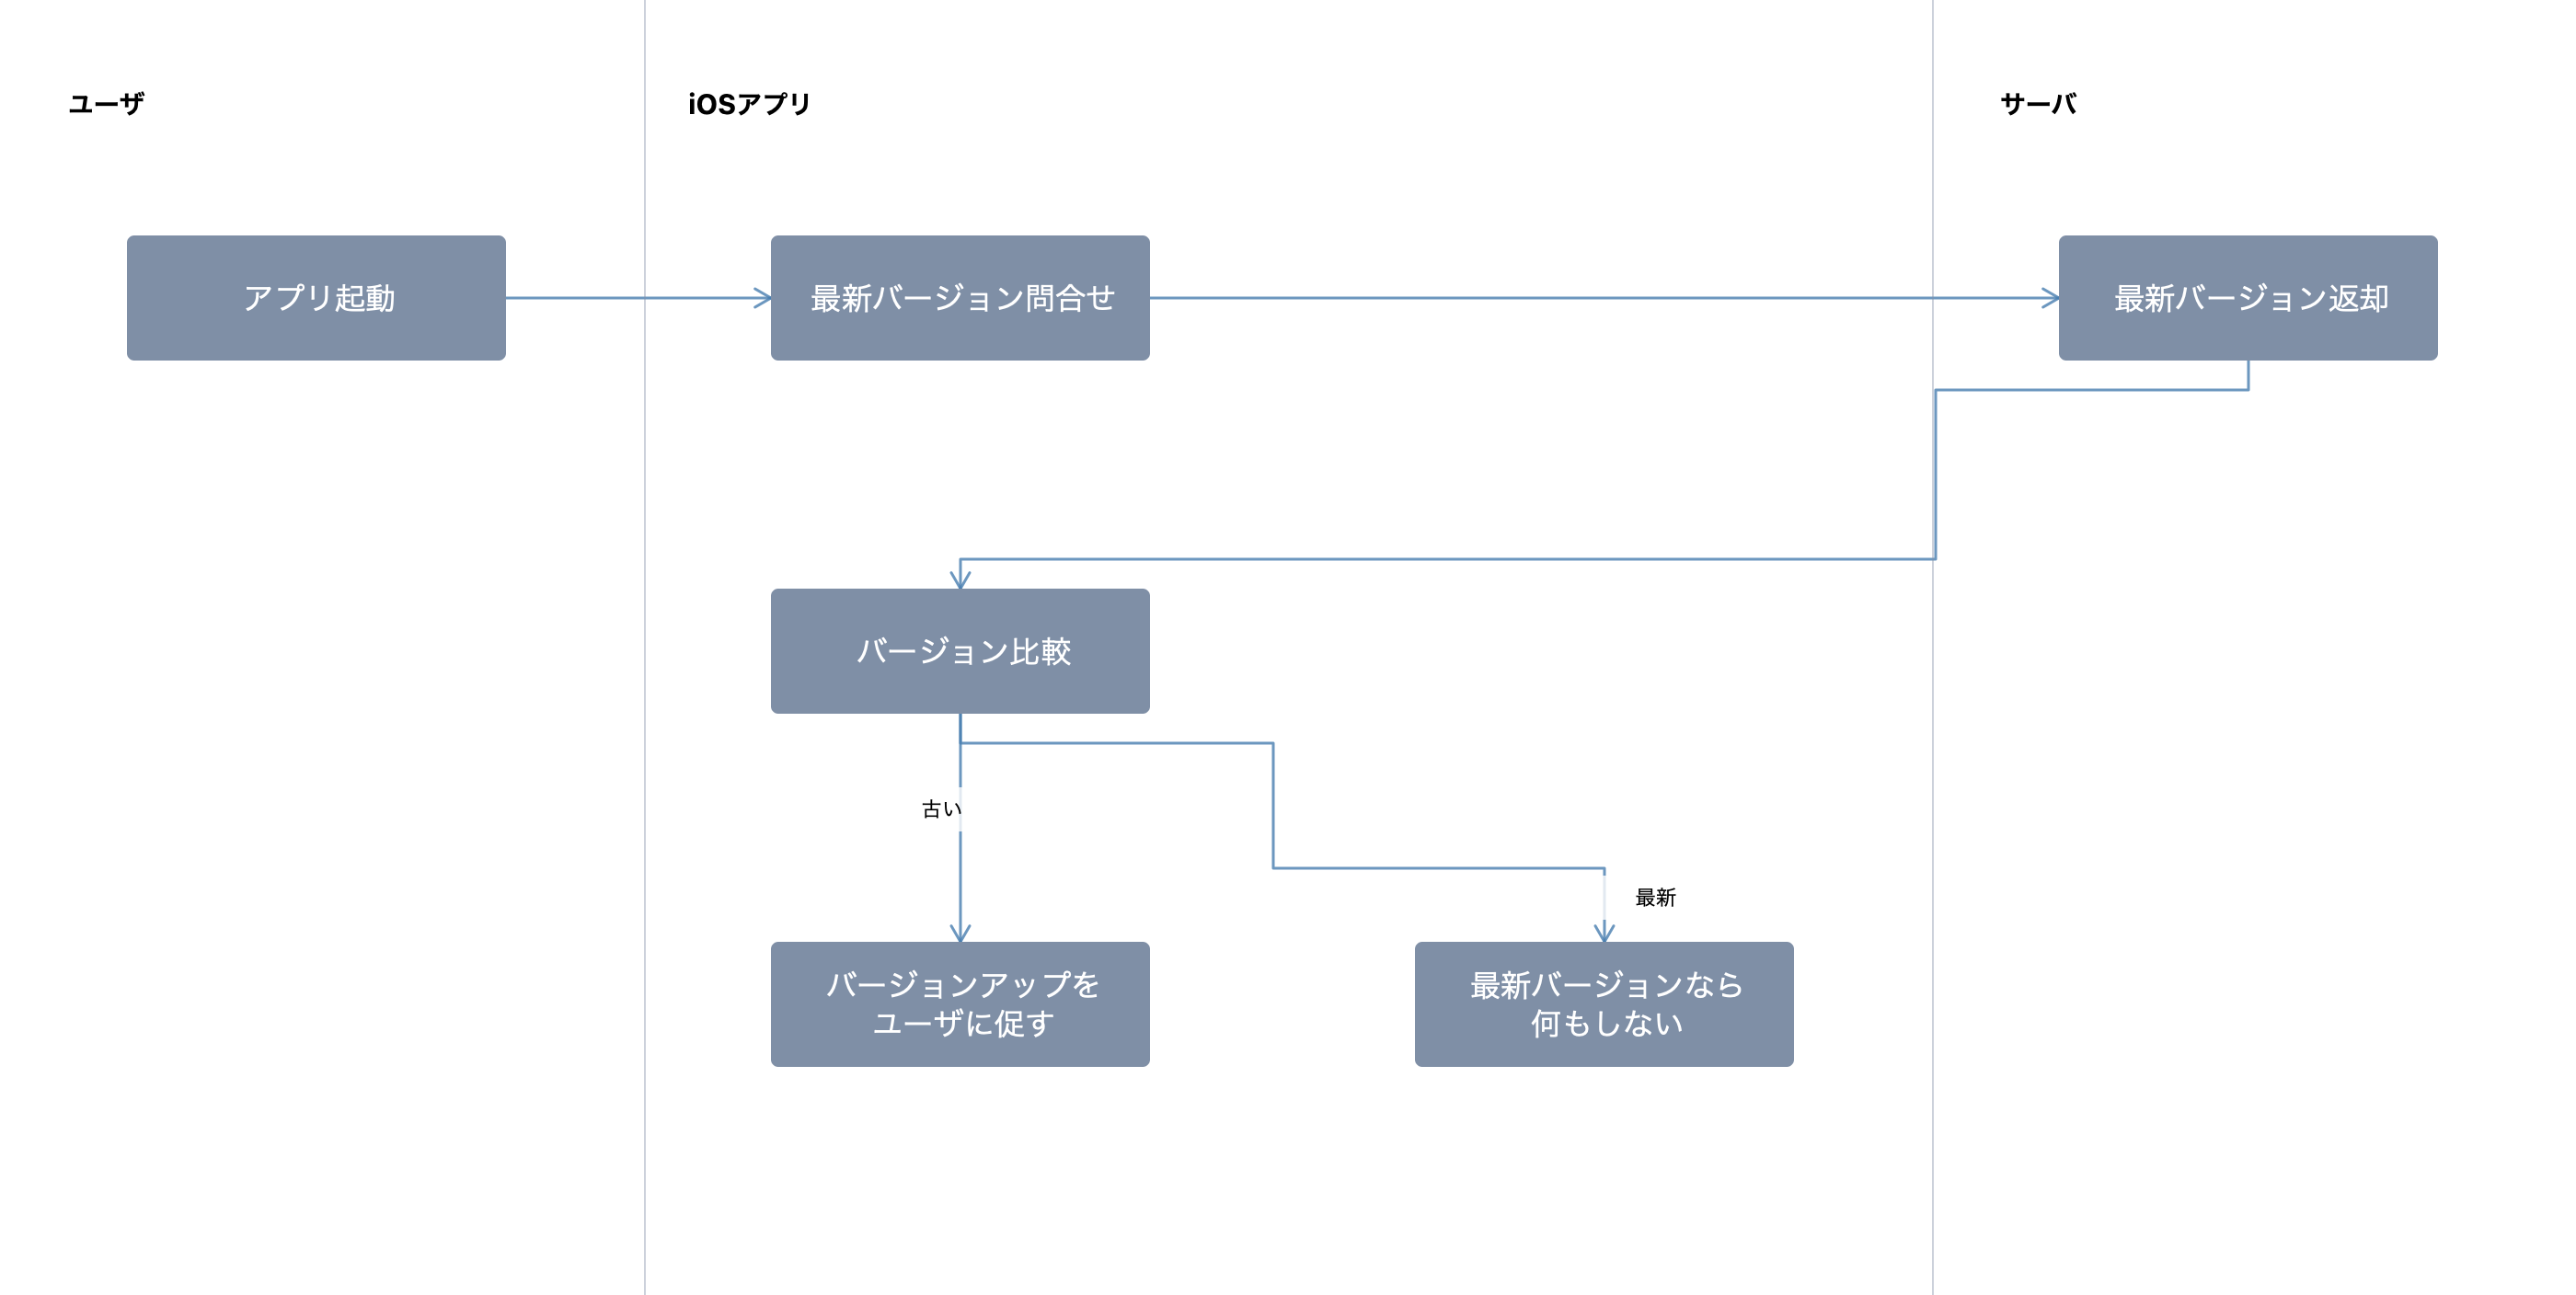
半強制アップデートの仕組みを実装するとき、だいたい以下のフローが考えられます。
- アプリが起動されたらサーバに最新バージョンを問い合わせる
- サーバから返却されたバージョンと現バージョンを比較
- 最新ではなかったらユーザにバージョンアップを促すUIを表示
iTunes Search API
最新バージョンを返すサーバを自前で用意しても良いですが、ここではiTunes Search APIを利用します。このAPIを使うと、App Storeで配信されているアプリの情報を無料で取得することができます。アプリ情報にはApp Storeでリリースされているバージョン情報も含まれています。
iTunes Search APIを使うことで、アプリが実際にApp Storeから配信されるようになった段階で、取得できるアプリのバージョン情報が自動的に最新のものになるため、自前で配信バージョンを管理するサーバを立てる必要がなく、最新バージョンの更新し忘れなども起きないため、運用が楽です。
AppStoreクラス
僕は以下のようなiTunes Search APIを叩くAppStoreクラスを実装しています。(通信ライブラリにAlamofire v5を使用しています)
import Foundation
import Alamofire

typealias LookUpResult = [String: Any]

enum AppStoreError: Error {
    case networkError
    case invalidResponseData
}

class AppStore {

    private static let lastCheckVersionDateKey = "\(Bundle.main.bundleIdentifier!).lastCheckVersionDateKey"

    static func checkVersion(completion: @escaping (_ isOlder: Bool) -> Void) {
        let lastDate = UserDefaults.standard.integer(forKey: lastCheckVersionDateKey)
        let now = currentDate

        // 日付が変わるまでスキップ
        guard lastDate < now else { return }

        UserDefaults.standard.set(now, forKey: lastCheckVersionDateKey)

        lookUp { (result: Result<LookUpResult, AppStoreError>) in
            do {
                let lookUpResult = try result.get()

                if let storeVersion = lookUpResult["version"] as? String {
                    let storeVerInt = versionToInt(storeVersion)
                    let currentVerInt = versionToInt(Bundle.version)
                    completion(storeVerInt > currentVerInt)
                }
            }
            catch {
                completion(false)
            }
        }
    }

    static func versionToInt(_ ver: String) -> Int {
        let arr = ver.split(separator: ".").map { Int($0) ?? 0 }

        switch arr.count {
            case 3:
                return arr[0] * 1000 * 1000 + arr[1] * 1000 + arr[2]
            case 2:
                return arr[0] * 1000 * 1000 + arr[1] * 1000
            case 1:
                return arr[0] * 1000 * 1000
            default:
                assertionFailure("Illegal version string.")
                return 0
        }
    }

    /// App Storeを開く
    static func open() {
        if let url = URL(string: storeURLString), UIApplication.shared.canOpenURL(url) {
            UIApplication.shared.open(url)
        }
    }
}

private extension AppStore {

    static var iTunesID: String {
        "<YOUR_ITUNES_ID>"
    }

    /// App Storeのアプリページ
    static var storeURLString: String {
        "https://apps.apple.com/jp/app/XXXXXXX/id" + iTunesID
    }

    /// iTunes Search API
    static var lookUpURLString: String {
        "https://itunes.apple.com/lookup?id=" + iTunesID
    }

    /// 現在日時から生成される20201116のような整数を返す
    static var currentDate: Int {
        let formatter = DateFormatter()
        formatter.calendar = Calendar(identifier: .gregorian)
        formatter.locale = .current
        formatter.dateFormat = "yyyyMMdd"
        return Int(formatter.string(from: Date()))!
    }

    static func lookUp(completion: @escaping (Result<LookUpResult, AppStoreError>) -> Void) {
        AF.request(lookUpURLString).responseJSON(queue: .main, options: .allowFragments) { (response: AFDataResponse<Any>) in
            let result: Result<LookUpResult, AppStoreError>

            if let error = response.error {
                result = .failure(.networkError)
            }
            else {
                if let value = response.value as? [String: Any],
                   let results = value["results"] as? [LookUpResult],
                   let obj = results.first {
                    result = .success(obj)
                }
                else {
                    result = .failure(.invalidResponseData)
                }
            }

            completion(result)
        }
    }
}

extension Bundle {
    /// Info.plistにあるバージョン番号を取得。major.minor.patch形式になっていることを前提とする
    static var version: String {
        return Bundle.main.infoDictionary!["CFBundleShortVersionString"] as! String
    }
}
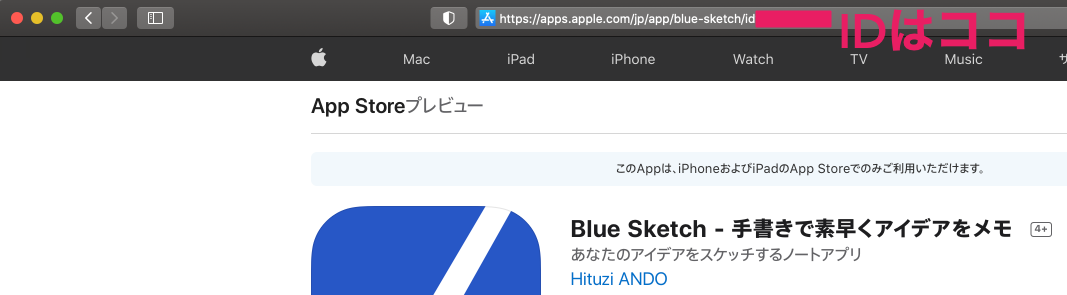
<YOUR_ITUNES_ID>の部分は、バージョン情報を取得したいアプリのiTunesIDに置き換えてください。iTunesIDはブラウザでApp Store上のアプリのページを開いたときのURLに表示されています。同様にstoreURLStringもApp StoreのURLに置き換えてください。
上記の実装では、1日1回バージョンの更新チェックをするようになっています。バージョン比較は、major.minor.patch形式のバージョン文字列をドットで分割しInt型に変換(
versionToInt(_:)メソッドを見てください)したもので比較しています。上記のやり方ではminorとpatchは0~999の1000ステップしか値を取れませんが十分でしょう。AppStoreクラスを使うときはViewControllerで以下のようなメソッドを作っておき、
viewDidAppearやUIApplication.willEnterForegroundNotificationをオブザーブしたメソッドなどで呼び出します。private extension ViewController { func checkVersion() { AppStore.checkVersion { (isOlder: Bool) in guard isOlder else { return } let alertController = UIAlertController(title: "新しいバージョンがあります!", message: "アップデートしてください。", preferredStyle: .alert) alertController.addAction(UIAlertAction(title: "アップデート", style: .default) { action in AppStore.open() }) alertController.addAction(UIAlertAction(title: "キャンセル", style: .cancel)) self.present(alertController, animated: true) } } }以上の実装で、新しいバージョンがリリースされたことをユーザに伝えることができるようになりました。
- 投稿日:2020-11-16T17:35:20+09:00
FirebaseでiOSのプッシュ通知を実装
始めに
iOS アプリでプッシュ通知機能を実装しようと思ったら、想定より苦戦したので、振り返ってみようと思います。
Firebase プロジェクトを作成する
Firebase コンソールで [プロジェクトを追加] をクリックし、 [プロジェクト名] を選択して、新しいプロジェクト名を入力します。
アプリを Firebase に登録する
- Firebase プロジェクトを作成したら、プロジェクトに iOS アプリを追加できます。 Firebase コンソールから、 [プロジェクトページ] に移動して、中央にある iOS アイコンをクリックして設定ワークフローを起動します。
- アプリのバンドル ID を [iOS バンドル ID] フィールドに入力します。このバンドル ID を探すには、 XCode でアプリを開き、最上位のディレクトリの [General] タブにアクセスします。[bundle identifier] フィールドの値が iOS バンドル ID です(例: com.atsushi-uchida.NewsTwit)。
Firebase 構成ファイルを追加する
- [Download GoogleService-Info.plist] をクリックして、Firebase iOS 構成ファイル(GoogleService-Info.plist)を取得します。
- 構成ファイルを Xcode プロジェクトのルートに移動します。メッセージが表示されたら、構成ファイルをすべてのターゲットに追加するオプションを選択します。
アプリに Firebase SDK を追加する
Firebase ライブラリのインストールにはCocoaPodsを使用することをおすすめします。
・ Podfile がない場合は作成します。$ cd your-project-directory$ pod init・ アプリで使用したいポッドを Podfile に追加します。たとえば、アナリティクスの場合は次のようになります。
$ pod 'Firebase/Analytics'これにより、iOS アプリで Firebase を稼働させるために必要なライブラリが、Firebase 向け Google アナリティクスとともに追加されます。
・ ポッドをインストールし、.xcworkspace ファイルを開いて Xcode でプロジェクトを確認します。
$ pod install$ open your-project.xcworkspace・ 注意!!!一度でも、CocoaPods でポッドをインストールをした事がある場合は、インストールではアップデートにします。
$ pod update2回目以降も、インストールを使用すると、依存性でエラーになる事が多いです。
証明書を発行編に移ります
プッシュ通知を送るために作成するもの・しておくことは以下の7つあります。
- CSRファイルの作成 ※初回作成すれば後は同じものを使いますので改めて作成不要です
- 開発用証明書(.cer)の作成 ※初回作成すれば後は同じものを使いますので改めて作成不要です
- AppIDの作成
- 端末の登録
- プロビショニングプロファイルの作成
- APNs用証明書(.cer)の作成
- APNs用証明書(.p12)の作成
1. CSRファイルの作成
- キーチェーンアクセスを開きます
- 「キーチェーンアクセス」>「証明書アシスタント」>「認証局に証明書を要求」をクリックします
- 「ユーザーのメールアドレス」を入力します
- (「通称」はそのまま、「CAのメールアドレス」は空欄でOK)
- 「要求の処理」は「ディスクに保存」を選択し「鍵ペア情報を設定」にチェックを入れます
- 「続ける」をクリックします
- 保存先の選択が出るので任意の場所を選択し「保存」をクリックします
- 「鍵ペア情報」画面を確認して「続ける」をクリックします
- 「設定結果」画面が出るので「完了」をクリックします
2. 開発用証明書(.cer)の作成
- Apple Developer Programにログインします
- 「Certificates, Identifiers & Profiles」をクリックします
- 「Certificates」をクリックし、「Certificates」の隣にある「+」をクリックします
- 「Create a New Certificate」画面が表示されるので設定していきます
- 「iOS App Development」にチェックをいれ、右上の方の「Continue」をクリックします
- 「Choose File」をクリックして、1.で作成した「CSRファイルの作成」を選択し、「Continue」をクリックします
- 開発者用証明書が作成されるので、「Download」をクリックして書き出しておきます
- 開発用証明書(.cer)の作成は完了です
3. App ID の作成
- 2. 「開発用証明書(.cer)の作成」の作業がスキップだった場合は、Apple Developer Programにログインして、「Certificates, Identifiers & Profiles」をクリックします(※2.の画像参照)
- 「Identifiers」の右の「+」をクリックします
- 「Register a New Identifier」が表示されるので「App IDs」にチェックをいれ、右上の方の「Continue」をクリックします
- 「Description」にアプリの概要を記入します 例) TestPushApp
- 「Bundle ID」では「Explicit」を選択し、「Bundle ID」を入力します 6「Wildcard」を選択するとプッシュ通知が利用できないので注意!
- 「Bundle ID」は アプリ側で同じものを設定します ので必ず控えておきましょう!
- 下にスクロールして「Capabilities」の「Push Notifications」にチェックを入れます
- これを忘れるとプッシュ通知が利用できないので注意!
- 「Continue」をクリックします
- 確認画面が表示されるので「Push Notifications」にチェックが入っている事を確認して「Register」をクリックします
- これでApp ID 作成は完了です
4. 端末の登録
- 「Devices」をクリックして、「Devices」の隣にある「+」をクリックします
- 「Platform」は「iOS, tvOS, WatchOS」に選択します
- 端末の「Device Name」と「Device ID(UDID)」を入力します
- 「Device Name」は自由に設定できます
- 「Device ID(UDID)」はXcodeを使うと確認し易いです
- Mac に端末を接続し、Xcodeを起動します
- 「Window」>「Devices and Simulators」をクリックします
- 「identifier」としてUDIDが確認できます
- 記入できたら「Continue」をクリックします
- 次の画面で端末情報を確認して「Register」をクリックします
- これで端末登録は完了です
5. プロビショニングプロファイルの作成
- 「Profiles」をクリックして、「Profiles」の隣にある「+」をクリックします
- 「Development」の「iOS App Development」を選択し、「Continue」をクリックします
- 利用する App ID、開発用証明書、端末をそれぞれ紐付けていきます
- 3.「App ID の作成」で作成したApp IDを選択し、「Continue」をクリックします
- 2.「開発用証明書(.cer)の作成」で作成した(あるいは既存の) 開発用証明書 を選択し、「Continue」をクリックします
- 4.「端末の登録」で登録した(あるいは既存の)端末を選択し、「Continue」をクリックします
- 最後に「Provisioning Profile Name」にファイル名入力します 例) TestPushApp Provisioning Profiles
- 紐付けを確認し「Generate」をクリックします
- プロビショニングプロファイルがが作成されるので、「Download」をクリックして書き出しておきます
- プロビショニングプロファイルの作成は完了です
6. APNs用証明書(.cer)の作成
- 「Certificates」をクリックして、「Certificates」の隣にある「+」をクリックします
- 2.「開発用証明書(.cer)の作成」で開発用証明書を作成したときとは異なり、下にスクロールし、「Service」の「Apple Push Notification service SSL (Sandbox)」をチェックに入れます
- 「Continue」をクリックします
- 3.「App ID の作成」で作成した App ID を選択し、「Continue」をクリックします
- 1.「CSRファイルの作成」で作成した(あるいは既存の)CSRファイルを選択し、「Continue」をクリックします
- APNs用証明書(.cer) が作成されるので、「Download」をクリックして書き出しておきます
- APNs用証明書(.cer) の作成は完了です
7. APNs用証明書(.p12) の作成
- 6.「APNs用証明書(.cer)の作成」で作成した「APNs用証明書(.cer)」をダブルクリックしてキーチェーンアクセスを開きます
- APNs用証明書(.cer) の左にある三角マークをクリックして開きます
- APNs用証明書(.cer) ファイルには鍵がセットされています
- APNs用証明書(.p12) を書き出すには、開いた状態で 鍵ではなく証明書の上で右クリック をして「~を書き出す…」をクリックします
- ファイル名「名前」と保存先「場所」を指定して「保存」をクリックします
- パスワードを求められますが、 何も入力しない で「OK」をクリックします
- この後、システム側にパスワードを求められる場合があります。対応してください。
- APNs用証明書(.p12) が書き出されます
- APNs用証明書(.p12) 作成は完了です
- これですべて必要なファイルが作成できました
FirebaseのCloud MessagingにAPNs証明書を登録
- 次にFirebaseの設定画面に移動します。
- Firebase Consoleの対象のプロジェクトの画面左上部の歯車のアイコンを選択して、プロジェクトの設定を選択します。
- SettingメニューのCloud Messagingを選択します。
- 画面スクロールしIOSアプリの設定のAPNs証明書の開発用APNs証明書のアプロードを選択します。
- ファイルをアップロードをクリックし、7. 「APNs用証明書(.p12) の作成」で作成したAPNs証明書を選択してップロードを選択します。
- こちらでアップロードが完了すればFirebaseの設定は完了です。
XcodeのSigningを設定
- 次にXcodeの設定を行います。Xcodeのこちらの画面を開き、Signing & Capabilityを選択します。
- まずAutomatically manage signingのチェックを外し、Provisioning Profileに5. 「プロビショニングプロファイルの作成」で作成したProvisioning Profileを設定します。
- 次に+CapabilityをクリックしてPush NortificationsをSigningのした後にドラッグアンドドロップします。
- 同様にBackgroundModeもドラックアンドドロップします。
- Background ModeのRemote nortificationsにチェックを入れます。こちらでXcodeの設定は完了です。
AppDelegate.swiftに通知の許可やDeviceの登録する処理を実装
最後にAppDelegateに処理を書いて終わりになります。
実装箇所は4箇所です。
1. import
2. didFinishLaunchingWithOptions
3. AppDelegateのクラス内
4. UNUserNotificationCenterDelegateのExtensionimport UIKit import Firebase import FirebaseMessaging import UserNotifications @UIApplicationMain class AppDelegate: UIResponder, UIApplicationDelegate { func application(_ application: UIApplication, didFinishLaunchingWithOptions launchOptions: [UIApplication.LaunchOptionsKey: Any]?) -> Bool { // Override point for customization after application launch. FirebaseApp.configure() if #available(iOS 10.0, *) { // For iOS 10 display notification (sent via APNS) UNUserNotificationCenter.current().delegate = self let authOptions: UNAuthorizationOptions = [.alert, .badge, .sound] UNUserNotificationCenter.current().requestAuthorization( options: authOptions, completionHandler: {_, _ in }) } else { let settings: UIUserNotificationSettings = UIUserNotificationSettings(types: [.alert, .badge, .sound], categories: nil) application.registerUserNotificationSettings(settings) } application.registerForRemoteNotifications() return true } // MARK: UISceneSession Lifecycle func application(_ application: UIApplication, configurationForConnecting connectingSceneSession: UISceneSession, options: UIScene.ConnectionOptions) -> UISceneConfiguration { // Called when a new scene session is being created. // Use this method to select a configuration to create the new scene with. return UISceneConfiguration(name: "Default Configuration", sessionRole: connectingSceneSession.role) } func application(_ application: UIApplication, didDiscardSceneSessions sceneSessions: Set<UISceneSession>) { // Called when the user discards a scene session. // If any sessions were discarded while the application was not running, this will be called shortly after application:didFinishLaunchingWithOptions. // Use this method to release any resources that were specific to the discarded scenes, as they will not return. } func application(_ application: UIApplication, didReceiveRemoteNotification userInfo: [AnyHashable: Any]) { // Print message ID. if let messageID = userInfo["gcm.message_id"] { print("Message ID: \(messageID)") } // Print full message. print(userInfo) } func application(_ application: UIApplication, didReceiveRemoteNotification userInfo: [AnyHashable: Any], fetchCompletionHandler completionHandler: @escaping (UIBackgroundFetchResult) -> Void) { // Print message ID. if let messageID = userInfo["gcm.message_id"] { print("Message ID: \(messageID)") } // Print full message. print(userInfo) completionHandler(UIBackgroundFetchResult.newData) } } @available(iOS 10, *) extension AppDelegate : UNUserNotificationCenterDelegate { func userNotificationCenter(_ center: UNUserNotificationCenter, willPresent notification: UNNotification, withCompletionHandler completionHandler: @escaping (UNNotificationPresentationOptions) -> Void) { let userInfo = notification.request.content.userInfo if let messageID = userInfo["gcm.message_id"] { print("Message ID: \(messageID)") } print(userInfo) completionHandler([]) } func userNotificationCenter(_ center: UNUserNotificationCenter, didReceive response: UNNotificationResponse, withCompletionHandler completionHandler: @escaping () -> Void) { let userInfo = response.notification.request.content.userInfo if let messageID = userInfo["gcm.message_id"] { print("Message ID: \(messageID)") } print(userInfo) completionHandler() } }コピペでできると思いますので、そのように実装してください。
こちらでコードの設定も完了です。
アプリを実機に接続して、アプリを起動し、通知の許可のダイアログが出ると思うので許可した状態で置いておいてください。(通知の許可がないと通知が届きません。+リモートの通知は実機でないと届かないです。)Cloud Messagingより通知を送信する
- あとは通知を送信するだけです!Firebase Console左メニューよりCloud Messagingを選択します。
- Send your firdt messageをクリックし、通知する内容を入力します。(適当で大丈夫です。) 次へをクリックします。
- アプリを選択から自分のアプリを選択して次へをクリックします。
- スケジュールは細かく設定できますが、今は現在で大丈夫です。次へをクリックします。
- コンバージョンイベントは特に何も設定せず次へをクリックします。
- 最後は通知音のON、OFFやIOSバッチ(アプリ右上につく赤い丸いやつ)の数量など細かく設定できます。設定はお任せします。問題なければ確認をクリックします。
- 最後に公開をクリックすると通知はが発送され、実機に通知が届きます。
- 以上で設定と通知が完了しました。
プッシュ通知が正しく配信されない場合
- 書類の作成順序を間違えている
- 途中で作成した書類を編集した
- 開発用証明書が複数作成されている
- CSRファイルが複数作成されている
- AppIDを作成時に「Push Notifications」にチェックを入れ忘れている
- 実機でアプリが開きっぱになっていないか確認(アプリが開いてると届かないです。)
- 通知の許可がうまくできていない可能性あるので、アプリを一度削除して再インストールする
- Info.plistに変な設定をしていないか確認する。(記事によってはInfo.plistに設定が必要と書いてありますが特に必要ないです。)
Firebase Admin SDKを使ったPush通知
Firebase Cloud Messaging (FCM)を利用して、サーバからスマホへのPush通知を試してみました。サーバからFirebase経由でPush通知を送信する方法を書いていきます。
Firebase Admin SDKをインストール
$ pip install firebase-adminサービス アカウントを認証して Firebase サービスへのアクセスを承認するには、秘密鍵ファイルを JSON 形式で生成する必要があります。
Firebase consoleからfirebase接続用の鍵ファイルを取得
- Firebase コンソールの左上にある歯車マークを押して、プロジェクトの設定画面を開きます。
- この画面から「サービスアカウント」のタブをクリックします。
- 「新しい秘密鍵の生成」ボタンを押すと、秘密鍵のファイルがダウンロードされます。
- キーを含む JSON ファイルを安全に保管します。
特定のスマホにPush通知
特定のスマホ(YOUR_REGISTRATION_TOKEN)へPush通知を送信します。
コードは以下です。path/to/serviceAccountKey.jsonは、ダウンロードした秘密鍵のファイルを指定します。import firebase_admin from firebase_admin import credentials from firebase_admin import messaging cred = credentials.Certificate("path/to/serviceAccountKey.json") firebase_admin.initialize_app(cred) # This registration token comes from the client FCM SDKs. registration_token = 'YOUR_REGISTRATION_TOKEN' # See documentation on defining a message payload. message = messaging.Message( notification=messaging.Notification( title='test server', body='test server message', ), token=registration_token, ) # Send a message to the device corresponding to the provided # registration token. response = messaging.send(message) # Response is a message ID string. print('Successfully sent message:', response)トピックに参加しているスマホにPush通知
特定のトピックに参加している複数のスマホにPush通知する方法です。
例えば、"weather"のトピックに参加しているスマホにPush通知するときは、メッセージの作成部分を以下のように変更します。
具体的には、tokenの部分をtopicに変更するだけです。message = messaging.Message( notification=messaging.Notification( title='test server', body='test server message', ), topic='weather', )iosでトピックへの参加は、AppDelegate.swiftに以下のようなコードで実現できます。
Messaging.messaging().subscribe(toTopic: "weather") { error in
    print("Subscribed to weather topic")
}
応用編 アイコン右上の数字(バッジ表示)をつける
今までは、タイトルとメッセージのみでしたが、バッジ処理(アイコン右上の数字)もつけてみようと思います。
以下のようなコードで実現できます。import firebase_admin from firebase_admin import credentials from firebase_admin import messaging cred = credentials.Certificate("path/to/serviceAccountKey.json") firebase_admin.initialize_app(cred) notification = messaging.Notification( title='test server', body='test server message', ) topic='weather' apns = messaging.APNSConfig( payload = messaging.APNSPayload( aps = messaging.Aps(badge = 1) # ここがバックグランド通知に必要な部分 ) ) message = messaging.Message( notification=notification, apns=apns, topic=topic, ) response = messaging.send(message) print('Successfully sent message:', response)終わりに
振り返ってみましたが、かなりの文字数になってしまいました。
それほど、大変ってことですかね?
長文を読んでくれて、ありがとうございました。
以下が参考にさせて頂いたリンクになります。
1. Firebase を iOS プロジェクトに追加する
2. 【Swift5】リモートプッシュ通知の実装方法
3. プッシュ通知に必要な証明書の作り方2020
4. Firebase Admin SDKを使ったPush通知
- 投稿日:2020-11-16T09:48:41+09:00
[Swift5]複雑なJSONの解析をおこない、条件を満たす要素のindexを取得する方法
はじめに
JSON解析についてわからない方はコチラ▼の記事を参考にしてください。
[Swift5]ライブラリ 'SwiftyJSON' を使ってJSONから配列(個別)の情報を取得する
https://qiita.com/nkekisasa222/items/84c40bbfacfaca9f38a9JSONデータの確認
joyCountArray.[{ "document_tone" : { "tones" : [ { "tone_name" : "Joy", "score" : 0.53749899999999995, "tone_id" : "joy" } ] } }, { "document_tone" : { "tones" : [ ] }, "sentences_tone" : [ { "tones" : [ ], "text" : "Kozai \"Aza\" Haruka: Haruka, Ie no Haruka: Haruka, Ie no Haruka, 'The body is too clean.'", "sentence_id" : 0 }, { "tones" : [ ], "text" : "(Entame NEXT)", "sentence_id" : 1 } ] }, { "document_tone" : { "tones" : [ { "tone_id" : "joy", "score" : 0.67608400000000002, "tone_name" : "Joy" }, { "tone_id" : "analytical", "score" : 0.92818699999999998, "tone_name" : "Analytical" } ] } }, { "document_tone" : { "tones" : [ { "tone_name" : "Joy", "score" : 0.74235700000000004, "tone_id" : "joy" } ] }, "sentences_tone" : [ { "sentence_id" : 0, "tones" : [ ], "text" : "Ariyoshi is also a lavatory?" }, { "sentence_id" : 1, "tones" : [ { "tone_name" : "Joy", "tone_id" : "joy", "score" : 0.75596300000000005 } ], "text" : "Mihopa's \"overwhelmable beauty Body\" sexy water shoe shots are released (Entame NEXT)" } ] }, { "sentences_tone" : [ { "text" : "Yuzuno Mizusawa, a beautiful woman with a hairstyle of blue hair, is released from hair color to a single one-peoped kamiwanpi with a blue-leg.", "sentence_id" : 0, "tones" : [ { "tone_id" : "joy", "tone_name" : "Joy", "score" : 0.76069399999999998 } ] }, { "sentence_id" : 1, "text" : "(Entame NEXT)", "tones" : [ ] } ], "document_tone" : { "tones" : [ { "tone_id" : "joy", "score" : 0.76504700000000003, "tone_name" : "Joy" } ] } }, { "sentences_tone" : [ { "text" : "Princess Inster of the Graviar world, Inster Saki Saki, said, \"I may not have felt any resistance to escaping from the beginning.\"", "sentence_id" : 0, "tones" : [ { "tone_id" : "joy", "score" : 0.64593199999999995, "tone_name" : "Joy" }, { "tone_id" : "tentative", "score" : 0.86333300000000002, "tone_name" : "Tentative" } ] }, { "text" : "(Entame NEXT)", "sentence_id" : 1, "tones" : [ ] } ], "document_tone" : { "tones" : [ { "score" : 0.65832100000000005, "tone_name" : "Joy", "tone_id" : "joy" }, { "score" : 0.98048800000000003, "tone_name" : "Tentative", "tone_id" : "tentative" } ] } }, { "document_tone" : { "tones" : [ { "score" : 0.70347899999999997, "tone_name" : "Joy", "tone_id" : "joy" } ] } }, { "sentences_tone" : [ { "sentence_id" : 0, "text" : "\"Shiratama\" in \"The Edge of the Bend\" and the dog dog \"Shiratama\" (The Dog Warrior), a dog in the Twin Till, the dog of the Twin Tin.", "tones" : [ ] }, { "sentence_id" : 1, "text" : "(Entame Next)", "tones" : [ ] } ], "document_tone" : { "tones" : [ ] } }, { "document_tone" : { "tones" : [ ] } }, { "document_tone" : { "tones" : [ { "tone_name" : "Analytical", "score" : 0.61642600000000003, "tone_id" : "analytical" } ] } }, { "document_tone" : { "tones" : [ { "score" : 0.58929500000000001, "tone_id" : "analytical", "tone_name" : "Analytical" } ] } }, { "sentences_tone" : [ { "text" : "Perfume, grag, grag, chalen, grag, grag!", "sentence_id" : 0, "tones" : [ ] }, { "text" : "The two shots that were too beautiful were the subject of the buzzo (Entame Next).", "sentence_id" : 1, "tones" : [ { "tone_name" : "Joy", "score" : 0.80030299999999999, "tone_id" : "joy" } ] } ], "document_tone" : { "tones" : [ { "tone_name" : "Joy", "score" : 0.79371400000000003, "tone_id" : "joy" } ] } }, { "document_tone" : { "tones" : [ { "tone_id" : "joy", "score" : 0.63750700000000005, "tone_name" : "Joy" } ] } }, { "document_tone" : { "tones" : [ { "tone_name" : "Joy", "score" : 0.83795299999999995, "tone_id" : "joy" } ] } }, { "sentences_tone" : [ { "sentence_id" : 0, "tones" : [ { "tone_name" : "Joy", "tone_id" : "joy", "score" : 0.67072399999999999 } ], "text" : "\"Bomb Girl,\" \"Bomb Girl,\" with a limited number of New Hare Acaler in the public, \"It's getting more and more cute.\"" }, { "sentence_id" : 1, "tones" : [ ], "text" : "(Entame NEXT)" } ], "document_tone" : { "tones" : [ { "score" : 0.69078499999999998, "tone_id" : "joy", "tone_name" : "Joy" } ] } }, { "document_tone" : { "tones" : [ ] } }, { "sentences_tone" : [ { "sentence_id" : 0, "tones" : [ { "tone_id" : "tentative", "tone_name" : "Tentative", "score" : 0.71630099999999997 } ], "text" : "\"I'm happy just looking at the scene of the popular Cossprayer ShenInin uniform.\"" }, { "sentence_id" : 1, "tones" : [ ], "text" : "(Entame NEXT)" } ], "document_tone" : { "tones" : [ { "score" : 0.94484500000000005, "tone_name" : "Tentative", "tone_id" : "tentative" } ] } }, { "document_tone" : { "tones" : [ { "score" : 0.77552100000000002, "tone_name" : "Joy", "tone_id" : "joy" } ] }, "sentences_tone" : [ { "sentence_id" : 0, "tones" : [ { "tone_id" : "joy", "score" : 0.62795699999999999, "tone_name" : "Joy" } ], "text" : "Followers: 32.4 million!" }, { "sentence_id" : 1, "tones" : [ { "tone_id" : "joy", "tone_name" : "Joy", "score" : 0.75022100000000003 } ], "text" : "The Queen of the Gravier and the Queen of the Gravies of the Gravies and the Queen of the Sainting and the Mine Tree" } ] }, { "document_tone" : { "tones" : [ { "score" : 0.83205300000000004, "tone_id" : "joy", "tone_name" : "Joy" } ] } }, { "document_tone" : { "tones" : [ { "tone_name" : "Joy", "tone_id" : "joy", "score" : 0.53014799999999995 } ] } }, { "document_tone" : { "tones" : [ ] } }, { "document_tone" : { "tones" : [ ] } }, { "sentences_tone" : [ { "text" : "\"The thighs are thicker.\"", "tones" : [ ], "sentence_id" : 0 }, { "text" : "Yuho HONDA, Cute and Sexual Dresses (Entame NEXT)", "tones" : [ { "tone_id" : "joy", "score" : 0.75571100000000002, "tone_name" : "Joy" } ], "sentence_id" : 1 } ], "document_tone" : { "tones" : [ { "tone_id" : "joy", "score" : 0.73423000000000005, "tone_name" : "Joy" } ] } }, { "document_tone" : { "tones" : [ { "tone_id" : "joy", "score" : 0.67583000000000004, "tone_name" : "Joy" } ] }, "sentences_tone" : [ { "text" : "\"Detective Conan\" with voice actors and sumptues, \"Detective Conan,\" which is too much of a love for \"Detective Conan,\" and \"Sumitai Edogawa.\"", "tones" : [ { "tone_id" : "joy", "tone_name" : "Joy", "score" : 0.70681300000000002 } ], "sentence_id" : 0 }, { "text" : "(\"Entame NEXT\")", "tones" : [ ], "sentence_id" : 1 } ] }, { "document_tone" : { "tones" : [ { "tone_name" : "Analytical", "tone_id" : "analytical", "score" : 0.84622399999999998 }, { "tone_name" : "Tentative", "tone_id" : "tentative", "score" : 0.61621599999999999 } ] }, "sentences_tone" : [ { "text" : "\"I don't feel comfortable with the Dokidoki\" (Entame NEXT), which is also known as \"Suta Akari,\" and the girl's favorite helcey.", "tones" : [ { "score" : 0.58152999999999999, "tone_name" : "Joy", "tone_id" : "joy" } ], "sentence_id" : 0 }, { "text" : "\" I don't feel like a dog", "tones" : [ { "tone_name" : "Analytical", "score" : 0.94455100000000003, "tone_id" : "analytical" } ], "sentence_id" : 1 } ] }, { "document_tone" : { "tones" : [ { "tone_name" : "Analytical", "score" : 0.82533800000000002, "tone_id" : "analytical" } ] } }, { "document_tone" : { "tones" : [ ] } }, { "document_tone" : { "tones" : [ ] } }, { "sentences_tone" : [ { "sentence_id" : 0, "text" : "Mo Musume.Makino Mari, a swimsuit, and a sneaker's legendable offshot: \"You really are a goddess.\"", "tones" : [ { "tone_name" : "Analytical", "score" : 0.50676299999999996, "tone_id" : "analytical" } ] }, { "sentence_id" : 1, "tones" : [ ], "text" : "(Entame NEXT)" } ], "document_tone" : { "tones" : [ { "tone_name" : "Analytical", "tone_id" : "analytical", "score" : 0.64375800000000005 } ] } }, { "document_tone" : { "tones" : [ { "score" : 0.66994399999999998, "tone_name" : "Joy", "tone_id" : "joy" } ] } }, { "document_tone" : { "tones" : [ { "tone_name" : "Joy", "score" : 0.91817700000000002, "tone_id" : "joy" } ] } }, { "document_tone" : { "tones" : [ { "score" : 0.61852099999999999, "tone_name" : "Joy", "tone_id" : "joy" } ] } }, { "document_tone" : { "tones" : [ { "tone_id" : "joy", "tone_name" : "Joy", "score" : 0.50842900000000002 } ] }, "sentences_tone" : [ { "text" : "Queen Inster in the Graviar world, Inster-Sakuchimi, said: \"Anyway, I'm aware of this by shooting.\"", "tones" : [ ], "sentence_id" : 0 }, { "text" : "(\"Entame Next\")", "tones" : [ ], "sentence_id" : 1 } ] }, { "document_tone" : { "tones" : [ { "tone_id" : "sadness", "score" : 0.503888, "tone_name" : "Sadness" }, { "tone_id" : "analytical", "score" : 0.57936699999999997, "tone_name" : "Analytical" } ] } }, { "document_tone" : { "tones" : [ { "tone_id" : "joy", "tone_name" : "Joy", "score" : 0.84084999999999999 } ] } }]このようにJSON形式のデータが存在しており、とある条件を満たす要素のインデックス番号を取得したいとします。今回指定する条件は、
tone_nameが "Joy" かつ "score" が0.5以上とします。条件をコードに落とし込む
JsonAnalysisModel.swiftclass JsonAnalysisModel { //JSON解析で使用するプロパティ var count = 0 var arrayCount = 35 var sampleJsonArray: [JSON] = [] var joyCountArray : [Any] = [] #省略 //メソッド作成 func startJsonAnalysis() { //JSONデータの確認(#JSONデータの確認で表示したデータ) print(sampleJsonArray.debugDescription) //sampleJsonArrayの要素数だけ繰り返し処理を行う(-1で整合性) for i in 0...arrayCount-1 { //JSONデータが "Joy" && scoreが0.5以上の要素で条件を絞る(ここで要素を検索) if sampleJsonArray[i]["document_tone"]["tones"][count]["score"] > 0.5 && sampleJsonArray[i]["document_tone"]["tones"][count]["tone_name"] == "Joy" { //条件を満たした要素のindex番号の取得(-1で整合性) joyCountArray.append(sampleJsonArray[0].count+i-1) } } //取得結果の確認 print("joyCountArray: \(joyCountArray)") } }ではログを確認してみましょう。
joyCountArray: [0, 2, 3, 4, 5, 6, 11, 12, 13, 14, 17, 18, 19, 22, 23, 29, 30, 31, 32, 34]これでJSONの解析をおこない、条件を満たす要素のindexの取得ができましたね!
最後に
今回はJSON解析の応用で複雑なJSONの解析をおこない、条件を満たす要素のindexを取得する方法について投稿しました。Swiftでは頻繁にJSON解析をおこなうので様々な条件に対応できるようにならないといけませんね。
最後までご覧いただきありがとうございました!
- 投稿日:2020-11-16T02:36:19+09:00
【SwiftUI】Mapkitを使った位置情報の取得と逆ジオコーデイング
はじめに
SwiftUIでMapkitとFirebaseを使用し、位置情報をデータベースに保存することを目的とする。
今回はSwiftUIで取得した現在地から逆ジオコーディングし、都道府県名と市区町村名を取得するところまでを記載。
Mapkitを使って現在置を取得する方法は前回記事を参考にしてください。参考記事
【SwiftUI】Mapkitを使った位置情報の取得とピンの表示開発環境
OSX 10.15.7 (Catalina)
Xcode 12.0.1
CocoaPods 1.10.0取得した現在地から逆ジオコーディングを実行する
追加するのは
makeCoordinatorの下部にtitleとsubtitleを定義します。ContentView.swiftfunc makeCoordinator() -> mapView.Coordinator { return mapView.Coordinator(parent1: self) } // ここから追加 // 都道府県名 @Binding var title : String // 市区町村名 @Binding var subtitle : String func makeUIView(context: UIViewRepresentableContext<mapView>) -> MKMapView { // Tokyo 35.6804° N, 139.7690° E次に
Coordinatorクラス内のlocationManagerファンクション内にtitleとsubtitleを追加します。
今回は都道府県名と市区町村名を取得できればよいため、administrativeAreaとlocalityを設定しました。
他の地名や郵便番号など取得したい場合はこの箇所を変更、または追加していきます。その場合は以下の記事が参考になりました。
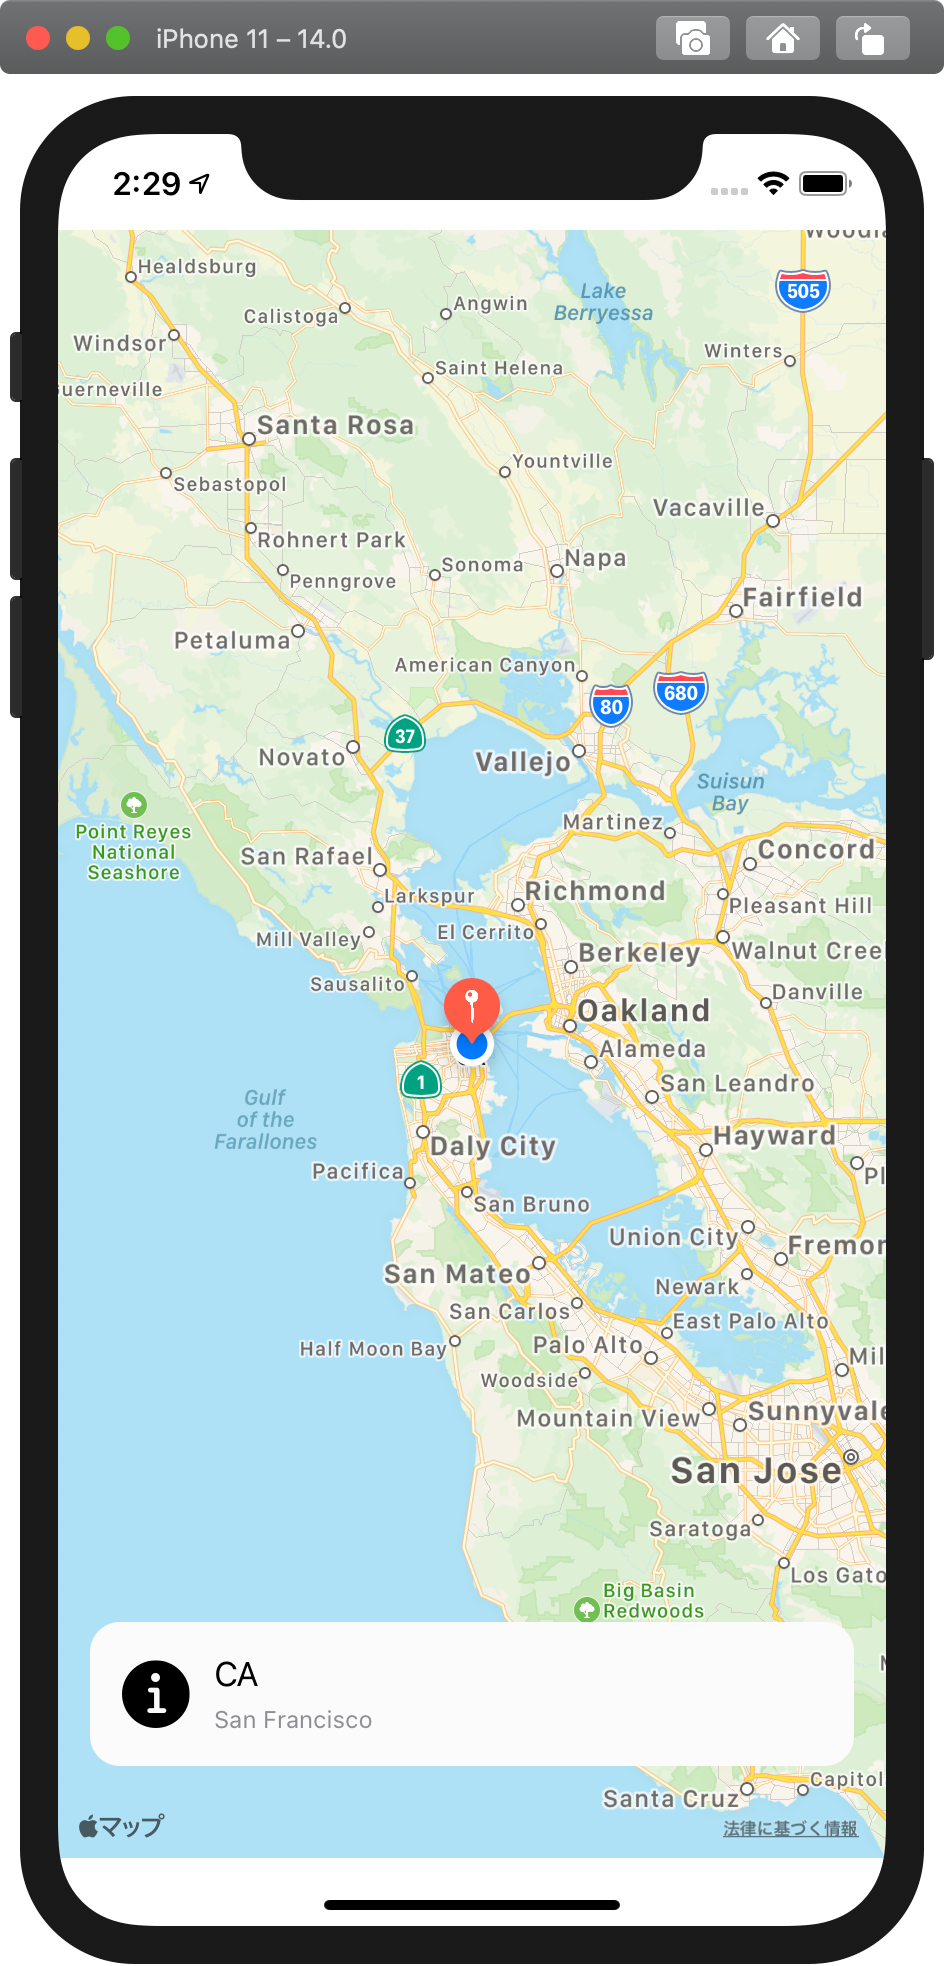
[Swift] MapKitを使って”ジオコーディング・逆ジオコーディング”をやってみるContentView.swiftclass Coordinator: NSObject, CLLocationManagerDelegate { var parent : mapView init(parent1 : mapView) { parent = parent1 } func locationManager(_ manager: CLLocationManager, didChangeAuthorization status: CLAuthorizationStatus) { if status == .denied{ parent.alert.toggle() print("denied") } } func locationManager(_ manager: CLLocationManager, didUpdateLocations locations: [CLLocation]) { let location = locations.last let point = MKPointAnnotation() let georeader = CLGeocoder() georeader.reverseGeocodeLocation(location!) { (places, err) in if err != nil { print((err?.localizedDescription)!) return } // ここから追加 // 都道府県名 self.parent.title = (places?.first?.administrativeArea)! // 市町村名 self.parent.subtitle = (places?.first?.locality)! // 前回記事から一部変更。ピンの選択時に都道府県名と市区町村名を表示できるように設定。 let place = places?.first?.administrativeArea let subPlace = places?.first?.locality print(place as Any) point.title = place point.subtitle = subPlace point.coordinate = location!.coordinate self.parent.map.removeAnnotations(self.parent.map.annotations) self.parent.map.addAnnotation(point) let region = MKCoordinateRegion(center: location!.coordinate, latitudinalMeters: 10000, longitudinalMeters: 100000) print(region) self.parent.map.region = region } } }今後、ここで取得した緯度経度と都道府県名、市区町村名はFirebaseに保存できるようにします。
都道府県名と市区町村名を表示する
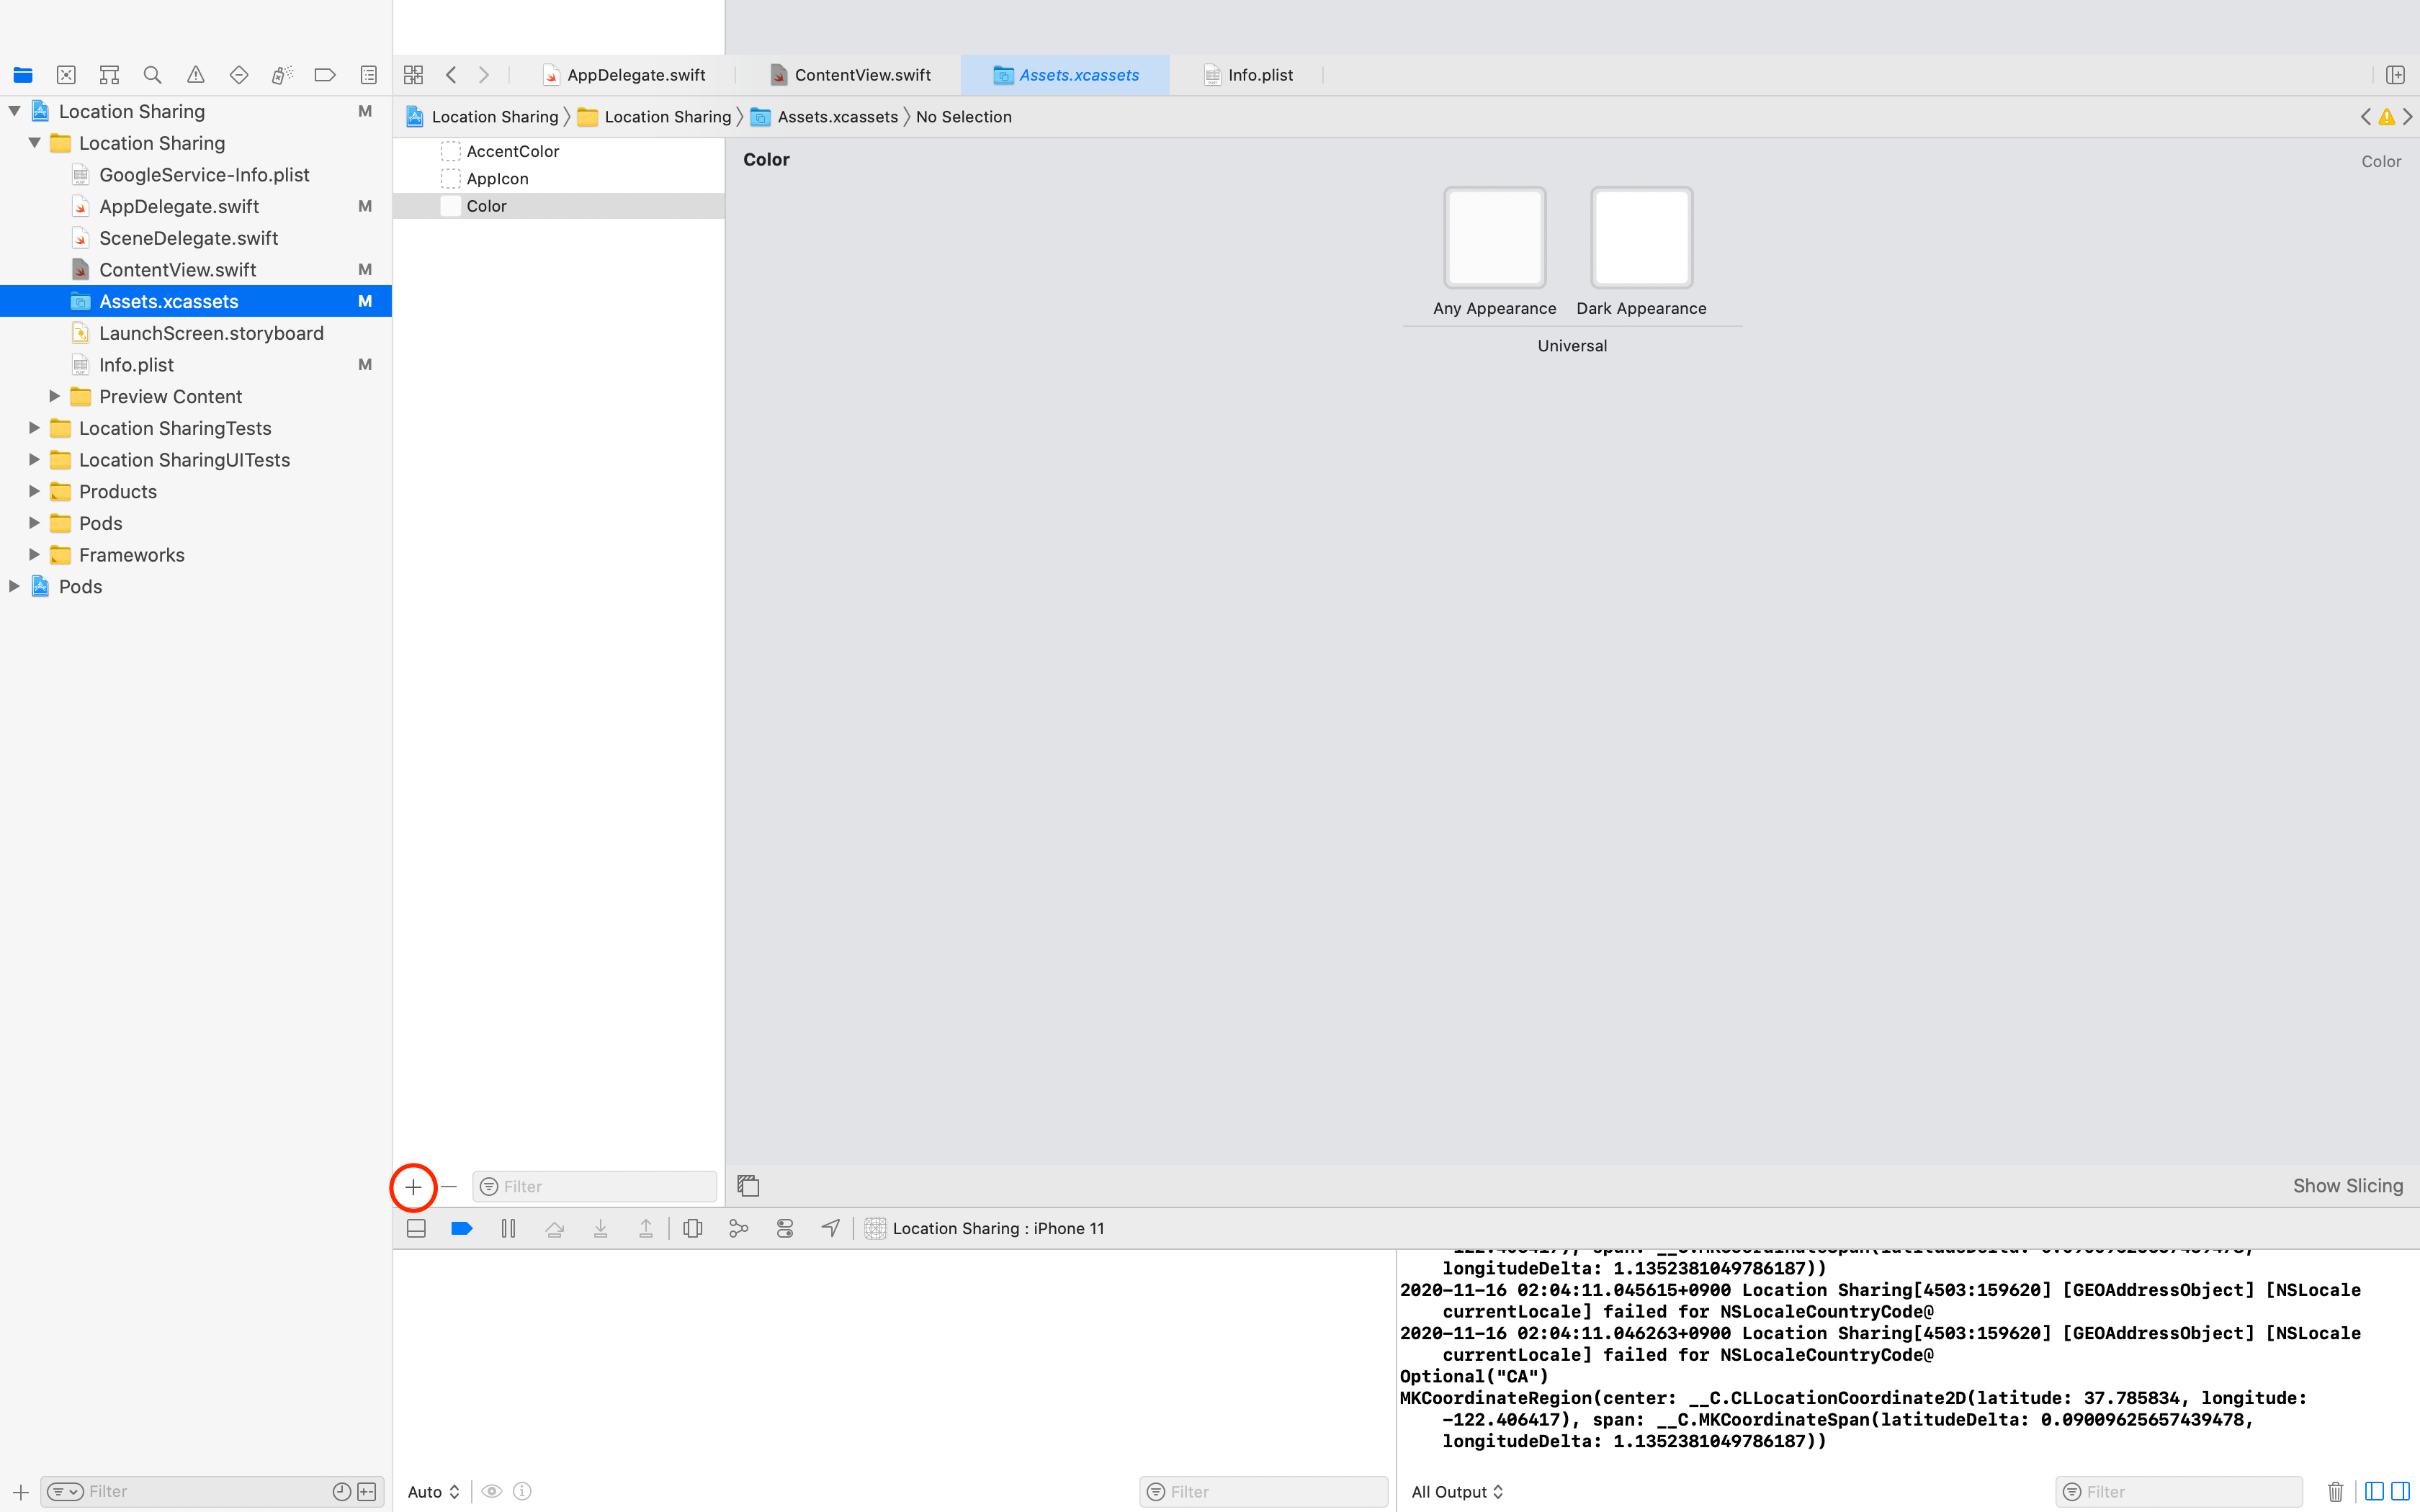
ContentView.swiftstruct ContentView: View { // ここから追加 @State var title = "" @State var subtitle = "" @State var manager = CLLocationManager() @State var alert = false var body: some View { // 以下の行を追加 // ContentViewに地図を表示 ZStack(alignment: .bottom, content: { mapView(manager: $manager, alert: $alert, title: $title, subtitle: $subtitle).alert(isPresented: $alert) { Alert(title: Text("Please Enable Location Access In Setting Panel!!!")) } // 以下を追加 // 地名を取得した場合に表示 if self.title != "" { HStack(spacing: 12) { Image(systemName: "info.circle.fill").font(.largeTitle).foregroundColor(.black) VStack(alignment: .leading, spacing: 5){ Text(self.title).font(.body).foregroundColor(.black) Text(self.subtitle).font(.caption).foregroundColor(.gray) } Spacer() } .padding() // "Color"はAssets.xcassetsで設定 .background(Color("Color")) .cornerRadius(15) .offset(y: -30) .padding() } }) } }"Color"はAssets.xcassetsで設定しました。[+]から、[Color set]を選択し、色を作成しました。
Simulatorで地図の表示と確認
以上です。
- 投稿日:2020-11-16T02:20:23+09:00
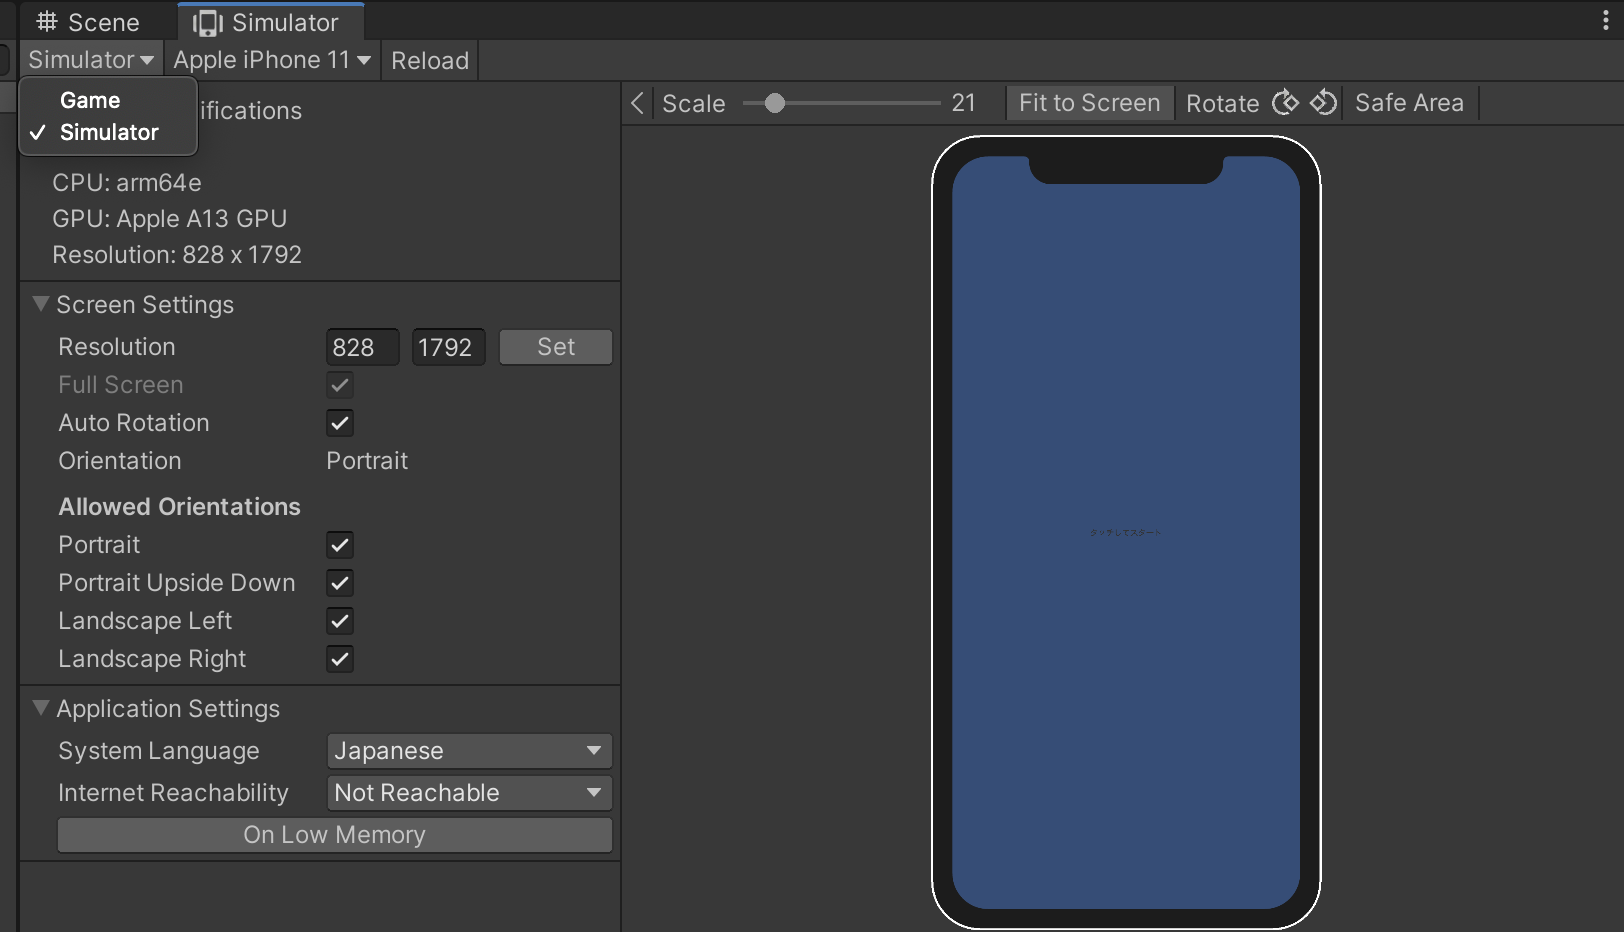
Unity Device Simulator のインストール方法
背景
Device Simulatorのインストール方法が変わったようなので、忘却録として。。。
開発環境
PC:macOS Catalina
Unity:2020.1.10f1内容
「Unity Device Simulator インストール」で検索すると、
同じような検索結果が出てくる。
メニューのwindowからPackage ManagerをクリックするとPackage Managerのダイアログが表示される。
ダイアログのAdvancedからshow preview pakagesにチェックを入れて、Device Simulatorで検索すれば見つかる、、、が肝心のAdvancedがない。調べてみると、Unity 2020.1以降からインストール方法が変わったらしい。(参考のUnity 日本語ヘルプデスクに書いてあります)
書いてある通りにやれば、無事インストールでき、GameタブにGameとSimulatorを選択できるようになる。
Safe Areaを表示したり、回転することもできる。
パッケージのインストール
参考