- 投稿日:2020-10-27T22:45:53+09:00
C# .NetCoreで、ボートレース結果の解析 読み込みその1
やらなきゃいけないこと
前回からの続き。
C# .NetCoreで、ボートレース結果の解析 構造検討
https://qiita.com/TamanegiTarao/items/04f43d96e50cb3eeaa03以下の情報取得を行えるようにする。
- 節間タイトル
- レースタイトル
- レース情報
- 選手結果
開発環境
- Windows10
- Visual Studio Community 2019
- C# .Net Core 3.1
リスト
    public class RaceResults
    {
        public List<InternodeTitle> InternodeTitles;
        public List<RaceTitle> RaceTitles;
        public List<RaceResult> Results;
        public List<PlayerResult> PlayerResults;
    }
InternodeTitles、RaceTitlesはそれぞれ、節間、レースタイトルのリストとして登録する。
Resultsはレース結果(各配当、人気)をリストとして登録する。
(解析時、配当オンリーの際はこちらのほうが、負荷が少ないため。)
PlayerResultはInternodeTitles,ReceTitlesは各リストに紐づけるようにする。Shift-JISのエンコード
.NetCoreの場合 Shift-JISのEncodingを使用するには
Encoding.RegisterProvider(CodePagesEncodingProvider.Instance);をEncoding前までに宣言しておく必要がある。
System.Textをusingしておくこと。
(https://qiita.com/sugasaki/items/0639ea9ca07f1ba7a9e0)List重複対策
上記の通り、節間タイトル、レースタイトルはリストで管理するため、
読み込んだ文字列がリスト内にあるか確認する必要がある。if( List.Exist(x => x.SearchParameter == ReadParameter)) { /* 存在する際の処理 */ } else { /* 存在しない際の処理 */ }https://csharp-ref.com/program_linq-lambda.html
読み込みの流れ
前回の例にとってデータの取得する位置を決める。
STARTK ←無視
24KBGN ←1.開催場コードを取得
大 村[成績]     10/ 1      第6回夜の本命・波乱  第 5日 ←無視
←無視
                            *** 競走成績 ***←無視
←無視
          第6回夜の本命・波乱決定戦           ←2.節間タイトルを取得
←無視
   第 5日          2019/10/ 1                             ボートレース大 村←3.節間日、開催年月日の取得
←ここから無視
               -内容については主催者発行のものと照合して下さい-

   [払戻金]       3連単           3連複           2連単         2連複
           1R  3-1-2    3360    1-2-3     260    3-1    1560    1-3     290
          ...略...
          12R  1-4-6    2010    1-4-6     810    1-4     530    1-4     390


←ここまで無視
   1R       一 般                    H1800m  曇り  風  北西  1m  波   1cm←4.レース番号、レースタイトル、風向、風速の取得
  着 艇 登番  選 手 名  モーター ボート 展示 進入 スタートタイミンク レースタイム 差し   ←5.決まり手の取得
-------------------------------------------------------------------------------
  01  3 2841 吉 田    稔 70   75  6.82   3    0.14     1.50.6←6.選手結果の取得
  ...略...
  06  5 3856 水 野  暁 広 43   21  6.79   5    0.24      .  . ←6.選手結果の取得

        単勝     3         2150  ←7.ここからレース結果の取得
        複勝     3          170  1          120
        2連単   3-1       1560  人気     6
        2連複   1-3        290  人気     2
        拡連複   1-3        170  人気     3
                 2-3        140  人気     2
                 1-2        120  人気     1
        3連単   3-1-2     3360  人気    12
        3連複   1-2-3      260  人気     1 ←7.ここまでレース結果の取得


  2~12Rは省略←4~7を繰り返す。
24KEND
22KBGN←1~7を繰り返す
...略
05KEND
FINALK
1~3の開催場や節間タイトルなどの全体的な情報と、4~7のレース毎の情報に分けることができる。
1~3の間と4~7の間は、それぞれ、行数で管理することが望ましそう。
欠場の場合はどのような記載になるかは動かしてから考える。コーディング
文字列は基本的に使いたくない。
たくさんのデータを拾いたいのでなるべく文字列で保持したくない。
レースタイトル等は仕方ないが、複数の要素しかないも文字列は数値で管理したいため、
以下の通り、Enumやintへの変換を行った
- 風向き
public enum WindDirection { None, N, NE, E, ES, S, SW, W, WN };
public static WindDirection WindDirectionNumber(string str)
{
    switch (str)
    {
        case "無風 ": return WindDirection.None;
        case "北  ": return WindDirection.N;
        case "北東 ": return WindDirection.NE;
        case "東  ": return WindDirection.E;
        case "南東 ": return WindDirection.ES;
        case "南  ": return WindDirection.S;
        case "南西 ": return WindDirection.SW;
        case "西  ": return WindDirection.W;
        case "北西 ": return WindDirection.WN;
        default: return WindDirection.None;
    }
}
3文字固定で検索を行うようにした。
- 決まり手
public enum Kimarite { Nige, Makuri, Sashi, Makurisashi, Megumare, Nuki, Huseiritsu }

public static Kimarite KimariteNumber(string str)
{
    switch (str)
    {
        case "逃げ   ": return Kimarite.Nige;
        case "差し   ": return Kimarite.Sashi;
        case "まくり  ": return Kimarite.Makuri;
        case "まくり差し": return Kimarite.Makurisashi;
        case "抜き   ": return Kimarite.Nuki;
        case "恵まれ  ": return Kimarite.Megumare;
        case "     ": return Kimarite.Huseiritsu;
        default: return Kimarite.Nige;
    }
}
- 着順のフライング、失格、欠場 フライングや欠場の場合は数値ではなく特定の英数字になる。 単純にParseではフライングなのか欠場なのか判断できないため、 以下の通り、Parse失敗時は着順がつかなかった理由を判別できるようにした。
        public static int ResultNumber(string str)
        {
            string[] resultList =
            {
                "F ","L ","K0","K1",
                "S0","S1","S2"
            };

            int rtn;
            if (int.TryParse(str, out rtn) == false)
            {
                for (int i = 0; i < resultList.Length; i++)
                {
                    if (str == resultList[i])
                    {
                        return i * (-1);
                    }
                }
                return resultList.Length * (-1);
            }
            return rtn;
        }
文字列から数値への変換
Parseは変換ができないと例外が発生するため、TryParseを使用し、
汎用の関数を用意した。static public int IntParse(string str) { int rtn = 0; if(!int.TryParse(str,out rtn)) { rtn = 0; } return rtn; } static public double DoubleParse(string str) { double rtn = 0.0; if (!double.TryParse(str, out rtn)) { rtn = 0; } return rtn; }実際にリードして読み込む
今までの内容を踏まえてリード部分を作成した。
public void Read(string file)
{
    Encoding.RegisterProvider(CodePagesEncodingProvider.Instance);
    using (var sr = new StreamReader(file, Encoding.GetEncoding("shift_jis")))
    {
        InternodeTitle internodeTitle = new InternodeTitle();
        RaceTitle raceTitle;
        RaceInfo raceInfo = new RaceInfo();
        RaceResult raceResult = new RaceResult();
        Race raceBase = new Race();
        Race race;
        int inLineInfo = -9999;
        int inLinePlayer = -9999;
        int place = 0;
        bool entryfirst = false;
        bool nextKakurenSecond = false;
        bool nextKakurenThired = false;
        while (sr.EndOfStream == false)
        {
            var line = sr.ReadLine();

            if (line.Contains("KBGN"))
            {   // 1.開催場コードの取得
                place = Lib.IntParse(line.Replace("KBGN", ""));
                inLineInfo = 0;
            }
            else if (inLineInfo == 5) // 文字列を含むかどうかで拾うのがむつかしい
            {   // 2.節間タイトルを取得
                // https://csharp-ref.com/program_linq-lambda.html
                string title = _StringExtraction(line, 10, 50);
                if (InternodeTitles.Exists(x => x.Title == title))
                {
                    internodeTitle = InternodeTitles.OrderBy(x => x.Start).FirstOrDefault();
                    entryfirst = false;
                }
                else
                {
                    internodeTitle = new InternodeTitle();
                    internodeTitle.Title = title;
                    entryfirst = true;
                    InternodeTitles.Add(internodeTitle);
                }
            }
            else if (inLineInfo == 7)// 文字列を含むかどうかで拾うのがむつかしい
            {   // 3.節間日、開催年月日の取得
                raceBase.Place = place;
                raceBase.InDay = Lib.IntParse(_StringExtraction(line, 5, 2));
                DateTime dateTime = new DateTime(Lib.IntParse(_StringExtraction(line, 19, 4)),
                                                    Lib.IntParse(_StringExtraction(line, 24, 2)),
                                                    Lib.IntParse(_StringExtraction(line, 27, 2)));
                raceBase.Date = dateTime;
                if (entryfirst)
                    internodeTitle.Start = dateTime;
                internodeTitle.End = dateTime;

            }
            else if (line.Contains("H1800m"))
            {   // 4.レース番号、レースタイトル、風向、風速の取得
                race = raceBase.Clone();
                race.RaceNum = Lib.IntParse(_StringExtraction(line, 2, 2));
                // レースタイトル
                var title = _StringExtraction(line, 12, 12);
                if (RaceTitles.Exists(x => x.Title == title))
                {
                    raceTitle = RaceTitles.Where(x => x.Title == title).FirstOrDefault();
                }
                else
                {
                    raceTitle = new RaceTitle() { Title = title };
                    RaceTitles.Add(raceTitle);
                }
                // レース情報
                raceInfo = new RaceInfo();
                raceResult = new RaceResult();
                raceInfo.WindDirectionSet(_StringExtraction(line, 59, 6));
                raceInfo.WindMetor = Lib.IntParse(_StringExtraction(line, 65, 2));
                raceInfo.RaceTitle = raceTitle;
                raceInfo.Race = race;
                raceInfo.RaceResult = raceResult;
                raceInfo.InternodeTitle = internodeTitle;
            }
            else if (line.Contains(" 着 艇 登番  選 手 名  モーター ボート 展示 進入 スタートタイミンク レースタイム"))
            {   // 5.決まり手の取得
                raceInfo.KimariteSet(_StringExtraction(line, 66, 10));
                inLinePlayer = -1; // この次の行が --------------だから
            }
            else if (1 <= inLinePlayer && inLinePlayer <= 6)// 文字列を含むかどうかで拾うのがむつかしい
            {   // 6.選手結果の取得
                PlayerResult adder = new PlayerResult();
                adder.RaceInfo = raceInfo;
                adder.Number = Lib.IntParse(_StringExtraction(line, 8, 4));
                adder.Result = PlayerResult.ResultNumber(_StringExtraction(line, 2, 3));
                adder.Wakuban = Lib.IntParse(_StringExtraction(line, 6, 1));
                adder.Cource = Lib.IntParse(_StringExtraction(line, 46, 1));
                adder.Motor = Lib.IntParse(_StringExtraction(line, 30, 2));
                adder.Boat = Lib.IntParse(_StringExtraction(line, 34, 3));
                adder.Tenji = Lib.DoubleParse(_StringExtraction(line, 39, 4));
                adder.Start = Lib.DoubleParse(_StringExtraction(line, 51, 4));
                PlayerResults.Add(adder);
            }
            else if (6 < inLinePlayer && !line.Contains("不成立"))
            {   // ←7.レース結果の取得
                if (line.Contains("単勝"))
                {   // ここの特払い、傾向つかめれば統一したい。
                    if (line.Contains("特払い"))
                    {
                        raceResult.Tansho.First = -1;
                        raceResult.Tansho.Yen = Lib.IntParse(_StringExtraction(line, 27, 4));
                    }
                    else
                    {
                        raceResult.Tansho.First = Lib.IntParse(_StringExtraction(line, 17, 1));
                        raceResult.Tansho.Yen = Lib.IntParse(_StringExtraction(line, 25, 6));
                    }

                }
                if (line.Contains("複勝"))
                {
                    raceResult.Fukusho1.First = Lib.IntParse(_StringExtraction(line, 17, 1));
                    raceResult.Fukusho1.Yen = Lib.IntParse(_StringExtraction(line, 25, 6));
                    raceResult.Fukusho2.First = Lib.IntParse(_StringExtraction(line, 33, 1));
                    raceResult.Fukusho2.Yen = Lib.IntParse(_StringExtraction(line, 41, 6));
                }
                if (line.Contains("2連単") || line.Contains("2連複") || line.Contains("各連複") ||
                    nextKakurenSecond || nextKakurenThired)
                {
                    ResultTwo res = line.Contains("2連単") ? raceResult.NirenTan :
                                    line.Contains("2連複") ? raceResult.NirenFuku :
                                    line.Contains("各連複") ? raceResult.Kakuren1 :
                                    nextKakurenSecond ? raceResult.Kakuren2 : raceResult.Kakuren3;

                    res.First = Lib.IntParse(_StringExtraction(line, 17, 1));
                    res.Second = Lib.IntParse(_StringExtraction(line, 19, 1));
                    res.Yen = Lib.IntParse(_StringExtraction(line, 25, 6));
                    res.Popler = Lib.IntParse(_StringExtraction(line, 40, 3));
                    // 各連複の2.3番目は取れないので
                    nextKakurenSecond = res == raceResult.Kakuren1 ? true : false;
                    nextKakurenThired = res == raceResult.Kakuren2 ? true : false;
                }
                if (line.Contains("3連単") || line.Contains("3連複"))
                {
                    ResultThree res = line.Contains("3連単") ? raceResult.SanrenTan : raceResult.SanrenFuku;

                    res.First = Lib.IntParse(_StringExtraction(line, 17, 1));
                    res.Second = Lib.IntParse(_StringExtraction(line, 19, 1));
                    res.Thired = Lib.IntParse(_StringExtraction(line, 21, 1));
                    res.Yen = Lib.IntParse(_StringExtraction(line, 25, 6));
                    res.Popler = Lib.IntParse(_StringExtraction(line, 40, 3));
                    if (res == raceResult.SanrenFuku)
                        inLinePlayer = -9999;
                }
            }
            inLinePlayer++;
            inLineInfo++;
        }
    }
}
思ったより見にくい。保守するなら工夫が必要かも。
結果
例のファイルを読み込んで、結果を出力するようにしてみた。
結果を一部抜粋。第6回夜の本命・波乱決定戦 ,一 般 ,24,2019,10,01,5,1,0,2150,3,0,170,3,0,120,1,6,1560,3,1,2,290,1,3,0,0,0,0,0,0,0,0,0,0,0,0,12,3360,3,1,2,1,260,1,2,3,2,8,1,2841,1,3,3,70,75,6.82,0.14 第13回多摩川蛭子カップ外向発売所開設2周年記念 ,蛭子選抜戦 ,5,2019,10,01,1,12,0,430,2,0,130,2,0,470,3,13,3480,2,3,9,2990,2,3,0,0,0,0,0,0,0,0,0,0,0,0,50,14740,2,3,4,11,2640,2,3,4,2,4,2,3909,1,2,2,49,167,6.72,0.19まとめ
ようやく、結果の読み込みが行えるようになった。
多くのファイルを読み込んでくと、排他処理追加する必要が出てきそうな感じがする。今後は、細かい処理のと、スタート展示の情報が競争成績のファイルには存在していないため、
スタート展示のスクレイピングについてもやっていきたいと思う。
- 投稿日:2020-10-27T18:35:40+09:00
C#のif文でオーバーフロー確認
if文でオーバーフローを確認したいときは下記のように書きます。
if (Double.IsInfinity(value))
{
処理;
}
- 投稿日:2020-10-27T18:17:44+09:00
C#のRandamで同じ値を吐き出してしまい乱数を取得できない
処理が速いとRondom関数で乱数がうまく取得できない時があります。
(Rondom関数は時刻で乱数を生成しているため)私も、デバッグでブレークポイントを貼ってモニタすると乱数になっているのに、
普通に実行すると乱数にならず同じ値になる。という現象になり、困ったことがあります。Random r1 = new System.Random(); x = r1.Next(0, 100);以下のようにすれば、処理が速いときでも乱数を取得できます。
using System.Security.Cryptography;

byte[] b1 = new byte[4];
RNGCryptoServiceProvider r1 = new RNGCryptoServiceProvider();
r1.GetBytes(b1);
int i = System.BitConverter.ToInt32(b1, 0);

x = (Math.Abs(i) % (max - min)) + min;
- 投稿日:2020-10-27T07:32:27+09:00
VisualStudio(コンパイル結果)とRiderのWinformsのレイアウト(大きさや間隔など)が異なる場合の修正方法
FormのDesignerのAutoScaleDimensionsの値(7F,14F)をいい感じの値に変更する。

- 投稿日:2020-10-27T07:19:38+09:00
cscの作法 その41
概要
cscの作法、調べてみた。
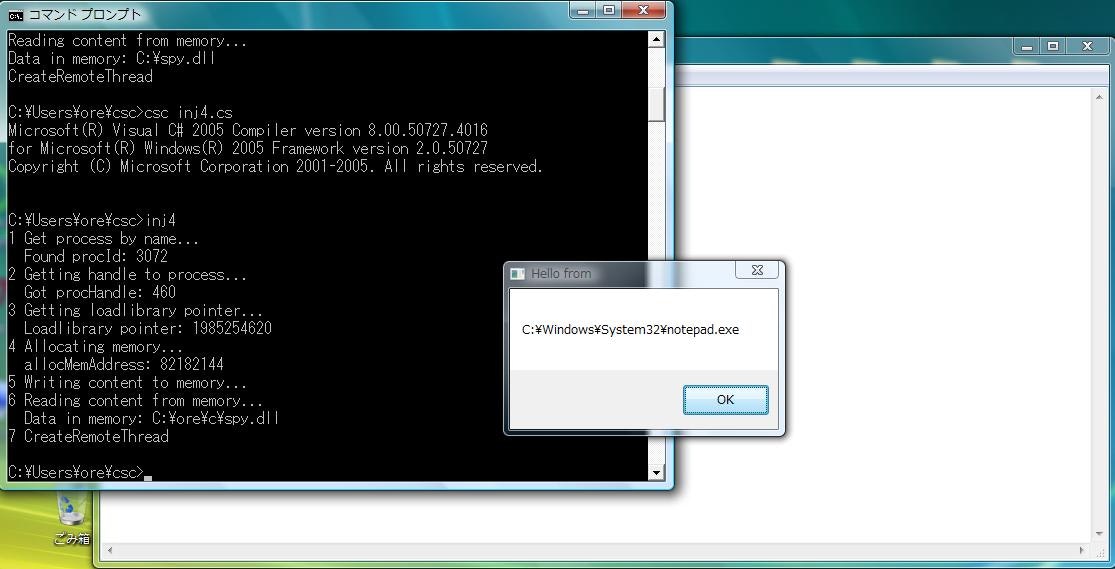
dllinjectやってみた。写真
環境
windows vista 32bit
.net 2.0サンプルコード
using System;
using System.Diagnostics;
using System.Runtime.InteropServices;
using System.Text;

public class Test {
    [DllImport("kernel32.dll")]
    public static extern IntPtr OpenProcess(int dwDesiredAccess, bool bInheritHandle, int dwProcessId);
    [DllImport("kernel32.dll", CharSet = CharSet.Auto)]
    public static extern IntPtr GetModuleHandle(string lpModuleName);
    [DllImport("kernel32", CharSet = CharSet.Ansi, ExactSpelling = true, SetLastError = true)]
    static extern IntPtr GetProcAddress(IntPtr hModule, string procName);
    [DllImport("kernel32.dll", SetLastError = true, ExactSpelling = true)]
    static extern IntPtr VirtualAllocEx(IntPtr hProcess, IntPtr lpAddress,uint dwSize, uint flAllocationType, uint flProtect);
    [DllImport("kernel32.dll", SetLastError = true)]
    static extern bool WriteProcessMemory(IntPtr hProcess, IntPtr lpBaseAddress, byte[] lpBuffer, uint nSize, out UIntPtr lpNumberOfBytesWritten);
    [DllImport("kernel32.dll")]
    static extern bool ReadProcessMemory(IntPtr hProcess, IntPtr lpBaseAddress, byte[] lpBuffer, int dwSize, ref int lpNumberOfBytesRead);
    [DllImport("kernel32.dll")]
    static extern IntPtr CreateRemoteThread(IntPtr hProcess, IntPtr lpThreadAttributes, uint dwStackSize, IntPtr lpStartAddress, IntPtr lpParameter, uint dwCreationFlags, IntPtr lpThreadId);
    const int PROCESS_CREATE_THREAD = 0x0002;
    const int PROCESS_QUERY_INFORMATION = 0x0400;
    const int PROCESS_VM_OPERATION = 0x0008;
    const int PROCESS_VM_WRITE = 0x0020;
    const int PROCESS_VM_READ = 0x0010;
    const uint MEM_COMMIT = 0x00001000;
    const uint MEM_RESERVE = 0x00002000;
    const uint PAGE_READWRITE = 4;
    public static int Main() {
        Console.WriteLine("1 Get process by name...");
        Process targetProcess = Process.GetProcessesByName("notepad")[0];
        Console.WriteLine("  Found procId: " + targetProcess.Id);
        Console.WriteLine("2 Getting handle to process...");
        IntPtr procHandle = OpenProcess(PROCESS_CREATE_THREAD | PROCESS_QUERY_INFORMATION | PROCESS_VM_OPERATION | PROCESS_VM_WRITE | PROCESS_VM_READ, false, targetProcess.Id);
        Console.WriteLine("  Got procHandle: " + procHandle);
        Console.WriteLine("3 Getting loadlibrary pointer...");
        IntPtr loadLibraryAddr = GetProcAddress(GetModuleHandle("kernel32.dll"), "LoadLibraryA");
        Console.WriteLine("  Loadlibrary pointer: " + loadLibraryAddr);
        string dllName = "C:\\ore\\c\\spy.dll";
        Console.WriteLine("4 Allocating memory...");
        IntPtr allocMemAddress = VirtualAllocEx(procHandle, IntPtr.Zero, (uint) ((dllName.Length + 1) * Marshal.SizeOf(typeof(char))), MEM_COMMIT | MEM_RESERVE, PAGE_READWRITE);
        Console.WriteLine("  allocMemAddress: " + allocMemAddress);
        Console.WriteLine("5 Writing content to memory...");
        UIntPtr bytesWritten;
        bool resp1 = WriteProcessMemory(procHandle, allocMemAddress, Encoding.Default.GetBytes(dllName), (uint)((dllName.Length + 1) * Marshal.SizeOf(typeof(char))), out bytesWritten);
        int bytesRead = 0;
        byte[] buffer = new byte[24];
        Console.WriteLine("6 Reading content from memory...");
        ReadProcessMemory(procHandle, allocMemAddress, buffer, buffer.Length, ref bytesRead);
        Console.WriteLine("  Data in memory: " + System.Text.Encoding.UTF8.GetString(buffer));
        Console.WriteLine("7 CreateRemoteThread");
        CreateRemoteThread(procHandle, IntPtr.Zero, 0, loadLibraryAddr, allocMemAddress, 0, IntPtr.Zero);
        return 0;
    }
}
以上。
- 投稿日:2020-10-27T00:31:47+09:00
Azure Relay のハイブリッド接続を .NET で試してみた
Azure の PaaS からオンプレミスへ接続できるサービスがないか調べていたら、Azure Relay で実現できそうでしたので、Azure Relay を試してみました。
Azure Relay の概要のページにもオンプレミスのサービスとクラウドとの通信についての記載があります。
Azure Relay には、ハイブリッド接続(Web ソケット or HTTP)と WCF リレーがありますが、今回は HTTP を使用したハイブリッド接続のチュートリアル+α をやってみました。
ハイブリッド接続と WCF リレーの詳細な説明も Azure Relay の概要ページに記載があります。ハイブリッド接続のチュートリアル
必要なもの
- Visual Studio
- Azure サブスクリプション
チュートリアルの概要
- Relay 名前空間の作成
- Relay 名前空間にハイブリッド接続の作成
- メッセージを受信するサーバー (リスナー) アプリの作成
- メッセージを送信するクライアント (送信側) アプリの作成
- 動作確認
Relay 名前空間の作成
- Azure Portal の Maketplace より Relay を作成します。
- 名前空間の作成画面で以下を入力し、「確認および作成」をクリックします。
- サブスクリプション
- リソースグループ
- 名前
- 場所
- 「作成」ボタンをクリックし、名前空間を作成します。
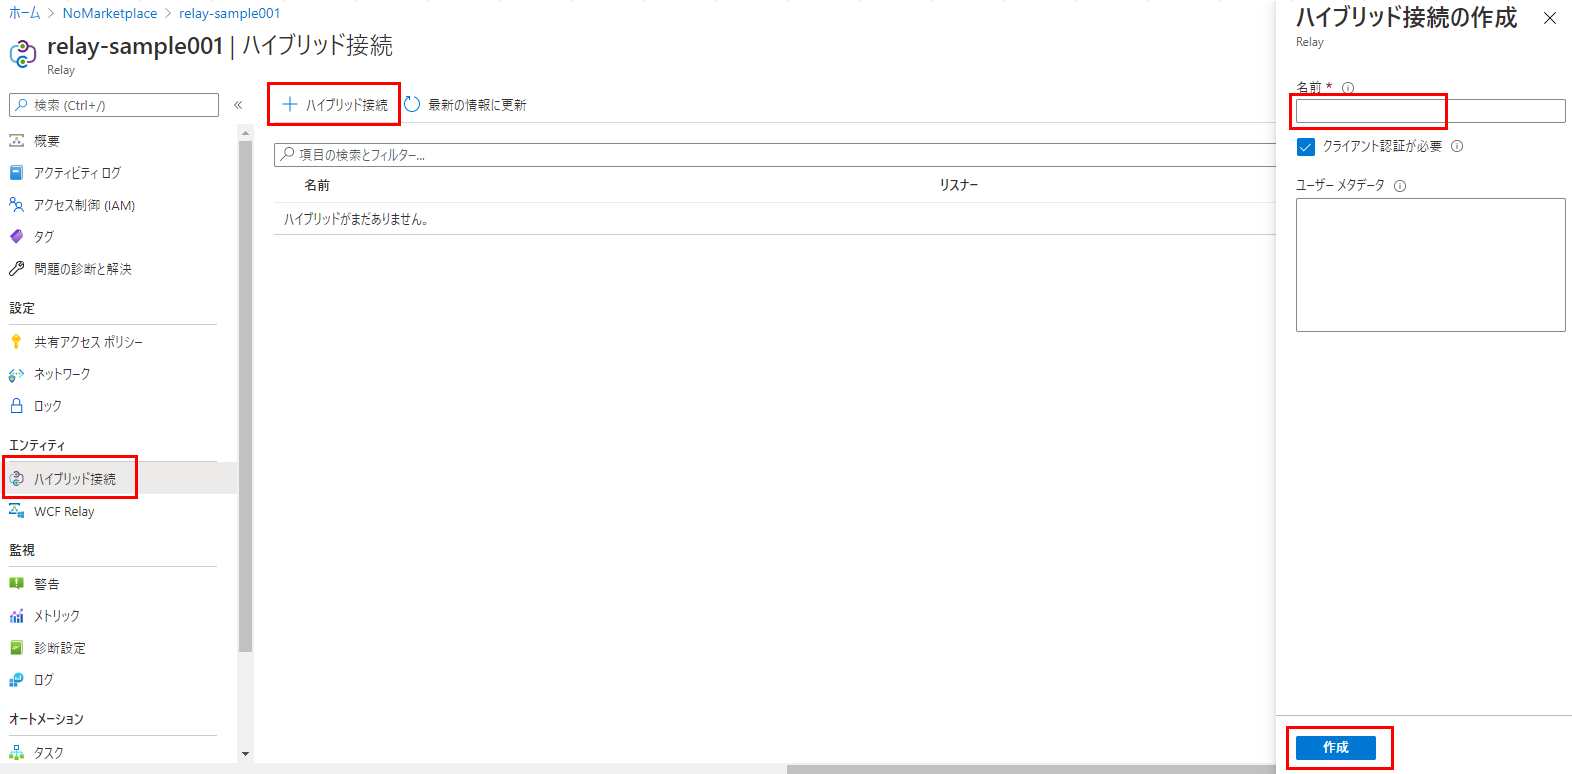
Relay 名前空間にハイブリッド接続の作成
Relay 名前空間の作成 で作成した名前空間の画面より「ハイブリッド接続」→「+ハイブリッド接続」と選択し、ハイブリッド接続の名前を入力し、「作成」ボタンをクリックします。
動作確認用のアプリの作成
ハイブリッド接続の動作確認のためのアプリの作成を行います。
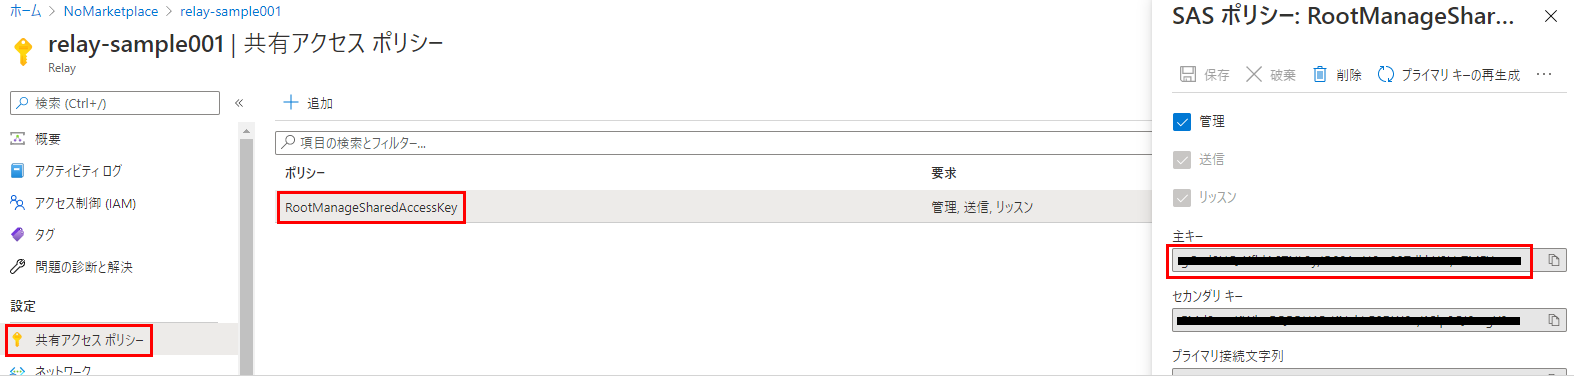
クライアント側、サーバー側のアプリ共に Relay 名前空間への接続情報を記載します。
// {RelayNamespace} 部分には、Relay 名前空間の作成時に入力した「名前」を指定します。
private const string RelayNamespace = "{RelayNamespace}.servicebus.windows.net";

// {HybridConnectionName} 部分には、Relay 名前空間にハイブリッド接続の作成時に入力した「ハイブリッド接続の名前」を指定します。
private const string ConnectionName = "{HybridConnectionName}";

// {SAKKeyName} 部分には、Relay 名前空間の「共有アクセスポリシー」のポリシー名を指定します。チュートリアルでは、固定値「RootManageSharedAccessKey」を指定します。
private const string KeyName = "{SASKeyName}";

// {SASKey} 部分には、KeyName に指定したポリシーの主キーを指定します。
private const string Key = "{SASKey}";
接続情報の KeyName, Key は共有アクセスポリシー画面より取得します。
メッセージを受信するサーバー (リスナー) アプリの作成
- Visual Studio で「コンソールアプリ(.NET Core)」を作成し、Program.cs に以下の実装を行います。
- Nuget より
Microsoft.Azure.Relayをインストールします。このアプリは、クライアントからの HTTP リクエストを受信すると、レスポンスとして
hello!を返します。using System; using System.IO; using System.Net; using System.Threading.Tasks; using Microsoft.Azure.Relay; namespace Server { public class Program { // {RelayNamespace} 部分には、Relay 名前空間の作成時に入力した「名前」を指定します。 private const string RelayNamespace = "{RelayNamespace}.servicebus.windows.net"; // {HybridConnectionName} 部分には、Relay 名前空間にハイブリッド接続の作成時に入力した「ハイブリッド接続の名前」を指定します。 private const string ConnectionName = "{HybridConnectionName}"; // {SAKKeyName} 部分には、Relay 名前空間の「共有アクセスポリシー」のポリシー名を指定します。チュートリアルでは、固定値「RootManageSharedAccessKey」を指定します。 private const string KeyName = "{SASKeyName}"; // {SASKey} 部分には、KeyName に指定したポリシーの主キーを指定します。 private const string Key = "{SASKey}"; public static void Main(string[] args) { RunAsync().GetAwaiter().GetResult(); } private static async Task RunAsync() { var tokenProvider = TokenProvider.CreateSharedAccessSignatureTokenProvider(KeyName, Key); var listener = new HybridConnectionListener(new Uri(string.Format("sb://{0}/{1}", RelayNamespace, ConnectionName)), tokenProvider); // Subscribe to the status events. listener.Connecting += (o, e) => { Console.WriteLine("Connecting"); }; listener.Offline += (o, e) => { Console.WriteLine("Offline"); }; listener.Online += (o, e) => { Console.WriteLine("Online"); }; // Provide an HTTP request handler listener.RequestHandler = (context) => { // Do something with context.Request.Url, HttpMethod, Headers, InputStream... context.Response.StatusCode = HttpStatusCode.OK; context.Response.StatusDescription = "OK"; using (var sw = new StreamWriter(context.Response.OutputStream)) { sw.WriteLine("hello!"); } // The context MUST be closed here context.Response.Close(); }; // Opening the listener establishes the control channel to // the Azure Relay service. The control channel is continuously // maintained, and is reestablished when connectivity is disrupted. await listener.OpenAsync(); Console.WriteLine("Server listening"); // Start a new thread that will continuously read the console. await Console.In.ReadLineAsync(); // Close the listener after you exit the processing loop. await listener.CloseAsync(); } } }※ チュートリアルでは、コンソール アプリ (.NET Framework) でアプリを作成していましたが、コンソール アプリ (.NET Core) でも作成できました。
メッセージを送信するクライアント (送信側) アプリの作成
- Visual Studio で「コンソールアプリ(.NET Core)」を作成し、Program.cs に以下の実装を行います。
- Nuget より
Microsoft.Azure.Relayをインストールします。このアプリは、サーバーに HTTP リクエストを送信し、サーバーからのレスポンスをコンソールに出力します。
using System;
using System.Threading.Tasks;
using System.Net.Http;
using Microsoft.Azure.Relay;

namespace Client
{
    class Program
    {
        // {RelayNamespace} 部分には、Relay 名前空間の作成時に入力した「名前」を指定します。
        private const string RelayNamespace = "{RelayNamespace}.servicebus.windows.net";
        // {HybridConnectionName} 部分には、Relay 名前空間にハイブリッド接続の作成時に入力した「ハイブリッド接続の名前」を指定します。
        private const string ConnectionName = "{HybridConnectionName}";
        // {SAKKeyName} 部分には、Relay 名前空間の「共有アクセスポリシー」のポリシー名を指定します。チュートリアルでは、固定値「RootManageSharedAccessKey」を指定します。
        private const string KeyName = "{SASKeyName}";
        // {SASKey} 部分には、KeyName に指定したポリシーの主キーを指定します。
        private const string Key = "{SASKey}";

        static void Main(string[] args)
        {
            RunAsync().GetAwaiter().GetResult();
        }

        private static async Task RunAsync()
        {
           var tokenProvider = TokenProvider.CreateSharedAccessSignatureTokenProvider(
            KeyName, Key);
            var uri = new Uri(string.Format("https://{0}/{1}", RelayNamespace, ConnectionName));
            var token = (await tokenProvider.GetTokenAsync(uri.AbsoluteUri, TimeSpan.FromHours(1))).TokenString;
            var client = new HttpClient();
            var request = new HttpRequestMessage()
            {
                RequestUri = uri,
                Method = HttpMethod.Get,
            };
            request.Headers.Add("ServiceBusAuthorization", token);
            var response = await client.SendAsync(request);
            Console.WriteLine(await response.Content.ReadAsStringAsync());
        }
    }
}
※ チュートリアルでは、コンソール アプリ (.NET Framework) でアプリを作成していましたが、コンソール アプリ (.NET Core) でも作成できました。
動作確認
Visual Studio でサーバー (リスナー) アプリをデバッグ実行します。
コマンドプロンプトが起動し、以下のメッセージが表示されます。
サーバー (リスナー) アプリを実行した状態で、別の Visual Studio でクライアント (送信側) アプリをデバッグ実行します。
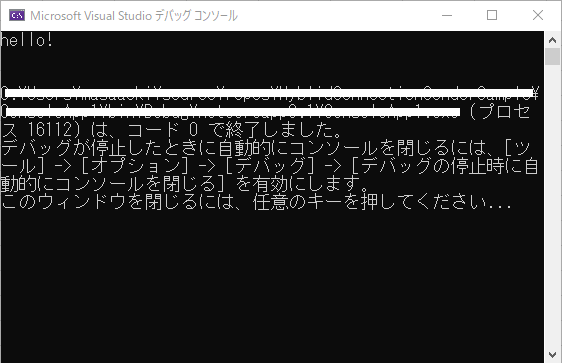
コマンドプロンプトが起動し、以下のメッセージが表示されます。
サーバー (リスナー) アプリは、リクエストを受信すると
hello!を返し、クライアント (送信側) アプリは、サーバーからのレスポンスをコンソールに出力するので、クライアント側のコンソールにhello!がコンソールに出力されています。
これで、クライアントとサーバーの通信ができていることが確認できました。アプリを Azure にデプロイして動かしてみた
もともとやりたかったことが、「Azure の PaaS からオンプレミスへ接続できるサービスがないか」だったので、次の構成で試してみます。
- メッセージを受信するサーバー (リスナー) アプリは IaaS で実行
オンプレサーバーは用意できなかったので、IaaS にしています。- メッセージを送信するクライアント (送信側) アプリは Azure Functions で実行
プログラムも少し変えてみます。
- サーバー (リスナー) アプリでは受信した文字列をコンソールに出力できるよう変更
- クライアント (送信側) アプリから任意の文字列を送信できるように変更
メッセージを受信するサーバー (リスナー) アプリは IaaS で実行
サーバー (リスナー) アプリは、受信した文字列をコンソールに出力するよう変更します。
変更前のコード
// Provide an HTTP request handler
listener.RequestHandler = (context) =>
{
    // Do something with context.Request.Url, HttpMethod, Headers, InputStream...
    context.Response.StatusCode = HttpStatusCode.OK;
    context.Response.StatusDescription = "OK";
    using (var sw = new StreamWriter(context.Response.OutputStream))
    {
        sw.WriteLine("hello!");
    }

    // The context MUST be closed here
    context.Response.Close();
};
変更後のコード
// Provide an HTTP request handler
listener.RequestHandler = (context) =>
{
    // Do something with context.Request.Url, HttpMethod, Headers, InputStream...
    context.Response.StatusCode = HttpStatusCode.OK;
    context.Response.StatusDescription = "OK";

    var bytes = new byte[context.Request.InputStream.Length]; // add
    context.Request.InputStream.Read(bytes, 0, bytes.Length); // add
    var str = Encoding.UTF8.GetString(bytes); // add

    using (var sw = new StreamWriter(context.Response.OutputStream))
    {
        sw.WriteLine(str); // change
        Console.WriteLine(str); // add
    }

    // The context MUST be closed here
    context.Response.Close();
};
IaaS は Azure に VM(Windows Server 2019 Datacenter) を用意し、コンソールアプリを実行できるように .NET Core SDK をインストールします。また、HTTPS でハイブリッド接続するので 443 port を開けます。
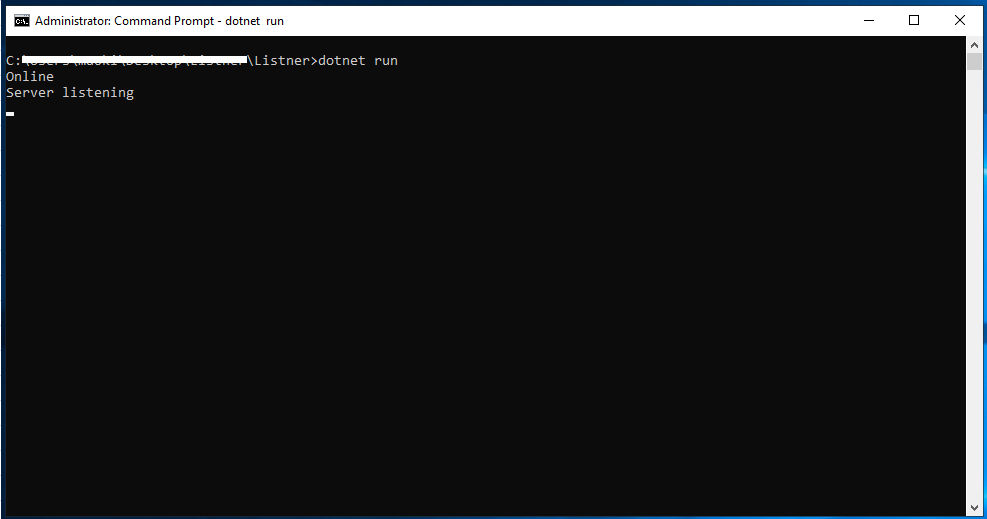
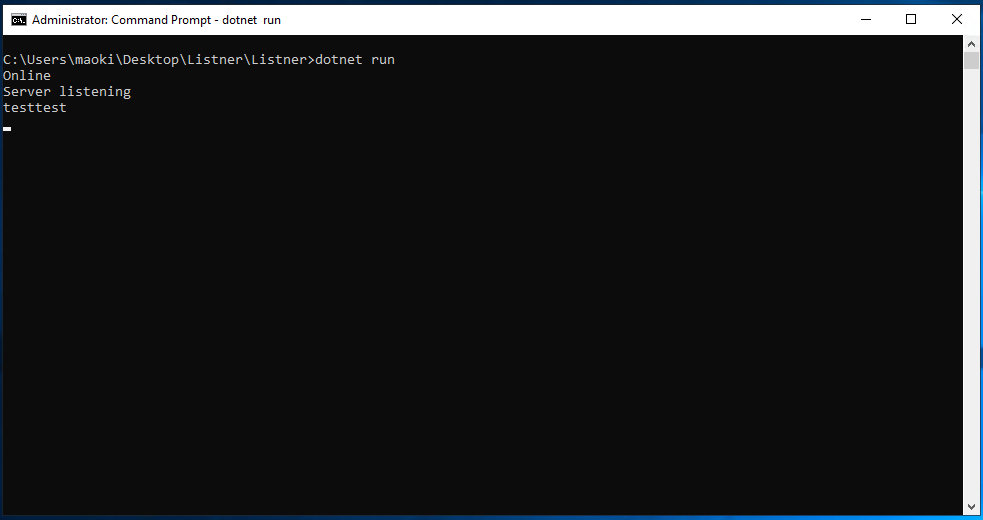
プログラムの変更と、IaaS の準備ができたら、サーバー (リスナー) アプリを IaaS に配置して、
dotnet runでアプリを実行します。
メッセージを送信するクライアント (送信側) アプリは Azure Functions で実行
クライアント (送信側) アプリは Azure Functions のコードに書き換え、リクエストボディの内容をリスナーに送信するように変更します。
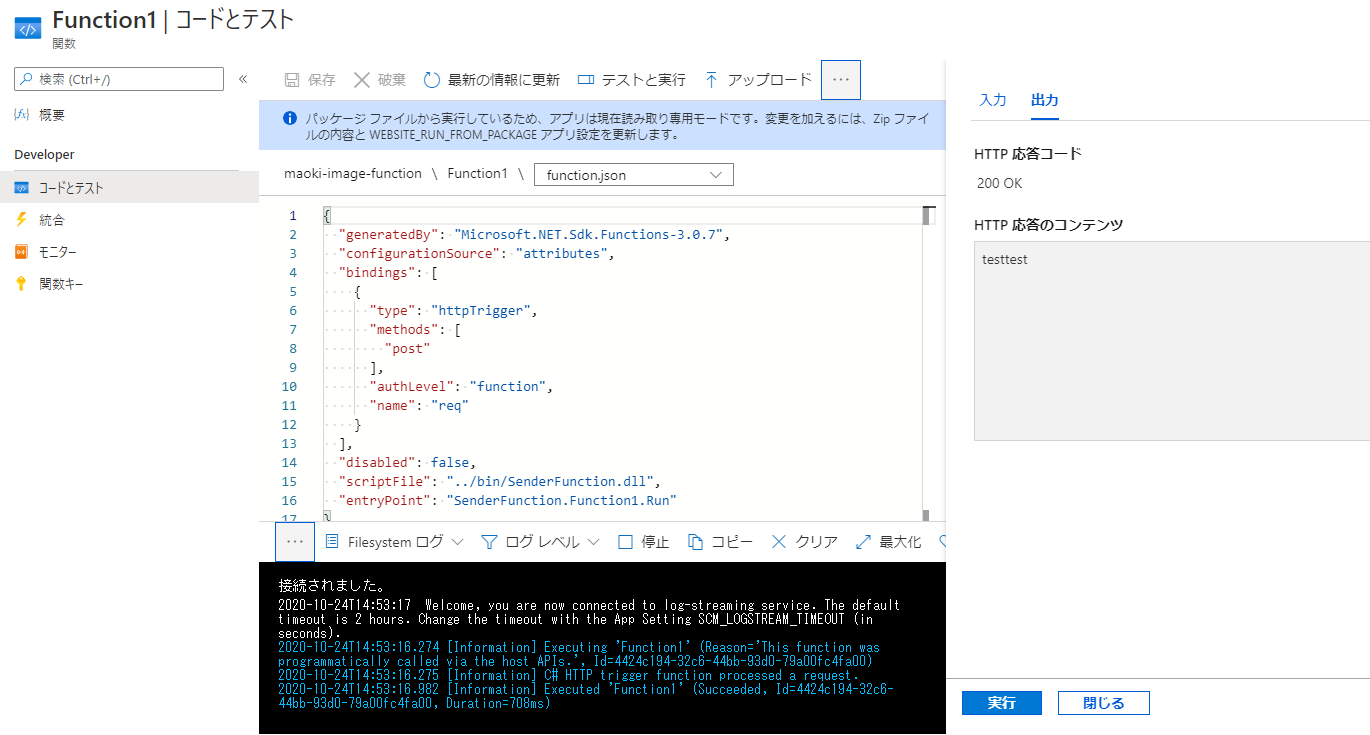
using System;
using System.Threading.Tasks;
using Microsoft.AspNetCore.Mvc;
using Microsoft.Azure.WebJobs;
using Microsoft.Azure.WebJobs.Extensions.Http;
using Microsoft.AspNetCore.Http;
using Microsoft.Extensions.Logging;
using Microsoft.Azure.Relay;
using System.Net.Http;
using System.IO;

namespace SenderFunction
{
    public static class Function1
    {
        // {RelayNamespace} 部分には、Relay 名前空間の作成時に入力した「名前」を指定します。
        private const string RelayNamespace = "{RelayNamespace}.servicebus.windows.net";
        // {HybridConnectionName} 部分には、Relay 名前空間にハイブリッド接続の作成時に入力した「ハイブリッド接続の名前」を指定します。
        private const string ConnectionName = "{HybridConnectionName}";
        // {SAKKeyName} 部分には、Relay 名前空間の「共有アクセスポリシー」のポリシー名を指定します。チュートリアルでは、固定値「RootManageSharedAccessKey」を指定します。
        private const string KeyName = "{SASKeyName}";
        // {SASKey} 部分には、KeyName に指定したポリシーの主キーを指定します。
        private const string Key = "{SASKey}";

        private static HttpClient _httpClient = new HttpClient();

        [FunctionName("Function1")]
        public static async Task<IActionResult> Run(
            [HttpTrigger(AuthorizationLevel.Function, "post", Route = null)] HttpRequest req, ILogger log)
        {
            log.LogInformation("C# HTTP trigger function processed a request.");

            var requestBody = await new StreamReader(req.Body).ReadToEndAsync();

            var tokenProvider = TokenProvider.CreateSharedAccessSignatureTokenProvider(KeyName, Key);
            var uri = new Uri(string.Format("https://{0}/{1}", RelayNamespace, ConnectionName));
            var token = (await tokenProvider.GetTokenAsync(uri.AbsoluteUri, TimeSpan.FromHours(1))).TokenString;
            var content = new StringContent(requestBody);
            content.Headers.Add("ServiceBusAuthorization", token);

            var response = await _httpClient.PostAsync(uri, content);
            var body = await response.Content.ReadAsStringAsync();

            return new OkObjectResult(body);
        }
    }
}
ソースコードを Azure Functions にデプロイし、Azure Functions の「テストと実行」よりリクエストを送信してみます。
testtestを送信しました。リスナー側のコンソールにtesttestが出力されています。
これで、PaaS から IaaS へ接続できることが確認できました。