- 投稿日:2020-09-25T21:28:59+09:00
MySQLのselect文を使ってテーブルに出力する
foreachを使って必要な情報をなるべく削る
日本語は文字化けするので文字化けコードを忘れないsqlconnect.php<?php require_once("func/header.php"); $pdo = new PDO('mysql:host=localhost;dbname= name_db;', 'name', 'pass', array( PDO::MYSQL_ATTR_INIT_COMMAND => 'SET NAMES utf8' )); echo "<table class='table'> <thead class='thead-light'> <tr> <th>番号</th> <th>ユーザー名</th> <th>ログインID</th> <th>パスワード</th> </tr> </thead> "; foreach ($pdo->query('SELECT * FROM t_user') as $row) { echo "<td>" . $row['id'] . "</td>"; echo "<td>" . $row['name'] . "</td>"; echo "<td>" . $row['login_id'] . "</td>"; echo "<td>" . $row['password'] . "</td>"; echo "</tr>"; echo "<tr>"; echo "<th>コメント</th>"; echo "</tr>"; echo "<tr>"; $id = $row['id']; foreach ($pdo->query('SELECT id,comment FROM t_comment WHERE id ="' . $id . '" AND comment IS NOT NULL') as $row2) { echo "<td>" . $row2['comment'] . "</td>"; } echo "</tr>"; } echo '</table>';参考にしたサイト
https://www.javadrive.jp/php/mysql/index6.htmlhttps://proengineer.internous.co.jp/content/columnfeature/6653
文字化けhttps://amg-solution.jp/blog/247
- 投稿日:2020-09-25T17:27:05+09:00
Can't connect to local MySQL server through socket
- 投稿日:2020-09-25T13:52:58+09:00
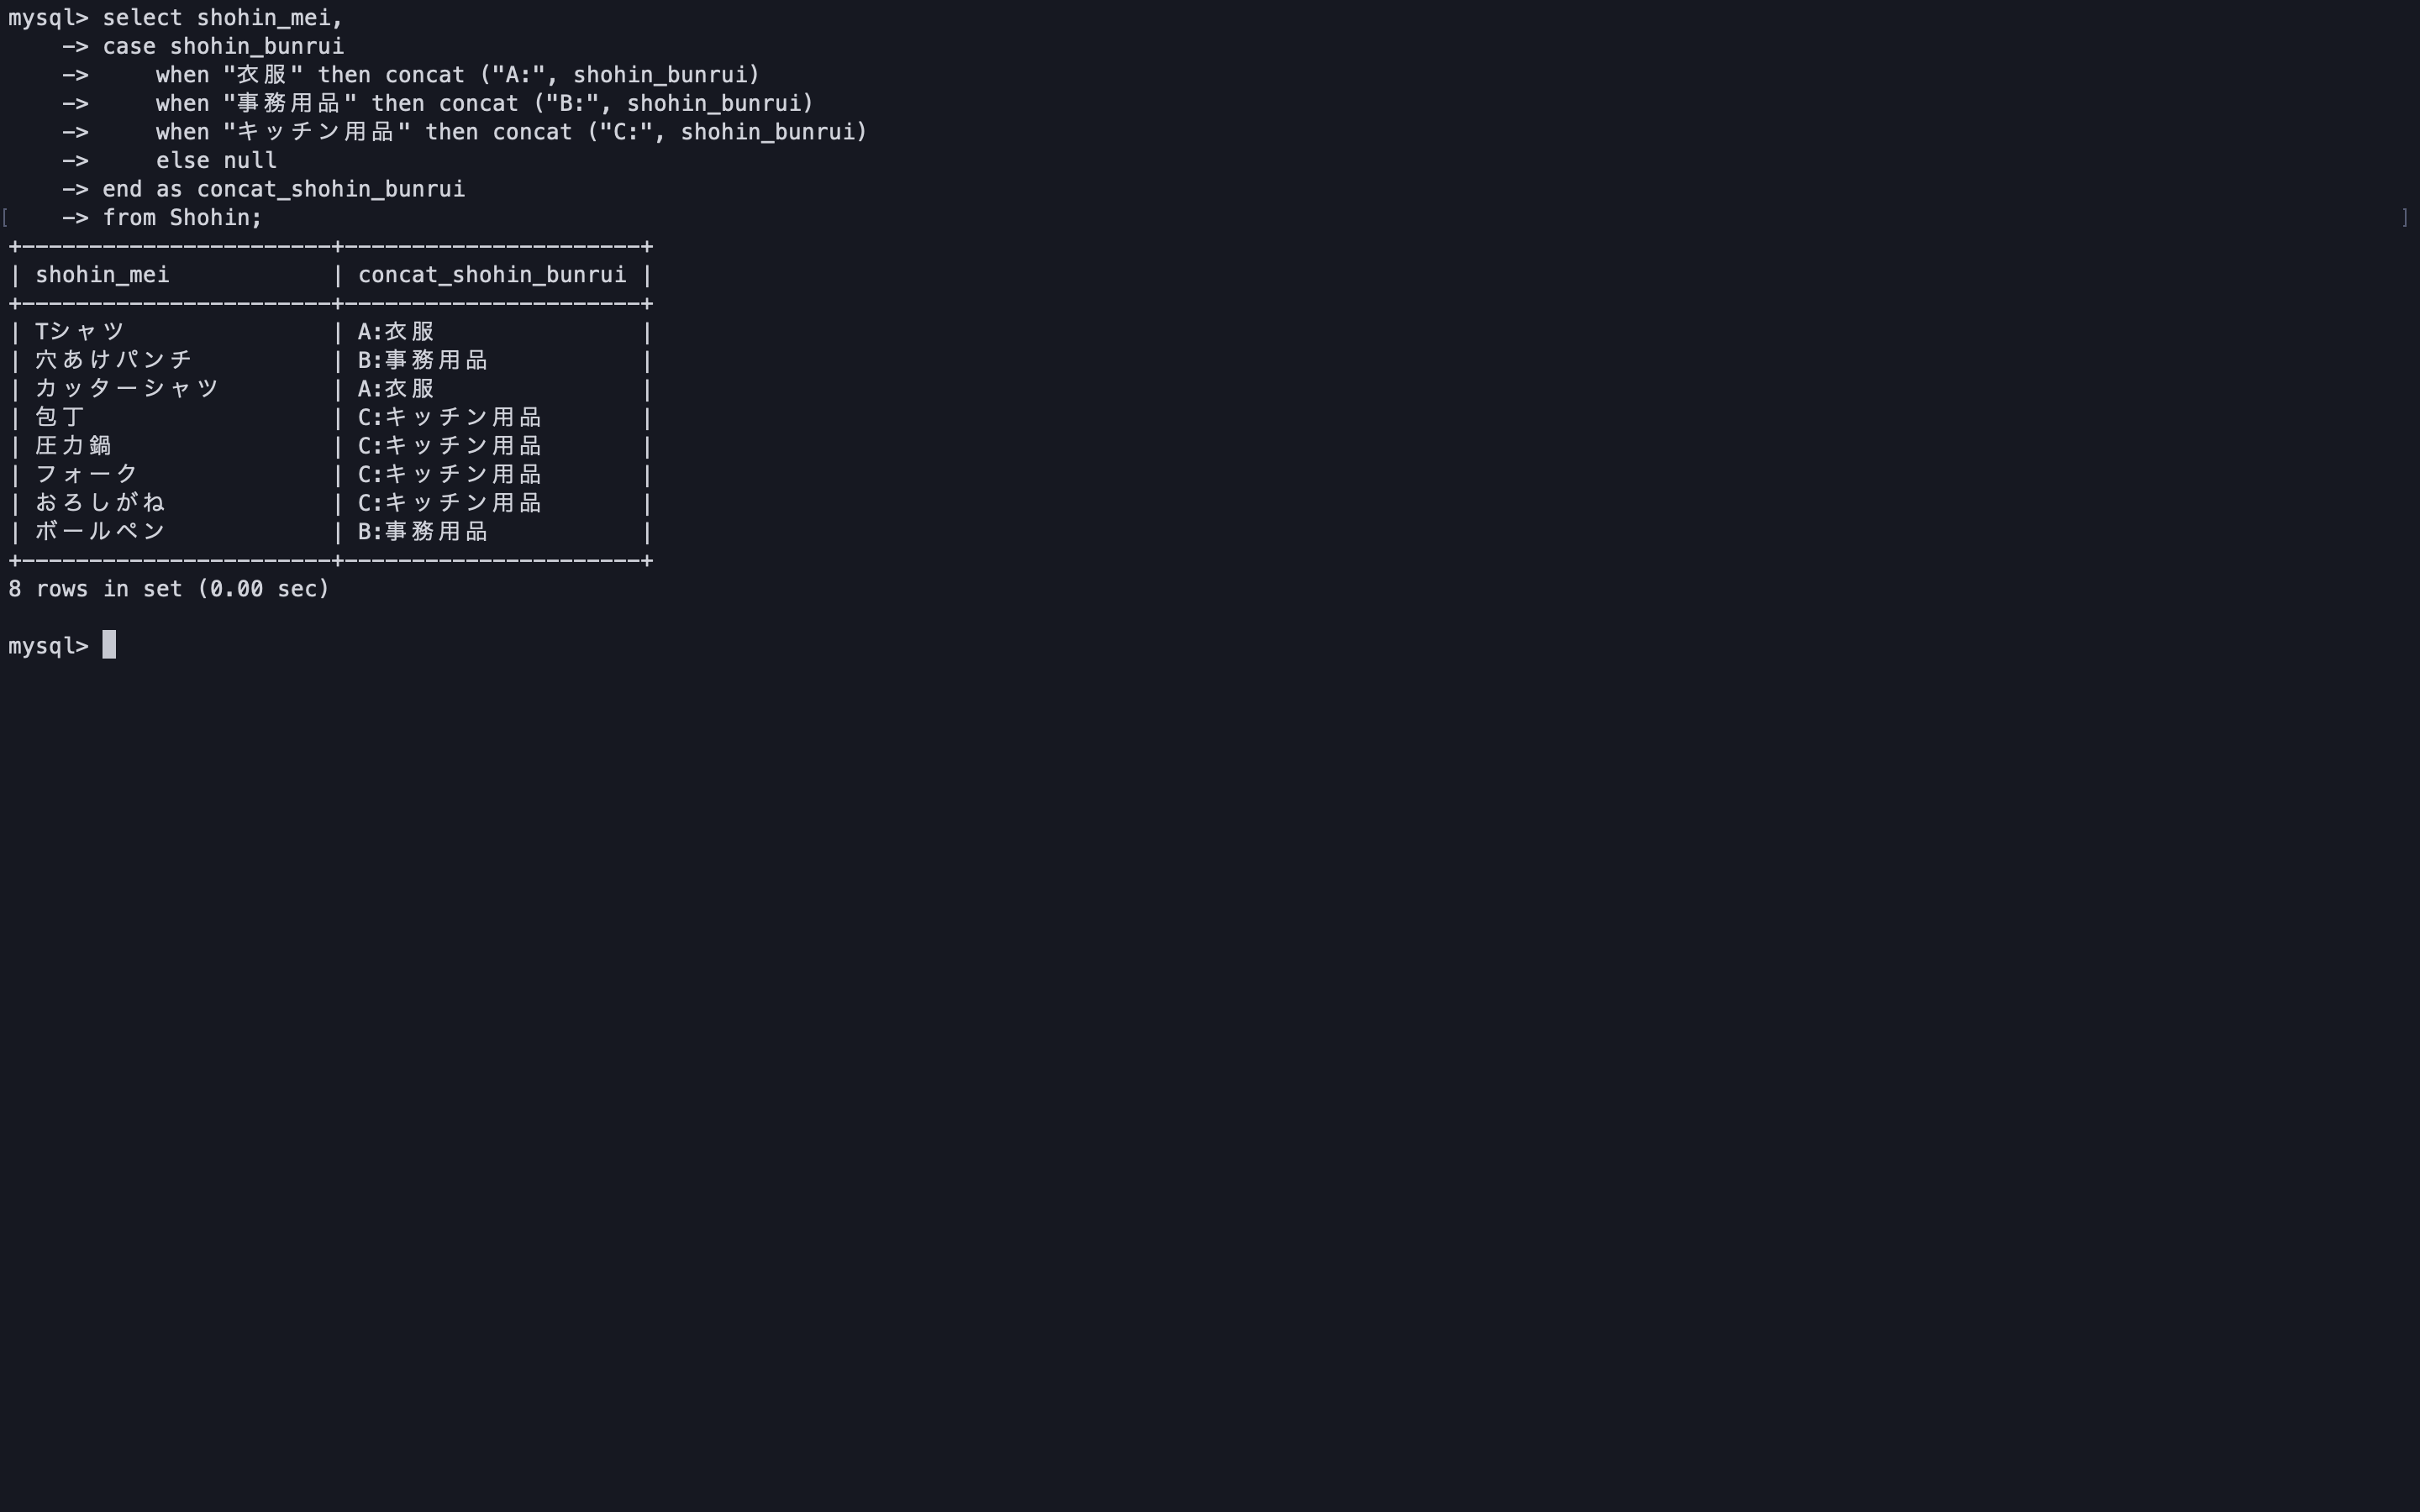
MySQLでcase式を扱う
構文には以下の2通りがあるようだ。
CASE case_value
    WHEN when_value THEN statement_list
    [WHEN when_value THEN statement_list] ...
    [ELSE statement_list]
END CASE
CASE WHEN search_condition THEN statement_list [WHEN search_condition THEN statement_list] ... [ELSE statement_list] END CASEまず1つ目の構文を試してみた
select shohin_mei,
case shohin_bunrui
    when "衣服" then concat ("A:", shohin_bunrui)
    when "事務用品" then concat ("B:", shohin_bunrui)
    when "キッチン用品" then concat ("C:", shohin_bunrui)
    else null
end as concat_shohin_bunrui
from Shohin;
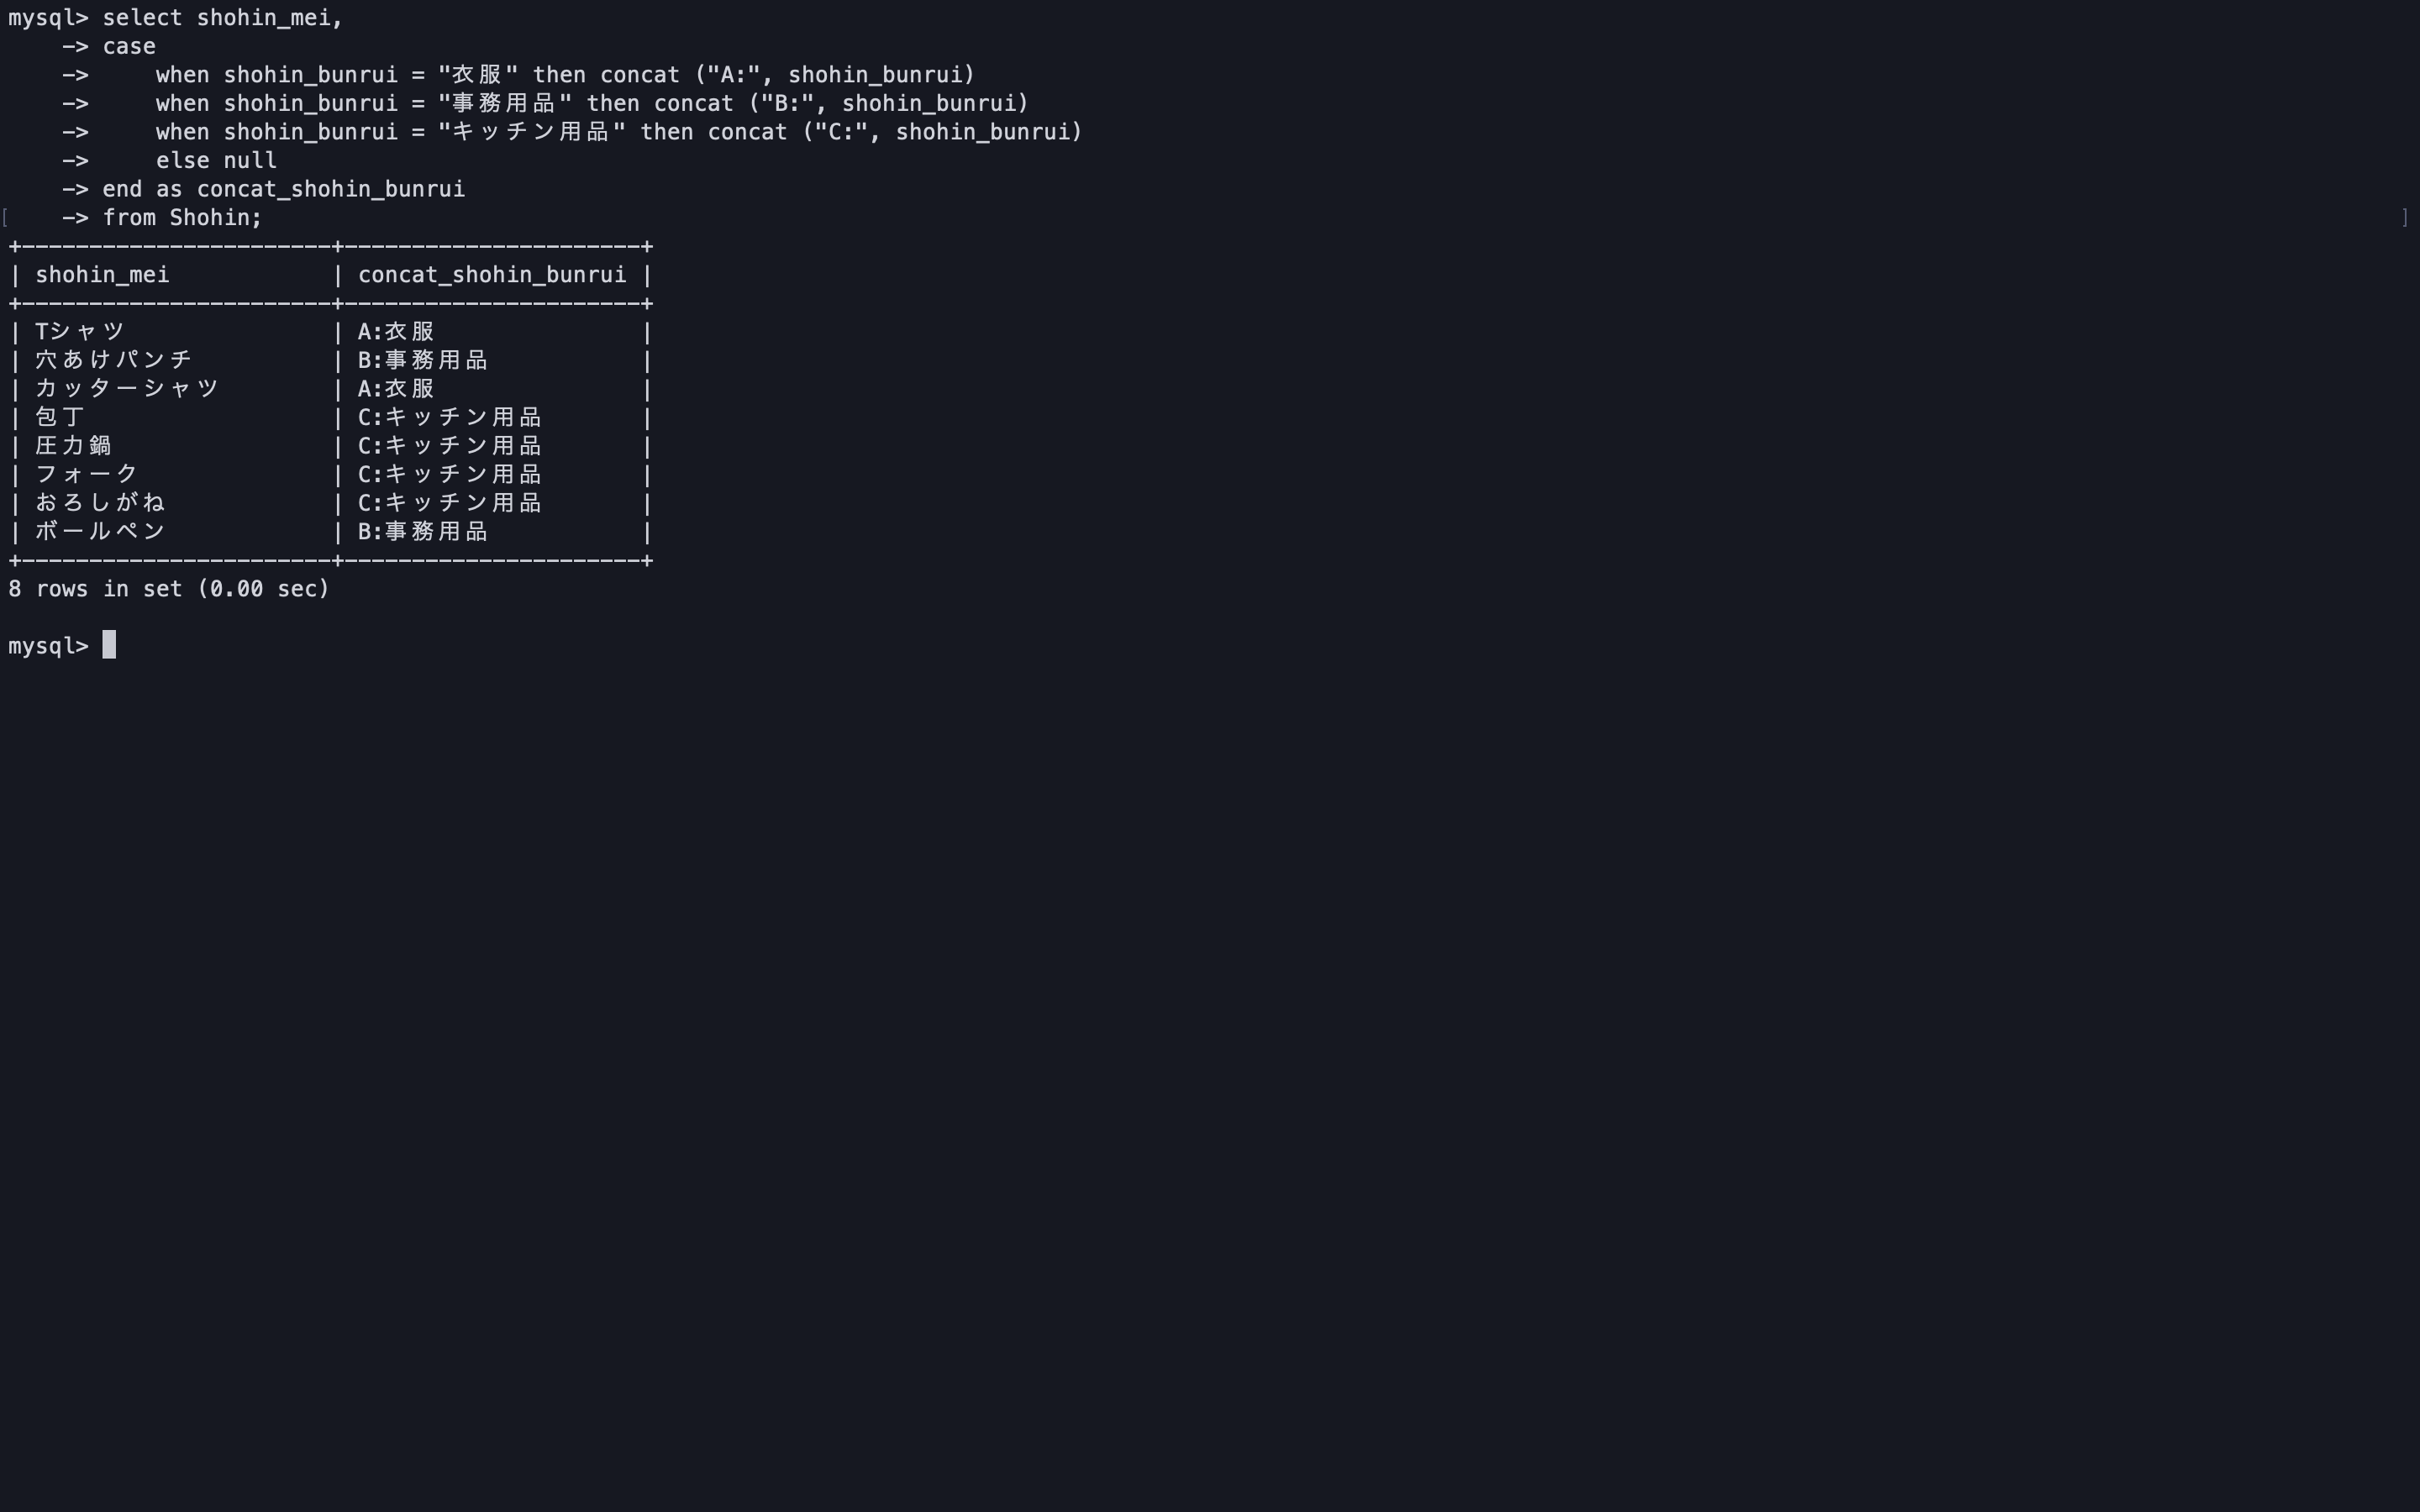
2つ目の構文
select shohin_mei,
case
    when shohin_bunrui = "衣服" then concat ("A:", shohin_bunrui)
    when shohin_bunrui = "事務用品" then concat ("B:", shohin_bunrui)
    when shohin_bunrui = "キッチン用品" then concat ("C:", shohin_bunrui)
    else null
end as concat_shohin_bunrui
from Shohin;
case式を使った行列変換
以下のようなcase式を使わないgroup byでの出力では行として出力される。
select shohin_bunrui, sum(hanbai_tanka)
from Shohin
group by shohin_bunrui;
case式を使うとこで列として出力することもできる。
select
sum(case when shohin_bunrui = "衣服" then hanbai_tanka else 0 end) as sum_ihuku,
sum(case when shohin_bunrui = "事務用品" then hanbai_tanka else 0 end) as sum_jimu_yohin,
sum(case when shohin_bunrui = "キッチン用品" then hanbai_tanka else 0 end) as sum_kitchen_yohin
from Shohin;
以下のようなsqlでは、値段ごとの列を作り、数を数えることもできる。
select
sum(case when hanbai_tanka <= 1000 then 1 else 0 end) as low_price,
sum(case when hanbai_tanka <= 3000 then 1 else 0 end) as mid_price,
sum(case when hanbai_tanka >= 3001 then 1 else 0 end) as high_price
from Shohin;
こちらを参考にさせていただきました。
SQL 第2版 ゼロからはじめるデータベース操作
MySQL 5.6 リファレンスマニュアル


- 投稿日:2020-09-25T02:33:06+09:00
エラーが解決しない時は、元を断つという考え方
どうも、三町哲平です。
プログラミングをしていたら必ずエラーに出会す場面が出てきます。
簡単に解決できるエラーもあれば、何時間、下手したら数日掛かっても解決しないそんなやる気すら失ってしまうエラーも存在します。そういうやる気を失ってしまう時に役立つエラーに使えるかも知れないテクニックを一つ紹介します。
尚、今回はRuby on Railsで発生したエラーですが、データベース絡みのエラーだとRails問わず、どのプログラミング言語での開発環境においても効果的です。今回は、エラー発生から3日掛かって解決しましたので、短くわかりやすくまとめてみました。
まず、結論
この記事の概略を説明すると、
データベースが元の異常ぽかったら、データベースを再作成した方が早いよ。
ていう話。では、3日間の闘いをどうぞ!
1日目. Template::Error
undefined method `image_name' for nil:NilClass上記の文をピックアップしてfor nil:NilClassの部分を無視して考えた時に
image_nameというメソッドが定義されていないという意味です。1. メソッドの定義忘れ
2. シンプルに誤字脱字この辺りを疑い色々試してみましたが、
メソッドの定義悪でも、誤字脱字でもない...ググってみても正解には辿り着けない...
とりあえず初日は疲れて寝てしまいました。
2日目. データベースっぽい
誤字脱字がないか再調査したが、問題なし。
ここで余り気に留めていなかった
for nil:NilClassの部分についてググってみるようになります。
ちなみにRubyを使ったことない方は、
nilって何?となるかもしれませんが、nilは、nullと同じ意味です。
つまり、「何もない」ということです。何もないという内容で思い付くのは1つ...
データベース絡みっぽいなということにそして気付けば深夜1時、またすっかり日付が変わっていました。
3日目.ググり続けた結果
Ruby on Rails 5 - undefined method `image_name' for nil:NilClass といエラーがでています|teratail
上記のサイトに辿り着きました。
ここからは、引用が続きますが、
このやり取りが全てです。
文字多いし小さしで読みたくない方に向けて結論だけ簡単に要約すると、
原因はおおよそ掴めたけど、もうデータベースを作り替えた方がいいよね。
という話。postsテーブルを作成してデータを複数入力
↓
nilの状態(何もない)のカラムを作成してはいけないルールに途中からプログラミングする
↓
新しいカラム(user_id)を作成する
↓
今までのuser_idカラムは全てnilの状態である
↓
エラー発生さいごに
原因はデータベースに入れてはいけないデータが含まれている。それならばそのデータを削除すれば良い。
もしくは開発環境のデータベースで消しても問題ないのならば今回のように再作成すればそれで復旧できます。仮にRuby on Railsの場合ですと、
Rails$ rails db:drop # データベースを削除する $ rails db:create # データベースを作成する $ rails db:migrate # データベースにマイグレートするこれと同じようにあなたの開発環境にあったソースコードを入力したら、良い訳ですね^^


- 投稿日:2020-09-25T01:20:48+09:00
PyMySQL
PyMySQL
PythonからMySQLを操作するパッケージ。
PyMySQL/PyMySQLubuntu:~$ pip3 install PyMySQL Requirement already satisfied: PyMySQL in ./.local/lib/python3.8/site-packages (0.10.1)既存のテーブルにレコードを追加する
データベース test、テーブル table1 に値を追加します。
mysqlユーザやデータベースは作成済みです。(それぞれ、ubuntu, test)import pymysql.cursors # MySQLに接続 connection = pymysql.connect(host='localhost', user='ubuntu', password='ubuntu', db='test', charset='utf8', cursorclass=pymysql.cursors.DictCursor) # レコードを挿入 with connection.cursor() as cursor: sql = "INSERT INTO table1 VALUE ('2020-09-25 01-14-11','python',888);" cursor.execute(sql) # 変更をコミット connection.commit() # 切断 connection.close()既存のテーブル table1 はこんな感じ
mysql> USE test;
Reading table information for completion of table and column names
You can turn off this feature to get a quicker startup with -A

Database changed
mysql> desc table1;
+--------+----------+------+-----+---------+-------+
| Field  | Type     | Null | Key | Default | Extra |
+--------+----------+------+-----+---------+-------+
| time   | datetime | YES  |     | NULL    |       |
| value  | char(10) | YES  |     | NULL    |       |
| number | int      | YES  |     | NULL    |       |
+--------+----------+------+-----+---------+-------+
3 rows in set (0.00 sec)
python 実行後の table1 を確認
mysql> SELECT * FROM table1;
+---------------------+-----------+--------+
| time                | value     | number |
+---------------------+-----------+--------+
| 2020-09-25 01:14:11 | python    |    888 |
+---------------------+-----------+--------+
1 rows in set (0.00 sec)
- 投稿日:2020-09-25T01:07:24+09:00
go/mysqlで値が上手く取れない
go/gorm/mysql
で値が上手く取れない現象が起きたので備忘録がてら例えばこのようなテーブルを作成し、CREATE TABLE dataids ( id INT, titleid INT, titleid2 INT );以下のように、insertしときます。
INSERT INTO collectq_db.dataids (id, titleid, titleid2) VALUES
(1,1,1),(2,1,2),(3,1,3);
そしてgormで取得しようと以下のようにしました
type Dataid struct {
    id       int
    titleid  int
    titleid2 int
}

func GetAllDataids(db *gorm.DB) []Dataid {
    var dataids []Dataid
    db.Find(&dataids)
    fmt.Println("確認!!", dataids)
    return dataids
とすると、以下のように、
fmt.Println上では
[{0 } {0 } {0 }]
googlechrome上では、
`[{},{},{}]
と表示されます。解決策
構造体の中身の変数名さえ頭文字大文字にしなければ、反応gormのFindで
反応してくれない。
(errではなくよくわからないのが帰ってくる(まあ対応する変数がないので、代入されないだけだと思うけど))type Dataid struct { Id int Titleid int Titleid2 int }
- 投稿日:2020-09-25T00:58:32+09:00
MySQL
目標
mysqlを初めて起動するところから、データベースとテーブルを作成し、値の挿入と確認までを行います。
root パスワードの設定
ubuntu:~ $ sudo -i
root:~# sudo /usr/bin/mysql_secure_installation

# root にパスワードを設定していない場合は Enter
Enter current password for root (enter for none):

# root に新しいパスワードを設定
Set root password? [Y/n] y
New password:
Re-enter new password:

Remove anonymous users? [Y/n] y
Disallow root login remotely? [Y/n] n
Remove test database and access to it? [Y/n] y
Reload privilege tables now? [Y/n] y
データベースとユーザの作成
データベース test、ユーザ ubuntu を作成します。
ubuntu:~$ mysql -u root -p
Enter password:
Welcome to the MySQL monitor.  Commands end with ; or \g.
Your MySQL connection id is 16
Server version: 8.0.21-0ubuntu0.20.04.4 (Ubuntu)
<snip>

mysql> USE mysql;
Reading table information for completion of table and column names
You can turn off this feature to get a quicker startup with -A

Database changed
mysql> CREATE DATABASE test;
Query OK, 1 row affected (0.00 sec)

mysql> CREATE USER 'ubuntu'@'localhost' IDENTIFIED BY 'ubuntu';
Query OK, 0 rows affected (0.00 sec)

mysql> GRANT ALL PRIVILEGES ON test.* TO 'ubuntu'@'localhost';
Query OK, 0 rows affected (0.00 sec)

mysql> FLUSH PRIVILEGES;
Query OK, 0 rows affected (0.00 sec)

mysql> SELECT user,plugin FROM user;
+------------------+-----------------------+
| user             | plugin                |
+------------------+-----------------------+
| debian-sys-maint | caching_sha2_password |
| mysql.infoschema | caching_sha2_password |
| mysql.session    | caching_sha2_password |
| mysql.sys        | caching_sha2_password |
| root             | mysql_native_password |
| ubuntu           | caching_sha2_password |
+------------------+-----------------------+
6 rows in set (0.00 sec)

mysql> quit
Bye
テーブルの作成
テーブル名 table1 の、型がそれぞれ datetime, char(10), integer のテーブルを作成します。
ubuntu:~$ mysql -u ubuntu -p
Enter password:
Welcome to the MySQL monitor.  Commands end with ; or \g.
<snip>

mysql> USE test;
Database changed
mysql> CREATE TABLE table1 (time DATETIME, value CHAR(10), number INTEGER );
Query OK, 0 rows affected (0.01 sec)

mysql> DESCRIBE table1;
+--------+----------+------+-----+---------+-------+
| Field  | Type     | Null | Key | Default | Extra |
+--------+----------+------+-----+---------+-------+
| time   | datetime | YES  |     | NULL    |       |
| value  | char(10) | YES  |     | NULL    |       |
| number | int      | YES  |     | NULL    |       |
+--------+----------+------+-----+---------+-------+
3 rows in set (0.01 sec)
値を挿入する
先ほど作成した table1 に値を入れます。
mysql> INSERT INTO table1 VALUE ('2020-09-25 00:51:20','test-char',777);
Query OK, 1 row affected (0.02 sec)
テーブルを確認する
mysql> SELECT * FROM table1;
+---------------------+-----------+--------+
| time                | value     | number |
+---------------------+-----------+--------+
| 2020-09-25 00:51:20 | test-char |    777 |
+---------------------+-----------+--------+
1 row in set (0.00 sec)
環境
ubuntu:~$ uname -a Linux ubuntu 5.4.0-48-generic #52-Ubuntu SMP Thu Sep 10 10:58:49 UTC 2020 x86_64 x86_64 x86_64 GNU/Linuxubuntu:~$ cat /etc/issue Ubuntu 20.04.1 LTS \n \lubuntu:~$ mysql --version mysql Ver 8.0.21-0ubuntu0.20.04.4 for Linux on x86_64 ((Ubuntu))
- 投稿日:2020-09-25T00:58:32+09:00
MySQL on Ubuntu 20.04
目標
mysqlを初めて起動するところから、データベースとテーブルを作成し、値の挿入と確認までを行います。
root パスワードの設定
ubuntu:~ $ sudo -i
root:~# sudo /usr/bin/mysql_secure_installation

# root にパスワードを設定していない場合は Enter
Enter current password for root (enter for none):

# root に新しいパスワードを設定
Set root password? [Y/n] y
New password:
Re-enter new password:

Remove anonymous users? [Y/n] y
Disallow root login remotely? [Y/n] n
Remove test database and access to it? [Y/n] y
Reload privilege tables now? [Y/n] y
データベースとユーザの作成
データベース test、ユーザ ubuntu を作成します。
ubuntu:~$ mysql -u root -p
Enter password:
Welcome to the MySQL monitor.  Commands end with ; or \g.
Your MySQL connection id is 16
Server version: 8.0.21-0ubuntu0.20.04.4 (Ubuntu)
<snip>

mysql> USE mysql;
Reading table information for completion of table and column names
You can turn off this feature to get a quicker startup with -A

Database changed
mysql> CREATE DATABASE test;
Query OK, 1 row affected (0.00 sec)

mysql> CREATE USER 'ubuntu'@'localhost' IDENTIFIED BY 'ubuntu';
Query OK, 0 rows affected (0.00 sec)

mysql> GRANT ALL PRIVILEGES ON test.* TO 'ubuntu'@'localhost';
Query OK, 0 rows affected (0.00 sec)

mysql> FLUSH PRIVILEGES;
Query OK, 0 rows affected (0.00 sec)

mysql> SELECT user,plugin FROM user;
+------------------+-----------------------+
| user             | plugin                |
+------------------+-----------------------+
| debian-sys-maint | caching_sha2_password |
| mysql.infoschema | caching_sha2_password |
| mysql.session    | caching_sha2_password |
| mysql.sys        | caching_sha2_password |
| root             | mysql_native_password |
| ubuntu           | caching_sha2_password |
+------------------+-----------------------+
6 rows in set (0.00 sec)

mysql> quit
Bye
テーブルの作成
テーブル名 table1 の、型がそれぞれ datetime, char(10), integer のテーブルを作成します。
ubuntu:~$ mysql -u ubuntu -p
Enter password:
Welcome to the MySQL monitor.  Commands end with ; or \g.
<snip>

mysql> USE test;
Database changed
mysql> CREATE TABLE table1 (time DATETIME, value CHAR(10), number INTEGER );
Query OK, 0 rows affected (0.01 sec)

mysql> DESCRIBE table1;
+--------+----------+------+-----+---------+-------+
| Field  | Type     | Null | Key | Default | Extra |
+--------+----------+------+-----+---------+-------+
| time   | datetime | YES  |     | NULL    |       |
| value  | char(10) | YES  |     | NULL    |       |
| number | int      | YES  |     | NULL    |       |
+--------+----------+------+-----+---------+-------+
3 rows in set (0.01 sec)
値を挿入する
先ほど作成した table1 に値を入れます。
mysql> INSERT INTO table1 VALUE ('2020-09-25 00:51:20','test-char',777);
Query OK, 1 row affected (0.02 sec)
テーブルを確認する
mysql> SELECT * FROM table1;
+---------------------+-----------+--------+
| time                | value     | number |
+---------------------+-----------+--------+
| 2020-09-25 00:51:20 | test-char |    777 |
+---------------------+-----------+--------+
1 row in set (0.00 sec)
環境
ubuntu:~$ uname -a Linux ubuntu 5.4.0-48-generic #52-Ubuntu SMP Thu Sep 10 10:58:49 UTC 2020 x86_64 x86_64 x86_64 GNU/Linuxubuntu:~$ cat /etc/issue Ubuntu 20.04.1 LTS \n \lubuntu:~$ mysql --version mysql Ver 8.0.21-0ubuntu0.20.04.4 for Linux on x86_64 ((Ubuntu))
- 投稿日:2020-09-25T00:32:26+09:00
DockerでRuby on Rails + Vue + MySQLの環境構築をする方法【2020/09最新版】
はじめに
フロントにVue、APIサーバにRailsという組み合わせは日本ではメジャーな構成の一つです。今回はこの構成をDockerを使って構築していきます。
この記事を読むことで、以下の構成をDocker作成出来るようになります!
API: Rails 6系
フロント:Vue(TypeScript) 2系
DB: MySQL 5.7環境構築の流れ
- Rails、VueのDockerfile作成
- docker-compose.yaml作成
- Rails、Vueのプロジェクト作成
最終的なディレクトリ構成は以下のようになります。
[project_name]
├── api // Rails
│   ├── Dockerfile
│   ├── ...
├── docker-compose.yaml
└── front // Vue
    ├── Dockerfile
    ├── ...
では環境構築に入っていきましょう!
1. ディレクトリ作成
プロジェクトディレクトリとその配下にAPI、フロントのディレクトリを作成します
$ mkdir project_name
$ cd project_name
$ mkdir api front
以降のコマンドはカレントディレクトリがプロジェクトディレクトリ想定で記載しています。
2. Dockerfile作成
RailsとVueそれぞれのDockerfileを作成します。
2-1. Rails
指定しているバージョン
- Ruby 2.7.1
- Rails 6.0.xapi/DockerfileFROM ruby:2.7.1 RUN apt-get update -qq && \ apt-get install -y build-essential \ libpq-dev \ nodejs \ && rm -rf /var/lib/apt/lists/* RUN mkdir /app ENV APP_ROOT /app WORKDIR $APP_ROOT ADD ./Gemfile $APP_ROOT/Gemfile ADD ./Gemfile.lock $APP_ROOT/Gemfile.lock RUN bundle install
rm -rf /var/lib/apt/lists/*はaptのキャッシュを削除しています。これはDockerのイメージファイルサイズを軽量化するためです。このDockerfileではRailsを含むGemfileを必要とするので、以下のファイルを
api/に作成します。api/Gemfilesource 'https://rubygems.org' gem 'rails', '~> 6.0.3'空のGemfile.lockも作成します。
$ touch api/Gemfile.lockこの時点でのディレクトリ構成
[project_name]
├── api
│   ├── Dockerfile   <- New!
│   ├── Gemfile      <- New!
│   └── Gemfile.lock <- New!
└── front
2-2. Vue
指定しているバージョン
- node 12.18.3
- Vue 2系 <- これは後述のコンテナ内でVueプロジェクトを作成する際に指定しますfront/DockerfileFROM node:12.18.3-alpine ENV APP_HOME /app RUN mkdir -p $APP_HOME WORKDIR $APP_HOME RUN apk update && npm install -g @vue/cliこの時点でのディレクトリ構成
[project_name]
├── api
│   ├── Dockerfile
│   ├── Gemfile
│   └── Gemfile.lock
└── front
    └── Dockerfile <- New!
3. docker-compose.yaml作成
以下のdocker-compose.yamlをプロジェクトディレクトリに作成します
docker-compose.yamlversion: '3' services: web: build: ./api command: bundle exec rails s -p 3000 -b '0.0.0.0' ports: - '3000:3000' depends_on: - db volumes: - ./api:/app - bundle:/usr/local/bundle tty: true stdin_open: true db: image: mysql:5.7 volumes: - mysql_data:/var/lib/mysql/ environment: MYSQL_ROOT_PASSWORD: password ports: - '3306:3306' front: build: ./front volumes: - ./front:/app ports: - '8080:8080' tty: true stdin_open: true command: npm run serve volumes: mysql_data: bundle:MySQLとbundleのデータはボリュームにマウントし永続化しています。これによってコンテナを削除しても、データは消えません。
bundleはマウントしなくても、Gemを追加するたびにイメージのビルドすれば良いのですが時間がかかります。bundleをマウントすることでGemの追加がdocker-compose run api bundle installで済むようにです。この時点でのディレクトリ構成
[project_name]
├── api
│   ├── Dockerfile
│   ├── Gemfile
│   └── Gemfile.lock
├── docker-compose.yaml <- New!
└── front
    └── Dockerfile
4. プロジェクトの作成
4-1. Rails
Railsプロジェクトの作成
rails newでRailsプロジェクトを作成します$ docker-compose run web rails new . --force --database=mysql --api --skip-bundle
rails newの引数について
--force:Gemfileを強制的に上書き更新する
--database:使用するデータベースをMySQLにする
--api:APIモードでプロジェクトを作成。APIモードではUIに関係するファイルが省略されます。
--skip-bundle:bundle installを省略します。次のdockerイメージのビルドでbundle installをするためです。dockerイメージ更新
Gemfileが更新されたので、buildしてdocker imageを更新します。$ docker-compose buildDBの設定ファイルを修正
RailsのDB設定ファイル
api/config/database.ymlを修正します。api/config/database.ymldefault: &default adapter: mysql2 encoding: utf8mb4 pool: <%= ENV.fetch("RAILS_MAX_THREADS") { 5 } %> username: root - password: + password: password - host: localhost + host: db
passwordはdocker-compose.yamlの環境変数MYSQL_ROOT_PASSWORDで指定したものhostはDBのサービス名 に対応しています。DBの作成
$ docker-compose run web rails db:createこれでRailsの環境構築は完了です!
4-2. Vue
vue-cliでVueプロジェクトを作成
コンテナ内に入り、vue-cliを使ってVueプロジェクトの作成を対話的にします。以下の設定項目はvue-cli v4.5.6のものです。設定内容は一例なのでお好みでどうぞ。
Vueコンテナでシェルを実行
$ docker-compose run front sh以下フロントコンテナ内で対話的に設定していきます。
$ vue create .
# 現在のディレクトリ(/app)に作成するかの確認
? Generate project in current directory? (Y/n) Yes

# プリセットを使用するかどうか
? Please pick a preset: (Use arrow keys)
  Default ([Vue 2] babel, eslint)
  Default (Vue 3 Preview) ([Vue 3] babel, eslint)
❯ Manually select features # TypeScriptをインストールするためこちらを選択

# プロジェクトにインストールするライブラリの選択
? Check the features needed for your project:
 ◉ Choose Vue version #
 ◉ Babel
❯◉ TypeScript # TypeScriptをインストールする場合はこれを選択
 ◯ Progressive Web App (PWA) Support
 ◯ Router
 ◯ Vuex
 ◯ CSS Pre-processors
 ◉ Linter / Formatter
 ◯ Unit Testing
 ◯ E2E Testing

# Vueバージョンの選択
? Choose a version of Vue.js that you want to start the project with (Use arrow keys)
❯ 2.x
  3.x (Preview)

# Class styleを使用するかどうか。私はObject styleを使うため No
? Use class-style component syntax? (Y/n) No

# TypeScriptと一緒にbabelを使うか
? Use Babel alongside TypeScript (required for modern mode, auto-detected polyfills, transpiling JSX)? (Y/n) Yes

# LintとFormatterの設定に何を使うか
? Pick a linter / formatter config:
  ESLint with error prevention only
  ESLint + Airbnb config
  ESLint + Standard config
❯ ESLint + Prettier
  TSLint (deprecated)

# Lintの実行タイミング
? Pick additional lint features: (Press <space> to select, <a> to toggle all, <i> to invert selection)
❯◉ Lint on save # 保存時にLintを実行
 ◯ Lint and fix on commit (requires Git)

# Babel, ESLintなどの設定をどこに記述するか
? Where do you prefer placing config for Babel, ESLint, etc.? (Use arrow keys)
❯ In dedicated config files # 各設定ファイルにする
  In package.json

# 今回設定した内容をプリセットで保存するか。基本的にはプロジェクトを以降作成することはないため No
? Save this as a preset for future projects? No

# パッケージマネージャーに何を使うか
? Pick the package manager to use when installing dependencies: (Use arrow keys)
❯ Use Yarn
  Use NPM
インストール完了後、
Ctrl+Dでコンテナを停止します。5. 動作確認
コンテナを立ち上げる
$ docker-compose up -d
-d: バックグラウンドでプロセスを実行する5-1. Rails
localhost:3000にアクセスし以下のページが表示されることを確認
5-2. Vue
localhost:8080にアクセスし以下のページが表示されることを確認
おわりに
お疲れさまでした。
今回はDockerでRuby on Rails + Vue + MySQLの環境構築する方法について書きました。VueとRailsはそこまで学習コストが高くないため、初心者にもオススメ出来る構成です。ぜひお試しください!
- 投稿日:2020-09-25T00:32:26+09:00
DockerでRails + Vue + MySQLの環境構築をする方法【2020/09最新版】
はじめに
フロントにVue、APIサーバにRailsという組み合わせは日本ではメジャーな構成の一つです。今回はこの構成をDockerを使って構築していきます。
この記事を読むことで、以下の構成をDocker作成出来るようになります!
API: Rails 6系
フロント:Vue(TypeScript) 2系
DB: MySQL 5.7環境構築の流れ
- Rails、VueのDockerfile作成
- docker-compose.yaml作成
- Rails、Vueのプロジェクト作成
最終的なディレクトリ構成は以下のようになります。
[project_name]
├── api // Rails
│   ├── Dockerfile
│   ├── ...
├── docker-compose.yaml
└── front // Vue
    ├── Dockerfile
    ├── ...
では環境構築に入っていきましょう!
1. ディレクトリ作成
プロジェクトディレクトリとその配下にAPI、フロントのディレクトリを作成します
$ mkdir project_name
$ cd project_name
$ mkdir api front
以降のコマンドはカレントディレクトリがプロジェクトディレクトリ想定で記載しています。
2. Dockerfile作成
RailsとVueそれぞれのDockerfileを作成します。
2-1. Rails
指定しているバージョン
- Ruby 2.7.1
- Rails 6.0.xapi/DockerfileFROM ruby:2.7.1 RUN apt-get update -qq && \ apt-get install -y build-essential \ libpq-dev \ nodejs \ && rm -rf /var/lib/apt/lists/* RUN mkdir /app ENV APP_ROOT /app WORKDIR $APP_ROOT ADD ./Gemfile $APP_ROOT/Gemfile ADD ./Gemfile.lock $APP_ROOT/Gemfile.lock RUN bundle install
rm -rf /var/lib/apt/lists/*はaptのキャッシュを削除しています。これはDockerのイメージファイルサイズを軽量化するためです。このDockerfileではRailsを含むGemfileを必要とするので、以下のファイルを
api/に作成します。api/Gemfilesource 'https://rubygems.org' gem 'rails', '~> 6.0.3'空のGemfile.lockも作成します。
$ touch api/Gemfile.lockこの時点でのディレクトリ構成
[project_name]
├── api
│   ├── Dockerfile   <- New!
│   ├── Gemfile      <- New!
│   └── Gemfile.lock <- New!
└── front
2-2. Vue
指定しているバージョン
- node 12.18.3
- Vue 2系 <- これは後述のコンテナ内でVueプロジェクトを作成する際に指定しますfront/DockerfileFROM node:12.18.3-alpine ENV APP_HOME /app RUN mkdir -p $APP_HOME WORKDIR $APP_HOME RUN apk update && npm install -g @vue/cliこの時点でのディレクトリ構成
[project_name]
├── api
│   ├── Dockerfile
│   ├── Gemfile
│   └── Gemfile.lock
└── front
    └── Dockerfile <- New!
3. docker-compose.yaml作成
以下のdocker-compose.yamlをプロジェクトディレクトリに作成します
docker-compose.yamlversion: '3' services: web: build: ./api command: bundle exec rails s -p 3000 -b '0.0.0.0' ports: - '3000:3000' depends_on: - db volumes: - ./api:/app - bundle:/usr/local/bundle tty: true stdin_open: true db: image: mysql:5.7 volumes: - mysql_data:/var/lib/mysql/ environment: MYSQL_ROOT_PASSWORD: password ports: - '3306:3306' front: build: ./front volumes: - ./front:/app ports: - '8080:8080' tty: true stdin_open: true command: npm run serve volumes: mysql_data: bundle:Railsの開発サーバ起動時に
-bでホストを指定します。省略するとホストからコンテナにアクセスできません。0.0.0.0を指定することで、コンテナが持つ全てのインターフェースでlistenできるようになるため、ホスト側からコンテナにアクセスできるようになります。MySQLとbundleのデータはボリュームにマウントし永続化しています。これによってコンテナを削除しても、データは消えません。
bundleはマウントしなくても、Gemを追加するたびにイメージのビルドすれば良いのですが時間がかかります。bundleをマウントすることでGemの追加がdocker-compose run api bundle installで済むようにです。この時点でのディレクトリ構成
[project_name]
├── api
│   ├── Dockerfile
│   ├── Gemfile
│   └── Gemfile.lock
├── docker-compose.yaml <- New!
└── front
    └── Dockerfile
4. プロジェクトの作成
4-1. Rails
Railsプロジェクトの作成
rails newでRailsプロジェクトを作成します$ docker-compose run web rails new . --force --database=mysql --api --skip-bundle
rails newの引数について
--force:Gemfileを強制的に上書き更新する
--database:使用するデータベースをMySQLにする
--api:APIモードでプロジェクトを作成。APIモードではUIに関係するファイルが省略されます。
--skip-bundle:bundle installを省略します。次のdockerイメージのビルドでbundle installをするためです。dockerイメージ更新
Gemfileが更新されたので、buildしてdocker imageを更新します。$ docker-compose buildDBの設定ファイルを修正
RailsのDB設定ファイル
api/config/database.ymlを修正します。api/config/database.ymldefault: &default adapter: mysql2 encoding: utf8mb4 pool: <%= ENV.fetch("RAILS_MAX_THREADS") { 5 } %> username: root - password: + password: password - host: localhost + host: db
passwordはdocker-compose.yamlの環境変数MYSQL_ROOT_PASSWORDで指定したものhostはDBのサービス名 に対応しています。DBの作成
$ docker-compose run web rails db:createこれでRailsの環境構築は完了です!
4-2. Vue
vue-cliでVueプロジェクトを作成
コンテナ内に入り、vue-cliを使ってVueプロジェクトの作成を対話的にします。以下の設定項目はvue-cli v4.5.6のものです。設定内容は一例なのでお好みでどうぞ。
Vueコンテナでシェルを実行
$ docker-compose run front sh以下フロントコンテナ内で対話的に設定していきます。
$ vue create .
# 現在のディレクトリ(/app)に作成するかの確認
? Generate project in current directory? (Y/n) Yes

# プリセットを使用するかどうか
? Please pick a preset: (Use arrow keys)
  Default ([Vue 2] babel, eslint)
  Default (Vue 3 Preview) ([Vue 3] babel, eslint)
❯ Manually select features # TypeScriptをインストールするためこちらを選択

# プロジェクトにインストールするライブラリの選択
? Check the features needed for your project:
 ◉ Choose Vue version #
 ◉ Babel
❯◉ TypeScript # TypeScriptをインストールする場合はこれを選択
 ◯ Progressive Web App (PWA) Support
 ◯ Router
 ◯ Vuex
 ◯ CSS Pre-processors
 ◉ Linter / Formatter
 ◯ Unit Testing
 ◯ E2E Testing

# Vueバージョンの選択
? Choose a version of Vue.js that you want to start the project with (Use arrow keys)
❯ 2.x
  3.x (Preview)

# Class styleを使用するかどうか。私はObject styleを使うため No
? Use class-style component syntax? (Y/n) No

# TypeScriptと一緒にbabelを使うか
? Use Babel alongside TypeScript (required for modern mode, auto-detected polyfills, transpiling JSX)? (Y/n) Yes

# LintとFormatterの設定に何を使うか
? Pick a linter / formatter config:
  ESLint with error prevention only
  ESLint + Airbnb config
  ESLint + Standard config
❯ ESLint + Prettier
  TSLint (deprecated)

# Lintの実行タイミング
? Pick additional lint features: (Press <space> to select, <a> to toggle all, <i> to invert selection)
❯◉ Lint on save # 保存時にLintを実行
 ◯ Lint and fix on commit (requires Git)

# Babel, ESLintなどの設定をどこに記述するか
? Where do you prefer placing config for Babel, ESLint, etc.? (Use arrow keys)
❯ In dedicated config files # 各設定ファイルにする
  In package.json

# 今回設定した内容をプリセットで保存するか。基本的にはプロジェクトを以降作成することはないため No
? Save this as a preset for future projects? No

# パッケージマネージャーに何を使うか
? Pick the package manager to use when installing dependencies: (Use arrow keys)
❯ Use Yarn
  Use NPM
インストール完了後、
Ctrl+Dでコンテナを停止します。5. 動作確認
コンテナを立ち上げる
$ docker-compose up -d
-d: バックグラウンドでプロセスを実行する5-1. Rails
localhost:3000にアクセスし以下のページが表示されることを確認
5-2. Vue
localhost:8080にアクセスし以下のページが表示されることを確認
おわりに
お疲れさまでした。
今回はDockerでRuby on Rails + Vue + MySQLの環境構築する方法について書きました。VueとRailsはそこまで学習コストが高くないため、初心者にもオススメ出来る構成です。ぜひお試しください!
- 投稿日:2020-09-25T00:31:05+09:00
`mysql -u root -p` ERROR 1698 (28000): Access denied for user 'root'@'localhost'
事象
ubuntu:~$  mysql -u root
ERROR 1698 (28000): Access denied for user 'root'@'localhost'
原因
root ユーザが auth_socket 認証を利用している。
ubuntu:~$ sudo mysql -u root
Welcome to the MySQL monitor.  Commands end with ; or \g.
Your MySQL connection id is 22
Server version: 8.0.21-0ubuntu0.20.04.4 (Ubuntu)
<snip>
mysql> USE mysql;
Reading table information for completion of table and column names
You can turn off this feature to get a quicker startup with -A

Database changed
mysql> SELECT User, Host, plugin FROM user;
+------------------+-----------+-----------------------+
| User             | Host      | plugin                |
+------------------+-----------+-----------------------+
| debian-sys-maint | localhost | caching_sha2_password |
| mysql.infoschema | localhost | caching_sha2_password |
| mysql.session    | localhost | caching_sha2_password |
| mysql.sys        | localhost | caching_sha2_password |
| root             | localhost | auth_socket           |
+------------------+-----------+-----------------------+
5 rows in set (0.00 sec)
auth_socket 認証プラグインは、Unix ソケットファイル経由でローカルホストから接続するクライアントを認証します。(中略) このプラグインは、ユーザー名がサーバーへのクライアントプログラムで指定された MySQL ユーザー名と一致するかどうかをチェックし、その名前が一致する場合にのみ接続を許可します。
MySQL 5.6 リファレンスマニュアル解決方法
root ユーザも mysql_native_password プラグインを利用する
ubuntu:~$ sudo -i
root:~# /usr/bin/mysql_secure_installation
<snip>
Press y|Y for Yes, any other key for No: no
Please set the password for root here.

New password:
Re-enter new password:
<snip>
Remove anonymous users? (Press y|Y for Yes, any other key for No) : y
Success.
<snip>
Disallow root login remotely? (Press y|Y for Yes, any other key for No) : n
<snip>
Remove test database and access to it? (Press y|Y for Yes, any other key for No) : y
<snip>
Reload privilege tables now? (Press y|Y for Yes, any other key for No) : y
Success.

All done!
root:~# exit
logout
ログイン
ubuntu:~$ mysql -u root -p
Enter password:
Welcome to the MySQL monitor.  Commands end with ; or \g.
<snip>
mysql> USE mysql;
Reading table information for completion of table and column names
You can turn off this feature to get a quicker startup with -A

Database changed
mysql> SELECT User, Host, plugin FROM user;
+------------------+-----------+-----------------------+
| User             | Host      | plugin                |
+------------------+-----------+-----------------------+
| debian-sys-maint | localhost | caching_sha2_password |
| mysql.infoschema | localhost | caching_sha2_password |
| mysql.session    | localhost | caching_sha2_password |
| mysql.sys        | localhost | caching_sha2_password |
| root             | localhost | mysql_native_password |
+------------------+-----------+-----------------------+
5 rows in set (0.00 sec)

mysql>
環境
ubuntu:~$ uname -a Linux ubuntu 5.4.0-48-generic #52-Ubuntu SMP Thu Sep 10 10:58:49 UTC 2020 x86_64 x86_64 x86_64 GNU/Linuxubuntu:~$ cat /etc/issue Ubuntu 20.04.1 LTS \n \lubuntu:~$ mysql --version mysql Ver 8.0.21-0ubuntu0.20.04.4 for Linux on x86_64 ((Ubuntu))
- 投稿日:2020-09-25T00:04:34+09:00
[PHP]PDOでDBへ接続する時に便利なクラス
PHP開発をしていると、絶対にデータベースに接続することは一度はあるはずです。今回はそんなDBへの接続をお手軽にするメソッドを紹介します。
PDOとは
PDOとは、PHP Data Objectの略称で、ナウいPHPではこのクラスを使ってデータベースに接続しています。PDOを正しく使っていればある程度SQLインジェクション対策にもなるため、セキュリティ観点からもWEB上に公開するアプリケーションはこのPDOを使うことが推奨されます(多分)。
DBへの接続を簡素にするコード
setting.phpdefine("DEV", $_SERVER['SERVER_NAME'] === "localhost" ? true : false); //開発環境か否か $_ = function(string $str): string{return $str;}; //ヒアドキュメント用 class Connect { //三項演算子を使って開発環境と本番環境でDSNを出し分ける const HOST = DEV ? "localhost" : "xxx.example.net"; const USER = DEV ? "root" : "server_admin_name"; const PASS = DEV ? "root" : "server_password"; const UTF = "utf8"; public function __construct($dbName) { global $_; $dsn = "mysql:dbname={$dbName};host={$_(self::HOST)};charset={$_(self::UTF)}"; try{ $pdo = new PDO($dsn, self::USER, self::PASS, [PDO::MYSQL_ATTR_INIT_COMMAND => "SET NAMES {$_(self::UTF)}"]); }catch(Exception $e){ echo "Connection Error"; die(); } $pdo->setAttribute(PDO::ATTR_ERRMODE, PDO::ERRMODE_WARNING); $this->dbh = $pdo; } }実際に接続して、値を取得するときは以下のようにする
$con = new Connect("database_name");
$pdo = $con->dbh;
//プリペアドステートメントなしで値を取得する
$stmt = $pdo->query("SELECT id, name FROM TABLE1;");
while($item = $stmt->fetch(PDO::FETCH_ASSOC)){
    echo "id:{$item['id']} name:{$item['name']}";
}

//IDが$xのnameを取得する場合
$stmt = $pdo->prepare("SELECT name FROM TABLE1 WHERE id = ? LIMIT 1;");
$stmt->execute([$x]);
$item = $stmt->fetch(PDO::FETCH_ASSOC);
echo "idが{$x}のnameは{$item['name']}です。";