- 投稿日:2020-09-21T22:46:30+09:00
(´ω`) わいが清掃のお仕事してた頃に作ったアプリってのがある
ホテル清掃の経験ある人フォロワーになってくれないか。
3つ目の記事になるがQiitaからフォローしてくれた人は0だ。来てくれたら歓迎するよ。何をしてたか
ホテル清掃をしていた頃、全ての作業は分担されておりベッドの人はベッドを何部屋もやる。バスルームも同じだ。おかげで某ビジネスホテルだがシングルのベッドなら3分で出来るようになったしバスルームでも7、8分で行えるようになった。
つまり、みんながキーボード触っている時期にわいは便所に手を突っ込んで掃除しながらたまに便器からはみ出た?をキレイにしてた。それから3時間56台の勢いでベッドをひたすら組んでいた。とはいっても毎日じゃない。何をしたいか
ただし、部屋数が増えてくればだれてくるし汚れている部屋であれば多少なりとも予定作業時間を過ぎてしまう。といったことが起こる。当たり前の話だ。そういったときにこのアプリが活かせる。自分が遅れているのか早く進んでいるか把握できるようになる。
何を作ったか
タイマーだ。部屋数と時刻を2か所入力する(作業開始時刻と作業時間)。あとは?ボタンを押すごとに時間が記録され予定完了時刻より早ければ緑、遅ければ赤に行色が変わる。
何を使ったか
・画面は Fomantic-UI
・時刻入力は CleaveJS
・現在時刻取得は MomentJS
・部屋毎の作業時間計算は MomentDuration
・また比較演算子を関数で行いたかったから Predicate
どう作ったか
index.html<!doctype html> <html> <head> <title></title> <meta charset='utf-8'> <meta content='' name='author'> <meta content='' name='description'> <meta content='' name='application-name'> <meta content='telephone=no,address=no,email=no,date=no,url=no' name='format-detection'> <meta content='noimageindex,notranslate,nosnippet,noarchive,nofollow,noindex' name='robots'> <meta content='width=device-width,initial-scale=1.0,minimum-scale=1.0,maximum-scale=1.0,user-scalable=no' name='viewport'> <link href='css/fomantic-ui/2.7.8.min.css' rel='stylesheet' media='screen'> <link href='asset/progressive-web.json' rel='manifest'> <link href='asset/favicon.ico' rel='icon'> <style name='font'> @font-face{ font-family:'M+2VM+IAPG circle'; src:url('asset/m+2vm+ipag-circle.ttf'); } @font-face{ font-family:'gidole'; src:url('asset/gidole.ttf'); } </style> <style> /* * 視認 */ html, body{ font-size:14px; } .ui.table td, .ui.table input{ font-family:'gidole'; } .ui.table>thead>tr>th, .ui.table>tbody>tr>td{ padding:0; } /* * 入力 */ .ui.table input[type='number']{ -moz-appearance:textfield; } .ui.table input::-webkit-outer-spin-button, .ui.table input::-webkit-inner-spin-button{ -webkit-appearance: none; } .ui.table input{ background:transparent; text-align:center; appearance:none; outline:none; border:none; width:100%; } /* * 見栄 */ .ui.table thead tr:first-child>th:first-child{ width:3em; } .ui.card, .ui.label, .ui.table, .ui.buttons{ border-bottom:2px solid rgba(34,36,38,.15) !important; box-shadow:rgba(16, 36, 94, 0.4) 0 2px 6px 0 !important; } .ui.card .description p{ font:12px 'M+2VM+IPAG circle'; line-height:1.2; color:black; } /* * アイコン */ i.icon.thumbs-up:before { content: '\f164'; } </style> </head> <body> <main> <div class='ui grid padded'> <div class='row'> <div class='column'> <div class='ui card fluid'> <div class='image'> <img src='asset/businesshotel-9956-400x400.png'> </div> <div class='content'> <div class='description'> <p>ホテル清掃の進捗を管理するアプリです。予定通り進んでいるか緑と赤のバランスでわかります。上のテーブルを入力して作業を開始しましょう。</p> </div> </div> </div> </div> </div> <div class='row'> <div class='column'> <table class='ui table unstackable celled fixed center aligned blue'> <thead> <tr> <th>数</th> <th>開始時刻</th> <th>作業時間</th> </tr> </thead> <tbody> <tr> <td><input type='number' v-model.number='rooms'></td> <td><input type='tel' v-model='time.base' ref='v1'></td> <td><input type='tel' v-model='time.task' ref='v2'></td> </tr> </tbody> </table> <table class='ui table unstackable celled fixed center aligned blue'> <thead> <th>No.</th> <th>予定時刻</th> <th>完了時刻</th> </thead> <tbody> <tr v-for='(no,i) in rooms' :class="[lt(i)]"> <td>{{no}}</td> <td>{{estimate[i] | HHmmss }}</td> <td>{{complete[i] | HHmmss }}</td> </tr> </tbody> </table> <div class='ui buttons two blue'> <button class='ui button icon' @click='reset'> <i class='icon file'></i> </button> <button class='ui button icon' @click='stamp'> <i class='icon thumbs-up'></i> </button> </div> </div> </div> </div> </main> </body> <!-- native --> <script src='js/native/moment-2.24.0.min.js'></script> <script src='js/native/moment-duration-format-2.3.2.min.js'></script> <script src='js/native/predicate-1.2.0.min.js'></script> <script src='js/native/cleave-1.5.3.min.js'></script> <!-- vue --> <script src='js/vue/2.6.10.js'></script> <script> new Vue({ el:'main', data:{ /* * 入力用のデータ */ time:{ base:null, /* 作業開始時刻 */ task:null, /* 作業平均時間(作業者)*/ }, rooms:10, /* 作業予定個数(部屋数)*/ /* * 進捗用のデータ */ estimate:[ /* 作業完了予定時刻 */ ], complete:[ /* 作業完了実際時刻 */ ], /* * 入力用のバリデーション(時刻と時間) */ validation:{ time:true, timePattern:['h','m','s'] } }, filters: { HHmmss:function(ts) { if(ts !== undefined){ /* 何時:何分:何秒 */ return moment(ts).format('HH:mm:ss') } } }, computed:{ timeChanged:function(){ /* 部屋数と時刻が修正されたことを監視 */ return this.rooms && this.time }, }, watch:{ timeChanged:{ deep:true, handler:function(){ /* 再計算 */ this.calc() } } }, methods:{ lt:function(i){ /* 予定より遅い or 早い */ return (i < this.complete.length) ? (predicate.lt(this.estimate[i],this.complete[i]) ? 'negative' : 'positive') : null }, stamp:function(){ /* 作業完了 */ if(this.complete.length < this.rooms) { this.complete.push(moment().valueOf()) } }, reset:function(){ /* 初期化 */ this.complete.splice(0,this.complete.length) }, calc:function(){ /* 計算 */ var base = moment(this.time.base,'HH:mm:ss') var task = moment.duration(this.time.task) for(var i=0;i<this.rooms;i++){ var val = base.add(task).valueOf() if(val){ this.estimate[i] = val } } }, init:function(){ /* HH:MM:SSによる入力検証 */ new Cleave(this.$refs.v1,this.validation) new Cleave(this.$refs.v2,this.validation) } }, mounted:function(){ this.time.base = '11:30:00' /* 作業開始 */ this.time.task = '00:09:00' /* 作業時間 */ this.init() /* NN:NN:NNの入力検証 */ this.calc() /* 計算(作業完了時刻) */ } }) </script> </html>


- 投稿日:2020-09-21T20:10:34+09:00
【Nuxt.js】非同期するなら、$axiosでしょ
標準搭載のaxiosと、Nuxtモジュールのaxiosの比較
モジュール axiosの表記 リクエストメソッドの表記 レスポンス値の取得 axios axios get res.data @nuxtjs/axios $axios $get res セットアップ
$ yarn add @nuxtjs/axiosnuxt.config.jsmodules: [ '@nuxtjs/axios', ], axios: { },Usage getリクエスト
asyncData関数
scriptexport default { async asyncData({ $axios }) { const res = await $axios.$get('URL') return { data: res } } }そのほかでの関数内
scriptexport default { methods: { async function () { const res = await this.$axios.$get('URL') this.data = res } } }Usage postリクエスト
scriptexport default { data () { return { user: { name: '', email: '', password: '', } } }, methods: { submit: async function () { const res = await this.$axios.$post('URL', this.user) console.log(res) } } }ルーティング内のid取得に関する比較
関数 /_idの取得 async asyncData (context) context.params.id その他 this.$route.params.id 番外編:ES6のDestructuring(分割代入)を利用した記述法
関数の引数の省略
scriptasync asyncData(context) { const posts = await context.$axios.$get('/posts') return { posts } },↓
scriptasync asyncData ({ $axios }) { const posts = await $axios.$get('/posts') }関数の引数 & レスポンス値の定数の省略
scriptasync asyncData (context) { const res = await axios.get('/posts/' + context.params.id) return { post: res.data } }↓
scriptasync asyncData ({ params }) { const { data } = await axios.get('/posts/' + params.id) return { post: data } }
- 投稿日:2020-09-21T16:21:23+09:00
JSの無い軽量な静的サイトを生成する11ty
Netlifyのガイド&チュートリアルを読んでいたところ、以下の記事が面白かった。
(英語記事)
https://www.netlify.com/blog/2020/09/18/eleventy-and-vue-a-match-made-to-power-netlify.com/彼らはWebサイトを次のレベルに引き上げるためのプロジェクトに着手しているようだ。
目標は、サイトを軽量にすることと、コンポーネントの再利用を容易にすることだ。
どうやらクライアント側で大量のJSを読み込むことを良しとしていない。
そのため、以下の技術が採用されている。
11ty
シンプルな静的サイトジェネレーター。Eleventyとも。
(ただしEleventyで検索するとアパレルブランドがヒットしてしまうので、11tyを使うことをお勧めする。)Vue
コンポーネント指向のJSのフレームワーク。お馴染み。選定にあたって様々なコンポーネント指向のフレームワークを試してみたが、それぞれクライアント側に何かしらのJSランタイムを提供する必要があったようだ。
確かに、有名な静的サイトジェネレーターであるGatsbyのデモサイトを見てみると、scriptタグで外部のJavaScriptを五個読んでいた。
これだけシンプルなサイトであってもだ。
https://gatsby-starter-blog-demo.netlify.app/
SPAという構成上、JSは避けて通れないものだ。しかしながら、11tyは一つもJSを読み込まない。
https://eleventy-base-blog.netlify.app/
こちらのデモサイトのhtmlを見てほしいが、scriptタグは存在しない。
これこそが彼らが求めていた軽量なサイトなのだ。ところが、11tyはコンポーネント指向ではない。
そのため、11tyにVueのプラグインを組み込む方法が記事に書かれている。
組み込むといってもあくまで開発側の話で、クライアント側にはVueランタイムが入るわけではない。
デプロイ前のビルド専用の最適化として使われるのみである。
組み込む方法は記事に任せるとして、僕としては11tyについて軽く調べてみた。11tyは様々なテンプレートエンジンを包括したようなもので、以下のようなものが使える。
https://www.11ty.dev/docs/languages/
mdやjsも使えるので、門戸は広い。すぐに始められるスターターも用意されていて、Lighthouseスコアが高いものがほとんどだ。
https://www.11ty.dev/docs/starter/
このパフォーマンスはさすがと言える。
(Gatsbyで作ったサイトも実は高得点だが。プリレンダリングとかのお陰かな?)統計データとして、静的サイトジェネレーターの比較サイトの
https://www.staticgen.com/
を見てみると、直近のGithubスター数ではNext.jsの次の二位に位置している。
勢いがあり、今後メジャーになっていく可能性がある。今はReact人気のため、GatsbyやNextのシェアが高いが、今後このVueプラグインの利便性が上がったりしてくれば、軽量を求めるサイトでの採用が増えてくると思われる。
(今はVueプラグインを使うには実験的機能を有効にしないといけないので、プロダクションへの採用は控えられるかもしれない)
- 投稿日:2020-09-21T14:01:00+09:00
[Laravel]Laravel6.8 × Vue.jsでSPAを構築する流れ
今回の題
1ヶ月前に勉強がてらLaravelとVue.jsでSPAを構築してみたのですが、1ヶ月経った今、その手順をすっかり忘れてしまいました。
必要な時に振り返ればいい知識だとは思うのですが、忘れすぎて少し癪だったのでアウトプットしておきます。この記事では、HomeとUserというページを作り、それぞれをページ遷移を行わずに切替えられる様にします。
ページのコンテンツとURLがページ遷移なしに切り替わっているのがわかると思います。
バージョン
- Laravel6.8
- Laravel Mix 4.1.4
- Vue.js 2.6.12
- Vue Router 3.4.3
手順
Laravelのインストール
$ composer create-project "laravel/laravel=6.8" laravel-spa各種パッケージのインストール
- Vue.js
$ npm install vue --save-dev
- Laravel Mix
$ npm install laravel-mix --save-dev
- Vue Router
$ npm install vue-router --save-dev
- cross-env
$ npm install cross-env --save-devLaravel Mixの設定
webpack.mix.jsにコンパイル先を定義します。webpack.mix.jsconst mix = require('laravel-mix'); mix.js('resources/js/app.js', 'public/js') .version();これで
resources/js/app.jsに書いたVueはpublic/jsにコンパイルされます。
version()はキャッシュ対策です。
ブラウザに以前のJavaScriptがキャッシュとして残っていると、キャッシュの方を使ってしまうので、ここでversion()を使い、さらにviewでmix関数を使ってjsを読み込むことで対策出来ます。
参考コンパイル
以下のコマンドで変更を監視し、自動的にコンパイルが行われる様にします。
$ npm run watch各種ファイル作成
view
resources/views/index.blade.php<!DOCTYPE html> <html> <head> <meta charset="utf-8"> <meta http-equiv="X-UA-Compatible" content="IE=edge"> <meta name="viewport" content="width=device-width, initial-scale=1"> </head> <body> <div id="app"> <router-view /> </div> <script src="{{ mix('js/app.js') }}"></script> </body> </html>router.js
resources/js/にrouter.jsを作成。
SPAのルーティングはここに定義します。router.jsimport Vue from 'vue' import Router from 'vue-router' import Home from './components/pages/Home' import User from './components/pages/User' Vue.use(Router) export default new Router({ mode: 'history', routes: [ { path: '/', name: 'home', component: Home }, { path: '/user', name: 'user', component: User }, ] })Vue.jsとvue-router、使用するコンポーネントをimportしたあと、ルーティングでパスにコンポーネントを割り振っています。
参考app.js
resources/js/app.jsを以下の様に編集します。import Vue from 'vue' import router from './router.js' new Vue({ router }).$mount('#app')Vue.jsとvue-routerをimportして、routerを適用する要素を設定します。
コンポーネント
ページの内容となるコンポーネントは
componentsディレクトリで管理します。$ mkdir resources/js/components
componentsディレクトリにpagesディレクトリを作成し、$ mkdir resources/js/components/pagesそこに、
Home.vueUser.vueというファイルを作り、以下の様にそれぞれ編集します。Home.vue<template> <div> <h1>Home</h1> <router-link :to="{ name: 'user' }">User</router-link> </div> </template>User.vue<template> <div> <h1>User</h1> <router-link :to="{ name: 'home' }">Home</router-link> </div> </template>確認
以下のコマンドでビルトインサーバーを立ち上げ、
$ php artisan servehttp://127.0.0.1:8000/
にアクセスして確認してください。最初のgifの様な動きが確認できるはずです。
あとはこれを土台に好きな様に弄り回してSPAで色々作れると思います。以上!!
一言
最初SPAの構築ができた時、めちゃくちゃ興奮して無駄にページ行き来しまくりました。
SPAすごい技術だなぁ……。参考
readouble アセットのコンパイル
Vue Router
Laravel6.xとVue Routerでvue.jsのSPA構築
- 投稿日:2020-09-21T12:39:35+09:00
(´ω`) ... VueのTable {width,align}を一括指定するディレクティブつくりました
前回、DatGuiをBackEnd APIを検証するための登録画面に利用している。って記事を記載した。がだれからも良いねはなくLGTMも来なくて内心ビビってる。マジか。と思った。というかツイッターのフォロワーは未だ増えないままだ。この現状を見てInputMaskをぶっこんだ話なんかも展開する予定だったがやめた。そしてQiitaフォントサイズ大きいなってことで自分でブログを作ろうと思った。プロトタイプはあるし順調だ。だからその話もメモ代わりにQiitaで展開していくつもりだ。そこで動作するサンプルなんかも公開しよう。その間の記事はQiitaにメモ代わりで投稿することにした。
1.前提
趣味で何かを開発していたら、テーブルの列が後から増えてくる(登録する項目なんか)ってのはよくある話だ。少なくとも自分の間じゃそうだ。最初のプロトタイプを作るときは名前なんて姓だけで十分だしあとIDとPASSの3項目でテーブル作って社員登録機能を作る。みたいな最小限の構成で組み始めている。できた次に社員名いっとくか。メールアドレスいっとくか。みたいに項目を増やしていく。(機能が出来たら次のデータを作る。棚田だ)
2.問題
ここで起きてくる問題はCSSだ。今や<tag>の中にstyleをぶっこむなんて真似も全くしてこなかった俺だが、このような作り方の前では後から項目が増えるからID指定やCLASS指定でやろうと面倒くさくなってくる。nth-child(n)で最初は指定していたが列間の途中に項目を増やす状況になると、配列途中に値を挿入するみたいに以降の全番号を手で振りなおすという愚かさだ。面倒くさい(姓と名は左寄せのほうがいいな)
sample.csstable tr td:nth-child(1) { width:6em; text-align:center; } table tr td.employee-name { width:6wm; text-align:center; } table tr td#employee-name { width:6em; text-align:center; } table tr td[data=employee_name] { width:6em; text-align:center; }3.結局
タグの中に書き込んだ方が一番手っ取り早い。という結論に至った。周りはどうかな?どうやってるか知りたい。だが、なぜ毎回widthやtext-alignを打ち込まなくちゃならないんだ?面倒くさい。APIを検証するためのこの画面ではテーブルの項目は永遠と増え続ける。テーブル自体もだ。そのたびに書くのは面倒だ。その間の時間を省いてチロルチョコを食べた方がいい。健康的な考えだ。
sample.html<table> <tr> <td style='width:6em;text-align:center;'></td> </tr> </table>4.ということでディレクティブを作った
前置きが長かった。要はセルのtdのwidthとalignを{attribute:value}をvalueの一括指定でDOM作ってくれたら便利だなという話だ。ソースはこれ。
directive.vueVue.directive('style',function(el,binding,vnode){ vnode.context.$nextTick(function(){ var arr = binding.value.split(',') switch(binding.arg){ case 'align': _.each(el.children,function(el,i){ var align = arr[i] == 'l' ? 'left' : arr[i] == 'r' ? 'right' : 'center' el.classList.add(align) }) break; case 'width': _.each(el.children,function(el,i){ el.style.width = (arr[i] == undefined) ? 'auto' : arr[i] + 'em' }) break; } }) })5.使い方
ディレクティブをかますだけ。<tr>に。列の幅指定はヘッダだけで良く配置指定はボディに組み込んでいるが、確かにv-style:alignは効率的じゃないかもしれない。全セルに指定することになるからループも多い。ここだけCSSにした方がいいかも。どうやるのがベストだと思うか知りたい。ダブルクォートの間にシングルクォートを挟むのはこれ自体を文字列として評価してもらうためだ。
それからこのコードはLODASHに依存している。_.each()のとこだけだ。
sample.html<table> <thead> <tr v-style:width="'7,7,7,5,5,5,5,5,5,5,5,5,5,auto'"> </tr> </thead> <tbody> <tr v-for='v,k,n in list' v-style:align="'c,l,l,c,c,c,c,c,c,c,c,c,c,c'"> </tr> </tbody> </table>


- 投稿日:2020-09-21T05:00:02+09:00
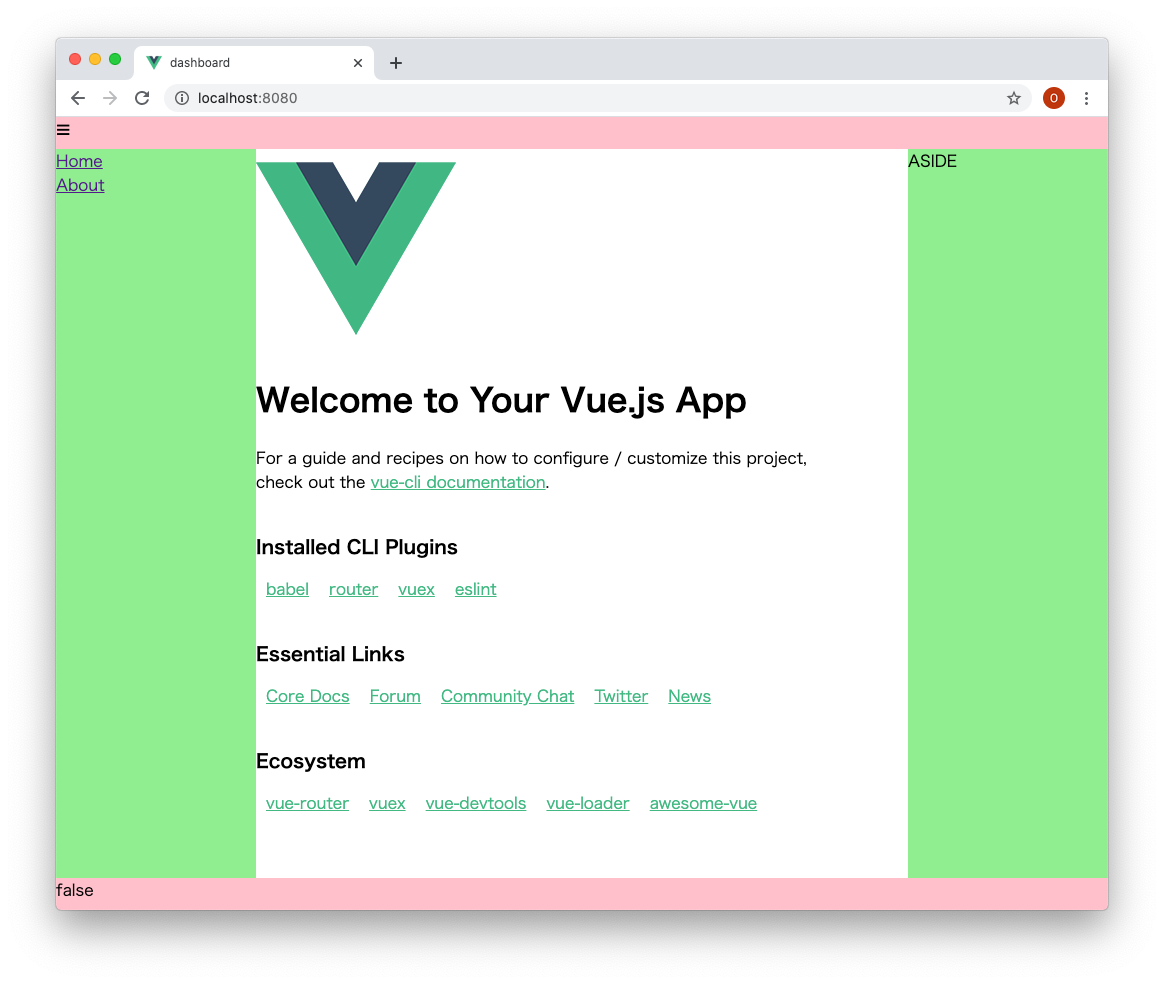
Vue3 でダッシュボードのスケルトンを作る。
Vue3 がリリースされました。
売りである
Composition APIはだいぶいい感じです。
Vue2に比べて学習コストがかなり低そうです。
Vue3そのものについては他所でたくさん説明されるでしょうから、この記事では実際にVue3の大きな使われ方と思われるダッシュボードのスケルトンをVue CLIを使って作る手順をご紹介します。また
Composition APIもさらっと使ってみます。できあがるのは以下のようなものです。ナビゲーションバーの
Home,Aboutでメインコンテンツが切り替わり、左上のハンバーガーボタンでナビゲーションバーの幅が変化します。
準備
npm install -g @vue/cli9/20現在インストールされるバージョンは
4.5.6です。この記事もそのバージョンで確認しています。プロジェクトを作成します。
vue create dashboardプロジェクト名(
dashboard)は任意のものでかまいません。以下のようにオプションが表示されます。
Vue CLI v4.5.6
? Please pick a preset:
  Default ([Vue 2] babel, eslint)
  Default (Vue 3 Preview) ([Vue 3] babel, eslint)
❯ Manually select features
vue-routerを使うのでManually select featuresを選択してください。Vue CLI v4.5.6 ? Please pick a preset: Manually select features ? Check the features needed for your project: ◉ Choose Vue version ◉ Babel ◯ TypeScript ◯ Progressive Web App (PWA) Support ❯◉ Router ◯ Vuex ◯ CSS Pre-processors ◉ Linter / Formatter ◯ Unit Testing ◯ E2E TestingRouter を選択します。
Vue CLI v4.5.6
? Please pick a preset: Manually select features
? Check the features needed for your project: Choose Vue version, Babel, Router, Linter
? Choose a version of Vue.js that you want to start the project with
  2.x
❯ 3.x (Preview)
この後の質問はデフォルトを選択しておけばいいです。
サービスを開始します。
cd dashboard
yarn serve
ブラウザで
localhost:8080に繋ぎます。作っていく
この時点でプロジェクトフォルダの中の
publicとsrcは以下のような中身になっています。この中のpublic/index.htmlとsrc/App.vueを変更していきます。public ├── favicon.ico └── index.html src ├── App.vue ├── assets │ └── logo.png ├── components │ └── HelloWorld.vue ├── main.js ├── router │ └── index.js └── views ├── About.vue └── Home.vuehtml, body, #app にスタイルを充てる
全画面を使うために、
public/index.htmlにcssを追記して高さを調整します。<style> html, body, #app { ; height: 100% ; margin: 0 } </style>聖杯レイアウトを作成する。
App.vueを編集して聖杯レイアウトにします。src/App.vue<template> <div id=HG> <header><div @click="toggleNav()">☰</div></header> <nav> <router-link to="/">Home</router-link><br> <router-link to="/about">About</router-link><br> </nav> <router-view/> <aside>ASIDE</aside> <footer>{{ shrink }}</footer> </div> </template> <script> import { ref } from 'vue' export default { setup() { const shrink = ref( false ) return { shrink , toggleNav : () => { document.querySelector( 'nav' ).style.width = shrink.value ? '200px' : '100px' shrink.value = !shrink.value } } } } </script> <style> #HG { ; height : 100% ; display : grid ; grid-template-rows : 32px 1fr 32px ; grid-template-columns : auto 1fr auto } nav, aside { ; width : 200px ; background : lightgreen ; transition : all 300ms 0s ease } header, footer { ; grid-column : 1 / 4 ; background : pink } </style>Composition-API
上のソースの
scriptタグの中でComposition-APIを使用しています。
setup()が返す辞書がtemplateの中で{{}}とか@clickとかから参照できるようになります。最後に
Composition-APIはVue2時代の指定方法より直感的で学習コストを下げることに成功していると思われます。積極的にVue3に乗り換えていっていいんじゃないでしょうか。
- 投稿日:2020-09-21T01:27:44+09:00
(´ω`) Let's Vue Programming, 登録画面にDatGui, Enter送りを添えて
1.DatGuiってこんなん
こんにちは。職業グラマです。最近ツイッター始めたのをきっかけにQiitaもやってみるか!ってことでトライしてます。ご紹介するのはDatGui。言わずもがなJavaScriptのパラメータ調整用画面をさくっと作れる便利ライブラリです。ゲーム画面やThree.JSを利用した画面なんかでよく利用されています。このFormのパラメータを調整するとJavaScriptのオブジェクト側にも値の変更を行ってくれるのでリアルタイムなゲームの制御また調整ができます。
2.DatGuiを登録画面に使ってみました
今回私は、このDatGuiをバックエンドのAPIを検証するためのフォームとして利用しました。社員の登録とか削除とか上書するための画面に使います。サクッと作れてコンパクト。だから項目が増えてもBootStrapやSemantic-Uiに比べて見晴らしがよく手間を減らせます。空いた時間にカップラーメン食えるぐらいには良い感じです。
3.DatGuiを登録画面にエンター送りを組み込みました
エンター送りってExcelのセルにEnterすると次セルに移動するあれです。伝票とか一日に何度も入力するフォームとかってTabで次の入力インプットに飛ばしたりするの面倒だから項目入力後のEnter Key押されたタイミングで自動的に次インプットにフォーカスを移動する。これがエンター送りです。
社員姓打ち込んでエンターしたら自動的に社員名の入力インプットにフォーカスが移る。って感じです。それを実現するためのコードがこちら。Vueのディレクティブとして構築してます。DatGuiにはtype=textのコントロールが公式にはありませんが私は個人的に組み込みました。動くサンプルとかどっかにあげようと考えてます。
visibleつけているのは、これが入力されているときは次項目を表示しない。といった場面でも正しく動作させるためです。
次INPUTがv-show='false'(display:none;)のときにそれを含まずにキチンと2個目のコントロールにジャンプしてくれます。vue.directiveVue.directive('focus-on-enter-next',function(el,binding,vnode){ var namespace = binding.arg var callback = (binding['value'] !== undefined) ? binding.value : function(){} var inputs = $([ 'input[type=password]:visible', 'input[type=checkbox]:visible', 'input[type=text]:visible', 'textarea:visible', 'select:visible' ].join(','),el) inputs.off([ 'focus.' + namespace, 'keydown.' + namespace, 'focusout.' + namespace ].join(' '),el) inputs.on('focus.' + namespace,function(ev){ $(el).closest('.cr').addClass('focus') }) inputs.on('focusout.' + namespace,function(ev){ $(el).closest('.cr').removeClass('focus') }) inputs.on('keydown.' + namespace,function(ev){ if(ev.keyCode == 13){ var i = inputs.index(this) var n = (i+1) if (n < inputs.length){ inputs.eq(n).focus() }else{ callback() } switch(inputs.eq(n).prop('localName')){ case 'textarea': case 'input': return false; } } }) })4.エンター送りの呼び出し側コード
v-focus-on-enter-next:event_namespace='function_complete'といった形で利用できます。event_namespaceは1画面中にある複数のDatGui毎にエンター送りを適用するためです。function_completeは最後の入力INPUTが完了したタイミングで呼び出されます。ここでは備考です。入力してENTERしたタイミングで呼び出されます。なので入力後に社員登録ボタンを押してAPIを呼び出さなくてもfunction_completeの中に記述しておけば備考までの入力が完了したタイミングで自動的に登録APIを処理できます。楽するためです。
example.html<dat-gui v-focus-on-enter-next:employee='complete'> <dat-value v-model.number='params.社員コード' label='コード' :min='0' :max='9999' :step='1' :empty_n='0'></dat-value> <dat-image v-model='params.社員アバター' label='画像'></dat-image> <dat-value v-model='params.社員姓' label='苗字'></dat-value> <dat-value v-model='params.社員名' label='名前'></dat-value> <dat-value v-model='params.社員姓かな' label='苗字-かな'></dat-value> <dat-value v-model='params.社員名かな' label='名前-かな'></dat-value> <dat-value v-model='params.社員性別' label='性別' :accepted-values="['男性','女性']"></dat-value> <dat-value v-model='params.社員パスワード' label='パスワード'></dat-value> <dat-value v-model='params.社員担当部署' label='担当部署' :accepted-values="['管理','営業','開発']"></dat-value> <dat-value v-model='params.社員入社日' label='入社日'></dat-value> <dat-value v-model='params.社員管理権' label='管理権'></dat-value> <dat-text v-model='params.社員備考' label='備考'></dat-text> </dat-gui>5.DatGui Vue Plugin忘れてました
lq111lq/vue-dat-guiを1ファイル化してTextコントローラを入れた版です。その他empty_nとかwideとかplaceholderとかreadonlyとかpasswordとか公式にはないプロパティは私個人が組み込んだものになります。
wide属性をdat-guiタグで有効(true)にすればDatGui左側のラベルが消えて幅広く入力できます。
ラベル名はそのままInputのplaceholderに適用されます。
password属性をdat-valueタグで有効にすれば入力内容が****として隠されます。
readonly属性は編集不可にするだけです。社員に自動付与されたIDの表示なんかに使います。
empty_nはスライダーボックスでempty_nのnの値の時、ボックス内を空文字にしてくれます。自分で社員IDを打ち込むときに使います。あと、DatGuiのプルリクエストにあったイメージコントローラとか、スライダーボックス上でマウスホイール又は上下キーでカウントアップ/カウントダウンを組み込んでます。これで登録も楽になるかなーと考えてました。
vue.directive(function(root){ var plugin={ install:function(Vue,options){ Vue.component('DatGui',{ template:"\ <div>\ <div ref='container'>\ <slot></slot>\ </div>\ </div>\ ", name:'DatGui', props: { wide: { type: Boolean, default: false } }, watch: { wide:function(value) { this.$_gui && this.$_gui.wide(value) } }, data:function(){ return { context: {} } }, provide:function() { return { context: this.context } }, created:function() { this.$_gui = new dat.GUI({ autoPlace: false }) }, mounted:function() { this.$refs.container.appendChild(this.$_gui.domElement) this.$_gui.wide(this.wide) }, beforeDestroy:function() { this.$_gui && this.$_gui.destroy() } }) Vue.component('DatFolder',{ template:"\ <span>\ <slot>\ </slot>\ </span>\ ", props: { name: { type: String, default: 'folder' }, wide: { type: Boolean, default: false } }, watch: { wide:function(value) { this.$_gui && this.$_gui.wide(value) } }, created:function() { this.$_gui = this.$parent.$_gui.addFolder(this.name) }, mounted:function() { this.$_gui.wide(this.wide) } }) Vue.component('DatValue',{ template:"\ <span>\ </span>\ ", name: 'DatValue', props: { value: { type: [Number, String, Boolean, undefined], default: undefined }, label: { type: String }, max: { type: Number, default: null }, min: { type: Number, default: null }, step: { type: Number, default: null }, empty_n: { type: Number, default: null }, acceptedValues: { type: [Object, Array], default:function() { return null } }, placeholder: { type: String, default: '' }, readonly: { type: Boolean, default: false }, password: { type: Boolean, default: false } }, inject: ['context'], computed: { valueInner:function() { return this.context && this.context[this.label] } }, watch: { value:function(value) { this.$_controller && this.$_controller.setValue(value) }, valueInner:function(newVal) { switch(true){ case this.$_controller instanceof dat.controllers.NumberController: case this.$_controller instanceof dat.controllers.NumberControllerBox: this.$emit('input', newVal <= this.empty_n ? '' : newVal) break; default: this.$emit('input', newVal) } }, label:function(value) { this.$_controller && this.$_controller.name(value) }, max:function(value) { this.$_controller && this.$_controller.max(value) this.$_controller.updateDisplay() }, min:function(value) { this.$_controller && this.$_controller.min(value) this.$_controller.updateDisplay() }, step:function(value) { this.$_controller && this.$_controller.step(value) this.$_controller.updateDisplay() }, empty_n:function(value){ this.$_controller && this.$_controller.empty_n(value) this.$_controller.updateDisplay() }, acceptedValues:function(list) { var html = '' var type = Object.prototype.toString.call(list).slice(8,-1).toLowerCase() switch(type){ case 'array': list.forEach(function(v){ html += '<option value=' + v + '>' + v + '</option>'; }) break; case 'object': Object.keys(list).forEach(function(k){ html += '<option value=' + list[k] + '>' + k + '</option>'; }) break; } if(this.$_controller){ this.$_controller.domElement.children[0].innerHTML = html } }, placeholder:function(value) { this.$_controller && this.$_controller.placeholder(value) }, readonly:function(value) { this.$_controller && this.$_controller.readonly(value) }, password:function(value) { this.$_controller && this.$_controller.password(value) } }, created:function() { var self = this if (this.value === undefined) { this.$set(this.context, this.label, function() { self.$emit('click') }) this.$parent.$_gui.add(this.context, this.label) return } this.$set(this.context, this.label, this.value) if (this.acceptedValues) { this.$_controller = this.$parent.$_gui.add(this.context, this.label, this.acceptedValues) this.$_controller.onFinishChange(function(obj){ var has_selected_option = this.__select.selectedOptions.length > 0 if(has_selected_option){ self.$emit('change',this.__select.selectedOptions[0].innerText) } }) } else if (this.min != null && this.max != null && this.step != null) { if (this.empty_n != null){ this.$_controller = this.$parent.$_gui.add(this.context, this.label, this.min, this.max, this.step, this.empty_n) } else { this.$_controller = this.$parent.$_gui.add(this.context, this.label, this.min, this.max, this.step) } this.$_controller.onChange(function(value){ self.$emit('change',value) }) } else { this.$_controller = this.$parent.$_gui.add(this.context, this.label) this.$_controller.placeholder(this.placeholder) this.$_controller.readonly(this.readonly) this.$_controller.password(this.password) } } }) Vue.component('DatColor',{ template:"\ <span>\ </span>\ ", name: 'DatColor', props: { value: { type: [String, Array, Object] }, label: { type: String } }, inject: ['context'], computed: { valueInner:function() { return this.context && this.context[this.label] } }, watch: { value:function(value) { this.$_controller && this.$_controller.setValue(value) }, valueInner:function(newVal) { this.$emit('input', newVal) } }, created:function() { this.$set(this.context, this.label, this.value) this.$_controller = this.$parent.$_gui.addColor(this.context, this.label) } }) Vue.component('DatText',{ template:"\ <span>\ </span>\ ", name: 'DatText', props: { value: { type: String }, label: { type: String }, placeholder: { type: String, default: '' }, readonly: { type: Boolean, default: false } }, inject: ['context'], computed: { valueInner:function() { return this.context && this.context[this.label] } }, watch: { value:function(value) { this.$_controller && this.$_controller.setValue(value) }, valueInner:function(newVal) { this.$emit('input', newVal) }, label:function(value) { this.$_controller && this.$_controller.name(value) }, placeholder:function(value) { this.$_controller.placeholder(value) }, readonly:function(value) { this.$_controller.readonly(value) } }, created:function() { this.$set(this.context, this.label, this.value) this.$_controller = this.$parent.$_gui.addText(this.context, this.label) this.$_controller.placeholder(this.placeholder) this.$_controller.readonly(this.readonly) } }) Vue.component('DatImage',{ template:"\ <span>\ </span>\ ", name: 'DatImage', props: { value: { type: String }, label: { type: String }, placeholder: { type: String, default: '' } }, inject: ['context'], computed: { valueInner:function() { return this.context && this.context[this.label] } }, watch: { value:function(value) { this.$_controller && this.$_controller.setValue(value) }, label:function(value) { this.$_controller && this.$_controller.name(value) } }, created:function() { var self = this this.$set(this.context, this.label, this.value) this.$_controller = this.$parent.$_gui.addImage(this.context, this.label) this.$_controller.placeholder(this.placeholder) this.$_controller.onChange(function(img){ if(img){ self.$emit('change',img.src) } }) } }) } } if( typeof module === 'object' && typeof module.exports === 'object'){ module.exports = plugin }else if(typeof define === 'function' && define.amd){ define('VueDatGui', plugin) }else{ root.VueDatGui = plugin } }(this));<dat-gui :wide='true'を設定すると入力INPUTが幅広くなります
dat-gui.jsVue.use(VueDatGui);興味ある人フォローして!!(´ω`)@https://twitter.com/seraphielbet
ありがとうございました。


- 投稿日:2020-09-21T01:27:44+09:00
Let's Vue Programming, 登録画面にDatGui, Enter送りを添えて...by chefよりIを込めて
1.DatGuiってこんなん
こんにちは。職業グラマです。最近ツイッター始めたのをきっかけにQiitaもやってみるか!ってことでトライしてます。ご紹介するのはDatGui。言わずもがなJavaScriptのパラメータ調整用画面をさくっと作れる便利ライブラリです。ゲーム画面やThree.JSを利用した画面なんかでよく利用されています。このFormのパラメータを調整するとJavaScriptのオブジェクト側にも値の変更を行ってくれるのでリアルタイムなゲームの制御また調整ができます。
2.DatGuiを登録画面に使ってみました
今回私は、このDatGuiをバックエンドのAPIを検証するためのフォームとして利用しました。社員の登録とか削除とか上書するための画面に使います。サクッと作れてコンパクト。だから項目が増えてもBootStrapやSemantic-Uiに比べて見晴らしがよく手間を減らせます。空いた時間にカップラーメン食えるぐらいには良い感じです。
3.DatGuiを登録画面にエンター送りを組み込みました
エンター送りってExcelのセルにEnterすると次セルに移動するあれです。伝票とか一日に何度も入力するフォームとかってTabで次の入力インプットに飛ばしたりするの面倒だから項目入力後のEnter Key押されたタイミングで自動的に次インプットにフォーカスを移動する。これがエンター送りです。
社員姓打ち込んでエンターしたら自動的に社員名の入力インプットにフォーカスが移る。って感じです。それを実現するためのコードがこちら。Vueのディレクティブとして構築してます。DatGuiにはtype=textのコントロールが公式にはありませんが私は個人的に組み込みました。動くサンプルとかどっかにあげようと考えてます。
visibleつけているのは、これが入力されているときは次項目を表示しない。といった場面でも正しく動作させるためです。
次INPUTがv-show='false'(display:none;)のときにそれを含まずにキチンと2個目のコントロールにジャンプしてくれます。vue.directiveVue.directive('focus-on-enter-next',function(el,binding,vnode){ var namespace = binding.arg var callback = (binding['value'] !== undefined) ? binding.value : function(){} var inputs = $([ 'input[type=password]:visible', 'input[type=checkbox]:visible', 'input[type=text]:visible', 'textarea:visible', 'select:visible' ].join(','),el) inputs.off([ 'focus.' + namespace, 'keydown.' + namespace, 'focusout.' + namespace ].join(' '),el) inputs.on('focus.' + namespace,function(ev){ $(el).closest('.cr').addClass('focus') }) inputs.on('focusout.' + namespace,function(ev){ $(el).closest('.cr').removeClass('focus') }) inputs.on('keydown.' + namespace,function(ev){ if(ev.keyCode == 13){ var i = inputs.index(this) var n = (i+1) if (n < inputs.length){ inputs.eq(n).focus() }else{ callback() } switch(inputs.eq(n).prop('localName')){ case 'textarea': case 'input': return false; } } }) })4.エンター送りの呼び出し側コード
v-focus-on-enter-next:event_namespace='function_complete'といった形で利用できます。event_namespaceは1画面中にある複数のDatGui毎にエンター送りを適用するためです。function_completeは最後の入力INPUTが完了したタイミングで呼び出されます。ここでは備考です。入力してENTERしたタイミングで呼び出されます。なので入力後に社員登録ボタンを押してAPIを呼び出さなくてもfunction_completeの中に記述しておけば備考までの入力が完了したタイミングで自動的に登録APIを処理できます。楽するためです。
example.html<dat-gui v-focus-on-enter-next:employee='complete'> <dat-value v-model.number='params.社員コード' label='コード' :min='0' :max='9999' :step='1' :empty_n='0'></dat-value> <dat-image v-model='params.社員アバター' label='画像'></dat-image> <dat-value v-model='params.社員姓' label='苗字'></dat-value> <dat-value v-model='params.社員名' label='名前'></dat-value> <dat-value v-model='params.社員姓かな' label='苗字-かな'></dat-value> <dat-value v-model='params.社員名かな' label='名前-かな'></dat-value> <dat-value v-model='params.社員性別' label='性別' :accepted-values="['男性','女性']"></dat-value> <dat-value v-model='params.社員パスワード' label='パスワード'></dat-value> <dat-value v-model='params.社員担当部署' label='担当部署' :accepted-values="['管理','営業','開発']"></dat-value> <dat-value v-model='params.社員入社日' label='入社日'></dat-value> <dat-value v-model='params.社員管理権' label='管理権'></dat-value> <dat-text v-model='params.社員備考' label='備考'></dat-text> </dat-gui>5.DatGui Vue Plugin忘れてました
lq111lq/vue-dat-guiを1ファイル化してTextコントローラを入れた版です。その他empty_nとかwideとかplaceholderとかreadonlyとかpasswordとか公式にはないプロパティは私個人が組み込んだものになります。
wide属性をdat-guiタグで有効(true)にすればDatGui左側のラベルが消えて幅広く入力できます。
ラベル名はそのままInputのplaceholderに適用されます。
password属性をdat-valueタグで有効にすれば入力内容が****として隠されます。
readonly属性は編集不可にするだけです。社員に自動付与されたIDの表示なんかに使います。
empty_nはスライダーボックスでempty_nのnの値の時、ボックス内を空文字にしてくれます。自分で社員IDを打ち込むときに使います。あと、DatGuiのプルリクエストにあったイメージコントローラとか、スライダーボックス上でマウスホイール又は上下キーでカウントアップ/カウントダウンを組み込んでます。これで登録も楽になるかなーと考えてました。
vue.directive(function(root){ var plugin={ install:function(Vue,options){ Vue.component('DatGui',{ template:"\ <div>\ <div ref='container'>\ <slot></slot>\ </div>\ </div>\ ", name:'DatGui', props: { wide: { type: Boolean, default: false } }, watch: { wide:function(value) { this.$_gui && this.$_gui.wide(value) } }, data:function(){ return { context: {} } }, provide:function() { return { context: this.context } }, created:function() { this.$_gui = new dat.GUI({ autoPlace: false }) }, mounted:function() { this.$refs.container.appendChild(this.$_gui.domElement) this.$_gui.wide(this.wide) }, beforeDestroy:function() { this.$_gui && this.$_gui.destroy() } }) Vue.component('DatFolder',{ template:"\ <span>\ <slot>\ </slot>\ </span>\ ", props: { name: { type: String, default: 'folder' }, wide: { type: Boolean, default: false } }, watch: { wide:function(value) { this.$_gui && this.$_gui.wide(value) } }, created:function() { this.$_gui = this.$parent.$_gui.addFolder(this.name) }, mounted:function() { this.$_gui.wide(this.wide) } }) Vue.component('DatValue',{ template:"\ <span>\ </span>\ ", name: 'DatValue', props: { value: { type: [Number, String, Boolean, undefined], default: undefined }, label: { type: String }, max: { type: Number, default: null }, min: { type: Number, default: null }, step: { type: Number, default: null }, empty_n: { type: Number, default: null }, acceptedValues: { type: [Object, Array], default:function() { return null } }, placeholder: { type: String, default: '' }, readonly: { type: Boolean, default: false }, password: { type: Boolean, default: false } }, inject: ['context'], computed: { valueInner:function() { return this.context && this.context[this.label] } }, watch: { value:function(value) { this.$_controller && this.$_controller.setValue(value) }, valueInner:function(newVal) { switch(true){ case this.$_controller instanceof dat.controllers.NumberController: case this.$_controller instanceof dat.controllers.NumberControllerBox: this.$emit('input', newVal <= this.empty_n ? '' : newVal) break; default: this.$emit('input', newVal) } }, label:function(value) { this.$_controller && this.$_controller.name(value) }, max:function(value) { this.$_controller && this.$_controller.max(value) this.$_controller.updateDisplay() }, min:function(value) { this.$_controller && this.$_controller.min(value) this.$_controller.updateDisplay() }, step:function(value) { this.$_controller && this.$_controller.step(value) this.$_controller.updateDisplay() }, empty_n:function(value){ this.$_controller && this.$_controller.empty_n(value) this.$_controller.updateDisplay() }, acceptedValues:function(list) { var html = '' var type = Object.prototype.toString.call(list).slice(8,-1).toLowerCase() switch(type){ case 'array': list.forEach(function(v){ html += '<option value=' + v + '>' + v + '</option>'; }) break; case 'object': Object.keys(list).forEach(function(k){ html += '<option value=' + list[k] + '>' + k + '</option>'; }) break; } if(this.$_controller){ this.$_controller.domElement.children[0].innerHTML = html } }, placeholder:function(value) { this.$_controller && this.$_controller.placeholder(value) }, readonly:function(value) { this.$_controller && this.$_controller.readonly(value) }, password:function(value) { this.$_controller && this.$_controller.password(value) } }, created:function() { var self = this if (this.value === undefined) { this.$set(this.context, this.label, function() { self.$emit('click') }) this.$parent.$_gui.add(this.context, this.label) return } this.$set(this.context, this.label, this.value) if (this.acceptedValues) { this.$_controller = this.$parent.$_gui.add(this.context, this.label, this.acceptedValues) this.$_controller.onFinishChange(function(obj){ var has_selected_option = this.__select.selectedOptions.length > 0 if(has_selected_option){ self.$emit('change',this.__select.selectedOptions[0].innerText) } }) } else if (this.min != null && this.max != null && this.step != null) { if (this.empty_n != null){ this.$_controller = this.$parent.$_gui.add(this.context, this.label, this.min, this.max, this.step, this.empty_n) } else { this.$_controller = this.$parent.$_gui.add(this.context, this.label, this.min, this.max, this.step) } this.$_controller.onChange(function(value){ self.$emit('change',value) }) } else { this.$_controller = this.$parent.$_gui.add(this.context, this.label) this.$_controller.placeholder(this.placeholder) this.$_controller.readonly(this.readonly) this.$_controller.password(this.password) } } }) Vue.component('DatColor',{ template:"\ <span>\ </span>\ ", name: 'DatColor', props: { value: { type: [String, Array, Object] }, label: { type: String } }, inject: ['context'], computed: { valueInner:function() { return this.context && this.context[this.label] } }, watch: { value:function(value) { this.$_controller && this.$_controller.setValue(value) }, valueInner:function(newVal) { this.$emit('input', newVal) } }, created:function() { this.$set(this.context, this.label, this.value) this.$_controller = this.$parent.$_gui.addColor(this.context, this.label) } }) Vue.component('DatText',{ template:"\ <span>\ </span>\ ", name: 'DatText', props: { value: { type: String }, label: { type: String }, placeholder: { type: String, default: '' }, readonly: { type: Boolean, default: false } }, inject: ['context'], computed: { valueInner:function() { return this.context && this.context[this.label] } }, watch: { value:function(value) { this.$_controller && this.$_controller.setValue(value) }, valueInner:function(newVal) { this.$emit('input', newVal) }, label:function(value) { this.$_controller && this.$_controller.name(value) }, placeholder:function(value) { this.$_controller.placeholder(value) }, readonly:function(value) { this.$_controller.readonly(value) } }, created:function() { this.$set(this.context, this.label, this.value) this.$_controller = this.$parent.$_gui.addText(this.context, this.label) this.$_controller.placeholder(this.placeholder) this.$_controller.readonly(this.readonly) } }) Vue.component('DatImage',{ template:"\ <span>\ </span>\ ", name: 'DatImage', props: { value: { type: String }, label: { type: String }, placeholder: { type: String, default: '' } }, inject: ['context'], computed: { valueInner:function() { return this.context && this.context[this.label] } }, watch: { value:function(value) { this.$_controller && this.$_controller.setValue(value) }, label:function(value) { this.$_controller && this.$_controller.name(value) } }, created:function() { var self = this this.$set(this.context, this.label, this.value) this.$_controller = this.$parent.$_gui.addImage(this.context, this.label) this.$_controller.placeholder(this.placeholder) this.$_controller.onChange(function(img){ if(img){ self.$emit('change',img.src) } }) } }) } } if( typeof module === 'object' && typeof module.exports === 'object'){ module.exports = plugin }else if(typeof define === 'function' && define.amd){ define('VueDatGui', plugin) }else{ root.VueDatGui = plugin } }(this));<dat-gui :wide='true'を設定すると入力INPUTが幅広くなります
dat-gui.jsVue.use(VueDatGui);興味ある人フォローして!!(´ω`)@https://twitter.com/seraphielbet
ありがとうございました。
- 投稿日:2020-09-21T00:43:57+09:00
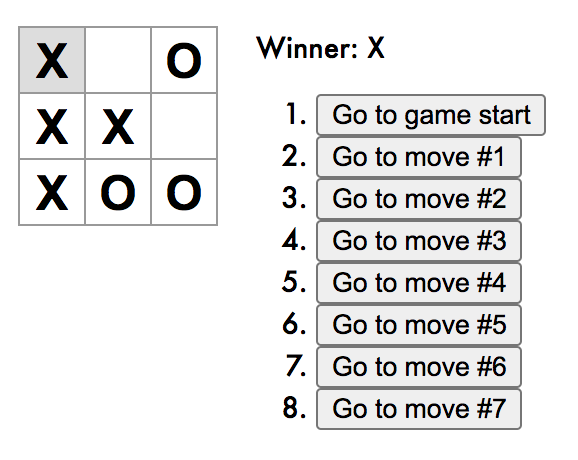
ReactチュートリアルをVue.jsで実装
Vue.jsとReactの勉強のため,Reactのチュートリアルの「Tic Tac Toe」をVue.jsで実装してみる。
vue-cliを使ってプロジェクトを作成(省略)。
バージョンはVue2。
components/フォルダ以下に次のファイルを作成。
- Square.vue
- ゲームの1マスを管理
- Board.vue
- ゲームボード(9マス)を管理
- Game.vue
- ゲーム全体の状態(手番,履歴)を管理
ちなみにcssもチュートリアルと同じになるように移植した。
Square.vue
Square.vue<template> <button class="square" @click="onClick">{{value}}</button> </template> <style scoped> .square { background: #fff; border: 1px solid #999; float: left; font-size: 24px; font-weight: bold; line-height: 34px; height: 34px; margin-right: -1px; margin-top: -1px; padding: 0; text-align: center; width: 34px; } .square:focus { outline: none; background: #ddd; } </style> <script> export default { name: 'Square', props: { value: String, onClick: Function, }, } </script>Squareコンポーネントはゲームの1マスにあたるボタンを表示する。
同時にボタンクリックのイベントを発火してゲームが進行するのだが,ゲームの状態は上位のGameコンポーネントが管理している。
通常はemitを使うところなのだろうが,ここではbutton@clickに上位コンポーネントからプロパティとして引き渡されたonClick(名前は何でもよい)関数を当ててみたら上手く動いた。(この方法が正しいのかどうか,どなたかご教示ください。)Board.vue
Board.vue<template> <div> <div class="board-row" v-for="r in [0,1,2]" :key="r"> <square v-for="c in [0,1,2]" :key="c" :value="squares[r*3+c]" :onClick="() => onClick(r*3+c)" /> </div> </div> </template> <style scoped> .board-row:after { clear: both; content: ""; display: table; } .status { margin-bottom: 10px; } </style> <script> import Square from '@/components/Square' export default { name: 'Board', components: { Square, }, props: { squares: Array, onClick: Function, }, } </script>Boardコンポーネントはゲームの盤面である9つのマスを管理する。
Reactのチュートリアルでは,Square 1つのレンダリングを関数にして,それを9回呼び出す方式をとっている。
Reactではレンダリングのテンプレート自体がJavaScript(の拡張)なのでそういったことができるが,Vue.jsで相当する方法が判らなかったので,ここではv-forによる二重ループで実装した。
onClickは「上から渡されたハンドラ関数をマス番号の引数付きで呼び出す」アロー関数に設定する。Game.vue
Game.vue<template> <div class="game"> <div class="game-board"> <board :squares="current.squares" :onClick="handleClick" /> </div> <div class="game-info"> <div>{{status}}</div> <ol> <li v-for="(step, move) in history" :key="move"> <button @click="() => jumpTo(move)">{{move ? 'Go to move #'+move : 'Go to game start'}}</button> </li> </ol> </div> </div> </template> <style scoped> .game { display: flex; flex-direction: row; } .game-info { margin-left: 20px; } ol, ul { padding-left: 30px; } </style> <script> import Board from '@/components/Board' function calculateWinner(squares) { const lines = [ [0, 1, 2], [3, 4, 5], [6, 7, 8], [0, 3, 6], [1, 4, 7], [2, 5, 8], [0, 4, 8], [2, 4, 6] ] for (let i = 0; i < lines.length; i++) { const [a, b, c] = lines[i] if (squares[a] && squares[a] === squares[b] && squares[a] === squares[c]) { return squares[a] } } return null } export default { name: 'Game', components: { Board, }, data() { return { history: [{ squares: Array(9).fill(null) }], stepNumber: 0, xIsNext: true, } }, computed: { current() { return this.history[this.stepNumber] }, winner() { return calculateWinner(this.current.squares) }, status() { return this.winner ? 'Winner: ' + this.winner : 'Next player: ' + (this.xIsNext ? 'X' : 'O') }, }, methods: { handleClick(i) { const history = this.history.slice(0, this.stepNumber + 1) const current = history[history.length - 1] const squares = current.squares.slice() if (calculateWinner(squares) || squares[i]) { return } squares[i] = this.xIsNext ? 'X' : 'O' this.history = history.concat([{ squares: squares }]) this.stepNumber = history.length this.xIsNext = !this.xIsNext }, jumpTo(step) { this.stepNumber = step this.xIsNext = (step % 2) === 0 }, } } </script>Gameコンポーネントはゲーム全体の状態を管理し,履歴を遡るための機能を提供している。
やはりレンダリングテンプレートを関数にできないことから,<template>の中がReactに比べて無理をしがち。履歴制御ボタンの@clickやテキストにそのあたりが表れている。
Vue.jsの流儀であれば,ここもコンポーネントにするべきなのだろうが,今回はReactチュートリアルとの比較しやすさをとった。App.vue
App.vue<template> <div id="app"> <game /> </div> </template> <style lang="scss"> #app { font: 14px "Century Gothic", Futura, sans-serif; margin: 20px; } </style> <script> import Game from '@/components/Game' export default { name: 'App', components: { Game, }, } </script>最後にGameコンポーネントを呼び出すようにApp.vueを修正。
動作画面はこんな感じ。
今回の気付き
- ReactではレンダリングテンプレートがJavaScriptであることにより,関数化などの柔軟な実装が可能。
- 下位コンポーネントで発生したイベントを,上位コンポーネントのハンドラで処理するためにプロパティが使える(要調査)。
- v-forで生成される要素に固有のハンドラを割り当てるために,
@clickにアロー関数を設定する方法が使える。