- 投稿日:2020-09-21T17:02:30+09:00
Git-flow GitHub-flow GitLab-flowという開発フローについてまとめる
gitを使用した開発フローである
Git-flow
GitHub-flow
GitLab-flowについてまとめる参考
Git-flowって何?
https://qiita.com/KosukeSone/items/514dd24828b485c69a05git-flowで用いるブランチまとめ
https://qiita.com/hatt0519/items/23ef0866f4abacce7296【図解】git-flow、GitHub Flowを開発現場で使い始めるためにこれだけは覚えておこう
https://www.atmarkit.co.jp/ait/articles/1708/01/news015.htmlGit-flowとは
Vincent Driessen氏がブログに書いた"A successful Git branching model" というブランチモデルの導入を簡単にする git プラグインである。他の"GitHub-flow"や"GitLab-flow"等のワークフローと比べると、大規模で複雑な構成になっています。Git-flowはGitブランチを活用するために最初に提案されたフローの1つです。masterブランチとは別にdevelopブランチがあり、その他にfeature、release、hotfixというブランチがあります。developブランチでの開発作業を進めた後に、releaseブランチを作成し、成果は最終的にmasterブランチへマージされます。
Git-flowイメージと各ブランチの役割

git-flowを使用した開発では「メインブランチ」とそれ以外の「サポートブランチ」を使用します。
メインブランチ
メインブランチには「master」と「develop」の2つのブランチがあります。これらのブランチは常に存在します。
master:
プロダクトとしてリリースするためのブランチ。リリース済みのソースコードを管理する。
リリースしたらタグ付けする。アプリケーションが安定して動く状態にする必要がある。develop:
開発ブランチ。開発中のソースコードを管理する。コードが安定し、リリース準備ができたら master へマージする。
リリース前はこのブランチが最新バージョンとなる。サポートブランチ
タスクごとに「フィーチャー」「リリース」「ホットフィックス」のいずれかのブランチを作成し、作業を行います。
これらのブランチはmasterまたはdevelopブランチから作成され、作業が完了すると削除されます。feature branches:
機能実装やバグ修正などの開発作業を行う。 develop から分岐し、 develop にマージする。
hotfixes:
リリース後のクリティカルなバグフィックスなど、 現在のプロダクトのバージョンに対する緊急の修正作業を行う変更用ブランチ。 master から分岐し、 master にマージし、タグをつける。次に develop にマージする。
release branches:
プロダクトリリースの準備。 機能の追加やマイナーなバグフィックスとは独立させることで、 リリース時に含めるコードを綺麗な状態に保つ(機能追加中で未使用のコードなどを含まないようにする)ことができる。 develop ブランチにリリース予定の機能やバグフィックスがほぼ反映した状態で develop から分岐する。 リリース準備が整ったら, master にマージし、タグをつける。次に develop にマージする。
Git-flowのメリット・デメリット
メリット
本番リリースしたデータと、制作中のデータの区別が明確になる。役割ごとに明確に使うタイミングや意図が分けられている。コミットツリーを見ることでどのように作業が進んだかを俯瞰して把握しやすい。
修正、リリース、機能追加などのいくつもの種類の違う作業を並行して進められる
リリースした内容の調査が簡単になる
git-flow用のコマンドでほとんどの管理を行えるので、操作マニュアルを用意しやすいデメリット
ブランチの種類が多いことやその開始地点やマージ先が多岐にわたっているため複雑になりやすい。
開発者がmasterブランチではなく、developブランチを利用しなくてはならない。GitHub-Flowとは
GitHub-Flowは「GitHub」の開発で使用されているワークフローであり、git-flowに比べてシンプルな構成になっています。developブランチが省略されて、pull request機能が使われていることが、大きな違いです。1日に複数回デプロイを行うようなWebアプリケーションの開発に適しています。
6つのルール
GitHub Flowには以下の6つのルールがあります。【ルール1】が最も重要で、それ以外のルールは【ルール1】を実現するために存在します。
* 【ルール1】masterブランチは常にデプロイ可能である
* 【ルール2】作業用ブランチをmasterから作成する(例:new-oauth2-scopes)
* 【ルール3】作業用ブランチを定期的にプッシュする
* 【ルール4】プルリクエストを活用する
* 【ルール5】プルリクエストが承認されたらmasterへマージする
* 【ルール6】masterへのマージが完了したら直ちにデプロイを行う開発フロー
GitHub Flowを使用した開発フロー
* [1]開発作業を行う
作業開始時に作業用ブランチをmasterブランチから作成します。
git-flowでは、「フィーチャー」「リリース」「ホットフィックス」のいずれかのブランチをmasterまたはdevelopブランチから作成しますが、GitHub Flowでは、全てのブランチをmasterブランチから作成します。
ブランチ名は、何の作業を行っているかが分かる名前にします。また、作業用ブランチは定期的にリモートリポジトリにプッシュするようにします。これによって、他の開発者の作業状況を把握できるようになります。
本ステップで行う作業は、連載第10回記事の「プルリクエスト作成の準備」で解説しています。
* [2]プルリクエストを行う
作業用ブランチをmasterブランチへマージできる状態になったら、プルリクエストを作成して他の開発者にコードレビューを依頼します。そして、プルリクエストが承認されたらmasterへマージします。
GitHub Flowを使用した開発では、プルリクエストを積極的に活用します。作業完了後のコードレビューだけではなく、作業途中の実装への助言を求める場合などにも使えます。
本ステップで行う作業は、連載第10回記事の「プルリクエストを作成する」「プルリクエストをレビューする」「プルリクエストをマージする」で解説しています。
* [3]デプロイする
masterへのマージが完了したら直ちにデプロイを行います。GitHub-flowのメリット・デメリット
メリット
サーバサイドとの親和性が非常に高い。
ブランチが複数存在しないため理解が容易である。
CIと絡めて「masterにマージするたびにデプロイ」といった運用も取れるので、リリース作業を簡略化できる。デメリット
リリースのタイミングを調整したい場合は不向き。アプリの場合は1つの作業単位ごとにリリースをするとも限らないのでどのブランチでリリース準備をすれば良いのか迷ってしまう。
また、サーバサイドであっても環境(ステージング環境、QA環境、広告配信テスト環境などなど)を分けてデプロイしたい場合はデプロイタイミングとブランチとの結びつきが不明確になってしまう。Gitlab flowとは
GitLab-Flowは「GitLab」の開発で使用されているワークフローである。Gitlab flowはイメージとしては「GitHub flow + リリースに必要なブランチ」である。
Gitlab-flowのブランチ
master
メインのブランチ。
pre-production
リリース前のテスト用(git-flowで言うreleaseブランチ)
production
リリース済みのコード管理をするブランチ。
feature/hotfix
機能開発、不具合対応ブランチ。
Gitlab-flowの流れ
機能開発
機能開発するとき、masterブランチからfeature/NAMEブランチを切って開発進む
開発が終わったらfeatureブランチからmasterにMerge Requestを作成します。
masterをステージング環境へデプロイして、確認する
プリプロダクションへデプロイしたい場合、masterブランチからpre-productionブランチへのMerge Requestを作成します。マージ済みになるとデプロイする
pre-productionブランチからproductionブランチへのMerge Requestを作成します。マージ済みになるとデプロイする不具合対応
不具合があるとき、masterブランチからhotfix/NAMEブランチを切って対応を行う
対応が終わったら、hotfixブランチからmasterにMerge Requestを作成します。
masterをステージング環境へデプロイして、確認する
確認して、問題がなければhotfixブランチを順次pre-production > production にマージGitLab-flowのメリット・デメリット
メリット
コミットがダウンストリームへ流れるのですべての環境で全てテスト済みであることを保証します
CIはサポートされる
CIを使ってlatestステータスで、現在環境ごとにどんなブランチをデプロイされるの確認もやりやすいデメリット
複雑(git-flowと同じ)
CIが便利ですが、自動実行なのでもし誤commit、pushすると環境にデプロイしてしまう。それぞれのメリット、デメリットを比較した上でチーム開発に合った開発フローを選択できるようになりたいです。


- 投稿日:2020-09-21T02:01:31+09:00
GitHub CLI 1.0 主要コマンドのサブコマンド、オプションまとめ
GitHub CLI 1.0の主要コマンドのサブコマンド、オプションまとめ
ついに
GitHub CLI 1.0が登場しましたね。?ソースコード、ドキュメントはこちらから
?https://github.com/cli/cli
?https://cli.github.com/GitHub CLIは、go言語製のGitHub公式のCLIツールです。(既存のGitHubのCLIツールとして有名なのはhubらしいですね)
従来はcommitなどの作業はターミナルで行うが、PRの作成などはブラウザを開いて行う必要がありました。
ターミナル→ブラウザ→ターミナル...みたいに頻繁にアプリを切り替える必要があり、個人的にはこのタイミングでコンテキストスイッチによって集中力が途切れがちでした。GitHubを開くためにブラウザ開いたのに、YouTubeのタブが開いていてそのまま...なんてことはよくありますよね...?GitHub CLIを利用すればこの切り替えの手間がなくなり、快適なGitHubライフを送ることができるというわけなんですね。2020年2月頃にβ版がリリースされていたのですが、2020年9月にβ版が終了して
GitHub CLI 1.0としてリリースされました。
β版では対応していなかったGitHub Enterprise Serverも利用できるようになったみたいですね?これをきっかけにGitHubCLIを使ってみようと少し触ってみたので、学んだことを共有します!
今回紹介するのは最低限の環境構築(認証、エディタの設定)とGitHubCLIの主要なコマンドgist,issue,pr,release,repoとそのサブコマンド、およびそれらの全フラグですが、その他コマンドaliasやapiなども随時更新、追加していく予定です。検証環境
Mac OS X
現在MacOS, Windows, Linuxに対応しています。
install
当方macOSなのでbrewでinstallします。
$ brew install ghversionを確認
??
$ gh --version
gh version 1.0.0 (2020-09-16)
https://github.com/cli/cli/releases/tag/v1.0.0
環境構築
認証
まずはGitHubアカウントの設定を行いましょう。
$ gh auth login対話形式で設定できるみたいですね。まずは
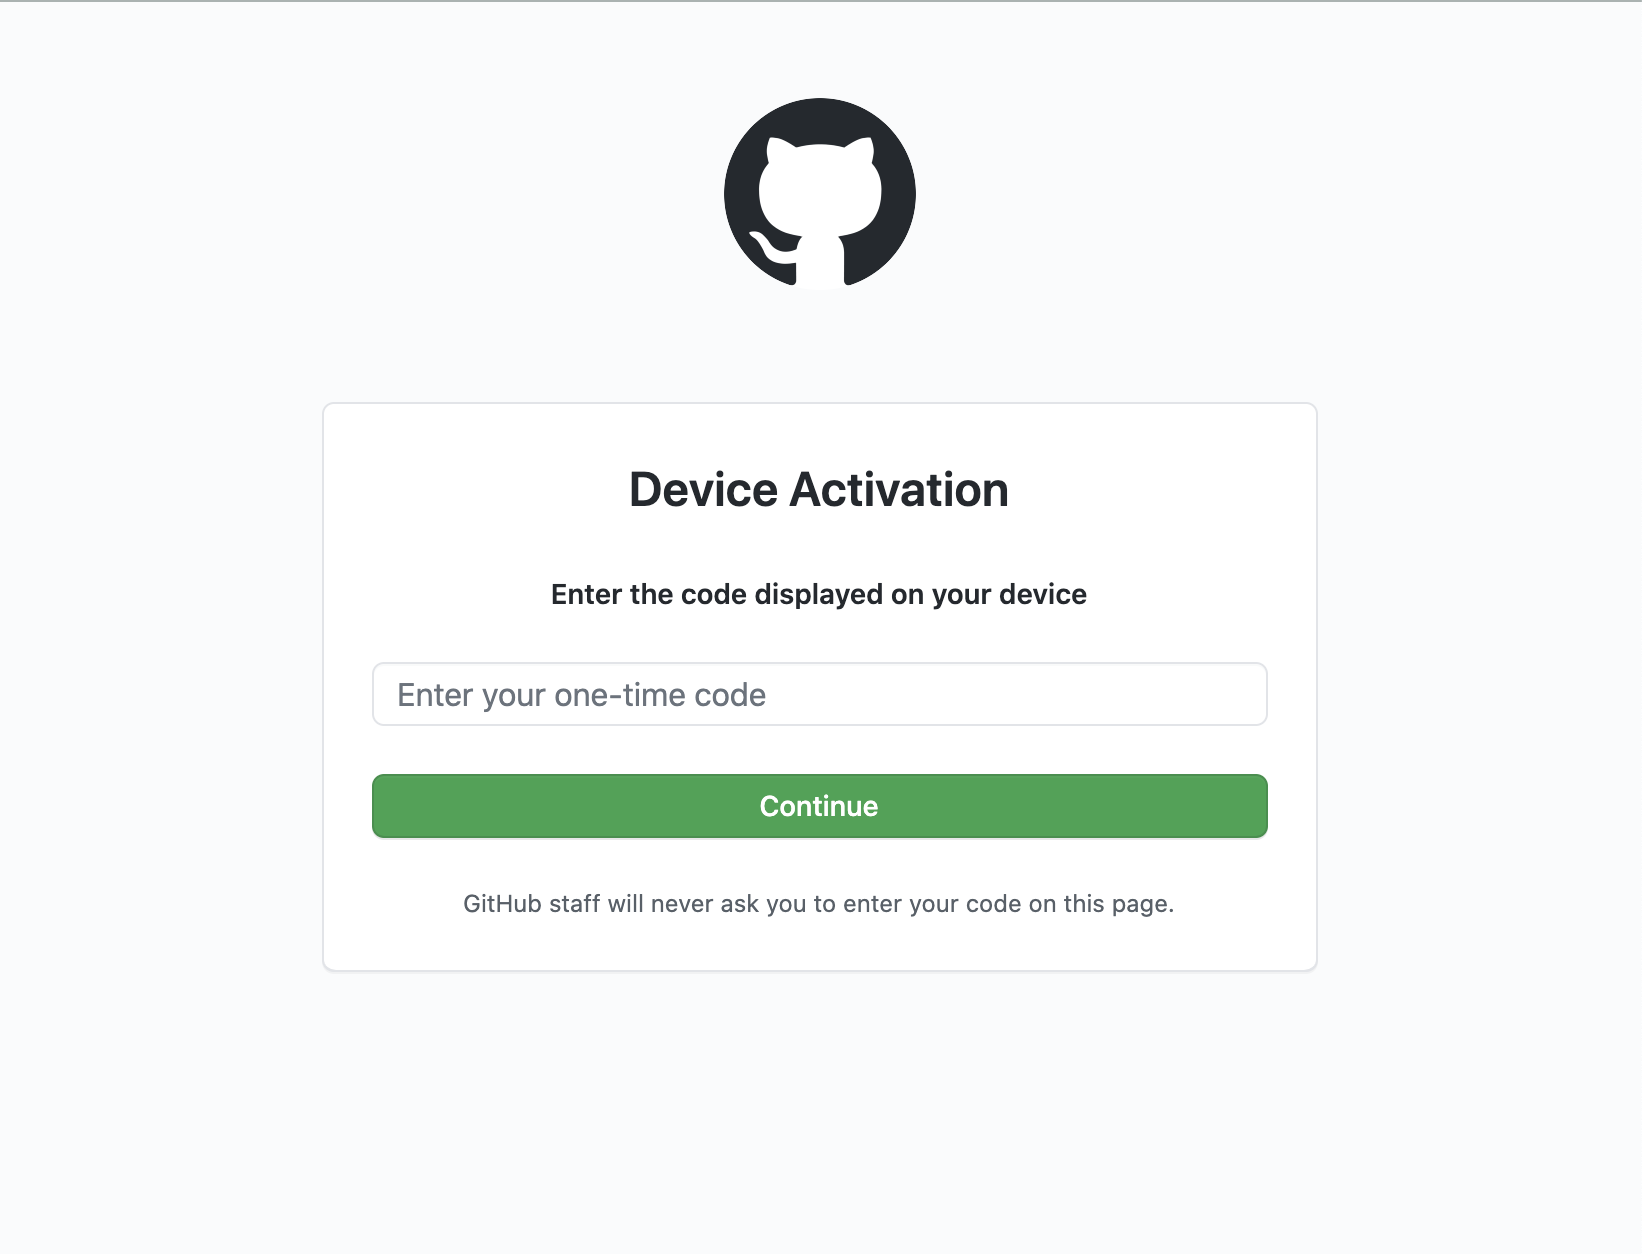
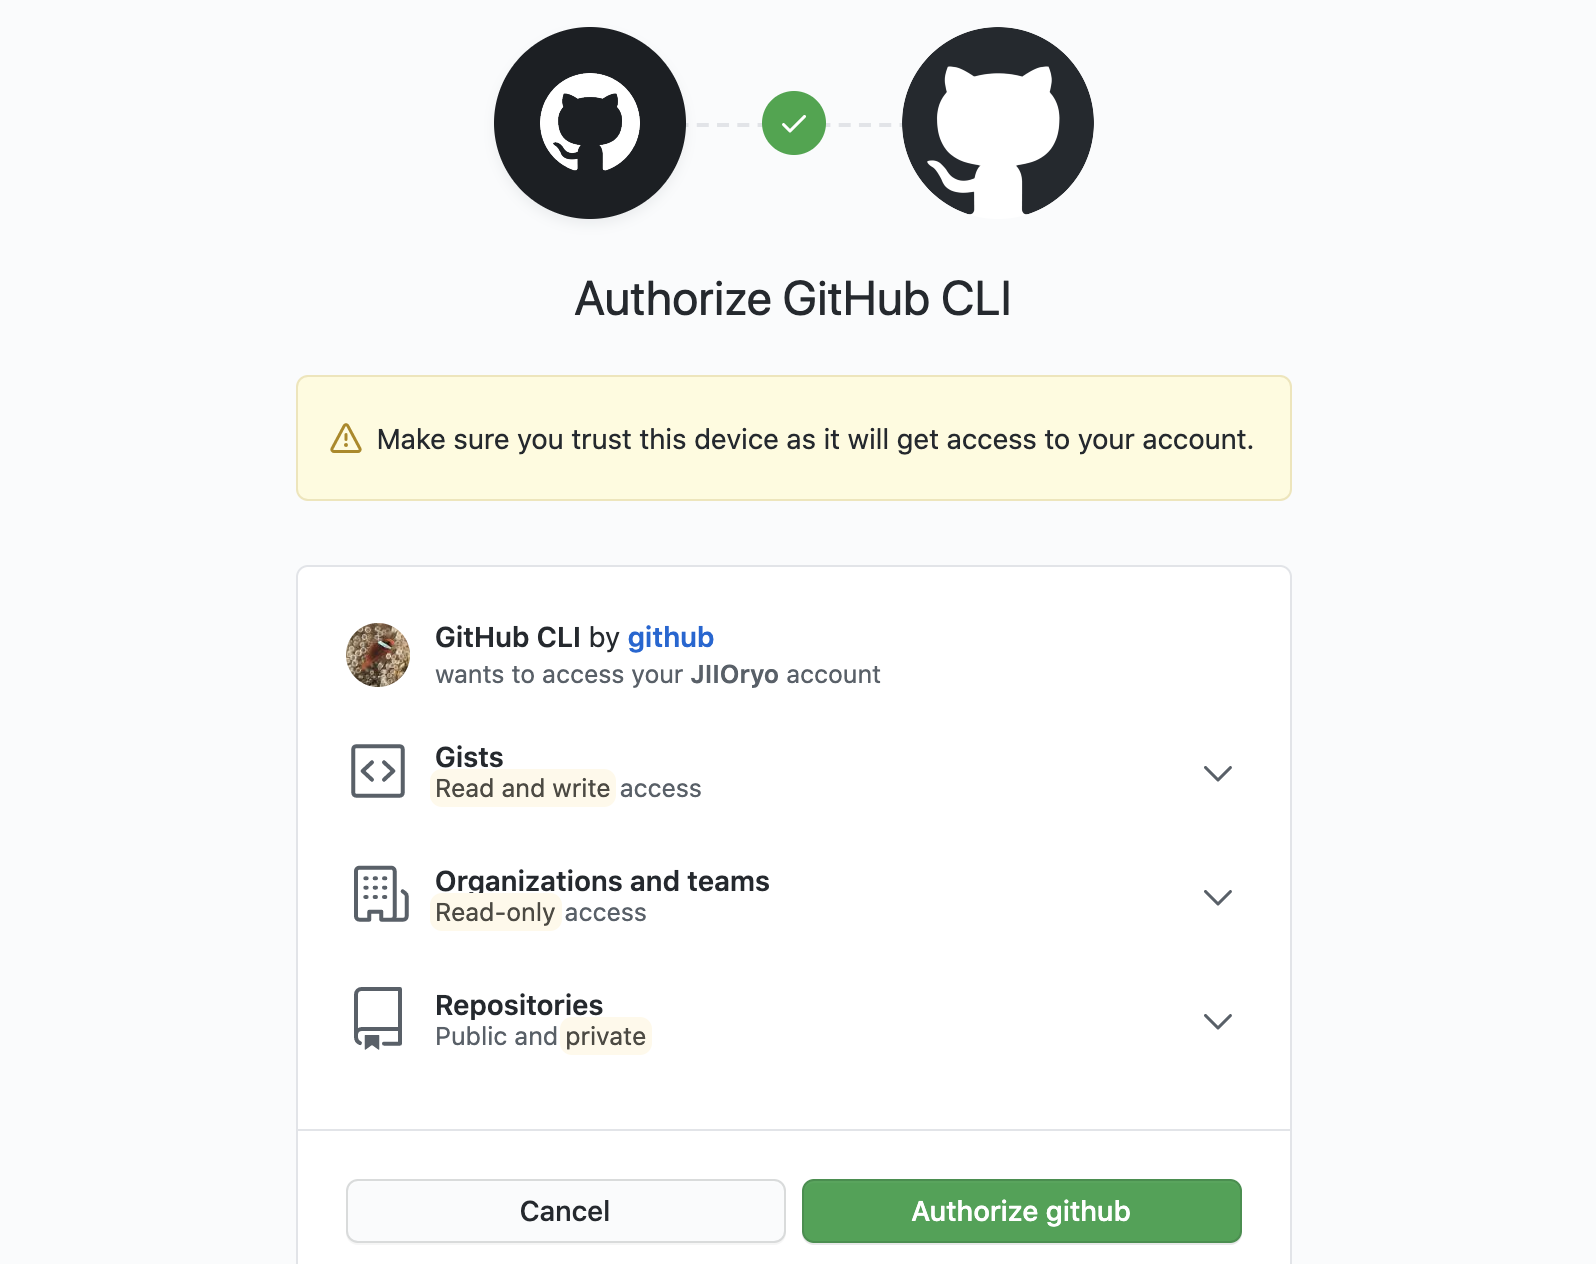
GitHub.comを利用するかGitHub Enterprise Serverを利用するか選択します。今回はGithub.comを利用します。? What account do you want to log into? [Use arrows to move, type to filter] > GitHub.com GitHub Enterprise Serverログインの方法を選択します。今回はブラウザを利用しました。
? How would you like to authenticate?  [Use arrows to move, type to filter]
> Login with a web browser
  Paste an authentication token
? How would you like to authenticate? Login with a web browser ! First copy your one-time code: 0062-4F62 - Press Enter to open github.com in your browser...表示された
one-time codeをブラウザに入力してください。
ブラウザの表示に従ってぽちぽちしていきます。
次にプロトコルを選択します。
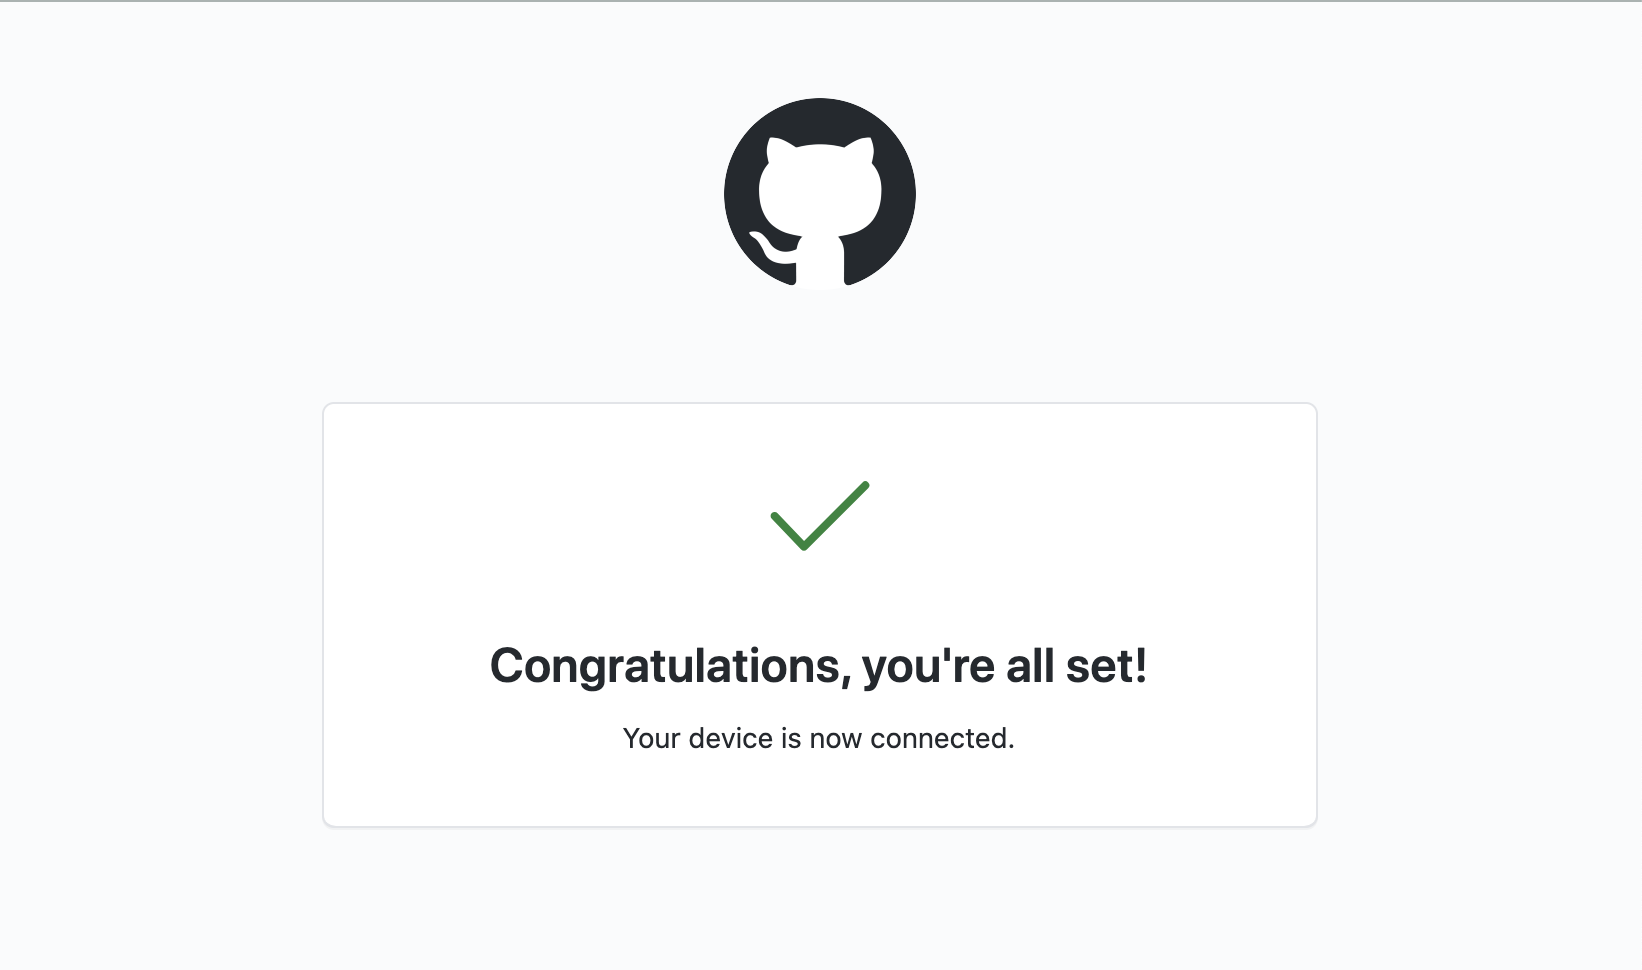
HTTPSかSSHを選択します。✓ Authentication complete. Press Enter to continue... ? Choose default git protocol [Use arrows to move, type to filter] HTTPS > SSHこれで認証の設定は完了しました。
? Choose default git protocol SSH
- gh config set -h github.com git_protocol ssh
✓ Configured git protocol
✓ Logged in as JIIOryo
エディタの設定
PRやissueを書く時などのエディタを設定します。今回はvimを設定しました。
$ gh config set editor vimちなみに公式ドキュメントによれば現状Windowsでは常にメモ帳らしい。
On Windows, the editor will currently always be Notepad.
コマンド
ghコマンドは、基本的に
gh <command> <subcommand> [flags]で実行します。commandとして利用できるのは、CORE COMMANDSとADDITIONAL COMMANDSです。よく利用する
CORE COMMANDSには以下の5種類があります。CORE COMMANDS gist: Create gists issue: Manage issues pr: Manage pull requests release: Manage GitHub releases repo: Create, clone, fork, and view repositories例えば、PRやissueを新規作成したい場合はそれぞれ以下のように実行します。
$ gh pr create
$ gh issue create
コマンドの実行は、フラグを指定しない場合はだいたい以下のように対話形式で進めます。
$ gh pr create
? Where should we push the 'feature/hoge' branch? JIIOryo/gh_test

Creating pull request for feature/hoge into master in JIIOryo/gh_test

? Title add HOGE
? Body <Received>
? What's next? Add metadata
? What would you like to add?  [Use arrows to move, space to select, <right> to all, <left> to none, type to filter]
  [ ]  Reviewers
> [x]  Assignees
  [ ]  Labels
  [ ]  Projects
  [ ]  Milestone
フラグを指定することでコマンド一発で実行することもできます。
$ gh issue create --title 'foo' --body 'bar' --milestone 'baz'これらのコマンドの使い方は後ほどそれぞれ説明します。
ADDITIONAL COMMANDSには以下の6種類があります。ADDITIONAL COMMANDS alias: Create command shortcuts api: Make an authenticated GitHub API request auth: Login, logout, and refresh your authentication completion: Generate shell completion scripts config: Manage configuration for gh help: Help about any command今回はとりあえず
CORE COMMANDSだけ紹介します。
随時ADDITIONAL COMMANDSも追加、更新していく予定です。ちなみにコマンドによって使えるフラグが異なりますが、だいたいのコマンドで以下のフラグは使用できます。
INHERITED FLAGS
      --help              Show help for command
  -R, --repo OWNER/REPO   Select another repository using the OWNER/REPO format
コマンドを忘れて困ったら、とりあえず
ghもしくはgh --help,gh -hを叩けば利用できるコマンドの一覧が取得できます。$ gh repo clone -h Clone a GitHub repository locally. If the "OWNER/" portion of the "OWNER/REPO" repository argument is omitted, it defaults to the name of the authenticating user. Pass additional 'git clone' flags by listing them after '--'. USAGE gh repo clone <repository> [<directory>] [-- <gitflags>...] INHERITED FLAGS --help Show help for command LEARN MORE Use 'gh <command> <subcommand> --help' for more information about a command. Read the manual at https://cli.github.com/manual?? gh repoコマンド ??
gh repoコマンドは、リポジトリの作成やclone、forkなどのリポジトリ関連の操作を行うことができます。
gh repo <command> [flags]で実行し、<command>には以下の4つが利用できます。clone: Clone a repository locally create: Create a new repository fork: Create a fork of a repository view: View a repository?? gh repo clone ??
gh repo cloneは、リポジトリのcloneを行うことができます。
gh repo clone <repository> [<directory>] [-- <gitflags>...]で実行します。例
$ gh repo clone cli/cli

Cloning into 'cli'...
remote: Enumerating objects: 21, done.
remote: Counting objects: 100% (21/21), done.
remote: Compressing objects: 100% (18/18), done.
remote: Total 13758 (delta 9), reused 11 (delta 3), pack-reused 13737
Receiving objects: 100% (13758/13758), 32.50 MiB | 4.07 MiB/s, done.
Resolving deltas: 100% (9177/9177), done.
リポジトリの後ろにcloneしたいパスを指定することもできます。
$ gh repo clone cli/cli path/to/repos
Cloning into 'path/to/repos'...
remote: Enumerating objects: 21, done.
remote: Counting objects: 100% (21/21), done.
remote: Compressing objects: 100% (18/18), done.
remote: Total 13758 (delta 9), reused 11 (delta 3), pack-reused 13737
Receiving objects: 100% (13758/13758), 32.50 MiB | 3.77 MiB/s, done.
Resolving deltas: 100% (9174/9174), done.

$ ls !$
ls path/to/repos
LICENSE   README.md auth      command   docs      go.mod    internal  script    update    wix.json
Makefile  api       cmd       context   git       go.sum    pkg       test      utils
?? gh repo create ??
gh repo createは、リポジトリの新規作成を行うことができるコマンドです。
gh repo create [<name>] [flags]で実行します。フラグ
以下のフラグが利用できます。
flags short flags long 説明 -y --confirm 確認なし -d --description リポジトリの説明を追加 --enable-issues issueを有効にするか(デフォルトtrue) --enable-wiki wikiを有効にするか(デフォルトtrue) -h --homepage ホームページURL --internal リポジトリをinternalで作成するか --private リポジトリをprivateで作成するか --private リポジトリをpublicで作成するか -t --team アクセスできるorganizationチーム -p --template テンプレートリポジトリから作成 対話形式で作成
fooというリポジトリを作ってみましょう。
以下の質問がされます。
- Visibility(publicなのかprivateなのかとか)どうする?
- currentディレクトリに作って良い?(Noを指定するとリポジトリ作らない。yesならこの時点でGitHub上に作成される)
- ローカルプロジェクトディレクトリをつくる?(Noを指定するとローカルのカレントディレクトリには作られない)
$ gh repo create foo
? Visibility Public
? This will create 'foo' in your current directory. Continue?  Yes
✓ Created repository JIIOryo/foo on GitHub
? Create a local project directory for JIIOryo/foo? Yes
Initialized empty Git repository in /path/to/repos/foo/.git/
✓ Initialized repository in './foo/'
ローカルプロジェクトディレクトリを作るを選択すると、ローカルにディレクトリを作成してgit initをしてくれてるっぽい。
https://github.com/cli/cli/blob/b2e36a0979a06b94bf364552a856c166cd415234/pkg/cmd/repo/create/create.go#L291コマンド一発で作成
例えば、
hoge-repoリポジトリを公開で説明付きで作成したい場合...$ gh repo create hoge-repo -y -d 'This is description!' --public ✓ Created repository JIIOryo/hoge-repo on GitHub Initialized empty Git repository in /path/to/repos/hoge-repo/.git/ ✓ Initialized repository in './hoge-repo/'こんな感じにリポジトリが一発で作成されました?
?? gh repo fork ??
gh repo forkコマンドは、リポジトリのforkの新規作成を行うことができます。
gh repo fork [<repository>] [flags]で実行します。フラグ
以下のフラグが利用できます。
flags short flags long 説明 --clone cloneするかどうか --remote リモートを設定するか 例
対話形式でforkしてみます。(cloneするかどうか聞かれる)
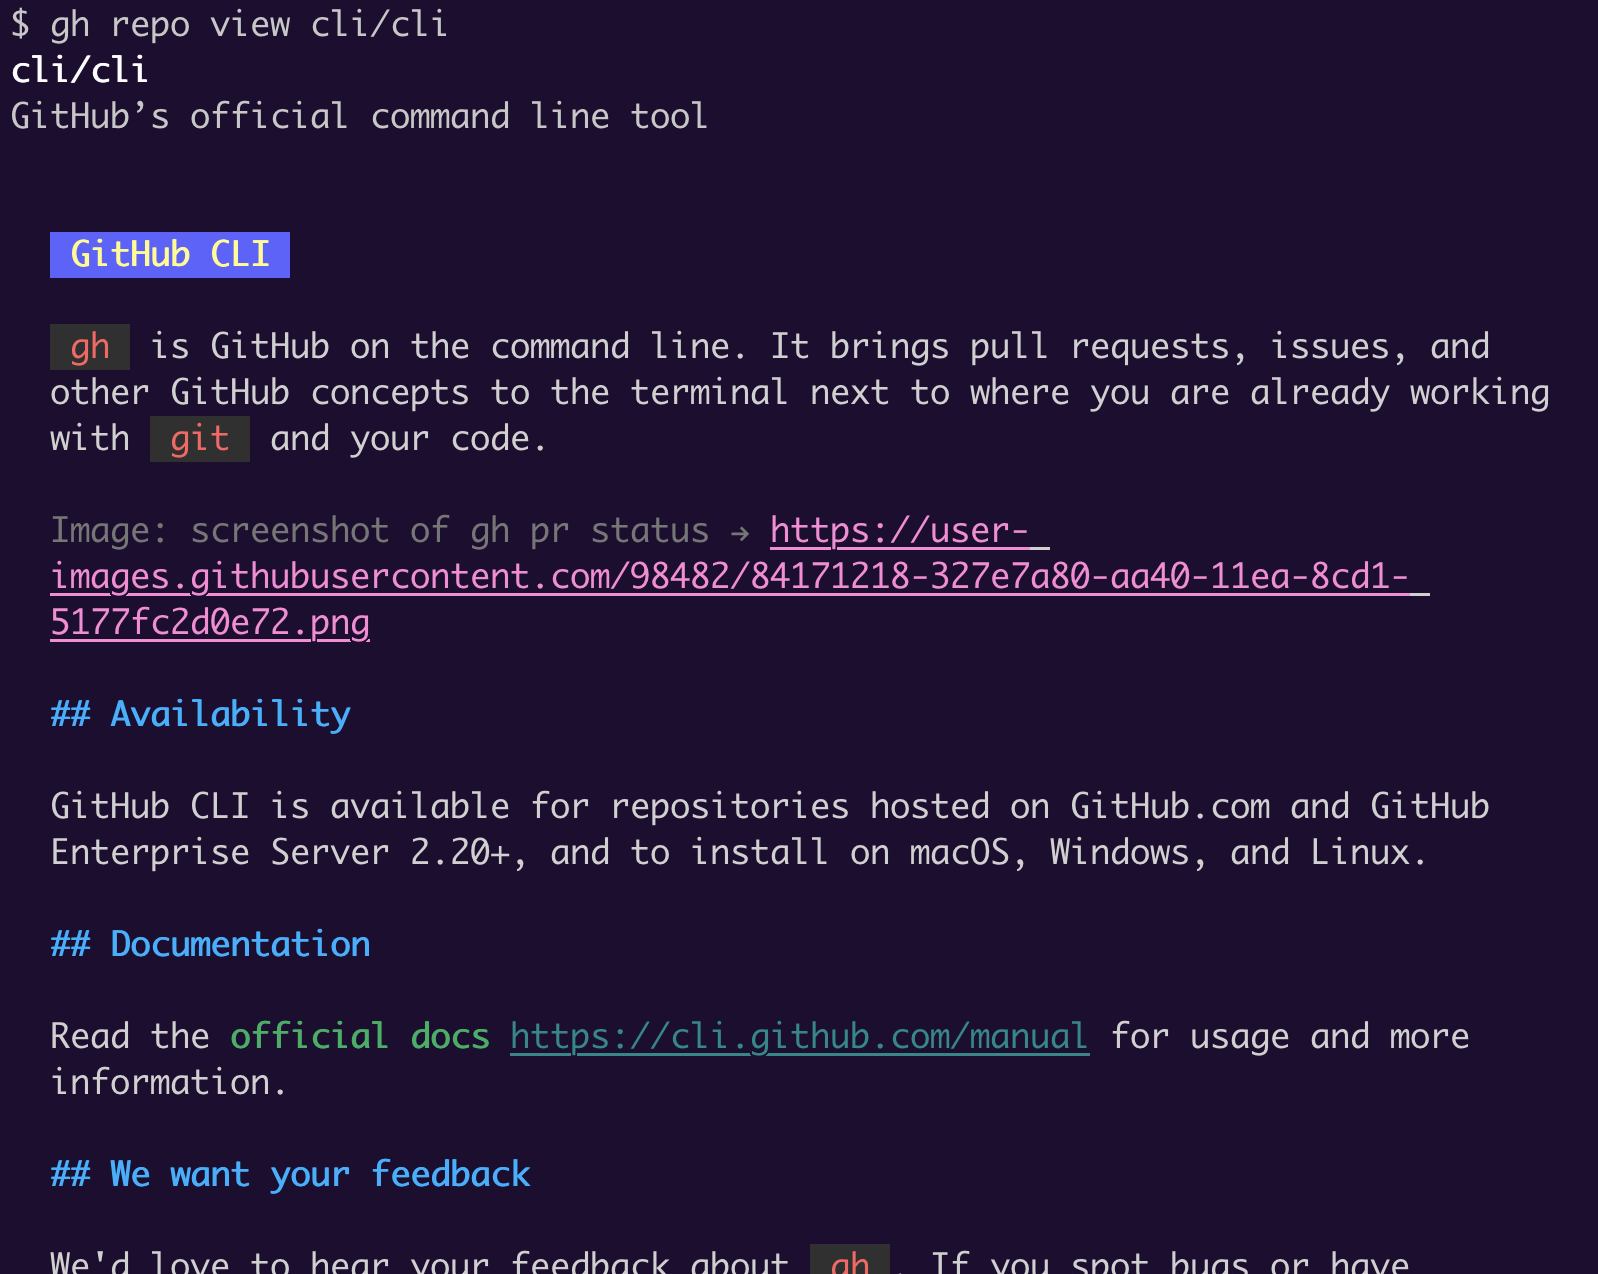
$ gh repo fork cli/cli

- Forking cli/cli...
✓ Created fork JIIOryo/cli
? Would you like to clone the fork? Yes

Cloning into 'cli'...
remote: Enumerating objects: 21, done.
remote: Counting objects: 100% (21/21), done.
remote: Compressing objects: 100% (18/18), done.
remote: Total 13758 (delta 9), reused 11 (delta 3), pack-reused 13737
Receiving objects: 100% (13758/13758), 32.50 MiB | 3.77 MiB/s, done.
Resolving deltas: 100% (9174/9174), done.
Updating upstream
From github.com:cli/cli
 * [new branch]      auth-check              -> upstream/auth-check
 * [new branch]      branch-switcher         -> upstream/branch-switcher
 * [new branch]      bulk-cmd                -> upstream/bulk-cmd
 * [new branch]      custom-commands         -> upstream/custom-commands
 * [new branch]      debians                 -> upstream/debians
 * [new branch]      default-cfg             -> upstream/default-cfg
 * [new branch]      fix-query               -> upstream/fix-query
 * [new branch]      ghe-conditional-request -> upstream/ghe-conditional-request
 * [new branch]      gist-list               -> upstream/gist-list
 * [new branch]      linux-repos             -> upstream/linux-repos
 * [new branch]      migrate-repo-clone      -> upstream/migrate-repo-clone
 * [new branch]      more-gists              -> upstream/more-gists
 * [new branch]      multi-graphql           -> upstream/multi-graphql
 * [new branch]      pager-docs              -> upstream/pager-docs
 * [new branch]      patch-review-prototype  -> upstream/patch-review-prototype
 * [new branch]      relective-pr-lookup     -> upstream/relective-pr-lookup
 * [new branch]      run-checks              -> upstream/run-checks
 * [new branch]      search-cmd              -> upstream/search-cmd
 * [new branch]      the-newlygit-game       -> upstream/the-newlygit-game
 * [new branch]      trunk                   -> upstream/trunk
 * [new branch]      ubuntus                 -> upstream/ubuntus
 * [new branch]      web-flag                -> upstream/web-flag
✓ Cloned fork

$ ls cli

LICENSE   api       command   git       internal  test      wix.json
Makefile  auth      context   go.mod    pkg       update
README.md cmd       docs      go.sum    script    utils
?? gh repo view ??
gh repo viewコマンドは、リポジトリのdescriptionとREADMEを参照することができます。
gh repo view [<repository>] [flags]で実行します。フラグ
以下のフラグが利用できます。
flags short flags long 説明 -w --web ブラウザで開く 例
リポジトリを明示的に指定しなければ現在いるリポジトリのREADMEが表示されます。ちゃんとマークダウンを認識して色が付けられていてとてもみやすいです?
ただ注意点としては、あくまでGitHub上の情報を参照しているので、ローカルでREADMEを作成、変更しても、pushしないと
gh repo viewではみることができません。
-wフラグをつけることで、ブラウザを開いて参照することができます。一発でジャンプできて便利。$ gh repo view cli/cli -w Opening github.com/cli/cli in your browser.?? gh pr コマンド ??
gh prコマンドは、プルリクの作成やマージ、ステータスを確認することができます。
gh pr <command> [flags]で実行し、<command>には以下の12個が利用できます。checkout: Check out a pull request in git checks: Show CI status for a single pull request close: Close a pull request create: Create a pull request diff: View changes in a pull request list: List and filter pull requests in this repository merge: Merge a pull request ready: Mark a pull request as ready for review reopen: Reopen a pull request review: Add a review to a pull request status: Show status of relevant pull requests view: View a pull requestprコマンドでは、基本的にブランチやPR番号を指定します。
ちなみに何も指定しないとカレントブランチを指定するようです。
https://github.com/cli/cli/blob/b2e36a0979a06b94bf364552a856c166cd415234/pkg/cmd/pr/shared/lookup.go#L34-L37?? gh pr create ??
gh pr createコマンドは、PRを作成することができるコマンドです。
gh pr create [flags]で実行します。フラグ
以下のフラグが利用できます。
flags short flags long 説明 -a --assignee assigneeを指定 -B --base マージ先ブランチ -b --body PRのbody(説明) -d --draft draftでPRを作成 -f --fill titleとbodyを入力しない。commit情報を使って埋める。 -H --head PRを作成したいブランチを指定(デフォルトでカレントブランチ) -l --label ラベルを指定 -m --milestone マイルストーンを指定 -p --project プロジェクトを指定 -r --reviewer reviewerを指定 -t --title タイトルを指定 -w --web PR作成画面をブラウザで開く 対話形式で作成
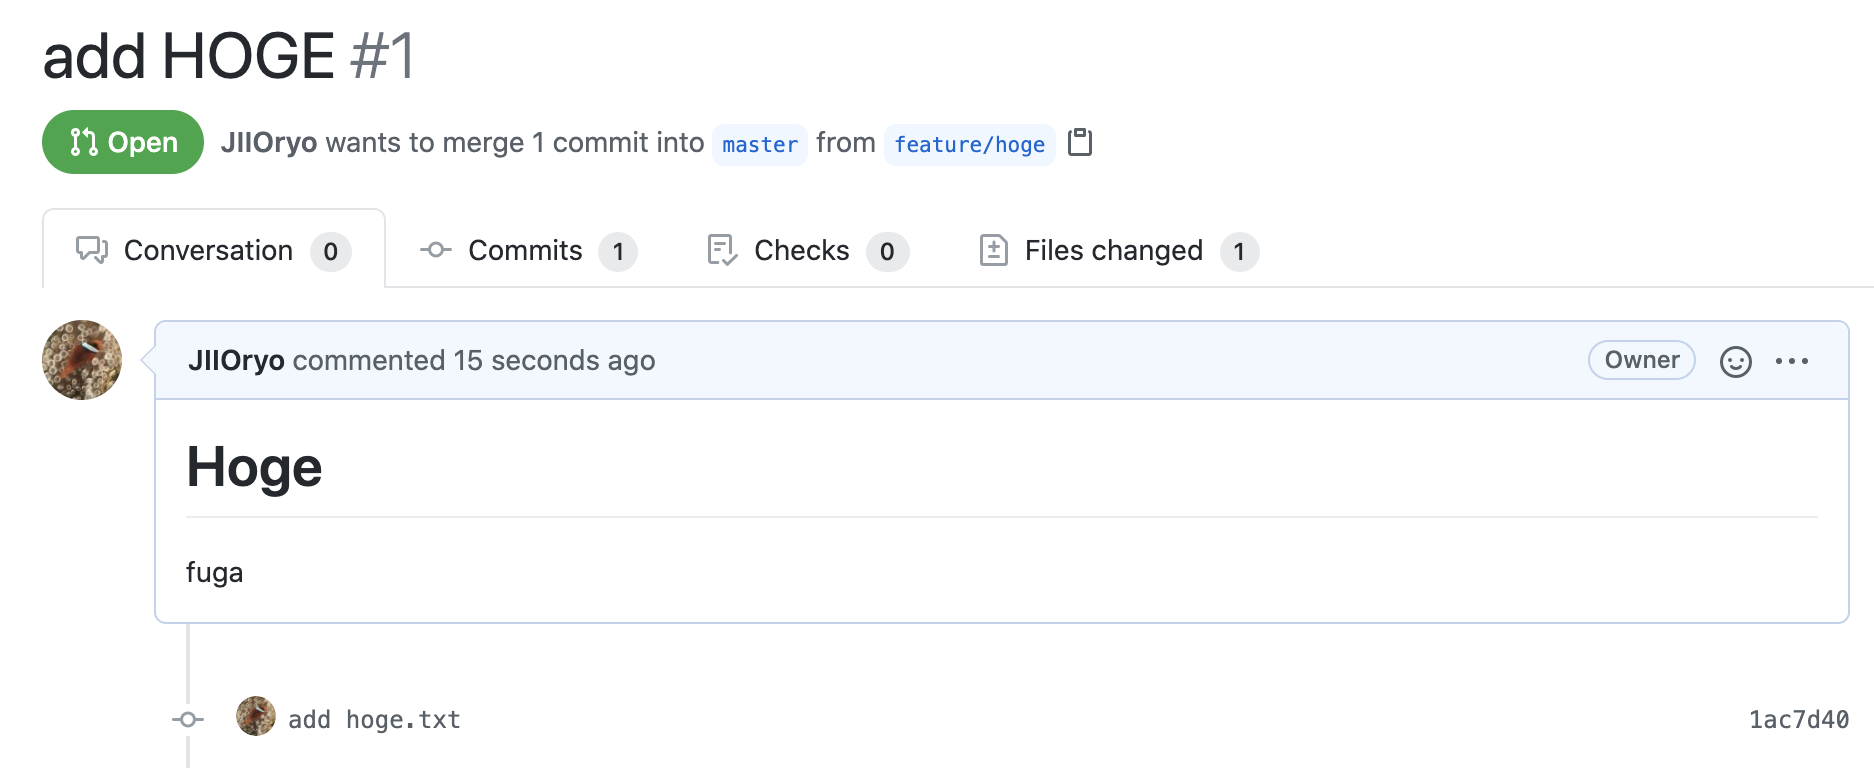
$ gh pr create
? Where should we push the 'feature/hoge' branch?  [Use arrows to move, type to filter]
> JIIOryo/foo
  Skip pushing the branch
  Cancel
タイトルを入力します。
? Title (add hoge.txt) add HOGE
eを押すとエディタが開き、PRの文章を記述できます。? Body [(e) to launch vim, enter to skip]submitするとPRが作成されます。
? What's next?  [Use arrows to move, type to filter]
> Submit
  Continue in browser
  Add metadata
  Cancel
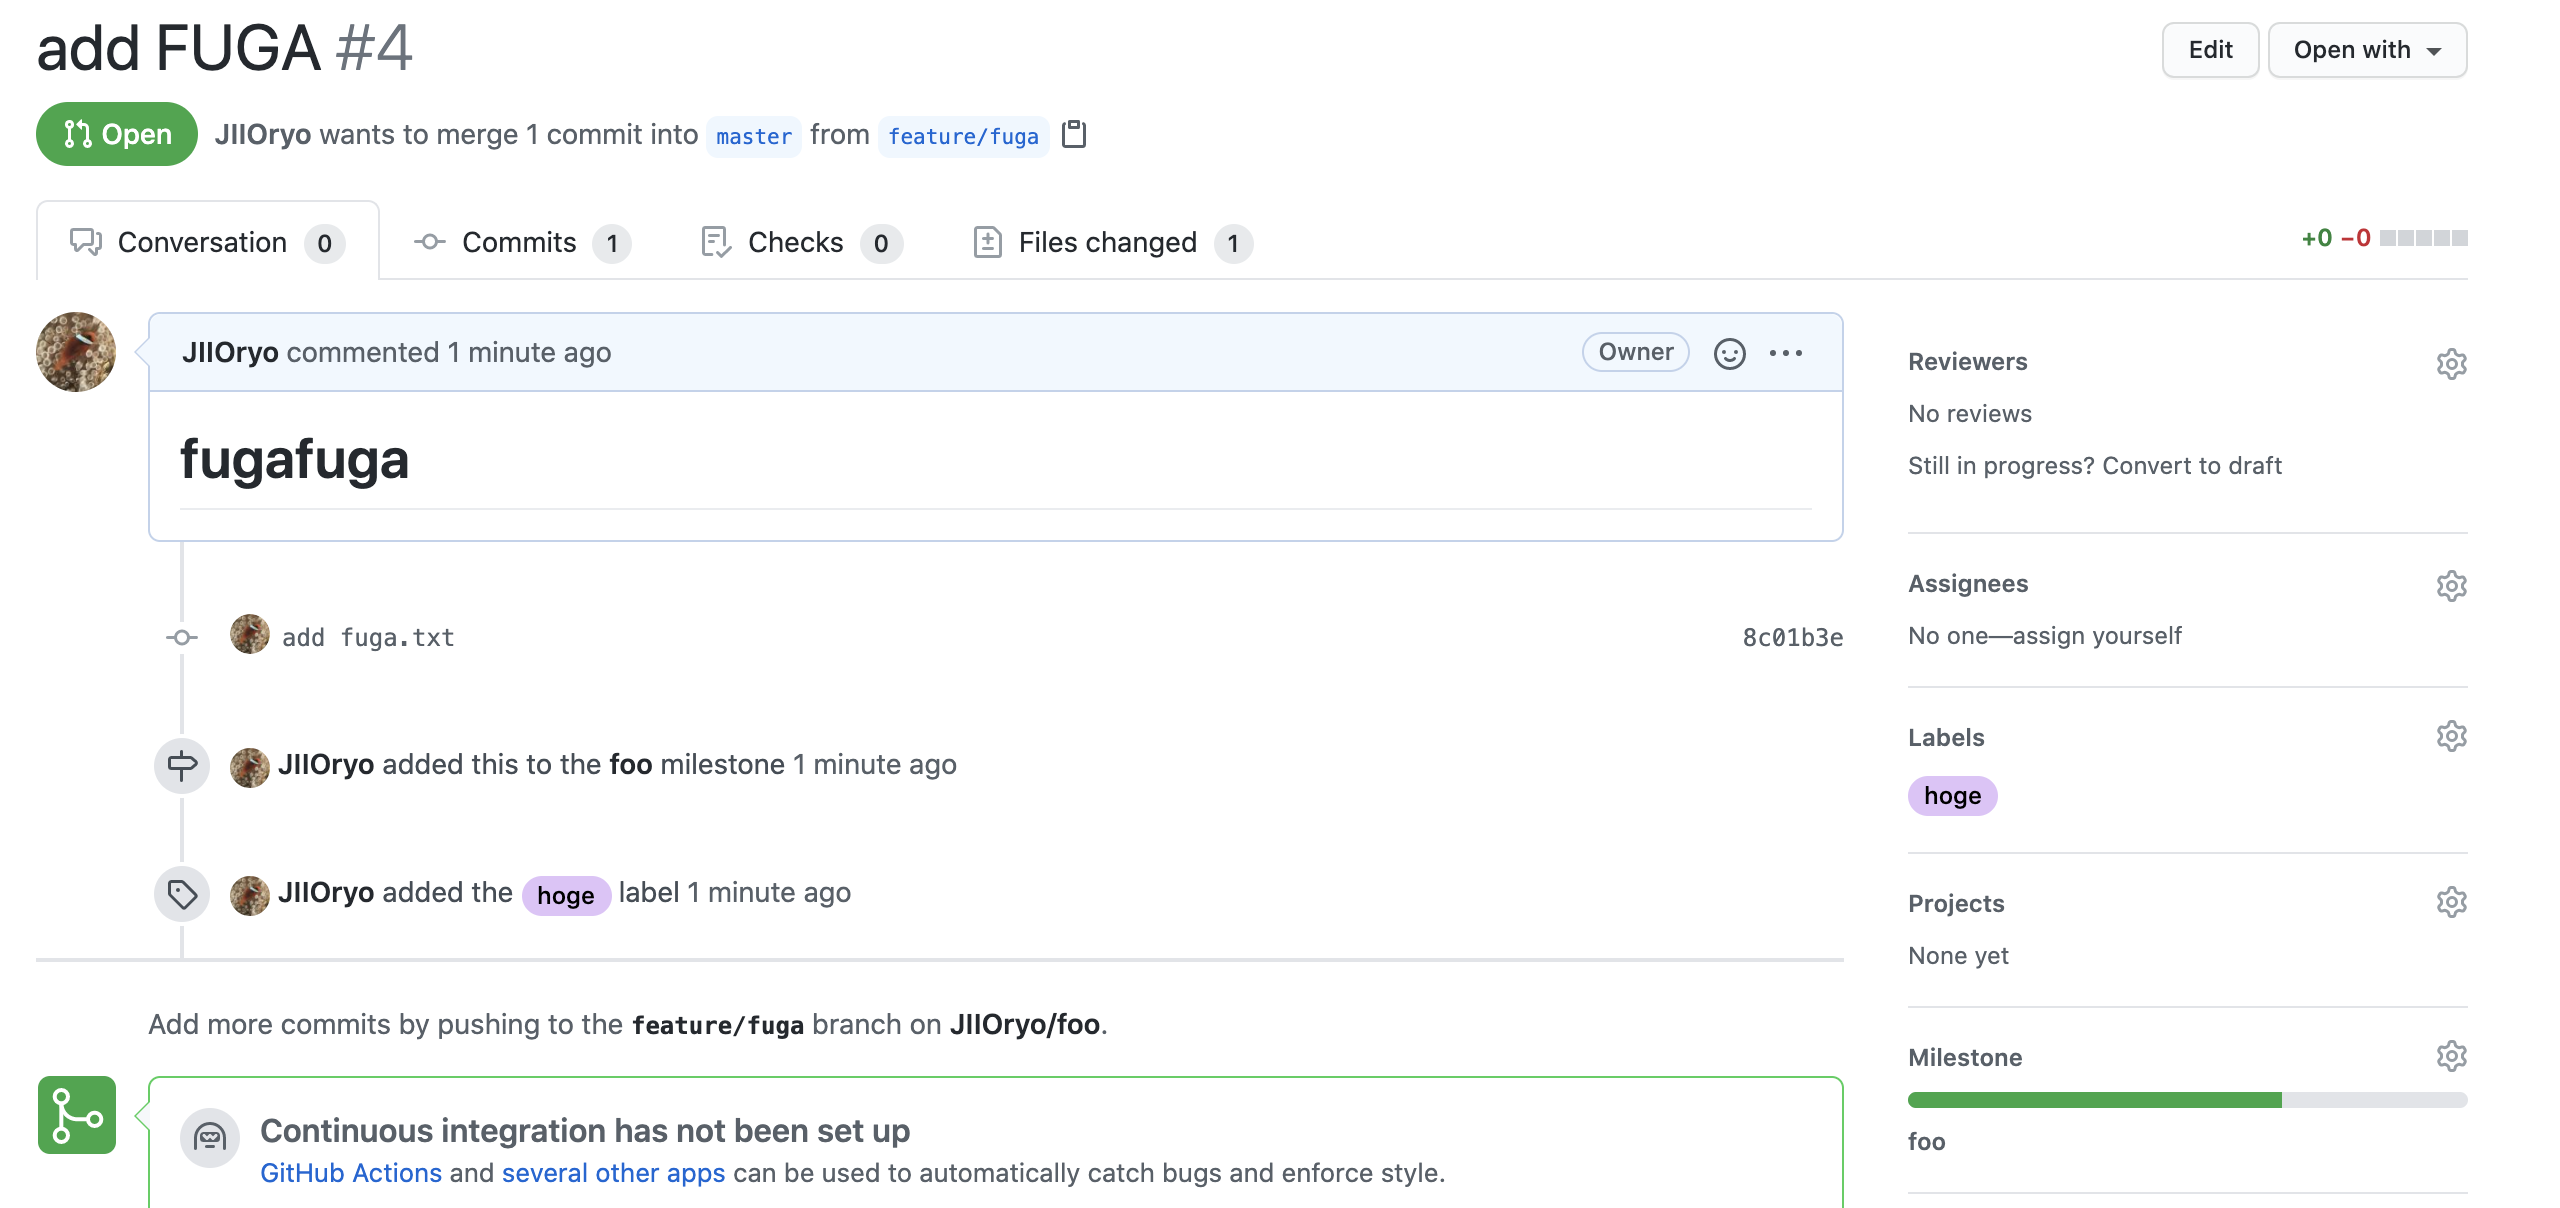
コマンド一発で作成
$ gh pr create -t 'add FUGA' -b '# fugafuga' -m foo -l hoge -B feature/hoge -dこれで一発でこのPRができます。スゴい。
この例では
-mがマイルストーンで、-lがラベル、-Bがマージ先ブランチ、-dがドラフトPRです。
ラベルなど、複数ある場合は,でつなげる。pushしていない場合は対話形式同様pushする?って聞かれる。
? Where should we push the 'feature/foo' branch? JIIOryo/foo
?? gh pr close ??
gh pr closeコマンドは、PRをクローズできるコマンドです。
gh pr close {<number> | <url> | <branch>} [flags]で実行します。
PRの指定方法はbranch,PR番号,urlの3種類あります。フラグ
以下のフラグが利用できます。
flags short flags long 説明 -d --delete-branch ブランチを削除する ブランチ名で指定
これが一番直感的でわかりやすいです。
$ gh pr close feature/fuga
✔ Closed pull request #5 (add FUGA)
PR番号で指定
$ gh pr close 5
✔ Closed pull request #5 (add FUGA)
URLで指定
$ gh pr close https://github.com/JIIOryo/foo/pull/5
✔ Closed pull request #5 (add FUGA)
ブランチも消す
-dオプションをつけることで、ブランチごと削除することが可能です。これは便利。$ gh pr close feature/fuga -d ✔ Closed pull request #5 (add FUGA) ✔ Deleted branch feature/fuga and switched to branch master?? gh pr reopen ??
gh pr reopenコマンドは、クローズしたPRを再び開くができます。
gh pr reopen {<number> | <url> | <branch>} [flags]で実行する。ReopenするPRを指定方法は
branch,PR番号,urlの3種類あります。PR番号でreopen
$ gh pr reopen 5
✔ Reopened pull request #5 (add FUGA)
URLで指定
$ gh pr reopen https://github.com/JIIOryo/foo/pull/5
✔ Reopened pull request #5 (add FUGA)
ブランチ名で指定
自分の場合ブランチ名で指定してもうまくいかなかったです。
$ gh pr reopen feature/fuga
no open pull requests found for branch "feature/fuga"
?? gh pr list ??
gh pr listコマンドは、PRの一覧を表示するコマンドです。
gh pr list [flags]で実行する。フラグ
以下のフラグが利用できます。
flags short flags long 説明 -a --assignee assigneeでフィルタリング -B --base ベースブランチでフィルタリング -l --label ラベルでフィルタリング -L --limit 最大表示個数を指定(デフォルト30) -s --state 状態を指定 open,closed,merged,allが指定可能 (デフォルトopen)-w --web ブラウザでPR一覧のページを開く 例
$ gh pr list

Showing 4 of 4 open pull requests in JIIOryo/foo

#13  add fugahoge  feature/fugahoge
#9   add hogefuga  feature/hogefuga
#6   add FOO       feature/foo
#1   add HOGE      feature/hoge
$ gh pr list -B master -l hoge -L 3 Showing 1 of 1 pull request in JIIOryo/foo that matches your search #1 add HOGE feature/hoge?? gh pr diff ??
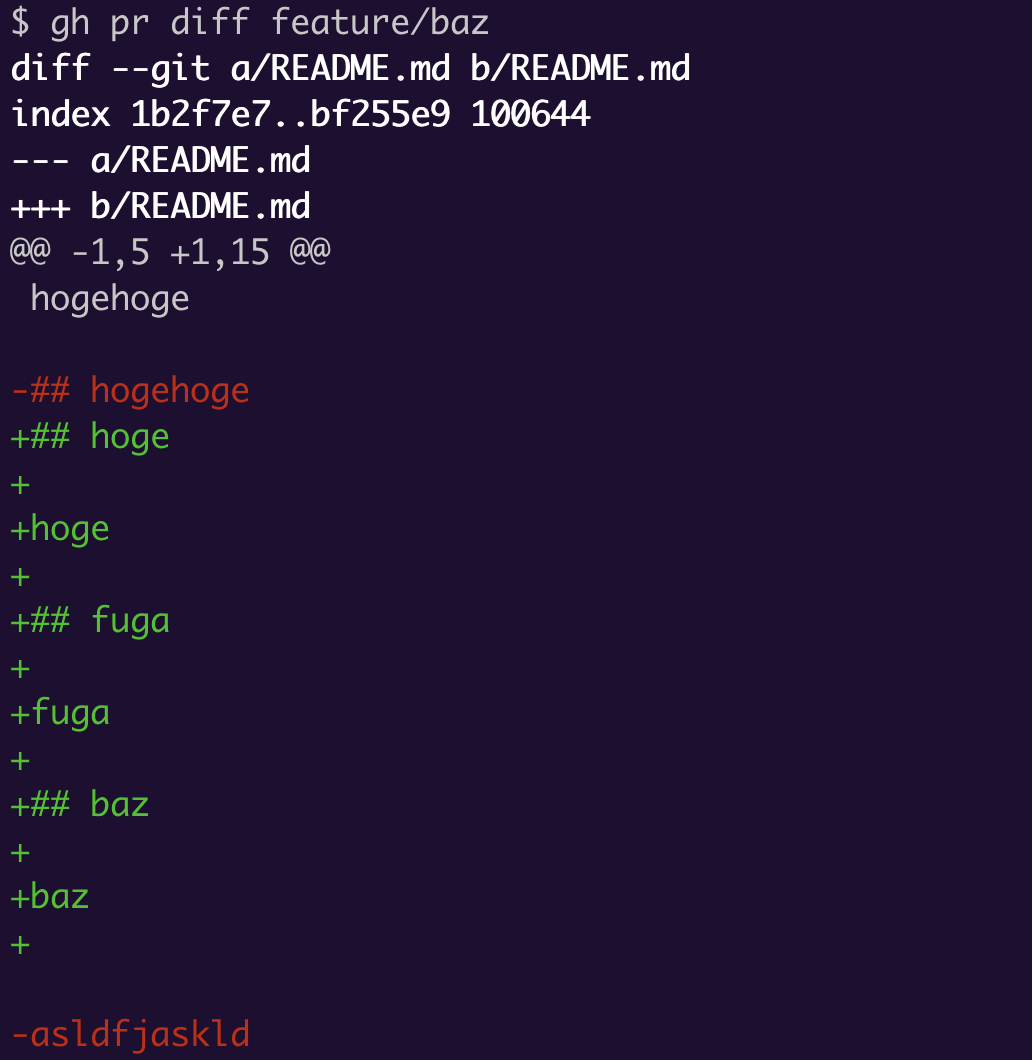
gh pr diffコマンドは、PRのdiffを確認することができるコマンドです。
gh pr diff [<number> | <url> | <branch>] [flags]で実行する。フラグ
以下のフラグが利用できます。
flags short flags long 説明 --color 色。 always,never,autoのうちいずれかを選択。(デフォルトauto)例
diffに関してはブラウザの方がわかりやすいので、これで
-wフラグが利用できたら便利なんですけどね。?? gh pr merge ??
gh pr mergeコマンドは、PRをマージすることができます。
gh pr merge [<number> | <url> | <branch>] [flags]で実行する。フラグ
以下のフラグが利用できます。
flags short flags long 説明 -d --delete-branch ブランチを削除するか(デフォルト true) -m --merge マージコミットを作成 -r --rebase リベース -s --squash スカッシュマージ 対話形式で試す
mergeは、マージコミットを作成、リベース、スカッシュマージの3種類が利用できます。
$ gh pr merge
? What merge method would you like to use?  [Use arrows to move, type to filter]
> Create a merge commit
  Rebase and merge
  Squash and merge
ブランチを削除するか聞かれます。
? Delete the branch locally and on GitHub? (Y/n)Done
✔ Merged pull request #7 (add baz)
✔ Deleted branch feature/baz and switched to branch master
コマンド一発でマージする
$ gh pr merge --squash feature/piyo
✔ Squashed and merged pull request #8 (add piyo)
✔ Deleted branch feature/piyo and switched to branch master
?? gh pr ready ??
gh pr readyコマンドは、draftPRをreview可能状態に変更するコマンドです。
gh pr ready [<number> | <url> | <branch>] [flags]で実行する。例
最初はドラフト状態(グレーの状態)です。
gh pr readyしてみます。
ReopenするPRを指定方法はbranch,PR番号,urlの3種類あります。
指定しない場合はカレントブランチを指定したことになります。
PRのstatusがレビュー可能状態(緑)に変わりました。
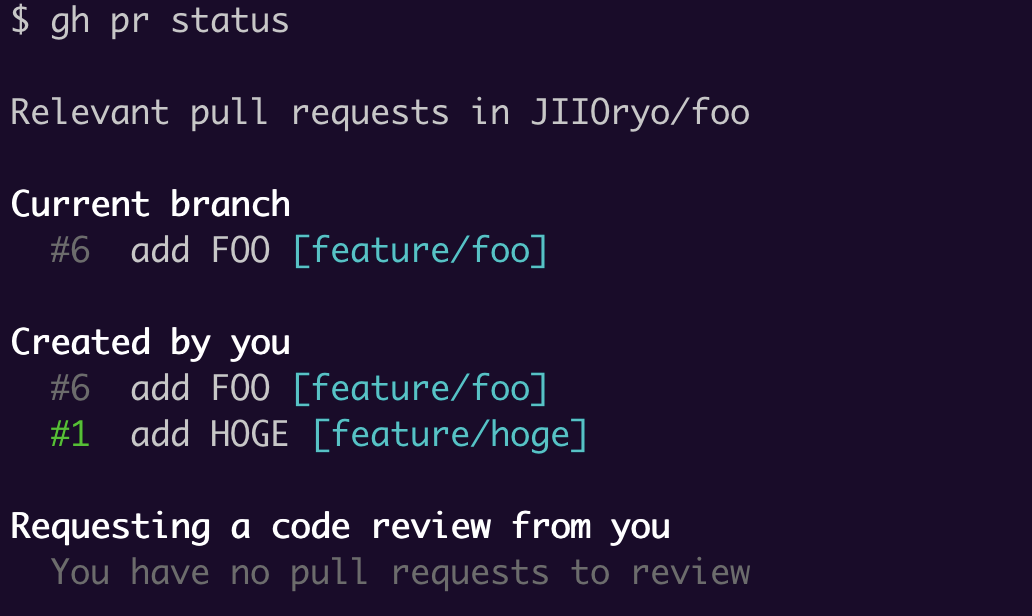
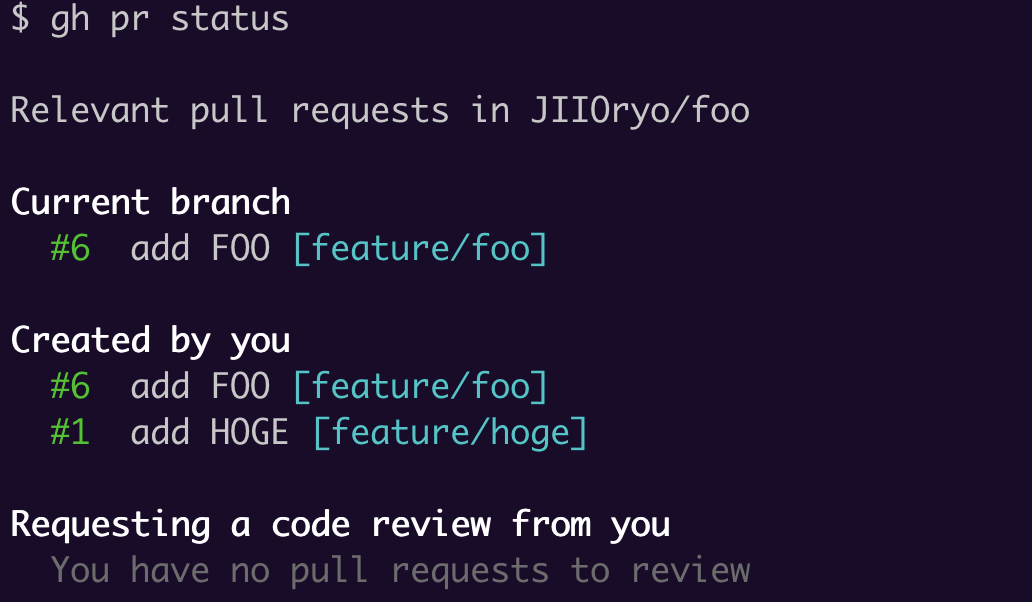
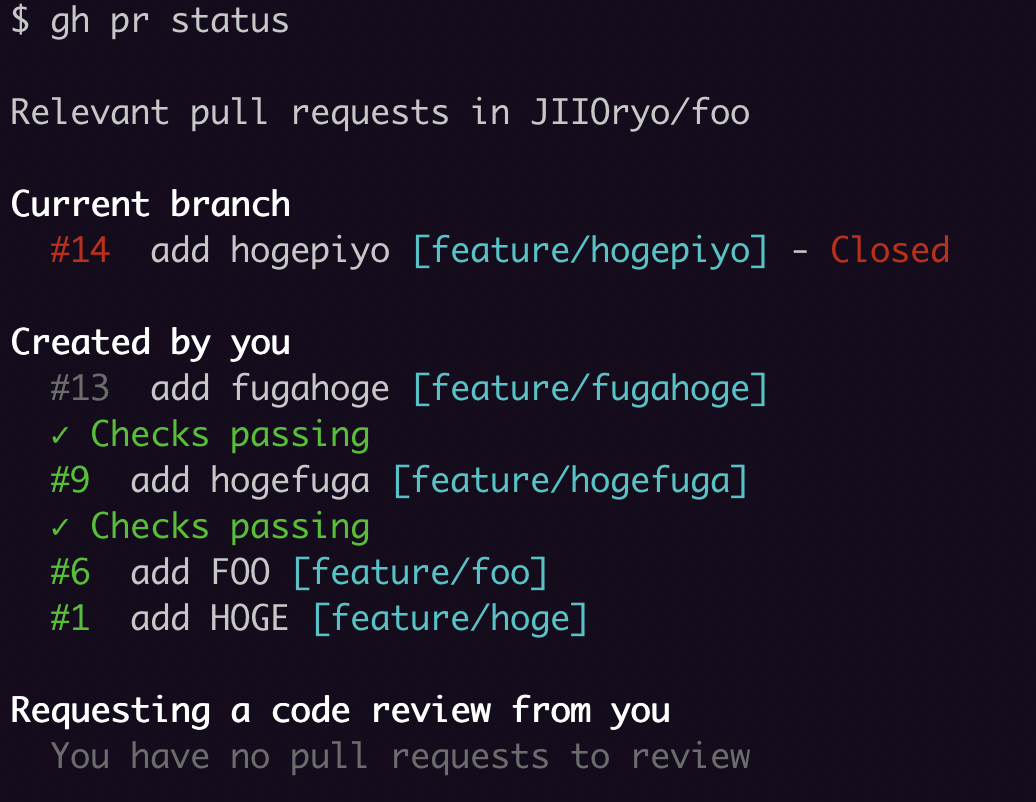
?? gh pr status ??
gh pr statusコマンドは、PRのステータスを確認することができるコマンドです。
gh pr status [flags]で実行します。例
draftはグレー、レビュー可能は緑色、Closedは赤に表示されました。
?? gh pr review ??
gh pr reviewコマンドは、レビューをすることができるコマンドです。
gh pr review [<number> | <url> | <branch>] [flags]で実行します。PRの指定方法は
branch,PR番号,urlの3種類あります。フラグ
以下のフラグが利用できます。
flags short flags long 説明 -a --approve PRをapproveする -b --body レビューのメッセージを指定 -c --comment PRのコメント (-bが必要) -r --request-changes 変更依頼 対話形式でレビューする
coment,approve,request changesの3つから選ぶことができます。コメントしてみましょう。$ gh pr review feature/foo ? What kind of review do you want to give? [Use arrows to move, type to filter] > Comment Approve Request changes
eを押すとエディタが開いてコメントを書くことができます。? Review body [(e) to launch vim]確認があるので、submitしましょう。
? Review body <Received>
Got:

  hoge

? Submit? (Y/n)
無事にレビューできました。
? Submit? Yes
- Reviewed pull request #6
対話形式でapproveする
approveを選択します。
$ gh pr review feature/foo
? What kind of review do you want to give?  [Use arrows to move, type to filter]
  Comment
> Approve
  Request changes
eを押すとエディタが開いてコメントを書くことができます。? Review body [(e) to launch vim, enter to skip]Approveのときのメッセージが確認できます。Submitしましょう。
? Review body <Received>
Got:

  LGTM?

? Submit? (Y/n)
コマンド一発でレビューする
-cはコメント、-aでapproveすることができます。
これらのメッセージは-bで指定します。$ gh pr review feature/foo -c -b 'hoge' - Reviewed pull request #6?? gh pr checks ??
gh pr checksコマンドは、CIのステータスを取得できるコマンドです。
gh pr checks [flags]で実行します。例
$ gh pr checks
All checks were successful
0 failing, 1 successful, and 0 pending checks

✓  ci/circleci: run    https://circleci.com/gh/JIIOryo/foo/2...
?? gh pr view ??
gh pr viewコマンドは、PRのタイトルやbodyの内容などの情報を表示するコマンドです。
gh pr view [<number> | <url> | <branch>] [flags]で実行します。
PRの指定方法はbranch,PR番号,urlの3種類あります。フラグ
以下のフラグが利用できます。
flags short flags long 説明 -w --web ブラウザで開く 例
今回はブランチ名から指定します。
$ gh pr view feature/hogefuga
ブラウザで開く
カレントブランチ(指定なし)のPRをブラウザで開きたいときは
-wフラグを利用します。$ gh pr view -w Opening github.com/JIIOryo/foo/pull/9 in your browser. (ブラウザが開く)これは便利。使えそう。
?? gh pr checkout ??
gh pr checkoutコマンドは、指定したPR(ブランチ)にcheckoutするコマンドです。
gh pr checkout {<number> | <url> | <branch>} [flags]で実行します。フラグ
以下のフラグが利用できます。
flags short flags long 説明 --recurse-submodules 再帰的に全てのアクティブなサブモジュールを更新する 例
$ gh pr checkout feature/hogefuga
Switched to branch 'feature/hogefuga'
Already up to date.
ちなみに実装を見ると、ローカルにブランチがある場合、
fetchcheckoutmergeを行い、そうでない場合はcheckout -bで新しいブランチを作成してくれているようですね。
https://github.com/cli/cli/blob/b2e36a0979a06b94bf364552a856c166cd415234/pkg/cmd/pr/checkout/checkout.go#L118-L133\
?? gh issue コマンド ??
gh issueコマンドは、issueの作成や閲覧することができます。
gh issue <command> [flags]で実行し、<command>には以下の6個が利用できます。close: Close issue create: Create a new issue list: List and filter issues in this repository reopen: Reopen issue status: Show status of relevant issues view: View an issue?? gh issue create ??
gh issue createコマンドは、issueを作成することができるコマンドです。
gh issue create [flags]で実行する。フラグ
以下のフラグが利用できます。
flags short flags long 説明 -a --assignee assigneeを指定 -b --body bodyを指定 -l --label ラベルを指定 -m --milestone マイルストーンを指定 -p --project プロジェクトを指定 -t --title タイトルを指定 -w --web ブラウザで開く 対話形式でissueを作成
まずはタイトルを指定します。
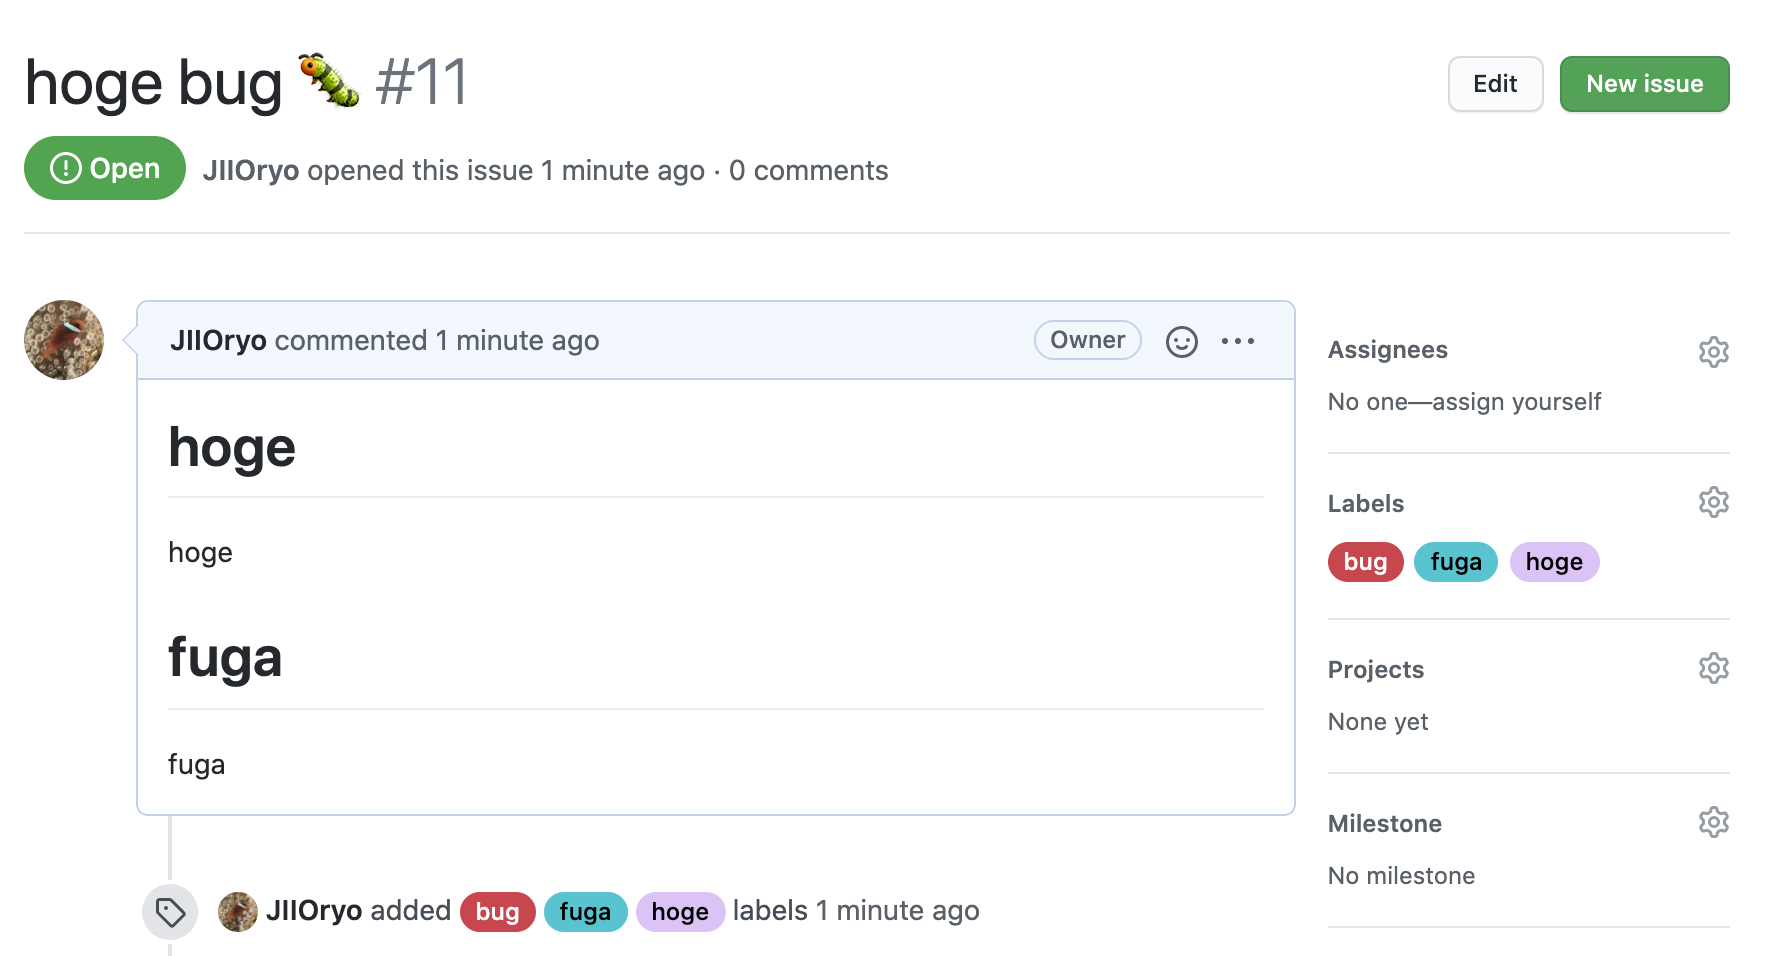
$ gh issue create

Creating issue in JIIOryo/foo

? Title hoge bug ?
eを押すことで、エディタが開きます。? Body [(e) to launch vim, enter to skip]入力が完了。
? Body <Received>
? What's next?  [Use arrows to move, type to filter]
> Submit
  Continue in browser
  Add metadata
  Cancel
Add metadataで、assigneeやlabelを指定することができます。移動は上下ボタン、選択はスペースキーです。確定はEnter。? What would you like to add? [Use arrows to move, space to select, <right> to all, <left> to none, type to filter] [ ] Assignees > [x] Labels [ ] Projects [ ] MilestoneLabelを選択すると、以下のようにラベル一覧が表示されます。同様に移動は上下ボタン、選択はスペースキーです。確定はEnter。
? Labels  [Use arrows to move, space to select, <right> to all, <left> to none, type to filter]
  [x]  bug
  [ ]  documentation
  [ ]  duplicate
> [ ]  enhancement
  [x]  fuga
  [ ]  good first issue
  [ ]  help wanted
Submitしましょう。
? What's next? [Use arrows to move, type to filter] > Submit Cancelhttps://github.com/JIIOryo/foo/issues/11issueができたみたいなので、みてみます。
コマンドで一発でissueを作成する。
-tでタイトル、-bでbody、-lでラベル、-mでマイルストーンを選択してみました。$ gh issue create -t 'fuga bug ?' -b 'fugafuga' -l hoge,fuga -m foo Creating issue in JIIOryo/foo https://github.com/JIIOryo/foo/issues/12ちなみに、
-wオプションをつけるとissueを作成する画面がブラウザで開きます。?? gh issue list ??
gh issue listコマンドは、issueの一覧を表示することができます。
gh issue list [flags]で実行する。フラグ
以下のフラグが利用できます。
flags short flags long 説明 -a --assignee assigneeでフィルタリング -A --author authorでフィルタリング -l --label ラベルでフィルタリング -L --limit issueの最大表示件数を指定 (デフォルト30件) -m --milestone マイルストーンをでフィルタリング --mention メンションでフィルタリング -p --project プロジェクトを指定 -s --state 状態でフィルタリング open,closed,allが指定できます。(デフォルトopen)-w --web ブラウザで開く 例
$ gh issue list

Showing 2 of 2 open issues in JIIOryo/foo

#12  fuga bug ?  (fuga, hoge)       about 5 minutes ago
#11  hoge bug ?  (bug, fuga, hoge)  about 9 minutes ago
フラグを付けて検索してみます。
$ gh issue list -l hoge,fuga -L 1 -s all

Showing 1 of 2 issues in JIIOryo/foo that match your search

#12  fuga bug ?  (fuga, hoge)  about 10 minutes ago
?? gh issue status ??
gh issue statusコマンドは、issueのステータスを表示するコマンドです。
gh issue status [flags]で実行する。
自分がアサインされたissue, メンションされたissue, 自分が作成したissueを確認することができます。例
$ gh issue status

Relevant issues in JIIOryo/foo

Issues assigned to you
  #12  fuga bug ?  (fuga, hoge)  less than a minute ago

Issues mentioning you
  #12  fuga bug ?  (fuga, hoge)  less than a minute ago

Issues opened by you
  #12  fuga bug ?  (fuga, hoge)       less than a minute ago
  #11  hoge bug ?  (bug, fuga, hoge)  about 3 hours ago
?? gh issue close ??
gh issue closeコマンドは、issueをcloseすることができるコマンドです。
gh issue close {<number> | <url>} [flags]で実行する。
issueを選択する方法は、issue番号,issueのURLの2つがあります。例
$ gh issue close 12
✔ Closed issue #12 (fuga bug ?)
$ gh issue close https://github.com/JIIOryo/foo/issues/12 ✔ Closed issue #12 (fuga bug ?)?? gh issue reopen ??
gh issue reopenコマンドは、closeしたissueを再び開くコマンドです。
gh issue reopen {<number> | <url>} [flags]で実行します。
issueを選択する方法は、issue番号,issueのURLの2つがあります。$ gh issue reopen 12 ✔ Reopened issue #12 (fuga bug ?)$ gh issue reopen https://github.com/JIIOryo/foo/issues/12 ✔ Reopened issue #12 (fuga bug ?)?? gh issue view ??
gh issue viewコマンドは、issueを閲覧することができるコマンドです。
gh issue view {<number> | <url>} [flags]で実行する。
issueを選択する方法は、issue番号,issueのURLの2つがあります。フラグ
以下のフラグが利用できます。
flags short flags long 説明 -w --web ブラウザで開く 例
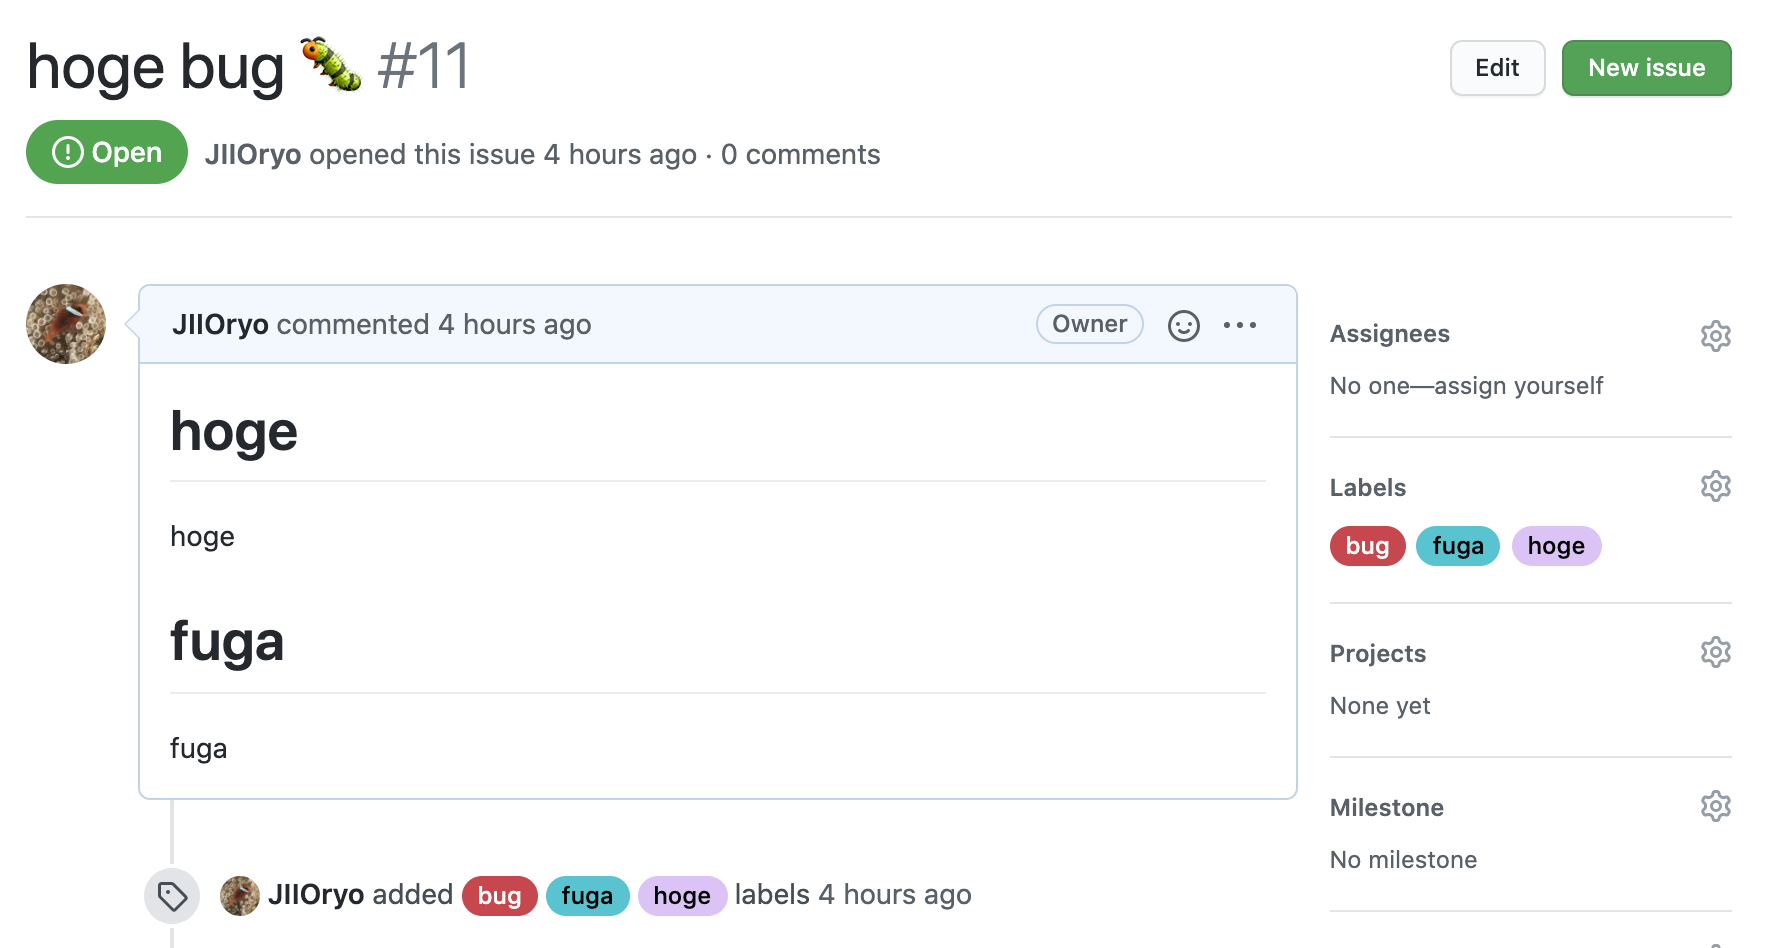
$ gh issue view 11$ gh issue view https://github.com/JIIOryo/foo/issues/11
markdownがしっかり認識されて色付けされていてみやすいですが、ブラウザでしっかり確認したい場合もあります。
そのような場合は
-wオプションを利用します。$ gh issue view 11 -w Opening github.com/JIIOryo/foo/issues/11 in your browser.
?? gh release コマンド ??
gh releaseコマンドは、releaseの作成や削除ができるコマンドです。
gh release <command> [flags]で実行し、<command>には以下の6個が利用できます。create: Create a new release delete: Delete a release download: Download release assets list: List releases in a repository upload: Upload assets to a release view: View information about a release?? gh release create ??
gh release createコマンドは、releaseを作成することができるコマンドです。
gh release create <tag> [<files>...] [flags]で実行する。フラグ
以下のフラグが利用できます。
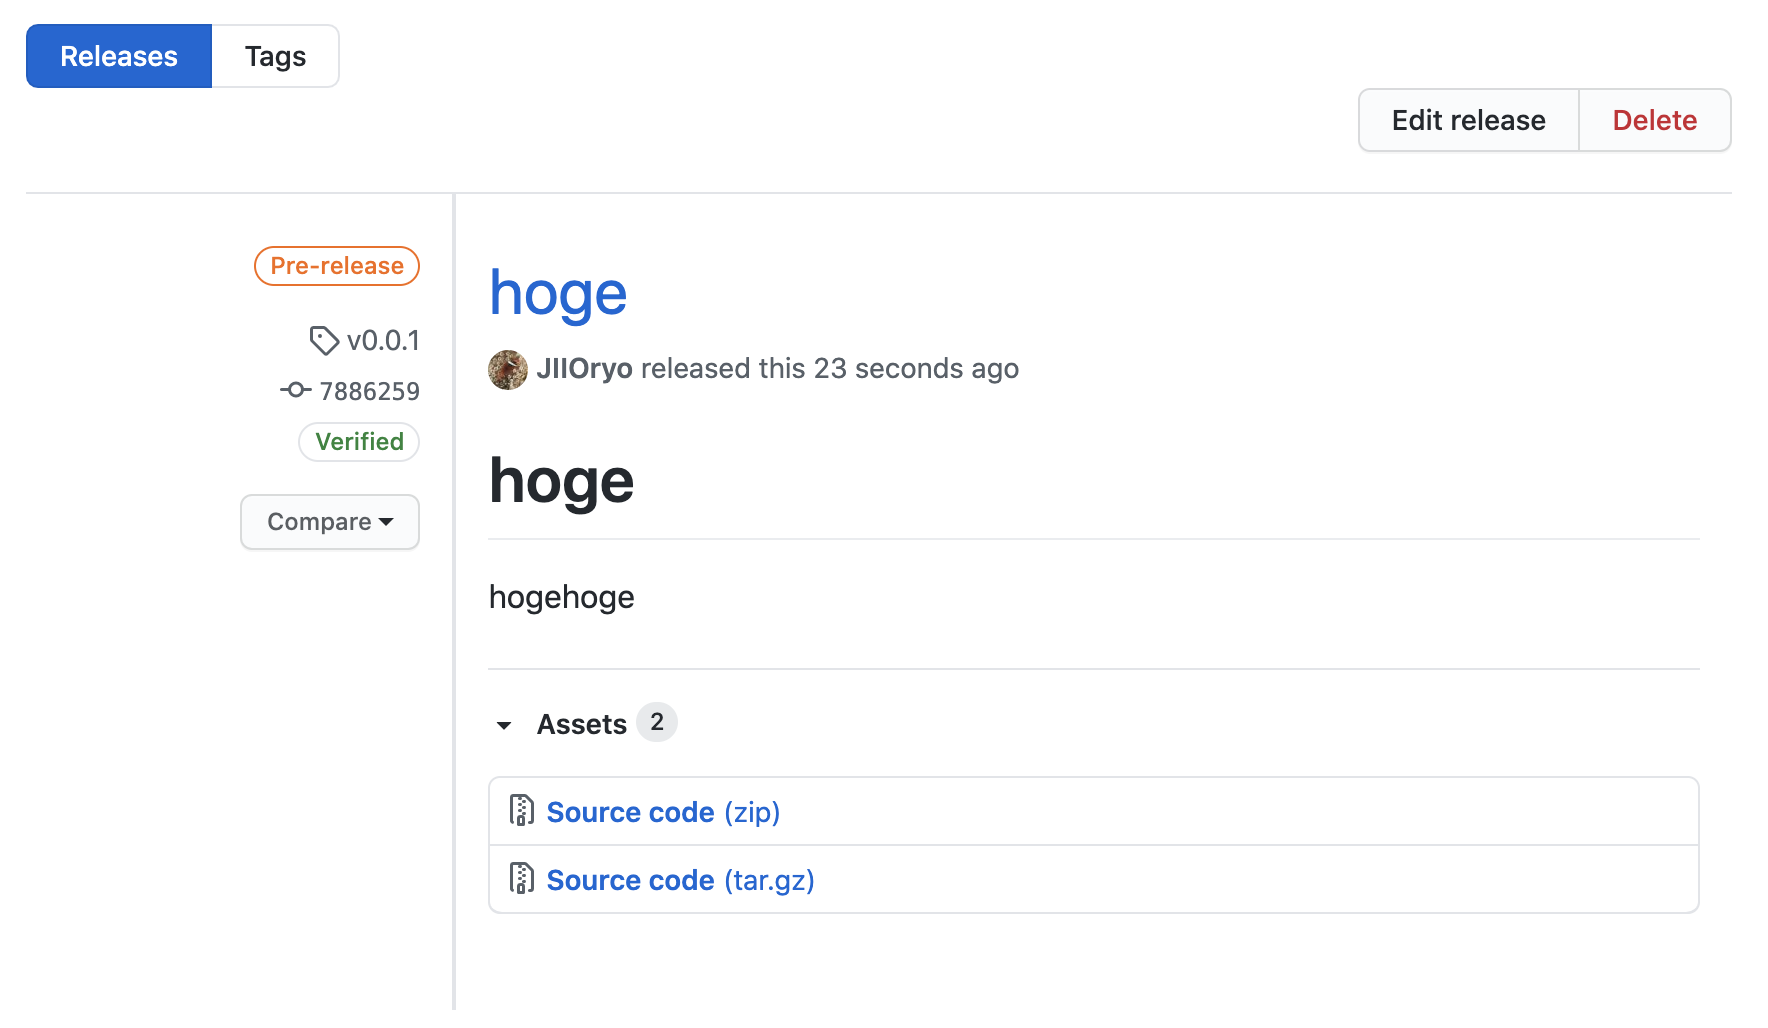
flags short flags long 説明 -d --draft ドラフトのリリースを作成 -n --notes Release notesを作成 -F --notes-file Release notesをファイルから指定して作成 -p --prerelease prerelease(不安定なバージョン)であることを知らせます。 -t --title リリースのタイトルを指定します。 対話形式でreleaseを作成
releaseを対話形式で作成してみます。まずはタイトルを入力。
$ gh release create v0.0.1
? Title (optional) hoge
Release noteを書くか選択します。
今回はWrite my ownを選択します。? Release notes [Use arrows to move, type to filter] > Write my own Leave blankprereleaseかどうか聞かれます。今回はyにします。
? Is this a prerelease? (y/N)releaseをpublishするか、draftとして保存するかなどを選択できます。
今回はpublishします。? Submit? [Use arrows to move, type to filter] > Publish release Save as draft Cancel以上で完了です。
出力されたURLを開いてみると、v0.0.1のタグでリリースを作成することができました。
?? gh release list ??
gh release listコマンドは、リリース一覧を表示するコマンドです。
gh release list [flags]で実行します。フラグ
以下のフラグが利用できます。
flags short flags long 説明 -L --limit 一度に取得する上限数(デフォルト30) 例
以下で実行してみます。
$ gh release listこのように、releaseの一覧が取得できました。
?? gh release upload ??
gh release uploadコマンドは、releaseのassetsをアップロードすることができるコマンドです。
gh release upload <tag> <files>... [flags]で実行します。フラグ
以下のフラグが利用できます。
flags short flags long 説明 --clobber 同名のassetsを上書きするか 例
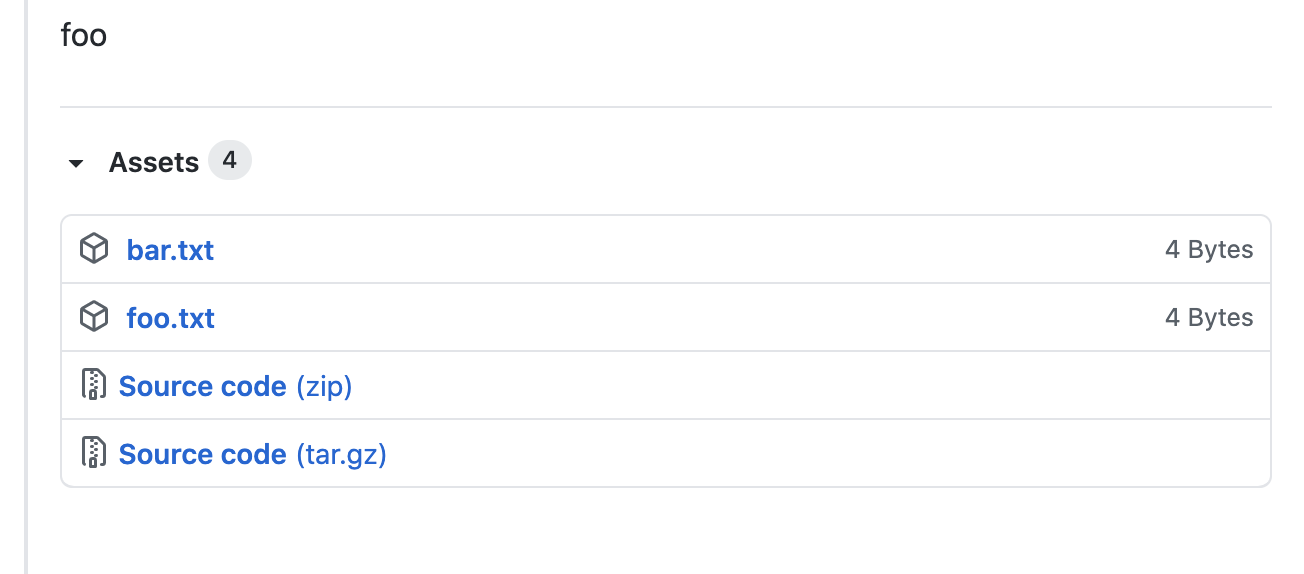
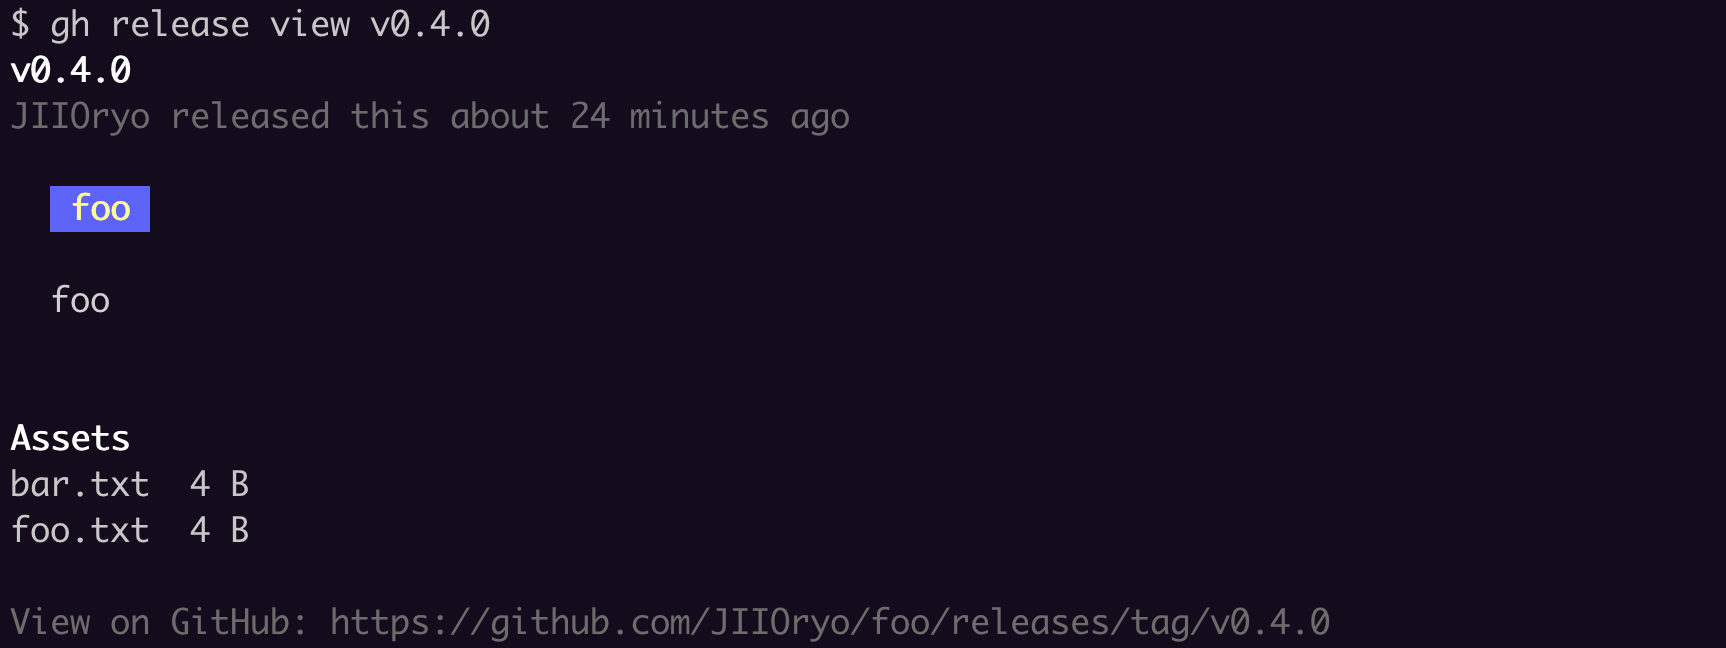
試しに、v0.4.0に
foo.txt,bar.txtを追加してみましょう。$ gh release upload v0.4.0 foo.txt bar.txt Successfully uploaded 2 assets to v0.4.0
ちなみに、同じ名前のassetsがすでにuploadされている場合は怒られます。
$ gh release upload v0.4.0 foo.txt
asset under the same name already exists: [foo.txt]
--clobberフラグを付ければ上書きできます。$ gh release upload v0.4.0 foo.txt --clobber Successfully uploaded 1 asset to v0.4.0?? gh release download ??
gh release downloadコマンドは、releaseのassetsをダウンロードすることができるコマンドです。
gh release download [<tag>] [flags]で実行します。フラグ
以下のフラグが利用できます。
flags short flags long 説明 -D --dir ダウンロードする先のディレクトリ(デフォルトで .)-p --pattern 特定のglobパターンにマッチするassetsをダウンロード 例
ダウンロード先はデフォルトでカレントディレクトリです。
$ gh release download v0.4.0
-Dフラグでダウンロード先の指定、-pフラグでglobのパターンを指定することができます。$ gh release download v0.4.0 -D ~/Desktop/ -p '*.txt'?? gh release delete ??
gh release deleteコマンドは、releaseを削除することができるコマンドです。
gh release delete <tag> [flags]で実行します。フラグ
以下のフラグが利用できます。
flags short flags long 説明 -y --yes 削除の確認をスキップ 例
例えば、現在以下のようなreleaseがあり、
v0.0.2のリリースを削除してみます。$ gh release list foo Latest (v0.4.0) about 16 minutes ago foo (v0.3.0) about 26 minutes ago add fuga Draft (v0.0.2) about 46 minutes ago foo Pre-release (v0.2.0) about 34 minutes ago fuga (v0.1.0) about 37 minutes ago hoge Pre-release (v0.0.1) about 50 minutes agoリリースを削除してもいいか質問されるのでyを選択。
$ gh release delete v0.0.2
? Delete release v0.0.2 in JIIOryo/foo? (Y/n) y
✓ Deleted release v0.0.2
ちなみに、
-yオプションを選択することで確認なしで削除できる。$ gh release delete v0.0.2 -y?? gh release view ??
gh release viewコマンドは、releaseの情報を閲覧することができるコマンドです。
gh release view [<tag>] [flags]で実行する。フラグ
以下のフラグが利用できます。
flags short flags long 説明 -w --web ブラウザで開く 例
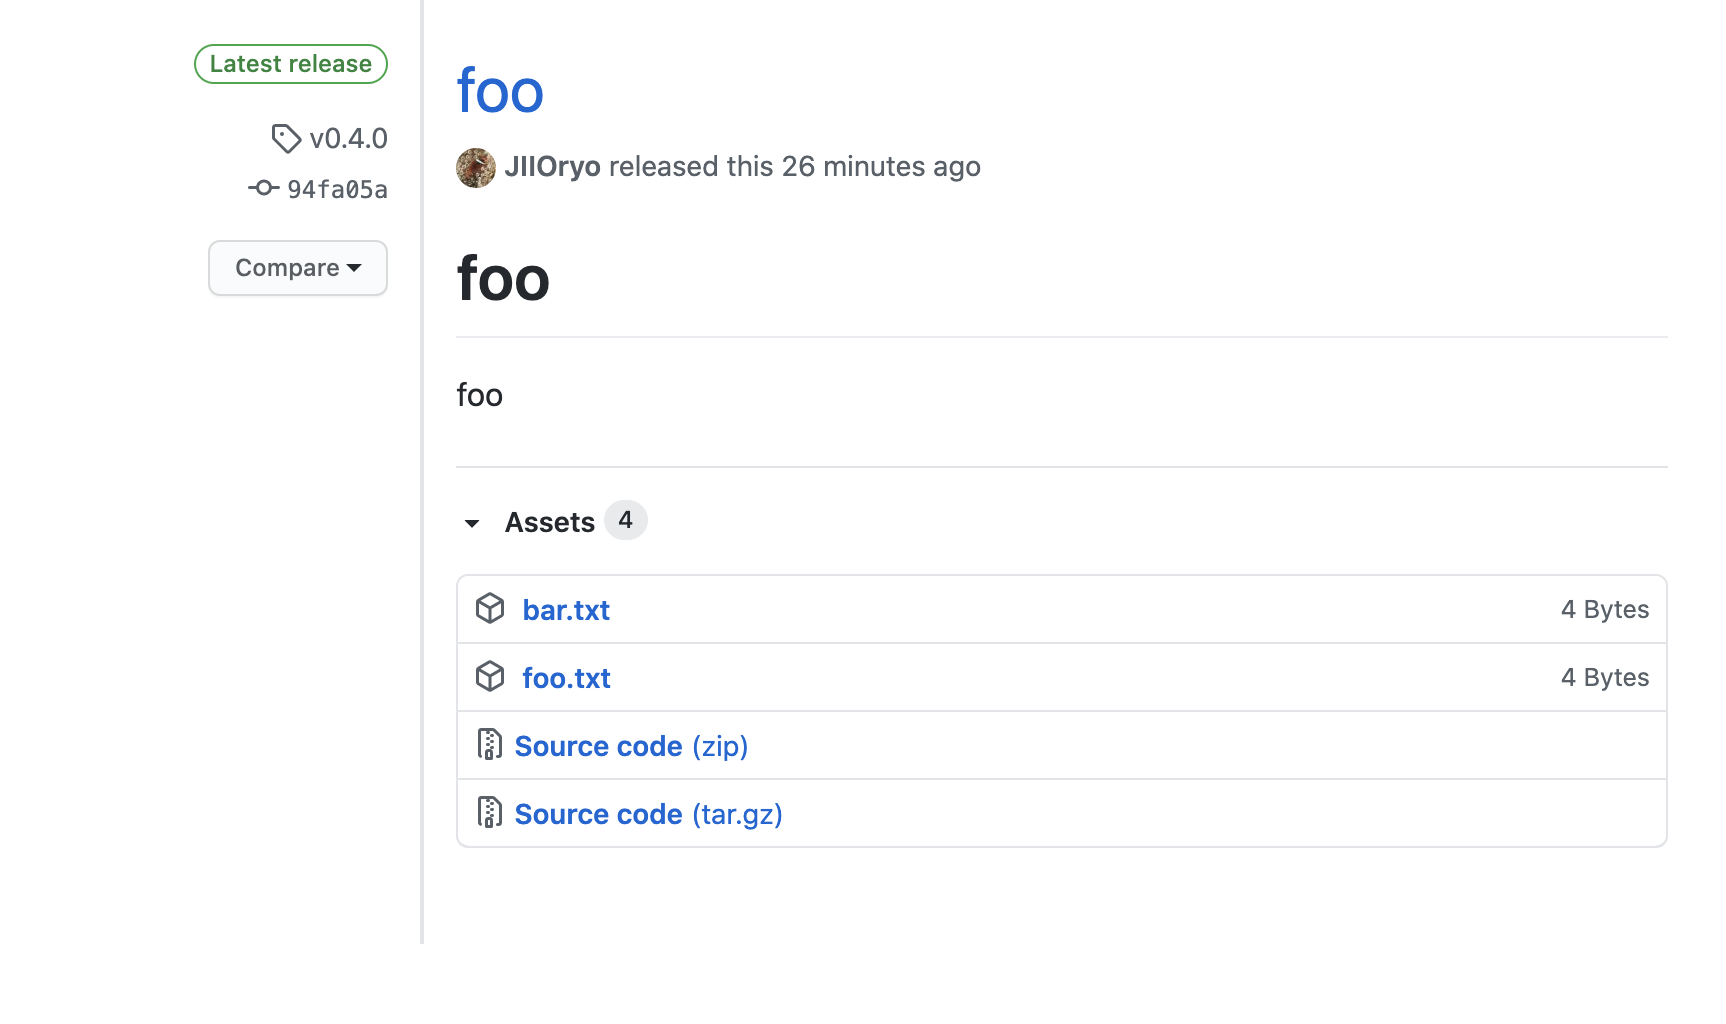
少しターミナルではみづらいと言う場合は、
-wフラグを付けてブラウザで開くと良いでしょう。$ gh release view v0.4.0 -w
?? gh gist コマンド ??
gh gistコマンドは、gistの作成や削除などができるコマンドです。
gh gist <command> [flags]で実行し、<command>には以下の4個が利用できます。create: Create a new gist edit: Edit one of your gists list: List your gists view: View a gist?? gh gist create ??
gh gist createコマンドは、gistを新規作成することができるコマンドです。
gh gist create [<filename>... | -] [flags]で実行する。フラグ
以下のフラグが利用できます。
flags short flags long 説明 -d --desc gistの説明を指定 -f --filename ファイル名を指定 (標準入力から指定する場合) -p --public gistを公開する (デフォルトprivate) 例
このようにファイル名を指定する方法を一番使うかと思います。
$ gh gist create hogefuga.txt
- Creating gist hogefuga.txt
✓ Created gist hogefuga.txt
https://gist.github.com/d09d42c7ef0643c432129f7085ffde9d
標準入力から内容を指定する場合、
--filenameでファイル名を指定することができる。$ echo hogehoge | gh gist create --filename hoge.txt - Creating gist hoge.txt ✓ Created gist hoge.txtもしくは、
-を利用する。書き終わったらCtrl+Dで抜けることができる。$ gh gist create - --filename hoge.js const hoge = 'hoge'; console.log(hoge); - Creating gist hoge.js ✓ Created gist hoge.js?? gh gist list ??
gh gist listコマンドは、gistの一覧を取得できるコマンドです。
gh gist list [flags]で実行する。フラグ
以下のフラグが利用できます。
flags short flags long 説明 -L --limit 表示最大件数を指定する(デフォルト 10) --public publicのgistを表示する --secret secretのgistを表示する 例
$ gh gist list
f6b19a5e7516b0bbadcba6e3b8732e62  hoge.js       1 file  secret  about 12 min...
08b23d0bc86a40cc74a7b2249259c7f8                1 file  secret  about 13 min...
1a564f0f1c176a7de2fff7738adc187c                1 file  secret  about 15 min...
c722167d04f9aa8528255f7db0f84e7f  hoge.txt      1 file  secret  about 17 min...
d09d42c7ef0643c432129f7085ffde9d  hogefuga.txt  1 file  secret  about 23 min...
8170566345795f3d330cef2fff57609e  hoge.txt      1 file  secret  about 19 hou...
?? gh gist edit ??
gh gist editコマンドは、自分のgistを編集することができるコマンドです。
gh gist edit {<gist ID> | <gist URL>} [flags]で実行する。
あらかじめgh gist listなどでIDを調べる必要があります。もしくはgistのURLでも指定することができます。フラグ
以下のフラグが利用できます。
flags short flags long 説明 -f --filename ファイル名 例
以下を実行すると、エディタが開いて編集することができます。
$ gh gist edit f6b19a5e7516b0bbadcba6e3b8732e62複数ファイルから構成されるgistの場合は、editするファイルを選択します。
$ gh gist edit d7f1cc09968c1064f42dfb92181ee983
? Edit which file?  [Use arrows to move, type to filter]
> bar.txt
  hogefuga.js
  hogefuga.txt
他のファイルも編集する場合は
Edit another fileを選択します。終了したらSubmitする。? What next? [Use arrows to move, type to filter] > Edit another file Submit Cancelちなみに
--filenameフラグを利用して特定のファイルを指定することができます。$ gh gist edit d7f1cc09968c1064f42dfb92181ee983 --filename hogefuga.txt?? gh gist view ??
gh gist viewコマンドは、gistを閲覧するコマンドです。
gh gist view {<gist id> | <gist url>} [flags]で実行する。
あらかじめgh gist listなどでIDを調べる必要があります。もしくはgistのURLでも指定することができます。フラグ
以下のフラグが利用できます。
flags short flags long 説明 -f --filename ファイル名を指定 -r --raw markdownをレンダリングしない -w --web ブラウザで開く 例
これは、複数のファイルから構成されているケースです。
$ gh gist view d7f1cc09968c1064f42dfb92181ee983
bar.txt

bar


hogefuga.js

const hoge = 'hoge';
const fuga = 'fuga';
console.log(hoge, fuga);


hogefuga.txt

foo
bar
baz
指定したgistが複数のファイルから構成されている場合は特定のファイルのみを指定することもできます。
$ gh gist view d7f1cc09968c1064f42dfb92181ee983 --filename hogefuga.js
const hoge = 'hoge';
const fuga = 'fuga';
console.log(hoge, fuga);
最後に
GitHub CLIコマンドいかがだったでしょうか。
個人的には、さすがにPRのレビューなどをターミナル完結で行うのは厳しそうなので、どれも(issueやPRなど)listで一覧をみて探す→-wでブラウザで開くってのが使いやすそうだと思いました。
まだ紹介していないその他コマンドaliasやapiなども随時更新、追加していく予定です!
当方まだGitHub CLIに精通していなくて基本的なコマンドしか紹介できませんでしたが、今後慣れてきたら便利なテクニックなどご紹介できればと思います!
もし記事に間違いや補足などあれば教えていただけると助かります?
最後まで読んでいただきありがとうございました。?


- 投稿日:2020-09-21T01:30:27+09:00
GitHub CLI 1.0 主要コマンドのサブコマンド、オプションまとめ
GitHub CLI 1.0の主要コマンドのサブコマンド、オプションまとめ
ついに
GitHub CLI 1.0が登場しましたね。?ソースコード、ドキュメントはこちらから
?https://github.com/cli/cli
?https://cli.github.com/GitHub CLIは、go言語製のGitHub公式のCLIツールです。(既存のGitHubのCLIツールとして有名なのはhubらしいですね)
従来はcommitなどの作業はターミナルで行うが、PRの作成などはブラウザを開いて行う必要がありました。
ターミナル→ブラウザ→ターミナル...みたいに頻繁にアプリを切り替える必要があり、個人的にはこのタイミングでコンテキストスイッチによって集中力が途切れがちでした。GitHubを開くためにブラウザ開いたのに、YouTubeのタブが開いていてそのまま...なんてことはよくありますよね...?GitHub CLIを利用すればこの切り替えの手間がなくなり、快適なGitHubライフを送ることができるというわけなんですね。2020年2月頃にβ版がリリースされていたのですが、2020年9月にβ版が終了して
GitHub CLI 1.0としてリリースされました。
β版では対応していなかったGitHub Enterprise Serverも利用できるようになったみたいですね?これをきっかけにGitHubCLIを使ってみようと少し触ってみたので、学んだことを共有します!
今回紹介するのは最低限の環境構築(認証、エディタの設定)とGitHubCLIの主要なコマンドgist,issue,pr,release,repoとそのサブコマンド、およびそれらの全フラグですが、その他コマンドaliasやapiなども随時更新、追加していく予定です。検証環境
Mac OS X
現在MacOS, Windows, Linuxに対応しています。
install
当方macOSなのでbrewでinstallします。
$ brew install ghversionを確認
??
$ gh --version
gh version 1.0.0 (2020-09-16)
https://github.com/cli/cli/releases/tag/v1.0.0
環境構築
認証
まずはGitHubアカウントの設定を行いましょう。
$ gh auth login対話形式で設定できるみたいですね。まずは
GitHub.comを利用するかGitHub Enterprise Serverを利用するか選択します。今回はGithub.comを利用します。? What account do you want to log into? [Use arrows to move, type to filter] > GitHub.com GitHub Enterprise Serverログインの方法を選択します。今回はブラウザを利用しました。
? How would you like to authenticate?  [Use arrows to move, type to filter]
> Login with a web browser
  Paste an authentication token
? How would you like to authenticate? Login with a web browser ! First copy your one-time code: 0062-4F62 - Press Enter to open github.com in your browser...表示された
one-time codeをブラウザに入力してください。
ブラウザの表示に従ってぽちぽちしていきます。
次にプロトコルを選択します。
HTTPSかSSHを選択します。✓ Authentication complete. Press Enter to continue... ? Choose default git protocol [Use arrows to move, type to filter] HTTPS > SSHこれで認証の設定は完了しました。
? Choose default git protocol SSH
- gh config set -h github.com git_protocol ssh
✓ Configured git protocol
✓ Logged in as JIIOryo
エディタの設定
PRやissueを書く時などのエディタを設定します。今回はvimを設定しました。
$ gh config set editor vimちなみに公式ドキュメントによれば現状Windowsでは常にメモ帳らしい。
On Windows, the editor will currently always be Notepad.
コマンド
ghコマンドは、基本的に
gh <command> <subcommand> [flags]で実行します。commandとして利用できるのは、CORE COMMANDSとADDITIONAL COMMANDSです。よく利用する
CORE COMMANDSには以下の5種類があります。CORE COMMANDS gist: Create gists issue: Manage issues pr: Manage pull requests release: Manage GitHub releases repo: Create, clone, fork, and view repositories例えば、PRやissueを新規作成したい場合はそれぞれ以下のように実行します。
$ gh pr create
$ gh issue create
コマンドの実行は、フラグを指定しない場合はだいたい以下のように対話形式で進めます。
$ gh pr create
? Where should we push the 'feature/hoge' branch? JIIOryo/gh_test

Creating pull request for feature/hoge into master in JIIOryo/gh_test

? Title add HOGE
? Body <Received>
? What's next? Add metadata
? What would you like to add?  [Use arrows to move, space to select, <right> to all, <left> to none, type to filter]
  [ ]  Reviewers
> [x]  Assignees
  [ ]  Labels
  [ ]  Projects
  [ ]  Milestone
フラグを指定することでコマンド一発で実行することもできます。
$ gh issue create --title 'foo' --body 'bar' --milestone 'baz'これらのコマンドの使い方は後ほどそれぞれ説明します。
ADDITIONAL COMMANDSには以下の6種類があります。ADDITIONAL COMMANDS alias: Create command shortcuts api: Make an authenticated GitHub API request auth: Login, logout, and refresh your authentication completion: Generate shell completion scripts config: Manage configuration for gh help: Help about any command今回はとりあえず
CORE COMMANDSだけ紹介します。
随時ADDITIONAL COMMANDSも追加、更新していく予定です。困ったら
コマンドを忘れて困ったら、とりあえず
ghもしくはgh --help,gh -hを叩けば利用できるコマンドの一覧が取得できます。$ gh Work seamlessly with GitHub from the command line. USAGE gh <command> <subcommand> [flags] CORE COMMANDS gist: Create gists issue: Manage issues pr: Manage pull requests release: Manage GitHub releases repo: Create, clone, fork, and view repositories ADDITIONAL COMMANDS alias: Create command shortcuts api: Make an authenticated GitHub API request auth: Login, logout, and refresh your authentication completion: Generate shell completion scripts config: Manage configuration for gh help: Help about any command FLAGS --help Show help for command --version Show gh version EXAMPLES $ gh issue create $ gh repo clone cli/cli $ gh pr checkout 321 ENVIRONMENT VARIABLES See 'gh help environment' for the list of supported environment variables. LEARN MORE Use 'gh <command> <subcommand> --help' for more information about a command. Read the manual at https://cli.github.com/manual FEEDBACK Open an issue using 'gh issue create -R cli/cli'ちなみにコマンドによって使えるフラグが異なりますが、だいたいのコマンドで以下のフラグは使用できます。
INHERITED FLAGS
      --help              Show help for command
  -R, --repo OWNER/REPO   Select another repository using the OWNER/REPO format
$ gh repo clone -h Clone a GitHub repository locally. If the "OWNER/" portion of the "OWNER/REPO" repository argument is omitted, it defaults to the name of the authenticating user. Pass additional 'git clone' flags by listing them after '--'. USAGE gh repo clone <repository> [<directory>] [-- <gitflags>...] INHERITED FLAGS --help Show help for command LEARN MORE Use 'gh <command> <subcommand> --help' for more information about a command. Read the manual at https://cli.github.com/manual? gh repoコマンド
gh repoコマンドは、リポジトリの作成やclone、forkなどのリポジトリ関連の操作を行うことができます。
gh repo <command> [flags]で実行し、<command>には以下の4つが利用できます。clone: Clone a repository locally create: Create a new repository fork: Create a fork of a repository view: View a repository? gh repo clone
gh repo cloneは、リポジトリのcloneを行うことができます。
詳細
gh repo clone <repository> [<directory>] [-- <gitflags>...]で実行します。例
$ gh repo clone cli/cli

Cloning into 'cli'...
remote: Enumerating objects: 21, done.
remote: Counting objects: 100% (21/21), done.
remote: Compressing objects: 100% (18/18), done.
remote: Total 13758 (delta 9), reused 11 (delta 3), pack-reused 13737
Receiving objects: 100% (13758/13758), 32.50 MiB | 4.07 MiB/s, done.
Resolving deltas: 100% (9177/9177), done.
リポジトリの後ろにcloneしたいパスを指定することもできます。
$ gh repo clone cli/cli path/to/repos
Cloning into 'path/to/repos'...
remote: Enumerating objects: 21, done.
remote: Counting objects: 100% (21/21), done.
remote: Compressing objects: 100% (18/18), done.
remote: Total 13758 (delta 9), reused 11 (delta 3), pack-reused 13737
Receiving objects: 100% (13758/13758), 32.50 MiB | 3.77 MiB/s, done.
Resolving deltas: 100% (9174/9174), done.

$ ls !$
ls path/to/repos
LICENSE   README.md auth      command   docs      go.mod    internal  script    update    wix.json
Makefile  api       cmd       context   git       go.sum    pkg       test      utils
help
$ gh repo clone --help
Clone a GitHub repository locally.

If the "OWNER/" portion of the "OWNER/REPO" repository argument is omitted, it
defaults to the name of the authenticating user.

Pass additional 'git clone' flags by listing them after '--'.


USAGE
  gh repo clone <repository> [<directory>] [-- <gitflags>...]

INHERITED FLAGS
  --help   Show help for command

LEARN MORE
  Use 'gh <command> <subcommand> --help' for more information about a command.
  Read the manual at https://cli.github.com/manual
? gh repo create
gh repo createは、リポジトリの新規作成を行うことができるコマンドです。
詳細
gh repo create [<name>] [flags]で実行します。フラグ
以下のフラグが利用できます。
flags short flags long 説明 -y --confirm 確認なし -d --description リポジトリの説明を追加 --enable-issues issueを有効にするか(デフォルトtrue) --enable-wiki wikiを有効にするか(デフォルトtrue) -h --homepage ホームページURL --internal リポジトリをinternalで作成するか --private リポジトリをprivateで作成するか --private リポジトリをpublicで作成するか -t --team アクセスできるorganizationチーム -p --template テンプレートリポジトリから作成 対話形式で作成
fooというリポジトリを作ってみましょう。
以下の質問がされます。
- Visibility(publicなのかprivateなのかとか)どうする?
- currentディレクトリに作って良い?(Noを指定するとリポジトリ作らない。yesならこの時点でGitHub上に作成される)
- ローカルプロジェクトディレクトリをつくる?(Noを指定するとローカルのカレントディレクトリには作られない)
$ gh repo create foo
? Visibility Public
? This will create 'foo' in your current directory. Continue?  Yes
✓ Created repository JIIOryo/foo on GitHub
? Create a local project directory for JIIOryo/foo? Yes
Initialized empty Git repository in /path/to/repos/foo/.git/
✓ Initialized repository in './foo/'
ローカルプロジェクトディレクトリを作るを選択すると、ローカルにディレクトリを作成してgit initをしてくれてるっぽい。
https://github.com/cli/cli/blob/b2e36a0979a06b94bf364552a856c166cd415234/pkg/cmd/repo/create/create.go#L291コマンド一発で作成
例えば、
hoge-repoリポジトリを公開で説明付きで作成したい場合...$ gh repo create hoge-repo -y -d 'This is description!' --public ✓ Created repository JIIOryo/hoge-repo on GitHub Initialized empty Git repository in /path/to/repos/hoge-repo/.git/ ✓ Initialized repository in './hoge-repo/'こんな感じにリポジトリが一発で作成されました?
help
$ gh repo create --help
Create a new GitHub repository.

USAGE
  gh repo create [<name>] [flags]

FLAGS
  -y, --confirm              Confirm the submission directly
  -d, --description string   Description of repository
      --enable-issues        Enable issues in the new repository (default true)
      --enable-wiki          Enable wiki in the new repository (default true)
  -h, --homepage string      Repository home page URL
      --internal             Make the new repository internal
      --private              Make the new repository private
      --public               Make the new repository public
  -t, --team string          The name of the organization team to be granted access
  -p, --template string      Make the new repository based on a template repository

INHERITED FLAGS
  --help   Show help for command

ARGUMENTS
  A repository can be supplied as an argument in any of the following formats:
  - <OWNER/REPO>
  - by URL, e.g. "https://github.com/OWNER/REPO"

EXAMPLES
  # create a repository under your account using the current directory name
  $ gh repo create

  # create a repository with a specific name
  $ gh repo create my-project

  # create a repository in an organization
  $ gh repo create cli/my-project

LEARN MORE
  Use 'gh <command> <subcommand> --help' for more information about a command.
  Read the manual at https://cli.github.com/manual
? gh repo fork
gh repo forkコマンドは、リポジトリのforkの新規作成を行うことができます。
詳細
gh repo fork [<repository>] [flags]で実行します。フラグ
以下のフラグが利用できます。
flags short flags long 説明 --clone cloneするかどうか --remote リモートを設定するか 例
対話形式でforkしてみます。(cloneするかどうか聞かれる)
$ gh repo fork cli/cli

- Forking cli/cli...
✓ Created fork JIIOryo/cli
? Would you like to clone the fork? Yes

Cloning into 'cli'...
remote: Enumerating objects: 21, done.
remote: Counting objects: 100% (21/21), done.
remote: Compressing objects: 100% (18/18), done.
remote: Total 13758 (delta 9), reused 11 (delta 3), pack-reused 13737
Receiving objects: 100% (13758/13758), 32.50 MiB | 3.77 MiB/s, done.
Resolving deltas: 100% (9174/9174), done.
Updating upstream
From github.com:cli/cli
 * [new branch]      auth-check              -> upstream/auth-check
 * [new branch]      branch-switcher         -> upstream/branch-switcher
 * [new branch]      bulk-cmd                -> upstream/bulk-cmd
 * [new branch]      custom-commands         -> upstream/custom-commands
 * [new branch]      debians                 -> upstream/debians
 * [new branch]      default-cfg             -> upstream/default-cfg
 * [new branch]      fix-query               -> upstream/fix-query
 * [new branch]      ghe-conditional-request -> upstream/ghe-conditional-request
 * [new branch]      gist-list               -> upstream/gist-list
 * [new branch]      linux-repos             -> upstream/linux-repos
 * [new branch]      migrate-repo-clone      -> upstream/migrate-repo-clone
 * [new branch]      more-gists              -> upstream/more-gists
 * [new branch]      multi-graphql           -> upstream/multi-graphql
 * [new branch]      pager-docs              -> upstream/pager-docs
 * [new branch]      patch-review-prototype  -> upstream/patch-review-prototype
 * [new branch]      relective-pr-lookup     -> upstream/relective-pr-lookup
 * [new branch]      run-checks              -> upstream/run-checks
 * [new branch]      search-cmd              -> upstream/search-cmd
 * [new branch]      the-newlygit-game       -> upstream/the-newlygit-game
 * [new branch]      trunk                   -> upstream/trunk
 * [new branch]      ubuntus                 -> upstream/ubuntus
 * [new branch]      web-flag                -> upstream/web-flag
✓ Cloned fork

$ ls cli

LICENSE   api       command   git       internal  test      wix.json
Makefile  auth      context   go.mod    pkg       update
README.md cmd       docs      go.sum    script    utils
help
$ gh repo fork --help
Create a fork of a repository.

With no argument, creates a fork of the current repository. Otherwise, forks the specified repository.

USAGE
  gh repo fork [<repository>] [flags]

FLAGS
  --clone    Clone the fork {true|false}
  --remote   Add remote for fork {true|false}

INHERITED FLAGS
  --help   Show help for command

LEARN MORE
  Use 'gh <command> <subcommand> --help' for more information about a command.
  Read the manual at https://cli.github.com/manual
? gh repo view
gh repo viewコマンドは、リポジトリのdescriptionとREADMEを参照することができます。
詳細
gh repo view [<repository>] [flags]で実行します。フラグ
以下のフラグが利用できます。
flags short flags long 説明 -w --web ブラウザで開く 例
リポジトリを明示的に指定しなければ現在いるリポジトリのREADMEが表示されます。ちゃんとマークダウンを認識して色が付けられていてとてもみやすいです?
ただ注意点としては、あくまでGitHub上の情報を参照しているので、ローカルでREADMEを作成、変更しても、pushしないと
gh repo viewではみることができません。
-wフラグをつけることで、ブラウザを開いて参照することができます。一発でジャンプできて便利。$ gh repo view cli/cli -w Opening github.com/cli/cli in your browser.
help
$ gh repo view --help
Display the description and the README of a GitHub repository.

With no argument, the repository for the current directory is displayed.

With '--web', open the repository in a web browser instead.

USAGE
  gh repo view [<repository>] [flags]

FLAGS
  -w, --web   Open a repository in the browser

INHERITED FLAGS
  --help   Show help for command

LEARN MORE
  Use 'gh <command> <subcommand> --help' for more information about a command.
  Read the manual at https://cli.github.com/manual
? gh pr コマンド
gh prコマンドは、プルリクの作成やマージ、ステータスを確認することができます。
gh pr <command> [flags]で実行し、<command>には以下の12個が利用できます。checkout: Check out a pull request in git checks: Show CI status for a single pull request close: Close a pull request create: Create a pull request diff: View changes in a pull request list: List and filter pull requests in this repository merge: Merge a pull request ready: Mark a pull request as ready for review reopen: Reopen a pull request review: Add a review to a pull request status: Show status of relevant pull requests view: View a pull requestprコマンドでは、基本的にブランチやPR番号を指定します。
ちなみに何も指定しないとカレントブランチを指定するようです。
https://github.com/cli/cli/blob/b2e36a0979a06b94bf364552a856c166cd415234/pkg/cmd/pr/shared/lookup.go#L34-L37? gh pr create
gh pr createコマンドは、PRを作成することができるコマンドです。
詳細
gh pr create [flags]で実行します。フラグ
以下のフラグが利用できます。
flags short flags long 説明 -a --assignee assigneeを指定 -B --base マージ先ブランチ -b --body PRのbody(説明) -d --draft draftでPRを作成 -f --fill titleとbodyを入力しない。commit情報を使って埋める。 -H --head PRを作成したいブランチを指定(デフォルトでカレントブランチ) -l --label ラベルを指定 -m --milestone マイルストーンを指定 -p --project プロジェクトを指定 -r --reviewer reviewerを指定 -t --title タイトルを指定 -w --web PR作成画面をブラウザで開く 対話形式で作成
$ gh pr create
? Where should we push the 'feature/hoge' branch?  [Use arrows to move, type to filter]
> JIIOryo/foo
  Skip pushing the branch
  Cancel
タイトルを入力します。
? Title (add hoge.txt) add HOGE
eを押すとエディタが開き、PRの文章を記述できます。? Body [(e) to launch vim, enter to skip]submitするとPRが作成されます。
? What's next?  [Use arrows to move, type to filter]
> Submit
  Continue in browser
  Add metadata
  Cancel
コマンド一発で作成
$ gh pr create -t 'add FUGA' -b '# fugafuga' -m foo -l hoge -B feature/hoge -dこれで一発でこのPRができます。スゴい。
この例では
-mがマイルストーンで、-lがラベル、-Bがマージ先ブランチ、-dがドラフトPRです。
ラベルなど、複数ある場合は,でつなげる。pushしていない場合は対話形式同様pushする?って聞かれる。
? Where should we push the 'feature/foo' branch? JIIOryo/foo
help
$ gh pr create --help
Create a pull request on GitHub.

When the current branch isn't fully pushed to a git remote, a prompt will ask where
to push the branch and offer an option to fork the base repository. Use '--head' to
explicitly skip any forking or pushing behavior.

A prompt will also ask for the title and the body of the pull request. Use '--title'
and '--body' to skip this, or use '--fill' to autofill these values from git commits.


USAGE
  gh pr create [flags]

FLAGS
  -a, --assignee login   Assign people by their login
  -B, --base branch      The branch into which you want your code merged
  -b, --body string      Body for the pull request
  -d, --draft            Mark pull request as a draft
  -f, --fill             Do not prompt for title/body and just use commit info
  -H, --head branch      The branch that contains commits for your pull request (default: current branch)
  -l, --label name       Add labels by name
  -m, --milestone name   Add the pull request to a milestone by name
  -p, --project name     Add the pull request to projects by name
  -r, --reviewer login   Request reviews from people by their login
  -t, --title string     Title for the pull request
  -w, --web              Open the web browser to create a pull request

INHERITED FLAGS
      --help              Show help for command
  -R, --repo OWNER/REPO   Select another repository using the OWNER/REPO format

EXAMPLES
  $ gh pr create --title "The bug is fixed" --body "Everything works again"
  $ gh pr create --reviewer monalisa,hubot
  $ gh pr create --project "Roadmap"
  $ gh pr create --base develop --head monalisa:feature


LEARN MORE
  Use 'gh <command> <subcommand> --help' for more information about a command.
  Read the manual at https://cli.github.com/manual
? gh pr close
gh pr closeコマンドは、PRをクローズできるコマンドです。
詳細
gh pr close {<number> | <url> | <branch>} [flags]で実行します。
PRの指定方法はbranch,PR番号,urlの3種類あります。フラグ
以下のフラグが利用できます。
flags short flags long 説明 -d --delete-branch ブランチを削除する ブランチ名で指定
これが一番直感的でわかりやすいです。
$ gh pr close feature/fuga
✔ Closed pull request #5 (add FUGA)
PR番号で指定
$ gh pr close 5
✔ Closed pull request #5 (add FUGA)
URLで指定
$ gh pr close https://github.com/JIIOryo/foo/pull/5
✔ Closed pull request #5 (add FUGA)
ブランチも消す
-dオプションをつけることで、ブランチごと削除することが可能です。これは便利。$ gh pr close feature/fuga -d ✔ Closed pull request #5 (add FUGA) ✔ Deleted branch feature/fuga and switched to branch master
help
$ gh pr close --help
Close a pull request

USAGE
  gh pr close {<number> | <url> | <branch>} [flags]

FLAGS
  -d, --delete-branch   Delete the local and remote branch after close

INHERITED FLAGS
      --help              Show help for command
  -R, --repo OWNER/REPO   Select another repository using the OWNER/REPO format

LEARN MORE
  Use 'gh <command> <subcommand> --help' for more information about a command.
  Read the manual at https://cli.github.com/manual
? gh pr reopen
gh pr reopenコマンドは、クローズしたPRを再び開くができます。
詳細
gh pr reopen {<number> | <url> | <branch>} [flags]で実行する。ReopenするPRを指定方法は
branch,PR番号,urlの3種類あります。PR番号でreopen
$ gh pr reopen 5
✔ Reopened pull request #5 (add FUGA)
URLで指定
$ gh pr reopen https://github.com/JIIOryo/foo/pull/5
✔ Reopened pull request #5 (add FUGA)
ブランチ名で指定
自分の場合ブランチ名で指定してもうまくいかなかったです。
$ gh pr reopen feature/fuga
no open pull requests found for branch "feature/fuga"
help
$ gh pr reopen --help
Reopen a pull request

USAGE
  gh pr reopen {<number> | <url> | <branch>} [flags]

INHERITED FLAGS
      --help              Show help for command
  -R, --repo OWNER/REPO   Select another repository using the OWNER/REPO format

LEARN MORE
  Use 'gh <command> <subcommand> --help' for more information about a command.
  Read the manual at https://cli.github.com/manual
? gh pr list
gh pr listコマンドは、PRの一覧を表示するコマンドです。
詳細
gh pr list [flags]で実行する。フラグ
以下のフラグが利用できます。
flags short flags long 説明 -a --assignee assigneeでフィルタリング -B --base ベースブランチでフィルタリング -l --label ラベルでフィルタリング -L --limit 最大表示個数を指定(デフォルト30) -s --state 状態を指定 open,closed,merged,allが指定可能 (デフォルトopen)-w --web ブラウザでPR一覧のページを開く 例
$ gh pr list

Showing 4 of 4 open pull requests in JIIOryo/foo

#13  add fugahoge  feature/fugahoge
#9   add hogefuga  feature/hogefuga
#6   add FOO       feature/foo
#1   add HOGE      feature/hoge
$ gh pr list -B master -l hoge -L 3 Showing 1 of 1 pull request in JIIOryo/foo that matches your search #1 add HOGE feature/hoge
help
$ gh pr list --help
List and filter pull requests in this repository

USAGE
  gh pr list [flags]

FLAGS
  -a, --assignee string   Filter by assignee
  -B, --base string       Filter by base branch
  -l, --label strings     Filter by labels
  -L, --limit int         Maximum number of items to fetch (default 30)
  -s, --state string      Filter by state: {open|closed|merged|all} (default "open")
  -w, --web               Open the browser to list the pull requests

INHERITED FLAGS
      --help              Show help for command
  -R, --repo OWNER/REPO   Select another repository using the OWNER/REPO format

EXAMPLES
  $ gh pr list --limit 999
  $ gh pr list --state closed
  $ gh pr list --label "priority 1" --label "bug"
  $ gh pr list --web


LEARN MORE
  Use 'gh <command> <subcommand> --help' for more information about a command.
  Read the manual at https://cli.github.com/manual
? gh pr diff
gh pr diffコマンドは、PRのdiffを確認することができるコマンドです。
詳細
gh pr diff [<number> | <url> | <branch>] [flags]で実行する。フラグ
以下のフラグが利用できます。
flags short flags long 説明 --color 色。 always,never,autoのうちいずれかを選択。(デフォルトauto)例
diffに関してはブラウザの方がわかりやすいので、これで
-wフラグが利用できたら便利なんですけどね。
help
$ gh pr diff --help
View changes in a pull request

USAGE
  gh pr diff [<number> | <url> | <branch>] [flags]

FLAGS
  --color string   Use color in diff output: {always|never|auto} (default "auto")

INHERITED FLAGS
      --help              Show help for command
  -R, --repo OWNER/REPO   Select another repository using the OWNER/REPO format

LEARN MORE
  Use 'gh <command> <subcommand> --help' for more information about a command.
  Read the manual at https://cli.github.com/manual
? gh pr merge
gh pr mergeコマンドは、PRをマージすることができます。
詳細
gh pr merge [<number> | <url> | <branch>] [flags]で実行する。フラグ
以下のフラグが利用できます。
flags short flags long 説明 -d --delete-branch ブランチを削除するか(デフォルト true) -m --merge マージコミットを作成 -r --rebase リベース -s --squash スカッシュマージ 対話形式で試す
mergeは、マージコミットを作成、リベース、スカッシュマージの3種類が利用できます。
$ gh pr merge
? What merge method would you like to use?  [Use arrows to move, type to filter]
> Create a merge commit
  Rebase and merge
  Squash and merge
ブランチを削除するか聞かれます。
? Delete the branch locally and on GitHub? (Y/n)Done
✔ Merged pull request #7 (add baz)
✔ Deleted branch feature/baz and switched to branch master
コマンド一発でマージする
$ gh pr merge --squash feature/piyo
✔ Squashed and merged pull request #8 (add piyo)
✔ Deleted branch feature/piyo and switched to branch master
help
$ gh pr merge --help
Merge a pull request on GitHub.

By default, the head branch of the pull request will get deleted on both remote and local repositories.
To retain the branch, use '--delete-branch=false'.


USAGE
  gh pr merge [<number> | <url> | <branch>] [flags]

FLAGS
  -d, --delete-branch   Delete the local and remote branch after merge (default true)
  -m, --merge           Merge the commits with the base branch
  -r, --rebase          Rebase the commits onto the base branch
  -s, --squash          Squash the commits into one commit and merge it into the base branch

INHERITED FLAGS
      --help              Show help for command
  -R, --repo OWNER/REPO   Select another repository using the OWNER/REPO format

LEARN MORE
  Use 'gh <command> <subcommand> --help' for more information about a command.
  Read the manual at https://cli.github.com/manual
? gh pr ready
gh pr readyコマンドは、draftPRをreview可能状態に変更するコマンドです。
詳細
gh pr ready [<number> | <url> | <branch>] [flags]で実行する。例
最初はドラフト状態(グレーの状態)です。
gh pr readyしてみます。
ReopenするPRを指定方法はbranch,PR番号,urlの3種類あります。
指定しない場合はカレントブランチを指定したことになります。
PRのstatusがレビュー可能状態(緑)に変わりました。
help
$ gh pr ready --help
Mark a pull request as ready for review

USAGE
  gh pr ready [<number> | <url> | <branch>] [flags]

INHERITED FLAGS
      --help              Show help for command
  -R, --repo OWNER/REPO   Select another repository using the OWNER/REPO format

LEARN MORE
  Use 'gh <command> <subcommand> --help' for more information about a command.
  Read the manual at https://cli.github.com/manual
? gh pr status
gh pr statusコマンドは、PRのステータスを確認することができるコマンドです。
詳細
gh pr status [flags]で実行します。例
draftはグレー、レビュー可能は緑色、Closedは赤に表示されました。
help
$ gh pr status --help
Show status of relevant pull requests

USAGE
  gh pr status [flags]

INHERITED FLAGS
      --help              Show help for command
  -R, --repo OWNER/REPO   Select another repository using the OWNER/REPO format

LEARN MORE
  Use 'gh <command> <subcommand> --help' for more information about a command.
  Read the manual at https://cli.github.com/manual
? gh pr review
gh pr reviewコマンドは、レビューをすることができるコマンドです。
詳細
gh pr review [<number> | <url> | <branch>] [flags]で実行します。PRの指定方法は
branch,PR番号,urlの3種類あります。フラグ
以下のフラグが利用できます。
flags short flags long 説明 -a --approve PRをapproveする -b --body レビューのメッセージを指定 -c --comment PRのコメント (-bが必要) -r --request-changes 変更依頼 対話形式でレビューする
coment,approve,request changesの3つから選ぶことができます。コメントしてみましょう。$ gh pr review feature/foo ? What kind of review do you want to give? [Use arrows to move, type to filter] > Comment Approve Request changes
eを押すとエディタが開いてコメントを書くことができます。? Review body [(e) to launch vim]確認があるので、submitしましょう。
? Review body <Received>
Got:

  hoge

? Submit? (Y/n)
無事にレビューできました。
? Submit? Yes
- Reviewed pull request #6
対話形式でapproveする
approveを選択します。
$ gh pr review feature/foo
? What kind of review do you want to give?  [Use arrows to move, type to filter]
  Comment
> Approve
  Request changes
eを押すとエディタが開いてコメントを書くことができます。? Review body [(e) to launch vim, enter to skip]Approveのときのメッセージが確認できます。Submitしましょう。
? Review body <Received>
Got:

  LGTM?

? Submit? (Y/n)
コマンド一発でレビューする
-cはコメント、-aでapproveすることができます。
これらのメッセージは-bで指定します。$ gh pr review feature/foo -c -b 'hoge' - Reviewed pull request #6
help
$ gh pr review --help
Add a review to a pull request.

Without an argument, the pull request that belongs to the current branch is reviewed.


USAGE
  gh pr review [<number> | <url> | <branch>] [flags]

FLAGS
  -a, --approve           Approve pull request
  -b, --body string       Specify the body of a review
  -c, --comment           Comment on a pull request
  -r, --request-changes   Request changes on a pull request

INHERITED FLAGS
      --help              Show help for command
  -R, --repo OWNER/REPO   Select another repository using the OWNER/REPO format

EXAMPLES
  # approve the pull request of the current branch
  $ gh pr review --approve

  # leave a review comment for the current branch
  $ gh pr review --comment -b "interesting"

  # add a review for a specific pull request
  $ gh pr review 123

  # request changes on a specific pull request
  $ gh pr review 123 -r -b "needs more ASCII art"

LEARN MORE
  Use 'gh <command> <subcommand> --help' for more information about a command.
  Read the manual at https://cli.github.com/manual
? gh pr checks
gh pr checksコマンドは、CIのステータスを取得できるコマンドです。
詳細
gh pr checks [flags]で実行します。例
$ gh pr checks
All checks were successful
0 failing, 1 successful, and 0 pending checks

✓  ci/circleci: run    https://circleci.com/gh/JIIOryo/foo/2...
help
$ gh pr checks --help
Show CI status for a single pull request

USAGE
  gh pr checks [flags]

INHERITED FLAGS
      --help              Show help for command
  -R, --repo OWNER/REPO   Select another repository using the OWNER/REPO format

LEARN MORE
  Use 'gh <command> <subcommand> --help' for more information about a command.
  Read the manual at https://cli.github.com/manual
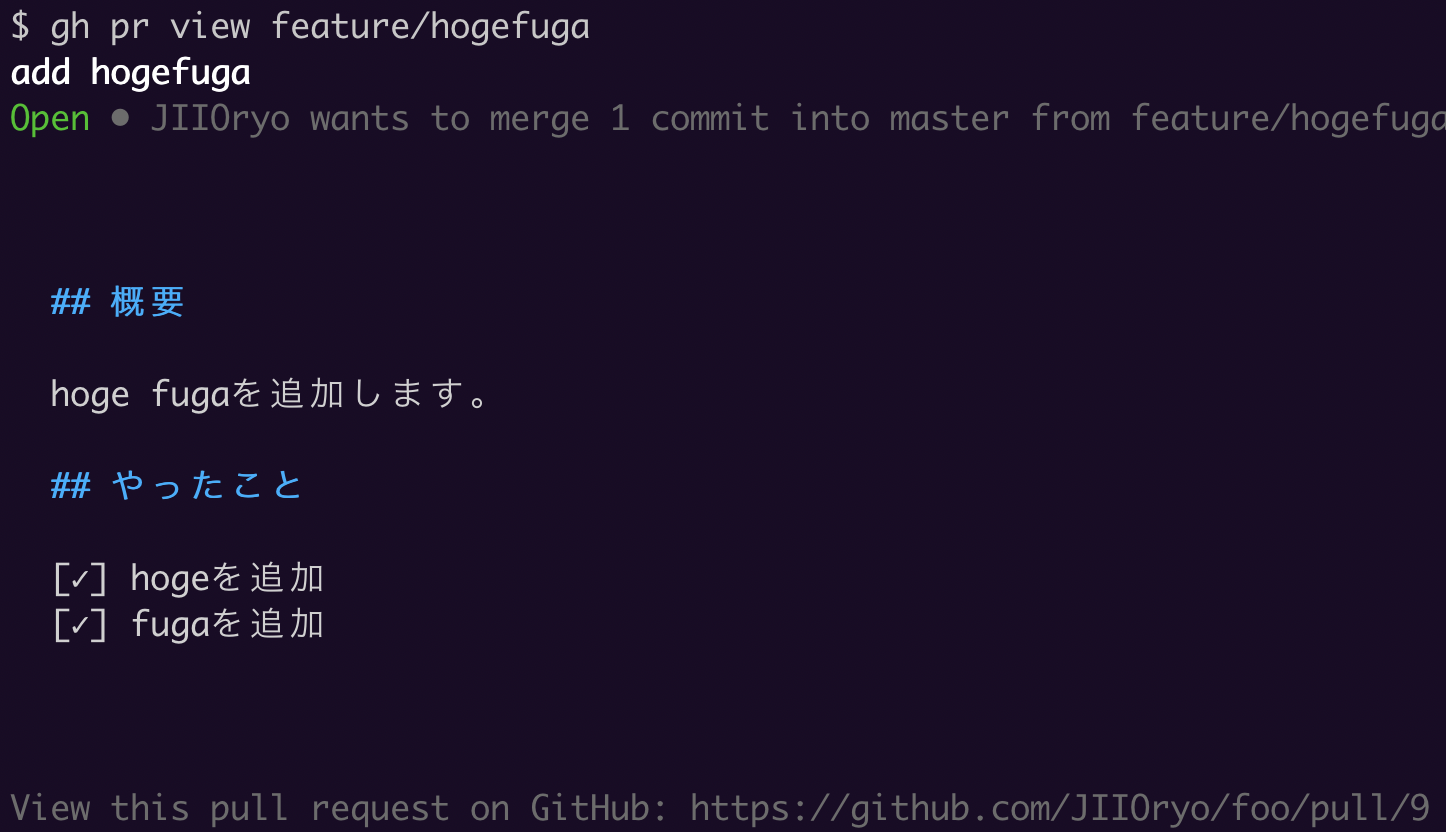
? gh pr view
gh pr viewコマンドは、PRのタイトルやbodyの内容などの情報を表示するコマンドです。
詳細
gh pr view [<number> | <url> | <branch>] [flags]で実行します。
PRの指定方法はbranch,PR番号,urlの3種類あります。フラグ
以下のフラグが利用できます。
flags short flags long 説明 -w --web ブラウザで開く 例
今回はブランチ名から指定します。
$ gh pr view feature/hogefuga
ブラウザで開く
カレントブランチ(指定なし)のPRをブラウザで開きたいときは
-wフラグを利用します。$ gh pr view -w Opening github.com/JIIOryo/foo/pull/9 in your browser. (ブラウザが開く)これは便利。使えそう。
help
$ gh pr view --help
Display the title, body, and other information about a pull request.

Without an argument, the pull request that belongs to the current branch
is displayed.

With '--web', open the pull request in a web browser instead.


USAGE
  gh pr view [<number> | <url> | <branch>] [flags]

FLAGS
  -w, --web   Open a pull request in the browser

INHERITED FLAGS
      --help              Show help for command
  -R, --repo OWNER/REPO   Select another repository using the OWNER/REPO format

LEARN MORE
  Use 'gh <command> <subcommand> --help' for more information about a command.
  Read the manual at https://cli.github.com/manual
? gh pr checkout
gh pr checkoutコマンドは、指定したPR(ブランチ)にcheckoutするコマンドです。
詳細
gh pr checkout {<number> | <url> | <branch>} [flags]で実行します。フラグ
以下のフラグが利用できます。
flags short flags long 説明 --recurse-submodules 再帰的に全てのアクティブなサブモジュールを更新する 例
$ gh pr checkout feature/hogefuga
Switched to branch 'feature/hogefuga'
Already up to date.
ちなみに実装を見ると、ローカルにブランチがある場合、
fetchcheckoutmergeを行い、そうでない場合はcheckout -bで新しいブランチを作成してくれているようですね。
https://github.com/cli/cli/blob/b2e36a0979a06b94bf364552a856c166cd415234/pkg/cmd/pr/checkout/checkout.go#L118-L133
help
$ gh pr checkout --help
Check out a pull request in git

USAGE
  gh pr checkout {<number> | <url> | <branch>} [flags]

FLAGS
  --recurse-submodules   Update all active submodules (recursively)

INHERITED FLAGS
      --help              Show help for command
  -R, --repo OWNER/REPO   Select another repository using the OWNER/REPO format

LEARN MORE
  Use 'gh <command> <subcommand> --help' for more information about a command.
  Read the manual at https://cli.github.com/manual
? gh issue コマンド
gh issueコマンドは、issueの作成や閲覧することができます。
gh issue <command> [flags]で実行し、<command>には以下の6個が利用できます。close: Close issue create: Create a new issue list: List and filter issues in this repository reopen: Reopen issue status: Show status of relevant issues view: View an issue? gh issue create
gh issue createコマンドは、issueを作成することができるコマンドです。
詳細
gh issue create [flags]で実行する。フラグ
以下のフラグが利用できます。
flags short flags long 説明 -a --assignee assigneeを指定 -b --body bodyを指定 -l --label ラベルを指定 -m --milestone マイルストーンを指定 -p --project プロジェクトを指定 -t --title タイトルを指定 -w --web ブラウザで開く 対話形式でissueを作成
まずはタイトルを指定します。
$ gh issue create

Creating issue in JIIOryo/foo

? Title hoge bug ?
eを押すことで、エディタが開きます。? Body [(e) to launch vim, enter to skip]入力が完了。
? Body <Received>
? What's next?  [Use arrows to move, type to filter]
> Submit
  Continue in browser
  Add metadata
  Cancel
Add metadataで、assigneeやlabelを指定することができます。移動は上下ボタン、選択はスペースキーです。確定はEnter。? What would you like to add? [Use arrows to move, space to select, <right> to all, <left> to none, type to filter] [ ] Assignees > [x] Labels [ ] Projects [ ] MilestoneLabelを選択すると、以下のようにラベル一覧が表示されます。同様に移動は上下ボタン、選択はスペースキーです。確定はEnter。
? Labels  [Use arrows to move, space to select, <right> to all, <left> to none, type to filter]
  [x]  bug
  [ ]  documentation
  [ ]  duplicate
> [ ]  enhancement
  [x]  fuga
  [ ]  good first issue
  [ ]  help wanted
Submitしましょう。
? What's next? [Use arrows to move, type to filter] > Submit Cancelhttps://github.com/JIIOryo/foo/issues/11issueができたみたいなので、みてみます。
コマンドで一発でissueを作成する。
-tでタイトル、-bでbody、-lでラベル、-mでマイルストーンを選択してみました。$ gh issue create -t 'fuga bug ?' -b 'fugafuga' -l hoge,fuga -m foo Creating issue in JIIOryo/foo https://github.com/JIIOryo/foo/issues/12ちなみに、
-wオプションをつけるとissueを作成する画面がブラウザで開きます。
help
$ gh issue create --help
Create a new issue

USAGE
  gh issue create [flags]

FLAGS
  -a, --assignee login   Assign people by their login
  -b, --body string      Supply a body. Will prompt for one otherwise.
  -l, --label name       Add labels by name
  -m, --milestone name   Add the issue to a milestone by name
  -p, --project name     Add the issue to projects by name
  -t, --title string     Supply a title. Will prompt for one otherwise.
  -w, --web              Open the browser to create an issue

INHERITED FLAGS
      --help              Show help for command
  -R, --repo OWNER/REPO   Select another repository using the OWNER/REPO format

EXAMPLES
  $ gh issue create --title "I found a bug" --body "Nothing works"
  $ gh issue create --label "bug,help wanted"
  $ gh issue create --label bug --label "help wanted"
  $ gh issue create --assignee monalisa,hubot
  $ gh issue create --project "Roadmap"

LEARN MORE
  Use 'gh <command> <subcommand> --help' for more information about a command.
  Read the manual at https://cli.github.com/manual
? gh issue list
gh issue listコマンドは、issueの一覧を表示することができます。
詳細
gh issue list [flags]で実行する。フラグ
以下のフラグが利用できます。
flags short flags long 説明 -a --assignee assigneeでフィルタリング -A --author authorでフィルタリング -l --label ラベルでフィルタリング -L --limit issueの最大表示件数を指定 (デフォルト30件) -m --milestone マイルストーンをでフィルタリング --mention メンションでフィルタリング -p --project プロジェクトを指定 -s --state 状態でフィルタリング open,closed,allが指定できます。(デフォルトopen)-w --web ブラウザで開く 例
$ gh issue list

Showing 2 of 2 open issues in JIIOryo/foo

#12  fuga bug ?  (fuga, hoge)       about 5 minutes ago
#11  hoge bug ?  (bug, fuga, hoge)  about 9 minutes ago
フラグを付けて検索してみます。
$ gh issue list -l hoge,fuga -L 1 -s all

Showing 1 of 2 issues in JIIOryo/foo that match your search

#12  fuga bug ?  (fuga, hoge)  about 10 minutes ago
help
$ gh issue list --help
List and filter issues in this repository

USAGE
  gh issue list [flags]

FLAGS
  -a, --assignee string    Filter by assignee
  -A, --author string      Filter by author
  -l, --label strings      Filter by labels
  -L, --limit int          Maximum number of issues to fetch (default 30)
      --mention string     Filter by mention
  -m, --milestone number   Filter by milestone number or `title`
  -s, --state string       Filter by state: {open|closed|all} (default "open")
  -w, --web                Open the browser to list the issue(s)

INHERITED FLAGS
      --help              Show help for command
  -R, --repo OWNER/REPO   Select another repository using the OWNER/REPO format

EXAMPLES
  $ gh issue list -l "help wanted"
  $ gh issue list -A monalisa
  $ gh issue list --web
  $ gh issue list --milestone 'MVP'

LEARN MORE
  Use 'gh <command> <subcommand> --help' for more information about a command.
  Read the manual at https://cli.github.com/manual
? gh issue status
gh issue statusコマンドは、issueのステータスを表示するコマンドです。
詳細
gh issue status [flags]で実行する。
自分がアサインされたissue, メンションされたissue, 自分が作成したissueを確認することができます。例
$ gh issue status

Relevant issues in JIIOryo/foo

Issues assigned to you
  #12  fuga bug ?  (fuga, hoge)  less than a minute ago

Issues mentioning you
  #12  fuga bug ?  (fuga, hoge)  less than a minute ago

Issues opened by you
  #12  fuga bug ?  (fuga, hoge)       less than a minute ago
  #11  hoge bug ?  (bug, fuga, hoge)  about 3 hours ago
help
$ gh issue status --help
Show status of relevant issues

USAGE
  gh issue status [flags]

INHERITED FLAGS
      --help              Show help for command
  -R, --repo OWNER/REPO   Select another repository using the OWNER/REPO format

LEARN MORE
  Use 'gh <command> <subcommand> --help' for more information about a command.
  Read the manual at https://cli.github.com/manual
? gh issue close
gh issue closeコマンドは、issueをcloseすることができるコマンドです。
詳細
gh issue close {<number> | <url>} [flags]で実行する。
issueを選択する方法は、issue番号,issueのURLの2つがあります。例
$ gh issue close 12
✔ Closed issue #12 (fuga bug ?)
$ gh issue close https://github.com/JIIOryo/foo/issues/12 ✔ Closed issue #12 (fuga bug ?)
help
$ gh issue close --help
Close issue

USAGE
  gh issue close {<number> | <url>} [flags]

INHERITED FLAGS
      --help              Show help for command
  -R, --repo OWNER/REPO   Select another repository using the OWNER/REPO format

LEARN MORE
  Use 'gh <command> <subcommand> --help' for more information about a command.
  Read the manual at https://cli.github.com/manual
? gh issue reopen
gh issue reopenコマンドは、closeしたissueを再び開くコマンドです。
詳細
gh issue reopen {<number> | <url>} [flags]で実行します。
issueを選択する方法は、issue番号,issueのURLの2つがあります。$ gh issue reopen 12 ✔ Reopened issue #12 (fuga bug ?)$ gh issue reopen https://github.com/JIIOryo/foo/issues/12 ✔ Reopened issue #12 (fuga bug ?)
help
$ gh issue reopen --help
Reopen issue

USAGE
  gh issue reopen {<number> | <url>} [flags]

INHERITED FLAGS
      --help              Show help for command
  -R, --repo OWNER/REPO   Select another repository using the OWNER/REPO format

LEARN MORE
  Use 'gh <command> <subcommand> --help' for more information about a command.
  Read the manual at https://cli.github.com/manual
? gh issue view
gh issue viewコマンドは、issueを閲覧することができるコマンドです。
詳細
gh issue view {<number> | <url>} [flags]で実行する。
issueを選択する方法は、issue番号,issueのURLの2つがあります。フラグ
以下のフラグが利用できます。
flags short flags long 説明 -w --web ブラウザで開く 例
$ gh issue view 11$ gh issue view https://github.com/JIIOryo/foo/issues/11
markdownがしっかり認識されて色付けされていてみやすいですが、ブラウザでしっかり確認したい場合もあります。
そのような場合は
-wオプションを利用します。$ gh issue view 11 -w Opening github.com/JIIOryo/foo/issues/11 in your browser.
help
$ gh issue view --help
Display the title, body, and other information about an issue.

With '--web', open the issue in a web browser instead.


USAGE
  gh issue view {<number> | <url>} [flags]

FLAGS
  -w, --web   Open an issue in the browser

INHERITED FLAGS
      --help              Show help for command
  -R, --repo OWNER/REPO   Select another repository using the OWNER/REPO format

LEARN MORE
  Use 'gh <command> <subcommand> --help' for more information about a command.
  Read the manual at https://cli.github.com/manual
? gh release コマンド
gh releaseコマンドは、releaseの作成や削除ができるコマンドです。
gh release <command> [flags]で実行し、<command>には以下の6個が利用できます。create: Create a new release delete: Delete a release download: Download release assets list: List releases in a repository upload: Upload assets to a release view: View information about a release? gh release create
gh release createコマンドは、releaseを作成することができるコマンドです。
詳細
gh release create <tag> [<files>...] [flags]で実行する。フラグ
以下のフラグが利用できます。
flags short flags long 説明 -d --draft ドラフトのリリースを作成 -n --notes Release notesを作成 -F --notes-file Release notesをファイルから指定して作成 -p --prerelease prerelease(不安定なバージョン)であることを知らせます。 -t --title リリースのタイトルを指定します。 対話形式でreleaseを作成
releaseを対話形式で作成してみます。まずはタイトルを入力。
$ gh release create v0.0.1
? Title (optional) hoge
Release noteを書くか選択します。
今回はWrite my ownを選択します。? Release notes [Use arrows to move, type to filter] > Write my own Leave blankprereleaseかどうか聞かれます。今回はyにします。
? Is this a prerelease? (y/N)releaseをpublishするか、draftとして保存するかなどを選択できます。
今回はpublishします。? Submit? [Use arrows to move, type to filter] > Publish release Save as draft Cancel以上で完了です。
出力されたURLを開いてみると、v0.0.1のタグでリリースを作成することができました。
help
$ gh release create --help
Create a new GitHub Release for a repository.

A list of asset files may be given to upload to the new release. To define a
display label for an asset, append text starting with '#' after the file name.


USAGE
  gh release create <tag> [<files>...] [flags]

FLAGS
  -d, --draft             Save the release as a draft instead of publishing it
  -n, --notes string      Release notes
  -F, --notes-file file   Read release notes from file
  -p, --prerelease        Mark the release as a prerelease
      --target branch     Target branch or commit SHA (default: main branch)
  -t, --title string      Release title

INHERITED FLAGS
      --help              Show help for command
  -R, --repo OWNER/REPO   Select another repository using the OWNER/REPO format

EXAMPLES
  # use release notes from a file
  $ gh release create v1.2.3 -F changelog.md

  # upload a release asset with a display label
  $ gh release create v1.2.3 '/path/to/asset.zip#My display label'

LEARN MORE
  Use 'gh <command> <subcommand> --help' for more information about a command.
  Read the manual at https://cli.github.com/manual
? gh release list
gh release listコマンドは、リリース一覧を表示するコマンドです。
詳細
gh release list [flags]で実行します。フラグ
以下のフラグが利用できます。
flags short flags long 説明 -L --limit 一度に取得する上限数(デフォルト30) 例
以下で実行してみます。
$ gh release listこのように、releaseの一覧が取得できました。
help
$ gh release list --help
List releases in a repository

USAGE
  gh release list [flags]

FLAGS
  -L, --limit int   Maximum number of items to fetch (default 30)

INHERITED FLAGS
      --help              Show help for command
  -R, --repo OWNER/REPO   Select another repository using the OWNER/REPO format

LEARN MORE
  Use 'gh <command> <subcommand> --help' for more information about a command.
  Read the manual at https://cli.github.com/manual
? gh release upload
gh release uploadコマンドは、releaseのassetsをアップロードすることができるコマンドです。
詳細
gh release upload <tag> <files>... [flags]で実行します。フラグ
以下のフラグが利用できます。
flags short flags long 説明 --clobber 同名のassetsを上書きするか 例
試しに、v0.4.0に
foo.txt,bar.txtを追加してみましょう。$ gh release upload v0.4.0 foo.txt bar.txt Successfully uploaded 2 assets to v0.4.0
ちなみに、同じ名前のassetsがすでにuploadされている場合は怒られます。
$ gh release upload v0.4.0 foo.txt
asset under the same name already exists: [foo.txt]
--clobberフラグを付ければ上書きできます。$ gh release upload v0.4.0 foo.txt --clobber Successfully uploaded 1 asset to v0.4.0
help
$ gh release upload --help
Upload asset files to a GitHub Release.

To define a display label for an asset, append text starting with '#' after the
file name.


USAGE
  gh release upload <tag> <files>... [flags]

FLAGS
  --clobber   Overwrite existing assets of the same name

INHERITED FLAGS
      --help              Show help for command
  -R, --repo OWNER/REPO   Select another repository using the OWNER/REPO format

LEARN MORE
  Use 'gh <command> <subcommand> --help' for more information about a command.
  Read the manual at https://cli.github.com/manual
? gh release download
gh release downloadコマンドは、releaseのassetsをダウンロードすることができるコマンドです。
詳細
gh release download [<tag>] [flags]で実行します。フラグ
以下のフラグが利用できます。
flags short flags long 説明 -D --dir ダウンロードする先のディレクトリ(デフォルトで .)-p --pattern 特定のglobパターンにマッチするassetsをダウンロード 例
ダウンロード先はデフォルトでカレントディレクトリです。
$ gh release download v0.4.0
-Dフラグでダウンロード先の指定、-pフラグでglobのパターンを指定することができます。$ gh release download v0.4.0 -D ~/Desktop/ -p '*.txt'
help
$ gh release download --help
Download assets from a GitHub release.

Without an explicit tag name argument, assets are downloaded from the
latest release in the project. In this case, '--pattern' is required.


USAGE
  gh release download [<tag>] [flags]

FLAGS
  -D, --dir string            The directory to download files into (default ".")
  -p, --pattern stringArray   Download only assets that match a glob pattern

INHERITED FLAGS
      --help              Show help for command
  -R, --repo OWNER/REPO   Select another repository using the OWNER/REPO format

EXAMPLES
  # download all assets from a specific release
  $ gh release download v1.2.3

  # download only Debian packages for the latest release
  $ gh release download --pattern '*.deb'

  # specify multiple file patterns
  $ gh release download -p '*.deb' -p '*.rpm'

LEARN MORE
  Use 'gh <command> <subcommand> --help' for more information about a command.
  Read the manual at https://cli.github.com/manual
? gh release delete
gh release deleteコマンドは、releaseを削除することができるコマンドです。
詳細
gh release delete <tag> [flags]で実行します。フラグ
以下のフラグが利用できます。
flags short flags long 説明 -y --yes 削除の確認をスキップ 例
例えば、現在以下のようなreleaseがあり、
v0.0.2のリリースを削除してみます。$ gh release list foo Latest (v0.4.0) about 16 minutes ago foo (v0.3.0) about 26 minutes ago add fuga Draft (v0.0.2) about 46 minutes ago foo Pre-release (v0.2.0) about 34 minutes ago fuga (v0.1.0) about 37 minutes ago hoge Pre-release (v0.0.1) about 50 minutes agoリリースを削除してもいいか質問されるのでyを選択。
$ gh release delete v0.0.2
? Delete release v0.0.2 in JIIOryo/foo? (Y/n) y
✓ Deleted release v0.0.2
ちなみに、
-yオプションを選択することで確認なしで削除できる。$ gh release delete v0.0.2 -y
help
$ gh release delete --help
Delete a release

USAGE
  gh release delete <tag> [flags]

FLAGS
  -y, --yes   Skip the confirmation prompt

INHERITED FLAGS
      --help              Show help for command
  -R, --repo OWNER/REPO   Select another repository using the OWNER/REPO format

LEARN MORE
  Use 'gh <command> <subcommand> --help' for more information about a command.
  Read the manual at https://cli.github.com/manual
? gh release view
gh release viewコマンドは、releaseの情報を閲覧することができるコマンドです。
詳細
gh release view [<tag>] [flags]で実行する。フラグ
以下のフラグが利用できます。
flags short flags long 説明 -w --web ブラウザで開く 例
少しターミナルではみづらいと言う場合は、
-wフラグを付けてブラウザで開くと良いでしょう。$ gh release view v0.4.0 -w
help
$ gh release view --help
View information about a GitHub Release.

Without an explicit tag name argument, the latest release in the project
is shown.


USAGE
  gh release view [<tag>] [flags]

FLAGS
  -w, --web   Open the release in the browser

INHERITED FLAGS
      --help              Show help for command
  -R, --repo OWNER/REPO   Select another repository using the OWNER/REPO format

LEARN MORE
  Use 'gh <command> <subcommand> --help' for more information about a command.
  Read the manual at https://cli.github.com/manual
? gh gist コマンド
gh gistコマンドは、gistの作成や削除などができるコマンドです。
gh gist <command> [flags]で実行し、<command>には以下の4個が利用できます。create: Create a new gist edit: Edit one of your gists list: List your gists view: View a gist? gh gist create
gh gist createコマンドは、gistを新規作成することができるコマンドです。
詳細
gh gist create [<filename>... | -] [flags]で実行する。フラグ
以下のフラグが利用できます。
flags short flags long 説明 -d --desc gistの説明を指定 -f --filename ファイル名を指定 (標準入力から指定する場合) -p --public gistを公開する (デフォルトprivate) 例
このようにファイル名を指定する方法を一番使うかと思います。
$ gh gist create hogefuga.txt
- Creating gist hogefuga.txt
✓ Created gist hogefuga.txt
https://gist.github.com/d09d42c7ef0643c432129f7085ffde9d
標準入力から内容を指定する場合、
--filenameでファイル名を指定することができる。$ echo hogehoge | gh gist create --filename hoge.txt - Creating gist hoge.txt ✓ Created gist hoge.txtもしくは、
-を利用する。書き終わったらCtrl+Dで抜けることができる。$ gh gist create - --filename hoge.js const hoge = 'hoge'; console.log(hoge); - Creating gist hoge.js ✓ Created gist hoge.js
help
$ gh gist create --help
Create a new GitHub gist with given contents.

Gists can be created from one or multiple files. Alternatively, pass "-" as
file name to read from standard input.

By default, gists are private; use '--public' to make publicly listed ones.


USAGE
  gh gist create [<filename>... | -] [flags]

FLAGS
  -d, --desc string       A description for this gist
  -f, --filename string   Provide a filename to be used when reading from STDIN
  -p, --public            List the gist publicly (default: private)

INHERITED FLAGS
  --help   Show help for command

EXAMPLES
  # publish file 'hello.py' as a public gist
  $ gh gist create --public hello.py

  # create a gist with a description
  $ gh gist create hello.py -d "my Hello-World program in Python"

  # create a gist containing several files
  $ gh gist create hello.py world.py cool.txt

  # read from standard input to create a gist
  $ gh gist create -

  # create a gist from output piped from another command
  $ cat cool.txt | gh gist create

LEARN MORE
  Use 'gh <command> <subcommand> --help' for more information about a command.
  Read the manual at https://cli.github.com/manual
? gh gist list
gh gist listコマンドは、gistの一覧を取得できるコマンドです。
詳細
gh gist list [flags]で実行する。フラグ
以下のフラグが利用できます。
flags short flags long 説明 -L --limit 表示最大件数を指定する(デフォルト 10) --public publicのgistを表示する --secret secretのgistを表示する 例
$ gh gist list
f6b19a5e7516b0bbadcba6e3b8732e62  hoge.js       1 file  secret  about 12 min...
08b23d0bc86a40cc74a7b2249259c7f8                1 file  secret  about 13 min...
1a564f0f1c176a7de2fff7738adc187c                1 file  secret  about 15 min...
c722167d04f9aa8528255f7db0f84e7f  hoge.txt      1 file  secret  about 17 min...
d09d42c7ef0643c432129f7085ffde9d  hogefuga.txt  1 file  secret  about 23 min...
8170566345795f3d330cef2fff57609e  hoge.txt      1 file  secret  about 19 hou...
help
$ gh gist list --help
List your gists

USAGE
  gh gist list [flags]

FLAGS
  -L, --limit int   Maximum number of gists to fetch (default 10)
      --public      Show only public gists
      --secret      Show only secret gists

INHERITED FLAGS
  --help   Show help for command

LEARN MORE
  Use 'gh <command> <subcommand> --help' for more information about a command.
  Read the manual at https://cli.github.com/manual
? gh gist edit
gh gist editコマンドは、自分のgistを編集することができるコマンドです。
詳細
gh gist edit {<gist ID> | <gist URL>} [flags]で実行する。
あらかじめgh gist listなどでIDを調べる必要があります。もしくはgistのURLでも指定することができます。フラグ
以下のフラグが利用できます。
flags short flags long 説明 -f --filename ファイル名 例
以下を実行すると、エディタが開いて編集することができます。
$ gh gist edit f6b19a5e7516b0bbadcba6e3b8732e62複数ファイルから構成されるgistの場合は、editするファイルを選択します。
$ gh gist edit d7f1cc09968c1064f42dfb92181ee983
? Edit which file?  [Use arrows to move, type to filter]
> bar.txt
  hogefuga.js
  hogefuga.txt
他のファイルも編集する場合は
Edit another fileを選択します。終了したらSubmitする。? What next? [Use arrows to move, type to filter] > Edit another file Submit Cancelちなみに
--filenameフラグを利用して特定のファイルを指定することができます。$ gh gist edit d7f1cc09968c1064f42dfb92181ee983 --filename hogefuga.txt
help
$ gh gist edit --help
Edit one of your gists

USAGE
  gh gist edit {<gist ID> | <gist URL>} [flags]

FLAGS
  -f, --filename string   a specific file to edit

INHERITED FLAGS
  --help   Show help for command

LEARN MORE
  Use 'gh <command> <subcommand> --help' for more information about a command.
  Read the manual at https://cli.github.com/manual
? gh gist view
gh gist viewコマンドは、gistを閲覧するコマンドです。
詳細
gh gist view {<gist id> | <gist url>} [flags]で実行する。
あらかじめgh gist listなどでIDを調べる必要があります。もしくはgistのURLでも指定することができます。フラグ
以下のフラグが利用できます。
flags short flags long 説明 -f --filename ファイル名を指定 -r --raw markdownをレンダリングしない -w --web ブラウザで開く 例
これは、複数のファイルから構成されているケースです。
$ gh gist view d7f1cc09968c1064f42dfb92181ee983
bar.txt

bar


hogefuga.js

const hoge = 'hoge';
const fuga = 'fuga';
console.log(hoge, fuga);


hogefuga.txt

foo
bar
baz
指定したgistが複数のファイルから構成されている場合は特定のファイルのみを指定することもできます。
$ gh gist view d7f1cc09968c1064f42dfb92181ee983 --filename hogefuga.js
const hoge = 'hoge';
const fuga = 'fuga';
console.log(hoge, fuga);
help
$ gh gist view --help
View a gist

USAGE
  gh gist view {<gist id> | <gist url>} [flags]

FLAGS
  -f, --filename string   display a single file of the gist
  -r, --raw               do not try and render markdown
  -w, --web               open gist in browser

INHERITED FLAGS
  --help   Show help for command

LEARN MORE
  Use 'gh <command> <subcommand> --help' for more information about a command.
  Read the manual at https://cli.github.com/manual
最後に
GitHub CLIコマンドいかがだったでしょうか。
個人的には、さすがにPRのレビューなどをターミナル完結で行うのは厳しそうなので、どれも(issueやPRなど)listで一覧をみて探す→-wでブラウザで開くってのが使いやすそうだと思いました。
まだ紹介していないその他コマンドaliasやapiなども随時更新、追加していく予定です!
当方まだGitHub CLIに精通していなくて基本的なコマンドしか紹介できませんでしたが、今後慣れてきたら便利なテクニックなどご紹介できればと思います!
もし記事に間違いや補足などあれば教えていただけると助かります?
最後まで読んでいただきありがとうございました。?
- 投稿日:2020-09-21T01:20:06+09:00
GitHub CLI 1.0 主要コマンドのサブコマンド、オプションまとめ
GitHub CLI 1.0の主要コマンドのサブコマンド、オプションまとめ
ついに
GitHub CLI 1.0が登場しましたね。?ソースコード、ドキュメントはこちらから
?https://github.com/cli/cli
?https://cli.github.com/GitHub CLIは、go言語製のGitHub公式のCLIツールです。(既存のGitHubのCLIツールとして有名なのはhubらしいですね)
従来はcommitなどの作業はターミナルで行うが、PRの作成などはブラウザを開いて行う必要がありました。
ターミナル→ブラウザ→ターミナル...みたいに頻繁にアプリを切り替える必要があり、個人的にはこのタイミングでコンテキストスイッチによって集中力が途切れがちでした。GitHubを開くためにブラウザ開いたのに、YouTubeのタブが開いていてそのまま...なんてことはよくありますよね...?GitHub CLIを利用すればこの切り替えの手間がなくなり、快適なGitHubライフを送ることができるというわけなんですね。2020年2月頃にβ版がリリースされていたのですが、2020年9月にβ版が終了して
GitHub CLI 1.0としてリリースされました。
β版では対応していなかったGitHub Enterprise Serverも利用できるようになったみたいですね?これをきっかけにGitHubCLIを使ってみようと少し触ってみたので、学んだことを共有します!
今回紹介するのは最低限の環境構築(認証、エディタの設定)とGitHubCLIの主要なコマンドgist,issue,pr,release,repoとそのサブコマンド、およびそれらの全フラグですが、その他コマンドaliasやapiなども随時更新、追加していく予定です。検証環境
Mac OS X
現在MacOS, Windows, Linuxに対応しています。
install
当方macOSなのでbrewでinstallします。
$ brew install ghversionを確認
??
$ gh --version
gh version 1.0.0 (2020-09-16)
https://github.com/cli/cli/releases/tag/v1.0.0
環境構築
認証
まずはGitHubアカウントの設定を行いましょう。
$ gh auth login対話形式で設定できるみたいですね。まずは
GitHub.comを利用するかGitHub Enterprise Serverを利用するか選択します。今回はGithub.comを利用します。? What account do you want to log into? [Use arrows to move, type to filter] > GitHub.com GitHub Enterprise Serverログインの方法を選択します。今回はブラウザを利用しました。
? How would you like to authenticate?  [Use arrows to move, type to filter]
> Login with a web browser
  Paste an authentication token
? How would you like to authenticate? Login with a web browser ! First copy your one-time code: 0062-4F62 - Press Enter to open github.com in your browser...表示された
one-time codeをブラウザに入力してください。
ブラウザの表示に従ってぽちぽちしていきます。
次にプロトコルを選択します。
HTTPSかSSHを選択します。✓ Authentication complete. Press Enter to continue... ? Choose default git protocol [Use arrows to move, type to filter] HTTPS > SSHこれで認証の設定は完了しました。
? Choose default git protocol SSH
- gh config set -h github.com git_protocol ssh
✓ Configured git protocol
✓ Logged in as JIIOryo
エディタの設定
PRやissueを書く時などのエディタを設定します。今回はvimを設定しました。
$ gh config set editor vimちなみに公式ドキュメントによれば現状Windowsでは常にメモ帳らしい。
On Windows, the editor will currently always be Notepad.
コマンド
ghコマンドは、基本的に
gh <command> <subcommand> [flags]で実行します。commandとして利用できるのは、CORE COMMANDSとADDITIONAL COMMANDSです。よく利用する
CORE COMMANDSには以下の5種類があります。CORE COMMANDS gist: Create gists issue: Manage issues pr: Manage pull requests release: Manage GitHub releases repo: Create, clone, fork, and view repositories例えば、PRやissueを新規作成したい場合はそれぞれ以下のように実行します。
$ gh pr create
$ gh issue create
コマンドの実行は、フラグを指定しない場合はだいたい以下のように対話形式で進めます。
$ gh pr create
? Where should we push the 'feature/hoge' branch? JIIOryo/gh_test

Creating pull request for feature/hoge into master in JIIOryo/gh_test

? Title add HOGE
? Body <Received>
? What's next? Add metadata
? What would you like to add?  [Use arrows to move, space to select, <right> to all, <left> to none, type to filter]
  [ ]  Reviewers
> [x]  Assignees
  [ ]  Labels
  [ ]  Projects
  [ ]  Milestone
フラグを指定することでコマンド一発で実行することもできます。
$ gh issue create --title 'foo' --body 'bar' --milestone 'baz'これらのコマンドの使い方は後ほどそれぞれ説明します。
ADDITIONAL COMMANDSには以下の6種類があります。ADDITIONAL COMMANDS alias: Create command shortcuts api: Make an authenticated GitHub API request auth: Login, logout, and refresh your authentication completion: Generate shell completion scripts config: Manage configuration for gh help: Help about any command今回はとりあえず
CORE COMMANDSだけ紹介します。
随時ADDITIONAL COMMANDSも追加、更新していく予定です。困ったら
コマンドを忘れて困ったら、とりあえず
ghもしくはgh --help,gh -hを叩けば利用できるコマンドの一覧が取得できます。$ gh Work seamlessly with GitHub from the command line. USAGE gh <command> <subcommand> [flags] CORE COMMANDS gist: Create gists issue: Manage issues pr: Manage pull requests release: Manage GitHub releases repo: Create, clone, fork, and view repositories ADDITIONAL COMMANDS alias: Create command shortcuts api: Make an authenticated GitHub API request auth: Login, logout, and refresh your authentication completion: Generate shell completion scripts config: Manage configuration for gh help: Help about any command FLAGS --help Show help for command --version Show gh version EXAMPLES $ gh issue create $ gh repo clone cli/cli $ gh pr checkout 321 ENVIRONMENT VARIABLES See 'gh help environment' for the list of supported environment variables. LEARN MORE Use 'gh <command> <subcommand> --help' for more information about a command. Read the manual at https://cli.github.com/manual FEEDBACK Open an issue using 'gh issue create -R cli/cli'ちなみにコマンドによって使えるフラグが異なりますが、だいたいのコマンドで以下のフラグは使用できます。
INHERITED FLAGS
      --help              Show help for command
  -R, --repo OWNER/REPO   Select another repository using the OWNER/REPO format
$ gh repo clone -h Clone a GitHub repository locally. If the "OWNER/" portion of the "OWNER/REPO" repository argument is omitted, it defaults to the name of the authenticating user. Pass additional 'git clone' flags by listing them after '--'. USAGE gh repo clone <repository> [<directory>] [-- <gitflags>...] INHERITED FLAGS --help Show help for command LEARN MORE Use 'gh <command> <subcommand> --help' for more information about a command. Read the manual at https://cli.github.com/manual? gh repoコマンド
gh repoコマンドは、リポジトリの作成やclone、forkなどのリポジトリ関連の操作を行うことができます。
gh repo <command> [flags]で実行し、<command>には以下の4つが利用できます。clone: Clone a repository locally create: Create a new repository fork: Create a fork of a repository view: View a repository? gh repo clone
gh repo cloneは、リポジトリのcloneを行うことができます。
詳細
gh repo clone <repository> [<directory>] [-- <gitflags>...]で実行します。例
$ gh repo clone cli/cli

Cloning into 'cli'...
remote: Enumerating objects: 21, done.
remote: Counting objects: 100% (21/21), done.
remote: Compressing objects: 100% (18/18), done.
remote: Total 13758 (delta 9), reused 11 (delta 3), pack-reused 13737
Receiving objects: 100% (13758/13758), 32.50 MiB | 4.07 MiB/s, done.
Resolving deltas: 100% (9177/9177), done.
リポジトリの後ろにcloneしたいパスを指定することもできます。
$ gh repo clone cli/cli path/to/repos Cloning into 'path/to/repos'... remote: Enumerating objects: 21, done. remote: Counting objects: 100% (21/21), done. remote: Compressing objects: 100% (18/18), done. remote: Total 13758 (delta 9), reused 11 (delta 3), pack-reused 13737 Receiving objects: 100% (13758/13758), 32.50 MiB | 3.77 MiB/s, done. Resolving deltas: 100% (9174/9174), done. $ ls !$ ls path/to/repos LICENSE README.md auth command docs go.mod internal script update wix.json Makefile api cmd context git go.sum pkg test utils
help
$ gh repo clone --help Clone a GitHub repository locally. If the "OWNER/" portion of the "OWNER/REPO" repository argument is omitted, it defaults to the name of the authenticating user. Pass additional 'git clone' flags by listing them after '--'. USAGE gh repo clone <repository> [<directory>] [-- <gitflags>...] INHERITED FLAGS --help Show help for command LEARN MORE Use 'gh <command> <subcommand> --help' for more information about a command. Read the manual at https://cli.github.com/manual
? gh repo create
gh repo createは、リポジトリの新規作成を行うことができるコマンドです。
詳細
gh repo create [<name>] [flags]で実行します。フラグ
以下のフラグが利用できます。
flags short flags long 説明 -y --confirm 確認なし -d --description リポジトリの説明を追加 --enable-issues issueを有効にするか(デフォルトtrue) --enable-wiki wikiを有効にするか(デフォルトtrue) -h --homepage ホームページURL --internal リポジトリをinternalで作成するか --private リポジトリをprivateで作成するか --private リポジトリをpublicで作成するか -t --team アクセスできるorganizationチーム -p --template テンプレートリポジトリから作成 対話形式で作成
fooというリポジトリを作ってみましょう。
以下の質問がされます。
- Visibility(publicなのかprivateなのかとか)どうする?
- currentディレクトリに作って良い?(Noを指定するとリポジトリ作らない。yesならこの時点でGitHub上に作成される)
- ローカルプロジェクトディレクトリをつくる?(Noを指定するとローカルのカレントディレクトリには作られない)
$ gh repo create foo ? Visibility Public ? This will create 'foo' in your current directory. Continue? Yes ✓ Created repository JIIOryo/foo on GitHub ? Create a local project directory for JIIOryo/foo? Yes Initialized empty Git repository in /path/to/repos/foo/.git/ ✓ Initialized repository in './foo/'ローカルプロジェクトディレクトリを作るを選択すると、ローカルにディレクトリを作成してgit initをしてくれてるっぽい。
https://github.com/cli/cli/blob/b2e36a0979a06b94bf364552a856c166cd415234/pkg/cmd/repo/create/create.go#L291コマンド一発で作成
例えば、
hoge-repoリポジトリを公開で説明付きで作成したい場合...$ gh repo create hoge-repo -y -d 'This is description!' --public ✓ Created repository JIIOryo/hoge-repo on GitHub Initialized empty Git repository in /path/to/repos/hoge-repo/.git/ ✓ Initialized repository in './hoge-repo/'こんな感じにリポジトリが一発で作成されました?
help
$ gh repo create --help Create a new GitHub repository. USAGE gh repo create [<name>] [flags] FLAGS -y, --confirm Confirm the submission directly -d, --description string Description of repository --enable-issues Enable issues in the new repository (default true) --enable-wiki Enable wiki in the new repository (default true) -h, --homepage string Repository home page URL --internal Make the new repository internal --private Make the new repository private --public Make the new repository public -t, --team string The name of the organization team to be granted access -p, --template string Make the new repository based on a template repository INHERITED FLAGS --help Show help for command ARGUMENTS A repository can be supplied as an argument in any of the following formats: - <OWNER/REPO> - by URL, e.g. "https://github.com/OWNER/REPO" EXAMPLES # create a repository under your account using the current directory name $ gh repo create # create a repository with a specific name $ gh repo create my-project # create a repository in an organization $ gh repo create cli/my-project LEARN MORE Use 'gh <command> <subcommand> --help' for more information about a command. Read the manual at https://cli.github.com/manual
? gh repo fork
gh repo forkコマンドは、リポジトリのforkの新規作成を行うことができます。
詳細
gh repo fork [<repository>] [flags]で実行します。フラグ
以下のフラグが利用できます。
flags short flags long 説明 --clone cloneするかどうか --remote リモートを設定するか 例
対話形式でforkしてみます。(cloneするかどうか聞かれる)
$ gh repo fork cli/cli - Forking cli/cli... ✓ Created fork JIIOryo/cli ? Would you like to clone the fork? Yes Cloning into 'cli'... remote: Enumerating objects: 21, done. remote: Counting objects: 100% (21/21), done. remote: Compressing objects: 100% (18/18), done. remote: Total 13758 (delta 9), reused 11 (delta 3), pack-reused 13737 Receiving objects: 100% (13758/13758), 32.50 MiB | 3.77 MiB/s, done. Resolving deltas: 100% (9174/9174), done. Updating upstream From github.com:cli/cli * [new branch] auth-check -> upstream/auth-check * [new branch] branch-switcher -> upstream/branch-switcher * [new branch] bulk-cmd -> upstream/bulk-cmd * [new branch] custom-commands -> upstream/custom-commands * [new branch] debians -> upstream/debians * [new branch] default-cfg -> upstream/default-cfg * [new branch] fix-query -> upstream/fix-query * [new branch] ghe-conditional-request -> upstream/ghe-conditional-request * [new branch] gist-list -> upstream/gist-list * [new branch] linux-repos -> upstream/linux-repos * [new branch] migrate-repo-clone -> upstream/migrate-repo-clone * [new branch] more-gists -> upstream/more-gists * [new branch] multi-graphql -> upstream/multi-graphql * [new branch] pager-docs -> upstream/pager-docs * [new branch] patch-review-prototype -> upstream/patch-review-prototype * [new branch] relective-pr-lookup -> upstream/relective-pr-lookup * [new branch] run-checks -> upstream/run-checks * [new branch] search-cmd -> upstream/search-cmd * [new branch] the-newlygit-game -> upstream/the-newlygit-game * [new branch] trunk -> upstream/trunk * [new branch] ubuntus -> upstream/ubuntus * [new branch] web-flag -> upstream/web-flag ✓ Cloned fork $ ls cli LICENSE api command git internal test wix.json Makefile auth context go.mod pkg update README.md cmd docs go.sum script utils
help
$ gh repo fork --help Create a fork of a repository. With no argument, creates a fork of the current repository. Otherwise, forks the specified repository. USAGE gh repo fork [<repository>] [flags] FLAGS --clone Clone the fork {true|false} --remote Add remote for fork {true|false} INHERITED FLAGS --help Show help for command LEARN MORE Use 'gh <command> <subcommand> --help' for more information about a command. Read the manual at https://cli.github.com/manual
? gh repo view
gh repo viewコマンドは、リポジトリのdescriptionとREADMEを参照することができます。
詳細
gh repo view [<repository>] [flags]で実行します。フラグ
以下のフラグが利用できます。
flags short flags long 説明 -w --web ブラウザで開く 例
リポジトリを明示的に指定しなければ現在いるリポジトリのREADMEが表示されます。ちゃんとマークダウンを認識して色が付けられていてとてもみやすいです?
ただ注意点としては、あくまでGitHub上の情報を参照しているので、ローカルでREADMEを作成、変更しても、pushしないと
gh repo viewではみることができません。
-wフラグをつけることで、ブラウザを開いて参照することができます。一発でジャンプできて便利。$ gh repo view cli/cli -w Opening github.com/cli/cli in your browser.
help
$ gh repo view --help Display the description and the README of a GitHub repository. With no argument, the repository for the current directory is displayed. With '--web', open the repository in a web browser instead. USAGE gh repo view [<repository>] [flags] FLAGS -w, --web Open a repository in the browser INHERITED FLAGS --help Show help for command LEARN MORE Use 'gh <command> <subcommand> --help' for more information about a command. Read the manual at https://cli.github.com/manual
? gh pr コマンド
gh prコマンドは、プルリクの作成やマージ、ステータスを確認することができます。
gh pr <command> [flags]で実行し、<command>には以下の12個が利用できます。checkout: Check out a pull request in git checks: Show CI status for a single pull request close: Close a pull request create: Create a pull request diff: View changes in a pull request list: List and filter pull requests in this repository merge: Merge a pull request ready: Mark a pull request as ready for review reopen: Reopen a pull request review: Add a review to a pull request status: Show status of relevant pull requests view: View a pull requestprコマンドでは、基本的にブランチやPR番号を指定します。
ちなみに何も指定しないとカレントブランチを指定するようです。
https://github.com/cli/cli/blob/b2e36a0979a06b94bf364552a856c166cd415234/pkg/cmd/pr/shared/lookup.go#L34-L37? gh pr create
gh pr createコマンドは、PRを作成することができるコマンドです。
詳細
gh pr create [flags]で実行します。フラグ
以下のフラグが利用できます。
flags short flags long 説明 -a --assignee assigneeを指定 -B --base マージ先ブランチ -b --body PRのbody(説明) -d --draft draftでPRを作成 -f --fill titleとbodyを入力しない。commit情報を使って埋める。 -H --head PRを作成したいブランチを指定(デフォルトでカレントブランチ) -l --label ラベルを指定 -m --milestone マイルストーンを指定 -p --project プロジェクトを指定 -r --reviewer reviewerを指定 -t --title タイトルを指定 -w --web PR作成画面をブラウザで開く 対話形式で作成
$ gh pr create ? Where should we push the 'feature/hoge' branch? [Use arrows to move, type to filter] > JIIOryo/foo Skip pushing the branch Cancelタイトルを入力します。
? Title (add hoge.txt) add HOGE
eを押すとエディタが開き、PRの文章を記述できます。? Body [(e) to launch vim, enter to skip]submitするとPRが作成されます。
? What's next? [Use arrows to move, type to filter] > Submit Continue in browser Add metadata Cancel
コマンド一発で作成
$ gh pr create -t 'add FUGA' -b '# fugafuga' -m foo -l hoge -B feature/hoge -dこれで一発でこのPRができます。スゴい。
この例では
-mがマイルストーンで、-lがラベル、-Bがマージ先ブランチ、-dがドラフトPRです。
ラベルなど、複数ある場合は,でつなげる。pushしていない場合は対話形式同様pushする?って聞かれる。
? Where should we push the 'feature/foo' branch? JIIOryo/foo
help
$ gh pr create --help Create a pull request on GitHub. When the current branch isn't fully pushed to a git remote, a prompt will ask where to push the branch and offer an option to fork the base repository. Use '--head' to explicitly skip any forking or pushing behavior. A prompt will also ask for the title and the body of the pull request. Use '--title' and '--body' to skip this, or use '--fill' to autofill these values from git commits. USAGE gh pr create [flags] FLAGS -a, --assignee login Assign people by their login -B, --base branch The branch into which you want your code merged -b, --body string Body for the pull request -d, --draft Mark pull request as a draft -f, --fill Do not prompt for title/body and just use commit info -H, --head branch The branch that contains commits for your pull request (default: current branch) -l, --label name Add labels by name -m, --milestone name Add the pull request to a milestone by name -p, --project name Add the pull request to projects by name -r, --reviewer login Request reviews from people by their login -t, --title string Title for the pull request -w, --web Open the web browser to create a pull request INHERITED FLAGS --help Show help for command -R, --repo OWNER/REPO Select another repository using the OWNER/REPO format EXAMPLES $ gh pr create --title "The bug is fixed" --body "Everything works again" $ gh pr create --reviewer monalisa,hubot $ gh pr create --project "Roadmap" $ gh pr create --base develop --head monalisa:feature LEARN MORE Use 'gh <command> <subcommand> --help' for more information about a command. Read the manual at https://cli.github.com/manual
? gh pr close
gh pr closeコマンドは、PRをクローズできるコマンドです。
詳細
gh pr close {<number> | <url> | <branch>} [flags]で実行します。
PRの指定方法はbranch,PR番号,urlの3種類あります。フラグ
以下のフラグが利用できます。
flags short flags long 説明 -d --delete-branch ブランチを削除する ブランチ名で指定
これが一番直感的でわかりやすいです。
$ gh pr close feature/fuga ✔ Closed pull request #5 (add FUGA)PR番号で指定
$ gh pr close 5 ✔ Closed pull request #5 (add FUGA)URLで指定
$ gh pr close https://github.com/JIIOryo/foo/pull/5 ✔ Closed pull request #5 (add FUGA)ブランチも消す
-dオプションをつけることで、ブランチごと削除することが可能です。これは便利。$ gh pr close feature/fuga -d ✔ Closed pull request #5 (add FUGA) ✔ Deleted branch feature/fuga and switched to branch master
help
$ gh pr close --help Close a pull request USAGE gh pr close {<number> | <url> | <branch>} [flags] FLAGS -d, --delete-branch Delete the local and remote branch after close INHERITED FLAGS --help Show help for command -R, --repo OWNER/REPO Select another repository using the OWNER/REPO format LEARN MORE Use 'gh <command> <subcommand> --help' for more information about a command. Read the manual at https://cli.github.com/manual
? gh pr reopen
gh pr reopenコマンドは、クローズしたPRを再び開くができます。
詳細
gh pr reopen {<number> | <url> | <branch>} [flags]で実行する。ReopenするPRを指定方法は
branch,PR番号,urlの3種類あります。PR番号でreopen
$ gh pr reopen 5 ✔ Reopened pull request #5 (add FUGA)URLで指定
$ gh pr reopen https://github.com/JIIOryo/foo/pull/5 ✔ Reopened pull request #5 (add FUGA)ブランチ名で指定
自分の場合ブランチ名で指定してもうまくいかなかったです。
$ gh pr reopen feature/fuga no open pull requests found for branch "feature/fuga"
help
$ gh pr reopen --help Reopen a pull request USAGE gh pr reopen {<number> | <url> | <branch>} [flags] INHERITED FLAGS --help Show help for command -R, --repo OWNER/REPO Select another repository using the OWNER/REPO format LEARN MORE Use 'gh <command> <subcommand> --help' for more information about a command. Read the manual at https://cli.github.com/manual
? gh pr list
gh pr listコマンドは、PRの一覧を表示するコマンドです。
詳細
gh pr list [flags]で実行する。フラグ
以下のフラグが利用できます。
flags short flags long 説明 -a --assignee assigneeでフィルタリング -B --base ベースブランチでフィルタリング -l --label ラベルでフィルタリング -L --limit 最大表示個数を指定(デフォルト30) -s --state 状態を指定 open,closed,merged,allが指定可能 (デフォルトopen)-w --web ブラウザでPR一覧のページを開く 例
$ gh pr list Showing 4 of 4 open pull requests in JIIOryo/foo #13 add fugahoge feature/fugahoge #9 add hogefuga feature/hogefuga #6 add FOO feature/foo #1 add HOGE feature/hoge$ gh pr list -B master -l hoge -L 3 Showing 1 of 1 pull request in JIIOryo/foo that matches your search #1 add HOGE feature/hoge
help
$ gh pr list --help List and filter pull requests in this repository USAGE gh pr list [flags] FLAGS -a, --assignee string Filter by assignee -B, --base string Filter by base branch -l, --label strings Filter by labels -L, --limit int Maximum number of items to fetch (default 30) -s, --state string Filter by state: {open|closed|merged|all} (default "open") -w, --web Open the browser to list the pull requests INHERITED FLAGS --help Show help for command -R, --repo OWNER/REPO Select another repository using the OWNER/REPO format EXAMPLES $ gh pr list --limit 999 $ gh pr list --state closed $ gh pr list --label "priority 1" --label "bug" $ gh pr list --web LEARN MORE Use 'gh <command> <subcommand> --help' for more information about a command. Read the manual at https://cli.github.com/manual
? gh pr diff
gh pr diffコマンドは、PRのdiffを確認することができるコマンドです。
詳細
gh pr diff [<number> | <url> | <branch>] [flags]で実行する。フラグ
以下のフラグが利用できます。
flags short flags long 説明 --color 色。 always,never,autoのうちいずれかを選択。(デフォルトauto)例
diffに関してはブラウザの方がわかりやすいので、これで
-wフラグが利用できたら便利なんですけどね。
help
$ gh pr diff --help View changes in a pull request USAGE gh pr diff [<number> | <url> | <branch>] [flags] FLAGS --color string Use color in diff output: {always|never|auto} (default "auto") INHERITED FLAGS --help Show help for command -R, --repo OWNER/REPO Select another repository using the OWNER/REPO format LEARN MORE Use 'gh <command> <subcommand> --help' for more information about a command. Read the manual at https://cli.github.com/manual
? gh pr merge
gh pr mergeコマンドは、PRをマージすることができます。
詳細
gh pr merge [<number> | <url> | <branch>] [flags]で実行する。フラグ
以下のフラグが利用できます。
flags short flags long 説明 -d --delete-branch ブランチを削除するか(デフォルト true) -m --merge マージコミットを作成 -r --rebase リベース -s --squash スカッシュマージ 対話形式で試す
mergeは、マージコミットを作成、リベース、スカッシュマージの3種類が利用できます。
$ gh pr merge ? What merge method would you like to use? [Use arrows to move, type to filter] > Create a merge commit Rebase and merge Squash and mergeブランチを削除するか聞かれます。
? Delete the branch locally and on GitHub? (Y/n)Done
✔ Merged pull request #7 (add baz) ✔ Deleted branch feature/baz and switched to branch masterコマンド一発でマージする
$ gh pr merge --squash feature/piyo ✔ Squashed and merged pull request #8 (add piyo) ✔ Deleted branch feature/piyo and switched to branch master
help
$ gh pr merge --help Merge a pull request on GitHub. By default, the head branch of the pull request will get deleted on both remote and local repositories. To retain the branch, use '--delete-branch=false'. USAGE gh pr merge [<number> | <url> | <branch>] [flags] FLAGS -d, --delete-branch Delete the local and remote branch after merge (default true) -m, --merge Merge the commits with the base branch -r, --rebase Rebase the commits onto the base branch -s, --squash Squash the commits into one commit and merge it into the base branch INHERITED FLAGS --help Show help for command -R, --repo OWNER/REPO Select another repository using the OWNER/REPO format LEARN MORE Use 'gh <command> <subcommand> --help' for more information about a command. Read the manual at https://cli.github.com/manual
? gh pr ready
gh pr readyコマンドは、draftPRをreview可能状態に変更するコマンドです。
詳細
gh pr ready [<number> | <url> | <branch>] [flags]で実行する。例
最初はドラフト状態(グレーの状態)です。
gh pr readyしてみます。
ReopenするPRを指定方法はbranch,PR番号,urlの3種類あります。
指定しない場合はカレントブランチを指定したことになります。
PRのstatusがレビュー可能状態(緑)に変わりました。
help
$ gh pr ready --help Mark a pull request as ready for review USAGE gh pr ready [<number> | <url> | <branch>] [flags] INHERITED FLAGS --help Show help for command -R, --repo OWNER/REPO Select another repository using the OWNER/REPO format LEARN MORE Use 'gh <command> <subcommand> --help' for more information about a command. Read the manual at https://cli.github.com/manual
? gh pr status
gh pr statusコマンドは、PRのステータスを確認することができるコマンドです。
詳細
gh pr status [flags]で実行します。例
draftはグレー、レビュー可能は緑色、Closedは赤に表示されました。
help
$ gh pr status --help Show status of relevant pull requests USAGE gh pr status [flags] INHERITED FLAGS --help Show help for command -R, --repo OWNER/REPO Select another repository using the OWNER/REPO format LEARN MORE Use 'gh <command> <subcommand> --help' for more information about a command. Read the manual at https://cli.github.com/manual
? gh pr review
gh pr reviewコマンドは、レビューをすることができるコマンドです。
詳細
gh pr review [<number> | <url> | <branch>] [flags]で実行します。PRの指定方法は
branch,PR番号,urlの3種類あります。フラグ
以下のフラグが利用できます。
flags short flags long 説明 -a --approve PRをapproveする -b --body レビューのメッセージを指定 -c --comment PRのコメント (-bが必要) -r --request-changes 変更依頼 対話形式でレビューする
coment,approve,request changesの3つから選ぶことができます。コメントしてみましょう。$ gh pr review feature/foo ? What kind of review do you want to give? [Use arrows to move, type to filter] > Comment Approve Request changes
eを押すとエディタが開いてコメントを書くことができます。? Review body [(e) to launch vim]確認があるので、submitしましょう。
? Review body <Received> Got: hoge ? Submit? (Y/n)無事にレビューできました。
? Submit? Yes - Reviewed pull request #6対話形式でapproveする
approveを選択します。
$ gh pr review feature/foo ? What kind of review do you want to give? [Use arrows to move, type to filter] Comment > Approve Request changes
eを押すとエディタが開いてコメントを書くことができます。? Review body [(e) to launch vim, enter to skip]Approveのときのメッセージが確認できます。Submitしましょう。
? Review body <Received> Got: LGTM? ? Submit? (Y/n)コマンド一発でレビューする
-cはコメント、-aでapproveすることができます。
これらのメッセージは-bで指定します。$ gh pr review feature/foo -c -b 'hoge' - Reviewed pull request #6
help
$ gh pr review --help Add a review to a pull request. Without an argument, the pull request that belongs to the current branch is reviewed. USAGE gh pr review [<number> | <url> | <branch>] [flags] FLAGS -a, --approve Approve pull request -b, --body string Specify the body of a review -c, --comment Comment on a pull request -r, --request-changes Request changes on a pull request INHERITED FLAGS --help Show help for command -R, --repo OWNER/REPO Select another repository using the OWNER/REPO format EXAMPLES # approve the pull request of the current branch $ gh pr review --approve # leave a review comment for the current branch $ gh pr review --comment -b "interesting" # add a review for a specific pull request $ gh pr review 123 # request changes on a specific pull request $ gh pr review 123 -r -b "needs more ASCII art" LEARN MORE Use 'gh <command> <subcommand> --help' for more information about a command. Read the manual at https://cli.github.com/manual
? gh pr checks
gh pr checksコマンドは、CIのステータスを取得できるコマンドです。
詳細
gh pr checks [flags]で実行します。例
$ gh pr checks All checks were successful 0 failing, 1 successful, and 0 pending checks ✓ ci/circleci: run https://circleci.com/gh/JIIOryo/foo/2...
help
$ gh pr checks --help Show CI status for a single pull request USAGE gh pr checks [flags] INHERITED FLAGS --help Show help for command -R, --repo OWNER/REPO Select another repository using the OWNER/REPO format LEARN MORE Use 'gh <command> <subcommand> --help' for more information about a command. Read the manual at https://cli.github.com/manual
? gh pr view
gh pr viewコマンドは、PRのタイトルやbodyの内容などの情報を表示するコマンドです。
詳細
gh pr view [<number> | <url> | <branch>] [flags]で実行します。
PRの指定方法はbranch,PR番号,urlの3種類あります。フラグ
以下のフラグが利用できます。
flags short flags long 説明 -w --web ブラウザで開く 例
今回はブランチ名から指定します。
$ gh pr view feature/hogefuga
ブラウザで開く
カレントブランチ(指定なし)のPRをブラウザで開きたいときは
-wフラグを利用します。$ gh pr view -w Opening github.com/JIIOryo/foo/pull/9 in your browser. (ブラウザが開く)これは便利。使えそう。
help
$ gh pr view --help Display the title, body, and other information about a pull request. Without an argument, the pull request that belongs to the current branch is displayed. With '--web', open the pull request in a web browser instead. USAGE gh pr view [<number> | <url> | <branch>] [flags] FLAGS -w, --web Open a pull request in the browser INHERITED FLAGS --help Show help for command -R, --repo OWNER/REPO Select another repository using the OWNER/REPO format LEARN MORE Use 'gh <command> <subcommand> --help' for more information about a command. Read the manual at https://cli.github.com/manual
? gh pr checkout
gh pr checkoutコマンドは、指定したPR(ブランチ)にcheckoutするコマンドです。
詳細
gh pr checkout {<number> | <url> | <branch>} [flags]で実行します。フラグ
以下のフラグが利用できます。
flags short flags long 説明 --recurse-submodules 再帰的に全てのアクティブなサブモジュールを更新する 例
$ gh pr checkout feature/hogefuga Switched to branch 'feature/hogefuga' Already up to date.ちなみに実装を見ると、ローカルにブランチがある場合、
fetchcheckoutmergeを行い、そうでない場合はcheckout -bで新しいブランチを作成してくれているようですね。
https://github.com/cli/cli/blob/b2e36a0979a06b94bf364552a856c166cd415234/pkg/cmd/pr/checkout/checkout.go#L118-L133
help
$ gh pr checkout --help Check out a pull request in git USAGE gh pr checkout {<number> | <url> | <branch>} [flags] FLAGS --recurse-submodules Update all active submodules (recursively) INHERITED FLAGS --help Show help for command -R, --repo OWNER/REPO Select another repository using the OWNER/REPO format LEARN MORE Use 'gh <command> <subcommand> --help' for more information about a command. Read the manual at https://cli.github.com/manual
? gh issue コマンド
gh issueコマンドは、issueの作成や閲覧することができます。
gh issue <command> [flags]で実行し、<command>には以下の6個が利用できます。close: Close issue create: Create a new issue list: List and filter issues in this repository reopen: Reopen issue status: Show status of relevant issues view: View an issue? gh issue create
gh issue createコマンドは、issueを作成することができるコマンドです。
詳細
gh issue create [flags]で実行する。フラグ
以下のフラグが利用できます。
flags short flags long 説明 -a --assignee assigneeを指定 -b --body bodyを指定 -l --label ラベルを指定 -m --milestone マイルストーンを指定 -p --project プロジェクトを指定 -t --title タイトルを指定 -w --web ブラウザで開く 対話形式でissueを作成
まずはタイトルを指定します。
$ gh issue create Creating issue in JIIOryo/foo ? Title hoge bug ?
eを押すことで、エディタが開きます。? Body [(e) to launch vim, enter to skip]入力が完了。
? Body <Received> ? What's next? [Use arrows to move, type to filter] > Submit Continue in browser Add metadata Cancel
Add metadataで、assigneeやlabelを指定することができます。移動は上下ボタン、選択はスペースキーです。確定はEnter。? What would you like to add? [Use arrows to move, space to select, <right> to all, <left> to none, type to filter] [ ] Assignees > [x] Labels [ ] Projects [ ] MilestoneLabelを選択すると、以下のようにラベル一覧が表示されます。同様に移動は上下ボタン、選択はスペースキーです。確定はEnter。
? Labels [Use arrows to move, space to select, <right> to all, <left> to none, type to filter] [x] bug [ ] documentation [ ] duplicate > [ ] enhancement [x] fuga [ ] good first issue [ ] help wantedSubmitしましょう。
? What's next? [Use arrows to move, type to filter] > Submit Cancelhttps://github.com/JIIOryo/foo/issues/11issueができたみたいなので、みてみます。
コマンドで一発でissueを作成する。
-tでタイトル、-bでbody、-lでラベル、-mでマイルストーンを選択してみました。$ gh issue create -t 'fuga bug ?' -b 'fugafuga' -l hoge,fuga -m foo Creating issue in JIIOryo/foo https://github.com/JIIOryo/foo/issues/12ちなみに、
-wオプションをつけるとissueを作成する画面がブラウザで開きます。
help
$ gh issue create --help Create a new issue USAGE gh issue create [flags] FLAGS -a, --assignee login Assign people by their login -b, --body string Supply a body. Will prompt for one otherwise. -l, --label name Add labels by name -m, --milestone name Add the issue to a milestone by name -p, --project name Add the issue to projects by name -t, --title string Supply a title. Will prompt for one otherwise. -w, --web Open the browser to create an issue INHERITED FLAGS --help Show help for command -R, --repo OWNER/REPO Select another repository using the OWNER/REPO format EXAMPLES $ gh issue create --title "I found a bug" --body "Nothing works" $ gh issue create --label "bug,help wanted" $ gh issue create --label bug --label "help wanted" $ gh issue create --assignee monalisa,hubot $ gh issue create --project "Roadmap" LEARN MORE Use 'gh <command> <subcommand> --help' for more information about a command. Read the manual at https://cli.github.com/manual
? gh issue list
gh issue listコマンドは、issueの一覧を表示することができます。
詳細
gh issue list [flags]で実行する。フラグ
以下のフラグが利用できます。
flags short flags long 説明 -a --assignee assigneeでフィルタリング -A --author authorでフィルタリング -l --label ラベルでフィルタリング -L --limit issueの最大表示件数を指定 (デフォルト30件) -m --milestone マイルストーンをでフィルタリング --mention メンションでフィルタリング -p --project プロジェクトを指定 -s --state 状態でフィルタリング open,closed,allが指定できます。(デフォルトopen)-w --web ブラウザで開く 例
$ gh issue list Showing 2 of 2 open issues in JIIOryo/foo #12 fuga bug ? (fuga, hoge) about 5 minutes ago #11 hoge bug ? (bug, fuga, hoge) about 9 minutes agoフラグを付けて検索してみます。
$ gh issue list -l hoge,fuga -L 1 -s all Showing 1 of 2 issues in JIIOryo/foo that match your search #12 fuga bug ? (fuga, hoge) about 10 minutes ago
help
$ gh issue list --help List and filter issues in this repository USAGE gh issue list [flags] FLAGS -a, --assignee string Filter by assignee -A, --author string Filter by author -l, --label strings Filter by labels -L, --limit int Maximum number of issues to fetch (default 30) --mention string Filter by mention -m, --milestone number Filter by milestone number or `title` -s, --state string Filter by state: {open|closed|all} (default "open") -w, --web Open the browser to list the issue(s) INHERITED FLAGS --help Show help for command -R, --repo OWNER/REPO Select another repository using the OWNER/REPO format EXAMPLES $ gh issue list -l "help wanted" $ gh issue list -A monalisa $ gh issue list --web $ gh issue list --milestone 'MVP' LEARN MORE Use 'gh <command> <subcommand> --help' for more information about a command. Read the manual at https://cli.github.com/manual
? gh issue status
gh issue statusコマンドは、issueのステータスを表示するコマンドです。
詳細
gh issue status [flags]で実行する。
自分がアサインされたissue, メンションされたissue, 自分が作成したissueを確認することができます。例
$ gh issue status Relevant issues in JIIOryo/foo Issues assigned to you #12 fuga bug ? (fuga, hoge) less than a minute ago Issues mentioning you #12 fuga bug ? (fuga, hoge) less than a minute ago Issues opened by you #12 fuga bug ? (fuga, hoge) less than a minute ago #11 hoge bug ? (bug, fuga, hoge) about 3 hours ago
help
$ gh issue status --help Show status of relevant issues USAGE gh issue status [flags] INHERITED FLAGS --help Show help for command -R, --repo OWNER/REPO Select another repository using the OWNER/REPO format LEARN MORE Use 'gh <command> <subcommand> --help' for more information about a command. Read the manual at https://cli.github.com/manual
? gh issue close
gh issue closeコマンドは、issueをcloseすることができるコマンドです。
詳細
gh issue close {<number> | <url>} [flags]で実行する。
issueを選択する方法は、issue番号,issueのURLの2つがあります。例
$ gh issue close 12 ✔ Closed issue #12 (fuga bug ?)$ gh issue close https://github.com/JIIOryo/foo/issues/12 ✔ Closed issue #12 (fuga bug ?)
help
$ gh issue close --help Close issue USAGE gh issue close {<number> | <url>} [flags] INHERITED FLAGS --help Show help for command -R, --repo OWNER/REPO Select another repository using the OWNER/REPO format LEARN MORE Use 'gh <command> <subcommand> --help' for more information about a command. Read the manual at https://cli.github.com/manual
? gh issue reopen
gh issue reopenコマンドは、closeしたissueを再び開くコマンドです。
詳細
gh issue reopen {<number> | <url>} [flags]で実行します。
issueを選択する方法は、issue番号,issueのURLの2つがあります。$ gh issue reopen 12 ✔ Reopened issue #12 (fuga bug ?)$ gh issue reopen https://github.com/JIIOryo/foo/issues/12 ✔ Reopened issue #12 (fuga bug ?)
help
$ gh issue reopen --help Reopen issue USAGE gh issue reopen {<number> | <url>} [flags] INHERITED FLAGS --help Show help for command -R, --repo OWNER/REPO Select another repository using the OWNER/REPO format LEARN MORE Use 'gh <command> <subcommand> --help' for more information about a command. Read the manual at https://cli.github.com/manual
? gh issue view
gh issue viewコマンドは、issueを閲覧することができるコマンドです。
詳細
gh issue view {<number> | <url>} [flags]で実行する。
issueを選択する方法は、issue番号,issueのURLの2つがあります。フラグ
以下のフラグが利用できます。
flags short flags long 説明 -w --web ブラウザで開く 例
$ gh issue view 11$ gh issue view https://github.com/JIIOryo/foo/issues/11
markdownがしっかり認識されて色付けされていてみやすいですが、ブラウザでしっかり確認したい場合もあります。
そのような場合は
-wオプションを利用します。$ gh issue view 11 -w Opening github.com/JIIOryo/foo/issues/11 in your browser.
help
$ gh issue view --help Display the title, body, and other information about an issue. With '--web', open the issue in a web browser instead. USAGE gh issue view {<number> | <url>} [flags] FLAGS -w, --web Open an issue in the browser INHERITED FLAGS --help Show help for command -R, --repo OWNER/REPO Select another repository using the OWNER/REPO format LEARN MORE Use 'gh <command> <subcommand> --help' for more information about a command. Read the manual at https://cli.github.com/manual
? gh release コマンド
gh releaseコマンドは、releaseの作成や削除ができるコマンドです。
gh release <command> [flags]で実行し、<command>には以下の6個が利用できます。create: Create a new release delete: Delete a release download: Download release assets list: List releases in a repository upload: Upload assets to a release view: View information about a release? gh release create
gh release createコマンドは、releaseを作成することができるコマンドです。
詳細
gh release create <tag> [<files>...] [flags]で実行する。フラグ
以下のフラグが利用できます。
flags short flags long 説明 -d --draft ドラフトのリリースを作成 -n --notes Release notesを作成 -F --notes-file Release notesをファイルから指定して作成 -p --prerelease prerelease(不安定なバージョン)であることを知らせます。 -t --title リリースのタイトルを指定します。 対話形式でreleaseを作成
releaseを対話形式で作成してみます。まずはタイトルを入力。
$ gh release create v0.0.1 ? Title (optional) hogeRelease noteを書くか選択します。
今回はWrite my ownを選択します。? Release notes [Use arrows to move, type to filter] > Write my own Leave blankprereleaseかどうか聞かれます。今回はyにします。
? Is this a prerelease? (y/N)releaseをpublishするか、draftとして保存するかなどを選択できます。
今回はpublishします。? Submit? [Use arrows to move, type to filter] > Publish release Save as draft Cancel以上で完了です。
出力されたURLを開いてみると、v0.0.1のタグでリリースを作成することができました。
help
$ gh release create --help Create a new GitHub Release for a repository. A list of asset files may be given to upload to the new release. To define a display label for an asset, append text starting with '#' after the file name. USAGE gh release create <tag> [<files>...] [flags] FLAGS -d, --draft Save the release as a draft instead of publishing it -n, --notes string Release notes -F, --notes-file file Read release notes from file -p, --prerelease Mark the release as a prerelease --target branch Target branch or commit SHA (default: main branch) -t, --title string Release title INHERITED FLAGS --help Show help for command -R, --repo OWNER/REPO Select another repository using the OWNER/REPO format EXAMPLES # use release notes from a file $ gh release create v1.2.3 -F changelog.md # upload a release asset with a display label $ gh release create v1.2.3 '/path/to/asset.zip#My display label' LEARN MORE Use 'gh <command> <subcommand> --help' for more information about a command. Read the manual at https://cli.github.com/manual
? gh release list
gh release listコマンドは、リリース一覧を表示するコマンドです。
詳細
gh release list [flags]で実行します。フラグ
以下のフラグが利用できます。
flags short flags long 説明 -L --limit 一度に取得する上限数(デフォルト30) 例
以下で実行してみます。
$ gh release listこのように、releaseの一覧が取得できました。
help
$ gh release list --help List releases in a repository USAGE gh release list [flags] FLAGS -L, --limit int Maximum number of items to fetch (default 30) INHERITED FLAGS --help Show help for command -R, --repo OWNER/REPO Select another repository using the OWNER/REPO format LEARN MORE Use 'gh <command> <subcommand> --help' for more information about a command. Read the manual at https://cli.github.com/manual
? gh release upload
gh release uploadコマンドは、releaseのassetsをアップロードすることができるコマンドです。
詳細
gh release upload <tag> <files>... [flags]で実行します。フラグ
以下のフラグが利用できます。
flags short flags long 説明 --clobber 同名のassetsを上書きするか 例
試しに、v0.4.0に
foo.txt,bar.txtを追加してみましょう。$ gh release upload v0.4.0 foo.txt bar.txt Successfully uploaded 2 assets to v0.4.0
ちなみに、同じ名前のassetsがすでにuploadされている場合は怒られます。
$ gh release upload v0.4.0 foo.txt asset under the same name already exists: [foo.txt]
--clobberフラグを付ければ上書きできます。$ gh release upload v0.4.0 foo.txt --clobber Successfully uploaded 1 asset to v0.4.0
help
$ gh release upload --help Upload asset files to a GitHub Release. To define a display label for an asset, append text starting with '#' after the file name. USAGE gh release upload <tag> <files>... [flags] FLAGS --clobber Overwrite existing assets of the same name INHERITED FLAGS --help Show help for command -R, --repo OWNER/REPO Select another repository using the OWNER/REPO format LEARN MORE Use 'gh <command> <subcommand> --help' for more information about a command. Read the manual at https://cli.github.com/manual
? gh release download
gh release downloadコマンドは、releaseのassetsをダウンロードすることができるコマンドです。
詳細
gh release download [<tag>] [flags]で実行します。フラグ
以下のフラグが利用できます。
flags short flags long 説明 -D --dir ダウンロードする先のディレクトリ(デフォルトで .)-p --pattern 特定のglobパターンにマッチするassetsをダウンロード 例
ダウンロード先はデフォルトでカレントディレクトリです。
$ gh release download v0.4.0
-Dフラグでダウンロード先の指定、-pフラグでglobのパターンを指定することができます。$ gh release download v0.4.0 -D ~/Desktop/ -p '*.txt'
help
$ gh release download --help Download assets from a GitHub release. Without an explicit tag name argument, assets are downloaded from the latest release in the project. In this case, '--pattern' is required. USAGE gh release download [<tag>] [flags] FLAGS -D, --dir string The directory to download files into (default ".") -p, --pattern stringArray Download only assets that match a glob pattern INHERITED FLAGS --help Show help for command -R, --repo OWNER/REPO Select another repository using the OWNER/REPO format EXAMPLES # download all assets from a specific release $ gh release download v1.2.3 # download only Debian packages for the latest release $ gh release download --pattern '*.deb' # specify multiple file patterns $ gh release download -p '*.deb' -p '*.rpm' LEARN MORE Use 'gh <command> <subcommand> --help' for more information about a command. Read the manual at https://cli.github.com/manual
? gh release delete
gh release deleteコマンドは、releaseを削除することができるコマンドです。
詳細
gh release delete <tag> [flags]で実行します。フラグ
以下のフラグが利用できます。
flags short flags long 説明 -y --yes 削除の確認をスキップ 例
例えば、現在以下のようなreleaseがあり、
v0.0.2のリリースを削除してみます。$ gh release list foo Latest (v0.4.0) about 16 minutes ago foo (v0.3.0) about 26 minutes ago add fuga Draft (v0.0.2) about 46 minutes ago foo Pre-release (v0.2.0) about 34 minutes ago fuga (v0.1.0) about 37 minutes ago hoge Pre-release (v0.0.1) about 50 minutes agoリリースを削除してもいいか質問されるのでyを選択。
$ gh release delete v0.0.2 ? Delete release v0.0.2 in JIIOryo/foo? (Y/n) y ✓ Deleted release v0.0.2ちなみに、
-yオプションを選択することで確認なしで削除できる。$ gh release delete v0.0.2 -y
help
$ gh release delete --help Delete a release USAGE gh release delete <tag> [flags] FLAGS -y, --yes Skip the confirmation prompt INHERITED FLAGS --help Show help for command -R, --repo OWNER/REPO Select another repository using the OWNER/REPO format LEARN MORE Use 'gh <command> <subcommand> --help' for more information about a command. Read the manual at https://cli.github.com/manual
? gh release view
gh release viewコマンドは、releaseの情報を閲覧することができるコマンドです。
詳細
gh release view [<tag>] [flags]で実行する。フラグ
以下のフラグが利用できます。
flags short flags long 説明 -w --web ブラウザで開く 例
少しターミナルではみづらいと言う場合は、
-wフラグを付けてブラウザで開くと良いでしょう。$ gh release view v0.4.0 -w
help
$ gh release view --help View information about a GitHub Release. Without an explicit tag name argument, the latest release in the project is shown. USAGE gh release view [<tag>] [flags] FLAGS -w, --web Open the release in the browser INHERITED FLAGS --help Show help for command -R, --repo OWNER/REPO Select another repository using the OWNER/REPO format LEARN MORE Use 'gh <command> <subcommand> --help' for more information about a command. Read the manual at https://cli.github.com/manual
? gh gist コマンド
gh gistコマンドは、gistの作成や削除などができるコマンドです。
gh gist <command> [flags]で実行し、<command>には以下の4個が利用できます。create: Create a new gist edit: Edit one of your gists list: List your gists view: View a gist? gh gist create
gh gist createコマンドは、gistを新規作成することができるコマンドです。
詳細
gh gist create [<filename>... | -] [flags]で実行する。フラグ
以下のフラグが利用できます。
flags short flags long 説明 -d --desc gistの説明を指定 -f --filename ファイル名を指定 (標準入力から指定する場合) -p --public gistを公開する (デフォルトprivate) 例
このようにファイル名を指定する方法を一番使うかと思います。
$ gh gist create hogefuga.txt - Creating gist hogefuga.txt ✓ Created gist hogefuga.txt https://gist.github.com/d09d42c7ef0643c432129f7085ffde9d標準入力から内容を指定する場合、
--filenameでファイル名を指定することができる。$ echo hogehoge | gh gist create --filename hoge.txt - Creating gist hoge.txt ✓ Created gist hoge.txtもしくは、
-を利用する。書き終わったらCtrl+Dで抜けることができる。$ gh gist create - --filename hoge.js const hoge = 'hoge'; console.log(hoge); - Creating gist hoge.js ✓ Created gist hoge.js
help
$ gh gist create --help Create a new GitHub gist with given contents. Gists can be created from one or multiple files. Alternatively, pass "-" as file name to read from standard input. By default, gists are private; use '--public' to make publicly listed ones. USAGE gh gist create [<filename>... | -] [flags] FLAGS -d, --desc string A description for this gist -f, --filename string Provide a filename to be used when reading from STDIN -p, --public List the gist publicly (default: private) INHERITED FLAGS --help Show help for command EXAMPLES # publish file 'hello.py' as a public gist $ gh gist create --public hello.py # create a gist with a description $ gh gist create hello.py -d "my Hello-World program in Python" # create a gist containing several files $ gh gist create hello.py world.py cool.txt # read from standard input to create a gist $ gh gist create - # create a gist from output piped from another command $ cat cool.txt | gh gist create LEARN MORE Use 'gh <command> <subcommand> --help' for more information about a command. Read the manual at https://cli.github.com/manual
? gh gist list
gh gist listコマンドは、gistの一覧を取得できるコマンドです。
詳細
gh gist list [flags]で実行する。フラグ
以下のフラグが利用できます。
flags short flags long 説明 -L --limit 表示最大件数を指定する(デフォルト 10) --public publicのgistを表示する --secret secretのgistを表示する 例
$ gh gist list f6b19a5e7516b0bbadcba6e3b8732e62 hoge.js 1 file secret about 12 min... 08b23d0bc86a40cc74a7b2249259c7f8 1 file secret about 13 min... 1a564f0f1c176a7de2fff7738adc187c 1 file secret about 15 min... c722167d04f9aa8528255f7db0f84e7f hoge.txt 1 file secret about 17 min... d09d42c7ef0643c432129f7085ffde9d hogefuga.txt 1 file secret about 23 min... 8170566345795f3d330cef2fff57609e hoge.txt 1 file secret about 19 hou...
help
$ gh gist list --help List your gists USAGE gh gist list [flags] FLAGS -L, --limit int Maximum number of gists to fetch (default 10) --public Show only public gists --secret Show only secret gists INHERITED FLAGS --help Show help for command LEARN MORE Use 'gh <command> <subcommand> --help' for more information about a command. Read the manual at https://cli.github.com/manual
? gh gist edit
gh gist editコマンドは、自分のgistを編集することができるコマンドです。
詳細
gh gist edit {<gist ID> | <gist URL>} [flags]で実行する。
あらかじめgh gist listなどでIDを調べる必要があります。もしくはgistのURLでも指定することができます。フラグ
以下のフラグが利用できます。
flags short flags long 説明 -f --filename ファイル名 例
以下を実行すると、エディタが開いて編集することができます。
$ gh gist edit f6b19a5e7516b0bbadcba6e3b8732e62複数ファイルから構成されるgistの場合は、editするファイルを選択します。
$ gh gist edit d7f1cc09968c1064f42dfb92181ee983 ? Edit which file? [Use arrows to move, type to filter] > bar.txt hogefuga.js hogefuga.txt他のファイルも編集する場合は
Edit another fileを選択します。終了したらSubmitする。? What next? [Use arrows to move, type to filter] > Edit another file Submit Cancelちなみに
--filenameフラグを利用して特定のファイルを指定することができます。$ gh gist edit d7f1cc09968c1064f42dfb92181ee983 --filename hogefuga.txt
help
$ gh gist edit --help Edit one of your gists USAGE gh gist edit {<gist ID> | <gist URL>} [flags] FLAGS -f, --filename string a specific file to edit INHERITED FLAGS --help Show help for command LEARN MORE Use 'gh <command> <subcommand> --help' for more information about a command. Read the manual at https://cli.github.com/manual
? gh gist view
gh gist viewコマンドは、gistを閲覧するコマンドです。
詳細
gh gist view {<gist id> | <gist url>} [flags]で実行する。
あらかじめgh gist listなどでIDを調べる必要があります。もしくはgistのURLでも指定することができます。フラグ
以下のフラグが利用できます。
flags short flags long 説明 -f --filename ファイル名を指定 -r --raw markdownをレンダリングしない -w --web ブラウザで開く 例
これは、複数のファイルから構成されているケースです。
$ gh gist view d7f1cc09968c1064f42dfb92181ee983 bar.txt bar hogefuga.js const hoge = 'hoge'; const fuga = 'fuga'; console.log(hoge, fuga); hogefuga.txt foo bar baz指定したgistが複数のファイルから構成されている場合は特定のファイルのみを指定することもできます。
$ gh gist view d7f1cc09968c1064f42dfb92181ee983 --filename hogefuga.js const hoge = 'hoge'; const fuga = 'fuga'; console.log(hoge, fuga);
help
$ gh gist view --help View a gist USAGE gh gist view {<gist id> | <gist url>} [flags] FLAGS -f, --filename string display a single file of the gist -r, --raw do not try and render markdown -w, --web open gist in browser INHERITED FLAGS --help Show help for command LEARN MORE Use 'gh <command> <subcommand> --help' for more information about a command. Read the manual at https://cli.github.com/manual
最後に
GitHub CLIコマンドいかがだったでしょうか。
個人的には、さすがにPRのレビューなどをターミナル完結で行うのは厳しそうなので、どれも(issueやPRなど)listで一覧をみて探す→-wでブラウザで開くってのが使いやすそうだと思いました。
まだ紹介していないその他コマンドaliasやapiなども随時更新、追加していく予定です!
当方まだGitHub CLIに精通していなくて基本的なコマンドしか紹介できませんでしたが、今後慣れてきたら便利なテクニックなどご紹介できればと思います!
もし記事に間違いや補足などあれば教えていただけると助かります?
最後まで読んでいただきありがとうございました。?