- 投稿日:2020-09-20T19:57:40+09:00
格安サーバprimergy tx1310 m3をGPUマシン用にカスタマイズしてみた。
環境
格安サーバー購入
端末:富士通 primergy tx1310 m3 4gb ディスクレスモデル
CPU:インテル® Celeron® プロセッサー G3930 (2.90 GHz)
メモリー:4GB
金額:17800円カスタマイズ
メモリー:amazonでW4U2400CM-4Gメモリ8GB(4GB×2)を5030円で購入。
CPU: Intel(R) Core(TM) i5-7500 CPU @ 3.40GHzをヤフオクでにて9000円で落札。
GPU: Palit GeForce® GTX 1050 Ti StormXをヤフオクでにて15000円で落札。
金額:29030円カスタマイズ後スペック
OS:Ubuntu 18.04.3 LTS
メモリー:12GB
CPU: Intel(R) Core(TM) i5-7500 CPU @ 3.40GHz
GPU: Palit GeForce® GTX 1050 Ti StormXz
総額:46830円
- 投稿日:2020-09-20T17:04:55+09:00
VPSサーバ上でTensorFlow2を動かす
準備
- さくらVPS
- Python 3.6.0
- TensorFlow 2.3.0
- Apache2
Flaskを本番環境で使う準備については下記を参照してください。
Apache2+WSGI+Flaskを動かす
TensorFlowのインストール
pipのアップデート
$ pip3 install --upgrade pipTensorFlowのインストール
python3 -m pip install tensorflow確認
$ python3 -c "import tensorflow as tf; print( tf.__version__ )"この記事を執筆時点では2.3.0が帰ってくる。
参考にしたサイト
- 投稿日:2020-09-20T04:42:12+09:00
handwrittenのclient script
handwritting.py コード:(try)
qiita.rbimport argparse import cv2 import datetime import grpc import numpy as np import os from tensorflow import make_tensor_proto, make_ndarray from tensorflow_serving.apis import predict_pb2 from tensorflow_serving.apis import prediction_service_pb2_grpc from pose_extractor import extract_poses import sys import time import math import logging as log from argparse import ArgumentParser, SUPPRESS from functools import reduce from PIL import ImageFont, ImageDraw, Image from openvino.inference_engine import IENetwork, IECore from utils.codec import CTCCodec from __future__ import print_function from utils.codec import CTCCodec import PIL import io import IPython.display from IPython.display import clear_output def load_image(file_path): img = cv2.imread(file_path) img = cv2.resize(img, (args['width'], args['height'])) img = img.transpose(2,0,1).reshape(1,3,args['height'],args['width']) return img def get_characters(char_file): with open(char_file, 'r', encoding='utf-8') as f: return ''.join(line.strip('\n') for line in f) def preprocess_input(src, height, width): src = cv2.cvtColor(src, cv2.COLOR_BGR2GRAY) ratio = float(src.shape[1]) / float(src.shape[0]) tw = int(height * ratio) rsz = cv2.resize(src, (tw, height), interpolation=cv2.INTER_CUBIC).astype(np.float32) outimg = np.full((height, width), 255., np.float32) rsz_h, rsz_w = rsz.shape outimg[:rsz_h, :rsz_w] = rsz cv2.imshow('OCR input image', outimg) outimg = np.reshape(outimg, (1, height, width)) return outimg #コマンドライン引数 parser = argparse.ArgumentParser(description='Demo for handwritten-japanese-recognition requests via TFS gRPC API.' 'analyses input images and saveswith with detected objects.' 'it relies on model given as parameter...') parser.add_argument('--model_name', required=False, help='Name of the model to be used', default="handwritten-japanese-recognition") parser.add_argument('--input_images_dir', required=False, help='Directory with input images', default="images") parser.add_argument('--output_dir', required=False, help='Directory for staring images with detection results', default="results") parser.add_argument('--batch_size', required=False, help='How many images should be grouped in one batch', default=1, type=int) parser.add_argument('--width', required=False, help='How the input image width should be resized in pixels', default=456, type=int) parser.add_argument('--height', required=False, help='How the input image width should be resized in pixels', default=256, type=int) parser.add_argument('--grpc_address',required=False, default='localhost', help='Specify url to grpc service. default:localhost') parser.add_argument('--grpc_port',required=False, default=9000, help='Specify port to grpc service. default: 9000') #parser.add_argument("-cl", "--charlist", type=str, default=os.path.join(os.path.dirname(__file__), "data/kondate_nakayosi_char_list.txt"), help="Path to the decoding char list file") args = vars(parser.parse_args()) channel = grpc.insecure_channel("{}:{}".format(args['grpc_address'],args['grpc_port'])) stub = prediction_service_pb2_grpc.PredictionServiceStub(channel) files = os.listdir(args['input_images_dir']) batch_size = args['batch_size'] model_name = args['model_name'] print("Running "+model_name+" on files:" + str(files)) imgs = np.zeros((0,3,args['height'],args['width']), np.dtype('<f')) #画像が複数ある場合 for i in files: img = load_image(os.path.join(args['input_images_dir'], i)) imgs = np.append(imgs, img, axis=0) print('Start processing {} iterations with batch size {}'.format(len(files)//batch_size , batch_size)) for x in range(0, imgs.shape[0] - batch_size + 1, batch_size): request = predict_pb2.PredictRequest() request.model_spec.name = model_name img = imgs[x:(x + batch_size)] print("\nRequest shape", img.shape) request.inputs["data"].CopyFrom(make_tensor_proto(img, shape=(img.shape))) start_time = datetime.datetime.now() result = stub.Predict(request, 10.0) end_time = datetime.datetime.now() duration = (end_time - start_time).total_seconds() * 1000 # Plugin initialization ie = IECore() # Read IR log.info("Loading network") model = 'handwritten-japanese-recognition-0001' model = './intel/'+model+'/FP16/'+model net = ie.read_network(model+'.xml', model+'.bin') assert len(net.inputs) == 1, "Demo supports only single input topologies" assert len(net.outputs) == 1, "Demo supports only single output topologies" log.info("Preparing input/output blobs") input_blob = next(iter(net.inputs)) out_blob = next(iter(net.outputs)) input_batch_size, input_channel, input_height, input_width= net.inputs[input_blob].shape # Read and pre-process input image (NOTE: one image only) files = os.listdir(args['input_images_dir']) for i in files: input_image = preprocess_input(os.path.join(args['input_images_dir'], i), height=iargs['height'], width=args['width'])[None,:,:,:] # Loading model to the plugin log.info("Loading model to the plugin") exec_net = ie.load_network(network=net, device_name="CPU") characters = get_characters('data/kondate_nakayosi_char_list.txt') codec = CTCCodec(characters) # Start sync inference number_iter = 1 log.info("Starting inference ({} iterations)".format(number_iter)) infer_time = [] for i in range(number_iter): t0 = time.time() preds = exec_net.infer(inputs={input_blob: input_image}) preds = preds[out_blob] result = codec.decode(preds) print(result) infer_time.append((time.time() - t0) * 1000) log.info("Average throughput: {} ms".format(np.average(np.asarray(infer_time)))) sys.exit()command:
// Download the latest Model Server image
docker pull openvino/ubuntu18_model_server:latest// Download model into a separate directory
curl --create-dirs https://download.01.org/opencv/2020/openvinotoolkit/2020.2/open_model_zoo/models_bin/3/handwritten-japanese-recognition-0001/FP32/handwritten-japanese-recognition-0001.xml https://download.01.org/opencv/2020/openvinotoolkit/2020.2/open_model_zoo/models_bin/3/handwritten-japanese-recognition-0001/FP32/handwritten-japanese-recognition-0001.bin -o handwritten-japanese-recognition-0001.xml -o model/handwritten-japanese-recognition-0001.bin// Start the container serving gRPC on port 9000
docker run -d -v $(pwd)/model:/models/handwritten-japanese-recognition/1 -e LOG_LEVEL=DEBUG -p 9000:9000 openvino/ubuntu18_model_server /ie-serving-py/start_server.sh ie_serving model --model_path /models/handwritten-japanese-recognition --model_name handwritten-japanese-recognition --port 9000 --shape auto// Download the example client script
curl https://raw.githubusercontent.com/OVaaS/ovaas-api/master/handwritting.py -o handwritting.py// Download an image to be analyzed
curl https://openvino.jp/wp-content/uploads/2020/04/handwritting2_crop4.jpg -o images/people1.jpeg// Install client dependencies
//pip install -r client_requirements.txt// Create a folder for results
mkdir results// Run inference and store results in the newly created folder
python handwriting.py
- 投稿日:2020-09-20T03:04:07+09:00
dockerによるkerasとtensorflow, jupyter labの環境構築およびport forwardingでのjupyterへの接続
概要
dockerによってkerasのgpuおよびjupyterlab環境構築をする。
dockerがどういうものか、dockerのインストール等は省略する。
またついでにport forwardingについて軽く解説する。イメージのpull
tensorflowのdockerhubにてタグがlatest gpuのimageをpullする。
タグがlatestのみだとcudaが使えない。
やることは以下の通り$ sudo docker pull tensorflow/tensorflow:latest-gpuイメージの確認
$ sudo docker images
REPOSITORY                        TAG                 IMAGE ID            CREATED             SIZE
tensorflow/tensorflow             latest-gpu          20fd065e3887        7 weeks ago         3.15GB
必要そうなモジュールとjupyterをインストール
インストールするモジュール
今回importするのは
- matplotlib
- cv2 (opencv-python)
- keras
- jupyter lab
インポートする前にdockerのコンテナをイメージから作成しておく。環境構築の際はrootで入る。
$ sudo docker run -it tensorflow/tensorflow:latest-gpupipとaptのアップデート
# pip install --upgrade pip
# apt-get update -y
opencvのインストールのための準備
以下を参照した
DockerでpythonのTensorFlowとOpenCVの実行環境を構築する# apt-get install -y libopencv-dev結構時間がかかる。
必要モジュールのインストール
# pip install matplotlib opencv-python keras
# pip install jupyterlab
モジュールがimportできるかテスト
# python
Python 3.6.9 (default, Jul 17 2020, 12:50:27)
[GCC 8.4.0] on linux
Type "help", "copyright", "credits" or "license" for more information.
>>> import matplotlib
>>> import numpy
>>> import cv2
>>> import keras
2020-09-20 01:02:34.313977: I tensorflow/stream_executor/platform/default/dso_loader.cc:48] Successfully opened dynamic library libcudart.so.10.1
>>> import tensorflow
大丈夫そうだ。
Ctrl + dで対話モードを抜けられる。
jupyterlabもこれにてインストールできているのだが、実行するためにはport forwardingをしないといけない。詳しい実行手順を確かめたかったら最後までこの記事を読んでほしい。イメージのコミット
jupyter lab のテストの前に一旦コンテナをイメージにcommitする。つまり色々インストールした現在の状況をセーブする。
Ctrl+p,Ctrl+qでコンテナを稼働させたままコンテナから抜ける。現在稼働中のコンテナの確認
$ sudo docker ps -n=-1
CONTAINER ID        IMAGE                              COMMAND                  CREATED             STATUS              PORTS                  NAMES
a24503258ede        tensorflow/tensorflow:latest-gpu   "/bin/bash"              24 minutes ago      Up 24 minutes                              romantic_gauss
コンテナのコミット
$ sudo docker commit a24503258ede keras-jupyter
sudo docker commit (コンテナID) (つけたいイメージの名前)のようにする。以降今まで作ったものはkeras-jupyterという名前のイメージをビルドすれば先程のコンテナが出来上がる。コンテナの停止
先程のコンテナを一旦止める。
$ sudo docker stop a245
$ sudo docker ps -n=-1
CONTAINER ID        IMAGE               COMMAND                  CREATED             STATUS              PORTS                  NAMES
コンテナIDは最初4文字くらいで反応してくれる。
port forwardingについて
これからjupyterlabの動作確認を行うのだが、ついでにport forwardingについて軽く説明する。
port forwarding(ポートフォワーディング)とは
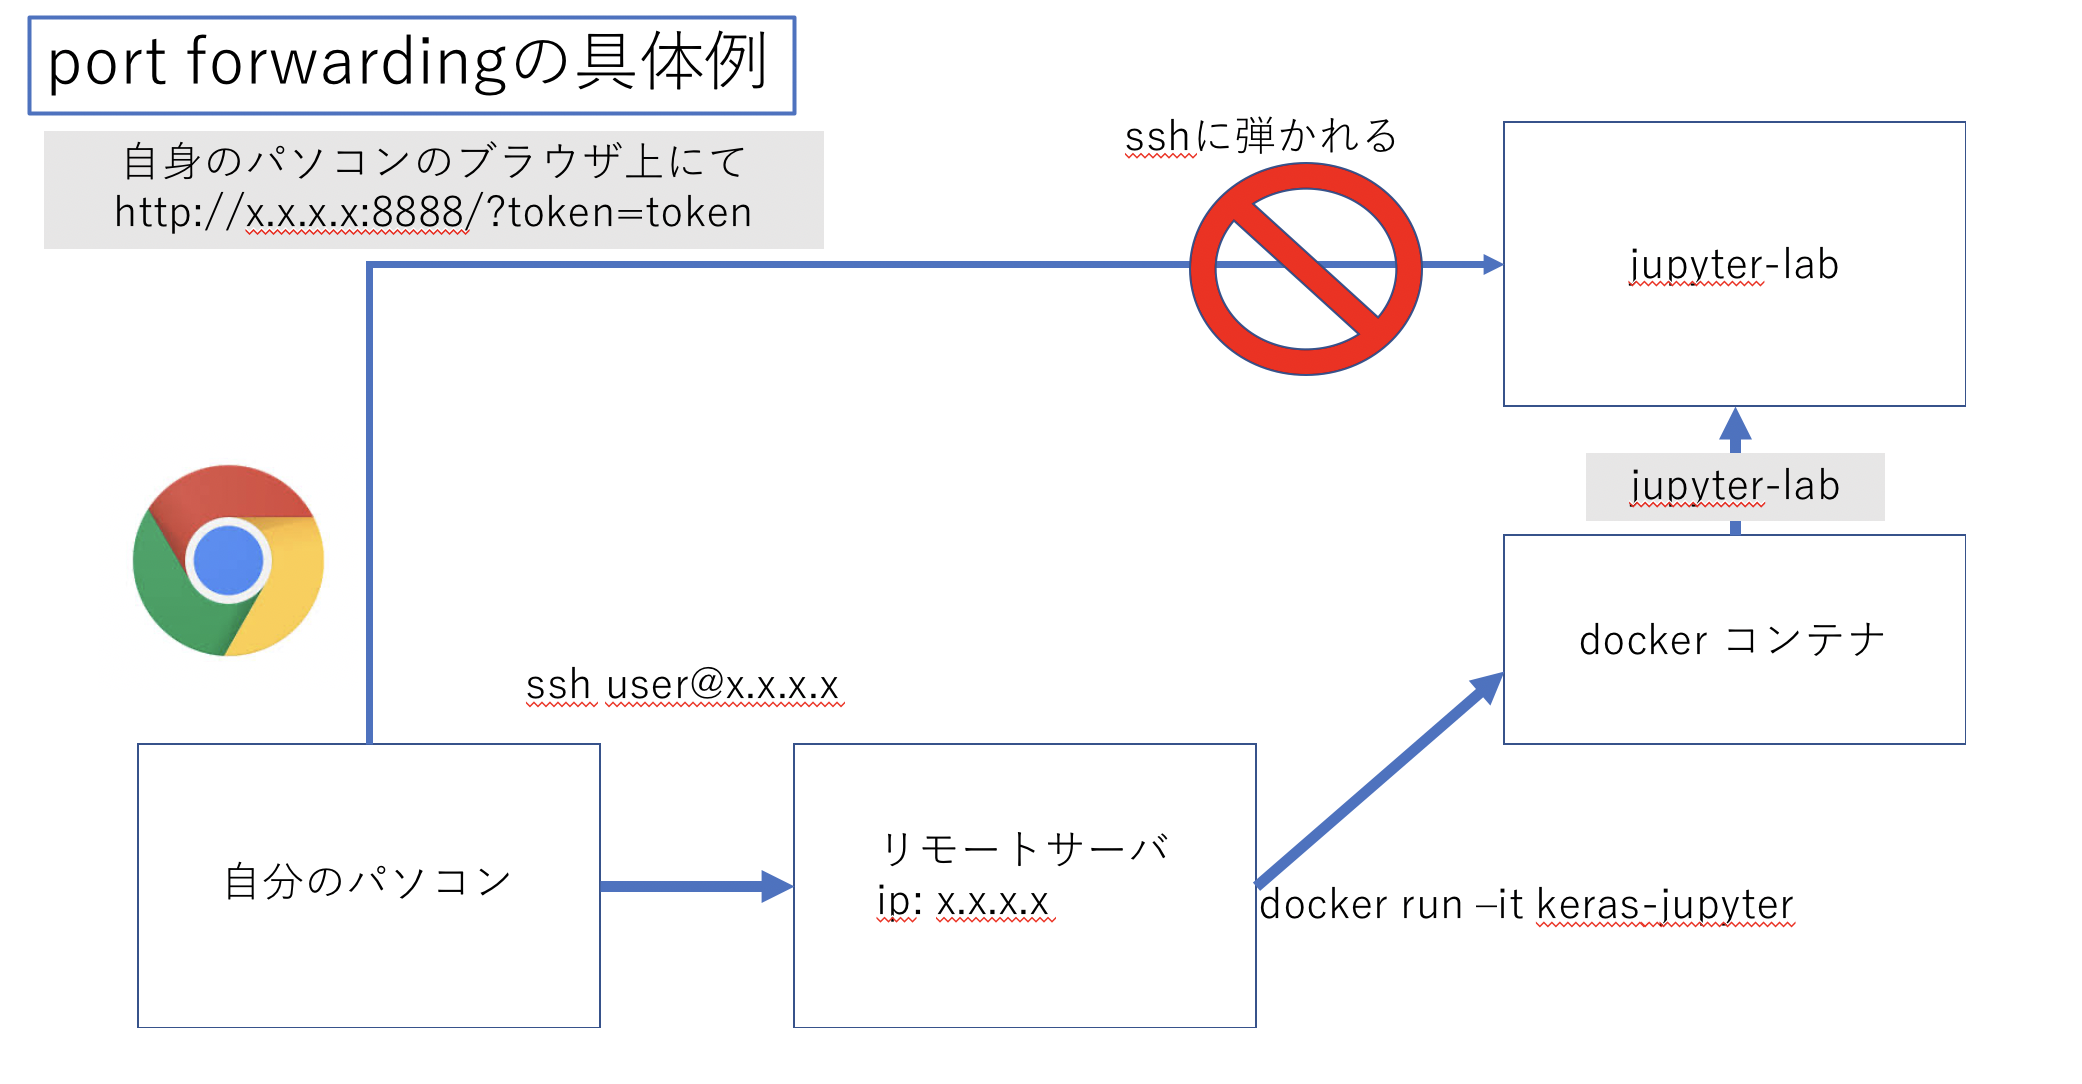
現在私は以下の図のように私自身のパソコンからサーバにssh接続し、その上でdockerを走らせて、更にその上でjupyterlabを起動させようとしている。
しかしjupyterlabはブラウザ上で扱うもののためssh接続とは別にもう一つjupyterlabまでの接続経路を作成しないといけない。
そのためブラウザ上でもjupyterに接続できるようssh以外の接続経路(トンネル)を作成することをport forwardingという。
以下の図のように各コマンドにオプションを加えることでsshのポート22番の他にトンネルを開けることができる。
ただ今回は解説のためにすべてポート番号を変えているが、間違えないようすべてのポートフォワードするポートは8888などに統一すると良いだろう。
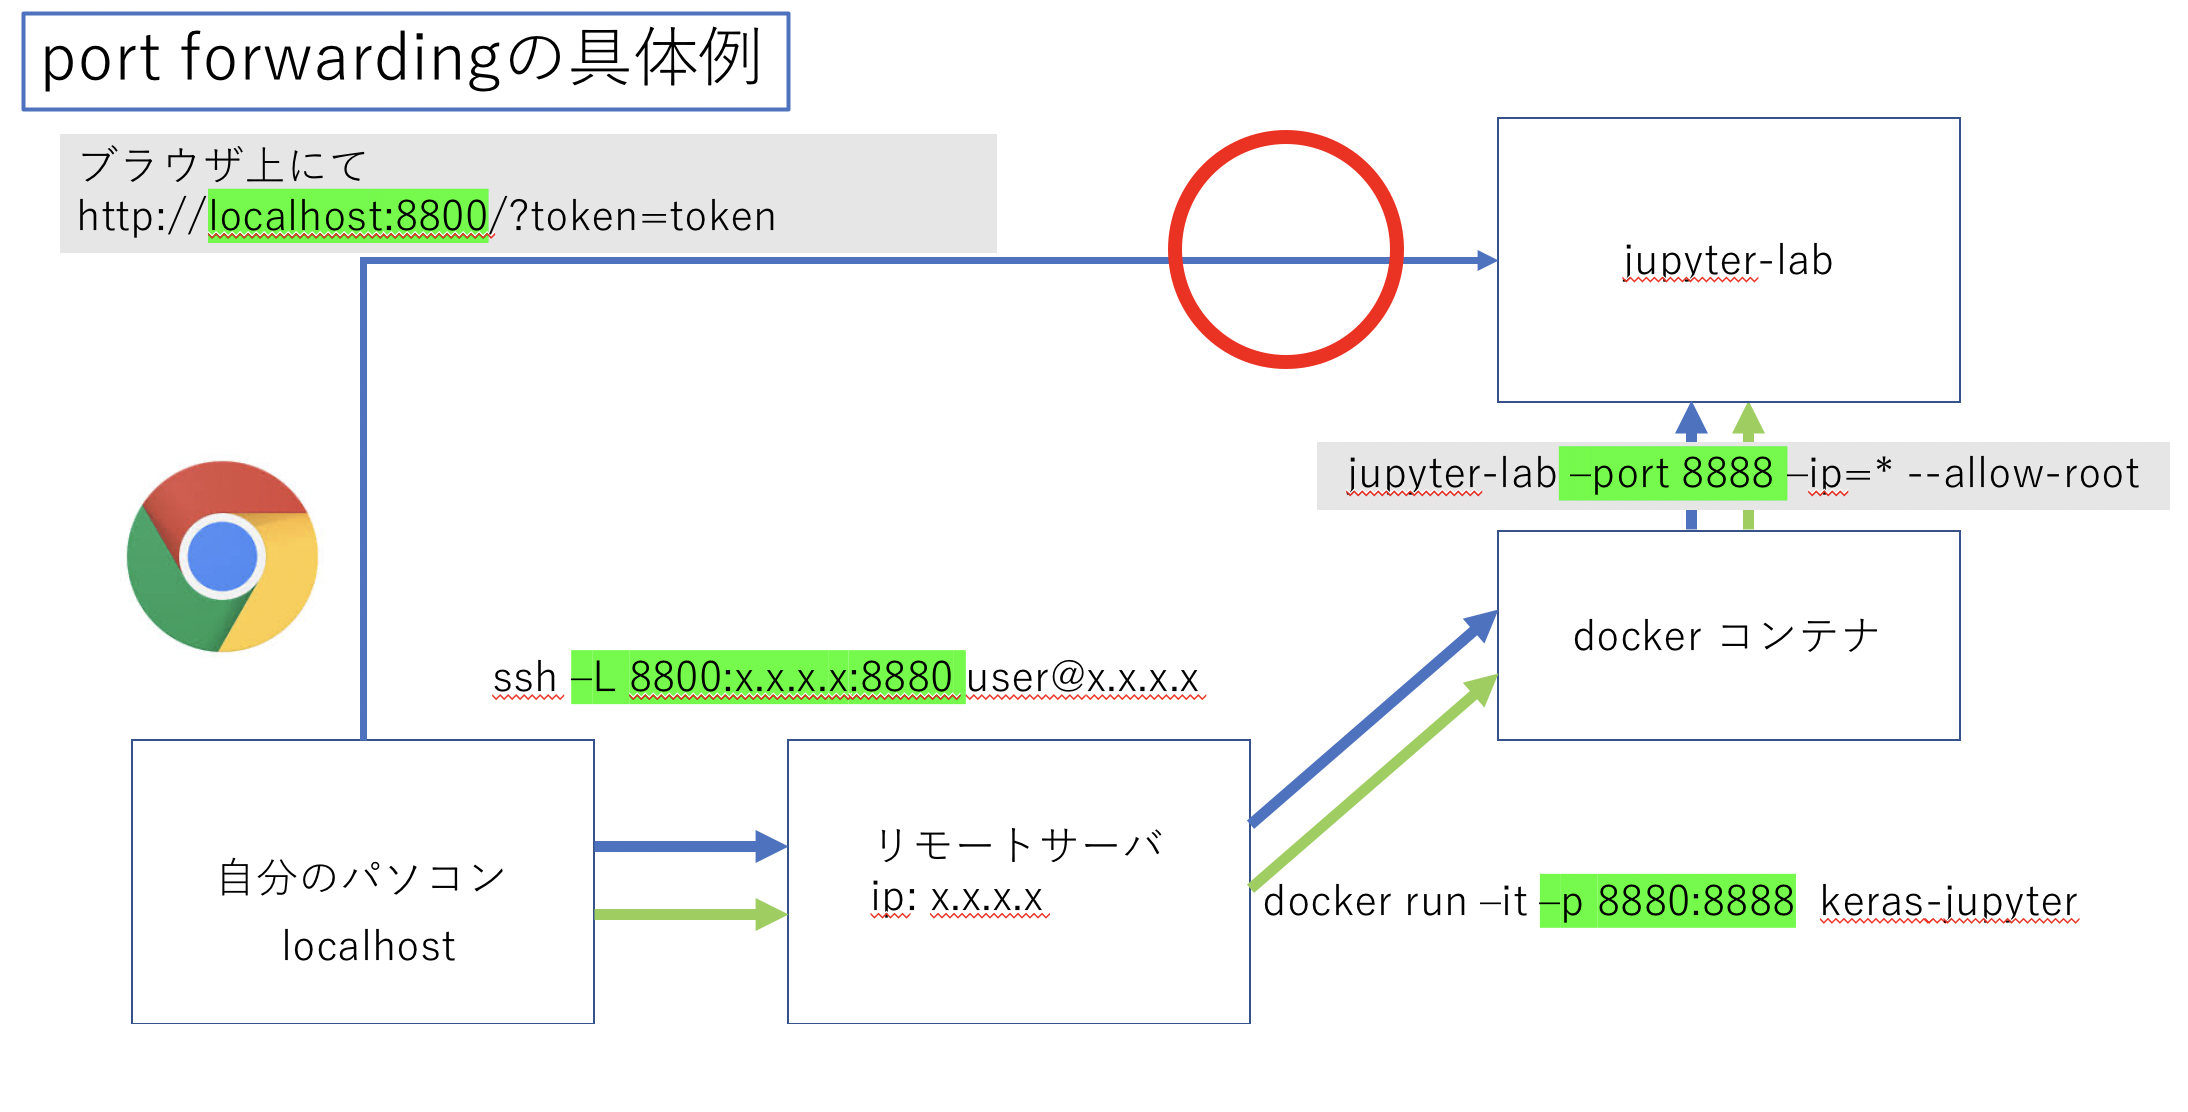
それでは具体的にjupyterlabのテストを通してポートフォアディングができているか確認していこう。jupyterlabへのport forwarding
sshでのport forward
まずローカルからsshでサーバに接続する。
$ ssh user@x.x.x.x -L 8800:x.x.x.x:8880
-L {ローカルのポート番号}:{サーバのip}:{サーバでつなぎたいポート番号}のようにオプションを付ける。dockerでのport forward
-p 8880:8888をオプションに追加する。
これによりサーバからdockerにアクセスした際にサーバのポート8880番がdockerの8888番につながる。$ sudo docker run -it -p 8880:8888 keras-jupyterこれによりローカルの8800番はdockerの8888番につながった。
jupyterlabの起動
次にコンテナ上でjupyterlabを以下のコマンドで起動する。
# jupyter lab --port 8888 --ip=* --allow-root以下コマンドの解説
- まずdockerのport8888番がローカルとつながっているためjupyterのportを8888とする。(
--port 8888)- jupyterをそのまま起動するとipがわからず接続できないためdocker環境とアドホックにつなぐ。(
--ip=*)- 最後に現在dockerはrootで起動してるためルートでの接続を許可する。(
--allow-root)以下のような出力の
http://127.0.0.1:8888/?token=614f6e5d410a1c459baa691ee28fdd0e2593c4644189a09e`をコピー。[W 02:52:43.023 LabApp] WARNING: The notebook server is listening on all IP addresses and not using encryption. This is not recommended. [I 02:52:43.028 LabApp] JupyterLab extension loaded from /usr/local/lib/python3.6/dist-packages/jupyterlab [I 02:52:43.028 LabApp] JupyterLab application directory is /usr/local/share/jupyter/lab [I 02:52:43.030 LabApp] Serving notebooks from local directory: / [I 02:52:43.030 LabApp] Jupyter Notebook 6.1.4 is running at: [I 02:52:43.030 LabApp] http://0829a84d25eb:8888/?token=614f6e5d410a1c459baa691ee28fdd0e2593c4644189a09e [I 02:52:43.030 LabApp] or http://127.0.0.1:8888/?token=614f6e5d410a1c459baa691ee28fdd0e2593c4644189a09e [I 02:52:43.030 LabApp] Use Control-C to stop this server and shut down all kernels (twice to skip confirmation).jupyterへの接続
先程のurlの一部を以下のように変更し、ローカルのブラウザに貼り付ける。
http://localhost:8800/?token=614f6e5d410a1c459baa691ee28fdd0e2593c4644189a09eこれでサーバで実行中のjupyterにポートフォアディングによって接続できる。
余談
実際dockerを実行する際にはユーザーをdockerとserverでバインドするなどここでは詳しく解説しないが以下のようにdocker run コマンドをaliasに登録して使うとよいだろう。
alias docker-run-keras = 'sudo docker run -v /etc/group:/etc/group:ro -v /etc/passwd:/etc/passwd:ro -v $HOME:$HOME -u $(id -u $USER):$(id -g $USER) -it --gpus 2 -p 8888:8888 --shm-size 30g keras-jupyter