- 投稿日:2020-09-09T21:50:38+09:00
【React Native】TextInputでAndoirdのみ縦方向の中央寄せができない
前提
- React Native 0.62.2
問題
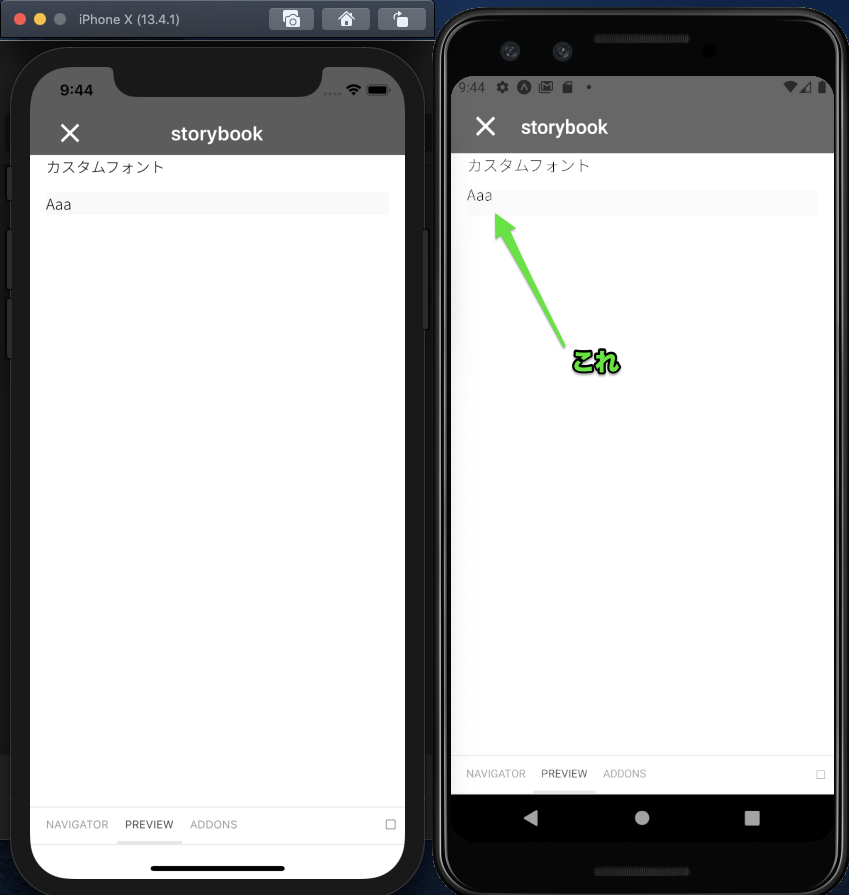
- TextInputコンポーネントでカスタムフォントを適用した際、Androidのみ入力したテキストの下方に謎のpaddingが出現する
↓左がiOS、右がAndroid
※わかりやすくするため、TextInputの背景をグレーにしている。
解決方法
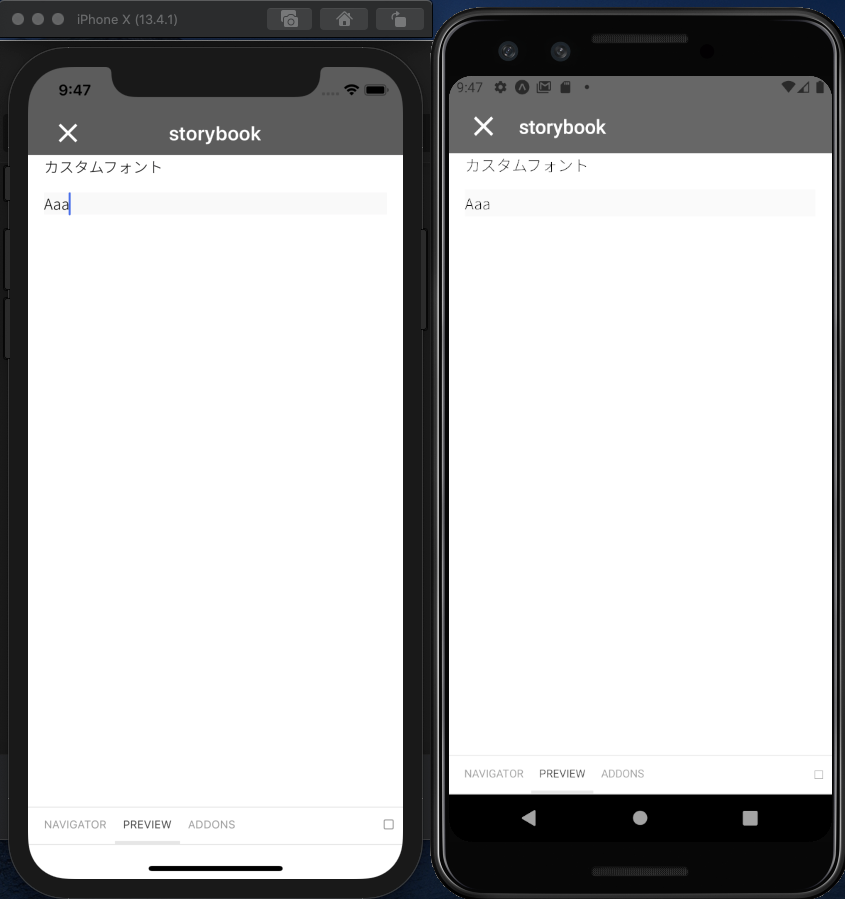
TextInputのstyleに
includeFontPadding: falseを追加する
ちなみに、色々調べると、多かったのは以下のパターンのいずれかの組み合わせだが、いずれもうまくいかなかった。
style = {
  padding:0,
  paddingVertical: 0,
  margin: 0,
  textAlignVertical: 'center',
}
参考文献
- 投稿日:2020-09-09T20:04:55+09:00
Cannot fit requested classes in a single dex file (# methods: 115337 > 65536)
メソッド数が65536を超えた場合のビルドエラー
https://minpro.net/android-64k-problems
要求されたクラスを単一のdexファイルに収めることはできません
解決法
最初から複数のdexファイルが使えるように設定。
build.gradle(app)defaultConfig { ... multiDexEnabled true } dependencies { implementation 'com.android.support:multidex:1.0.3' }
- 投稿日:2020-09-09T16:42:43+09:00
Essential Phone (PH-1) with twrp.2020【Evolution X】
Essential PhoneにEvolution Xを焼くためにTWRPについて色々と模索する必要があったためここに記しておく。現時点/現環境でTWRPを起動させることができない場合にこの記事は参考になるのではないかと思う。
この記事によって発生した損害について私は一切の責任を持たないので自己責任でよろしくお願いしたい。素人の備忘録なので手順が何のための手順なのかを理解していない節もある。あくまでここに示すのは自分が実際に行って成功した例である。
Essentialは倒産してWebページも削除されたため、この記事に書いてある必要なデーターは各自で探してくる必要がある。
環境構築
OSはWindows
- Essential-PH1-WindowsDrivers.exeの導入をしておく。
- ADB/FASTBOOTが使えるか確認しておく。
- ブートローダーアンロック済み。準備
- PH1-Images-QQ1A.200105.007.zip
- twrp-3.2.3-0-mata.img
- EvolitionXのOTAのROM
手順
Essential Phoneは倒産してしまい、最終アップデートは2020 Febの
QQ1A.200105.032となった。このバージョンはどうやらTWRPをFlashできない問題を抱えているらしい。2020 JanのQQ1A.200105.007に戻す必要がある。Androidが起動している状態で
$ adb reboot bootloaderからブートローダーを起動。
PH1-Images-QQ1A.200105.007.zipを解凍し、中身のファイル群の中のflashall.batをダブルクリックして走らせる。しばらく待つと再起動されてQQ1A.200105.007のROMに戻すことができる。この過程でユーザーデータは全消去される。再びAndroidが起動し、初期設定は省いてADBが使える状態にする。
これ以降は
aとbが出てくるが、初めにcurrent-slot: _aと出れば逆に読み替える。$ adb reboot bootloader $ fastboot getvar current-slot current-slot: _b $ fastboot flash boot_a twrp-3.2.3-0-mata.img $ fastboot --set-active=a音量ボタンと電源ボタンでリカバリーを選択し起動。TWRPが起動する。タッチは効かないのは既存の問題で気にする必要はない。
A.bat$ adb shell twrp sideload $ adb sideload EvolutionX_4.6_mata-10.0-20200809-1528-OFFICIAL.zipしばらく待つと実行が完了する。PCのログにエラーが出ていなければ成功だし、失敗しても再度上記の
A.batの内容を実行すればよい。自分は進捗が47%で止まり実行が完了してしまうが、ROM焼きは成功しているようである。あとがき
過去記事でLineageOSを焼いた。そのころのLineageOSの感触と今回焼いてみたEvolution Xとを比較すると後者は設定項目に無骨さがなく親しみやすいように感じた。また、Evolution XはGMSがあらかじめROMに内包されているので別途GAppsを導入する必要がないのはいい点だと思う。逆にGoogleの縛りから開放されてAOSP味を追求したいという人には向いていないと思う。
他のカスタムROMは知らないが、EssentialのStocckのROMの延長線でセキュリティーアップデートなどを適用していきたい人にはおすすめできるかと思う。
- 投稿日:2020-09-09T15:18:11+09:00
*Android*【HTTP通信_2】FlaskとHTTP通信をする(WebAPIを叩く[GET/POST])
はじめに
前回の記事では,httpbinをWebAPIとして使用し,HttpURLConnectionの使い方について解説しました.今回は,FlaskをWebAPIとして使用し,AndroidとFlask間でHTTP通信(GET/POST)を行ってみます.HttpURLConnectionやcurlコマンドの詳しい解説は,前回の記事を参考にしてください.
前提
*Android Studio 4.0.1
*targetSdkVersion 28
*Google Nexus 5xcurlコマンド, Python
*Ubuntu 20.04 LTS (WSL 2)
*Python 3.7.3GETメソッド
GETメソッドを使ったHTTP通信は簡単に実現できます.Android側は前回の記事を参考にしてください.最後に示すサンプルコードにはAndroid側のコードも記述します.ここではFlask側に関して記述します.
app.pyfrom flask import Flask, jsonify app = Flask(__name__) @app.route('/api/get', methods=['GET']) def get(): # GETリクエストに対するレスポンスを作成 response = {'result': 'success', 'status': 200} # JSONオブジェクトとして返す return jsonify(response)curlコマンドを使ってリクエストを送ってみます.
curl http://127.0.0.1:5000/api/get以下のようなレスポンスが出力されるはずです.
{
  "result": "success",
  "status": 200
}
POSTメソッド
POSTメソッドを使ったHTTP通信について説明します.
flaskでJSON形式のデータを読み込む
JSON形式のデータを読み込む方法としては3つあります.今回は,POSTリクエストで受け取ったデータを読み込むことになります.
app.pyfrom flask import Flask, request, jsonify import json app = Flask(__name__) @app.route('/api/post', methods=['POST']) def post(): # 方法1 # POSTで受け取ったデータをrequest.dataを取り出すとbytes型であることがわかる print(type(request.data)) # 出力してもbytes型であることがわかる print(request.data) # bytes型なので文字列に直すためにdecodeする print(request.data.decode('utf-8')) # JSON形式で書かれている文字列をloadsメソッドによってディクショナリ型に変換できる data = json.loads(request.data.decode('utf-8')) print(data) # 方法2 # loadsメソッドでは,文字列以外にbytes型,bytearray型を入れることができる data = json.loads(request.data) print(data) # 方法3 # request.jsonメソッドを使うことで,POSTで受け取ったデータをディクショナリ型として扱うことができる # この書き方が1番早いので推奨する print(request.json) # 方法3を採用し,戻り値としてJSONオブジェクトを返す data = request.json return jsonify(data) if __name__ == '__main__': app.run(host='0.0.0.0', debug=True)app.pyを実行して,試しにcurlを使ってPOSTリクエストを送ってみる.新しいターミナルを開き,以下のコマンドを実行する.bodyは,JSON形式で文字列を記述する.
curl -X POST -H 'Content-Type:application/json' -d `{"name": "foge", "value": "fogefoge"}` http://127.0.0.1:5000/api/postcurlコマンドを実行すると,app.pyを実行したターミナルに以下のように出力される.下3行の出力が同じであることが確認できる.
<class 'bytes'>
b'{"name": "foge", "value": "fogefoge"}'
{"name": "foge", "value": "fogefoge"}
{'name': 'foge', 'value': 'fogefoge'}
{'name': 'foge', 'value': 'fogefoge'}
{'name': 'foge', 'value': 'fogefoge'}
AndroidでのJsonのフォーマット
Androidから送信したJSON形式で書かれた文字列のデータをPythonで読み込むには,Androidの方でJSONの形式に則ってボディを記述する必要がある.具体的には以下のようにする.
String postData = "{\"name\": \"foge\", \"value\": \"fogefoge\"}";このように,文字列の中に二重引用符を記述する必要があるためエスケープシーケンスを使って記述する.また,文字列の中に変数のデータを埋め込みたい場合は以下のように記述する.
String name = "foge";
int value = 100;

String postData = String.format("{\"name\": \"%s\", \"value\": %d}", name, value);
しかし,このように記述するのは非常に面倒なため,一般的には以下のように記述する.
// 連想配列を作成する
HashMap<String, Object> jsonMap = new HashMap<>();
jsonMap.put("name", "foge");
jsonMap.put("value", 100);
// 連想配列をJSONObjectに変換
JSONObject responseJsonObject = new JSONObject(jsonMap);
// JSONObjectを文字列に変換
String postData = responseJsonObject.toString();
サンプルコード
では,以下にサンプルコードを示す.
app.pyfrom flask import Flask, request, jsonify app = Flask(__name__) # jsonifyの結果に日本語が含まれる場合,以下の1行を記述することで文字化けを回避できる app.config['JSON_AS_ASCII'] = False @app.route('/api/get', methods=['GET']) def get(): response = {"result": "success", "status": 200} return jsonify(response) @app.route('/api/post', methods=['POST']) def post(): data = request.json name = data['name'] value = data['value'] array = data['array'] print(f'data: {data}') print(f'data["name"]: {name}') print(f'data["value"]: {value}') print(f'data["array"]: {array}') print(f'data["array[0]"]: {array[0]}') print(f'data["array[1]"]: {array[1]}') print(f'data["array[2]"]: {array[2]}') return jsonify(data) if __name__ == '__main__': app.run(host='0.0.0.0', debug=True)Androidのサンプルコードを記述する前にcurlで一度HTTP通信ができるかどうか確認を行ってください.
curl http://127.0.0.1:5000/api/getcurl -X POST -H 'Content-Type:application/json' -d '{"name": "foge", "value": 100, "array":["おはよう", "こんにちは", "こんばんは"]}' http://127.0.0.1:5000/api/post以下にAndroidのサンプルコードを示します.
AndroidManifest.xml<?xml version="1.0" encoding="utf-8"?> <manifest xmlns:android="http://schemas.android.com/apk/res/android" package="com.example.samplehttpconnection"> <uses-permission android:name="android.permission.INTERNET"/> <application android:allowBackup="true" android:icon="@mipmap/ic_launcher" android:label="@string/app_name" android:roundIcon="@mipmap/ic_launcher_round" android:supportsRtl="true" android:theme="@style/AppTheme"> <activity android:name=".MainActivity"> <intent-filter> <action android:name="android.intent.action.MAIN" /> <category android:name="android.intent.category.LAUNCHER" /> </intent-filter> </activity> </application> </manifest>activity_main.xml<?xml version="1.0" encoding="utf-8"?> <androidx.constraintlayout.widget.ConstraintLayout xmlns:android="http://schemas.android.com/apk/res/android" xmlns:app="http://schemas.android.com/apk/res-auto" xmlns:tools="http://schemas.android.com/tools" android:layout_width="match_parent" android:layout_height="match_parent" tools:context=".MainActivity"> <TextView android:id="@+id/textView" android:layout_width="wrap_content" android:layout_height="wrap_content" android:layout_marginTop="100dp" android:gravity="center" android:text="" app:layout_constraintLeft_toLeftOf="parent" app:layout_constraintRight_toRightOf="parent" app:layout_constraintTop_toBottomOf="@+id/button2" /> <Button android:id="@+id/button" android:layout_width="wrap_content" android:layout_height="wrap_content" android:layout_marginTop="100dp" android:text="GET" app:layout_constraintEnd_toEndOf="parent" app:layout_constraintStart_toStartOf="parent" app:layout_constraintTop_toTopOf="parent" /> <TextView android:id="@+id/textView2" android:layout_width="wrap_content" android:layout_height="wrap_content" android:layout_marginTop="100dp" android:gravity="center" android:text="" app:layout_constraintEnd_toEndOf="parent" app:layout_constraintStart_toStartOf="parent" app:layout_constraintTop_toBottomOf="@+id/textView" /> <Button android:id="@+id/button2" android:layout_width="wrap_content" android:layout_height="wrap_content" android:layout_marginTop="50dp" android:text="POST" app:layout_constraintEnd_toEndOf="parent" app:layout_constraintStart_toStartOf="parent" app:layout_constraintTop_toBottomOf="@+id/button" /> </androidx.constraintlayout.widget.ConstraintLayout>MainActivity.javapackage com.example.samplehttpconnection; import androidx.appcompat.app.AppCompatActivity; import android.os.Bundle; import android.os.Handler; import android.view.View; import android.widget.Button; import android.widget.TextView; import org.json.JSONException; import org.json.JSONObject; import java.io.BufferedReader; import java.io.BufferedWriter; import java.io.IOException; import java.io.InputStream; import java.io.InputStreamReader; import java.io.OutputStream; import java.io.OutputStreamWriter; import java.net.HttpURLConnection; import java.net.MalformedURLException; import java.net.URL; import java.util.ArrayList; import java.util.HashMap; import java.util.Locale; public class MainActivity extends AppCompatActivity { private Handler handler = new Handler(); private Button button; private Button button2; private TextView textView; private TextView textView2; // IPアドレスは各自変更してください.Pythonのプログラムを実行しているPCのIPアドレスを記述 private String urlGetText = "http://192.168.0.10:5000/api/get"; private String urlPostText = "http://192.168.0.10:5000/api/post"; private String getResultText = ""; private String postResultText = ""; @Override protected void onCreate(Bundle savedInstanceState) { super.onCreate(savedInstanceState); setContentView(R.layout.activity_main); button = findViewById(R.id.button); button2 = findViewById(R.id.button2); textView = findViewById(R.id.textView); textView2 = findViewById(R.id.textView2); button.setOnClickListener(new View.OnClickListener() { @Override public void onClick(View v) { Thread thread = new Thread(new Runnable() { @Override public void run() { String response = ""; try { response = getAPI(); JSONObject rootJSON = new JSONObject(response); getResultText = rootJSON.toString(); } catch (JSONException e) { e.printStackTrace(); } handler.post(new Runnable() { @Override public void run() { textView.setText(getResultText); } }); } }); thread.start(); } }); button2.setOnClickListener(new View.OnClickListener() { @Override public void onClick(View v) { Thread thread = new Thread(new Runnable() { @Override public void run() { String response = ""; try { response = postAPI(); JSONObject rootJSON = new JSONObject(response); postResultText = rootJSON.toString(); } catch (JSONException e) { e.printStackTrace(); } handler.post(new Runnable() { @Override public void run() { textView2.setText(postResultText); } }); } }); thread.start(); } }); } public String getAPI(){ HttpURLConnection urlConnection = null; InputStream inputStream = null; String result = ""; String str = ""; try { URL url = new URL(urlGetText); urlConnection = (HttpURLConnection) url.openConnection(); urlConnection.setConnectTimeout(10000); urlConnection.setReadTimeout(10000); urlConnection.addRequestProperty("User-Agent", "Android"); urlConnection.addRequestProperty("Accept-Language", Locale.getDefault().toString()); urlConnection.setRequestMethod("GET"); urlConnection.setDoInput(true); urlConnection.setDoOutput(false); urlConnection.connect(); int statusCode = urlConnection.getResponseCode(); if (statusCode == 200){ inputStream = urlConnection.getInputStream(); BufferedReader bufferedReader = new BufferedReader(new InputStreamReader(inputStream, "utf-8")); result = bufferedReader.readLine(); while (result != null){ str += result; result = bufferedReader.readLine(); } bufferedReader.close(); } } catch (MalformedURLException e) { e.printStackTrace(); } catch (IOException e) { e.printStackTrace(); } return str; } public String postAPI(){ HttpURLConnection urlConnection = null; InputStream inputStream = null; OutputStream outputStream = null; String result = ""; String str = ""; try { URL url = new URL(urlPostText); urlConnection = (HttpURLConnection) url.openConnection(); urlConnection.setConnectTimeout(10000); urlConnection.setReadTimeout(10000); urlConnection.addRequestProperty("User-Agent", "Android"); urlConnection.addRequestProperty("Accept-Language", Locale.getDefault().toString()); urlConnection.addRequestProperty("Content-Type", "application/json; charset=UTF-8"); urlConnection.setRequestMethod("POST"); urlConnection.setDoInput(true); urlConnection.setDoOutput(true); urlConnection.connect(); outputStream = urlConnection.getOutputStream(); HashMap<String, Object> jsonMap = new HashMap<>(); jsonMap.put("name", "foge"); jsonMap.put("value", 100); ArrayList<String> array = new ArrayList<>(); array.add("おはよう"); array.add("こんにちは"); array.add("こんばんは"); jsonMap.put("array", array); JSONObject responseJsonObject = new JSONObject(jsonMap); String jsonText = responseJsonObject.toString(); BufferedWriter bufferedWriter = new BufferedWriter(new OutputStreamWriter(outputStream, "utf-8")); bufferedWriter.write(jsonText); bufferedWriter.flush(); bufferedWriter.close(); int statusCode = urlConnection.getResponseCode(); if (statusCode == 200){ inputStream = urlConnection.getInputStream(); BufferedReader bufferedReader = new BufferedReader(new InputStreamReader(inputStream)); result = bufferedReader.readLine(); while (result != null){ str += result; result = bufferedReader.readLine(); } bufferedReader.close(); } urlConnection.disconnect(); } catch (MalformedURLException e) { e.printStackTrace(); } catch (IOException e) { e.printStackTrace(); } return str; } }参照してもらいたいページ
- 投稿日:2020-09-09T15:18:11+09:00
*Android*【HTTP通信_2】FlaskとHTTP通信をする(WebAPIを叩く[GET, POST])
はじめに
前回の記事では,httpbinをWebAPIとして使用し,HttpURLConnectionの使い方について解説しました.今回は,FlaskをWebAPIとして使用し,AndroidとFlask間でHTTP通信(GET/POST)を行ってみます.HttpURLConnectionやcurlコマンドの詳しい解説は,前回の記事を参考にしてください.
前提
*Android Studio 4.0.1
*targetSdkVersion 28
*Google Nexus 5xcurlコマンド, Python
*Ubuntu 20.04 LTS (WSL 2)
*Python 3.7.3GETメソッド
GETメソッドを使ったHTTP通信は簡単に実現できます.Android側は前回の記事を参考にしてください.最後に示すサンプルコードにはAndroid側のコードも記述します.ここではFlask側に関して記述します.
app.pyfrom flask import Flask, jsonify app = Flask(__name__) @app.route('/api/get', methods=['GET']) def get(): # GETリクエストに対するレスポンスを作成 response = {'result': 'success', 'status': 200} # JSONオブジェクトとして返す return jsonify(response)curlコマンドを使ってリクエストを送ってみます.
curl http://127.0.0.1:5000/api/get以下のようなレスポンスが出力されるはずです.
{
  "result": "success",
  "status": 200
}
POSTメソッド
POSTメソッドを使ったHTTP通信について説明します.
flaskでJSON形式のデータを読み込む
JSON形式のデータを読み込む方法としては3つあります.今回は,POSTリクエストで受け取ったデータを読み込むことになります.
app.pyfrom flask import Flask, request, jsonify import json app = Flask(__name__) @app.route('/api/post', methods=['POST']) def post(): # 方法1 # POSTで受け取ったデータをrequest.dataを取り出すとbytes型であることがわかる print(type(request.data)) # 出力してもbytes型であることがわかる print(request.data) # bytes型なので文字列に直すためにdecodeする print(request.data.decode('utf-8')) # JSON形式で書かれている文字列をloadsメソッドによってディクショナリ型に変換できる data = json.loads(request.data.decode('utf-8')) print(data) # 方法2 # loadsメソッドでは,文字列以外にbytes型,bytearray型を入れることができる data = json.loads(request.data) print(data) # 方法3 # request.jsonメソッドを使うことで,POSTで受け取ったデータをディクショナリ型として扱うことができる # この書き方が1番早いので推奨する print(request.json) # 方法3を採用し,戻り値としてJSONオブジェクトを返す data = request.json return jsonify(data) if __name__ == '__main__': app.run(host='0.0.0.0', debug=True)app.pyを実行して,試しにcurlを使ってPOSTリクエストを送ってみる.新しいターミナルを開き,以下のコマンドを実行する.bodyは,JSON形式で文字列を記述する.
curl -X POST -H 'Content-Type:application/json' -d `{"name": "foge", "value": "fogefoge"}` http://127.0.0.1:5000/api/postcurlコマンドを実行すると,app.pyを実行したターミナルに以下のように出力される.下3行の出力が同じであることが確認できる.
<class 'bytes'>
b'{"name": "foge", "value": "fogefoge"}'
{"name": "foge", "value": "fogefoge"}
{'name': 'foge', 'value': 'fogefoge'}
{'name': 'foge', 'value': 'fogefoge'}
{'name': 'foge', 'value': 'fogefoge'}
AndroidでのJsonのフォーマット
Androidから送信したJSON形式で書かれた文字列のデータをPythonで読み込むには,Androidの方でJSONの形式に則ってボディを記述する必要がある.具体的には以下のようにする.
String postData = "{\"name\": \"foge\", \"value\": \"fogefoge\"}";このように,文字列の中に二重引用符を記述する必要があるためエスケープシーケンスを使って記述する.また,文字列の中に変数のデータを埋め込みたい場合は以下のように記述する.
String name = "foge";
int value = 100;

String postData = String.format("{\"name\": \"%s\", \"value\": %d}", name, value);
しかし,このように記述するのは非常に面倒なため,一般的には以下のように記述する.
// 連想配列を作成する
HashMap<String, Object> jsonMap = new HashMap<>();
jsonMap.put("name", "foge");
jsonMap.put("value", 100);
// 連想配列をJSONObjectに変換
JSONObject responseJsonObject = new JSONObject(jsonMap);
// JSONObjectを文字列に変換
String postData = responseJsonObject.toString();
サンプルコード
では,以下にサンプルコードを示す.
app.pyfrom flask import Flask, request, jsonify app = Flask(__name__) # jsonifyの結果に日本語が含まれる場合,以下の1行を記述することで文字化けを回避できる app.config['JSON_AS_ASCII'] = False @app.route('/api/get', methods=['GET']) def get(): response = {"result": "success", "status": 200} return jsonify(response) @app.route('/api/post', methods=['POST']) def post(): data = request.json name = data['name'] value = data['value'] array = data['array'] print(f'data: {data}') print(f'data["name"]: {name}') print(f'data["value"]: {value}') print(f'data["array"]: {array}') print(f'data["array[0]"]: {array[0]}') print(f'data["array[1]"]: {array[1]}') print(f'data["array[2]"]: {array[2]}') return jsonify(data) if __name__ == '__main__': app.run(host='0.0.0.0', debug=True)Androidのサンプルコードを記述する前にcurlで一度HTTP通信ができるかどうか確認を行ってください.
curl http://127.0.0.1:5000/api/getcurl -X POST -H 'Content-Type:application/json' -d '{"name": "foge", "value": 100, "array":["おはよう", "こんにちは", "こんばんは"]}' http://127.0.0.1:5000/api/post以下にAndroidのサンプルコードを示します.
AndroidManifest.xml<?xml version="1.0" encoding="utf-8"?> <manifest xmlns:android="http://schemas.android.com/apk/res/android" package="com.example.samplehttpconnection"> <uses-permission android:name="android.permission.INTERNET"/> <application android:allowBackup="true" android:icon="@mipmap/ic_launcher" android:label="@string/app_name" android:roundIcon="@mipmap/ic_launcher_round" android:supportsRtl="true" android:theme="@style/AppTheme"> <activity android:name=".MainActivity"> <intent-filter> <action android:name="android.intent.action.MAIN" /> <category android:name="android.intent.category.LAUNCHER" /> </intent-filter> </activity> </application> </manifest>activity_main.xml<?xml version="1.0" encoding="utf-8"?> <androidx.constraintlayout.widget.ConstraintLayout xmlns:android="http://schemas.android.com/apk/res/android" xmlns:app="http://schemas.android.com/apk/res-auto" xmlns:tools="http://schemas.android.com/tools" android:layout_width="match_parent" android:layout_height="match_parent" tools:context=".MainActivity"> <TextView android:id="@+id/textView" android:layout_width="wrap_content" android:layout_height="wrap_content" android:layout_marginTop="100dp" android:gravity="center" android:text="" app:layout_constraintLeft_toLeftOf="parent" app:layout_constraintRight_toRightOf="parent" app:layout_constraintTop_toBottomOf="@+id/button2" /> <Button android:id="@+id/button" android:layout_width="wrap_content" android:layout_height="wrap_content" android:layout_marginTop="100dp" android:text="GET" app:layout_constraintEnd_toEndOf="parent" app:layout_constraintStart_toStartOf="parent" app:layout_constraintTop_toTopOf="parent" /> <TextView android:id="@+id/textView2" android:layout_width="wrap_content" android:layout_height="wrap_content" android:layout_marginTop="100dp" android:gravity="center" android:text="" app:layout_constraintEnd_toEndOf="parent" app:layout_constraintStart_toStartOf="parent" app:layout_constraintTop_toBottomOf="@+id/textView" /> <Button android:id="@+id/button2" android:layout_width="wrap_content" android:layout_height="wrap_content" android:layout_marginTop="50dp" android:text="POST" app:layout_constraintEnd_toEndOf="parent" app:layout_constraintStart_toStartOf="parent" app:layout_constraintTop_toBottomOf="@+id/button" /> </androidx.constraintlayout.widget.ConstraintLayout>MainActivity.javapackage com.example.samplehttpconnection; import androidx.appcompat.app.AppCompatActivity; import android.os.Bundle; import android.os.Handler; import android.view.View; import android.widget.Button; import android.widget.TextView; import org.json.JSONException; import org.json.JSONObject; import java.io.BufferedReader; import java.io.BufferedWriter; import java.io.IOException; import java.io.InputStream; import java.io.InputStreamReader; import java.io.OutputStream; import java.io.OutputStreamWriter; import java.net.HttpURLConnection; import java.net.MalformedURLException; import java.net.URL; import java.util.ArrayList; import java.util.HashMap; import java.util.Locale; public class MainActivity extends AppCompatActivity { private Handler handler = new Handler(); private Button button; private Button button2; private TextView textView; private TextView textView2; // IPアドレスは各自変更してください.Pythonのプログラムを実行しているPCのIPアドレスを記述 private String urlGetText = "http://192.168.0.10:5000/api/get"; private String urlPostText = "http://192.168.0.10:5000/api/post"; private String getResultText = ""; private String postResultText = ""; @Override protected void onCreate(Bundle savedInstanceState) { super.onCreate(savedInstanceState); setContentView(R.layout.activity_main); button = findViewById(R.id.button); button2 = findViewById(R.id.button2); textView = findViewById(R.id.textView); textView2 = findViewById(R.id.textView2); button.setOnClickListener(new View.OnClickListener() { @Override public void onClick(View v) { Thread thread = new Thread(new Runnable() { @Override public void run() { String response = ""; try { response = getAPI(); JSONObject rootJSON = new JSONObject(response); getResultText = rootJSON.toString(); } catch (JSONException e) { e.printStackTrace(); } handler.post(new Runnable() { @Override public void run() { textView.setText(getResultText); } }); } }); thread.start(); } }); button2.setOnClickListener(new View.OnClickListener() { @Override public void onClick(View v) { Thread thread = new Thread(new Runnable() { @Override public void run() { String response = ""; try { response = postAPI(); JSONObject rootJSON = new JSONObject(response); postResultText = rootJSON.toString(); } catch (JSONException e) { e.printStackTrace(); } handler.post(new Runnable() { @Override public void run() { textView2.setText(postResultText); } }); } }); thread.start(); } }); } public String getAPI(){ HttpURLConnection urlConnection = null; InputStream inputStream = null; String result = ""; String str = ""; try { URL url = new URL(urlGetText); urlConnection = (HttpURLConnection) url.openConnection(); urlConnection.setConnectTimeout(10000); urlConnection.setReadTimeout(10000); urlConnection.addRequestProperty("User-Agent", "Android"); urlConnection.addRequestProperty("Accept-Language", Locale.getDefault().toString()); urlConnection.setRequestMethod("GET"); urlConnection.setDoInput(true); urlConnection.setDoOutput(false); urlConnection.connect(); int statusCode = urlConnection.getResponseCode(); if (statusCode == 200){ inputStream = urlConnection.getInputStream(); BufferedReader bufferedReader = new BufferedReader(new InputStreamReader(inputStream, "utf-8")); result = bufferedReader.readLine(); while (result != null){ str += result; result = bufferedReader.readLine(); } bufferedReader.close(); } } catch (MalformedURLException e) { e.printStackTrace(); } catch (IOException e) { e.printStackTrace(); } return str; } public String postAPI(){ HttpURLConnection urlConnection = null; InputStream inputStream = null; OutputStream outputStream = null; String result = ""; String str = ""; try { URL url = new URL(urlPostText); urlConnection = (HttpURLConnection) url.openConnection(); urlConnection.setConnectTimeout(10000); urlConnection.setReadTimeout(10000); urlConnection.addRequestProperty("User-Agent", "Android"); urlConnection.addRequestProperty("Accept-Language", Locale.getDefault().toString()); urlConnection.addRequestProperty("Content-Type", "application/json; charset=UTF-8"); urlConnection.setRequestMethod("POST"); urlConnection.setDoInput(true); urlConnection.setDoOutput(true); urlConnection.connect(); outputStream = urlConnection.getOutputStream(); HashMap<String, Object> jsonMap = new HashMap<>(); jsonMap.put("name", "foge"); jsonMap.put("value", 100); ArrayList<String> array = new ArrayList<>(); array.add("おはよう"); array.add("こんにちは"); array.add("こんばんは"); jsonMap.put("array", array); JSONObject responseJsonObject = new JSONObject(jsonMap); String jsonText = responseJsonObject.toString(); BufferedWriter bufferedWriter = new BufferedWriter(new OutputStreamWriter(outputStream, "utf-8")); bufferedWriter.write(jsonText); bufferedWriter.flush(); bufferedWriter.close(); int statusCode = urlConnection.getResponseCode(); if (statusCode == 200){ inputStream = urlConnection.getInputStream(); BufferedReader bufferedReader = new BufferedReader(new InputStreamReader(inputStream)); result = bufferedReader.readLine(); while (result != null){ str += result; result = bufferedReader.readLine(); } bufferedReader.close(); } urlConnection.disconnect(); } catch (MalformedURLException e) { e.printStackTrace(); } catch (IOException e) { e.printStackTrace(); } return str; } }参照してもらいたいページ
- 投稿日:2020-09-09T11:36:10+09:00
【Android/Kotlin】ウィジェットの作成とクリック時動作の設定方法
はじめに
執筆者は趣味レベルのAndroidアプリ開発者である為,説明間違いが含まれている可能性があります。お気づきの点がありましたら,是非コメントお願いいたします。また,アップデートにより,機能やコードが記事執筆時点と異なる場合があります。
本記事の内容
ボタンを押すとカウンターが1ずつ増えていくウィジェットを作成し,基本的なウィジェットの作成方法とクリック自動動作の設定方法について解説します。
ウィジェットのクリック時の動作の実装について
ウィジェット上のボタンにクリック時動作を付加したい場合,
Activityと同様に「findViewByIdからのsetOnClickListenerで....」とは出来ません(泣)ウィジェットの場合,ブロードキャストという仕組みを使用します。
これは,アラームの実装等にも使われる仕組みで,ブロードキャストの為のトリガーを設定し,トリガーが起動したら情報(Intent)を全体に通知し,それをBroadcastReceiverによって受信して処理を行うという流れになります。ちょっと面倒ですが・・・アプリにウィジェットを追加する方法
アプリにウィジェットを追加するのは簡単です。
Android Studioの上のメニューの[File]->[New]->[Widget]->[AppWidget]でウィジェットのテンプレートを簡単に追加できます。
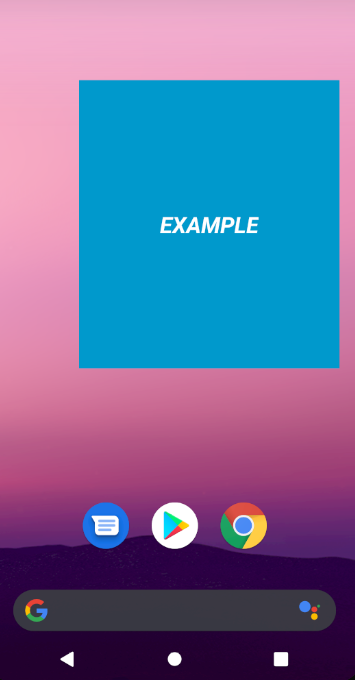
この際,AppWidgetProviderを継承したクラスが自動で作成されたり,自動的にManifestにBroadcastReceiverが登録されたりします。また,リソースにはレイアウトファイルが追加されたり,ウィジェットの情報を定義したxmlファイルが追加されています。初期状態のウィジェットのデザインは,青い背景の中央にテキストビューが配置されただけのものになります。
ウィジェットにボタンを追加していく
ウィジェット用のレイアウトファイルを編集しましょう。
今回は以下のようにしました。sample_app_widget.xml<LinearLayout xmlns:android="http://schemas.android.com/apk/res/android" android:layout_width="match_parent" android:layout_height="match_parent" android:background="@android:color/white" android:gravity="center" android:orientation="vertical" android:padding="@dimen/widget_margin"> <TextView android:id="@+id/counter" android:layout_width="wrap_content" android:layout_height="wrap_content" android:text="0" android:textAppearance="@style/TextAppearance.AppCompat.Display1" /> <Button android:id="@+id/add_button" android:layout_width="wrap_content" android:layout_height="wrap_content" android:text="add" /> </LinearLayout>白背景にカウンターとボタンのみ配置しています。因みに,LinearLayoutにbackgroundが設定されていますが,これを設定しない場合,背景は透過します。
クリック時処理を追加していく
ウィジェット作成時にAppWidgetProviderを継承したクラスが作成されていると思います。
このクラスの中で,ウィジェットの初期設定や,削除時や更新時の設定を行うことができます。AppWidgetProviderはBroadcastReceiverのサブクラスである為,AppWidgetProvideを継承したクラスでは,BroadcastReceiverのonReceiveをオーバーライドすることが出来ます。
onReceiveとは,そのクラス宛のIntentが送られてきた際に実行されるメソッドになります。onReceiveの中でintentの情報を読み取り,その情報に応じて各々の処理を実装するというのが一般的な流れになります。
以下が実際のソースになります
SampleAppWidget.kt//com.example.android.stackwidgetの部分は自分のアプリのIDに修正する private const val COUNT_UP = "com.example.android.buttonwidgettest.COUNT_UP" class SampleAppWidget : AppWidgetProvider() { override fun onUpdate( context: Context, appWidgetManager: AppWidgetManager, appWidgetIds: IntArray ) { // There may be multiple widgets active, so update all of them for (appWidgetId in appWidgetIds) { updateAppWidget(context, appWidgetManager, appWidgetId) } } override fun onReceive(context: Context?, intent: Intent?) { super.onReceive(context, intent) if (context == null || intent == null) return when (intent.action) { COUNT_UP -> { // カウント値を読み込み val dataStore = context.getSharedPreferences("widget", Context.MODE_PRIVATE) var clickCount = dataStore.getInt("clickCount", -1) clickCount++ // カウントアップ後のカウント値を書き込み dataStore.edit().putInt("clickCount", clickCount).commit() //TextViewにカウント値を適用 val views = RemoteViews(context.packageName, R.layout.sample_app_widget) views.setTextViewText(R.id.counter, clickCount.toString()) // ウィジェットを更新 val myWidget = ComponentName(context, SampleAppWidget::class.java) val manager = AppWidgetManager.getInstance(context) manager.updateAppWidget(myWidget, views) } } } } //onUpdateのappWidgetId毎の処理はこちらで実装する internal fun updateAppWidget( context: Context, appWidgetManager: AppWidgetManager, appWidgetId: Int ) { // SharedPreferencesからデータを読み出し(登録されていない場合は0) val dataStore = context.getSharedPreferences("widget", Context.MODE_PRIVATE) var clickCount = dataStore.getInt("clickCount", -1) if (clickCount == -1) { dataStore.edit().putInt("clickCount", 0).apply() clickCount = 0 } // RemoteViews オブジェクトを作成 val views = RemoteViews(context.packageName, R.layout.sample_app_widget) //TextViewにカウント値を適用 views.setTextViewText(R.id.counter, clickCount.toString()) //Button押下通知用のPendingIntentを作成しに登録 val countIntent = Intent(context, SampleAppWidget::class.java).apply { action = COUNT_UP } val countPendingIntent = PendingIntent.getBroadcast(context, 0, countIntent, PendingIntent.FLAG_UPDATE_CURRENT) views.setOnClickPendingIntent(R.id.add_button, countPendingIntent) // ウィジェットを更新 appWidgetManager.updateAppWidget(appWidgetId, views) }ウィジェット作成時の初期化処理
ウィジェット毎の,作成時の初期化処理は主にupdateAppWidgetに実装します。
今回は,カウント値の保存にはSharedPreferencesを使っていきます。まず,カウント値をSharedPreferencesを使って読み込みます。
作成されていない場合は,新規に作成します。
そして,TextViewにカウント値を適用を適用します。次に,countIntentというIntentを作成しています。Intentのactionには,自分で定義したCOUNT_UPという定数を設定しています。COUNT_UPはアプリのIDを含んでいますが,これはウィジェットからのブロードキャストを他のアプリも受け取る可能性がある為ですので,自分のアプリIDを含めてください。
次に,Intentを元にPendingIntentを作成します。PendingIntentはアラーム時の処理や今回のタップ時処理のように,Intentを後から利用したいときに作成するものになります。作成したPendingIntentをsetOnClickPendingIntentを使用して,ボタンウィジェットのクリック時処理に登録します。
最後にupdateAppWidgetを行います。変更を即座にUIに反映するためにはupdateAppWidgetを行う必要があるので,忘れず実行しましょう。
ボタンが押された際の処理
Intentの作成時に,Intentの通知先にSampleAppWidgetを設定しているため,ボタンが押された際にはこのクラスのonReceiveが実行されます。
onReceiveでは,送付されてきたIntentのactionを見ることで処理を振り分けしています。
actionがCOUNT_UPである場合,まずSharedPreferencesからカウント値を読み込み,カウントを+1して,+1した値をSharedPreferencesに保存し,TextViewを更新するというような流れになります。
これで,ウィジェットを起動してみると,ちゃんとカウントアップされると思います。ただこのままだと・・・
この実装で複数のウィジェットを作成した際に,複数が同じものとして動作します。
複数のウィジェットを作成した際,それぞれを独立させて動作させたい場合も多いかと思います。その場合の実装方法ですが,別で記事を書いていますのでこちらの記事を御覧ください。
おわりに
もし説明や実装におかしな点がありましたら是非コメントください。
修正させて頂きます。


- 投稿日:2020-09-09T11:36:10+09:00
【Android/Kotlin】Widgetの作成と,クリック動作を設定する方法
はじめに
執筆者は趣味レベルのAndroidアプリ開発者である為,説明間違いが含まれている可能性があります。ですので,お気づきの点がありましたら,是非コメントお願いいたします。また,アップデートにより,機能やコードが記事執筆時点と異なる場合があります。
ウィジェットのクリック時の動作の実装について
ウィジェット上のボタンにクリック時動作を付加したい場合,
Activityと同様に「findViewByIdからのsetOnClickListenerで....」
とはいかないのがウィジェットの辛い点です。ウィジェットの場合,ブロードキャストという仕組みを使用します。
これは,アラームの実装等にも使われる仕組みで,ブロードキャストの為のトリガーを設定し,トリガーが起動したら情報(Intent)を全体に通知し,それをBroadcastReceiverによって受信して処理を行うという仕組みになります。setOnClickListenerを使うより,だいぶ面倒です。具体的な実装は,ソースコードで説明します。
アプリにウィジェットを追加する方法
アプリにウィジェットを追加するのは簡単です。
Android Studioの上のメニューの[File]->[New]->[Widget]->[AppWidget]でウィジェットのテンプレートを簡単に追加できます。
この際,AppWidgetProviderを継承したクラスが自動で作成されたり,自動的にManifestにBroadcastReceiverが登録されたりします。また,リソースにはレイアウトファイルが追加されたり,ウィジェットの情報を定義したxmlファイルが追加されています。初期状態のウィジェットのデザインは,青い背景の中央にテキストビューが配置されただけのものになります。
ウィジェットにボタンを追加していく
ウィジェット用のレイアウトファイルを編集しましょう。
今回は以下のようにしました。<LinearLayout xmlns:android="http://schemas.android.com/apk/res/android" android:layout_width="match_parent" android:layout_height="match_parent" android:background="@android:color/white" android:gravity="center" android:orientation="vertical" android:padding="@dimen/widget_margin"> <TextView android:id="@+id/counter" android:layout_width="wrap_content" android:layout_height="wrap_content" android:text="0" android:textAppearance="@style/TextAppearance.AppCompat.Display1" /> <Button android:id="@+id/add_button" android:layout_width="wrap_content" android:layout_height="wrap_content" android:text="add" /> </LinearLayout>ボタンを押すとカウンターが1ずつ増えていくウィジェットを作成するので,白背景にカウンターとボタンのみ配置しています。因みに,LinearLayoutにbackgroundが設定されていますが,これを設定しない場合,背景は透過します。
クリック時処理を追加していく
ウィジェット作成時にAppWidgetProviderを継承したクラスが作成されていると思います。
このクラスの中で,ウィジェットの初期設定や,削除時や更新時の設定を行うことができます。AppWidgetProviderはBroadcastReceiverのサブクラスである為,AppWidgetProvideを継承したクラスでは,BroadcastReceiverのonReceiveをオーバーライドすることが出来ます。
onReceiveとは,そのクラス宛のIntentが送られてきた際に実行されるメソッドになります。onReceiveの中でintentの情報を読み取り,その情報によってそれぞれの処理を実装するというのが一般的な流れになります。
以下が実際のソースになります
//com.example.android.stackwidgetの部分は自分のアプリのIDにしたほうが良い
private const val COUNT_UP = "com.example.android.widgettest.COUNT_UP"
private var clickCount = 0

class SampleAppWidget : AppWidgetProvider() {

    override fun onUpdate(
        context: Context,
        appWidgetManager: AppWidgetManager,
        appWidgetIds: IntArray
    ) {
        // There may be multiple widgets active, so update all of them
        for (appWidgetId in appWidgetIds) {
            updateAppWidget(context, appWidgetManager, appWidgetId)
        }
    }

    override fun onReceive(context: Context?, intent: Intent?) {
        super.onReceive(context, intent)

        if (context == null || intent == null)
            return

        val views = RemoteViews(context.packageName, R.layout.widget)

        when (intent.action) {
            COUNT_UP -> {
                clickCount++
                views.setTextViewText(R.id.counter, clickCount.toString())

                pushWidgetUpdate(context, views)
            }
        }
    }
}

fun pushWidgetUpdate(context: Context, remoteViews: RemoteViews) {
    val myWidget = ComponentName(context, SampleAppWidget::class.java)
    val manager = AppWidgetManager.getInstance(context)
    manager.updateAppWidget(myWidget, remoteViews)
}

internal fun updateAppWidget(
    context: Context,
    appWidgetManager: AppWidgetManager,
    appWidgetId: Int
) {
    // Construct the RemoteViews object
    val views = RemoteViews(context.packageName, R.layout.widget)

    //TextViewに値を適用
    views.setTextViewText(R.id.counter, clickCount.toString())

    //Button押下通知用のPendingIntentを作成してボタンに登録
    val countIntent = Intent(context, SampleAppWidget::class.java).apply {
        action = COUNT_UP
    }
    val countPendingIntent =
        PendingIntent.getBroadcast(context, 0, countIntent, PendingIntent.FLAG_UPDATE_CURRENT)
    views.setOnClickPendingIntent(R.id.add_button, countPendingIntent)

    // Instruct the widget manager to update the widget
    appWidgetManager.updateAppWidget(appWidgetId, views)
}
クリックリスナーの登録
updateAppWidgetの中で主な初期化処理を行っており,ここでボタンにクリック時のブロードキャストの登録を行います。
まず,countIntentというIntentを作成しています。Intentのactionには,自分で定義したCOUNT_UPという定数を設定しています。COUNT_UPはアプリのIDを含んでいますが,これはウィジェットからのブロードキャストは他のアプリも受け取る可能性がある為だと思われます。(間違っていたらすみません)
次に,IntentをもとにPendingIntentを作成します。PendingIntentはアラーム時の処理や今回のタップ時処理のように,Intentを後から利用したいときに作成するものになります。
このPendingIntentをsetOnClickPendingIntentを使用して,ボタンウィジェットのクリック時処理に登録します。ボタンが押された際の処理
Intentの作成時に,Intentの通知先にSampleAppWidgetを設定しているため,ボタンが押された際にはこのクラスのonReceiveが実行されます。
onReceiveでは,送付されてきたIntentのactionを見ることで処理を振り分けしています。
COUNT_UPを受け取った際には,clickCountを+1して,その値をTextViewに適用しています。
尚,最後にpushWidgetUpdateでupdateAppWidgetを行っていますが,これを行わないとTextViewの変更が即時アップデートされませんので,注意してください。おわりに
このままですと,clickCountは再起動等で簡単にリセットされますので,値をどこかに保存しておく処理が必要になります。
また,この実装ですと,複数のウィジェットを作成した際には,複数が同じものとして連動して動作します。
複数のウィジェットを作成した際,それぞれが別々のウィジェットとして動作する方法に関しては,実装方法が分かり次第,追記したいと思います。
- 投稿日:2020-09-09T11:36:10+09:00
【Android/Kotlin】Widgetを作ってクリック時の動作を設定する
はじめに
執筆者は趣味レベルのAndroidアプリ開発者である為,説明間違いが含まれている可能性があります。お気づきの点がありましたら,是非コメントお願いいたします。また,アップデートにより,機能やコードが記事執筆時点と異なる場合があります。
本記事の内容
ボタンを押すとカウンターが1ずつ増えていくウィジェットを作成し,基本的なウィジェットの作成方法とクリック自動動作の設定方法について解説します。
ウィジェットのクリック時の動作の実装について
ウィジェット上のボタンにクリック時動作を付加したい場合,
Activityと同様に「findViewByIdからのsetOnClickListenerで....」とは出来ません(泣)ウィジェットの場合,ブロードキャストという仕組みを使用します。
これは,アラームの実装等にも使われる仕組みで,ブロードキャストの為のトリガーを設定し,トリガーが起動したら情報(Intent)を全体に通知し,それをBroadcastReceiverによって受信して処理を行うという流れになります。ちょっと面倒ですが・・・アプリにウィジェットを追加する方法
アプリにウィジェットを追加するのは簡単です。
Android Studioの上のメニューの[File]->[New]->[Widget]->[AppWidget]でウィジェットのテンプレートを簡単に追加できます。
この際,AppWidgetProviderを継承したクラスが自動で作成されたり,自動的にManifestにBroadcastReceiverが登録されたりします。また,リソースにはレイアウトファイルが追加されたり,ウィジェットの情報を定義したxmlファイルが追加されています。初期状態のウィジェットのデザインは,青い背景の中央にテキストビューが配置されただけのものになります。
ウィジェットにボタンを追加していく
ウィジェット用のレイアウトファイルを編集しましょう。
今回は以下のようにしました。sample_app_widget.xml<LinearLayout xmlns:android="http://schemas.android.com/apk/res/android" android:layout_width="match_parent" android:layout_height="match_parent" android:background="@android:color/white" android:gravity="center" android:orientation="vertical" android:padding="@dimen/widget_margin"> <TextView android:id="@+id/counter" android:layout_width="wrap_content" android:layout_height="wrap_content" android:text="0" android:textAppearance="@style/TextAppearance.AppCompat.Display1" /> <Button android:id="@+id/add_button" android:layout_width="wrap_content" android:layout_height="wrap_content" android:text="add" /> </LinearLayout>白背景にカウンターとボタンのみ配置しています。因みに,LinearLayoutにbackgroundが設定されていますが,これを設定しない場合,背景は透過します。
クリック時処理を追加していく
ウィジェット作成時にAppWidgetProviderを継承したクラスが作成されていると思います。
このクラスの中で,ウィジェットの初期設定や,削除時や更新時の設定を行うことができます。AppWidgetProviderはBroadcastReceiverのサブクラスである為,AppWidgetProvideを継承したクラスでは,BroadcastReceiverのonReceiveをオーバーライドすることが出来ます。
onReceiveとは,そのクラス宛のIntentが送られてきた際に実行されるメソッドになります。onReceiveの中でintentの情報を読み取り,その情報に応じて各々の処理を実装するというのが一般的な流れになります。
以下が実際のソースになります
SampleAppWidget.kt//com.example.android.stackwidgetの部分は自分のアプリのIDに修正する private const val COUNT_UP = "com.example.android.buttonwidgettest.COUNT_UP" class SampleAppWidget : AppWidgetProvider() { override fun onUpdate( context: Context, appWidgetManager: AppWidgetManager, appWidgetIds: IntArray ) { // There may be multiple widgets active, so update all of them for (appWidgetId in appWidgetIds) { updateAppWidget(context, appWidgetManager, appWidgetId) } } override fun onReceive(context: Context?, intent: Intent?) { super.onReceive(context, intent) if (context == null || intent == null) return when (intent.action) { COUNT_UP -> { // カウント値を読み込み val dataStore = context.getSharedPreferences("widget", Context.MODE_PRIVATE) var clickCount = dataStore.getInt("clickCount", -1) clickCount++ // カウントアップ後のカウント値を書き込み dataStore.edit().putInt("clickCount", clickCount).commit() //TextViewにカウント値を適用 val views = RemoteViews(context.packageName, R.layout.sample_app_widget) views.setTextViewText(R.id.counter, clickCount.toString()) // ウィジェットを更新 val myWidget = ComponentName(context, SampleAppWidget::class.java) val manager = AppWidgetManager.getInstance(context) manager.updateAppWidget(myWidget, views) } } } } //onUpdateのappWidgetId毎の処理はこちらで実装する internal fun updateAppWidget( context: Context, appWidgetManager: AppWidgetManager, appWidgetId: Int ) { // SharedPreferencesからデータを読み出し(登録されていない場合は0) val dataStore = context.getSharedPreferences("widget", Context.MODE_PRIVATE) var clickCount = dataStore.getInt("clickCount", -1) if (clickCount == -1) { dataStore.edit().putInt("clickCount", 0).apply() clickCount = 0 } // RemoteViews オブジェクトを作成 val views = RemoteViews(context.packageName, R.layout.sample_app_widget) //TextViewにカウント値を適用 views.setTextViewText(R.id.counter, clickCount.toString()) //Button押下通知用のPendingIntentを作成しに登録 val countIntent = Intent(context, SampleAppWidget::class.java).apply { action = COUNT_UP } val countPendingIntent = PendingIntent.getBroadcast(context, 0, countIntent, PendingIntent.FLAG_UPDATE_CURRENT) views.setOnClickPendingIntent(R.id.add_button, countPendingIntent) // ウィジェットを更新 appWidgetManager.updateAppWidget(appWidgetId, views) }ウィジェット作成時の初期化処理
ウィジェット毎の,作成時の初期化処理は主にupdateAppWidgetに実装します。
今回は,カウント値の保存にはSharedPreferencesを使っていきます。まず,カウント値をSharedPreferencesを使って読み込みます。
作成されていない場合は,新規に作成します。
そして,TextViewにカウント値を適用を適用します。次に,countIntentというIntentを作成しています。Intentのactionには,自分で定義したCOUNT_UPという定数を設定しています。COUNT_UPはアプリのIDを含んでいますが,これはウィジェットからのブロードキャストを他のアプリも受け取る可能性がある為ですので,自分のアプリIDを含めてください。
次に,Intentを元にPendingIntentを作成します。PendingIntentはアラーム時の処理や今回のタップ時処理のように,Intentを後から利用したいときに作成するものになります。作成したPendingIntentをsetOnClickPendingIntentを使用して,ボタンウィジェットのクリック時処理に登録します。
最後にupdateAppWidgetを行います。変更を即座にUIに反映するためにはupdateAppWidgetを行う必要があるので,忘れず実行しましょう。
ボタンが押された際の処理
Intentの作成時に,Intentの通知先にSampleAppWidgetを設定しているため,ボタンが押された際にはこのクラスのonReceiveが実行されます。
onReceiveでは,送付されてきたIntentのactionを見ることで処理を振り分けしています。
actionがCOUNT_UPである場合,まずSharedPreferencesからカウント値を読み込み,カウントを+1して,+1した値をSharedPreferencesに保存し,TextViewを更新するというような流れになります。
これで,ウィジェットを起動してみると,ちゃんとカウントアップされると思います。ただこのままだと・・・
この実装で複数のウィジェットを作成した際に,複数が同じものとして動作します。
複数のウィジェットを作成した際,それぞれを独立させて動作させたい場合も多いかと思います。その場合の修正点ですが,1つのトピックとして記事を書きたかった為こちらの記事に記述しました。ぜひ御覧ください
おわりに
もし説明や実装におかしな点がありましたら是非コメントください。
修正させて頂きます。