20200626のNode.jsに関する記事は8件です。

Reactアプリ - 文章中キーワード黒塗りはがし

はじめに

 Reactを使って文章中の特定のキーワードの黒塗り文字列をクリックして黒塗りをはがして読めるようにするアプリを作りましたので紹介いたします。

 このアプリは単純で、黒塗りをはがすためにはキーワードの黒塗り部分をクリックします。再びキーワードをクリックすると黒塗りに戻ります。

前提条件

 node.jsがインストールされている事が必要です。まだインストールしていない場合には、インストールしておいてください。

Reactプロジェクトを作成します

以下のようにcreate-react-appコマンドを実行します。少し、時間がかかります。

  • macOS
terminal
(base) macpro:dev teruroom$ cd /Users/teruroom/dev/react/
(base) macpro:react teruroom$ npx create-react-app blackout-peeling
  • Windows10
powershell
PS C:\> cd C:\dev\react\
PS C:\dev\react\> npx create-react-app blackout-peeling
macOS実行結果
Creating a new React app in /Users/teruroom/dev/react/blackout-peeling.
・・・・・・・・途中省略・・・・・・・・・・・
Success! Created blackout-peeling at /Users/teruroom/dev/react/blackout-peeling
Inside that directory, you can run several commands:
  npm start
    Starts the development server.
  npm run build
    Bundles the app into static files for production.
  npm test
    Starts the test runner.
  npm run eject
    Removes this tool and copies build dependencies, configuration files
    and scripts into the app directory. If you do this, you can’t go back!
We suggest that you begin by typing:
  cd react-boardgame
  npm start
Happy hacking!

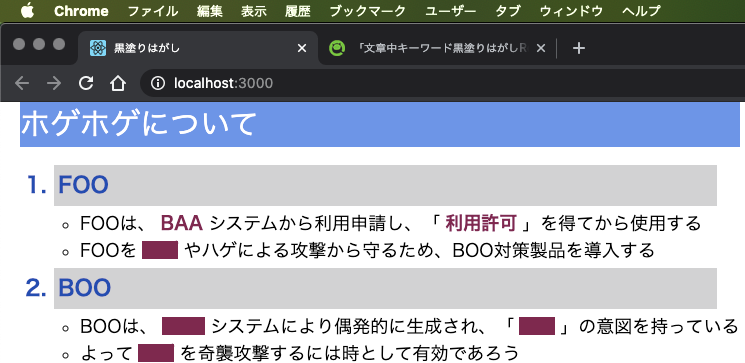
デフォルトで生成されたファイルを全て削除します

  • macOS
terminal
(base) macpro:react teruroom$ cd blackout-peeling/src
(base) macpro:src teruroom$ rm -f *
  • Windows10
powershell
PS C:\dev\react> cd .\blackout-peeling\src
PS C:\dev\react\blackout-peeling\src> rm -Force *

必要なJavaScriptとCSSファイルを作成します

  • macOS
terminal
(base) macpro:src teruroom$ touch index.css index.js
  • Windows10
powershell
PS C:\dev\react\blackout-peeling\src> New-Item -type file index.css
PS C:\dev\react\blackout-peeling\src> New-Item -type file index.js

JavaScriptとCSSを実装します

  • VSCodeを起動し、blackout-peelingフォルダを開きます
  • srcフィルダ内のindex.jsindex.cssを以下のように実装します
    image.png

  • index.js

以下のようにクラスの階層構造を設計しました
Pageクラス:ページ
  |
  +--Sentenceクラス:ページ内の文章
       |
       +--Keywordクラス:文章内のキーワード

index.js
import React from 'react';
import ReactDOM from 'react-dom';
import './index.css';

const white = '#fff';
const crimson = '#880E4F';
const marginwidth = '5px';
const fontweight = 'bold';

class Keyword extends React.Component {
  constructor(props) {
    super(props);

    this.state = {
      value: null,
      forecolor: blackOutColor,
      backcolor: blackOutColor,
      margin: marginwidth,
      fontweight: fontweight,
    };
    this.changeColor = this.changeColor.bind(this);
  }
  changeColor() {
    const newColor = this.state.backcolor === blackOutColor ? white : blackOutColor;
    this.setState({ forecolor: blackOutColor, backcolor: newColor })
  }
  render() {
    return (
      <span style={{
        color: this.state.forecolor
        , background: this.state.backcolor
        , marginLeft: this.state.margin
        , marginRight: this.state.margin
        , fontWeight: this.state.fontweight
      }}
        onClick={() => this.changeColor()} >
        {this.props.value}
      </span>
    );
  }
}

class Sentence extends React.Component {
  blackOut(keyString) {
    return <Keyword value={keyString} />;
  }

  render() {
    return (
      <div>
        <div className="maintitle">ホゲホゲについて</div>
        <ol>
          <li className="subtitle">FOO</li>
          <ul>
            <li>FOOは、{this.blackOut('BAA')}システムから利用申請し、「{this.blackOut('利用許可')}」を得てから使用する</li>
            <li>FOO{this.blackOut('ホゲ')}やハゲによる攻撃から守るため、BOO対策製品を導入する</li>
          </ul>
        一部省略
        </ol>
      </div>
    );
  }
}

class Page extends React.Component {
  render() {
    return (
      <div className="page">
        <div className="page-sentence">
          <Sentence />
        </div>
        <div className="page-info">
          <div>{/* status */}</div>
          <ol>{/* TODO */}</ol>
        </div>
      </div>
    );
  }
}

ReactDOM.render(
  <Page />,
  document.getElementById('root')
);
  • index.css
index.css
body {
  width: 1100px;
  font: 18px "Meiryo", "Century Gothic", sans-serif;
  margin: 0px;
  cursor: pointer;
}

ol, ul {
  padding-left: 30px;
}

td {
  width: 50%;
}

.maintitle {
  width: 100%;
  font-size: 30px;
  color: #fff;
  background: cornflowerblue;
}
.subtitle {
  width: 95%;
  font-size: 22px;
  font-weight: bold;
  color: rgb(26, 75, 182);
  background: rgb(210, 210, 211);
  margin: 4px;
  padding: 4px;
}

.page {
  display: flex;
  flex-direction: row;
}

.page-sentence {
  margin-left: 20px;
}

.page-info {
  margin-left: 20px;
}

React Webアプリを開発用に起動します

  • VSCodeの TerminalNew Terminalで新規のターミナルを起動します
  • Webアプリを起動コマンドを実行します
    image.png

  • macOS

terminal
(base) macpro:blackout-peeling teruroom$ npm start
  • 実行結果
    image.png

  • Windows10

powershell
PS C:\dev\react\blackout-peeling> npm start

Web ブラウザで http://localhost:3000 が自動的に立ち上がりページが表示されます。以降、VSCodeで実装コードを変更し、保存するたびごとにWeb ブラウザの http://localhost:3000 が自動的に再読み込み(Reload)されるようになります

最適化ビルドを実行します

React Webアプリが完成したら、最適化ビルドを実行してから公開します

  • macOS
terminal
(base) macpro:blackout-peeling teruroom$ npm run build
  • Windows10
powershell
PS C:\dev\react\blackout-peeling> npm run build
  • 実行結果

macOSの場合
省略

Windows10の場合
> security-compliance@0.1.0 build C:\dev\react\blackout-peeling
> react-scripts build
Creating an optimized production build...
Compiled successfully.
File sizes after gzip:
  39.89 KB  build\static\js\2.73f5bc0c.chunk.js
  5.5 KB    build\static\js\main.11e48eb2.chunk.js
  782 B     build\static\js\runtime-main.623a1e28.js
  310 B     build\static\css\main.3c6f1d95.chunk.css
The project was built assuming it is hosted at /.
You can control this with the homepage field in your package.json.
The build folder is ready to be deployed.
You may serve it with a static server:
  npm install -g serve
  serve -s build
Find out more about deployment here:
  bit.ly/CRA-deploy

React Webアプリを本番用に起動します

オプション--host='0.0.0.0'をつけてコマンドを実行し、インバウンドとして全てのIPアドレスからのリクエストを受け付けるようにします

  • macOS ➡️ ubuntsサーバにデプロイ
bash
teruroom$ npm start --host='0.0.0.0'
  • Windows10 ➡️ Windows Server 2016にデプロイ
powershell
PS C:\dev\react\blackout-peeling> npm start --host='0.0.0.0'

React Webアプリを利用します

WebブラウザでURL http://192.168.0.16:3000 (192.168.0.16はWebアプリを動かしているPCのIPアドレス)にアクセスします

macOSの場合

デフォルトWebブラウザのSafariや後からインストールしたChromeで表示されます

image.png

Windows10の場合

 デフォルトWebブラウザのEdgeや後からインストールしたChromeで表示されます。IE11では残念ながらそのままでは表示や動作が上手くいきません。react-app-polyfillライブラリを別途インストールし、index.jsファイルの先頭でimport 'react-app-polyfill/ie11';` のようにインポートする必要があります。

 諸々の都合によりIE11を既定のブラウザにしている場合には、以下のようにWindowsショートカットなどにURLを仕込んでおいてください。ショートカットを開くとEdgeによりReact Webアプリが開かれるようになります

microsoft-edge:http://hoge-foo.ad.baa.co.jp:3000/

  • hoge-foo.ad.baa.co.jp:Active Directry内のReact Webアプリを起動しているPCの端末名

黒塗りをクリックすると剥がれてキーワード文字が読めるようになります

image.png

  • このエントリーをはてなブックマークに追加
  • Qiitaで続きを読む

【Node.js】Express フロント側でpublicフォルダのcssやらライブラリファイルを読み込めない時の対処法

jqueryが読み込めない・・・

image.png
index.ejsから
・public/lib/jquery-3.5.1.min.jsw
・public/css/index.css
を読み込めない!

image.png
404 Not Foundと言われていますね

なんで・・・?

index.ejs
<!-- css -->
<link rel="stylesheet" type="text/css" href="public\css\index.css">
<!-- jQuery -->
<script type="text/javascript" src="public\lib\jquery-3.5.1.min.js"></script>

ちゃんと相対パス書いてあげてるのになー
絶対パスに変えてみてもダメだった

解決策

app.js
// 静的ファイルは無条件に公開
app.use('/public', express.static('public'))

app.jsでpublicフォルダをstaticにしてあげるだけでよかった!

おわり

みなさんも同じ手詰まりをしないように

  • このエントリーをはてなブックマークに追加
  • Qiitaで続きを読む

Cloud Foundryでのlocalhostとportの設定

Cloud FoundryでのDeployで、localhostとportの設定を行う

今回はexpressのアプリを例にやります。
CFでは環境変数のVCAP_APP_HOSTとVCAP_APP_PORTをそれぞれ用います。
存在しない場合の設定も加えます。

server/index.js
...
const HOST = process.env.VCAP_APP_HOST || 'localhost'
const PORT = process.env.VCAP_APP_PORT || 3000
app.listen(PORT, HOST)
...

以上です。

  • このエントリーをはてなブックマークに追加
  • Qiitaで続きを読む

Cloud Foundry Deploy時のlocalhostとportの設定

Cloud Foundry Deployの際のlocalhostとportの設定について

今回はexpressのアプリを例にとります。
CFへのdeployでは、環境変数のVCAP_APP_HOSTとVCAP_APP_PORTを用いてエンドポイントを形成する必要があります。
その時、ローカル環境開発を考慮に入れ、2つのパラメータが存在しない場合も対応します。

server/index.js
...
const HOST = process.env.VCAP_APP_HOST || 'localhost'
const PORT = process.env.VCAP_APP_PORT || 3000
app.listen(PORT, HOST)
...

ちなみに

VCAP_APP_HOSTとVCAP_APP_PORTを確認する方法

$ cf ssh <app name>
$ env

以上です。

  • このエントリーをはてなブックマークに追加
  • Qiitaで続きを読む

ℹ NuxtJS collects completely anonymous data about usage.

ℹ NuxtJS collects completely anonymous data about usage.
  This will help us improving Nuxt developer experience over the time.
  Read more on https://git.io/nuxt-telemetry

? Are you interested in participation? (Y/n)

なんかこういうのが出るようになった。
ちょっと鬱陶しい。

表示されるリンクを見るだけなんだけれども。
https://github.com/nuxt/telemetry#opting-out

3の nuxt.config.js に設定するやり方で出なくなった。

export default {
  telemetry: false
}
  • このエントリーをはてなブックマークに追加
  • Qiitaで続きを読む

firebase finctionsでfirestoreを使おうとした時に出るエラーの対策

現象

Cloud functionsでfirestoreを利用しようと思い、公式ガイドの通りに進めたらエラーが出た。

index.js
const functions = require("firebase-functions");
const admin = require('firebase-admin');
admin.initializeApp(functions.config().firebase);

const db = admin.firestore();

Error

(node:51161) UnhandledPromiseRejectionWarning: Error: Could not load the default credentials. Browse to https://cloud.google.com/docs/authentication/getting-started for more information.

対策

1.Firestoreにアクセスするための秘密鍵を取得します
「プロジェクトの設定」->「サービスアカウント」->「新しい秘密鍵の生成」
ファイル名は何でもいいですがここではServiceAccount.jsonで保存しておきます

https___qiita-image-store.s3.ap-northeast-1.amazonaws.com_0_175213_283127e3-f95b-42af-4d17-8b14d5df9b90.png

2.先ほどのindex.jsを以下のように書き換える
+ この例ではServiceAccount.jsonをfunctionsフォルダ直下においている

index.js
const admin = require('firebase-admin');
const functions = require('firebase-functions');
const ServiceAccount = require('./ServiceAccount.json');

admin.initializeApp({ credential: admin.credential.cert(ServiceAccount) });

const db = admin.firestore();

これでfirestoreにアクセスできるようになるはず!

Enjoy Hacking!?

  • このエントリーをはてなブックマークに追加
  • Qiitaで続きを読む

ビルド不要のドキュメントサイトジェネレーター「docsify」の個人的まとめ

この記事は、
ドキュメント静的サイトジェネレーターである docsify の使い方について
個人的にまとめたものです。

はじめに

想定読者

  • Markdown について知っている
  • 開発が活発にされなくなった gitbook-cli の代替を探している
  • 日本語検索に対応している 静的サイトジェネレーター が欲しい

この記事で得られること

  • docsify の基本的な使い方
  • お手軽なドキュメント作成方法

この記事で得られないこと

docsifyの特徴

docsify とは

image.png

「docsify」は、公式を直訳すると 魔法のドキュメントサイトジェネレーター です。

すなわち、ドキュメントを作成するツールです。

どのあたりが魔法かというと、

  • markdown などから html を生成する 静的サイトジェネレーターと違って、ビルド不要
  • シンプルで比較的軽量
  • 全文検索プラグイン付き
  • 複数テーマ有り
  • プラグインシステムが使える
  • 絵文字やIE11のサポート
  • サーバーサイドレンダリングも可能

とのことです。

なぜ docsify 紹介してるの

ことの発端は、ある時、Node.jsのバージョンを上げた際に、開発がもうあまり活発ではない gitbook-cli を使おうとしたら、ついにエラーが起きてしまったんですね。

旧バージョンであれば使えるので、まあいいか、とも思ったのですがこれを機に、新たなツールを模索していた際に出会ったのが docsify でした。

Rust製の mdbook もいい なと思ったので、使い分けしていこうと思っていますが、
docsifyの手軽さと、日本語検索に対応しているという点で魅力を感じ、
使い方を整理しておこう! といった流れで今に至ります。

また、npxを使って、ライブラリのインストール不要で利用できる 点も個人的に高評価ですね。
Node.js が動く環境でさえあれば、利用できるわけです!

さらに言えば、Node.jsが無くても動作します。

docsifyの一番簡単な使い方

説明はこれくらいにして、使い方を見ていきましょう。

一番シンプルな例です。

index.htmlREADME.MDの2つを用意するだけでシングルページを作成できます。

.
├── README.md
└── index.html

index.html

index.htmlは、次の内容で作成します。

index.html
<!-- index.html -->

<!DOCTYPE html>
<html>
<head>
  <meta http-equiv="X-UA-Compatible" content="IE=edge,chrome=1">
  <meta name="viewport" content="width=device-width,initial-scale=1">
  <meta charset="UTF-8">
  <link rel="stylesheet" href="//cdn.jsdelivr.net/npm/docsify/themes/vue.css">
</head>
<body>
  <div id="app"></div>
  <script>
    window.$docsify = {
      //...
    }
  </script>
  <script src="//cdn.jsdelivr.net/npm/docsify/lib/docsify.min.js"></script>
</body>
</html>

README.md

README.md
# これはサンプルです。

ドキュメント静的サイトジェネレーターである **docsify** の使い方について

個人的にまとめたものです。

## はじめに

### 想定読者

* Markdown について知っている
* 開発が活発にされなくなった gitbook-cli の代替を探している
* 日本語検索に対応している 静的サイトジェネレーター が欲しい

### この記事で得られること

* [docsify](https://github.com/docsifyjs/docsify) の基本的な使い方
* お手軽なドキュメント作成方法

### この記事で得られないこと

* [公式ドキュメント](https://docsify.js.org/#/)に記載されている細かい仕様
* [他の静的サイトジェネレーター](https://www.staticgen.com/)について
* Node.js の環境準備方法

ローカルプレビュー( Python を使用した例)

Pythonを使用した場合の、ローカルサーバープレビューです。

python -m http.server 3000

image.png

めちゃくちゃ簡単ですね。

npx を使った docsify の使い方

npx を使った場合の例です。
上の「一番簡単な使い方」のファイル作成部分をコマンドから自動でやってくれる点で便利です。

※ もちろんインストールして使用することも可能なのでその場合は、公式のわかりやすいクイックスタートを参照してください!

初期化

npx docsify-cli init ./docs
.
└── docs
    ├── .nojekyll
    ├── README.md
    └── index.html
# ./docs/.nojekyll (Github Page用)

docsは任意フォルダです。

ローカルサーバープレビュー

npx docsify-cli serve docs
# http://localhost:3000にアクセスすると、README.mdの内容が表示される

docsifyのカスタマイズ

基本的な使い方は、理解していただけたかと思います。

実際にドキュメントを作成していくと、サイトの表記やデザインなどをカスタマイズしたくなるかと思います。

サイトのデザインやプラグインなどの設定は、index.htmlを編集することでカスタマイズできます。

docsifyの設定

docsifyの設定は、window.$docsify = {} 内で行うようです。

<script>
    window.$docsify = {
      //...
    }
</script>

個人的ベストプラクティスのの方針が固まったら、当記事を随時更新したいと思います。

それまでは、公式ドキュメント - カスタマイズ- を参照くださーい。(手抜き)

デプロイ方法

公式ドキュメント - デプロイ - にいくつか、方法が紹介されています。
わかりやすいので、読めばわかると思いますので、これも手抜きしちゃいます。

おわりに

使いながら、より良い設定値なんかを更新できたらいいなと思います。

以下は、その他の参考です。

参考

  • このエントリーをはてなブックマークに追加
  • Qiitaで続きを読む

[Cloud Functions] Node.jsのバージョンを10にしたら「TypeError: Cannot read property 'charCodeAt' of undefined」ってエラーが出た

発生した問題

FirestoreのバックアップをCloudFunctionsで行っていたのだが、
Node.js 8 ランタイムが非推奨になり10にアップデートしないといけなかったので変更したら
変更後に以下のエラーが発生するようになった。

TypeError: Cannot read property 'charCodeAt' of undefined
    at peg$parsetemplate (/workspace/node_modules/google-gax/build/src/pathTemplateParser.js:320:17)
    at Object.peg$parse [as parse] (/workspace/node_modules/google-gax/build/src/pathTemplateParser.js:649:18)
    at new PathTemplate (/workspace/node_modules/google-gax/build/src/pathTemplate.js:32:54)
    at segments.forEach.segment (/workspace/node_modules/google-gax/build/src/pathTemplate.js:103:29)
    at Array.forEach (<anonymous>)
    at PathTemplate.render (/workspace/node_modules/google-gax/build/src/pathTemplate.js:97:23)
    at FirestoreAdminClient.databasePath (/workspace/node_modules/@google-cloud/firestore/build/src/v1/firestore_admin_client.js:792:57)
    at exports.scheduledFirestoreExport.functions.region.pubsub.schedule.timeZone.onRun (/workspace/index.js:11:12)
    at cloudFunction (/workspace/node_modules/firebase-functions/lib/cloud-functions.js:127:23)
    at Promise.resolve.then (/layers/google.nodejs.functions-framework/functions-framework/node_modules/@google-cloud/functions-framework/build/src/invoker.js:330:28) 

解決策

FirestoreAdminClientのdatabasePathのprojectの指定を以下に変更した。

Before

const databaseName = client.databasePath(process.env.GCP_PROJECT, '(default)');

After

const projectId = process.env.GCP_PROJECT || process.env.GCLOUD_PROJECT;
const databaseName = client.databasePath(projectId, '(default)');

どうやらGCLOUD_PROJECTを指定するとエラーが消えるよう。

参考サイト

  • このエントリーをはてなブックマークに追加
  • Qiitaで続きを読む