- 投稿日:2020-05-26T23:01:26+09:00
create-react-native-moduleのexample/iosのビルドに失敗する
現象
create-react-native-moduleを使ってNativeModuleを作成しようとしたところ、iosでビルド失敗してシミュレータが起動しなくなってしまった。$ create-react-native-module --generate-example Example実行環境
実行環境は以下です。
- Xode 11.5
- Cocoapods 1.9.1 (from brew)
- react-native 0.62.2
- create-react-native-module 0.19.0
react-native iosではビルドに失敗して起動しなかったが、Xcodeではビルドしてシミュレータを起動することができた。
Cocoapods側の不具合にでもあるのかなと推測。修正内容
Yogaに関するエラーが出ていたので、StackOverflowで似たようなことを書いてある記事を探してトライ&エラーで試してみた。
上手くシミュレーターが立ち上がったの解決策のものはCocoapodsの不具合に言及していたコレ↓
https://stackoverflow.com/questions/48705250/react-native-ios-could-not-build-module-yoga-algorithm-file-not-foundPOdfileにYogaのヘッダーファイルを
Podfile:use_native_modules! # Enables Flipper. # # Note that if you have use_frameworks! enabled, Flipper will not work and # you should disable these next few lines. add_flipper_pods! + def change_lines_in_file(file_path, &change) + print "Fixing #{file_path}...\n" + + contents = [] + + file = File.open(file_path, 'r') + file.each_line do | line | + contents << line + end + file.close + + File.open(file_path, 'w') do |f| + f.puts(change.call(contents)) + end + end post_install do |installer| flipper_post_install(installer) + # https://github.com/facebook/yoga/issues/711#issuecomment-381098373 + change_lines_in_file('./Pods/Target Support Files/yoga/yoga-umbrella.h') do |lines| + lines.reject do | line | + [ + '#import "Utils.h"', + '#import "YGLayout.h"', + '#import "YGNode.h"', + '#import "YGNodePrint.h"', + '#import "YGStyle.h"', + '#import "Yoga-internal.h"', + ].include?(line.strip) + end + end + end end target 'example-tvOS' do # Pods for example-tvOS target 'example-tvOSTests' do inherit! :search_paths # Pods for testing end end後書き
エラーログを取り忘れてたので別プロジェクトを作ってエラーを再現させようとしたが、一度ビルドできるようになるとエラーが発生しなくなってしまった。
- 投稿日:2020-05-26T22:18:35+09:00
Composable Architectureがすごいので紹介したい
はじめに
Swiftを用いたiOS/macOS/tvOS/watchOSアプリ開発用に Composable Architecture (現在のver0.2.0)というのがあり、それがめっちゃ良いやん!と思ったのでそれを書いておきます。フレームワーク的に提供されていますが、特にSwiftUIを使ってどういう構成でアプリを作ろうかと考えている人がコードを読むだけでもとてもいい教材になると思います。
Composable Archtectureは関数型プログラミングとSwiftについての動画コンテンツ提供している Point-Free で考えられたようです。
https://www.pointfree.co/episodes/ep100-a-tour-of-the-composable-architecture-part-1必須要件
Composable Architectureの必須要件を先に書いておきます。
- iOS13以上 (macOS, tvOS, watchOSでも使用できる)
- SwiftUI, Combineが使える必要がある
- UIKitにも対応している
概要
Composable Architectureをまずざっくり説明すると、Apple製品のSwift/Combine/UIKitでのアプリ開発におけるシステムアーキテクチャを提供してくれてるわけです。というよりこの仕組を取り入れるということは開発のフレームワークと言ったほうがいいかもしれないですね。
概要を箇条書きにします。
- View以外のコンポーネントをViewStore, Store, Reducerとしている
- ViewStore
- Viewからアクションを送り結果をViewに反映できる
- Store
- StateとActionを持ち、ActionによりReducerを呼び出してStateを変更して結果をViewStoreに反映する
- Reducer
- Stateを変更するコンポーネント化された処理として定義され、小さな処理を組み合わせることもできる
- StoreをView用とするViewStoreに変換するためのWithViewStoreなどもある
- WithViewStoreがSwiftUI.Viewに準拠しておりViewのように扱える
- SubViewをWithViewStoreのbodyに記述していく
コンポーネントを図にすると次のようになるでしょう。
良い点
良い点も超ざっくり説明すると、ReduxっぽさがありながらそれをSwiftUI/Combineの仕組みを上手く使って各コンポーネント間のやりとりをしています。
- Reduxっぽい
- Redcuerを細かく分割し、画面によって必要があればそれを組み合わせる
- 巨大なグローバルReducerを作るわけではない
- 画面ごとにReducerがあり、それは別画面で組み合わせても良い
- Combineをうまく使っている点がある
- 変化をPublisherを使って反映したり
- Effectをsinkして再帰的にReducerを呼び出したりする
- SwiftUIをうまく使っている点がある
- WithViewStoreでSubView用にStoreを変換しているのが自然でいい
- 副作用をPublisherに準拠するEffect型として取り扱う
- いわゆるビジネスロジックをEffectとして取り扱う
登場するパーツやコンポーネントの説明
Effect
ロジックをCombine.Publisherとしてつなぐためのラッパーとしていい感じに作られています。
- 副作用のPublisherを定義する
- 例えば通信、ファイルアクセスなどをEffect型としている
- キャンセルがわかりやすい
- Reducerで処理のidを決めておく
- グローバルにCancellablesを配列で保持しておりそれをidでキャンセル
具体的には、副作用の結果を取得する際にそのまま直接Publisher/Futureを使うようなことはしません。もちろんEffectの実行時にFutureを選択することはあります。
 Effect<Int, Never>.future { callback in
   DispatchQueue.main.asyncAfter(deadline: .now() + 1) {
     callback(.success(42))
     callback(.success(1729)) // Will not be emitted by the effect
   }
 }
他には既存のPublisherをEfffectに変換することも可能です。このために既存のPublisherを渡されて初期化する場合は
upstreamすることで対応しています。public struct Effect<Output, Failure: Error>: Publisher { public let upstream: AnyPublisher<Output, Failure> public init<P: Publisher>(_ publisher: P) where P.Output == Output, P.Failure == Failure { self.upstream = publisher.eraseToAnyPublisher() } public func receive<S>( subscriber: S ) where S: Combine.Subscriber, Failure == S.Failure, Output == S.Input { self.upstream.receive(subscriber: subscriber) } ... }WithViewStore
- SwiftUI.View
- こいつが
@ObservedObjectを用意する具体的にはカウンタ用のSwiftUIのViewがあったとして、そいつはObservedObjectは持たない。その中でWithViewStoreを用意し、storeを渡すようにする。そしてWithViewStoreのサブビューが実際の描画用のViewになる。
struct CounterView: View {
  let store: Store<CounterState, CounterAction>
  // この外のViewではObservedObjectは持たない

  var body: some View {
    WithViewStore(self.store) { viewStore in
      HStack {
        Button("−") { viewStore.send(.decrementButtonTapped) }
        Text("\(viewStore.count)")
          .font(Font.body.monospacedDigit())
        Button("+") { viewStore.send(.incrementButtonTapped) }
      }
    }
  }
}
この例だとマイナスのButtonとTextとプラスのButtonがある。WithViewStoreはSwiftUI.Viewであり、こいつがObservedObjectを保持する。
public struct WithViewStore<State, Action, Content>: View where Content: View {
  private let content: (ViewStore<State, Action>) -> Content
  private var prefix: String?
  @ObservedObject private var viewStore: ViewStore<State, Action>

  ...

  public init(
    _ store: Store<State, Action>,
    removeDuplicates isDuplicate: @escaping (State, State) -> Bool,
    @ViewBuilder content: @escaping (ViewStore<State, Action>) -> Content
  ) {
    self.content = content
    self.viewStore = ViewStore(store, removeDuplicates: isDuplicate)
  }
}
Viewの外からやってきたstoreは
@ObservedObjectのViewStore型に渡される。ViewStore
- UIからのアクションをStore以降に送れる
- ObservableObjectに準拠している
@PublishedによりSwiftUI.Viewを更新することができる@dynamicMemberLookup public final class ViewStore<State, Action>: ObservableObject { /// A publisher of state. public let publisher: StorePublisher<State> private var viewCancellable: AnyCancellable? /// Initializes a view store from a store. /// /// - Parameters: /// - store: A store. /// - isDuplicate: A function to determine when two `State` values are equal. When values are /// equal, repeat view computations are removed. public init( _ store: Store<State, Action>, removeDuplicates isDuplicate: @escaping (State, State) -> Bool ) { let publisher = store.$state.removeDuplicates(by: isDuplicate) self.publisher = StorePublisher(publisher) self.state = store.state self._send = store.send self.viewCancellable = publisher.sink { [weak self] in self?.state = $0 } } /// The current state. @Published public internal(set) var state: State let _send: (Action) -> Void ... }Store
- StateとActionを持つ
- ActioinによるReducerを呼び出しStateを変更
- Stateが変化するとViewStoreに反映
- 一つの画面に一つのStateの塊
- Stateの子供もしくはNestedStateとして配列を保持できる
- scopeによって複数ステートを分けて扱える
Reducer
- 画面ごとにReducerがある
- その画面で実行する処理をまとめられる
- 例
- ボタンタップしてカウントアップ
- キャンセル処理
- 通信結果の成功と失敗のハンドリング
- 別画面に使ったReducerを組み合わせたりできる
- Reducerの処理の戻り値はEffectなのでsinkできる
- Effectの結果で再帰的にReduderを呼び出せる
- Reducerに処理のハンドリングを任せる
- エラーハンドリングもReducer
- ハンドリングしたらstateを変える
- stateが変わったらStore → ViewStoreと変更が伝わりViewが変わる
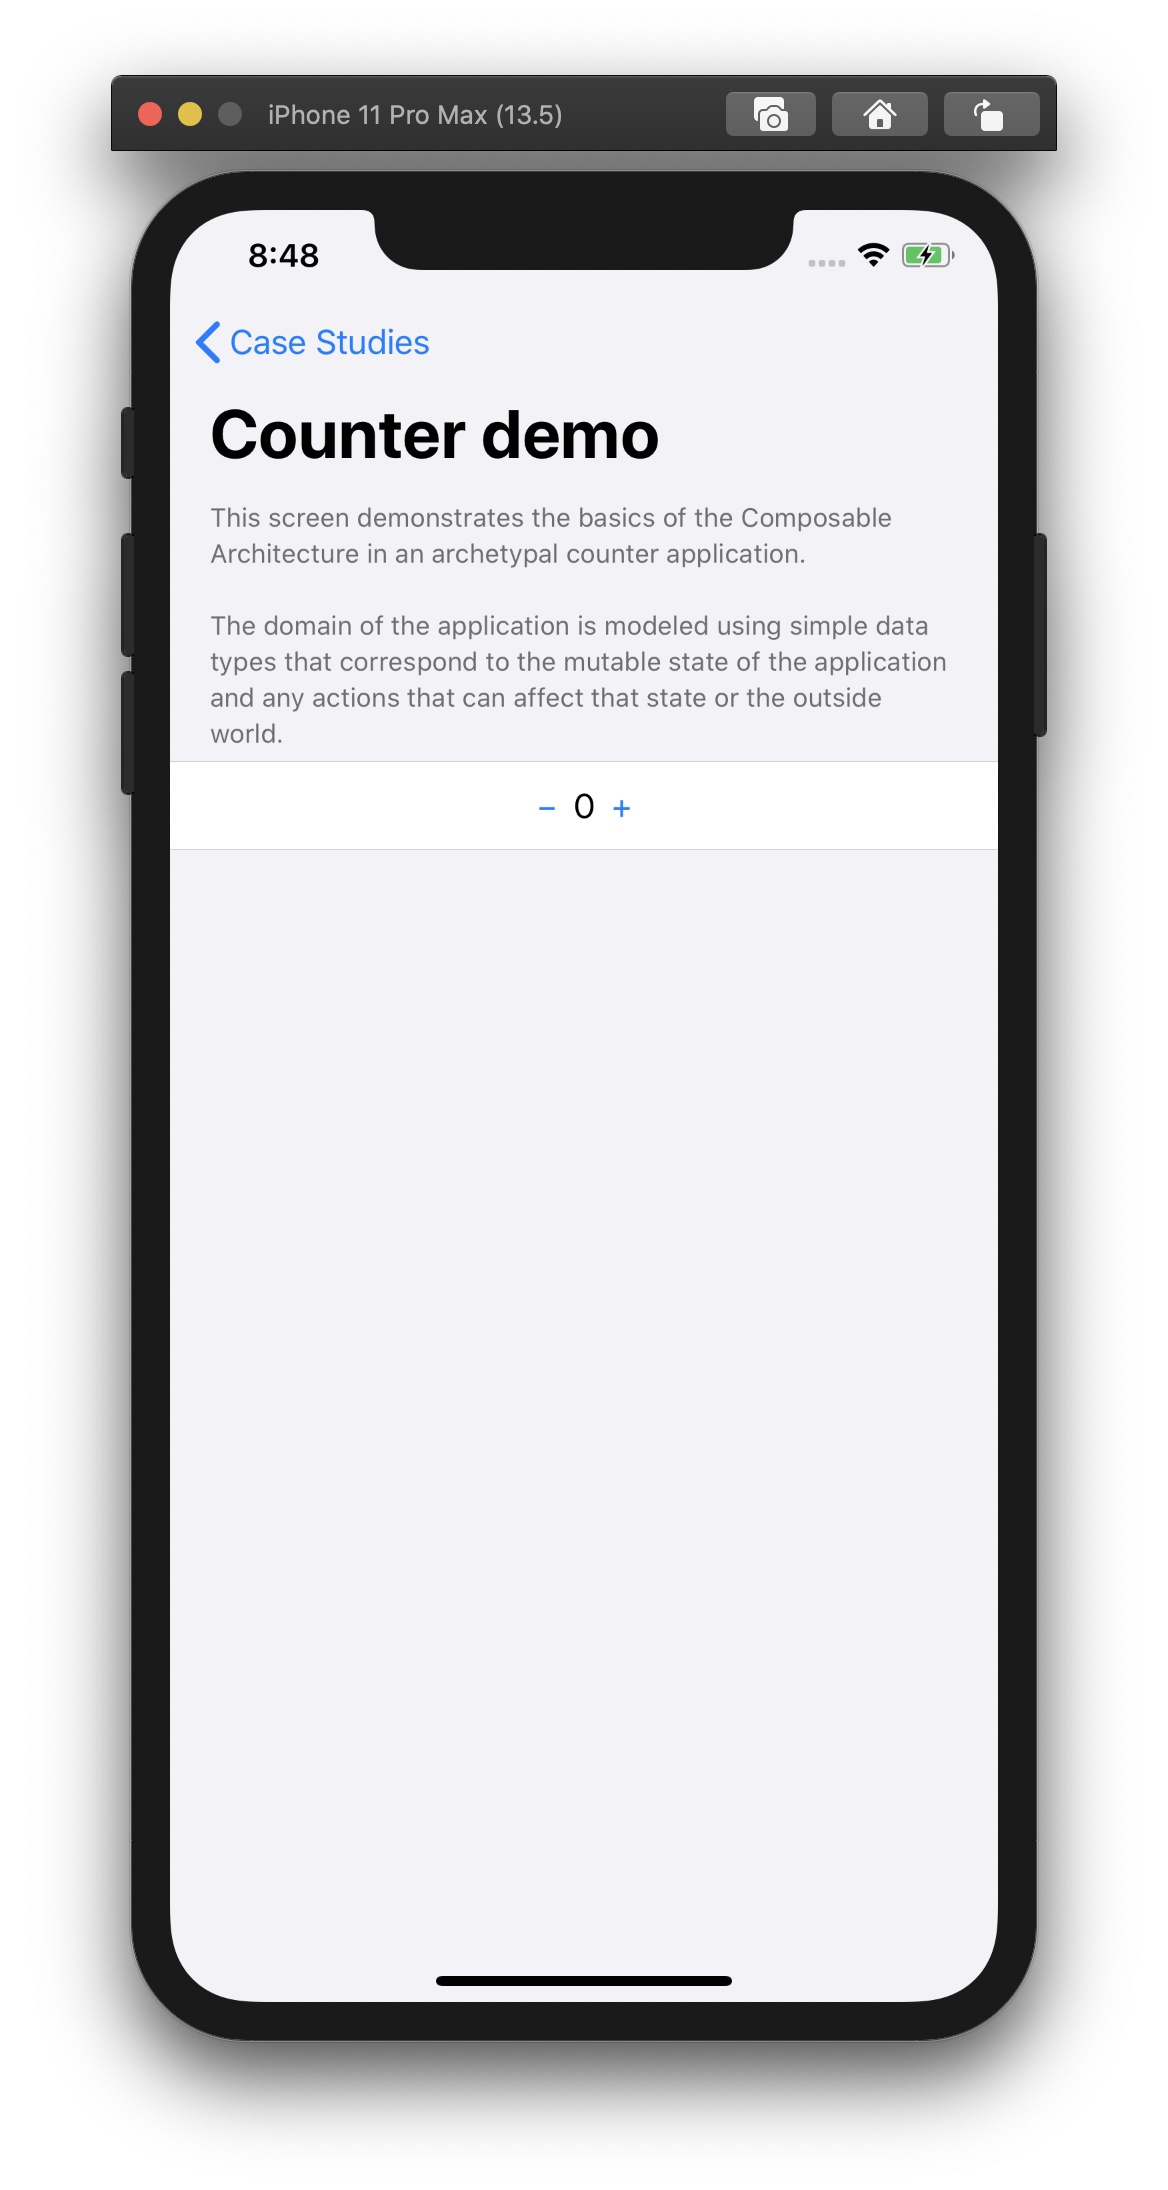
CounterアプリのカウントをアップダウンするだけのシンプルなReducerであるcounterReducer
let counterReducer = Reducer<CounterState, CounterAction, CounterEnvironment> { state, action, _ in
  switch action {
  case .decrementButtonTapped:
    state.count -= 1
    return .none
  case .incrementButtonTapped:
    state.count += 1
    return .none
  }
}
やっていることはActionに応じてStateを変更している。return している
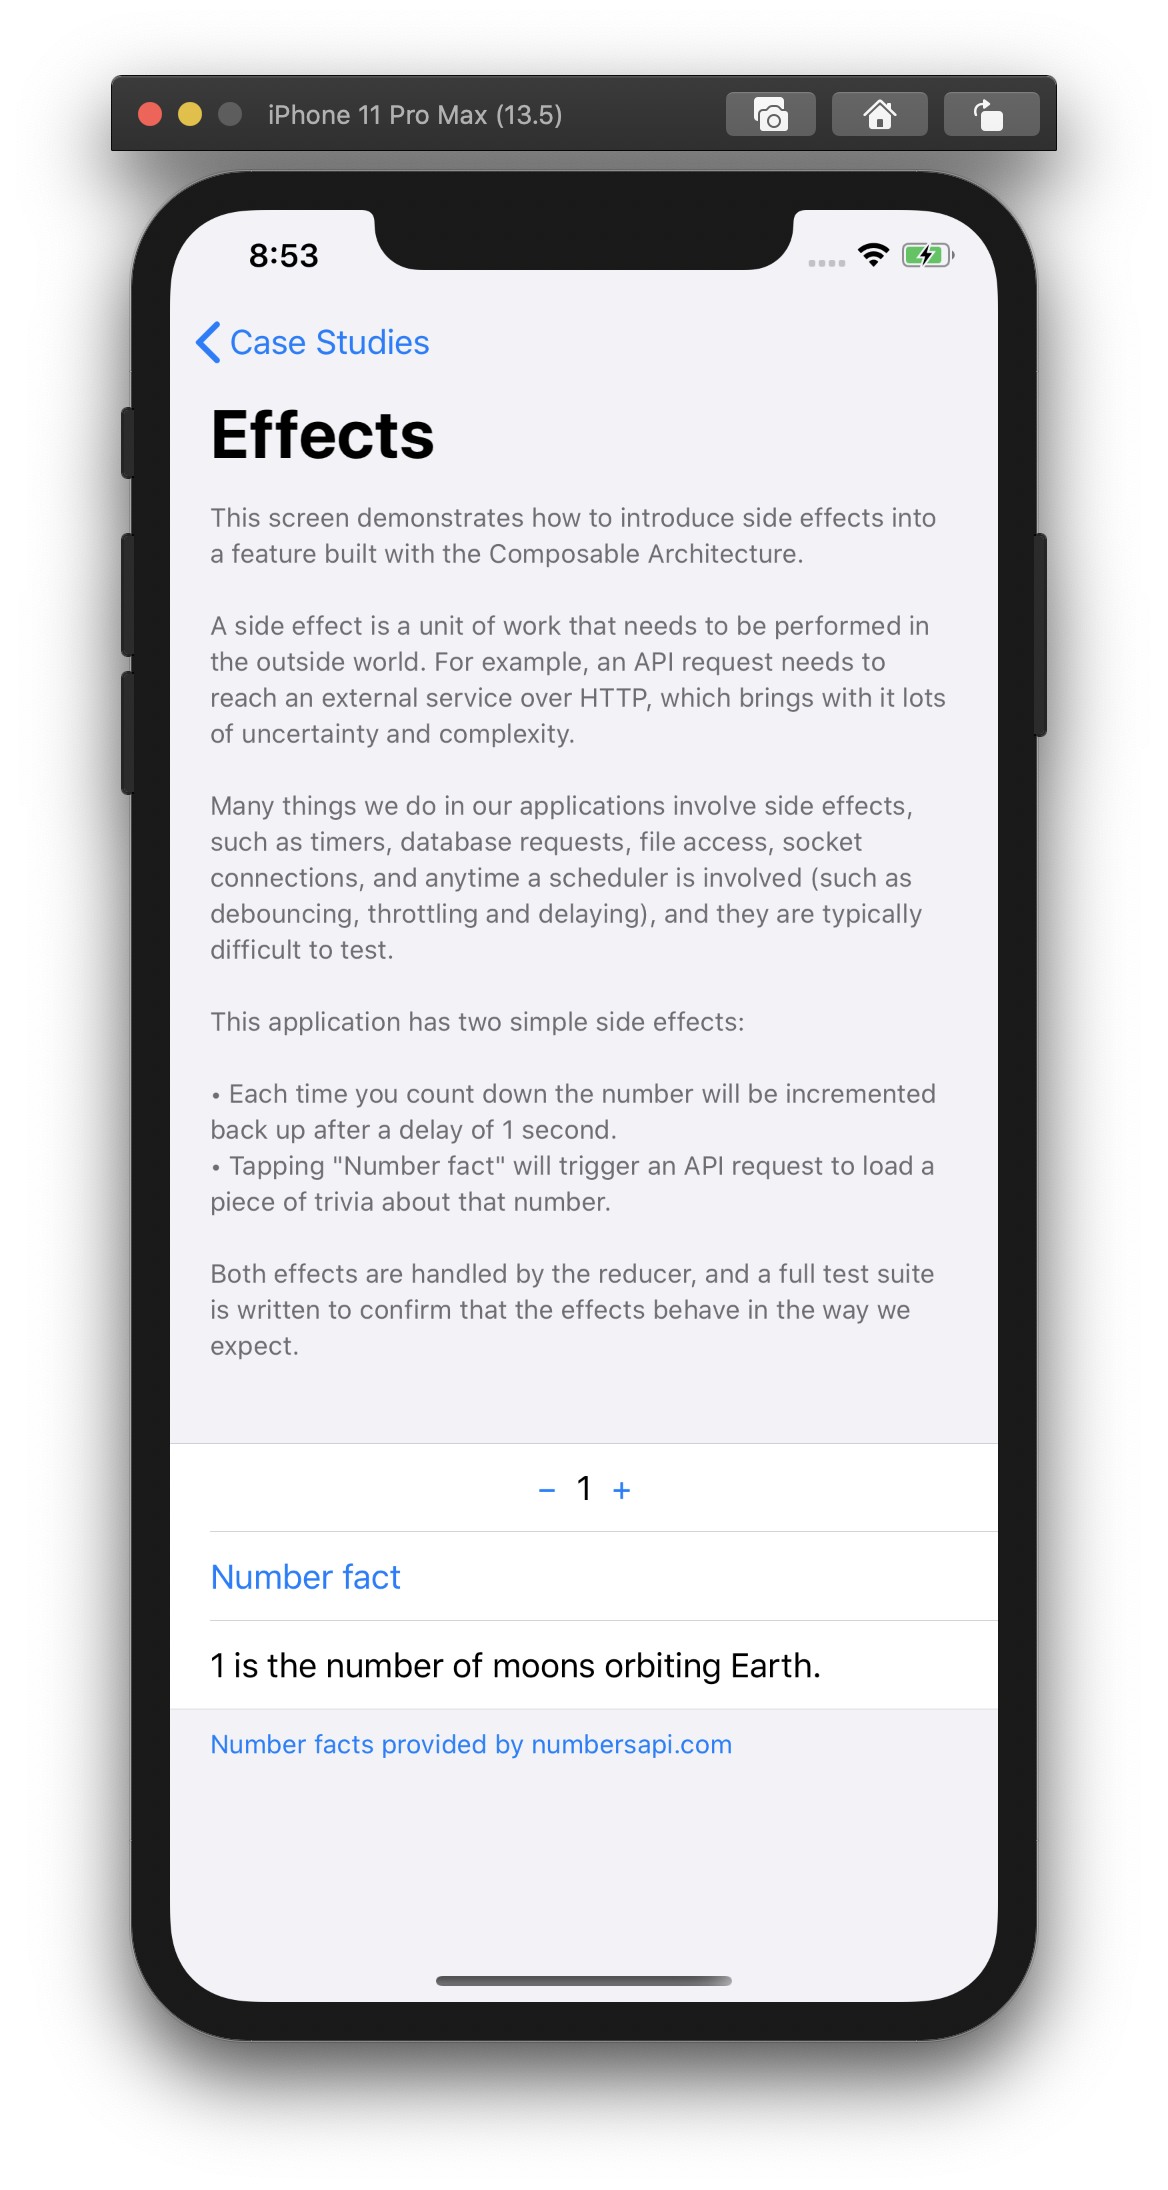
.noneはEffectのEmptyを意味していて、これをsinkしても意味がないことを示している。returnをする際にEffectを指定する例はCounterで用意した数字を基にWebAPIを呼び出すeffectsBasicsReducerがわかりやすい。
let effectsBasicsReducer = Reducer<
  EffectsBasicsState, EffectsBasicsAction, EffectsBasicsEnvironment
> { state, action, environment in
  switch action {
  case .decrementButtonTapped:
    state.count -= 1
    state.numberFact = nil
    // Return an effect that re-increments the count after 1 second.
    return Effect(value: EffectsBasicsAction.incrementButtonTapped)
      .delay(for: 1, scheduler: environment.mainQueue)
      .eraseToEffect()

  case .incrementButtonTapped:
    state.count += 1
    state.numberFact = nil
    return .none

  case .numberFactButtonTapped:
    state.isNumberFactRequestInFlight = true
    state.numberFact = nil
    // Return an effect that fetches a number fact from the API and returns the
    // value back to the reducer's `numberFactResponse` action.
    return environment.numberFact(state.count)
      .receive(on: environment.mainQueue)
      .catchToEffect()
      .map(EffectsBasicsAction.numberFactResponse)

  case let .numberFactResponse(.success(response)):
    state.isNumberFactRequestInFlight = false
    state.numberFact = response
    return .none

  case .numberFactResponse(.failure):
    state.isNumberFactRequestInFlight = false
    return .none
  }
}
Actionが
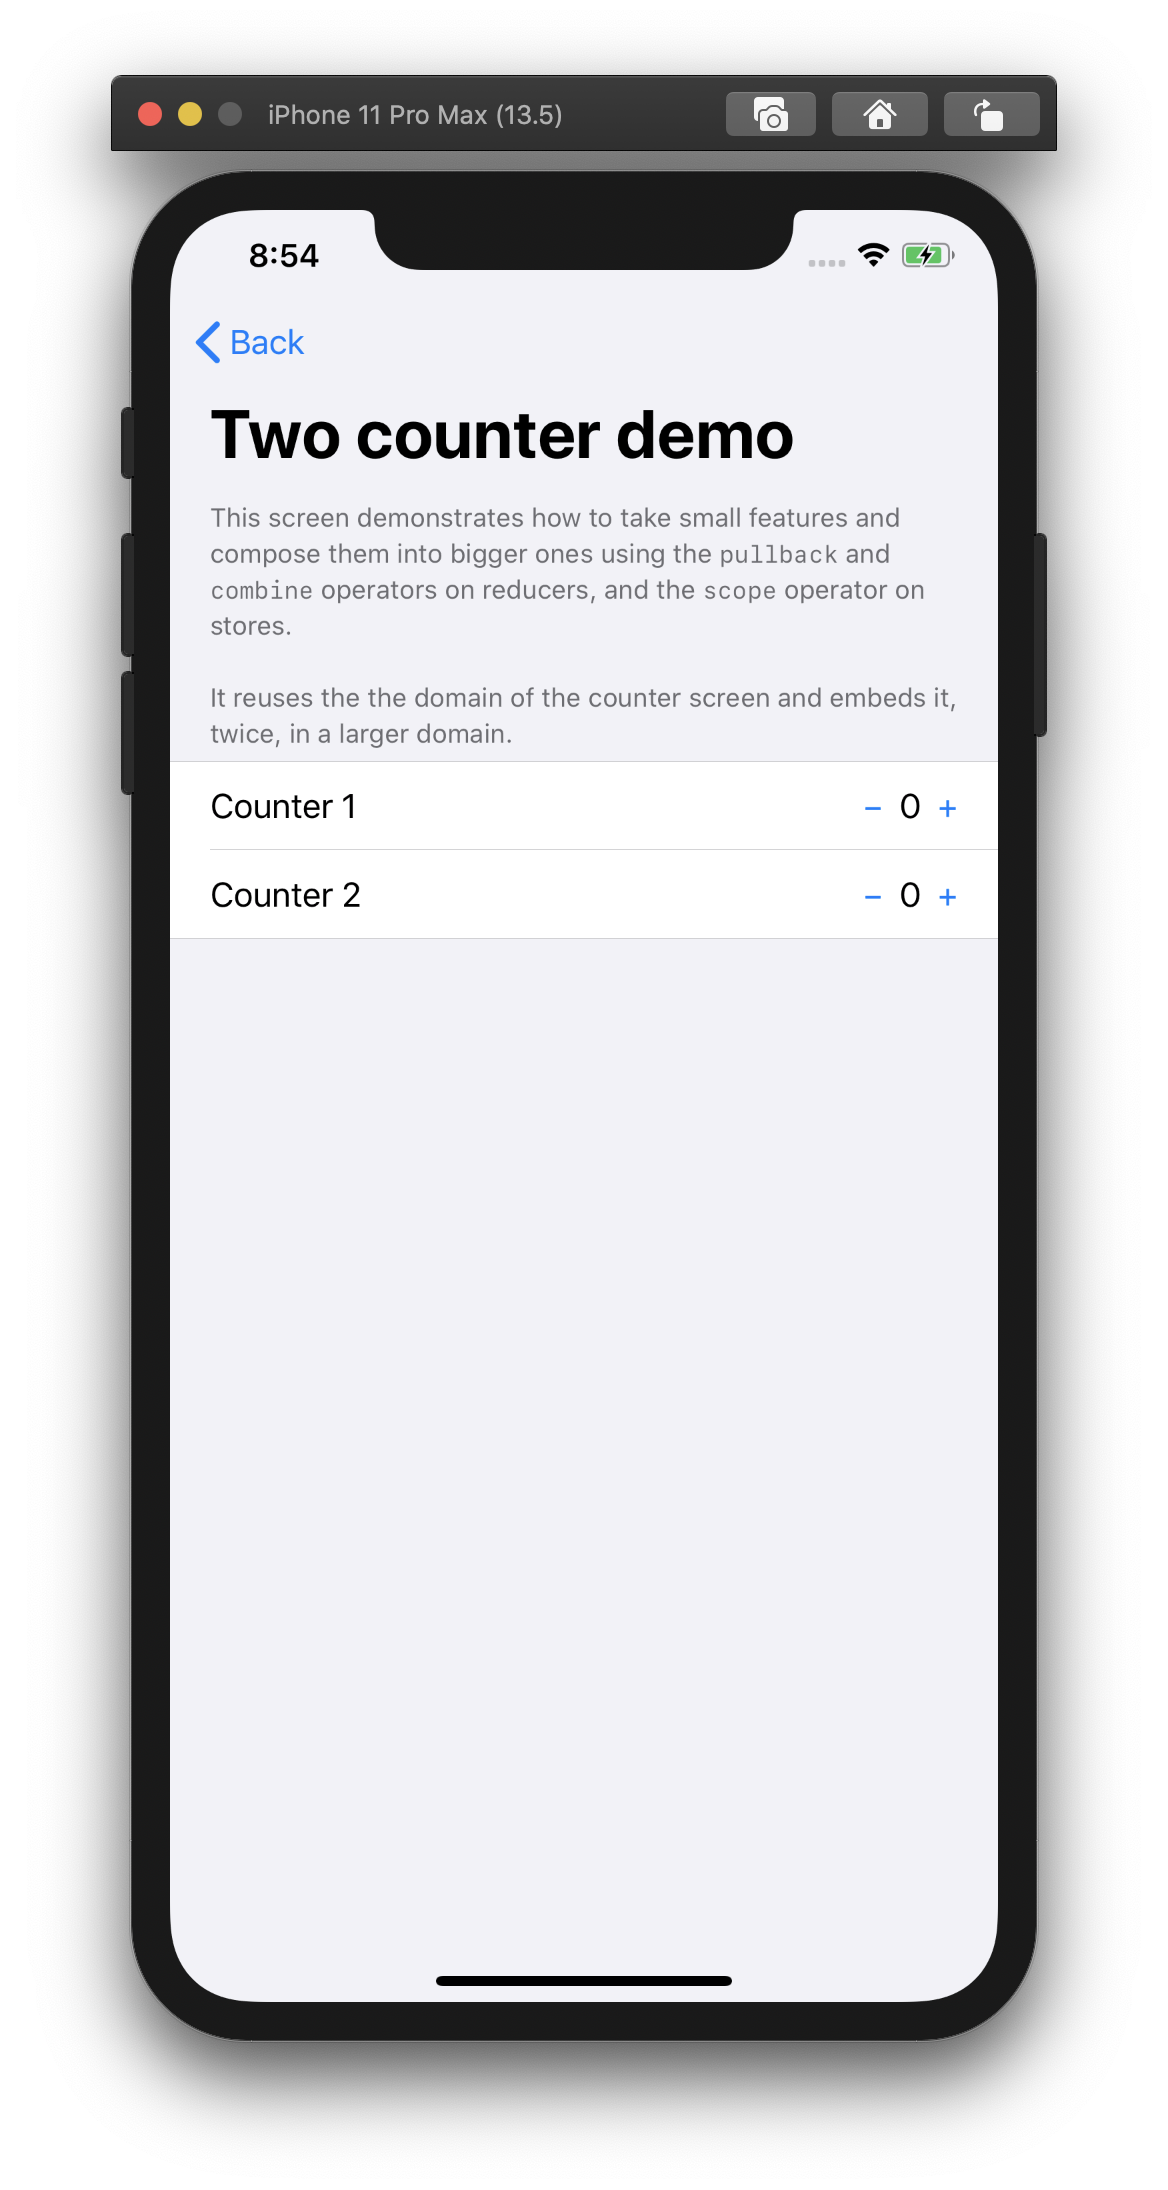
.numberFactButtonTappedの場合に戻り値をenvironment.numberFact()としてEffectを作り、結果をmapしてEffectsBasicsAction.numberFactResponseとすることで、sinkした結果を元にして、このeffectsBasicsReducerが再度呼び出されて action.numberFactResponseのsuccessかfailureが呼び出される。さらに小さなcounterReducerは他のReducerでも使うことができる。次のtowCountersReducerは一つの画面にViewとして2つのカウンタがある。
let twoCountersReducer = Reducer<TwoCountersState, TwoCountersAction, TwoCountersEnvironment>
  .combine(
    counterReducer.pullback(
      state: \TwoCountersState.counter1,
      action: /TwoCountersAction.counter1,
      environment: { _ in CounterEnvironment() }
    ),
    counterReducer.pullback(
      state: \TwoCountersState.counter2,
      action: /TwoCountersAction.counter2,
      environment: { _ in CounterEnvironment() }
    )
  )
counterReducerをpullbackし、それらをcombineすることで一つのReducerにするという例となっている。
その他
複数stateを階層化できる?
- 配列としてStateを保持していくこともできる
- 並列にNestedStateを持てるし(初期画面に3つ並べる)
- 一つのStateを掘り下げていくこともできる
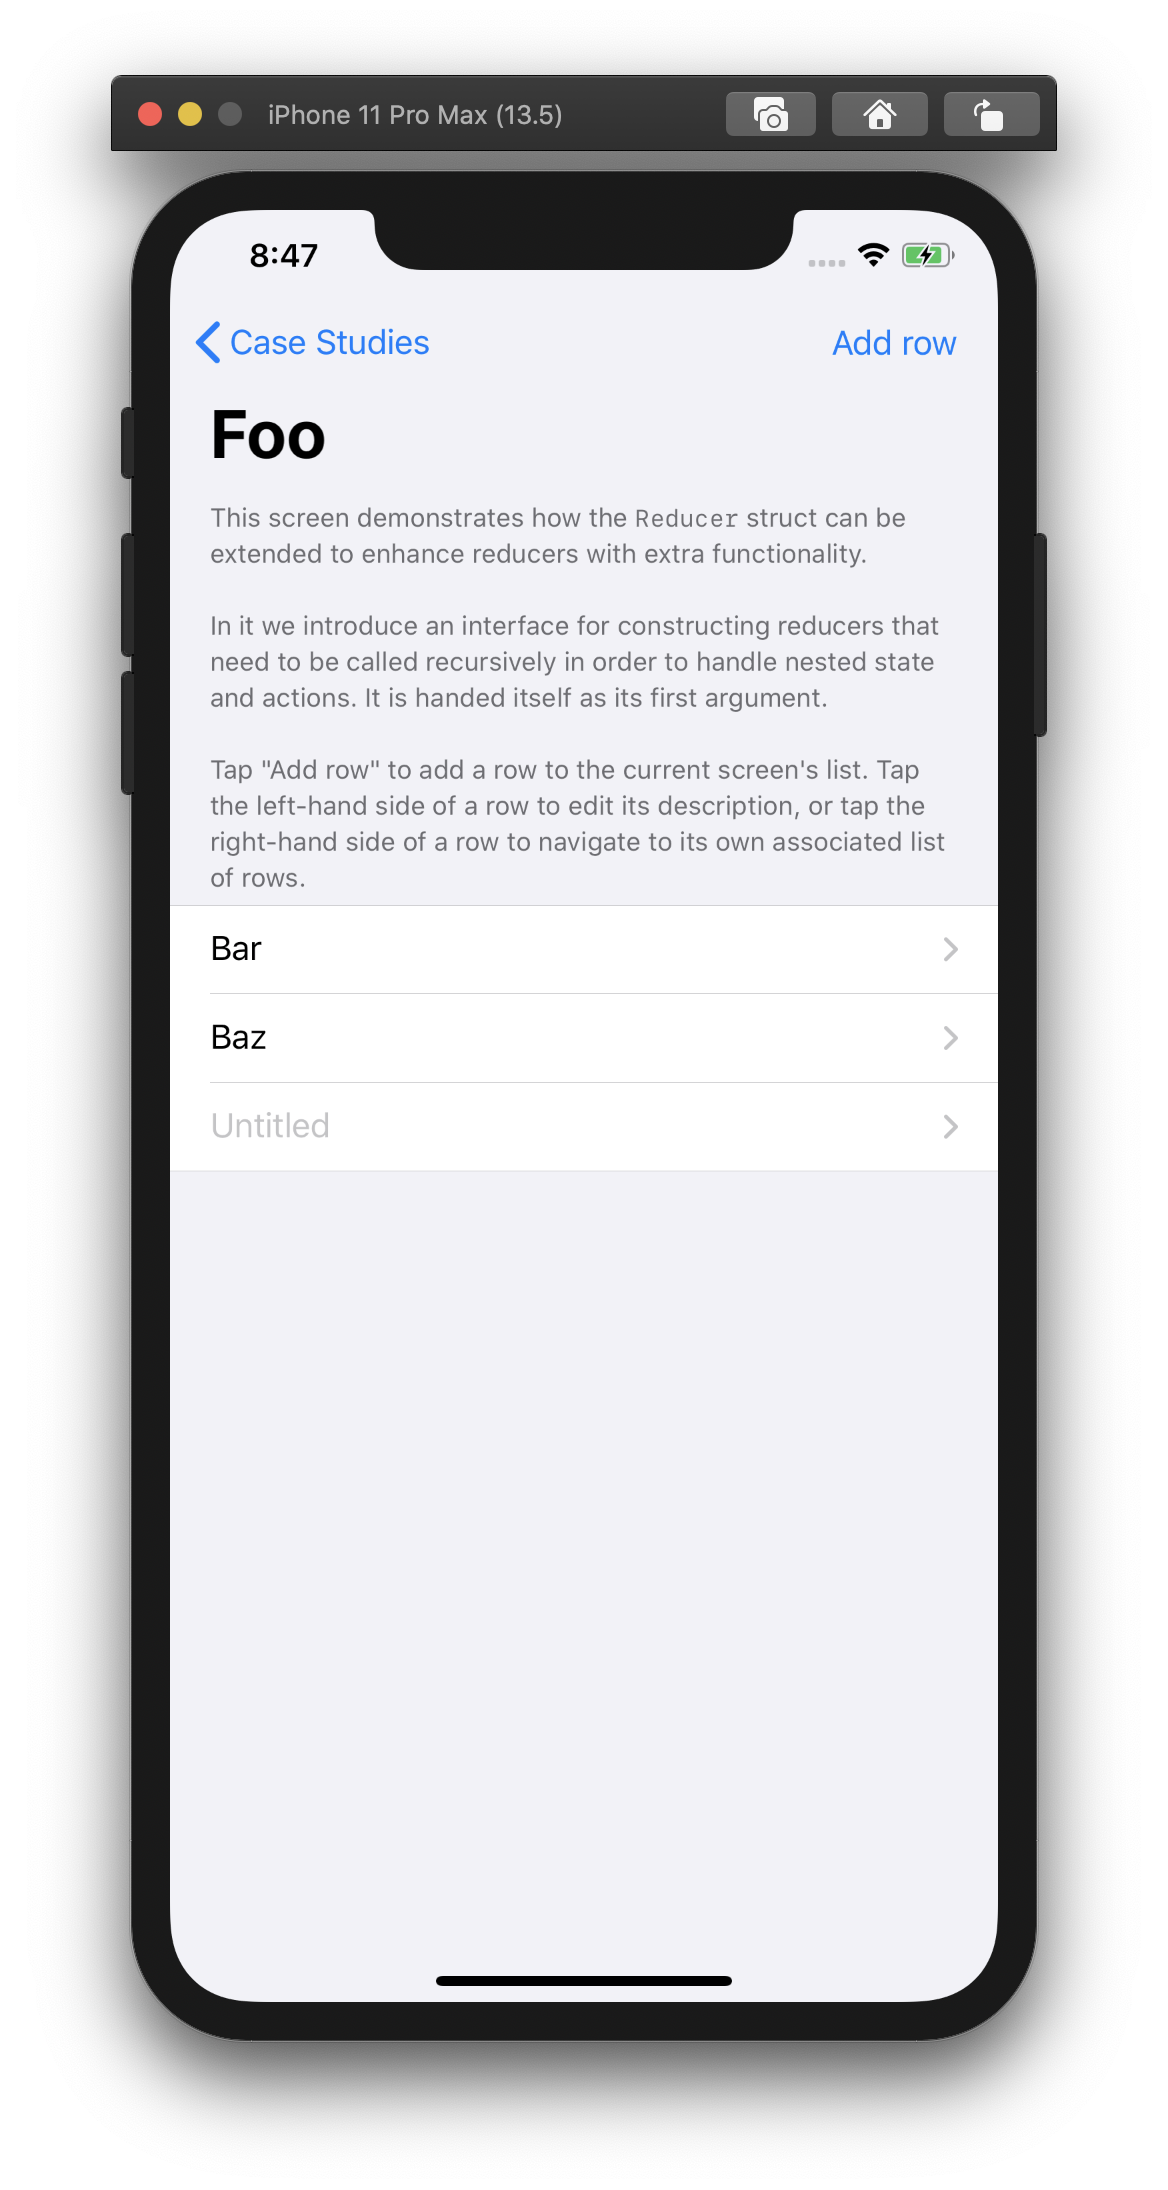
- サンプル
- Recursive state and actions
Bindingはどうやるの?
- View側でStoreを直接編集させない
- (set)テキスト変更時
- Actionをストアに送信することで変更を発生させる
- (get)テキスト取得時
- stateの内容を取得する
TextField(
  "Type here",
  text: viewStore.binding(
      get: { $0.text },
      send: BindingBasicsAction.textChange
    )
)
public func binding<LocalState>( get: @escaping (State) -> LocalState, send localStateToViewAction: @escaping (LocalState) -> Action ) -> Binding<LocalState> { Binding( get: { get(self.state) }, set: { newLocalState, transaction in withAnimation(transaction.disablesAnimations ? nil : transaction.animation) { self.send(localStateToViewAction(newLocalState)) } }) }Reducerのキャンセル
- キャンセルもReducerに処理を渡す
- そもそもReducerでEffectのCancellableは
var cancellationCancellables: [AnyHashable: [UUID: AnyCancellable]] = [:]に保存している- Reducerでidを作成
- idは都度インスタンスを作っているがHashableなので同じ
- Hashableはメンバが同じなら同様になるんだろうがカラなのでそれでも同じ
- キャンセルのReducerではidによってキャンセルする処理を選ぶ
let effectsCancellationReducer = Reducer<
  EffectsCancellationState, EffectsCancellationAction, EffectsCancellationEnvironment
> { state, action, environment in

  struct TriviaRequestId: Hashable {}

  switch action {
  case .cancelButtonTapped:
    state.isTriviaRequestInFlight = false
    return .cancel(id: TriviaRequestId())

  case let .stepperChanged(value):
    state.count = value
    state.currentTrivia = nil
    state.isTriviaRequestInFlight = false
    return .cancel(id: TriviaRequestId())

  case .triviaButtonTapped:
    state.currentTrivia = nil
    state.isTriviaRequestInFlight = true

    return environment.trivia(state.count)
      .receive(on: environment.mainQueue)
      .catchToEffect()
      .map(EffectsCancellationAction.triviaResponse)
      .cancellable(id: TriviaRequestId())

  case let .triviaResponse(.success(response)):
    state.isTriviaRequestInFlight = false
    state.currentTrivia = response
    return .none

  case .triviaResponse(.failure):
    state.isTriviaRequestInFlight = false
    return .none
  }
}
興味深いのはHashableに準拠したTriviaRequestId型をインスタンス化したものをidとしているが、TriviaRequestId型はカラでメンバーがない。つまり、このカラの構造体のインスタンスを比較すると常に同じとなります。
TriviaRequestId() == TriviaRequestId()リファレンスを読むともちろんこれは正常な動作なんだけど、普段私がHashableを使うのは内部の値を気にせず型を作る時、それを比較するようにするのに使うわけです。
これの何が私に興味深いかというと、普段みなさんとしたらWeb APIで取得したIntのUserIDとかをアプリ側で型にして使うはずで、その時に比較可能にしようとHashable使うと思うんだけど、メンバをカラにしてハッシュ化する対象なけりゃ同じになるという。それってEmpty的な意味合いになって都合も合う pic.twitter.com/ub6a5PPtgc
— imajô (@yimajo) May 25, 2020内部をカラにすることでそのカラのインスタンスだけで比較することができるというのは理にかなっていて興味深いですよね。
おわりに
Composable ArchitectureはSwiftUI専用ってわけではないですが、SwiftUIを使ってアプリを開発する上でどのような構成にするのかという一つの指針になるはずです。

- 投稿日:2020-05-26T22:18:35+09:00
Swiftによるアプリ開発のためのComposable Architectureがすごいので紹介したい
はじめに
Swiftを用いたiOS/macOS/tvOS/watchOSアプリ開発用に Composable Architectureというのがあり、それがめっちゃ良いやん!と思ったのでそれを書いておきます。フレームワーク的に提供されていますが、特にSwiftUIを使ってどういう構成でアプリを作ろうかと考えている人がコードを読むだけでもとてもいい教材になると思います。
Composable Archtectureを提案しているのは、関数型プログラミングとSwiftについての動画コンテンツ提供しているPoint-Freeというサービスを提供している方たちです。
必須要件
Composable Architectureの必須要件を先に書いておきます。
- iOS13以上 (macOS, tvOS, watchOSでも使用できる)
- SwiftUI, Combineが使える必要がある
- UIKitにも対応している
この記事時点でのバージョンは0.2.0です。
概要
Composable Architectureをまずざっくり説明すると、Apple製品のSwift/Combine/UIKitでのアプリ開発におけるシステムアーキテクチャをフレームワークのかたちで提供してくれると言ったほうがいいかもしれないですね。
概要を箇条書きにします。
- View以外のコンポーネントをViewStore, Store, Reducerとしている
- ViewStore
- Viewからアクションを送り結果をViewに反映できる
- Store
- StateとActionを持ち、ActionによりReducerを呼び出してStateを変更して結果をViewStoreに反映する
- Reducer
- Stateを変更するコンポーネント化された処理として定義され、小さな処理を組み合わせることもできる
- StoreをView用とするViewStoreに変換するためのWithViewStoreなどもある
- WithViewStoreがSwiftUI.Viewに準拠しておりViewのように扱える
- SubViewをWithViewStoreのbodyに記述していく
コンポーネントを図にしてみると次のような感じです。
公式の作画ではなく私の作画なので間違いあるかもしれません。その場合はコメントなどをください。
良い点
良い点も超ざっくり説明すると、ReduxっぽさがありながらそれをSwiftUI/Combineの仕組みを上手く使って各コンポーネント間のやりとりをしています。
- ReduxっぽいがRedcuerを細かく分割していて、画面によって必要があればそれを組み合わせる
- 巨大なグローバルReducerを作るわけではない
- 画面ごとにReducerがあり、それは別画面で組み合わせても良い
- Combineをうまく使っている点がある
- 変化をPublisherを使って反映したり
- Effectをsinkして再帰的にReducerを呼び出したりする
- SwiftUIをうまく使っている点がある
- WithViewStoreでSubView用にStoreを変換しているのが自然でいい
- 副作用をPublisherに準拠するEffect型として取り扱う
- いわゆるビジネスロジックをEffectとして取り扱う
登場するパーツやコンポーネントの説明
Effect
ロジックをCombine.PublisherとしてつなぐためのラッパーとしてEffect型というのをいい感じに作られています。
- 副作用のPublisherを定義する
- 例えば通信、ファイルアクセスなどをEffect型としている
- キャンセルがわかりやすい
- Reducerで処理のidを決めておく
- グローバルにCancellablesを配列で保持しておりそれをidでキャンセル
具体的には、副作用の結果を取得する際にそのまま直接Publisher/Futureを使うようなことはしません。もちろんEffectの実行時にFutureを選択することはあります。
EffectからFutureを使ってるサンプルは次のような感じ
 Effect<Int, Never>.future { callback in
   DispatchQueue.main.asyncAfter(deadline: .now() + 1) {
     callback(.success(42))
     callback(.success(1729)) // Will not be emitted by the effect
   }
 }
他には既存のPublisherをEffectに変換することも可能です。このために既存のPublisherを渡されて初期化する場合は、Publisherを
upstreamとし、それをSubscriberにreceiveすることで対応しています。public struct Effect<Output, Failure: Error>: Publisher { public let upstream: AnyPublisher<Output, Failure> public init<P: Publisher>(_ publisher: P) where P.Output == Output, P.Failure == Failure { self.upstream = publisher.eraseToAnyPublisher() } public func receive<S>( subscriber: S ) where S: Combine.Subscriber, Failure == S.Failure, Output == S.Input { self.upstream.receive(subscriber: subscriber) } ... }WithViewStore
- SwiftUI.View
- こいつが
@ObservedObjectを用意する例えばカウンタ用のSwiftUIのViewがあったとします
その画面を示す大外のViewはObservedObjectは持たず、その中のカウンター部分でWithViewStoreを用意し、storeを渡すようにする。そしてWithViewStoreのサブビューが実際の描画用のViewになります。
struct CounterView: View {
  let store: Store<CounterState, CounterAction>
  // この大外のViewではObservedObjectは持たない

  var body: some View {
    // ↓このWithViewStoreがObservedObjectを持ちます
    WithViewStore(self.store) { viewStore in
      HStack {
        // サブビューたち
        Button("−") { viewStore.send(.decrementButtonTapped) }
        Text("\(viewStore.count)")
          .font(Font.body.monospacedDigit())
        Button("+") { viewStore.send(.incrementButtonTapped) }
      }
    }
  }
}
WithViewStoreはSwiftUI.Viewであり、こいつがObservedObjectを保持し、
サブビューとしてマイナスのButtonとTextとプラスのButtonがあります。WithViewStoreはフレームワークとして提供されます。下記に省略しつつ紹介します。
public struct WithViewStore<State, Action, Content>: View where Content: View {
  private let content: (ViewStore<State, Action>) -> Content
  private var prefix: String?
  @ObservedObject private var viewStore: ViewStore<State, Action>

  ...

  public init(
    _ store: Store<State, Action>,
    removeDuplicates isDuplicate: @escaping (State, State) -> Bool,
    @ViewBuilder content: @escaping (ViewStore<State, Action>) -> Content
  ) {
    self.content = content
    self.viewStore = ViewStore(store, removeDuplicates: isDuplicate)
  }
}
WithViewStoreによってViewの外からやってきたstoreは
@ObservedObjectのViewStore型に渡されます。ViewStore
- UIからのアクションをStore以降に送れる
- ObservableObjectに準拠している
@PublishedによりSwiftUI.Viewを更新することができる@dynamicMemberLookup public final class ViewStore<State, Action>: ObservableObject { /// A publisher of state. public let publisher: StorePublisher<State> private var viewCancellable: AnyCancellable? /// Initializes a view store from a store. /// /// - Parameters: /// - store: A store. /// - isDuplicate: A function to determine when two `State` values are equal. When values are /// equal, repeat view computations are removed. public init( _ store: Store<State, Action>, removeDuplicates isDuplicate: @escaping (State, State) -> Bool ) { let publisher = store.$state.removeDuplicates(by: isDuplicate) self.publisher = StorePublisher(publisher) self.state = store.state self._send = store.send self.viewCancellable = publisher.sink { [weak self] in self?.state = $0 } } /// The current state. @Published public internal(set) var state: State let _send: (Action) -> Void ... }Store
- StateとActionを持つ
- ActioinによるReducerを呼び出しStateを変更
- Stateが変化するとViewStoreに反映
- 一つの画面に一つのStateの塊
- Stateの子供もしくはNestedStateとして配列を保持できる
- scopeによって複数ステートを分けて扱える
Reducer
- 画面ごとにReducerがある
- その画面で実行する処理をまとめられる
- 例
- ボタンタップしてカウントアップ
- キャンセル処理
- 通信結果の成功と失敗のハンドリング
- 別画面に使ったReducerを組み合わせたりできる
- Reducerの処理の戻り値はEffectなのでsinkできる
- Effectの結果で再帰的にReduderを呼び出せる
- Reducerに処理のハンドリングを任せる
- エラーハンドリングもReducer
- ハンドリングしたらstateを変える
- stateが変わったらStore → ViewStoreと変更が伝わりViewが変わる
CounterアプリのカウントをアップダウンするだけのシンプルなReducerであるcounterReducer
let counterReducer = Reducer<CounterState, CounterAction, CounterEnvironment> { state, action, _ in
  switch action {
  case .decrementButtonTapped:
    state.count -= 1
    return .none
  case .incrementButtonTapped:
    state.count += 1
    return .none
  }
}
やっていることはActionに応じてStateを変更している。return している
.noneはEffectのEmptyを意味していて、これをsinkしても意味がないことを示している。returnをする際にEffectを指定する例はCounterで用意した数字を基にWebAPIを呼び出すeffectsBasicsReducerがわかりやすい。
let effectsBasicsReducer = Reducer<
  EffectsBasicsState, EffectsBasicsAction, EffectsBasicsEnvironment
> { state, action, environment in
  switch action {
  case .decrementButtonTapped:
    state.count -= 1
    state.numberFact = nil
    // Return an effect that re-increments the count after 1 second.
    return Effect(value: EffectsBasicsAction.incrementButtonTapped)
      .delay(for: 1, scheduler: environment.mainQueue)
      .eraseToEffect()

  case .incrementButtonTapped:
    state.count += 1
    state.numberFact = nil
    return .none

  case .numberFactButtonTapped:
    state.isNumberFactRequestInFlight = true
    state.numberFact = nil
    // Return an effect that fetches a number fact from the API and returns the
    // value back to the reducer's `numberFactResponse` action.
    return environment.numberFact(state.count)
      .receive(on: environment.mainQueue)
      .catchToEffect()
      .map(EffectsBasicsAction.numberFactResponse)

  case let .numberFactResponse(.success(response)):
    state.isNumberFactRequestInFlight = false
    state.numberFact = response
    return .none

  case .numberFactResponse(.failure):
    state.isNumberFactRequestInFlight = false
    return .none
  }
}
Actionが
.numberFactButtonTappedの場合に戻り値をenvironment.numberFact()としてEffectを作り、結果をmapしてEffectsBasicsAction.numberFactResponseとすることで、sinkした結果を元にして、このeffectsBasicsReducerが再度呼び出されて action.numberFactResponseのsuccessかfailureが呼び出される。さらに小さなcounterReducerは他のReducerでも使うことができる。次のtowCountersReducerは一つの画面にViewとして2つのカウンタがある。
let twoCountersReducer = Reducer<TwoCountersState, TwoCountersAction, TwoCountersEnvironment>
  .combine(
    counterReducer.pullback(
      state: \TwoCountersState.counter1,
      action: /TwoCountersAction.counter1,
      environment: { _ in CounterEnvironment() }
    ),
    counterReducer.pullback(
      state: \TwoCountersState.counter2,
      action: /TwoCountersAction.counter2,
      environment: { _ in CounterEnvironment() }
    )
  )
counterReducerをpullbackし、それらをcombineすることで一つのReducerにするという例となっている。
その他
複数stateを階層化できる?
- 配列としてStateを保持していくこともできる
- 並列にNestedStateを持てるし(初期画面に3つ並べる)
- 一つのStateを掘り下げていくこともできる
- サンプル
- Recursive state and actions
Bindingはどうやるの?
- View側でStoreを直接編集させない
- (set)テキスト変更時
- Actionをストアに送信することで変更を発生させる
- (get)テキスト取得時
- stateの内容を取得する
TextField(
  "Type here",
  text: viewStore.binding(
      get: { $0.text },
      send: BindingBasicsAction.textChange
    )
)
public func binding<LocalState>( get: @escaping (State) -> LocalState, send localStateToViewAction: @escaping (LocalState) -> Action ) -> Binding<LocalState> { Binding( get: { get(self.state) }, set: { newLocalState, transaction in withAnimation(transaction.disablesAnimations ? nil : transaction.animation) { self.send(localStateToViewAction(newLocalState)) } }) }Reducerのキャンセル
- キャンセルもReducerに処理を渡す
- そもそもReducerでEffectのCancellableは
var cancellationCancellables: [AnyHashable: [UUID: AnyCancellable]] = [:]に保存している- Reducerでidを作成
- idは都度インスタンスを作っているがHashableなので同じ
- Hashableはメンバが同じなら同様になるんだろうがカラなのでそれでも同じ
- キャンセルのReducerではidによってキャンセルする処理を選ぶ
let effectsCancellationReducer = Reducer<
  EffectsCancellationState, EffectsCancellationAction, EffectsCancellationEnvironment
> { state, action, environment in

  struct TriviaRequestId: Hashable {}

  switch action {
  case .cancelButtonTapped:
    state.isTriviaRequestInFlight = false
    return .cancel(id: TriviaRequestId())

  case let .stepperChanged(value):
    state.count = value
    state.currentTrivia = nil
    state.isTriviaRequestInFlight = false
    return .cancel(id: TriviaRequestId())

  case .triviaButtonTapped:
    state.currentTrivia = nil
    state.isTriviaRequestInFlight = true

    return environment.trivia(state.count)
      .receive(on: environment.mainQueue)
      .catchToEffect()
      .map(EffectsCancellationAction.triviaResponse)
      .cancellable(id: TriviaRequestId())

  case let .triviaResponse(.success(response)):
    state.isTriviaRequestInFlight = false
    state.currentTrivia = response
    return .none

  case .triviaResponse(.failure):
    state.isTriviaRequestInFlight = false
    return .none
  }
}
興味深いのはHashableに準拠したTriviaRequestId型をインスタンス化したものをidとしているが、TriviaRequestId型はカラでメンバーがない。つまり、このカラの構造体のインスタンスを比較すると常に同じとなります。
TriviaRequestId() == TriviaRequestId()リファレンスを読むともちろんこれは正常な動作なんだけど、普段私がHashableを使うのは内部の値を気にせず型を作る時、それを比較するようにするのに使うわけです。
これの何が私に興味深いかというと、普段みなさんとしたらWeb APIで取得したIntのUserIDとかをアプリ側で型にして使うはずで、その時に比較可能にしようとHashable使うと思うんだけど、メンバをカラにしてハッシュ化する対象なけりゃ同じになるという。それってEmpty的な意味合いになって都合も合う pic.twitter.com/ub6a5PPtgc
— imajô (@yimajo) May 25, 2020内部をカラにすることでそのカラのインスタンスだけで比較することができるというのは理にかなっていて興味深いですよね。
おわりに
Composable ArchitectureはSwiftUI専用ってわけではないですが、SwiftUIを使ってアプリを開発する上でどのような構成にするのかという一つの指針になるはずです。
- 投稿日:2020-05-26T21:05:23+09:00
UIButtonに隠しActionをつける方法
はじめに
ただどう動くんだろう?って言うだけの話で実用性は皆無です

なんか UIButton に謎のアクションを付けれたというお話です。環境
- Xcode 11.4
- iPhone 11 Pro Max (13.4)
実装
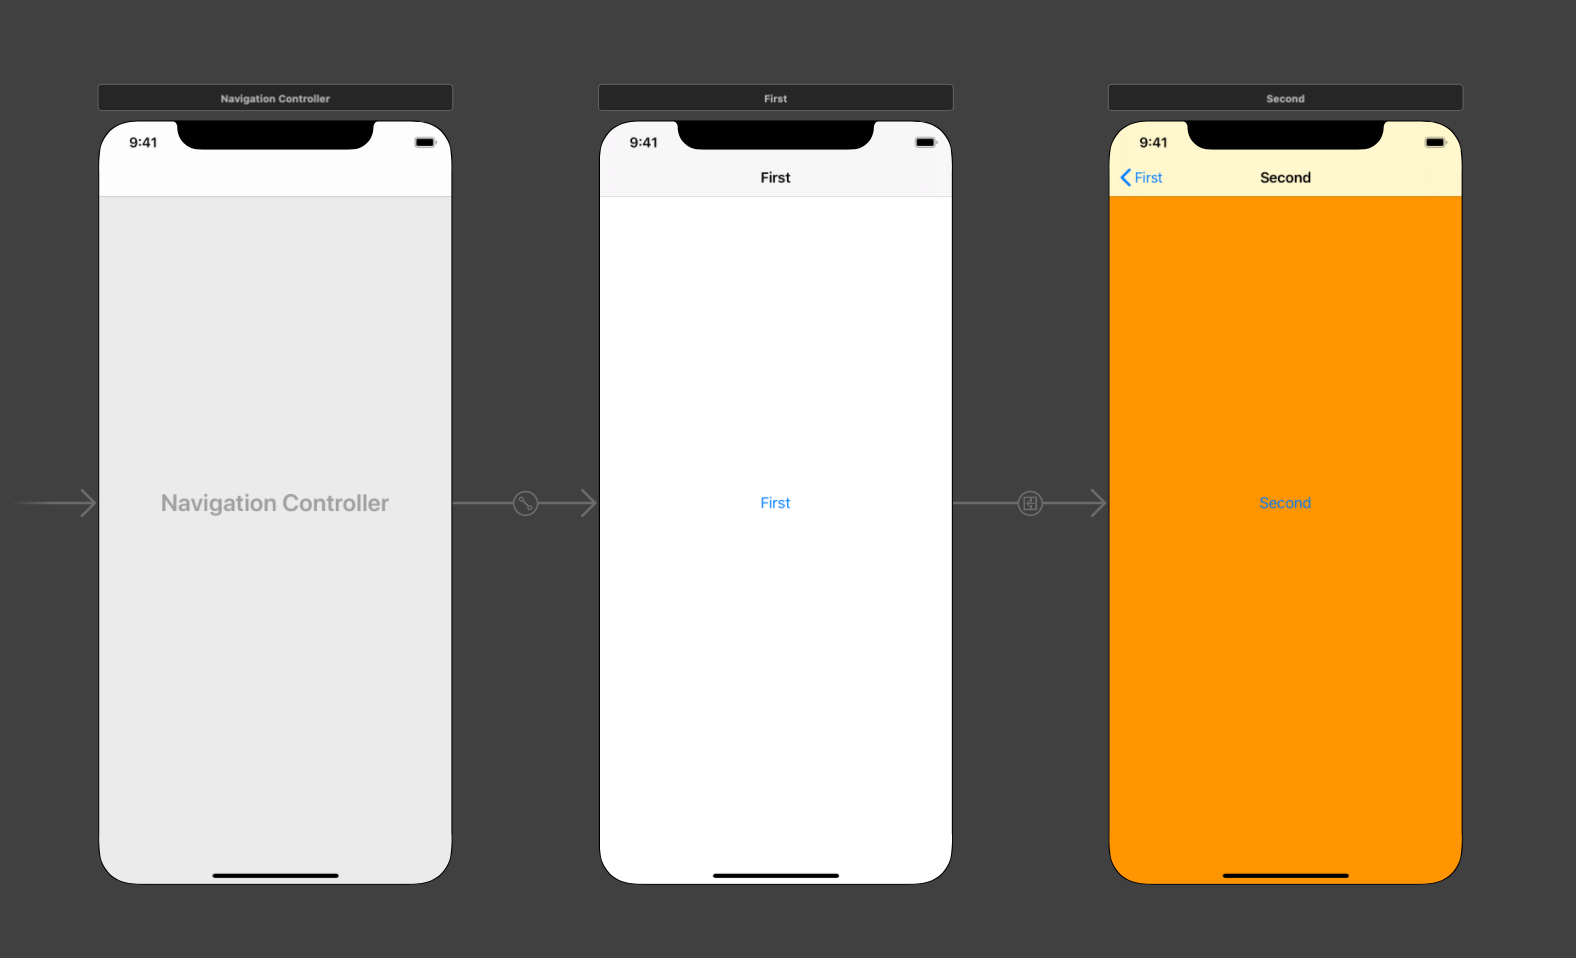
- StoryboardでFirstViewControllerとSecondViewControllerを用意する
- FirstVCにボタンをのせる
- IBActionでボタンのアクションをFirstVCに紐付ける(
tappedFirst(_ sender: Any))- SecondVCにFirstVCのボタンをコピペする
- IBActionでボタンのアクションをSecondVCに紐付ける(
tappedSecond(_ sender: Any))こんな感じ
final class FirstViewController: UIViewController {

    @IBAction private func tappedFirst(_ sender: Any) {
        print("First")
        let vc = storyboard?.instantiateViewController(identifier: "Second")
        navigationController?.pushViewController(vc!, animated: true)
    }
}

final class SecondViewController: UIViewController {

    @IBAction private func tappedSecond(_ sender: Any) {
        print("Second")
    }
}
現象
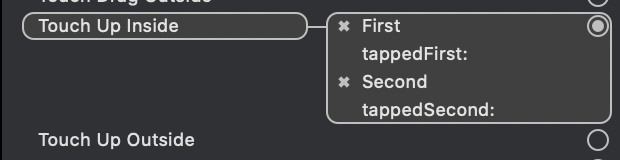
Storyboard で SecondVC のボタンを確認すると...
こうなる!
tappedFirstがついてる。シュミレータで SecondVC のボタンを押下してみるとSecondと print 表示される。(FirstVCのtappedFirst(_)が呼ばれたりはしない)unrecognized selector でクラッシュもしない調査
下記のようにボタンのカスタムクラスを作り FirstVC と SecondVC のボタンに継承させる。
class CustomButton: UIButton {

    override func sendActions(for controlEvents: UIControl.Event) {
        print("sendActions")
        super.sendActions(for: controlEvents)
    }

    override func sendAction(_ action: Selector, to target: Any?, for event: UIEvent?) {
        print("sendAction")
        super.sendAction(action, to: target, for: event)
    }

    override func beginTracking(_ touch: UITouch, with event: UIEvent?) -> Bool {
        print("beginTracking")
        return super.beginTracking(touch, with: event)
    }

    override func endTracking(_ touch: UITouch?, with event: UIEvent?) {
        print("endTracking")
        return super.endTracking(touch, with: event)
    }

    override func cancelTracking(with event: UIEvent?) {
        print("cancelTracking")
        super.cancelTracking(with: event)
    }

    override func addTarget(_ target: Any?, action: Selector, for controlEvents: UIControl.Event) {
        print("addTarget")
        super.addTarget(target, action: action, for: controlEvents)
    }
}
FirstVC表示時のログ
addTargetFirstVCのボタン押下時のログ
beginTracking
endTracking
sendAction
First
addTarget
最後の addTarget は SecondVC 表示時のやつ
SecondVC表示時のログ
addTargetアクションは2つあるけど1回しか呼ばれない
SecondVCのボタン押下時のログ
beginTracking
endTracking
sendAction
Second
調査結果
SecondVC のボタンの
addTargetが一回しか呼ばれていないことからそもそもtappedFirstのアクションは追加されていないみたい
Storyboardでアクションを付けたボタンを他画面からコピペすれば動作しない謎のアクションを付けることができる!これをすれば他の開発者を惑わすこともたやすいだろう
さいごに
実装中に謎のアクションをみつけたので調べてみた結果です。活かせる場はあるだろうか
- 投稿日:2020-05-26T19:04:52+09:00
iOSアプリの GitLab CI/CD 環境を整える(コードレビュー編 SwiftLint, Fastlane, Danger)
はじめに
本記事のゴール
iOSアプリのGitLab CI/CD環境を整えたい!
ということで、第一弾はコードレビュー編です。
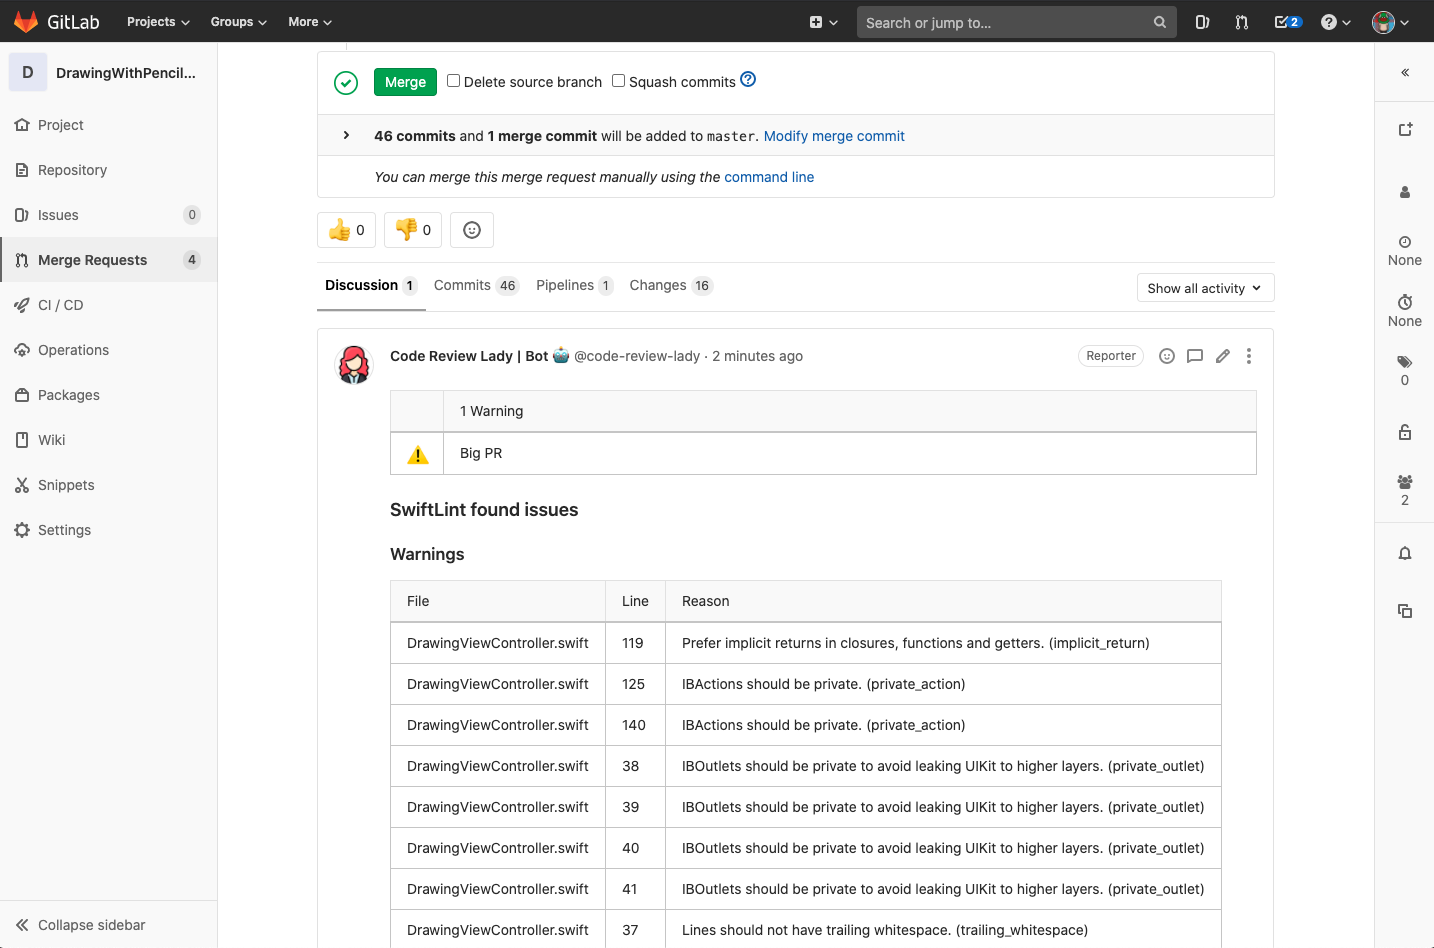
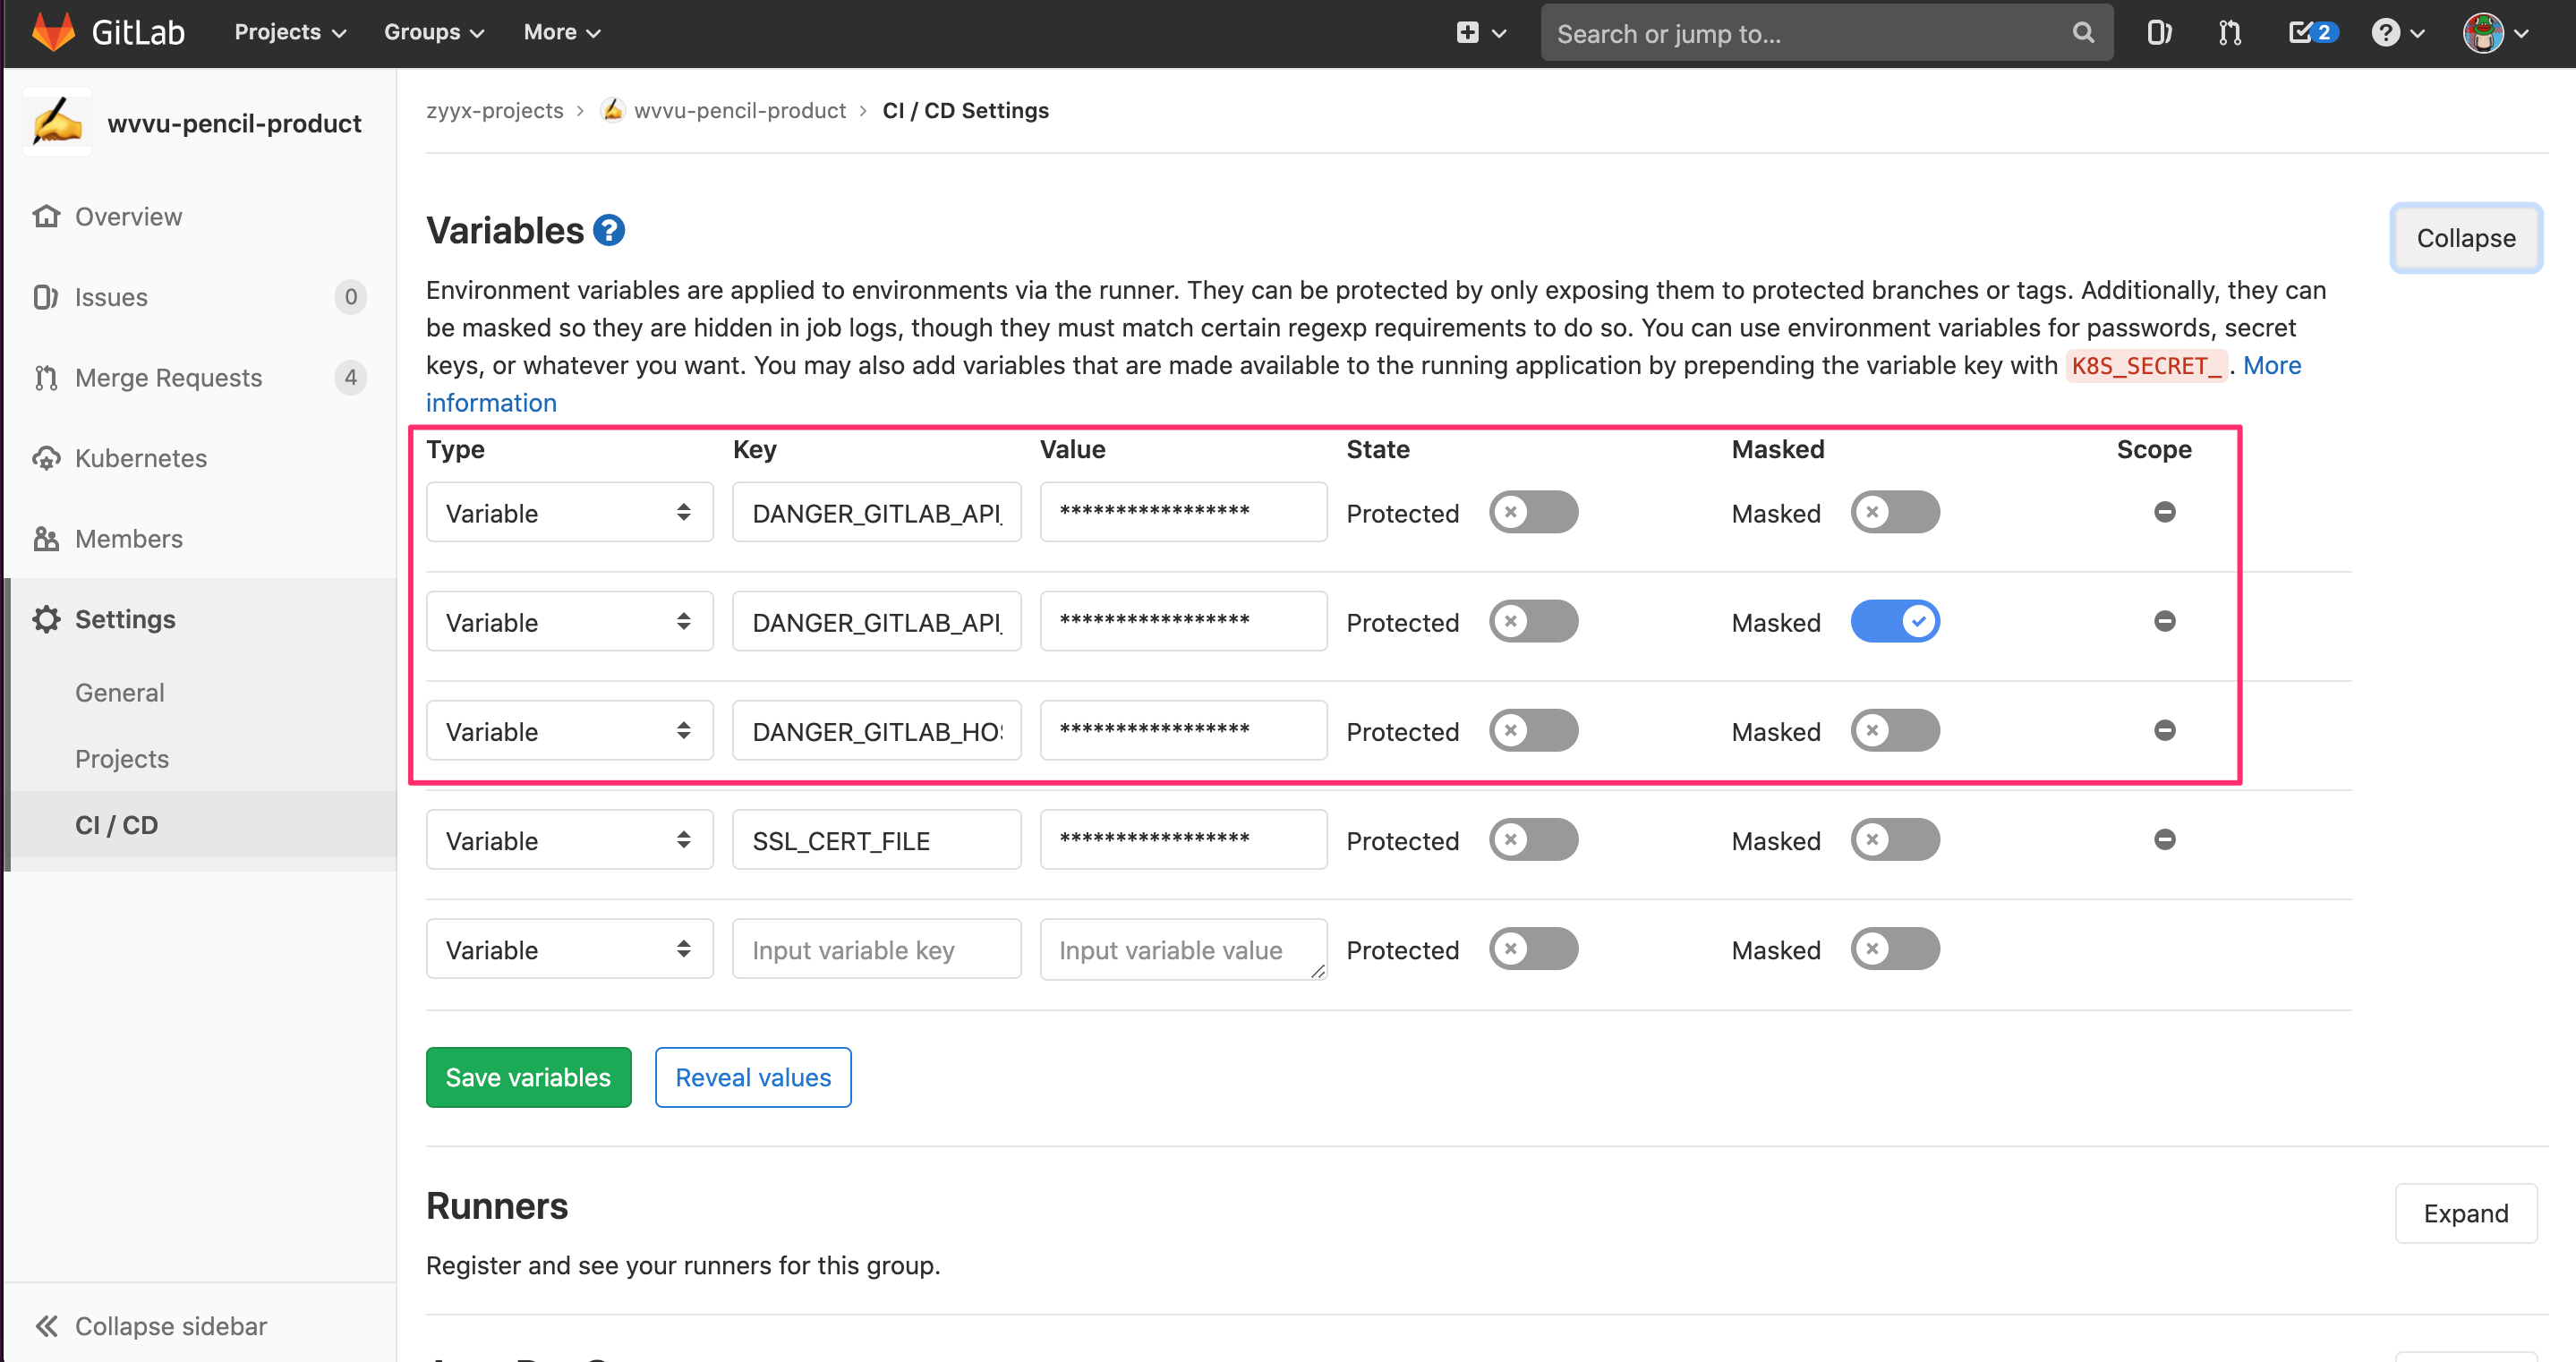
以下のキャプチャのようにMerge Request作成時に自動でSwiftLintを実行+実行結果をコメントに残すことで、コードレビューを円滑にし品質向上に繋げることを目的としています。
環境
- macOS(ビルド用):macOS Catalina 10.15.4
- Xcode:11.4.1
- Swift:5.2.2
- SwiftLint:0.30.1
- Danger:8.0.0
- Danger Gitlab:8.0.0
- Danger Swiftlint:0.24.2
- Fastlane:2.148.1
- GitLab CE(セルフホスティング):12.4.0
- GitLab CI:11.1.0
SwiftLint とは?
SwiftLint は、Swift用の静的解析ツールです。
コードレビュー時に静的解析ツールを挟むことで、品質向上に繋げるのが目的です。詳しくは公式ドキュメントを読んで下さい。
https://realm.github.io/SwiftLint/Fastlane とは?
Fastlaneは、モバイルアプリ開発で必要な様々な作業(テスト/ビルド/リリース等)の自動化ツールです。
.gitlab-ci.ymlにCIプロセスを記述するのも有りですが、CI環境に依存しない+リリースプロセスまで考えると、iOSアプリ開発ではFastlaneを使う方が良いと思います。また、Fastlane標準でSwiftLintに対応しているのですが、MRコメントにLint結果を残すまではできないので、少し歯がゆさが残ります。
これを解決するために、次のDangerを使用します。詳しくは公式ドキュメントを読んで下さい。
https://fastlane.tools/Danger とは?
Dangerは、コードレビューの自動化ツールです。
FastlaneだけでもCIプロセス中にSwiftLintを実行することは出来るのですが、Lint結果を確認するために一々ジョブの中身のログだったりアーティファクトを確認しないとダメなので面倒です。(※やりようによってはGitLab PagesでLint結果を公開することもできますが、ここでは割愛)
ですので、Lint結果をMRコメントに残す目的で使用します。
詳しくは公式ドキュメントを読んで下さい。
https://danger.systems/swift/1. SwiftLint を導入する
1-1. SwiftLint のインストール
チームで共有しやすいようにCocoapodsでインストールします
Podfiletarget 'MyApp' do use_frameworks! + pod 'SwiftLint' end$ pod install※Homebrewでもインストールできるので、必要に応じて公式ドキュメントを確認して下さい
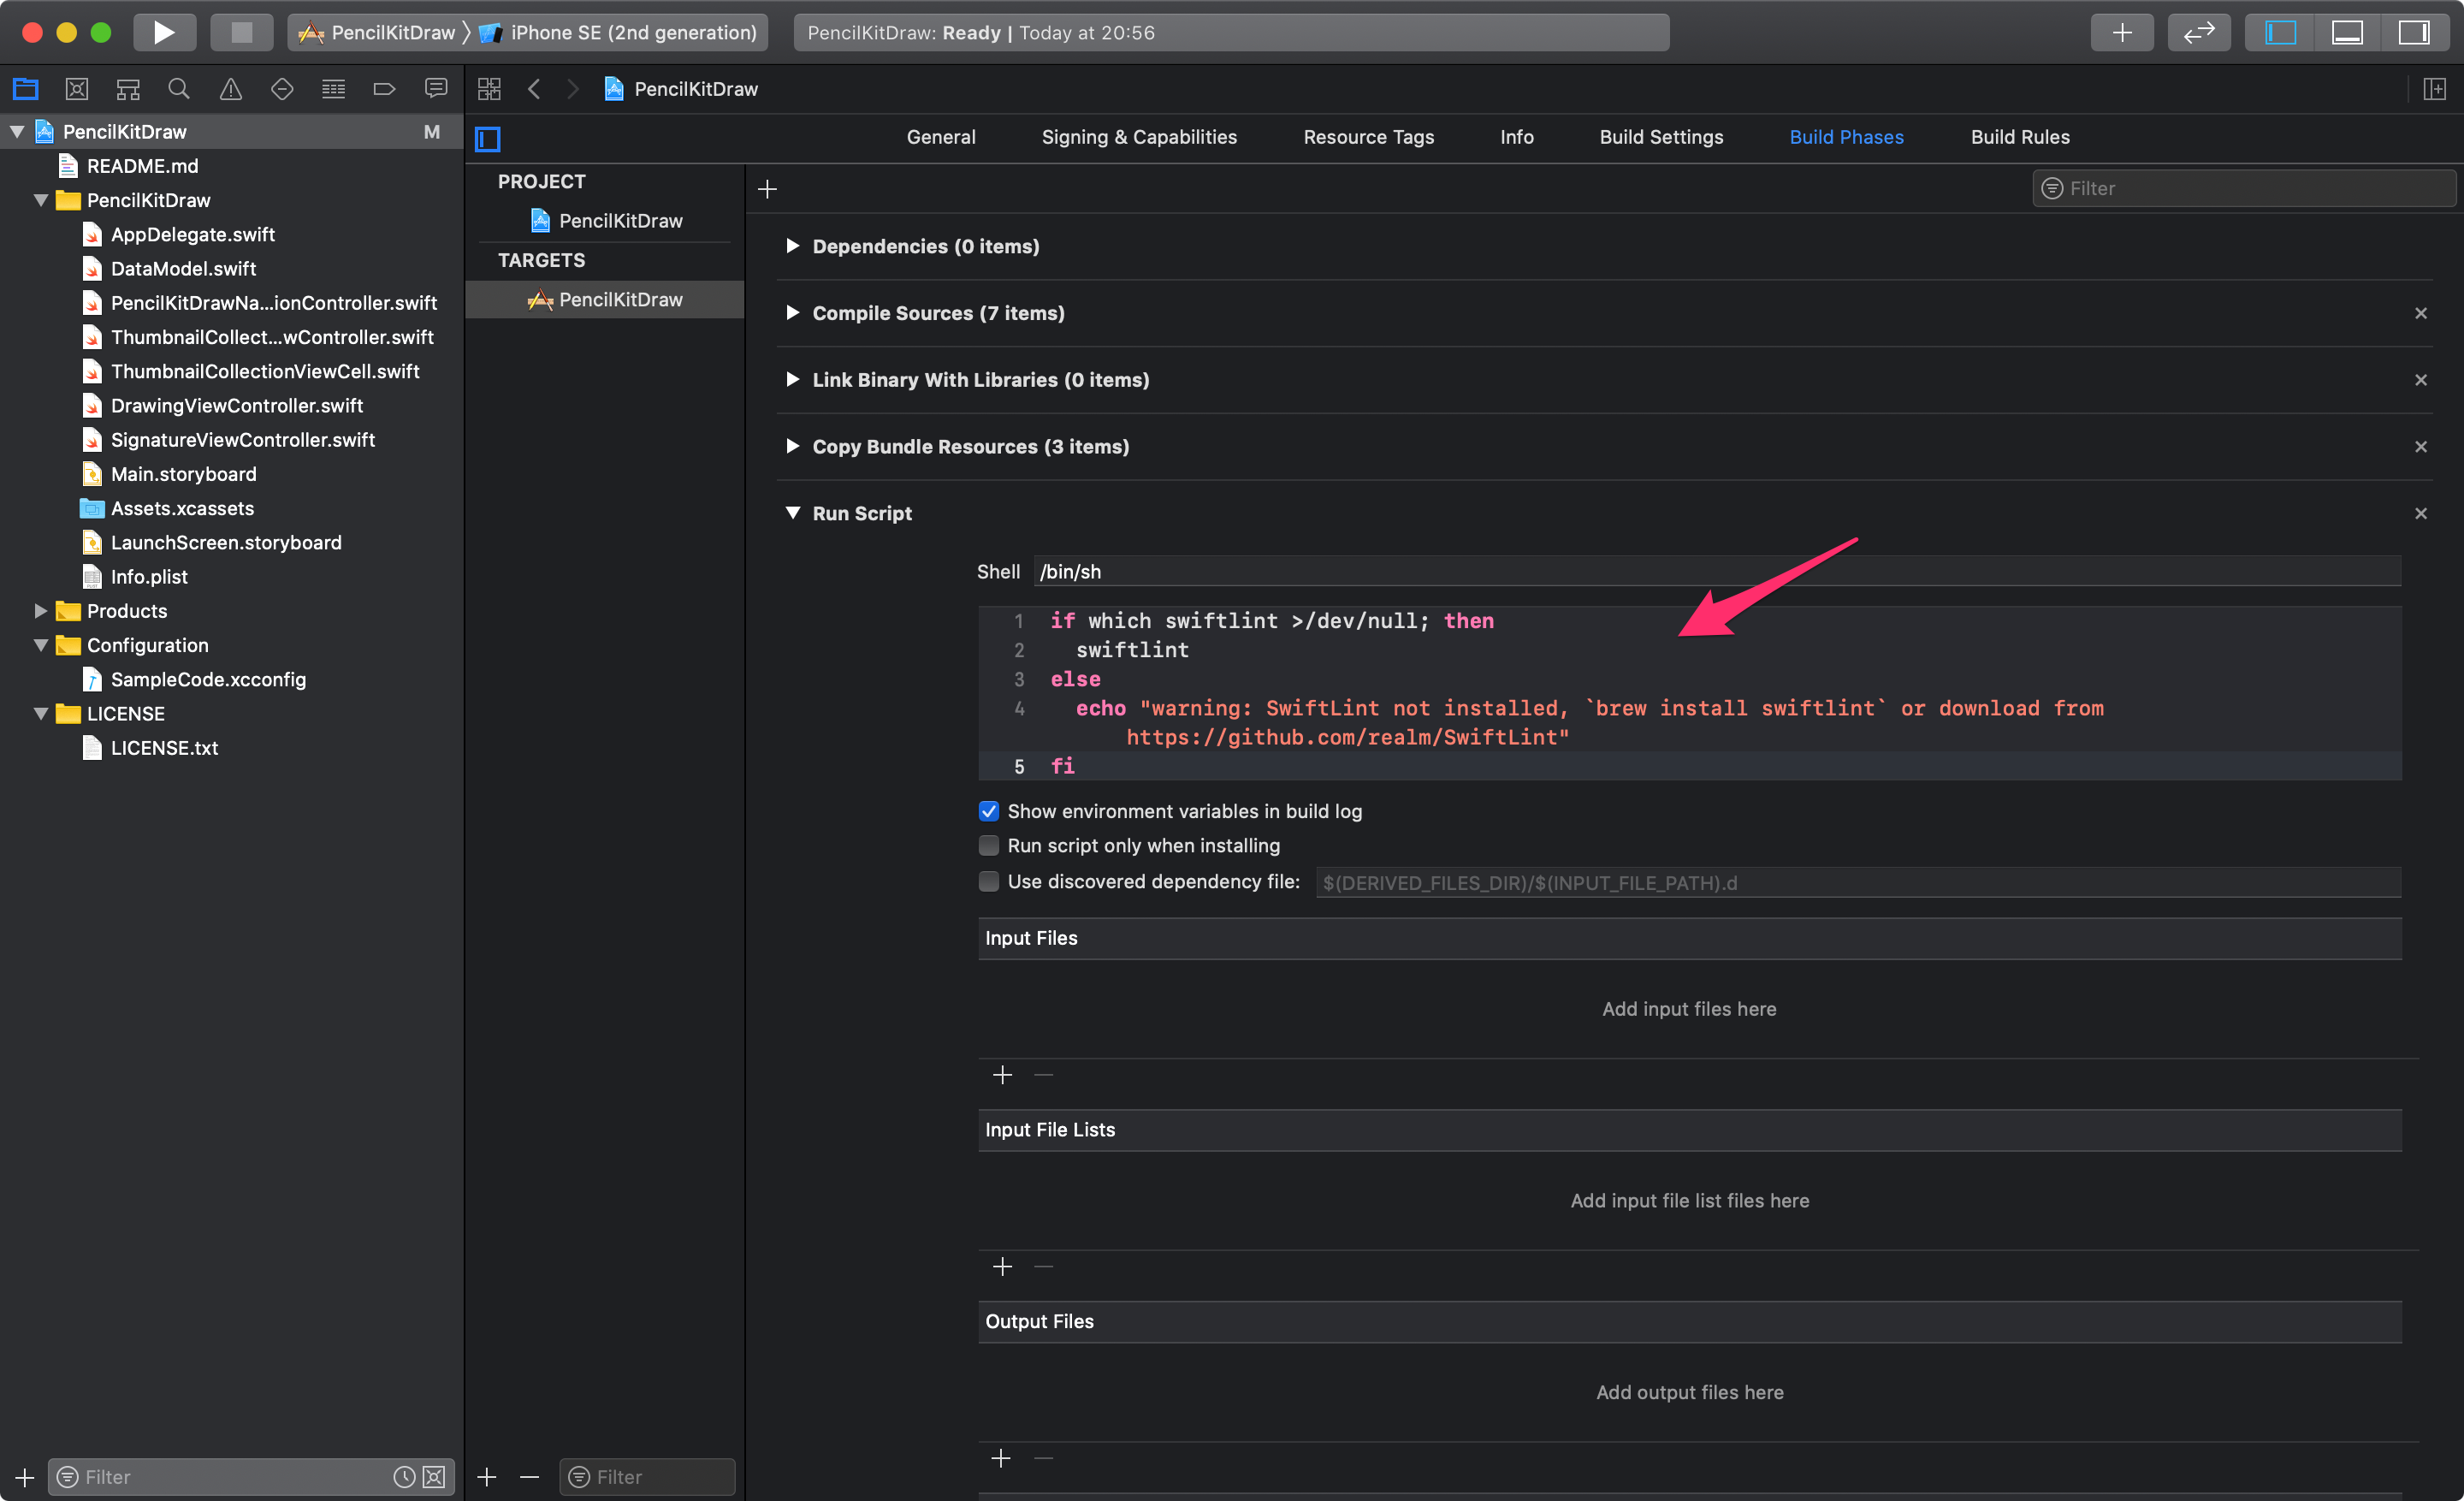
1-2. Xcode での SwiftLint 実行スクリプトの設定
Xcodeでのビルド実行時に、WarningsとErrorsメッセージを表示するために、実行スクリプトの設定をします
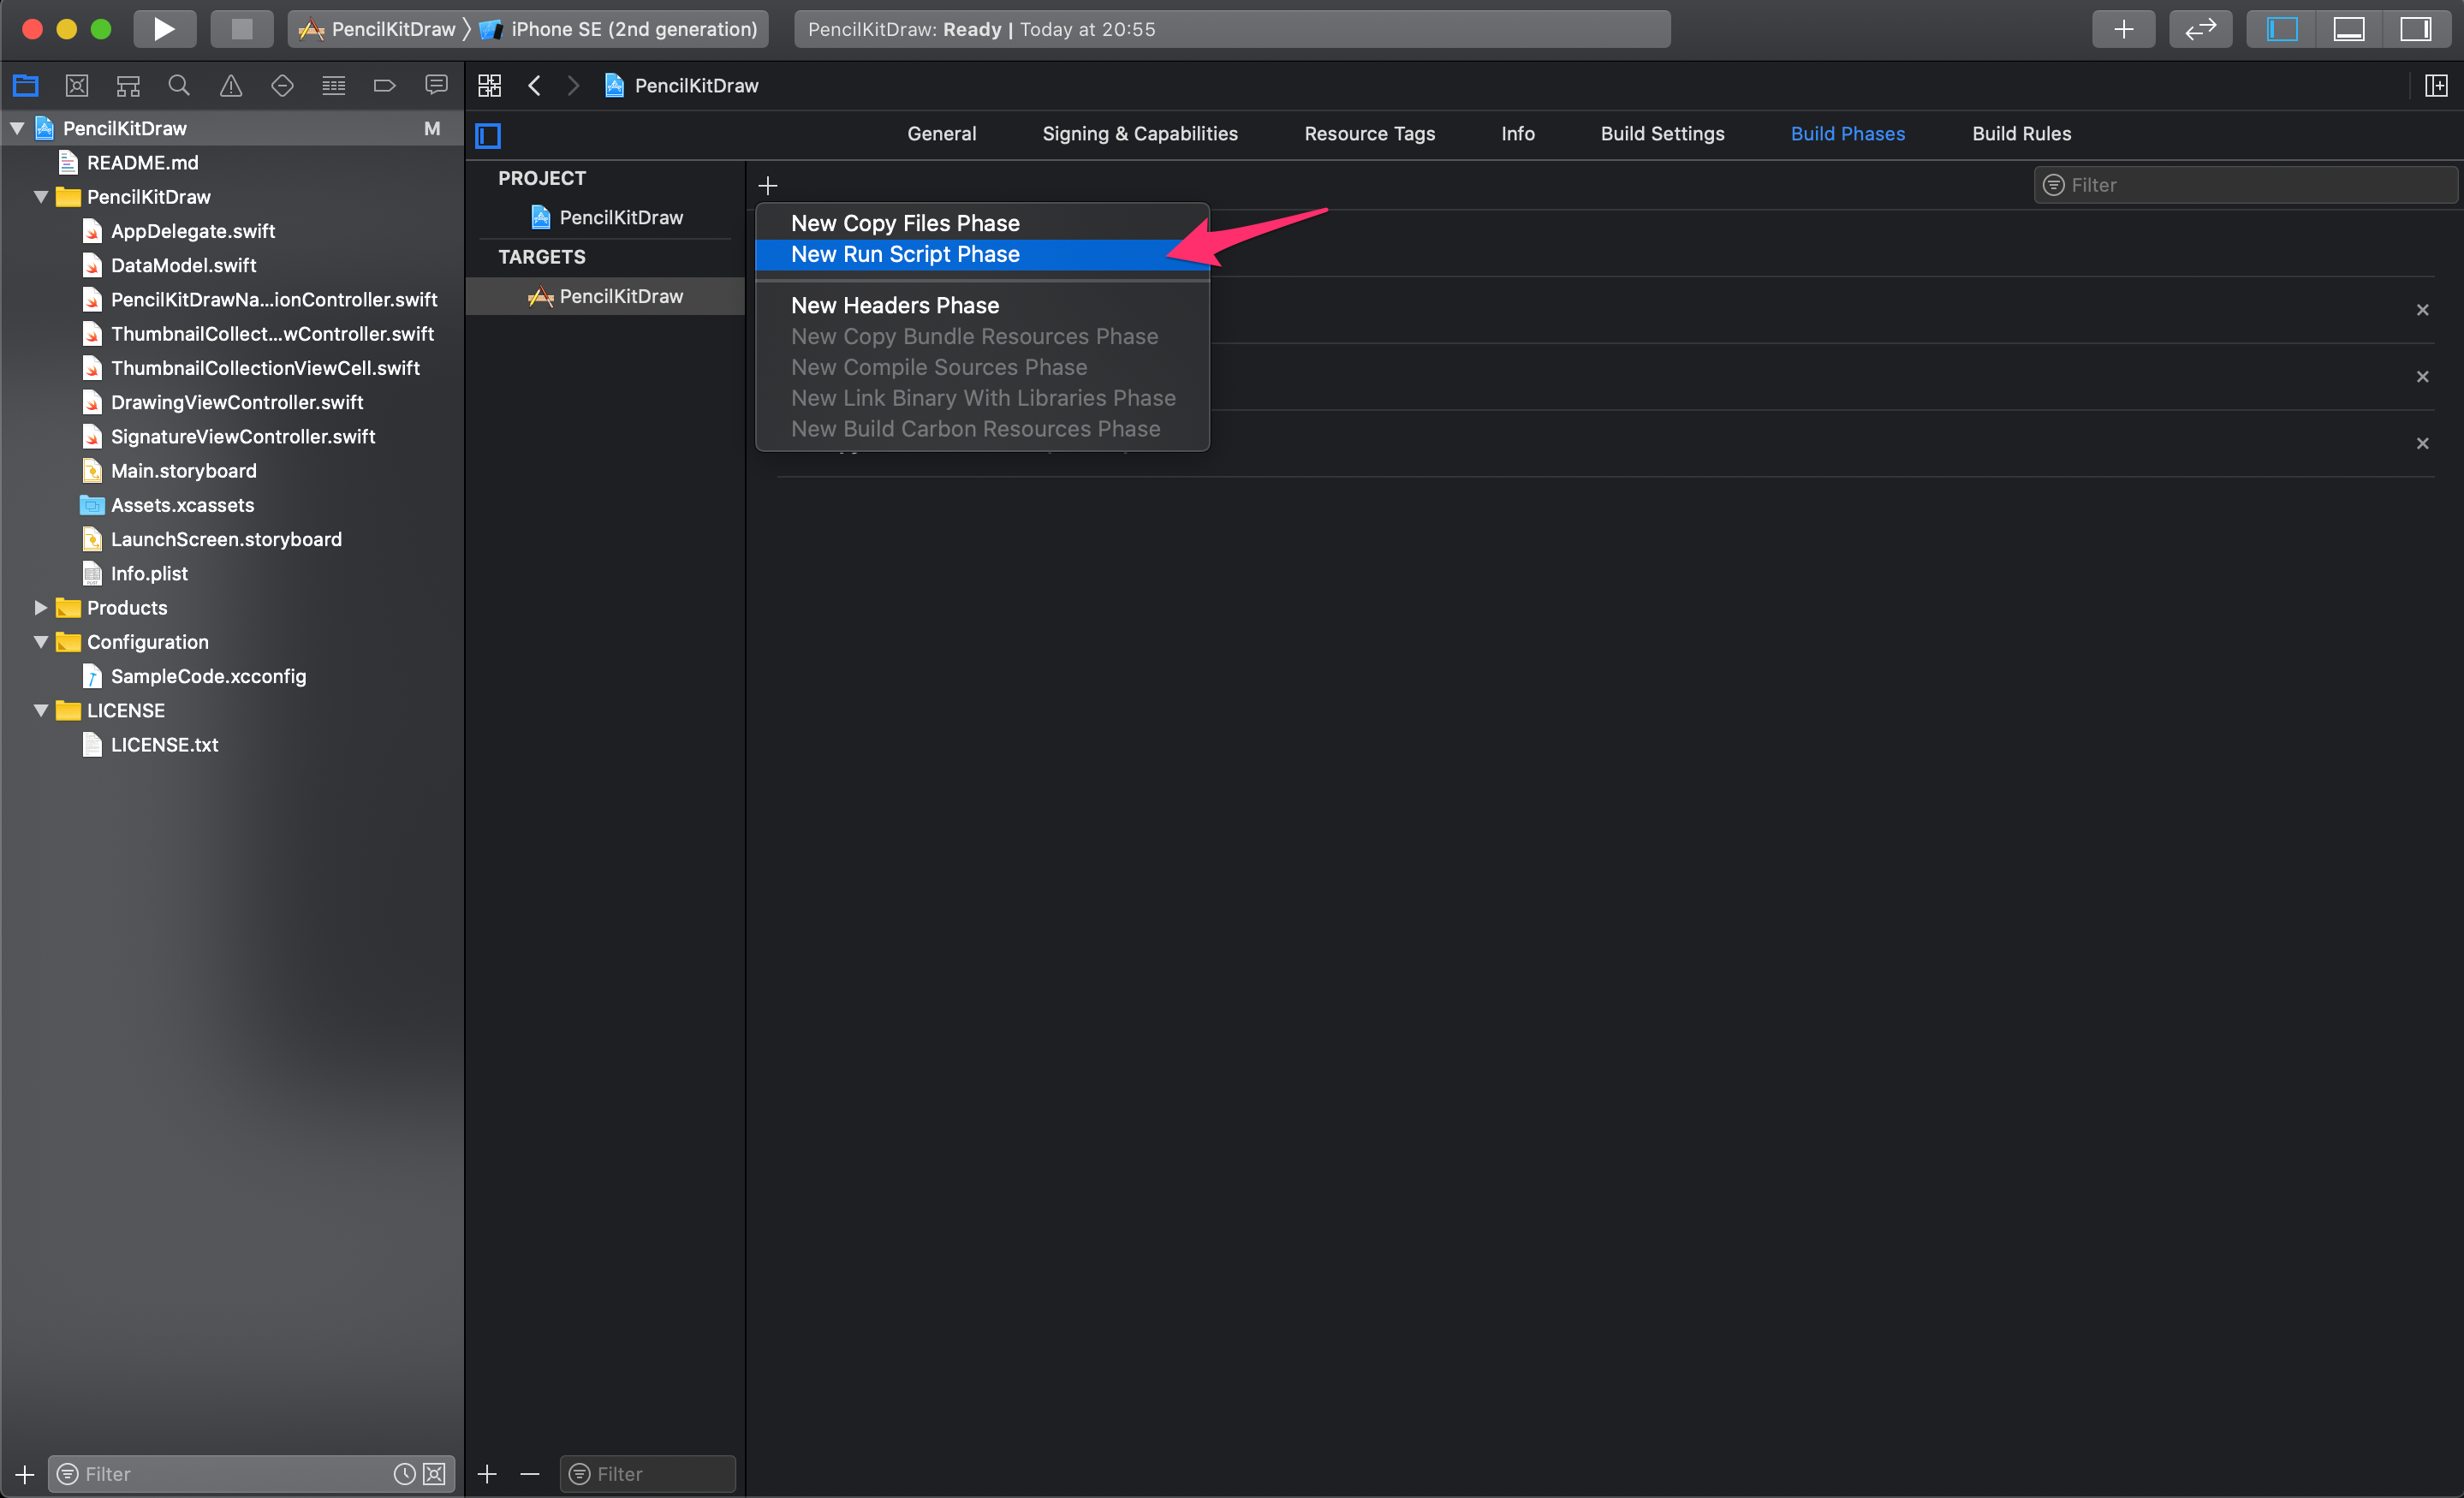
- Xcode でプロジェクトを開く
- [Project Navigator] でプロジェクトを選択する
- [Targets] からターゲットを選択する
- [Build Phase]タブ -> [+]ボタン -> [New Run Script Phase] を選択する
- 追加された『Run Script』項目にスクリプトを書く
if which ${PODS_ROOT}/SwiftLint/swiftlint >/dev/null; then
  ${PODS_ROOT}/SwiftLint/swiftlint
else
  echo "warning: SwiftLint not installed, download from https://github.com/realm/SwiftLint"
fi
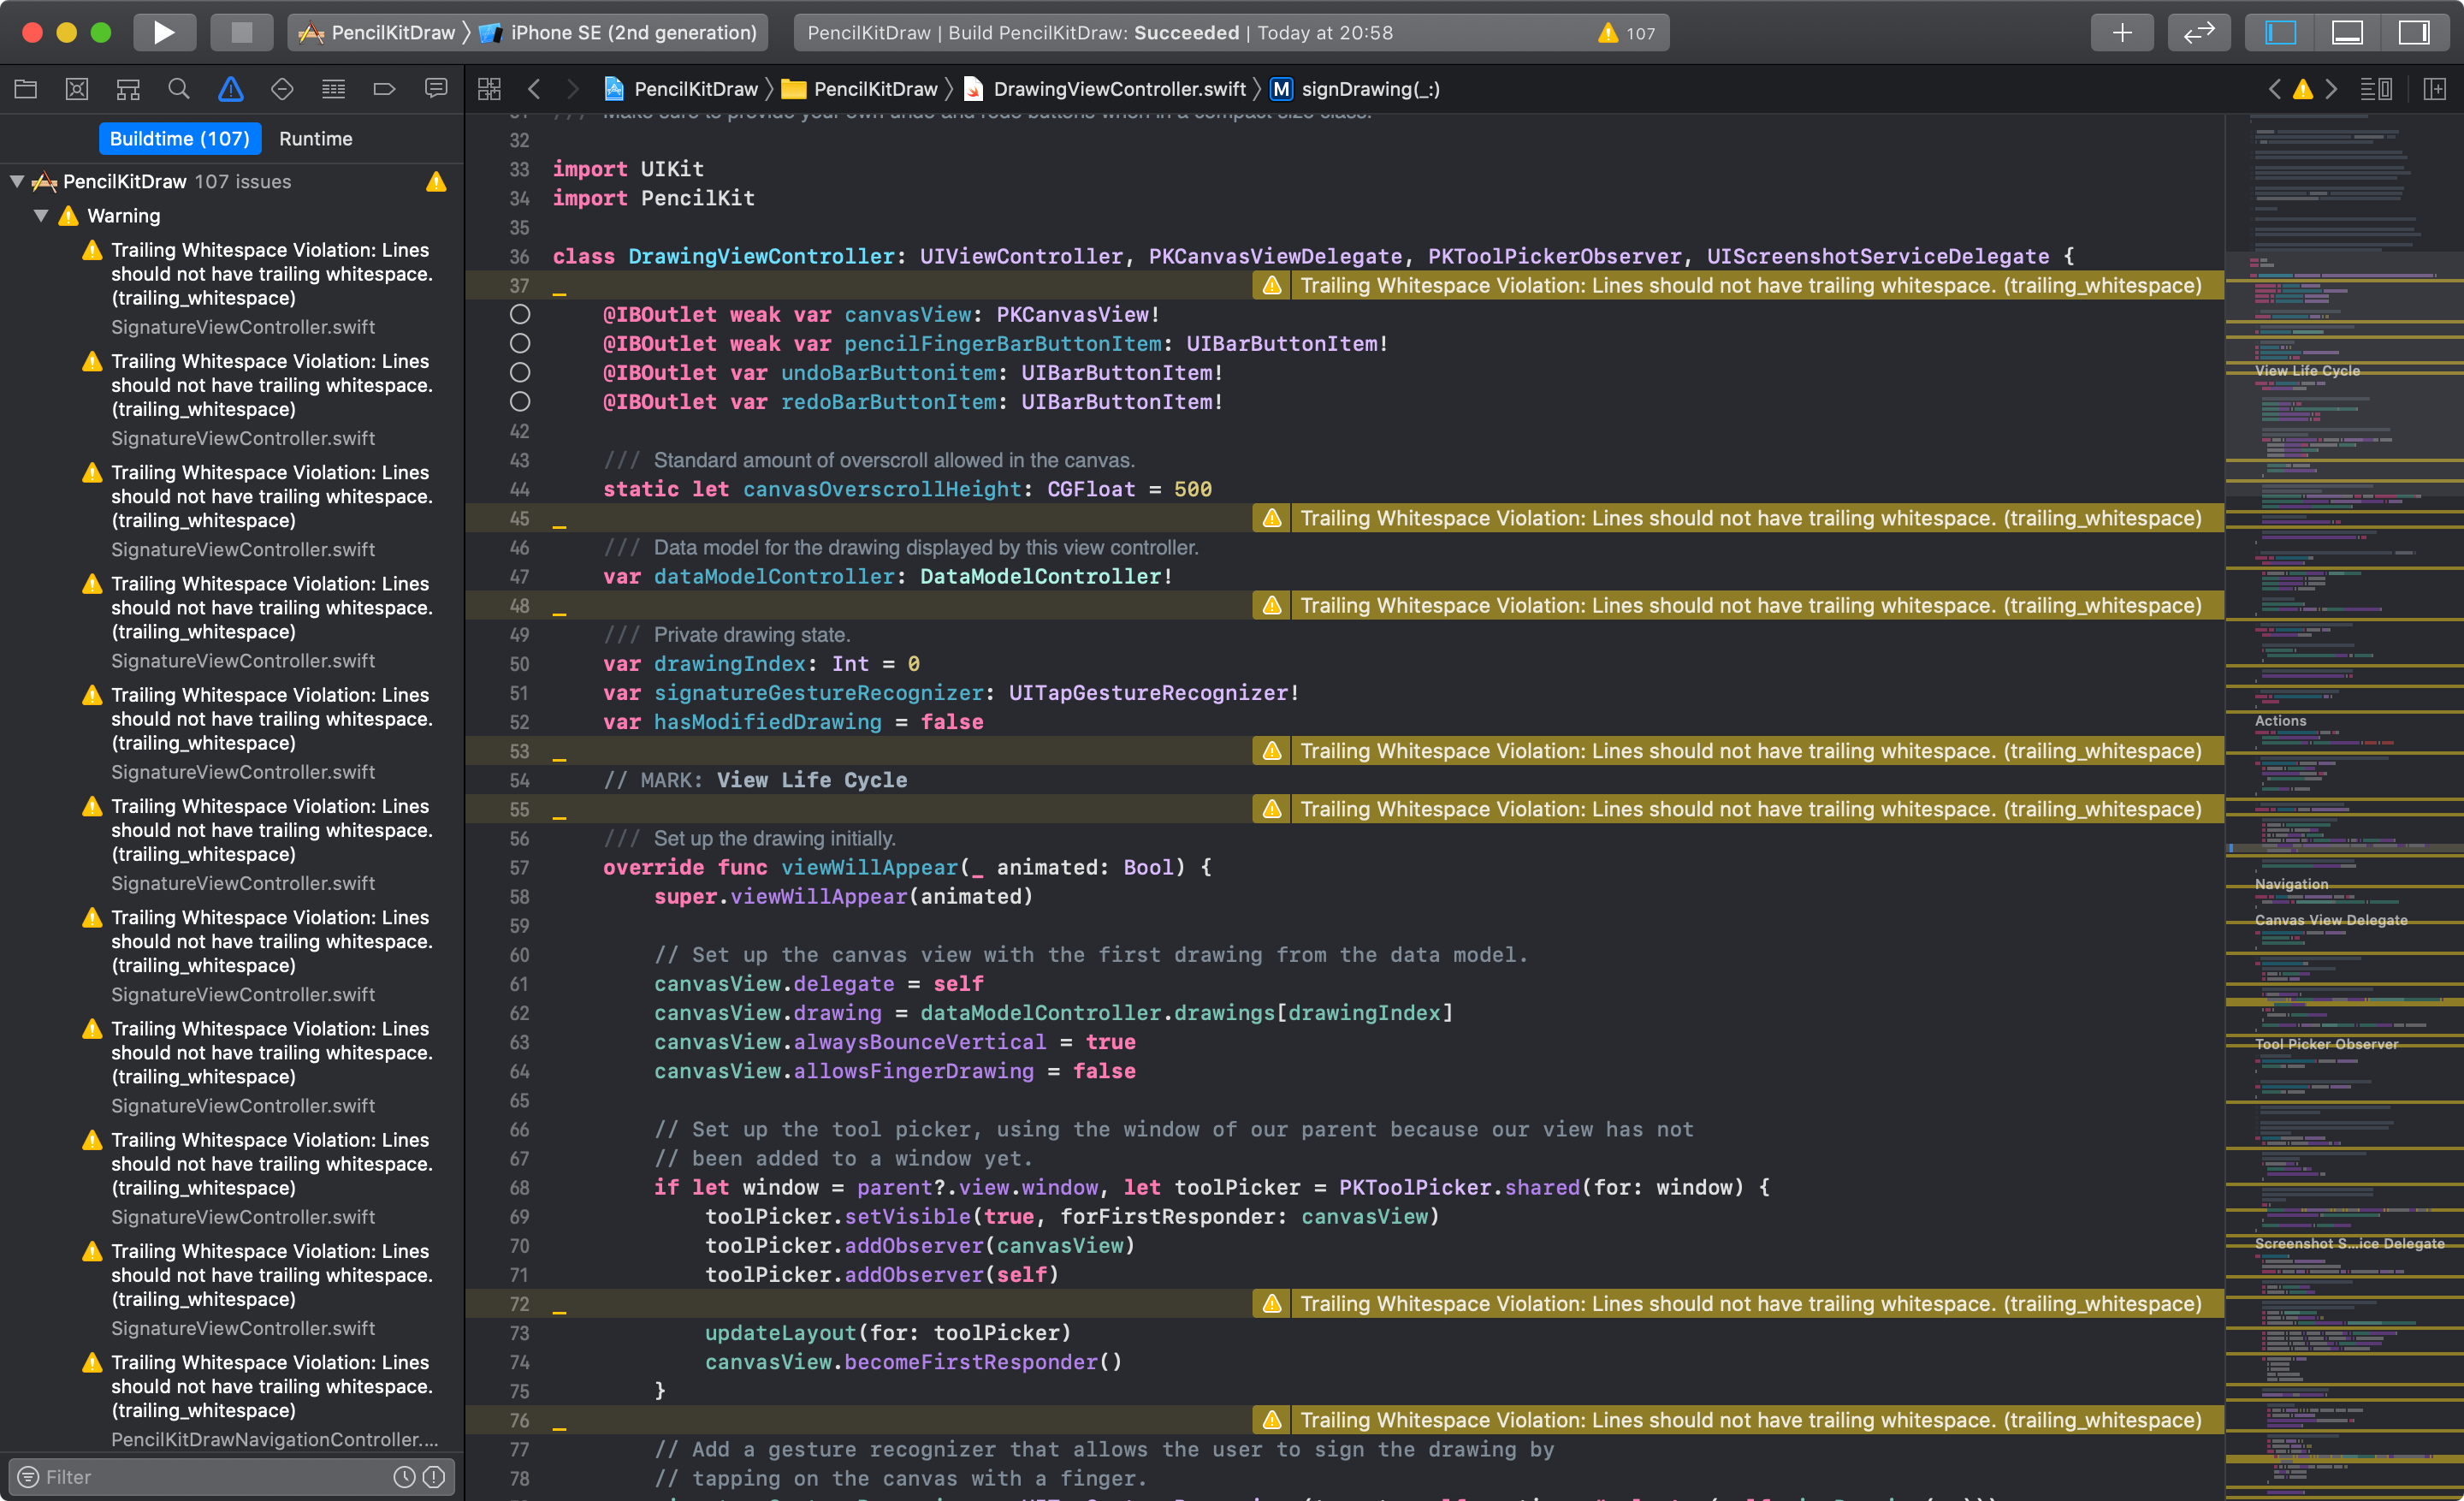
1-3. 静的解析の実行
ビルド実行(⌘+B)で静的解析を実行する
1-4. ルールの詳細設定
プロジェクトのルートディレクトリに
.swiftlint.ymlを作成し、その中にルールの詳細を記述します$ touch .swiftlint.ymlファイルの中身は Swiftの静的解析ツール「SwiftLint」のセットアップ方法 > ルールの詳細設定
を参考にさせて頂きました
ここまでで、ローカルではSwiftLintが実行できるようになりました
GitLab CIで実行するための設定に続きます2. Fastlane と Danger を導入する
2-1. Fastlane と Danger のGemインストール
bundle initでGemfileを作成してインストールします$ bundle initGemfilesource "https://rubygems.org" gem "fastlane" gem "cocoapods" gem "danger" gem "danger-gitlab" gem "danger-swiftlint"$ bundle install --path vendor/bundle2-2. Fastlane のセットアップ
fastlane initを実行して「4.マニュアルセットアップ」でセットアップする$ bundle exec fastlane init [✔] ? [23:15:49]: Sending anonymous analytics information [23:15:49]: Learn more at https://docs.fastlane.tools/#metrics [23:15:49]: No personal or sensitive data is sent. [23:15:49]: You can disable this by adding `opt_out_usage` at the top of your Fastfile [✔] Looking for iOS and Android projects in current directory... [23:15:49]: Created new folder './fastlane'. [23:15:49]: Detected an iOS/macOS project in the current directory: 'PencilKitDraw.xcodeproj' [23:15:49]: --- Welcome to fastlane ? --- [23:15:49]: fastlane can help you with all kinds of automation for your mobile app [23:15:49]: We recommend automating one task first, and then gradually automating more over time [23:15:49]: What would you like to use fastlane for? 1. ? Automate screenshots 2. ?✈️ Automate beta distribution to TestFlight 3. ? Automate App Store distribution 4. ? Manual setup - manually setup your project to automate your tasks ? 4Fastfileの設定
実行後、ルートディレクトリにfastlaneフォルダが作成されているので、FastfileにSwiftLint実行用のレーンを作成します
※Fastlaneでは、アクションと呼ばれる機能を組み合わせをレーンと呼びます前述のとおり、Fastlane標準でSwiftLintをサポートしていますが、MR上でLint結果の確認が大変なので、こちらは使用しません。
https://docs.fastlane.tools/actions/swiftlint/fastlane/Fastfiledefault_platform(:ios) platform :ios do desc "Does a static analysis of the project. Configure the options in .swiftlint.yml" lane :lint do # Runs pod install for the project # https://docs.fastlane.tools/actions/cocoapods/ cocoapods # Runs danger for the project # https://docs.fastlane.tools/actions/danger/ danger end enddangerアクションがSwiftLintの実行を内包しているので、記述はこれだけで大丈夫です
2-3. Danger のセットアップ
danger initを実行してセットアップ(チュートリアルは全てEnterで飛ばしてOK)$ bundle exec danger initDangerfileの設定
実行後、ルートディレクトリにDangerfileが作成されているので、以下の設定を記述します
Dangerfile# Make it more obvious that a MR is a work in progress and shouldn't be merged yet warn("MR is classed as Work in Progress") if gitlab.mr_title.include? "WIP" # Warn when there is a big MR warn("Big MR") if git.lines_of_code > 500 # Swiftlint swiftlint.config_file = '.swiftlint.yml' # swiftlint.lint_files inline_mode: true swiftlint.lint_files fail_on_error: true
swiftlint.lint_files inline_mode: trueはLint結果をMRにインラインでコメントする設定です。
Warningが多いと逆にコメントが追えなくなるので、コメントアウトしています。Dangerプラグイン
danger-gitlab
danger-swiftlint
https://github.com/ashfurrow/danger-ruby-swiftlint/blob/master/lib/danger_plugin.rb
FastlaneとDangerの設定が完了です

最後にGitlab CI/CD環境に組み込んでいきます3. GitLab CI/CD 環境を構築する
3-1.
.gitlab-ci.ymlファイルの作成$ touch .gitlab-ci.yml.gitlab-ci.ymlstages: - build variables: LC_ALL: "en_US.UTF-8" LANG: "en_US.UTF-8" GIT_STRATEGY: clone before_script: - export CI_MERGE_REQUEST_ID=$(curl -s "https://${DANGER_GITLAB_HOST}/api/v4/projects/${CI_PROJECT_ID}/merge_requests?private_token=${OAUTH_TOKEN}&state=opened" | jq -r ".[]|select(.sha == \"$CI_COMMIT_SHA\")|.iid") - bundle install lint: stage: build script: - fastlane lint tags: - ios only: - merge_requests3-2. GitLab CI Runner のセットアップ(ビルド用maxOS)
残念ながら、GitLab CI/CD環境でiOSアプリをビルドするにはmacOSでビルドすることが唯一の現実的な方法です。(2020.05.26時点)
なので、今回は自宅で眠っていたMacbook ProにGitLab CI Runnerしました。$ sudo curl --output /usr/local/bin/gitlab-runner https://gitlab-runner-downloads.s3.amazonaws.com/latest/binaries/gitlab-runner-darwin-amd64 $ sudo chmod +x /usr/local/bin/gitlab-runner $ cd ~ $ gitlab-runner install $ gitlab-runner start※gitlab-runnerコマンドは絶対にsudoを付けないようにして下さい
$ gitlab-runner status
Runtime platform                                    arch=amd64 os=darwin pid=18242 revision=c127439c version=13.0.0
gitlab-runner: Service is running!
無事起動していることを確認
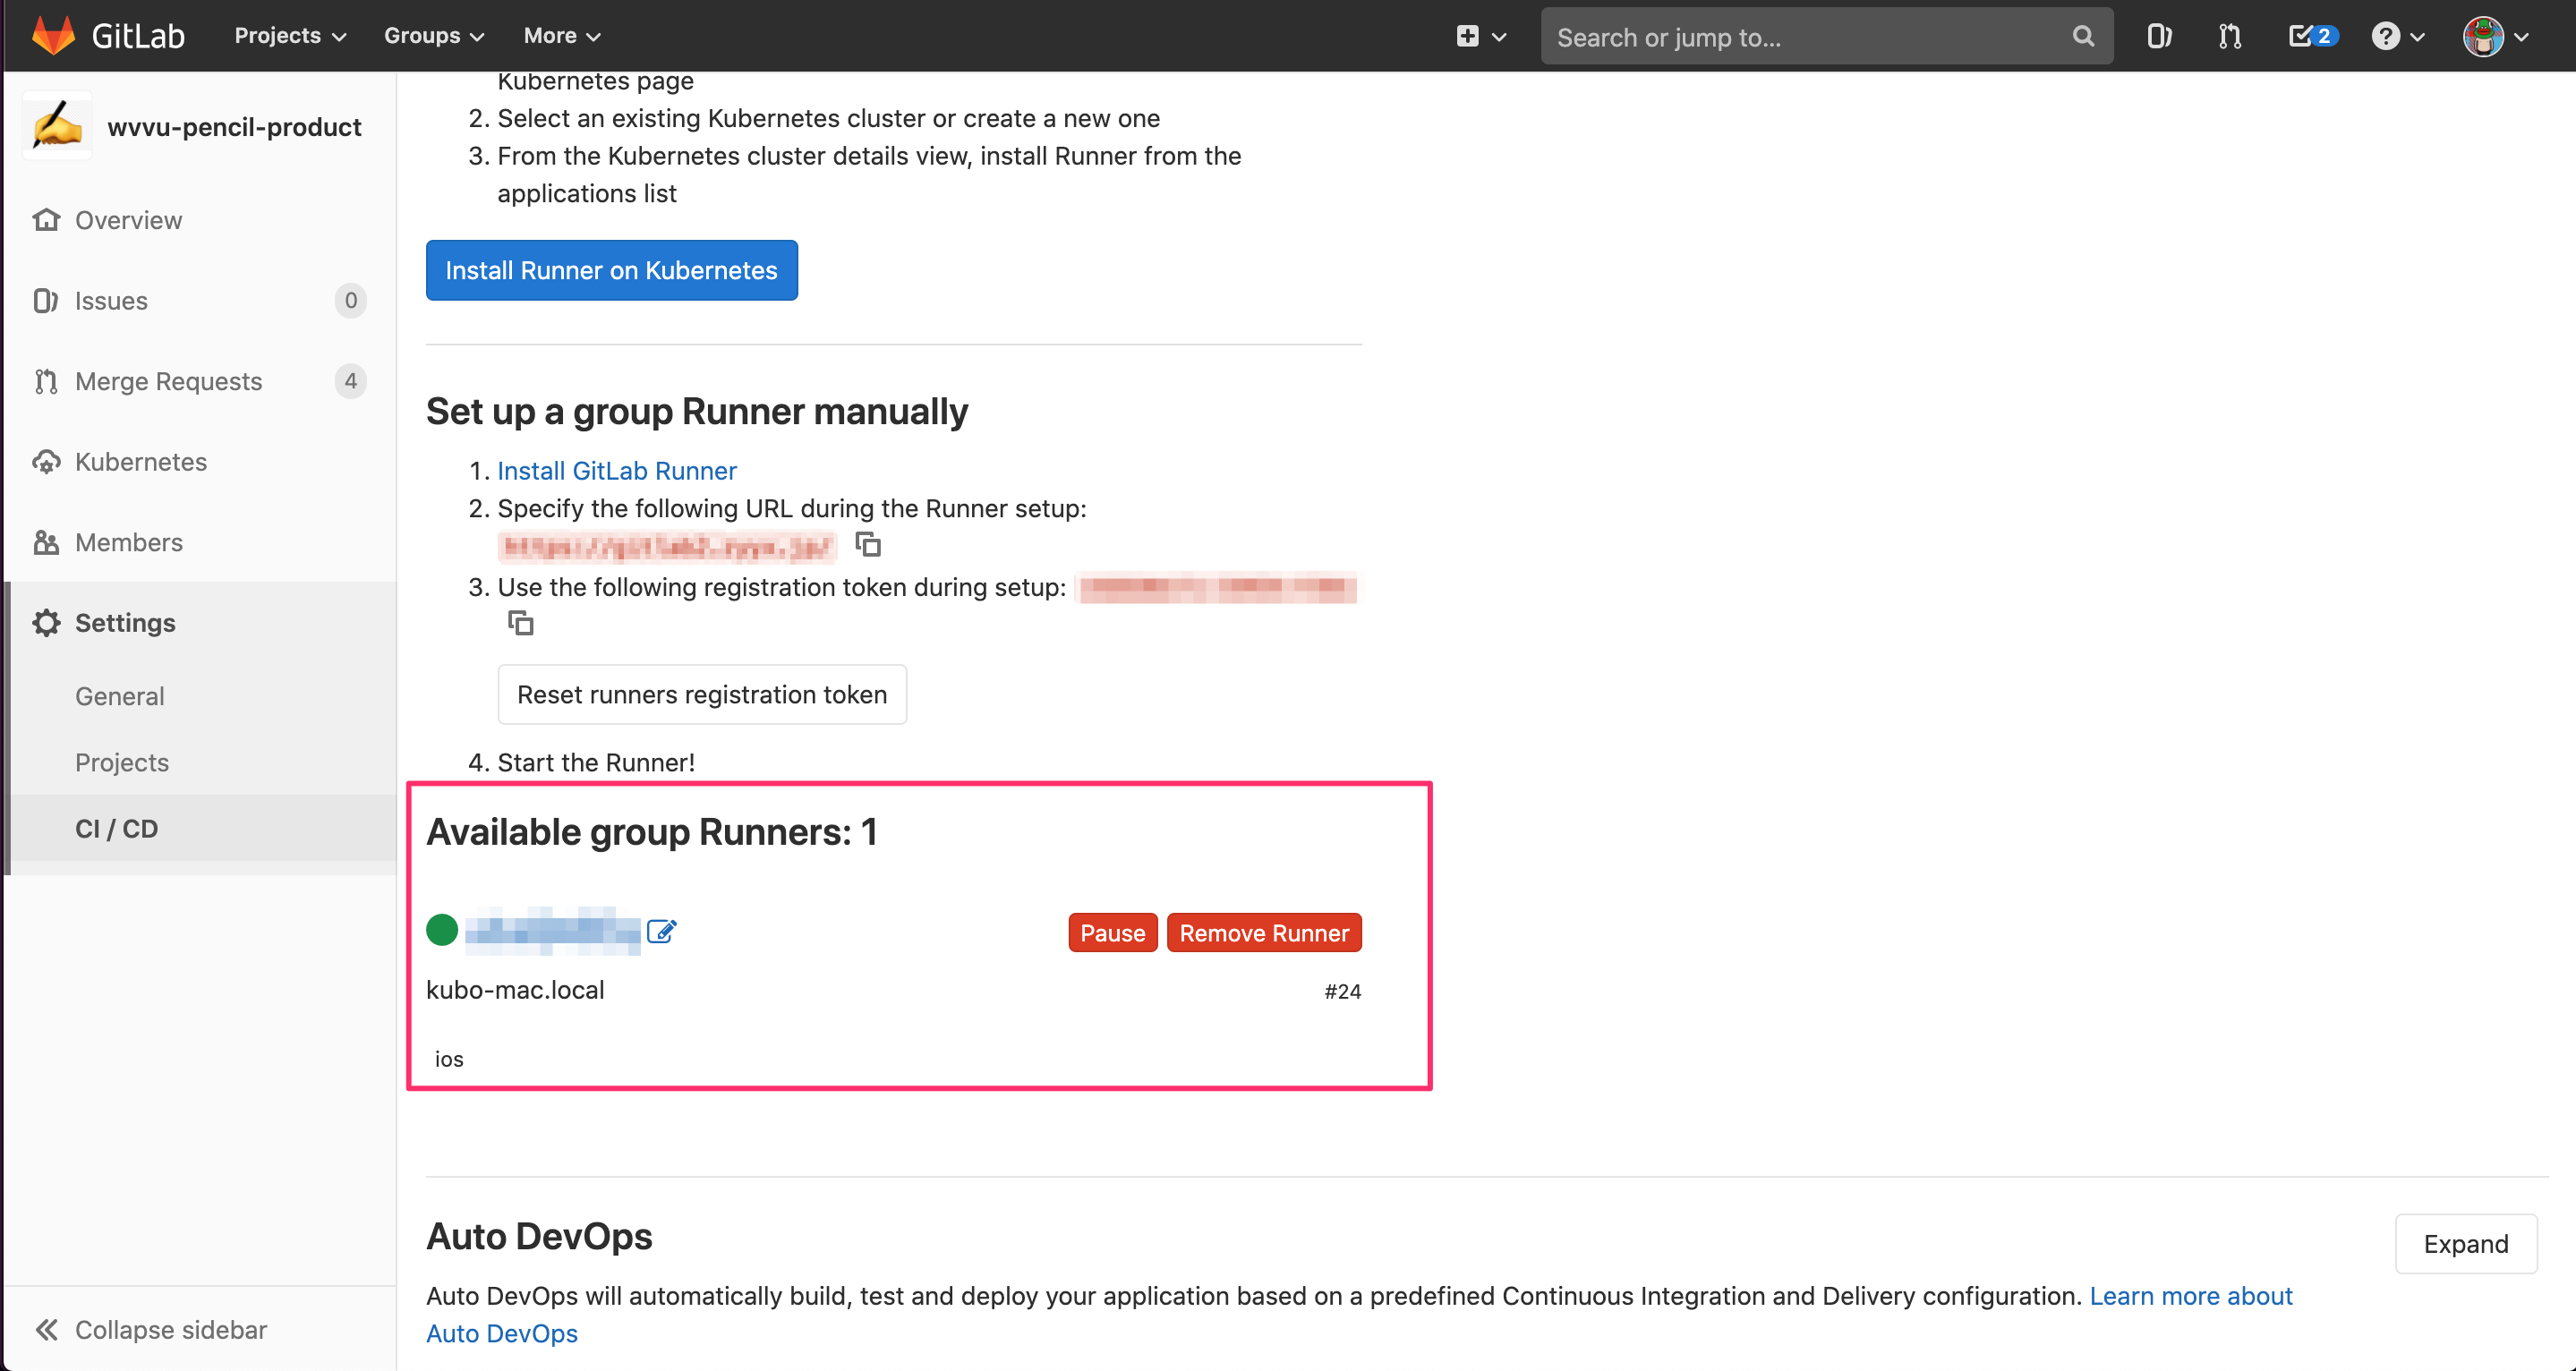
3-3. GitLab CI Runner の登録(ビルド用maxOS)
続いて、CI Runnerを登録します。
GitLabプロジェクト管理画面のSettings > CI/CD > Specific Runners > Set up a specific Runner manuallyからURLとトークンを取得します。
そして、ビルド用MacbookにGitLab CI Runnerをシェル実行として登録します。
$ gitlab-runner register
Runtime platform                                    arch=amd64 os=darwin pid=3501 revision=c127439c version=13.0.0
Running in system-mode.

Please enter the gitlab-ci coordinator URL (e.g. https://gitlab.com/):
-> Enter URL

Please enter the gitlab-ci token for this runner:
-> Enter Token

Please enter the gitlab-ci description for this runner:
-> Enter Description

Please enter the gitlab-ci tags for this runner (comma separated):
-> Enter Tag (e.g. ios)

Registering runner... succeeded                     runner=Rk3cH_Lx

Please enter the executor: ssh, docker+machine, kubernetes, virtualbox, docker-ssh+machine, custom, docker, docker-ssh, parallels, shell:
-> shell

Runner registered successfully. Feel free to start it, but if it's running already the config should be automatically reloaded!
GitLabプロジェクト管理画面から正常にCI Runnerが登録できていることを確認
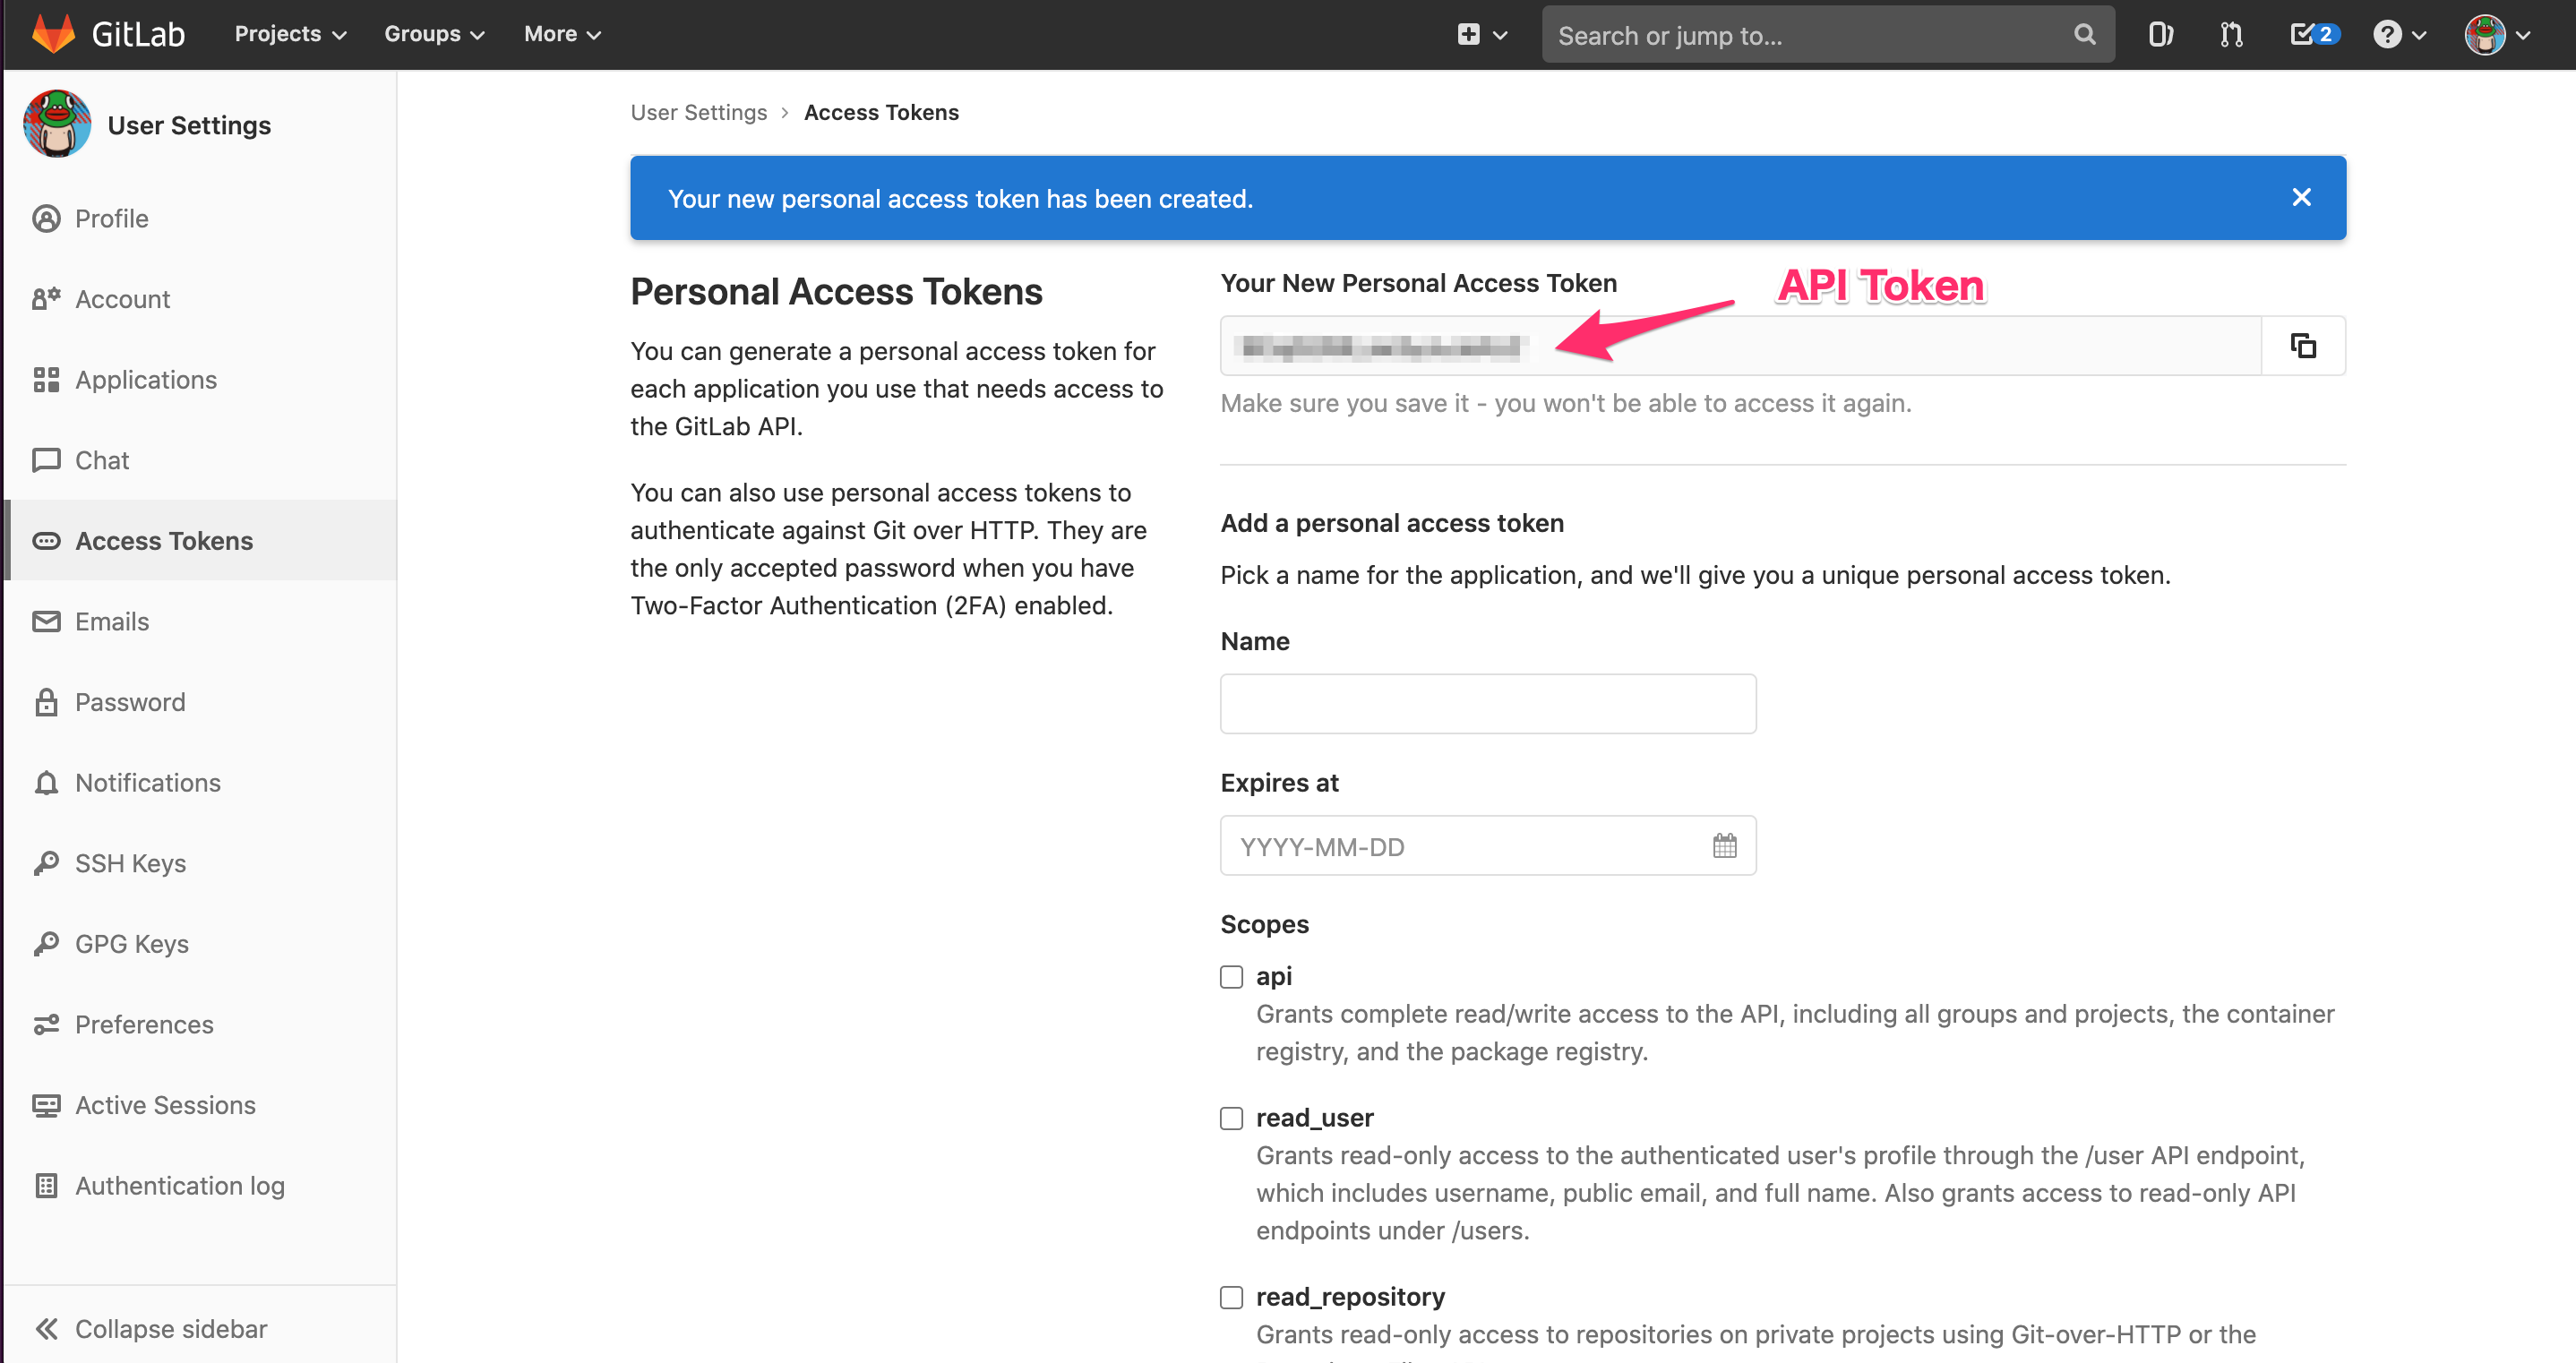
3-4. Danger用のGitLab APIトークン生成
DangerはGitLab APIを使用してMRコメントを投稿するので、GitLab APIトークンを生成します
GitLabプロフィール管理画面のUser Settings > Access Tokens > Personal Access TokensにScopes > api にチェックを入れてトークンを生成する(NameとExpires atは任意)
3-5. Danger用の環境変数の登録
GitLabプロジェクト管理画面のSettings > CI/CD > Variablesに以下の環境変数を設定します
Key Value Masked DANGER_GITLAB_API_BASE_URL e.g. https://gitlab.com/api/v4 DANGER_GITLAB_API_TOKEN 3-4で生成したAPIトークン on DANGER_GITLAB_HOST e.g. gitlab.com
以上で全ての設定が完了です

MRを作成して、SwiftLintの実行結果がMRコメントに追加されていることを確認してみましょう!
ハマったポイント
- GitLab CEを社内サーバーにオレオレ証明書で立てていた影響でハマる
- CI Runnerが有効にならない
- DangerでGitLab API実行エラー
- 解決策 Danger用の環境変数の追加
Key Value SSL_CERT_FILE e.g. /etc/gitlab/certs/gitlab.hogehoge.com.crt


- 投稿日:2020-05-26T16:17:35+09:00
[Swift5][ FAB]フローティングアクションボタンの作り方
フローティングアクションボタンの作り方。
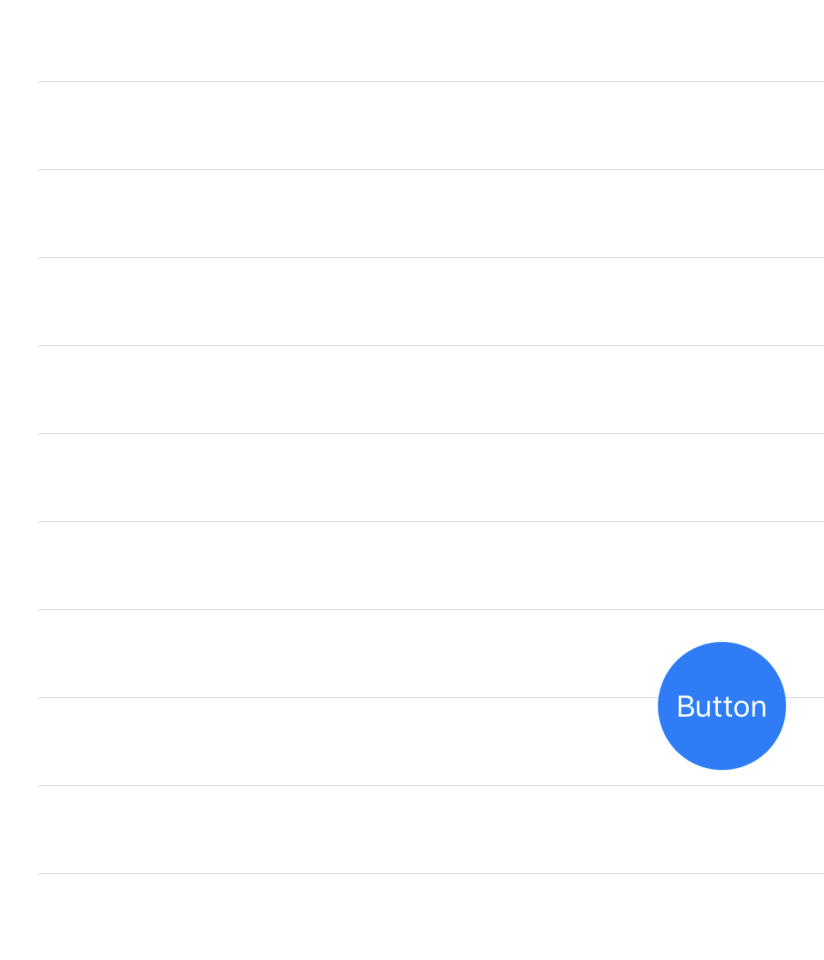
実装イメージ
TableViewCellの上に浮いてるデザインで、スライドしても固定されるように実装します。
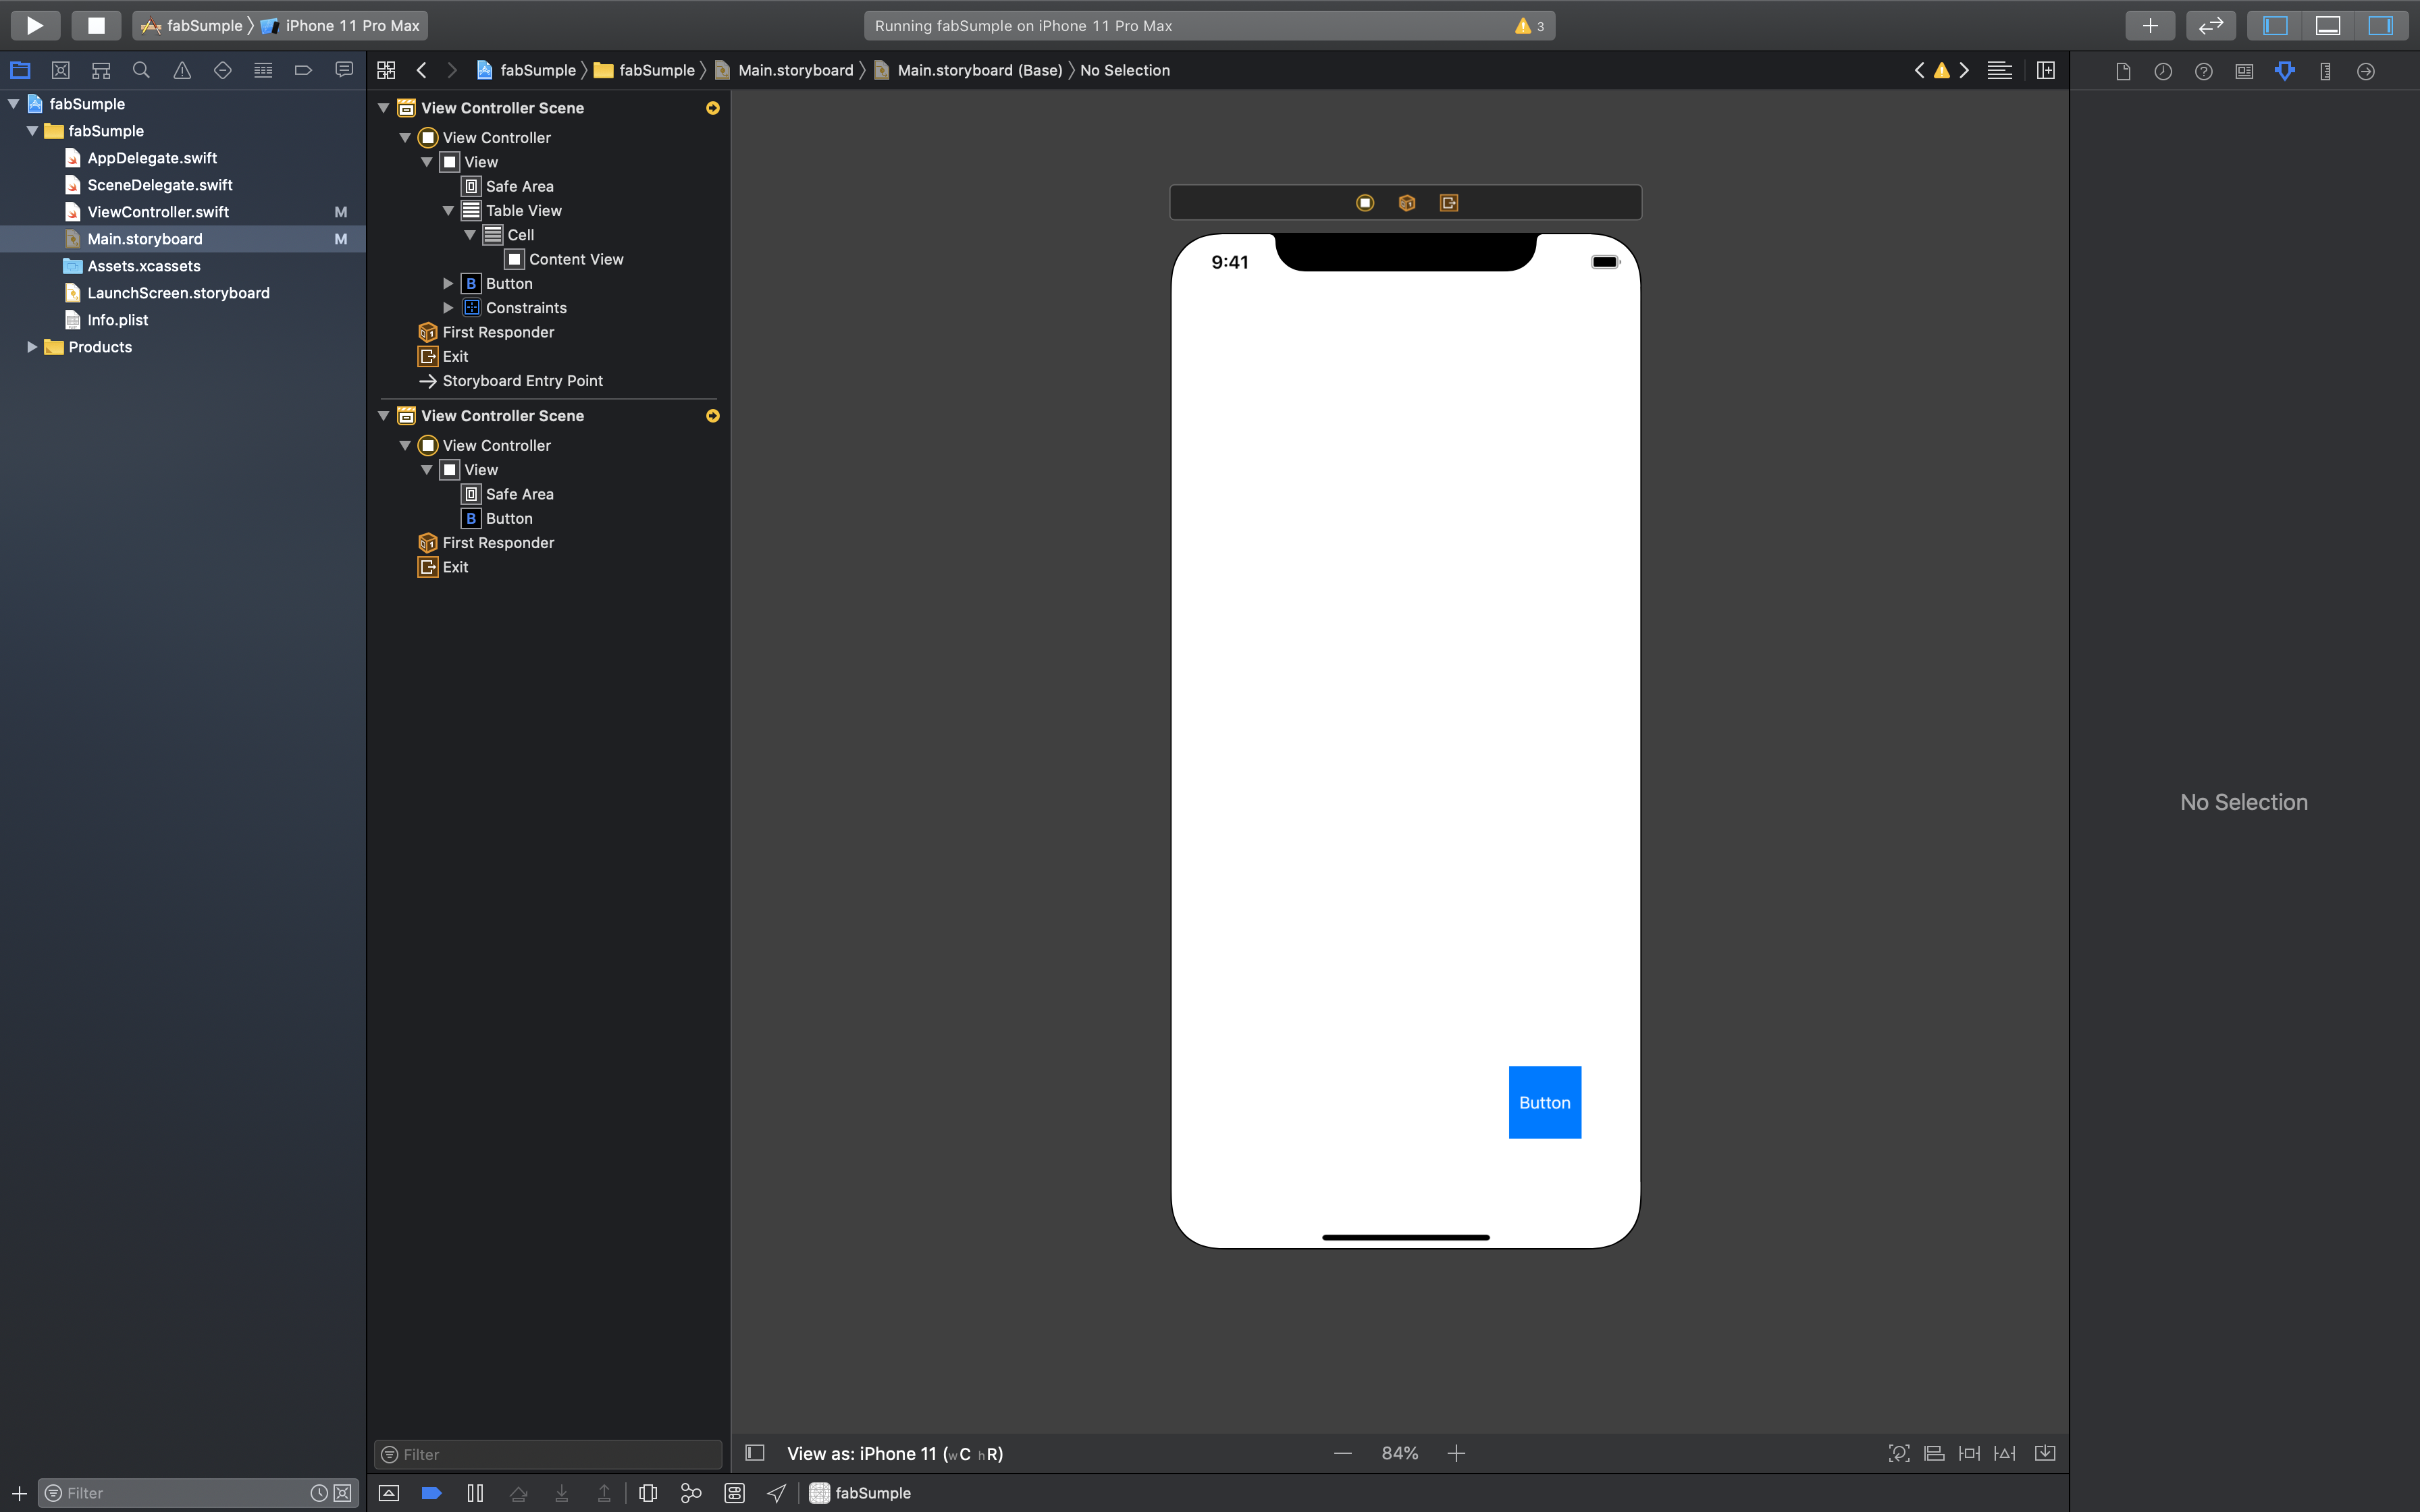
Storyboard
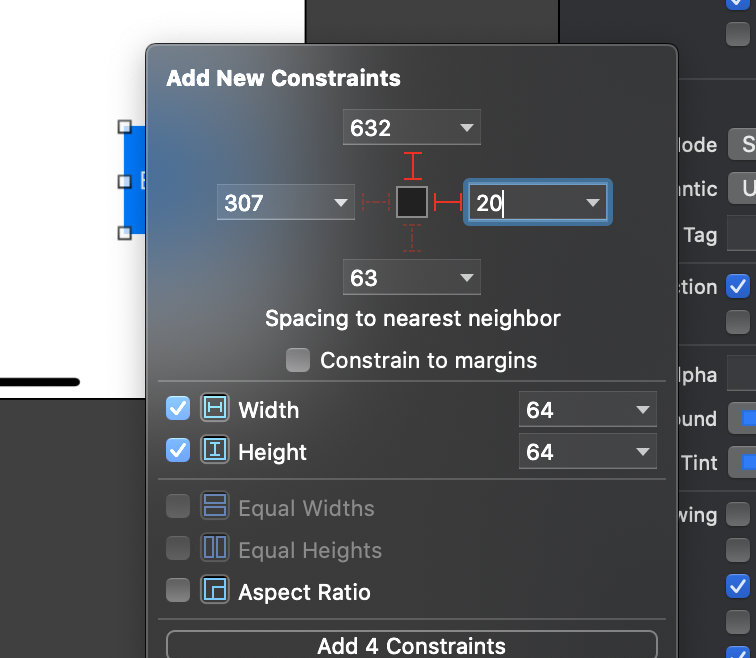
まずbuttonのみを置いてAutoLayoutをつけます。
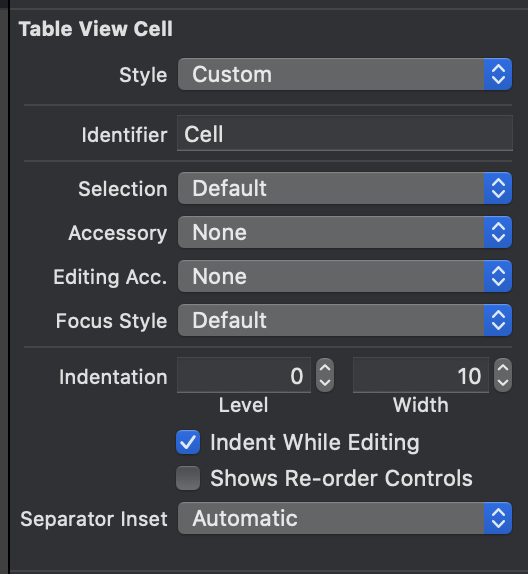
その上にTableView,TableViewCellを画面一杯に配置します。TableViewCellのIdentifierはCellに設定しましょう。
ソースコード
ViewController.Swiftimport UIKit class ViewController: UIViewController,UITableViewDelegate,UITableViewDataSource { @IBOutlet weak var tableView: UITableView! @IBOutlet weak var button: UIButton! // TableView func tableView(_ tableView: UITableView, numberOfRowsInSection section: Int) -> Int { return 30 } func tableView(_ tableView: UITableView, cellForRowAt indexPath: IndexPath) -> UITableViewCell { let cell = tableView.dequeueReusableCell(withIdentifier: "Cell", for: indexPath) return cell } // FAB var startingFrame : CGRect! var endingFrame : CGRect! func scrollViewDidScroll(_ scrollView: UIScrollView) { if (scrollView.contentOffset.y >= (scrollView.contentSize.height - scrollView.frame.size.height)) && self.button.isHidden { self.button.isHidden = false self.button.frame = startingFrame UIView.animate(withDuration: 1.0) { self.button.frame = self.endingFrame } } } func configureSizes() { let screenSize = UIScreen.main.bounds let screenWidth = screenSize.width let screenHeight = screenSize.height startingFrame = CGRect(x: 0, y: screenHeight+100, width: screenWidth, height: 100) endingFrame = CGRect(x: 0, y: screenHeight-100, width: screenWidth, height: 100) } override func viewDidLoad() { super.viewDidLoad() // buttonを角丸にする button.layer.cornerRadius = 32 } }
- 投稿日:2020-05-26T16:17:35+09:00
[Swift5][FAB]フローティングアクションボタンの作り方
フローティングアクションボタンの作り方。
実装イメージ
TableViewCellの上に浮いてるデザインで、スライドしても固定されるように実装します。
Storyboard
まずbuttonのみを置いてAutoLayoutをつけます。
その上にTableView,TableViewCellを画面一杯に配置します。TableViewCellのIdentifierはCellに設定しましょう。
ソースコード
ViewController.Swiftimport UIKit class ViewController: UIViewController,UITableViewDelegate,UITableViewDataSource { @IBOutlet weak var tableView: UITableView! @IBOutlet weak var button: UIButton! // TableView func tableView(_ tableView: UITableView, numberOfRowsInSection section: Int) -> Int { return 30 } func tableView(_ tableView: UITableView, cellForRowAt indexPath: IndexPath) -> UITableViewCell { let cell = tableView.dequeueReusableCell(withIdentifier: "Cell", for: indexPath) return cell } // FAB var startingFrame : CGRect! var endingFrame : CGRect! func scrollViewDidScroll(_ scrollView: UIScrollView) { if (scrollView.contentOffset.y >= (scrollView.contentSize.height - scrollView.frame.size.height)) && self.button.isHidden { self.button.isHidden = false self.button.frame = startingFrame UIView.animate(withDuration: 1.0) { self.button.frame = self.endingFrame } } } func configureSizes() { let screenSize = UIScreen.main.bounds let screenWidth = screenSize.width let screenHeight = screenSize.height startingFrame = CGRect(x: 0, y: screenHeight+100, width: screenWidth, height: 100) endingFrame = CGRect(x: 0, y: screenHeight-100, width: screenWidth, height: 100) } override func viewDidLoad() { super.viewDidLoad() // buttonを角丸にする button.layer.cornerRadius = 32 } }
- 投稿日:2020-05-26T14:54:56+09:00
[Swift5] TextFieldのあるAlertを表示させる方法
SwiftでTextFieldのあるAlertを表示させる方法。
実装イメージ
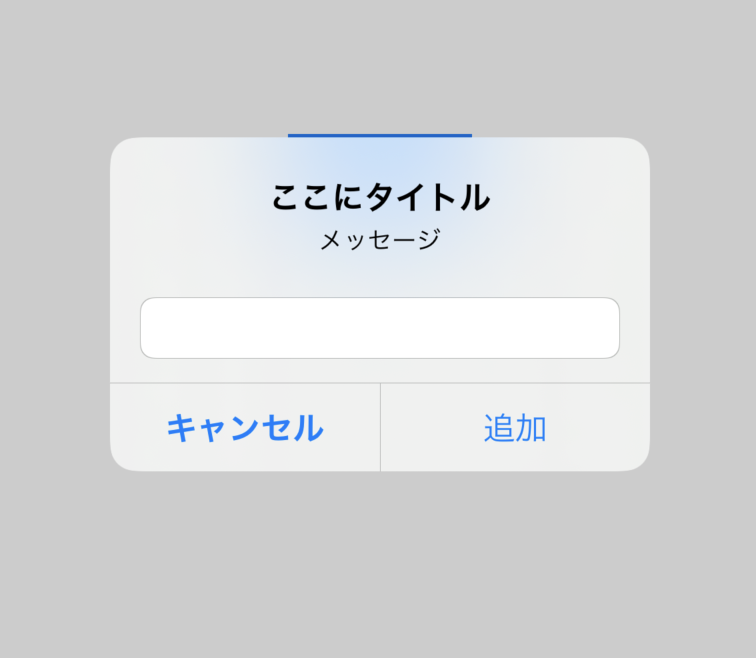
このようなタイトル、サブタイトル、入力欄、キャンセル、追加で構成されたAlertを作成して行きます。
Storyboard
buttonを押すとAlertが表示されるようにするため、好きな場所にbuttonを1つ追加しましょう。
ソースコード
ViewController.Swiftimport UIKit //UITextFieldDelegateを追加する class ViewController: UIViewController,UITextFieldDelegate { //StoryboardのbuttonをAction接続する @IBAction func aleat(_ sender: Any) { let alert = UIAlertController(title: nil, message: nil, preferredStyle: .alert) alert.title = "ここにタイトル" alert.message = "メッセージ" alert.addTextField(configurationHandler: {(textField) -> Void in textField.delegate = self }) //追加ボタン alert.addAction( UIAlertAction( title: "追加", style: .default, handler: {(action) -> Void in self.hello(action.title!) }) ) //キャンセルボタン alert.addAction( UIAlertAction( title: "キャンセル", style: .cancel, handler: {(action) -> Void in self.hello(action.title!) }) ) //アラートが表示されるごとにprint self.present( alert, animated: true, completion: { print("アラートが表示された") }) } func hello(_ msg:String){ print(msg) } override func viewDidLoad() { super.viewDidLoad() } }ビルドして確認してみましょう
実装イメージのようなAlertを表示させることができたでしょうか?
title部分は好きな文に変えることでお好みのAlertを表示させることができます。できたー!という方はLGTM押してくださると僕がめっちゃ喜びます!

- 投稿日:2020-05-26T06:32:11+09:00
monacaでcordova-plugin-admob-freeを使った広告表示
少し面倒だったので忘れないようにメモしておきます。
admobで「ca-app-pub-」から始まるapp idを取得していることが前提です。ビルド環境の設定
- monacaクラウドIDEでビルド→ビルド環境の設定→iOS5.1.1を選択して保存する。
- monacaクラウドIDEで設定→JS/CSSコンポーネントの追加と削除→Monaca Core Utilityのバージョンを2.1.0以上に上げる。
- monacaクラウドIDEで設定→iOSアプリ設定→WebViewエンジンにWKWebViewを指定して保存。
プラグインを用意する
cordova-admob-sdk
以下のサイトからv0.24.1のzipをダウンロードしました。
cordova-admob-sdkcordova-plugin-admob-free
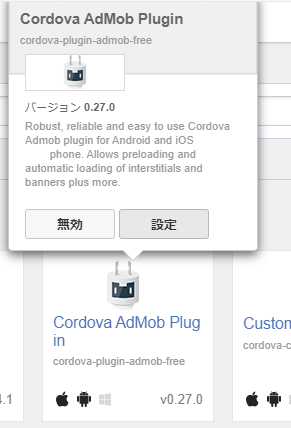
以下のサイトからv0.27.0のzipをダウンロードしました。
cordova-plugin-admob-freeWKWebViewの対応
ダウンロードしたcordova-admob-sdkは内部でGoogle Mobile Ads SDKの7.42.1を使用していました。
このバージョンはUIWebView廃止に未対応のようなので、手作業でSDKを更新します。
- Google Mobile Ads SDKにアクセスしてgooglemobileadssdkios.zipをダウンロードします。ここでは7.60.0をダウンロードしました。
- cordova-admob-sdk-master.zipを解凍します。
- ./src/ios/GoogleMobileAds.framework をフォルダごと削除します。
- googlemobileadssdkios.zipを解凍して./GoogleMobileAdsSdkiOS-7.60.0/GoogleMobileAds.frameworkを先程削除したフォルダがあった場所(cordova-admob-sdk-master/src/ios/)にコピーします。
- cordova-admob-sdk-masterをzipで圧縮します。
次に、cordova-plugin-admob-freeですが、www/admob.jsが無くてビルドエラーになるので作成します。
1. cordova-plugin-admob-free-master.zipを解凍します。
2. コンソールを起動して解凍したフォルダへ移動します。
3. npm install を実行
4. npm run build を実行(wwwフォルダが作成されます)
5. node_modulesフォルダを削除
6. cordova-plugin-admob-free-masterをzipで圧縮します。これでプラグインの準備はできました。
プラグインをインポート
次に、プロジェクトへプラグインを適用します。
1. monacaのクラウドIDEで設定→cordovaプラグインの管理 を選択します。
2. cordovaプラグインのインポートでcordova-admob-sdk-master.zipを指定してインポートします。
3. cordovaプラグインのインポートでcordova-plugin-admob-free.zipを指定してインポートします。
4. 設定を追加します。
設定ADMOB_APP_ID=ca-app-pub-348...config.xml修正
5. config.xmlを開きます。
6. <platform name="ios"タグ内に以下を追加します。config.xml<preference name="WKWebViewOnly" value="true"/> <preference name="CordovaWebViewEngine" value="CDVWKWebViewEngine"/> <feature name="CDVWKWebViewEngine"> <param name="ios-package" value="CDVWKWebViewEngine"/> </feature>※デプロイ時にITMS-90683がでた場合は以下も追加。
config.xml<edit-config target="NSBluetoothAlwaysUsageDescription" file="*-Info.plist" mode="merge"> <string>適当な説明</string> </edit-config>※カスタムビルドデバッガーでビルドして起動したときにスプラッシュで落ちる場合は以下を追加。
config.xml<edit-config file="*-Info.plist" mode="merge" target="GADApplicationIdentifier"> <string>ca-app-pub-348...</string> </edit-config> <edit-config file="*-Info.plist" mode="merge" target="GADIsAdManagerApp"> <true/> </edit-config>※上記を追加してもITMS-90809でrejectになる場合、以下を追加するといいかも。
config.xml<edit-config file="*-Info.plist" mode="merge"> <key>gad_preferred_webview</key> <string>wkwebview</string> </edit-config>広告表示用のスクリプト
とりあえずons.readyのタイミングに表示処理を書いた。
index.htmlons.ready(function() { // console.log(admob); var admobid = { banner: 'ca-app-pub-... ※バナー広告のid' } // Banner admob.banner.config({ id: admobid.banner, isTesting: true, autoShow: false, size: 'LARGE_BANNER', }) admob.banner.prepare() .then (() => { console.log('banner prepare success!') }) .catch (err => { console.log('banner prepare error!', err) }) });カスタムデバッグビルドして広告が表示できていればOK。
can't find variable admob というエラーが出る場合。
最初プロジェクト作った時に選択したプロジェクトテンプレートがまずいんだと思う。
フレームワークテンプレートの中のminimumをベースに再構築すればいいかもしれません。
- 投稿日:2020-05-26T06:32:11+09:00
monacaでcordova-admob-plugin-freeを使った広告表示
少し面倒だったので忘れないようにメモしておきます。
admobで「ca-app-pub-」から始まるapp idを取得していることが前提です。ビルド環境の設定
- monacaクラウドIDEでビルド→ビルド環境の設定→iOS5.1.1を選択して保存する。
- monacaクラウドIDEで設定→JS/CSSコンポーネントの追加と削除→Monaca Core Utilityのバージョンを2.1.0以上に上げる。
- monacaクラウドIDEで設定→iOSアプリ設定→WebViewエンジンにWKWebViewを指定して保存。
プラグインを用意する
cordova-admob-sdk
以下のサイトからv0.24.1のzipをダウンロードしました。
cordova-admob-sdkcordova-plugin-admob-free
以下のサイトからv0.27.0のzipをダウンロードしました。
cordova-plugin-admob-freeWKWebViewの対応
ダウンロードしたcordova-admob-sdkは内部でGoogle Mobile Ads SDKの7.42.1を使用していました。
このバージョンはUIWebView廃止に未対応のようで、手作業でSDKを更新します。
- Google Mobile Ads SDKにアクセスしてgooglemobileadssdkios.zipをダウンロードします。ここでは7.60.0をダウンロードしました。
- cordova-admob-sdk-master.zipを解凍します。
- ./src/ios/GoogleMobileAds.framework をフォルダ毎削除します。
- googlemobileadssdkios.zipを解凍して./GoogleMobileAdsSdkiOS-7.60.0/GoogleMobileAds.frameworkを先程削除したフォルダがあった場所(cordova-admob-sdk-master/src/ios/)にコピーします。
- cordova-admob-sdk-masterをzipで圧縮します。
次に、cordova-plugin-admob-freeですが、www/admob.jsが無くてビルドエラーになるので作成します。
1. cordova-plugin-admob-free-master.zipを解凍します。
2. コンソールを起動して解凍したフォルダへ移動します。
3. npm install を実行
4. npm run build を実行(wwwフォルダが作成されます)
5. node_modulesフォルダを削除
6. cordova-plugin-admob-free-masterをzipで圧縮します。これでプラグインの準備はできました。
プラグインをインポート
次に、プロジェクトへプラグインを適用します。
1. monacaのクラウドIDEで設定→cordovaプラグインの管理 を選択します。
2. cordovaプラグインのインポートでcordova-admob-sdk-master.zipを指定してインポートします。
3. cordovaプラグインのインポートでcordova-plugin-admob-free.zipを指定してインポートします。
4. 設定を追加します。
設定ADMOB_APP_ID=ca-app-pub-348...config.xml修正
5. config.xmlを開きます。
6. <platform name="ios"タグ内に以下を追加します。config.xml<preference name="WKWebViewOnly" value="true"/> <preference name="CordovaWebViewEngine" value="CDVWKWebViewEngine"/> <feature name="CDVWKWebViewEngine"> <param name="ios-package" value="CDVWKWebViewEngine"/> </feature>※デプロイ時にITMS-90683がでた場合は以下も追加。
config.xml<edit-config target="NSBluetoothAlwaysUsageDescription" file="*-Info.plist" mode="merge"> <string>適当な説明</string> </edit-config>※カスタムビルドデバッガーでビルドして起動したときにスプラッシュで落ちる場合は以下を追加。
config.xml<edit-config file="*-Info.plist" mode="merge" target="GADApplicationIdentifier"> <string>ca-app-pub-348...</string> </edit-config> <edit-config file="*-Info.plist" mode="merge" target="GADIsAdManagerApp"> <true/> </edit-config>※上記を追加してもITMS-90809でrejectになる場合、以下を追加するといいかも。
config.xml<edit-config file="*-Info.plist" mode="merge"> <key>gad_preferred_webview</key> <string>wkwebview</string> </edit-config>広告表示用のスクリプト
とりあえずons.readyのタイミングに表示処理を書いた。
index.htmlons.ready(function() { // console.log(admob); var admobid = { banner: 'ca-app-pub-... ※バナー広告のid' } // Banner admob.banner.config({ id: admobid.banner, isTesting: true, autoShow: false, size: 'LARGE_BANNER', }) admob.banner.prepare() .then (() => { console.log('banner prepare success!') }) .catch (err => { console.log('banner prepare error!', err) }) });カスタムデバッグビルドして広告が表示できていればOK。
can't find variable admob というエラーが出る場合。
最初プロジェクト作った時に選択したプロジェクトテンプレートがまずいんだと思う。
フレームワークテンプレートの中のminimumをベースに再構築すればいいかもしれません。
- 投稿日:2020-05-26T02:19:05+09:00
Swift Method Swizzling (initializer, class method, instance method, getter, setter)
Swift 5のSwizzleについて1つのサンプルにまとめました。
自分もデバッグや一時的な動作変更に使う程度なので、間違いや補足などありましたらご指摘願います。
UIView+Swizzle.swift
import UIKit

extension UIView {

    private struct SwizzleStatic {
        static var once = true
    }

    class func swizzle() {
        guard SwizzleStatic.once else {
            return
        }
        SwizzleStatic.once = false
        let swizzleMethod = { (original: Selector, swizzled: Selector) in
            guard let originalMethod = class_getInstanceMethod(self, original),
                let swizzledMethod = class_getInstanceMethod(self, swizzled) else {
                    return
            }
            method_exchangeImplementations(originalMethod, swizzledMethod)
        }
        let swizzleClassMethod = { (original: Selector, swizzled: Selector) in
            guard let originalMethod = class_getClassMethod(self, original),
                let swizzledMethod = class_getClassMethod(self, swizzled) else {
                    assertionFailure("The methods are not found!")
                    return
            }
            method_exchangeImplementations(originalMethod, swizzledMethod)
        }
        // イニシャライザ
        swizzleMethod(#selector(UIView.init(frame:)),
                      #selector(UIView.swizzled_init(frame:)))
        // クラスメソッド
        swizzleClassMethod(#selector(UIView.animate(withDuration:delay:options:animations:completion:)),
                           #selector(UIView.swizzled_animate(withDuration:delay:options:animations:completion:)))
        // インスタンスメソッド
        swizzleMethod(#selector(UIView.addSubview(_:)),
                      #selector(UIView.swizzled_addSubview(_:)))
        // プロパティ getter
        swizzleMethod(#selector(getter: UIView.frame),
                      #selector(UIView.swizzled_get_frame))
        // プロパティ setter
        swizzleMethod(#selector(setter: UIView.frame),
                      #selector(UIView.swizzled_set_frame(_:)))
    }

    // イニシャライザを上書き
    @objc func swizzled_init(frame: CGRect) -> UIView {
        let instance = swizzled_init(frame: frame)
        print("\(type(of: self)):\(#function):\(#line), \( instance )")
        return instance
    }

    // クラスメソッドを上書き
    @objc class func swizzled_animate(withDuration duration: TimeInterval, delay: TimeInterval, options: UIView.AnimationOptions = [], animations: @escaping () -> Void, completion: ((Bool) -> Void)? = nil) {
        print("\(type(of: self)):\(#function):\(#line), \( duration )")
        swizzled_animate(withDuration: duration, delay: delay, options: options, animations: animations, completion: completion)
    }

    // インスタンスメソッドを上書き
    @objc func swizzled_addSubview(_ view: UIView) {
        print("\(type(of: self)):\(#function):\(#line), \( view )")
        swizzled_addSubview(view)
    }

    // プロパティ getter を上書き
    @objc func swizzled_get_frame() -> CGRect {
        let frame = swizzled_get_frame()
        print("\(type(of: self)):\(#function):\(#line), \( frame )")
        return frame
    }

    // プロパティ setter を上書き
    @objc func swizzled_set_frame(_ frame: CGRect) {
        print("\(type(of: self)):\(#function):\(#line), \( frame )")
        swizzled_set_frame(frame)
    }

    // 新しいプロパティを追加
    private static var swizzleKeyName = "name"
    var swizzledName: String? {
        get {
            objc_getAssociatedObject(self, &UIView.swizzleKeyName) as? String
        }
        set {
            objc_setAssociatedObject(self, &UIView.swizzleKeyName, newValue, objc_AssociationPolicy.OBJC_ASSOCIATION_RETAIN_NONATOMIC)
        }
    }

}
イニシャライザとクラスメソッドは一部のクラスで指定方法に違いがあるようです。
有効化
上記
UIView+Swizzle.swiftをプロジェクト内に置き、AppDelegateのapplication(_:didFinishLaunchingWithOptions:)で呼び出すだけです。func application(_ application: UIApplication, didFinishLaunchingWithOptions launchOptions: [UIApplication.LaunchOptionsKey: Any]? = nil) -> Bool { UIView.swizzle() ... return true }
- 投稿日:2020-05-26T01:04:07+09:00
高CPU消費でバックグラウンドの動画再生が60秒でiOSにキルされていた
iOS 13 WKWebView上の動画をAVPlayerにすり替えてバックグラウンドで動画音声を再生するアプリを作って公開しているのですが、わかりにくいエラーに遭遇したのでシェアしておきます。同じエラーの検索で来た人の助けになればうれしいです。
現象
バックグラウンド状態になってからも動画の音声は再生され続けるのですが、約60秒でクラッシュし、Xcodeのログ上には次のように表示されます。実機でしか再現しません。
Message from debugger: Terminated due to signal 9これだけじゃ何が原因かよくわからない。
以下のエラーはリリース済みアプリの同現象を Firebase Crashlytics が捉えたもの。
Fatal Exception: CALayerInvalidGeometry
CALayer position contains NaN: [nan nan]. Layer: <CALayer:0x282bad620; position = CGPoint (0 0); bounds = CGRect (0 0; 0 0); delegate = <UIView: 0x13de736c0; frame = (0 0; 0 0); transform = [0, 0, 0, 0, 0, 0]; clipsToBounds = YES; animations = { opacity=<CABasicAnimation: 0x282b33f20>; }; layer = <CALayer: 0x282bad620>>; sublayers = (<CALayer: 0x282bae000>, <AVPlayerLayer: 0x282bad4c0>); mask = <CAShapeLayer: 0x282badf00>; masksToBounds = YES; allowsGroupOpacity = YES; opacity = 1; transform = CATransform3D (0 0 0 0; 0 0 0 0; 0 0 1 0; 0 0 0 1); backgroundColor = <CGColor 0x28091fe30> [<CGColorSpace 0x280e08a20> (kCGColorSpaceICCBased; kCGColorSpaceModelMonochrome; Generic Gray Gamma 2.2 Profile; extended range)] ( 0 0.32 ); animations = [opacity=<CABasicAnimation: 0x282b33f20>]>
どちらのエラーからも明確な位置は特定できません。
Method SwizzlingでCALayerのsetterプロパティを上書きして、すべての代入処理をログにはきだしてもNaNが入る余地はなかったので悩みました。原因
細部に導入したアニメーションが実は高処理で、バックグラウンドでもCPUを消費していたことが原因でした。
Instruments の Time Profiler で異常値を発見してCPU消費を100%近くから一桁台へ抑えたところバックグラウンド再生が60秒を超えても動作するようになりました。iOS 13でバックグラウンド処理が頻繁に落とされるとの情報も聞いていたのでビビりましたが、凡ミスだったようでよかったです。スッキリしたのでアプリを審査に出して寝ます。