- 投稿日:2020-05-14T23:35:56+09:00
Reactとfirebaseでアプリケーションを作る①
ReactとFirebaseでアプリケーションを作る①
①では、環境作成と下地作りまでです。
やりたいこと
- Reactのチュートリアルで基礎を学ぶ
- チュートリアルを参考に、一人神経衰弱ゲームを作る
- Firebase Authentication を使ってログイン認証する
- Firebase を使ってデータを管理する
チュートリアルを修正して、一人神経衰弱ゲームを作る
チュートリアルは、「チュートリアル:React の導入」を利用する。
今回、理解するポイントはチュートリアルの通り。チュートリアルの準備:以下のチュートリアルを進めるにあたっての開始地点です。
概要:コンポーネントや props、state といった基礎概念について学びます。
ゲームを完成させる:React での開発における非常によくある技法について学びます。チュートリアルの準備
環境を作る
以前作成したDockerのReact環境「DockerにReact環境を構築する」をクローンする。
git clone https://github.com/abiitaka/docker-react.git react-firebase
docker-compose.ymlとinit.shのプロジェクト名を変更する。
- 変更前:
reactstudy01→ 変更後:react-firebase以降は、チュートリアルの不要なファイルを削除するところから進めていく。
Reactのチュートリアルで基礎を学ぶ
三目並べを作る
チュートリアルに従って進めていくと三目並べは完成する。
作ったソースは以下にあります。
三目並べ作成チュートリアルのポイント
Reactのチュートリアルでは、リフトアップとイミュータビリティについて補足説明をしている。
以下の2点がポイントです。リフトアップ
複数の子要素からデータを集めたい、または 2 つの子コンポーネントに互いにやりとりさせたいと思った場合は、代わりに親コンポーネント内で共有の state を宣言する必要があります。親コンポーネントは props を使うことで子に情報を返すことができます。こうすることで、子コンポーネントが兄弟同士、あるいは親との間で常に同期されるようになります。
このように state を親コンポーネントにリフトアップ (lift up) することは React コンポーネントのリファクタリングでよくあることですので、この機会に挑戦してみましょう。
また、「state のリフトアップ」にも、まとめられています。
イミュータビリティ
ミュータブル (mutable) なオブジェクトは中身が直接書き換えられるため、変更があったかどうかの検出が困難です。ミュータブルなオブジェクト変更の検出のためには、以前のコピーと比較してオブジェクトツリーの全体を走査する必要があります。
イミュータブルなオブジェクトでの変更の検出はとても簡単です。参照しているイミュータブルなオブジェクトが前と別のものであれば、変更があったということです。
mutable、immutableの変更検出は、scpとして「shouldComponentUpdate の実際の動作」にまとめられています。
チュートリアルを参考にひとり神経衰弱ゲームを作る
ルール
- 3x4のマス目を作る
- マスに1〜6までの数字のペアを配置する
- クリックすると数字を表示する
- 2箇所クリックすると数字が表示される
- 表示した数字がペアかどうか判断する
- ペアであれば表示し、ペアでなければ表示しない
ソース
かなり強引なやり方ですが、、、
class Board extends React.Component {
    constructor(props) {
        super(props);
        this.state = {
            xIsNext: true,
            squares: Array(12).fill(null),
            gameBoard: [3, 2, 6, 2, 6, 5, 5, 4, 1, 3, 1, 4],
            history: [],
            clickCount: 1,
            isPair: false,
            pairCount: 0,
            isStart: true,
        }
    }

    handleClick(i) {
        const squares = this.state.squares.slice();
        if (squares[i] && this.state.gameBoard.length === 0) {
            return;
        }

        // 盤表示
        squares[i] = this.state.gameBoard[i];

        // 表示履歴
        this.state.history.push(i);

        // ペア判定
        let isPair = this.isPair(this.state.history);
        let pairCount = this.state.pairCount;
        if (isPair) {
            pairCount = pairCount + 1;
        }

        this.setState({
            squares: squares,
            history: this.state.history,
            clickCount: this.state.clickCount + 1,
            isPair: isPair,
            pairCount: pairCount,
        });

        // ペア一致しない場合はボード版を戻す
        this.reverseBoard(this.state.history, squares, isPair);
    }

    isPair(history) {
        if (!this.isTwoClick(history)) {
            return false;
        }

        const oneIndexHistory = history[history.length - 2];
        const twoIndexHistory = history[history.length - 1];
        if (this.state.gameBoard[twoIndexHistory] === this.state.gameBoard[oneIndexHistory]) {
            return true;
        } else {
            return false;
        }
    }

    isTwoClick(history) {
        const isTwoClick = history.length % 2;
        return !(isTwoClick === 1)
    }

    reverseBoard(history, squares, isPair) {
        if (!this.isTwoClick(history)) {
            return;
        }

        if (!isPair) {
            setTimeout(() => {
                // ボードを2つ戻す
                squares[history[history.length - 2]] = null;
                squares[history[history.length - 1]] = null;
                this.setState({ squares: squares, });
            }, 300);
        }
    }

    renderSquare(i) {
        return (
            <Square
                value={this.state.squares[i]}
                onClick={() => this.handleClick(i)}
            />
        );
    }

    render() {
        const isEnd = (this.state.squares[0] && this.state.pairCount === this.state.gameBoard.length / 2);
        return (
            <div>
                <p>{!isEnd ? (this.state.pairCount + 'ペア ') : 'ゲーム終了'}</p>
                <div className="board-row">
                    {this.renderSquare(0)}
                    {this.renderSquare(1)}
                    {this.renderSquare(2)}
                    {this.renderSquare(3)}
                </div>
                <div className="board-row">
                    {this.renderSquare(4)}
                    {this.renderSquare(5)}
                    {this.renderSquare(6)}
                    {this.renderSquare(7)}
                </div>
                <div className="board-row">
                    {this.renderSquare(8)}
                    {this.renderSquare(9)}
                    {this.renderSquare(10)}
                    {this.renderSquare(11)}
                </div>
            </div>
        );
    }
}
作ったソースは以下にあります。
一人神経衰弱ゲーム作成Firebase Authentication と Firebase は、「ReactとFirebaseでアプリケーションを作る②(準備中)」でまとめます。
- 投稿日:2020-05-14T23:11:57+09:00
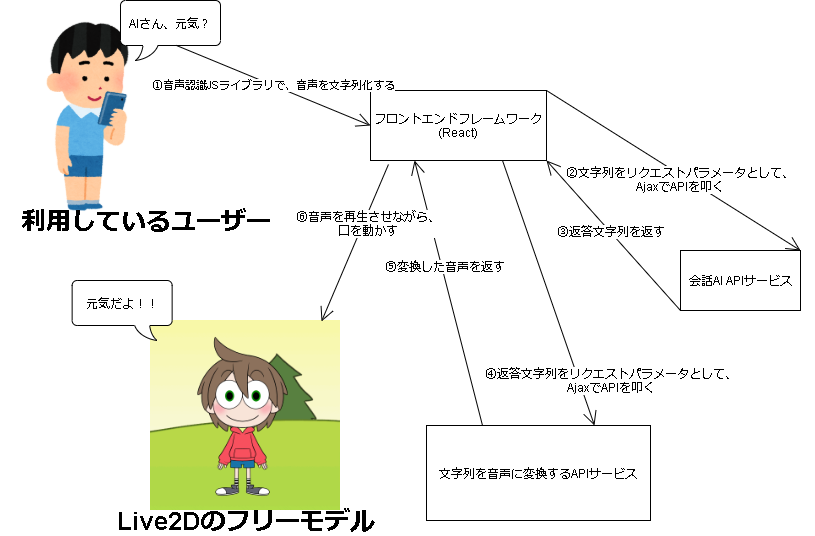
AIトークの設計(フロント概要)
注意点
今現在開発中のもののため、内容を変更する可能性があります。
使用技術
- 言語
- JavaScript
- フレームワーク
- React
- React Bootstrap
- 利用外部サービス
- AWS(S3,Amazon Polly)
- Netlify
- Nody API
サービスの流れ
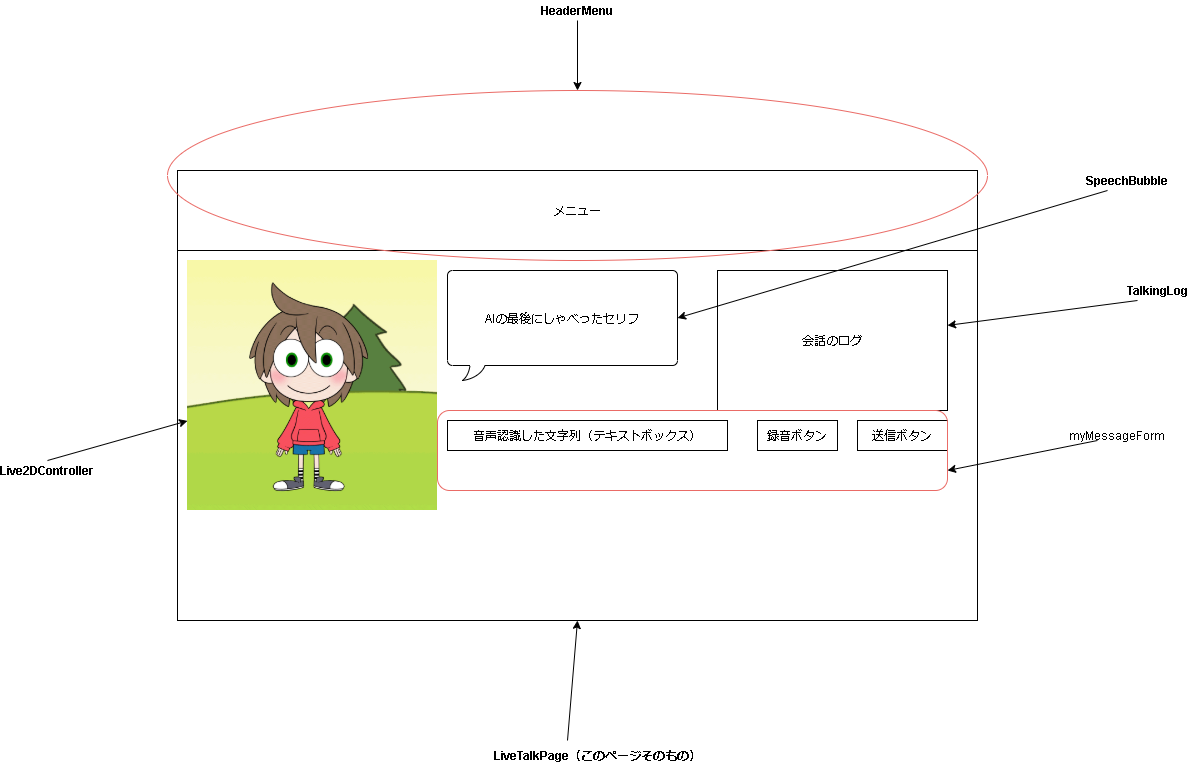
画面設計
PC画面(Reactのコンポーネントクラスが入っています)
スマホ画面z
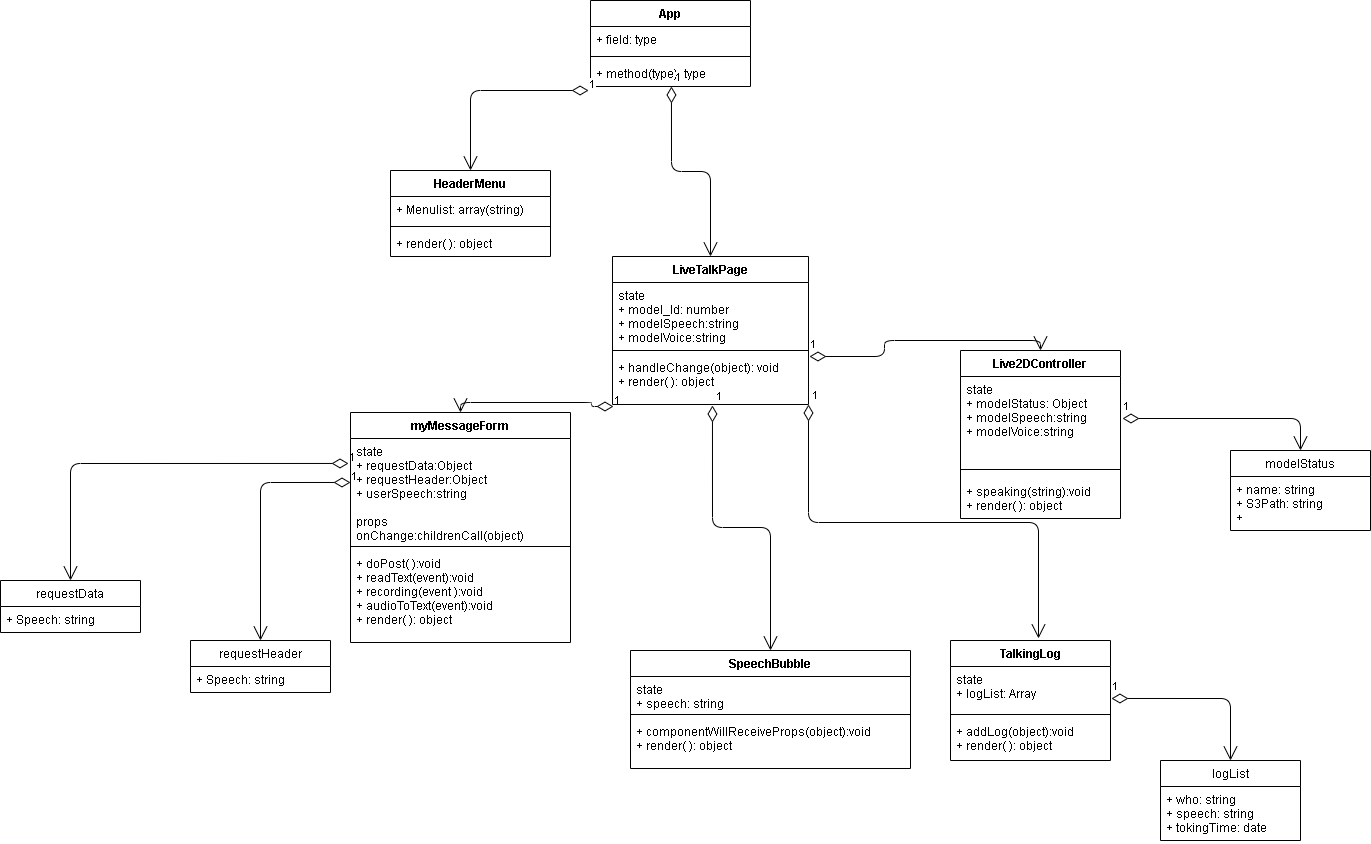
クラス図
初めてまともなクラス図を描いたので、矢印の使い方を間違っている可能性があります。
また、クラス解説の内容と矛盾してる可能性があります。
クラス解説
LiveTalkPage
- 概要
"/livetalk"に遷移するページそのものである。そのため、この中に様々なコンポーネントを集約させる。
myMessageForm
- 概要
ユーザーがAIに対して、メッセージを送るためのフォームである。
メッセージの送り方は、テキストボックスに入力するか、録画ボタンを押して、マイクを通して音声をテキストに変換する方法である
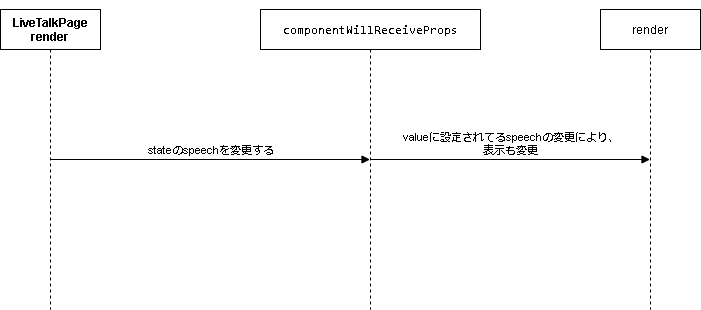
SpeechBubble
- 概要
AIが最後に喋った台詞を記載する
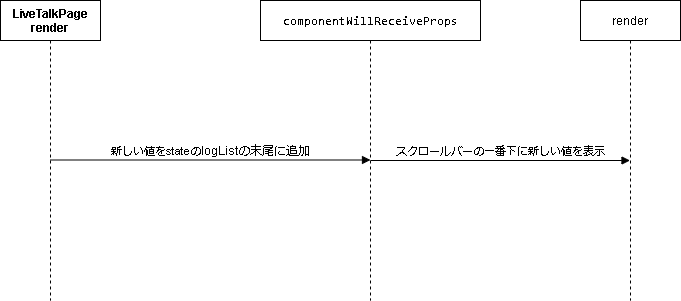
TalkingLog
- 概要
AIとユーザーの会話ログをスクロールバーの末尾に新しいものを表示
実際にログ1つ分の表示の仕方
表示<p>私:元気?</p>表示するための配列の構造
配列の構造[{who: '私',speech:'元気?'},{Who: 'AI',speech:'元気?'}];
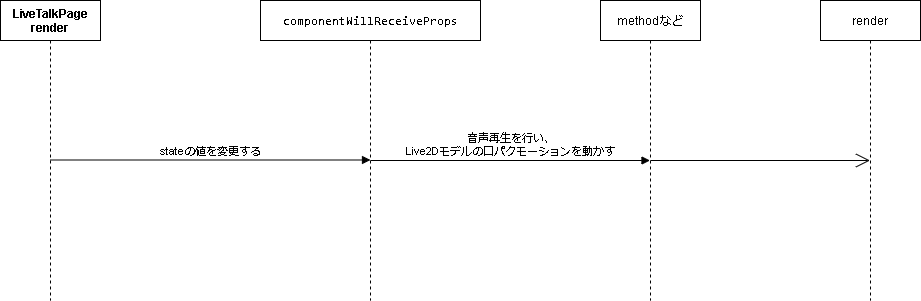
Live2DController
- 概要
Live2Dを操作するコントローラー。音声と再生させながら、口パクモーションを再生させる!
Live2Dの操作を参考にするもの:https://docs.live2d.com/cubism-sdk-tutorials/sample-build-web/?locale=ja


- 投稿日:2020-05-14T21:36:49+09:00
expo-cliのinstallでpermission deniedエラー
前提
npm install expo-cli --globalでexpo-cliを使用できるようにインストールしようとした時のお話mac
本題
npm install expo-cli --globalで下記のようなpermission deniedのエラー発生。terminal.npm WARN notsup SKIPPING OPTIONAL DEPENDENCY: Unsupported platform for @expo/ngrok-bin-freebsd-x64@2.2.8: wanted {"os":"freebsd","arch":"x64"} (current: {"os":"darwin","arch":"x64"}) npm ERR! code EACCES npm ERR! syscall access npm ERR! path /usr/local/lib/node_modules npm ERR! errno -13 npm ERR! Error: EACCES: permission denied, access '/usr/local/lib/node_modules' npm ERR! [Error: EACCES: permission denied, access '/usr/local/lib/node_modules'] { npm ERR! stack: "Error: EACCES: permission denied, access '/usr/local/lib/node_modules'", npm ERR! errno: -13, npm ERR! code: 'EACCES', npm ERR! syscall: 'access', npm ERR! path: '/usr/local/lib/node_modules' npm ERR! } npm ERR! npm ERR! The operation was rejected by your operating system. npm ERR! It is likely you do not have the permissions to access this file as the current user npm ERR! npm ERR! If you believe this might be a permissions issue, please double-check the npm ERR! permissions of the file and its containing directories, or try running npm ERR! the command again as root/Administrator. npm ERR! A complete log of this run can be found in: npm ERR! /Users/ユーザー名/.npm/_logs/2020-05-14T12_14_47_487Z-debug.log解決方法
nmpの公式サイトを見ると解決!
sudo chown -R $(whoami) $(npm config get prefix)/{lib/node_modules,bin,share}もう一度、
npm install expo-cli --global実行!
expo --versionでインストールできているか確認!expo-cliでできること
JavaScriptのコードをビルドする
本番公開の際にpublishする
- 投稿日:2020-05-14T14:32:36+09:00
Gatsby+Firestoreでステートフックを利用したCRUD
Gatsby+Firestoreでステートフックを利用したCRUD
参考チュートリアルはこちらBuild a CRUD Firestore App in React/Gatsby with Hooks
前提
- すでにnpmとGitをインストール済み。
- Firebase(https://firebase.google.com) にログインできる状態。
- ReactとFirestoreの基本。
参考:
React.js & Next.js超入門のチャプター6を改変:Firestore使用するようにした①
React.js & Next.js超入門のチャプター6を改変:Firestore使用するようにした②
- フックについてさらっと(任意)
参考: ステートフックの利用法 、 副作用フックの利用法でははじめよう。
firebaseでfirestoreを準備
https://firebase.google.com/ にログインし新規プロジェクト作成。
新しくFirestoreデータベースを作成
練習なのでテストモードで。
Gatsbyプロジェクトを準備
プロジェクト作成
- コマンドプロンプトでGatsby CLIをインストール
npm install -g gatsby-cli- 任意のディレクトリでGatsbyプロジェクト作成
gatsby new CRUD-sample- CRUD-sampleというフォルダができてるのでそこに移動
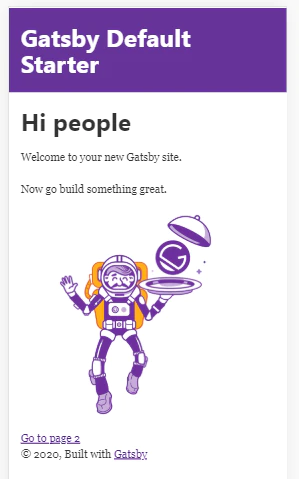
gatsby developで開発環境が立ち上がる。http://localhost:8000/をブラウズ- デフォルトページが表示される
そしたら、srcの下のpagesフォルダにindex.jsファイルがデフォルトで存在するのでそれを、もしくは同じ階層にtest.jsなどを新規作成してもよい。
そこに以下のコードを記述。
// pages/test.js

import React from "react"

export default () => (
  <div>
    <h1>Firestore CRUD App </h1>
    <h2>Item List</h2>
    <h2>Add Item</h2>
  </div>
)
http://localhost:8000/testにアクセスするとブラウザは以下のように表示される。
GatsbyプロジェクトにFirebase設定
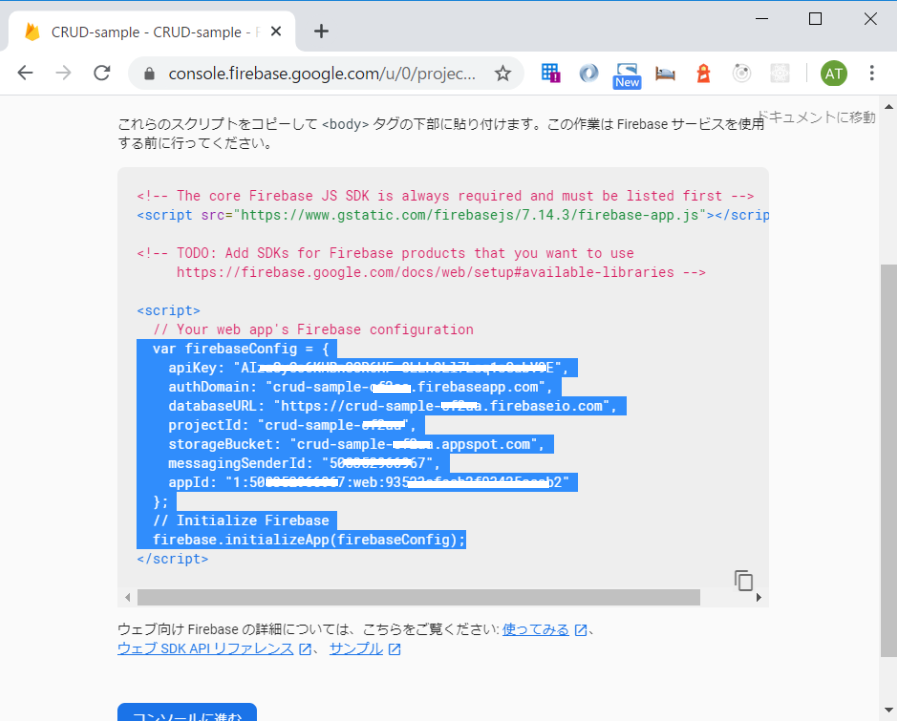
デフォルトでsrcの下にcomponentsフォルダがあるのでそこにitemlist.jsxファイルとfirestore.jsファイルを作成する。Firebaseコンソールに戻り</>のところをクリック。
ニックネームを適当に入力してアプリを登録ボタンをクリック
<scrip />タグ内にあるコンフィグスクリプトをコピーしてどこかに保存しておく。
Firebase関連モジュールをインストール
コマンドプロンプトでプロジェクトルートにて以下のコマンドでインストール
$ npm install -g firebase-tools

$ npm install firebase --save
完了したらいちおう
gatsby developでさっきと同じ画面がブラウズできるか確認。Firebaseコンフィグ設定
components/firebase.jsを開いて、コピーしておいたコンフィグをペースト
// components/firebase.js

import firebase from "firebase/app"
import 'firebase/firestore'

  var firebaseConfig = {
    apiKey: "AIzxxxxxxxxxxxxx6HF-8LLhOxxxxxxxxabV9E",
    authDomain: "crud-sample-cxxXxxa.firebaseapp.com",
    databaseURL: "https://crud-sample-cxXxxa.firebaseio.com",
    projectId: "crud-sample-cxXxxa",
    storageBucket: "crud-sample-cxXxxa.appspot.com",
    messagingSenderId: "508xxxxxxx67",
    appId: "1:50xxxxxx967:web:9352xxxxxxxxxx5aeab2"
  };
  // Initialize Firebase
  firebase.initializeApp(firebaseConfig);

export default firebase
import~文とexport default firebaseを忘れずに。
Firestore接続テスト
test.jsに以下のコードを記述。
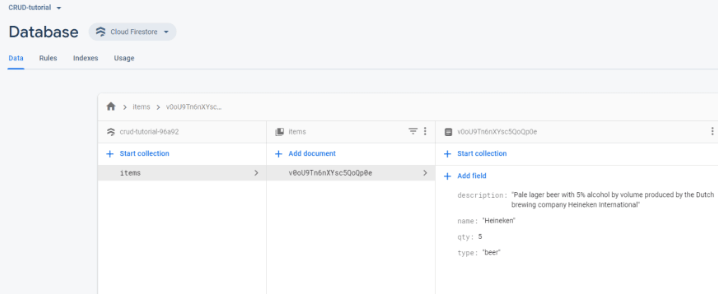
// pages/test.js

import React from "react"
import firebase from "./components/firebase"

export default () => {
  firebase
    .firestore()
    .collection("items")
    .add({
      name: "Heineken",
      type: "beer",
      qty: 5,
      description:
        "Pale lager beer with 5% alcohol by volume produced by the Dutch brewing company Heineken International",
    })
    .then(ref => {
      console.log("Added document with ID: ", ref.id)
    })

  return (
    <div>
      <h1>Firestore CRUD App </h1>
      <h2>Item List</h2>
      <h2>Add Item</h2>
    </div>
  )
}
そしたら
http://localhost:8000/testをリロード。すると…
Firestoreにコレクションが追加されている!
はずです。ここまでミスなければ。
Firestoreに接続し書き込みができることがわかった。test.jsのテストコードは消去する。
データ閲覧
データをとってきて画面に表示させる。itemlist.jsxを開いて以下のように記述。
// components/itemlist.jsx

import React, { useState, useEffect } from "react"
import firebase from "./firebase"
import "../styles/global.css"

const ItemList = () => {
    return (

        <table className="tg">
            <tbody>
            <tr>
                <th>名称</th>
                <th>タイプ</th>
                <th>数</th>
                <th>備考</th>
                <th></th>
            </tr>
            </tbody>

            {listItem.map(item => (
            <tbody key={item.id}>
            <tr>
                <td>{item.name}</td>
                <td>{item.type}</td>
                <td>{item.qty}</td>
                <td>{item.description}</td>
                <td>
                    <button>Edit</button>
                    <button>Delete</button>
                </td>
            </tr>
            </tbody>
            ))}

        </table>
    )

}

export default ItemList
これでまずはカラのテーブルが表示される。
ステートフックを使うのでuseState, useEffectをインポートする。
Firestoreに接続するのfirebase をインポートする。import React, { useState, useEffect } from "react" import firebase from "./firebase" import "../styles/global.css" ・・・略・・・ちなみにスタイルはsrcの下のstylesフォルダのglobal.cssというファイルに記述する(なかったら作る)。ここで使うスタイルは以下の通り。
// styles/global.css

.tg {
  border-collapse: collapse;
  border-spacing: 0;
  border-color: #000000;
}
.tg td {
  font-family: Arial, sans-serif;
  font-size: 14px;
  padding: 10px 5px;
  border-style: solid;
  border-width: 1px;
  overflow: hidden;
  word-break: normal;
  border-color: #000000;
  color: #333;
  background-color: #fff;
}
.tg th {
  font-family: Arial, sans-serif;
  font-size: 14px;
  font-weight: normal;
  padding: 10px 5px;
  border-style: solid;
  border-width: 1px;
  overflow: hidden;
  word-break: normal;
  border-color: #000000;
  color: #333;
  background-color: #f0f0f0;
}
そしたらgatsby-browser.jsにインポート文を記述。
// gatsby-browser.js

import "./src/styles/global.css"
ではステートフックを使ってFirestoreからデータをもってくるコード。
// components/itemlist.jsx

const useItems = () => {
    const [items, setItems] = useState([]);

    useEffect(() => {
        const unsubscribe = firebase
        firebase
          .firestore()
          .collection("items")
          .onSnapshot(snapshot => {
            const data = []
            snapshot.forEach(d => data.push({ // snapshot.doc.mapではだめだった
                id: d.id,
                ...d.data(),
              }));
              setItems(data)
          });
        return () => unsubscribe();
    }, []);

    return items;
};
・・・略・・・
【コラム】ステートフック:useStateとuseEffect
この一行
const [items, setItems] = useState([]);
これで、例えばReactクラスのコンストラクタ内でステート変数をセットするのと同じこと。こんな感じ↓constructor(props) { super(props); this.state = { items: null }; }フックの場合、変数が二つあるが、“分割代入 (destructuring)” とか呼ばれるらしいが、まあ要はふたつめのsetItems(名前は自由に決められる)は関数変数みたいなものでステート変数Itemsを更新する関数的に使う。こんな感じ↓
setItem({ id: 01, name: "生茶", type: "ソフトドリンク", qty: "8", description: "アサヒビバレッジ製造のお茶" });ざっくりいうと、useState()でステート変数をセット、setItems()でステート変数を更新。
じゃあuseEffect()はなんなの?
それもステート変数を更新する。だけどsetItems()がイベントドリブンぽく使うのに対して、useEffectはコンポーネントをマウントしたとき、コンポーネントが更新されたとき、アンマウントされたとき、いずれの場合も発火して“ハイヨ”って動いてくれる。ライフサイクルを気にせずにそこに書いとけばあとはReactがやってくれるよ~という便利なやつ。とりあえずuseEffectもステート変数を更新。
return () => unsubscribe();
のところでは、Firestoreの接続を切る、ということをしている。電気のつけっぱなしはイカンよということであろう。
ここまでのlistitem.jsx
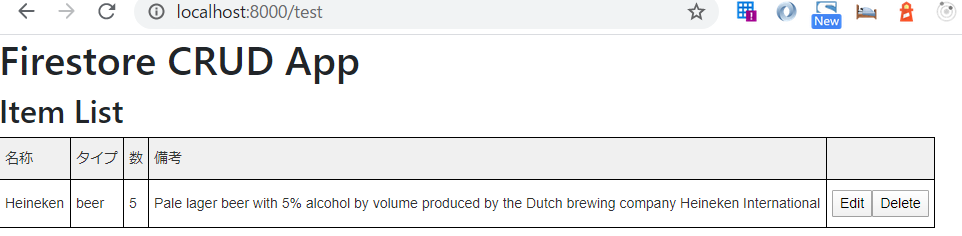
// components/listitem.jsx

import React, { useState, useEffect } from "react"
import firebase from "./firebase"
import "../styles/global.css"

const useItems = () => {
    const [items, setItems] = useState([]);

    useEffect(() => {
        const unsubscribe = firebase
        firebase
          .firestore()
          .collection("items")
          .onSnapshot(snapshot => {
            const data = []
            snapshot.forEach(d => data.push({ // snapshot.doc.mapではだめだった
                id: d.id,
                ...d.data(),
              }));
              setItems(data)
          });
        return () => unsubscribe();
    }, []);

    return items;
};

const ItemList = () => {
    /* useItem() API を listItem変数に格納 */
    const listItem = useItems()

    return (

        <table className="tg">
            <tbody>
            <tr>
                <th>名称</th>
                <th>タイプ</th>
                <th>数</th>
                <th>備考</th>
                <th></th>
            </tr>
            </tbody>

            {listItem.map(item => ( // listItemに格納されたデータをひとつづつ取り出してitemオブジェクトに格納. Itemごとに<tr><td>...</td></tr>に吐き出す.
            <tbody key={item.id}>
            <tr>
                <td>{item.name}</td>
                <td>{item.type}</td>
                <td>{item.qty}</td>
                <td>{item.description}</td>
                <td>
                    <button>Edit</button>
                    <button>Delete</button>
                </td>
            </tr>
            </tbody>
            ))}

        </table>
    )

}

export default ItemList
test.js(Firestore接続テストに使ったコードは全部消して)
// pages/test.js

import React from "react"
import ItemList from "../components/itemlist"
import "../styles/global.css"

export default () => {
  return (
    <div>
      <h1>Firestore CRUD App </h1>
      <h2>Item List</h2>
      <ItemList />
      <h2>Add Item</h2>
    </div>
  )
}
こんなふうに表示される。はず。
データ追加
これは簡単。
componentsの下にadditemform.jsxファイルを作成。
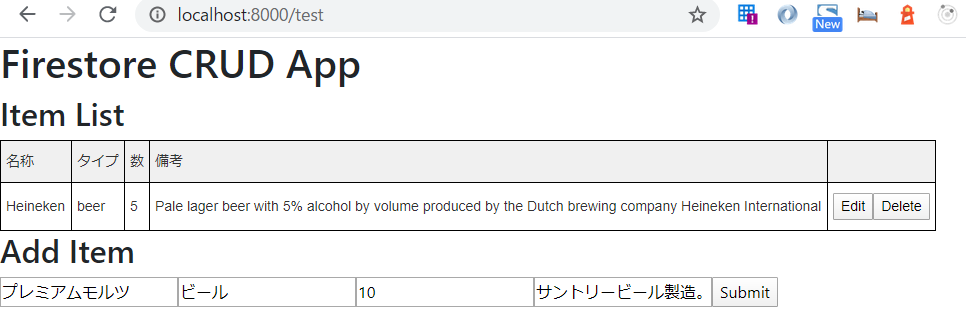
以下のようにコードを。//components/additemform.jsx import React, { useState } from "react" import firebase from "firebase" const AddItemForm = () => { const [name, setName] = useState("") const [type, setType] = useState("") const [qty, setQty] = useState(null) const [description, setDescription] = useState("") const onSubmit = e => { // eはevent /* preventDefaultでページがリロードされるのを防ぐ */ e.preventDefault() firebase .firestore() .collection("items") .add({ name, type, qty, description, }) //.then でフォームクリア .then(() => setName(""), setType(""), setQty(''), setDescription("")) } return ( <form onSubmit={onSubmit}> <input placeholder="Name" value={name} name="name" /* e.currentTarget.value にインプットされた値が入る */ onChange={e => setName(e.currentTarget.value)} type="text" /> <input placeholder="Type" value={type} name="type" onChange={e => setType(e.currentTarget.value)} type="text" /> <input placeholder="Qty" value={qty} name="qty" onChange={e => setQty(e.currentTarget.value)} type="number" /> <input placeholder="Description" value={description} name="description" onChange={e => setDescription(e.currentTarget.value)} type="text" /> <button>Submit</button> </form> ) } export default AddItemFormtest.jsは以下のように編集。
// pages/test.js

import React from "react"
import ItemList from "../components/itemlist"
import AddItemForm from '../components/additemform' //追加
import "../styles/global.css"

export default () => {
  return (
    <div>
      <h1>Firestore CRUD App </h1>
      <h2>Item List</h2>
      <ItemList />
      <h2>Add Item</h2>
     <AddItemForm /> //追加
    </div>
  )
}
では書き込んでみる。
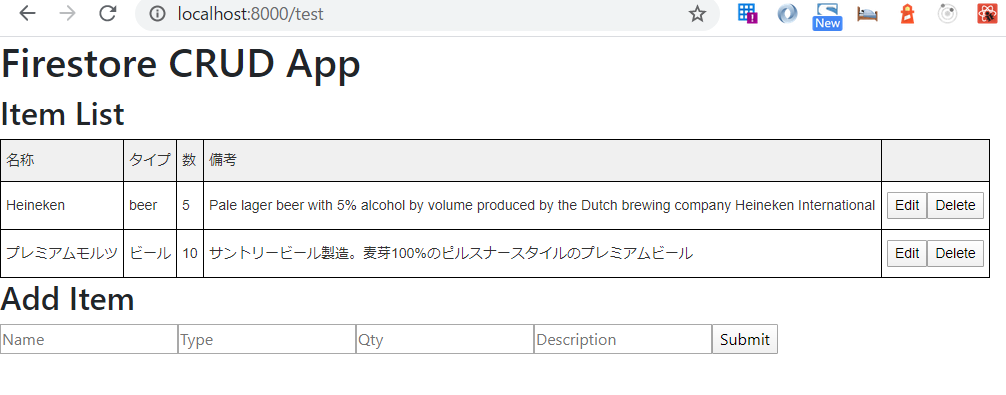
Submitボタンをクリック。
リロードしなくともすぐにページに反映される。
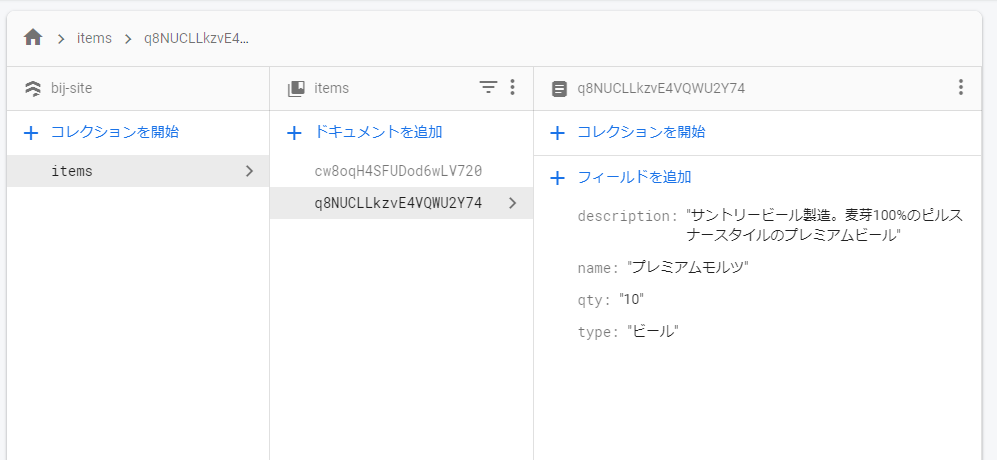
Firestoreにも反映されている。
データ削除
これも簡単。
itemlist.jsxを編集する。
HTMLのテーブルにDeleteボタンがあると思う。
deleteItem関数を作ってそのDeleteボタンに割り当てるだけ。
// components/itemlist.jsx
・・・略・・・
const deleteItem = (id) => {  // 追加
    firebase
      .firestore()
      .collection("items")
      .doc(id)
      .delete()
}
・・・略・・・
            {listItem.map(item => (
            <tbody key={item.id}>
            <tr>
                <td>{item.name}</td>
                <td>{item.type}</td>
                <td>{item.qty}</td>
                <td>{item.description}</td>
                <td>
                    <button>Edit</button>
                    <button onClick={() => deleteItem(item.id)}>Delete</button>  // 更新
                </td>
            </tr>
・・・略・・・
データ更新
これがややこしい!
3つのステップがある。
まずは更新用のupdateitemコンポーネントを表示・非表示させるためのフラッグをオフオンする機能
2つめ、更新したいitemデータを特定する機能
最後、実際のデータ更新。ではcomponentsフォルダにupdateitem.jsxファイルを作成。そして以下のコードを。
// components/updateitem.jsx

import React from "react"

const UpdateItem = () => {
  return (
    <>
      <h2>Update Item</h2>
      <form>
        <label htmlFor="Update Item">Update Item:</label>
        <input type="text" name="name" />
        <input type="text" name="type" />
        <input type="number" name="qty" />
        <input type="text" name="description" />
        <button>Update</button>
        <button>Cancel</button>
      </form>
    </>
  )
}
export default UpdateItem
test.jsを編集
import React, { useState } from "react" // 変更
import ItemList from '../components/itemlist'
import AddItemForm from '../components/additemform'
import UpdateItem from "../components/updateitem" // 追加
import "../styles/global.css"


export default () => {
  return (
    <div>
      <h1>Firestore CRUD App </h1>
      <h2>Item List</h2>
      <ItemList />
      <h2>Add Item</h2>
      <UpdateItem /> // 追加
      <AddItemForm />
    </div>
  )
}
つぎに以下のコードをtest.jsに追加する。2つのステート変数をセットするもの。
// pages/test.js

・・・略・・・
export default () => {
  /* 初期化するためのカラ変数配列 */
  const initialItemState = [
    { id: null, name: "", type: "", qty: "", description: "" },
  ]
  /* currentItemステート変数をセット */
  const [currentItem, setCurrentItem] = useState(initialItemState)

  /* 編集モードフラッグになるステート変数をセット */
  const [editing, setEditing] = useState(false)
・・・略・・・
currentItemは「いま選んでいるItem」を格納するステート変数。initialItemState は初期化のためだけのもの。つまりcurrentItemを何も選んでいないステート(状態)にするためのものでカラ。
editingは編集モードかそうでないかのフラグboolean。初期値はfalse。編集モード
ということでまずは編集モードを操作する。editingフラグがtrueの場合はupdateitem.jsxコンポーネントを表示し、falseの場合は同コンポーネントを非表示にする、という機能を追加していく。ではitemlist.jsxを編集する。
// components/itemlist.jsx

・・・略・・・
const ItemList = ({ editItem }) => {... // 変更

  <button onClick={() => editItem()}>Edit</button> // 変更

  ...}
・・・略・・・
HTMLのテーブルにEditボタンがあると思う。
そこにeditItem()関数を割り当ててる。editItem()関数はtest.jsに書くので、その返り値をプロパティとして貰ってくるために
const ItemList = ({ editItem }) =>という具合に{ editItem }プロパティを記述。EditボタンをクリックするとeditItem()関数を呼びそこで編集モードフラッグeditingをtrueにする。editItem()関数はあとでtext.jsに書く。
つぎにupdateitem.jsxを以下のように編集。
// components/updateitem.jsx
・・・略・・・
const UpdateItem = ({setEditing}) => { //変更

  return (...
    <button onClick={()=>setEditing(false)}>Cancel</button> // 変更
  ...)
・・・略・・・
setEditing()関数をCancelボタンに割り当ててる。setEditing()はtest.jsにセットしたステートフック
const [editing, setEditing] = useState(false)の分割代入された変数2つめsetEditingのこと。。
CancelボタンをクリックするとsetEditing()を呼び編集モードフラッグeditingをfalseにする。
そしたらtest.jsにeditItem()関数を記述しよう。
// pages/test.js

import React, { useState } from "react"
import ItemList from '../components/itemlist'
import AddItemForm from '../components/additemform'
import UpdateItem from "../components/updateitem"
import "../styles/global.css"

export default () => {

  /* 初期化するためのカラのステート変数s */
  const initialItemState = [
    { id: null, name: "", type: "", qty: "", description: "" },
  ]
  /* currentItemステートにカラのステート変数sを割り当て */
  const [currentItem, setCurrentItem] = useState(initialItemState)

  /* editモードフラッグを初期化 */
  const [editing, setEditing] = useState(false)


  /* editモードをtrueに */
  const editItem = (item) => {
    setEditing(true)
  }

  return (
    <div>
      <h1>Firestore CRUD App </h1>
      <h2>Item List</h2>
      <ItemList editItem={editItem} />
      <h2>Add Item</h2>
      {editing ? <UpdateItem setEditing={setEditing}/> : <AddItemForm />} // 変更. ternary operation(三項演算子)
    </div>
  )
}
これで編集モードの切り替えができた。
「いま選んでいるItem」
「いま選んでいるItem」とはアイテムリストで該当ItemのEditボタンをクリックしたItemのこと。
currentItemをもってくる機能を追加しよう。updateitem.jsxを以下のように編集。
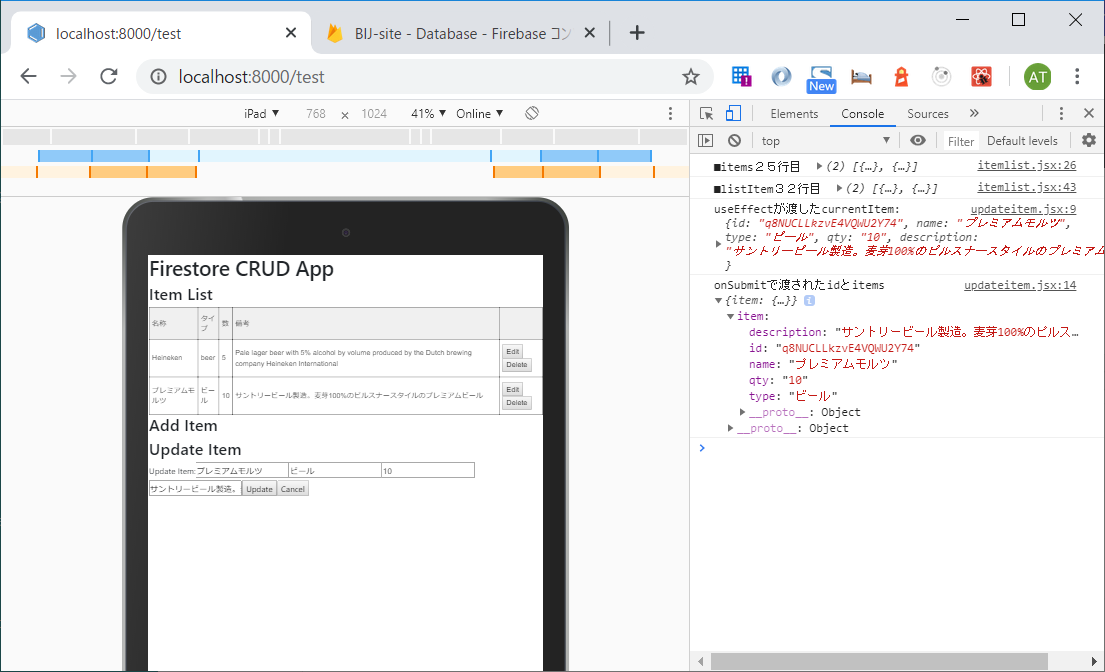
// components/updateitem.jsx

import React, { useState, useEffect } from "react"; // 変更

const UpdateItem = ({ setEditing, currentItem }) => {

  const [item, setItem] = useState(currentItem); // 追加

  useEffect(() => { // 追加
    setItem(currentItem);
    console.log("useEffectが渡したcurrentItem: ", currentItem);
  }, [currentItem]);

  const onSubmit = e => { // 追加
    e.preventDefault();
    console.log("onSubmitで渡されたidとitems", { item });
  };

  return (
    <>
      <h2>Update Item</h2>
      <form onSubmit={onSubmit}> // 変更
        <label htmlFor="Update Item">Update Item:</label>
        <input type="text" name="name" value={item.name} />
        <input type="text" name="type" value={item.type} />
        <input type="number" name="qty" value={item.qty} />
        <input type="text" name="description" value={item.description} />
        <button>Update</button>
        <button onClick={() => setEditing(false)}>Cancel</button> // 変更
      </form>
    </>
  );
};
export default UpdateItem;
itemlist.jsxのEditボタンのところを以下のように編集。
// components/itemlist.jsx

・・・略・・・
<button onClick={() => editItem(item)}>Edit</button>
・・・略・・・
test.jsのeditItem()関数と
<UpdateItem />コンポーネントを編集。// pages/test.js export default () => {... const editItem = (item) => { setEditing(true) setCurrentItem({ // 追加 id: item.id, name: item.name, type: item.type, qty: item.qty, description: item.description, }) } return (... <UpdateItem setEditing={setEditing} currentItem={currentItem} /> // 変更したらEditボタンをクリックして現れたUpdateフォームでUpdateボタンをクリックしてみる。
選んだ(該当ItemのEditボタンをクリックした)Itemの名前や数量や備考などのデータがコンソールログに吐かれている。
これでだいたい完成。
データ更新する関数
あとはFirestoreに更新命令をするだけなので簡単。
test.jsにupdateItem関数をつくる。また
<UpdateItem />にプロパティを加える。// pages/test.js ・・・略・・・ /* firestoreのデータを更新 */ const updateItem = ({ currentItem }, updatedItem) => { // 追加 console.log( "Firestoreで更新するデータ: ", updatedItem, currentItem.id ); //editフラグをfalseに setEditing(false) firebase .firestore() .collection("items") .doc(currentItem.id) .update(updatedItem); }; return ( <div> <h1>Firestore CRUD App </h1> <h2>Item List</h2> <ItemList editItem={editItem} /> <h2>Add Item</h2> {editing ? <UpdateItem setEditing={setEditing} currentItem={currentItem} updateItem={updateItem} /> : <AddItemForm />} // 更新 </div> ) }最後。
updateitem.jsxにonChangeイベントハンドラーを。// components/updateitem.jsx ・・・略・・・ const onSubmit = e => { e.preventDefault(); console.log("onSubmitで渡されたidとitems", { item }); updateItem({ currentItem }, item); // 追加 }; const onChange = e => { // 追加 const { name, value } = e.target; setItem({ ...item, [name]: value }); }; return ( <> <h2>Update Item</h2> <form onSubmit={onSubmit}> <label htmlFor="Update Item">Update Item:</label> <input type="text" name="name" value={item.name} onChange={onChange} /> // 変更 <input type="text" name="type" value={item.type} onChange={onChange} /> // 変更 <input type="number" name="qty" value={item.qty} onChange={onChange} /> // 変更 <input type="text" name="description" value={item.description} onChange={onChange} /> // 変更 <button>Update</button> <button onClick={()=>setEditing(false)}>Cancel</button> </form> </> ) } export default UpdateItemコード最終形
もし一部うまくいかなくても、この最終形でちゃんと動く。Dont Worry❢
test.js
// pages/test.js

import React, { useState } from "react"
import firebase from "../components/firebase";
import ItemList from '../components/itemlist'
import AddItemForm from '../components/additemform'
import UpdateItem from "../components/updateitem"
import "../styles/global.css"

export default () => {

  /* 初期化するためのカラ変数配列 */
  const initialItemState = [
    { id: null, name: "", type: "", qty: "", description: "" },
  ]
  /* currentItemステート変数をセット */
  const [currentItem, setCurrentItem] = useState(initialItemState)

  /* 編集モードフラッグステート変数をセット */
  const [editing, setEditing] = useState(false)


  /* editモードをtrueにしてcurrentItemにEditボタンを押下したitemを格納 */
  const editItem = (item) => {
    setEditing(true)
    setCurrentItem({
      id: item.id,
      name: item.name,
      type: item.type,
      qty: item.qty,
      description: item.description,
    })
  }

  /* firestoreのデータを更新 */
  const updateItem = ({ currentItem }, updatedItem) => {
    console.log(
      "Firestoreで更新するデータ: ",
      updatedItem,
      currentItem.id
    );
    //editフラグをfalseに
    setEditing(false)
    firebase
      .firestore()
      .collection("items")
      .doc(currentItem.id)
      .update(updatedItem);
  };

  return (
    <div>
      <h1>Firestore CRUD App </h1>
      <h2>Item List</h2>
      <ItemList editItem={editItem} />
      <h2>Add Item</h2>
      {editing ? <UpdateItem setEditing={setEditing} currentItem={currentItem} updateItem={updateItem} /> : <AddItemForm />}
    </div>
  )
}
itemlist.jsx
// components/itemlist.jsx

import React, { useState, useEffect } from "react"
import firebase from "./firebase"
import "../styles/global.css"


const useItems = () => {
    const [items, setItems] = useState([]);

    useEffect(() => {
        const unsubscribe = firebase
        firebase
          .firestore()
          .collection("items")
          .onSnapshot(snapshot => {
            const data = []
            snapshot.forEach(d => data.push({ // snapshot.doc.mapではだめだった
                id: d.id,
                ...d.data(),
              }));
              console.log('◆data19行目 ', data);
              setItems(data)
          });
        return () => unsubscribe();
    }, []);

    console.log('■items25行目 ', items);
    return items;
};

const deleteItem = (id) => {
    firebase
      .firestore()
      .collection("items")
      .doc(id)
      .delete()
}


const ItemList = ({editItem}) => {

    /* useItem() API を listItem変数に格納 */
    const listItem = useItems()
    console.log('■listItem32行目 ', listItem);
    return (

        <table className="tg">
            <tbody>
            <tr>
                <th>名称</th>
                <th>タイプ</th>
                <th>数</th>
                <th>備考</th>
                <th></th>
            </tr>
            </tbody>

            {listItem.map(item => (
            <tbody key={item.id}>
            <tr>
                <td>{item.name}</td>
                <td>{item.type}</td>
                <td>{item.qty}</td>
                <td>{item.description}</td>
                <td>
                    <button onClick={() => editItem(item)}>Edit</button>
                    <button onClick={() => deleteItem(item.id)}>Delete</button>
                </td>
            </tr>
            </tbody>
            ))}

        </table>
    )

}

export default ItemList
additemform.jsx
// components/additemform.jsx

import React, { useState } from "react"
import firebase from "firebase"

const AddItemForm = () => {

    const [name, setName] = useState("")
    const [type, setType] = useState("")
    const [qty, setQty] = useState(null)
    const [description, setDescription] = useState("")

const onSubmit = e => { // eはevent
    /*
    preventDefaultでページがリロードされるのを防ぐ
    */
    e.preventDefault()
    firebase
        .firestore()
        .collection("items")
        .add({
            name,
            type,
            qty,
            description,
        })
        //.then でフォームクリア
        .then(() => setName(""), setType(""), setQty(''), setDescription(""))
}

    return (
      <form onSubmit={onSubmit}>
        <input placeholder="Name"
          value={name}
          name="name"
          /*  e.currentTarget.value にインプットされた値が入る */
          onChange={e => setName(e.currentTarget.value)}
          type="text"
        />
        <input placeholder="Type"
          value={type}
          name="type"
          onChange={e => setType(e.currentTarget.value)}
          type="text"
        />
        <input placeholder="Qty"
          value={qty}
          name="qty"
          onChange={e => setQty(e.currentTarget.value)}
          type="number"
        />
        <input placeholder="Description"
          value={description}
          name="description"
          onChange={e => setDescription(e.currentTarget.value)}
          type="text"
        />
        <button>Submit</button>
      </form>
    )

 }
export default AddItemForm
updateitem.jsx
// components/updateitem.jsx

import React, { useState, useEffect } from "react";

const UpdateItem = ({setEditing, currentItem, updateItem }) => {

    const [item, setItem] = useState(currentItem);

    useEffect(() => {
        setItem(currentItem);
        console.log("useEffectが渡したcurrentItem: ", currentItem);
    }, [currentItem]);

    const onSubmit = e => {
        e.preventDefault();
        console.log("onSubmitで渡されたidとitems", { item });
       // updateItem({ currentItem }, item);
    };


    const onChange = e => {
        const { name, value } = e.target;
        setItem({ ...item, [name]: value });
    };


    return (
        <>
        <h2>Update Item</h2>
        <form onSubmit={onSubmit}>
            <label htmlFor="Update Item">Update Item:</label>
            <input type="text" name="name" value={item.name} onChange={onChange} />
            <input type="text" name="type" value={item.type} onChange={onChange} />
            <input type="number" name="qty" value={item.qty} onChange={onChange} />
            <input type="text" name="description" value={item.description} onChange={onChange} />
            <button>Update</button>
            <button onClick={()=>setEditing(false)}>Cancel</button>
        </form>
        </>
    )
}
export default UpdateItem
global.css
// styles/global.css


.tg {
  border-collapse: collapse;
  border-spacing: 0;
  border-color: #000000;
}
.tg td {
  font-family: Arial, sans-serif;
  font-size: 14px;
  padding: 10px 5px;
  border-style: solid;
  border-width: 1px;
  overflow: hidden;
  word-break: normal;
  border-color: #000000;
  color: #333;
  background-color: #fff;
}
.tg th {
  font-family: Arial, sans-serif;
  font-size: 14px;
  font-weight: normal;
  padding: 10px 5px;
  border-style: solid;
  border-width: 1px;
  overflow: hidden;
  word-break: normal;
  border-color: #000000;
  color: #333;
  background-color: #f0f0f0;
}
参考:
Build a CRUD Firestore App in React/Gatsby with Hooks
ステートフックの利用法
副作用フックの利用法


- 投稿日:2020-05-14T11:29:03+09:00
React Hooks: 子コンポーネントから親の状態をレンダー時に変えたら叱られた ー Warning: Cannot update a component while rendering a different component
ネストした子コンポーネントから親の状態を変えるReactアプリケーションで、少し試行錯誤したことを書きとめます。経緯の説明からはじめますので、タイトルの警告(Warning)の意味が知りたいという方は最後の「レンダーが済んでから親の状態を変える」をお読みください。
配列データから動的にドロップダウンメニューとコンポーネントをつくる
サンプルとしてつぎのコードで、ドロップダウンメニューと子のコンポーネントをつくります。同じ配列データ(
selections)を用いて、それぞれ動的にテンプレートを組み立てました。3つのコンポーネントはメニューで切り替わり、表示されるのはつねにひとつだけです。src/App.jsimport React, { useState } from 'react'; function App() { const selections = [ {name: 'Home', component: Home}, {name: 'Products', component: Products}, {name: 'About', component: About}, ]; const [selection, setSelection] = useState(selections[0].name); return ( <div className="App"> <h1>Selection</h1> <div> <select onChange={(event) => setSelection(event.target.value)}> {selections.map((selection, id) => ( <option key={id}>{selection.name}</option> ))} </select> <div> {selections.map((_selection, id) => { const Component = _selection.component; return ( _selection.name === selection ? <Component name={_selection.name} key={id} /> : null ); })} </div> </div> </div> ); } const Home = ({ name }) => (<h2>{name}</h2>); const Products = ({ name }) => (<h2>{name}</h2>); const About = ({ name }) => (<h2>{name}</h2>); export default App;ひとつポイントとなるのは、以下に抜き書きした子コンポーネントのテンプレートをつくるコードです。配列からデータ(
_selection)を取り出して、前述のとおりメニューの選択(selection)と一致するコンポーネントを表示しました。このとき、コンポーネントをオブジェクトのドット参照(
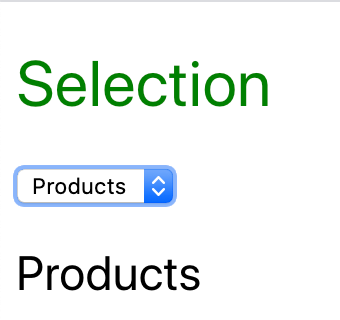
_selection.component)で定めるのは適切ではありません。クラスと同じアッパーキャメルケースが推奨されているからです(「[翻訳] Airbnb React/JSX Style Guide」「命名規則」参照)。そのため一旦変数(Component)に取り出しました。src/App.js{selections.map((_selection, id) => { const Component = _selection.component; return ( _selection.name === selection ? <Component name={_selection.name} key={id} /> : null ); })}これで、プルダウンメニューによりコンポーネントが切り替えられるようになりました(図001)。
図001■プルダウンメニューでコンポーネントが切り替わる
コンポーネントのテキストカラーを変える
プルダウンメニューでコンポーネントを切り替えたとき、ルートコンポーネント(
App)のテキスト(<h1>要素)の色を変えます。この簡単なサンプルでは、メニューを選んだイベント(onChange)でそのカラー値を変数(color)にとり、テキストカラーに反映させればよいでしょう。src/App.jsfunction App() { const selections = [ {name: 'Home', component: Home, color: 'blue'}, {name: 'Products', component: Products, color: 'green'}, {name: 'About', component: About, color: 'red'}, ]; const [color, setColor] = useState(selections[0].color); return ( <div className="App"> {/* <h1>Selection</h1> */} <h1 style={{color: color}}>Selection</h1> <div> {/* <select onChange={(event) => setSelection(event.target.value)}> */} <select onChange={(event) => { const name = event.target.value; setSelection(name); setColor(selections.find((_selection) => _selection.name === name).color); }}> </select> </div> </div> ); }これでメニューを選ぶと、コンポーネントだけでなく、テキストの色も変わります(図002)。
図002■メニューを選ぶとテキストの色が変わる
子コンポーネントから親の状態を変える
子コンポーネントの切り替えが、メニュー以外からも行われるとしたらどうでしょう。たとえば、子コンポーネントの中に他のコンポーネントに移動するボタンがあるような場合です。それでも、ボタンクリックしたときの切り替え処理そのものは、親が一手に握るという対応が考えられます(多くの場合そうでしょう)。
ところが、本稿を書くきっかけとなったアプリケーションでは、子コンポーネントがルーターで遷移しました。つまり、ブラウザのナビゲーション(たとえば戻るボタン)でも、コンポーネントが切り替わってしまうのです。そこで、子コンポーネントの側から、自分が表示されたことを親に伝えようと考えたわけです。
つぎのように、子コンポーネントにそれぞれのカラー値と親の状態設定関数(
setColor)を渡し、子の関数本体で設定をさせます。これで一応、コンポーネントの切り替えに応じて、親のテキストカラーが変わるようにはなりました。src/App.jsfunction App() { return ( <div className="App"> <div> {/* <select onChange={(event) => { }}> */} <select onChange={(event) => setSelection(event.target.value)}> {selections.map((selection, id) => ( <option key={id}>{selection.name}</option> ))} </select> <div> {selections.map((_selection, id) => { const Component = _selection.component; return ( _selection.name === selection ? // <Component name={_selection.name} key={id} /> : <Component color={_selection.color} setColor={setColor} /> : null ); })} </div> </div> </div> ); } // const Home = ({ name }) => (<h2>{name}</h2>); const Home = ({ name, color, setColor }) => { setColor(color); return (<h2>{name}</h2>) }; // const Products = ({ name }) => (<h2>{name}</h2>); const Products = ({ name, color, setColor }) => { setColor(color); return (<h2>{name}</h2>) }; // const About = ({ name }) => (<h2>{name}</h2>); const About = ({ name, color, setColor }) => { setColor(color); return (<h2>{name}</h2>) };レンダーが済んでから親の状態を変える
メニューの切り替えを試してみると、ブラウザコンソールにはたとえばつぎのような警告が示されます。どうも、子コンポーネントから親の状態設定関数を呼び出すことが叱られているようです。
Warning: Cannot update a component (
App) while rendering a different component (Products). To locate the bad setState() call insideProducts, follow the stack trace as described in https://fb.me/setstate-in-renderReactコンポーネントは、他のコンポーネントがレンダー中は副作用、つまりその状態を変えることが許されないのです。「React v16.13.0」の「Warnings for some updates during render」にはつぎのように説明されています(訳: 筆者)。
It is supported to call
setStateduring render, but only for the same component. If you callsetStateduring a render on a different component, you will now see a warning:レンダー中に状態設定関数(
setState)を呼び出すことがサポートされるのは、そのコンポーネント自身へのものにかぎられます。他のコンポーネントの状態設定関数を、そのコンポーネントがレンダーされているときに呼び出せば、つぎのような警告が示されるでしょう。Warning: Cannot update a component from inside the function body of a different component.ではどうするかというと、レンダーが済んでから状態設定関数を呼び出せばよいのです。解説はつぎのように続きます。
This warning will help you find application bugs caused by unintentional state changes. In the rare case that you intentionally want to change the state of another component as a result of rendering, you can wrap the
setStatecall intouseEffect.この警告により、意図しない状態変更から生じるアプリケーションのバグが見つけやすくなります。あえて他のコンポーネントの状態を変えて、そのレンダー結果に反映したいというまれな場合は、状態設定関数の呼び出しを
useEffectでラップしてください。あえて親の状態変更をレンダーに反映させたい今回の「まれな場合」は、つぎのように子コンポーネントから
useEffect()の副作用関数(第1引数)で親の状態を変えればよいということです。src/App.js// import React, { useState } from 'react'; import React, { useState, useEffect } from 'react'; const Home = ({ name, color, setColor }) => { // setColor(color); useEffect( () => setColor(color), [color, setColor] ); return (<h2>{name}</h2>) }; const Products = ({ name, color, setColor }) => { // setColor(color); useEffect( () => setColor(color), [color, setColor] ); return (<h2>{name}</h2>) }; const About = ({ name, color, setColor }) => { // setColor(color); useEffect( () => setColor(color), [color, setColor] ); return (<h2>{name}</h2>) };モジュール
react:src/App.jsの記述全体を、つぎのコード001にまとめます。併せて、実際のサンプルReactアプリケーションをCodeSandboxに公開しました。コード001■子コンポーネントから親の状態を変える
src/App.jsimport React, { useState, useEffect } from 'react'; function App() { const selections = [ {name: 'Home', component: Home, color: 'blue'}, {name: 'Products', component: Products, color: 'green'}, {name: 'About', component: About, color: 'red'}, ]; const [selection, setSelection] = useState(selections[0].name); const [color, setColor] = useState(selections[0].color); return ( <div className="App"> <h1 style={{color: color}}>Selection</h1> <div> <select onChange={(event) => setSelection(event.target.value)}> {selections.map((selection, id) => ( <option key={id}>{selection.name}</option> ))} </select> <div> {selections.map((_selection, id) => { const Component = _selection.component; return ( _selection.name === selection ? <Component name={_selection.name} key={id} color={_selection.color} setColor={setColor} /> : null ); })} </div> </div> </div> ); } const Home = ({ name, color, setColor }) =>{ useEffect( () => setColor(color), [color, setColor] ); return (<h2>{name}</h2>) }; const Products = ({ name, color, setColor }) =>{ useEffect( () => setColor(color), [color, setColor] ); return (<h2>{name}</h2>) }; const About = ({ name, color, setColor }) =>{ useEffect( () => setColor(color), [color, setColor] ); return (<h2>{name}</h2>) }; export default App;

- 投稿日:2020-05-14T11:05:56+09:00
【超初心者向け】github-pagesで公開したSPAサイト、アプリの更新方法
はじめに
この記事はReactで制作したSPAサイトをgithub-pagesに初めて公開した超初心者向けの記事になっています。
github-pagesの公開までは、React公式のこちらの手順通りに進めていけば出来ます。
問題は、公開後です。いざ公開したら修正箇所が見つかることはよくあると思います。というより、そういうことだらけです。そんな時に慌てて修正しても更新方法がわかっていなければどうしようもありません。
公開までは丁寧に解説する記事があっても、更新する方法の記事が全然載っていなかったのでここに記します。
更新する
結論から先に言うと、
npm run deployこれでOKです。
エディタ上で修正して、保存したら、公開時最後に行ったnpmコマンドを再度実行することで公開したサイトも更新されます。
こんな単純なことなので、誰も記事にしないわけですね。
※ 私がここでつまった言い訳として、github-pagesでのサイト公開前にFirebase Hostingを用いてアプリを公開・更新していたので、頭の中でごちゃまぜになった結果長時間悩むことになりました。ちなみにReactとFirebase Hostingでの更新は、
npm run buildの後に、
firebase deployです。
このbuild、deployのコマンド実行場所を各サービスで使い分けることを意識しておかないと私のように時間を浪費してしまうので要注意です。
少し時間をおく
更新方法は上記方法で大丈夫なはずですが、それでも更新されない時があるかもしれません。そんな時に一番シンプルな方法は少し時間をおくことです。
更新しても反映までに時間がかかることがあるので、10分程度何も触らずに待ってからもう一度公開されたサイトのリンクへ飛んでみてください。意外とこれで解決することもあります。
修正箇所がある場合、たいてい急いで更新が反映されるのを確認したくなりがちで、上手く反映されていないとまた修正してすぐに確認してと負のループに陥ることがあります。その結果、本当は最初の修正で上手くいっていたのに、無駄に時間を使ってしまうことになりかねないです。なので、待ちましょう。
ただし、もし30分以上待ったのに何も更新されていない場合、それはgithub側の問題ではなくあなた自身の問題(記述ミス、コマンドミス、修正箇所の誤り)の可能性が高いです。今一度コードを見直しましょう。
終わりに
はじめにで言った通り、超初心者向けの解決策です。ですが、初心者は本当に単純な見落としでつまづいて、時間を浪費してしまうものなのです。そう言った人達と自分のために、この記事を残します。少しでも役に立てたなら幸いです。
- 投稿日:2020-05-14T10:14:33+09:00
React+Firebase Storageでファイルをドラッグしてアップロードする
概要
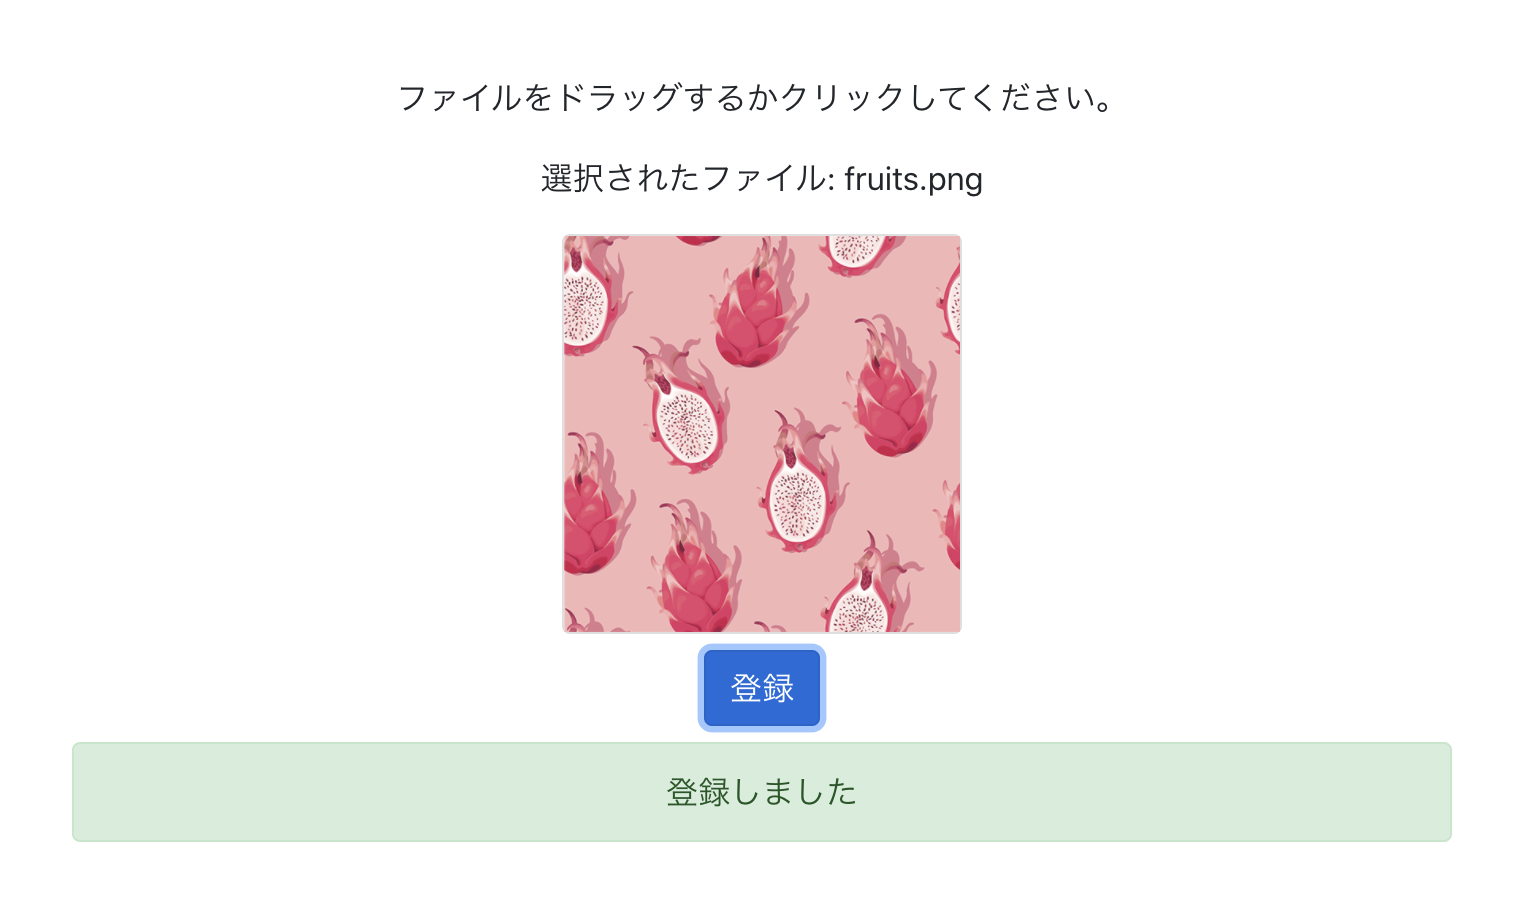
Reactで以下の内容を実装するサンプルです。ファイルは画像を前提にしています。
1.ファイルをドラッグするとファイルをプレビュー
2.登録ボタンを押すとstorageにアップロードし、最後にDB書き込みインストール
ファイルをドラッグしてファイル情報を取得するコンポーネントは
react-dropzoneを使います。
- react-dropzone
- https://react-dropzone.js.org/
firebaseもインストールします。
npm i -S react-dropzone
npm i -S firebase
オプショナルですがbootstrapを入れておきます
npm i -S bootstrapドラッグでファイル情報を取得する
まず、ファイルをドラッグしたらファイル情報を取得するところを実装します。
onDropはドラッグしたときに呼ばれる関数で、callbackを利用しています。import React, { useState, useCallback } from 'react'; import { useDropzone } from 'react-dropzone'; import 'bootstrap/dist/css/bootstrap.min.css'; function App() { const [uploadfile, setUploadfile] = useState(); const maxSize = 3 * 1024 * 1024; //dropzone const onDrop = useCallback((acceptedFiles) => { if (acceptedFiles.length > 0) { setUploadfile(acceptedFiles[0]); } }, []); //initialize const { acceptedFiles, getRootProps, getInputProps, isDragActive, isDragReject, fileRejections } = useDropzone({ onDrop, accept: 'image/png, image/jpeg, image/gif, image/jpg', minSize: 1, maxSize, }); return ( <div className="container m-5 text-center"> <div {...getRootProps()}> <input {...getInputProps()} /> <p>ファイルをドラッグするかクリックしてください。</p> {uploadfile ? <p>選択されたファイル: {uploadfile.name}</p> : null} </div> </div> ); } export default App;ファイルがドラッグされるとコールバックでonDropが呼ばれ、acceptedFielsのなかに、ファイル情報が入ってきます。
これをuploadfileというステートに入れてファイル情報を画面に表示しています。実行すると、以下のように選択されたファイルが表示されます。
条件に一致しないファイルをエラーにする
initializeのところで、
maxSizeとacceptを指定しています。
maxSizeはドロップできる最大サイズ、acceptはファイルタイプを指定しています。
これを指定することで自動的にファイルをリジェクトしてくれます。ドラッグすると、ファイルタイプが一致しない場合は
isDragRejectがtrue、ファイルサイズではねられるものはfileRejectionsにエラー情報が入ってきます。
isDragRejectはドラッグ中のみ取得できます。<div className="container m-5 text-center"> <div {...getRootProps()}> <input {...getInputProps()} /> <p>ファイルをドラッグするかクリックしてください。</p> {uploadfile ? <p>選択されたファイル: {uploadfile.name}</p> : null} {isDragReject ? <div className="alert alert-danger" role="alert">ファイルタイプが一致しません</div> : null} {fileRejections.length > 0 ? <div className="alert alert-danger" role="alert"> {fileRejections[0].errors[0].message} </div> : null} </div> </div>
fireRejectionsに入っているerrorsがエラー情報です。codeとmessageが英語で入っているので、実際の実装時にはcodeをみてメッセージを表示すると良いと思います。
ドラッグした時にプレビュー表示する
次にプレビュー表示します。
画像を表示するためにファイル情報をURL形式にし、state(fileUrl)に設定します。stateの設定とonDrop を次ように変更します。
    const [fileUrl, setFileUrl] = useState();

//省略

    const onDrop = useCallback((acceptedFiles) => {

        if (acceptedFiles.length > 0) {
            const src = URL.createObjectURL(acceptedFiles[0]);
            setFileUrl(src);
            setUploadFile(acceptedFiles[0]);
        }

    }, []);
取得した画像を表示する部分です
        <div className="container m-5 text-center">
            <div {...getRootProps()}>
                <input {...getInputProps()} />
                <p>ファイルをドラッグするかクリックしてください。</p>
                {uploadfile ? <p>選択されたファイル: {uploadfile.name}</p> : null}
                {isDragReject ? <div className="alert alert-danger" role="alert">ファイルタイプが一致しません</div> : null}
                {fileRejections.length > 0 ? <div className="alert alert-danger" role="alert">
                    {fileRejections[0].errors[0].message}
                </div> : null}
+               <div className="card mt-2" style={{ margin: 'auto', width: '200px', height: '200px' }} >
+                   <img src={fileUrl} width="100%" />
+               </div>
            </div>
        </div>
実行したところです。
storageにアップロードしてDBに書き込む
次にstroageにアップロードして、参照用のdownloadUrlを取得してDBに書きこみます。
firebase用の設定は割愛します。
作成したfirebaseの設定をimportで予めimportしておきます。登録部分を実装します。
//省略
import firebase from './firebase'; //firebaseの設定

function App() {

//省略

    const [message, setMessage] = useState();

    //submit
    const upload = async () => {

        //fire upload
        let url = "";
        if (uploadfile.name) {
            const storageref = firebase.storage().ref('sample/' + uploadfile.name);
            const snapshot = await storageref.put(uploadfile);
            url = await snapshot.ref.getDownloadURL();
        }

        //db updated
        if (url) {
            await firebase.firestore().collection('sample').doc().set({
                filename: uploadfile.name,
                fileUrl: url,
            });

            setMessage('登録しました');
        }
    }
先にstorageにアップし、アップした時にgetDownloadUrlで参照用のstorageのURLを取得します。
それをfirestoreに登録しています。登録ボタンと登録後のメッセージ表示の部分です。
        <div className="container m-5 text-center">
            <div {...getRootProps()}>
                <input {...getInputProps()} />
                <p>ファイルをドラッグするかクリックしてください。</p>
                {uploadfile ? <p>選択されたファイル: {uploadfile.name}</p> : null}
                {isDragReject ? <div className="alert alert-danger" role="alert">ファイルタイプが一致しません</div> : null}
                {fileRejections.length > 0 ? <div className="alert alert-danger" role="alert">
                    {fileRejections[0].errors[0].message}
                </div> : null}

                <div className="card mt-2" style={{ margin: 'auto', width: '200px', height: '200px' }} >
                    <img src={fileUrl} width="100%" />
                </div>
            </div>
+            <button type="button" className="btn btn-primary mt-2" onClick={upload}>登録</button>
+            {message ? <div className="alert alert-success mt-2" role="alert">{message}</div> : null}
        </div>
実行してみた画面です。
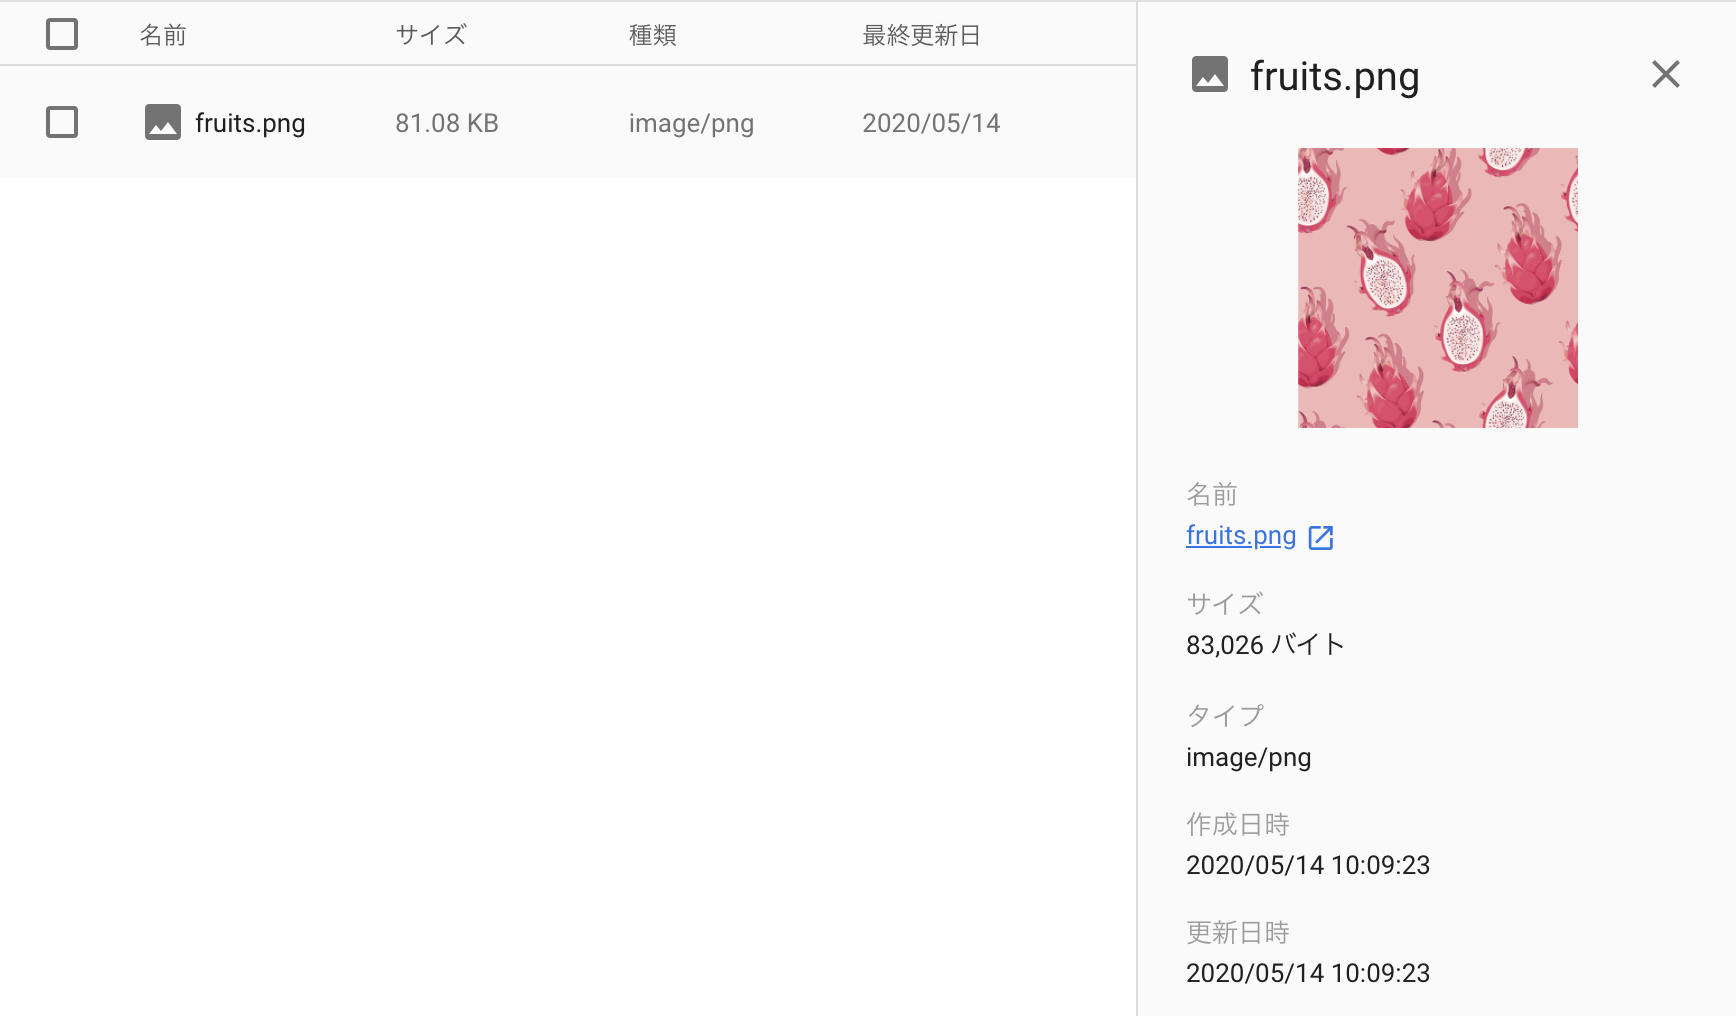
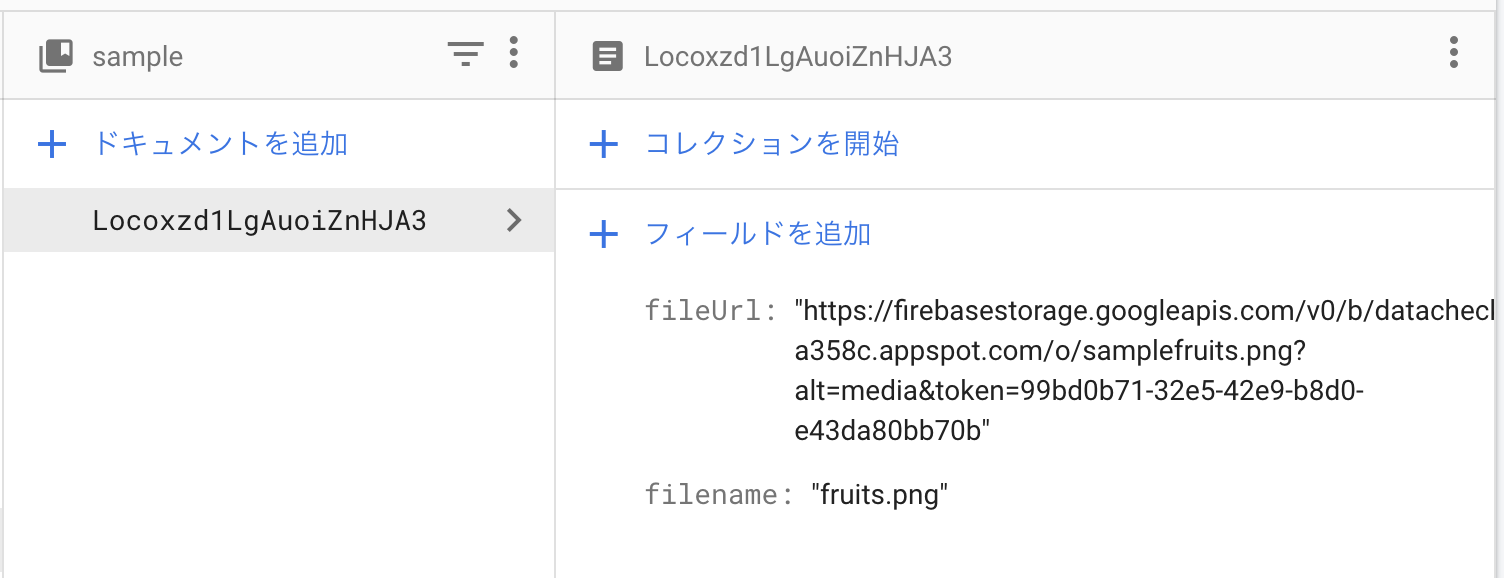
storageにもfirestoreにも書き込まれています。
storage
firestore
以上です。


- 投稿日:2020-05-14T09:37:47+09:00
react-navigationのページ遷移先でパラメーターを取得できない問題
サマリー
- FW
- React Native
- パッケージ
- react-navigation v5
- 問題
- ページ遷移先にパラメーターを渡しているのに、遷移先のページでパラメーターを取得しようとするとエラーがおきる
- 原因
- react-navigationのバージョンによってパラメーターの取得方法が異なり、使用しているバージョンとは違うやり方をしていたこと。
ネットだとバージョン4系に対応した書き方が沢山出てくるかと思いますが、最新は5系になりますので書き方が違います。
もし、”undefined"だったり、"...is not a function"みたいなエラーが出ていたら、バージョンにあった書き方をしているかどうか確認してみてください!
以下より詳細に解説していきます。コード
問題のコード
パラメーターの取得方法がネットでは2種類のやり方がありましたが、両方ダメでした。
IndexScreen.js// 遷移元(これは問題ない) // navigate()の第2引数に、渡したいパラメーターをセットしている <Button title="詳細を見る" onPress={() => this.props.navigation.navigate('DetailScreen', { id: 'hogehoge' }) />DetailScreen.js// 遷移先(問題あり) // 渡されたパラメーターを取得しようとしているがエラーが出る // エラーがでる取得方法1 <Text> {this.props.navigation.getParam('id')} </Text> // エラー文 => "TypeError: this.props.navigation.getParam is not a function..." // エラーがでる取得方法2 <Text> {this.props.navigation.state.params.id} </Text> // エラー文 => "Cannot read property params of undefined"成功したコード
DetailScreen.js// 遷移先 // パラメーターの取得に成功した方法 <Text> {this.props.route.params.id} </Text>まとめ
- 初歩的なエラーが出たら、バージョンに合った書き方ができてない可能性アリ
- 4系と5系では取得する書き方違うよ!
- てかドキュメントに書いてあったわ...公式のドキュメントちゃんと読みます?
参考ページ
Stack Overflow
https://stackoverflow.com/questions/61126610/typeerror-this-props-navigation-getparam-is-not-a-function-while-passing-parameReact Navigation 公式ドキュメント
https://reactnavigation.org/docs/params
- 投稿日:2020-05-14T02:26:12+09:00
React + TypeScript の boilerplate を作って環境構築周りを学ぶ
最近、環境構築周りを見直す機会が多く、また、曖昧な知識だった箇所が多かったため、この機会に boilerplate を作成しながら設定周りを学習してみようと思いました。
作成した boilerplate は、React + TypeScript で SPA を実装する想定で、 webpack + babel + tsc の構成です。
また、テストは Jest + Enzyme、 storybook を用いた最低限必要そうな環境を用意しています。
サンプルコードの実装は、その後の実装にバイアスがかかってしまいそうなので行っていません。構築中に学んだ内容の解説も出来たらなと思います。
※そんなん知ってる、コードを見せてって方は、以下にリポジトリへのリンクがあるのでそちらから覗いてみて下さい。
作成した boilerplate は こちら です。
使用しているツール
- React
- TypeScript
- webpack
- Babel
- Styled-Components
- ESLint
- stylelint
- Jest
- Enzyme
- Prettier
- StoryBook
- husky
- lint-staged
- fixpack
- yarn
以下、各種設定ファイルの必要なものに関して、学んだ事・今回使用した設定の解説を行っていきます。
React,TypeScriptは既に追加している前提で記述していきます。Babel を学ぶ
本 boilerplate では、 Babel を用いて TypeScript から JavaScript へのトランスパイルを行うため、そのための設定を行います。
使うものをインストールする
本 boilerpalte では、以下の package をインストールしています。
$ yarn add -D @babel/core babel-loader @babel/preset-env @babel/preset-react @babel/preset-typescript
$ yarn add core-js // core-js@3
※
core-jsは最近色々ありましたが、今回は触れないでおきます。。Babel とは、 JavaScript Compiler です。
Babel 自体は、@babel/coreを install することで使用出来ます。
(Babel をコマンドで実行したい場合は、別途@babel/cliが必要になります。)
本 boilerplate では、 webpack を用いて Babel を実行したいため、babel-loaderを使用します。
@babel/preset-envは、各種設定を参照し、指定されたターゲットに向けた JavaScript を生成してくれる preset です。
@babel/preset-reactは、 jsx をサポートするための preset です。
@babel/preset-typescriptは、 Babel 単体で TypeScript を JavaScript にトランスパイルできるようにする preset です。Babel の設定ファイルを用意する
Babel の設定ファイルは、
.babelrcまたは、babel.config.jsというファイル名が使用されます。
公式が JavaScript として読み込むことを推奨していることと、 JavaScript であれば、コメントや lint の対象にできるなどの利点があるので、本 boilerplate では、babel.config.jsで記述しています。設定は、以下のようにしています。
babel.config.jsmodule.exports = { presets: [ [ '@babel/preset-env', { useBuiltIns: 'usage', // コードから必要な Polyfill のみを読み込んでくれる corejs: 3, // core-js のバージョンを指定する }, ], '@babel/preset-react', '@babel/preset-typescript', ], }browserslist を設定する
@babel/preset-envは、変換対象とするブラウザを指定するために、browserslistを参照します。
Babel の設定ファイルにbrowserslistの指定がある場合や、ignoreBrowserslistConfigのフラグが無い場合に、package.jsonや.browserslistrcが参照されます。
本 boilerplate では、 Babel 公式が推奨している.browserslistrcファイルでの指定をしています。
(browserslist 公式はpackage.jsonへの記述を推奨).browserslistrc> 0.25% not dead
> 0.25%は、ブラウザの世界シェアが 0.25% 以上を対象とすることを表しています。
not deadは、公式のサポートが2年間無いバージョンを除外することを表しています。デフォルト値は、
> 0.5%, last 2 versions, Firefox ESR, not deadです。指定した設定に該当するブラウザは、
$ npx browserslistで確認できます。tsc の設定
tsc は TyapeScript 純正のコンパイラです。
noEmitオプションを用いる事で型チェックのみを行うようにも使えます。本 boilerplate では Babel でコンパイルするため、 tsc は型チェックのために使用しています。
以下のように設定しています。tsconfig.json{ "compilerOptions": { "baseUrl": "./", "paths": { "@components/*": ["./src/components/*"], "@pages/*": ["./src/pages/*"], "@themes/*": ["./src/themes/*"], "@images/*": ["./static/images/*"] }, "target": "esnext", "moduleResolution": "node", "jsx": "react", "types": ["react", "node", "jest"], "typeRoots": ["./node_modules/@types", "./types"], "esModuleInterop": true, "experimentalDecorators": true, "forceConsistentCasingInFileNames": true, "noEmit": true, "noFallthroughCasesInSwitch": false, "noImplicitReturns": true, "noUnusedLocals": true, "noUnusedParameters": true, "strict": true } }
baseUrl: 相対パス指定時の基準となるパス
paths: TypeScript が path alias を解決してくれる(別途 webpack や eslint、Jest などでも解決してあげる必要がある)
target: どの動作環境向けにトランスパイルするかを指定するパラメータです。 target の値によってデフォルト値が変わるものがあります(module や lib)。特に lib は target に指定したバージョンのライブラリを暗黙的に指定してくれるので、 esnext としておけばとりあえず新しい es 構文を使えます。(libはコンパイルに含めるライブラリの指定ができるパラメータです。今回は tsc によるコンパイルは行いませんが、構文チェックなどにも影響するため、新しい ES構文を使う場合は相応の設定が必要になります)
moduleResolution: モジュールの解決方法が変わります
jsx: jsx のサポートのため(モードによって出力が変わったりしますが今回は割愛します)
esModuleInterop: CommonJS モジュールも default import を許可できるようにすることが出来るパラメータ(ヘルパー関数が挿入される) 。Babel, webpack では commonJS のdefault import を許可しているため有効にします
experimentalDecorators: デコレータサポートの有効
forceConsistentCasingInFileNames: ファイル名の大文字小文字を区別して参照を行うようにすることができます
noImplicitReturns: 関数内で全てのコードパスが値を返さない場合にエラーを吐いてくれるように設定できます
noUnusedLocals: 未使用のローカル変数があるとエラーを吐いてくれるように設定できます
noUnusedParameters: 未使用のパラメータがあるとエラーを吐いてくれるように設定できます
strict:--noImplicitAny,--noImplicitThis,--alwaysStrict,--strictBindCallApply,--strictNullChecks,--strictFunctionTypes,--strictPropertyInitializationを一括して有効に出来ます(個々の説明は割愛します)Lint の設定
Lint はソースコードの構文や品質を検査できるツールです。
本 boilerplate では、 TypeScript の検査に ESLint, style の検査に styleLint を用いています。ESLint
ESLint の設定は外だしして別のリポジトリで管理しています。
本 boilerplate では、このリポジトリをインストールして、随時必要な設定を上書きして使用する想定で作成しました。
@hey3/eslint-configは、 TypeScript と React 用の ESLint の設定をプラスしています。
(現状上記 eslint-config を使うにはeslint prettier typescript reactのインストールが必要です。 ※ pretter が必要な理由は、 ESLint と pretter を共存させるための設定を含んでいるためです。いずれうまく直したい。。)公式推奨(
eslint:recommendedなど)の設定でも良さそう使うものをインストールする
ESLint の設定を外だししているので、本 boilerplate では以下のものをインストールします。
$ yarn add -D eslint @hey3/eslint-config # prettier typescript reactESLint の設定ファイルを用意する
設定は
.eslintrc.jsに記述していきます。
外だしした設定をextendsで指定する事で使用することができます。
また、本 boilerplate では、path alias を使用するため、その設定をプロジェクト側で指定しています。.eslintrc.jsconst path = require('path') module.exports = { extends: ['@hey3/eslint-config'], settings: { 'import/resolver': { node: { extensions: ['.js', '.jsx', '.ts', '.tsx'], }, webpack: { config: path.join(__dirname, './webpack.config.js') }, }, }, }StyleLint
使うものをインストールする
$ yarn add -D stylelint stylelint-processor-styled-components \
stylelint-config-standard stylelint-config-styled-components stylelint-config-prettier
本 boilerplate では、
styled-componentsを採用しているため、プロセッサにstylelint-processor-styled-componentsを追加します。
また、既存の構成を拡張するためにstylelint-config-standard,stylelint-config-styled-components,stylelint-config-prettierを追加します。
stylelint-config-prettierは prettier との競合を防ぐために入れています。stylelint の設定ファイルを用意する
設定は
.stylelintrcに記述していきます。.stylelintrc{ "processors": ["stylelint-processor-styled-components"], "extends": [ "stylelint-config-standard", "stylelint-config-styled-components", "stylelint-config-prettier" ], "rules": { "no-descending-specificity": null, "value-keyword-case": ["lower", { "ignoreKeywords": ["dummyValue"] }] }, "syntax": "scss" }rules の
no-descending-specificityは、セレクタの詳細度が高いものを後に書かせるためのルールですが、 scss 構文を用いる場合に引っかかる場合があるので切っています。
value-keyword-caseに関しては、今回デフォルト CSS のリセットにstyled-resetを用いており、その際にエラーになるので記述しています。(特異なので後でどうにかしたい。。)Webpack の設定
使うものをインストールする
本 boilerplate では、以下の package をインストールしています。
$ yarn add -D webpack webpack-cli webpack-dev-server html-webpack-plugin dotenv-webpack設定ファイルは以下のように設定しています。
webpack.config.jsconst HtmlWebpackPlugin = require('html-webpack-plugin') const path = require('path') const webpack = require('webpack') const Dotenv = require('dotenv-webpack') const env = process.env.BUILD_MODE const defineEnv = new webpack.DefinePlugin({ 'process.env': { REACT_APP_ENV: JSON.stringify(process.env.REACT_APP_ENV), }, }) module.exports = { mode: env || 'development', entry: './src/main.tsx', output: { path: path.resolve(__dirname, './dist'), filename: 'build.js', }, module: { rules: [ { test: /\.(js|ts|tsx)$/, loader: 'babel-loader', exclude: /node_modules/, }, { test: /\.(png|jpg|gif|svg)$/, loader: 'file-loader', }, ], }, resolve: { alias: { '@components': path.resolve(__dirname, './src/components'), '@pages': path.resolve(__dirname, './src/pages'), '@themes': path.resolve(__dirname, './src/themes'), '@images': path.resolve(__dirname, './static/images'), }, extensions: ['.js', '.ts', '.tsx'], }, plugins: [ new HtmlWebpackPlugin({ template: './src/index.html', filename: 'index.html', }), defineEnv, new Dotenv({ path: `./src/envs/.env.${process.env.REACT_APP_ENV}`, }), ], devtool: env === 'production' ? false : 'inline-source-map', devServer: { contentBase: path.resolve(__dirname, 'dist'), historyApiFallback: true, }, }今回 webpack は
BUILD_MODEとREACT_APP_ENVの2つの環境変数を受け取って実行する想定で作成しています。
BUILD_MODEは、 production と development が入り、 主に mode の切り替えに用います。
REACT_APP_ENVは、 local, development, staging, production が入り、各実行環境毎の設定の切り替えの用途に用いる想定です。
webpack では、様々なことが行えるのですが、本 boilerplate では、ある程度の設定のみで最小の構成で作成しています。テストライブラリの設定
本 boilerplate では、 Jest + Enzyme でのテスト環境を用意しました。
使うものをインストールする
$ yarn add -D jest @types/jest ts-jest \
enzyme @types/enzyme enzyme-adapter-react-16 @types/enzyme-adapter-react-16 \
react-test-renderer @types/react-test-renderer
今回は Jest + Enzyme の構成を採用しているので、それぞれで必要なものをインストールしています。
また、 snapshot test を行うためにreact-test-rendererもインストールしています。
enzyme-adapter-react-16は、 React と Enzyme を連携するために必要です。
今回は React v16 環境なのでenzyme-adapter-react-16を使います。設定ファイルを用意する
まず、 Enzyme と React を連携させるための設定ファイルを用意します。
今回はadapterの設定のみ記述しています。src/enzymeConfig.tsimport { configure } from 'enzyme' import Adapter from 'enzyme-adapter-react-16' configure({ adapter: new Adapter() })そして、 Jest の設定ファイルを
jest.config.jsに記述します。jest.config.jsmodule.exports = { clearMocks: true, coverageDirectory: 'coverage', moduleNameMapper: { '^@(components|pages|themes)/(.+)': '<rootDir>/src/$1/$2', '^@images/(.+)': '<orotDr>/static/images/$1', }, roots: ['<rootDir>/src'], setupFiles: ['<rootDir>/src/enzymeConfig.ts'], transform: { '^.+\\.jsx?$': 'babel-jest', '^.+\\.tsx?$': 'ts-jest', }, }
clearMocks: テスト間で自動的に mock をクリアするかどうかの設定です。毎回mockClear()しなくて済むようになります。
coverageDirectory: カバレッジ情報を出力するディレクトリを指定します。本 boilerplate では<root>/coverageに保存します。
moduleNameMapper: Jest で alias を使ったモジュール参照をするための設定です。tsconfigなどと同じ設定にします。
roots: Jest がテストファイルを探索するディレクトリを指定できます。
setupFiles: 各テスト前にテスト環境の構成やセットアップを設定するファイルを指定できます。今回はenzymeConfig.tsを設定しています。
transform: 正規表現で transformer へのパスマップを指定できます。 transformer は各ソースファイルを同期処理で変換するモジュールです。今回は Babel を使っていますが、babel-jest のみだと型チェックが出来ません。 Jest でも型チェックをしたいため ts-jest も用いています。テストのサンプル
リポジトリにコードは無いですが、簡単な実行確認した例を載せておきます。
src/components/Input/Input.test.tsxdescribe('Input', () => { // react component test it('should be type passed from props', () => { const props: React.ComponentProps<typeof Input> = { type: 'text', } const wrapper = mount( <ThemeProvider> <Input {...props} /> </ThemeProvider> ) expect(wrapper.getDOMNode().getAttribute('type')).toBe(props.type) }) // snapshot test it('renders correctly', () => { const props: React.ComponentProps<typeof Input> = { type: 'text', } const tree = renderer .create( <ThemeProvider> <Input {...props} /> </ThemeProvider> ) .toJSON() expect(tree).toMatchSnapshot() }) })storybook の設定
使うものをインストールする
$ yarn add -D @storybook/react @storybook/addons \
@storybook/addon-a11y @storybook/addon-actions @storybook/addon-knobs @storybook/addon-viewport \
@storybook/theming storybook-readme
@storybook/reactをインストールして設定ファイルを少し書けば、とりあえず React 環境でstorybookは使えます。
アドオンをいくつか追加することで開発に便利な機能が使えるので、本 boilerplate ではいくつかアドオンを入れています。
a11y: コンポーネントのWEBアクセシビリティのチェックを行ってくれます。
actions: storybook 上で UIアクションに対してログを吐いてくれます。onClickなどのイベントのシミュレートが出来るので便利です。
knobs: コンポーネントの props を動的に変更することが可能になります。 props により変化する UI の確認がしやすくなります。
viewports: storybook 上でデバイス毎の UI を確認できるようになります。レスポンシブデザインの確認などがやりやすくなります。
theming: storybook 自体のカスタマイズが可能になります。
readme: コンポーネントに README を追加出来るようになります。コンポーネントの仕様を書いたりするのに便利です。設定ファイルを用意する
storybook はデフォルトの構成として、 Babel, webpack が使用されています。
Babel に関しては、プロジェクトの.babelrcを読み込んでくれます。(babel.config.jsも急ぎで対応されています)
webpack に関しても、デフォルト設定を使うか独自の設定を使うかを選べます。
今回、プロジェクトでも webpack を使用しているので、その設定を.storybook/main.jsに記述して storybook でも利用できるようにします。.storybook/mainjsconst custom = require('../webpack.config.js') module.exports = { webpackFinal: (config) => { return { ...config, module: { ...config.module, rules: custom.module.rules }, resolve: custom.resolve, } }, }
webpackFinalを使うことでデフォルトの設定をカスタマイズすることができます。
今回は、プロジェクトの設定からmodule.rulesとresolveをデフォルトにマージしています。
利用時の状況により変更が必要になるかと思います。
.storybook/config.jsは以下のように設定しています。.storybook/config.jsimport React from 'react' import { configure, addDecorator, addParameters } from '@storybook/react' import { create } from '@storybook/theming' import { withA11y } from '@storybook/addon-a11y' import { withKnobs } from '@storybook/addon-knobs' import { addReadme } from 'storybook-readme' import { INITIAL_VIEWPORTS } from '@storybook/addon-viewport' import ThemeProvider from '../src/themes/ThemeProvider' const req = require.context('../src/components', true, /.stories.tsx$/) function loadStories() { req.keys().forEach((filename) => req(filename)) } addParameters({ options: { theme: create({ base: 'light', brandTitle: 'hey3 starter-for-react storybook', brandUrl: 'https://github.com/hey3/starter-for-react', }), }, }) addParameters({ viewport: { viewports: INITIAL_VIEWPORTS } }) addDecorator(withA11y) addDecorator(withKnobs) addDecorator(addReadme) addDecorator((Story) => ( <ThemeProvider> <Story /> </ThemeProvider> )) configure(loadStories, module)
loadStoriesで*.stories.tsxの読み込み、addParametes,addDecoraterで storybook のカスタマイズ(addon の適用やストーリーの wrap など)を行っています。addon の読み込みは、
.storybook/addons.jsに記述していきます。.storybook/addons.jsimport '@storybook/addon-a11y/register' import '@storybook/addon-actions/register' import '@storybook/addon-knobs/register' import '@storybook/addon-viewport/register' import 'storybook-readme/register'その他の設定
fixpack を使って package.json を整える
fixpackを使うことで、 package.json に規則性を持たせることが出来ます。
必須項目の設定や、項目がない場合に警告を表示することも出来ます。
設定ファイルは省略します。ThemeProvider の設定
本 boilerplate では、 Context にテーマを持たせています。
カラーテーマ、サイズテーマ、フレームテーマを持たせており、ダークモードの切り替えも用意しています。
コードはsrc/theme以下に記述しています。
この辺コードが怪しいので、直していきたい気持ちです。。
詳細は省略します。husky の設定
本 boilerplate では、
pre-commitにフックして以下の処理を行います。
主に対応するファイル毎に linter をかけています。"*.{ts,tsx,js}": [ "eslint --fix" ], "*.{ts,tsx,js,json}": [ "prettier --write" ], "*package.json": [ "fixpack" ]CircleCI の設定
本 boilerplate は、 CircleCI を用いて CI を回しています。
内容としては、基本的な内容の workflows を設定しました。
- node_modules の restore
- yarn install
- node_modules の save
を各 job の前処理として実行し、
- test job の実行
- master branch では、 prod 環境の build(deploy)
- master branch 以外では、 dev 環境の build(deploy)
を行うようにしています。
※deploy は job のみ用意し、 workflow には組み込んでいません最後に
長々と記述してきましたが、つらつらと設定内容を記述しているだけになってしまったような。。
まだ学習中なのもあり、踏み込んだ内容は記述できませんでしたが、今回やった事で大分基礎の知識がついたかなと思いました。ありがとうございます。
- 投稿日:2020-05-14T02:09:36+09:00
Next.jsをGitHub Pagesにデプロイしたらリンクが壊れた
背景
新しくなった Next.js のチュートリアル を完走し、せっかくだからと GitHub Pages にデプロイしてみたところ、ハイパーリンクや画像が正しく参照されなかった。
一般ユーザーの GitHub Pages の URL は
https://USER_NAME.github.io/PROJECT_NAME/の形式だが、 Next.js は原則としてルートからの絶対パスでリンクするため、例えばチュートリアルで作成するブログサイトにおける 1 つ目の記事はhttps://USER_NAME.github.io/posts/ssg-ssrにリンクされてしまう。注記
本記事は Next.js のチュートリアルのコードを前提としているが、筆者の趣味で TypeScript に置き換えられているので注意。JavaScript で書いても大差ないはず。
なお筆者は TypeScript も React もチュートリアルしか触ったことがない初学者なので、より良い方法や間違った使い方があれば教えてください!結論
公式な方法が見当たらないので、
/PROJECT_NAMEを環境変数に持たせて無理やり参照に追加した。必要な環境変数を設定する。今回はビルド時に
productionを指定したときだけ/PROJECT_NAMEがルートとなるようにした。next.config.jsmodule.exports = { assetPrefix: process.env.NODE_ENV === "production" ? "/PROJECT_NAME" : "", publicRuntimeConfig: { basePath: process.env.NODE_ENV === "production" ? "/PROJECT_NAME" : "", }, };
assetPrefixは生成される静的サイトのうち_nextディレクトリが置かれるパスを指定するもの1。
publicRuntimeConfigには任意の定数を設定できる。次に、文字列に
/PROJECT_NAMEを付与するモジュールを作成する。/lib/basepath.tsimport { format } from 'url'; import getConfig from 'next/config'; const { publicRuntimeConfig = {} } = getConfig() || {}; const { basePath } = publicRuntimeConfig; export default (path: string): string => format((basePath || "") + (path || ""));先ほどのモジュールを任意の名前2でインポートして、サイト内のパスを指定するすべての文字列を囲う。
ここではlayout.tsxの一部を例に示す。/components/layout.tsximport Head from 'next/head' import styles from './layout.module.css' import utilStyles from '../styles/utils.module.css' import Link from 'next/link' import B from '../lib/basepath'; ... <> <Link href={B("/")}> <a> <img src={B("/images/profile.jpg")} className={`${styles.headerImage} ${utilStyles.borderCircle}`} alt={name} /> </a> </Link> <h2 className={utilStyles.headingLg}> <Link href={B("/")}> <a className={utilStyles.colorInherit}>{name}</a> </Link> </h2> </> ...
index.tsxにある動的ルーティングはhrefではなくasの方を囲う。/pages/index.tsx... <Link href="/posts/[id]" as={B(`/posts/${id}`)}> <a>{title}</a> </Link> ...次に、 npm scripts を設定する。
package.json... "scripts": { "dev": "next dev", "build": "env NODE_ENV='production' next build", "start": "next start", "export": "next export" }, ...
buildに環境変数productionを設定し、静的サイトを生成するexportを追加。最後に以下を参照して
.github/workflows/gh-pages.ymlを追加し、GitHub のパブリックリポジトリに PUSH すれば良い。調べたこと
相対パスで参照する
チュートリアルの例では
layout.tsxなどのコンポーネントが参照をもつ場合、相対位置を予め決めることができず破綻する。Issue
類似の Issue がいくつか上がっているものの、現時点 (2020/5/14) で未解決。
どうやら結構難しいらしい。
Multi Zones
同じホスト上に別のパスで複数のアプリケーションをデプロイするための機能。
今回とは別な環境向けのような気がした。
先人たち
いずれも
next/linkのラッパーコンポーネントを作ってパスを修正する方法。
- Next.js app on Github Pages - ITNEXT
- Deploy your NextJS Application on a different base path (i.e. not root)
通常のリンクで使う
hrefと動的ルーティングで使うasの振り分けを実装する力がなかったのと、imgやlinkなどの参照を含むあらゆるタグのラッパーコンポーネントを用意するのが辛そうだったのでやめた。そのほか、外部リンクと内部リンクの振り分け、ないしタグの使い分けも必要になりそう。
本来は静的リソースを CDN に置くために使う ↩
HtmlSpecialChars の慣習に習って 1 文字にすれば許せる程度の手間かなと ↩