- 投稿日:2020-04-09T23:00:56+09:00
Pixabay APIでフリー画像を取得しLINE botで送信する
やること
Pixabay APIという、フリー素材の画像、イラスト、動画を提供しているAPIを利用して取得した画像をLINE botへ送信してみます。
LINE botからユーザに画像を送信する方法は次の記事にまとめました。
【LINE botから画像送信する方法】問いかけると柴犬の画像を返してくれるLINE botを作ってみた
できたもの
何かテキストを入力すると、ビーバーの画像を返してくれる。(本当は、テキストに応じた画像を出したかった...。)
アニマル画像botのようなLINE botできた! pic.twitter.com/pQBXfAgTRB
— まえぷー@出窓菜園 BWG (@kmaepu) April 9, 2020作ってみよう!
実際にPixabay APIを利用して画像を取得し、LINE botから画像を送信してみます。
手順は次の通り。
- Pixabayに登録し、アクセスキーを取得
- 試しにURLを作ってアクセスしてみる
- プログラムからアクセス(Node.js)
- LINE botに送信!
サーバサイドの処理はローカルPCで動かし、ngrokでトンネリングしています。
構成はこんな感じです。
1.Pixabayに登録し、アクセスキーを取得
登録方法はこちらのとおりに進めました。いきなりPixabayのサイトに行くと、「どこにAPIの説明があるんだ?」状態となります(~_~;)
2.試しにURLを作ってアクセスしてみる
Google chormを開いてURLを入力、実行!!画面いっぱいにJsonデータが表示されれば確認OKです。URLは次のフォーマットで入力します。APIキーが必要なので、その部分は入力が必要となっています。この例では、ビーバーの画像を検索しています。
https://pixabay.com/api/?key=APIキーを入れる&q=beaver
3.プログラムからアクセス(Node.js)
今回はローカルPC上でNode.jsのサーバーを実行し、Pixabayから画像を取得するようにしました。ここでは重要な処理だけ解説し、全ソースコードは最後に載せています。
LINE botで画像送信するために必要な情報は画像のURlです。この情報をPixabay APiで取得したjsonデータの中から抜き出します。次の2行で必要なデータをログに表示することができます。
console.log(response.data.hits[0].previewURL);
console.log(response.data.hits[0].userImageURL);
このログは次のように表示されます。このURLをブラウザに入力すると画像を確認することができます。
https://cdn.pixabay.com/photo/2020/03/19/02/22/beaver-4946032_150.jpg
https://cdn.pixabay.com/user/2020/03/14/23-23-43-766_250x250.jpg
4.LINE botに送信!
取得した画像のURLを次のファーマっとに当てはめれば完了です!
return client.replyMessage(event.replyToken, {
    type: 'image',
    originalContentUrl: 'オリジナルサイズの画像URL',
    previewImageUrl: 'LINEアプリのトーク画面にプレビューされるサイズの画像URL'
});
例では次のようになります。
return client.replyMessage(event.replyToken, {
    type: 'image',
    originalContentUrl: 'https://cdn.pixabay.com/user/2020/03/14/23-23-43-766_250x250.jpg',
    previewImageUrl: 'https://cdn.pixabay.com/photo/2020/03/19/02/22/beaver-4946032_150.jpg'
  });
おわりに
ビーバーの画像を出したいのに、カピバラがいたりする。Pixabayはユーザ投稿型なので、本来欲しい画像出なかったりするのはしょうがない気もする...。画像解析で対象物のマッチングするとフィルタリングできそう。
あと、Pixabayの404 Not Foundページはいいセンスしている
ソースコード
'use strict';

const express = require('express');
const line = require('@line/bot-sdk');
const axios = require('axios');
const PORT = process.env.PORT || 3000;

const config = {
  channelSecret: 'LINE botのチャンネルシークレット',
  channelAccessToken: 'LINE botのアクセストークン'
};

const app = express();

app.post('/webhook', line.middleware(config), (req, res) => {
    console.log(req.body.events);

    //ここのif文はdeveloper consoleの"接続確認"用なので後で削除して問題ないです。
    if(req.body.events[0].replyToken === '00000000000000000000000000000000' && req.body.events[1].replyToken === 'ffffffffffffffffffffffffffffffff'){
      res.send('Hello LINE BOT!(POST)');
      console.log('疎通確認用');
      return;
    }

    Promise
      .all(req.body.events.map(handleEvent))
      .then((result) => res.json(result));
});

const client = new line.Client(config);

async function handleEvent(event) {
  var url = 'https://pixabay.com/api/?key=PixabayのAPIキーを入力する&q=beaver&image_type=photo&category=animals';

  console.log('start');
  if (event.type !== 'message' || event.message.type !== 'text') {
    //console.log('errpr message');
    return Promise.resolve(null);
  }

  // LINE botからのリクエストで実行される処理を書く
  console.log("access to Pixabay");

  // Pixabayにアクセス
  const response = await axios.get(url);

  console.log(response.data.hits[0].previewURL);
  console.log(response.data.hits[0].userImageURL);

  return client.replyMessage(event.replyToken, {
    type: 'image',
    originalContentUrl: response.data.hits[3].userImageURL,
    previewImageUrl: response.data.hits[3].previewURL
  });
}

app.listen(PORT);
console.log(`Server running at ${PORT}`);


- 投稿日:2020-04-09T23:00:56+09:00
Pixabay APIでフリー素材の画像を取得しLINE botで送信する
やること
Pixabay APIという、フリー素材の画像、イラスト、動画を提供しているAPIを利用して取得した画像をLINE botへ送信してみます。
LINE botからユーザに画像を送信する方法は次の記事にまとめました。
【LINE botから画像送信する方法】問いかけると柴犬の画像を返してくれるLINE botを作ってみた
できたもの
何かテキストを入力すると、ビーバーの画像を返してくれる。(本当は、テキストに応じた画像を出したかった...。)
アニマル画像botのようなLINE botできた! pic.twitter.com/pQBXfAgTRB
— まえぷー@出窓菜園 BWG (@kmaepu) April 9, 2020作ってみよう!
実際にPixabay APIを利用して画像を取得し、LINE botから画像を送信してみます。
手順は次の通り。
- Pixabayに登録し、アクセスキーを取得
- 試しにURLを作ってアクセスしてみる
- プログラムからアクセス(Node.js)
- LINE botに送信!
サーバサイドの処理はローカルPCで動かし、ngrokでトンネリングしています。
構成はこんな感じです。
1.Pixabayに登録し、アクセスキーを取得
登録方法はこちらのとおりに進めました。いきなりPixabayのサイトに行くと、「どこにAPIの説明があるんだ?」状態となります(~_~;)
2.試しにURLを作ってアクセスしてみる
Google chormを開いてURLを入力、実行!!画面いっぱいにJsonデータが表示されれば確認OKです。URLは次のフォーマットで入力します。APIキーが必要なので、その部分は入力が必要となっています。この例では、ビーバーの画像を検索しています。
https://pixabay.com/api/?key=APIキーを入れる&q=beaver
3.プログラムからアクセス(Node.js)
今回はローカルPC上でNode.jsのサーバーを実行し、Pixabayから画像を取得するようにしました。ここでは重要な処理だけ解説し、全ソースコードは最後に載せています。
LINE botで画像送信するために必要な情報は画像のURlです。この情報をPixabay APiで取得したjsonデータの中から抜き出します。次の2行で必要なデータをログに表示することができます。
console.log(response.data.hits[0].previewURL);
console.log(response.data.hits[0].userImageURL);
このログは次のように表示されます。このURLをブラウザに入力すると画像を確認することができます。
https://cdn.pixabay.com/photo/2020/03/19/02/22/beaver-4946032_150.jpg
https://cdn.pixabay.com/user/2020/03/14/23-23-43-766_250x250.jpg
4.LINE botに送信!
取得した画像のURLを次のファーマっとに当てはめれば完了です!
return client.replyMessage(event.replyToken, {
    type: 'image',
    originalContentUrl: 'オリジナルサイズの画像URL',
    previewImageUrl: 'LINEアプリのトーク画面にプレビューされるサイズの画像URL'
});
例では次のようになります。
return client.replyMessage(event.replyToken, {
    type: 'image',
    originalContentUrl: 'https://cdn.pixabay.com/user/2020/03/14/23-23-43-766_250x250.jpg',
    previewImageUrl: 'https://cdn.pixabay.com/photo/2020/03/19/02/22/beaver-4946032_150.jpg'
  });
おわりに
ビーバーの画像を出したいのに、カピバラがいたりする。Pixabayはユーザ投稿型なので、本来欲しい画像出なかったりするのはしょうがない気もする...。画像解析で対象物のマッチングするとフィルタリングできそう。
あと、Pixabayの404 Not Foundページはいいセンスしている
ソースコード
'use strict';

const express = require('express');
const line = require('@line/bot-sdk');
const axios = require('axios');
const PORT = process.env.PORT || 3000;

const config = {
  channelSecret: 'LINE botのチャンネルシークレット',
  channelAccessToken: 'LINE botのアクセストークン'
};

const app = express();

app.post('/webhook', line.middleware(config), (req, res) => {
    console.log(req.body.events);

    //ここのif文はdeveloper consoleの"接続確認"用なので後で削除して問題ないです。
    if(req.body.events[0].replyToken === '00000000000000000000000000000000' && req.body.events[1].replyToken === 'ffffffffffffffffffffffffffffffff'){
      res.send('Hello LINE BOT!(POST)');
      console.log('疎通確認用');
      return;
    }

    Promise
      .all(req.body.events.map(handleEvent))
      .then((result) => res.json(result));
});

const client = new line.Client(config);

async function handleEvent(event) {
  var url = 'https://pixabay.com/api/?key=PixabayのAPIキーを入力する&q=beaver&image_type=photo&category=animals';

  console.log('start');
  if (event.type !== 'message' || event.message.type !== 'text') {
    //console.log('errpr message');
    return Promise.resolve(null);
  }

  // LINE botからのリクエストで実行される処理を書く
  console.log("access to Pixabay");

  // Pixabayにアクセス
  const response = await axios.get(url);

  console.log(response.data.hits[0].previewURL);
  console.log(response.data.hits[0].userImageURL);

  return client.replyMessage(event.replyToken, {
    type: 'image',
    originalContentUrl: response.data.hits[3].userImageURL,
    previewImageUrl: response.data.hits[3].previewURL
  });
}

app.listen(PORT);
console.log(`Server running at ${PORT}`);
- 投稿日:2020-04-09T20:07:38+09:00
[未完]在宅勤務中の家族との距離をうまくとるサイネージ
はじめに
こちらはProtoOutStudioというイケイケなスクールの「LINE Bot+IoTで表現してアウトプット」という課題で製作したものです。
obnizとLINEBotを組み合わせて何か作ろう!というものです。概要と作れなかったところ
新型コロナウィルスの生で在宅になったものの、仕事中の家族との距離が難しい。
特にうちは猫が3匹もいるので、ニャンコちゃん達が騒ぎ始めたら、どちらの部屋に引き取る?とか、ご飯何時ににする?などなど、いちいちメッセージを送らずに部屋越しに会話することがよくあるのですが、
実は今オンラインミーティング中!!!!みたいなことがあって気まずい思いをしたりして、何かトイレの空き情報みたいなサイネージが欲しくて作りました。
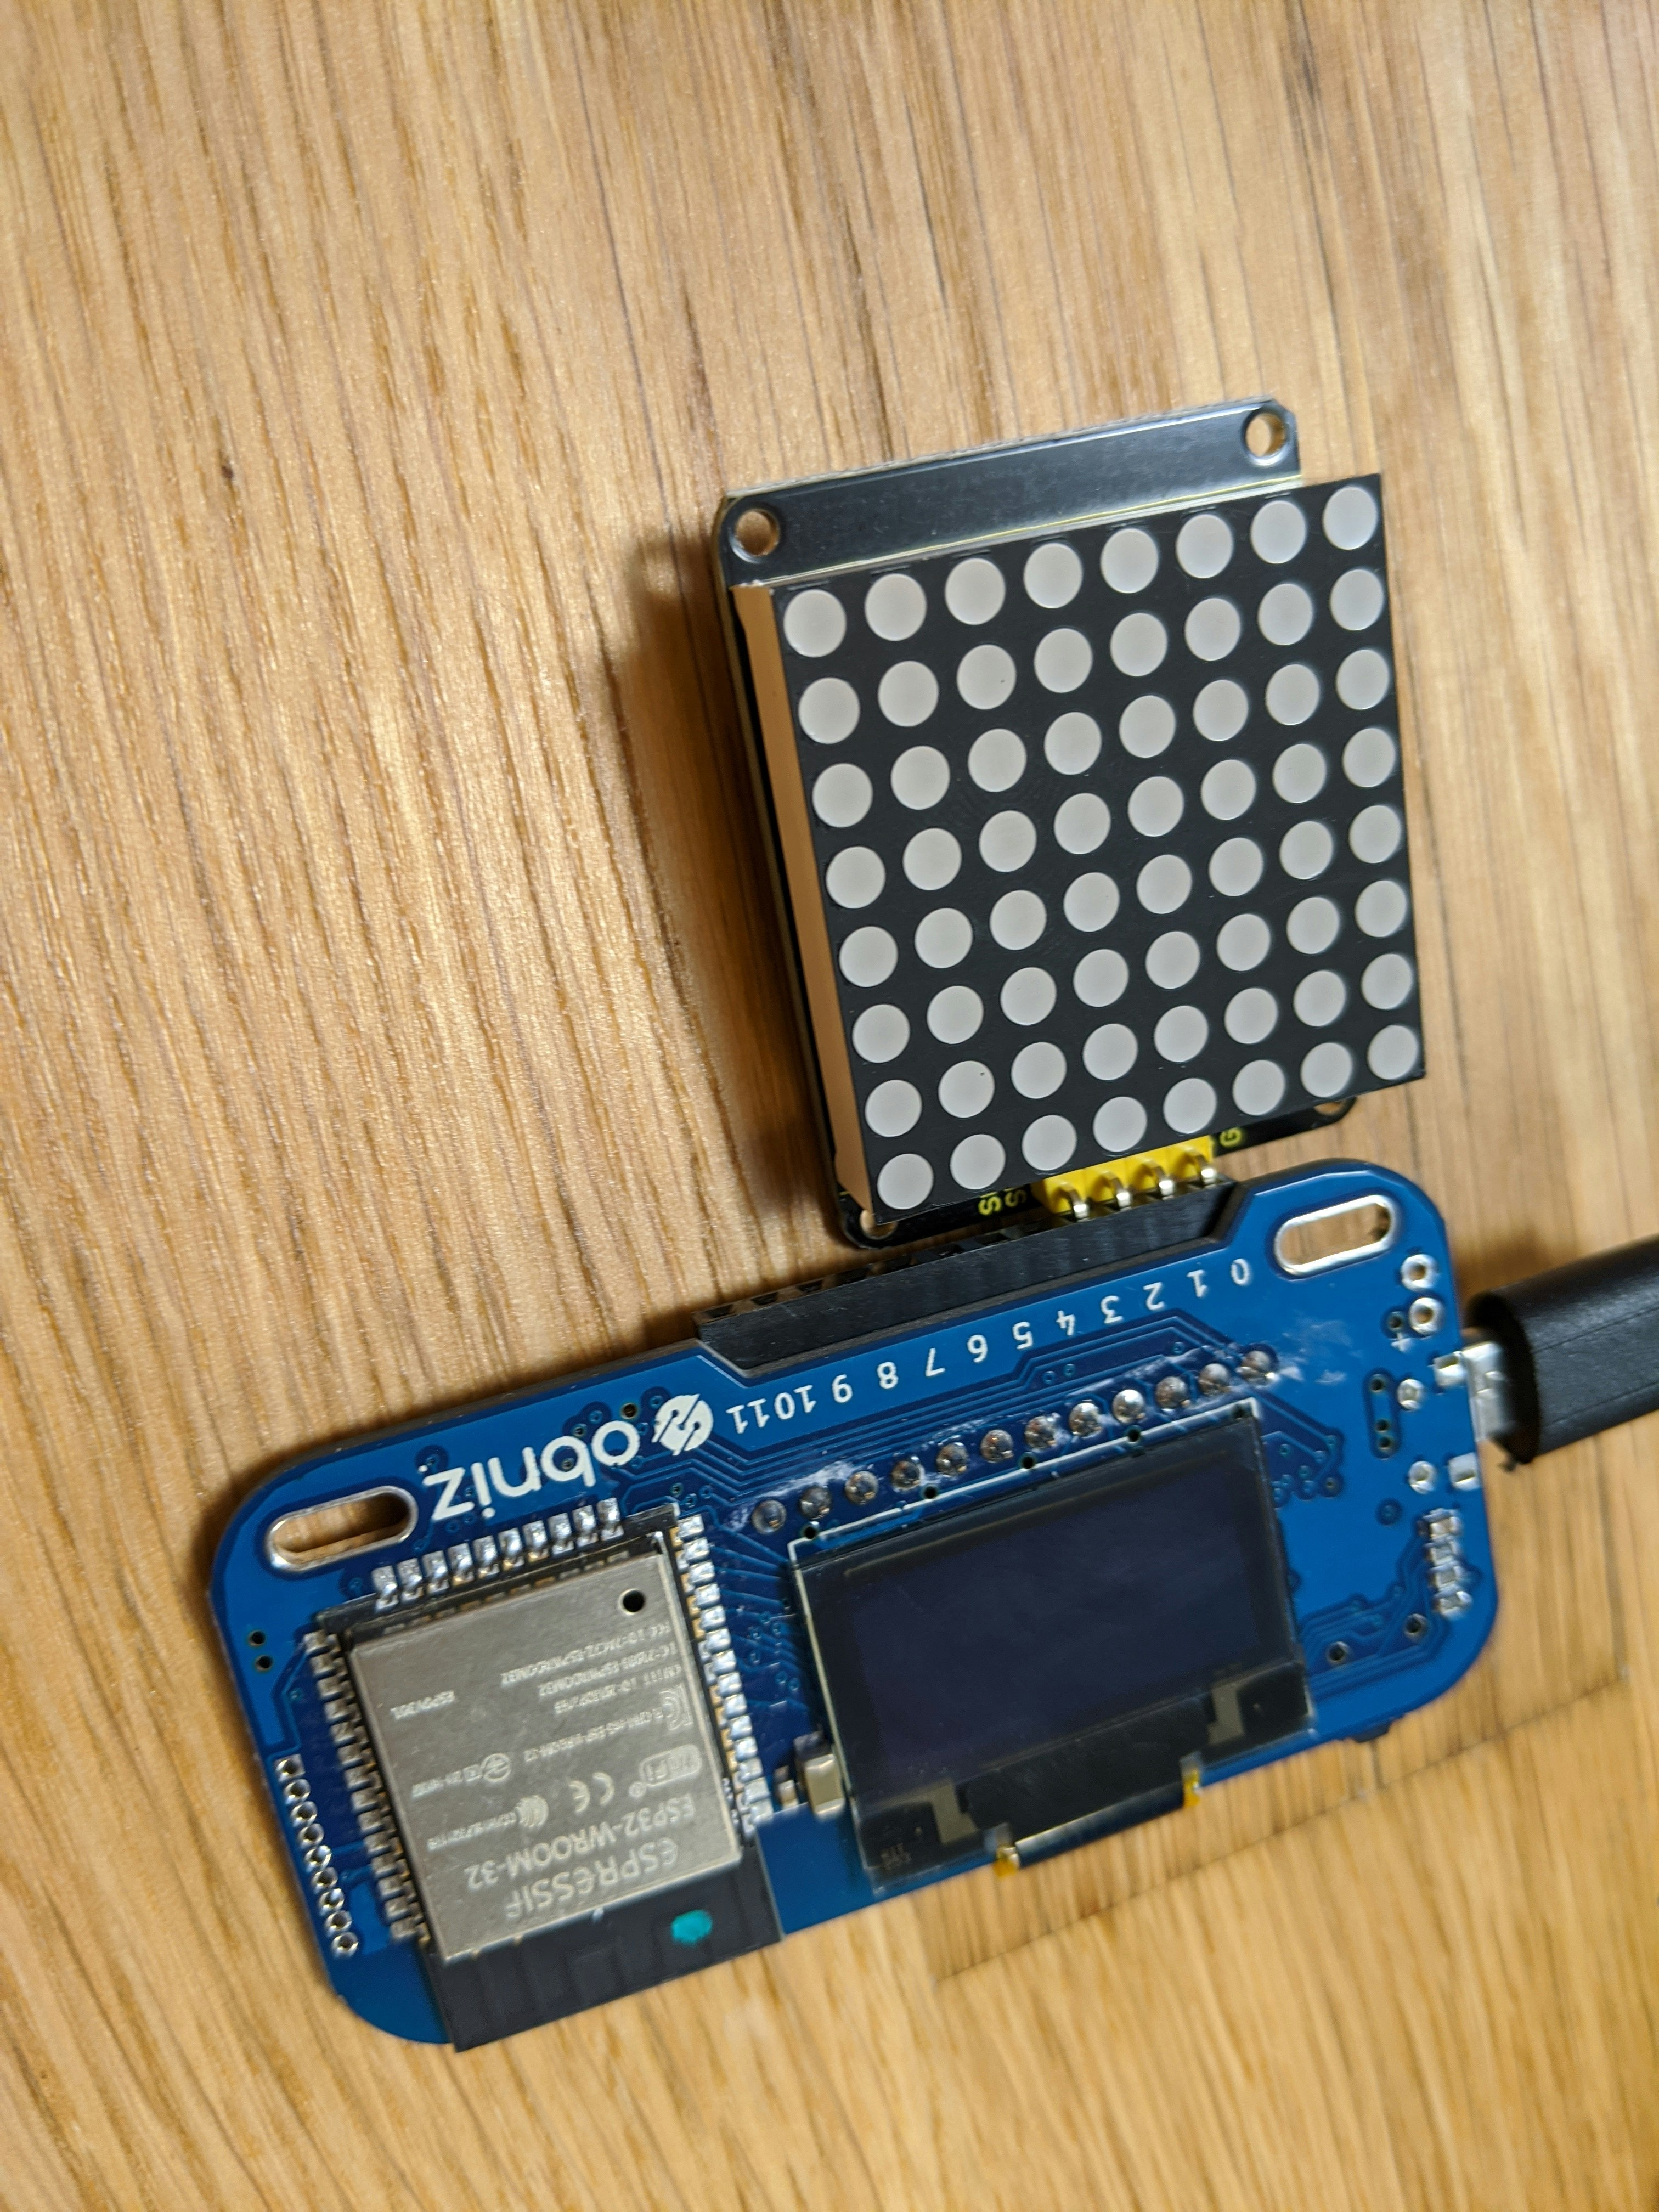
obniz Starter Kit| obnizを買ったので、LEDマトリックスで◯×を出そうと思ったのですが、よくわからない文字しか出せず、挙げ句の果てに壊してしまいました。。。テスト画面ですら動かなくなってしまった。
作りたいもの
部屋にいながら部屋の扉にある
1.LINEBotで操作する
2.マトリックスが「今は部屋を開けないで的なマークを出す」
3.何かにデプロイしていつでも動くLINEBot
4.ディスプレイにメッセージを出す
5.扉につける作れなかったところ
部屋にいながら部屋の扉にある
1.○ → obnizをLINEBotで操作する
2.× → マトリックスが「今は部屋を開けないで的なマークを出す」
3.× → ngrokではなく何かにデプロイしていつでも動くLINEBot
4.○ → ディスプレイにメッセージを出す
5.○ → 扉につける
環境
Node.js v13.7.0
MacBook Pro macOS Mojave
Visual Studio Code 1.44.0
できたもの
コロナ対策でみんなお家にいる困りごとをobnizで解決しようと頑張った。。。マトリックス使いたかった。。。( ; ; )壊してしまった。。。#ProtoOut #obniz pic.twitter.com/SICQ4442vR
— 3yaka (@3yaka4) April 9, 2020マトリックスを壊してしまったのでobnizのディスプレイを使って
LINEBotからオンラインミーティングが始まったら
「開けないで」 と送ると、
大きめの × を表示させる
「終わったよ」と送ると表示が消える
(マトリックスの残骸付き)
扉への設置は、画鋲を打とうとしてマジで注意を受けたので透明のバックに入れて、ドアノブに引っ掛けるという荒技です。
コード
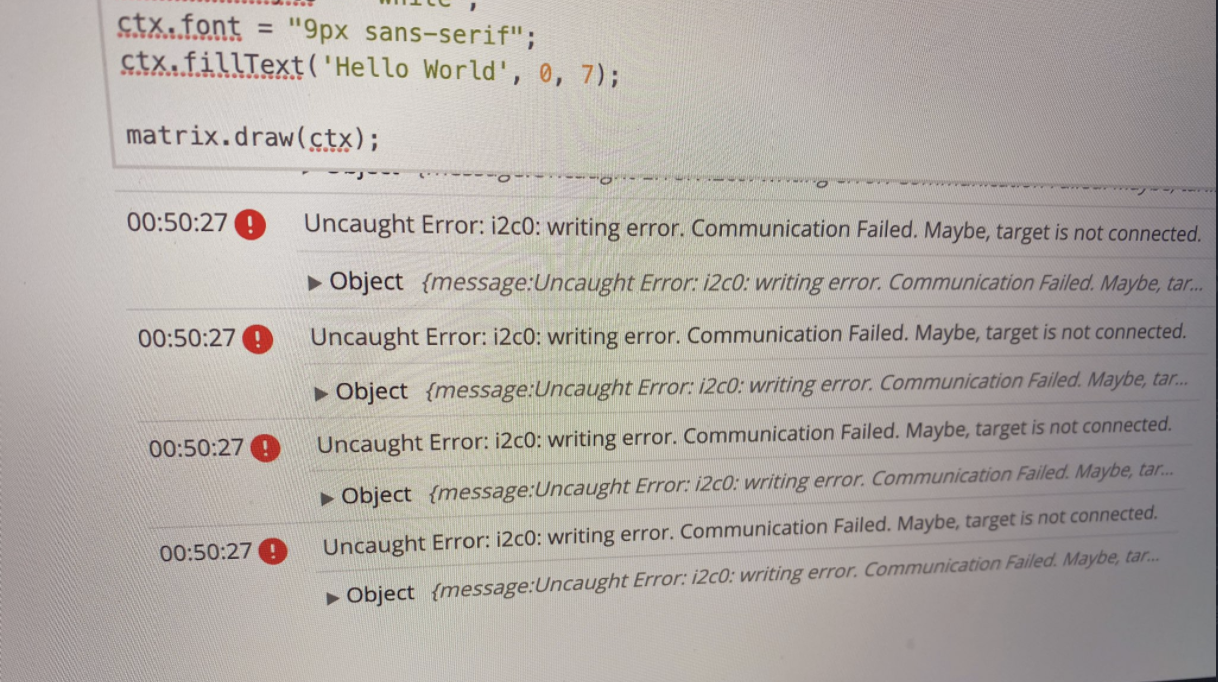
node.js'use strict'; // obniz呼び出し const Obniz = require('obniz'); var obniz = new Obniz("***"); // Obniz_ID に自分のIDを入れます const express = require('express'); const line = require('@line/bot-sdk'); const axios = require('axios'); const PORT = process.env.PORT || 3000; let matrix; const { createCanvas } = require('canvas') const canvas = createCanvas(128, 64); const ctx = canvas.getContext('2d'); const config = { channelAccessToken: '***', channelSecret: '***' }; const app = express(); app.post('/webhook', line.middleware(config), (req, res) => { console.log(req.body.events); Promise .all(req.body.events.map(handleEvent)) .then((result) => res.json(result)); }); const client = new line.Client(config); // obniz接続 obniz.onconnect = async function () { obniz.display.clear(); obniz.display.print("obniz meets LINE Bot!"); //matrix = obniz.wired("MatrixLED_HT16K33", { vcc: 1, gnd: 0, sda: 2, scl: 3 }); //matrix.init(8); //matrix.brightness(7); ctx.fillStyle = "white"; ctx.font = "60px sans-serif"; ctx.strokeStyle = 'rgba(255,255,255,1)' } function handleEvent(event) { if (event.type !== 'message' || event.message.type !== 'text') { return Promise.resolve(null); } let mes = event.message.text; if (event.message.text === '開けないで') { mes = '表示を出すよ'; //待ってねってメッセージだけ先に処理 getAskObnizTemp(event.source.userId); //スクレイピング処理が終わったらプッシュメッセージ } else if (event.message.text === '終わったよ') { obniz.display.clear(); } else { mes = event.message.text; } return client.replyMessage(event.replyToken, { type: 'text', text: mes }); } const getAskObnizTemp = async (userId, mes) => { //let ctx = obniz.util.createCanvasContext(matrix.width, matrix.height); // ctx.fillStyle = "black"; // ctx.fillRect(0, 0, matrix.width, matrix.height); // ctx.fillStyle = "white"; // ctx.font = "9px sans-serif"; // ctx.fillText('X', 0, 7); let linemes = encodeURIComponent(mes); ctx.strokeStyle = 'rgba(255,255,255,1)' ctx.beginPath() ctx.lineTo(0, 0) ctx.lineTo(127, 63) ctx.stroke() ctx.beginPath() ctx.lineTo(127, 0) ctx.lineTo(0, 63) ctx.stroke() //ctx.fillText(' ×', 0, 60); await obniz.display.draw(ctx); await client.pushMessage(userId, { type: 'text', text: "変えました", }); } app.listen(PORT); console.log(`Server running at ${PORT}`);
感想
マトリックスが動いていた時も、このコードだとエラーだらけだったので、なんとも言えない気持ちで着地できずでした。
node-canvasにしてもエラーだったのできっと根本的なところが違うんだろうなと思いました。


- 投稿日:2020-04-09T20:07:38+09:00
[未完]在宅勤務同士の家族との距離をうまくとるサイネージ
はじめに
こちらはProtoOutStudioというイケイケなスクールの「LINE Bot+IoTで表現してアウトプット」という課題で製作したものです。
obnizとLINEBotを組み合わせて何か作ろう!というものです。概要と作れなかったところ
新型コロナウィルスの生で在宅になったものの、仕事中の家族との距離が難しい。
特にうちは猫が3匹もいるので、ニャンコちゃん達が騒ぎ始めたらどちらの部屋に引き取る?とか、
ご飯何時にする?
などなど、いちいちメッセージを送らずに部屋越しに会話することがよくあるのですが、実は「今オンラインミーティング中!!!!ノックしないでー、開けないでー」みたいなことがあって気まずい思いをしたりして、何かトイレの空き情報みたいなサイネージが欲しくて作りました。
obniz Starter Kit| obnizを買ったので、LEDマトリックス(MatrixLED_HT16K33)で◯×を出そうと思ったのですが、よくわからない文字しか出せず、挙げ句の果てに壊してしまいました。。。テスト画面ですら動かなくなってしまった。
作りたいもの
部屋にいながら部屋の外にある
1.LINEBotで操作する
2.マトリックスが「今は部屋を開けないで的なマークを出す」
3.何かにデプロイしていつでも動くLINEBot
4.ディスプレイにメッセージを出す
5.扉にとりつける作れなかったところ
部屋にいながら部屋の外にある
1.○ → obnizをLINEBotで操作する
2.× → マトリックスが「今は部屋を開けないで的なマークを出す」
3.× → ngrokではなく何かにデプロイしていつでも動くLINEBot
4.○ → ディスプレイにメッセージを出す
5.○ → 扉にとりつける
環境
Node.js v13.7.0
MacBook Pro macOS Mojave
Visual Studio Code 1.44.0
できたもの
コロナ対策でみんなお家にいる困りごとをobnizで解決しようと頑張った。。。マトリックス使いたかった。。。( ; ; )壊してしまった。。。#ProtoOut #obniz pic.twitter.com/SICQ4442vR
— 3yaka (@3yaka4) April 9, 2020マトリックスを壊してしまったのでobnizのディスプレイを使って
LINEBotからオンラインミーティングが始まったら
「開けないで」 と送ると、
大きめの × を表示させる
「終わったよ」と送ると表示が消える
(マトリックスの残骸付き)扉への設置は、画鋲を打とうとしてマジで注意を受けたので透明のバックに入れて、ドアノブに引っ掛けるという荒技です。
コード
node.js'use strict'; // obniz呼び出し const Obniz = require('obniz'); var obniz = new Obniz("***"); // Obniz_ID に自分のIDを入れます const express = require('express'); const line = require('@line/bot-sdk'); const axios = require('axios'); const PORT = process.env.PORT || 3000; let matrix; const { createCanvas } = require('canvas') const canvas = createCanvas(128, 64); const ctx = canvas.getContext('2d'); const config = { channelAccessToken: '***', channelSecret: '***' }; const app = express(); app.post('/webhook', line.middleware(config), (req, res) => { console.log(req.body.events); Promise .all(req.body.events.map(handleEvent)) .then((result) => res.json(result)); }); const client = new line.Client(config); // obniz接続 obniz.onconnect = async function () { obniz.display.clear(); obniz.display.print("obniz meets LINE Bot!"); //matrix = obniz.wired("MatrixLED_HT16K33", { vcc: 1, gnd: 0, sda: 2, scl: 3 }); //matrix.init(8); //matrix.brightness(7); ctx.fillStyle = "white"; ctx.font = "60px sans-serif"; ctx.strokeStyle = 'rgba(255,255,255,1)' } function handleEvent(event) { if (event.type !== 'message' || event.message.type !== 'text') { return Promise.resolve(null); } let mes = event.message.text; if (event.message.text === '開けないで') { mes = '表示を出すよ'; //待ってねってメッセージだけ先に処理 getAskObnizTemp(event.source.userId); //スクレイピング処理が終わったらプッシュメッセージ } else if (event.message.text === '終わったよ') { obniz.display.clear(); } else { mes = event.message.text; } return client.replyMessage(event.replyToken, { type: 'text', text: mes }); } const getAskObnizTemp = async (userId, mes) => { //let ctx = obniz.util.createCanvasContext(matrix.width, matrix.height); // ctx.fillStyle = "black"; // ctx.fillRect(0, 0, matrix.width, matrix.height); // ctx.fillStyle = "white"; // ctx.font = "9px sans-serif"; // ctx.fillText('X', 0, 7); let linemes = encodeURIComponent(mes); ctx.strokeStyle = 'rgba(255,255,255,1)' ctx.beginPath() ctx.lineTo(0, 0) ctx.lineTo(127, 63) ctx.stroke() ctx.beginPath() ctx.lineTo(127, 0) ctx.lineTo(0, 63) ctx.stroke() //ctx.fillText(' ×', 0, 60); await obniz.display.draw(ctx); await client.pushMessage(userId, { type: 'text', text: "変えました", }); } app.listen(PORT); console.log(`Server running at ${PORT}`);
参考サイト
MatrixLED_HT16K33 | JS Parts Library | obniz
node.js+canvasでobnizのLCDに文字などを表示する: xshige's beta notes感想
マトリックスが動いていた時も、このコードだとエラーだらけだったので、なんとも言えない気持ちで着地できずでした。
node-canvasにしてもエラーだったのできっと根本的なところが違うんだろうなと思いました。
がんばるっ
- 投稿日:2020-04-09T20:07:38+09:00
在宅ワーク中家族に部屋に入ってこないでサインをobnizとLINEBotで作る
はじめに
こちらはProtoOutStudioというイケイケなスクールの「LINE Bot+IoTで表現してアウトプット」という課題で製作したものです。
obnizとLINEBotを組み合わせて何か作ろう!というものです。概要と作れなかったところ
新型コロナウィルスの生で在宅になったものの、仕事中の家族との距離が難しい。
特にうちは猫が3匹もいるので、ニャンコちゃん達が騒ぎ始めたらどちらの部屋に引き取る?とか、
ご飯何時にする?
などなど、いちいちメッセージを送らずに部屋越しに会話することがよくあるのですが、実は「今オンラインミーティング中!!!!ノックしないでー、開けないでー」みたいなことがあって気まずい思いをしたりして、何かトイレの空き情報みたいなサイネージが欲しくて作りました。
obniz Starter Kit| obnizを買ったので、LEDマトリックス(MatrixLED_HT16K33)で◯×を出そうと思ったのですが、よくわからない文字しか出せず、挙げ句の果てに壊してしまいました。。。テスト画面ですら動かなくなってしまった。
作りたいもの
部屋にいながら部屋の外にある
1.LINEBotで操作する
2.マトリックスが「今は部屋を開けないで的なマークを出す」
3.何かにデプロイしていつでも動くLINEBot
4.ディスプレイにメッセージを出す
5.扉にとりつける作れなかったところ
部屋にいながら部屋の外にある
1.○ → obnizをLINEBotで操作する
2.× → マトリックスが「今は部屋を開けないで的なマークを出す」
3.× → ngrokではなく何かにデプロイしていつでも動くLINEBot
4.○ → ディスプレイにメッセージを出す
5.○ → 扉にとりつける
環境
Node.js v13.7.0
MacBook Pro macOS Mojave
Visual Studio Code 1.44.0
できたもの
コロナ対策でみんなお家にいる困りごとをobnizで解決しようと頑張った。。。マトリックス使いたかった。。。( ; ; )壊してしまった。。。#ProtoOut #obniz pic.twitter.com/SICQ4442vR
— 3yaka (@3yaka4) April 9, 2020マトリックスを壊してしまったのでobnizのディスプレイを使って
LINEBotからオンラインミーティングが始まったら
「開けないで」 と送ると、
大きめの × を表示させる
「終わったよ」と送ると表示が消える
(マトリックスの残骸付き)扉への設置は、画鋲を打とうとしてマジで注意を受けたので透明のバックに入れて、ドアノブに引っ掛けるという荒技です。
コード
node.js'use strict'; // obniz呼び出し const Obniz = require('obniz'); var obniz = new Obniz("***"); // Obniz_ID に自分のIDを入れます const express = require('express'); const line = require('@line/bot-sdk'); const axios = require('axios'); const PORT = process.env.PORT || 3000; let matrix; const { createCanvas } = require('canvas') const canvas = createCanvas(128, 64); const ctx = canvas.getContext('2d'); const config = { channelAccessToken: '***', channelSecret: '***' }; const app = express(); app.post('/webhook', line.middleware(config), (req, res) => { console.log(req.body.events); Promise .all(req.body.events.map(handleEvent)) .then((result) => res.json(result)); }); const client = new line.Client(config); // obniz接続 obniz.onconnect = async function () { obniz.display.clear(); obniz.display.print("obniz meets LINE Bot!"); //matrix = obniz.wired("MatrixLED_HT16K33", { vcc: 1, gnd: 0, sda: 2, scl: 3 }); //matrix.init(8); //matrix.brightness(7); ctx.fillStyle = "white"; ctx.font = "60px sans-serif"; ctx.strokeStyle = 'rgba(255,255,255,1)' } function handleEvent(event) { if (event.type !== 'message' || event.message.type !== 'text') { return Promise.resolve(null); } let mes = event.message.text; if (event.message.text === '開けないで') { mes = '表示を出すよ'; //待ってねってメッセージだけ先に処理 getAskObnizTemp(event.source.userId); //スクレイピング処理が終わったらプッシュメッセージ } else if (event.message.text === '終わったよ') { obniz.display.clear(); } else { mes = event.message.text; } return client.replyMessage(event.replyToken, { type: 'text', text: mes }); } const getAskObnizTemp = async (userId, mes) => { //let ctx = obniz.util.createCanvasContext(matrix.width, matrix.height); // ctx.fillStyle = "black"; // ctx.fillRect(0, 0, matrix.width, matrix.height); // ctx.fillStyle = "white"; // ctx.font = "9px sans-serif"; // ctx.fillText('X', 0, 7); let linemes = encodeURIComponent(mes); ctx.strokeStyle = 'rgba(255,255,255,1)' ctx.beginPath() ctx.lineTo(0, 0) ctx.lineTo(127, 63) ctx.stroke() ctx.beginPath() ctx.lineTo(127, 0) ctx.lineTo(0, 63) ctx.stroke() //ctx.fillText(' ×', 0, 60); await obniz.display.draw(ctx); await client.pushMessage(userId, { type: 'text', text: "変えました", }); } app.listen(PORT); console.log(`Server running at ${PORT}`);
参考サイト
MatrixLED_HT16K33 | JS Parts Library | obniz
node.js+canvasでobnizのLCDに文字などを表示する: xshige's beta notes感想
マトリックスが動いていた時も、このコードだとエラーだらけだったので、なんとも言えない気持ちで着地できずでした。
node-canvasにしてもエラーだったのできっと根本的なところが違うんだろうなと思いました。
がんばるっ
- 投稿日:2020-04-09T20:07:38+09:00
在宅ワーク中に会議中だよサインをobnizとLINEBotで作ってみた
はじめに
こちらはProtoOutStudiooの課題でobnizとLINEBotを組み合わせて何か作ろう!というものです。
概要
新型コロナウィルスのせいで在宅ワークになったため、仕事中の家族との距離が難しい。
特にうちは猫が3匹もいるので、ニャンコちゃん達が騒ぎ始めたらどちらの部屋に引き取る?とか、ご飯何時にする?
などなど、いちいちメッセージを送らずに部屋越しに会話することがよくあるのですが、実は「今オンラインミーティング中!!!!ノックしないでー、開けないでー」みたいなことがあって気まずい思いをしたりして、何かトイレの空き情報みたいなサイネージが欲しくて作りました。できたもの
部屋に入らないで欲しい時に入らないでマークをLINEから、obnizで表示させるサイネージ的なもの
コロナ対策でみんなお家にいる困りごとをobnizで解決しようと頑張った。。。マトリックスLED使いたかった。。。壊してしまった。。。#ProtoOut #obniz pic.twitter.com/SICQ4442vR
— 3yaka (@3yaka4) April 9, 2020

作りたいもの
部屋にいながら部屋の外にある
1.LINEBotで操作する
2.マトリックスが「今は部屋を開けないで的なマークを出す」
3.何かにデプロイしていつでも動くLINEBot
4.ディスプレイにメッセージを出す
5.扉にとりつける作れなかったところ
部屋にいながら部屋の外にある
1.○ → obnizをLINEBotで操作する
2.× → マトリックスが「今は部屋を開けないで的なマークを出す」
3.× → ngrokではなく何かにデプロイしていつでも動くLINEBot
4.○ → ディスプレイにメッセージを出す
5.○ → 扉にとりつけるobniz Starter Kitを買ったので、LEDマトリックス(MatrixLED_HT16K33)で◯×を出そうと思ったのですが、よくわからない文字しか出せず、挙げ句の果てに壊してしまいました。。。テスト画面ですら動かなくなってしまった。
環境
Node.js v13.7.0
MacBook Pro macOS Mojave
Visual Studio Code 1.44.0
使用部材
obniz
扉への設置は、画鋲を打とうとしてマジで注意を受けたので透明のバックに入れて、ドアノブに引っ掛けるという荒技です。
マトリックスを壊してしまったのでobnizのディスプレイを使って
LINEBotからオンラインミーティングが始まったら
「開けないで」 と送ると、
大きめの × を表示させる
「終わったよ」と送ると表示が消える
(マトリックスの残骸付き)コード
node.js'use strict'; // obniz呼び出し const Obniz = require('obniz'); var obniz = new Obniz("***"); // Obniz_ID に自分のIDを入れます const express = require('express'); const line = require('@line/bot-sdk'); const axios = require('axios'); const PORT = process.env.PORT || 3000; let matrix; const { createCanvas } = require('canvas') const canvas = createCanvas(128, 64); const ctx = canvas.getContext('2d'); const config = { channelAccessToken: '***', channelSecret: '***' }; const app = express(); app.post('/webhook', line.middleware(config), (req, res) => { console.log(req.body.events); Promise .all(req.body.events.map(handleEvent)) .then((result) => res.json(result)); }); const client = new line.Client(config); // obniz接続 obniz.onconnect = async function () { obniz.display.clear(); obniz.display.print("obniz meets LINE Bot!"); //matrix = obniz.wired("MatrixLED_HT16K33", { vcc: 1, gnd: 0, sda: 2, scl: 3 }); //matrix.init(8); //matrix.brightness(7); ctx.fillStyle = "white"; ctx.font = "60px sans-serif"; ctx.strokeStyle = 'rgba(255,255,255,1)' } function handleEvent(event) { if (event.type !== 'message' || event.message.type !== 'text') { return Promise.resolve(null); } let mes = event.message.text; if (event.message.text === '開けないで') { mes = '表示を出すよ'; //待ってねってメッセージだけ先に処理 getAskObnizTemp(event.source.userId); //スクレイピング処理が終わったらプッシュメッセージ } else if (event.message.text === '終わったよ') { obniz.display.clear(); } else { mes = event.message.text; } return client.replyMessage(event.replyToken, { type: 'text', text: mes }); } const getAskObnizTemp = async (userId) => { //let ctx = obniz.util.createCanvasContext(matrix.width, matrix.height); // ctx.fillStyle = "black"; // ctx.fillRect(0, 0, matrix.width, matrix.height); // ctx.fillStyle = "white"; // ctx.font = "9px sans-serif"; // ctx.fillText('X', 0, 7); ctx.strokeStyle = 'rgba(255,255,255,1)' ctx.beginPath() ctx.lineTo(0, 0) ctx.lineTo(127, 63) ctx.stroke() ctx.beginPath() ctx.lineTo(127, 0) ctx.lineTo(0, 63) ctx.stroke() //ctx.fillText(' ×', 0, 60); await obniz.display.draw(ctx); await client.pushMessage(userId, { type: 'text', text: "変えました", }); } app.listen(PORT); console.log(`Server running at ${PORT}`);
参考サイト
MatrixLED_HT16K33 | JS Parts Library | obniz
node.js+canvasでobnizのLCDに文字などを表示する: xshige's beta notes感想
マトリックスが動いていた時も、このコードだとエラーだらけだったので、なんとも言えない気持ちで着地できずでした。
node-canvasにしてもエラーだったのできっと根本的なところが違うんだろうなと思いました。
がんばるっ
- 投稿日:2020-04-09T16:37:45+09:00
Node.jsのバージョン管理システム「nodebrew」を使ってNode.jsをインストールする手順
はじめに
nodebrewはNode.jsのバージョンを管理するためのツールです。
nodebrewを使うことで、一つの環境に複数バージョンのNode.jsを導入することができ、バージョンの切替も簡単に行えます。環境
OS:macOS Catalina v10.15.3
nodebrewのインストール
nodebrewのGitHubに手順が記載されていますので、そちらを参考にインストールしていきます。
https://github.com/hokaccha/nodebrewcurlでインストールします。
※今回はcurlでインストールしましたがmacOS用パッケージマネージャ「Homebrew」からのインストールをお勧めします$ curl -L git.io/nodebrew | perl - setup % Total % Received % Xferd Average Speed Time Time Time Current Dload Upload Total Spent Left Speed 0 0 0 0 0 0 0 0 --:--:-- --:--:-- --:--:-- 0 0 0 0 0 0 0 0 0 --:--:-- 0:00:01 --:--:-- 0 0 0 0 0 0 0 0 0 --:--:-- 0:00:02 --:--:-- 0 100 24634 100 24634 0 0 9763 0 0:00:02 0:00:02 --:--:-- 9763 Fetching nodebrew... Installed nodebrew in $HOME/.nodebrew ======================================== Export a path to nodebrew: export PATH=$HOME/.nodebrew/current/bin:$PATH ========================================パスを通します。
$ export PATH=$HOME/.nodebrew/current/bin:$PATHインストール後の確認。nodebrewコマンドが認識されていればOKです。
$ nodebrew help
nodebrew 1.0.1

Usage:
    nodebrew help                         Show this message
    nodebrew install <version>            Download and install <version> (from binary)
    nodebrew compile <version>            Download and install <version> (from source)
    nodebrew install-binary <version>     Alias of `install` (For backward compatibility)
    nodebrew uninstall <version>          Uninstall <version>
    nodebrew use <version>                Use <version>
    nodebrew list                         List installed versions
    nodebrew ls                           Alias for `list`
    nodebrew ls-remote                    List remote versions
    nodebrew ls-all                       List remote and installed versions
    nodebrew alias <key> <value>          Set alias
    nodebrew unalias <key>                Remove alias
    nodebrew clean <version> | all        Remove source file
    nodebrew selfupdate                   Update nodebrew
    nodebrew migrate-package <version>    Install global NPM packages contained in <version> to current version
    nodebrew exec <version> -- <command>  Execute <command> using specified <version>

Example:
    # install
    nodebrew install v8.9.4

    # use a specific version number
    nodebrew use v8.9.4
Node.jsのインストール
今回は最新バージョンのNode.jsをインストール。
$ nodebrew install latest
Fetching: https://nodejs.org/dist/v13.12.0/node-v13.12.0-darwin-x64.tar.gz
######################################################################################## 100.0%
Installed successfully
インストールされたNode.jsのバージョンを一覧で表示する。
(複数バージョンがインストールされている場合は複数行表示されます)$ nodebrew ls v13.12.0使用するバージョンを設定する。
$ nodebrew use v13.12.0
use v13.12.0
もう一度インストールされたNode.jsのバージョンを一覧で表示する。
currentが表示され、現在選択されているNode.jsのバージョンが確認できます。$ nodebrew ls v13.12.0 current: v13.12.0nodeコマンドを実行してバージョンを確認すると適用したバージョンになっています。
$ node -v
v13.12.0
最後に
複数プロジェクトで違うバージョンのNode.jsを使っているとバージョン管理が面倒ですが、nodebrewを導入するとコマンド一つでバージョン管理ができるのでめちゃくちゃ楽です。
- 投稿日:2020-04-09T15:20:03+09:00
Express Validatorを使ってみる(API変更後)
はじめに
完全自粛中なのでNode.js超入門第2版でnode.jsの勉強をしていました。
express-validatorがAPI変更に伴って、参考書通りのソースコードだとバリデーションが実行されなかったので、変更点も交えながら記事投稿します。環境
・node 12.7.0
・express 4.16.1
・express-validator 5.3.1Node.js超入門第2版 P334~335
app.jsvar validator = require('express-validator'); app.use(validator());hello.jsrouter.get('/add',(req,res,next) => { var data = { title: 'Hello/Add', content: '新しいレコードを入力:', form: { name: '', mail: '', age: 0 } } res.render('hello/add',data); }); router.post('/add',(req,res,next) => { req.check('name','名前は必ずご入力してください。').notEmpty(); req.check('mail','メールアドレスをご入力してください。').isEmail(); req.check('age','年齢は整数をご入力してください。').isInt(); req.getValidationResult().then((result) => { if(!result.isEmpty()) { var re = '<ul class="error">'; var result_arr = result.array(); for(var n in result_arr){ re += '<li>' + result_arr[n].msg + '</li>'; } re += '</ul>'; var data = { title: 'Hello/add', content: re, form: req.body } res.render('hello/add',data); } else{ var nm = req.body.name; var ml = req.body.mail; var ag = req.body.age; var data = { 'name': nm, 'mail': ml, 'age': ag }; var connection = mysql.createConnection(mysql_setting); connection.connect(); connection.query('insert into mydata set ?',data, function(error,results,fields){ res.redirect('/hello'); }); connection.end(); } }); });API変更後
hello.js// Express-validatorを読み込む const { check, validationResult } = require('express-validator/check'); router.get('/add',(req,res,next) => { var data = { title: 'Hello/Add', content: '新しいレコードを入力:', form: { name: '', mail: '', age: 0 } } res.render('hello/add',data); }); router.post('/add', [ check('name','名前は必ずご入力してください。').not().isEmpty(), check('mail','メールアドレスをご入力してください。').isEmail(), check('age','年齢は整数をご入力してください。').isInt() ],(req,res,next) => { // getValidationResult()ではなく、validationResult(req)でバリデーションの実行結果を受け取る。 var result = validationResult(req); // チェック項目があった場合 if(!result.isEmpty()) { var re = '<ul class="error">'; var result_arr = result.array(); for(var n in result_arr){ re += '<li>' + result_arr[n].msg + '</li>'; } re += '</ul>'; var data = { title: 'Hello/add', content: re, form: req.body } res.render('hello/add',data); } // チェックを通過した場合 else{ var nm = req.body.name; var ml = req.body.mail; var ag = req.body.age; var data = { 'name': nm, 'mail': ml, 'age': ag }; var connection = mysql.createConnection(mysql_setting); connection.connect(); connection.query('insert into datamy set ?',data,function(error,results,fields){ res.redirect('/hello'); }); connection.end(); } });モジュールのロードの仕方とValidatorの追加の仕方
app.use(validator());が使えなくなっているため。
req.check()ではなくcheck()でExpressValidator.Validatorのオブジェクトを返す
app.post('/add',[],(req,res,next)=>{});第1引数にPOST処理後のルーティング処理、第2引数にチェック項目を配列で、第3引数にコールバック関数を入れる
参考
・https://express-validator.github.io/docs/index.html
・https://www.shuwasystem.co.jp/book/9784798055220.htmlおわりに
参考書で勉強していて困っていた人の助けになれれば光栄です。