- 投稿日:2020-04-07T23:29:35+09:00
CompositionalLayoutでリマインダー風のレイアウトを実装するs
はじめに
CompositionalLayoutとは2019年にWWDCで発表されたUICollectionViewのレイアウト手法です。個人的にこのレイアウト手法が登場してからすごく楽にUICollectionViewのレイアウトを組めています!!(Webでいうとfloatからflexboxに変わるくらい)
しかし、学習する際に調べたところハンズオン形式で学べる記事というものがなかなか見つからなかったので、今回はCompositionalLayoutを使ってiOSにデフォルトでインストールされているリマインダー風のレイアウトを作っていきたいと思います!!また、初心者さん向けの話し方で説明していますのでご了承ください。CompositionalLayoutについての詳細はこちらの記事が参考になるかと思います。
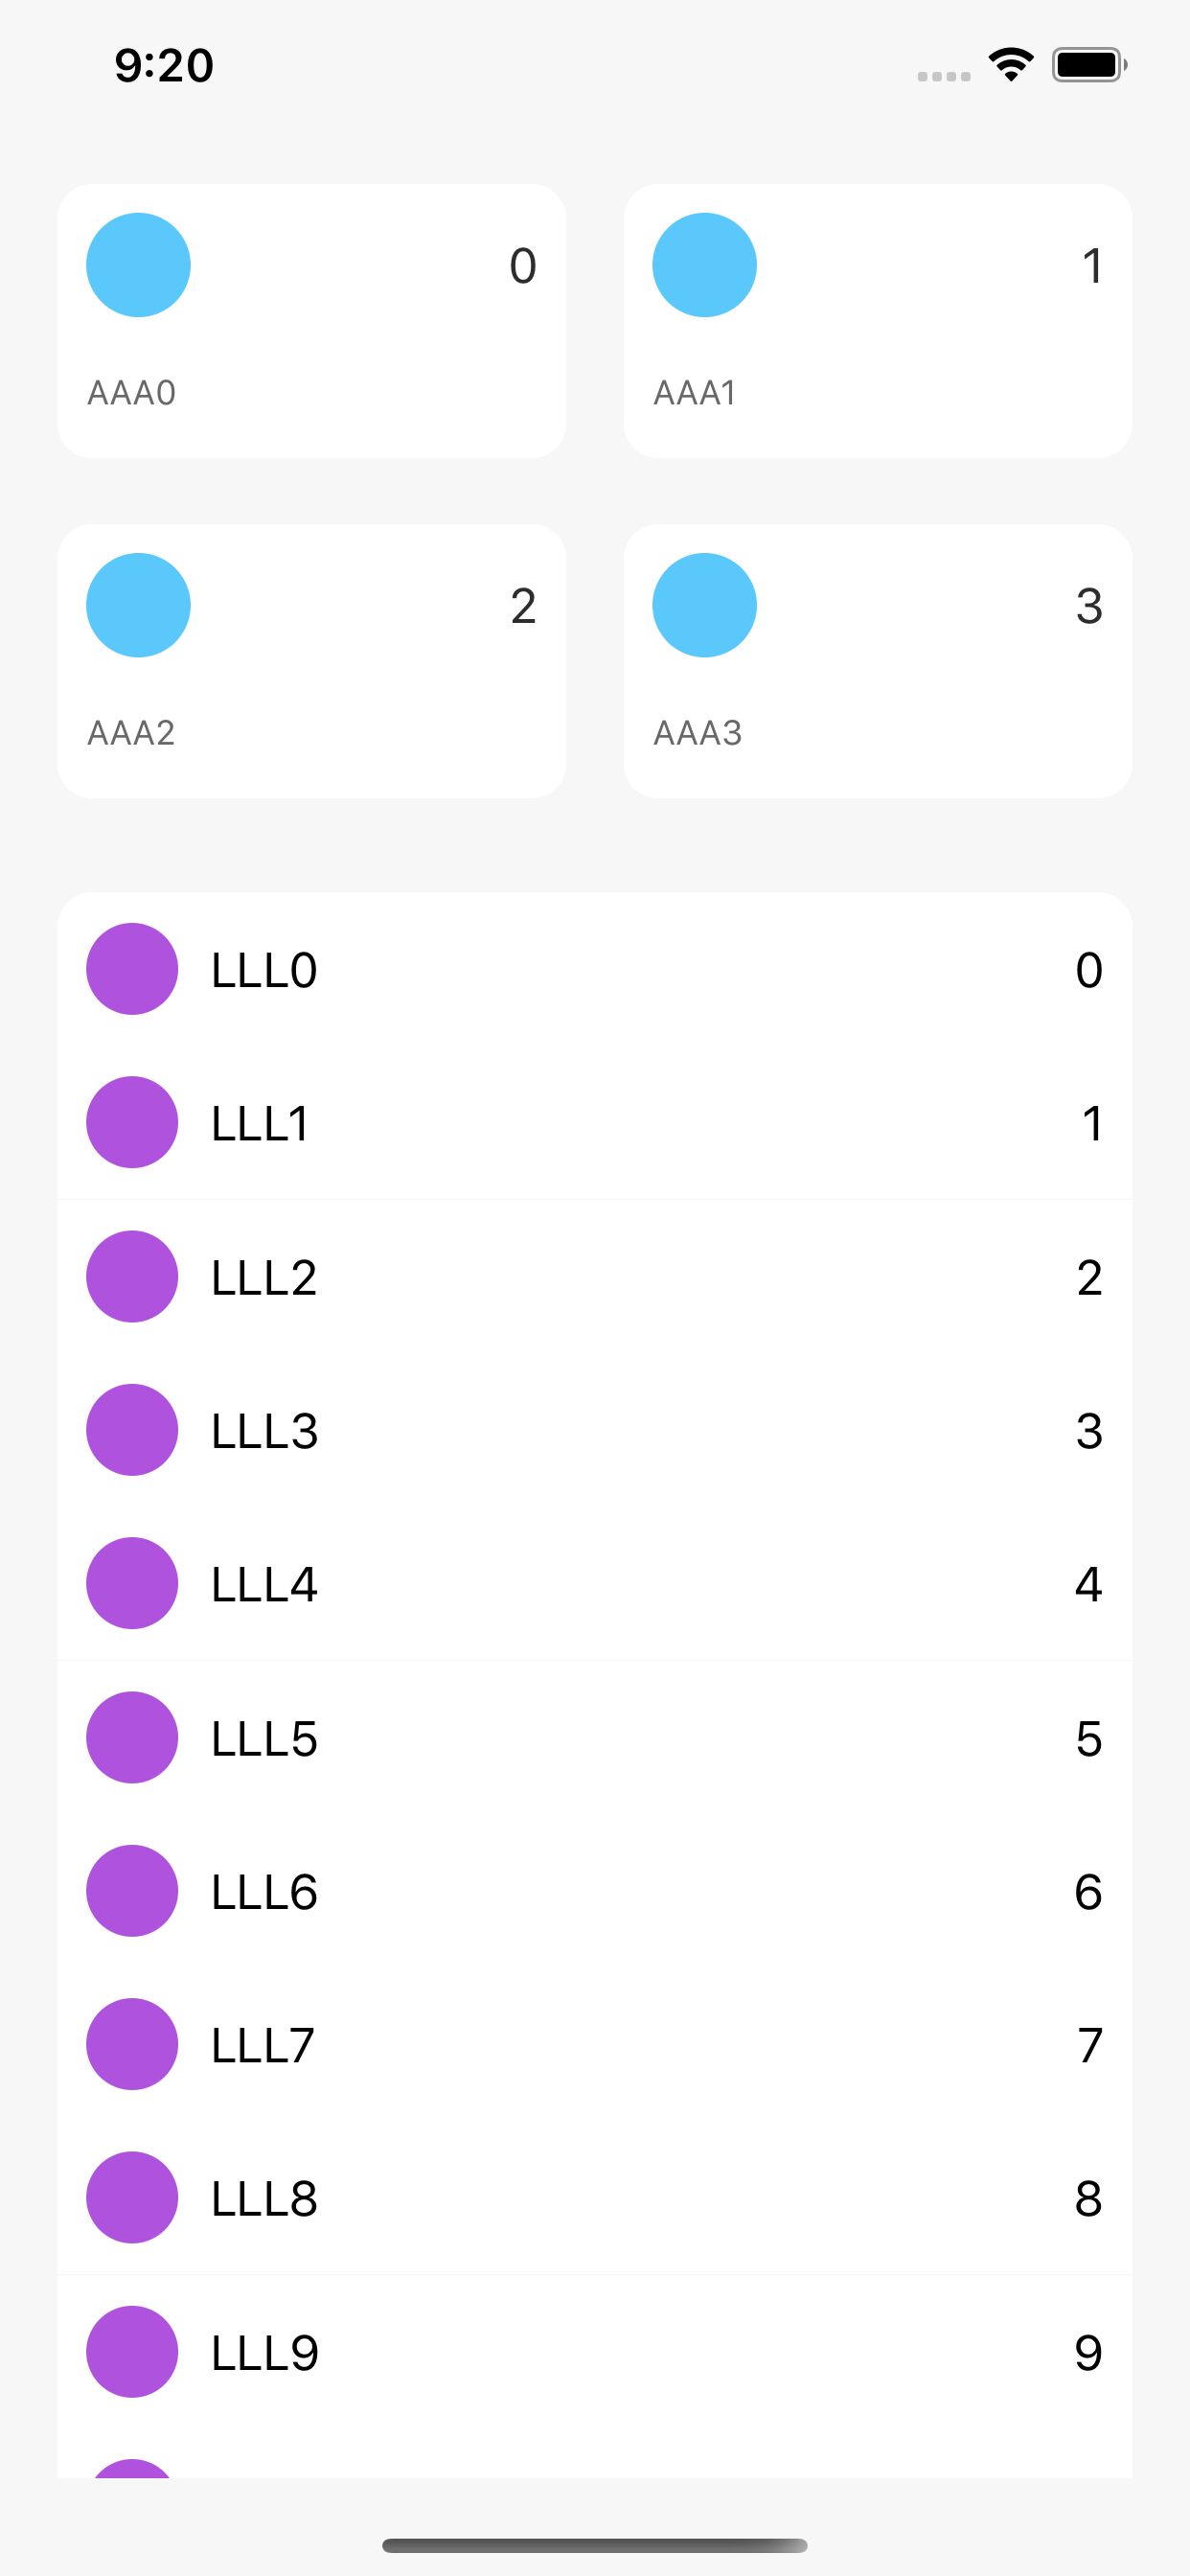
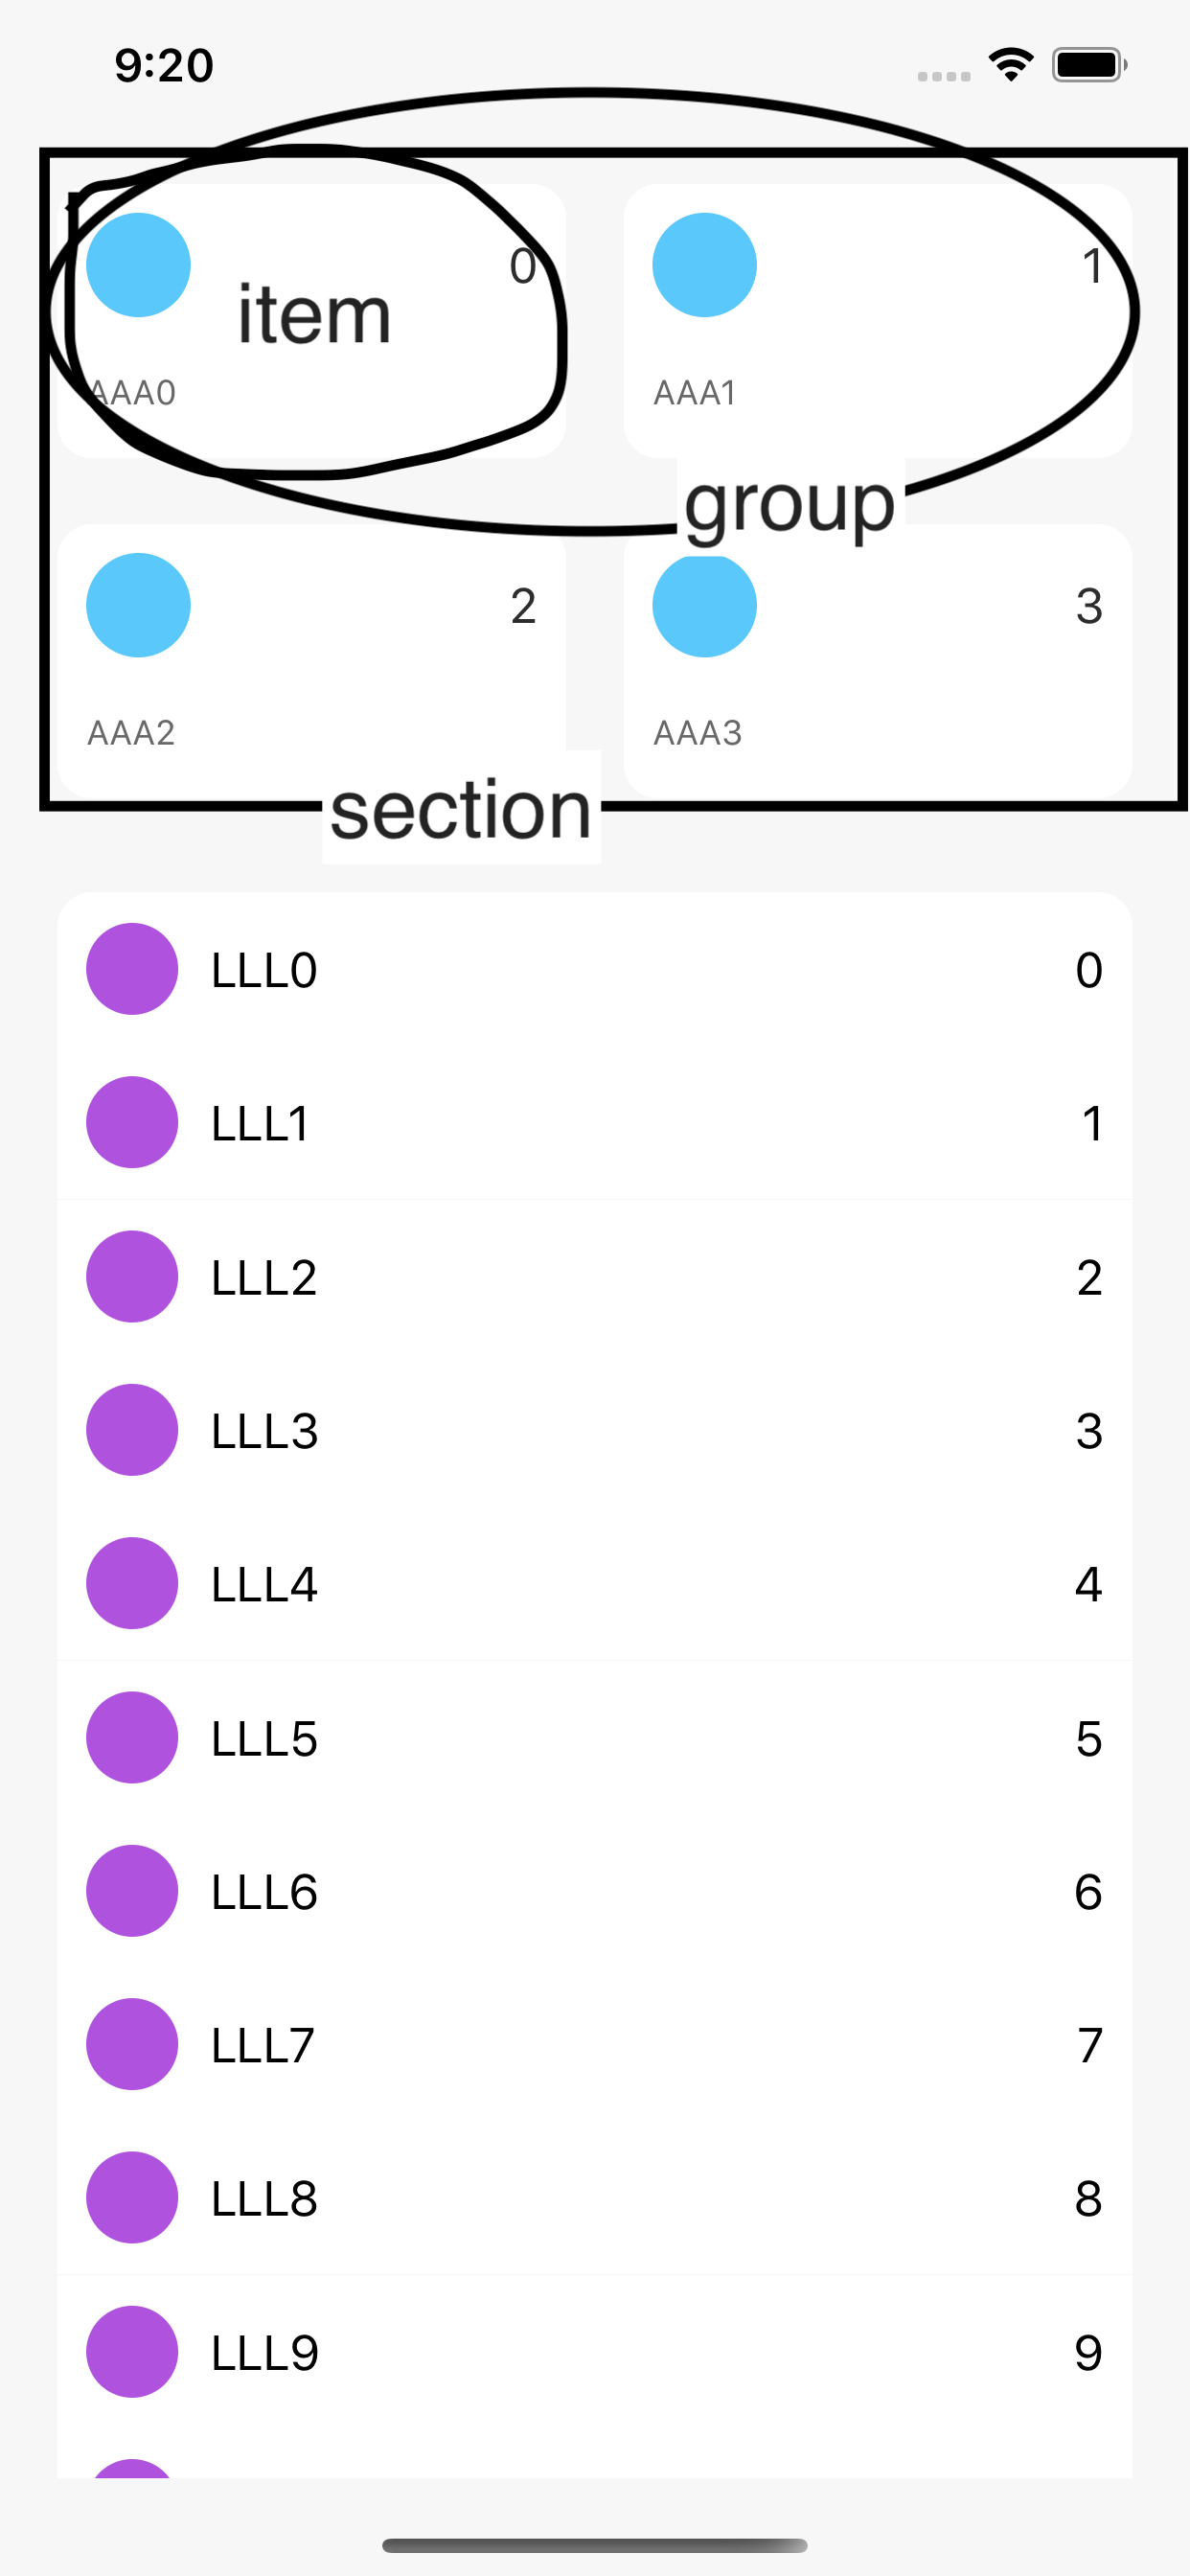
目標物
少し雑ですがこのようなレイアウトを組んでいきたいと思います!!
Main.storyboard
ViewControllerにUICollectionViewを1つ貼るだけなので説明は省きます!
Cellを作る
まず最初にCellを作っていきます!!
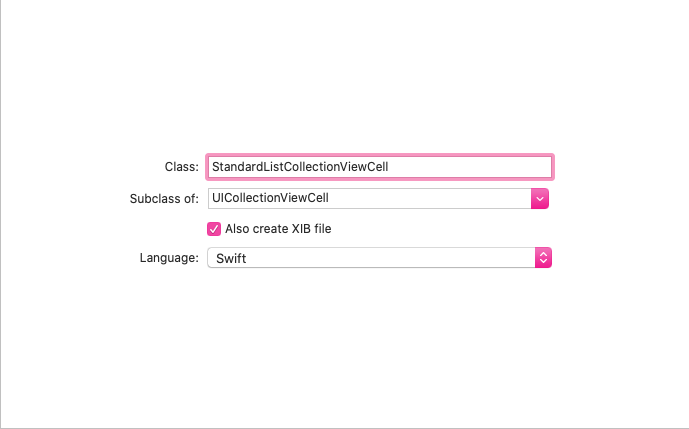
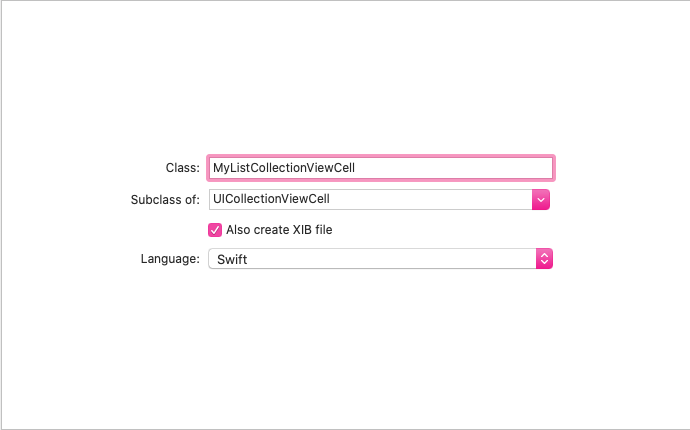
also xibにチェックを入れて、StandardListCollectionViewCell.swift
とMyListCollectionViewCell.swiftを作成します。
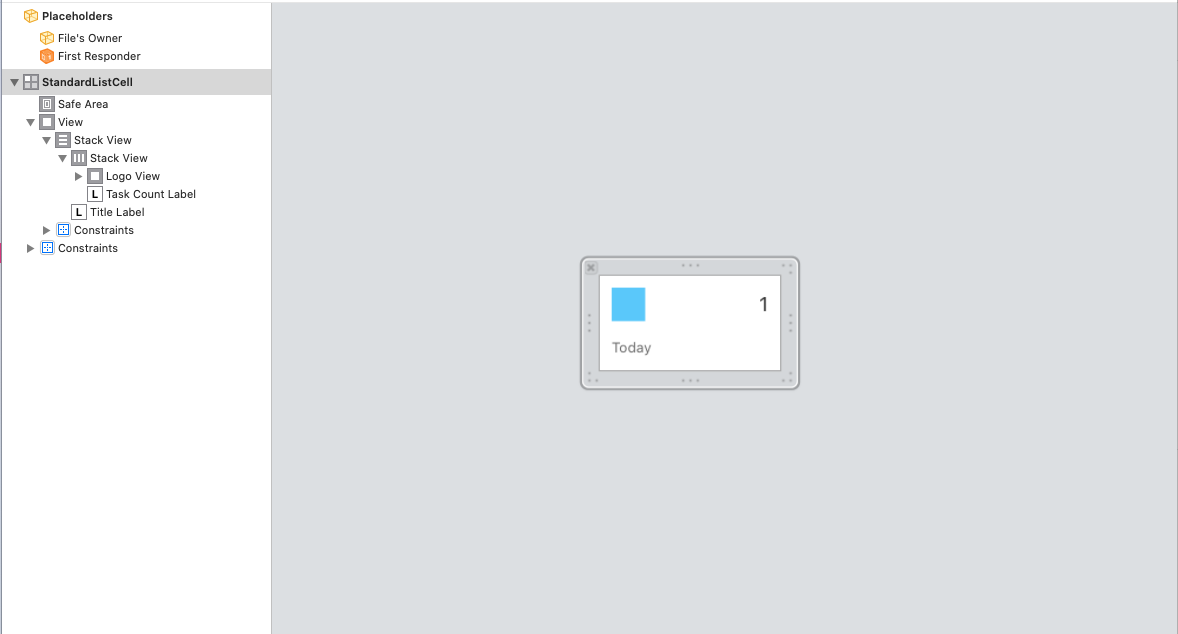
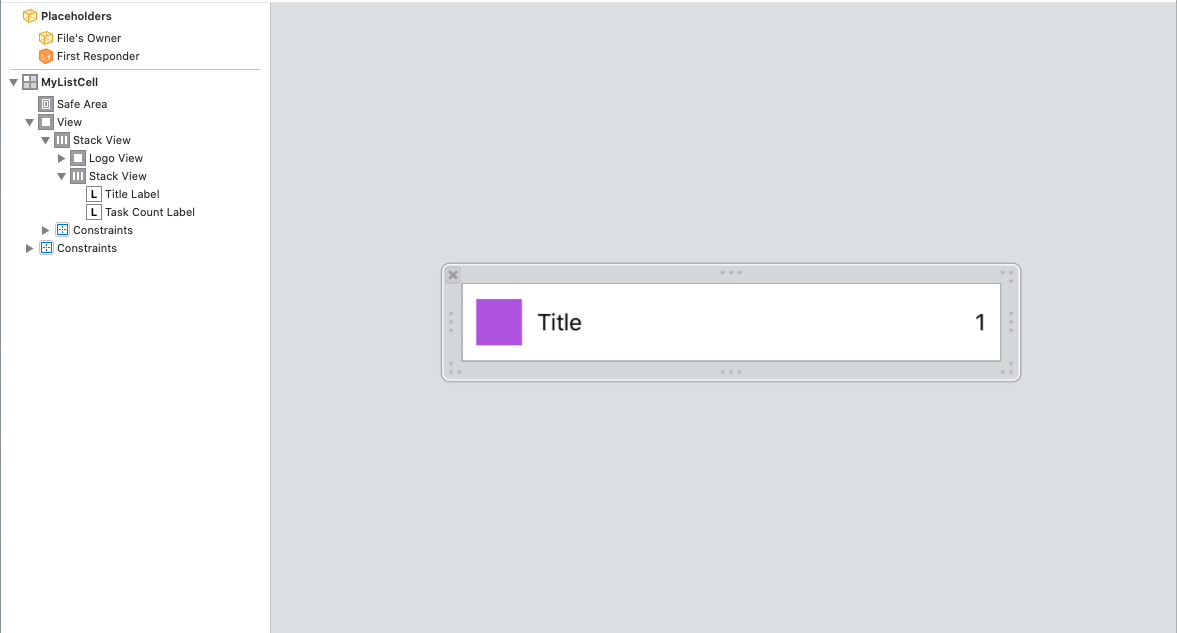
xibのレイアウトはそれぞれこんな感じです!! ↓↓↓↓↓↓↓
それぞれ、"StandardListCell", "MyListCell"でreuseIdentifierを設定してください!!
(AutoLayout等の説明はこの記事の趣旨から外れるので省かせていただきます..)Cellの実装
まずは、StandardListCollectionViewCellから!!
StandardListCollectionViewCell.swiftimport UIKit final class StandardListCollectionViewCell: UICollectionViewCell { @IBOutlet private weak var logoView: UIView! @IBOutlet private weak var taskCountLabel: UILabel! @IBOutlet private weak var titleLabel: UILabel! override func awakeFromNib() { super.awakeFromNib() self.layer.cornerRadius = 12 self.clipsToBounds = true logoView.clipsToBounds = true } override func layoutIfNeeded() { super.layoutIfNeeded() logoView.layer.cornerRadius = logoView.bounds.height * 0.5 } func configure(taskCount: Int, title: String) { taskCountLabel.text = String(taskCount) titleLabel.text = title } }特に特別な実装はしていないのですが、一点だけ
layoutIfNeeded()関数について説明させていただきます。
この関数内のlogoView.layer.cornerRadius = logoView.bounds.height * 0.5この実装は本来、AutoLayoutを使わない実装ではawakeFromNib()関数内に書くと思うのいます。ですが今回の僕の場合はAutoLayoutで割合を計算して制約をつけているので描画処理の順番の関係でawakeFromNib等の関数内に書くとlogoView.bounds.heightで取れるlogoViewの高さがAutoLayout適用前のものになってしまい、本来角に高さの半分の角丸をつけて円を作りたいのに、円の形がいびつ担ってしまう....ぴえん。なんてことになるのでこういった実装をしています。
(上記、「もっといい実装あるよ!!」というような意見があればお聞きしたいです!!)続いて、MyListCollectionViewCellを実装していきます!!
MyListCollectionViewCell.swiftimport UIKit final class MyListCollectionViewCell: UICollectionViewCell { @IBOutlet private weak var logoView: UIView! @IBOutlet private weak var taskCountLabel: UILabel! @IBOutlet private weak var titleLabel: UILabel! override func awakeFromNib() { super.awakeFromNib() logoView.clipsToBounds = true } override func layoutIfNeeded() { super.layoutIfNeeded() logoView.layer.cornerRadius = logoView.bounds.height * 0.5 } func configure(cellType: CellType, taskCount: Int, title: String) { taskCountLabel.text = String(taskCount) titleLabel.text = title switch cellType { case .first: self.layer.cornerRadius = 12 self.layer.maskedCorners = [.layerMinXMinYCorner, .layerMaxXMinYCorner] self.clipsToBounds = true case .normal: self.layer.cornerRadius = 0 case .last: self.layer.cornerRadius = 12 self.layer.maskedCorners = [.layerMinXMaxYCorner, .layerMaxXMaxYCorner] self.clipsToBounds = true } } } enum CellType { case first, normal, last }このコードも特に特別な実装をしている分けでは無いのですが、先ほど説明した
layoutIfNeeded()ともう一点、最初のCellと最後のCellだけ上下それぞれの角を丸めるといった実装をしています。こちらは難しい事は何もしておらず、単にCellを最初に構成するメソッドconfigure()にCollectionViewのデータソースからそのCellが何番目のCellなのか(最初なのか、間にあるのか、最後にあるのか)をCellTypeというenumを作って渡しています!!CollectionViewのデータソースを実装
今回はsectionが2つある影響もありViewControllerが若干見にくくなってしまったのでextensionではなくUICollectionViewDataSourceのサブクラスを作っていきたいと思います!!
CollectionViewDataSource.swiftimport UIKit final class CollectionViewDataSource: NSObject, UICollectionViewDataSource { func numberOfSections(in collectionView: UICollectionView) -> Int { return 2 } func collectionView(_ collectionView: UICollectionView, numberOfItemsInSection section: Int) -> Int { switch section { case 0: return 4 case 1: return 12 default: return 0 } } func collectionView(_ collectionView: UICollectionView, cellForItemAt indexPath: IndexPath) -> UICollectionViewCell { switch indexPath.section { case 0: guard let standardListCell = collectionView.dequeueReusableCell(withReuseIdentifier: "StandardListCell", for: indexPath) as? StandardListCollectionViewCell else { return UICollectionViewCell() } standardListCell.layoutIfNeeded() standardListCell.configure(taskCount: indexPath.row, title: "AAA\(indexPath.row)") return standardListCell case 1: guard let myListCell = collectionView.dequeueReusableCell(withReuseIdentifier: "MyListCell", for: indexPath) as? MyListCollectionViewCell else { return UICollectionViewCell() } var cellType: CellType = .normal if indexPath.row == 0 { cellType = .first } else if indexPath.row == 11 { cellType = .last } myListCell.layoutIfNeeded() myListCell.configure(cellType: cellType, taskCount: indexPath.row, title: "LLL\(indexPath.row)") return myListCell default: break } return UICollectionViewCell() } }本題のCompositionalLayoutまでの道のりが長くて申し訳ないです..()
こちらのコードは上から順に関数ごとの説明をしていきたいと思います。
numberOfSections
こちらは1つのCollectionViewに持たせるsectionの数を返す関数なので今回は2を返しています。
collectionView(_ collectionView: UICollectionView, numberOfItemsInSection section: Int)
こちらの関数はsectionごとに(sectionが一つの場合は分岐は必要ない)必要なcellの数を返しています。今回は上部のStandardListCollectionViewCell用に4個、MyListCollectionViewCell用に12個返していますが、本来はアプリのデータの数(lists.count的な)を返します。
collectionView(_ collectionView: UICollectionView, cellForItemAt indexPath: IndexPath) -> UICollectionViewCell
最後にこの関数でsectionごとに、それぞれStandardListCollectionViewCellとMyListCollectionViewCellを返します。この関数内で注目して欲しいのがstandardListCell.layoutIfNeeded()とmyListCell.layoutIfNeeded()です。ここで何をしているかというと先ほど説明したそれぞれのCellのlogoViewに正しい角丸をつける関数を呼び出しているだけなのですが、初心者の勘違いポイントとしてawakeFromNibや、`layoutSubViews'のように勝手に呼ばれると考えてしまうことがあると思うので、要注意です!!ようやくLayoutを組む
ようやく本題のCompositionalLayoutを使ってレイアウトを組んでいきたいと思います!!
ViewController本体のコード量が非常に少なくなったのでViewControllerのコードもまとめて載せていきます!!ViewController.swiftclass ViewController: UIViewController { @IBOutlet private weak var collectionView: UICollectionView! private let dataSource: CollectionViewDataSource = .init() override func viewDidLoad() { super.viewDidLoad() collectionView.dataSource = dataSource collectionView.contentInset = UIEdgeInsets(top: 10, left: 0, bottom: 0, right: 0) collectionView.collectionViewLayout = createLayout() collectionView.register(UINib(nibName: "StandardListCollectionViewCell", bundle: nil), forCellWithReuseIdentifier: "StandardListCell") collectionView.register(UINib(nibName: "MyListCollectionViewCell", bundle: nil), forCellWithReuseIdentifier: "MyListCell") } } extension ViewController { private func createLayout() -> UICollectionViewLayout { let layout = UICollectionViewCompositionalLayout {( sectionIndex: Int, layoutEnvironment: NSCollectionLayoutEnvironment) -> NSCollectionLayoutSection? in if sectionIndex == 0 { return self.createStanadardListLayout() } else if sectionIndex == 1 { return self.createMyListLayout() } else { return nil } } return layout } private func createStanadardListLayout() -> NSCollectionLayoutSection { let itemSize = NSCollectionLayoutSize(widthDimension: .fractionalWidth(0.5), heightDimension: .fractionalWidth(0.28)) let item = NSCollectionLayoutItem(layoutSize: itemSize) item.contentInsets = NSDirectionalEdgeInsets(top: 0, leading: 10, bottom: 15, trailing: 10) let groupSize = NSCollectionLayoutSize(widthDimension: .fractionalWidth(1), heightDimension: .fractionalWidth(0.3)) let group = NSCollectionLayoutGroup.horizontal(layoutSize: groupSize, subitems: [item]) let section = NSCollectionLayoutSection(group: group) section.contentInsets = NSDirectionalEdgeInsets(top: 10, leading: 10, bottom: 0, trailing: 10) return section } private func createMyListLayout() -> NSCollectionLayoutSection { let itemSize = NSCollectionLayoutSize(widthDimension: .fractionalWidth(1), heightDimension: .fractionalWidth(1 / 7)) let item = NSCollectionLayoutItem(layoutSize: itemSize) let groupSize = itemSize let group = NSCollectionLayoutGroup.horizontal(layoutSize: groupSize, subitems: [item]) let section = NSCollectionLayoutSection(group: group) section.contentInsets = NSDirectionalEdgeInsets(top: 10, leading: 20, bottom: 0, trailing: 20) return section } }まずはViewController本体のコードを手短に説明します。
private let dataSource: CollectionViewDataSource = .init()
collectionView.dataSource = dataSource
普段extensionのみで実装している方もいらっしゃるかと思いますので一応説明しておきます。先ほど実装したCollectionViewDataSourceを初期化し、collectionView.dataSourceに代入しています。
collectionView.register(UINib(nibName: "StandardListCollectionViewCell", bundle: nil), forCellWithReuseIdentifier: "StandardListCell")
collectionView.register(UINib(nibName: "MyListCollectionViewCell", bundle: nil), forCellWithReuseIdentifier: "MyListCell")
こちらのコードはcollectionViewにcellを登録しているコードです!!ViewController内でCollectionViewに直接Cellを貼り付けた場合は必要ないですが、カスタムでxibファイルを使って実装した場合は必要になってきます。
CompositionalLayoutの実装について
僕はCompositionalLayoutにかかわらずUIStackViewを使ってレイアウトを組むときにも1度コンポーネント設計のようなことをしてから実装しています。参考になるかはわかりませんが簡単な図を載せておきます。
CompositionalLayoutは上記の図のように、item, group, section3つの単位を組み立てていきます。感覚でいうとStackViewに似たところを感じます。それではコードの説明をしていきます!!
private func createLayout() -> UICollectionViewLayout {
    let layout = UICollectionViewCompositionalLayout {(
        sectionIndex: Int,
        layoutEnvironment: NSCollectionLayoutEnvironment) -> NSCollectionLayoutSection? in
        if sectionIndex == 0 {
            return self.createStanadardListLayout()
        } else if sectionIndex == 1 {
            return self.createMyListLayout()
        } else {
            return nil
        }
    }
    return layout
}
こちらのコードはsectionの数だけ呼ばれるクロージャの中に、sectionIndexに応じてそれぞれ
createStandardListLayout(),createMyListLayout()という風に分けてUICollectionViewCompositionalLayoutを初期化し、返すというような実装をしています。createStandardListLayout()private func createStanadardListLayout() -> NSCollectionLayoutSection { let itemSize = NSCollectionLayoutSize(widthDimension: .fractionalWidth(0.5), heightDimension: .fractionalWidth(0.28)) let item = NSCollectionLayoutItem(layoutSize: itemSize) item.contentInsets = NSDirectionalEdgeInsets(top: 0, leading: 10, bottom: 15, trailing: 10) let groupSize = NSCollectionLayoutSize(widthDimension: .fractionalWidth(1), heightDimension: .fractionalWidth(0.3)) let group = NSCollectionLayoutGroup.horizontal(layoutSize: groupSize, subitems: [item]) let section = NSCollectionLayoutSection(group: group) section.contentInsets = NSDirectionalEdgeInsets(top: 10, leading: 10, bottom: 0, trailing: 10) return section }順を追って説明していくと、まず一番小さい単位であるitemのサイズを初期化します。詳細にはCollectionViewの横幅の半分(0.5)のwidthとCollectionViewの横幅*0.28のheigthを返すというようなことをしています。
itemSizeを基に、itemを初期化し、itemにcontentInset(内側の余白)を設定していきます。(webでいうとpaddingのようなもの)次にその親となるgroupのサイズを初期化していくのですが、今回の場合だと横に並んだ2つのcellを1つのグループとして扱いたいので、横幅は先ほど初期化したitemの2倍の1、高さはitemと同じ0.28に設定し、horizontalGroupを初期化します。
最後にgroupを使用してsectionを初期化して終わりです!!!!
ここまでの流れがCompositionalLayoutの基本的な実装フローになってきます。もう片方のcreateMyListsLayout()も結果的には同じことをしているので説明は省かせていただきます。まとめ
いかがでしたでしょうか?
今回は「CompositionalLayoutでリマインダー風のレイアウトを実装する」というタイトルではありましたが、viewの描画順やdataSourceクラスの切り分け、複数sectionを使ったCollectionViewの実装、カスタムCellの実装など、色々な概念の説明をしてきました。
この記事の内容に疑問、間違い等ございましたらコメントいただけると幸いです!!
(Qiita初投稿なのでお手柔らかにお願いします!!)tips的な
iOS12でもCompositionalLayoutが使えるライブラリがあるらしい?
こちら

- 投稿日:2020-04-07T23:29:35+09:00
CompositionalLayoutでリマインダー風のレイアウトを実装する
はじめに
CompositionalLayoutとは2019年にWWDCで発表されたUICollectionViewのレイアウト手法です。個人的にこのレイアウト手法が登場してからすごく楽にUICollectionViewのレイアウトを組めています!!(Webでいうとfloatからflexboxに変わるくらい)
しかし、学習する際に調べたところハンズオン形式で学べる記事というものがなかなか見つからなかったので、今回はCompositionalLayoutを使ってiOSにデフォルトでインストールされているリマインダー風のレイアウトを作っていきたいと思います!!また、初心者さん向けの話し方で説明していますのでご了承ください。CompositionalLayoutについての詳細はこちらの記事が参考になるかと思います。
目標物
少し雑ですがこのようなレイアウトを組んでいきたいと思います!!
Main.storyboard
ViewControllerにUICollectionViewを1つ貼るだけなので説明は省きます!
Cellを作る
まず最初にCellを作っていきます!!
also xibにチェックを入れて、StandardListCollectionViewCell.swift
とMyListCollectionViewCell.swiftを作成します。
xibのレイアウトはそれぞれこんな感じです!! ↓↓↓↓↓↓↓
それぞれ、"StandardListCell", "MyListCell"でreuseIdentifierを設定してください!!
(AutoLayout等の説明はこの記事の趣旨から外れるので省かせていただきます..)Cellの実装
まずは、StandardListCollectionViewCellから!!
StandardListCollectionViewCell.swiftimport UIKit final class StandardListCollectionViewCell: UICollectionViewCell { @IBOutlet private weak var logoView: UIView! @IBOutlet private weak var taskCountLabel: UILabel! @IBOutlet private weak var titleLabel: UILabel! override func awakeFromNib() { super.awakeFromNib() self.layer.cornerRadius = 12 self.clipsToBounds = true logoView.clipsToBounds = true } override func layoutIfNeeded() { super.layoutIfNeeded() logoView.layer.cornerRadius = logoView.bounds.height * 0.5 } func configure(taskCount: Int, title: String) { taskCountLabel.text = String(taskCount) titleLabel.text = title } }特に特別な実装はしていないのですが、一点だけ
layoutIfNeeded()関数について説明させていただきます。
この関数内のlogoView.layer.cornerRadius = logoView.bounds.height * 0.5この実装は本来、AutoLayoutを使わない実装ではawakeFromNib()関数内に書くと思うのいます。ですが今回の僕の場合はAutoLayoutで割合を計算して制約をつけているので描画処理の順番の関係でawakeFromNib等の関数内に書くとlogoView.bounds.heightで取れるlogoViewの高さがAutoLayout適用前のものになってしまい、本来角に高さの半分の角丸をつけて円を作りたいのに、円の形がいびつ担ってしまう....ぴえん。なんてことになるのでこういった実装をしています。
(上記、「もっといい実装あるよ!!」というような意見があればお聞きしたいです!!)続いて、MyListCollectionViewCellを実装していきます!!
MyListCollectionViewCell.swiftimport UIKit final class MyListCollectionViewCell: UICollectionViewCell { @IBOutlet private weak var logoView: UIView! @IBOutlet private weak var taskCountLabel: UILabel! @IBOutlet private weak var titleLabel: UILabel! override func awakeFromNib() { super.awakeFromNib() logoView.clipsToBounds = true } override func layoutIfNeeded() { super.layoutIfNeeded() logoView.layer.cornerRadius = logoView.bounds.height * 0.5 } func configure(cellType: CellType, taskCount: Int, title: String) { taskCountLabel.text = String(taskCount) titleLabel.text = title switch cellType { case .first: self.layer.cornerRadius = 12 self.layer.maskedCorners = [.layerMinXMinYCorner, .layerMaxXMinYCorner] self.clipsToBounds = true case .normal: self.layer.cornerRadius = 0 case .last: self.layer.cornerRadius = 12 self.layer.maskedCorners = [.layerMinXMaxYCorner, .layerMaxXMaxYCorner] self.clipsToBounds = true } } } enum CellType { case first, normal, last }このコードも特に特別な実装をしている分けでは無いのですが、先ほど説明した
layoutIfNeeded()ともう一点、最初のCellと最後のCellだけ上下それぞれの角を丸めるといった実装をしています。こちらは難しい事は何もしておらず、単にCellを最初に構成するメソッドconfigure()にCollectionViewのデータソースからそのCellが何番目のCellなのか(最初なのか、間にあるのか、最後にあるのか)をCellTypeというenumを作って渡しています!!CollectionViewのデータソースを実装
今回はsectionが2つある影響もありViewControllerが若干見にくくなってしまったのでextensionではなくUICollectionViewDataSourceのサブクラスを作っていきたいと思います!!
CollectionViewDataSource.swiftimport UIKit final class CollectionViewDataSource: NSObject, UICollectionViewDataSource { func numberOfSections(in collectionView: UICollectionView) -> Int { return 2 } func collectionView(_ collectionView: UICollectionView, numberOfItemsInSection section: Int) -> Int { switch section { case 0: return 4 case 1: return 12 default: return 0 } } func collectionView(_ collectionView: UICollectionView, cellForItemAt indexPath: IndexPath) -> UICollectionViewCell { switch indexPath.section { case 0: guard let standardListCell = collectionView.dequeueReusableCell(withReuseIdentifier: "StandardListCell", for: indexPath) as? StandardListCollectionViewCell else { return UICollectionViewCell() } standardListCell.layoutIfNeeded() standardListCell.configure(taskCount: indexPath.row, title: "AAA\(indexPath.row)") return standardListCell case 1: guard let myListCell = collectionView.dequeueReusableCell(withReuseIdentifier: "MyListCell", for: indexPath) as? MyListCollectionViewCell else { return UICollectionViewCell() } var cellType: CellType = .normal if indexPath.row == 0 { cellType = .first } else if indexPath.row == 11 { cellType = .last } myListCell.layoutIfNeeded() myListCell.configure(cellType: cellType, taskCount: indexPath.row, title: "LLL\(indexPath.row)") return myListCell default: break } return UICollectionViewCell() } }本題のCompositionalLayoutまでの道のりが長くて申し訳ないです..()
こちらのコードは上から順に関数ごとの説明をしていきたいと思います。
numberOfSections
こちらは1つのCollectionViewに持たせるsectionの数を返す関数なので今回は2を返しています。
collectionView(_ collectionView: UICollectionView, numberOfItemsInSection section: Int)
こちらの関数はsectionごとに(sectionが一つの場合は分岐は必要ない)必要なcellの数を返しています。今回は上部のStandardListCollectionViewCell用に4個、MyListCollectionViewCell用に12個返していますが、本来はアプリのデータの数(lists.count的な)を返します。
collectionView(_ collectionView: UICollectionView, cellForItemAt indexPath: IndexPath) -> UICollectionViewCell
最後にこの関数でsectionごとに、それぞれStandardListCollectionViewCellとMyListCollectionViewCellを返します。この関数内で注目して欲しいのがstandardListCell.layoutIfNeeded()とmyListCell.layoutIfNeeded()です。ここで何をしているかというと先ほど説明したそれぞれのCellのlogoViewに正しい角丸をつける関数を呼び出しているだけなのですが、初心者の勘違いポイントとしてawakeFromNibや、`layoutSubViews'のように勝手に呼ばれると考えてしまうことがあると思うので、要注意です!!ようやくLayoutを組む
ようやく本題のCompositionalLayoutを使ってレイアウトを組んでいきたいと思います!!
ViewController本体のコード量が非常に少なくなったのでViewControllerのコードもまとめて載せていきます!!ViewController.swiftclass ViewController: UIViewController { @IBOutlet private weak var collectionView: UICollectionView! private let dataSource: CollectionViewDataSource = .init() override func viewDidLoad() { super.viewDidLoad() collectionView.dataSource = dataSource collectionView.contentInset = UIEdgeInsets(top: 10, left: 0, bottom: 0, right: 0) collectionView.collectionViewLayout = createLayout() collectionView.register(UINib(nibName: "StandardListCollectionViewCell", bundle: nil), forCellWithReuseIdentifier: "StandardListCell") collectionView.register(UINib(nibName: "MyListCollectionViewCell", bundle: nil), forCellWithReuseIdentifier: "MyListCell") } } extension ViewController { private func createLayout() -> UICollectionViewLayout { let layout = UICollectionViewCompositionalLayout {( sectionIndex: Int, layoutEnvironment: NSCollectionLayoutEnvironment) -> NSCollectionLayoutSection? in if sectionIndex == 0 { return self.createStanadardListLayout() } else if sectionIndex == 1 { return self.createMyListLayout() } else { return nil } } return layout } private func createStanadardListLayout() -> NSCollectionLayoutSection { let itemSize = NSCollectionLayoutSize(widthDimension: .fractionalWidth(0.5), heightDimension: .fractionalWidth(0.28)) let item = NSCollectionLayoutItem(layoutSize: itemSize) item.contentInsets = NSDirectionalEdgeInsets(top: 0, leading: 10, bottom: 15, trailing: 10) let groupSize = NSCollectionLayoutSize(widthDimension: .fractionalWidth(1), heightDimension: .fractionalWidth(0.3)) let group = NSCollectionLayoutGroup.horizontal(layoutSize: groupSize, subitems: [item]) let section = NSCollectionLayoutSection(group: group) section.contentInsets = NSDirectionalEdgeInsets(top: 10, leading: 10, bottom: 0, trailing: 10) return section } private func createMyListLayout() -> NSCollectionLayoutSection { let itemSize = NSCollectionLayoutSize(widthDimension: .fractionalWidth(1), heightDimension: .fractionalWidth(1 / 7)) let item = NSCollectionLayoutItem(layoutSize: itemSize) let groupSize = itemSize let group = NSCollectionLayoutGroup.horizontal(layoutSize: groupSize, subitems: [item]) let section = NSCollectionLayoutSection(group: group) section.contentInsets = NSDirectionalEdgeInsets(top: 10, leading: 20, bottom: 0, trailing: 20) return section } }まずはViewController本体のコードを手短に説明します。
private let dataSource: CollectionViewDataSource = .init()
collectionView.dataSource = dataSource
普段extensionのみで実装している方もいらっしゃるかと思いますので一応説明しておきます。先ほど実装したCollectionViewDataSourceを初期化し、collectionView.dataSourceに代入しています。
collectionView.register(UINib(nibName: "StandardListCollectionViewCell", bundle: nil), forCellWithReuseIdentifier: "StandardListCell")
collectionView.register(UINib(nibName: "MyListCollectionViewCell", bundle: nil), forCellWithReuseIdentifier: "MyListCell")
こちらのコードはcollectionViewにcellを登録しているコードです!!ViewController内でCollectionViewに直接Cellを貼り付けた場合は必要ないですが、カスタムでxibファイルを使って実装した場合は必要になってきます。
CompositionalLayoutの実装について
僕はCompositionalLayoutにかかわらずUIStackViewを使ってレイアウトを組むときにも1度コンポーネント設計のようなことをしてから実装しています。参考になるかはわかりませんが簡単な図を載せておきます。
CompositionalLayoutは上記の図のように、item, group, section3つの単位を組み立てていきます。感覚でいうとStackViewに似たところを感じます。それではコードの説明をしていきます!!
private func createLayout() -> UICollectionViewLayout {
    let layout = UICollectionViewCompositionalLayout {(
        sectionIndex: Int,
        layoutEnvironment: NSCollectionLayoutEnvironment) -> NSCollectionLayoutSection? in
        if sectionIndex == 0 {
            return self.createStanadardListLayout()
        } else if sectionIndex == 1 {
            return self.createMyListLayout()
        } else {
            return nil
        }
    }
    return layout
}
こちらのコードはsectionの数だけ呼ばれるクロージャの中に、sectionIndexに応じてそれぞれ
createStandardListLayout(),createMyListLayout()という風に分けてUICollectionViewCompositionalLayoutを初期化し、返すというような実装をしています。createStandardListLayout()private func createStanadardListLayout() -> NSCollectionLayoutSection { let itemSize = NSCollectionLayoutSize(widthDimension: .fractionalWidth(0.5), heightDimension: .fractionalWidth(0.28)) let item = NSCollectionLayoutItem(layoutSize: itemSize) item.contentInsets = NSDirectionalEdgeInsets(top: 0, leading: 10, bottom: 15, trailing: 10) let groupSize = NSCollectionLayoutSize(widthDimension: .fractionalWidth(1), heightDimension: .fractionalWidth(0.3)) let group = NSCollectionLayoutGroup.horizontal(layoutSize: groupSize, subitems: [item]) let section = NSCollectionLayoutSection(group: group) section.contentInsets = NSDirectionalEdgeInsets(top: 10, leading: 10, bottom: 0, trailing: 10) return section }順を追って説明していくと、まず一番小さい単位であるitemのサイズを初期化します。詳細にはCollectionViewの横幅の半分(0.5)のwidthとCollectionViewの横幅*0.28のheigthを返すというようなことをしています。
itemSizeを基に、itemを初期化し、itemにcontentInset(内側の余白)を設定していきます。(webでいうとpaddingのようなもの)次にその親となるgroupのサイズを初期化していくのですが、今回の場合だと横に並んだ2つのcellを1つのグループとして扱いたいので、横幅は先ほど初期化したitemの2倍の1、高さはitemと同じ0.28に設定し、horizontalGroupを初期化します。
最後にgroupを使用してsectionを初期化して終わりです!!!!
ここまでの流れがCompositionalLayoutの基本的な実装フローになってきます。もう片方のcreateMyListsLayout()も結果的には同じことをしているので説明は省かせていただきます。まとめ
いかがでしたでしょうか?
今回は「CompositionalLayoutでリマインダー風のレイアウトを実装する」というタイトルではありましたが、viewの描画順やdataSourceクラスの切り分け、複数sectionを使ったCollectionViewの実装、カスタムCellの実装など、色々な概念の説明をしてきました。
この記事の内容に疑問、間違い等ございましたらコメントいただけると幸いです!!
(Qiita初投稿なのでお手柔らかにお願いします!!)tips的な
iOS12でもCompositionalLayoutが使えるライブラリがあるらしい?
こちら
- 投稿日:2020-04-07T15:47:51+09:00
Xcodeでよく使うショートカットキー

- 投稿日:2020-04-07T12:06:49+09:00
WIP: コロナウイルス 下でAppleのアプリ審査にどのくらい時間がかかるか試してみた。
2020/2月
自作アプリ完成
・ アプリ名 PriLingo
アニメ「プリパラ」シリーズを題材にした語彙を収録する。日本語・英語・中国語(簡体字&繁体字)で閲覧・音声再生ができる。お気に入り登録ができる。
機能としては単純で、主にApp Storeアップロードを1人で全てやる事を目的として作成した。ただ単語が200種類ほど収録しており、それらの選定・それぞれの発音記号の記載、音声の作成などに一番時間を要した。音声ファイルは、Amazon Web Services の一つであるAmazon Pollyを使って生成した。
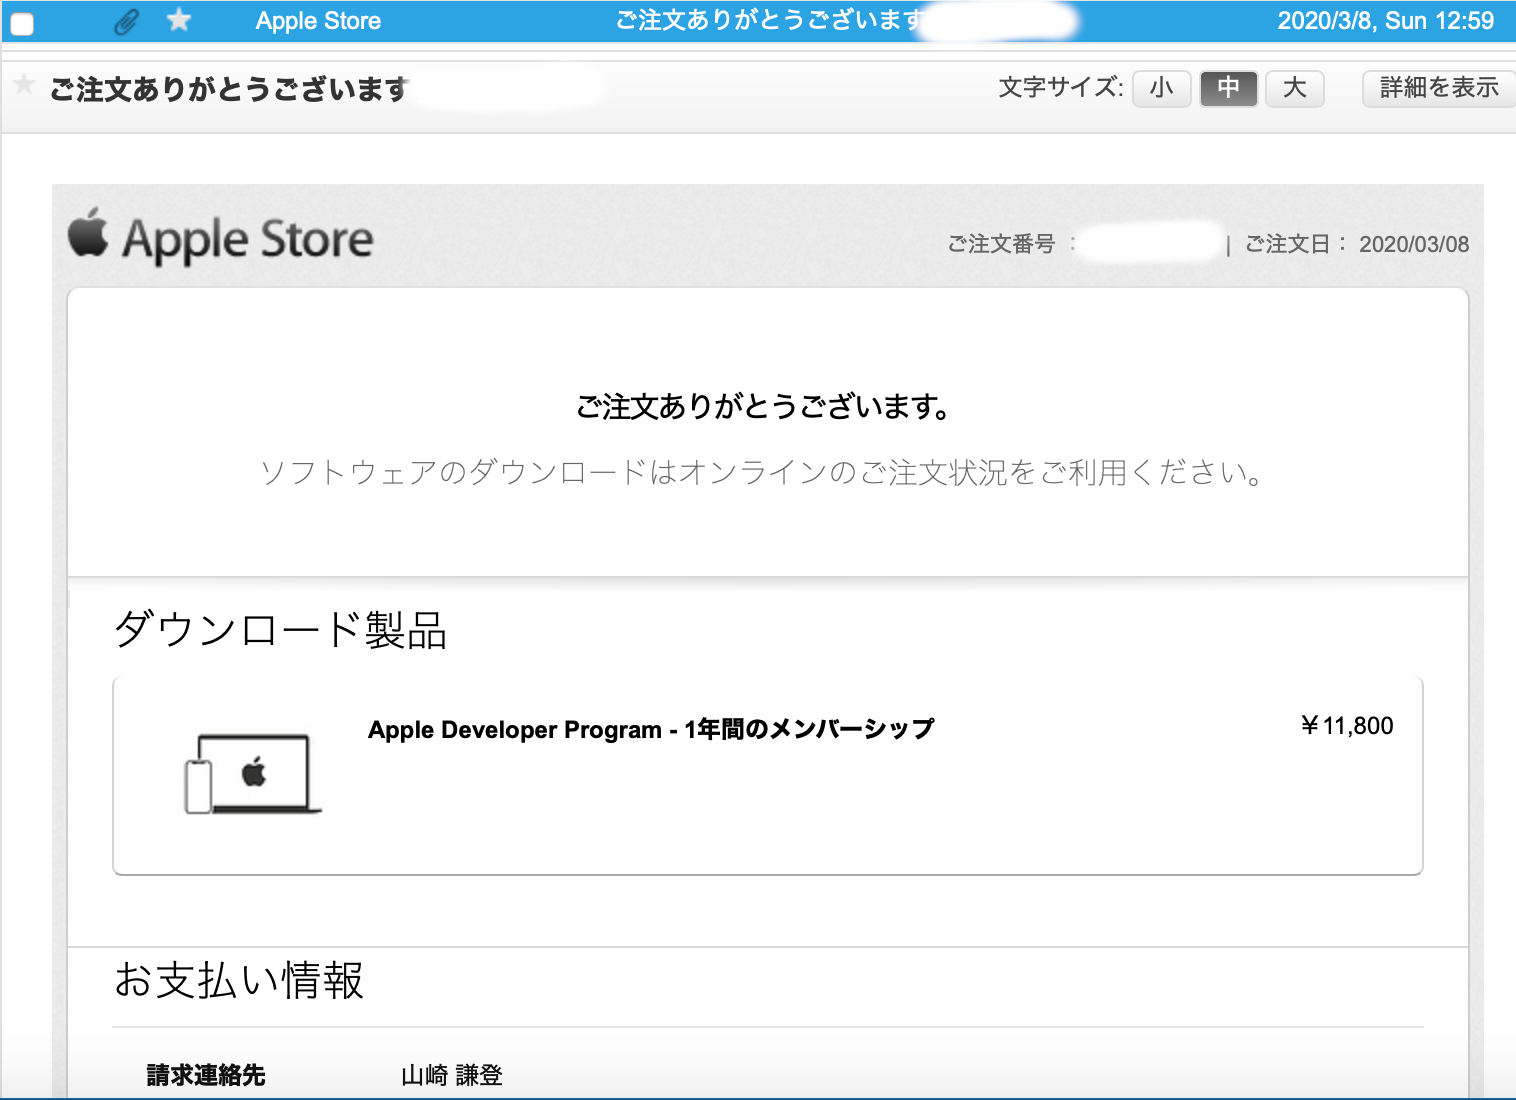
2020/3/8 Apple Developer Program メンバーシップ(個人) 購入
アプリが完成した段階で、App Storeにアップロードするためのメンバーシップを購入した。仕事ではアプリをアップロードした事があったが、個人ではなかったため購入していなかった。
元々持っているApple IDでメンバーシップを購入した。が、なぜかSafariで購入しようとすると、ログイン時の2ファクタ認証コードを入力する欄が表示されず、ログイン自体ができなかった。とりあえずGoogle Chromeでやってみた所、無事ログインが出来、購入する事ができた。
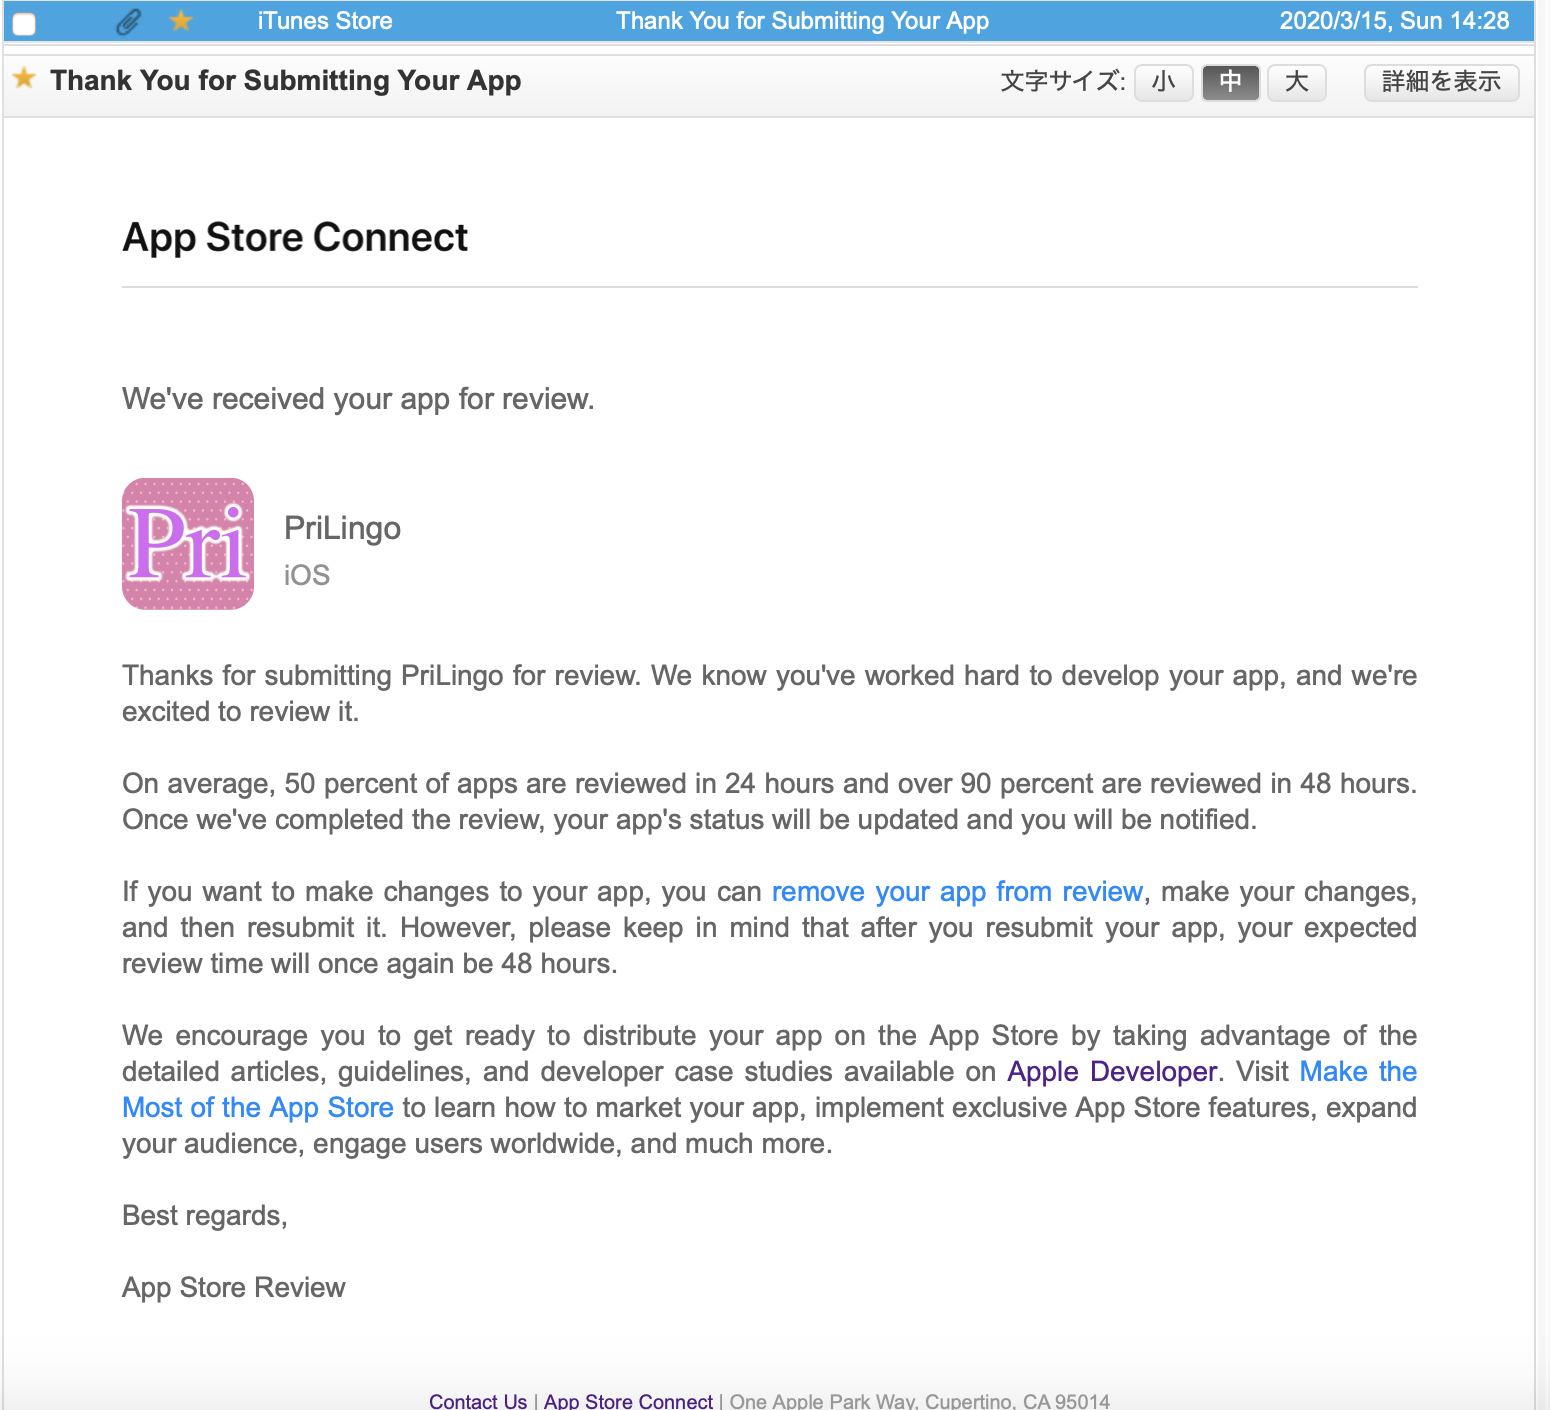
2020/3/15 App Store Connectにて審査に提出
「提出されたアプリのうち50%は24時間以内に審査される」
「90%以上は48時間以内に審査される」とのことだったが・・・コロナウイルスで時間がかかっているのか翌日・翌々日連絡はなし。
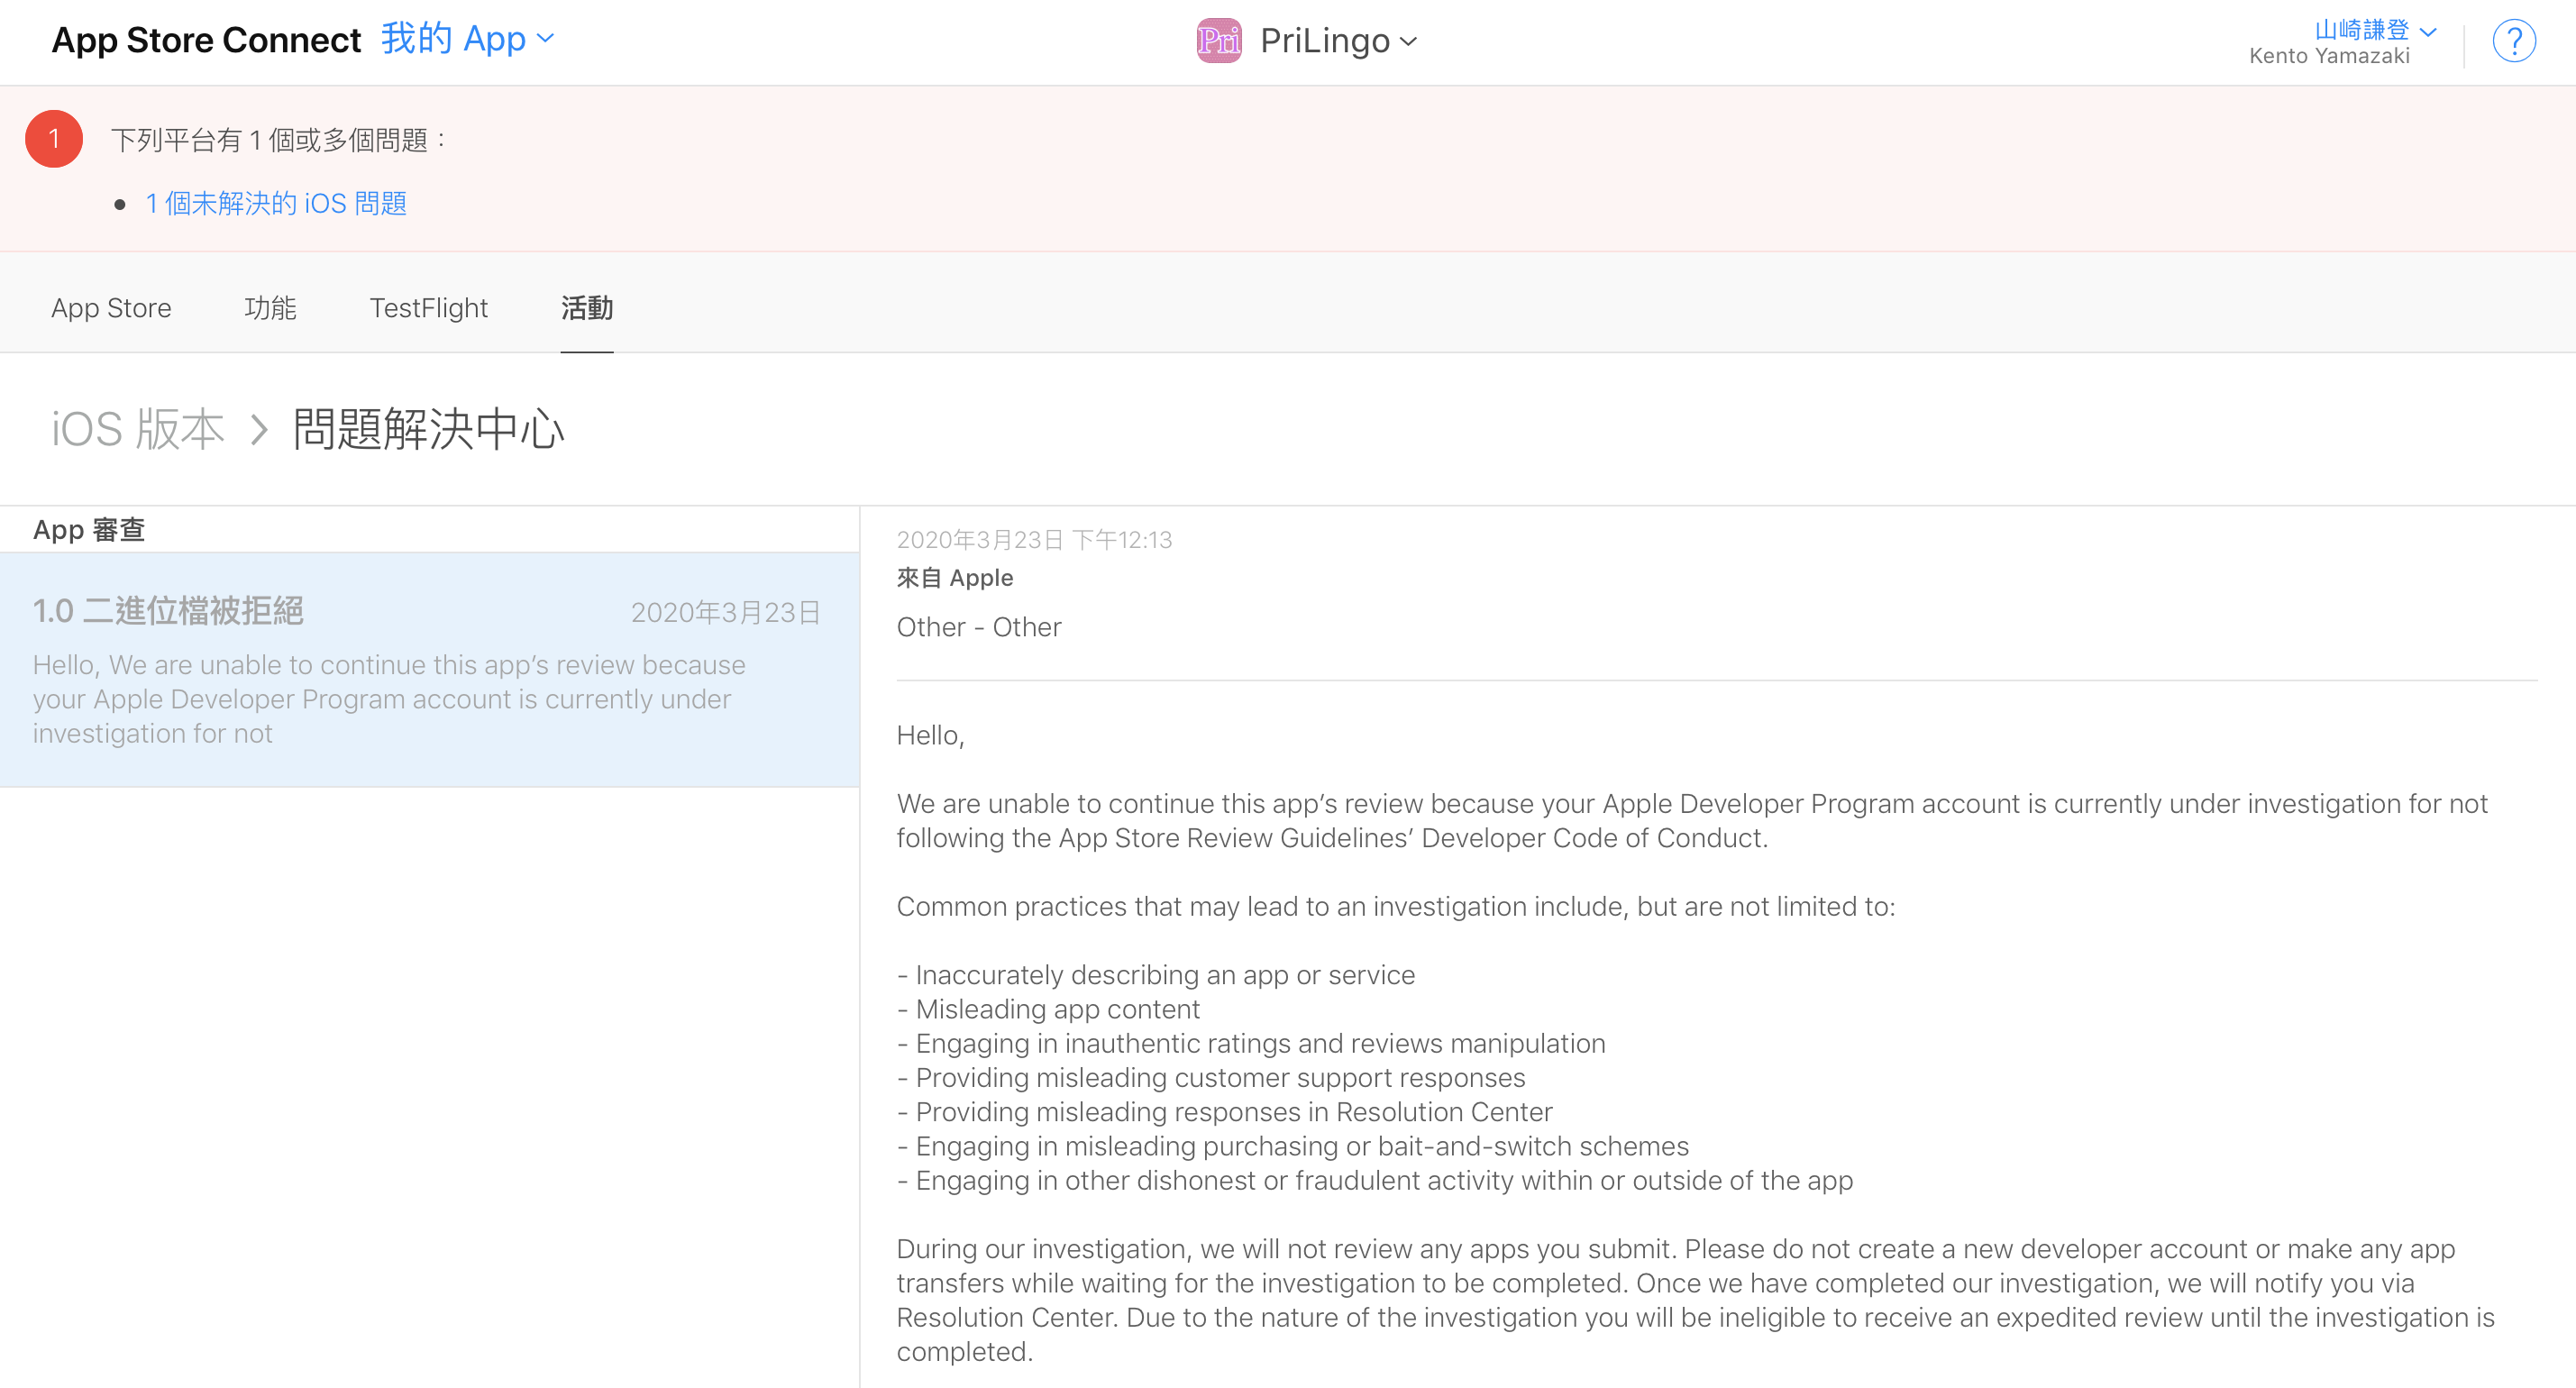
2020/3/22 ステータスが審査中になる
ちょうど一週間経ってやっと審査が開始される。やはりコロナウイルスの影響で時間がかかっている模様。
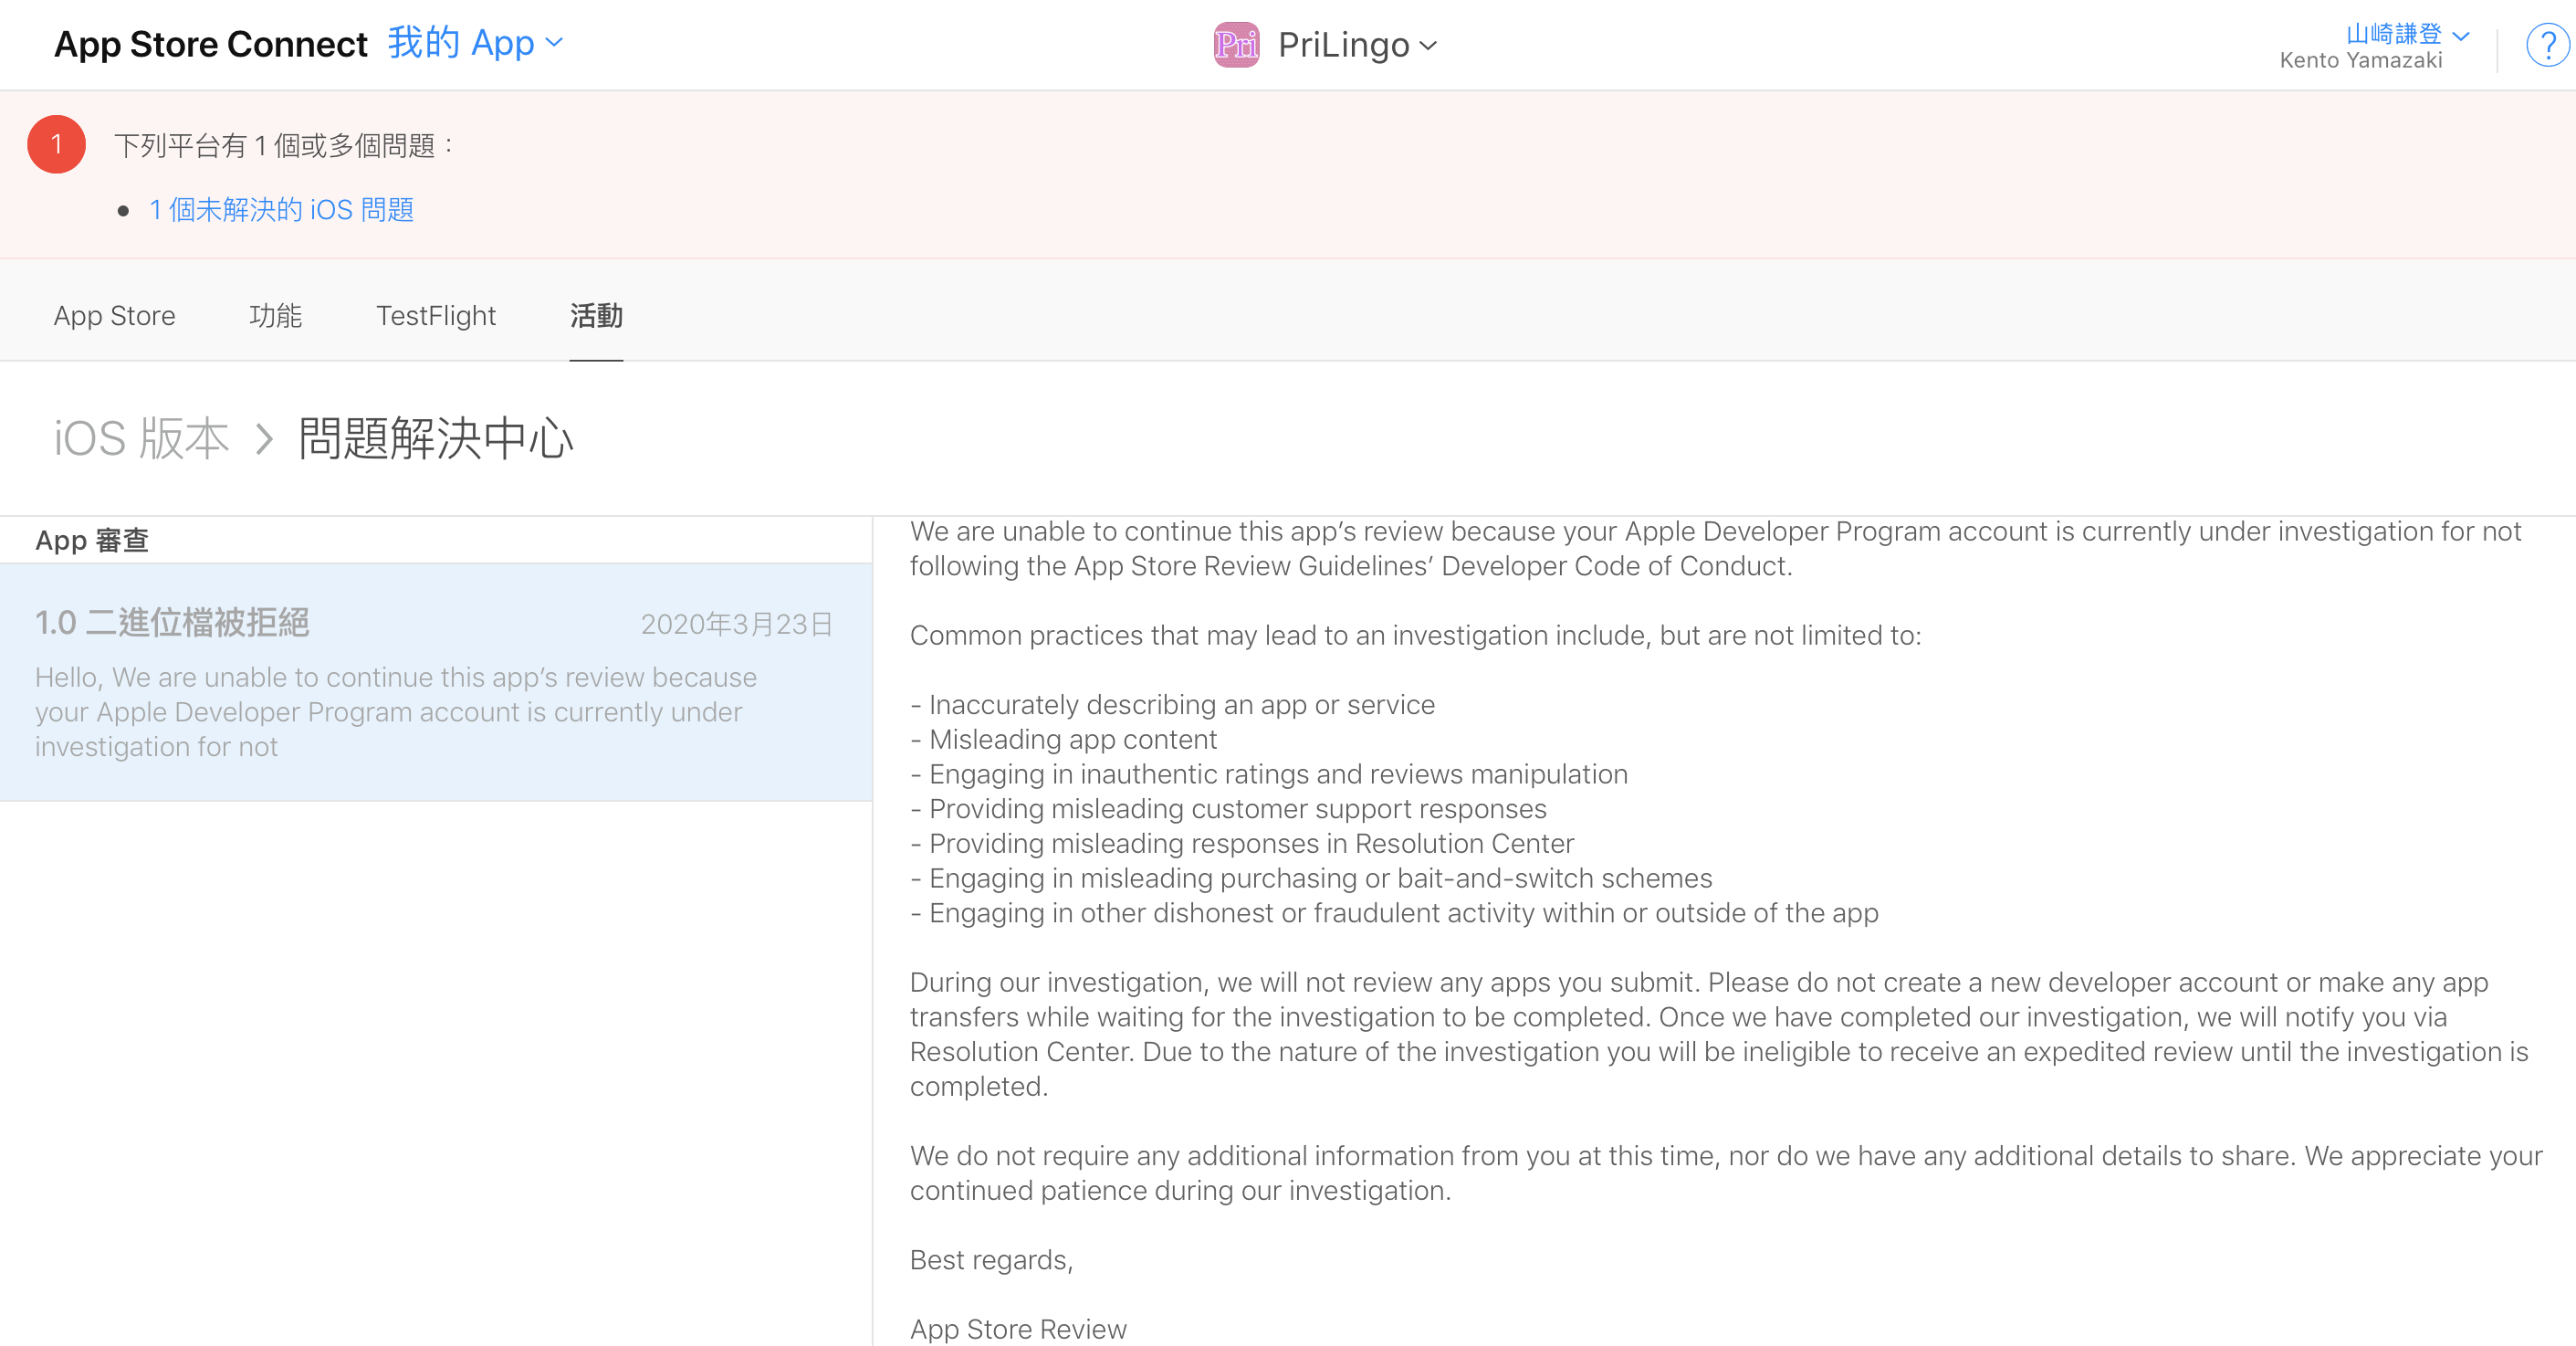
2020/3/23 リジェクトされる
「Apple Developer Program account is currently under investigation」などと言っており、アプリそのもののみならず私のアカウントの正当性まで問題にされている模様。
このメッセージは最初にアプリを提出したアカウントでは比較的よくあることのようだ。場合によっては1ヶ月程度かかるとのこと。(参考:https://qiita.com/gureta/items/b21b264dfa95051e67bb )しかもAppleからの文章に記載の通り、現状ではこちらからできることは何も無い。アプリを再提出することもやめてくれと書かれている。
2020/4/7
いいかげん痺れを切らしてきたので、Appleにメッセージを送り、あとどれくらいかかりそうか尋ねてみた。
Can I ask you how long it will take you to complete investigation of my account and the app I submitted? Though I know recent social situation, but I would be glad to know the rest of time you will need even roughly.
以下、続報をお待ちください。

- 投稿日:2020-04-07T11:28:32+09:00
Sign in with apple実装中に、サーバーサイド側でJWTを検証しようとしたところ、Signature verification raisedが発生する
iOSクライアントからJwt送信 -> Rails側でデコードをする場合に
Signature verification raisedが発生した
各種パラメーターは正しく与えているのにデコードに失敗してしまう
jwtの有効期限が切れたのかと思ったがそういうわけでもないようだった
結論、keysの正しいkidを選択していなかったことだった
Appleのサイトから証明書のjsonを取得すると、keysが2つあるのに気づいていた
確認したところ、デコードに使えるのは片方1つのみで、それはjwtの中に指定されている
正しいkeyのkidを指定したところ、うまく動くようになった
- 投稿日:2020-04-07T10:32:27+09:00
Storyboardが複数の場合の画面遷移
はじめに
Storyboard:ViewController=1:1で開発する時に画面遷移ってどうするんだろう、と思ったのでやってみました。
そこら中に記事があるので、自分用の備忘録として残しておきます。
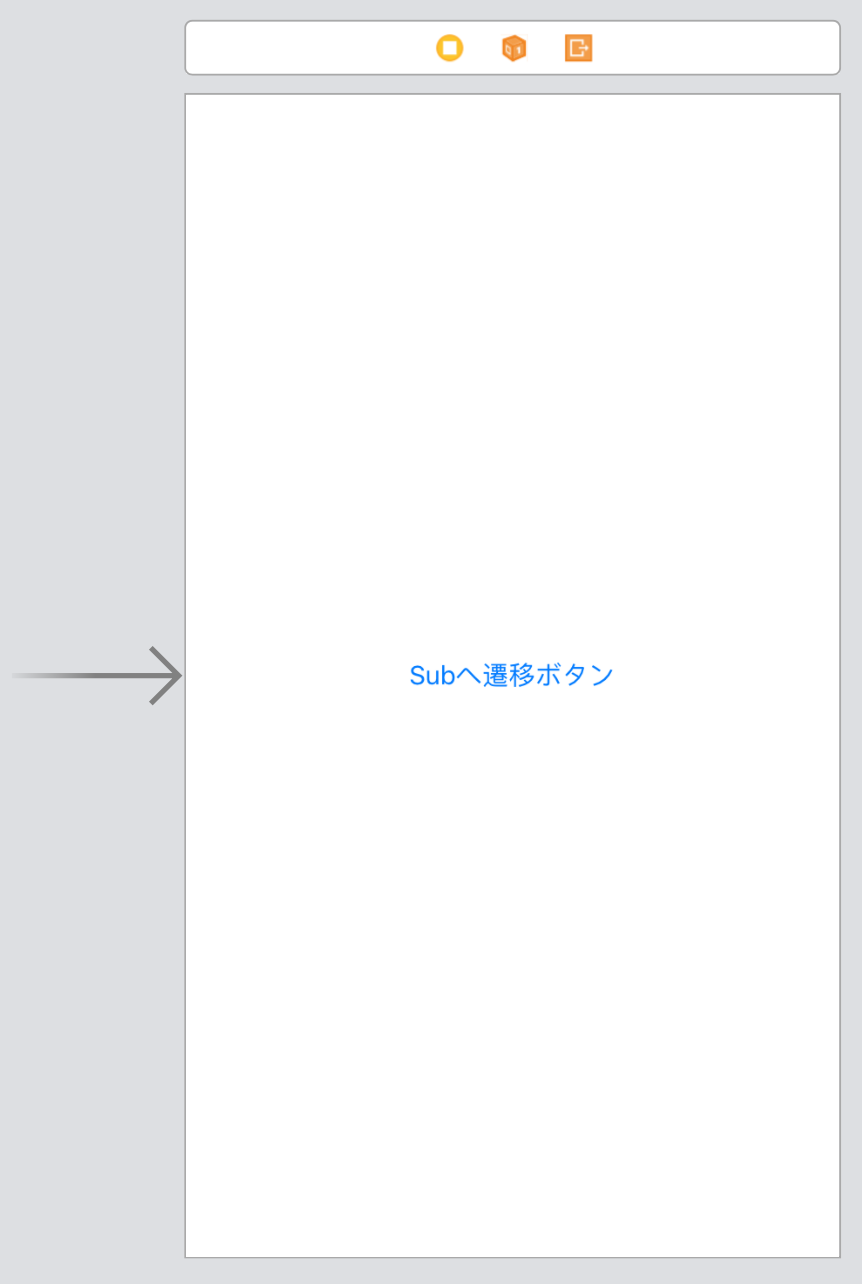
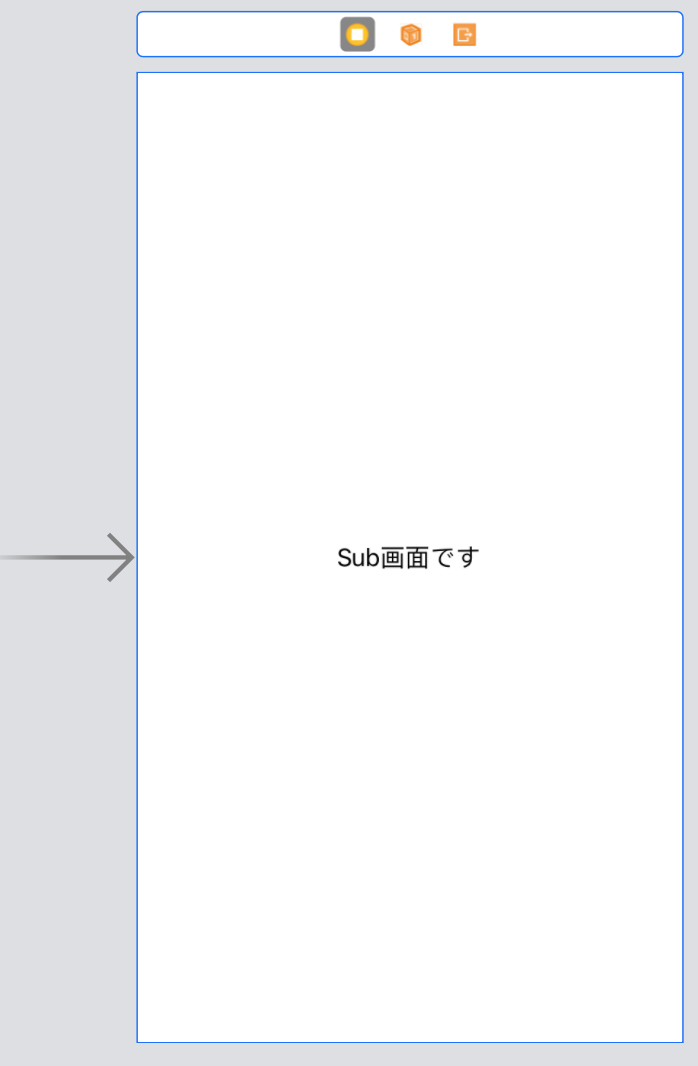
想定は「Main.storybard」→「Sub.storyboard」の画面遷移です。手順
1.
Main.storyboardを開いて画面遷移する用のボタンを用意する。
MainViewController.swiftimport UIKit class MainViewController: UIViewController { override func viewDidLoad() { super.viewDidLoad() // Do any additional setup after loading the view. } @IBAction func tapBtn(_ sender: Any) { // Storyboardのインスタンスを名前指定で取得する let storyboard = UIStoryboard(name: "Sub", bundle: nil) // Storyboard内で'is initial'に指定されているViewControllerを取得する let nextVC = storyboard.instantiateInitialViewController() as! SubViewController // FullScreenにする nextVC.modalPresentationStyle = .fullScreen // Subへ渡す値 nextVC.text = "hello" // <--- SubViewControllerのプロパティ`text` // presentする self.present(nextVC, animated: true, completion: nil) } }2.
Sub.storyboardとSubViewController.swiftを作成する
この時、
Is Initial ViewControllerにチェックを入れることを忘れないように!
3.起動すれば動くはず
参考

- 投稿日:2020-04-07T05:33:51+09:00
[Swift] Unity as a LibraryをSwiftから呼ぶ
基本的なところはここを見ながら進める。
https://qiita.com/tkyaji/items/7dbd56b41b6ac3e72635SwiftでUnityクラスを作る。上の記事ならこんなかんじ。
class Unity: NSObject, UnityFrameworkListener, NativeCallsProtocol {
    static let shared = Unity()
    private let unityFramework: UnityFramework

    override init() {
        let bundlePath = Bundle.main.bundlePath
        let frameworkPath = bundlePath + "/Frameworks/UnityFramework.framework"
        let bundle = Bundle(path: frameworkPath)!
        if !bundle.isLoaded {
            bundle.load()
        }
        let frameworkClass = bundle.principalClass as! UnityFramework.Type
        let framework = frameworkClass.getInstance()!
        if framework.appController() == nil {
            var header = _mh_execute_header
            framework.setExecuteHeader(&header)
        }
        unityFramework = framework
        super.init()
    }

    func application(_ application: UIApplication, didFinishLaunchingWithOptions launchOptions: [UIApplication.LaunchOptionsKey: Any]?) {
        unityFramework.register(self)
        FrameworkLibAPI.registerAPIforNativeCalls(self)
        unityFramework.setDataBundleId("com.unity3d.framework")
        unityFramework.runEmbedded(withArgc: CommandLine.argc, argv: CommandLine.unsafeArgv, appLaunchOpts: launchOptions)
    }

    var view: UIView {
        unityFramework.appController()!.rootView!
    }

    func showHostMainWindow(_ color: String!) {

    }
}
ViewControllerを作る。
class LaunchViewController: UIViewController {}

class ViewController: UIViewController {
    private let unityView = Unity.shared.view

    override func loadView() {
        super.loadView()
        view.addSubview(unityView)
        NSLayoutConstraint.activate([
            unityView.topAnchor.constraint(equalTo: view.topAnchor),
            unityView.leftAnchor.constraint(equalTo: view.leftAnchor),
            unityView.rightAnchor.constraint(equalTo: view.rightAnchor),
            unityView.bottomAnchor.constraint(equalTo: view.bottomAnchor),
        ])
    }
}
後述するが、
LaunchViewControllerなるものを作っておく。AppDelegate.swift@UIApplicationMain class AppDelegate: UIResponder, UIApplicationDelegate { lazy var window: UIWindow? = .init(frame: UIScreen.main.bounds) func application(_ application: UIApplication, didFinishLaunchingWithOptions launchOptions: [UIApplication.LaunchOptionsKey: Any]?) -> Bool { window?.rootViewController = LaunchViewController() window?.makeKeyAndVisible() Unity.shared.application(application, didFinishLaunchingWithOptions: launchOptions) window?.rootViewController = ViewController() return true } }起動時にUnityクラスを初期化しておく。
runEmbeddedはwindowが無いと上手く動かないので、先ほど作ったLaunchViewControllerでwindowを作り、そのあとでメインのViewControllerに差し替える。
起動直後にUnityを出さないのであれば、適当にwindowが出来てから呼べばOK
- 投稿日:2020-04-07T01:51:06+09:00
Swift5 UITextFieldやUITextViewで全角文字数制限、半角文字数制限(全角数の倍)
はじめに
UITextFieldやUITextViewで入力された文字数を制限する方法は簡単にできますが
半角全角混在した文字列を全角で50文字(半角だと100文字)みたいな
簡単にできそうな事がswiftで実現するには苦労しました自分なりに試行錯誤しながら考えた方法ですが
下記の方法以外にいい方法があったら教えてくださいゴール
最大文字数が全角で50文字(半角で100文字)以内という条件の時
全角で50文字、半角で100文字を越えるとそれ以上入力できない
もしくは超えた分を削除詰まるところ半角全角が混在した文章がshiftJISで100バイトを超えない事
コード全文
この後に冗長的な解説がありますので...取り急ぎコードのみでわかる方用に全文載せておきます
ViewController.swift//swift5 import UIKit class ViewController: UIViewController, UITextFieldDelegate, UITextViewDelegate { let limitTextField = UITextField() let maxLength: Int = 100 override func viewDidLoad() { super.viewDidLoad() NotificationCenter.default.addObserver( self, selector: #selector(inputTextdDidChange), name: UITextField.textDidChangeNotification, object: nil ) configureViews() } func configureViews(){ limitTextField.keyboardType = UIKeyboardType.default limitTextField.borderStyle = UITextField.BorderStyle.roundedRect limitTextField.returnKeyType = UIReturnKeyType.done limitTextField.clearButtonMode = UITextField.ViewMode.whileEditing limitTextField.translatesAutoresizingMaskIntoConstraints = false limitTextField.delegate = self self.view.addSubview(limitTextField) limitTextField.widthAnchor.constraint(equalToConstant: 200).isActive = true limitTextField.topAnchor.constraint(equalTo: self.view.topAnchor, constant: 16).isActive = true limitTextField.centerXAnchor.constraint(equalTo: self.view.centerXAnchor).isActive = true } @objc func inputTextdDidChange(notification: NSNotification) { let textField = notification.object as! UITextField if textField == limitTextField { if let text = textField.text { var eachCharacter = [Int]() for i in 0..<text.count { let textIndex = text.index(text.startIndex, offsetBy: i) eachCharacter.append(String(text[textIndex]).lengthOfBytes(using: String.Encoding.shiftJIS)) } if textField.markedTextRange == nil && text.lengthOfBytes(using: String.Encoding.shiftJIS) > maxLength { var countByte = 0 var countCharacter = 0 for n in eachCharacter { if countByte < maxLength - 1 { countByte += n countCharacter += 1 } } textField.text = text.prefix(countCharacter).description } } }else{ return } } override func touchesBegan(_ touches: Set<UITouch>, with event: UIEvent?) { self.view.endEditing(true) } }詳細な解説(駄文)
UITextFieldの状態をリアルタイムで監視する
textField独自の
textField:shouldChangeCharactersInRange:replacementString:
はなにやら問題があるみたいなので
NotificationCenterでUITextFieldが変更されるたびにくる通知(UITextField.textDidChangeNotification)を監視して
関数を実行しますiOS で文字数制限つきのテキストフィールドをちゃんと作るのは難しいという話
※上記リンク先ではでは入力後、さらに文中に文字を挿入した時に制限以上になった場合直前の文字列から削除していく方法が載っています
本稿では単に制限文字以上入力できない、または制限文字数以上は後ろから削除という仕様ですViewController.viewDidLoad()NotificationCenter.default.addObserver( self, selector: #selector(inputTextdDidChange), //textFielに変更があると呼びだすユーザー関数 name: UITextField.textDidChangeNotification, //Swiftが持ってる通知(textFielに変更があるかを監視) object: nil )UITextFieldが変更されるたびに実行する関数
半角か全角どちらか一方のみを文字数制限する場合
ViewController.inputTextdDidChange@objc func inputTextdDidChange(notification: NSNotification) { let textField = notification.object as! UITextField if textField == limitTextField { if let text = textField.text { if textField.markedTextRange == nil && text.count > maxLength { textField.text = text.prefix(maxLength).description } } }else{ return } }
textField.markedTextRange == nil && text.count > maxLength //文字変換が終了した時点で設定していた最大文字数を超えていた場合

textField.text = text.prefix(maxLength).description //textFieldの文字にtextFieldの文字から最大文字数までの文字を入力(最大文字数以上削除して再入力)

※textField.markedTextRange == nil  // 文字変換が終了したかどうか
このtext.countと.prefixが半角全角を区別せずに文字を数えてしまいますので
半角全角混在していなければこちらのコードでも文字数制限できます
(例: "123あいう"はtext.countも.prefixも6文字、実際は半角で9文字,全角で4.5文字)こっから本題
text.countで半角全角を区別します
.countの代わりに.lengthOfBytes(using: String.Encoding.shiftJIS)を使い
shiftJISにエンコードしてバイト数を数えるので(shiftJISでは半角=1バイト、全角=2バイト以外ない)
"123あいう"は9バイトが返ってきました.prefixでは半角全角を区別できません
.countは.lengthOfBytes(using: String.Encoding.shiftJIS)で半角全角が区別できましたが
.prefixには代用手段がありませんでしたので.prefixでは半角全角を区別できません(あったら教えて欲しえてください)仮に全角で5文字以内の文字数制限の時
入力した文字列が全部半角なら
if text.lengthOfBytes(using: String.Encoding.shiftJIS) > MaxLength {
のmaxLengthを10にすれば半角文字が10個以上入力された時(10バイト=全角5文字)
textField.text = text.prefix(maxLength).description
maxLengthの文字数までを自分のtextFieldに入力する(これ以上入力してもまたここまで戻ってくるのでこれ以上入れられない)この条件で全角文字を入れると
if text.lengthOfBytes(using: String.Encoding.shiftJIS) > MaxLength {
"あいうえお" 全角で5文字の時(10バイトの時)
textField.text = text.prefix(maxLength).description
maxLengthの文字数までを自分のtextFieldに入力する
ここで.prefixは半角全角を区別しないので全角で10文字(20バイト)まで入ってしまいます
そこでtext.prefix(maxLength).description
のmaxLengthを半角の文字数と全角の文字数によって変えなければいけません。
“1234567890”なら10
“12345678あ”なら9
“123456あい”なら8
.
.
.
“12あいうえ”なら6
のように可変的に変えるには.prefixでは半角全角を区別できないので可変的に最大文字数を取得し制限文字数として設定
    @objc func inputTextdDidChange(notification: NSNotification) {
        let textField = notification.object as! UITextField
        if textField == limitTextField {
            if let text = textField.text {
                var eachCharacter = [Int]()
                for i in 0..<text.count {
                    let textIndex = text.index(text.startIndex, offsetBy: i)
                    eachCharacter.append(String(text[textIndex]).lengthOfBytes(using: String.Encoding.shiftJIS))
                }

                if textField.markedTextRange == nil && text.lengthOfBytes(using: String.Encoding.shiftJIS) > maxLength {
                    var countByte = 0
                    var countCharacter = 0
                    for n in eachCharacter {
                        if countByte < maxLength - 1 {
                            countByte += n
                            countCharacter += 1
                        }
                    }
                    textField.text = text.prefix(countCharacter).description
                }
            }
        }else{
            return
        }
    }
この関数自体がUITextFieldが変更されるたびに呼び出されるので
UITextFieldが変更されるたびに全角か半角か判定しますvar eachCharacter = [Int]() for i in 0..<text.count { let textIndex = text.index(text.startIndex, offsetBy: i) eachCharacter.append(String(text[textIndex]).lengthOfBytes(using: String.Encoding.shiftJIS)) }UITextFieldが変更されるたび
全ての文字一つずつを毎回1バイトか2バイトか判定して、配列に要素として追加
毎回検証するのは途中で文字が消されたりしても、実際の文字列と配列の要素数を乖離させないためif textField.markedTextRange == nil && text.lengthOfBytes(using: String.Encoding.shiftJIS) > maxLength { var countByte = 0 var countCharacter = 0 for n in eachCharacter { if countByte < maxLength - 1 { countByte += n countCharacter += 1 } } textField.text = text.prefix(countCharacter).description }上で文字列を要素として追加した配列をfor inで分解して
バイト数を変数countCharacterに足していく
と同時に文字数を変数countByteでカウント
変数countCharacterのバイト数が上限(maxLength)に達したら終了
変数countCharacterがバイト数が上限に達した時の文字数(countByte)を最大文字数として
.prefixで文字を制限これで半角全角問わず、バイト数を上限に可変的に最大文字数を取得し
半角全角混在した文字列でも文字数で制限することができましたUITextViewでの方法
UITextViewのコードは割愛します
多分ほとんどUITextFieldと同じだと思います
タイトル詐欺です。すみません
- 投稿日:2020-04-07T01:05:11+09:00
iOS app開発 習得日記 (3)
(https://qiita.com/gomi_ningen/items/4e0e5bd98f08c4bcf93d)
続き
4.6.2
まで行くが、つまづくエラーが理解できない
viewDidLoadにdelegateプロパティを設定するところ
addTaskTextField.delegete = self
ここで、Use of unresolved identifier とでる。
tableViewと同じように宣言しなければならないのはわかっているのだが、
どうすればいいのか?
接続するのか?誰か教えてください!!
import UIKit
import Foundation

class TODOMainViewContorller: UIViewController {

    @IBOutlet weak var dismissButton: UIBarButtonItem!

   @IBOutlet weak var tableView: UITableView!

    @IBOutlet weak var textField: UITextField!

    fileprivate var tasks:[String] = ["go to school", "go back home"]

    override func viewDidLoad() {
        super.viewDidLoad()
        dismissButton.target = self
        dismissButton.action = #selector(TODOMainViewContorller.dismissButtonTapped(_ :))
        tableView.delegate = self
        tableView.dataSource = self

        addTaskTextField.delegete = self

    }

    @objc func dismissButtonTapped(_ sender: Any) {
        dismiss(animated: true, completion: nil)
    }

}

    extension TODOMainViewContorller: UITableViewDataSource {
        func tableView(_ tableView: UITableView, numberOfRowsInSection section: Int) -> Int {
            return tasks.count
    }
        func tableView(_ tableView: UITableView, cellForRowAt indexPath: IndexPath) -> UITableViewCell {
            if let cell = tableView.dequeueReusableCell(withIdentifier: "TODOMainViewTableCell") as? TODOMainViewTableCell {
                cell.taskLabelText = tasks[indexPath.item]
                return cell
            } else {
                return UITableViewCell()
            }

        }

}

extension TODOMainViewContorller: UITableViewDelegate {

    func tableView(_ tableView: UITableView, heightForHeaderInSection section: Int) -> CGFloat {
        return 1
    }

    func tableView(_ tableView: UITableView, didSelectRowAt indexPath: IndexPath) {
        NSLog("selected row at: \(indexPath.item)")
    }

    func tableView(_ tableView: UITableView, heightForRowAt indexPath: IndexPath) -> CGFloat {
        return 30
    }

    func tableView(_ tableView: UITableView, canEditRowAt indexPath: IndexPath) -> Bool {
        return true
    }

    func tableView(_ tableView: UITableView, editActionsForRowAt indexPath: IndexPath) -> [UITableViewRowAction]? {
        let action = UITableViewRowAction(style: .destructive, title: "Delete") {[weak self] _,_ in self?.tasks.remove(at: indexPath.item)
            tableView.reloadData()

    }
        return[action]
}

}

extension TODOMainViewContorller: UITextFieldDelegate {
    func textFieldShouldReturn(_ textField: UITextField) -> Bool {
        textField.resignFirstResponder()
        if let task = textField.text, task != "" {
            tasks.append(task)
            textField.text = ""
            tableView.reloadData()
        }
        return true
    }
}