- 投稿日:2020-04-02T23:12:22+09:00
久しぶりに create-react-app を使ったら動かなかった話
事象
最近はいつも React Native を書いてるので、たまには React でも触ろうとして、公式に従い
npx create-react-appコマンドを実行したら、node_modules/ package.json yarn.lockしか存在しないプロジェクトが生成されました。
しかも、package.jsonは、{ "name": "PROJECT_NAME", "version": "0.1.0", "private": true, "dependencies": { "react": "^16.13.1", "react-dom": "^16.13.1", "react-scripts": "3.4.1", }, }というシンプル極まりないもの。
グローバルインストールしたcreate-react-appを削除しても直りません。解決策
GitHub の issue にあるように、再度グローバルインストールをして、
npx create-react-appを実行すると直りました。久しぶりに触ると色々とトラブルに直面しますね。不幸だ(ぇ
- 投稿日:2020-04-02T21:08:20+09:00
ReactとTypeScriptでWebクライアントを5分で作る
ReactとTypeScriptで軽くクライアントを作ってみます。
コマンドをコピペして実行していけば5分程度で作れます。下準備
ディレクトリの作成
mkdir sample_client
cd sample_client
Babel系ライブラリのインストール
トランスパイラーのライブラリを入れます。
$ yarn add -D @babel/core \
    @babel/plugin-external-helpers \
    @babel/plugin-proposal-class-properties \
    @babel/plugin-proposal-object-rest-spread \
    @babel/plugin-transform-runtime \
    @babel/preset-env \
    @babel/preset-react \
    @babel/preset-typescript
Webpack系のライブラリのインストール
webpackやそれに関連するライブラリと各種基本的なローダー系ライブラリを入れます。
あとTypescriptとts-loaderも。$ yarn add -D webpack \ webpack-cli \ webpack-dev-server \ webpack-hot-middleware \ html-webpack-plugin \ babel-loader \ style-loader \ css-loader \ source-map-loader \ typescript \ ts-loaderReactのインストール
$ yarn add react \
    react-dom \
    @types/react \
    @types/react-dom
ESLintとPrettierのインストール
$ yarn add -D eslint \
    eslint-config-prettier \
    eslint-plugin-prettier \
    @typescript-eslint/eslint-plugin \
    @typescript-eslint/parser \
    prettier
webpackの設定
$ touch webpack.config.jswebpack.config.jsconst path = require('path') const HtmlWebpackPlugin = require('html-webpack-plugin') module.exports = (env, { mode = 'development' }) => { const config = { mode, entry: './src/Index.tsx', output: { path: path.resolve(__dirname, 'dist'), filename: 'bundle.js', }, devtool: 'source-map', resolve: { extensions: ['.js', '.jsx', '.ts', '.tsx'] }, module: { rules: [ { test: /\.(js|jsx|tsx|ts)$/, exclude: /node_modules/, use: { loader: 'babel-loader', options: { presets: [ '@babel/preset-env', '@babel/preset-react', '@babel/preset-typescript', ], plugins: [ '@babel/plugin-transform-runtime', '@babel/plugin-proposal-class-properties', '@babel/plugin-proposal-object-rest-spread', ], }, }, }, { loader: 'source-map-loader', test: /\.js$/, exclude: /node_modules/, enforce: 'pre', }, { test: /\.css/, use: [ 'style-loader', { loader: 'css-loader', options: { url: false }, }, ], }, ], }, devServer: { port: 3000, }, plugins: [ new HtmlWebpackPlugin({ filename: path.resolve(__dirname, 'dist/index.html'), template: path.resolve(__dirname, 'src/public', 'index.html'), }), ], } return config }TypeScriptの設定
$ touch tsconfig.jsontsconfig.json{ "extends": "./tsconfig.paths.json", "compilerOptions": { "outDir": "./dist/", "sourceMap": true, "noImplicitAny": true, "module": "es6", "target": "es2015", "jsx": "react", "strict": true, "allowSyntheticDefaultImports": true, "forceConsistentCasingInFileNames": true }, "include": [ "./src/", ], "exclude": [ "node_modules", "dist", ], }extendsではエイリアスを定義することができ、別ファイルに分けて以下のように書ける(一応付け足しているが別に分けなくても良い)。
$ touch tsconfig.paths.jsontsconfig.paths.json{ "compilerOptions": { "baseUrl": "./", "paths": { "@public/*": ["./src/public/*"] } } }これに加えて、webpack.config.jsを以下の部分を修正するとimportの方法を変えることができる。
webpack.config.jsmodule.exports = (env, { mode = 'development' }) => { const config = { . . . resolve: { extensions: ['.js', '.jsx', '.ts', '.tsx'], alias: { '@public': path.resolve(__dirname, 'src/public') }, // 追加 }, . . . } }以降
./src/public配下のファイルはimport SomeModule from '@public'で参照することができる。Reactコンポーネントの作成
まずReactをマウントするhtmlを作成する(webpack.config.jsのHtmlWebpackPluginのtemplateで参照するファイル)。
$ mkdir src $ mkdir src/public $ cd src/public $ touch index.htmlindex.html<html> <head> <title>SampleClient</title> </head> <body> <div id='root'/> </body> </html>次に、Reactのルートのファイルを作成する(webpack.config.jsのconfig.entryで指定するファイル)。
$ cd ../ $ touch Index.tsx $ touch App.tsx $ touch index.csssrc/Index.tsximport React from 'react' import ReactDOM from 'react-dom' import App from './App' ReactDOM.render(<App />, document.getElementById('root'))
Index.tsxで読んでいるApp.tsxを作成する。App.tsximport React from 'react' import './index.css' const App: React.FC = () => { return <p>Hello, world</p> } export default Appindex.cssbody { margin: 0px; padding: 0px; } p { color: #f05e5e; }あとはPresentational Component(見た目だけを扱うコンポーネント)とContainer Component(Reduxとのやり取りやロジックを扱うコンポーネント)でコンポーネントを分けて、うまい具合に
App.tsxでReact-routerでルーティングしてあげるなど、好きに作っていきます。ESLintとPrettierの設定
cd ../
touch .eslintrc.json
rulesのprettier/prettierでprettierの設定を追加している。eslintrc.json{ "extends": [ "eslint:recommended", "plugin:@typescript-eslint/recommended", "plugin:@typescript-eslint/eslint-recommended", "plugin:prettier/recommended", "prettier/@typescript-eslint" ], "plugins": [ "@typescript-eslint", "prettier" ], "parser": "@typescript-eslint/parser", "env": { "browser": true, "node": true, "es6": true }, "parserOptions": { "sourceType": "module" }, "rules": { "prettier/prettier": [ "error", { "trailingComma": "es5", "tabWidth": 2, "semi": false, "singleQuote": true } ], "@typescript-eslint/explicit-function-return-type": "off", "@typescript-eslint/array-type": [ "error", { "default": "array-simple" } ], "@typescript-eslint/no-var-requires": "off", "@typescript-eslint/no-unused-vars": "off", "@typescript-eslint/no-explicit-any": "off" } }
package.jsonのscriptを追加する。
yarn start・・・localhost:3000でクライアントを実行
yarn build・・・distディレクトリにbundle.jsを生成
format-autofix・・・eslintとprettierでコードを整形package.json{ "scripts": { "start": "webpack-dev-server --open --hot", "build": "webpack --mode production", "format-autofix": "eslint src --ext .ts,.tsx --fix" }, . . . }おわり
ReduxやRedux-sagaを追加して非同期でAPI通信をしたり、
DotentやStyledComponentsを入れたりしてSPAを作っていきましょう以下はソースコードサンプルです。
https://github.com/yutaro1204/sampleReactClient
- 投稿日:2020-04-02T15:38:31+09:00
Angular開発者のためのReact基本
Angular開発者のためのReact基本
Angularの人気がよろしくない。
「今後学習するつもりもないと回答するユーザーの割合多い。徐々に使用割合が減っていく可能性が見えてきている。」JavaScriptフロントエンドフレームワーク、Angularの人気が下落中ということでReactやVueへ移行するプロジェクト、それらの習得に軸足を移していくフロントエンジニアもいるでしょう。私もそう。Googleのネームバリューとフルスタックフレームワークという豪奢性に飛びついたのだが。
というわけでこれからはAngularのメンテをしながら新たにReactをやっていこう。なによりReact Nativeのコミュニティが妙に熱い。
初期設定
まずnode.jsをインストール
Reactアプリケーションを作成
$ npx create-react-app <アプリケーション名>
または
$ npm init react-app <アプリケーション名>
最後にHappy hacking!と表示されていればOK。
Reactアプリケーションを起動(http://localhost:3000)
プロジェクトフォルダに移動して、
$ npm start
または
$ yarn start
Reactアプリケーションをビルド
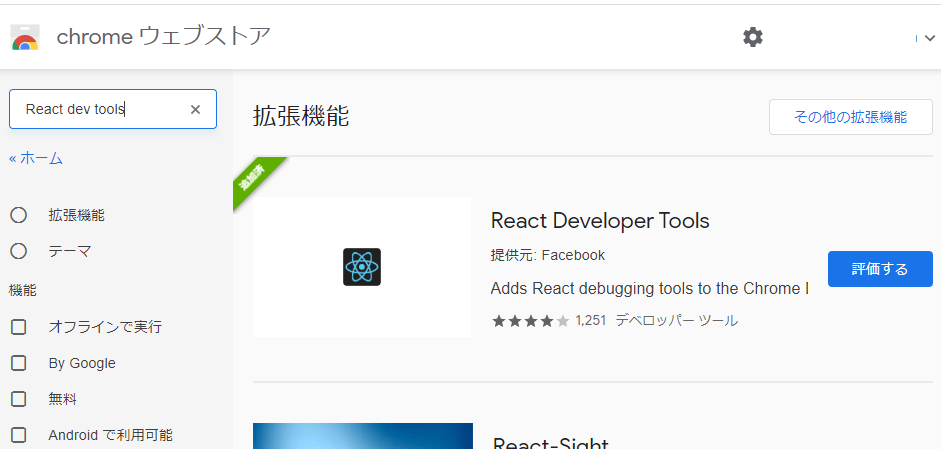
$ npm run build
または
$ yarn build
React Developper Tools のインストール
Chromeプラグイン
https://chrome.google.com/webstore
でインストールする。
スタンドアロン版
以下のコマンドでインストール
$ npm install -g react-devtools以下のコマンドで起動
$ react-devtoolsそして、アプリケーションのほうのindex.htmlに、
<script src="http://localhost:8097"></script>を
<head>タグ内に入れておく。ビルドするときは外す。
開発途中いろいろ
コンポーネント
ng generate componentみたくコマンドで作成する必要ない。TSとHTMLとCSSでファイルが分けてあるとかもない。もちろん分けてもよい。原則としては.jsだけで完結できる。デフォルトでindex.jsとApp.jsが存在する。index.jsが最初に読み込まれると考えてよい。App.jsがAngularにおけるapp.component.ts的なもの。例えば以下のように、App.jsファイルにひとつまたは複数のクラス(関数でも可)を書くと、クラスそのものがそのまんまコンポーネントになる。//App.js import React, { Component } from 'react'; // Appコンポーネントクラス class App extends Component { h1 = { size:"30px" } constructor(props){ super(props); // ← おまじない } render() { return ( <div> <h1 style={this.h1}>Home</h1> </div> ); } } export default App // AppコンポーネントをエクスポートHTMLとCSSもApp.js内に書いてあり、最終的には
render(){return(……)}関数の中にHTMLを書いてJSXにレンダリングさせる。「①TSファイル②HTMLファイル③CSSファイル」の3つでワンセットとするAngularと比べるとカオスな感じがある。コンストラクターの中の
super(props);は上位コンポーネントのプロパティを継承するという意味だが必ずつけるおまじないと思ってよい。このようにして作成したAppコンポーネント、これを利用する側のコンポーネントでは(ここではindex.js)、
//index.js
import React from 'react'
import ReactDOM from 'react-dom'
import App from './App'; // ← インポートして

ReactDOM.render(
   <App />         // ← 読み込む
  document.getElementById('root') // ← おまじない
);
のように、
<App />のような形で記述して読み込む。それでApp.jsで処理された内容がindex.jsに埋め込まれて表示される。表示するには
ReactDom.render()という関数を使ってレンダリングする。属性 this.props
index.jsからAppコンポーネント側に渡したい属性があるとする。例えばそれがnameという属性で値は"アトム"だったとしたら
<App name="アトム" />
のように書くことができる。この勝手に加えた属性nameは必ずthis.propsという名前のオブジェクトの中に入る。そういうキマリ。App.jsを以下のように修正すれば、{this.props.name}という形でその値を取り出せる。//App.js import React, { Component } from 'react'; // Appコンポーネントクラス class App extends Component { h1 = { size:"30px" } constructor(props){ super(props); } render() { return ( <div> <h1 style={this.h1}>Home</h1> <p>ハロー, {this.props.name}</p> //← ハロー, アトム と表示される. </div> ); } } export default App※ ちなみに
this.props.childrenにはすべての属性(およびDOM)が含まれている。
フォーム
Angularみたく
FormsModuleとかいらなくてReact.Componentだけで済む。以下のコードはinputテキストボックスに入力された文字列をeventキャッチしてmessageステート変数に代入し(doChange()関数)、ボタンクリックで実際の処理を行っている(doAction()関数)。【doAction()関数は、ここではstate変数のmessageをログ出力してから元のカラにしている】
関数についてはコンストラクターでバインドするというおまじないが必要。意味は知らなくていい。
イベント処理についてもe.preventDefault();というおまじないが必要。意味は知らなくていい。//Form.jsx import React, { Component } from 'react'; class Form extends Component { input = { fontSize:"16pt", color:"#006", padding:"1px", margin:"5px 0px" } btn = { fontSize:"14pt", color:"#006", padding:"2px 10px" } constructor(props){ super(props); ← おまじない this.state = { message:'' } this.doChange = this.doChange.bind(this); // ← おまじない this.doAction = this.doAction.bind(this); // ← おまじない } doChange(e){ this.setState({ message: e.target.value }); } doAction(){ e.preventDefault(); ← おまじない console.log('メッセージ' + massage); // ← 処理 this.setState((state)=> ({ // ← 処理 message: '' })); } render(){ return ( <div> <p>{this.props.message}</p> <form onSubmit={this.doAction}> <input type="text" size="40" onChange={this.doChange} style={this.input} value={this.state.message} required /> <input type="submit" style={this.btn} value="Add"/> </form> </div> ); } } export default App;
バリデーション
requiredやpatternなど。変わらない。
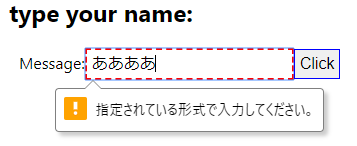
//App.js
import React, { Component } from 'react';

class App extends Component {
  input = '';

  msgStyle = {
    fontSize:"20pt",
    color:"#900",
    margin:"20px 0px",
    padding: "5px",
  }
  inputStyle = {
    fontSize:"12pt",
    padding:"5px"
  }
 input:invalid {
   border: 2px dashed red;
 }
 input:valid {
   border: 1px solid blue;
 }

  constructor(props){
    super(props); ← おまじない
    this.state = {
      message:'type your name:'
    };
    this.doChange = this.doChange.bind(this); // ← おまじない
    this.doSubmit = this.doSubmit.bind(this); // ← おまじない
  }

  doChange(event) {
    this.input = event.target.value;
  }

  doSubmit(event) {
    this.setState({
      message: 'Hello, ' + this.input + '!!'
    });
    event.preventDefault(); // ← おまじない
  }

  render(){
    return <div>
      <h1>React</h1>
      <h2>{this.state.message}</h2>
      <form onSubmit={this.doSubmit}>
        <label>
          <span style={this.inputStyle}></span>Message:
          <input type="text" style={this.inputStyle}
                 onChange={this.doChange}
                 required          //← 必須
                 pattern="[A-Za-z _,.]+"  //← 正規表現パターン
                 minlength="4"       //← 最小文字数
                 maxlength="20"       //← 最大文字数
                 />
        </label>
        <input type="submit" style={this.inputStyle} value="Click" />
      </form>
    </div>;
  }
}
コンテキスト
グローバル変数を設定するみたいな?
使うかのう?。とりあえずスルー。Redux
Angularのngrxみたく色々なライブラリをインストールする必要なくてシンプル。
Reduxのインストール
$ npm install --save redux
$ npm install --save react-redux
$ npm install --save-dev redux-devtools
Redux Persistのインストール
永続化Reduxを使う場合は以下のコマンドも。
$ npm install --save redux-persist使い方はここでは省略。書ききれん。Angularでngrx使うよりコードは少なく済みわかりやすい。また、もしかしたらReact Hooksという新しいモノがReact Reduxに取って代わる可能性あり。でもReact-Reduxでもとても良い。
ルーター
インストール
$ npm install --save react-router-domほかにもreact-router、react-router-reduxがあるがブラウザで動くページを書くにはreact-router-dom。react-routerはReact Nativeで使うようだ。
書き方
Angularのように原則app.module.tsファイルに書くとかapp.route.tsファイルを用意するとかない。App.jsに書くべし、なのか?
ほとんど同じでしょと思ったがAngularと勝手が違う。
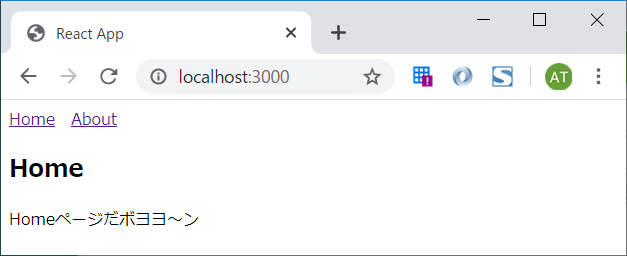
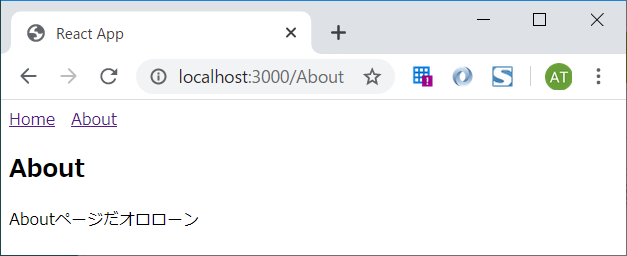
Home、Aboutページ(コンポーネント)があるだけのシンプルな例:
// App.js
import React, { Component } from 'react'
import { BrowserRouter, Route, Link } from 'react-router-dom'

class App extends Component {
  constructor(props){
    super(props);
  }

  render(){
    return(
      <BrowserRouter>
        <nav>
          <Link to="/">Home</Link>
          <Link to="/About">About</Link>
        </nav>
          <Route exact path='/' component={Home} />
          <Route path='/about' component={About} />
      </BrowserRouter>
    )
  }
}

class Home extends Component { // Homeコンポーネント
  render(){
    return(
      <div>
        <h2>Home</h2>
        <p>Homeページだボヨヨ~ン</p>
      </div>
    )
  }
}

class About extends Component { // Aboutコンポーネント
  render(){
    return(
      <div>
        <h2>About</h2>
        <p>Aboutページだオロローン</p>
      </div>
    )
  }
}

export default App;
ルーティングの設定は
<BrowserRouter>というHTMLタグのようなもので挟んで、<Route exact path='/' component={Home} />という風に<Route>で設定。
exactは完全一致を意味してて、それをつけないと/aboutも前方一致してしまう、という。パスへのリンクには
<Link>を使う。toの指定先は"/About"とシンプルなテキストだけでなく例えば下記のようにオブジェクトもOK。<Link to={{ pathname: '/about', // パス文字列 search: '?yourself=atom', // クエリパラメータ hash: '#the-hash', // URLハッシュ state: { flag: true } // 任意のデータ }}>About</Link>ほかにも
<Switch>で囲んだりchildren={<SomeComponent />}指定、クエリパラメータの扱いなどいろいろある。Hookにも対応!Vue.jsエンジニアのためのReact Router v5入門に詳しく書いてある。Next.js
ReactのSSR化ライブラリー。
AngularにおけるUniversalよりはるかに良いかもしれない。まだ試してないが。(Universalはこんなに大変→Angular8: パフォーマンス改善のためUniversalを導入しServer Side Rendering化する)また、Reactだけだとあくまでシングルページアプリケーションを考えてのモノであり、複数ページを持つWebサイトなりWeb appを想定するとNext.jsがほぼ必須?のようだ。なのでNext.jsまで学んで初めてAngularというのはオールマイティの全部入りだったのだなあ、と気づく。
インストール
新しいプロジェクトフォルダを作ってその中にpackage.jsonを前もって作成(後で編集してもいいけど)。
// package.json
{
  "scripts": {
    "dev": "next",
    "build": "next build",
    "start": "next start",
    "export": "next export"
  },
}
あと、後ででもいいけどpagesというサブフォルダも作成しておく。
next_app
 |
 |---package.json
 |---pages
そんでインストールコマンド
$ npm install --save next react react-dom起動コマンド
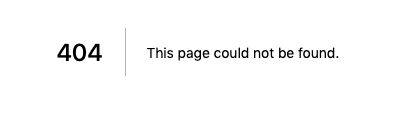
$ npm run devブラウザからlocalhost:3000へアクセスで、以下のように404エラー。これでよい。
開発途中いろいろ
まずHello World
pagesフォルダの配下にindex.jsを作成して、そのファイルに下記のコード。pagesというフォルダの下にメインとなるコンポーネント(ページ)を置いていくキマリ。pagesフォルダはNext.jsのAPIとマッピングしているそうだ。
以下ではクラスの代わりに無名関数がコンポーネントになっている。
// pages/index.js
export default () =><div>
  <div>Hello World!</div>
</div>
また、
./pages/_app.jsを作成することによって、<App>を上書きできる。Next.jsではReactのようにApp.jsはない(隠れた所にある)。以下はNext.jsでReduxを使うときに使うべき./pages/_app.jsのコード。
// pages/_app.js
import App, {Container} from 'next/app';
import React from 'react';
import withReduxStore from '../lib/redux-store';
import { Provider } from 'react-redux';

class _App extends App {
  render () {
    const {Component, pageProps, reduxStore} = this.props
    return (
      <Container>
        <Provider store={reduxStore}>
          <Component {...pageProps} />
        </Provider>
      </Container>
    )
  }
}

export default withReduxStore(_App)
./pages/_error.jsを作成することにより、 404 または 500 エラーの上書きができる。// pages/_error.js import React from 'react' class Error extends React.Component { static getInitialProps({ res, err }) { const statusCode = res ? res.statusCode : err ? err.statusCode : null return { statusCode } } render() { return ( <p> {this.props.statusCode ? `An error ${this.props.statusCode} occurred on server` : 'An error occurred on client'} </p> ) } } export default ErrorNextをインストール後のデフォルトバンドルはこういうことになっているようだ。つまりdocument.jsもまた./pages/_document.jsで上書きできる。まあやらんだろう。
$ cd .next/dist/bundles
$ tree
.
└── pages
    ├── _app.js
    ├── _app.js.map
    ├── _document.js
    ├── _document.js.map
    ├── _error.js
    ├── _error.js.map
コンフィグファイル
プロジェクトルートに
next.config.jsファイルを置く。angular.json的なものかなあ。デフォルトではこのファイルはないので使いたかったら新規で作成。いろいろな設定ができる。例えば静的ファイルにエキスポートする設定コードは、
// next.config.js
module.exports = {
    exportPathMap: function (
      defaultPathMap,
      { dev, dir, outDir, distDir, buildId }
    ) {
      return {
        '/': { page: '/' }
      }
    }
}
そして以下のコマンドでエキスポート
$ npm run build
$ npm run export
これでhello worldだけの1ページであればoutフォルダができてそこにindex.htmlと404.htmlが生成されているはず。
参考:Static HTML exportスタティックアセット
CSSや画像ファイルなどはstaticというサブフォルダを作成してそこに置く。ちなみにCSSファイルは使えないのでスクリプトの形にしてそれを読み込む。以下のように。
// statc/Style.js
import css from 'styled-jsx/css';

export default <style>{`
  body {
    margin:10px;
    padding:5px;
    color:#669;
  }
  h1 {
    font-size:22pt;
    font-weight:bold;
    text-align:left;
    letter-spacing:0px;
    color:#77a;
    margin:-50px 0px 50px 0px;
  }
  p {
    margin:0px;
    color:#669;
    font-size:16pt;
}
`}</style>;
そして読み込む側のJSファイルでは、
import style from '../static/Style';と。// pages/sample.js import React, { Component } from 'react'; import style from '../static/Style'; // ← ココ class Sample extends Component { render() { return (<div> {style} // ← ココで使ってる <hr/> <h1>タイトル</h1> <p>メッセージ</p> </div>); } } export default Sample;画像へのリンク
画像ファイルをstaticフォルダに置いて
<img src="" />でOK。たとえば<img src="/static/image.png"/>ルーティング
pagesフォルダ配下のファイル同士で移動できる。つまりpageフォルダにhoge.jsやfuga.jsなどを置いておけばよいだけ。Angularのルーティング設定みたいなのはいらない。
// pages/index.js import Link from 'next/link'; // ← Linkをインポートして export default () =>( <hr/> <Link href="./hoge"> // Link href=でhogeやfugaなどを指定するだけ <button> go to HOGE >> </button> </Link> );
<Link>タグで囲む。<Link>タグの中に<a>タグを置いてもいいけどそこにhref属性は置けない。<Link href="./hoge"> // ← href="./hoge"... <Link>タグの中に <a> // ← a href="./hoge"... とはできない go to HOGE >> // ← <a>タグならいちおうこの文字がリンカブルブルーになるが別に<p>タグでもいい </a> </Link>※ 外部リンクだったら普通にアンカータグ
<a href="https://qiita.com/">Google</a>で良いようだ。
- href:pages/ ディレクトリ内のパスとクエリ文字列
- as:ブラウザのURLバーに表示されるパス。
<Link href="/post?slug=something" as="/post/something">※ 動的リンクについてはこちら参照:動的ルーティング
動的コンポーネント
JavaScriptモジュールやReact Componentsを動的にインポートしてそれらを使用できるようだ。AngularではJavaScriptをそのまま使えないのでこれは随分ラクだろう。
以下ではcomponentsフォルダの下に作った動的コンポーネントhello.jsファイルを読み込んでいる。// pages/home.js import dynamic from 'next/dynamic' const DynamicComponent = dynamic(() => import('../components/hello')) function Home() { return ( <div> <DynamicComponent /> <p>HOME PAGE is here!</p> </div> ) } export default Homeヘッダー情報を編集
HTMLのヘッダー情報を編集できるビルトインコンポーネントがある。
<Head>タグで囲むだけ。AngularではTSファイルのコンストラクターでmeta.addTag()して編集できるが…TwitterカードなどのOGPボットが拾ってくれない問題(Universal化してもsizeが大きいせいか拾ってくれない)を解決してくれるかもしれない。import Head from 'next/head' function IndexPage() { return ( <div> <Head> <title>My page title</title> <meta name="viewport" content="initial-scale=1.0, width=device-width" /> </Head> <p>Hello world!</p> </div> ) } export default IndexPageRedux on Next.js
複数ページ間で共通データをまたいで扱うことができるReduxを、Next.jsでも使える
インストール
$ npm install --save redux
$ npm install --save react-redux
$ npm install --save redux-thunk
使い方
詳しくはReact.js & Next.js超入門に載っている。とても書ききれん。
補足
Angularでの経験が役に立つのは、現在ReactでもTypescriptを使うケースが増えていること。TypeScriptでのサンプルコードの少なさに悶え、苦しんだ経験が報われるだろう。
TypeScriptでのReactプロジェクト作成は物凄く簡単になったらしく、以下のコマンドだけ。
$ npx create-react-app <アプリケーション名> --typescript
参照:
React.js & Next.js超入門? ReduxとNext.jsの説明が非常にわかりやすくオススメ(超入門とあるがそれなりのレベルの内容)
JSフレームワーク事情2020年始め
Use React Hooks with Storage as Global State Management
react-router@v4を使ってみよう:シンプルなtutorial
【超簡単】Reactのルーティング設定方法
Hookにも対応!Vue.jsエンジニアのためのReact Router v5入門
Next.js
Next.jsの機能
なぜReact+TypeScriptでコンポーネント作成が早くなるのか


- 投稿日:2020-04-02T08:33:32+09:00
新型コロナ感染箇所マップを作ってみる【FastAPI/PostGIS/deck.gl(React)】(データ表示編)
こちらの記事は新型コロナ感染箇所マップを作ってみる【FastAPI/PostGIS/deck.gl(React)】(データ加工編)の続きです。
上の記事をご覧になってからお読みください!
Reactの環境構築
ここまででcsvの元データをAPIからGeoJSON形式で吐き出せるようになっていると思いますので、そのデータを利用して地図上にコロナウイルス感染者の位置を表示できるようにしていきましょう!
まずはReactのプロジェクトを簡単に作成できる
create-react-appを実行するためのNode.jsがインストールされているか確認しましょう$node -v v12.13.1 $npm -v 6.12.1上記2つのコマンドを入力してバージョンの数字が表示されればインストールされています。
コマンドがないよー!なんて怒られた場合にはインストールされていませんのでNodebrewでNodeをインストールするなんかを参考にして
nodebrewのインストール→nodebrewからNode.jsをインストール→npmのインストールを行っていきましょう!
npmのインストールまで終わったらcovid_sampleに移動し、以下のコマンドでReactのプロジェクトを作成していきます。$npm install -g create-react-app $npx create-react-app .これで
covid_sample自体がReactのプロジェクトになります。(コマンド最後の.はカレントディレクトリにプロジェクトを作成するという意味で、ここに何か任意の名前を入れると、covid_sample以下にその名前でディレクトリが作成されます)$npm startのコマンド入力後、
localhost:3000へブラウザからアクセスし、以下のような画面が表示されればプロジェクトの作成成功です!
deck.glの環境構築
deck.glは自動車配車サービスのUberが作成した大規模なデータセットの視覚的・探索的データ分析のためのWebGLを利用したフレームワークで、React上で動作させることを想定されています。(最近はpureJSでもちゃんと動くみたいですが)
めっちゃかっこいいです。
データさえあれば、以下のサンプルのように地図上に美しくデータを表現することができます。
今回はこのdeck.glを利用して地図上にデータを表示させていきましょう!
(ちなみに!!!!!今回扱うデータはただのポイントデータ(箇所ごとに緯度経度の位置情報があるだけのデータ)なので上のサンプルのようにかっこよくはなりません!!!!!!!すいません!!!!)
deck.glを利用するために以下の2つのコマンドを入力しましょう。
$npm install deck.gl
$npm install react-map-gl
下の
react-map-glはこちらもUberが作ったもので、Mapbox GL JSというWebGIS界隈では非常に有名なライブラリのReact用ラッパーになります。今回は背景地図の表示に利用していきます。
これでいよいよ開発環境が整ったので、アプリケーションを作成していきましょう!
アプリケーションの作成
mapboxの登録とトークンの発行
mapboxとは、Google マップのようなサービスですが、JavaScriptやネイティブ用のSDKが公開されており、自由に、簡単にカスタマイズできる地図サービスのことです。
今回は背景地図としてmapboxを利用していきますので、トップページから会員登録・マイページに表示されるトークンをコピーしておいてください。
背景地図の表示
srcというディレクトリが出来ているはずなのでそちらに移動しましょう。Reactのプロジェクトでは基本的にこの
src以下のファイル群をいじっていきます。
srcディレクトリの構成は以下のような感じになっていると思いますが、今回編集するファイルはApp.jsのみになります。tree. ├── App.css ├── App.js ├── App.test.js ├── index.css ├── index.js ├── logo.svg ├── serviceWorker.js └── setupTests.jsということでゴリゴリ修正していきましょう!
src/App.js// Reactのインポート import React from 'react'; // deck.glを利用 import DeckGL from '@deck.gl/react'; // geojsonを使うのでGeoJsonLayerを利用 import {GeoJsonLayer} from '@deck.gl/layers'; // 背景地図の表示にMapbox GL JSのラッパーを利用 import {StaticMap, Popup} from 'react-map-gl'; // 先ほど取得したトークンを文字列で格納 const MAPBOX_ACCESS_TOKEN = <MAPBOX_ACCESS_TOKEN>; // 初期表示位置などを指定 const initialViewState = { longitude: 139.7212733, latitude: 35.6606213, zoom: 8, pitch: 45, bearing: 0 }; // 最近は関数ベースのコンポーネントが主流だが、サンプルに合わせてクラスベース class App extends React.Component { // コンストラクターでデータを格納するstateを定義 constructor(props) { super(props); this.state = { geojsonPoint: null, }; } // コンポーネントがマウントされてから動作するメソッド // APIにアクセスしてデータを取得しておく componentDidMount() { fetch("http://0.0.0.0:8000/") .then(res => res.json()) .then( (result) => { this.setState({ geojsonPoint: result }); console.log("result", result); }, (error) => { console.log(error) } ) } // ポップアップを表示させるためのメソッド _renderTooltip() { // hoveredObjectはホバーしている地物の情報 const {hoveredObject} = this.state || {}; console.log("hoveredObject", hoveredObject); if (hoveredObject !== undefined) { return ( // react-map-glのPopupコンポーネントを利用してポップアップを表示 <Popup longitude={hoveredObject.geometry.coordinates[0]} latitude={hoveredObject.geometry.coordinates[1]}> <div> <p>id:{hoveredObject.properties.id}</p> <p>年齢:{hoveredObject.properties.age}</p> <p>確定日:{hoveredObject.properties.fixed_data}</p> </div> </Popup> ) } } // レンダリング用のメソッド render() { // コンストラクターで定義したstateからGeoJSONを取得 const geojsonPoint = this.state.geojsonPoint; console.log("geojsonPoint: ", geojsonPoint); const layers = [ new GeoJsonLayer({ // 任意のid id: 'point_layer', // GeoJSONを指定 data: geojsonPoint, // pointの半径 getRadius: d => 2000, // 地物のカラーをRGBaで指定 // aは透過度で0~255から指定 getFillColor: d => [245, 36, 36, 150], pickable: true, // 地物にホバーした時に発生するイベント // stateを更新する onHover: info => this.setState({ hoveredObject: info.object, }) }), ]; return ( <> {/*DeckGLコンポーネントに必要な情報を渡す*/} <DeckGL initialViewState={initialViewState} controller={true} layers={layers} > {/*利用したいmapboxのスタイルとトークンを渡す*/} <StaticMap mapStyle="mapbox://styles/mapbox/dark-v9" mapboxApiAccessToken={MAPBOX_ACCESS_TOKEN}> {/*ポップアップ用の関数も入れる*/} {this._renderTooltip()} </StaticMap> </DeckGL> </> ); } } export default App;Reactの基本的な解説などは別記事に書こうと思っていますが、Reactでは基本的にコンポーネントの戻り値はJSXというJavaScript内にHTMLを埋め込むような記法で書いていきます。
なので、Appクラスのrenderメソッドの戻り値はHTMLのタグのようなものがずらっと並んでいます。
しかし、実際にはトランスパイルされてJavaScriptに変換されるので
<DeckGL initialViewState={initialViewState}></DeckGL>のようにタグの中にpropsと呼ばれる変数のようなものを渡して表示を動的に切り替えることが出来ます!
その他、どういう処理を行なっているのか…という部分はコード中にコメントを書いているので参考にしてみてください!
注意する点としては
- 新型コロナ感染箇所マップを作ってみる【FastAPI/PostGIS/deck.gl(React)】(データ加工編)で作成した、dockerコンテナが立ち上がっているか
http://0.0.0.0:8000/にアクセスしてGeoJSONが返ってくるか- mapboxのトークンは記入されているか
だけ気をつけてもらえればあとはちゃんと表示されるはずです!
ブラウザで表示させてみる
ここまで出来たらあとは表示させるだけです!
$npm startでサーバーを起動させてlocalhost:3000に接続してみましょう!
こんな感じで地図上にポイントが表示されて、ホバーすると情報が表示されるようになったと思います!!!
最後に
こんな感じで情報の収集・加工・配信・表示まで一連で行なってきましたが、データさえあれば簡単に可視化できるのが、最近のフレームワークの良いところですね!
また、データの加工段階でQGISなどのGISソフトなどを使えば都道府県ごとの人数をヒートマップで可視化などいろんなことができると思いますのでみなさんどんどんGISやっていきましょう!


- 投稿日:2020-04-02T08:23:13+09:00
第8回 2020年版 React+Firebaseで画像のアップロード(その3)
1. 概要
前回の記事でFirebaseに画像をアップロードするプログラムを開発しましたが、今回はFirebase Cloud Functionsを利用して、画像アップロードをトリガーにサムネイルを作成する方法について説明します。
2. 前提条件
作業日時
- 2020/3/24
環境
- MacBook Pro (15-inch, 2018)
- macOS Catalina 10.15.2(19C57)
ソフトウェアのバージョン
分類 ソフトウェア バージョン 静的型付け TypeScript 3.7.5 Firebase CLI firebase-tools 7.15.1 ライブラリ firebase-admin 8.6.0 ライブラリ firebase-functions 3.3.0 3. 前提条件
前々回の記事で、Firebase SDK for Cloud Functions は初期化されている前提です。
firebase initで初期化をすると、以下のようなファイル群が作成されます。
*functions以外のファイルについては割愛しています。firebase-storage-sample +- .firebaserc # Hidden file that helps you quickly switch between | # projects with `firebase use` | +- firebase.json # Describes properties for your project | +- functions/ # Directory containing all your functions code | +- .eslintrc.json # Optional file containing rules for JavaScript linting. | +- package.json # npm package file describing your Cloud Functions code | +- index.ts # main source file for your Cloud Functions code | +- node_modules/ # directory where your dependencies (declared in # package.json) are installed4. Node.jsのバージョンをCloud Functionsの対応バージョンに合わせる
Cloud Functionsはv8かv10(ベータ)しか対応していないため、開発環境のNode.jsのバージョンをいずれかに合わせる必要があります。
4.1. Cloud functionsのNode.jsのバージョンの設定
以下funcions配下にある
package.jsonのenginesの設定で、Node.jsのバージョンを指定します。 今回はv10を利用するため、enginesに10を指定します。functions/package.json{ "name": "functions", "scripts": { "lint": "tslint --project tsconfig.json", "build": "tsc", "serve": "npm run build && firebase serve --only functions", "shell": "npm run build && firebase functions:shell", "start": "npm run shell", "deploy": "firebase deploy --only functions", "logs": "firebase functions:log" }, "engines": { "node": "10" }, "main": "lib/index.js", "dependencies": { "firebase-admin": "^8.6.0", "firebase-functions": "^3.3.0" }, "devDependencies": { "tslint": "^5.12.0", "typescript": "^3.2.2", "firebase-functions-test": "^0.1.6" }, "private": true }4.2. 開発環境のNode.jsのバージョンの設定
次に開発環境のNode.jsのバージョンの設定します。まず、
nodebrew ls-remoteで使えるバージョンの一覧を表示します。$ node -v v13.11.0 $ nodebrew ls-remoteCloud Functions の Node.js 10 ランタイムは Node.js バージョン
10.15.3に基づいているため、開発環境のバージョンも10.15.3に合わせます。$ nodebrew install v10.15.3 $ nodebrew use v10.15.3 use v10.15.3 $ nodebrew list v10.15.3 v13.11.0 current: v10.15.3 $ node -v v10.15.35. ライブラリの追加
functionsのディレクトリでライブラリの追加を行う。
child-process-promiseは$ cd functions/ $ yarn add child-process-promise*もしかしたら、
yarn add @google-cloud/storageで@google-cloud/storageも追加が必要だったかもしれません。6. 関数の作成
6.1 関数ごとにファイルを分割可能とする
複数のエントリポイントをファイルを分割して開発が可能なように、
index.tsから外部のモジュールを読み込めるように修正します。
以下のように修正し、関数を追加する際は/func/配下にファイルを追加します。/functions/src/index.ts// The Firebase Admin SDK to access the Firebase Realtime Database. const admin = require('firebase-admin'); admin.initializeApp(); // initializeAppは一回だけ実行する /* * 配下にあるプログラムを読み込む。 * エントリポイントを追加する際は、こちらにも追加する。 */ const cloud_functions = { // Write function references addMessage: './func/addMessage', makeUppercase: './func/makeUppercase', generateThumbnail: './func/generateThumbnail', }; const loadFunctions = (funcs: any) => { for (let name in funcs) { if (!process.env.FUNCTION_NAME || process.env.FUNCTION_NAME === name) { exports[name] = require(funcs[name]); } } }; loadFunctions(cloud_functions);6.2 各関数の作成
HTTPリクエストのトリガーの関数
サムネイルには関係ありませんが、練習を兼ねて、HTTPリクエストをトリガーとして、Realtime Databaseに書き込むプログラムを作成します。
プログラムの最初に
firebase-functionsおよびfirebase-adminのモジュールを読み込みます。HTTPのトリガでは、エンドポイントに対するリクエストを行うと、Express.JS スタイルの Request オブジェクトと Response オブジェクトが onRequest() コールバックに渡されます。このサンプルでは、HTTPリクエストで受けたテキスト値をRealtime Databaseの
/messages/:pushId/originalに挿入します。リージョンは
asia-northeast1を選択している。/functions/src/func/addMessage.tsimport * as functions from 'firebase-functions'; const admin = require('firebase-admin'); const region = 'asia-northeast1'; // Take the text parameter passed to this HTTP endpoint and insert it into the // Realtime Database under the path /messages/:pushId/original module.exports = functions.region(region).https.onRequest(async (request, response) => { try { // Grab the text parameter. const original = request.query.text; // Push the new message into the Realtime Database using the Firebase Admin SDK. const snapshot = await admin.database().ref('/messages').push({ original: original }); // Redirect with 303 SEE OTHER to the URL of the pushed object in the Firebase console. response.redirect(303, snapshot.ref.toString()); } catch (error) { console.log(error); response.status(500).send(error); } });Realtime Databaseのトリガーの関数
このサンプルでは
addMessageでRealtime Databaseにテキストが追加されたことを検知して、その文字列を大文字に変換します。/functions/src/func/makeUppercase.tsimport * as functions from 'firebase-functions'; // Realtime Databaseのイベントトリガーを利用する場合の推奨リージョンはus-central1となる。 const region = 'us-central1'; /* Realtime Database に書き込まれるときに実行される。 {} で囲まれたものは、コールバックで利用可能な「パラメータ」となる。 */ module.exports = functions.region(region).database.ref('/messages/{pushId}/original').onCreate((snapshot, context) => { // Grab the current value of what was written to the Realtime Database. const original = snapshot.val(); console.log('Uppercasing', context.params.pushId, original); const uppercase = original.toUpperCase(); // You must return a Promise when performing asynchronous tasks inside a Functions such as // writing to the Firebase Realtime Database. // Setting an "uppercase" sibling in the Realtime Database returns a Promise. if (snapshot.ref.parent !== null) { return snapshot.ref.parent.child('uppercase').set(uppercase); } else { return undefined; } });Storage トリガーの関数
やっとサムネイルのサンプルですが、Storageへの変更をトリガーとする関数を作成します。Storageにファイルが追加された時に本関数が実行されます。contentTypeで画像のみを処理するようにしています。
/functions/src/func/generateThumbnail.tsimport * as functions from 'firebase-functions'; const admin = require('firebase-admin'); //import * as spawnts from 'child-process-promise'; import * as path from 'path'; import * as os from 'os'; import * as fs from 'fs'; const spawn = require('child-process-promise').spawn; const region = 'asia-northeast1'; const THUMB_PREFIX = 'thumb_'; /* generateThumbnail */ module.exports = functions.region(region).storage.object().onFinalize(async (object) => { const filePath = object.name; // File path in the bucket. const contentType = object.contentType; // File content type. const fileBucket = object.contentType; // File content type. const metageneration = object.metageneration; // Number of times metadata has been generated. New objects have a value of 1. console.log('File path:' + filePath); // images/thumb_Material-uiサンプル.png console.log('fileBucket:' + fileBucket); // react-sample-d086e.appspot.com console.log('contentType:' + contentType); // imaga/png console.log('metageneration:' + metageneration); // 1 // if (filePath === undefined) { console.log('File path is undefined.'); return null; } // 画像以外だったら何もしない if (contentType === undefined || !contentType.startsWith('image/')) { console.log('This is not an image.'); return null; } // サムネイル画像であった場合何もしない const fileName = path.basename(filePath); if (fileName.startsWith(THUMB_PREFIX)) { console.log('Already a Thumbnail.'); return null; } const fileDir = path.dirname(filePath); const thumbFilePath = path.normalize(path.join(fileDir, `${THUMB_PREFIX}${fileName}`)); // const extension = "png"; // const thumbFilePath2 = path.normalize(path.format({dir: fileDir, name: `${THUMB_PREFIX}${fileName}`, ext: extension})); const tempFilePath = path.join(os.tmpdir(), fileName); const metadata = { contentType: contentType }; // 出力先のバケット const storage = admin.storage(); const bucket = storage.bucket(fileBucket); const file = bucket.file(filePath); (async () => { // バケットにアップロードされたファイルを仮想マシンのテンプディレクトリにダウンロード await file.download({ destination: tempFilePath }); console.log('The file has been downloaded to', tempFilePath); // tmp/react_icon.png // Generate a thumbnail using ImageMagick. await spawn('convert', [tempFilePath, '-thumbnail', '200x200>', tempFilePath]); console.log('Thumb image created at', tempFilePath); // リサイズされたサムネイルをバケットにアップロード await bucket.upload(tempFilePath, { destination: thumbFilePath, metadata: metadata }); console.log('Thumb image uploaded to Storage at', thumbFilePath); // Once the thumbnail has been uploaded delete the local file to free up disk space. fs.unlinkSync(tempFilePath); })() .then(() => { console.log('Generate Thumbnail Success!'); }) .catch((error) => { console.error(error); }); return null; });7. functionのデプロイ
7.1. デプロイ
プロジェクトのルートフォルダで以下コマンドを実行し、functionをデプロイできる。各関数がデプロイされているロケーションがプログラムで指定しているものになっていることが確認できます。
$ firebase deploy --only functions

=== Deploying to 'sample-9f36d'...

i  deploying functions
Running command: npm --prefix "$RESOURCE_DIR" run lint

> functions@ lint /Users/tayamat/Documents/00_mygit/hoshimado/firebase-storage-sample/functions
> tslint --project tsconfig.json

Running command: npm --prefix "$RESOURCE_DIR" run build

> functions@ build /Users/tayamat/Documents/00_mygit/hoshimado/firebase-storage-sample/functions
> tsc

✔  functions: Finished running predeploy script.
i  functions: ensuring necessary APIs are enabled...
✔  functions: all necessary APIs are enabled
i  functions: preparing functions directory for uploading...
i  functions: packaged functions (90 KB) for uploading
✔  functions: functions folder uploaded successfully
i  functions: updating Node.js 10 (Beta) function addMessage(asia-northeast1)...
i  functions: updating Node.js 10 (Beta) function makeUppercase(us-central1)...
i  functions: updating Node.js 10 (Beta) function generateThumbnail(asia-northeast1)...
✔  functions[addMessage(asia-northeast1)]: Successful update operation.
✔  functions[makeUppercase(us-central1)]: Successful update operation.
✔  functions[generateThumbnail(asia-northeast1)]: Successful update operation.

✔  Deploy complete!

Project Console: https://console.firebase.google.com/project/sample-9f36d/overview
macbookpro-tt:firebase-storage-sample tayamat$
7.2 デプロイの確認
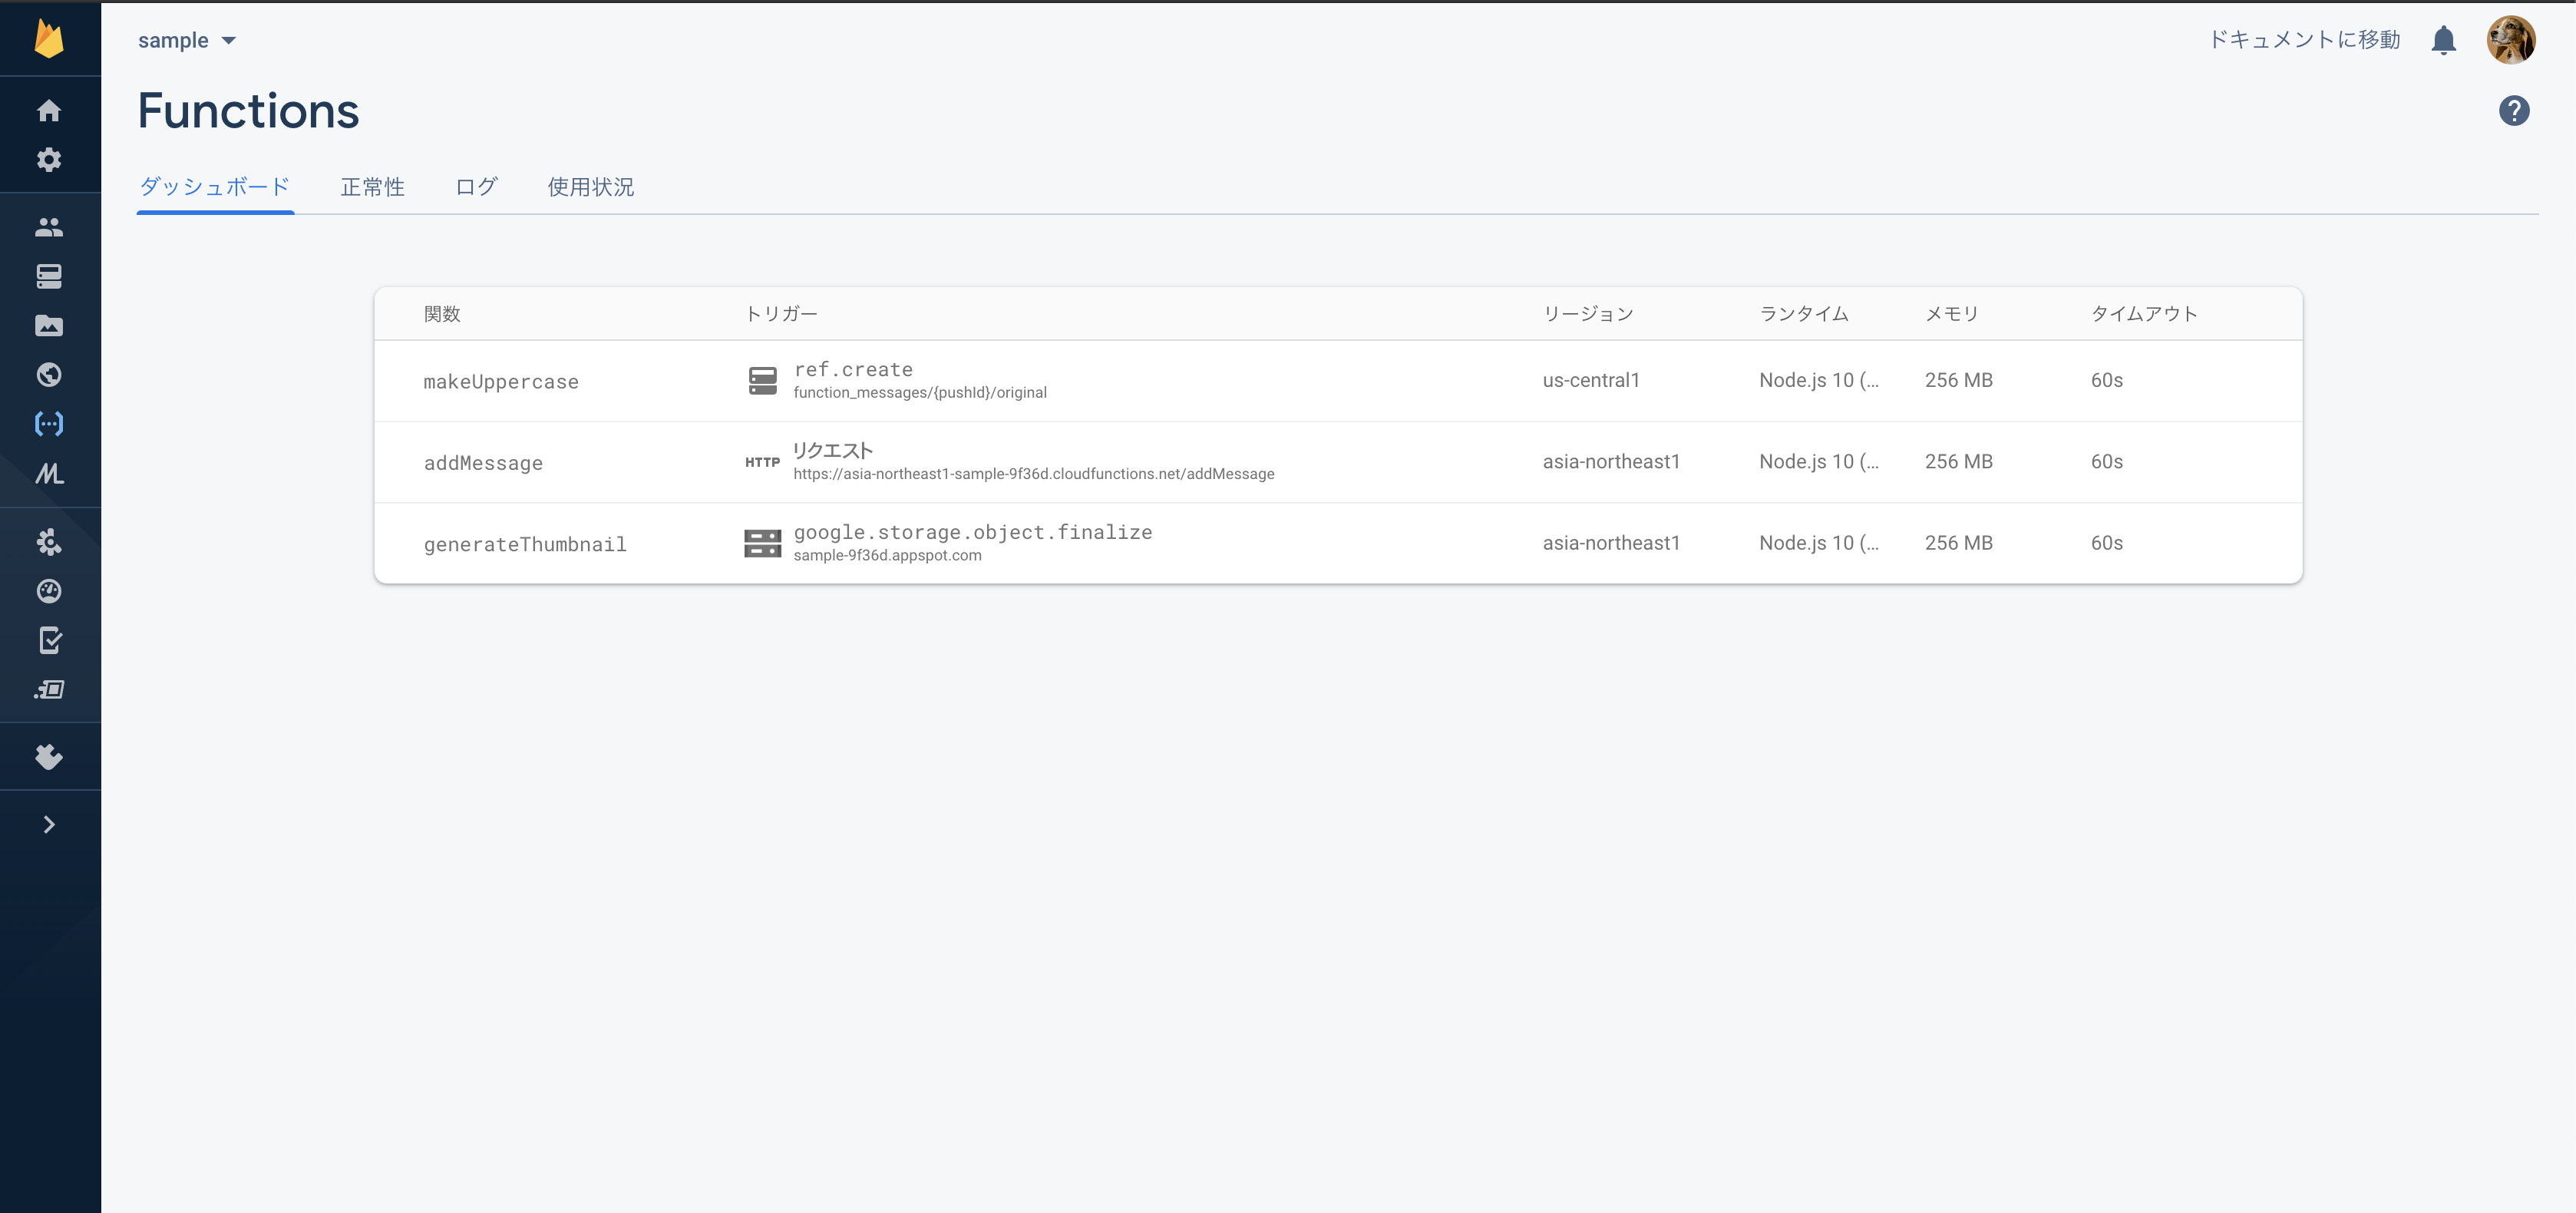
FirebaseのWebコンソールでfunctionsに関数が追加されていることを確認します。
8. 動作確認
8.1. HTTPリクエスト
テキストクエリ パラメータを addMessage() URL に追加し、ブラウザで開きます。
https://us-central1-MY_PROJECT.cloudfunctions.net/addMessage?text=uppercaseme関数によりブラウザが実行され、テキスト文字列が格納されているデータベースの場所にある Firebase コンソールにリダイレクトされます。テキスト値がコンソールに表示されます。
Function URL (addMessage): https://us-central1-MY_PROJECT.cloudfunctions.net/addMessage8.2. 画像の変換
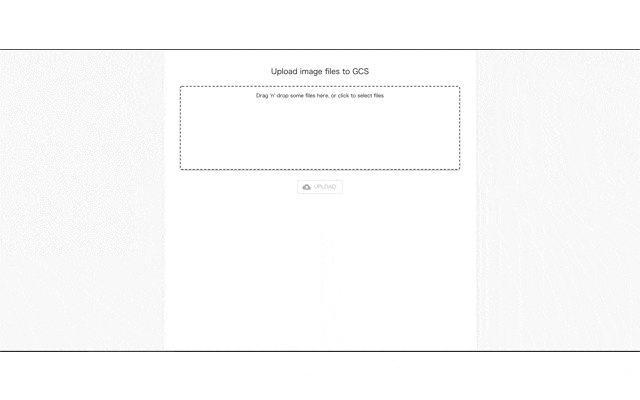
前回作成したプログラムを
yarn startでサーバーを起動し、ブラウザで表示します。
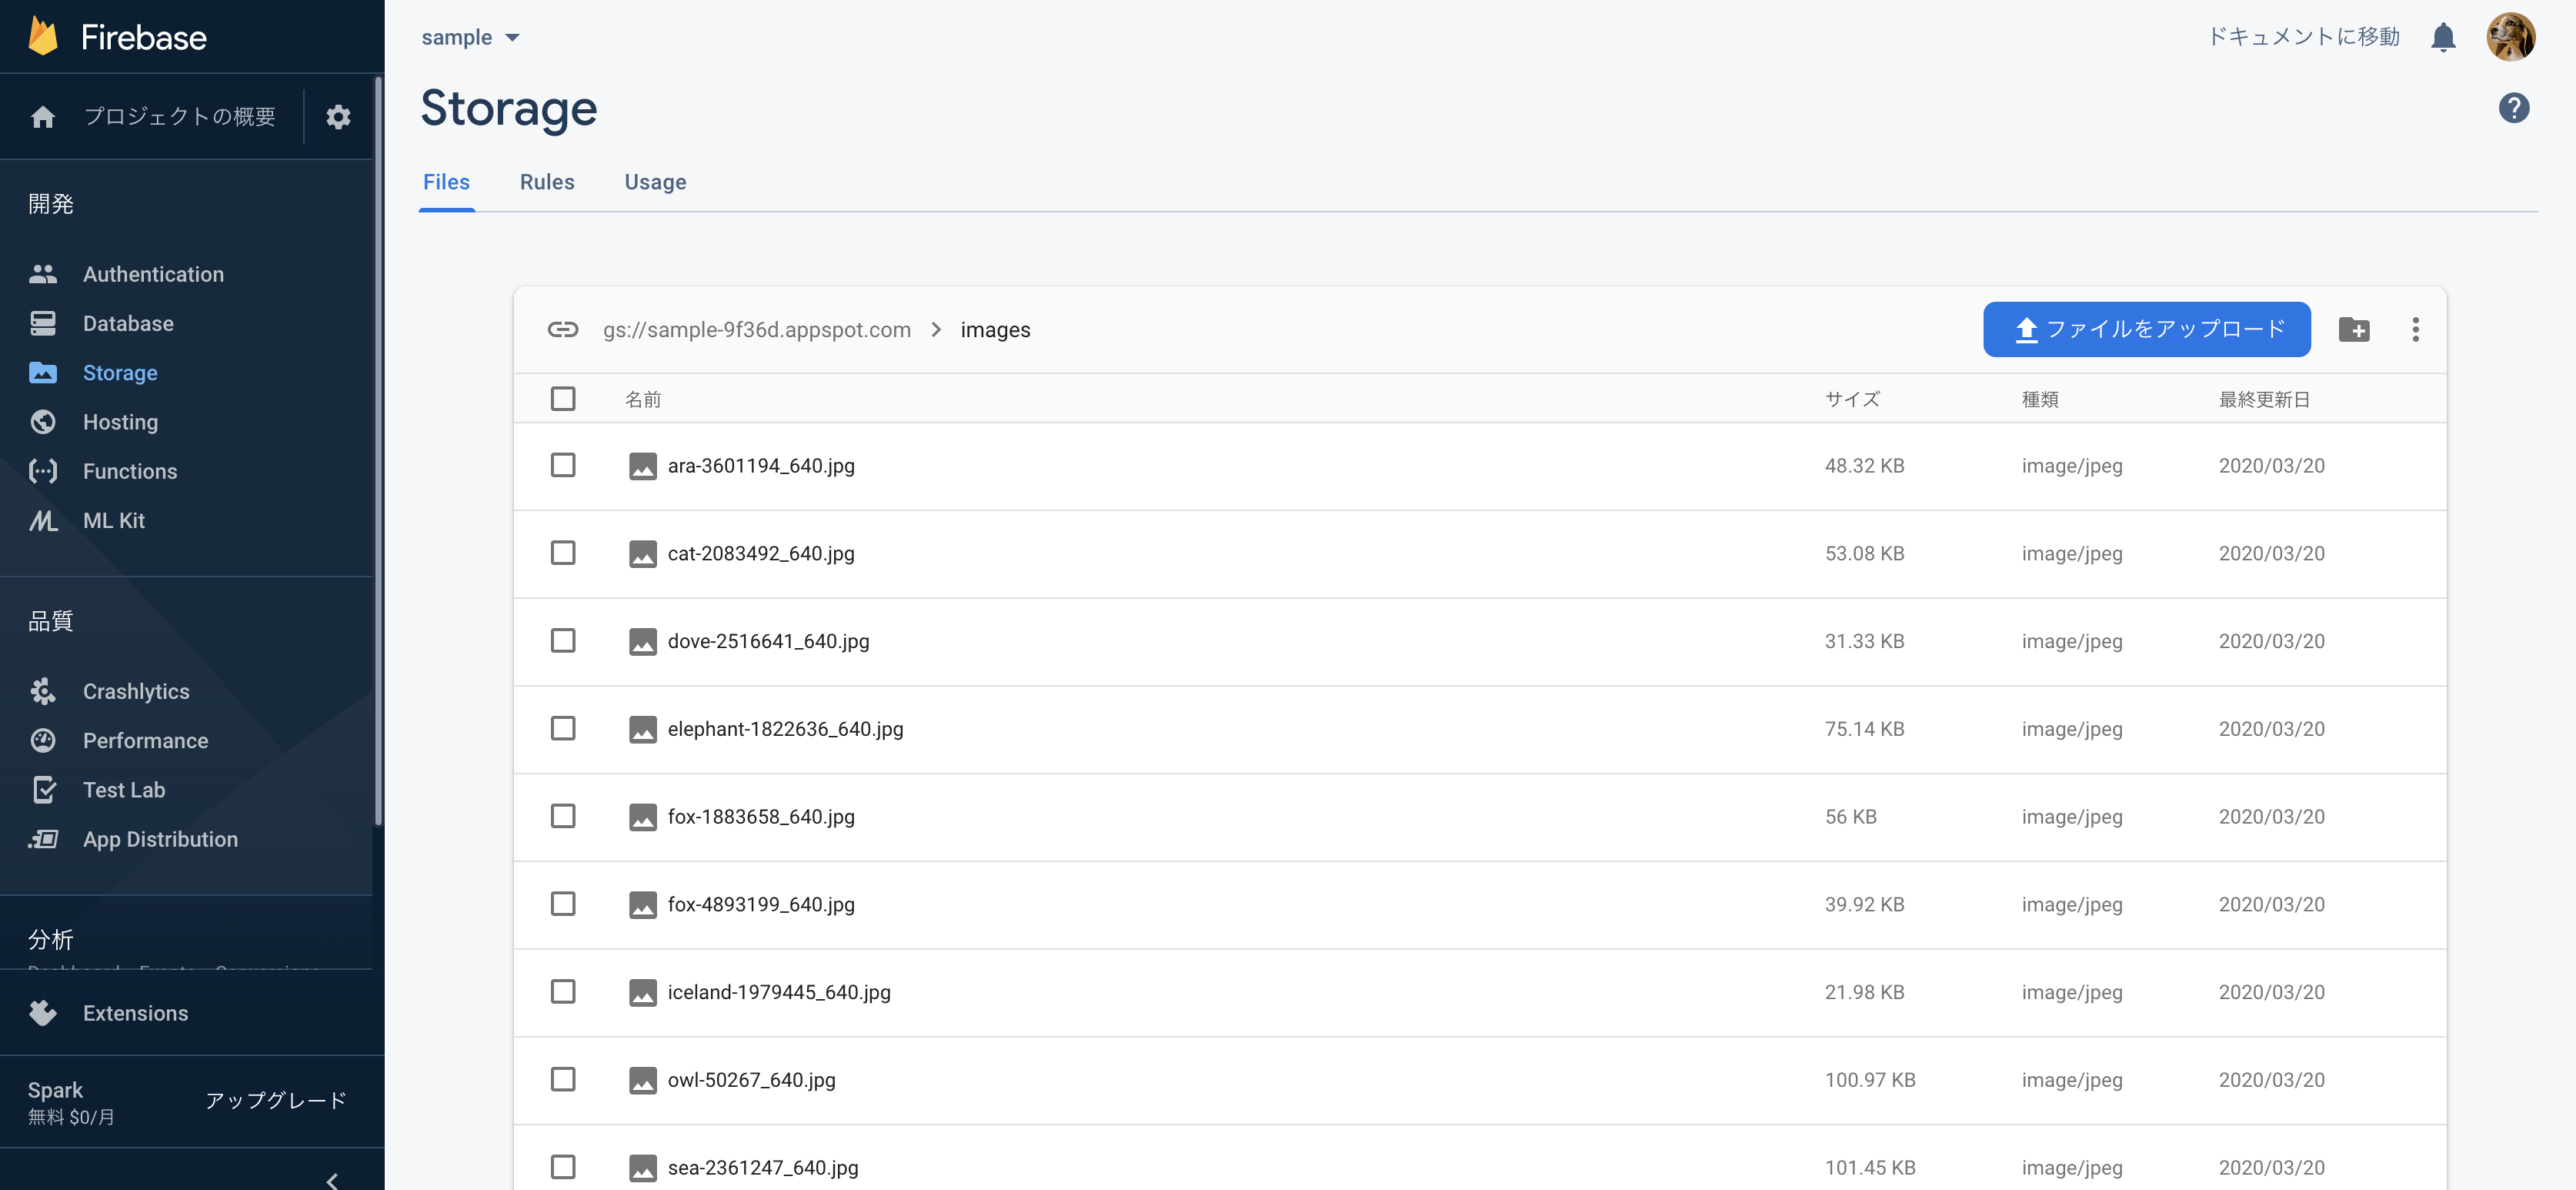
FirebaseのWebコンソールでファイルがアップロードされていること、また、サムネイルが作成されていることを確認します。
9. 最後に
今回はFirebase Cloud Functionsを利用して、画像アップロードをトリガーにサムネイルを作成する方法について説明しました。
ですが、実はサムネイルの作成だけであれば、Firebaseの拡張機能で同様のことが実現できます。あくまで学習のためにcloud functionsでサムネイルを作成してみました。
10. 関連記事
Reactに関する記事です。