- 投稿日:2020-04-02T19:16:58+09:00
便利な関数の作り方(入力値)
前置き
あ~、競プロ(競技プログラミング)でいっつも同じような入力書くの面倒だなあ~。('Д')
よし、自動化してやれ!自作ライブラリの使用OKって書いてるしな!自作ライブラリが何かしらないけど。(^◇^)
ここから本編
function.csstatic public void Main() { //aに一つの文字列を入力 string a = onestring(); //bに複数の文字列を入力 string[] b = arraystring(); //cに一つの数字を入力 int c = oneint(); //dに複数の数字を入力 int[] d = arrayint(); } //一つの文字列を受け渡す static string onestring() { return Console.ReadLine(); } //複数の文字列を配列で受け渡す //文字列と文字列の間は" "で区切る static string[] arraystring() { return Console.ReadLine().Split(' '); } //一つの数字を受け渡す static int oneint() { return int.Parse(Console.ReadLine()); } //複数の数字を配列で受け渡す //数字と数字の間は" "で区切る static int[] arrayint() { String[] input_line = Console.ReadLine().Split(' '); int[] input_num = new int[input_line.Length]; for(int i = 0; i < input_line.Length; i++) { input_num[i] = int.Parse(input_line[i]); } return input_num; }staticがないとエラー吐いてくるので注意
どんな型を返り値にしたいかは、staticの後に書けばいいみたい。
配列の文字を配列の数字に短い行でする方法わかんなかった(´;ω;`)入力値はMainで受け取ってる。
数字を配列に直すのだけ関数の中が長くなっちゃったなあ。
もっと短くなる方法は知らなかったのさ。しかし、ほとんどのケースで結局数文字しか短くならなかった……。
面倒くさがらずに書けという神からのお告げなのだろうか(+o+)
- 投稿日:2020-04-02T13:58:57+09:00
Visual StudioとC#を初めて扱うのでブロック崩しゲームを作ってみた
自由な時間を与えられたので適当にゲームを探していたところ丁度良いものがあった。
文法の基礎さえ知っていれば作れるレベル。
ベクトルが登場するので、高校数学苦手なら少し難しいかも・・・ボール作成
参考その1
残念ながらオリジナルではないです。
上のサイトを見ながら作りました。ボールが移動し跳ね返るところまで。
基本は参考サイトを見ていただいて
初学者にわかりやすくする為、こちらでさらにコメント追記や軽い解説をしていく。using System; using System.Collections.Generic; using System.ComponentModel; using System.Data; using System.Drawing; using System.Linq; using System.Text; using System.Threading.Tasks; using System.Windows; using System.Windows.Forms; namespace Breakout { public partial class Form1 : Form { Vector ballPos; //位置(Vector:2D空間における変位を表す) Vector ballSpeed; int ballRadius; //半径 public Form1() { InitializeComponent(); //設定したDraw等のイベントハンドラを呼ぶ this.ballPos = new Vector(200, 200); this.ballSpeed = new Vector(-3, -4); this.ballRadius = 10; Timer timer = new Timer(); timer.Interval = 33; timer.Tick += new EventHandler(Update); //timer.Trik:Timer有効時に呼ばれる timer.Start(); } private void Update(object sender, EventArgs e) { //ボールの移動 ballPos += ballSpeed; //左右の壁でのバウンド if (ballPos.X + ballRadius > this.Bounds.Width || ballPos.X - ballRadius < 0) { ballSpeed.X *= -1; } //上の壁でバウンド if (ballPos.Y - ballRadius < 0) { ballSpeed.Y *= -1; } //画面再描画 Invalidate(); } private void Draw(object sender, PaintEventArgs e) //Draw意味:描画する { SolidBrush pinkBrush = new SolidBrush(Color.HotPink); //SolidBrush(ブラシ)は.Netのクラスで図形を塗り潰す //左上からの位置を設定 float px = (float)this.ballPos.X - ballRadius; //マイナス半径とすることで円の中心になる float py = (float)this.ballPos.Y - ballRadius; //e.描画.円(色, 横, 縦, 物質幅, 物質高さ) e.Graphics.FillEllipse(pinkBrush, px, py, this.ballRadius * 2, this.ballRadius * 2); } } }解説
上のメソッド毎に渡される「object sender」「e」は
senterでどの部品か判定し、eにその情報を含んでいる。
このようにイベントで動くメソッドをイベントハンドラという。↓メリットの例としては呼ばれた時点で部品を判断でき、
まとめて管理できる。Button.csprivate void Button_Click(object Sender, EventArgs e) { switch((Sender as Button).Name){ case "Button1": // Button1 のクリック処理 break; case "Button2": // Button2 のクリック処理 break; case "Button3": // Button3 のクリック処理 break; ... } }修正箇所
左右壁に触れるときボールが半分壁にめり込むのが気になったので、
判定条件を少し変更している。
//左右の壁でのバウンド

            if (ballPos.X + ballRadius * 2 > this.Bounds.Width || ballPos.X - ballRadius < 0)
パドル作成
参照その2
ここに来て高校数学で習ったベクトルが登場する...
全く覚えていない。。
鋭角三角形のcosθがマイナスになることはggって思い出し、
ベクトルの定理は呪文として理解した(理解したとは言っていない)。当たり判定はパドルとボールのX軸Y軸座標から求めることもできるが、
後で作成するブロックにも同じ処理を使えるよう
汎用性のある法線の長さから求めるべきだろう。using System; using System.Collections.Generic; using System.ComponentModel; using System.Data; using System.Drawing; using System.Linq; using System.Text; using System.Threading.Tasks; using System.Windows; using System.Windows.Forms; namespace Breakout { public partial class Form1 : Form { Vector ballPos; //位置(Vector:2D空間における変位を表す) Vector ballSpeed; int ballRadius; //半径 Rectangle paddlePos; //パドル位置(Rectangle:四角形を作成) public Form1() { InitializeComponent(); //設定したハンドラ等の初期設定 this.ballPos = new Vector(200, 200); this.ballSpeed = new Vector(-3, -4); this.ballRadius = 10; this.paddlePos = new Rectangle(100, this.Height - 50, 100, 5); //(位置横縦,サイズ横縦) Timer timer = new Timer(); timer.Interval = 33; timer.Tick += new EventHandler(Update); //timer.Trik:Timer有効時に呼ばれる timer.Start(); } /// <summary> /// 内積計算 /// </summary> /// <param name="a"></param> /// <param name="b"></param> /// <returns></returns> double DotProduct(Vector a, Vector b) { return a.X * b.X + a.Y * b.Y; } /// <summary> /// 当たり判定 /// </summary> /// <param name="p1">パドル左端座標</param> /// <param name="p2">パドル右端座標</param> /// <param name="center">ボール中心</param> /// <param name="radius">ボール半径</param> /// <returns></returns> bool LineVsCircle(Vector p1, Vector p2, Vector center, float radius) { Vector lineDir = (p2 - p1); //パドルのベクトル(パドルの長さ) Vector n = new Vector(lineDir.Y, -lineDir.X); //パドルの法線 n.Normalize(); Vector dir1 = center - p1; Vector dir2 = center - p2; double dist = Math.Abs(DotProduct(dir1, n)); double a1 = DotProduct(dir1, lineDir); double a2 = DotProduct(dir2, lineDir); return (a1 * a2 < 0 && dist < radius) ? true : false; } private void Update(object sender, EventArgs e) { //ボールの移動 ballPos += ballSpeed; //左右の壁でのバウンド if (ballPos.X + ballRadius * 2 > this.Bounds.Width || ballPos.X - ballRadius < 0) { ballSpeed.X *= -1; } //上の壁でバウンド if (ballPos.Y - ballRadius < 0) { ballSpeed.Y *= -1; } //パドルの当たり判定 if (LineVsCircle(new Vector(this.paddlePos.Left, this.paddlePos.Top), new Vector(this.paddlePos.Right, this.paddlePos.Top), ballPos, ballRadius) ) { ballSpeed.Y *= -1; } //画面再描画 Invalidate(); } private void Draw(object sender, PaintEventArgs e) //Draw意味:描画する { SolidBrush pinkBrush = new SolidBrush(Color.HotPink); //SolidBrush(ブラシ)は.Netのクラスで図形を塗り潰す SolidBrush grayBrush = new SolidBrush(Color.DimGray); //左上からの位置を設定 float px = (float)this.ballPos.X - ballRadius; //マイナス半径とすることで円の中心になる float py = (float)this.ballPos.Y - ballRadius; //e.描画.円(色, 横, 縦, 物質幅, 物質高さ) e.Graphics.FillEllipse(pinkBrush, px, py, this.ballRadius * 2, this.ballRadius * 2); //e.描画.長方形(色, 長方形) e.Graphics.FillRectangle(grayBrush, paddlePos); } private void KeyPressed(object sender, KeyPressEventArgs e) //押下毎 { if (e.KeyChar == 'a') //A押下時 { this.paddlePos.X -= 20; } else if (e.KeyChar == 's') //S押下時 { this.paddlePos.X += 20; } } } }複雑なのはベクトル計算ロジックだけ。。
「///」:スラッシュ3つ並んでいる箇所はドキュメントコメントといい、パラメーターやメソッドの説明を記述している。
修正箇所
パドルが画面の外にも移動できるのが気になったので
画面から消えないようにする。private void KeyPressed(object sender, KeyPressEventArgs e) //押下毎 { if (e.KeyChar == 'a' && paddlePos.Left > 0) //A押下時 { this.paddlePos.X -= 20; } else if (e.KeyChar == 's' && paddlePos.Right < this.Width) //S押下時 { this.paddlePos.X += 20; } }ブロック作成
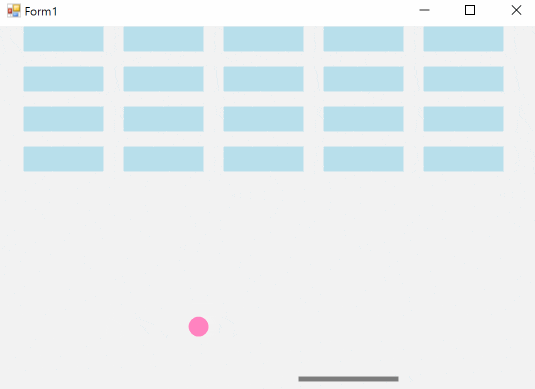
参考その3
ブロックを作成後、リスト化してボールが当たれば消えるようにする。
当たり判定は参照その2を流用するので難しいことは特に記述しない。using System; using System.Collections.Generic; using System.ComponentModel; using System.Data; using System.Drawing; using System.Linq; using System.Text; using System.Threading.Tasks; using System.Windows; using System.Windows.Forms; namespace Breakout { public partial class Form1 : Form { Vector ballPos; //位置(Vector:2D空間における変位を表す) Vector ballSpeed; int ballRadius; //半径 Rectangle paddlePos; //パドル位置(Rectangle:四角形を作成) List<Rectangle> blockPos; //ブロックの位置(リスト化) public Form1() { InitializeComponent(); //設定したハンドラ等の初期設定 this.ballPos = new Vector(200, 200); this.ballSpeed = new Vector(-4, -8); this.ballRadius = 10; this.paddlePos = new Rectangle(100, this.Height - 50, 100, 5); //(位置横縦,サイズ横縦) this.blockPos = new List<Rectangle>(); for (int x = 0; x <= this.Height; x += 100) { for (int y = 0; y <= 150; y += 40) { this.blockPos.Add(new Rectangle(25 + x, y, 80, 25)); } } Timer timer = new Timer(); timer.Interval = 33; timer.Tick += new EventHandler(Update); //timer.Trik:Timer有効時に呼ばれる timer.Start(); } /// <summary> /// 内積計算 /// </summary> /// <param name="a"></param> /// <param name="b"></param> /// <returns></returns> double DotProduct(Vector a, Vector b) { return a.X * b.X + a.Y * b.Y; } /// <summary> /// 当たり判定 /// </summary> /// <param name="p1">パドル左端座標</param> /// <param name="p2">パドル右端座標</param> /// <param name="center">ボール中心</param> /// <param name="radius">ボール半径</param> /// <returns></returns> bool LineVsCircle(Vector p1, Vector p2, Vector center, float radius) { Vector lineDir = (p2 - p1); //パドルのベクトル(パドルの長さ) Vector n = new Vector(lineDir.Y, -lineDir.X); //パドルの法線 n.Normalize(); Vector dir1 = center - p1; Vector dir2 = center - p2; double dist = Math.Abs(DotProduct(dir1, n)); double a1 = DotProduct(dir1, lineDir); double a2 = DotProduct(dir2, lineDir); Console.WriteLine(dist); return (a1 * a2 < 0 && dist < radius) ? true : false; } int BlockVsCircle(Rectangle block, Vector ball) { if (LineVsCircle(new Vector(block.Left, block.Top), new Vector(block.Right, block.Top), ball, ballRadius)) return 1; if (LineVsCircle(new Vector(block.Left, block.Bottom), new Vector(block.Right, block.Bottom), ball, ballRadius)) return 2; if (LineVsCircle(new Vector(block.Right, block.Top), new Vector(block.Right, block.Bottom), ball, ballRadius)) return 3; if (LineVsCircle(new Vector(block.Left, block.Top), new Vector(block.Left, block.Bottom), ball, ballRadius)) return 4; return -1; } private void Update(object sender, EventArgs e) { //ボールの移動 ballPos += ballSpeed; //左右の壁でのバウンド if (ballPos.X + ballRadius * 2 > this.Bounds.Width || ballPos.X - ballRadius < 0) { ballSpeed.X *= -1; } //上の壁でバウンド if (ballPos.Y - ballRadius < 0) { ballSpeed.Y *= -1; } //パドルの当たり判定 if (LineVsCircle(new Vector(this.paddlePos.Left, this.paddlePos.Top), new Vector(this.paddlePos.Right, this.paddlePos.Top), ballPos, ballRadius) ) { ballSpeed.Y *= -1; } // ブロックとのあたり判定 for (int i = 0; i < this.blockPos.Count; i++) { int collision = BlockVsCircle(blockPos[i], ballPos); if (collision == 1 || collision == 2) { ballSpeed.Y *= -1; this.blockPos.Remove(blockPos[i]); } else if (collision == 3 || collision == 4) { ballSpeed.X *= -1; this.blockPos.Remove(blockPos[i]); } } //画面再描画 Invalidate(); } private void Draw(object sender, PaintEventArgs e) //Draw意味:描画する { SolidBrush pinkBrush = new SolidBrush(Color.HotPink); //SolidBrush(ブラシ)は.Netのクラスで図形を塗り潰す SolidBrush grayBrush = new SolidBrush(Color.DimGray); SolidBrush blueBrush = new SolidBrush(Color.LightBlue); //左上からの位置を設定 float px = (float)this.ballPos.X - ballRadius; //マイナス半径とすることで円の中心になる float py = (float)this.ballPos.Y - ballRadius; //e.描画.円(色, 横, 縦, 物質幅, 物質高さ) e.Graphics.FillEllipse(pinkBrush, px, py, this.ballRadius * 2, this.ballRadius * 2); //e.描画.長方形(色, 長方形) e.Graphics.FillRectangle(grayBrush, paddlePos); //ブロック描画 for (int i = 0; i < this.blockPos.Count; i++) { e.Graphics.FillRectangle(blueBrush, blockPos[i]); } } private void KeyPressed(object sender, KeyPressEventArgs e) //押下毎 { if (e.KeyChar == 'a' && paddlePos.Left > 0) //A押下時 { this.paddlePos.X -= 20; } else if (e.KeyChar == 's' && paddlePos.Right < this.Width) //S押下時 { this.paddlePos.X += 20; } } } }↓BlockVsCircleのfor文で回しているブロックの生成順
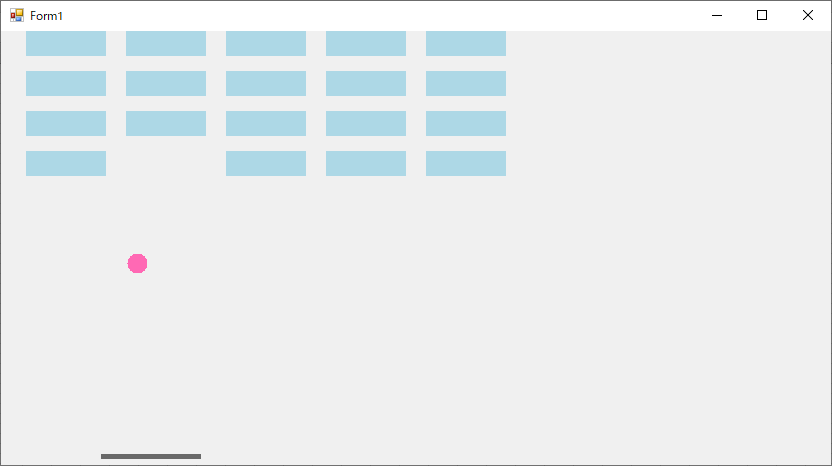
縦(Y軸)に全て並べてから右(X軸)に移る
以下のように横長になってしまった場合、Form1.csのデザインで簡単にフォームのサイズを変更できる。
また、横長にブロックを並べたいときはForm1コンストラクタの「this.Height」を「this.Width」に変更すればよい。
感想
冒頭に1時間あれば終わるって書いてたのに全く足りんかった・・まだまだだな。
Unityでゲーム作ったほうが色々できそうだし楽しそう!
- 投稿日:2020-04-02T13:58:57+09:00
Visual StudioとC#を初めて使ってブロック崩しゲームを作ってみた
少しばかり自由時間を与えられたので勉強がてらにゲームアプリを探していたところ丁度良いものを発見!
文法の基礎さえ知っていれば作れるレベル。
ベクトルが登場するので、高校数学苦手なら少し難しいかも・・・ボール作成
参考その1
残念ながらオリジナルではないです。
上のサイトを見ながら作りました。
Visual Studioのインストール手順も載っています。その1.ではボールが移動し跳ね返るところまで。
基本は参考サイトを見ていただいて
初学者にわかりやすくする為、こちらでさらにコメント追記や軽い解説をしていく。using System; using System.Collections.Generic; using System.ComponentModel; using System.Data; using System.Drawing; using System.Linq; using System.Text; using System.Threading.Tasks; using System.Windows; using System.Windows.Forms; namespace Breakout { public partial class Form1 : Form { Vector ballPos; //位置(Vector:2D空間における変位を表す) Vector ballSpeed; int ballRadius; //半径 public Form1() { InitializeComponent(); //設定したDraw等のイベントハンドラを呼ぶ this.ballPos = new Vector(200, 200); this.ballSpeed = new Vector(-3, -4); this.ballRadius = 10; Timer timer = new Timer(); timer.Interval = 33; timer.Tick += new EventHandler(Update); //timer.Trik:Timer有効時に呼ばれる timer.Start(); } private void Update(object sender, EventArgs e) { //ボールの移動 ballPos += ballSpeed; //左右の壁でのバウンド if (ballPos.X + ballRadius > this.Bounds.Width || ballPos.X - ballRadius < 0) { ballSpeed.X *= -1; } //上の壁でバウンド if (ballPos.Y - ballRadius < 0) { ballSpeed.Y *= -1; } //画面再描画 Invalidate(); } private void Draw(object sender, PaintEventArgs e) //Draw意味:描画する { SolidBrush pinkBrush = new SolidBrush(Color.HotPink); //SolidBrush(ブラシ)は.Netのクラスで図形を塗り潰す //左上からの位置を設定 float px = (float)this.ballPos.X - ballRadius; //マイナス半径とすることで円の中心になる float py = (float)this.ballPos.Y - ballRadius; //e.描画.円(色, 横, 縦, 物質幅, 物質高さ) e.Graphics.FillEllipse(pinkBrush, px, py, this.ballRadius * 2, this.ballRadius * 2); } } }解説
上のメソッド毎に渡される「object sender」「e」は
senterでどの部品か判定し、eにその情報を含んでいる。
このようにイベントで動くメソッドをイベントハンドラという。↓メリットの例としては呼ばれた時点で部品を判断でき、
まとめて管理できる。Button.csprivate void Button_Click(object Sender, EventArgs e) { switch((Sender as Button).Name){ case "Button1": // Button1 のクリック処理 break; case "Button2": // Button2 のクリック処理 break; case "Button3": // Button3 のクリック処理 break; ... } }修正箇所
左右壁に触れるときボールが半分壁にめり込むのが気になったので、
判定条件を少し変更している。
//左右の壁でのバウンド

            if (ballPos.X + ballRadius * 2 > this.Bounds.Width || ballPos.X - ballRadius < 0)
パドル作成
参照その2
ここに来て高校数学で習ったベクトルが登場する...
全く覚えていない。。
鋭角三角形のcosθがマイナスになることはggって思い出し、
ベクトルの定理は呪文として理解した(理解したとは言っていない)。当たり判定はパドルとボールのX軸Y軸座標から求めることもできるが、
後で作成するブロックにも同じ処理を使えるよう
汎用性のある法線の長さから求めるべきだろう。using System; using System.Collections.Generic; using System.ComponentModel; using System.Data; using System.Drawing; using System.Linq; using System.Text; using System.Threading.Tasks; using System.Windows; using System.Windows.Forms; namespace Breakout { public partial class Form1 : Form { Vector ballPos; //位置(Vector:2D空間における変位を表す) Vector ballSpeed; int ballRadius; //半径 Rectangle paddlePos; //パドル位置(Rectangle:四角形を作成) public Form1() { InitializeComponent(); //設定したハンドラ等の初期設定 this.ballPos = new Vector(200, 200); this.ballSpeed = new Vector(-3, -4); this.ballRadius = 10; this.paddlePos = new Rectangle(100, this.Height - 50, 100, 5); //(位置横縦,サイズ横縦) Timer timer = new Timer(); timer.Interval = 33; timer.Tick += new EventHandler(Update); //timer.Trik:Timer有効時に呼ばれる timer.Start(); } /// <summary> /// 内積計算 /// </summary> /// <param name="a"></param> /// <param name="b"></param> /// <returns></returns> double DotProduct(Vector a, Vector b) { return a.X * b.X + a.Y * b.Y; } /// <summary> /// 当たり判定 /// </summary> /// <param name="p1">パドル左端座標</param> /// <param name="p2">パドル右端座標</param> /// <param name="center">ボール中心</param> /// <param name="radius">ボール半径</param> /// <returns></returns> bool LineVsCircle(Vector p1, Vector p2, Vector center, float radius) { Vector lineDir = (p2 - p1); //パドルのベクトル(パドルの長さ) Vector n = new Vector(lineDir.Y, -lineDir.X); //パドルの法線 n.Normalize(); Vector dir1 = center - p1; Vector dir2 = center - p2; double dist = Math.Abs(DotProduct(dir1, n)); double a1 = DotProduct(dir1, lineDir); double a2 = DotProduct(dir2, lineDir); return (a1 * a2 < 0 && dist < radius) ? true : false; } private void Update(object sender, EventArgs e) { //ボールの移動 ballPos += ballSpeed; //左右の壁でのバウンド if (ballPos.X + ballRadius * 2 > this.Bounds.Width || ballPos.X - ballRadius < 0) { ballSpeed.X *= -1; } //上の壁でバウンド if (ballPos.Y - ballRadius < 0) { ballSpeed.Y *= -1; } //パドルの当たり判定 if (LineVsCircle(new Vector(this.paddlePos.Left, this.paddlePos.Top), new Vector(this.paddlePos.Right, this.paddlePos.Top), ballPos, ballRadius) ) { ballSpeed.Y *= -1; } //画面再描画 Invalidate(); } private void Draw(object sender, PaintEventArgs e) //Draw意味:描画する { SolidBrush pinkBrush = new SolidBrush(Color.HotPink); //SolidBrush(ブラシ)は.Netのクラスで図形を塗り潰す SolidBrush grayBrush = new SolidBrush(Color.DimGray); //左上からの位置を設定 float px = (float)this.ballPos.X - ballRadius; //マイナス半径とすることで円の中心になる float py = (float)this.ballPos.Y - ballRadius; //e.描画.円(色, 横, 縦, 物質幅, 物質高さ) e.Graphics.FillEllipse(pinkBrush, px, py, this.ballRadius * 2, this.ballRadius * 2); //e.描画.長方形(色, 長方形) e.Graphics.FillRectangle(grayBrush, paddlePos); } private void KeyPressed(object sender, KeyPressEventArgs e) //押下毎 { if (e.KeyChar == 'a') //A押下時 { this.paddlePos.X -= 20; } else if (e.KeyChar == 's') //S押下時 { this.paddlePos.X += 20; } } } }複雑なのはベクトル計算ロジックだけ。。
「///」:スラッシュ3つ並んでいる箇所はドキュメントコメントといい、パラメーターやメソッドの説明を記述している。
修正箇所
パドルが画面の外にも移動できるのが気になったので
画面から消えないようにする。private void KeyPressed(object sender, KeyPressEventArgs e) //押下毎 { if (e.KeyChar == 'a' && paddlePos.Left > 0) //A押下時 { this.paddlePos.X -= 20; } else if (e.KeyChar == 's' && paddlePos.Right < this.Width) //S押下時 { this.paddlePos.X += 20; } }ブロック作成
参考その3
ブロックを作成後、リスト化してボールが当たれば消えるようにする。
当たり判定は参照その2を流用するので難しいことは特に記述しない。using System; using System.Collections.Generic; using System.ComponentModel; using System.Data; using System.Drawing; using System.Linq; using System.Text; using System.Threading.Tasks; using System.Windows; using System.Windows.Forms; namespace Breakout { public partial class Form1 : Form { Vector ballPos; //位置(Vector:2D空間における変位を表す) Vector ballSpeed; int ballRadius; //半径 Rectangle paddlePos; //パドル位置(Rectangle:四角形を作成) List<Rectangle> blockPos; //ブロックの位置(リスト化) public Form1() { InitializeComponent(); //設定したハンドラ等の初期設定 this.ballPos = new Vector(200, 200); this.ballSpeed = new Vector(-4, -8); this.ballRadius = 10; this.paddlePos = new Rectangle(100, this.Height - 50, 100, 5); //(位置横縦,サイズ横縦) this.blockPos = new List<Rectangle>(); for (int x = 0; x <= this.Height; x += 100) { for (int y = 0; y <= 150; y += 40) { this.blockPos.Add(new Rectangle(25 + x, y, 80, 25)); } } Timer timer = new Timer(); timer.Interval = 33; timer.Tick += new EventHandler(Update); //timer.Trik:Timer有効時に呼ばれる timer.Start(); } /// <summary> /// 内積計算 /// </summary> /// <param name="a"></param> /// <param name="b"></param> /// <returns></returns> double DotProduct(Vector a, Vector b) { return a.X * b.X + a.Y * b.Y; } /// <summary> /// 当たり判定 /// </summary> /// <param name="p1">パドル左端座標</param> /// <param name="p2">パドル右端座標</param> /// <param name="center">ボール中心</param> /// <param name="radius">ボール半径</param> /// <returns></returns> bool LineVsCircle(Vector p1, Vector p2, Vector center, float radius) { Vector lineDir = (p2 - p1); //パドルのベクトル(パドルの長さ) Vector n = new Vector(lineDir.Y, -lineDir.X); //パドルの法線 n.Normalize(); Vector dir1 = center - p1; Vector dir2 = center - p2; double dist = Math.Abs(DotProduct(dir1, n)); double a1 = DotProduct(dir1, lineDir); double a2 = DotProduct(dir2, lineDir); Console.WriteLine(dist); return (a1 * a2 < 0 && dist < radius) ? true : false; } int BlockVsCircle(Rectangle block, Vector ball) { if (LineVsCircle(new Vector(block.Left, block.Top), new Vector(block.Right, block.Top), ball, ballRadius)) return 1; if (LineVsCircle(new Vector(block.Left, block.Bottom), new Vector(block.Right, block.Bottom), ball, ballRadius)) return 2; if (LineVsCircle(new Vector(block.Right, block.Top), new Vector(block.Right, block.Bottom), ball, ballRadius)) return 3; if (LineVsCircle(new Vector(block.Left, block.Top), new Vector(block.Left, block.Bottom), ball, ballRadius)) return 4; return -1; } private void Update(object sender, EventArgs e) { //ボールの移動 ballPos += ballSpeed; //左右の壁でのバウンド if (ballPos.X + ballRadius * 2 > this.Bounds.Width || ballPos.X - ballRadius < 0) { ballSpeed.X *= -1; } //上の壁でバウンド if (ballPos.Y - ballRadius < 0) { ballSpeed.Y *= -1; } //パドルの当たり判定 if (LineVsCircle(new Vector(this.paddlePos.Left, this.paddlePos.Top), new Vector(this.paddlePos.Right, this.paddlePos.Top), ballPos, ballRadius) ) { ballSpeed.Y *= -1; } // ブロックとのあたり判定 for (int i = 0; i < this.blockPos.Count; i++) { int collision = BlockVsCircle(blockPos[i], ballPos); if (collision == 1 || collision == 2) { ballSpeed.Y *= -1; this.blockPos.Remove(blockPos[i]); } else if (collision == 3 || collision == 4) { ballSpeed.X *= -1; this.blockPos.Remove(blockPos[i]); } } //画面再描画 Invalidate(); } private void Draw(object sender, PaintEventArgs e) //Draw意味:描画する { SolidBrush pinkBrush = new SolidBrush(Color.HotPink); //SolidBrush(ブラシ)は.Netのクラスで図形を塗り潰す SolidBrush grayBrush = new SolidBrush(Color.DimGray); SolidBrush blueBrush = new SolidBrush(Color.LightBlue); //左上からの位置を設定 float px = (float)this.ballPos.X - ballRadius; //マイナス半径とすることで円の中心になる float py = (float)this.ballPos.Y - ballRadius; //e.描画.円(色, 横, 縦, 物質幅, 物質高さ) e.Graphics.FillEllipse(pinkBrush, px, py, this.ballRadius * 2, this.ballRadius * 2); //e.描画.長方形(色, 長方形) e.Graphics.FillRectangle(grayBrush, paddlePos); //ブロック描画 for (int i = 0; i < this.blockPos.Count; i++) { e.Graphics.FillRectangle(blueBrush, blockPos[i]); } } private void KeyPressed(object sender, KeyPressEventArgs e) //押下毎 { if (e.KeyChar == 'a' && paddlePos.Left > 0) //A押下時 { this.paddlePos.X -= 20; } else if (e.KeyChar == 's' && paddlePos.Right < this.Width) //S押下時 { this.paddlePos.X += 20; } } } }↓BlockVsCircleのfor文で回しているブロックの生成順
縦(Y軸)に全て並べてから右(X軸)に移る
以下のように横長になってしまった場合、Form1.csのデザインで簡単にフォームのサイズを変更できる。
また、横長にブロックを並べたいときはForm1コンストラクタの「this.Height」を「this.Width」に変更すればよい。
感想
冒頭に1時間あれば終わるって書いてたのに全く足りんかった・・まだまだだな。
Unityでゲーム作ったほうが色々できそうだし楽しそう!
- 投稿日:2020-04-02T01:41:46+09:00
今更ながらWPFに置き換えてみる(9)
本来の機能である毎日のPC起動時間と終了時間をテキストに保存して、リスト表示する部分のロジックをVB→C#に置き換え。
読み込んだテキストバッファをCRLF区切りでSPLITして行配列化、さらに各行をカンマでSPLITして出来上がったフィールド配列をアイテムに突っ込むというベタな手順。
VB+Formsの時はこんな感じDim i As Integer For i = 0 To UBound(lines) - 1 Dim cols() = Split(lines(i), ",") Dim itemx As New ListViewItem Dim e_w() = {"SUN", "MON", "TUE", "WED", "THU", "FRI", "SAT"} 'アイテムの作成 itemx.Text = Mid(cols(0), 5, 2) & "/" & Mid(cols(0), 7, 2) '日付 'アイテムの追加 itemx.SubItems.Add(e_w(Int(cols(1)))) '曜日 If Int(cols(1)) = 0 Then itemx.UseItemStyleForSubItems = False itemx.SubItems(1).ForeColor = Color.Red End If If Int(cols(1)) = 6 Then itemx.UseItemStyleForSubItems = False itemx.SubItems(1).ForeColor = Color.Blue End If itemx.SubItems.Add(cols(2)) '開始時間 itemx.SubItems.Add(cols(3)) '終了時間 Me.ListView1.Items.Add(itemx) Next iおんなじListviewだし、Formsと大して変わらんだろうと思ってましたが考えが甘かった。結構迷う。
なによりWPFのListviewはサブアイテムなどというものがない模様。
でさらにItem内容を書き換えてもRefreshしてやらないと画面更新されない。
リスト作成はWPF+C#の場合、private void MakeListView(string Buff) { //ListViewを作成 //曜日 string[] e_w = { "SUN", "MON", "TUE", "WED", "THU", "FRI", "SAT"}; //行配列化、さらにフィールド分解してListViewItemとして追加 string[] crlf = { "\r\n" }; string[] lines = Buff.Split(crlf, StringSplitOptions.None); string[] dlm = { "," }; for (int i = 0; i < lines.Length-1; i++) { string[] fld = lines[i].Split(dlm, StringSplitOptions.None); fld[0] = fld[0].Substring(4, 2) + "/" + fld[0].Substring(6,2); fld[1] = e_w[int.Parse(fld[1])]; this.listView.Items.Add(fld); } this.listView.Items.Refresh(); }さらにリスト内のアイテムを動的に更新する場合ベタなループで、
            //Listview上で特定条件の行の特定項目を更新する
            for(int i=0;i<listView.Items.Count;i++)
            {
                string[] fld = (string[])listView.Items[i];     //1行分を配列に入れる
                if (fld[0] == "AAA")
                {
                    fld[0]="xxx"
                    listView.Items[i] = fld;      //こんな感じで配列をそのまま突っ込む
                }
            }
            listView.Items.Refresh();
てな感じで対応。foreachを使ったほうが早い模様ですが、どのみち更新するためのインデックスがいるので、わかりやすさからforで処理記述しています。
- 投稿日:2020-04-02T00:36:05+09:00
OpenCvSharp4でカメラ用キャリブレーションファイルを使う
はじめに
こんばんは
OpenCvSharp4を使ってWEBカメラのキャリブレーションを行ったので備忘録として残します。
キャリブレーション自体の理論や理屈はまだまだ理解できていないのでコードが動いただけですが。。。環境
WEBカメラ : FullHD 1080P(200万画素カメラ)
キャリブレーションファイル作成:python(python-opencv)
カメラレンズ歪み計算:C#(opencvsharp4.windows)pythonでカメラキャリブレーションyamlファイルの作成
本当はOpencvsharpでキャリブレーション計算も行いたかったのですが
いかんせん3系のサンプル達の流用が難しく、4系で置き換えるのも私のレベルでは太刀打ちできそうにもなかったので大人しくサンプルのあるpythonで計算を行いますというわけでこちらを参考に以下のコードを作成して実行します。
核になる部分はほとんどコピペです。。。
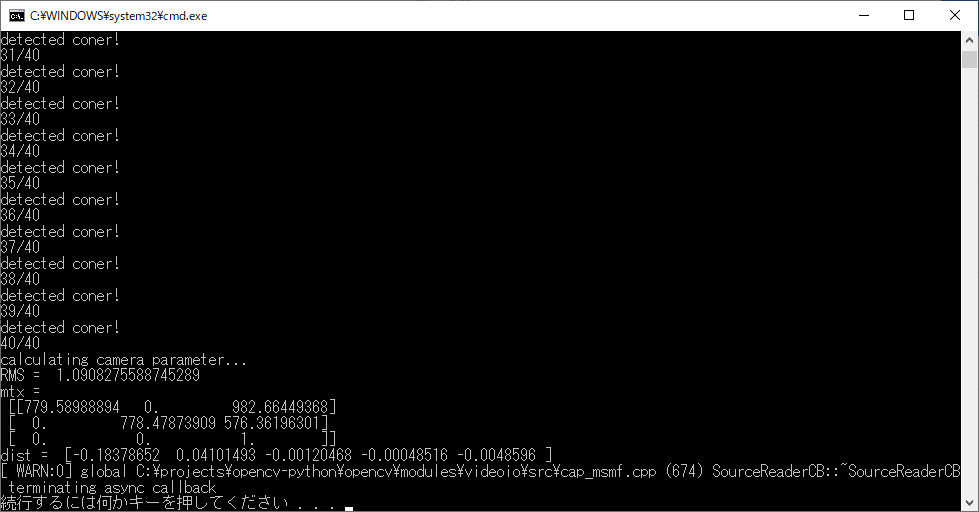
いや、ほんとありがたい。CalcCalibration.pyimport os import sys import numpy as np import cv2 from time import sleep from datetime import datetime FILE_NAME = "calib.yml" # 参照画像の枚数 REFERENCE_IMG = 40 # 正方形の1辺のサイズ[cm] SQUARE_SIZE = 2.0 # 交差ポイントの数 PATTERN_SIZE = (8, 13) def main(): """ メイン関数 :return: """ calc_camera() # カメラの歪みを計算 def calc_camera(): """ カメラの歪みを計算する関数 :return: """ pattern_points = np.zeros((np.prod(PATTERN_SIZE), 3), np.float32) # チェスボード(X,Y,Z)座標の指定 (Z=0) pattern_points[:, :2] = np.indices(PATTERN_SIZE).T.reshape(-1, 2) pattern_points *= SQUARE_SIZE obj_points = [] img_points = [] capture = cv2.VideoCapture(0) # 解像度を指定 # カメラ画像の横幅を1920に設定 capture.set(cv2.CAP_PROP_FRAME_WIDTH, 1920) # カメラ画像の縦幅を1080に設定 capture.set(cv2.CAP_PROP_FRAME_HEIGHT, 1080) while len(obj_points) < REFERENCE_IMG: # 画像の取得 ret, img = capture.read() height = img.shape[0] width = img.shape[1] gray = cv2.cvtColor(img, cv2.COLOR_BGR2GRAY) # チェスボードのコーナーを検出 ret, corner = cv2.findChessboardCorners(gray, PATTERN_SIZE) # コーナーがあれば if ret: print("detected coner!") print(str(len(obj_points) + 1) + "/" + str(REFERENCE_IMG)) term = (cv2.TERM_CRITERIA_EPS + cv2.TERM_CRITERIA_COUNT, 30, 0.1) cv2.cornerSubPix(gray, corner, (5, 5), (-1, -1), term) img_points.append(corner.reshape(-1, 2)) # appendメソッド:リストの最後に因数のオブジェクトを追加 obj_points.append(pattern_points) cv2.imshow('image', img) # 毎回判定するから 200 ms 待つ.遅延するのはココ if cv2.waitKey(200) & 0xFF == ord('q'): break print("calculating camera parameter...") # 内部パラメータを計算 rms, mtx, dist, rvecs, tvecs = cv2.calibrateCamera(obj_points, img_points, gray.shape[::-1], None, None) # 計算結果を表示 print("RMS = ", rms) print("mtx = \n", mtx) print("dist = ", dist.ravel()) # ymlに保存 f = cv2.FileStorage(FILE_NAME, flags=1) f.write('mtx', mtx) f.write('dist', dist) # f.write('translation', rvecs) # f.write('distortion', tvecs) f.release() if __name__ == '__main__': main()
参照画像の枚数、正方形の1辺のサイズ、交差ポイントの数、カメラ解像度の設定は
環境に合わせて設定します。
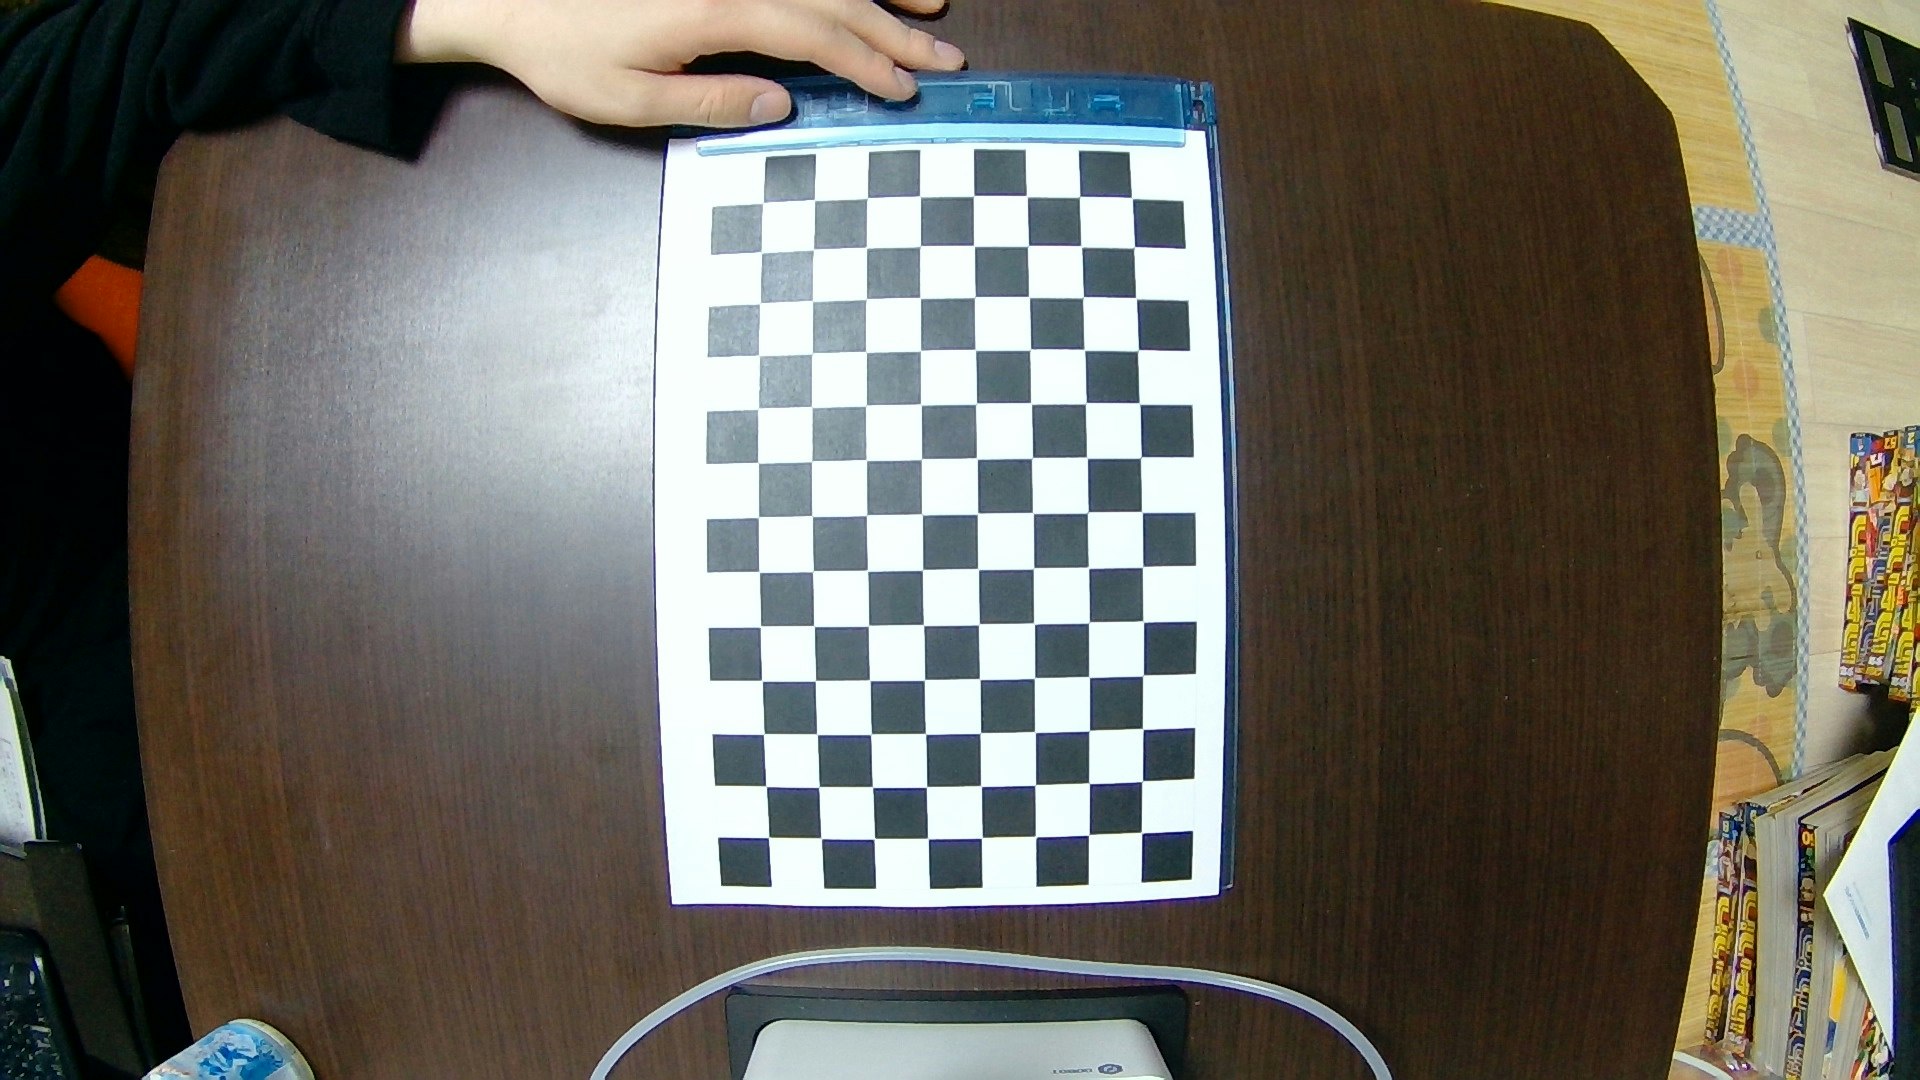
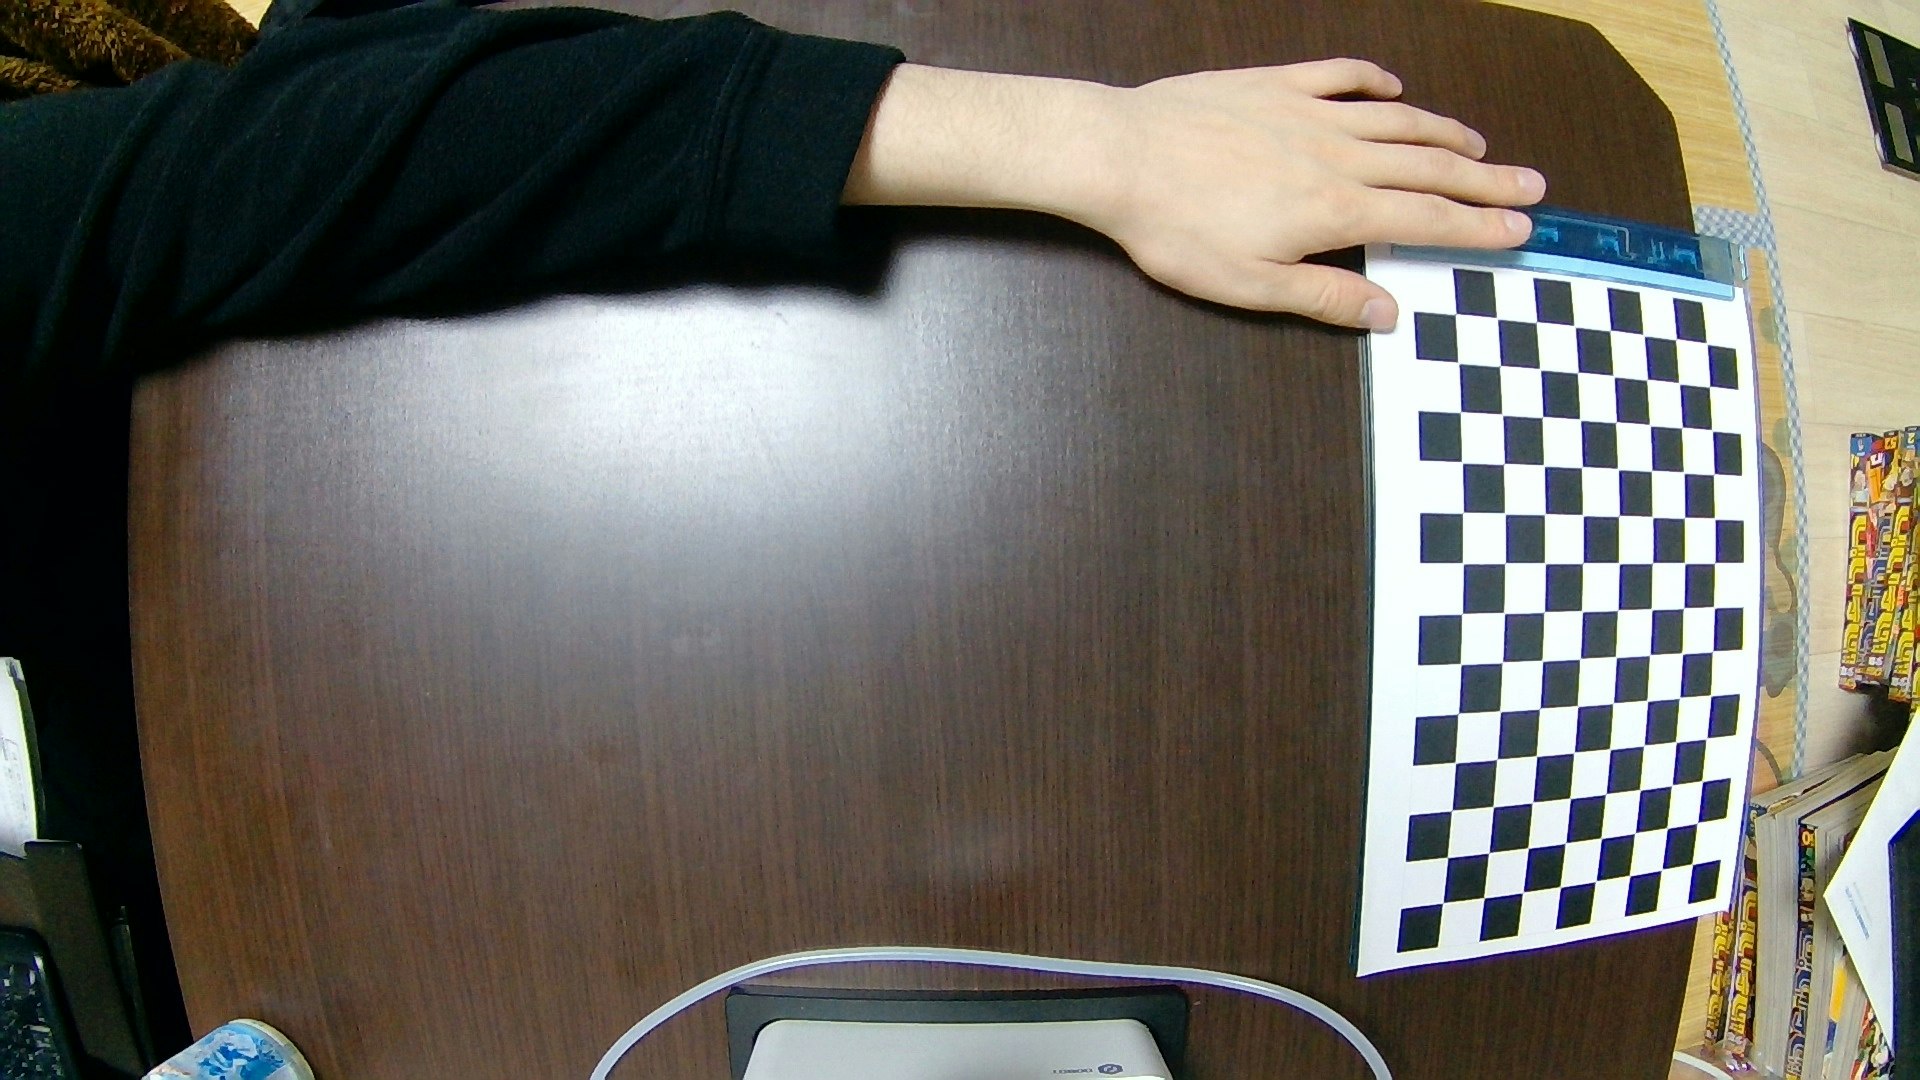
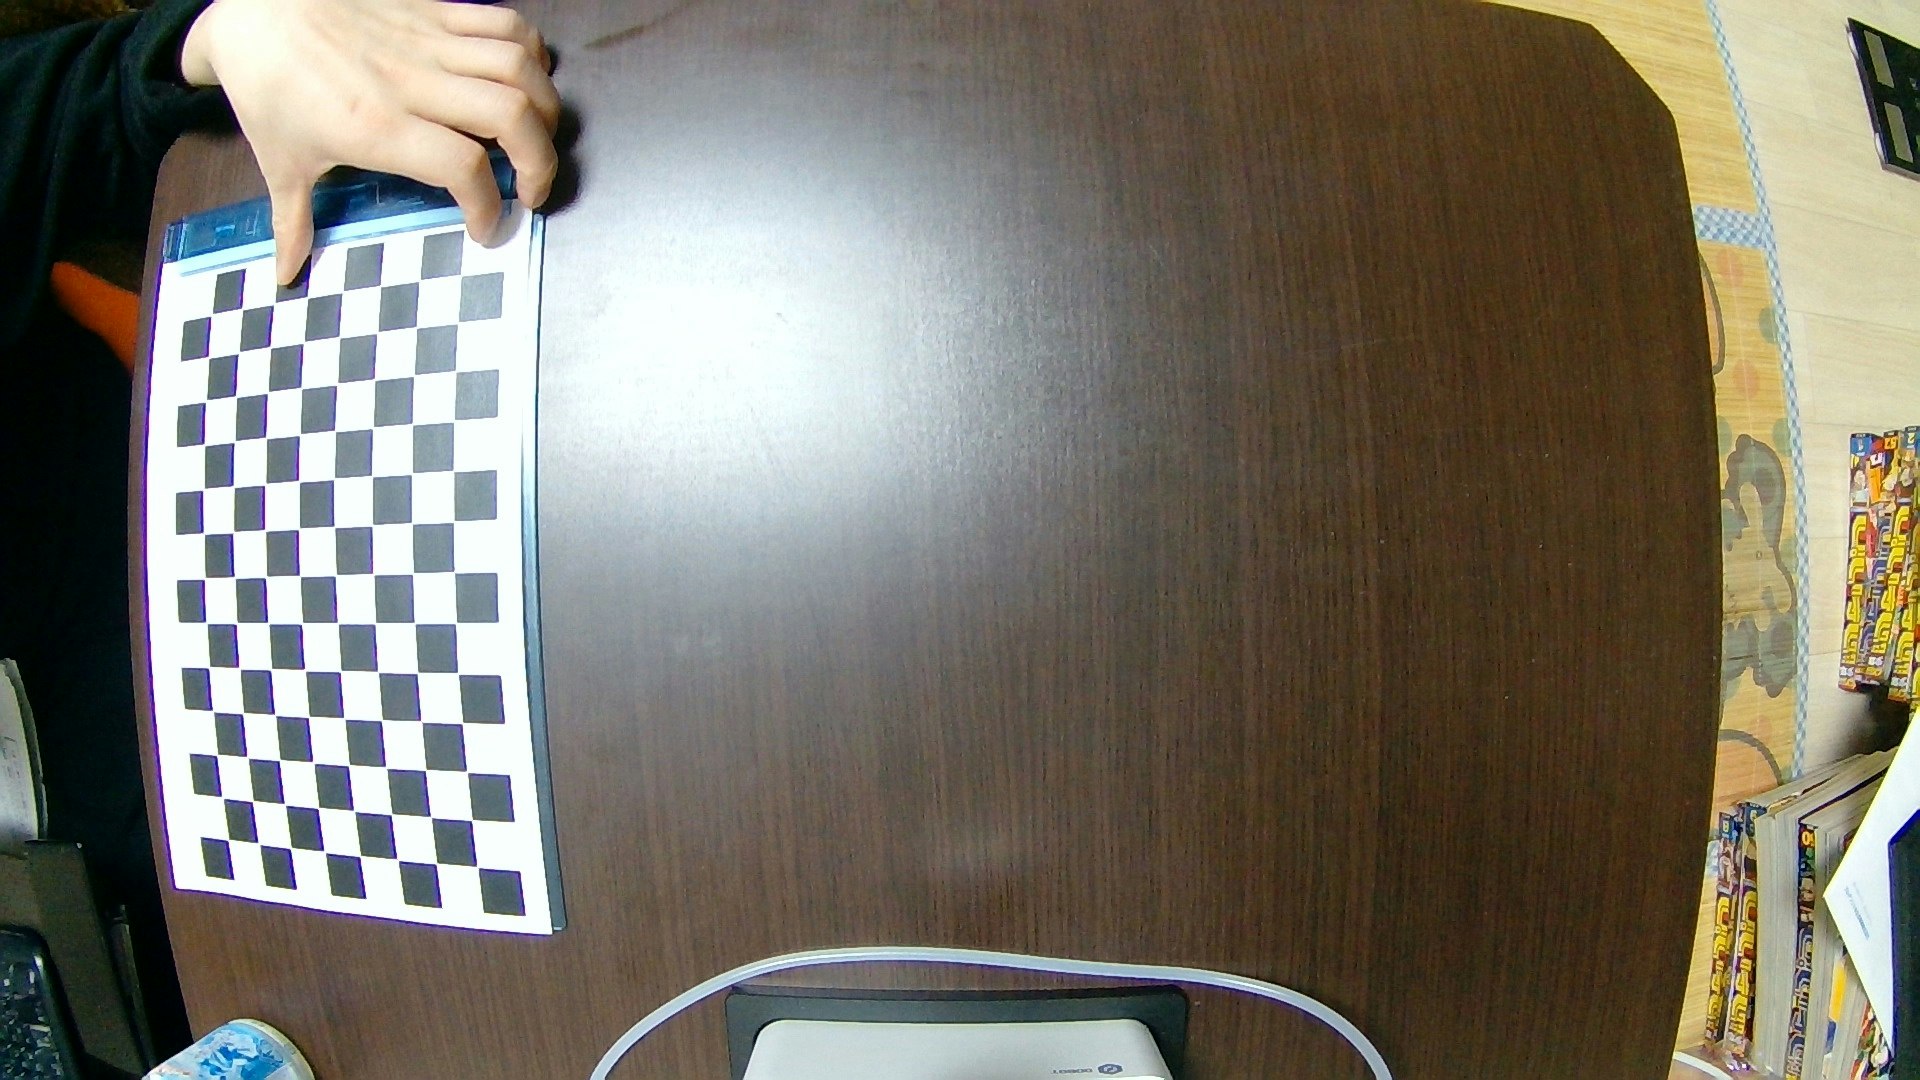
今回はこちらを作成し、A4サイズで印刷してプラ板に貼って使用しました。
正方形1辺=20mmなので2.0cm、交差ポイントは横方向8、縦方向13です。
↓のようにまんべんなく移動させながら歪み計算を行います。
40枚分チェスボードのコーナーが検出できれば歪みを計算します。
↓のように結果が確認できます。同時に"calib.yml"が出力されている事も確認できます。
calib.yml%YAML:1.0 --- mtx: !!opencv-matrix rows: 3 cols: 3 dt: d data: [ 7.7958988893525259e+02, 0., 9.8266449367809537e+02, 0., 7.7847873908657630e+02, 5.7636196300911377e+02, 0., 0., 1. ] dist: !!opencv-matrix rows: 1 cols: 5 dt: d data: [ -1.8378651673412880e-01, 4.1014929211162864e-02, -1.2046811513395908e-03, -4.8516056956278577e-04, -4.8595996923656995e-03 ]OpenCvSharp4でyamlファイルを読み込んで歪み補正を行う
まずはopencvsharpをインストールします。
何故か上側のOpenCvSharp4では実行時にDLLの読み込みエラーが発生したので
OpenCvSharp4.WIndowsをインストールします。
インストールが完了したら"calib.yml"と検証用の画像を用意し
以下のコードを動かします。Program.csusing System; using System.Collections.Generic; using System.Linq; using System.Text; using System.Threading.Tasks; using OpenCvSharp; namespace CameraCalibrationSample { class Program { static void Main(string[] args) { const string ImagePath = @"./img/"; const string YamlFilePath = @"calib.yml"; // (1)キャリブレーション画像(補正前)の読み込み string[] imagePaths = System.IO.Directory.EnumerateFiles(ImagePath, "*", System.IO.SearchOption.AllDirectories).ToArray(); int imageNum = imagePaths.Length; Mat[] srcImg = new Mat[imageNum]; for (int i = 0; i < imageNum; i++) { srcImg[i] = Cv2.ImRead(imagePaths[i], ImreadModes.Color); Mat src = Cv2.ImRead(imagePaths[i], ImreadModes.Color); // ymlファイルを読み来み計算パラメータを取得 using (var fs = new FileStorage(YamlFilePath, FileStorage.Mode.Read)) { var mtx = fs["mtx"].ReadMat(); var dist = fs["dist"].ReadMat(); Mat calib = new Mat(); Cv2.Undistort(src, calib, mtx, dist); Cv2.ImShow("src", srcImg[i]); Cv2.ImShow("calib", calib); OpenCvSharp.Cv2.WaitKey(0); } } Cv2.DestroyAllWindows(); } } }歪み計算がうまく機能していれば↓のようになります。
・補正前
・補正後
ちゃんと補正されているのが確認できます。やったね!(^O^)
終わりに
3系と4系で結構コードに違いがあり、旧バージョンのサンプルを4で書き直そうと思っても敷居が高かったです。。。
本家OpenCVの公式サイトではC++, pythonのサンプルソースがありますがこれをC#に置き換えるのも自分にとってはなかなか難しい。
今回は計算部分をC#で書くのは諦めて補正パラメータを使用するところだけC#で書くことにしました。
それでも3系と4系でFileStorageの書き方がかなり変わっていたので割と時間がかかりました。ちゃんとWikiを見ればすぐにわかるのですが3系のサンプルばかり追っかけていたので気づくのに時間がかかってしまいました。ちゃんと調べるべきでしたね。参考・出典元
上記URLに感謝です。
https://qiita.com/ReoNagai/items/5da95dea149c66ddbbdd
https://github.com/shimat/opencvsharp/wiki/FileStorage
https://stackoverrun.com/ja/q/11850575
http://hima-tubusi.blogspot.com/2016/02/opencvsharp_3.html
https://qiita.com/Kazuhito/items/cc6b8a0bd75cf9689bf9
https://www.learnopencv.com/camera-calibration-using-opencv/