- 投稿日:2020-03-27T20:17:49+09:00
【TypeScript】Next.jsでAppバーを共通化する方法
_app.tsxにAppバーコンポーネントを追加する
以下参考プログラムです。
_app.tsximport React from "react"; import App from "next/app"; import Bar from "../components/Bar"; export default class MyApp extends App { static async getInitialProps({ Component, ctx }: { Component: any; ctx: any; }) { let pageProps = {}; if (Component.getInitialProps) { pageProps = await Component.getInitialProps(ctx); } return { pageProps }; } render() { const { Component, pageProps } = this.props; return ( <React.Fragment> <Bar /> <Component {...pageProps} /> </React.Fragment> ); } }
- 投稿日:2020-03-27T19:04:48+09:00
【TypeScript】Next.jsにNProgressを導入する方法
NProgressをインストールする
必要なモジュールをインストールします。
npm i nprogress @types/nextjs-progressbarNProgess用のCSSをstaticフォルダに配置
以下から取ってこれます。
https://github.com/rstacruz/nprogress/blob/master/nprogress.css/static/css/nprogress.css/* Make clicks pass-through */ #nprogress { pointer-events: none; } #nprogress .bar { background: rgb(79, 214, 255); position: fixed; z-index: 1031; top: 0; left: 0; width: 100%; height: 3px; } /* Fancy blur effect */ #nprogress .peg { display: block; position: absolute; right: 0px; width: 100px; height: 100%; box-shadow: 0 0 10px rgb(79, 214, 255), 0 0 5px rgb(79, 214, 255); opacity: 1; -webkit-transform: rotate(3deg) translate(0px, -4px); -ms-transform: rotate(3deg) translate(0px, -4px); transform: rotate(3deg) translate(0px, -4px); } /* Remove these to get rid of the spinner */ #nprogress .spinner { display: block; position: fixed; z-index: 1031; top: 15px; right: 15px; } #nprogress .spinner-icon { width: 18px; height: 18px; box-sizing: border-box; border: solid 2px transparent; border-top-color: rgb(79, 214, 255); border-left-color: rgb(79, 214, 255); border-radius: 50%; -webkit-animation: nprogress-spinner 400ms linear infinite; animation: nprogress-spinner 400ms linear infinite; } .nprogress-custom-parent { overflow: hidden; position: relative; } .nprogress-custom-parent #nprogress .spinner, .nprogress-custom-parent #nprogress .bar { position: absolute; } @-webkit-keyframes nprogress-spinner { 0% { -webkit-transform: rotate(0deg); } 100% { -webkit-transform: rotate(360deg); } } @keyframes nprogress-spinner { 0% { transform: rotate(0deg); } 100% { transform: rotate(360deg); } }Routerにイベントを追加
CSSを読み込み、Routerにイベントを追加します。
共通Appバーにこの処理を書けば、全ての画面遷移でプログレスバーが表示されます。AppBar.tsximport React from "react"; import Router from "next/router"; import NProgress from "nprogress"; import Head from "next/head"; NProgress.configure({ showSpinner: false }); Router.events.on("routeChangeStart", () => { NProgress.start(); }); Router.events.on("routeChangeComplete", () => { NProgress.done(); }); Router.events.on("routeChangeError", () => { NProgress.done(); }); export default function Bar() { return ( <div> <Head> <link rel="stylesheet" type="text/css" href="/static/css/nprogress.css" /> </Head> </div> ); }
- 投稿日:2020-03-27T18:57:07+09:00
Webサイトを運営しているミニマリストがインストールしている最低限必要なアプリ達
Overview
シンプルであることに越したことはない。
シンプルなら環境の移行や再構築も苦にならない。
シンプルなら必然的にミスする確率も低減する。
今回は環境構築メモの役割も含めて、Webサイト運営に使用しているアプリを公開しておきます。Target reader
- シンプルかつ低コスト&高い可用性を持つWebアプリを運用したい方。
- Webサイトを作る上で最低限何を勉強しないといけないか知りたい方。
Prerequisite
- OSはWindows
- Macは1社に依存することからリスクヘッジのためWindows
- ただし、LinuxコマンドがメジャーなのでWindowsで実行する場合にググらないといけないことがある。 (WindowsのLinux環境であるWSL2が一般的になれば格差は是正されるかもしれない)
- 言語はNode.js
- フロントエンドがJavaScript一択なので、バックエンドも同一言語ならパッケージも共有でき効率的。
- クラウドベンダーのFaaS(Functions)をみた場合、Node.jsは各社採用言語の中で1,2位に属している。
- クラウドはFirebase(Google Cloud Platform)
- 個人でサービス提供するには可用性が命。その上でJavaScriptのコンテンツを配置するだけでいいFirebase Hostingは最善の一手。
- PWA化することで、キャッシュ優先利用により更に可用性を高めることが可能。
- データ転送量による完全従量制のため、ミニマムスタートにもってこい。
- そのほかオフライン対応の完全従量制DBであるFirestore等がそろっている。
- アプリが複雑化した際はGCPが控えているのでAWSやAzureにも決して見劣りはしない。
Body
Windowsにインストールしているアプリ
Chrome
https://www.google.com/intl/ja_jp/chrome/
文句なしのブラウザシェアNo.1なので、Chromeで開発しないWebアプリはありえない。
Git
Gitはソース管理のために利用する。
GitというよりGitHubはGCPにデプロイするためのハブになっているので不可欠。
GitHubに障害がおこるとデプロイできなくなるためもはや仕事不可。
(Gitはローカルで更新できるのでソースの修正を記録し続けることは可能)Node.js
フロントエンドもバックエンドもJavaScript言語で書けてしまうJavaScriptランタイム。
バックエンドは別言語でもいいが、あえて別の言語にする理由がないならJavaScript一つで十分。Visual Studio Code
https://azure.microsoft.com/ja-jp/products/visual-studio-code/
Visual Studio Codeはソースコード書いたり、デバッグしたり、開発時に利用する。
WebアプリのIDEのスタンダードになりつつあるかな?
Windows開発向けに作られたVisual Studioが動作が重く、ダウンロードサイズも大きかったがこいつは軽量で人気が高い。
拡張機能も充実しており、IDEとの連携でVSCodeがないということは見たことない。[optional]Google Cloud SDK
https://cloud.google.com/sdk/install?hl=ja
今のところ
gcloud functions deployコマンドで必要になるが、Cloud Buildを利用してデプロイしているだめインストールされてなくても問題ない。
ただし、各プロダクトのコマンドを使うことになるはずなので、必要になったら入れたほうがいい。
入れなくてもCloud Shellがあるため乗り越えられるかもしれないが。[optional]Firefox
https://www.mozilla.org/ja/firefox/new/
ブラウザシェアはChromeが圧倒しているが、Firefoxも一定程度ユーザーがいる。
そのため、Firefoxでの動作確認もしておきたいところ。[optional]Edge
https://support.microsoft.com/ja-jp/help/4501095/download-the-new-microsoft-edge-based-on-chromium
Edgeのシェアはかなりすくないが、Chromiumベースとなり標準でインストールされるようになったら今後無視できなくなるかも?
ChromiumベースでChromeと違いも少なくなると予想できることから、WindowsPCをある程度ターゲットにするなら動作確認したいところ。[optional]Slack
https://slack.com/intl/ja-jp/downloads/windows
個人で開発しているとPC上でコミュニケーションは取る必要がないため、PCへのインストールは必須ではない。
ただし、通知はよく使うはずなので、スマホへのインストールは必須。npmでグローバルにインストールしているパッケージ
他にtoとupdateというパッケージがインストールされていた。
手動でインストールした記憶はないが、何かのインストールでバンドルされるなら消さないほうが吉。firebase-tools
https://firebase.google.com/docs/cli?hl=ja
firebase関連のコマンド実行の際に必要。
現状だとFirebase Hostingにデプロイする際に使用している。npmで各プロジェクトにインストールしているパッケージ
React
https://ja.reactjs.org/docs/create-a-new-react-app.html
個人開発に重要なSPAで今構築するならVue.jsかReact。
私は仕事でReactを経験したので、それを引き継いでいるがVue.jsの採用を検討したいところ。Material-UI
Reactだけでは生のHTMLで記述するため、見た目がかなり貧相になる。
そのため、見た目をよくするために必要なパッケージとして有力なのがMaterial-UI。
基本的なサンプルソースがそろっており、カスタマイズもしやすいので非常に使いやすい。REACT ROUTER
https://reacttraining.com/react-router/web/guides/quick-start
WEBのページ遷移を管理するためライブラリ。
パスとそれに対応したコンポーネントを指定することで簡単にページ切り替えができる。
コードが多くなるとコード分割が必須になるが、導入しておくとパスごとに簡単に分割できるので便利。VisualStudio Codeにインストールしている拡張パッケージ
Debugger for Chrome
https://marketplace.visualstudio.com/items?itemName=msjsdiag.debugger-for-chrome
VSCode上でChromeをデバッグするために必要な拡張機能。
個人的にはあまり使っていないが、入れておいた方がいいだろう。Japanese Language Pack for Visual
https://marketplace.visualstudio.com/items?itemName=MS-CEINTL.vscode-language-pack-ja
VSCodeを日本語表記にしてくれる。
[optional]REST Client
https://marketplace.visualstudio.com/items?itemName=humao.rest-client
いろんなパラメータを含んだWebAPIをコールしたいときに便利。
個人的にはあまり使っていないが、入れておいた方がいいだろう。[optional]DotEnv
https://marketplace.visualstudio.com/items?itemName=mikestead.dotenv
Reactで環境変数を使う際に.envというファイルを使うが、VS上で強調表示してくれるもの。
なくても支障はない。[optional]VSNotes
https://marketplace.visualstudio.com/items?itemName=patricklee.vsnotes
MarkDown形式でメモできる拡張機能。
課題やメモ等をとにかく書き込んで使っている。
最低限のものしかインストールしていないので、最終的にこのVSNotesが何でも屋としてフォローしてくれている。Google Chromeにお気に入りとしているサイト
Search Console
https://search.google.com/search-console/about?hl=ja
自身のサイトがGoogle検索に正しく登録されているか、ユーザーがどんな検索ワードで入ってきているか等がわかる。
Webサイトを公開するなら100%通る道。Google Analytics
https://marketingplatform.google.com/intl/ja/about/analytics/
サイトに入ってから出るまでのあらゆる情報が収集されている。
サイトを成長させるうえで分析は効果的ゆえ、これも必ず導入したいものの一つ。Create React App
https://create-react-app.dev/docs/getting-started/
Reactを新規で作るなら、もはやCreate React Appは必須といっても過言ではない。
Create React Appを用いれば、深い知識を必要とせずに簡単に本番向けのサイトを構築できる。Google Cloud Platform
https://console.cloud.google.com/home/dashboard
GCPのダッシュボード。クラウドを扱う以上必須。
Firebase
https://console.firebase.google.com/
Firebaseのダッシュボード。クラウドを扱う以上必須。
Google Adsense
https://www.google.com/adsense/
Webサイトの収益化の筆頭。モバイルがApp StoreかGoogle PlayならWebはAdsense。
審査に通れば簡単に収益化できる反面、厳しい処置を受けることもある。
身綺麗な運営と理不尽と感じてもそれを受け入れる忍耐が必要。Conclusion
インストールが必要なアプリやライブラリが20個未満でサイトの運用が可能です。
これらを理解したなら、その少し先に私がいるということです。
学習コスト高いものもありますが、低コスト&高い可用性実現のために頑張ってみてください。便利なものはつい入れたくなりますが、依存関係を増やす以上のメリットがあるか考えてみるといいでしょう。
インストールしているものが一般的なものなら、クラウドベンダーが提供しているDockerイメージをそのまま利用できる場合もあります。
個人的には数年後、SurfaceGo持ち歩きながらVS Onlineで開発して、パワフルなノートPCを持たない人を目指していますsimple is best!
Have a great day!
- 投稿日:2020-03-27T18:29:16+09:00
react-bootstrapのas属性で好きなLinkコンポーネントを使用する
結論
こうする。
// toで行き先を指定する、自作のLinkコンポーネント。
import Link from './Link';
import {Navbar} from 'react-bootstrap';

export default function Foo() {
  return (
    <Navbar bg="light">
      {/* asで渡して、渡したいpropsもそのまま書く。 */}
      <Navbar.Brand as={Link} to="/">
        Home
      </Navbar.Brand>
    </Navbar>
  );
}
説明
最近reactに入って苦労してる者です。
react-bootstrapを使う際に、困ったことがありました。
react starter kitを使用している都合上、ページ遷移には付属のLinkコンポーネントを使いたいのですが、ドキュメントを見ると、Navbar.BrandやNavDropdown.Itemのようなものはhrefを指定して、aタグで飛ばなきゃいけないかのように見えたのです。リンクを指定するところだけ普通にbootstrapのclassを指定しようかとも思いましたが、ふとソースコードを覗いてみると、
github.com/react-bootstrap/react-bootstrap/blob/master/src/NavbarBrand.jsから一部抜粋const NavbarBrand = React.forwardRef( ({ bsPrefix, className, as, ...props }, ref) => { bsPrefix = useBootstrapPrefix(bsPrefix, 'navbar-brand'); const Component = as || (props.href ? 'a' : 'span'); return ( <Component {...props} ref={ref} className={classNames(className, bsPrefix)} /> ); }, );とありました。
大事なのはここですね。
const Component = as || (props.href ? 'a' : 'span');asに渡したものが、Componentとして使用されます。
そしてComponentにはpropsがそのまま渡されるので、to: "/"など、自由に属性を渡せます。他のコンポーネントも覗いてみましたが、ちらほらasが使えるコンポーネントがありました。
困ったときは、ちらっとでもソースコードを覗くのが大事ですね。
- 投稿日:2020-03-27T17:01:51+09:00
Render PropsとHooksで処理中を管理する
Render PropsとHooksでローディング処理を管理する
ローディングや処理中を管理する方法として
useStateを使うことは多いと思います。
しかし複数のフォームやコンポーネントが処理中である・・・等管理したい場合にuseStateだけではの管理では気持ち悪かったので、それの対策っぽい記事を書きますこんなかんじ
LoadingProvider.tsximport React, {useState, FC, ReactElement} from 'react'; type RenderProps = { loading: boolean setLoading: (bool: boolean) => void } type Props = { initialValue?: RenderProps['loading'] children: (props: RenderProps) => ReactElement } export const LoadingProvider: FC<Props> = ({children, initialValue = false}) => { const [loading, setLoading] = useState(initialValue); return children({loading, setLoading}) };ProductPage.tsxexport const ProductPage: FC<> = ({ products actions }) => { return ( {products.map(product => ( <LoadingProvider> {({loading, setLoading}) => { <Product product={product} addToCart={async () => { setLoading(true) actions.addToCart(product.id) setLoading(false) } // 処理中のprops processing={loading} /> }} </LoadingProvider> ))} ) }以上!
これなら複数のComponetが処理中でも脳死で使えるきがする。最初はContextAPIを使おうと思ったが、今回のケースだとこれくらいの実装が最適かなと。
LoadinProviderでloading === trueだったら、Loadingのグルグルを表示させるComponentに差し替える。みたいなのを実装するのもよさそう。むやみにRenderPropsを使うのは微妙そうだけど、こういうケースでは有用だなーとおもいました。 まる。
- 投稿日:2020-03-27T16:47:11+09:00
Chart.jsにいい感じの色を自動的に割り当てる
やりたいこと
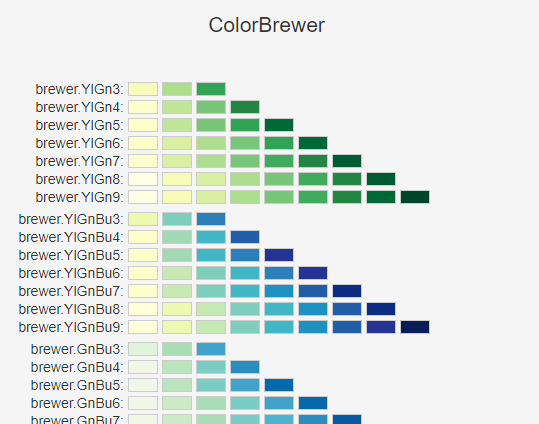
簡単にカッコいいグラフやチャートを表示できるJavascriptライブラリ「Chart.js」を使う際、色を自分で指定するのが大変。更にデータの個数が可変な時、自動的にいい感じの色を割り当てたい。
実現方法
Chart.jsのプラグイン「chartjs-plugin-colorschemes」を使うとプリセットされたいい感じのカラースキームを使うことができます。
chartjs-plugin-colorschemes
https://nagix.github.io/chartjs-plugin-colorschemes/ja/およそ500種類くらいのカラースキームが用意してあるので好みのものを選んでください。
今回はReactを使った例で説明していきます。更に「Chart.js」をそのまま使うのではなくのReactラッパーである「react-chartjs-2」を使っていきます。データをpropsで渡すだけでコンポーネントのように簡単にグラフやチャートを追加できます。
手順
まずはnpmを使ってインストールしていきます。
$ npm install --save chart.js react-chartjs-2 chartjs-plugin-colorschemes追加したいjsファイルの先頭でモジュールのインポートをしていきましょう
//今回はドーナッツグラフを作ります
import { Doughnut } from 'react-chartjs-2';

//一括でインポートしても...
import 'chartjs-plugin-colorschemes';
//ファイルサイズを減らしたい場合はカラースキームだけをインポートしても大丈夫です
//今回はbrewr.Paired12というカラースキームを使いたいので以下のように指定しました。
import { brewr } from 'chartjs-plugin-colorschemes/src/colorshemes/colorschemes.office';
Reactのファイルはこんな感じになります。
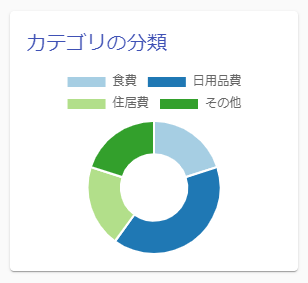
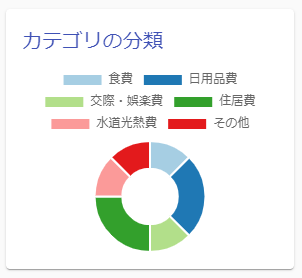
家計簿アプリを例に説明すると、今回はAPIを叩いてカテゴリごとの金額の合計を取得してセットしています。import React, { useState, useEffect } from 'react'; import { Doughnut } from 'react-chartjs-2'; import { brewer } from 'chartjs-plugin-colorschemes'; import axios from 'axios'; const DoughnutChart = (props) => { const [chartData, setChartData] = useState({}); useEffect(() => { getChartData(); }, []); const getChartData = () => { axios .get("/api/getChartData") .then(res => { const expenses = res.data; let labels = []; let data = []; expenses.forEach(expense => { labels.push(expense.category); data.push(expense.money); }); setChartData({ labels:labels, datasets: [ { label: labels, data: data, //ここはfalseに設定 fill: false, } ] } ); }); }; const options = { plugin: { colorschemes: { scheme: 'brewr.Paired12' } } }; return ( <React.Fragment> <Doughnut data={chartData} options={options}/> </React.Fragment> ); }; export default DoughnutChart;このコンポーネントを組み込んで表示するとこんな感じのおしゃれな配色のグラフが表示されます。
もし新たなカテゴリのデータが登録され、表示するデータが増えた際もカラースキームから色を割り振って表示してくれます。今回使っている「brewr.Paired12」の場合は12色まで対応可能です。
参考にさせて頂いたサイト
Chart.js | Open source HTML5 Charts for your website
chartjs-plugin-colorschemes
jerairrest/react-chartjs-2: React wrapper for Chart.js - GitHub
react-chartjs-2とChart.jsを使ってグラフを作ってみた - Qiita

- 投稿日:2020-03-27T09:52:30+09:00
create-react-appを使わない構成でGAEにデプロイする
create-react-appを使わずにインストールするための記事はたくさんありましたが、デプロイを行う方法が見当たらなかったため、実際にやってみました。
create-react-appを使わない意図としましては脱create-react-appがわかりやすいかと思います。参考
今回は下記を参考に環境構築およびインストールを行いました
作りながら学ぶ React 入門
Cloud BuildでReactアプリをGAEにデプロイする ※今回はCloud Buildは使用していません。構成
作りながら学ぶ React 入門に倣った構成とモジュールになっています
├── public
│   ├── js
│   │    └── app.js // npm run buildで生成
│   └── index.html
├── src
│   └── index.js
├── app.yaml
├── package-lock.json
├── package.json
└── webpack.config.js
インストール
「作りながら学ぶ React 入門」 サポートページを参考にインストールしてください
webpack.config.jsmodule.exports = { entry: { app: "./src/index.js" }, output: { path: __dirname + '/public/js', filename: "[name].js" }, devServer: { contentBase: __dirname + '/public', port: 8080, publicPath: '/js/' }, devtool: "eval-source-map", mode: 'development', module: { rules: [{ test: /\.js$/, enforce: "pre", exclude: /node_modules/, loader: "eslint-loader" }, { test: /\.css$/, loader: ["style-loader","css-loader"] }, { test: /\.js$/, exclude: /node_modules/, loader: 'babel-loader' }] } };インストールしたら
npm startで動作確認GAEにデプロイを行います
Cloud BuildでReactアプリをGAEにデプロイするを参考にデプロイを行います
app.yamlservice: front // 定義しない場合はdefaultにデプロイされる(はず) runtime: nodejs10 //node.jsはローカルでインストールしなくても大丈夫です handlers: - url: / static_files: public/index.html upload: public/index.html secure: always - url: / static_dir: publicあとはGoogle Cloud SDKをインストールして下記コードでデプロイしてください
$ npm run build // ビルドコマンド
$ gcloud app deploy
以上
- 投稿日:2020-03-27T03:38:37+09:00
redux-form で Warning
概要
redux-form の
Fieldで Warning が表示された。
Warning: Cannot update a component from inside the function body of a different component.環境
react: 16.13.0
redux-form: 8.3.1警告が出る例
import React, { Component } from "react";
import { Field, reduxForm } from "redux-form";

class Hoge extends Component {
  renderField(field) {
    const { input, label, type } = field;

    return (
      <div>
        <input {...input} placeholder={label} type={type} />
      </div>
    );
  }

  render() {
    const { handleSubmit } = this.props;

    return (
      <form onSubmit={handleSubmit(this.onSubmit)}>
        <Field
          label="Title"
          name="title"
          type="tetx"
          component={this.renderField}
        />
        <input type="submit" value="Submit" disabled={false} />
      </form>
    );
  }
}
上記のようなコードで
Fieldに文字を入力すると、Warning が表示された。解決方法
React16.13.0で新しく Warning が追加された。Warnings for some updates during render
A React component should not cause side effects in other components during rendering.It is supported to call setState during render, but only for the same component. If you call setState during a render on a different component, you will now see a warning:
Warning: Cannot update a component from inside the function body of a different component.
This warning will help you find application bugs caused by unintentional state changes. In the rare case that you intentionally want to change the state of another component as a result of rendering, you can wrap the setState call into useEffect.しかし、
React 16.13.1で Warning が削除された。
React v16.13.1Revert warning for cross-component updates that happen inside class render lifecycles (componentWillReceiveProps, shouldComponentUpdate, and so on). (@gaearon in #18330)
Warning を削除するなら、
React16.13.1にする必要がある。
または、React16.13.0より下げる必要がある。
(もしくは、 redux-form の更新を待つ?)参考
- 投稿日:2020-03-27T03:38:37+09:00
redux-form で Warning: Cannot update a component from inside the function body of a different component.
概要
redux-form の
Fieldで Warning が表示された。
Warning: Cannot update a component from inside the function body of a different component.環境
react: 16.13.0
redux-form: 8.3.1警告が出る例
import React, { Component } from "react";
import { Field, reduxForm } from "redux-form";

class Hoge extends Component {
  renderField(field) {
    const { input, label, type } = field;

    return (
      <div>
        <input {...input} placeholder={label} type={type} />
      </div>
    );
  }

  render() {
    const { handleSubmit } = this.props;

    return (
      <form onSubmit={handleSubmit(this.onSubmit)}>
        <Field
          label="Title"
          name="title"
          type="tetx"
          component={this.renderField}
        />
        <input type="submit" value="Submit" disabled={false} />
      </form>
    );
  }
}
上記のようなコードで
Fieldに文字を入力すると、Warning が表示された。解決方法
React16.13.0で新しく Warning が追加された。Warnings for some updates during render
A React component should not cause side effects in other components during rendering.It is supported to call setState during render, but only for the same component. If you call setState during a render on a different component, you will now see a warning:
Warning: Cannot update a component from inside the function body of a different component.
This warning will help you find application bugs caused by unintentional state changes. In the rare case that you intentionally want to change the state of another component as a result of rendering, you can wrap the setState call into useEffect.しかし、
React 16.13.1で Warning が削除された。
React v16.13.1Revert warning for cross-component updates that happen inside class render lifecycles (componentWillReceiveProps, shouldComponentUpdate, and so on). (@gaearon in #18330)
Warning を削除するなら、
React16.13.1にする必要がある。
または、React16.13.0より下げる必要がある。
(もしくは、 redux-form の更新を待つ?)参考
- 投稿日:2020-03-27T01:34:34+09:00
Amplify+ReactでCRUDアプリ作成RTA(Any%)Part.1
amplify+reactでアプリ作成RTAやっていきます。
当方基盤エンジニアです。(ただ、ハッカソンでアプリ作成経験ありです。)
はい、よーいスタートレギュレーション(又の名を前提)
- AWSに乗っかるのでamplify利用(前も使ったから)
- 面倒なので認証なし(前はCognitoとか実装した)
- GraphQLを使いたい(バックエンド考えるの大変だからね。)
- 必要機能はCRUD(わかりやすさ重視)
- 計測期間はreactの雛形作成からデプロイして初回アクセスまで
- Google先生は多用する。
- 失踪しない
イメージ図
1.Create画面
2.一覧表示
それでは、イクゾー!(デッデッデデデデ カーン)
初期設定
1.いつも通りreactの雛形作成
詳細は以下を参考にしてください。丁寧丁寧丁寧に記載されているのでおすすめです。
https://qiita.com/G-awa/items/a5b2cc7017b1eceeb002npx create-react-app <アプリ名> cd <アプリ名>2.色々インストール
いろんなUI使ってみたいので今回はevergreen-uiを利用してみました。
(大胆なチャート変更)yarn add react-dom evergreen-ui yarn add aws-amplify aws-amplify-react3.amplify設定
amplify init4.GraphQLスキーマ作成
amplify add api
amplify push
graphqlのスキーマは入力速度を考慮して以下としました。ほぼ変えてないです;;
(Postの方が良かったですね、、、複数形にするとPostssになってしまいますた。)/amplify/backend/api/~~~AppName~~~/schema.graphqltype posts @model { id: ID! name: String! url: String! description: String }コーディング準備
気持ちよくアプリを作成していくために準備をしていきます。
あちなみに、筆者の環境はVSCodeです。ちなみにVimmerです。(宗教戦争)0.GitHubのリポジトリ登録しておく
リポジトリ作成は割愛します。適当でもOKですgit remote add origin git@github.com:aion0721/ozadoc.git1.不要ファイル削除
以下ファイルはフヨウラ!
ただ普通に消すとgitの管理もありややこしくなるのでgitコマンドで消します。git rm logo.svg git rm App.css2.index.js
変更点とかだけ抜き出します。全文はgithub参照してください。
(え、URLはどこかだって?ヒントをあげているので自分で考えてください。)index.jsimport * as serviceWorker from "./serviceWorker"; import Amplify from "aws-amplify"; import config from "./aws-exports"; Amplify.configure(config);3.app.js
師匠の教えを守りcomponentsフォルダを作りますので、以下の記載にします。
(正直ファイル分ける必要なかったのでここ600fpsぐらいロスですね。)App.jsimport Top from "./components/Top"; function App() { return ( <div> <Top /> </div> ); }4.Top.js作成
メインディッシュです。mkdir ./components touch ./components/Top.jsTop.jsimport React from "react"; function Top(){ return( <div> Hello, World!!!~素晴らしきこの世界~ </div> ); } export default Top;5.起動確認
とりあえず起動してみます。yarn start文字が出たらOK
次回へ続く
短いですがPart.1としてはここまでにします。
区間ラップは1.5時間です。ほぼ、UI選ぶ時間でした。勉強も兼ねてるから仕方ないね(レ)
(更新部分を残す走者の鑑)

