- 投稿日:2020-03-22T16:25:50+09:00
Kerasでhard-swishを実装
概要
ここ1年でディープラーニングの軽量化モデルがいくつか出てきている中で有名なのが
mobilenetV3だと思います(kerasにもV2は実装されていますし)その中の軽量化の一端を担っているのがh-swish(hard-swish)です。
通常のswishはsigmoidを使って重たいので処理が軽いもので近似+量子化したときの誤差も小さい
ということらしいです。
日本語の詳細の解説は下記の記事を参考にしてみてください。
参考: 【論文読み】Searching for MobilenetV3本記事はkerasでのhard-swishの実装という内容です。
といっても関数自体そこまで難しいものではないのでバックエンドでサクッと実装できてしまいます。
せっかくなのでswishも実装してグラフで比較したいと思います。
また、実装のやり方としてバックエンドを使用して
1.活性化関数としての定義
2.レイヤーとしての定義
の2つの実装をします。前提
tensorflow 1.15.0
keras 2.3.1定義の確認
一応定義を確認しておきます。
h-swish [x] = x\frac{ReLU6(x+3)}{6}swish[x] = x×Sigmoid(x)【パターン1】活性化関数として定義
1.関数の定義
kerasの公式ドキュメントを参考にして実装しました。
活性化関数の使い方h-swish.pyfrom keras import backend as K #hard_swishの定義 def hard_swish(x): return x * (K.relu(x + 3., max_value = 6.) / 6.) #swishの定義 def swish(x): return x * K.sigmoid(x)バックエンドのreluに上限を設定できる引数
max_valueがあるのでそれでReLU6を定義した後は式通り実装するだけです。2.結果の確認
定義した関数が定義通りになっているか確認します。
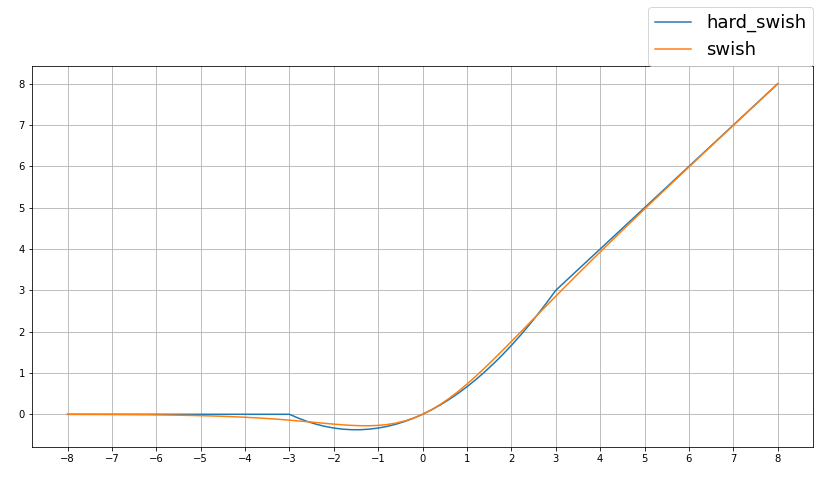
これもまたバックエンドを使ってnumpy配列で計算してみます。backend_result.pyfrom keras import backend as K import numpy as np import matplotlib.pyplot as plt #-10から10まで0.2刻みで配列を定義 inputs = np.arange(-10, 10.2, 0.2) #numpy配列をtensorに変更 inputs_v = K.variable(inputs) #定義した関数で演算グラフを定義 outputs_hs = hard_swish(inputs_v) outputs_s = swish(inputs_v) #計算して出力を取得する outputs_hs = K.get_value(outputs_hs) outputs_s = K.get_value(outputs_s) #結果を表示する plt.figure(figsize=(14,7)) plt.yticks(range(0, 9, 1)) plt.xticks(range(-8, 9, 1)) plt.grid(True) plt.plot(inputs, outputs_hs, label="hard_swish") plt.plot(inputs, outputs_s, label="swish") plt.legend(bbox_to_anchor=(1, 1), loc='lower right', borderaxespad=0, fontsize=18)本記事の実装の結果
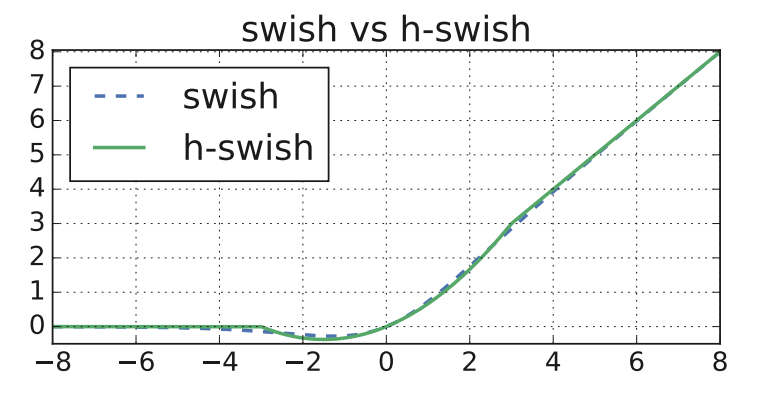
論文の結果
論文URL:Searching for MobileNetV3良さそうですね。
3.使い方
activationに先ほど定義した関数を適応するだけです。
conv.pyfrom keras.layers import Conv2D Conv2D(16,(3,3),padding = "SAME", activation = hard_swish)もしくは
conv.pyfrom keras.layers import Activation Activation(hard_swish)【パターン2】レイヤーとしての定義
githubに上がっているkerasの
Advanced Activationsの実装を参考にしました。
論文URL:advanced_activations.pyh-swish_layer.pyfrom keras import backend as K from keras.engine.topology import Layer #hard_swishの定義 class Hard_swish(Layer): def __init__(self): super(Hard_swish, self).__init__() def call(self, inputs): return inputs * (K.relu(inputs + 3., max_value=6.) / 6.) def compute_output_shape(self, input_shape): return input_shape使い方の例です。cifar10を想定しています。
h-swish_use.pyinputs = Input(shape = (32,32,3)) x = Conv2D(64,(3,3),padding = "SAME")(inputs) x = Hard_swish()(x) x = Conv2D(64,(3,3),padding = "SAME")(x) x = Hard_swish()(x) x = MaxPooling2D()(x) x = Conv2D(128,(3,3),padding = "SAME")(x) x = Hard_swish()(x) x = Conv2D(128,(3,3),padding = "SAME")(x) x = Hard_swish()(x) x = MaxPooling2D()(x) x = Conv2D(256,(3,3),padding = "SAME")(x) x = Hard_swish()(x) x = Conv2D(256,(3,3),padding = "SAME")(x) x = Hard_swish()(x) x = GlobalAveragePooling2D()(x) x = Dense(1024)(x) x = Hard_swish()(x) prediction = Dense(10,activation = "softmax")(x) model = Model(inputs, prediction ) model.summary()model_outputModel: "model" _________________________________________________________________ Layer (type) Output Shape Param # ================================================================= input_1 (InputLayer) [(None, 32, 32, 3)] 0 _________________________________________________________________ conv2d (Conv2D) (None, 32, 32, 64) 1792 _________________________________________________________________ hard_swish (Hard_swish) (None, 32, 32, 64) 0 _________________________________________________________________ conv2d_1 (Conv2D) (None, 32, 32, 64) 36928 _________________________________________________________________ hard_swish_1 (Hard_swish) (None, 32, 32, 64) 0 _________________________________________________________________ max_pooling2d (MaxPooling2D) (None, 16, 16, 64) 0 _________________________________________________________________ conv2d_2 (Conv2D) (None, 16, 16, 128) 73856 _________________________________________________________________ hard_swish_2 (Hard_swish) (None, 16, 16, 128) 0 _________________________________________________________________ conv2d_3 (Conv2D) (None, 16, 16, 128) 147584 _________________________________________________________________ hard_swish_3 (Hard_swish) (None, 16, 16, 128) 0 _________________________________________________________________ max_pooling2d_1 (MaxPooling2 (None, 8, 8, 128) 0 _________________________________________________________________ conv2d_4 (Conv2D) (None, 8, 8, 256) 295168 _________________________________________________________________ hard_swish_4 (Hard_swish) (None, 8, 8, 256) 0 _________________________________________________________________ conv2d_5 (Conv2D) (None, 8, 8, 256) 590080 _________________________________________________________________ hard_swish_5 (Hard_swish) (None, 8, 8, 256) 0 _________________________________________________________________ global_average_pooling2d (Gl (None, 256) 0 _________________________________________________________________ dense (Dense) (None, 1024) 263168 _________________________________________________________________ hard_swish_6 (Hard_swish) (None, 1024) 0 _________________________________________________________________ dense_1 (Dense) (None, 10) 10250 ================================================================= Total params: 1,418,826 Trainable params: 1,418,826 Non-trainable params: 0 _________________________________________________________________活性化関数の定義と比べたメリット(?)としては
summaryで可視化したときにhard-swishを使っていることがわかること(ぐらい)です。おわりに
今回はググってもhard-swishのkerasの実装が見つからなかったので実装してみました。
調べながらやるとよく使っていたReLU関数にmax_valueの引数があることがわかったので良い機会になりました。
不明点、おかしい点ありましたらコメントよろしくお願いします。