- 投稿日:2020-03-21T23:51:10+09:00
[Rails+Vue.js]に係るCRUD入門〜Part Last: Docker化編〜
Rails+Vue.js+Webpackerによる「Create, Read, Update, Destroy」処理のチュートリアルを記述する...
しかし、半年前にあらかた学びたいことは終わり、業務では Nuxt を見ることが多くなるため、シリーズとして終了とする。<概要>
□ 本記事の内容
- 開発環境を Docker 化する。
- 合わせて Ruby と Rails のバージョンを上げる。
- 今回のコードは,GitHubのコミット履歴で確認可能である。
□ 記事共通
- 目次
実装機能
- お気に入りの本に係る登録,参照,編集,削除処理
- 非同期通信(Ajax)による[Rails+Vue.js]のCRUD処理
- Single Page Application(SPA)
- ユーザー登録機能(JWTによるトークン認証)
- 開発環境をDocker化
開発環境
- MacOS Mojave
- Ruby(2.5.1 => 2.7.0)
- Ruby on Rails(5.2.1 => 6.0.1)
- Vue.js(2.6.10)
- Yarn(1.17.0)
- Webpack(4.39.2)
学習情報URL
<本文>
□ 各種ファイルの調整
■ Ruby, Rails のバージョンアップ関係
application.rb... - config.load_defaults 5.2 + config.load_defaults 6.0 + config.time_zone = "Asia/Tokyo" ...Gemfile... - ruby '2.5.1' + ruby '2.7.0' ... - gem 'rails', '~> 5.2.3' + gem 'rails', '6.0.2' ... - gem 'sqlite3' + gem 'mysql2'Gemfile.lock# 全削除■ Docker化: サーバ起動設定
bin/server#!/bin/ash -i rm -f /app/tmp/pids/server.pid bundle exec foreman start -f Procfile.devProcfile.devweb: bundle exec rails s -p 5000 -b 0.0.0.0 webpacker: ./bin/webpack-dev-server --host 0.0.0.0 --port 3035config/webpakcer.yml... dev_server: https: false - host: localhost + host: 0.0.0.0 port: 3035 - public: localhost:3035 + public: 0.0.0.0:3035 ...■ Docker化: mysql の接続設定
config/database.ymldefault: &default adapter: mysql2 charset: utf8mb4 collation: utf8mb4_bin encoding: utf8mb4 pool: <%= ENV.fetch("RAILS_MAX_THREADS") { 5 } %> host: <%= ENV.fetch("APP_DATABASE_HOST") { '127.0.0.1' } %> port: <%= ENV.fetch("APP_DATABASE_PORT") { '3306' } %> username: <%= ENV.fetch("APP_DATABASE_USERNAME") { 'root' } %> password: <%= ENV.fetch("APP_DATABASE_PASSWORD") { 'pass' } %> development: <<: *default database: rails_vue_bookshelf_development test: <<: *default database: rails_vue_bookshelf_test production: <<: *default database: rails_vue_bookshelf_production■ Docker化: redis の接続
config/initializers/redis.rb# docker-compose.yml で定義する `REDIS_URL: redis://redis:6379`が入る。 REDIS ||= Redis.new(url: ENV['REDIS_URL'] || 'redis://localhost:6379')books_controller.rb... # 'json'の箇所を全てシンボルに置換する。 # Rails6へのバージョンアップによりシンボルしか受け付けなくなったみたい。 - render 'index', formats: 'json', handlers: 'jbuilder' + render 'index', formats: :json, handlers: 'jbuilder' ... - render 'show', formats: 'json', handlers: 'jbuilder' + render 'show', formats: :json, handlers: 'jbuilder' ... - render 'index', formats: 'json', handlers: 'jbuilder' + render 'index', formats: :json, handlers: 'jbuilder' ...□ Docker 化の実行
■ Dockerfile の準備
bash$ mkdir docker $ touch docker/DockerfileDockerfileFROM ruby:2.7.0-alpine3.10 ENV LANG C.UTF-8 ENV TZ Asia/Tokyo ENV BASE_PACKAGES="alpine-sdk build-base tzdata" \ WEBPACKER_PACKAGES="python2 yarn nodejs-current nodejs-npm" \ BUILD_PACKAGE="mysql-client mysql-dev" \ FAVORITE_PACKAGE="less" RUN apk update && \ apk upgrade && \ apk --update --no-cache add \ ${BASE_PACKAGES} \ ${WEBPACKER_PACKAGES} \ ${BUILD_PACKAGE} \ ${FAVORITE_PACKAGE} WORKDIR /app COPY Gemfile \ Gemfile.lock \ package.json \ yarn.lock \ /app/ RUN bundle install --jobs=4 RUN yarn install # https://github.com/bundler/bundler/issues/6154 ENV BUNDLE_GEMFILE='/app/Gemfile'■ docker-compose.yml の準備
bash$ touch docker-compose.ymldocker-compose.ymlversion: '3' services: datastore: image: busybox volumes: - db_data:/var/lib/mysql - redis_data:/data - bundle_install:/usr/local/bundle - node_modules:/app/node_modules db: image: mysql:5.7 ports: - 3306:3306 volumes: - db_data:/var/lib/mysql environment: MYSQL_ROOT_PASSWORD: pass app: build: context: . dockerfile: ./docker/Dockerfile command: ["bin/server"] ports: - 5000:5000 - 3035:3035 volumes: - bundle_install:/usr/local/bundle - node_modules:/app/node_modules - ./:/app:cached environment: APP_DATABASE_HOST: db APP_DATABASE_USERNAME: root APP_DATABASE_PASSWORD: pass REDIS_URL: redis://redis:6379 depends_on: - db - redis stdin_open: true tty: true redis: image: redis ports: - "6379:6379" volumes: - redis_data:/data stdin_open: true volumes: db_data: redis_data: bundle_install: node_modules:■ その他設定
- ご覧通りデータベースの初期設定に必要なコード群です。
$ docker/bootstrapで一括で必要なコマンドを実行してもらうことが目的です。bash$ touch docker/bootstrap $ chmod 777 docker/bootstrap#!/usr/bin/env bash docker-compose run --rm app ./bin/rails db:create docker-compose run --rm app ./bin/rails db:migrate docker-compose run --rm app ./bin/rails db:seed■ コンテナの構築及び起動
- 以下を実行して http://localhost:5000 で起動を確認したら成功です。
bash$ ./docker/bootstrap $ docker-compose build $ docker-compose up -d〜Part Last: Docker化編終了〜
- 投稿日:2020-03-21T23:41:01+09:00
rbenvを利用してRubyのバージョンを最新安定版にする
環境
- macOS Mojave 10.14.6
- rbenv 1.1.2
- Homebrew 2.2.10
方法
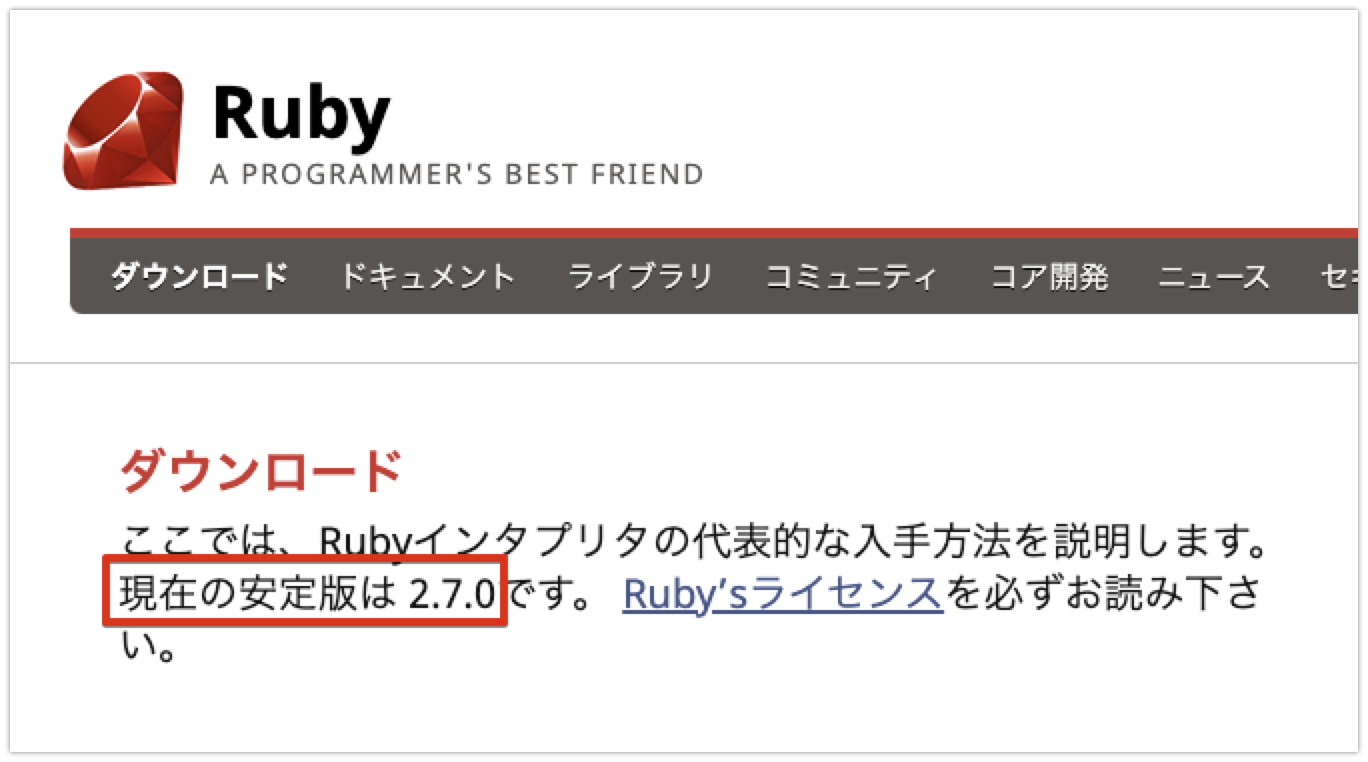
1. 公式サイトで最新版を確認する。
https://www.ruby-lang.org/ja/downloads/
2. rbenvのインストール可能なバージョン一覧に、1.で確認したバージョンがあるか確認する。
$ rbenv install --list(もし確認したバージョンが無い場合)
以下のコマンドで、rbenvとruby-buildを更新する。
$ brew upgrade rbenv ruby-build再度、rbenvのインストール可能なバージョン一覧に、1.で確認したバージョンがあるか確認する。
$ rbenv install --list3. rbenvで1.で確認したバージョンをインストールする。
※今回はバージョン2.7.0
$ rbenv install 2.7.0インストールされているか確認する。
$ rbenv versions4. インストールしたバージョンは適用させる。
(環境全体に適用)
$ rbenv global 2.7.0適用されているか確認する。(適用されていない場合はカレントディレクトリに適用させる。)
$ rbenv versions(カレントディレクトリに適用)
$ rbenv local 2.7.0適用されているか確認する。
$ rbenv versionsおわりに
『もっと簡単にできる方法あるよーーー!』
『ここわかりにくいよーーー!』
『ここ間違っているよーーー!』
等あればコメントいただけるとめちゃくちゃ嬉しいです!!!
twiiter → https://twitter.com/jiko797torayo
- 投稿日:2020-03-21T22:54:52+09:00
railsストロングパラメータについて
はじめに
ストロングパラメータについて調べたので備忘録として記事にしました。
対象読者
プログラミング勉強始めたての方。
題材
自分のポートフォリオのUserオブジェクト周りを題材としています。
ストロングパラメータとは
ユーザー登録フォームなどによって送られてきた情報を限定して取得し、データベースに一気に保管出来るようにした処理のことです。なぜ、情報を限定するかというとユーザー側にいじって欲しくない情報をデータベースに保存させないようにするためです。
例えば管理者情報などをいじられて勝手に管理者にならないようにしています。
また、複数カラムにデータを保存できるようにする役割もあります。
実際に設定しているものがこちらです。app/controllers/users_controller.rbdef create @user = User.new(user_params) if @user.save log_in @user flash[:success] = 'ユーザー登録完了' redirect_to root_url else render 'new' end end private def user_params params.require(:user).permit(:name, :email, :password, :password_confirmation)基本的にはコントローラーのprivate内(カプセル化)で定義し、create等のアクション渡します。(private内に定義する理由はこのコントローラないでしか参照しない、コードがすっきりするからです。)
ストロングパラメータ内では3つのメゾットが定義されておりそれぞれに以下のような役割があります。
params:フォームなどで送られてきたメゾットを取得
require:送られてくる値が二次元ハッシュのときに使い引数に渡されたものがキーとなっているもののみ取得する。
permit:引数に渡されたもののみデータベースに保存するのを許可する。paramsについて
送られてきたメゾットを取得します。
フォームからのpostメゾットや検索フォームなどのgetメゾットでURLのクエリに入るデータがparamsで取得できるデータです。
※検索機能についてはこちら
https://qiita.com/E6YOteYPzmFGfOD/items/dc1ab3c19d4718a0edc8
実際に新規ユーザーを登録する時にはこんな感じでフォームからコントローラへ送られます。Parameters: {"utf8"=>"✓", "authenticity_token"=>"OSab8g1vpkYUMQI74VcZX08Ci82gTPxBCK/ YOZ766OzRmPuM/pYW5+ZX8gh/l+87UPpag69De8f+NjhCs+SqmA==", "user"=>{"name"=>"test", "email"=>"foo@bar.com", "password"=>"[FILTERED]", "password_confirmation"=> "[FILTERED]"}, "commit"=>"作成"}パラメータを取り出す際はこのように指定すれば取り出せます。
params[:user]
<ActionController::Parameters {"name"=>"test",
 "email"=>"foo@bar.com", "password"=>"123456",
 "password_confirmation"=>"123456"} permitted: false>

params[:user][:name]※二次元ハッシュ キーのnameにさらにuserがキーになっている。
"test"
このようにして値を取り出せますが、このままcreateメゾットに渡してもエラーになります。
app/controllers/users_controller.rbdef create @user = User.new(user_params)※エラーになる。なぜエラーになるのかというと先ほどパラメータで取得した値の中に「permitted: false」とありますがこれがfalseになっているせいです。primittedはマスアサイメント機能を許可する部分になります。マスアサイメントとはdbに値を保存する時に複数のカラムを一括で指定できる機能になります。これをtrueにかえるのがpermitメゾットです。
permit
実際にpermitでdbに保存する値を限定することによってpermitがtrueになります。
※まさにストロングパラメータの形です。params[:user] <ActionController::Parameters {"name"=>"test", "email"=>"foo@bar.com", "password"=>"123456", "password_confirmation"=>"123456"} permitted: false> params.require(:user).permit(:name,:email,:password,:password_confirmation) <ActionController::Parameters {"name"=>"test", "email"=>"foo@bar.com", "password"=>"123456", "password_confirmation"=>"123456"} permitted: true>これでpermitted: trueになったのでストロングパラメータで取得したものをcreateアクションに渡すことで複数カラムに情報を保存できるようになりました。
requireについて
このメゾットは値が二次元ハッシュで送られる時(post)に必要となり、引数に渡したキーの値だけを取得できるようになります。
params
<ActionController::Parameters {"utf8"=>"✓",
"authenticity_token"=>"OSab8g1vpkYUMQI74VcZX08Ci82gTPxBCK/YOZ766OzRmPuM/pYW5+ZX8gh/l+87UPpag69De8f+NjhCs+SqmA==",
 "user"=><ActionController::Parameters {"name"=>"test",
 "email"=>"foo@bar.com", "password"=>"123456",
 "password_confirmation"=>"123456"} permitted: false>,
 "commit"=>"作成", "controller"=>"users",
 "action"=>"create"} permitted: false>

params.require(:user)
<ActionController::Parameters {"name"=>"test",
 "email"=>"foo@bar.com", "password"=>"123456",
 "password_confirmation"=>"123456"} permitted: false>
最後に
ここまでお付き合いいただきありがとうございました。
また、何か気になったことがあれば記事にしたいと思います。
間違い等コメントいただけると幸いです。
それではありがとうございました。
- 投稿日:2020-03-21T22:33:24+09:00
LoadError, Unable to autoload constant ~
本記事投稿のいきさつ
railsでアプリ作成をしていたところLoadErrorが発生し基礎知識がなかったためにハマったため忘れないように、書き残します。
また、同じエラーで困っている初心者のためになれば幸いです。エラー発生
itemモデルとitem_imageモデルでアソシエーションを組み,以下の記述をしたところエラーが発生
items_controller.rbdef new @item = Item.new @item_images = Item_image.new endエラー表示は以下です。
LoadError in ItemsController#newUnable to autoload constant Item_image, expected *****/models/item_image.rb to define it解決まで
なるほど。アソシエーションの記入を間違えたのか。
と初学者の自分は考えitem_image.rbを確認します。
item_image.rbの記述は以下です。item_image.rbclass ItemImage < ApplicationRecord belongs_to :item endあれ?ちゃんと書けている。
と初学者の自分は思いました。自分の仮説が外れたので、Google先生に聞いてみました。解決
Googleで調べたところどうやら
モデル名にアンダーバーを使ってもクラス名にアンダーバーはつかないとのことです。
ということでitems_controller.rbを編集。
items_controller.rbdef new @item = Item.new @item_images = ItemImage.new end無事解決することができました。
とても基本的なことですが、今までモデル名にアンダーバーを使っていなかったため、気づくこと出来なかった自分にとってはいい経験になりました。おわり
最後まで見ていただき、ありがとうございました。
- 投稿日:2020-03-21T21:45:55+09:00
チーム開発 3/21
3/21
メモになります
最終課題 四日目
トップページが終わったので
商品詳細ページのビューを作っていきますブロックの形を丸くしたい
border-radius
で解決ボタンを押すと引っ込んだりする
立体的な動きをするようにしたい
:active
を使って擬似要素を使っていく
プラスα
border-bottom: solid 5px #25b8bd;
を使うとボーダーの色を変えて影っぽくして
擬似要素に
border-bottom: none;
を使って押すとボーダーをなくしてボタンを押したようにできる表っぽく作りたい
border
を使うと解決ページのソースを表示するためのショートカットキー
「option + command + U」%li.optionalBtn
%a{:href => "#"}
%i.fa.fa-flag
不適切な商品の通報
このコードを=>使わずに使いたい%li.optionalBtn
=link_to "#" do
%i.fa.fa-flag 不適切な商品の通報
これで解決
https://pikawaka.com/rails/link_to
参考したサイト%form#new_comment.new_comment{"accept-charset" => "UTF-8", :action => "#", :method => "post"} %input{:name => "utf8", :type => "hidden", :value => "✓"}/ %input{:name => "authenticity_token", :type => "hidden", :value => "UZaji94lj/rTfLW3DcSaCXs2HPv6Ic+zHxCyGaZhfKQcIpGKWGwWxX9gCQcYcZ2SdCqU5NyBOUL3tc3504qWYA=="}/ %textarea#comment_body{:name => "comment[body]", :required => "required"} %p.noticeMsg 相手のことを考え丁寧なコメントを心がけましょう。 %br/ 不快な言葉遣いなどは利用制限や退会処分となることがあります。 %br/ %button.commentBtn-show{:name => "button", :type => "submit"} %i.fa.fa-comment コメントするこの文も直したい
accept-charset属性
form要素のaccept-charset属性は、文字エンコーディングを指定する属性。ほとんどの場合、
サーバーの自動判定に任せておけば問題ないが、文字化けする場合には試してみるとよい。%ul.commentContents %form#new_comment.new_comment{ action: "#",method: "post"} %input{name: "utf8", type: "hidden", value: "✓"}/ %input{name: "authenticity_token", type: "hidden", value: "UZaji94lj/rTfLW3DcSaCXs2HPv6Ic+zHxCyGaZhfKQcIpGKWGwWxX9gCQcYcZ2SdCqU5NyBOUL3tc3504qWYA=="} %textarea#comment_body{name: "comment[body]", required: "required"} %p.noticeMsg 相手のことを考え丁寧なコメントを心がけましょう。 %br/ 不快な言葉遣いなどは利用制限や退会処分となることがあります。 %br/ %button.commentBtn-show{name: "button", type: "submit"} %i.fa.fa-comment コメントするこのコードで解決
とりあえず商品詳細ページが完成!この後は少し個人アプリをやっていく
改めて個人アプリを見てみると
ビューもサーバーサイトもめちゃくちゃデータベースから考え直していこうと思う
ER図から考え直す
中間テーブルには
- has_many :messages, through: :messages_tags
と言ったthroughを使って関連づける使いたい機能を改めて考える
・検索機能
タグとキーワード別に検索を使いたい
キーワードはtextのキーワードにする
・タグ機能
検索しやすくする
・ログイン機能
・いいね機能
わかりやすく纏まっている物をみんなで共有したいため
・ランキング機能
いいねの数が多いほど上位になる
検索で結果を出す時並びはランキングを使いたいなぁアプリの概要としては
トップページでいいねのランキングを表示
新規でtextを書くところのページ
検索結果のページ
自分の作った暗記カードを見るところのところまで実装したい
付け足したい機能としては
・タイムライン機能
・気に入った人の暗記カードをストックする
みたいなをしてみたいなぁアプリのイメージは
Qiitaのタイトルが単語、内容がその意味で
みんなでいい解説している物を共有する物
そしてそれを単語帳みたいに使えるようにしたいER図形は作れていたので次の段階
ビューを見ていく
かなり崩れていたり簡素に仕上がっていたので手直しをしていく
ルートを作った後は
rails g controller messages index
- 投稿日:2020-03-21T21:29:40+09:00
Pay.jpを用いた購入機能の実装
概要
Pay.jpを用いた購入機能の実装を備忘録としてまとめます。
修正点ありましたらご指摘お願いいたします。
Transaction(取り引き)テーブルおよびProduct(商品)テーブルをもとに作っていきます。前提
- Pay.jpのアカウント作成済み
- Pay.jpにてクレジットカード登録機能は実装済み
- ビューはHamlで記載
- deviseにてログイン済み
手順
- Transactionテーブルを作成(購入済みの場合SOLD OUTを表示させるため)
- アソシエーションの設定
- Transactionコントローラーを作成
- 環境変数の設定
- ルーティングの設定
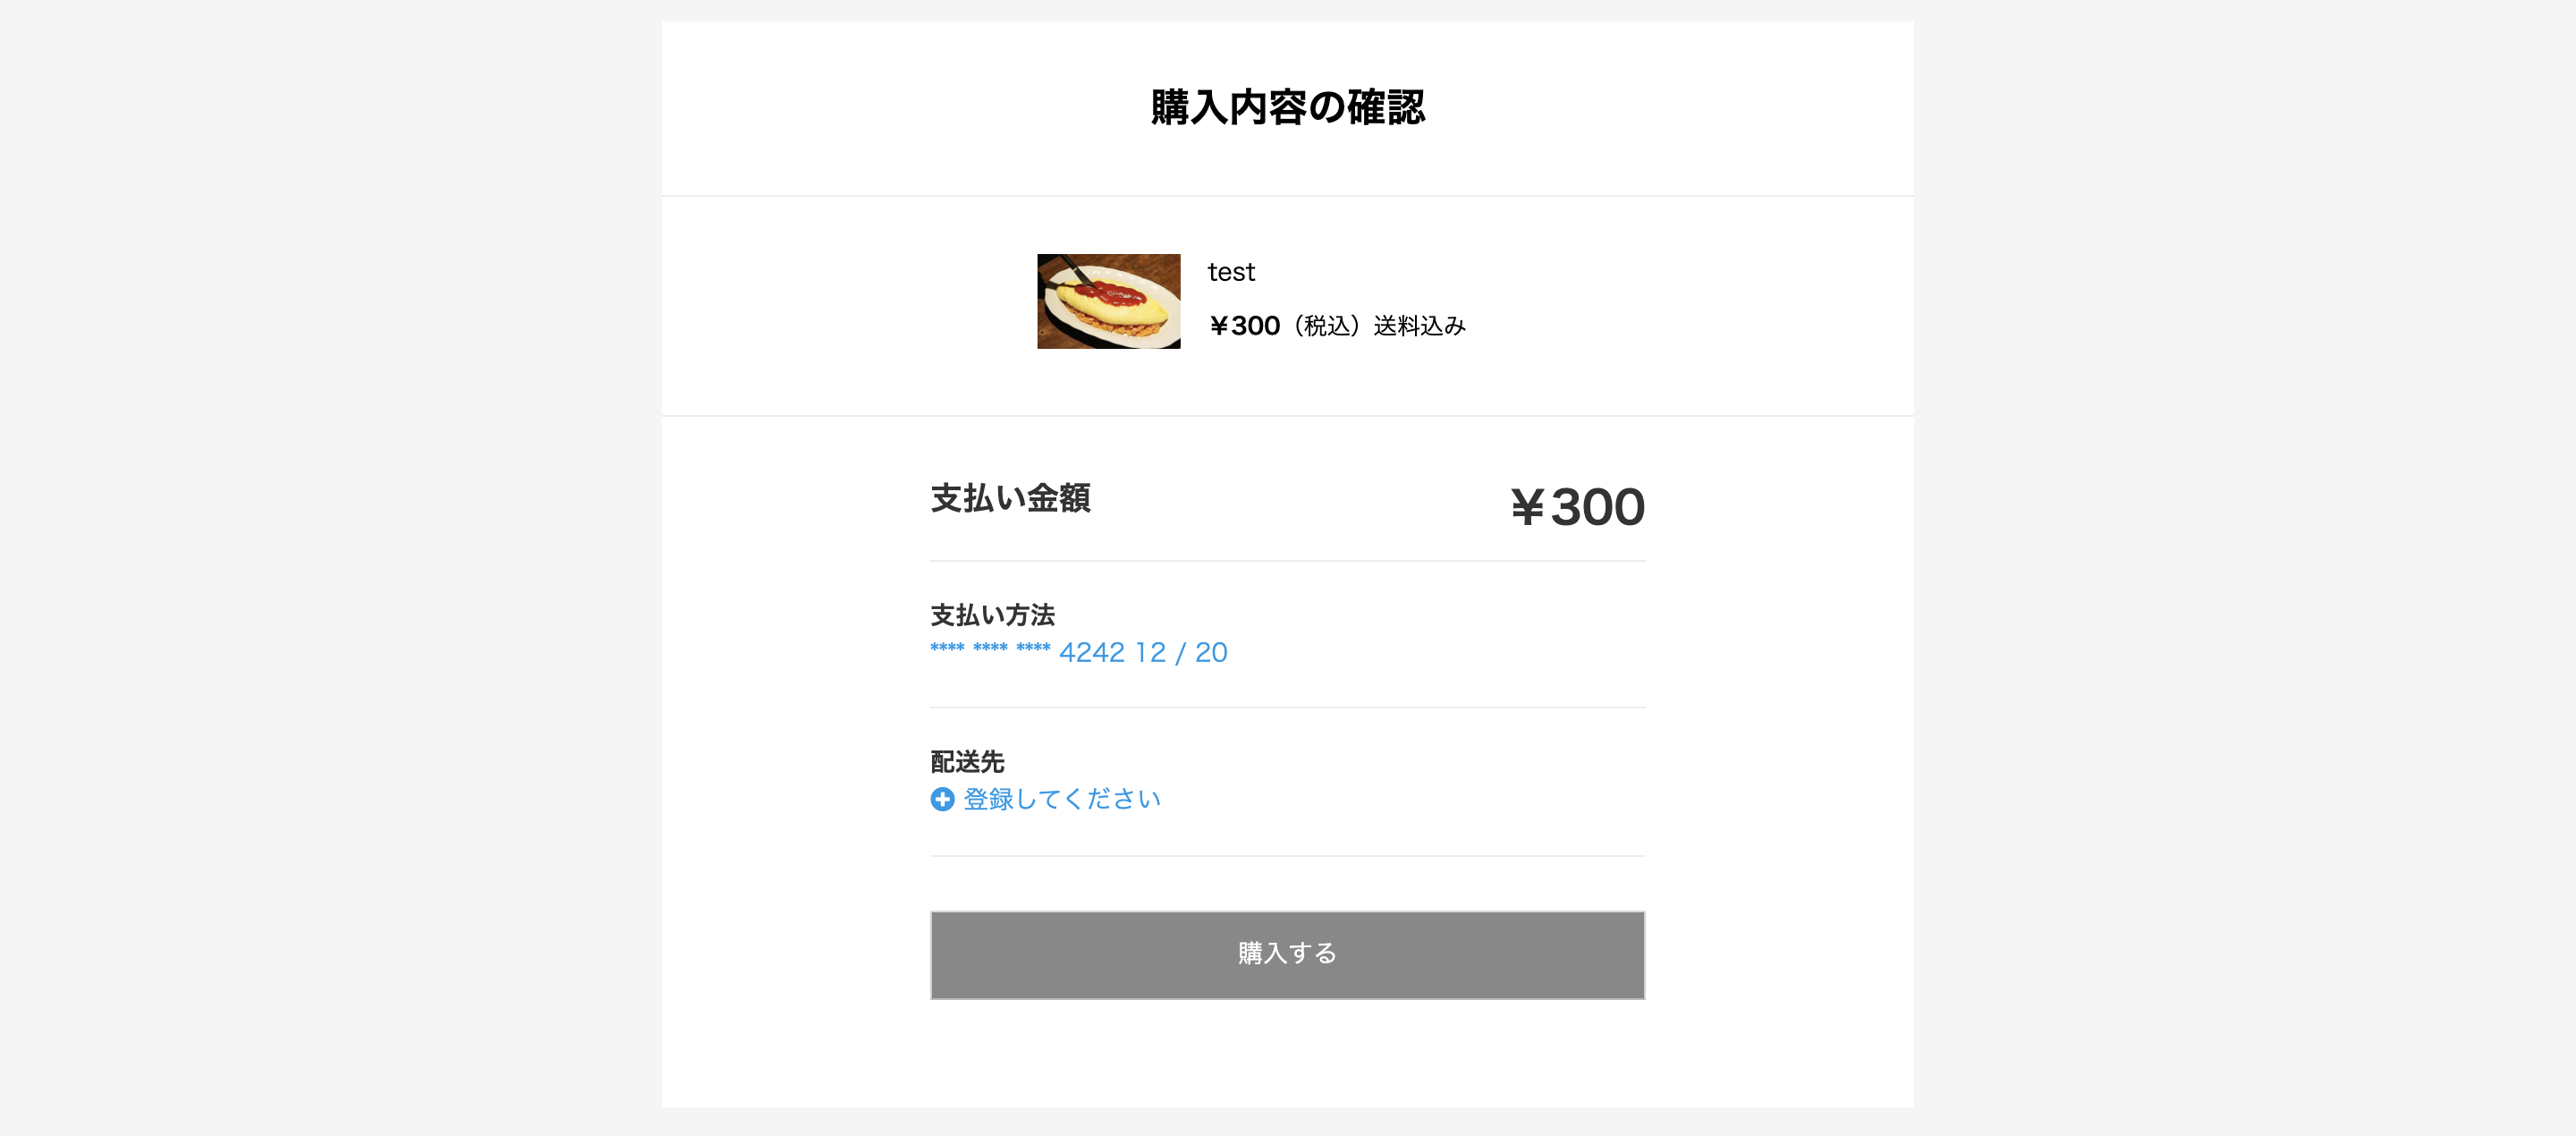
- マークアップ:購入内容確認画面
- マークアップ:購入完了画面
- マークアップ:購入済みの場合SOLD OUTを表示
- 購入データの確認
Transactionテーブルを作成
今回は購入済みの場合SOLD OUTを表示させるためにTransactionテーブルを作成します。
$ rails g model Transactiondb/migrate/20200000000000_create_transactions.rbclass CreateTransactions < ActiveRecord::Migration[5.2] def change create_table :transactions do |t| t.references :product, null: false, foreign_key: true t.references :user, null: false, foreign_key: true t.timestamps end end endマイグレートを実行
$ rails db:migrateアソシエーションの設定
transaction.rbclass Transaction < ApplicationRecord belongs_to :user, optional: true belongs_to :product, optional: true endTransactionコントローラーを作成
$ rails g controller transactionstransactions_controller.rbclass TransactionsController < ApplicationController require 'payjp' before_action :set_card, only: [:pay_index, :pay] before_action :set_product def pay_index @top_image = @product.images.first @card = @set_card.first if @card.blank? redirect_to controller: "cards", action: "new" else Payjp.api_key = ENV["PAYJP_PRIVATE_KEY"] customer = Payjp::Customer.retrieve(@card.customer_id) @default_card_information = customer.cards.retrieve(@card.card_id) end end def pay @card = @set_card.first Payjp.api_key = ENV['PAYJP_PRIVATE_KEY'] Payjp::Charge.create( :amount => @product.price, :customer => @card.customer_id, :currency => 'jpy', ) redirect_to action: 'done', product_id: @product end def done @top_image = @product.images.first Transaction.create(product_id: @product.id, user_id: current_user.id) end private def set_card @set_card = Card.where(user_id: current_user.id) end def set_product @product = Product.find(params[:product_id]) end end環境変数の設定
コントローラ内のENV["PAYJP_PRIVATE_KEY"]は環境変数でテスト秘密鍵を設定し読み込む。
今回はdotenvとgonを利用する。dotenv:Railsの環境変数管理
gon:JSにてRailsで定義した環境変数を使用
参考:https://qiita.com/3443/items/44202ff6504210592570#comments※gonはCard登録機能にて使用したため今回は関係ありません
ルーティングの設定
routes.rbRails.application.routes.draw do devise_for :users root "products#index" resources :users, only: [:edit, :update] resources :products resources :cards, only: [:new, :show, :destroy] do collection do post 'pay_show', to: 'cards#pay_show' post 'pay', to: 'cards#pay' end end ##今回の該当箇所 resources :transactions, only: [:index] do collection do get 'pay_index', to: 'transactions#pay_index' post 'pay', to: 'transactions#pay' get 'done', to: 'transactions#done' end end endマークアップ:購入内容確認画面
pay_index.html.haml.transaction-pay .transaction-pay__content %h2.transaction-pay__title 購入内容の確認 .transaction-pay__item .transaction-pay__item-box = image_tag @top_image.image.url, alt:"商品画像", class: "transaction-pay__item-image" .transaction-pay__item-detail %p.transaction-pay__item-detail--name = @product.name .transaction-pay__item-detail-price .transaction-pay__item-detail-price--text ¥ .transaction-pay__item-detail-price--text = @product.price .transaction-pay__item-detail-price--shipping (税込)送料込み .transaction-pay__table .transaction-pay__table-inner .transaction-pay__table-form .transaction-pay__table-content .transaction-pay__table-pay %p.transaction-pay__table-pay--title 支払い金額 .transaction-pay__table-price %p.transaction-pay__table-price--title ¥ %p.transaction-pay__table-price--title = @product.price .transaction-pay__table-way %h3 支払い方法 .transaction-pay__table-register - if @default_card_information.blank? %i.fas.fa-plus-circle %span.icon-register = link_to "登録してください", new_card_path - else = "**** **** **** " + @default_card_information.last4 - exp_month = @default_card_information.exp_month.to_s - exp_year = @default_card_information.exp_year.to_s.slice(2,3) = exp_month + " / " + exp_year .transaction-pay__table-buy = form_tag(action: :pay, method: :post, product_id: @product) do %button.transaction-pay__table-buy-button 購入するマークアップ:購入完了画面
done.html.haml.transaction-done .transaction-done__content .transaction-done__text 購入が完了しました! .transaction-done__image = image_tag @top_image.image.url, alt:"商品画像", class: "transaction-done__image--img" .transaction-done__title = @product.name .transaction-done__price .transaction-done__price--text = @product.price .transaction-done__price--info (送料込み)マークアップ:購入済みの場合SOLD OUTを表示
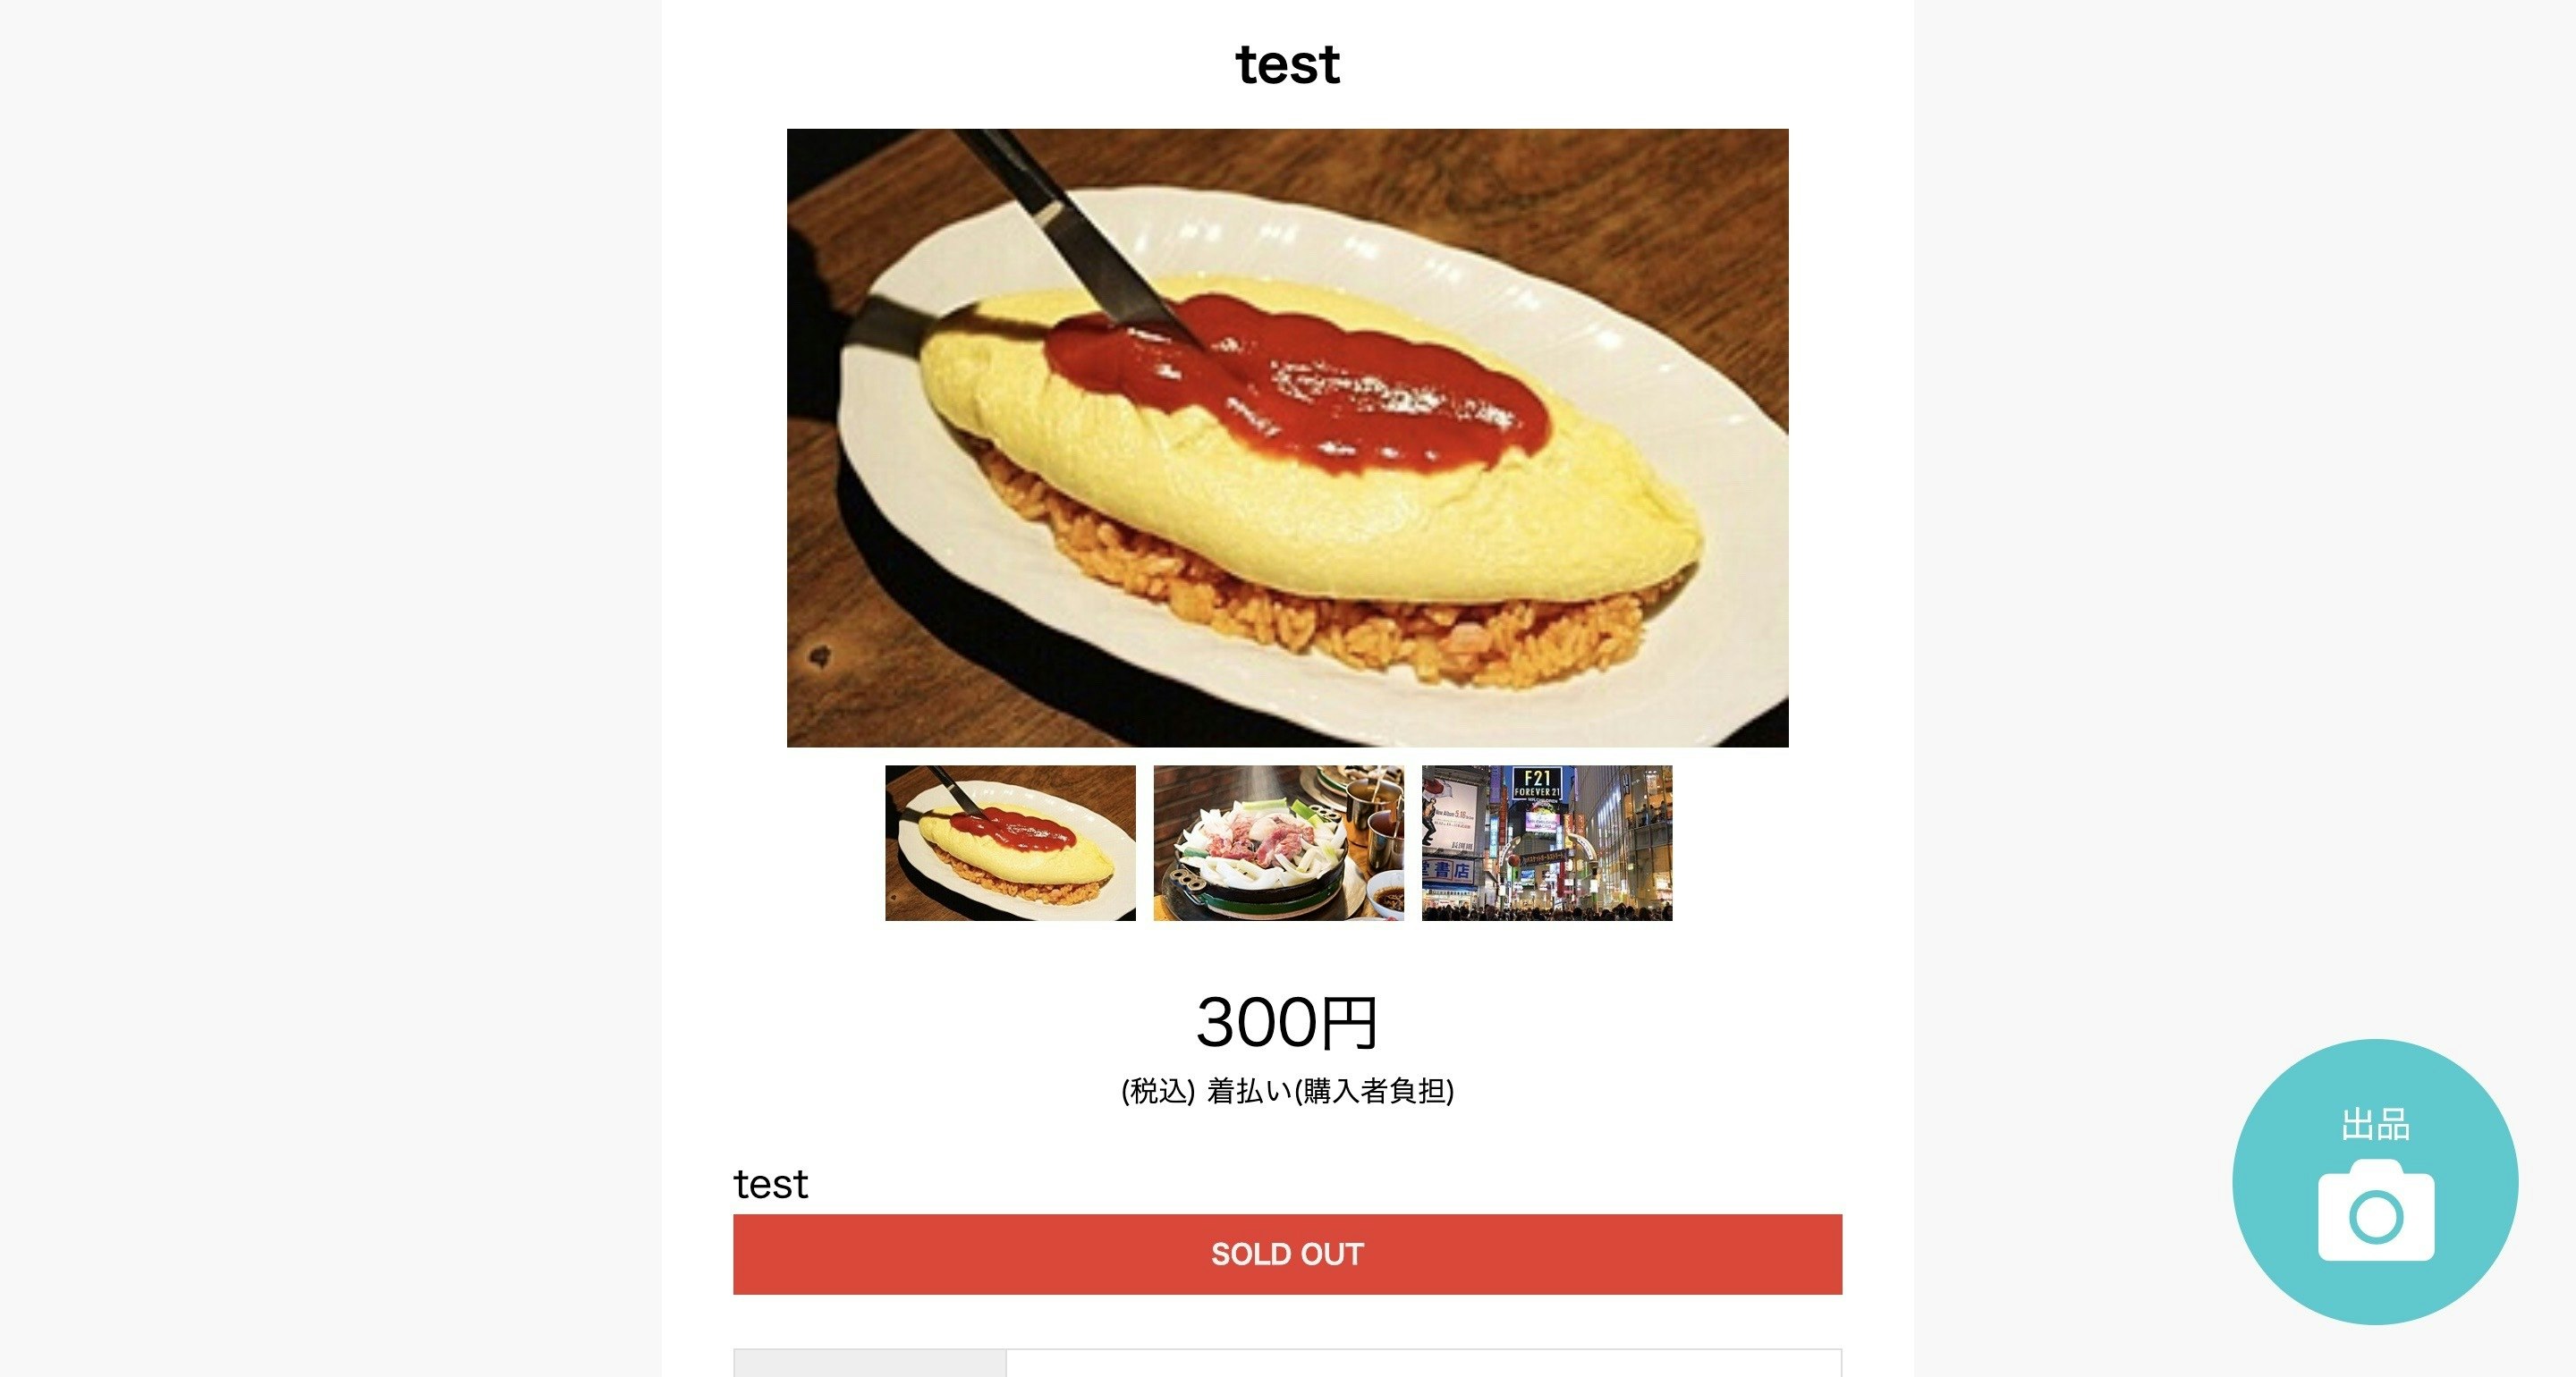
show.html.haml.product-show .product-show__main .product-show__content .product-show__top-content .product-show__item-box .product-show__item-box--name = @product.name .product-show__item-box__body .product-show__item-box__body--top-img = image_tag @top_image.image.url, alt:"トップ画像", class: "product-show__item-top-img" .product-show__item-box__body--list - @images.each do |image| .product-show__item-box__body--sub-img = image_tag image.image.url, alt:"サブ画像", class: "product-show__item-sub-img" .product-show__item-box--price %span = "#{@product.price}円" .product-show__item-box--price-detail %span.product-show__item-box--price-detail-text (税込) %span.product-show__item-box--price-detail-text = @product.delivery_charge .product-show__item-box--item-detail = @product.name -# 商品出品者であれば表示させない - if user_signed_in? && (current_user.id == @product.user_id) - else .product-show__transaction .product-show__transaction-box -# 商品購入済みであればSOLD OUT - if @product_id.present? .product-transaction-btn SOLD OUT - else = link_to "購入画面に進む", pay_index_transactions_path(product_id: @product), class: "product-transaction-btn"購入データの確認
購入ができていれば下記のURLにて履歴が確認できます。
https://pay.jp/d/charges以上です

- 投稿日:2020-03-21T21:28:27+09:00
docker-compose buildでYou must use Bundler 2 or greater with this lockfile.とエラーが出た話
経緯
「既存の作成済のrailsアプリケーションにDockerを導入してみたい!!でも、いきなり導入していろいろ変なことになったら嫌だな」ということで、Railsチュートリアルの開発環境をDockerにしてみなイカ?という記事を参考にさせていただき、まずはrailsチュートリアルをdockerにのせようと、奮闘している最中、
You must use Bundler 2 or greater with this lockfile.
ERROR: Service 'app' failed to build: The command '/bin/sh -c bundle install --jobs=4' returned a non-zero code: 20
というエラーが。。
解決した方法
You must use Bundler 2 or greater with this lockfile.これは、Bundlerのバージョンが2以上を使わなければならなかったのに、Dockerのimageで1.X.Xを利用していたことが原因だったみたいです。
確かに、Gemfile.lockを見ると、一番最後の行に、BUNDLED WITH 2.1.4の記載が。。。
そこで、docker-compose buildした際に、bundlerをinstallすれば問題ないと知り、
Dockerfileにて~~~略~~~ RUN bundle installとしていたところを
~~~略~~~
RUN gem install bundler && bundle install
のように、bundlerをインストールすることで解決しました!!
- 投稿日:2020-03-21T18:57:25+09:00
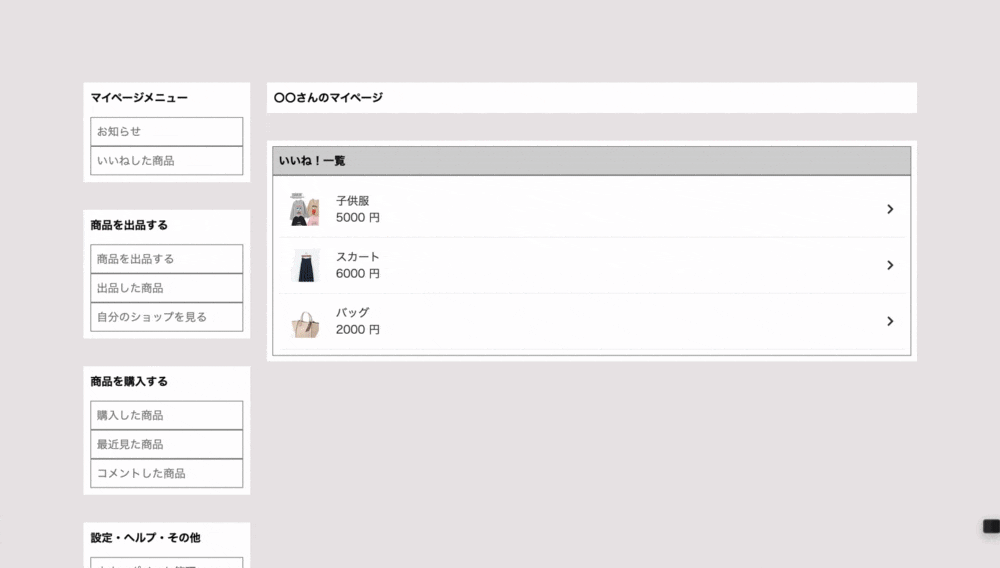
[Rails]いいねした商品をマイページに一覧表示する
ユーザー(user)のマイページ(show)にいいね(like)した商品一覧を表示させます。
モデルの指定はこちらに記載してます。ルーティング
routes.rbresources :users, only: [:index, :show] do collection do get :likes end enduserのshowアクションにネストさせます。
モデル
user.rbhas_many :likes, dependent: :destroy has_many :like_items, through: :likes, source: :item※今回のポイント
like_itemsでuserがどのitemにいいねしているか取得できます。ビュー
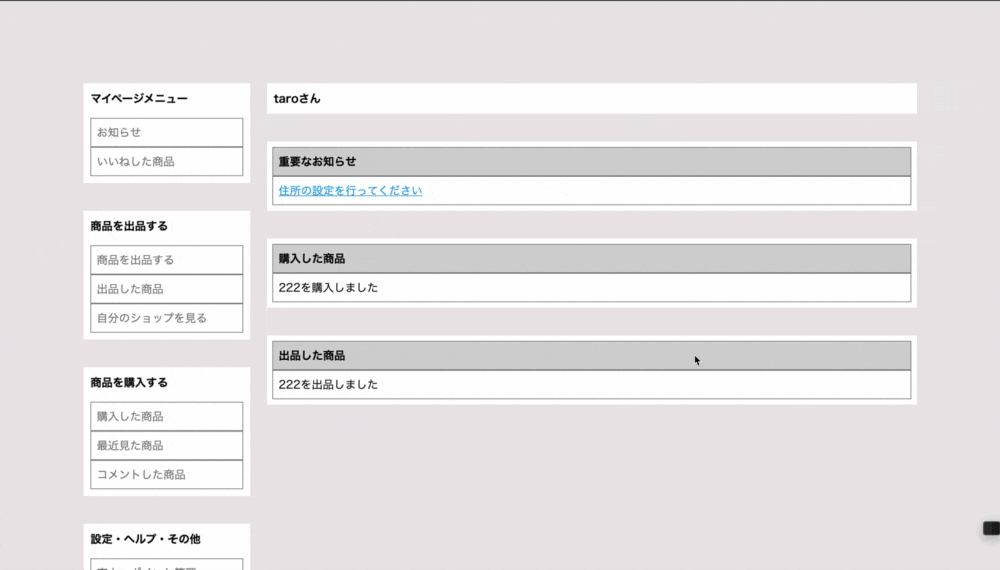
users/_side-bar.html.haml.side-bar %section.side-bar__group %h2.side-bar__group__title マイページメニュー %li.side-bar__group__list = link_to "お知らせ", "#" %li.side-bar__group__list = link_to "いいねした商品", likes_users_pathリンク先
likes_users_path指定users/likes.html.haml.container-show = render "side-bar" .main %section.main__group %h2.main__group__title 〇〇さんのマイページ %section.main__table %h2.main__table__header いいね!一覧 %ul.main__table__list - current_user.like_items.each do |item| %li =link_to item_path(item), class: "main__table__list__item" do %figure = image_tag asset_path(item.images[0].content), :size =>'48x64' .main__table__list__item__body .main__table__list__item__body__text = item.name %br = item.price 円 %i.fas.fa-chevron-rightlikeファイルを作成
- current_user.like_items.each do |item|で現在ログインしているuserがいいねしたitemを取得しています。
=link_to item_path(item)で各商品詳細ページに遷移できるようにしてます。完成イメージ
ご指摘ありましたらぜひコメントよろしくおねがいします!!
- 投稿日:2020-03-21T18:56:52+09:00
Blocked host: localhostの対処
- 投稿日:2020-03-21T18:26:27+09:00
[Rails]非同期のいいね機能実装
ユーザー(user)が出品した商品(item)にいいねできる機能を実装してます。
Likeモデル、テーブル作成
rails g model Likelike.rbclass Like < ApplicationRecord endXXXXXXXXXXX_create_likes.rbclass CreateLikes < ActiveRecord::Migration[5.2] def change create_table :likes do |t| t.integer :user_id t.integer :item_id t.timestamps end end end
rails db:migrateマイグレーションファイル実行モデル
通常はuserとitemは1対多の関係ですが、いいね機能実装時に関してはlikeテーブルが加わるので、多対多の関係になります。
user.rbhas_many :likes, dependent: :destroy has_many :like_items, through: :likes, source: :itemitem.rbhas_many :likes, dependent: :destroy has_many :liking_users, through: :likes, source: :user
dependent: :destroyはいいねを外した時に、中間likesテーブルにある該当userとitemのレコードを一緒に削除してくれます。
:like_itemsはuserがどのitemをいいねしているのかを取得
:liking_usersはitemがどのuserによっていいねされているのか取得
through: :likesは多対多の関係で中間likeテーブルを経由するための関連付けで記述
source:オプションは関連付け元の名前を指定するため記述like.rbclass Like < ApplicationRecord belongs_to :item, counter_cache: :likes_count belongs_to :user end
counter_cahce: :likes_countはリレーションされているlikeの数の値をリレーション先のlikes_countというカラムの値に入れるという意味です。なのでlikes_countカラムをitemsテーブルに追加しましょう。itemsテーブルにlikes_countカラム追加
rails g migration AddLikes_countToItemsXXXXXXXXXXX_add_likes_count_to_items.rbclass AddLikesCountToItems < ActiveRecord::Migration[5.2] def change add_column :items, :likes_count, :integer end end
rails db:migrateマイグレーションファイル実行ルーティング設定
routes.rbresources :items member do post '/like/:item_id' => 'likes#like', as: 'like' delete '/like/:item_id' => 'likes#unlike', as: 'unlike' endいいねをつける時→like 外す時→unlike
as:でルーティングに名前を付けれる。この二つはlike_path,unlike_pathとして使えるようになります。コントローラー
rails g contoller likeslikes_controller.rbclass LikesController < ApplicationController before_action :set_variables def like like = current_user.likes.new(item_id: @item.id) like.save end def unlike like = current_user.likes.find_by(item_id: @item.id) like.destroy end private def set_variables @item = Item.find(params[:item_id]) @id_name = "#like-link-#{@item.id}" end end
@id_nameは非同期で使用します。ビュー
items/show.html.haml.option = render partial: 'likes/like', locals: { item: @item }
renderを使用し、部分テンプレートへ誘導
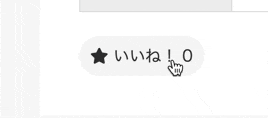
likesディレクトリに部分テンプレート_like.html.hamlファイルを作成likes/_like.html.haml.option__like{:id => "like-link-#{@item.id}"} - if current_user.likes.find_by(item_id: item.id) = link_to unlike_item_path(@item.id, @item.id), method: :delete, remote: true, class: "option__like-on" do .fas.fa-star .option__like-on__text いいね! .option__like-on__count =item.likes.count - else = link_to like_item_path(@item.id, @item.id), method: :post, remote: true, class: "option__like-off" do .fas.fa-star .option__like-off__text いいね! .option__like-off__count =item.likes.countいいねボタンのビューを記述します。
{:id => "like-link-#{@item.id}"}をつけることで@itemのボタンであることを指定します。
remote: trueをつけることでリンクを押した時、ajaxを発火させます。
=item.likes.countでいいねされた数を表示します。いいねボタンの非同期化
like.js.hamlとunlike.js.hamlファイル作成likes/like.js.haml$("#{@id_name}").html('#{escape_javascript(render("likes/like", item: @item ))}');likes/unlike.js.haml$("#{@id_name}").html('#{escape_javascript(render("likes/like", item: @item ))}');コントローラーで定義した
@id_nameを指定し、escape_javascriptで先ほど作成した_likeファイルを埋め込んでます。Sass
item.show.scss.option { display: flex; justify-content: space-between; &__like { &-on { text-decoration: none; padding: 11px 10px; border-radius: 40px; color: #3CCACE; border: 1px solid #ffb340; display: flex; line-height: 16px; .fas.fa-star { padding-right: 5px; } &__text { padding-right: 5px; } } &-off { text-decoration: none; padding: 11px 10px; border-radius: 40px; color: #333; border: 1px solid #f5f5f5; display: flex; line-height: 16px; background: #f5f5f5; .fas.fa-star { padding-right: 5px; } &__text { padding-right: 5px; } } } }sassの説明は省略します。
完成イメージ
ユーザーがいいねした商品一覧を表示させたい方はこちらをご覧ください
間違えている部分があったらぜひコメントよろしくお願いします!!
- 投稿日:2020-03-21T16:01:33+09:00
複数画像投稿で盛大に自爆した時の確認事項[備忘録]
はじめに
某フリマアプリの模倣アプリを開発中、出品機能実装で複数画像の登録に死ぬほど手を焼いたので、備忘録として掲載します。
誤った記述などあればご指摘いただけると幸いです。
開発環境・前提
Ruby 2.5.1p57
Ruby on rails 5.2.3
jquery-rails 4.3.5
haml-rails 2.0.1
sass-rails 5.1.0
CarrierWave 2.1.0完成コード
先に完成コードを載せておく。
image.rbbelongs_to :item, optional: true validates_presence_of :item validates :content, presence: true mount_uploader :content, ImageUploaderitem.rbbelongs_to :brand, optional: true belongs_to :user, optional: true belongs_to :category, optional: true has_many :images, dependent: :destroy accepts_nested_attributes_for :images, allow_destroy: trueitems_controller.rbdef new @item = Item.new @brands = Brand.all @category_parent_array = ["指定なし"] Category.where(ancestry: nil).each do |parent| @category_parent_array << parent.name end @item.images.build end def create @item = Item.new(item_params) if @item.save! @image = @item.images.create redirect_to :root else render :new end end private def item_params params.require(:item).permit( :name, :description, :condition, :price, :fee, :brand_id, :area, :shipping_days, images_attributes: [:content, :id, :_destroy] ).merge(user_id: current_user.id, category_id: params[:category_id], brand_id: params[:item][:brand_id]) endnew.html.haml#画像投稿フォームの記述部分 .main-items = form_with model: @item, local: true do |f| .wrapper.image-wrapper #image-box.image-wrapper__image-box = f.fields_for :images do |i| .image-wrapper__image-box__js.js-file_group{data:{index: "#{i.index}"}} = i.label :content, class: "image-wrapper__image-box__js__label" do .image-wrapper__image-box__js__label__image.img_field{id: "img_field--#{i.index}", onClick: "$('#file').click()"} - if @item.images[i.index][:content].present? = image_tag(f.image.content) - else = image_tag 'icon_camera.png', class: "image-wrapper__image-box__js__label__image__url" = i.file_field :content, class: "image-wrapper__image-box__js__label__file js-file", id: "item_images_attributes_#{i.index}_content" .js-remove %span.js-remove__text 削除モデルへのmout_uploaderの記述
before
image.rbmount_uploaders :content, ImageUploaderafter
image.rbmount_uploader :content, ImageUploadermount_uploaderとするかmount_uploadersか。
error.messageNoMethodError (undefined method `map' for #<ActionDispatch::Http::UploadedFile......> #省略 Did you mean? tap): app/controllers/items_controller.rb:68:in `create'mount_uploadersにすると、デフォルトでmapメソッドが使われてしまう。
つまり、1つのfile_fieldに複数の画像データが入っている配列である必要があるのだ。
そういう時は、file_fieldにmultiple: trueを記載する必要がある。
multiple: true
multiple: true を記述すると、一つのfile_fieldに複数画像をアップロードしようとする。
修正前の記述
new.html.haml= form_with model: @item, local: true do |f| .wrapper.image-wrapper #image-box.image-wrapper__image-box = f.fields_for :images do |i| .image-wrapper__image-box__js.js-file_group{data:{index: "#{i.index}"}} = i.label :content, class: "image-wrapper__image-box__js__label" do .image-wrapper__image-box__js__label__image.img_field{id: "img_field--#{i.index}", onClick: "$('#file').click()"} - if @item.images[i.index][:content].present? = image_tag(f.image.content) - else = image_tag 'icon_camera.png', class: "image-wrapper__image-box__js__label__image__url" = i.file_field :content, multiple: true, class: "image-wrapper__image-box__js__label__file js-file", id: "item_images_attributes_#{i.index}_content", required: "required" .js-remove %span.js-remove__text 削除inputタグのtype[file]部分のHTML(検証)
multiple有り
<input multiple="multiple" class="image-wrapper__image-box__js__label__file js-file"
id="item_images_attributes_0_content" type="file"
name="item[images_attributes][0][content][]">
multiple無し
<input class="image-wrapper__image-box__js__label__file js-file"
 id="item_images_attributes_0_content" type="file"
 name="item[images_attributes][0][content]">
デフォルトで設定されるname属性が変わる
私の場合は、各file_fieldに一つずつ保存させるようなコードを書いていたのにもかかわらず、multipleの記述をしてしまっていて、エラーが起きた。
labelタグのfor属性
labelタグのfor属性は、連動させたい子要素のidの値を記述する必要がある。
修正前のlabel部分の記述
html.haml%label.image-wrapper__image-box__js__label .image-wrapper__image-box__js__label__image.img_field{id: "img_field--#{i.index}", onClick: "$('#file').click()"} - if @item.images[i.index][:content].present? = image_tag(f.image.content) - else = image_tag 'icon_camera.png', class: "image-wrapper__image-box__js__label__image__url" = i.file_field :content, multiple: true, class: "image-wrapper__image-box__js__label__file js-file", id: "item_images_attributes_#{i.index}_content", required: "required" .js-remove %span.js-remove__text 削除修正後
html.haml= i.label :content, class: "image-wrapper__image-box__js__label" do .image-wrapper__image-box__js__label__image.img_field{id: "img_field--#{i.index}", onClick: "$('#file').click()"} - if @item.images[i.index][:content].present? = image_tag(f.image.content) - else = image_tag 'icon_camera.png', class: "image-wrapper__image-box__js__label__image__url" = i.file_field :content, multiple: true, class: "image-wrapper__image-box__js__label__file js-file", id: "item_images_attributes_#{i.index}_content", required: "required" .js-remove %span.js-remove__text 削除labelタグの性質をよく理解せずに使っていた。
修正前の記述だと、検証でみてみるとわかるが、labelタグにfor属性が付与されておらず、inputタグのid属性(ここでは、item_images_attributes_0_content)に対応しておらず、不具合がおきた。後からわかったことだが、、hidden_fieldの記述を消してやれば、%labelのままでも支障はないことがわかった。
hidden_fieldの記述
修正前の記述
new.html.haml= form_with model: @item, local: true do |f| .wrapper.image-wrapper #image-box.image-wrapper__image-box = f.fields_for :images do |i| .image-wrapper__image-box__js.js-file_group{data:{index: "#{i.index}"}} = i.label :content, class: "image-wrapper__image-box__js__label" do .image-wrapper__image-box__js__label__image.img_field{id: "img_field--#{i.index}", onClick: "$('#file').click()"} - if @item.images[i.index][:content].present? = image_tag(f.image.content) - else = image_tag 'icon_camera.png', class: "image-wrapper__image-box__js__label__image__url" = i.file_field :content, multiple: true, class: "image-wrapper__image-box__js__label__file js-file", id: "item_images_attributes_#{i.index}_content", required: "required" = i.hidden_field :item_id, value: @item.id .js-remove %span.js-remove__text 削除imagesのitem_idをparamsに送るための記述をしていたが、idや外部キーはデフォルトで送られるようになっているため、必要なかった。逆に、これがあることによって、:contentが入っていない空のfile_fieldがhidden_fieldと共にparamsに送られてしまうため、validationに引っかかってしまう。
最後に
チーム開発で商品出品機能を担当したことにより、HTML&CSS, jQuery, Rubyについての知識がかなり深まった。欲張りな性格なので、いろんな記事のいいとこ取りをしようとした結果、こんなにもの何重もの罠を自分で仕掛けて自分でハマるということになってしまった。次からは是非とも一つ一つの用法や性質を理解した上で、実装していきたい。
でも、何かしらの初学者ってこういう風に泥臭く成長していくのかなぁとも思った。
諦めたら、そこで試合終了だよ。
- 投稿日:2020-03-21T15:58:16+09:00
Railsチュートリアルメモ - 第13章
サマリ
- マイクロソフトの表示、投稿、削除
- モデルの関連付け(
has_manyおよびbelongs_to)- モデルを使ったレコードの取得(取得条件、並び順、取得件数の指定)
- ラムダ式 (Stabby lambda) を使ったProcオブジェクトの生成
- Homeページの動的な出し分け
- CarrierWaveを使った画像ファイルのアップロード
- ImageMagick(+MiniMagick)を使った画像ファイルのリサイズ
- 本番環境でのfogを使ったS3への画像アップロード
ポイント
rails generate modelの際、referencesを指定するとFKの指定を行ってくれるe.g.
rails generate model Micropost content:text user:referencesを実行した場合class Micropost < ApplicationRecord belongs_to :user end
モデルの関連付けを行うと、1対Nの1側からN側のオブジェクトを生成することができ、N側のオブジェクトには1側のオブジェクトのidが設定される。
- e.g.
user.microposts.createuser.microposts.create!=> !をつけると生成失敗時に例外を発生させるuser.microposts.build
buildメソッドはオブジェクトを返すがデータベースに反映はしないモデル内で
default_scopeを指定することで、並び順を指定することができるdefault_scope -> { order(created_at: :desc) }
- ->というラムダ式は、ブロックを引数に取り、Procオブジェクトを返す
- Procオブジェクトは、callメソッドが呼ばれたとき、ブロック内の処理を評価する
- モデルの関連付けをした1対多の1側に
dependent: :destroyを付与しておくと、1側のオブジェクトが削除された際に、多側のオブジェクトも一緒に削除される- orderメソッド、takeメソッドを使って取得するレコードの並び順と件数を指定できる
User.order(:created_at).take(6)
- whereメソッドでレコードの取得条件を指定できる。?句を使うことで、変数をエスケープし、SQLインジェクションを防ぐことができる。
  def feed
    Micropost.where("user_id = ?", id)
  end
- フォーム内でバリデーションエラーがあった場合、form_forのブロック変数のobject属性にエラーが入る
- errorパーシャルなどにrenderから変数を引き渡す場合、第二引数にハッシュを指定する e.g.
  <%= form_for(@user) do |f| %>
  <%= render 'shared/error_messages', object: f.object %>
  <% end %>
<% if object.errors.any? %> <div id="error_explanation"> <ul> <% object.errors.full_messages.each do |msg| %> <li><%= msg %></li> <% end %> </ul> </div> <% end %>renderには以下の使い方がある
- 引数ががアクション名(new, editなど) => アクションに対応したerbの描画
- 引数がパーシャル => パーシャルの描画(第二引数に与えた変数をパーシャル内で使用できる)
- 引数がインスタンス変数 => インスタンス変数に対応したパーシャルを探して描画
- e.g.
render @feed_itemsで@feed_itemsの中身がmicropostであれば_micropostパーシャルを探して描画
- フォームが含まれる画面を描画する際は、form_for(@インスタンス変数)の@インスタンス変数をbuildして空のオブジェクトを用意してから描画する必要がある。
- フォームが送信されたら改めてparamsから取得した値を使用して@インスタンス変数をbuildしsaveする。
- erb内の
link_toメソッドにdata: { confirm: "You sure?" }を渡すとリンククリック時に確認のダイアログが表示される
redirect_to request.referrerと記載すると、一つ前のページにリダイレクトさせられるCarrierWaveを使った画像ファイルの取り扱い手順
- Gemfileに
carrierwaveを追加し、bundle installrails generate uploader Xxxでアップローダーを作成- モデルに
mount_uploader :picture, PictureUploaderを追加- ビューにimage_tagを追加
<%= image_tag micropost.picture.url if micropost.picture? %><span class="picture"> <%= f.file_field :picture %> </span>
- モデルに独自定義したバリデーションを追加する場合は、
validatesではなくvalidateを使用する感想
- 終盤のコンテンツだけあってなかなか内容が盛りだくさんだった。
- リスト13.50で空の配列(@feed_items = [])を追加している箇所は、
_feed.html.erbの方を以下のように変えた方がわかりやすい気がした。<% if @feed_items && @feed_items.any? %>
ただ、これだと空の配列追加と同様、フィードの一覧が表示されないので、普通に
redirect_to root_urlでHomeにリダイレクトすればよいのではと思ってやってみたが、リダイレクトするとflashメッセージが表示されずエラーが発生したことがわからない。やはりrender 'static_pages/home'は必要なよう。uploader導入後のローカルテストがredになり以下のERRORが表示された。
- NameError: uninitialized constant Micropost::PictureUploader app/models/micropost.rb:4:in
<class:Micropost>' app/models/micropost.rb:1:in'サーバーを再起動しても解消せず原因が分からなかったが、一度VSCodeのすべてのターミナルを閉じてから再度開き直して実行したところgreenになった。
herokuにpushした際、以下のエラーが発生した。
remote:  !
remote:  !     Failed to install gems via Bundler.
remote:  !
(省略)
To https://git.heroku.com/xxx.git
 ! [remote rejected] master -> master (pre-receive hook declined)
error: failed to push some refs to 'https://git.heroku.com/xxx.git'
- herokuはpushされた際にbundle installも実行するようで、そこでこけるとpushがエラーになる模様(たしかにここまで一度もherokuでbundle installをしなかったが、勝手にやってくれていたらしい)
- bundle installがこけた原因は
heroku config:setでAWSクレデンシャルを環境変数に設定していなかったことが原因のようで設定してからpushすると正常に動作した。
- 投稿日:2020-03-21T14:57:26+09:00
jwtで認証を実装する時のrspecテスト
はじめに
今参加させていただいているスタートアップでapi実装をしており、認証をfirebase authenticationに頼っているのですが、rspecでテストを行うときにjwtの認証をよしなにスキップする方法でめちゃめちゃハマったのでその備忘録です
元々のコード(説明のためかなり省略しています)
applicatioion_controller.rbclass ApplicationController < ActionController::Base before_action :authenticate! private def authenticate! if request.headers['Authorization'].present? jwt = request.headers['Authorization'] # jwtを渡すと検証を行いユーザーの情報を返してくれる独自モジュールを呼び出し @user_info = Firebase::JwtAuth.authenticate(jwt) else render json: { type: '401', message: 'not authorized' }, status: 401 end end enduser_controller.rbclass UsersController < ApplicationController # ユーザー一覧を持ってくる def index users = User.all render json: user status: :ok end endspec/requests/user_spec.rbdescribe UsersController, type: :request do let(:headers) { { CONTENT_TYPE: 'application/json', Authorization: 'hoge_token' } } describe 'GET /users' do it '全てのユーザーを取得する' do # header情報をくっつけてリクエストする get "/users", headers: headers # ステータスコード200が返ってくる、、、はずだった expect(response.status).to eq(200) end end end問題点
最初はこんな感じで実装してたのですが、、、これだと色々と問題があります
- jwtは有効期限が決められているため、実装した瞬間は通ることはあっても一定の時間が経つと通らなくなってしまう
- テストをするたびにfirebase側に不要なリクエストを送ってしまう
もっとあるとは思いますが、ざっとこんなところでしょうか?
対処法
これの対処法としては
テスト時にauthenticate!メソッドが呼ばれた時はあらかじめ設定しておいた@user_infoを返すようなスタブを作成するというものです※スタブってなんぞ?って人は↓この辺を見てあとは自分で調べてくださいw
https://wa3.i-3-i.info/word14933.htmlってことなのでそのスタブを作っていきます
/support/authenticated_helper.rbmodule AuthenticationHelper def authenticate_stub # 渡したいインスタンス変数を定義 @user_info = [ { 'name' => 'kosuke', 'email' => 'kosuke@example.com', 'email_verified' => true, } ] # allow_any_instance_ofメソッドを使ってauthenticate!メソッドが呼ばれたら # ↑のインスタンス変数を返す allow_any_instance_of(ApplicationController).to receive(:authenticate!).and_return(@user_info) end endそして作ったスタブをテストコードから呼び出します
spec/requests/user_spec.rbdescribe UsersController, type: :request do let(:headers) { { CONTENT_TYPE: 'application/json', Authorization: 'hoge_token' } } describe 'GET /users' do it '全てのユーザーを取得する' do authenticate_stub # ←追記 # header情報をくっつけてリクエストする get "/users", headers: headers # ステータスコード200が返ってくる expect(response.status).to eq(200) end end endこうしてあげることで
authenticate!メソッドが呼ばれた時に用意しておいたインスタンス変数が帰るので
無事テストを通すことができます以上!
- 投稿日:2020-03-21T14:49:43+09:00
[PostgreSQL]テーブルの項目の型の調べ方/確認の仕方
はじめに
PostgreSQLで実装中に「今のテーブルのそれぞれの項目の状態ってどうなってたっけ?」
となったときに、カラムの型の確認の仕方がまとまっていなかったので、まとめる環境
macOS Catalina
Ruby 2.5.1
Rails 5.0.7.2
PostgreSQL 12.2確認方法
1.
psql -lで、確認したいテーブルが含まれるデータベースの名前を確認するPostgreSQLにあるデータベースが一覧表示されるので、確認したいテーブルが含まれるデータベース名をコピーしておく
ternminal$ psql -l #PostgreSQLのDBを一覧で表示する ##実行結果 (今回は「app-name_development」が対象) List of databases Name | Owner | Encoding | Collate | Ctype | Access privileges -------------------------+--------+----------+---------+-------+------------------- app-name_development | user | UTF8 | C | C | app-name_test | user | UTF8 | C | C | postgres | user | UTF8 | C | C | template0 | user | UTF8 | C | C | =c/user + | | | | | user=CTc/user template1 | user | UTF8 | C | C | =c/user + | | | | | user=CTc/user (5 rows)2.
psql -d データベース名とコマンド入力コンソール状態のようになる
ternminal$ psql -d app-name_development #1.でコピーしたデータベース名 psql (12.2) Type "help" for help. app-name_development=#3.
\d テーブル名とコマンド入力入力したテーブル名のカラム、インデックス、外部キーが一覧表示される
ternminal$ psql -d app-name_development psql (12.2) Type "help" for help. app-name_development=# \d users #確認したいテーブル名 Table "public.users" Column | Type | Collation | Nullable | Default ------------+-----------------------------+-----------+----------+---------------------------------- id | integer | | not null | nextval('woms_id_seq'::regclass) name | character varying | | not null | group_id | integer | | | created_at | timestamp without time zone | | not null | updated_at | timestamp without time zone | | not null | Indexes: "users_pkey" PRIMARY KEY, btree (id) "index_users_on_group_id" btree (group_id) Foreign-key constraints: "fk_rails_b5bbe7a612" FOREIGN KEY (group_id) REFERENCES groups(id) app-name_development=# \q #\qで終了追記(2020/03/21)
これ書いた後に気付いたが、普通に
db/schema.rbを確認するだけでよかった気もする...
- 投稿日:2020-03-21T14:39:06+09:00
フリマアプリの出品テストが上手く書けない人へ
初投稿です!
どうか優しい目で見てあげて下さい。お願いします!さてさて、今回はテストコードの初歩的な事について備忘録的に書き残していこうかと思います。
フリマアプリを開発上で、商品(product)の出品時の
「必須項目が全て入力してある際は登録できる」
といったテストコードを書こうと思います!
今回登録する中身はこちら↓
productsテーブル
カラム名 型 オプション name string null: false price integer null: false description(商品説明) string null: false status(商品の状態) string null: false size string null: false judgment integer days(発送までの日にち) string null: false cost(配送料負担者) string null: false prefecture_id integer null: false category_id integer null: false, foreign_key: true brand_id integer foreign_key: true user_id integer null: false, foreign_key: true テーブルから
name,
price,
description,
status,
size,
days,
cost,
prefecture_id,
category_id,
user_id
のカラムの値があれば登録できそう( ^ω^ )というわけで、今回はFactoryBotを用いて、下記の様にテストコードを書きました!!
spec/factories/product.rbFactoryBot.define do factory :product do #値は適当です name {"tomato"} price {111} description {"aaa"} status {"aaa"} size {"aaa"} days {"aaa"} cost {"aaa"} prefecture_id {1} category_id {1} user_id {1} end endspec/models/product_spec.rbrequire 'rails_helper' describe Product do describe '#create' do it "is valid with a name, price, description, status, size, days, cost, prefecture_id, category_id, user_id" do product = FactoryBot.build(:product) expect(product).to be_valid end end endさてこれで、【bundle exec rspec】っと( ^ω^ )
結果
ターミナルProduct #create is valid with a name, price, description, status, size, days, cost, prefecture_id, category_id, user_id (FAILED - 1) Failures: 1) Product#create is valid with a name, price, description, status, size, days, cost, prefecture_id, category_id, user_id Failure/Error: expect(product).to be_valid expected #<Product id: nil, name: "abe", price: 111, description: "aaa", status: "aaa", size: "aaa", judgment: nil, days: "aaa", cost: "aaa", prefecture_id: 1, category_id: 1, brand_id: nil, user_id: 1, created_at: nil, updated_at: nil> to be valid, but got errors: Userを入力してください, Categoryを入力してください # ./spec/models/product_spec.rb:7:in `block (3 levels) in <top (required)>' Finished in 0.18668 seconds (files took 3.15 seconds to load) 1 example, 1 failure失敗( ´ ▽ ` )
エラー分を見てみると、
「UserとCategoryってどこのどいつ誰だよ!そんなのどこにもいねぇぞ!」
と怒られてます。それもそのはず…
user_idとcategory_idを外部キーで指定しているのにその先が居ないからね…。( ˊ̱˂˃ˋ̱ )そこで、
FactoryBotにUserとCategoryも追記します!!
まずここでUserとCategoryのテーブルを確認↓Usersテーブル
カラム名 型 オプション nickname string null: false string null: false encrypted_password string null: false user_image (プロフィール画像) string introduction (自己紹介) text family_name (姓) string null: false first_name (名) string null: false family_name_kana (セイ) string null: false first_name_kana (メイ) string null: false birth_day (生年月日) date null: false Categoriesテーブル
カラム名 型 オプション name string null: false ancestry string なので、FactoryBotに以下の様に追記!
spec/factories/product.rb# ----------追記部分ここから-------------- FactoryBot.define do factory :user do #値は適当です nickname {"sasa"} email {"kkk@gmail.com"} password {"00000000"} #登録の際に必要なので追記! encrypted_password{"00000000"} family_name {"sasaki"} first_name {"goro"} family_name_kana {"sasaki"} first_name_kana {"goro"} birth_day {"1990-08-24"} end factory :category do #値は適当です name {"aaa"} end # ----------追記部分ここまで-------------- factory :product do #値は適当です name {"tomato"} price {111} description {"aaa"} status {"aaa"} size {"aaa"} days {"aaa"} cost {"aaa"} prefecture_id {1} category_id {1} user_id {1} end endそしてuserとcategoryはこのテスト内で一旦保存されないと、
また「UserとCategoryってどこのどいつ誰だよ!そんなのどこにもいねぇぞ!」
と怒られてしまうので、
buildではなくcreateを使って行きます!!spec/models/product_spec.rbrequire 'rails_helper' describe Product do describe '#create' do it "is valid with a name, price, description, status, size, days, cost, prefecture_id, category_id, user_id" do user = create(:user) category = create(:category) product = FactoryBot.build(:product) expect(product).to be_valid end end endこれでいける!!
【bundle exec rspec】っと( ^ω^ )結果
ターミナルProduct #create is valid with a name, price, description, status, size, days, cost, prefecture_id, category_id, user_id (FAILED - 1) Failures: 1) Product#create is valid with a name, price, description, status, size, days, cost, prefecture_id, category_id, user_id Failure/Error: expect(product).to be_valid expected #<Product id: nil, name: "abe", price: 111, description: "aaa", status: "aaa", size: "aaa", judgment: nil, days: "aaa", cost: "aaa", prefecture_id: 1, category_id: 1, brand_id: nil, user_id: 1, created_at: nil, updated_at: nil> to be valid, but got errors: Userを入力してください, Categoryを入力してください # ./spec/models/product_spec.rb:8:in `block (3 levels) in <top (required)>' Finished in 0.17322 seconds (files took 2.77 seconds to load) 1 example, 1 failure…えっ?_:(´ཀ`」 ∠):
同じエラーでとる…何故…??
もしかして、userもcategoryもcreateできてない?
と思い、【binding.pry】を【category = create(:category)】の直下に記入し、
確かめてみると、、、Product #create From: /Users/hoge/Desktop/GitHub/hogehoge/spec/models/product_spec.rb @ line 7 : 2: describe Product do 3: describe '#create' do 4: it "is valid with a name, price, description, status, size, days, cost, prefecture_id, category_id, user_id" do 5: user = create(:user) 6: category = create(:category) => 7: binding.pry 8: product = build(:product) 9: expect(product).to be_valid 10: end 11: 12: # it "is invalid without a name" do [1] pry(#<RSpec::ExampleGroups::Product::Create>)> user => #<User id: 15, nickname: "sato", email: "kkk@gmail.com", user_image: nil, introduction: nil, family_name: "sato", first_name: "kenta", family_name_kana: "sato", first_name_kana: "kenta", birth_day: "1990-08-24", created_at: "2020-03-21 05:17:39", updated_at: "2020-03-21 05:17:39"> [2] pry(#<RSpec::ExampleGroups::Product::Create>)> category => #<Category:0x00007fe4caab5138 id: 7, name: "aaa", ancestry: nil, created_at: Sat, 21 Mar 2020 05:17:39 UTC +00:00, updated_at: Sat, 21 Mar 2020 05:17:39 UTC +00:00> [3] pry(#<RSpec::ExampleGroups::Product::Create>)>なんてことない、userとcategoryのidが違っていただけでした。( ´ ▽ ` )
そりゃ常にidが1な訳ないよね。。。と言うことでさらにテストコードを下記の様に修正!!
spec/models/product_spec.rbrequire 'rails_helper' describe Product do describe '#create' do it "is valid with a name, price, description, status, size, days, cost, prefecture_id, category_id, user_id" do user = create(:user) category = create(:category) #修正点!! user_id: user[:id], category_id: category[:id]を追記、これでテスト時に保存されたuserとcategoryのidが呼び出され、上書きされる product = FactoryBot.build(:product, user_id: user[:id], category_id: category[:id]) expect(product).to be_valid end end endこれでどうかな?
( ^ω^ )つ【bundle exec rspec】結果
ターミナルProduct #create is valid with a name, price, description, status, size, days, cost, prefecture_id, category_id, user_id Finished in 0.07648 seconds (files took 2.63 seconds to load) 1 example, 0 failures無事テスト成功!!
やったぜ!✌︎('ω'✌︎ )( ✌︎'ω')✌︎
まとめ
テスト内容は単純でも、
アプリごとにテーブルなどの制約(NotNullや、外部キーなど)も異なるので、
そこに気をつけてテストコードを書いていかないと、
私の様に、テストコードの沼にハマる事になります。この記事が少しでも初学者の役に立ちます様に。
ここまで読んでくれて
ありがとう。
また次の記事でお会いしましょう!!♪( ´θ`)ノそれでは
- 投稿日:2020-03-21T11:25:45+09:00
enumで下書き、公開機能を実装
いろいろやったので備忘録
概要 要件
- 美容室のページに下書き機能を実装する
- デフォルト下書き、編集→保存、及び、ボタンでステータスを変更できるようにする
- その美容室に紐づくモデル(スタイリスト、スタイル、メニュー)も非公開にする
- ログインしていれば下書き状態のものも見ることができる
- ログインしていても他のユーザーの非公開ページは見れない
Bootstrap4、Rails6
完成(目標物)
1、model
modelにstatusカラムを追加
rails generate migration AddStatusToSalon status:integer追記
db/migrate/xxxxxxxx_add_status_to_salon.rbdef change add_column :salons, :status, :integer, default: 0, null:false enddefaultで0を指定
null: falseで、指定したカラムに空保存を防ぐrails db:migrateenum定義
下書き:0
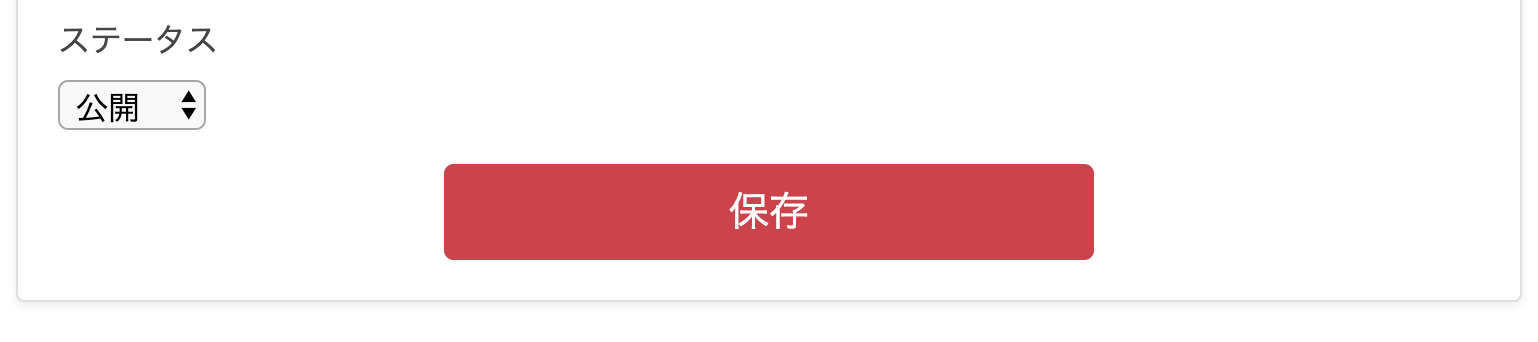
公開:1salon.rbenum status: { draft: 0, published: 1, deleted: 2 } validates :status, inclusion: { in: Salon.statuses.keys }2、View
salons/edit.html.erb<div class="form-group"> <label>ステータス</label><br> <%= form.select :status, [["下書き", "draft"],["公開", "published"]], id: "status", class: "form-control" %> </div>3、controller
元のソース
salons_controller.rbdef show @hairstyles = @salon.hairstyles.order(id: "desc") @hairstyles = @salon.hairstyles.rank(:row_order) render layout: false end下書き状態の時でログインしていれば見れる。
公開だったら見れるsalons_controller.rbdef show if (@salon.published? || user_signed_in? && @salon.draft?) @hairstyles = @salon.hairstyles.order(id: "desc") @hairstyles = @salon.hairstyles.rank(:row_order) render layout: false else flash[:alert] = "非公開です ログインしてください" redirect_to root_path end endログインしていても他のアカウントのページは見れない(自分のページしか見れない)
salons_controller.rbdef show if (@salon.draft? && @salon.user.id != current_user.id) flash[:alert] = "権限がありません" redirect_to root_path elsif (@salon.published? || user_signed_in? && @salon.draft?) @hairstyles = @salon.hairstyles.order(id: "desc") @hairstyles = @salon.hairstyles.rank(:row_order) render layout: false else flash[:alert] = "非公開です ログインしてください" redirect_to root_path end endしかしこのままだと、紐づくモデルまでは効かないので、各コントローラーの見せたくないアクションにも追記
if (@salon.draft? && @salon.user.id != current_user.id)
      flash[:alert] = "権限がありません"
      redirect_to root_path
elsif (@salon.published? || user_signed_in? && @salon.draft?)
   xxxxxxxxx
   xxxxxxxxx
end
4、ボタンでステータスを変更できるようにする
modeにメソッドを作成
draftだったらpublishedに変更
publishedだったらdraftに変更salon.rbdef toggle_status! draft? ? published! : draft! endcontroller
salons_controller.rbdef toggle_status @salon.toggle_status! redirect_to dashboard_path, notice: 'ステータスを変更しました' endroutes
routes.rbresources :salons do patch :toggle_status endview
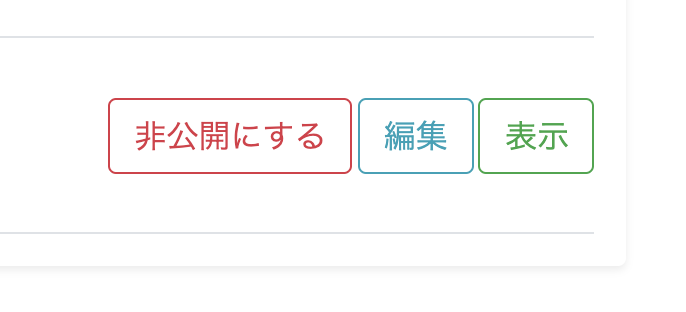
店舗一覧ページ
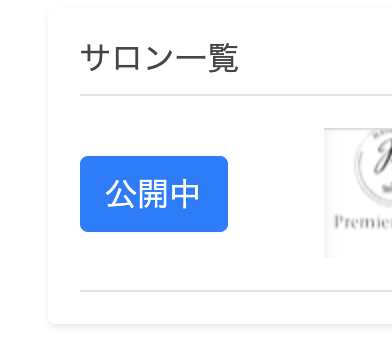
dashborad.html.erb<% if (salon.published?) %> <%= link_to "非公開にする", salon_toggle_status_path(salon), method: :patch, class: "btn btn-outline-danger" %> <% else %> <%= link_to "公開する", salon_toggle_status_path(salon), method: :patch, class: "btn btn-outline-danger" %> <% end %>
ステータス表示
 <% if (salon.published?) %>
      <div class="btn btn-primary mr-5 float-left">公開中</div>
 <% else %>
      <div class="btn btn-success mr-5 float-left">下書き</div>
 <% end %>
終わりに
書き方等、変なところあれば、ご指摘ください。
以下、記事参考にさせていただきました。参考記事
『Rails』enumを使って下書き記事と公開記事を保存できるようにした
link_to でenumのステータスを変更する方法
Rails enumについてまとめておく

- 投稿日:2020-03-21T08:32:38+09:00
サンプルアプリケーションを作ろう!!〜Railsチュートリアル3章〜
ほぼ性的なページの作成
あのーうち実家暮らしで家でUDEMYとかYOUTUBEとかでプログラミング動画みることあるんだけど、その時に「静的なページが作れます〜静的なページが〜」とか連呼されると若干気まずくなるからほんと辞めてほしいと思う今日この頃、、、NSぱんだまんです。アニメとか映画とかはそういうシーン来るのだいたい分かるからボリューム落としたりするんだけどまさかこんな真面目な動画でくると思わなかったからいちいち弁明するのもあれだし、すぐ自分の部屋に逃げました。
さて今回は第3章〜ほぼ静的なページの作成〜ですね。
まず静的、動的ってようわからんかったので調べました。
静的、、、何度アクセスしても同じものが表示されるWebページ
動的、、、アクセスした時の状況に応じて異なる内容が表示されるページ
ということですね。静的なページは企業紹介のサイトとか見るユーザーに同じものを見せたいときに使用される特に動きのないページ。動的ページはSNSサイトとか掲示板とかユーザー毎によって表示される内容が異なるページのことを指すんだって。まずセットアップします〜ここは何回もやってるから少しずつ慣れていってる気がする。立ち上げのスピードも上がってきてる感じします。
- 投稿日:2020-03-21T08:09:36+09:00
よくわかんないけどToyアプリを作ろう!!(Railsチュートリアル2章)
前回までのあらすじ
やりたくねーなと目を背けていたRailsチュートリアル。。真剣に取り組み始めました。。
なんとか環境構築、railsの導入、git.GitHubの導入に成功しました。
*ちなみにHerokuは一旦とばしました。とりあえず一周して余裕でたらやります。
今回から第2章やります。さあやります。
よーし頑張ってくぞー!!
内容としてはscaffoldっていうスクリプトを使ってTOYアプリっていうのを作っていくみたい。
うーん安定の意味わからんなー。。
とりあえずscaffold(スキャフォールド)っていうのは。。。railsアプリケーションの開発をする際にはMVCを作っていき、更に必要なルーティングを作成していく必要がある。これらの作業をまとめて行って、簡単にアプリケーションの雛形を作ってくれる機能のこと。scaffoldを使用することで素早くrailsアプリケーションを作ることができる。
なるほどねー。とりあえず内容を深くっていうよりはrailsのアプリケーションを素早く作って慣れましょう、みたいな章なのかな?
アプリケーションの計画
はじめにどんなアプリにするか計画を建てると。
まずrailsインストール$ cd ~/environment $ rails _5.1.6_ new toy_app $ cd toy_app/んでbundleで扱うgemfileをテキストエディタで編集。
$ bundle install --without production
bundleインストールします。
んでgit githubの登録。ここら辺は前回の内容と同じですね。
*Herokuはとばします。ユーザーのモデル設計
ここでユーザーのデータモデルの説明が入ります。
各ユーザーには重複のない一意のキーとなるinteger型のID番号(idと呼ぶ)を割り当て、このIDに加えて一般公開されるstring型の名前(name)そして同じくstring型のメールアドレス(email)をもたせる。メールアドレスはユーザーとしても使われる。と。
ここら辺はprogateでもなんとなくやったな。要するにユーザーというモデルにどんな概念にするのか。ここでの情報はDBのテーブルというところに保存されて必要があれば取り出すことができるんだよね。
んで、id name emailは属性っていってテーブルの中の縦の列のなるんだよね。マイクロソフトのモデル設定
マイクロソフトはidとマイクロポストのテキスト内を格納するtext型のcontentだけで構成されている。それとマイクロポストをユーザーと関連付ける必要があるためuser_idも必要となる。
ここで気になったんだけどデータ型っていっぱいあるじゃん?
これまとめてみた。string 文字列型(1~255文字) text テキスト(不定長文字列)型(1~4294967296文字) integer 整数型(整数:4バイト) bigint(整数:8バイト) float 浮動小数点数型(浮動小数) decimal 固定長整数型(精度の高い小数) datetime 日時型(日時) time 時刻型(時間) date 日付型(日付) binary バイナリ文字列型(バイナリーデータ) boolean 真偽値型(Boolean型)とまあこんな感じ。多いね。笑 若干よくわかんないのもあるし、これが全部ってわけじゃないけど主にrailsだとここらへんが使われてるらしい。文字を扱う場合stringとtextが対応しているけどstringはtextに比べると扱える文字数が少し短め、名前とかemailとかの文字情報はstringで扱って、本文や備考などの文章はtextつ合うのが一般的みたいだよ。
Userリソース
ここではさっきのユーザー用のデータモデルを、そのモデルを表示するためのWebインターフェイスに従って実装します。
このデータモデルとWebインターフェイスは、組み合わさってUsersリソースとなり、ユーザーというものを、HTTPプロトコル経由で自由に作成/取得/更新/削除できるオブジェクトとみなすことができるようになります。「はじめに」で約束したとおり、このUsersリソースはすべてのRailsプロジェクトに標準装備されているscaffoldジェネレータで生成します。scaffoldで生成された膨大なコードを今詳細に読む必要はありません。今の段階ではおそらく混乱するだけでしょう。
(〜Railsチュートリアルより〜)これそのままrailsチュートリアルの文章コピペしたんだけどさ。
もうこの文章が混乱するわ笑
わからない単語が多すぎる、、一回一回ポケモン図鑑開くマサラタウンの某少年のような気分だよ。一個一個分解していこう。データモデルはさっきの情報がつまってる一つの塊だよね。
webインターフェースはWebページおよびWebブラウザを用いてソフトウェアの表示、操作を行うもののこと(IT用語辞典参照)つまり処理の方法、手段のことかな。
これが組み合わさってUserリソース(動作の実行に必要な処理システムの要素)が出来上がる。これをhttpプロトコル(インターネット上で、Webサーバーとユーザーが、相互に通信するための仕組み)経由でいろいろな編集ができるオブジェクトとみなすことができる。オブジェクトっていうのはデータと、それに対する処理(メソッド)をひとまとめにしたもののこと。
これをすべてscaffoldジェネレータで全部生成しちまおうってことなんだね。
いわゆるチート武器ってやつだ。無限ロケランみたなもんだね。
Railsのscaffoldはrails generateスクリプトにscaffoldコマンドを渡すことで生成される。scaffoldコマンドの引数には、リソース名を単数形にしたもの(この場合はUser)を使い、必要に応じてデータモデルの属性をオプションとしてパラメータに追加できる。(下のやつだとまず引数にUserを入れて、中にデータ型がStringのname emailのパラメーターも入れて作ってくださいねー!)って意味になる。$ rails generate scaffold User name:string email:stringあとこれにプラスしてDBをmigrateしなくちゃいけない。
$ rails db:migrate$ rails server画面見えるようになります。
本日のエラー発生
翌日CLOUD9を起動したらサーバーがつながらないってかプレビュー見れない。
oops!!みたな青白の画面出る。
原因、、、cloud9を落としたことでダウンした?
解決策、、、 $ cd 指定したいapp
からの〜 $ rails update
最後にー $ rails server
でできた!!updateとrails serverするときはcdにて指定したディレクトリになっているか確認しよう。memo
HTTPリクエスト URL アクション 用途
GET /users index すべてのユーザーを一覧するページ
GET /users/1 show id=1のユーザーを表示するページ
GET /users/new new 新規ユーザーを作成するページ
POST /users create ユーザーを作成するアクション
GET /users/1/edit edit id=1のユーザーを編集するページ
PATCH /users/1 update id=1のユーザーを更新するアクション
DELETE /users/1 destroy id=1のユーザーを削除するアクションあとは同じようにmicropostっていうデータベースをマイグレーションしてUSERとMICROPOSTのデータベースの情報をくっつけるみたいな感じの流れで2章は終了しました。
Progateやってたからここらへんは割とすんなり理解できました。
次回は3章目に進んでいきたいと思います。では今日はここまで