- 投稿日:2020-03-21T17:46:23+09:00
脆弱性を直した後のセキュリティテスト(SQLインジェクションの場合)
脆弱性が報告されてから修正が完了するまでに、Webアプリケーション開発者(またはテスター)ができることをセキュリティテストを中心に書く。
- 再現手順の確立
- 原因究明
- 対策の実行
- 修正の確認
- セキュリティテスト
セキュリティテストってどうやればいいの?というエンジニアの参考になればいいなあ。
※本記事のサンプルコードは C# + Entity Framework だが、プロセスは他の言語やフレームワークでも通用する。
1.再現手順の確立
※注意:再現行為を本番環境でやるのは危険すぎるので、検証環境でやるのがよい
脆弱性が報告されたら、通常のバグ修正と同じように、まず脆弱性を再現させる。(TDD風に言うなら、レッドになるテストを作る)
SQLインジェクションの場合、主にHTTPリクエスト(HTTP の URL、ヘッダ、本文など)が再現手順になる。あらかじめ Web サイトへのログインが必要な場合は、それも再現手順に含めておく。
再現手順を確立しておくことで、修正後に再現しなくなる(テストがグリーンになる)=修正できたことを確認できるようになる。
また、この時点で脆弱性スキャナを実行して脆弱性が検出されることを確認しておくのもよい。理由は後述の 脆弱性スキャン に記載。
2.原因究明
SQL インジェクションの原因は、たとえば次のようなケースが考えられる。
- 自分たちが書いたコードに問題がある場合
- ミドルウェアやライブラリ、プラグイン等に脆弱性があった場合
- 脆弱なテストプログラムやサンプルプログラムが残ったままになっていた場合
原因がわかったら、報告を受けた箇所だけではなくほかにも同様の問題がないかも確認する。
今回は自分たちが書いたコードに問題がある場合を想定して話を進める。
3.対策の実行
SQLインジェクションの対策について詳しく知りたい場合は、IPA が公開している 安全なSQLの呼び出し方 を参照。
たとえばこんなコードを
SQLインジェクション可能なコードvar sql = "SELECT Id, Author, Title, PostedAt, Text From Posts"; sql += $" Where Author like '%{author}%'"; return await _context.Posts.FromSqlRaw(sql).ToArrayAsync();こんな感じに修正する
SQLインジェクション対策済みコードreturn await _context.Posts.Where(p => p.Author.Contains(author)).ToArrayAsync();4.修正の確認
1.再現手順の確立 で確立した脆弱性の再現方法を修正箇所に試し、問題が再現しないことを確認する。
これで対策完了!ではない。
5.セキュリティテスト
4.修正の確認は「正しくできた」ことを確認するテスト。対して「正しくできていない」ことを発見するのがセキュリティテストの役割になる。「正しくできていない」とは、間違った対策や中途半端な対策のこと。
セキュリティテストは、通常のテストと同様、コストと網羅性のバランスが必要。修正完了までコードの変更とテストが何度も繰り返されることも多いので、フィードバックの早さも重要。すべてを満たすテスト手法は多分ないので、複数の手法を組み合わせるのが良い。
SQLインジェクションの問題は、コードを見ればある程度問題の有無を判断できることと、自動テストを書きやすそうなことから、次の3つの手法を採用することにする。
- コードインスペクション
- ○コスト安:手っ取り早く実行できる
- ○フィードバック超早:コードが見れればできる
- ×属人性高:セキュアコーディングのスキルが必要
- ファジング
- ○フィードバック早:自動化しやすく、繰り返し実行できる
- △コスト中:入力データや自動テストを作る必要がある
- △属人性中:適切なテストデータを作る・選ぶスキルが必要
- 脆弱性スキャナ
- ○属人性低:独立性が高く、かつ安定した結果が得られる
- ×フィードバック遅:デプロイが必要
- ×コスト高:ツールによってはお金がかかる。学習コストもあるかも。
プロジェクトによっては下記のような選択肢もあるかもしれない。
- 静的コード解析ツール(SAST)を使う(良い精度のツールがあるなら)
- sqlmap のようなツールを使って疑似攻撃を試みる(セキュリティエンジニアがいるなら)
- セキュリティベンダに診断を依頼する(超重要なシステムで、かつ、お金と時間があるなら)
コードインスペクション
コードインスペクションは静的なホワイトボックステストの1つ。あるルールに基づいて人(または機械)がコードを精査し、欠陥を発見する手法。
コードさえ見れれば、デプロイどころかコンパイラすらしなくてもテストできるため、実行コストが低くフィードバックがとても早いという利点がある。ただし精度はテスターのスキルに依存する。
コードインスペクションではセキュリティの問題を発見することにのみ集中する。SQL インジェクション対策のインスペクションであれば、「パラメータを文字列操作してSQL文を作成していないこと」のようなルールをあらかじめ定めたうえで精査する。
ルールは言語やフレームワークによって異なる点に注意。C# + Entity Framework の場合、下記のようなルールになる。
問題なし:固定文字列なSQLvar sql = "SELECT * from Posts";問題なし:SQLを文字列連結しているが、可変部分はないvar sql = "SELECT * from Posts"; sql += " WHERE author = 'Tanaka Ichiro'";問題なし:パラメータプレースホルダを使ってるvar sql = "SELECT Id, Author, Title, PostedAt, Text From Posts"; sql += " Where Author = {0}"; _context.Posts.FromSqlRaw(sql, author)...問題なし:LINQ_to_SQLdbContext.Posts.Where(p => p.Author == author)...×問題有り:パラメータを文字列連結してSQL文を生成しているvar sql = "SELECT * from Posts"; sql += " WHERE author = '" + author + "'";×問題有り:パラメータを文字列置換してSQL文を生成しているvar sql = "SELECT * from Posts"; sql += " WHERE author = '{AUTHOR}'"); sql = sql.Replace("{AUTHOR}", author);コーディング規約がない場合はいろんなSQL発行パターンがわいてくるので、判断基準を作りながらテストするか、いっそ標準を定めて標準以外の書き方はNGとしてしまってもよいかもしれない。
コードインスペクションのアウトプットは、テスト対象となったファイルとその結果の一覧になる。(例)
ファイル名 SQL発行の有無 メソッド名 パラメータ有無 SQL発行方法 OK/NG Hoge.cs 無し - - - OK Foo.cs 有り Bar 無し - OK Foo.cs 有り Nar 有り LINQ to SQL OK Moge.cs 有り Soge 有り Parametered Query OK Moge.cs 有り Doge 有り 文字列連結 NG この結果を受けて、例えば次のような判断ができる。
- NG がなくなるまで修正と再テストを繰り返す
- (コードの修正が困難すぎて)NGや判断不可な箇所を
- 以降のテストでカバーする
- 熟練セキュアコーダーにインスペクションしてもらう(人がいれば)
- この結果にかかわらず、以降のテストを全箇所実施する
どうするかは、テストの独立性やコストパフォーマンス等のバランスを見て決めればよい。
ファジング
ファジングは動的なブラックボックステストの1つで、「変なデータ」を入力しまくって欠陥を見つける手法。詳しくは IPA の 脆弱性対策:ファジング を参照。
ファジングはWebサイトに対して実行することもできるし、SQLを発行している関数・メソッドに対しても実行できる。
テストは小さい単位でやるほうがコストパフォーマンスがよくフィードバックも早いので、可能なら関数・メソッドに対してやるのがお勧め。もちろん Web サイトにやってもよい。
「変なデータ」はランダムに作っても良いが、今回は fuzzdb で公開されている SQL インジェクションを発見するための入力パターン集を使う。
ユニットテストフレームワークで実行
関数・メソッドに対してテストする場合、ユニットテストフレームワークを使うのが楽。(ユニットテストか?という疑問は気にしないことにする)
以下は C# + ASP.NET Core + SQL Server + xUnit.net の例
こんな脆弱なコードに対して
SQLインジェクション可能なコードpublic class BlogPostsController : Controller { private readonly BlogDbContext _context; public BlogPostsController(BlogDbContext context) { _context = context; } public async Task<BlogPost[]> SearchByAuthor(string author) { // 危険なコード! var sql = "SELECT Id, Author, Title, PostedAt, Text From Posts"; sql += $" Where Author like '%{author}%'"; return await _context.Posts.FromSqlRaw(sql).ToArrayAsync(); } // 省略...こんなテストコードを書く
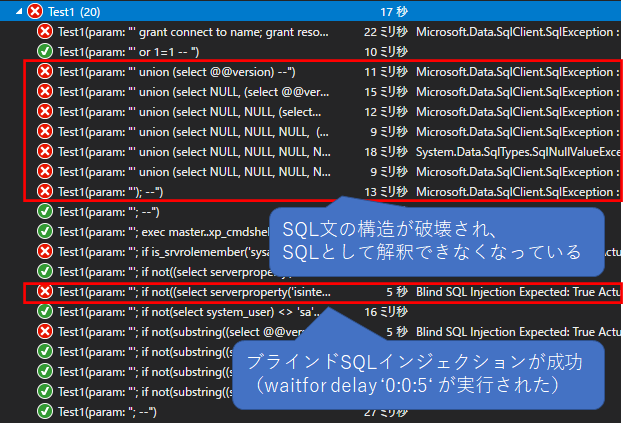
ユニットテストコードpublic class UnitTest1 { // fuzz.txt の1行を1テストケースとして定義 // ※後述の Parameters プロパティを参照 [Theory] [MemberData(nameof(Parameters))] public async Task SqlInjectionTest(string param) { // * Arrange using (var db = new BlogDbContext()) { // テーブルを空にしておく db.Posts.RemoveRange(db.Posts.ToArray()); // SQL が正しく実行されれば、この Entity が帰ってくるはず db.Posts.Add(new BlogPost() { Author = param, Title = "test" }); // こっちは帰ってこないはず db.Posts.Add(new BlogPost() { Author = "Dummy", Title = "Dummy" }); db.SaveChanges(); } using (var db = new BlogDbContext()) { var controller = new BlogPostsController(db); var sw = Stopwatch.StartNew(); // * Act var result = await controller.QueryPosts(param); // * Assert // 実行に5秒以上かかったら Blind な SQL Injection が成功してるのでNG Assert.True(sw.ElapsedMilliseconds < 5000, "Blind SQL Injection"); // 正しいSQL文が発行されていれば1件の結果が返ってくるはず Assert.Equal(param, result.Single().Author); } } // SqlInjectionTest で使う入力データ列 public static IEnumerable<object[]> Parameters { get { var f = Path.Combine(AppDomain.CurrentDomain.BaseDirectory, "fuzz.txt"); var r = File.ReadAllLines(f) .Where(l => !string.IsNullOrWhiteSpace(l)) .Select(l => new object[] { l }) .ToArray(); return r; } } }ユニットテストの入力データに使う fuzz.txt はこんな感じ。
テストデータ; -- '; -- '); -- '; exec master..xp_cmdshell 'ping 10.10.1.2'-- ' grant connect to name; grant resource to name; -- ' or 1=1 -- ' union (select @@version) -- ' union (select NULL, (select @@version)) -- ' union (select NULL, NULL, (select @@version)) -- ' union (select NULL, NULL, NULL, (select @@version)) -- ' union (select NULL, NULL, NULL, NULL, (select @@version)) -- ' union (select NULL, NULL, NULL, NULL, NULL, (select @@version)) -- '; if not(substring((select @@version),25,1) <> 0) waitfor delay '0:0:5' -- '; if not(substring((select @@version),25,1) <> 5) waitfor delay '0:0:5' -- '; if not(substring((select @@version),25,1) <> 8) waitfor delay '0:0:5' -- '; if not(substring((select @@version),24,1) <> 1) waitfor delay '0:0:5' -- '; if not(select system_user) <> 'sa' waitfor delay '0:0:5' -- '; if is_srvrolemember('sysadmin') > 0 waitfor delay '0:0:5' -- '; if not((select serverproperty('isintegratedsecurityonly')) <> 1) waitfor delay '0:0:5' -- '; if not((select serverproperty('isintegratedsecurityonly')) <> 0) waitfor delay '0:0:5' --上記の例では BlogPostsController クラスの SearchByAuthor メソッドに対してファジングしているが、同様に他のテスト対象のメソッド・パラメータに対してもテストを作り、実行すればよい。SQL 文を正しく作れている(脆弱性が無い)ならすべてのテストがグリーンになるはず。
テスト実行結果の例(脆弱性を修正する前)
Webサイトに対して実行
ユニットテストが困難な場合や、ミドルウェア・フレームワークのバグも心配な場合は、稼働している Web サイトを対象にファジングする。ファジングの方法は IPA が公開している ファジング実践資料 第2版 を参照。
ただし Web サイトを対象とする場合、ユニットテストと比較すると下記の点で不利。
- デプロイしないとテストできない
- テスト環境が必要(本番環境を使うのは超危険!)
- フィードバックが遅い
- ファジングツールが必要(自前でスクリプトを書いてもいいけど)
脆弱性スキャン
最後に独立性の高いテストとして、脆弱性スキャンを実行する。上2つのテストが成功していればこのテストも成功する可能性が高いが、万が一の抜け漏れを見つけてくれるかもしれない。
注意点は、スキャナの性能や設定値によっては脆弱性を検出できないことがあること。そのため、次の2点を確認するのがよい。
- 修正前のWebサイトをスキャンして脆弱性が報告されること
- 修正後のWebサイトをスキャンして脆弱性が報告されないこと
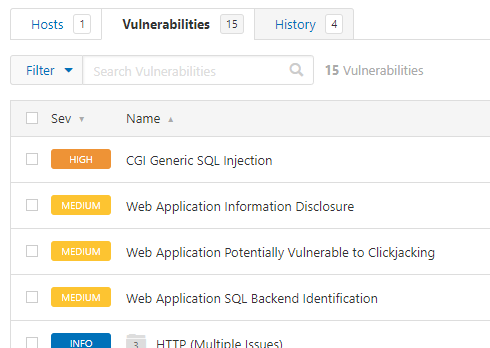
下記は Nessus を使った例。Nessus の使い方は説明しない。
※Nessus を選んだ理由はたまたま手元にあったから、というだけで、Nessus を推奨しているわけではない。
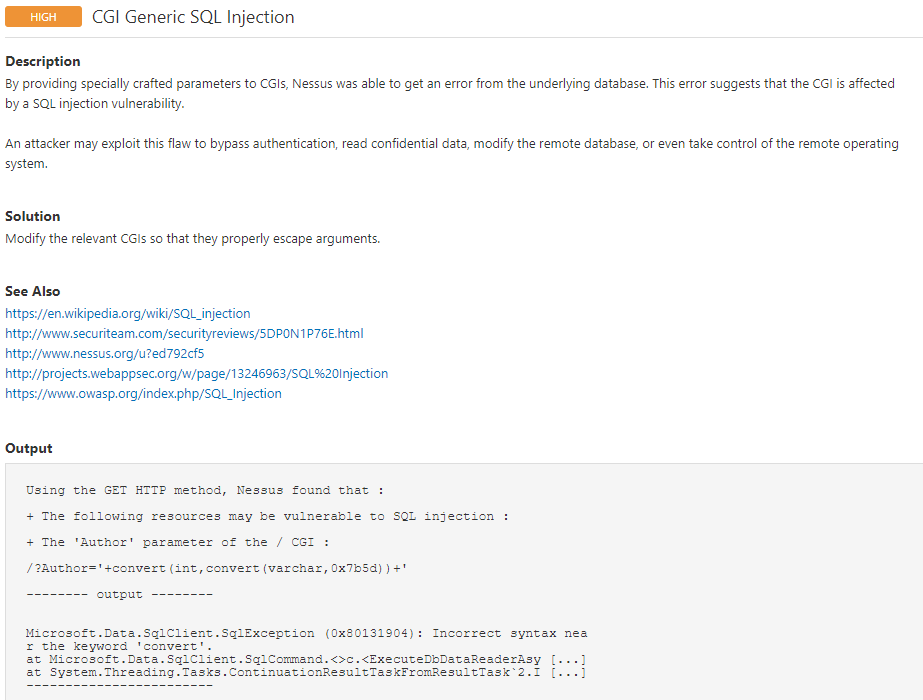
修正前:CGI Generic SQL Injection という脆弱性が報告されている
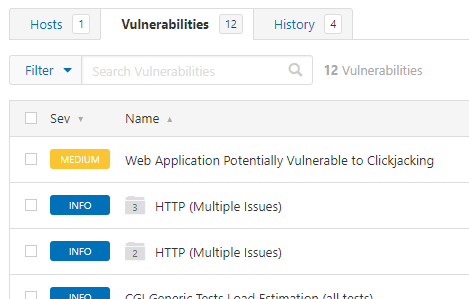
修正後:SQL Injection とそれに関連する脆弱性の報告が消えている
このテストの成功をもって脆弱性対策を完了とする。ただし↓
退行テスト
脆弱性を修正したら機能が使えなくなった、では意味がないので忘れずに。
(セキュリティテストではないけど)まとめ
SQLインジェクションが発見されてから修正完了まで、Webアプリケーション開発者(またはテスター)ができることの流れを書いた。
- 再現手順の確立:脆弱性の再現方法を確立する
- 原因究明:脆弱性の原因を特定する
- 対策の実行:原因に対応した方法で対策する
- 修正の確認:1で確立した再現方法を使い、問題が解消されたことを確認する。
- セキュリティテスト:コスト、網羅性、独立性、使えるリソース等を考えて、適切なテスト手法を選択する。
参考
IPAが公開しているガイドライン。開発者以外(PM/POとかセキュリティ担当とか)にも役立つ情報あり。
Entity Framework 関連
- 投稿日:2020-03-21T09:36:03+09:00
UiPath Activity Creatorを使ってみる。(その4:アクティビティの外観の設定について)
このドキュメントの概要
前回 はActivity Creator のWizardでの設定項目と、実際にUiPath Studioのプロパティパネルやデザイナーパネルでどのように反映されるかを見ました。
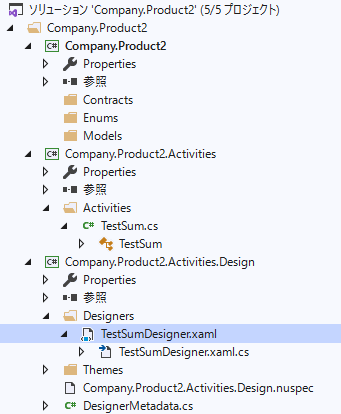
今回は、Activity Creatorのデザイナーパネル上でのアクティビティの外観の設定方法について見ていきます。Activities.Designプロジェクトについて
Activity CreatorのWizardでアクティビティを追加すると、名称.Activities.DesignプロジェクトのDesignersフォルダ以下に外観に関するファイルが追加されます。
この生成されたファイルを編集することにより、アクティビティの外観を変更することができます。外観の変更方法
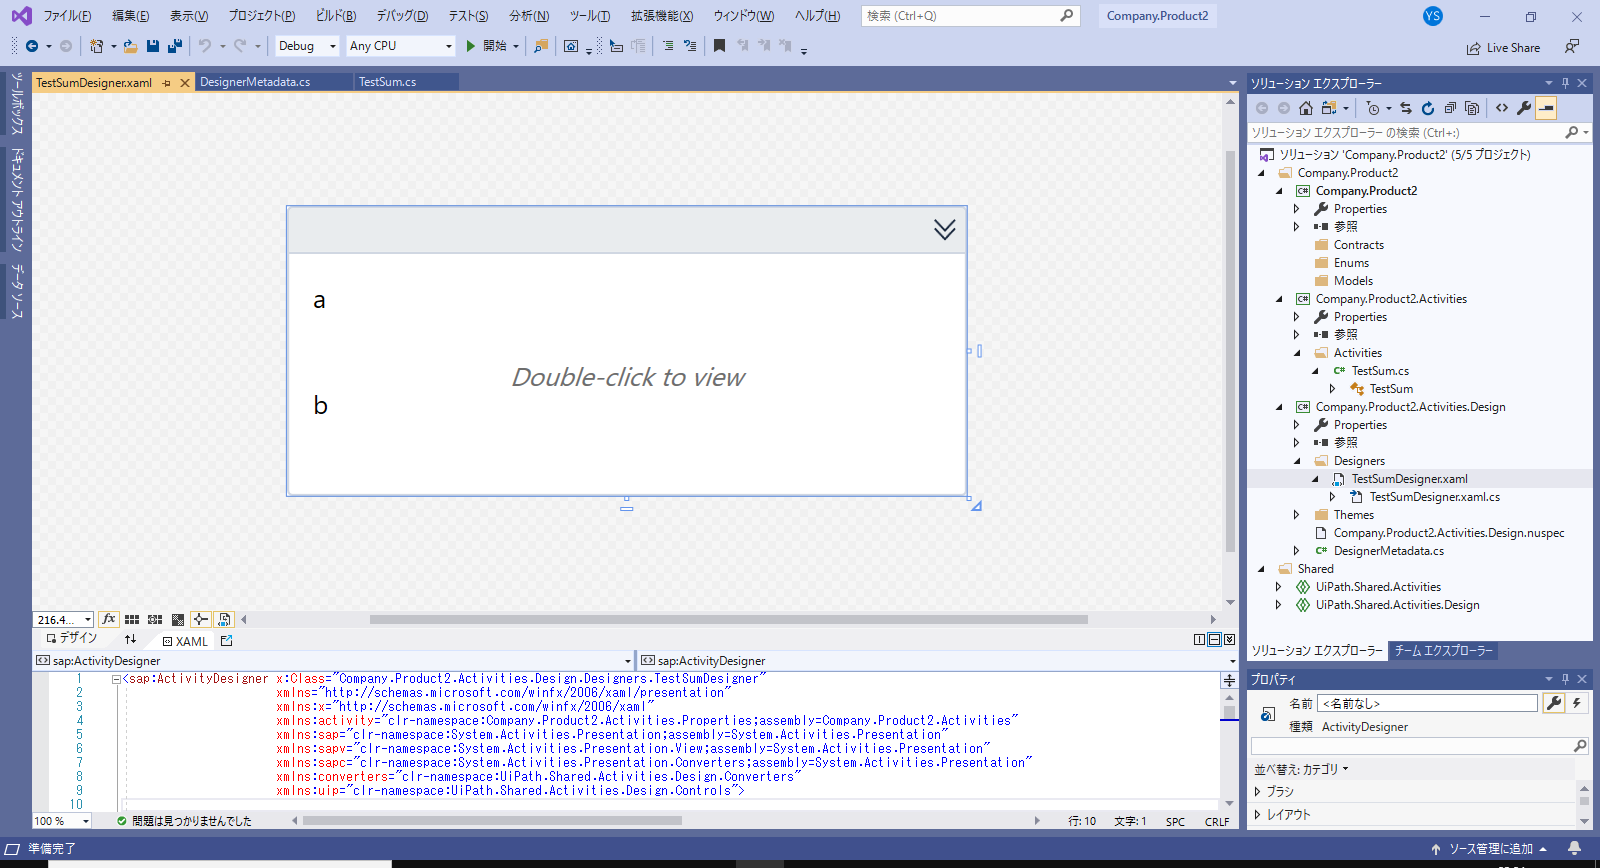
今回はその2で作成したtestSumアクティビティを作成する際に自動生成された、testSumDesinger.xamlを使います。まず、このファイルをVisual Studioで開くと以下のような画面になります。
実際の設定変更はウインドウ下部のxamlを変更します。
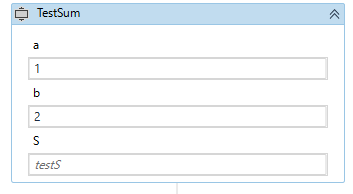
今回のケースはRequiredとして指定したa b 2つのプロパティが、デザイナーパネル上のアクティビティ上にテキストボックスとして表示されています。これに新たに追加した、
InArgument<int>型のSプロパティのテキストボックスを追加してみます。
以下は自動生成されたxamlの一部を抜粋したものです。testSumDesinger.xaml(略) <uip:ActivityDecoratorControl Style="{StaticResource ActivityDecoratorStyle}"> <Grid Width="300"> <Grid.RowDefinitions> <RowDefinition Height="Auto" /> <RowDefinition Height="Auto" /> <RowDefinition Height="Auto" /> <RowDefinition Height="Auto" /> </Grid.RowDefinitions> <Label Content="{x:Static activity:Resources.TestSum_A_DisplayName}" Grid.Row="0" /> <sapv:ExpressionTextBox Grid.Row="1" ExpressionType="{Binding ModelItem.Properties[A].PropertyType.GenericTypeArguments[0]}" OwnerActivity="{Binding Path=ModelItem}" HintText="{x:Static activity:Resources.TestSum_A_Description}" UseLocationExpression="False"> <sapv:ExpressionTextBox.Expression> <Binding Path="ModelItem.A" Converter="{StaticResource ArgumentToExpressionConverter}" Mode="TwoWay" ConverterParameter="In" UpdateSourceTrigger="PropertyChanged" /> </sapv:ExpressionTextBox.Expression> </sapv:ExpressionTextBox> <Label Content="{x:Static activity:Resources.TestSum_B_DisplayName}" Grid.Row="2" /> <sapv:ExpressionTextBox Grid.Row="3" ExpressionType="{Binding ModelItem.Properties[B].PropertyType.GenericTypeArguments[0]}" OwnerActivity="{Binding Path=ModelItem}" HintText="{x:Static activity:Resources.TestSum_B_Description}" UseLocationExpression="False"> <sapv:ExpressionTextBox.Expression> <Binding Path="ModelItem.B" Converter="{StaticResource ArgumentToExpressionConverter}" Mode="TwoWay" ConverterParameter="In" UpdateSourceTrigger="PropertyChanged" /> </sapv:ExpressionTextBox.Expression> </sapv:ExpressionTextBox> </Grid> </uip:ActivityDecoratorControl> (略)これを以下のようにします。
testSumDesinger.xaml(略) <uip:ActivityDecoratorControl Style="{StaticResource ActivityDecoratorStyle}"> <Grid Width="300"> <Grid.RowDefinitions> <RowDefinition Height="Auto" /> <RowDefinition Height="Auto" /> <RowDefinition Height="Auto" /> <RowDefinition Height="Auto" /> <RowDefinition Height="Auto" /> <RowDefinition Height="Auto" /> </Grid.RowDefinitions> <Label Content="{x:Static activity:Resources.TestSum_A_DisplayName}" Grid.Row="0" /> <sapv:ExpressionTextBox Grid.Row="1" ExpressionType="{Binding ModelItem.Properties[A].PropertyType.GenericTypeArguments[0]}" OwnerActivity="{Binding Path=ModelItem}" HintText="{x:Static activity:Resources.TestSum_A_Description}" UseLocationExpression="False"> <sapv:ExpressionTextBox.Expression> <Binding Path="ModelItem.A" Converter="{StaticResource ArgumentToExpressionConverter}" Mode="TwoWay" ConverterParameter="In" UpdateSourceTrigger="PropertyChanged" /> </sapv:ExpressionTextBox.Expression> </sapv:ExpressionTextBox> <Label Content="{x:Static activity:Resources.TestSum_B_DisplayName}" Grid.Row="2" /> <sapv:ExpressionTextBox Grid.Row="3" ExpressionType="{Binding ModelItem.Properties[B].PropertyType.GenericTypeArguments[0]}" OwnerActivity="{Binding Path=ModelItem}" HintText="{x:Static activity:Resources.TestSum_B_Description}" UseLocationExpression="False"> <sapv:ExpressionTextBox.Expression> <Binding Path="ModelItem.B" Converter="{StaticResource ArgumentToExpressionConverter}" Mode="TwoWay" ConverterParameter="In" UpdateSourceTrigger="PropertyChanged" /> </sapv:ExpressionTextBox.Expression> </sapv:ExpressionTextBox> <Label Content="{x:Static activity:Resources.TestSum_S_DisplayName}" Grid.Row="4" /> <sapv:ExpressionTextBox Grid.Row="5" ExpressionType="{Binding ModelItem.Properties[S].PropertyType.GenericTypeArguments[0]}" OwnerActivity="{Binding Path=ModelItem}" HintText="{x:Static activity:Resources.TestSum_S_Description}" UseLocationExpression="False"> <sapv:ExpressionTextBox.Expression> <Binding Path="ModelItem.S" Converter="{StaticResource ArgumentToExpressionConverter}" Mode="TwoWay" ConverterParameter="In" UpdateSourceTrigger="PropertyChanged" /> </sapv:ExpressionTextBox.Expression> </sapv:ExpressionTextBox> </Grid> </uip:ActivityDecoratorControl> (略)ポイントは2つあります。
一つ目は、<Grid.RowDefinitions>要素に<RowDefinition>要素を必要数分追加することです。これにより表示領域が追加されます。今回は他のプロパティも1つあたり2行としているので、同じく2行分追加しました。
二つ目はLabel要素とsapv:ExpessionTextBox.Expression要素をa,bと同様の書式で追加することです。
ただしBinding先をSにしてあげる点(Binding ModelItem.Properties[S].PropertyType.GenericTypeArguments[0]の部分です。)と各Resourceから呼び出している情報について個別に定義を追加する必要がある点、Grid.Row属性の設定には注意してください。
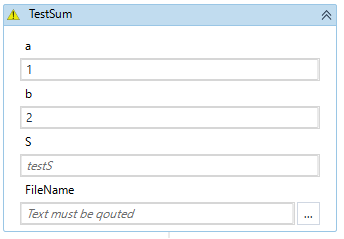
以下のような外観になります。
もしResourceを追加しているにも関わらずVisual Studio上でResource未定義のエラーが解消されない場合は、一度Visual Studioを再起動した方が良いかもしれません。
Activity Creatorで用意されているパーツの利用
Activity Creator独自で用意されているパーツがいくつかあります。その中の一つ
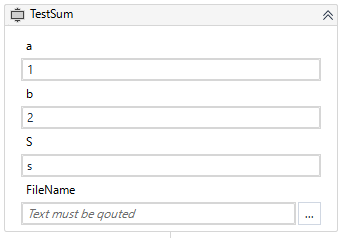
FilePathControlを使ってみましょう。
InArgument<string>型のプロパティFilePathを追加した上で、行領域を確保した後、以下のLabel要素とuip:FilePathControl要素を追加してみてください。testSumDesinger.xaml(略) <Label Content="{x:Static activity:Resources.TestSum_FileName_DisplayName}" Grid.Row="6" /> <uip:FilePathControl Grid.Row="7" ModelItem="{Binding ModelItem}" PropertyName="FileName" Expression="{Binding Path=ModelItem.FileName, Converter={StaticResource ArgumentToExpressionConverter}, ConverterParameter=In, Mode=TwoWay}" /> (略)以下のようにファイルパス選択ボタンがあるテキストボックスが追加されました。
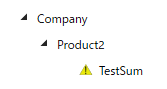
ツールチップアイコンの変更
続いてツールチップアイコンの変更の仕方について説明します。ツールチップアイコンはアクティビティパネル上でアクティビティ名の左側や、デザイナーパネル上でのアクティビティの左上にあるアイコンのことです。
これを変更するにはtheme\Icons.xamlファイルにIconのデータを記述する必要があります。記述するデータの生成方法ですがMicrosoft Expression Designなどで作成する、SVG-xamlの変換ツールを利用するなどがあります。
Activity CreatorではDrawingBrush要素の x:Key属性にアクティビティ名+"Icon"を設定することにより、これがそのアクティビティ名のIconと認識されるようにできています。例えば以下を追加するとTestSumアクティビティのIconとなります。Icons.xaml<DrawingBrush x:Key="TestSumIcon" Viewbox="0,0,52.706,14.497" ViewboxUnits="Absolute" Stretch="Uniform"> <DrawingBrush.Drawing> <DrawingGroup x:Name="DrawingLayerGetWarning"> <DrawingGroup.ClipGeometry> <RectangleGeometry Rect="0,0,192,192" /> </DrawingGroup.ClipGeometry> <GeometryDrawing> <GeometryDrawing.Pen> <Pen Brush="#00FFFFFF" Thickness="1" /> </GeometryDrawing.Pen> <GeometryDrawing.Geometry> <RectangleGeometry Rect="0,0,192,192" /> </GeometryDrawing.Geometry> </GeometryDrawing> <DrawingGroup> <DrawingGroup.Children> <GeometryDrawing Brush="#FFE9E90B" Geometry="F1 M 93.6697,26.6973L 19.1666,153.263L 168.42,153.117L 93.6697,26.6973 Z "> <GeometryDrawing.Pen> <Pen Thickness="2" LineJoin="Round" Brush="#FF000000"/> </GeometryDrawing.Pen> </GeometryDrawing> <GeometryDrawing Brush="#FF000000" Geometry="F1 M 89.8066,124.033L 87.2466,73.4926L 87.2466,52.3526L 98.7666,52.3526L 98.7666,73.4926L 96.2066,124.033L 89.8066,124.033 Z M 87.2466,144.513L 87.2466,132.993L 98.7666,132.993L 98.7666,144.513L 87.2466,144.513 Z "/> </DrawingGroup.Children> </DrawingGroup> </DrawingGroup> </DrawingBrush.Drawing> </DrawingBrush>以下のようにアイコンが変わりました。
次回はスコープをもったアクティビティについて説明します。
(その4終わり)

- 投稿日:2020-03-21T09:21:48+09:00
カレンダーの表示 (paizaランク B 相当)
解説を視る前に書いたコード(エラーになるが原因は分かっていない)
class Program { static int[] NextDay(int year,int month, int day) { day++; if(day > LastDay(year, month)) { day = 1; month++; } if(month > 12) { month = 1; year++; } return new int[] { year, month, day }; } //1800年1月1日からの日数を計算するメソッド static int CountDay (int year,int month,int day) { int y = 1800, m = 1, d = 1; int count = 0; //400年分の日数 int daysOf400years = 365 * 400 + (400 / 4) - (400 / 100) + (400 + 400); //400年の倍数飛ぶ count += ((year - 1800) / 400) * daysOf400years; y = year - (year - 1800) % 400; while(!(y == year && m == month && d == day)) { count++; int[] nextDay = NextDay(y, m, d); y = nextDay[0]; m = nextDay[1]; d = nextDay[2]; } return count; } static int LastDay(int year, int month) { switch (month) { case 2: if(year % 400 == 0 || (year % 100 != 0 && year % 4 == 0)) { return 29; } else { return 28; } case 4: case 6: case 9: case 11: return 30; default: return 31; } } static int WhatDay(int year, int month, int day) { int dayOfweek = 3; //1800年1月1日は水曜日 int count = CountDay(year, month, day); return (dayOfweek + count) % 7; } static void Main(string[] args) { string[] input = Console.ReadLine().Trim().Split(' '); int y = int.Parse(input[0]); int m = int.Parse(input[1]); //y年m月1日の曜日を求める int dayOfWeek = WhatDay(y, m,1); //日→0、月→1、・・・・ 土→6 //y年m月は何日か int lastDay = LastDay(y, m); for(int i = 0; i < dayOfWeek; i++) { Console.Write(" "); } for(int i = 1; i < 10; i++) { Console.Write(" {0}", i); //日から金なら後ろに半角スペース、土なら改行 if(dayOfWeek != 6) { Console.Write(" "); } else { Console.WriteLine(); } dayOfWeek = (dayOfWeek + 1) % 7; } for(int i = 10;i < lastDay+1; i++) { Console.Write("{0}", i); //日から金なら後ろに半角スペース、土なら改行 if (dayOfWeek != 6) { Console.Write(" "); } else { Console.WriteLine(); } dayOfWeek = (dayOfWeek + 1) % 7; } for(int i = dayOfWeek; i < 7; i++) { Console.Write(" "); if (i != 6) { Console.Write(" "); } else { Console.WriteLine(); } } } }YouTubeの解説動画を視て書いたもの
メモ string.Formatメソッドで桁数を指定する方法[
string.Format("値は{0,5}です。", 10);

string.Format("値は{0,-5}です。", "ABC");
{}の中の変数を指定する番号の後に、カンマで区切って指定する。
プラスで右寄せ、マイナスで左寄せ。
    class Program
    {
        static int[] NextDay(int year, int month, int day)
        {
            day++;
            if (day > LastDay(year, month))
            {
                day = 1;
                month++;
            }
            if (month > 12)
            {
                month = 1;
                year++;
            }
            return new int[] { year, month, day };
        }

        static int LastDay(int year, int month)
        {
            switch (month)
            {
                case 2:
                    if (year % 400 == 0 || (year % 100 != 0 && year % 4 == 0))
                    {
                        return 29;
                    }
                    else
                    {
                        return 28;
                    }
                case 4:
                case 6:
                case 9:
                case 11:
                    return 30;
                default:
                    return 31;
            }
        }
        static int DayOfWeek(int year, int month, int day)
        {
            int y = 1800, m = 1, d = 1, dow = 3;
            while(!(y == year && m == month && d == day))
            {
                int[] date = NextDay(y, m, d);
                y = date[0];
                m = date[1];
                d = date[2];
                dow = (dow + 1) % 7;
            }
            return dow;
        }
        static void Main(string[] args)
        {
            string[] input = Console.ReadLine().Trim().Split(' ');
            int y = int.Parse(input[0]);
            int m = int.Parse(input[1]);
            string[][] cal = new string[6][];
            for(int i = 0; i < 6; i++)
            {
                cal[i] = new string[7];
                for(int j = 0; j < 7; j++)
                {
                    cal[i][j] = "  ";
                }
            }
            //calを更新する
            int line = 0, column = DayOfWeek(y, m, 1);
            int day = 1;
            while(day <= LastDay(y, m))
            {
                cal[line][column] = string.Format("{0,2}", day); //プラスで右寄せ、マイナスで左寄せ
                day++;
                line += (column + 1) / 7;
                column = (column + 1) % 7;
            }
            DisplayCalendar(cal);
        }
        static void DisplayCalendar(string[][] cal)
        {
            for(int i = 0;i < cal.Length;i++)
            {
                Console.Write(cal[i][0]);
                for(int j = 1; j < cal[i].Length; j++)
                {
                    Console.Write(" {0}", cal[i][j]);
                }
                Console.WriteLine();
            }
        }
    }
- 投稿日:2020-03-21T03:12:20+09:00
Blazor webassemblyのアプリケーションをGitHub Actionsを使ってGithub Pagesにデプロイする
はじめに
タイトル通りの内容の手順の備忘録です.
リポジトリSPAをGitHub Pagesに展開するために
URLの書き換えを処理することでSingle Page ApplicationをGitHub Pages上に展開することができるそうです.
詳しくは ASP.NET Core Blazor WebAssembly をホストしてデプロイする をご確認ください.URLの変更
base URLを
username.github.io/repogitoryにするためにwwwroot下にあるindex.htmlのbaseタグにリポジトリ名を追加します.index.html<head> <title>HelloBlazorWasm</title> <base href="/HelloBlazorWasm/"/> </head>また,ローカル環境の
IIS Expressサーバで実行する際にも,変更したURLで実行するために,Properties/launchSettings.jsonのiisSettingsのapplicationUrlも変更します.launchSettings.json"iisSettings": { "windowsAuthentication": false, "anonymousAuthentication": true, "iisExpress": { "applicationUrl": "http://localhost:xxxxx/HelloBlazorWasm", "sslPort": xxxxx }SPA対応
まず,
index.htmlのbody内の_framework/blazor.webassembly.jsを読み込む前にSPAのルーティングを設定します.詳しくは Single Page Apps for GitHub Pages をご確認ください.index.html<body> <app>Loading...</app> <!-- Start Single Page Apps for GitHub Pages --> <script type="text/javascript"> // Single Page Apps for GitHub Pages // https://github.com/rafrex/spa-github-pages // Copyright (c) 2016 Rafael Pedicini, licensed under the MIT License // ---------------------------------------------------------------------- // This script checks to see if a redirect is present in the query string // and converts it back into the correct url and adds it to the // browser's history using window.history.replaceState(...), // which won't cause the browser to attempt to load the new url. // When the single page app is loaded further down in this file, // the correct url will be waiting in the browser's history for // the single page app to route accordingly. (function(l) { if (l.search) { var q = {}; l.search.slice(1).split('&').forEach(function(v) { var a = v.split('='); q[a[0]] = a.slice(1).join('=').replace(/~and~/g, '&'); }); if (q.p !== undefined) { window.history.replaceState(null, null, l.pathname.slice(0, -1) + (q.p || '') + (q.q ? ('?' + q.q) : '') + l.hash ); } } }(window.location)) </script> <!-- End Single Page Apps for GitHub Pages --> <!-- 何かしらの処理 --> <script src="_framework/blazor.webassembly.js"></script> </body>次に,
wwwroot下に以下の内容で404.htmlを作成します.404.html<!DOCTYPE html> <html> <head> <meta charset="utf-8"> <title>Single Page Apps for GitHub Pages</title> <script type="text/javascript"> // Single Page Apps for GitHub Pages // https://github.com/rafrex/spa-github-pages // Copyright (c) 2016 Rafael Pedicini, licensed under the MIT License // ---------------------------------------------------------------------- // This script takes the current url and converts the path and query // string into just a query string, and then redirects the browser // to the new url with only a query string and hash fragment, // e.g. http://www.foo.tld/one/two?a=b&c=d#qwe, becomes // http://www.foo.tld/?p=/one/two&q=a=b~and~c=d#qwe // Note: this 404.html file must be at least 512 bytes for it to work // with Internet Explorer (it is currently > 512 bytes) // If you're creating a Project Pages site and NOT using a custom domain, // then set segmentCount to 1 (enterprise users may need to set it to > 1). // This way the code will only replace the route part of the path, and not // the real directory in which the app resides, for example: // https://username.github.io/repo-name/one/two?a=b&c=d#qwe becomes // https://username.github.io/repo-name/?p=/one/two&q=a=b~and~c=d#qwe // Otherwise, leave segmentCount as 0. var segmentCount = 0; var l = window.location; l.replace( l.protocol + '//' + l.hostname + (l.port ? ':' + l.port : '') + l.pathname.split('/').slice(0, 1 + segmentCount).join('/') + '/?p=/' + l.pathname.slice(1).split('/').slice(segmentCount).join('/').replace(/&/g, '~and~') + (l.search ? '&q=' + l.search.slice(1).replace(/&/g, '~and~') : '') + l.hash ); </script> </head> <body> </body> </html>そして,
wwwroot下に中身が空の.nojekyllファイルを作成します.GitHubActions用のymlの設定
GitHub Actionsで自動化するために,設定ファイルを作成します.
こちらの設定ファイルでは,masterブランチに変更があった際に,dotnet publishコマンドで生成されたファイルをGitHub Pages用のgh-pagesブランチにpushします.gh-pages.ymlname: Deploy to Github Pages on: push: branches: [ master ] pull_request: branches: [ master ] jobs: build: runs-on: ubuntu-latest # Steps represent a sequence of tasks that will be executed as part of the job steps: # Checks-out your repository under $GITHUB_WORKSPACE, so your job can access it - uses: actions/checkout@v2 # .NET Core環境の構築 - name: Setup .NET Core SDK uses: actions/setup-dotnet@v1.4.0 with: # Blazor webassemblyが使えるSDKを指定 dotnet-version: '3.1.200' - name: Build Application # デプロイするProjectを指定 (今回は"HelloBlazorWasm") run: dotnet publish -c Release ./HelloBlazorWasm/HelloBlazorWasm.csproj - name: Deploy uses: peaceiris/actions-gh-pages@v3 with: github_token: ${{ secrets.GITHUB_TOKEN }} # publishコマンドで出力されたファイルをgh-pagesブランチにpush publish_dir: ./HelloBlazorWasm/bin/Release/netstandard2.1/publish/wwwroot/GitHub Pagesの設定
GitHubリポジトリの
Settings -> GitHub Pages -> Sourceをgh-pages branchに変更します.おわりに
BlazorのHello Worldをデプロイした結果
ほぼ参考記事通りの内容ですが,GitHub Actionsを初めて使ったので,勉強もかねてまとめてみました.
GitHub Pagesだとコストも掛からないので,遊びで作ったアプリでも気軽に公開できそうです.参考
- 投稿日:2020-03-21T03:12:20+09:00
Blazor WebAssemblyのアプリケーションをGitHub Actionsを使ってGithub Pagesにデプロイする
はじめに
タイトル通りの内容の手順の備忘録です.
リポジトリBlazor WebAssemblyのプロジェクト
Blazor WebAssemblyはASP.NET Core 3.1ではまだPreviewなので,テンプレートのインストールが必要です.
dotnet new --install Microsoft.AspNetCore.Components.WebAssembly.Templates::3.2.0-preview2.20160.5
インストール後,テンプレートからBlazor WebAssemblyのプロジェクトを作成します.SPAをGitHub Pagesに展開するために
URLの書き換えを処理することでSingle Page ApplicationをGitHub Pages上に展開することができるそうです.
詳しくは ASP.NET Core Blazor WebAssembly をホストしてデプロイする をご確認ください.URLの変更
base URLを
username.github.io/repogitoryにするためにwwwroot下にあるindex.htmlのbaseタグにリポジトリ名を追加します.index.html<head> <title>HelloBlazorWasm</title> <base href="/HelloBlazorWasm/"/> </head>また,ローカル環境の
IIS Expressサーバで実行する際にも,変更したURLで実行するために,Properties/launchSettings.jsonのiisSettingsのapplicationUrlも変更します.launchSettings.json"iisSettings": { "windowsAuthentication": false, "anonymousAuthentication": true, "iisExpress": { "applicationUrl": "http://localhost:xxxxx/HelloBlazorWasm", "sslPort": xxxxx }SPA対応
まず,
index.htmlのbody内の_framework/blazor.webassembly.jsを読み込む前にSPAのルーティングを設定します.詳しくは Single Page Apps for GitHub Pages をご確認ください.index.html<body> <app>Loading...</app> <!-- Start Single Page Apps for GitHub Pages --> <script type="text/javascript"> // Single Page Apps for GitHub Pages // https://github.com/rafrex/spa-github-pages // Copyright (c) 2016 Rafael Pedicini, licensed under the MIT License // ---------------------------------------------------------------------- // This script checks to see if a redirect is present in the query string // and converts it back into the correct url and adds it to the // browser's history using window.history.replaceState(...), // which won't cause the browser to attempt to load the new url. // When the single page app is loaded further down in this file, // the correct url will be waiting in the browser's history for // the single page app to route accordingly. (function(l) { if (l.search) { var q = {}; l.search.slice(1).split('&').forEach(function(v) { var a = v.split('='); q[a[0]] = a.slice(1).join('=').replace(/~and~/g, '&'); }); if (q.p !== undefined) { window.history.replaceState(null, null, l.pathname.slice(0, -1) + (q.p || '') + (q.q ? ('?' + q.q) : '') + l.hash ); } } }(window.location)) </script> <!-- End Single Page Apps for GitHub Pages --> <!-- 何かしらの処理 --> <script src="_framework/blazor.webassembly.js"></script> </body>次に,
wwwroot下に以下の内容で404.htmlを作成します.404.html<!DOCTYPE html> <html> <head> <meta charset="utf-8"> <title>Single Page Apps for GitHub Pages</title> <script type="text/javascript"> // Single Page Apps for GitHub Pages // https://github.com/rafrex/spa-github-pages // Copyright (c) 2016 Rafael Pedicini, licensed under the MIT License // ---------------------------------------------------------------------- // This script takes the current url and converts the path and query // string into just a query string, and then redirects the browser // to the new url with only a query string and hash fragment, // e.g. http://www.foo.tld/one/two?a=b&c=d#qwe, becomes // http://www.foo.tld/?p=/one/two&q=a=b~and~c=d#qwe // Note: this 404.html file must be at least 512 bytes for it to work // with Internet Explorer (it is currently > 512 bytes) // If you're creating a Project Pages site and NOT using a custom domain, // then set segmentCount to 1 (enterprise users may need to set it to > 1). // This way the code will only replace the route part of the path, and not // the real directory in which the app resides, for example: // https://username.github.io/repo-name/one/two?a=b&c=d#qwe becomes // https://username.github.io/repo-name/?p=/one/two&q=a=b~and~c=d#qwe // Otherwise, leave segmentCount as 0. var segmentCount = 0; var l = window.location; l.replace( l.protocol + '//' + l.hostname + (l.port ? ':' + l.port : '') + l.pathname.split('/').slice(0, 1 + segmentCount).join('/') + '/?p=/' + l.pathname.slice(1).split('/').slice(segmentCount).join('/').replace(/&/g, '~and~') + (l.search ? '&q=' + l.search.slice(1).replace(/&/g, '~and~') : '') + l.hash ); </script> </head> <body> </body> </html>そして,
wwwroot下に中身が空の.nojekyllファイルを作成します.GitHubActions用のymlの設定
GitHub Actionsで自動化するために,設定ファイルを作成します.
こちらの設定ファイルでは,masterブランチに変更があった際に,dotnet publishコマンドで生成されたファイルをGitHub Pages用のgh-pagesブランチにpushします.gh-pages.ymlname: Deploy to Github Pages on: push: branches: [ master ] pull_request: branches: [ master ] jobs: build: runs-on: ubuntu-latest # Steps represent a sequence of tasks that will be executed as part of the job steps: # Checks-out your repository under $GITHUB_WORKSPACE, so your job can access it - uses: actions/checkout@v2 # .NET Core環境の構築 - name: Setup .NET Core SDK uses: actions/setup-dotnet@v1.4.0 with: # Blazor WebAssemblyが使えるSDKを指定 dotnet-version: '3.1.200' - name: Build Application # デプロイするProjectを指定 (今回は"HelloBlazorWasm") run: dotnet publish -c Release ./HelloBlazorWasm/HelloBlazorWasm.csproj - name: Deploy uses: peaceiris/actions-gh-pages@v3 with: github_token: ${{ secrets.GITHUB_TOKEN }} # publishコマンドで出力されたファイルをgh-pagesブランチにpush publish_dir: ./HelloBlazorWasm/bin/Release/netstandard2.1/publish/wwwroot/GitHub Pagesの設定
GitHubリポジトリの
Settings -> GitHub Pages -> Sourceをgh-pages branchに変更します.おわりに
BlazorのHello Worldをデプロイした結果
ほぼ参考記事通りの内容ですが,GitHub Actionsを初めて使ったので,勉強もかねてまとめてみました.
GitHub Pagesだとコストも掛からないので,遊びで作ったアプリでも気軽に公開できそうです.参考