- 投稿日:2020-02-25T22:25:42+09:00
1回限りのアイテム(SkuType.INAPP)で○○日間有効アイテムを実現してみた
はじめに
Google Play Billing Library を使って期間有効アイテムを実装してみました。
期間有効アイテム: 7間有効チケット、 30日有効チケット などのことです。1回限りのアイテム(SkuType.INAPP)には、有効期限がありませんので、有効期限については自前で管理する必要があります。
アプリ内に保持しておくとアンインストールされたら復元できなくなってしまうため、アイテム購入が終了したらアイテム消費処理と
同時にクラウドに購入情報を保存しなければいけません。
(ここでは購入と同時に消費処理を行うため、その瞬間から有効期限のカウントダウンが開始します)定期購入(SkuType.SUBS)使えよっていうツッコミはごもっともです (><)
下記のバージョンを使用
com.android.billingclient:billing:2.0.3
ざっくりとした流れ
1: ユーザーがアイテムをポチった
2: すでに購入済みか確認
2-a: 購入済みだったらアプリをアイテム有効状態に変更
2-b: 購入処理を実行以上!!
実装: 購入済みか確認
billingViewModel.ktval scope: CoroutineScope = CoroutineScope(Job() + Dispatchers.Main) private val billingCase: BillingUseCase // 2: すでに購入済みか確認 fun restore(context: Context) { scope.launch { try { // ライブラリを接続状態に if (!billingCase.startBillingConnection()) { showRestoreError() return@launch } // アイテムの購入履歴を取得 billingCase.queryPurchaseHistoryAsync(resultRestore = ::resultRestore) } catch (ex: Exception) { showRestoreError() } } }BillingUseCase.ktprivate val billingRepository: BillingRepository private val dispatcher: CoroutineDispatcher = Dispatchers.Default // ライブラリを接続状態に suspend fun startBillingConnection() = billingRepository.startBillingConnection() // アイテムの購入履歴を取得 suspend fun queryPurchaseHistoryAsync(resultRestore: KFunction1<@ParameterName(name = "ticketInfo") TicketInformation?, Unit>) { withContext(dispatcher) { // アイテム購入履歴 val inAppHistoryList: List<PurchaseHistoryRecord>? = billingRepository.queryInAppHistoryAsync() // 履歴がなかったら購入処理へ if (inAppHistoryList == null) { resultRestore(null) return@withContext } // クラウドへ結果をポストし、有効期限内のアイテムがあるかチェックする // postAppHistoryDataの結果をうけて、 // アプリをアイテム有効状態に変更 or 購入処理 をする val postResult = postItemData(inAppHistoryList) resultRestore(postResult) } }BillingRepository.ktprivate var billingClient: BillingClient = BillingClient.newBuilder(context).enablePendingPurchases().setListener(this).build() private var broadcastChannel: BroadcastChannel<PurchasesUpdatedResultData> = BroadcastChannel(capacity = 1) // ライブラリを接続状態に suspend fun startBillingConnection(): Boolean { if (billingClient.isReady) { return true } return suspendCoroutine { continuation -> billingClient = builder.enablePendingPurchases().setListener(this).build() billingClient.startConnection(object : BillingClientStateListener { override fun onBillingServiceDisconnected() { // ライブラリを使う前に接続状態にし、この通知は無視する } override fun onBillingSetupFinished(billingResult: BillingResult) { continuation.resume(billingResult.responseCode == BillingResponseCode.OK) } }) // onBillingSetupFinished呼ばれたら返るようにする return@suspendCoroutine } } suspend fun queryInAppHistoryAsync(): List<PurchaseHistoryRecord> { return suspendCoroutine { continuation -> billingClient.queryPurchaseHistoryAsync(BillingClient.SkuType.INAPP) { billingResult, historyRecordList -> when (billingResult.responseCode) { BillingResponseCode.OK -> continuation.resume(historyRecordList) else -> continuation.resumeWithException(Exception()) } } } }実装: 購入処理
billingViewModel.ktfun purchaseItem(){ scope.launch { try { billingCase.purchaseItemAsync(itemId, resultPurchase = ::resultPurchase) } catch (ex: Exception) { showPurchaseError() } } }BillingUseCase.ktsuspend fun purchaseItemAsync(itemId: String?, resultPurchase: KFunction1<@ParameterName(name = "ticketInfo") TicketInformation?, Unit>) { withContext(dispatcher) { val skuList = purchaseId?.let { // SKU詳細情報の取得 billingRepository.querySkuDetailsAsync(it, isTicket) } ?: return@withContext val purchaseParams = BillingFlowParams.newBuilder() .setSkuDetails(skuList[0]) .build() // 購入結果を受け取るレシーバ- val receiver = billingRepository.createReceiveChannel() // 購入実行 billingRepository.startPurchaseFlow(purchaseParams) receiver.consumeEach { val responseCode: Int = it.responseCode val purchaseList: List<Purchase>? = it.purchases if (responseCode == BillingResponseCode.OK) { // 消費処理 val consumeList: List<Purchase> = consumeInApp(purchaseList) // クラウドへ結果をポスト if (consumeList.isNotEmpty()) { val postResult = postItemData(consumeList) // アプリをアイテム有効状態に変更 resultPurchase(responseCode, postResult) } else { resultPurchase(responseCode, null) } } else { resultPurchase(responseCode, null) } receiver.cancel() } } } // 消費処理 private suspend fun consumeInApp(purchaseList: List<Purchase>?): List<Purchase> { val inAppPurchaseList: MutableList<Purchase> = mutableListOf() purchaseList?.forEach {purchase -> // アイテムなのでisAcknowledgedチェックは必要ないかもしれません if (purchase.isAcknowledged) { inAppPurchaseList.add(purchase) return@forEach } val consumeResult = billingRepository.consumePurchase(purchase) inAppPurchaseList.add(consumeResult) } return inAppPurchaseList }BillingRepository.kt// SKU詳細情報の取得 suspend fun querySkuDetailsAsync(id: String?): List<SkuDetails> { return suspendCoroutine { continuation -> val params = SkuDetailsParams.newBuilder() .setSkusList(listOf(id)) .setType(BillingClient.SkuType.INAPP) billingClient.querySkuDetailsAsync(params.build()) { billingResult, skuDetailsList -> if (billingResult.responseCode == BillingResponseCode.OK) { continuation.resume(skuDetailsList) } else { continuation.resumeWithException(Exception("responseCode: ${billingResult.responseCode}")) } } } } fun createReceiveChannel(): ReceiveChannel<PurchasesUpdatedResultData> { if (broadcastChannel.isClosedForSend) { broadcastChannel = BroadcastChannel(capacity = 1) } return broadcastChannel.openSubscription() } // region PurchasesUpdatedListener override fun onPurchasesUpdated(billingResult: BillingResult, purchases: MutableList<Purchase>?) { // レシーバーへ購入結果を通知する broadcastChannel.offer(PurchasesUpdatedResultData(billingResult.responseCode, purchases)) } // endregion // 消費処理 // 消費処理を行うことで同じアイテムが再度購入できるようになる。 suspend fun consumePurchase(purchase: Purchase): Purchase { return suspendCoroutine { continuation -> val params = ConsumeParams.newBuilder().setPurchaseToken(purchase.purchaseToken).build() billingClient.consumeAsync(params) { billingResult, _ -> when (billingResult.responseCode) { BillingResponseCode.OK -> continuation.resume(purchase) else -> continuation.resumeWithException(Exception()) } } } }PurchasesUpdatedResultDatadata class PurchasesUpdatedResultData(@BillingResponseCode val responseCode: Int, val purchases: List<Purchase>?)まとめ
・かなり急いで書いたので誤記があれば修正していきたいと思います。
・定期購読とあわせた使い方も追記できればとおもいます。
・アイテムは消費処理を行うと queryPurchases() では購入履歴が取得できなくなるので、消費済み履歴も取得したい場合は queryPurchaseHistoryAsync() を使用する。
・Google Play Console の[デベロッパーアカウント]>[アカウントの詳細]>[ライセンス テスト]>[テスト用のアクセス権がある Gmail アカウント]に
アカウントを登録すれば実機での確認も簡単。
- 投稿日:2020-02-25T17:57:22+09:00
Storage in Android11 Developer Preview
この記事は
https://developer.android.com/preview/overview
https://developer.android.com/preview/behavior-changes-all
こちらを読めば済むことを気になったことだけ書いています。必ず最新の内容を確認してください。また、ストレージ周りの変更については2019のDevSummitにて同様の話がほぼされています。
リリース時期
Milestone Timeline Note Developer Preview 2月〜4月 Beta Release 5月〜7月頃? Beta2(Final APIs and behaviors)は6月 Final Release 8月〜9月頃? Android10のリリースは9月第二週 全OS対象の変更
対象別ストレージ
Android10から物議を醸しているストレージ構造の抜本的変更
- requestLegacyExternalStorageはAPI29以下では継続して利用可能だが、30以上からは利用不可になる。
- GooglePlayのAPIレベル要件の更新は例年11/1。現在は28であるため、実質の対応期限は2021/11/1の予想。
全ファイルアクセス権限付与
- MANAGE_EXTERNAL_STORAGE permissionを宣言することで、ユーザに権限を求めることができる。
- 共有ストレージ内の全てのファイルに対するread|write権限、及びMediaStoreのテーブルへのアクセス権限が付与される。
- Googleの申告フォームに申請し、ホワイトリストに載ることで初めて宣言が可能となる。
- 「Googleが知る限りではファイルマネージャなど・・・」と言っているので、なんらかの審査があるらしい
- 今後のdeveloper previewにて申請方法が開示される予定
ディレクトリアクセス制限
- ACTION_OPEN_DOCUMENT もしくは ACTION_OPEN_DOCUMENT_TREE を用いて特定のディレクトリにアクセス出来なくなる
- アプリの固有ディレクトリ(android/data等)
- 権限を付与する必要無く、アプリ固有ディレクトリ内のファイルには最初からアクセス可能になっているためで、弊害はない。
- downloads
- 全体が選べなくなるだけで、downloads/以下のディレクトリを個別に指定することは可能。
- SDカードのルートディレクトリ
- おそらく全ファイルアクセス権限付与でカバーされるため?
ファイルパスやネイティブライブラリを使ったアクセス
- 直接のファイルパスを使ってファイルにアクセスすることが可能となる
- 詳細不明。今まではExternalStorageからパスが取れたけどMediaStoreを使わない直パスってScopedStorage以降どうなってるのか、そもそもdataからフルパス取れなくなった時点で使い勝手がかなりめんどくさいことになってるはずだしああああああああああ
所感
ファイルマネージャ系アプリ用に強い権限が入った以外、そこまでAndroid10と変わりないんじゃないでしょうか。直パスの使い勝手次第・・・?
- 投稿日:2020-02-25T17:54:20+09:00
【Android】リップルエフェクトとイベント遅延を併用したタップ時の演出
概要
Androidアプリで、リストの要素やボタンなどをタップした時に、押したことが見て分かるようにしたいです。
Androidにはリップルエフェクトという波紋のようなエフェクトがあるので、それを設定することにします。
以下では、CardViewとButtonについて説明します。要素にリップルエフェクトを設定する
CardView
CardViewにリップルエフェクトを付ける場合、
?android:attr/selectableItemBackgroundを設定するのが簡単です。card.xml<?xml version="1.0" encoding="utf-8"?> <com.google.android.material.card.MaterialCardView xmlns:android="http://schemas.android.com/apk/res/android" xmlns:app="http://schemas.android.com/apk/res-auto" android:layout_width="match_parent" android:layout_height="200dp"> <LinearLayout android:layout_width="match_parent" android:layout_height="match_parent" android:orientation="vertical" android:foreground="?android:attr/selectableItemBackground"> <View android:layout_width="200dp" android:layout_height="100dp" android:background="#EEEEEE" /> </LinearLayout> </com.google.android.material.card.MaterialCardView>
backgroundに設定した場合は、以下のようにリップルがViewの下に隠れます。
Button
Buttonには標準でリップルエフェクトが付いていますが、
backgroundを設定した場合は、リップルが付いていないもので上書きされてしまいます。
<ripple>を使うことで、リップル付きのbackgroundを設定できます。
以下では、リップル付きの角丸背景を作成しています(背景を角丸にした場合、foregroundでリップルを付けるとリップルが角からはみ出してしまいます)。res/drawable/button_background.xml<?xml version="1.0" encoding="utf-8"?> <ripple xmlns:android="http://schemas.android.com/apk/res/android" android:color="?android:attr/colorControlHighlight"> <item> <shape> <solid android:color="#AABEFF"/> <corners android:radius="28dp"/> </shape> </item> </ripple>リップルエフェクトを付けたい要素の
backgroundに、先ほどのdrawableを指定します。fragment.xml<LinearLayout ...(略)> <Button android:layout_width="match_parent" android:layout_height="wrap_content" android:background="@drawable/button_background" /> </LinearLayout>イベントを遅延させる
例えばカードやボタンを押すと画面遷移をする時、OSのバージョンやデバイスによっては、リップルエフェクトの発生と同時に画面が遷移してリップルが見えない場合があります。
タップイベントの実行を遅らせて、リップルが見えるようにします。
処理の遅延にはHandler()を使っています。Fragment.ktitem.setOnClickListener { Handler().postDelayed(object : Runnable { override fun run() { // タップした時の処理 } }, 100) // 遅延させたい時間をミリ秒で指定 }まとめ
- カードやボタンを押した時にリップルエフェクトが発生するようにしました。
- リップルが見えるようにタップした時の処理の実行を遅らせました。
参考
https://qiita.com/nissiy/items/bf2742ffb990e3c8f875
https://qiita.com/hkusu/items/32b96eef9bbaafb2dea6

- 投稿日:2020-02-25T14:11:28+09:00
自分用メモ flutterのPageViewをほかのイベントからページ切り替えする方法
PageViewをプログラム側からページ切り替えしようと思ったら詰まった
やりたかったこと
ボタンとドロップダウンリストを使ってページ切り替え
説明に「PageControllerのinitialPage:で最初に表示するページを設定する」みたいなことが書いてあったので、なるほどPageControllerを再作成して切り替えたいページを指定するんだなと思って↓を書いた
//MyPageWidgetは省略

class MyPageState extends State<MyPageWidget>{
   var _currentPage = 0;
   @Override
   Widget build(BuildContext context) {
      final controller = PageController(initialPage: _currentPage);
      return Column(
      children: <Widget>[
        Row( //ボタン用の行widget
          children: <Widget>[
            IconButton( //前ページボタン
              icon: Icon(Icons.navigate_before),
              onPressed: _currentPage > 0 ? () { //クリックイベント処理
                setState(){ _currentPage--;};
              } : null,
            ),
            Expanded( //ドロップダウンリストを余白いっぱいに引き伸ばす
              child: DropdownButton( //ドロップダウンリスト
                isExpanded: true,
                value: _current,
                items: List.generate(
                    12,
                    (index) => DropdownMenuItem(
                          value: index,
                          child: Text(
                            index.toString(),
                            textAlign: TextAlign.center,
                            textScaleFactor: 1.5,
                          ),
                        )),
                onChanged: (value) { //アイテム選択イベント処理
                  if (value is int) setState(){ _currentPage = value; };
                },
              ),
            ),
            IconButton( //次ページボタン
              icon: Icon(Icons.navigate_next),
              onPressed: _current < 11 ? (){ setState(){ _currentPage++ ;} : null,
            )
          ],
        ),
        Expanded( //PageViewはサイズが可変なので、Column Widgetに入れるときはこれに入れる
          child: PageView.builder(
              itemCount: 12,
              controller: _mController,
              onPageChanged: (index){ //ページ変更イベント処理
                setState(() {
                  _current = index;
                });
              },
              itemBuilder: (context, index){
                 return Center( child: Text((index + 1).toString() + "ページ",textScaleFactor: 3;
              }),
        )
      ],
    )
※動きません
flutterのPageViewリファレンスページをよく見ると
The PageController can also be used to control the PageController.initialPage, which determines which page is shown when the PageView is first constructed,
ページビューが最初に作成された時に表示されるページを決定する(雑訳)
つまりこれ、最初の一回だけページを指定するのであって、ページを移動するためには使えない、ということか!?
PageControllerのリファレンスを見ると……
METHODS
animateToPage
attach
createScrollPosition
jumpToPage
nextPage
previousPage
addListener↑はい、この辺を使うんですね分かります。
//MyPageWidgetは省略

class MyPageState extends State<MyPageWidget>{
   var _currentPage = 0;
   var duration = Duration(milisecond: 200); //アニメーションする時間
   var curve = Curves.fastInSlowOut; //アニメーションの動き
   @Override
   Widget build(BuildContext context) {
      final controller = PageController();

      //色々省略

      onPressed: _current > 0 ? (){ //前ページボタンイベント処理
           controller.previousPage(duration: duration,curve: curve);
         },
      //色々省略
                onChanged: (value) { //ドロップダウンリストアイテム選択イベント処理
                  if (value is int) {
                     controller.jumpToPage(value);
                  };
                },
       //色々省略
       onPressed: _current > 0 ? (){ //前ページボタンイベント処理
           controller.nextPage(duration: duration,curve: curve);
         },
   //色々省略
}
*これで動いた
*durationやcurveを変えるとアニメーションも変わる気付かなかった理由
flutterのUIフレームワークになれすぎた。
何かを変更するときは値を変えてsetState()すれば終わりだと思ってた。
っていうかAnimatedContainerはsetState()で値変えたら自動でアニメーションするからさあ……(見苦しい言い訳)androidStudioではずっとそうやって使ってきたのに完全に忘れちゃってたな。
おまけ
これらのメソッドはFutureクラスを返すので、
   controller.nextPage( duration: duration, curve:curve)
      .whenComplete((){
          //なにかの処理
       });
こうすれば、ページ切り替えが終わったあとに何らかの処理をする事ができる。
- 投稿日:2020-02-25T01:40:16+09:00
Android Studioで署名付きAPK作成時にLintエラーが出た場合の対処法
アプリが完成し、いざ署名付きリリースビルド!
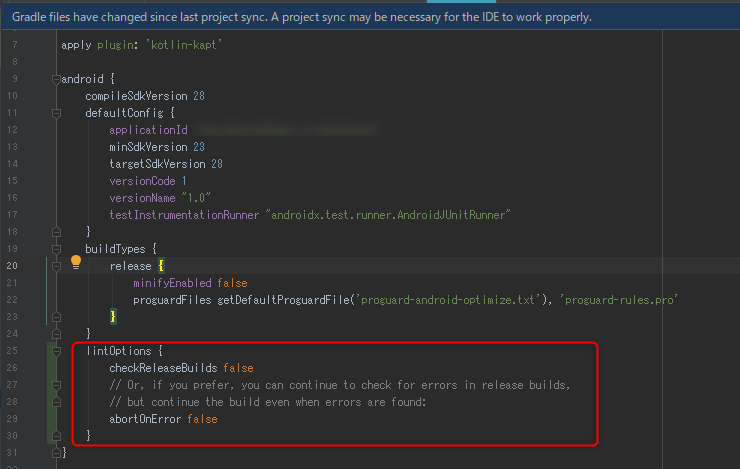
と思ったら以下のエラーが出ました。Lint found fatal errors while assembling a release target. To proceed, either fix the issues identified by lint, or modify your build script as follows: ... android { lintOptions { checkReleaseBuilds false // Or, if you prefer, you can continue to check for errors in release builds, // but continue the build even when errors are found: abortOnError false } } ...
指示通り、build.gradle(Module:app)の「android」の中に
「lintOptions」を貼り付けて「Sync Now」。checkReleaseBuildsは、
リリースビルド時にLintチェックするかどうか。
abortOnErrorはエラー時にビルドを停止する、ですね。ビルドし直すとエラーが出なくなりました。
- 投稿日:2020-02-25T00:35:02+09:00
AndroidでBluetooth関係のAPIを使ってPAPERANGに接続してみる その2
はじめに
前回から進捗があったので。
コードはGitHubで公開。
ライセンス周りがちょっと怪しいところがあるのでその辺はもう少し調べて解決したい。
GitHubはこちら⇒paperangsample今回は画像の印刷で苦労したのでその辺を・・・
画像の印刷について -前置き-
PAPERANG P1で扱う画像は、横384ピクセルになります。
画像は2値化して、1ピクセルを1ビットに変換します。
なので、384/8=48byteで横を表現します。
一度に印刷できる高さは41ピクセルのようです。
なので、一度に印刷できるデータ量は48bytex41=1968byteとなります。
このサイズを超える画像は、分割して処理する必要があります。ビットで表現することになるので、当然濃淡はつけられません。
そのため、誤差分散法などを用いて、画像の濃淡を表現する必要があります。
今回のプログラムでは以下の記事を参考にさせていただきました。
【OpenCV】3つの擬似濃淡変換(ディザリング)の解説【Python】画像の印刷について
今回はグレースケールに変換後、誤差拡散法を用いて変換しています。
この辺、OpenCVを使うと楽にできそうなんですが、なんとなく使いたくなかったので、Canvasを使って、グレースけるにしています。
グレースケールにする際に、元画像のサイズも調整しています。グレースケールの処理は以下の通りです。
    public Bitmap convGrayscale(Bitmap img){
        int width = img.getWidth();
        int height = img.getHeight();
        if(width != 384) {
            // サイズ調整
            float par = 384f / (float) width;
            Log.i("PAPERANG", Float.toString(par));
            width = Math.round(width * par);
            height = Math.round(height * par);
            if (width != 384) {
                width = 384;
            }
        }
        Bitmap bmp = Bitmap.createBitmap(width, height, Bitmap.Config.RGB_565);
        Canvas canvas = new Canvas(bmp);
        Paint paint = new Paint();

        ColorMatrix cm = new ColorMatrix();
        cm.setSaturation(0);
        ColorMatrixColorFilter f = new ColorMatrixColorFilter(cm);
        paint.setColorFilter(f);

        Rect distRect = new Rect(0, 0, width, height);
        Rect srcRect = new Rect(0, 0, img.getWidth(), img.getHeight());
        canvas.drawBitmap(img, srcRect, distRect, paint);
        canvas = null;
        return bmp;
    }
Canvasにフィルタを適用していますが、ColorMatrix.setSaturation()メソッドで引数に0を指定し、ColorMatrixFilterに設定することで、グレースケールのフィルタになるとのことで、そのように処理しています。
あとは、元画像をグレースケールのフィルタを適用したキャンバスに描画します。
これで、グレースケールの画像が完成します。次に、誤差拡散法で2値化します。
メソッド名がダサいですが、処理は以下の通りです。public Bitmap conv2Value(Bitmap img){ Bitmap bmp = convGrayscale(img); int width = bmp.getWidth(); int height = bmp.getHeight(); int thresh = 128; int err = 0; int[] gray= new int[width * height]; bmp.getPixels(gray, 0, width, 0, 0, width, height); for(int y = 0; y < height; y++){ for(int x = 0; x < width; x++){ int color = gray[y * width + x]; int r = Color.red(color); //int g = Color.green(color); //int b = Color.blue(color); if(r + err < thresh){ err = r + err - 0; gray[y * width + x] = Color.argb(255,0,0,0); }else{ err = r + err - 255; gray[y * width + x] = Color.argb(255,255,255,255); } } } bmp.setPixels(gray, 0, width, 0, 0, width, height); return bmp; }引数の画像のピクセルの配列を取得します。
取得したピクセルからR(赤)の値を取得します。
これは、グレースケールにしているので、RGBのどれでもいいので、Rにしています。
そして、誤差拡散法で2値化していきます。
(誤差拡散法についてはどこかでちゃんと理解せねば・・・)
閾値を超えるか超えないかで白か黒かを決めていきます。
参考サイトを見てもらいとわかりますが、今回の方法からさらに進んだ方法もあります。できたデータをビットマップを作成します。
Bitmapオブジェクトにすることで、画面に表示して確認することも可能です。印刷コマンドを発行する部分ですが、以下のようなソースになっています。
    public void printImage(Bitmap img) throws IOException {
        int width = img.getWidth();
        int height = img.getHeight();
        int[] pixcels = new int[width * height];
        img.getPixels(pixcels, 0, width, 0, 0, width, height);
        byte[] bits = new byte[48 * height];
        for(int y = 0; y < height; y++){
            for(int x = 0; x < width; x++){
                int r = Color.red(pixcels[y * width + x]);
                if(r == 0x00) {
                    int idx = y * 48 + (x / 8);
                    switch(x % 8){
                        case 0:
                            bits[idx] = (byte)(bits[idx] | (byte)0x80);
                            break;
                        case 1:
                            bits[idx] = (byte)(bits[idx] | (byte)0x40);
                            break;
                        case 2:
                            bits[idx] = (byte)(bits[idx] | (byte)0x20);
                            break;
                        case 3:
                            bits[idx] = (byte)(bits[idx] | (byte)0x10);
                            break;
                        case 4:
                            bits[idx] = (byte)(bits[idx] | (byte)0x08);
                            break;
                        case 5:
                            bits[idx] = (byte)(bits[idx] | (byte)0x04);
                            break;
                        case 6:
                            bits[idx] = (byte)(bits[idx] | (byte)0x02);
                            break;
                        case 7:
                            bits[idx] = (byte)(bits[idx] | (byte)0x01);
                            break;
                    }
                }
            }
        }
        int loffset = 41;
        if(height <= 41){
            loffset = height;
        }
        try {
            byte[] buff = new byte[48];
            ByteBuffer buffs = ByteBuffer.allocate(48 * loffset);
            buffs.order(ByteOrder.LITTLE_ENDIAN);
            for (int i = 0; i < bits.length; i++) {
                if(i % (48 * loffset) == 0 && i > 0){
                    //ResultData ret = getStatus();
                    Log.i("PAPERANG","print");
                    printData(buffs.array());
                    buffs.clear();
                    buffs = ByteBuffer.allocate(48 * loffset);
                    buffs.order(ByteOrder.LITTLE_ENDIAN);
                }
                buffs.put(bits[i]);
            }
            printData(buffs.array());
        }catch(Exception e){
            if(e != null){
                if(e.getMessage() != null){
                    Log.e("PAPERANG", e.getMessage());
                }else{
                    Log.e("PAPERANG", e.toString());
                }
            }
        }
    }
最初の方で、画像のピクセル情報を取ってきて、ビットに変換しています。
実際に印刷して気づいた点
- 1は白、0は黒で印刷しないといけません。
- 1バイト目は8ビット、2バイト目は7ビット・・・というように変換が必要
これら2点に気を付けないと、プレビューで誤差拡散した画像はOK、印刷するとそれっぽいのが出てるんだけどなんか違うということになります。
ちなみに、switch文でやるとダサい感じになるけど、面倒なのでwビットに変換して、配列に入れたあと、最後のfor文で印刷を実施します。
ここでは、48byte x 41 で印刷するように処理しています。最後に
おもちゃとしてはなかなか楽しめました。
今後はまだ未確認のコマンドを確認していきたいと思います。
変数名やメソッド名がダサい部分があるので、どこかで見直しておきたいところ。
C#版とか作りたいような気もしてるけど作らないかもw
(公開したコード読んでくれれば多分簡単にできるんじゃないかな?)
画像が出るようになったので、オープンソースカンファレンス 2020 Hamanakoでなにか展示するかもです。
