- 投稿日:2020-02-24T23:59:09+09:00
node.jsからMongoDBに接続してDocumentを登録する。
はじめに
node.jsからMongoDBをインストールして、接続しようとしたところ、最初の接続で少し躓いたので、まとめる。
環境
- Windows10 Pro 64bit
- node.js v12.14.1
- mongodb v6.13.4
- MongoDB 4.2.3
環境構築
node.jsにmongodbをインストール
以下コマンドを実行
npm install mongodbMongoDBをインストールする。
公式サイトからWindows用のインストーラをダウンロードしてインストールする。
実行して「次へ」ボタン押していく。インストール後に環境変数にPathを追加する。
C:\Program Files\MongoDB\Server\4.2\binMongoDB側の準備
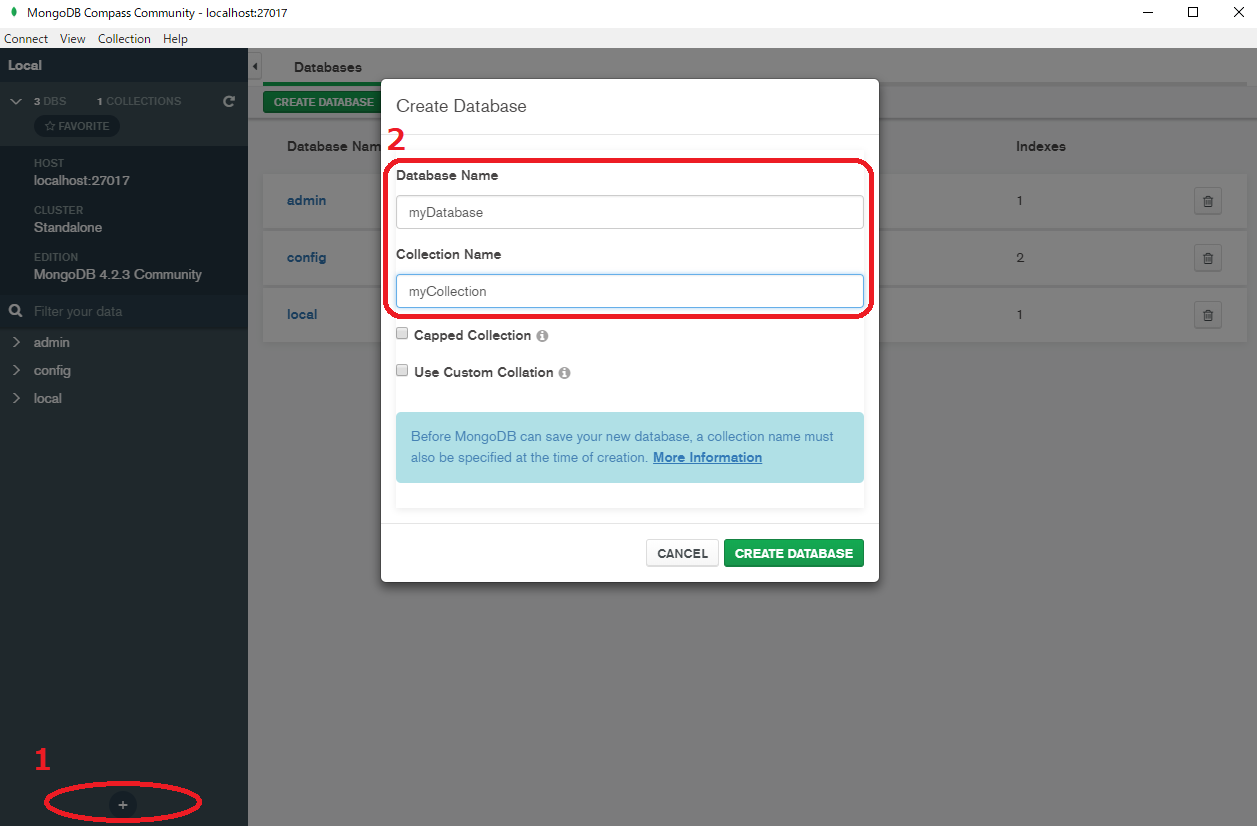
MongoDB Compass Communityを使用して、取得したいdatabaseとDocumentを作成しておく。
左下のボタンで押下すると、Create Databaseのダイアログが出るので、入力するだけ。
node.js側のコード
以上で準備完了。実際のサンプルコードは以下。
コメントアウト部分は旧VersionのMongoDBの記載方法です。
ネットで見つけた旧Versionの記載方法だとTypeError: db.collection is not a functionのエラーになりはまる。node.jsconst MongoClient = require("mongodb").MongoClient; const dburl = "mongodb://localhost:27017/"; // const dburl = "mongodb://localhost:27017/myDatabase"; MongoClient.connect(dburl, (error, client) => { const collection = client.db('myDatabase').collection('myCollection'); // const collection = client.collection('myCollection'); collection .insertOne({_id: 1, path: "test"}) .then(()=> console.log("success")) .catch(err => console.log(err)); });最後に
MongoDB以外にも、Electronもバージョンによって、大きく記述方法が変わっており、ネットで調べたコードでそのまま動かしてもうまく動かず躓くことが多い。。。
公式サイト読めばいいのだけど、時間かかるしで、少しジレンマを感じる今日この頃。
- 投稿日:2020-02-24T22:36:11+09:00
同期的に複数のファイルをform-dataを使って送信するサンプル
こんにちは、wattak777です。
一ファイルを送信する、というサンプルは幾つかあるのですが、requestとform-dataを組み合わせて送る場合、複数ファイルの場合、例えばforループで送るようにしても1つ目、2つ目、3つ目と送りきる前にどんどん送ってしまうため同期的に送ることが出来ません。
なので、ちょっとサンプルを作ってみました。
サーバー側はmulterを使った以下のサンプル。
server.jsvar express = require( 'express' ) ; var app = express() ; var multer = require( 'multer' ) ; app.post('/file_upload', multer({dest: ファイルを置くパス}).single('my_file'), function (req, res) { console.log(req.file.path, req.file.originalname) ; res.sendStatus(200) ; }); var server = app.listen(12345, function() { console.log("listening at port %s", server.address().port) ; });で、本題のクライアント側は以下の実装。
request-promiseを使って同期的に送るようにしました。client.jsconst fs = require('fs') ; const request = require('request-promise') ; const FileNameList = [ 'test1.bin', 'test2.bin', 'test3.bin' ] ; var FileNameIndex = 0 ; var returnCode = httpPost() ; function httpPost() { const FormData = { my_file: { value: fs.createReadStream(ファイルのパス + FileNameList[FileNameIndex]), options: { filename: FileNameList[FileNameIndex], contentType: 'application/octet-stream' } } } const options = { uri: "http://サーバーのIPアドレス:12345/file_upload", formData: FormData, method: 'post', headers: { 'Content-Type': 'multipart/form-data' } } var response = request(options) .then( function(body) { console.log( 'then :' + body ) ; onEnd() ; }) .catch( function(err) { console.log( 'catch error :' + err ) ; }) ; return response.statusCode ; } function onEnd() { console.log( 'Index ' + FileNameIndex + ' is finish.' ) ; FileNameIndex = FileNameIndex + 1 ; if ( FileNameIndex >= FileNameList.length ) { console.log( 'End Operation.' ) ; } else { var res = httpPost() ; } } console.log( 'Start Operation.' ) ;とやると、クライアント側の表示は以下のようになります。
$ node client.js
Start Operation.
then :OK
Index 0 is finish.
then :OK
Index 1 is finish.
then :OK
Index 2 is finish.
End Operation.
- 投稿日:2020-02-24T22:28:55+09:00
同期的に複数のファイルをform-dataを使って送るには
こんにちは、wattak777です。
一ファイルを送信する、というサンプルは幾つかあるのですが、requestとform-dataを組み合わせて送る場合、複数ファイルの場合、例えばforループで送るようにしても1つ目、2つ目、3つ目と送りきる前にどんどん送ってしまうため同期的に送ることが出来ないため、ちょっとサンプルを作ってみました。
サーバー側はmulterを使った以下のサンプル。
server.jsvar express = require( 'express' ) ; var app = express() ; var multer = require( 'multer' ) ; app.post('/file_upload', multer({dest: ファイルを置くパス}).single('my_file'), function (req, res) { console.log(req.file.path, req.file.originalname) ; res.sendStatus(200) ; }); var server = app.listen(12345, function() { console.log("listening at port %s", server.address().port) ; });で、本題のクライアント側は以下の実装。
request-promiseを使って同期的に送るようにしました。client.jsconst fs = require('fs') ; const request = require('request-promise') ; const FileNameList = [ 'test1.bin', 'test2.bin', 'test3.bin' ] ; var FileNameIndex = 0 ; var returnCode = httpPost() ; function httpPost() { const FormData = { my_file: { value: fs.createReadStream(ファイルのパス + FileNameList[FileNameIndex]), options: { filename: FileNameList[FileNameIndex], contentType: 'application/octet-stream' } } } const options = { uri: "http://サーバーのIPアドレス:12345/file_upload", formData: FormData, method: 'post', headers: { 'Content-Type': 'multipart/form-data' } } var response = request(options) .then( function(body) { console.log( 'then :' + body ) ; onEnd() ; }) .catch( function(err) { console.log( 'catch error :' + err ) ; }) ; return response.statusCode ; } function onEnd() { console.log( 'Index ' + FileNameIndex + ' is finish.' ) ; FileNameIndex = FileNameIndex + 1 ; if ( FileNameIndex >= FileNameList.length ) { console.log( 'End Operation.' ) ; } else { var res = httpPost() ; } } console.log( 'Start Operation.' ) ;とやると、クライアント側の表示は以下のようになります。
$ node form2_promise.js
Start Operation.
then :OK
Index 0 is finish.
then :OK
Index 1 is finish.
then :OK
Index 2 is finish.
End Operation.
- 投稿日:2020-02-24T22:16:44+09:00
face-api.jsでニコラ○・ケ○ジになる
顔認識がjsだけでもそれなりに動くのを今更知ったので触ってみた。
顔晒すのに抵抗感がある古い人間なので文中画像少なめです。成果物
Git: https://github.com/engabesi/face-nicolas
GithubPages: https://engabesi.github.io/face-nicolas/
やること
- expressでlocalhostを建てる
- face-api.jsで顔の矩形を取る
- 顔に画像を被せる
- GithubPagesにdeploy
face-api.js
今回顔認識に使うライブラリはこちら
https://github.com/justadudewhohacks/face-api.js
jsだけでそれなりの精度とパフォーマンスを出せます。
複数人も認識可能。
ランドマークや表情、顔認証も出来ます。
demoはこちら
https://justadudewhohacks.github.io/face-api.js/face_and_landmark_detection/注意点
face-api.jsはWebGLを使用しています。
その為ブラウザの設定でハードウェアアクセラレーションをオフにしている場合上手く動作しない可能性があります。expressでlocalサーバーを建てる
android等でも気軽にテストするためにまずはlocalhostで動作するようにします。
後にgithubPagesも利用したいため、以下の構成にします。構成root/ ├─ app.js └─ docs/ ├─ index.html ├─ images/ └─ js/ ├─ index.js └─ lib/ ├─ face-api.min.js └─ models/ ├─ tiny_face_detector_model-shard1 └─ tiny_face_detector_model-weights_manifest.json
face-api.min.js, 及びmodels内ファイルは以下のrepoから取ってきます
https://github.com/justadudewhohacks/face-api.js/tree/master/dist
https://github.com/justadudewhohacks/face-api.js/tree/master/weightsexpressを導入します。
shellyarn init -y yarn add expressdocs\index.html<!DOCTYPE html> <html lang="ja"> <head> <meta charset="UTF-8" /> <meta name="viewport" content="width=device-width, initial-scale=1.0" /> <title>Document</title> <script defer src="./js/lib/face-api.min.js"></script> <style> body { margin: 0; padding: 0; width: 100vw; height: 100vh; display: flex; justify-content: center; align-items: center; } canvas { position: absolute; } </style> </head> <body> <video id="video" width="720" height="560" autoplay muted></video> <script defer src="js/index.js"></script> </body> </html>app.jsconst express = require("express"); const app = express(); const path = require("path"); app.listen(8080, () => { console.log("Running at Port 8080..."); }); app.use(express.static(path.join(__dirname, "docs"))); app.use((req, res) => res.sendStatus(404));これでshellに
node app.jsと打ち、http://localhost:8080/ にアクセスするとページが開きます(今は真っ白)webcamera設定
docs\index.jsconst startVideo = async video => { try { const constraints = { audio: false, video: {} }; const stream = await navigator.mediaDevices.getUserMedia(constraints); video.srcObject = stream; } catch (error) { console.error(error); } }; (async () => { const video = document.querySelector("video"); await startVideo(video); })();これでlocalhostを開くとwebcameraの映像が取れているはずです。
顔の矩形を取る
まずmodelを読み込みます。
docs\index.js+ const loadModels = async () => { + await Promise.all([ + faceapi.nets.tinyFaceDetector.loadFromUri(`/js/lib/models`) + ]); + }; (async () => { const video = document.querySelector("video"); + await loadModels(); await startVideo(video); })();次に顔を認識して矩形描画処理を追加します。
docs\index.js(async () => { const video = document.querySelector("video"); await loadModels(); await startVideo(video); // --- ADD --- video.addEventListener("play", () => { // overlay canvas作成 const canvas = faceapi.createCanvasFromMedia(video); document.body.append(canvas); const displaySize = { width: video.width, height: video.height }; faceapi.matchDimensions(canvas, displaySize); const tinyFaceDetectorOption = { // default 416 inputSize: 224, // default 0.5 scoreThreshold: 0.5 }; setInterval(async () => { const results = await faceapi.detectAllFaces( video, new faceapi.TinyFaceDetectorOptions(tinyFaceDetectorOption) ); if (results.length <= 0) return; // 検出結果をcanvasのサイズにリサイズ const resizedResults = faceapi.resizeResults(results, displaySize); // canvasの内容をクリア canvas.getContext("2d").clearRect(0, 0, canvas.width, canvas.height); // 矩形描画 faceapi.draw.drawDetections(canvas, resizedResults); }, 100); }); // --- ADD --- })();これでscoreが記載された矩形が顔に被さって表示されるようになります。
顔に画像を被せる
検出結果から座標を取ってその位置に画像を被せてみます。
docs\index.js(async () => { const video = document.querySelector("video"); + // 画像セットアップ + const image = new Image(); + image.src = `/images/cage_neutral.png`; await loadModels(); await startVideo(video); video.addEventListener("play", () => { const canvas = faceapi.createCanvasFromMedia(video); document.body.append(canvas); const displaySize = { width: video.width, height: video.height }; faceapi.matchDimensions(canvas, displaySize); const tinyFaceDetectorOption = { // default 416 inputSize: 224, // default 0.5 scoreThreshold: 0.5 }; setInterval(async () => { const results = await faceapi.detectAllFaces( video, new faceapi.TinyFaceDetectorOptions(tinyFaceDetectorOption) ); if (results.length <= 0) return; const resizedResults = faceapi.resizeResults(results, displaySize); canvas.getContext("2d").clearRect(0, 0, canvas.width, canvas.height); - // faceapi.draw.drawDetections(canvas, resizedResults); + resizedResults.forEach(detection => { + // 矩形のtopはデコあたりなので調整 + const marginVal = 0.4; + // 矩形の情報はdetection.boxに格納されている + const width = detection.box.width; + const height = detection.box.height * (1.0 + marginVal); + const x = detection.box.x; + const y = detection.box.y - detection.box.height * marginVal; + canvas.getContext("2d").drawImage(image, x, y, width, height); + }); }, 100); }); })();これで自分の顔に画像を貼り付けることが出来ました。
他にもmodelやdetection時に.with~~とするだけで表情やランドマーク等の情報を取れます。
詳しくは公式README参照。自分のgitにあげている物にも画像調達に飽きて中途半端になっていますが表情を取るコードも記載してあります。GithubPages
コードをrepositoryに上げたら
repository > settings > Options > GithubPages > Sourceを
master branch /docs folderにすればGithubPagesにデプロイすることが出来ます。
だから、ディレクトリ名をdocsにする必要があったんですね。注意点
上記コードでは画像のpathを直打ちしています。
github.ioにデプロイする場合は問題ありませんが、github.io/SUB_REPO/にデプロイした場合、ルートURLがgithub.io扱いとなり、SUB_REPOが飛ばされてしまってpathがおかしくなってしまいます。
jekyllの使用をgithubは推奨していますが試して遊ぶだけの場合ちょっと面倒です。
暫定対策としてpath前に直接SUB_REPO名をくっつけてあげると一応動きます。まとめ
たった数分でブラウザ完結の顔認識ができるなんて素晴らしい世の中になりました。
現状のコードだとスマートフォンで見た場合矩形がものすごく横長になってしまっているのでその辺の対応をしだすとヘビーになるかもしれませんがちょっと遊んで見るぐらいだと非常に有用だと思います。他にも
clmtrackr.jsやpico.js、更にはChromeの機能だけでできるShape Detection API等様々なライブラリがありますので是非触って遊んでみてください。

- 投稿日:2020-02-24T20:55:39+09:00
Testable Redux ~ React と Redux のテスト戦略 ~
本記事では Redux を使用した場合の React コンポーネントに対するテスト方法を考察します。
Redux に接続された React コンポーネントは、コンポーネント内のプロパティを Redux Store の state と同期させています。 Redux に強く依存しているコンポーネントをどのように Testable にしていけば良いのでしょうか。記事のタイトルは、t-wada 先生の言葉をお借りして、Testable Redux とつけさせていただきました。
純粋な React コンポーネントをテストする
さて、まずはじめに純粋な React のコンポーネントに対するテスト方法を振り返ってみます。Facebook に習えば、jest の公式ドキュメントでも紹介されている
jestとenzymeを組み合わせた方法が一般的でしょう。以下のようなシンプルなコンポーネントを例として使用します。
countを保持する state をもち、onClickで state を変更します。簡単のために Functional Component とし、State Hooks を使用します。後のテストのために各タグにはカスタムデータ属性(data-test)を付与しておきます。プロダクションビルドでカスタムデータ属性を取り除く方法もあります。こちらの記事にて詳細に解説されていました。import React, { useState } from "react"; export default () => { const [count, setCount] = useState(0); return ( <div> <h3 data-test="count">count: {count}</h3> <button data-test="count-up" onClick={() => setCount(count + 1)}>⬆︎</button> <button data-test="count-down" onClick={() => setCount(count - 1)}>⬇︎</button> </div> ); };これに対するテストは以下のように記述できます。初期値が 0 であること、ボタンをクリックして 1 に変わることを確認します。
import React from "react";
import { shallow } from "enzyme";
import Counter from "./PureReactCounter";

import testConfigure from "../../testConfigure";
testConfigure();

const sel = (id: string) => `[data-test="${id}"]`;
describe("<Counter /> コンポーネント", () => {
  const Component = shallow(<Counter />);
  it("ボタンをクリックしてカウントアップする", () => {
    expect(Component.find("h3").text()).toEqual("count: 0");
    Component.find(sel("count-up")).simulate("click");
    expect(Component.find("h3").text()).toEqual("count: 1");
  });
});
なお、
testConfigureには以下を記述しておきます。enzyme を使用する場合のお約束のようなものです。enzyme の installationにて解説されています。import Enzyme from "enzyme"; import EnzymeAdapter from "enzyme-adapter-react-16"; export default () => Enzyme.configure({ adapter: new EnzymeAdapter() });結果は 8ms でした。このテストでは
shallow()を使用しています。Shallow レンダリングは、コンポーネントをユニットテストの範囲でテストできるように制限します。テストが子コンポーネントの動作を間接的にアサートしないようにしてくれます。コンポーネントは子コンポーネントに依存させず、常にステートレスに保つことによって Shallow レンダリングによるテストができ、高速です。PASS src/components/PureReactCounter.test.tsx <Counter /> コンポーネント ✓ ボタンをクリックしてカウントアップする (8ms)ちなみに、
mount()は完全な DOM レンダリングを行います。DOM API とやり取りする可能性のあるコンポーネントである場合や、より高次のコンポーネントにラップされているコンポーネントをテストする必要がある場合に最適です。ただしその一方で多くの依存関係を考慮することによりテストに要する時間は増える傾向にあります。PASS src/components/PureReactCounter.test.tsx <Counter /> コンポーネント Shallowレンダリング ✓ ボタンをクリックしてカウントアップする (8ms) Fullレンダリング ✓ ボタンをクリックしてカウントアップする (8ms)結果として実行時間はほとんど変わりませんでした。これは今回実装したコンポーネントが他のコンポーネントや API などと依存していないシンプルなコンポーネントであるためです。
Redux の使用を開始する
さて、先ほど実装したコンポーネントは、
countを保持する state をもち、onClickで state を変更していました。このcountという state を Redux の store で管理します。実装例を紹介する前に Redux のライフサイクルのおさらいをしましょう。
- View: ユーザが操作を行い、handleClick() などのイベント起動 function が実行される。
- ActionCreater: イベント起動 function は ActionCreater を通して action を生成する。
- Dispacther: action は Dispater に渡され、Reducer に流れる。
- Reducer: Reducer は action の type に応じて新しい state を返却する。
説明の粒度は荒いですが、おおまかにこのような流れで Redux による状態の管理が行われます。
さて、ディレクトリ構成は以下のようにして実装を進めていきます。
src/
├── index.tsx
├── App.tsx
├── components
│   ├── Counter.tsx
│   └── Counter.test.tsx
└── store
    ├── actions
    │   └── counterActions.ts
    ├── reducers
    │   └── counterReducer.ts
    └── store.ts
Action (actions/counterActions.ts)
Action の定義を行います。今回はカウントアップとカウントダウンする2種類の action があるので事前に定義しておき、他のファイルから参照できるようにしておきましょう。
export const INCREMENT = "INCREMENT";
export const DECREMENT = "DECREMENT";

export interface ICountReducerAction {
  type: typeof INCREMENT | typeof DECREMENT;
}
Reducer (reducers/counterReducer.ts)
Reducer は飛んできた action の type に応じて state 返却する処理を書くのでした。
INCREMENTの場合は+1、DECREMENTの場合は-1された新しい state を返却しています。import { ICountReducerAction, INCREMENT, DECREMENT } from "../actions/counterActions"; const initialState = 0; const counterReducer = (state = initialState, action: ICountReducerAction) => { switch (action.type) { case INCREMENT: return state + 1; case DECREMENT: return state - 1; default: return state; } }; export default counterReducer;Store
先に定義した
reducerを束ねて、storeを作成しましょう。今回reducerは1つですが、複数使用することになることも考慮してcombineReducers()を使用しています。import { createStore } from "redux"; import { combineReducers } from "redux"; import counterReducer from "./reducers/counterReducer"; const reducer = combineReducers({ count: counterReducer }); export default createStore(reducer);Component から Redux の store を参照する
Redux の state を View に表示できるようにコンポーネントを実装していきましょう。まず初めに純粋に Redux の store を直接参照するような実装を考えます。
ReactDOM.render()をstoreからsubscribe()します。import React from "react"; import ReactDOM from "react-dom"; import App from "./App"; import store from "./store/store"; const render = () => ReactDOM.render(<App />, document.getElementById("root")); render(); store.subscribe(render);コンポーネントは以下のように実装します。この場合はどうでしょう、テストは容易でしょうか。
import React from "react";
import store from "../../store/store";
import { INCREMENT, DECREMENT } from "../../store/actions/counterActions";

export default () => {
  const count = store.getState().count; // store から直接参照する
  return (
    <div>
      <h3 data-test="count">count: {count}</h3>
      <button onClick={() => store.dispatch({ type: INCREMENT })}>⬆︎</button>
      <button onClick={() => store.dispatch({ type: DECREMENT })}>⬇︎</button>
    </div>
  );
};
テストコードを振り返ってみましょう。このままでは Redux の store を参照ができないため、ボタンをクリックした後に発火するはずの Reducer が起動しません。結果として count は 0 のままです。
const sel = (id: string) => `[data-test="${id}"]`;
describe("<Counter /> コンポーネント", () => {
  describe("Shallowレンダリング", () => {
    const Component = shallow(<Counter />);
    it("ボタンをクリックしてカウントアップする", () => {
      expect(Component.find("h3").text()).toEqual("count: 0");
      Component.find(sel("count-up")).simulate("click"); // Redux store の state が変更されない
      expect(Component.find("h3").text()).toEqual("count: 1"); // 0 のまま
    });
  });
  describe("Fullレンダリング", () => {
    const Component = mount(<Counter />);
    it("ボタンをクリックしてカウントアップする", () => {
      expect(Component.find("h3").text()).toEqual("count: 0");
      Component.find(sel("count-up")).simulate("click");
      expect(Component.find("h3").text()).toEqual("count: 1");
    });
  });
});
テスト結果(クリックして開く)
 FAIL  src/components/DirectAccessReduxStore.test.tsx
  <Counter /> コンポーネント
    Shallowレンダリング
      ✕ ボタンをクリックしてカウントアップする (11ms)
    Fullレンダリング
      ✕ ボタンをクリックしてカウントアップする (6ms)

  ● <Counter /> コンポーネント › Shallowレンダリング › ボタンをクリックしてカウントアップする

    expect(received).toEqual(expected) // deep equality

    Expected: "count: 1"
    Received: "count: 0"

      13 |       expect(Component.find("h3").text()).toEqual("count: 0");
      14 |       Component.find(sel("count-up")).simulate("click");
    > 15 |       expect(Component.find("h3").text()).toEqual("count: 1");
         |                                           ^
      16 |     });
      17 |   });
      18 |   describe("Fullレンダリング", () => {

      at Object.<anonymous> (src/components/DirectAccessReduxStore.test.tsx:15:43)

  ● <Counter /> コンポーネント › Fullレンダリング › ボタンをクリックしてカウントアップする

    expect(received).toEqual(expected) // deep equality

    Expected: "count: 1"
    Received: "count: 0"

      21 |       expect(Component.find("h3").text()).toEqual("count: 0");
      22 |       Component.find(sel("count-up")).simulate("click");
    > 23 |       expect(Component.find("h3").text()).toEqual("count: 1");
         |                                           ^
      24 |     });
      25 |   });
      26 | });

      at Object.<anonymous> (src/components/DirectAccessReduxStore.test.tsx:23:43)
Redux と React のコンポーネントが強く依存する関係になっており、React のコンポーネント単体としてテストしづらくなっています。この構成を変えていきましょう。まずは React と Redux の間の依存関係を切り離す方法を考えます。
react-reduxのconnect()を使用して React と Redux の依存を引き剥がず最も代表的な実装パターンとして react-redux の
connect()を使用する方法が挙げられます。これは、コンポーネントをマウントする時点で子コンポーネントや依存関係にある構成要素を考える必要がなく、シンプルです。Counter コンポーネントと Redux store が強い依存関係にある実装から、なるべく疎結合になるように配慮します。いわゆる DI (Dependency Injection) の考え方にしたがって、Counter コンポーネントの store を外から props として注入できるように変更します。ただ単に props によって注入するだけではなく、Redux store との接合は
connect()によって行います。詳細な手続きは公式チュートリアルを参照しましょう。このようなコンポーネントを HOC (Higher Order Component) と呼びます。詳細はこちらの記事が参考になります。import React from "react"; import { connect } from "react-redux"; import { Dispatch } from "redux"; import { INCREMENT, DECREMENT } from "../../store/actions/counterActions"; interface ICounterState { counter: number; } interface ICounterProps { count: number; increment: any; decrement: any; } // props として store を流し込んで DI できるるようにする。 export const Counter = (store: ICounterProps) => { const { count, increment, decrement } = store; return ( <div> <div data-testid="count">count: {count}</div> <button onClick={increment}>⬆︎</button> <button onClick={decrement}>⬇︎</button> </div> ); }; const mapStateToProps = (state: ICounterState) => ({ count: state.counter }); const mapDespatchToProps = (dispatch: Dispatch) => ({ increment: () => dispatch({ type: INCREMENT }), decrement: () => dispatch({ type: DECREMENT }) }); // 第一引数の mapStateToProps は component に渡す props を制御する // 第二引数の mapDespatchToProps は reducer を呼び出して、redux で管理している state を更新する // Counter は取得したデータを props として扱いたい component を指定する export default connect(mapStateToProps, mapDespatchToProps)(Counter);さて、ここまでできれば勝てる気がしてきました。テストを書きます。
import React from "react";
import { mount, shallow } from "enzyme";
import { Provider } from "react-redux";
import { createStore } from "redux";
import sinon from "sinon";
import ConnectedCounter, { Counter } from "./ReactRedux";
import { reducer } from "../../store/store";
import testConfigure from "../../testConfigure";
testConfigure();
const sel = (id: string) => `[data-test="${id}"]`;
describe("<Counter /> コンポーネント", () => {
  describe("Shallowレンダリング", () => {
    const props = {
      count: 0,
      increment: sinon.spy(), // カウントアップするボタンを押した挙動を確認するためにスパイを差し込む
      decrement: sinon.spy()
    };
    const shallowComponent = shallow(<Counter {...props} />);
    it("ボタンをクリックしてカウントアップする", () => {
      expect(shallowComponent.find("h3").text()).toEqual("count: 0");
      shallowComponent.find(sel("count-up")).simulate("click");
      expect(props.increment).toHaveProperty("callCount", 1);
    });
  });
  describe("Fullレンダリング", () => {
    const getWrapper = (mockStore = createStore(reducer, { count: 0 })) =>
      mount(
        <Provider store={mockStore}>
          <ConnectedCounter />
        </Provider>
      );
    it("ボタンをクリックしてカウントアップする", () => {
      const wrapper = getWrapper();
      expect(wrapper.find("h3").text()).toEqual("count: 0");
      wrapper.find(sel("count-up")).simulate("click");
      expect(wrapper.find("h3").text()).toEqual("count: 1");
    });
  });
});
上記のテストでは、Shallow レンダリングと Full レンダリングの2つの方法でテストを記述しました。
Shallow レンダリングでは Redux の store を含めず、コンポーネント単体でテストを行います。そのため、カウントアップするボタンを押した際のハンドラ関数は
simon.spy()を使用してスパイを差し込んで挙動を確認します。一方で、Full レンダリングの場合は Redux の store だけをモックとして作成し、
<Provider>の store に DI します。こちらの手法の方が Redux の store を含めたテストにはなるのですが、実行時間が増える傾向にあるため注意が必要です。ちなみに実行時間を比較すると以下のようになります。PASS src/components/container/ReactRedux.test.tsx <Counter /> コンポーネント Shallowレンダリング ✓ ボタンをクリックしてカウントアップする (9ms) Fullレンダリング ✓ ボタンをクリックしてカウントアップする (44ms)mount するのはインテグレーションテストだユニットテストではない、shallow の方が高速だ、などの論争があります。個人的な意見ですが、チーム開発を行う上ではシンプルかつ可読性を維持したテストコードを書いた方がむしろチームとしてアジリティが上がるのではないかと考えています。学習コストも高いですしね。
それでもプロダクトコードの量が大きくなるにつれて、テストの実行時間の増加によりアジリティが下がるケースもあります。shallow レンダリングと full レンダリングの実行時間の差は ms 程度ですが、塵も積もれば山となるということです。テストの方針を決めるのは難しいですね。Redux Hooks を使用してコード量を減らす
怠惰で傲慢な我々は、現状に満足することはありません。上に挙げた実装は React と Redux の依存関係を引き剥がすことで、Shallow レンダリングによるテストが実現できるようになりました。その一方で少し複雑な実装をしなければならないように感じます。この章では Redux Hooks を使用して簡単に記述できる方法をご紹介します。
React の Hooks API は、Functional コンポーネントに対してローカルコンポーネントの state を使用できるようになる優秀な機能です。
react-reduxでも、既存のconnect()を使用して実装された HOC (Higher Order Component) の代わりとして Hooks API を提供するようになりました。これを使用すると、前章の実装のようにコンポーネントをにラップして HOC を作るような面倒な作業は必要ありません。Redux store に subscribe して action を dispatch できます。導入は非常に簡単です。
useSelector()とuseDispatch()を使用しましょう。import React from "react"; import { useSelector, useDispatch } from "react-redux"; import { INCREMENT, DECREMENT } from "../../store/actions/counterActions"; export default () => { const count = useSelector((state: any) => state.count); const dispatch = useDispatch(); const increment = () => { dispatch({ type: INCREMENT })}; const decrement = () => { dispatch({ type: DECREMENT })}; return ( <div> <h3>count: {count}</h3> <button data-test="count-up" onClick={increment}>⬆︎</button> <button data-test="count-down" onClick={decrement}>⬇︎</button> </div> ); };コードがとても短くなりました。かなりスマートです。あれ? でもおかしいですね、少し振り返ってみましょう。
connect()を使用して HOC を作ったときには純粋な React コンポーネントと Redux との依存関係を引き剥がすことに成功していました。今回、Redux Hooks を使用した実装では、また依存関係が強くなってしまいました。これでは Full レンダリングを行うようなテストしか記述できません。describe("<Counter /> コンポーネント", () => { describe("Fullレンダリング", () => { const getWrapper = (mockStore = createStore(reducer, { count: 0 })) => mount( <Provider store={mockStore}> <ConnectedCounter /> </Provider> ); it("ボタンをクリックしてカウントアップする", () => { const wrapper = getWrapper(); expect(wrapper.find("h3").text()).toEqual("count: 0"); wrapper.find(sel("count-up")).simulate("click"); expect(wrapper.find("h3").text()).toEqual("count: 1"); }); }); });Redux Hooks でも Redux と React を分離する
基本的な考え方は今までと同様です。Redux と接続する部分を DI できるようにすれば OK です。
useSelector()とuseDispatch()を使用している箇所を外に出してやりましょう。import { useSelector, useDispatch } from "react-redux"; import { IRootState } from "../../store/store"; import { INCREMENT, DECREMENT } from "../../store/actions/counterActions"; import { Dispatch } from "redux"; interface ICounterProps { count: number; increment: Dispatch; decrement: Dispatch; } export const Counter = (props: ICounterProps) => { const { count, increment, decrement } = props; return ( <div> <h3>count: {count}</h3> <button data-test="count-up" onClick={increment}>⬆︎</button> <button data-test="count-down" onClick={decrement}>⬇︎</button> </div> ); }; export default (props: any) => { const count = useSelector<IRootState>(state => state.count); const dispatch = useDispatch(); const _props = { count, increment: () => dispatch({ type: INCREMENT }), decrement: () => dispatch({ type: DECREMENT }), ...props }; return <Counter {..._props} />; };当然といえば当然ですが、テストコードは
react-reduxのconnect()を使用した場合の実装と同じになります。
テストコード(クリックして開く)
const sel = (id: string) => `[data-test="${id}"]`;
describe("<Counter /> コンポーネント", () => {
  describe("Shallowレンダリング", () => {
    const props = {
      count: 0,
      increment: sinon.spy(),
      decrement: sinon.spy()
    };
    const shallowComponent = shallow(<Counter {...props} />);
    it("ボタンをクリックしてカウントアップする", () => {
      expect(shallowComponent.find("h3").text()).toEqual("count: 0");
      shallowComponent.find(sel("count-up")).simulate("click");
      expect(props.increment).toHaveProperty("callCount", 1);
    });
  });
  describe("Fullレンダリング", () => {
    const getWrapper = (mockStore = createStore(reducer, { count: 0 })) =>
      mount(
        <Provider store={mockStore}>
          <ConnectedCounter />
        </Provider>
      );
    it("ボタンをクリックしてカウントアップする", () => {
      const wrapper = getWrapper();
      expect(wrapper.find("h3").text()).toEqual("count: 0");
      wrapper.find(sel("count-up")).simulate("click");
      expect(wrapper.find("h3").text()).toEqual("count: 1");
    });
  });
});
さいごに
結局のところ、どのアプローチを採用した場合も実際の Redux store を使用した React コンポーネントのテストは高速です。Redux の設計は、Action、Reducer、State のそれぞれが互いに分離される方法のため、テストに非常に適しています。
このように Dependency Injection しやすい設計のもと Redux が作られているので、このようなシンプルな構造を取ることができました。今回はご紹介できませんでしたが、Redux Saga や Redux Thunk を使用した場合のアーキテクチャでも同様にテストはシンプルに記述できます。React をとりまくエコシステムは素晴らしいですね。

- 投稿日:2020-02-24T19:11:05+09:00
javascriptのfor in(オブジェクトのプロパティ名についての繰り返し)
for-in文は、オブジェクトに存在するプロパティについて、プロパティの名前を順不同で取り出していき、処理を実行する構文です。
for in の書き方
for([プロパティ名を格納する変数] in [オブジェクト]) {
  文
}
指定したオブジェクトについて、プロパティ名を順不同で取り出し、inの前に定義した変数に格納してから処理を実行します。この時、繰り返しはすべてのプロパティについて処理を行うと終了します。
for in の例
var sum = 0;
var obj = { a:1, b:2, c:3 };
for(var name in obj) { // オブジェクトの中のプロパティ名を取り出す。
  sum += obj[name];
}
参考
- 投稿日:2020-02-24T17:45:32+09:00
Node.js 事始め
はじめに
TypeScriptを覚えたいのですが、まずはNode.jsの勉強から始めた方が良さそうな感じでしたので、Node.jsの勉強を始めました。
Noda.jsのインストール
公式サイトからインストーラーをダウンロードしてインストールします。
LTS版の方が無難だと思います。
Node.jsはmacやLinuxのイメージが強かったのですが、Windowsでも問題なく動きました。環境
OS:Windows 10 Pro 64bit
DB:SQL Server 2019(Cent OS 8 on Hyper-V)
node.js:v12.16.1
npm:v6.13.4
Editor:Visual Studio Code作業フォルダの作成
今回は「D:\Node」を作業フォルダにしました。
Hello World
作業フォルダに以下のファイルを作成します。
sample01.jsvar http = require('http'); var server = http.createServer( function(req, res) { res.writeHead( 200, {'Content-Type': 'text/plain'}); res.write('Hello World'); res.end(); }); server.listen(3000); console.log('サーバを起動しました');コマンドプロンプトを起動し、作業フォルダに移動します。
D:
CD Node
Node.jsを起動します。
起動方法は「node ファイル名」ですnode sample01.js問題がなければ、コマンドプロンプトに以下の様に表示されます。
サーバを起動しましたhttp://localhost:3000
にアクセスします
ブラウザに「Hello World」と表示されればOKです。


- 投稿日:2020-02-24T17:45:32+09:00
Node.js (サーバサイド JavaScript) 事始め
はじめに
TypeScriptを覚えたいのですが、まずはNode.jsの勉強から始めた方が良さそうな感じでしたので、Node.jsの勉強を始めました。
Noda.jsのインストール
公式サイトからインストーラーをダウンロードしてインストールします。
LTS版の方が無難だと思います。
Node.jsはmacやLinuxのイメージが強かったのですが、Windowsでも問題なく動きました。環境
OS:Windows 10 Pro 64bit
DB:SQL Server 2019(Cent OS 8 on Hyper-V)
node.js:v12.16.1
npm:v6.13.4
Editor:Visual Studio Code作業フォルダの作成
今回は「D:\Node」を作業フォルダにしました。
Hello World
作業フォルダに以下のファイルを作成します。
sample01.jsvar http = require('http'); var server = http.createServer( function(req, res) { res.writeHead( 200, {'Content-Type': 'text/plain'}); res.write('Hello World'); res.end(); }); server.listen(3000); console.log('サーバを起動しました');コマンドプロンプトを起動し、作業フォルダに移動します。
D:
CD Node
Node.jsを起動します。
起動方法は「node ファイル名」ですnode sample01.js問題がなければ、コマンドプロンプトに以下の様に表示されます。
サーバを起動しましたhttp://localhost:3000
にアクセスします
ブラウザに「Hello World」と表示されればOKです。
- 投稿日:2020-02-24T17:18:17+09:00
Node.js日記#2
- 投稿日:2020-02-24T16:16:49+09:00
javascript(node.js)のsetHeaderとwriteHeadの違い
- 投稿日:2020-02-24T01:43:44+09:00
AWS LambdaによるスクレイピングでQiita Organizationの最新記事を取得しSlackに通知するBotを作った
Organizationページの「最新の投稿」をAWS Lambda(node.js)でスクレイピングし、新しい投稿の記事のタイトルとURLをSlackに投稿するBotを作ってみました
コードはここに置いてます(大分汚いです)
https://github.com/uji/qiita-organization-scraping/blob/master/app.jsAWS Lambdaの処理の流れ
- 「最新の投稿」にある記事をスクレイピングで取得
- AWS S3にあるtxtファイルを確認し、Slack未投稿の記事の有無を確認
- 未投稿の記事をSlackに投稿
- 最新記事のタイトルをtxtファイルでAWS S3に保存
投稿済みの記事を永続化する必要があるのですが、DB使うのは大げさな気がしたのでS3にtxtで保存します
スクレイピング
AWS Lambda 用のchromium chrome-aws-lambda を使ってスクレイピングしました
Google Cloud Functionsでも使えるっぽいです
puppeteerと使用感はほぼ同じです
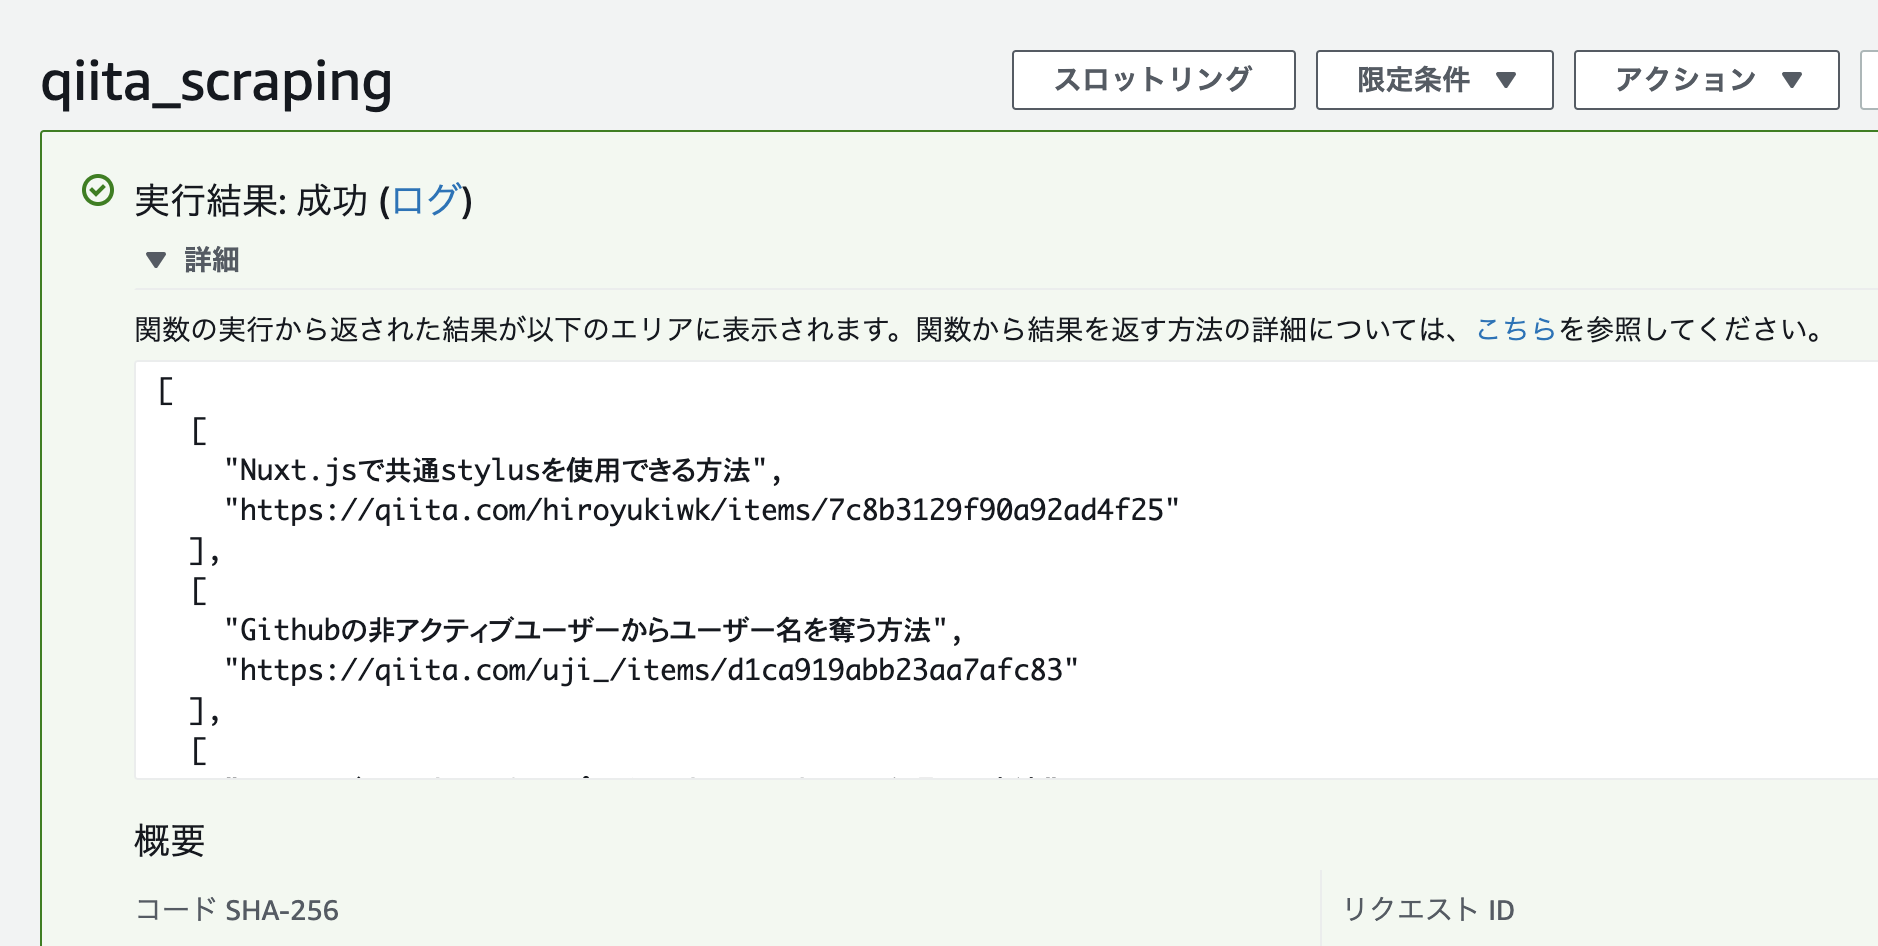
.of-ItemLink_header-titleclassを取ってくると「最新の投稿」の要素を取ってこれますconst chromium = require("chrome-aws-lambda"); exports.handler = async (event, context) => { let browser = null; let elems = []; try { browser = await chromium.puppeteer.launch({ args: chromium.args, defaultViewport: chromium.defaultViewport, executablePath: await chromium.executablePath, headless: chromium.headless, }); let page = await browser.newPage(); await page.goto("http://qiita.com/organizations/" + process.env.ORGANIZATION_NAME); const selector = ".of-ItemLink_header-title"; elems = await page.$$eval(selector, es => es.map(e => [e.textContent, e.href])); } catch (error) { return context.fail(error); } finally { if (browser !== null) { await browser.close(); } } return context.succeed(elems); };Slackに通知する
@slack/boltまたは@slack/web-apiでSlack APIを叩き、取得した記事をSlackに投げます
Slack Botでメッセージを送るには、singning secret、bot token、channel idが必要になりますboltの場合const { App, ExpressReceiver } = require("@slack/bolt"); const receiver = new ExpressReceiver({ signingSecret: process.env.SLACK_SIGNING_SECRET }); const app = new App({ token: process.env.SLACK_BOT_TOKEN, receiver: receiver }); app.client.chat.postMessage({ channel: process.env.SLACK_CHANNEL, text: "message", token: process.env.SLACK_BOT_TOKEN });S3のテキストファイル読み込み、上書き
投稿済みの記事のタイトルを永続化します
aws-sdkを使うと結構簡単にS3にアクセスできます読み込みconst AWS = require("aws-sdk"); const s3 = new AWS.S3({ region: "ap-northeast-1" }); let s3Params = { Bucket: process.env.BACKET_NAME, Key: process.env.FILE_NAME }; s3.getObject(s3Params, (err, data) => { if (err) return context.fail(err); else latest = data.Body.toString(); });上書きconst AWS = require("aws-sdk"); const s3 = new AWS.S3({ region: "ap-northeast-1" }); let s3Params = { Bucket: process.env.BACKET_NAME, Key: process.env.FILE_NAME, Body: "タイトル" }; s3.putObject(s3Params, (err) => { if (err) return context.fail(err); });AWS Lambdaの設定
ランタイムにnode.jsを指定してLambdaを作成します
まあまあ時間のかかる処理なので、基本設定からメモリ、タイムアウト時間を変更しておきます
メモリは512MB、タイムアウト時間は1分にしましたnode_modulesはzipにまとめてLayerに登録します
AWS Lambda レイヤーAWS Lambdaで動かす
コードをLambdaに書いてテストを実行してみます
Slackに通知されました
AWS Cloud Watch Eventsで定期実行
AWS LambdaのトリガーにAWS Cloud Watch Eventsを追加して定期実行されるようにします
毎朝9時に実行される設定にしました
まとめ
今回はスクレイピングで取得しましたがQiita APIを使ってユーザーごとの最新記事をとる方法もあります
そっちの方が良さそう