- 投稿日:2020-02-20T22:57:36+09:00
スクリプトでPuppetMasterのRagdoll作成
概要
スクリプトでPuppetMasterのRagdollを作成します。
※コレをスクリプトでやります。実装
using UnityEngine;
using RootMotion.Dynamics;

public class Set : MonoBehaviour
{
    [SerializeField] GameObject Obj;

    void Start()
    {
        var anim = Obj.GetComponent<Animator>();

        var r = new BipedRagdollReferences();
        r.root = Obj.transform;
        r.hips = anim.GetBoneTransform(HumanBodyBones.Hips);
        r.spine = anim.GetBoneTransform(HumanBodyBones.Spine);
        r.chest = anim.GetBoneTransform(HumanBodyBones.Chest);
        r.head = anim.GetBoneTransform(HumanBodyBones.Head);
        r.leftUpperLeg = anim.GetBoneTransform(HumanBodyBones.LeftUpperLeg);
        r.leftLowerLeg = anim.GetBoneTransform(HumanBodyBones.LeftLowerLeg);
        r.leftFoot = anim.GetBoneTransform(HumanBodyBones.LeftFoot);
        r.rightUpperLeg = anim.GetBoneTransform(HumanBodyBones.RightUpperLeg);
        r.rightLowerLeg = anim.GetBoneTransform(HumanBodyBones.RightLowerLeg);
        r.rightFoot = anim.GetBoneTransform(HumanBodyBones.RightFoot);
        r.leftUpperArm = anim.GetBoneTransform(HumanBodyBones.LeftUpperArm);
        r.leftLowerArm = anim.GetBoneTransform(HumanBodyBones.LeftLowerArm);
        r.leftHand = anim.GetBoneTransform(HumanBodyBones.LeftHand);
        r.rightUpperArm = anim.GetBoneTransform(HumanBodyBones.RightUpperArm);
        r.rightLowerArm = anim.GetBoneTransform(HumanBodyBones.RightLowerArm);
        r.rightHand = anim.GetBoneTransform(HumanBodyBones.RightHand);

        BipedRagdollCreator.Create(r, BipedRagdollCreator.Options.Default);
    }
}
参考
https://www.youtube.com/watch?v=y-luLRVmL7E&feature=emb_title

- 投稿日:2020-02-20T19:30:35+09:00
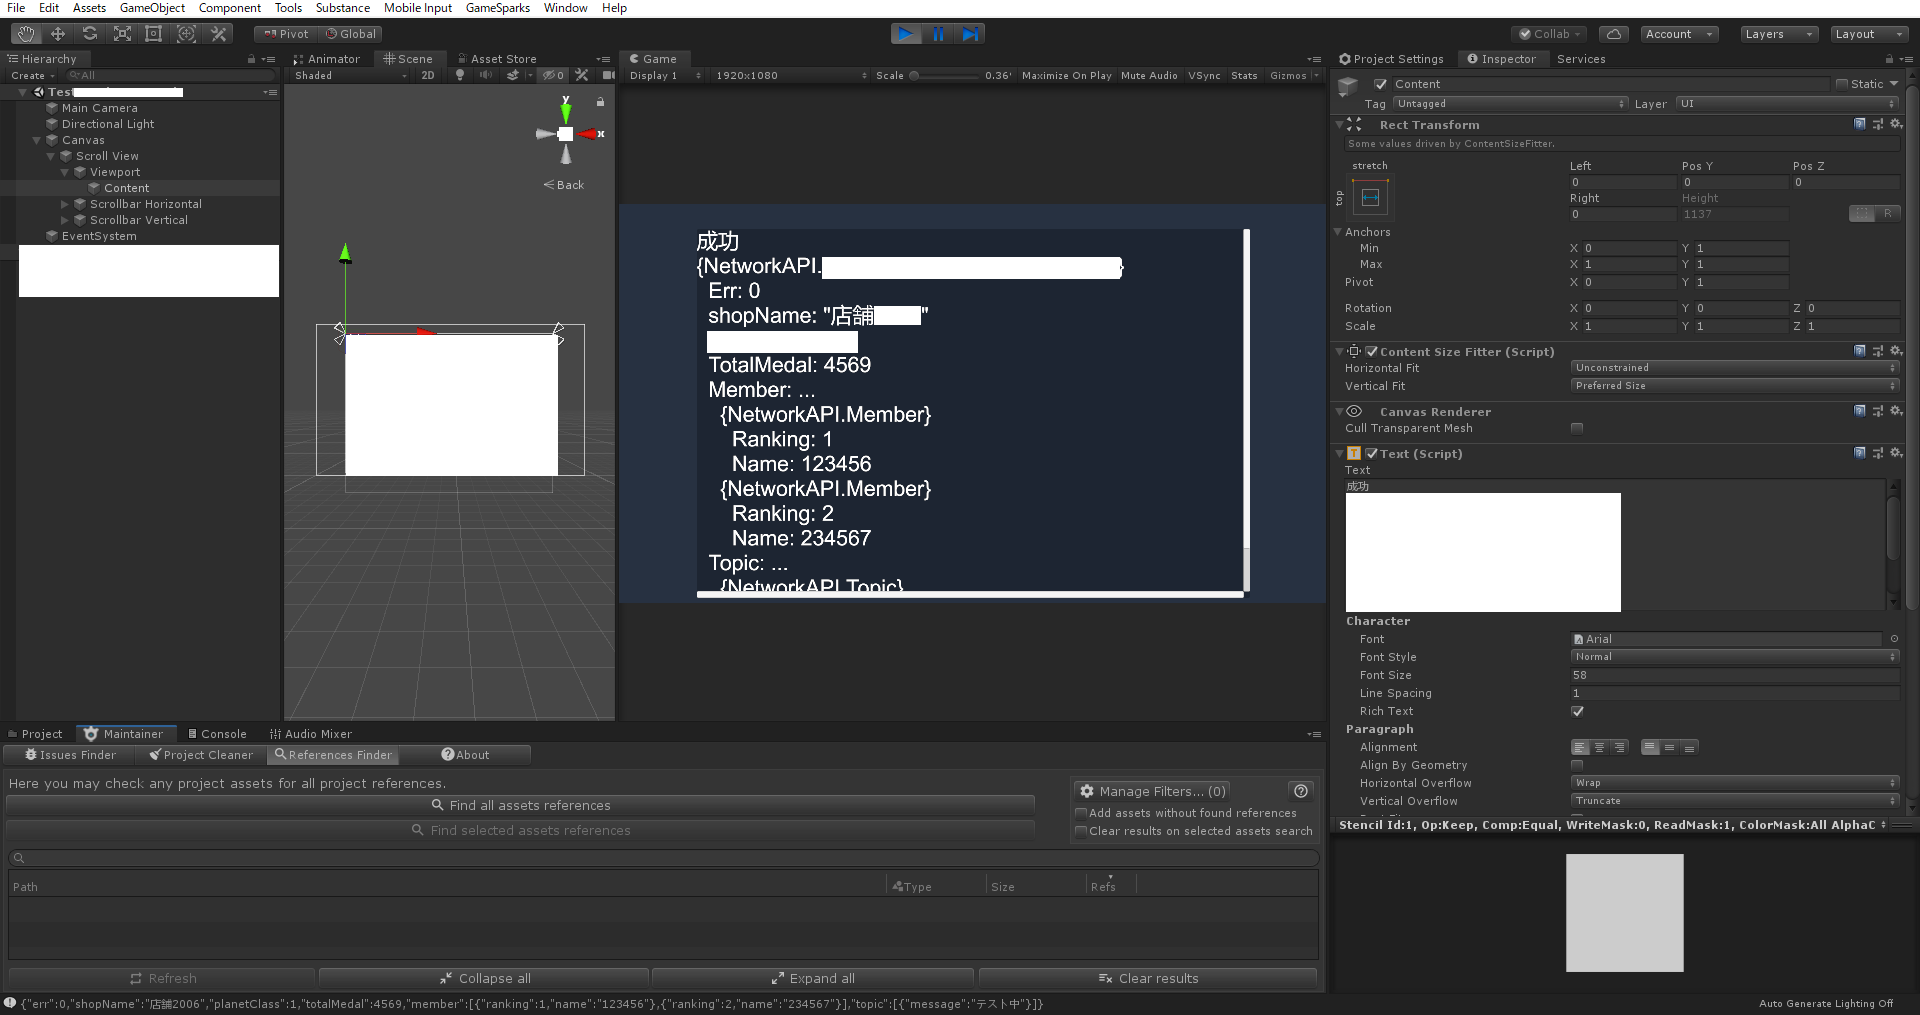
Unity API実装で値ちゃんと受け取れてるか確認
↓C#の頭いいやつが作ったリフレクションで変数群取れるやつ用意する
ObjectDumper.csusing System; using System.Collections; using System.Collections.Generic; using System.Reflection; using System.Text; public class ObjectDumper { private int _level; private readonly int _indentSize; private readonly StringBuilder _stringBuilder; private readonly List<int> _hashListOfFoundElements; private ObjectDumper(int indentSize) { _indentSize = indentSize; _stringBuilder = new StringBuilder(); _hashListOfFoundElements = new List<int>(); } public static string Dump(object element) { return Dump(element, 2); } public static string Dump(object element, int indentSize) { var instance = new ObjectDumper(indentSize); return instance.DumpElement(element); } private string DumpElement(object element) { if (element == null || element is ValueType || element is string) { Write(FormatValue(element)); } else { var objectType = element.GetType(); if (!typeof(IEnumerable).IsAssignableFrom(objectType)) { Write("{{{0}}}", objectType.FullName); _hashListOfFoundElements.Add(element.GetHashCode()); _level++; } var enumerableElement = element as IEnumerable; if (enumerableElement != null) { foreach (object item in enumerableElement) { if (item is IEnumerable && !(item is string)) { _level++; DumpElement(item); _level--; } else { if (!AlreadyTouched(item)) DumpElement(item); else Write("{{{0}}} <-- bidirectional reference found", item.GetType().FullName); } } } else { MemberInfo[] members = element.GetType().GetMembers(BindingFlags.Public | BindingFlags.Instance); foreach (var memberInfo in members) { var fieldInfo = memberInfo as FieldInfo; var propertyInfo = memberInfo as PropertyInfo; if (fieldInfo == null && propertyInfo == null) continue; var type = fieldInfo != null ? fieldInfo.FieldType : propertyInfo.PropertyType; object value = fieldInfo != null ? fieldInfo.GetValue(element) : propertyInfo.GetValue(element, null); if (type.IsValueType || type == typeof(string)) { Write("{0}: {1}", memberInfo.Name, FormatValue(value)); } else { var isEnumerable = typeof(IEnumerable).IsAssignableFrom(type); Write("{0}: {1}", memberInfo.Name, isEnumerable ? "..." : "{ }"); var alreadyTouched = !isEnumerable && AlreadyTouched(value); _level++; if (!alreadyTouched) DumpElement(value); else Write("{{{0}}} <-- bidirectional reference found", value.GetType().FullName); _level--; } } } if (!typeof(IEnumerable).IsAssignableFrom(objectType)) { _level--; } } return _stringBuilder.ToString(); } private bool AlreadyTouched(object value) { if (value == null) return false; var hash = value.GetHashCode(); for (var i = 0; i < _hashListOfFoundElements.Count; i++) { if (_hashListOfFoundElements[i] == hash) return true; } return false; } private void Write(string value, params object[] args) { var space = new string(' ', _level * _indentSize); if (args != null) value = string.Format(value, args); _stringBuilder.AppendLine(space + value); } private string FormatValue(object o) { if (o == null) return ("null"); if (o is DateTime) return (((DateTime)o).ToShortDateString()); if (o is string) return string.Format("\"{0}\"", o); if (o is char && (char)o == '\0') return string.Empty; if (o is ValueType) return (o.ToString()); if (o is IEnumerable) return ("..."); return ("{ }"); } }使い方
Example.cs//データ表示したい型をuserに代入するとstringに変換される var dump = ObjectDumper.Dump(user);使用例
TestAPI.csusing NetworkAPI; using UnityEngine; using UnityEngine.UI; public class TestAPI : MonoBehaviour { Text test; // Start is called before the first frame update void Start() { test = this.gameObject.GetComponent<Text>(); //API送るなにか作った想定 APIManager.Api(hoge, GetRanking_Success, GetRanking_Failure); } private void GetRanking_Failure(NetworkStatus status, int bizerror, string bizerrormessage) { test.text = "失敗\nサーバーのURL接続の設定合ってますか?\n"; } private void GetRanking_Success(object data) { //受け取りたい型として変換 GetRankingResponseForm getData = data as GetRankingResponseForm; //受け取った型をstringに変換 string dump = ObjectDumper.Dump(getData); //表示 test.text = "成功\n"+dump; } }だいたいこんな感じでそれぞれのAPIごとにテストシーン作ってくといいかも
- 投稿日:2020-02-20T18:43:44+09:00
【Unity(C#)】サンプルから理解するUniRx
めちゃくちゃ難しかった
世の中には大量にUniRxに関する
最強にわかりやすい資料が転がっているのですが、
どうやら私は人より完全に理解した気になるのが早いらしく、
悪い勘違いをしたまま、完全に理解した気になっていたようです。現時点でもその可能性は否定できませんが、
実際のサンプルを用いて人に説明するつもりで学んでいけば、
より理解が深まるのではないかと思い、メモを残すことにしました。実際のサンプル
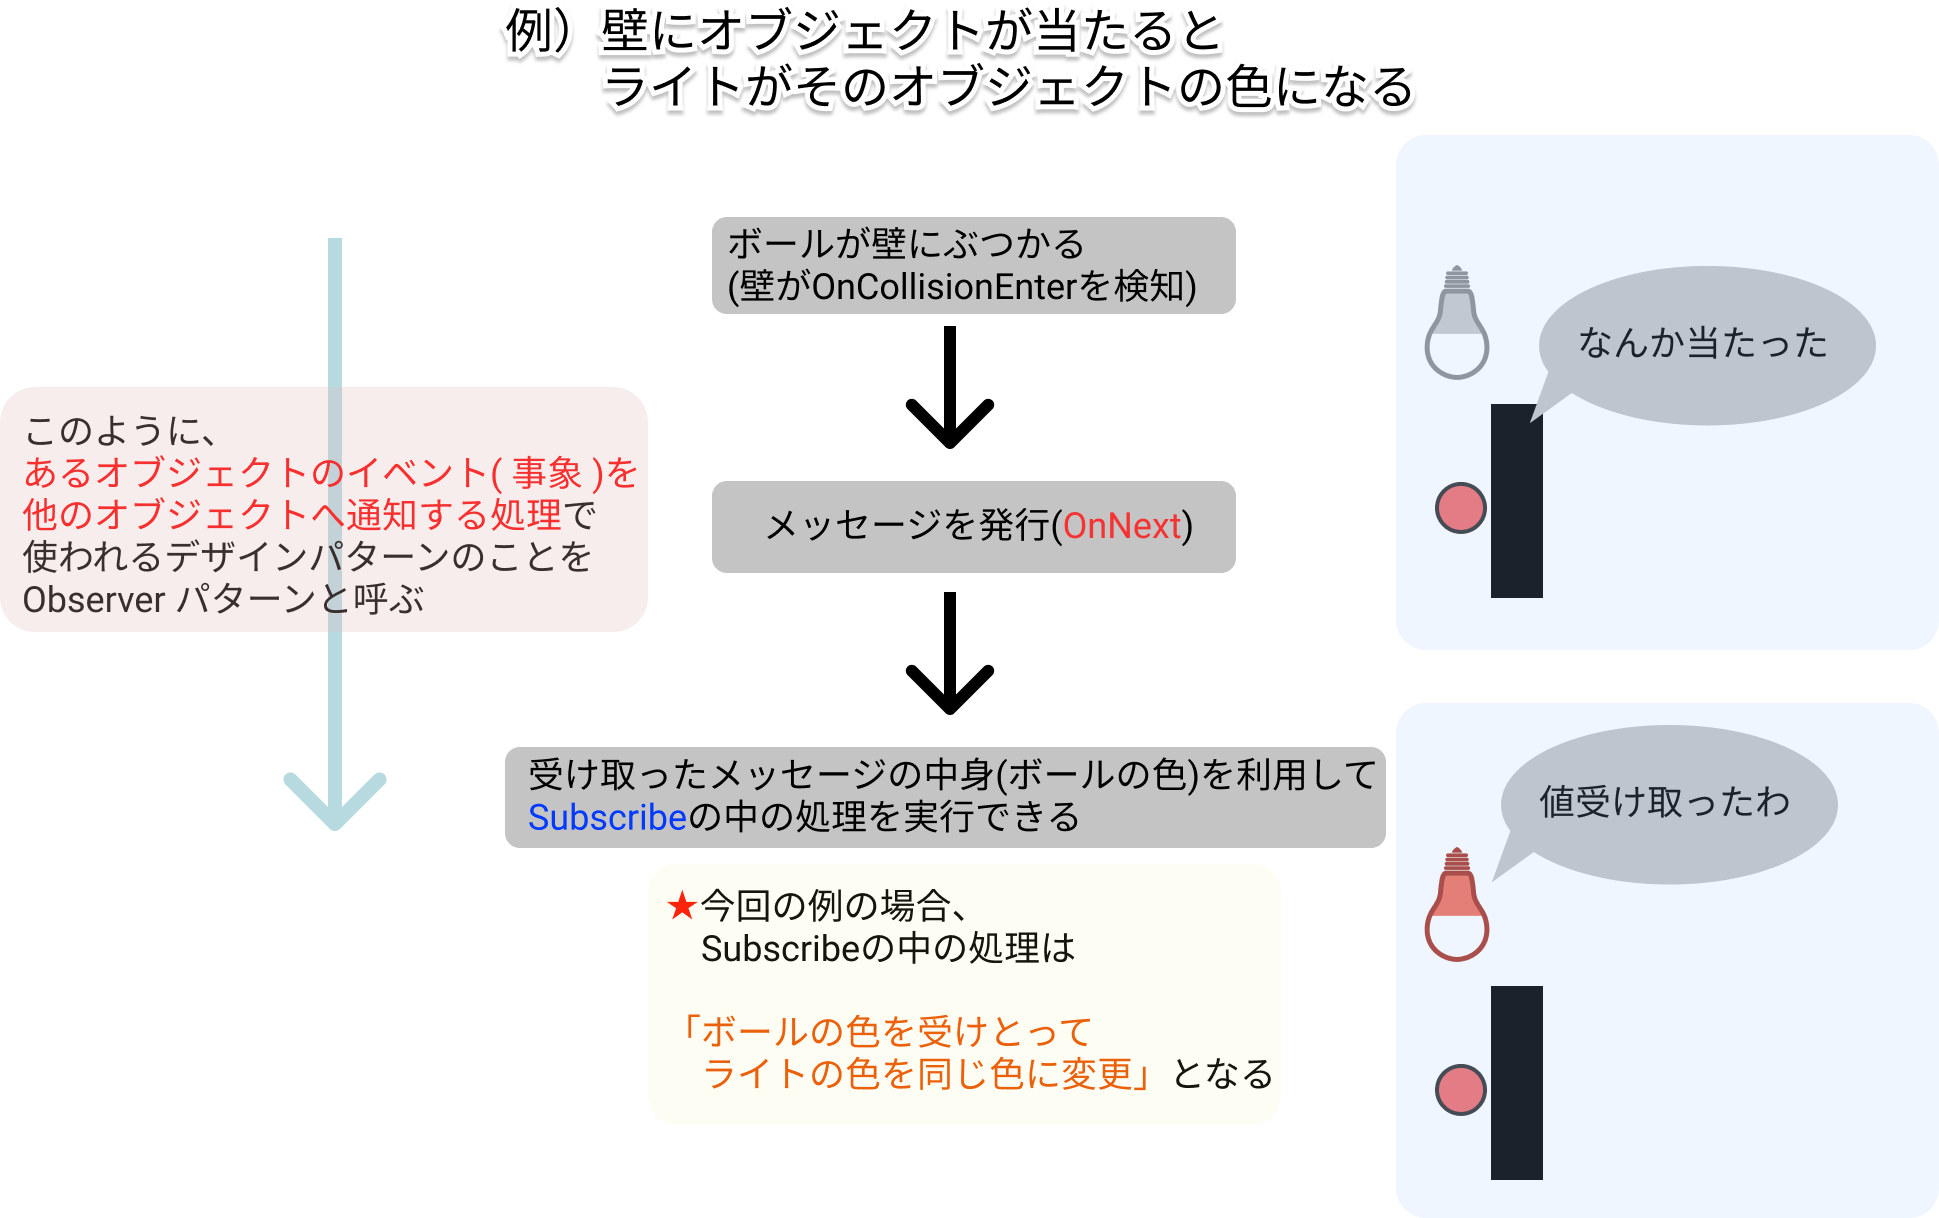
実際のサンプルがこちらです。
右の黒い柱のようなオブジェクト(この記事内では"壁"とします)に
球体(この記事内では"ボール"とします)が衝突すると
ライトの色がボールの色と同じ色に変化します。この程度ならUniRxを使わずとも簡単に実装可能なので
行われている処理をイメージしやすいと思いサンプルに選びました。UniRxを利用
では実際にUniRxを使った場合はどうなるのか見ていきます。
図の通りです。
と言いたいところですが
自分でも嫌になるくらいごちゃごちゃしてしまったので、
コードを追って説明する上での補足として見るぐらいがいいと思います。では実際にコードを追っていきます。
コード
using UniRx;
using UnityEngine;
using System;
/// <summary>
/// 壁にアタッチ
/// </summary>
public class CollisionNotify : MonoBehaviour
{
    //下のコメントアウトしたプロパティを簡潔に書いたらこうなる
    //IObservableは外部のクラスで監視されるためpublicで公開しておく
    public IObservable<Color> colorObservable => colorSubject;

    //public IObservable<Color> triggerObservable
    //{
    //    get { return colorSubject; }
    //}

    //何かしら起きたことをお知らせする機能(SubjectのIObserver)はこのクラス内で使用するので外部に公開する必要はない
    readonly Subject<Color> colorSubject = new Subject<Color>();

    //オブジェクトの衝突時、メッセージを発行する
    void OnCollisionEnter(Collision collision)
    {
        Color otherObjColor = collision.gameObject.GetComponent<MeshRenderer>().material.color;
        colorSubject.OnNext(otherObjColor);
    }
}
CollisionNotifyクラス内ではIObservable,Subject,OnNextが書かれています。しかし、実際にObserverパターンの中の具体的な処理を担っているのは
ここではSubject,OnNextのみです。
IObservableは外部に公開しており、
他のクラス内でやってほしい処理を登録する役割を担います。
次に先ほど具体的な処理を担っていなかった
IObservableに対して別クラスにて役割を与えます。using UnityEngine; using UniRx; /// <summary> /// 適当なオブジェクトにアタッチ /// </summary> public class LightColorChanger : MonoBehaviour { [SerializeField] CollisionNotify collisionNotify; [SerializeField] Light directionalLight; void Start() { //OnNextメッセージを受け取ったら実行(≒OnNextメッセージが飛んでくるまで監視される) collisionNotify.colorObservable .Subscribe(collisionObjectColor => { directionalLight.color = collisionObjectColor; Debug.Log("色変わったよ!"); }) .AddTo(this); } }コード内のコメントにもある通り、
発行された値(OnNextの引数に指定した値)を受け取って、
Subscribe内の処理を実行します。なので
Subscribe(collisionObjectColor => {})のcollisionObjectColorにはcolorSubject.OnNext(otherObjColor);で
発行したメッセージの中身のotherObjColorが入っています。つまり、
①オブジェクトが壁にぶつかる
②メッセージが発行される
③メッセージの中の値を受け取る
④登録した処理が実行される(値を利用できる)
となります。ここまでのメモを振り返って改めて最初の図を見ると、
最初に見た時よりはマシに見えてきました。
Subjectは外部のクラスに公開しない
Subjectをreadonlyにして、OnNextを発行するクラスを制限していました。CollisionNotifyクラスreadonly Subject<Color> colorSubject = new Subject<Color>();設計の観点から、メッセージを発行するクラスは、
不用意に外部のクラスに公開するのはよろしくないそうです。これは別にprivateでも問題ないのですが、
"外では使わないよ"というのを強調するために使っています。UniRx.Triggers
先ほどの図で説明した一連の流れをストリームソースと呼びます。
ただ、Unityには既にいろんなコールバックイベント(Button押したら...衝突したら...とか)が存在しています。
そこで、既存のコールバックイベントを活用してストリームソースを作りたい。。。
という願いに答えてくれる機能が既にあります。
例えば、先ほど例に挙げた、
OnCollisionEnterを検知しOnNextメッセージを発行するサンプル
は下記のように書き換えできます。
using UniRx.Triggers; //これ必要
using UniRx;
using UnityEngine;

public class UseOnCollisionEnterAsObservable : MonoBehaviour
{
    [SerializeField]
    Light directionalLight;

    void Start()
    {
        this.OnCollisionEnterAsObservable()
             .Subscribe(collisionObject =>
             {
                 ColorChange(collisionObject);
                 Debug.Log("色変わったよ!");
             })
           .AddTo(this);
    }

    void ColorChange(Collision collision)
    {
        directionalLight.color = collision.gameObject.GetComponent<MeshRenderer>().material.color;
    }
}
いろんなのがある(特にUI関連)ので実際に触ってみると便利さがわかるかと思います。
【参考リンク】:UniRx.Triggers
UniRxって結局何
Q. UniRxって結局何がすごいの?
という疑問。
その答えとしては、いろいろあるのでしょうが、A. MVPパターンを簡単に実装できる
が一番大きな利点でしょうか。(特にお仕事で利用する場合は)
それに伴ってまた疑問となるのが、
Q. MVPパターンって何がすごいの?
ですが、
A. 規模が大きくなっても比較的楽に拡張ができる
が答えでしょうか。
(私もあまり詳しくないので、もっと他に理由があれば教えてください)【参考リンク】:Unityで学ぶMVPパターン ~ UniRxを使って体力Barを作成する ~
最後に
もうちょっと踏み込んだ理解をしようと試みたんですが、
今の自分ではまだ難しかったです。これから学習する方の入門書の入門書となれば幸いです。
今後はそもそもの理解度を深めつつ、Hot、Cold等の話もインプットして自分なりのメモを残そうと思います。
参考リンク

- 投稿日:2020-02-20T18:31:28+09:00
【Unity、Windowsビルドエラー Burst】解決済み
UnityでWindows向けにビルドしたときに下記エラーが出たので下記の様なエラーが出た。
Burst.Backend.CompilerBackendException: Unable to write module to filePath:
C:\Users\?????\AppData\Local\Temp\burst-aot3zybxaez.424\lib_burst_generated_part_0.bc

Burst.Backend.StandardCompilerBackend.ErrorHandlerCallback(String reason)
Burst.Backend.StandardCompilerBackend.SaveModuleToDisk(Module module, String filePath)
Burst.Backend.ChainCompilerBackend.SaveModuleToDisk(Module module, String filePath)
Burst.Compiler.IL.Aot.AotCompiler.ModuleToLink.WriteModule(ExtendedCompilerBackend backend, TargetMachine targetMachine)
Burst.Compiler.IL.Aot.AotCompiler.Link(List`1 groups, AotCompilerOptions compilerOptions)
Burst.Bcl.BclApp.CompileAndLink(List`1 methodGroups)
Burst.Bcl.Program.Main(String[] args)
BuildFailedException: Burst compiler (1.1.1) failed running
環境
Windows10(x86-64)
Unity 2019.2今回キーとなったパッケージ
Barracuda 0.4
Burst解決法
エラーの内容で、パスの一部が???なので、
ディレクトリのパスが日本語になっているところの問題なのかなと思ったが、
先人のやり取り曰くそうなでもないらしい。下記はその抜粋だが、特定のUnityバージョンでBurstが正常に動かないそうな。
https://issuetracker.unity3d.com/issues/linux-burst-compiler-fails-when-building-windows-player[LINUX] BURST COMPILER FAILS WHEN BUILDING WINDOWS PLAYER
Linux-Jul 31, 2019
To reproduce:
1) Create a new project
2) Add a Burst package to project
3) Build a windows playerResult: You get errors that Burst Compiler failed running. Build succeeds in 2018.4 and 2019.1 and executables are made; but fails in 2019.2 and 2019.3
Reproduced in 2018.4.0f1, 2019.1.0b2, 2019.3.0a11
感想⇒ マジで。
ただ、先人のおかげでちゃんと解決法が公式ページにありました↓
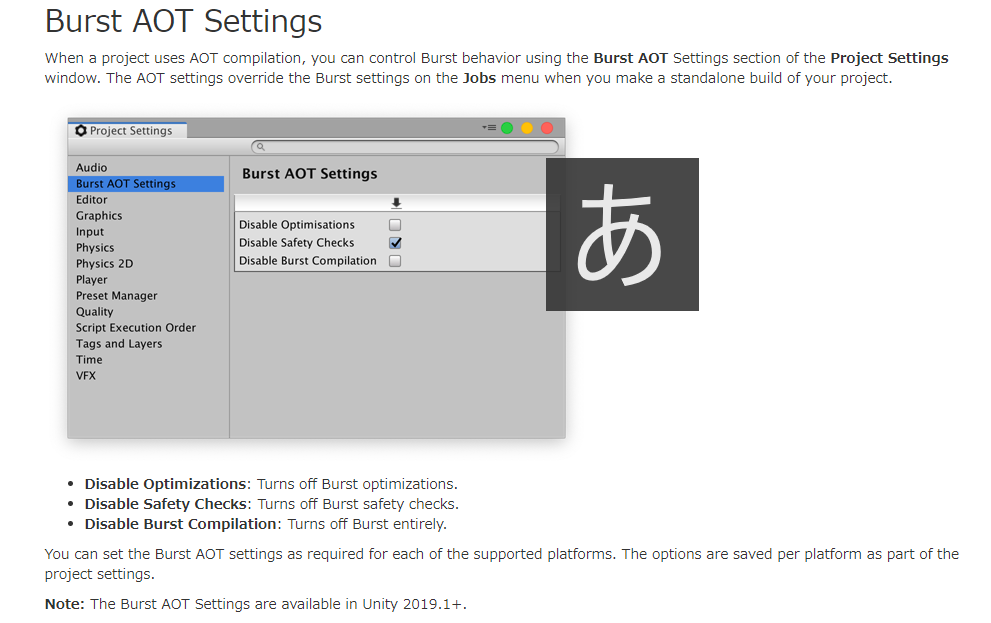
https://docs.unity3d.com/Packages/com.unity.burst@1.1/manual/index.html?_ga=2.105268739.1800891498.1582179731-112051585.1573460324#standalone-player-support大事なのはこのあたり。
Project Settings > Burst AOT Settings にて
全項目をDisableにするとイケた!!!感想
良かった。ほっとした。
BarracudaがBurstに依存しており、
私の開発環境ではOnnxを読むためのBarracudaはどうしても外せなかったから一安心でござる。以上。どどん。
- 投稿日:2020-02-20T15:45:58+09:00
Realsense D435i のIMUの値をUnityで取得する。
UnityでIMUのデータを取得するためのスクリプト
データが取得できることを確認。。詳細はまだ、、、
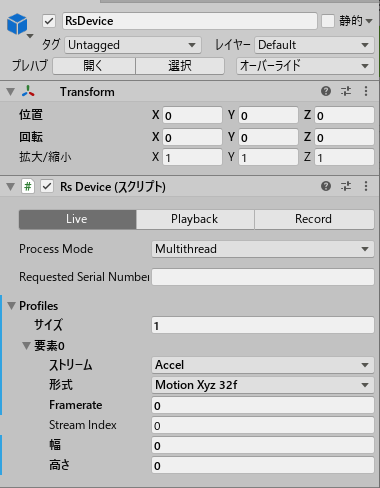
Realsens SDK/Prefabs/RsDeveice を Assestにおいて、
RdDeviceの
ストリームを"accel"または"gyro"
形式を"Motion Xyz 32f"
Framerate,StreamIndex,幅,高さを"0"
Scriptを作成する。名前はIMUにする。
IMU.csusing System.Collections; using System.Collections.Generic; using UnityEngine; using Intel.RealSense; using System; using System.Threading; using UnityEngine.Events; using System.Runtime.InteropServices; public class IMU : MonoBehaviour { private static TextureFormat Convert(Format lrsFormat) { switch (lrsFormat) { case Format.Z16: return TextureFormat.R16; case Format.Disparity16: return TextureFormat.R16; case Format.Rgb8: return TextureFormat.RGB24; case Format.Rgba8: return TextureFormat.RGBA32; case Format.Bgra8: return TextureFormat.BGRA32; case Format.Y8: return TextureFormat.Alpha8; case Format.Y16: return TextureFormat.R16; case Format.Raw16: return TextureFormat.R16; case Format.Raw8: return TextureFormat.Alpha8; case Format.Disparity32: return TextureFormat.RFloat; case Format.Yuyv: case Format.Bgr8: case Format.Raw10: case Format.Xyz32f: case Format.Uyvy: case Format.MotionRaw: case Format.MotionXyz32f: case Format.GpioRaw: case Format.Any: default: throw new ArgumentException(string.Format("librealsense format: {0}, is not supported by Unity", lrsFormat)); } } public RsFrameProvider Source; public Stream _stream; public Format _format; public int _streamIndex; Predicate<Frame> matcher; public struct Vector3 { public float x, y, z; } public Vector3 ImuData; void Start() { Source.OnStart += OnStartStreaming; Source.OnStop += OnStopStreaming; } void Update() { } void OnDestroy() { } protected void OnStopStreaming() { Source.OnNewSample -= OnNewSample; } void OnNewSample(Frame frame) { try { if (frame.IsComposite) { using (var fs = frame.As<FrameSet>()) using (var f = fs.FirstOrDefault(matcher)) { if (f != null) { ImuData=Marshal.PtrToStructure<Vector3>(f.Data); print("x=" + ImuData.x + " , y=" + ImuData.y + " , y=" + ImuData.z); } return; } } if (!matcher(frame)) return; } catch (Exception e) { Debug.LogException(e); // throw; } } public void OnStartStreaming(PipelineProfile activeProfile) { matcher = new Predicate<Frame>(Matches); Source.OnNewSample += OnNewSample; } private bool Matches(Frame f) { using (var p = f.Profile) return p.Stream == _stream && p.Format == _format && p.Index == _streamIndex; } }RsDeviceの下に空のGameObjectを置く。(名前を例えばIMUにする)
上記スクリプトを組み込む。設定をRsDeviceと一緒にする。
まだ、うまくデータが取得出来たら、printは消す。

- 投稿日:2020-02-20T15:45:58+09:00
Realsense D435i のIMUをUnityで取得する。
UnityでIMUでデータを取得するためのスクリプト
データが取得できることを確認。。詳細はまだ、、、
Realsens SDK/Prefabs/RsDeveice を Assestにおいて、
RdDeviceの
ストリームを"accel"または"gyro"
形式を"Motion Xyz 32f"
Framerate,StreamIndex,幅,高さを"0"
Scriptを作成する。名前はIMUにする。
IMU.csusing System.Collections; using System.Collections.Generic; using UnityEngine; using Intel.RealSense; using System; using System.Threading; using UnityEngine.Events; using System.Runtime.InteropServices; public class IMU : MonoBehaviour { private static TextureFormat Convert(Format lrsFormat) { switch (lrsFormat) { case Format.Z16: return TextureFormat.R16; case Format.Disparity16: return TextureFormat.R16; case Format.Rgb8: return TextureFormat.RGB24; case Format.Rgba8: return TextureFormat.RGBA32; case Format.Bgra8: return TextureFormat.BGRA32; case Format.Y8: return TextureFormat.Alpha8; case Format.Y16: return TextureFormat.R16; case Format.Raw16: return TextureFormat.R16; case Format.Raw8: return TextureFormat.Alpha8; case Format.Disparity32: return TextureFormat.RFloat; case Format.Yuyv: case Format.Bgr8: case Format.Raw10: case Format.Xyz32f: case Format.Uyvy: case Format.MotionRaw: case Format.MotionXyz32f: case Format.GpioRaw: case Format.Any: default: throw new ArgumentException(string.Format("librealsense format: {0}, is not supported by Unity", lrsFormat)); } } public RsFrameProvider Source; public Stream _stream; public Format _format; public int _streamIndex; Predicate<Frame> matcher; public struct Vector3 { public float x, y, z; } public Vector3 ImuData; void Start() { Source.OnStart += OnStartStreaming; Source.OnStop += OnStopStreaming; } void Update() { } void OnDestroy() { } protected void OnStopStreaming() { Source.OnNewSample -= OnNewSample; } void OnNewSample(Frame frame) { try { if (frame.IsComposite) { using (var fs = frame.As<FrameSet>()) using (var f = fs.FirstOrDefault(matcher)) { if (f != null) { ImuData=Marshal.PtrToStructure<Vector3>(f.Data); print("x=" + ImuData.x + " , y=" + ImuData.y + " , y=" + ImuData.z); } return; } } if (!matcher(frame)) return; } catch (Exception e) { Debug.LogException(e); // throw; } } public void OnStartStreaming(PipelineProfile activeProfile) { matcher = new Predicate<Frame>(Matches); Source.OnNewSample += OnNewSample; } private bool Matches(Frame f) { using (var p = f.Profile) return p.Stream == _stream && p.Format == _format && p.Index == _streamIndex; } }RsDeviceの下に空のGameObjectを置く。(名前を例えばIMUにする)
上記スクリプトを組み込む。設定をRsDeviceと一緒にする。
まだ、printなので、その部分を変数にする必要はある。
- 投稿日:2020-02-20T11:43:53+09:00
Unity2018までのInputManagerを拡張していたら車輪の再発明になっていた話
そもそもの話
- 元々はUnity2018.2.8f1で利用するためのInputManager拡張スクリプトだった(特にXInputを使うゲームパッド用)。
- エディタ拡張の練習がてら拡張をしようとしたときにInputSystemが発表された。
- InputSystemはUnity2019.1から利用可能
とどのつまり、元々再発明をしようとして作ったわけではないです。
Unity2018をまだ利用している方がいらっしゃれば参考にしていただければと思います。Unity2019.1から利用可能なInputSystemについての解説は一切行いませんのでご注意ください!
開発環境
Windows10 Home
Unity2018.2.8f1→Unity2018.4.17f1
VisualStudio 2017 Community→VisualStudio 2019 professional上記環境(特に後者)以外での動作は一切保証してません。
ソースコード
載せているコード外でいくつかバグが発覚したため不具合調整中です
エディタ拡張表示部分
InputManagerEX.csvoid Display() { switch (selected) { #region 操作名 case 0: inputCodeCount = EditorGUILayout.IntField("操作の数", inputCodeCount); using (var scrollView = new EditorGUILayout.ScrollViewScope(new Vector2(0, scroll))) { for (int i = 0; i < inputCodeCount; i++) { try { inputCode[i] = EditorGUILayout.TextField("操作の名前", inputCode[i]); } catch { inputCode.Add(""); inputCode[i] = EditorGUILayout.TextField("操作の名前", inputCode[i]); } } scroll = scrollView.scrollPosition.y; } //横並びの開始 EditorGUILayout.BeginHorizontal(); if (GUILayout.Button("Refresh")) { Debug.Log("画面更新開始"); try { LoadEnum(); Debug.Log("画面更新完了"); } catch (System.Exception e) { Debug.LogError(e.Message); throw; } } if (GUILayout.Button("Export")) { Debug.Log("出力開始"); try { CreateEnum(); ClearDictionary(); Debug.Log("出力完了"); } catch (System.Exception e) { Debug.LogError(e.Message); throw; } } //横並び終了 EditorGUILayout.EndHorizontal(); break; #endregion case 1: try { using (var scrollView = new EditorGUILayout.ScrollViewScope(new Vector2(0, scroll))) { //更新されるたびに初期化する Dictionary<InputCode, KeyCode> keyListDic = new Dictionary<InputCode, KeyCode>(); Dictionary<InputCode, ButtonList> buttonListDic = new Dictionary<InputCode, ButtonList>(); //表示部分更新処理 for (int i = 0; i < (int)InputCode.END; i++) { EditorGUILayout.BeginHorizontal(); #region 操作 EditorGUILayout.BeginVertical(); //Enumのポップアップ表示 GUILayout.Label("操作の名前"); //string型でinputListsと同時に生成などしてるので問題ない GUILayout.Label(inputCode[i]); EditorGUILayout.EndVertical(); #endregion #region ボタン EditorGUILayout.BeginVertical(); GUILayout.Label("ボタンの名前"); buttons[i] = (ButtonList)EditorGUILayout.EnumPopup(buttons[i]); if ((32 < (int)buttons[i]) && ((int)buttons[i] < 41) && !inputManager.CodeAtTriggerDictionary.ContainsKey(inputs[i])) inputManager.SetTrigger(inputs[i], inputManager.GetTriggerAtButton(buttons[i])); else if ((0 < buttons[i]) && ((int)buttons[i] < 33) && !inputManager.CodeDictionary.ContainsKey(inputs[i])) inputManager.SetButton(inputs[i], inputManager.GetKeyCodeAtButton(buttons[i])); else if (!inputManager.CodeDictionaryOnKeyBoard.ContainsKey(inputs[i])) inputManager.SetKeyCode(inputs[i], inputManager.GetKeyCodeAtButton(buttons[i])); EditorGUILayout.EndVertical(); #endregion #region キー EditorGUILayout.BeginVertical(); if (inputManager.CodeAtTriggerDictionary.ContainsKey(inputs[i]) && inputManager.TriggerAtButtonDictionary.ContainsKey(buttons[i])) { GUILayout.Label("トリガー"); GUILayout.Label(inputManager.GetTriggerAtButton(buttons[i]).ToString()); } else { GUILayout.Label("キーコード"); GUILayout.Label(inputManager.GetKeyCodeAtButton(buttons[i]).ToString()); } EditorGUILayout.EndVertical(); #endregion EditorGUILayout.EndHorizontal(); } #region メッセージ EditorGUILayout.BeginVertical(); for (int i = 0; i < (int)InputCode.END; i++) { int count = 0; for (int j = 0; j < (int)InputCode.END; j++) { if ((buttons[i] == buttons[j]) && (i != j)) { count++; } } EditorGUILayout.BeginHorizontal(); if (count > 0) { GUILayout.Label("Attention!!:同一のボタンが割り当てられています!『対象の操作名:" + inputs[i] + ", 対象のボタン:" + buttons[i] + ", 重複している個数:" + count + "』"); } EditorGUILayout.EndHorizontal(); EditorGUILayout.BeginHorizontal(); if (buttons[i] == ButtonList.None) { GUILayout.Label("Attention!!:ボタンが割り当てられていません!『対象の操作名:" + inputs[i] + "』"); } EditorGUILayout.EndHorizontal(); GUILayout.Space(10); } EditorGUILayout.EndVertical(); #endregion scroll = scrollView.scrollPosition.y; } } catch (System.Exception e) { Debug.LogError(e.Message); throw; } break; } }解説
switch文で表示を切り替えています。
1番 InputCode
こちらはswitch文での1番。利用する操作の数と操作の名前を入力。
最終的にExportのボタンを押すことで列挙型を含めた.csファイルを生成しています。2番 CodeJoin
操作とキーコード(コントローラーのボタン)を結び付ける部分です。
同一のボタンが割り当てられている場合とボタンが割り当てられていないときにアテンションします。なお、ボタンの名前を保存する列挙型(ButtonCode.cs)はキーコードとの連動部分でDictionaryでの設定が必要になるために今回はGUIでの設定の実装を見送りました。
実際の処理部分
長いので小分けにします
インスタンス生成部分
InputManager.cs/// <summary> /// インスタンス取得 /// </summary> /// <returns>実体</returns> public static InputManager GetInstance { get { if (inputManager == null) { //GameObjectの生成 myObject = new GameObject("InputManagerGO"); //InputManagerのAdd myObject.AddComponent<InputManager>(); inputManager = myObject.GetComponent<InputManager>(); //初期化 inputManager.Initialize(); } return inputManager; } } public static void DeleteObjct() { #if UNITY_EDITOR DestroyImmediate(myObject); #endif } /// <summary> /// 再生直後に一回だけ実行 /// </summary> void Awake() { #if UNITY_STANDALONE //破壊不可 DontDestroyOnLoad(gameObject); #endif }解説
シングルトンパターンで作製しています。
最初に呼び出されたときに初期化を行い、Awakeメソッドを利用することでアプリケーション開始の最初のフレームでDontDestroyOnLoadオブジェクトとして設定しています。また、InputCode.csを生成する際、ゲームオブジェクトである「InputManagerGO」がアセットの再読み込みを行うAssetDatabase.Refreshメソッドを呼び出すと「InputManagerGO」が再生成されてしまいます。すると、アセットの再読み込みの度に仕事をしない「InputManagerGO」が増えてしまいます。
InputCode.cs生成部分
InputManagerEX.cs/// <summary> /// InputCodeの生成 /// </summary> void CreateEnum() { string path = Application.dataPath + "\\Resouces\\XInputAssistManager\\Scripts\\InputCode.cs"; StringBuilder stringBuilder = new StringBuilder(); stringBuilder.AppendLine("namespace XInputAssistManager"); stringBuilder.AppendLine("{"); stringBuilder.AppendLine(" public enum InputCode"); stringBuilder.AppendLine(" {"); //リストの中身を入れる for (int i = 0; i < inputCodeCount; i++) { stringBuilder.Append(" "); stringBuilder.Append(inputCode[i]); stringBuilder.AppendLine(","); } stringBuilder.Append(" "); stringBuilder.Append("END"); stringBuilder.AppendLine(","); stringBuilder.AppendLine(" }"); stringBuilder.AppendLine("}"); // 文字コードを指定 Encoding enc = Encoding.GetEncoding("UTF-8"); // ファイルを開く StreamWriter writer = new StreamWriter(path, false, enc); // テキストを書き込む writer.Write(stringBuilder.ToString()); // ファイルを閉じる writer.Close(); Debug.Log(path + "に出力"); InputManager.DeleteObjct(); AssetDatabase.Refresh(); try { LoadEnum(); } catch (System.Exception e) { Debug.LogError(e.Message); throw; } }そこで読み込む直前でDestroyImmediateメソッド(をラッパーしたメソッド)を呼び出すことで古い「InputManagerGO」を削除しています。
注意
利用する場合、ProjectSettingsのInputのAxisに"LT(number)"(かっこは不要)をJoyStickAxisの9th axisで追加しなければなりません。
同様に、ProjectSettingsのInputのAxisに"RT(number)"をJoyStickAxisの10th axisで追加しなければなりません。
(numberはコントローラーの数ですので、InputのJoyNumでコントローラーの番号を指定してください)詳しいことはGitHubに
プロジェクトとunitypackageを置いておきますので、そちらで確認してください。参考にさせていただいた記事


- 投稿日:2020-02-20T03:20:24+09:00
マウスクリックをキー入力(FやGなど)の代わりにしたい
こんにちは、私はUnityを初めて二カ月の初心者です。
D,F,G,H,J,の5つのキーを使ってリズムゲーを作っていましたが、
今日、Android用にビルドしたところ、スマホではこの5つの入力が使えない、という超初歩的なことに気づきました。他のUIのクリックボタンは、当然タッチで出来ますが、キー入力で作ったものをタッチ入力に変える方法がどうしてもわかりません。
初心者なので、この対処法は、
①5つのGameObjectをつくる。
②これらにタッチすると、D,F,G,H,J,それぞれのキー入力をしたことにするスクリプトを書き、アタッチする。
という方法にしたいと思っています。この実現の為、色々調べまして、様々な入力方法のコードの書き方は分かったのですが、その先の、
「このInputがあったらキー入力をしたことにするスクリプト」の書き方が全く分かりません。知っているかたがいらっしゃましたら、ご教授いただけますでしょうか。
よろしくお願いいたします。