- 投稿日:2020-02-20T22:02:25+09:00
SwiftUIのプレビューデバイスを設定する方法
SwiftUIのプレビューデバイスを設定する方法
SwiftUIで開発している時、特定の端末または複数の端末でプレビューをみたい時がありますよね。そんな願いを叶える方法です。(SwiftUIチュートリアルをやったことある人は知っているはず)
次のコード内の2つ目のstructのSwiftUIView_Previewsがプレビューに関するコードです。この部分にコードを加えて、プレビューデバイスを設定します。
SwiftUIView.swiftimport SwiftUI struct SwiftUIView: View { var body: some View { Text("Hello, World!") } } /// 以下のコードがプレビューに関するコード struct SwiftUIView_Previews: PreviewProvider { static var previews: some View { SwiftUIView() } }1 特定の端末のプレビューデバイスを設定する
1-1 実装方法
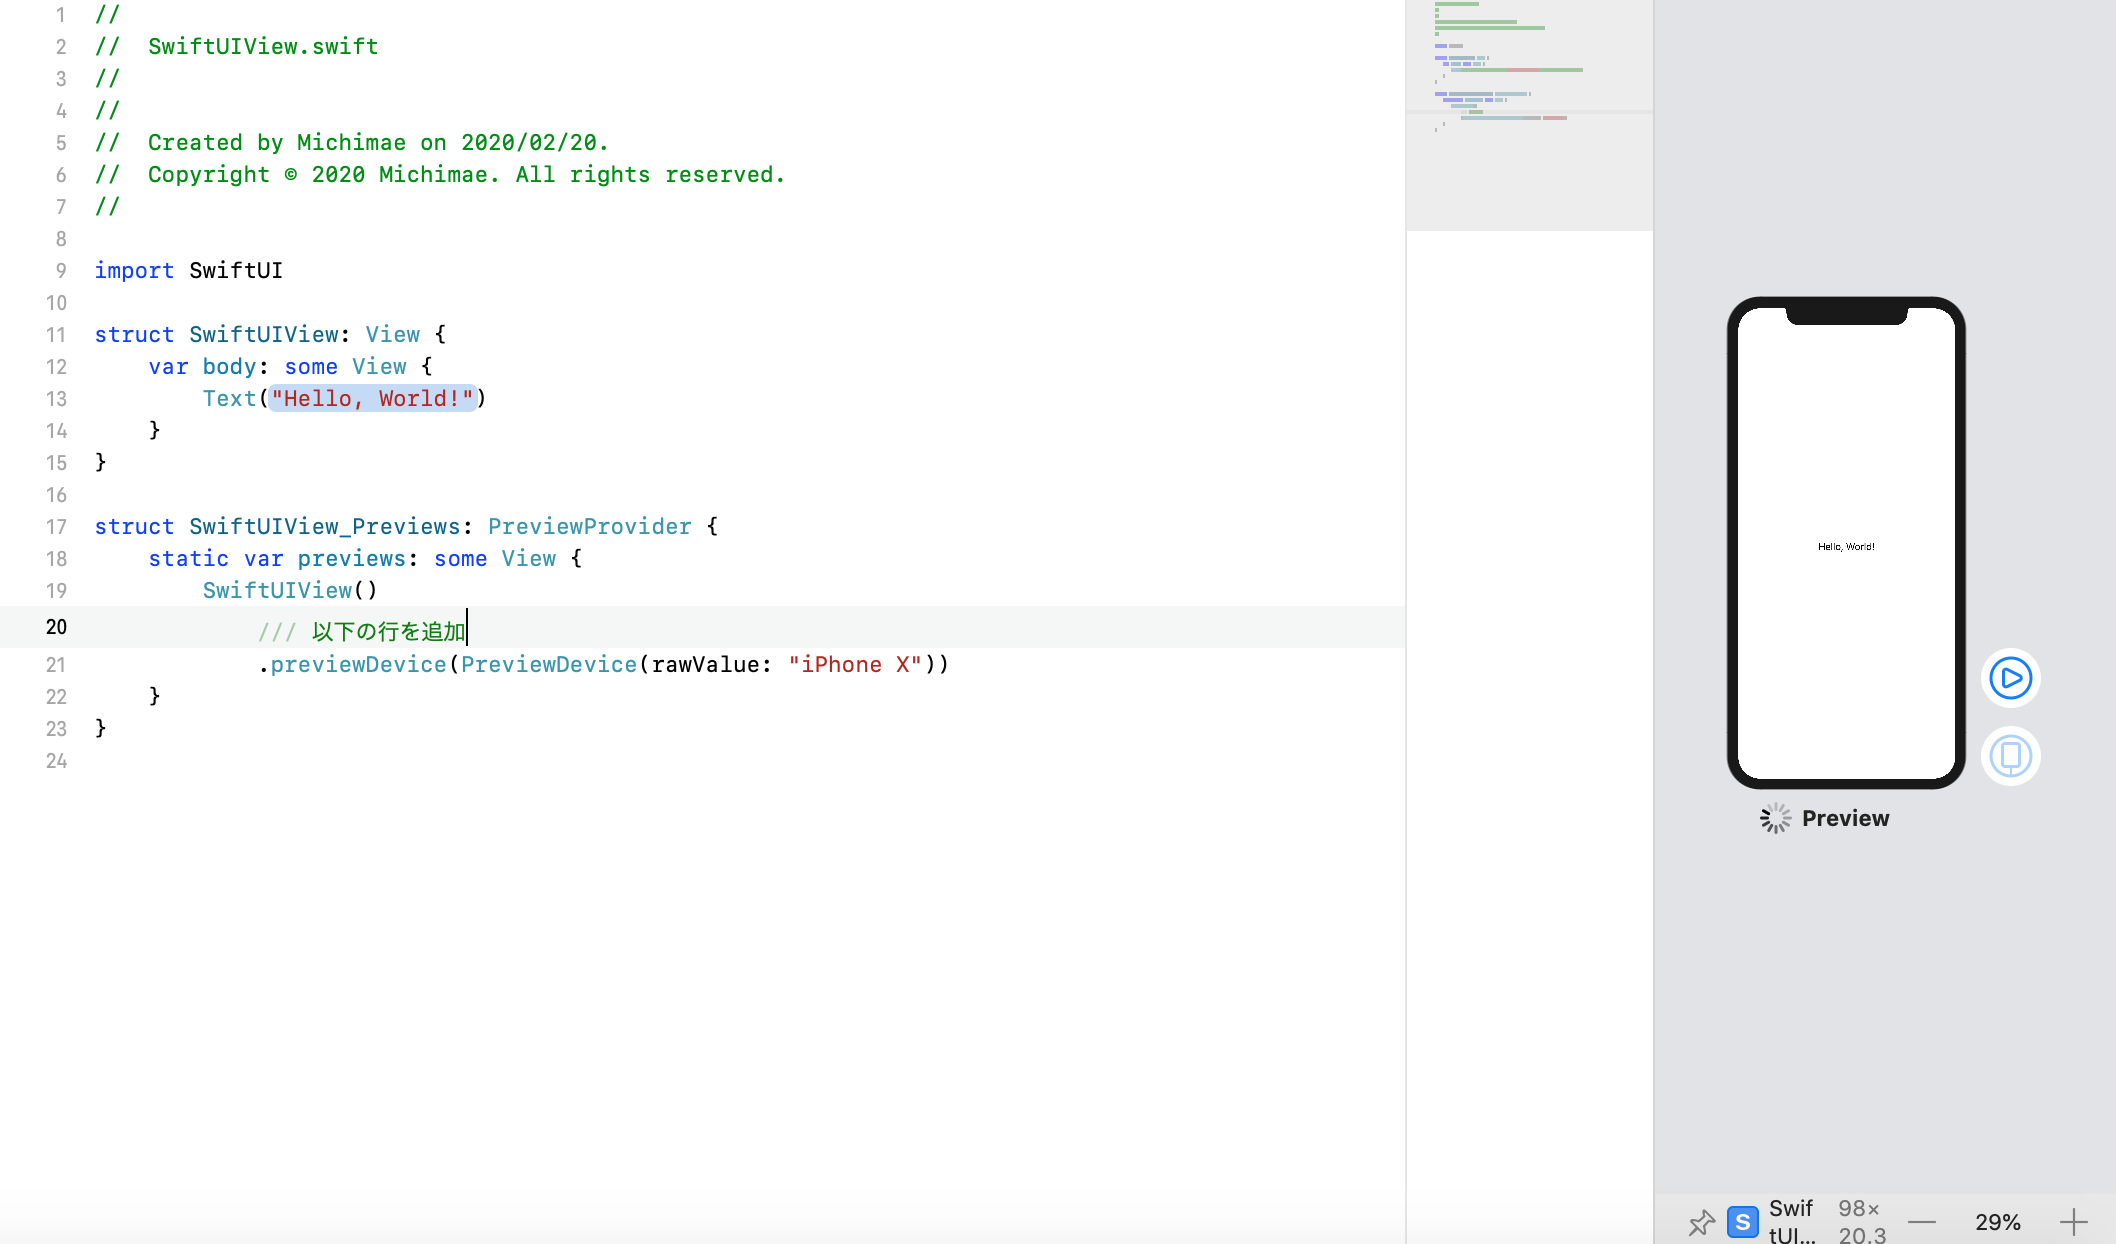
SwiftUIView.swiftstruct SwiftUIView_Previews: PreviewProvider { static var previews: some View { SwiftUIView() /// 以下の行を追加 .previewDevice(PreviewDevice(rawValue: "iPhone X")) } }1-2 実行結果
1-3 解説
.previewDeviceのrawValueに端末を指定すれば、プレビューデバイスを設定できます。設定できるデバイス例 → 3 設定できる端末例
2 複数の端末のプレビューデバイスを設定する
2-1 実装方法
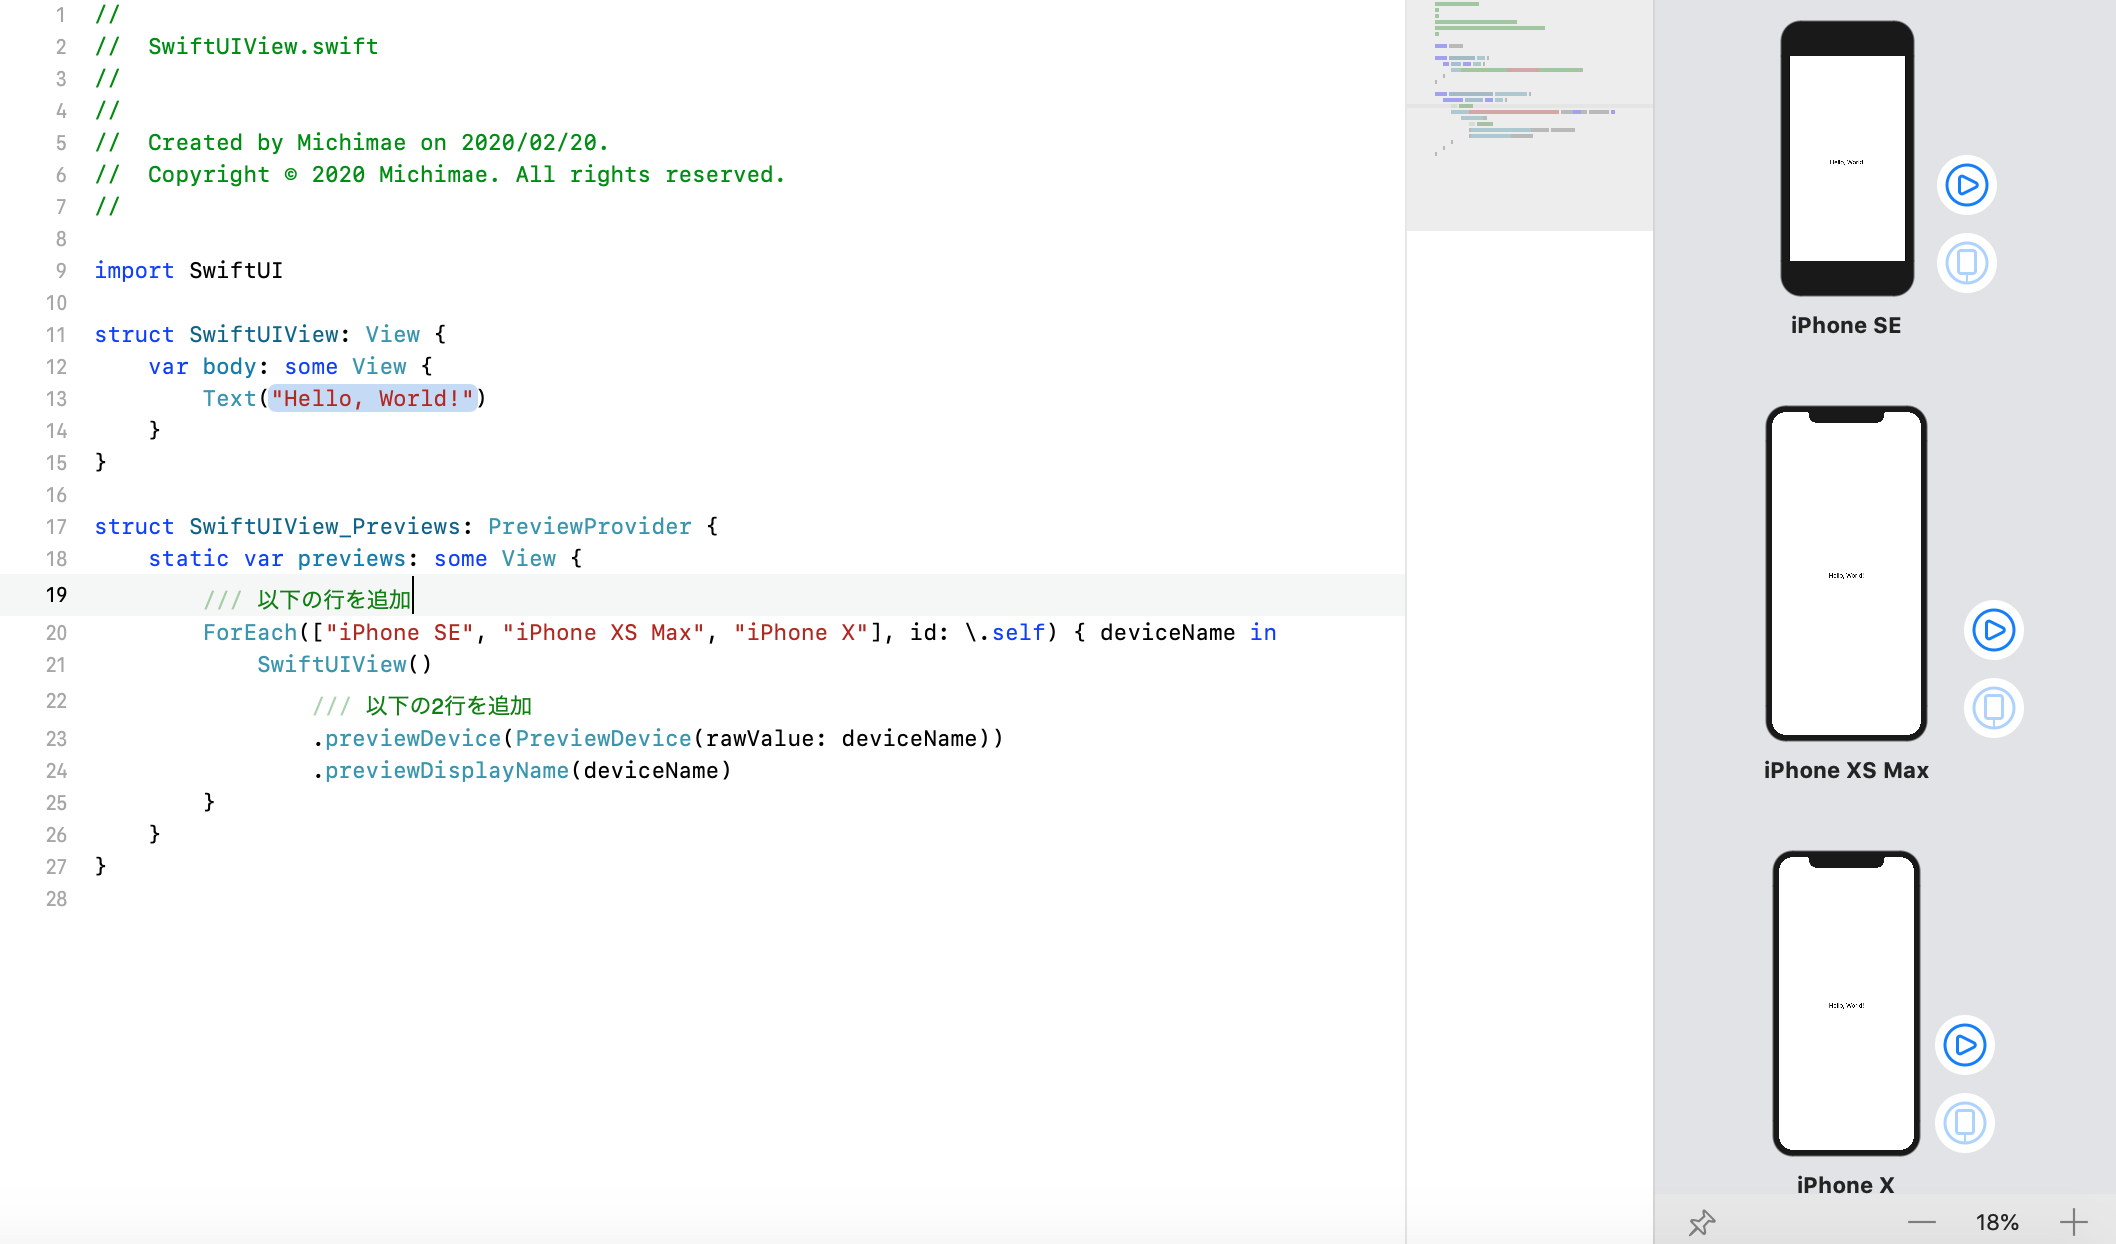
SwiftUIView.swiftstruct SwiftUIView_Previews: PreviewProvider { static var previews: some View { /// 以下の行を追加 ForEach(["iPhone SE", "iPhone XS Max", "iPhone X"], id: \.self) { deviceName in SwiftUIView() /// 以下の2行を追加 .previewDevice(PreviewDevice(rawValue: deviceName)) .previewDisplayName(deviceName) } } }2-2 実行結果
2-3 解説
ForEachに端末の配列を渡して、反復処理の実行ごとに.previewDeviceのrawValueに端末を指定し、プレビューを表示させています。なお、「id: .self」は配列の要素が一意であることをSwiftUIに知らせるためのもので必須です。
.previewDisplayName(deviceName)では右側のプレビューで表示される端末の下の端末名を指定しています。これを設定しないと、全て「Preview」と表示されます。複数の端末のプレビューデバイスを設定する際は必要だと思います。3 設定できる端末例
端末一覧(iPhoneのみ).swift"iPhone 7" "iPhone 7 Plus" "iPhone 8" "iPhone 8 Plus" "iPhone SE" "iPhone X" "iPhone Xs" "iPhone Xs Max" "iPhone Xʀ"4 プレビューデバイスを設定を設定していない場合は?
TARGETSのDeployment Info内のDeviceからXcodeが自動選択しているようです。
5 参考ページ
AppleDevelopper(.previewDeviceについて)
Hacking with Swift(id: .selfについて)
- 投稿日:2020-02-20T21:03:03+09:00
CGAffineTransformを使ってLayerアニメーションをしてみる
はじめに
CoreGraphicsのCGAffineTranaformを使った
回転•拡大/縮小•移動•せん断のアニメーションサンプルのメモです。回転
    //ラジアン計算
    let angle = 180 * CGFloat.pi / 180
    //時計回りに180°
    let transform = CGAffineTransform(rotationAngle: angle)
    UIView.animate(withDuration: 1.0, animations: {
        self.animationView.transform = transform
    }) { _ in
        //元に戻す
        self.identity()
    }
拡大•縮小
拡大
    // `1`がDefaultValue
    let transform = CGAffineTransform(scaleX: 2, y: 2)
    UIView.animate(withDuration: 1.0, animations: {
        self.animationView.transform = transform
    }) { _ in
        self.identity()
    }
縮小
    let transform = CGAffineTransform(scaleX: 0.5, y: 0.5)
    UIView.animate(withDuration: 1.0, animations: {
        self.animationView.transform = transform
    }) { _ in
        self.identity()
    }
移動
    let transform = CGAffineTransform(translationX: 100, y: 100)
    UIView.animate(withDuration: 1.0, animations: {
        self.animationView.transform = transform
    }) { _ in
        self.identity()
    }
せん断
    let transform = CGAffineTransform(a: 1, b: 0, c: 1, d: 1, tx: 0, ty: 0)
    UIView.animate(withDuration: 1.0, animations: {
        self.animationView.transform = transform
    }) { _ in
        self.identity()
    }
メモ
CGAffineTranaformは
回転・拡大・縮小・移動についてはそれぞれのコンストラクタがありますが、
せん断についてはアフィン変換行列から指定する必要があります。最後に指定方法をまとめます。アニメーションの原点を左上にしてみる
Point
layerのアニメーションの原点は
anchorPointで変更することができます。ただ、anchorPointを修正するとアニメーションの表示位置が意図通りにならないことがあるので、元のFrameにLayer.Frameを合わせることで正しい位置に表示するようにします。回転
    let angle = 180 * CGFloat.pi / 180
    let transform = CGAffineTransform(rotationAngle: angle)
    // anchorPointを変更しつつ、表示位置を変更させないための小技
    let tmpFrame = animationView.frame
    animationView.layer.anchorPoint = CGPoint(x: 0, y: 0)
    animationView.layer.frame = tmpFrame
    UIView.animate(withDuration: 1.0, animations: {
        self.animationView.transform = transform
    }) { _ in
        self.identity()
    }
拡大
    let transform = CGAffineTransform(scaleX: 2, y: 2)
    let tmpFrame = animationView.frame
    animationView.layer.anchorPoint = CGPoint(x: 0, y: 0)
    animationView.layer.frame = tmpFrame
    UIView.animate(withDuration: 1.0, animations: {
        self.animationView.transform = transform
    }) { _ in
        self.identity()
    }
縮小
    let transform = CGAffineTransform(scaleX: 0.5, y: 0.5)
    let tmpFrame = animationView.frame
    animationView.layer.anchorPoint = CGPoint(x: 0, y: 0)
    animationView.layer.frame = tmpFrame
    UIView.animate(withDuration: 1.0, animations: {
        self.animationView.transform = transform
    }) { _ in
        self.identity()
    }
移動
    let transform = CGAffineTransform(translationX: 100, y: 100)
    let tmpFrame = animationView.frame
    animationView.layer.anchorPoint = CGPoint(x: 0, y: 0)
    animationView.layer.frame = tmpFrame
    UIView.animate(withDuration: 1.0, animations: {
        self.animationView.transform = transform
    }) { _ in
        self.identity()
    }
せん断
    let transform = CGAffineTransform(a: 1, b: 0, c: 1, d: 1, tx: 0, ty: 0)
    let tmpFrame = animationView.frame
    animationView.layer.anchorPoint = CGPoint(x: 0, y: 0)
    animationView.layer.frame = tmpFrame
    UIView.animate(withDuration: 1.0, animations: {
        self.animationView.transform = transform
    }) { _ in
        self.identity()
    }
アニメーションを組み合わせてみる
Point
CGAffineTransformをアニメーションとして組み合わせる場合は
transformをセットするタイミングで連結することで上手くアニメーションが作動します。アニメーションをセットする前にCGAffineTransformを連結すると最初のtransformのみ実行されるので注意が必要です。回転&拡大
    let tmpFrame = animationView.frame
    let angle = 180 * CGFloat.pi / 180
    let transform = CGAffineTransform(scaleX: 2, y: 2)
    let transform2 = CGAffineTransform(rotationAngle: angle)
    animationView.layer.anchorPoint = CGPoint(x: 0, y: 0)
    animationView.layer.frame = tmpFrame
    UIView.animate(withDuration: 1.0, animations: {
        // 組み合わせる時はtransformをセットするタイミングで連結しないとうまくいかない
        self.animationView.transform = transform.concatenating(transform2)
    }) { _ in
        self.identity()
    }
アフィン変換について
swiftからは
回転・移動・拡大・縮小などに関するアフィン変換についてはそれぞれラッパーとなるコンストラクタがありますが、せん断やカスタムでLayerを描画したい場合は下記の行列を指定して実装する必要があります。三列目は常に(0, 0, 1)などで実質データ構造としては最初の二列を指定します。\begin{bmatrix} a & b & 0 \\ c & d & 0\\ tx & ty & 1 \end{bmatrix}a, b, c, d, tx, ty それぞれの役割はこんな感じになり、tx・tyはそのままの意味で、それぞれ平行移動する距離をあらわします。
\begin{bmatrix} a & b & 0 \\ c & d & 0\\ tx & ty & 1 \end{bmatrix} ? \begin{bmatrix} x.scale & y' & 0 \\ x' & y.scale & 0\\ tx & ty & 1 \end{bmatrix}ちなみに何も指定していない場合のDefault値は以下になります。
\begin{bmatrix}
a & b & 0 \\
c & d & 0\\
tx & ty & 1
\end{bmatrix}

?

\begin{bmatrix}
1 & 0 & 0 \\
0 & 1 & 0\\
0 & 0 & 1
\end{bmatrix}
https://developer.apple.com/documentation/coregraphics/cgaffinetransform
行列を指定して実装してみる
拡大
    // x, y とも2倍
    let transform = CGAffineTransform(a: 2, b: 0,
                                      c: 0, d: 2,
                                      tx: 0, ty: 0)
    UIView.animate(withDuration: 1.0, animations: {
        self.animationView.transform = transform
    }) { _ in
        self.identity()
    }
縮小
    // x, y とも1/2倍
    let transform = CGAffineTransform(a: 0.5, b: 0,
                                      c: 0, d: 0.5,
                                      tx: 0, ty: 0)
    UIView.animate(withDuration: 1.0, animations: {
        self.animationView.transform = transform
    }) { _ in
        self.identity()
    }
移動
     // x方向に100pt移動
     let transform = CGAffineTransform(a: 1, b: 0,
                                       c: 0, d: 1,
                                       tx: 100, ty: 0)
     UIView.animate(withDuration: 1.0, animations: {
         self.animationView.transform = transform
     }) { _ in
         self.identity()
     }
せん断
せん断前のセクションで実装した通り下記のようになります。なお指定するCGFloatの移動距離は
x.scale * cになります。今回は1を指定しているのでviewのframe.width分xの正方向に軸が傾きます。// x.scale(width) * 1 軸が傾く let transform = CGAffineTransform(a: 1, b: 0, c: 1, d: 1, tx: 100, ty: 0) UIView.animate(withDuration: 1.0, animations: { self.animationView.transform = transform }) { _ in self.identity() }回転
回転に関するアフィン変換は少し複雑で、それぞれ
x'、y'を導き出す数式を知っていると上手く変換できます。回転の場合下記のようなアフィン変換で考えるとわかりやすい。\begin{bmatrix} x' \\ y' \end{bmatrix} ? \begin{bmatrix} cosθ & -sinθ \\ sinθ & cosθ \end{bmatrix} アフィン変換で表すと \begin{bmatrix} cosθ & sinθ & 0 \\ -sinθ & cosθ & 0\\ tx & ty & 1 \end{bmatrix}数学的な見解が知りたい場合はここで説明してるサイトがわかりやすかったです。
     // 90°時計回りに回転
     let angle = 90 * CGFloat.pi / 180
     let sinAngle = sin(angle)
     let cosAngle = cos(angle)
     let transform = CGAffineTransform(a: cosAngle, b: sinAngle,
                                          c: -sinAngle, d: cosAngle,
                                          tx: 0, ty: 0)
     UIView.animate(withDuration: 1.0, animations: {
         self.animationView.transform = transform
     }) { _ in
            self.identity()
     }
さいごに
Githubにコードアップしました!
https://github.com/YamatoOtaka/CGAffineTransFormSample


- 投稿日:2020-02-20T17:33:59+09:00
protocolでstaticな関数
ただのメモです。
Swift 4だか5だか。定義
protocol P {
    static func staticFunc() -> String
}
extension P {
    static func staticFunc() -> String {return "default"}
}
class A: P {
    static func staticFunc() -> String {return String(describing: self)}
}
class B: P {}
class C: A {}
class D    {}
//class E: A {
//  static override func staticFunc() -> String {return "hogehoge"}
//}
//error: cannot override static method
実行
[A.self, B.self, C.self, D.self].forEach {
    if let type = $0 as? P.Type {
        print("\(type): \(type.staticFunc())")
    }
}
//A: A
//B: default
//C: C
DはPに準拠していないので呼び出されない。- overrideは出来ない。
- 投稿日:2020-02-20T11:06:31+09:00
NSURLErrorDomainのコード一覧
NSURLErrorDomain のコード一覧を置いておきますね。ログでコードでてきてもすぐに結びつかないので...。
name value NSURLErrorUnknown -1 NSURLErrorCancelled -999 NSURLErrorBadURL -1000 NSURLErrorTimedOut -1001 NSURLErrorUnsupportedURL -1002 NSURLErrorCannotFindHost -1003 NSURLErrorCannotConnectToHost -1004 NSURLErrorNetworkConnectionLost -1005 NSURLErrorDNSLookupFailed -1006 NSURLErrorHTTPTooManyRedirects -1007 NSURLErrorResourceUnavailable -1008 NSURLErrorNotConnectedToInternet -1009 NSURLErrorRedirectToNonExistentLocation -1010 NSURLErrorBadServerResponse -1011 NSURLErrorUserCancelledAuthentication -1012 NSURLErrorUserAuthenticationRequired -1013 NSURLErrorZeroByteResource -1014 NSURLErrorCannotDecodeRawData -1015 NSURLErrorCannotDecodeContentData -1016 NSURLErrorCannotParseResponse -1017 NSURLErrorAppTransportSecurityRequiresSecureConnection -1022 NSURLErrorFileDoesNotExist -1100 NSURLErrorFileIsDirectory -1101 NSURLErrorNoPermissionsToReadFile -1102 NSURLErrorDataLengthExceedsMaximum -1103 NSURLErrorFileOutsideSafeArea -1104 NSURLErrorSecureConnectionFailed -1200 NSURLErrorServerCertificateHasBadDate -1201 NSURLErrorServerCertificateUntrusted -1202 NSURLErrorServerCertificateHasUnknownRoot -1203 NSURLErrorServerCertificateNotYetValid -1204 NSURLErrorClientCertificateRejected -1205 NSURLErrorClientCertificateRequired -1206 NSURLErrorCannotLoadFromNetwork -2000 NSURLErrorCannotCreateFile -3000 NSURLErrorCannotOpenFile -3001 NSURLErrorCannotCloseFile -3002 NSURLErrorCannotWriteToFile -3003 NSURLErrorCannotRemoveFile -3004 NSURLErrorCannotMoveFile -3005 NSURLErrorDownloadDecodingFailedMidStream -3006 NSURLErrorDownloadDecodingFailedToComplete -3007 NSURLErrorInternationalRoamingOff -1018 NSURLErrorCallIsActive -1019 NSURLErrorDataNotAllowed -1020 NSURLErrorRequestBodyStreamExhausted -1021 NSURLErrorBackgroundSessionRequiresSharedContainer -995 NSURLErrorBackgroundSessionInUseByAnotherProcess -996 NSURLErrorBackgroundSessionWasDisconnected -997
- 投稿日:2020-02-20T00:44:57+09:00
【ARKit】childNode(withName:recursively:)でThread 1: Fatal error: Unexpectedly found nil while unwrapping an Optional value
はじめに
こちらを参考にARKitで3Dモデルを表示しようとしたところ、「 Thread 1: Fatal error: Unexpectedly found nil while unwrapping an Optional value」のエラーが出たので、その対処を備忘録として。
実行環境
- Xcode 11.2.1
- MagicaVoxel 0.99.4
- Mixamo
コード
上記リンクのサンプルはボタンで使うscnを切り替えていたのですが、簡単にテストするために変数を「swing」固定としました。また SceneKit Catalog の名前も変更(art.scnassets)してあります。
ViewController.swiftvar selectedItem: String? = "swing" //(中略) let scene = SCNScene(named: "art.scnassets/\(selectedItem).scn")エラーになった箇所
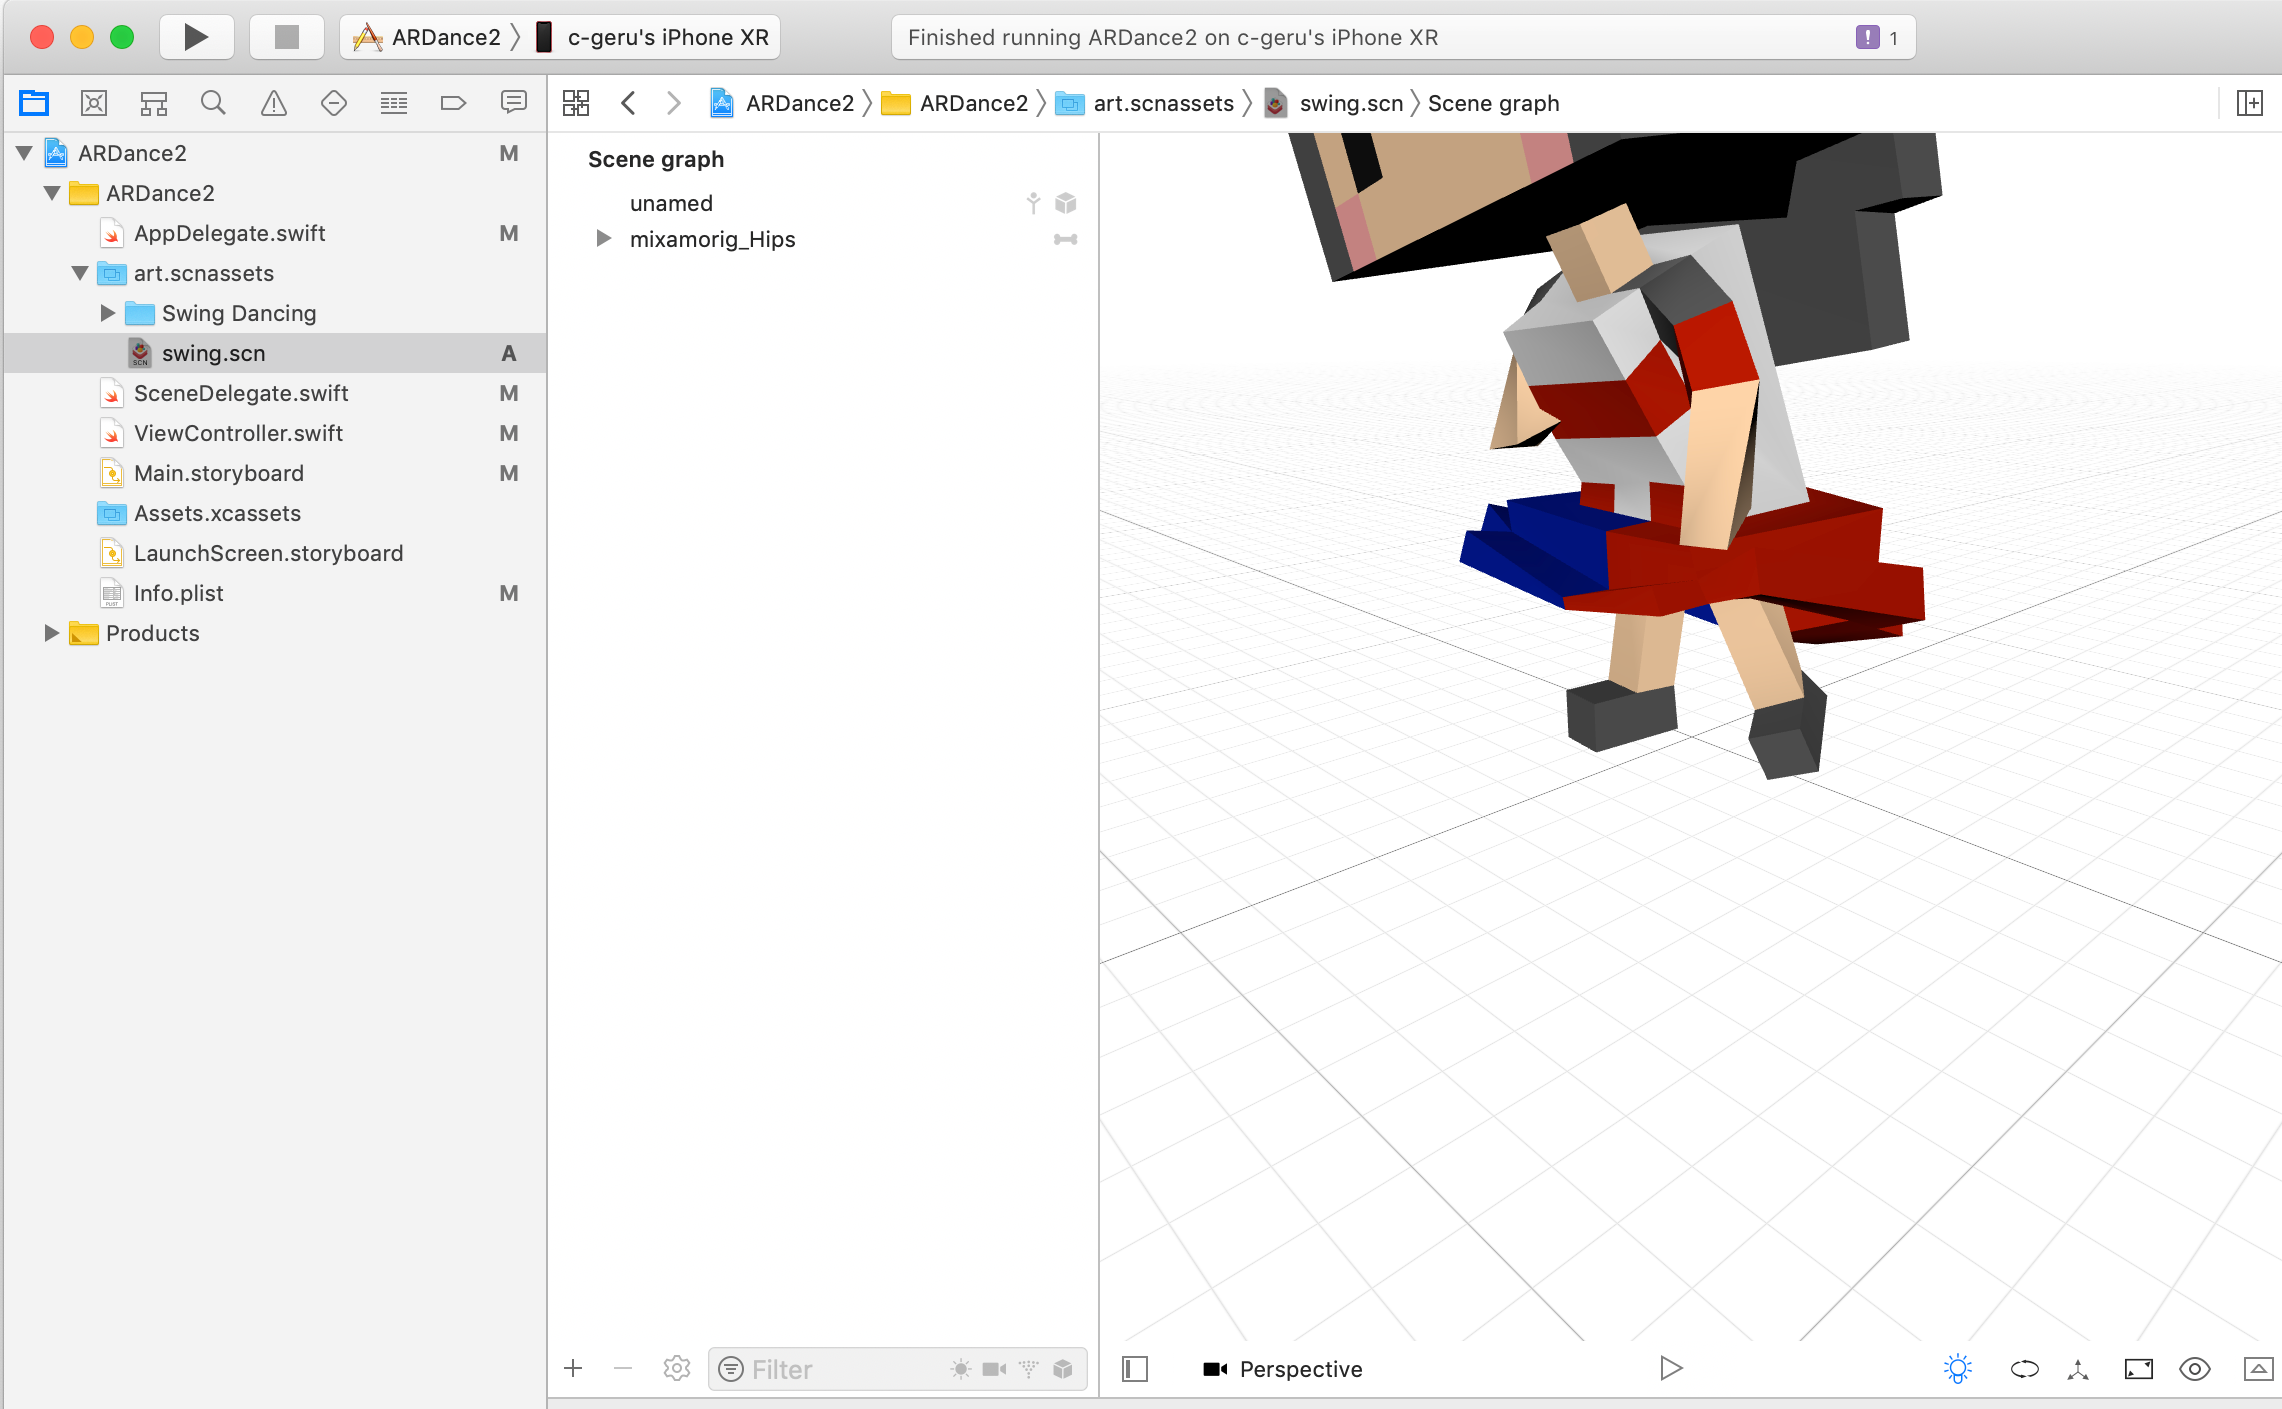
以下のfunctionの childNode(withName:recursively:) で 「 Thread 1: Fatal error: Unexpectedly found nil while unwrapping an Optional value」のエラーが出ました。
addItemfunc addItem(hitTestResult: ARHitTestResult) { if let selectedItem = self.selectedItem { // アセットのより、シーンを作成 let scene = SCNScene(named: "art.scnassets/\(selectedItem).scn") // ノード作成 let node = (scene?.rootNode.childNode(withName: selectedItem, recursively: false))! // 現実世界の座標を取得 let transform = hitTestResult.worldTransform let thirdColumn = transform.columns.3 // アイテムの配置 node.position = SCNVector3(thirdColumn.x, thirdColumn.y, thirdColumn.z) self.mainSceneView.scene.rootNode.addChildNode(node) } }原因
SCNScene.childNode(withName:recursively:) は、SCNScene から withNname で指定した名前のノードを取得するメソッドですが、swing.scnに "swing" というノードが存在しないためでした。
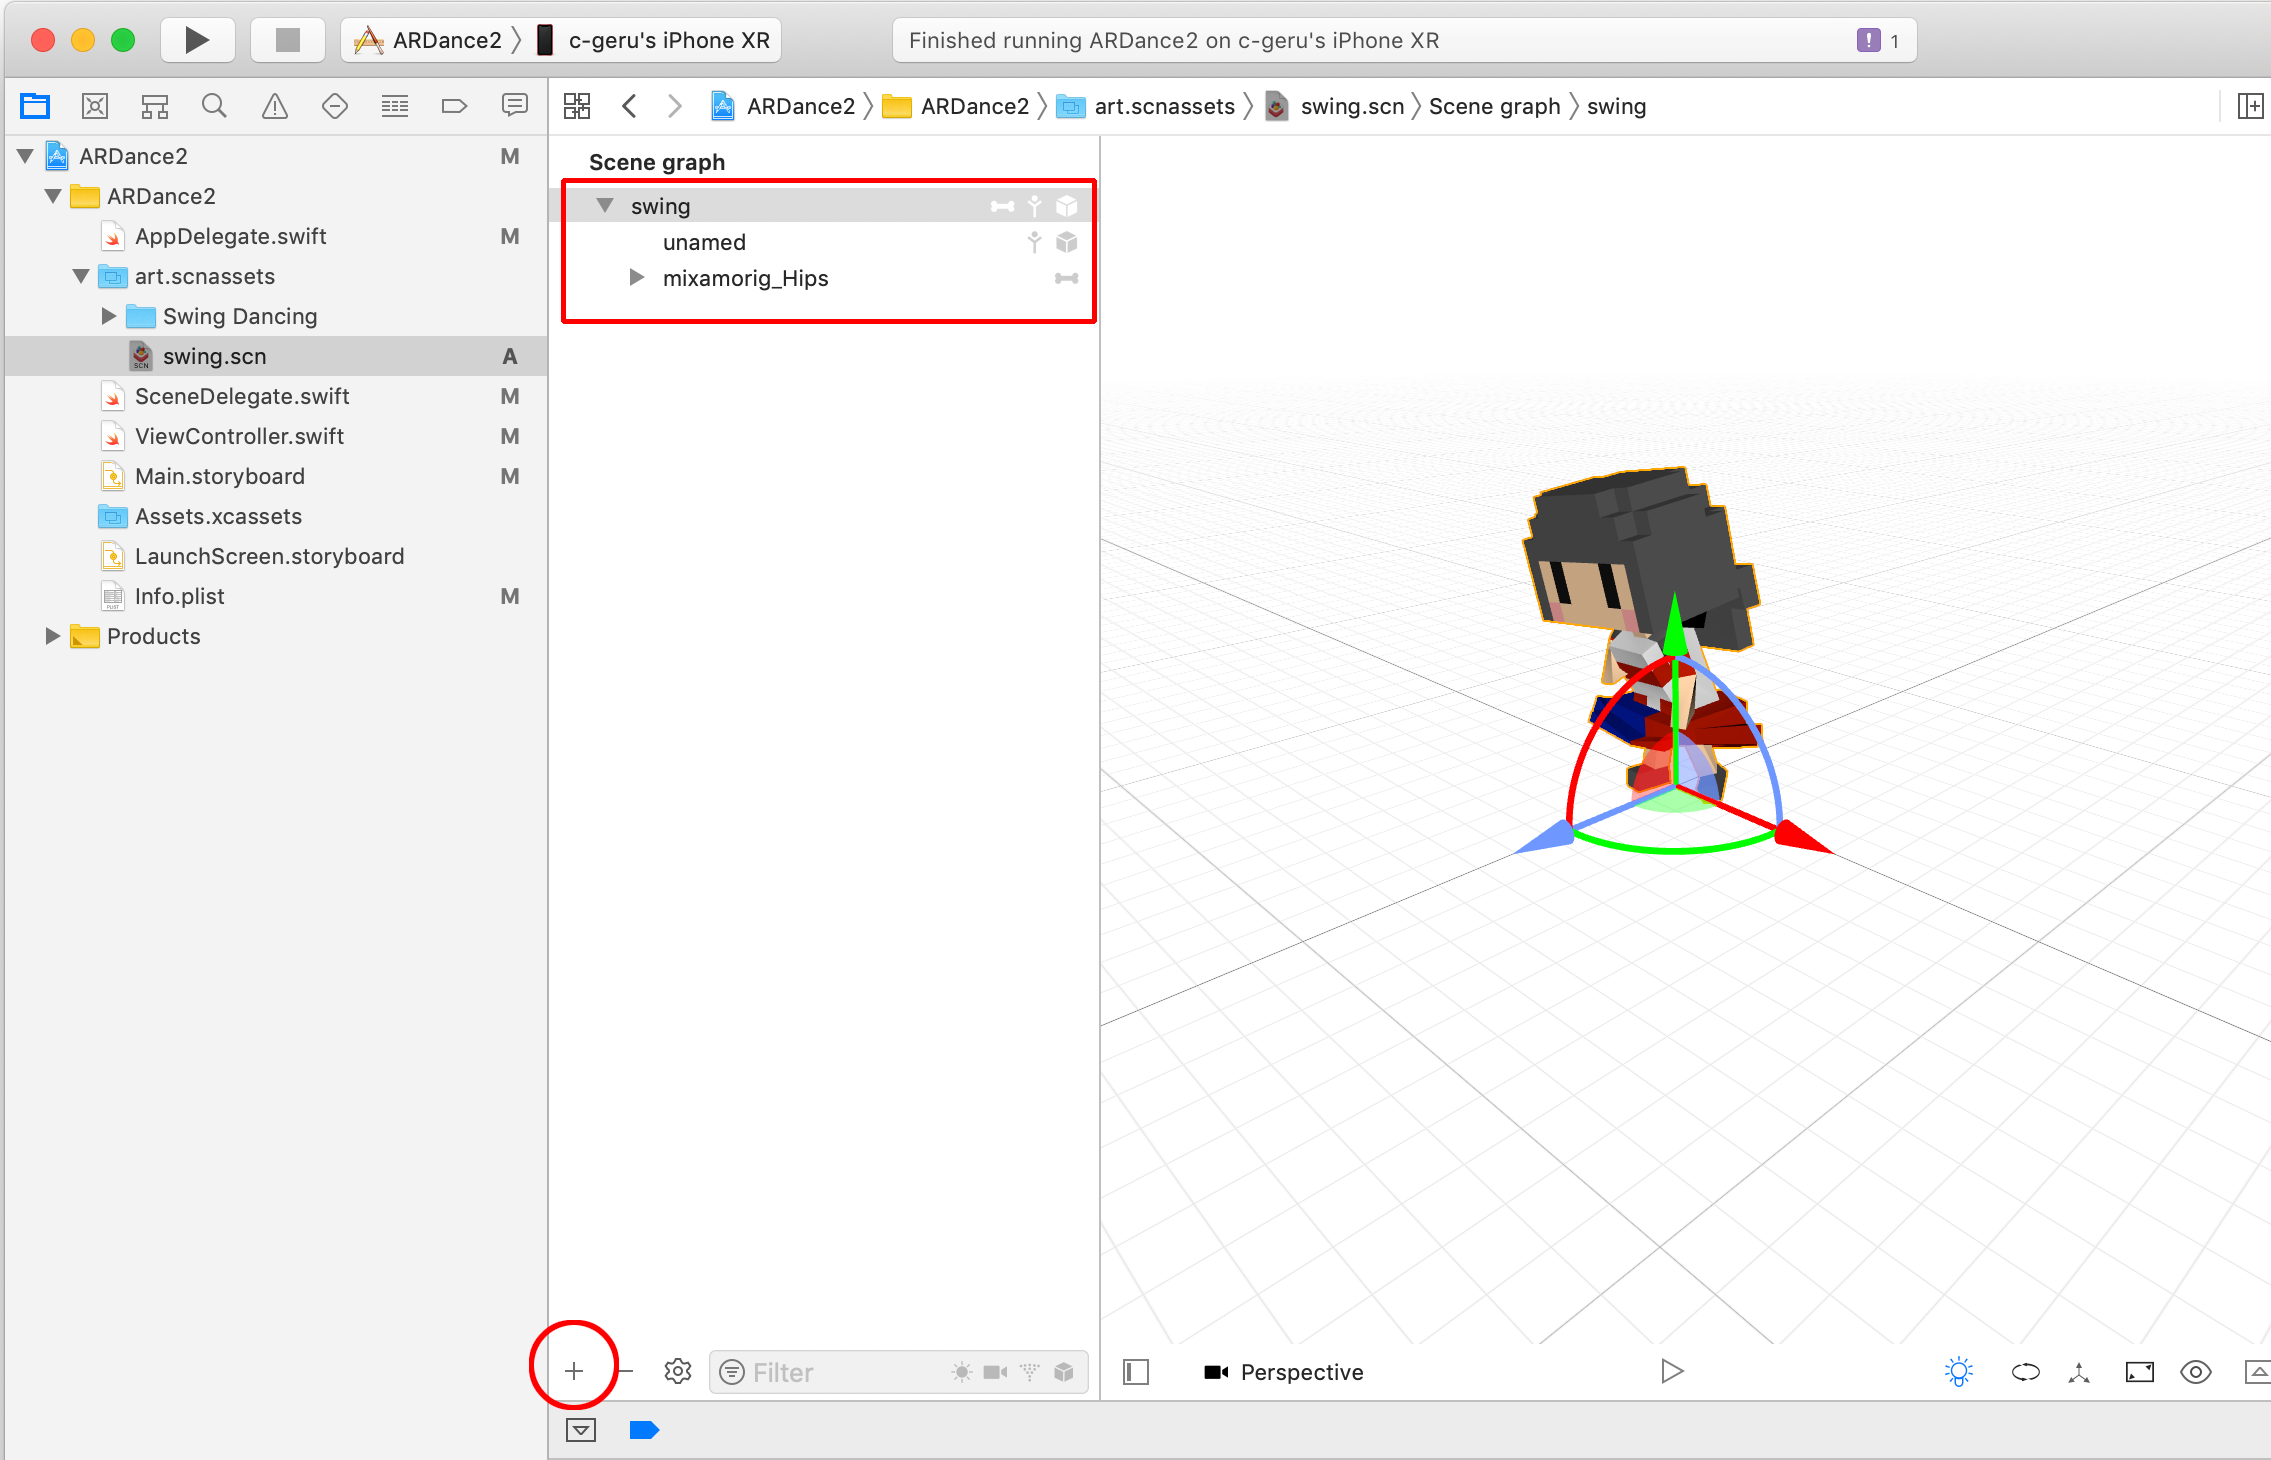
対処
swing.scnを開いて、Scene graphパネルの左下の「+」ボタンでノードを追加して「swing」に名前を変更して、元々あったノードを「swing」ノードの配下にドラッグして移動します。
3Dオブジェクトのサイズ調整
3Dオブジェクトのサイズが大きすぎたので、サイズ変更のコードを追加してあります。
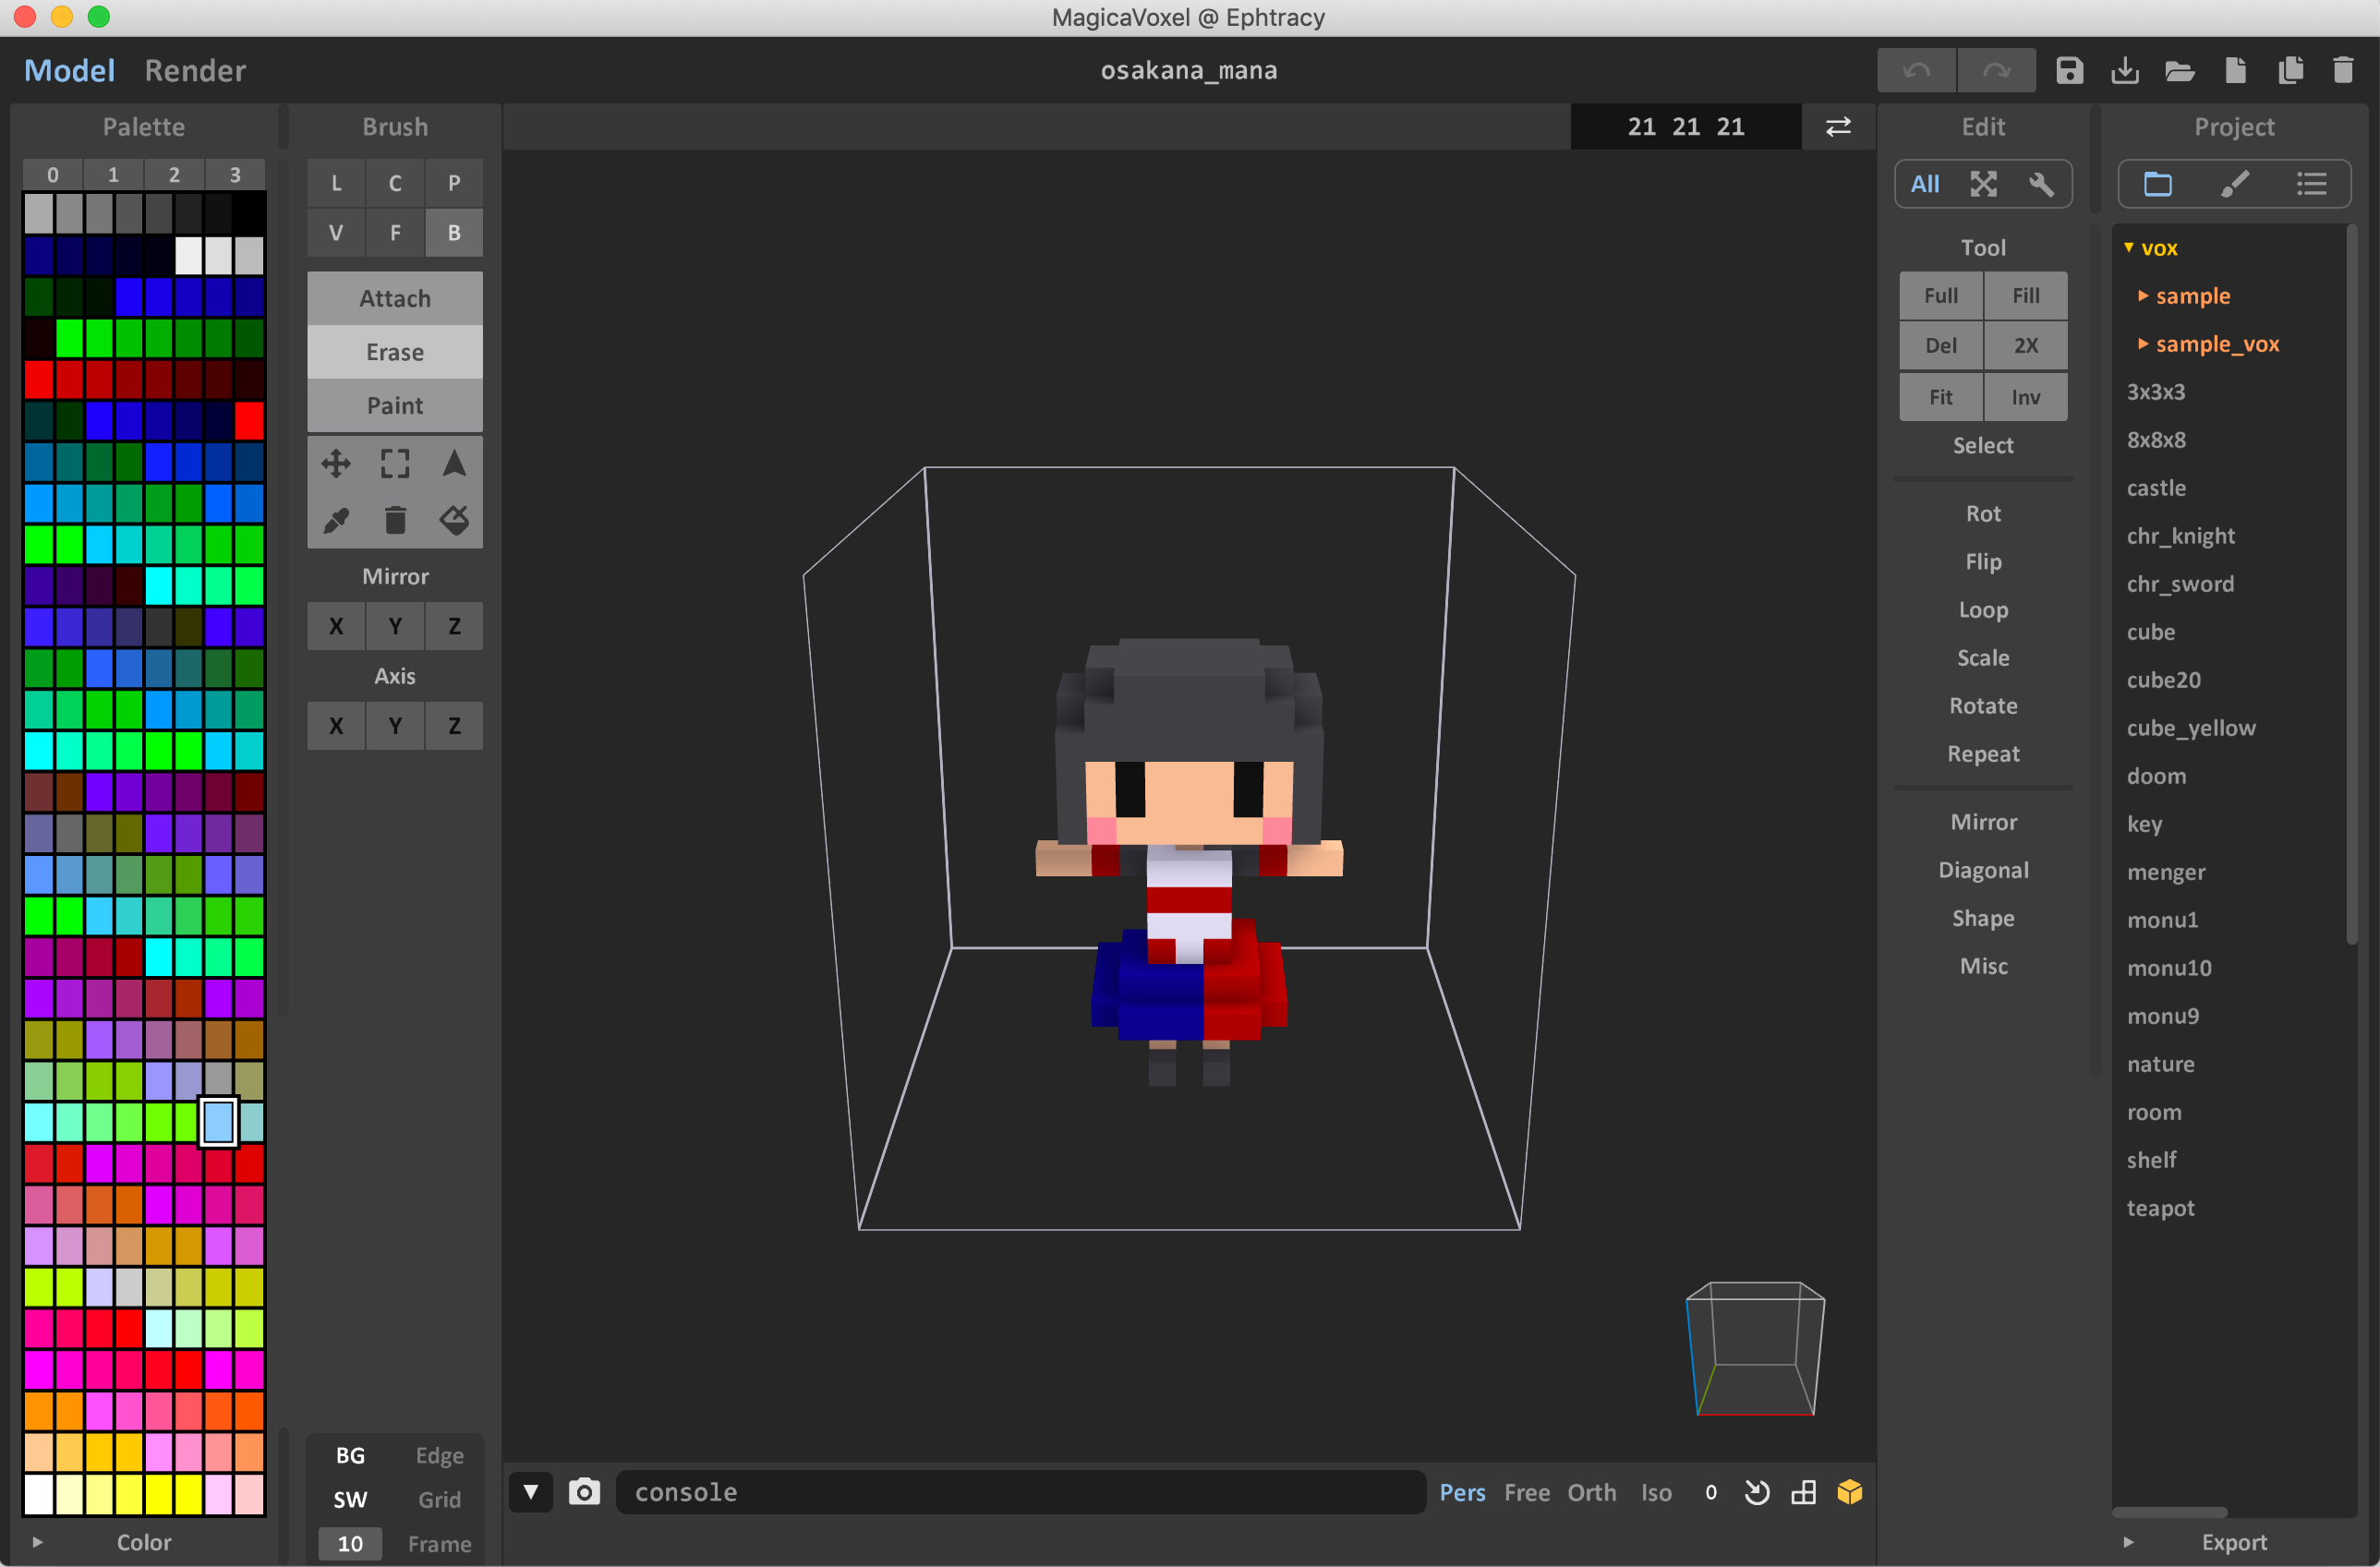
node.scale = SCNVector3(0.05, 0.05, 0.05)addItem/// アイテム配置メソッド func addItem(hitTestResult: ARHitTestResult) { if let selectedItem = self.selectedItem { // アセットのより、シーンを作成 let scene = SCNScene(named: "art.scnassets/\(selectedItem).scn") // ノード作成 let node = (scene?.rootNode.childNode(withName: selectedItem, recursively: false))! // 現実世界の座標を取得 let transform = hitTestResult.worldTransform let thirdColumn = transform.columns.3 // アイテムの配置 node.position = SCNVector3(thirdColumn.x, thirdColumn.y, thirdColumn.z) // アイテムのサイズを変更 node.scale = SCNVector3(0.05, 0.05, 0.05) self.mainSceneView.scene.rootNode.addChildNode(node) } }ちなみに MagicaVoxelで作ったときのサイズは、21 21 21 でした。
この辺の適正サイズや,sncファイルのscale値で変更した方がいいのかは、現時点ではちょっとわからず。。。
まとめ
前提の知識(3Dモデルとか)が乏しいのでいろいろ躓いています。他の3Dアプリで作ったモデルはちゃんとノード名がつくんですかね。。。
MagicaVoexlについてはこちらを参考にしました。やはり公開することを考えると、オリジナルのモデルが必要になるので、簡単でいいです。
MagicaVoexlにアニメーションをつけるのには、Maximoを使いました。こちらもモデルをアップロードしてアニメーション選ぶだけなので、これまた簡単です。こちらを参考にしました(モデルをMagicaVoexlで作る場合は、Blender部分はすっ飛ばして大丈夫です)。