- 投稿日:2020-02-17T22:38:26+09:00
[Rails] Params
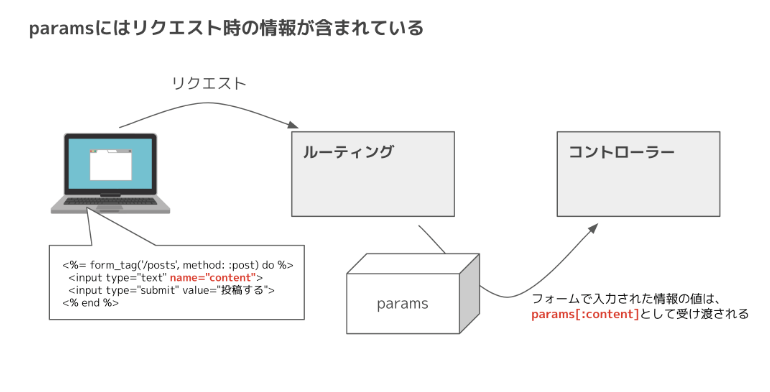
Paramsメソッドとは
Railsで送られたきたパラメーターを受け渡しするメソッドです。主にコントローラーに記載します。
例:app/controllers/posts_controller.rb


class PostsController < ApplicationController
  def index
    @posts = Post.all
  end

  def new
  end

  def create
    Post.create(content: params[:content])
  end
end


#左側がテーブルのカラム名、右側がparamsとして送られてきたデータ。
#Post.create()で実際にテーブルに登録したいデータを記載
createメソッド
ActiveRecordのメソッドの一種。テーブルにレコードを追加します。
モデル名.メソッド(ここではcreate)。updateも同じように使える。
ストロングパラメーターとは
指定したキーを持つパラメーターのみを受け取るようにするもの。
プライベートメソッドとは
クラス外から呼び出すことのできないメソッド。主にストロングパラメーターとセットになっている。
app/controllers/posts_controller.rb

class PostsController < ApplicationController
  def index
    @posts = Post.all
  end

  def new
  end

#ストロングパラメーター
#post_paramsメソッドを呼び出し
  def create
    Post.create(post_params)
  end

#プライベートメソッド
  private
  def post_params
    params.permit(:content)
  end
end
form_tagとform_withでの記載の違い
# form_tagを使用した時のストロングパラメーター
def post_params
  params.permit(`カラム名`)
end

# form_withを使用した時ストロングパラメーター
def post_params
  params.require(`モデル名`).permit(`カラム名`)
end
form_withの場合はrequireをつける。
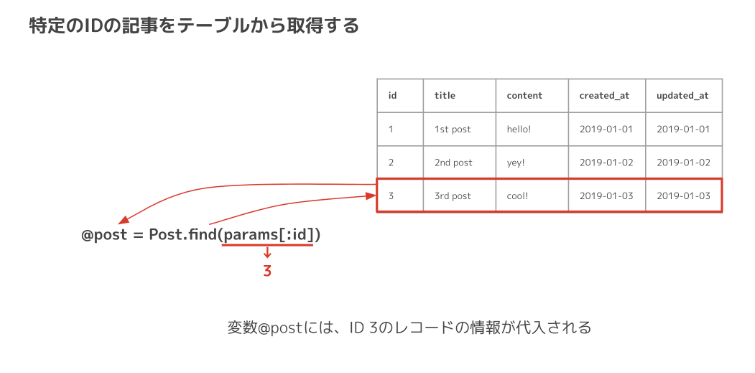
findを使う場合
  def show
    @post = Post.find(params[:id])
  end
- 投稿日:2020-02-17T21:32:50+09:00
rails[質問] データベースに画像を保存する方法
carrierwaveを使ってDBに画像のパスを保存したいのですがうまくいきません。
「状況」
gem 'carrierwave'
gem 'mini_magick'
をGemfileに記載してbundle install 済みrails g uploader image
でimage_uploaderを作成pictureモデルの記載は
class Picture < ApplicationRecord
mount_uploader :image, ImageUploader
belongs_to :user
endpicturesテーブルにはimageカラムstring型有り
rails db:migrate等は済んでいるapp/views/pictures/new.html.erbにて
<%= form_for(@picture, url: {controller: 'pictures', action: 'create' }) do |f| %>
<%= f.label :image %>
<%= f.file_field :image %>
<%= f.submit %>
<% end %>
というフォームを記載関連するルーティングは
get '/newimage', to: 'pictures#new'
post '/createimage', to: 'pictures#create'コントローラーでは
Picture.create(
image: params[:image],
user_id: current_user.id,
)バリデーションは特にかけていません。
画像を送信するとuser_idは登録されますがimageはnilのままです。puclic以下には画像が入ります。「やりたいこと」
DBに画像へのパスを保存して後で表示させたい「考えていること」
user_idは保存されるので、モデルはできてそうなので、formの送信方法やルーティング設定が悪い?
:imageだとバイナリのまま?きちんとパスを渡さないとダメ?
carrierwaveの設定に何か不備がある?
この辺りかと思いガチャガチャと弄っていたのですがうまくいきません。
- 投稿日:2020-02-17T21:06:15+09:00
Rails form_tagとform_withの違い
from_tagとは
投稿ページなどのフォームを実装するためのヘルパーメソッドになります。ヘルパーメソッドはrubyとして扱われるので<%= %>(erbタグ)で囲む必要があります。
HTMLのみの場合とform_tagを使用した場合の違い
<form action="/posts" method="post">
  <input type="text" name="content">
  <input type="submit" value="投稿する">
</form>

#↓form_tagの場合

<%= form_tag('/posts', method: :post) do %>
  <input type="text" name="content">
  <input type="submit" value="投稿する">
<% end %>
form_withとは
Viewファイルで使用することで、簡単にフォームを生成することができるヘルパーメソッドになります。
<!-- form_tagを使用した例 -->
<%= form_tag('/posts', method: :post) do %>
  <input type="text" name="content">
  <input type="submit" value="投稿する">
<% end %>


<!-- form_withを使用した例 -->
<%= form_with model: @post, local: true do |form| %>
  <%= form.text_field :content %>
  <%= form.submit '投稿する' %>
<% end %>
form_withを使うメリット
・HTTPメソッドを指定する必要がない。
・コントローラーから渡された、ActiveRecordを継承するモデルのインスタンスが利用できる(上記では@postがそれに該当)
・inputタグを指定しなくて良い。ヘルパーメソッドって
viewをシンプルにする為にあらかじめ用意されたメソッドになります。HTMLやRubyの記述がセットになった、ビューファイルで使用できるメソッドです。
- 投稿日:2020-02-17T19:11:01+09:00
can't find gem bundler (>= 0.a) with executable bundle (Gem::GemNotFoundException)の解決方法
rbenvで複数のrubyバージョンが存在する時に、bundle installを行うと、以下のエラーが発生。
can't find gem bundler (>= 0.a) with executable bundle (Gem::GemNotFoundException)該当するrubyのバージョンを再インストールするも状況は改善されず。
いろいろと探した結果、bundlerのバージョンとGemfile.lock側のbundlerのバージョンが異なることで発生していたようなので、
$ gem install bundler -v 該当バージョンこれで、バージョンの相違を解消してあげればOK。
- 投稿日:2020-02-17T13:00:44+09:00
ruby(rails)でデータ量が多い時でもcsvファイルを比較的素早く作成する書き方
メモなので分かりにくいかもです
user_data_csv = CSV.generate do |csv|
  csv_column_names = ["名前", "年齢"]
  csv << csv_column_names

  User.all.find_each do |user|
    csv << [user.name, user.age]
  end
end

File.open("all_user_data.csv", "w") do |csv|
  csv.puts user_data_csv
end
データをまとめてからcsvファイルに書き出してるので、こう書くより速い
CSV.open('all_user_data.csv','w') do |csv|
  csv_column_names = ["名前", "年齢"]
  csv << csv_column_names

  User.all.find_each do |user|
    csv << [user.name, user.age]
  end
end
- 投稿日:2020-02-17T13:00:44+09:00
ruby(rails)でデータ量が多い時でもcsvファイルを比較的速く作成する書き方
メモなので分かりにくいかもです
user_data_csv = CSV.generate do |csv|
  csv_column_names = ["名前", "年齢"]
  csv << csv_column_names

  User.all.find_each do |user|
    csv << [user.name, user.age]
  end
end

File.open("all_user_data.csv", "w") do |csv|
  csv.puts user_data_csv
end
データをまとめてからcsvファイルに書き出してるので、こう書くより速い
CSV.open('all_user_data.csv','w') do |csv|
  csv_column_names = ["名前", "年齢"]
  csv << csv_column_names

  User.all.find_each do |user|
    csv << [user.name, user.age]
  end
end
こちらにさらにいいやり方が載っていました。
https://www.techscore.com/blog/2017/12/04/fast_and_low-load_processing_method_when_exporting_csv_from_db_with_rails/
- 投稿日:2020-02-17T12:05:45+09:00
rbenvによるRubyのインストールとバージョン管理
概要
ローカル環境がごちゃごちゃしていたので一度全てアンインストールしてので再インストールした記録。
環境
macOS Catalina 10.15.3
zsh(bashを使用している場合は「.zshrc」を「.bashrc」に読み替えられる。詳しく知りたい場合は参考先を参照。)
homebrew手順
1.現在のrubyのバージョンと場所の確認。
$ ruby -v # バージョンの確認
  ruby 2.6.3p62 (2019-04-16 revision 67580) [universal.x86_64-darwin19]

$ which ruby # 場所の確認
  /usr/bin/ruby
「/usr/bin」配下のrubyは削除しないほうが良いようなのでこの状態でOK。
/usr/bin配下はMacOS標準のコマンドが格納されていて、システム自身が利用します。
削除やインストールなどはしないでください。
参考2.rbenvのインストールとセットアップ
$ brew install rbenv ruby-build # rbenvのインストール

$ echo '# rbenv' >> ~/.zshrc \ # PATHを通す
$ echo 'export PATH=~/.rbenv/bin:$PATH' >> ~/.zshrc \
$ echo 'eval "$(rbenv init -)"' >> ~/.zshrc \

$ source .zshrc # PATHの追加を反映

$ vim .zshrc # .zshrcの確認。確認ができたら「:q」でvimを抜ける
# rbenv
export PATH=~/.rbenv/bin:$PATH
eval "$(rbenv init -)"

$ rbenv -v # rbenvのバージョンを確認
  rbenv 1.1.2
3.Rubyのインストール
Ruby公式ページで安定版の確認。
$ rbenv install 2.7.0 # ruby安定版のインストール

$ rbenv versions # アクティブなバージョンを確認
  system
* 2.6.3 (set by /Users/ユーザー名/.ruby-version)
  2.7.0

$ rbenv global 2.6.0 # バージョンの切り替え。

$ rbenv versions # アクティブなバージョンを確認。変わっていなければ「rbenv local 2.6.0」を実行。
  system
  2.6.3
* 2.7.0 (set by /Users/ユーザー名/.ruby-version)

$ ruby -v # rubyのバージョン確認
  ruby 2.7.0p0 (2019-12-25 revision 647ee6f091) [x86_64-darwin19]

$ rbenv uninstall 2.6.3 # アンインストール(任意)
参考
- 投稿日:2020-02-17T11:59:01+09:00
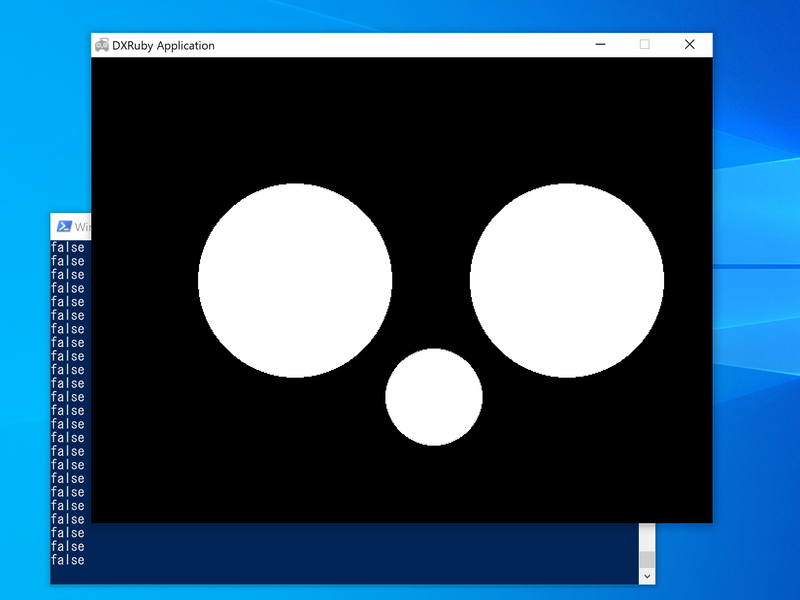
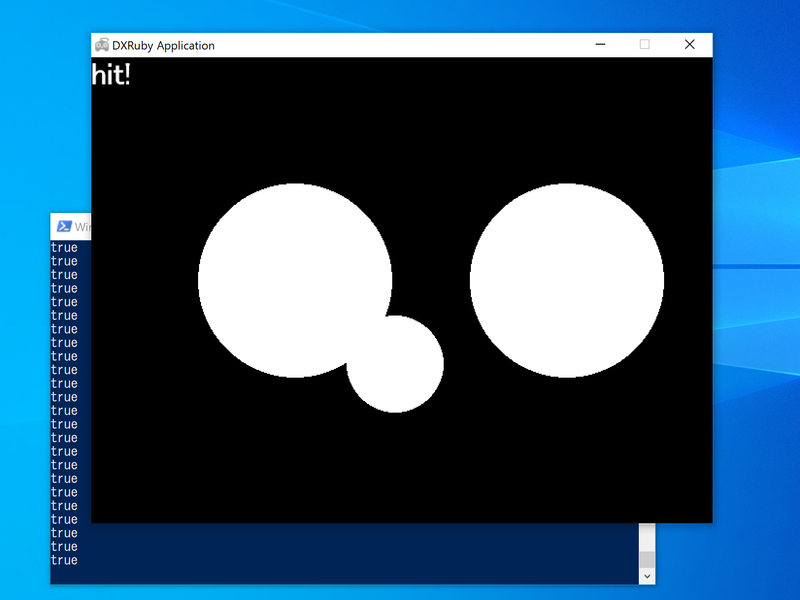
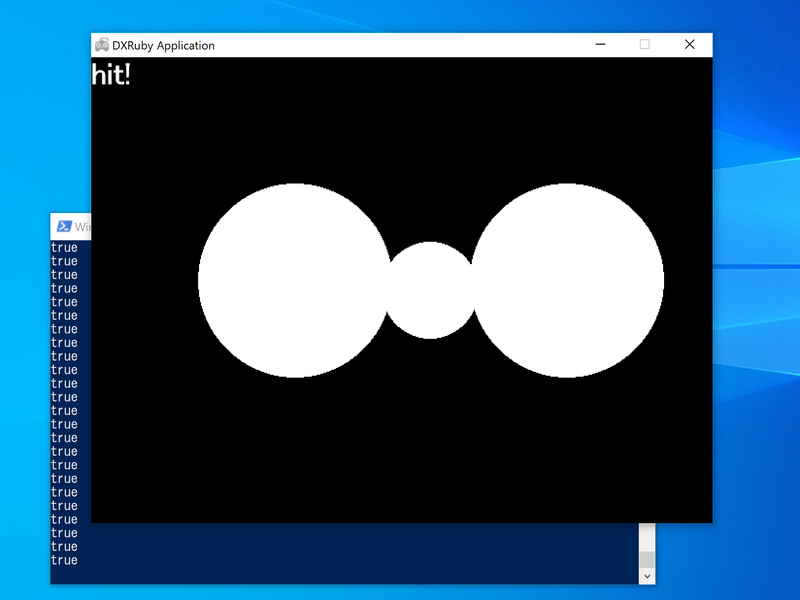
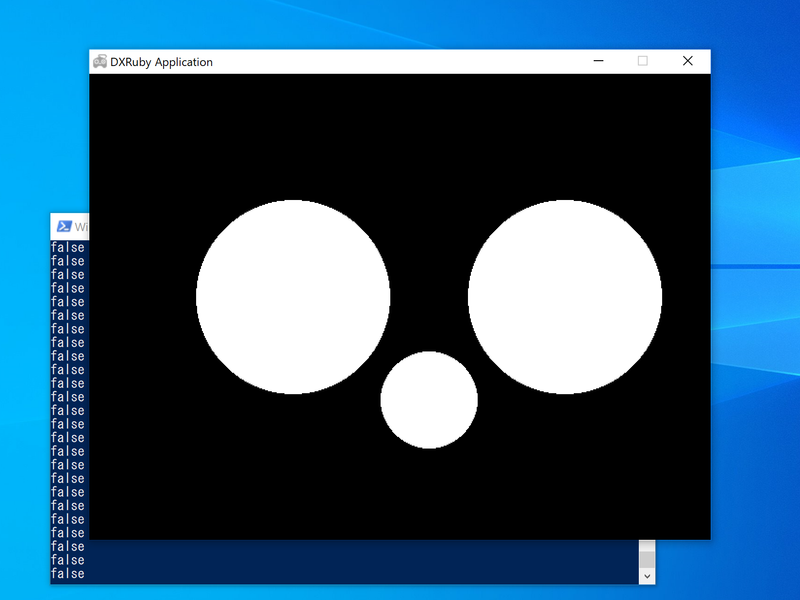
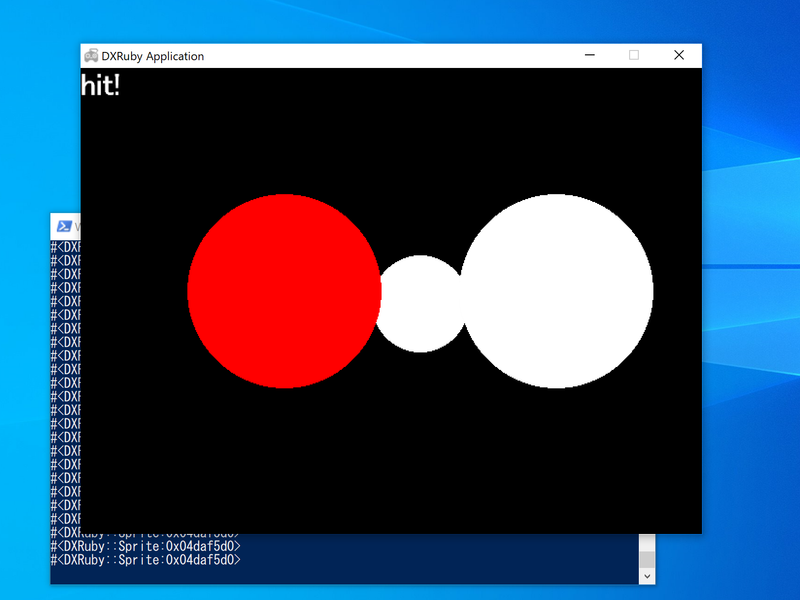
DXRuby:「当たり判定」を自分で作ってみよう B. 円の中心からの距離で判定する
概要
この記事は中学高校生向けプログラミング教室の教材として作ったものを一部改変したものです。
今回の記事は、
・DXRuby:「当たり判定」を自分で作ってみよう - Qiita● 当たり(衝突)判定の方法
A. 四角形の四隅の座標で判定する
B. 円の中心からの距離で判定する
C. 色で判定するの内の
B. 円の中心からの距離で判定する
になります。
前の記事
・DXRuby:「当たり判定」を自分で作ってみよう A. 四角形の四隅の座標で判定する - Qiita次の記事
・DXRuby:「当たり判定」を自分で作ってみよう C. 色で判定する技術解説
- 使用ライブラリ
- 参考サイト については、上記記事を参照してください。
ライセンス
ソースコード、本解説ともにパブリックドメイン
プログラム解説
B. 円の中心からの距離で判定する
→ 「ブロック崩し」追加課題 1b);衝突判定の自作(円) - noanoa 日々の日記
http://blog.livedoor.jp/noanoa07/archives/2046462.htmlB-1a.
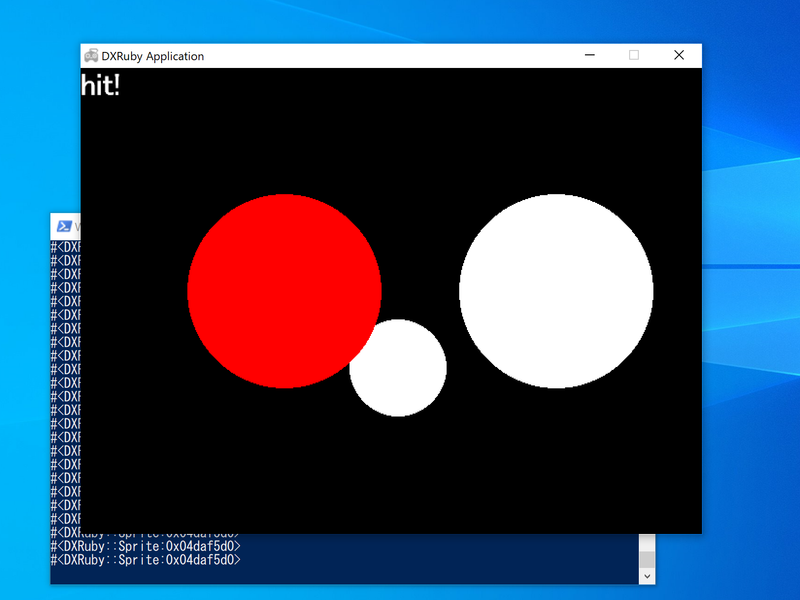
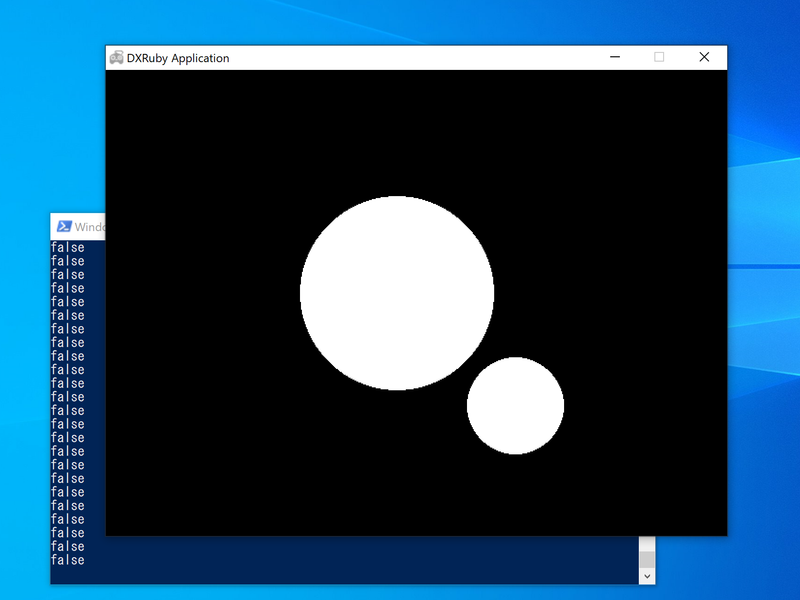
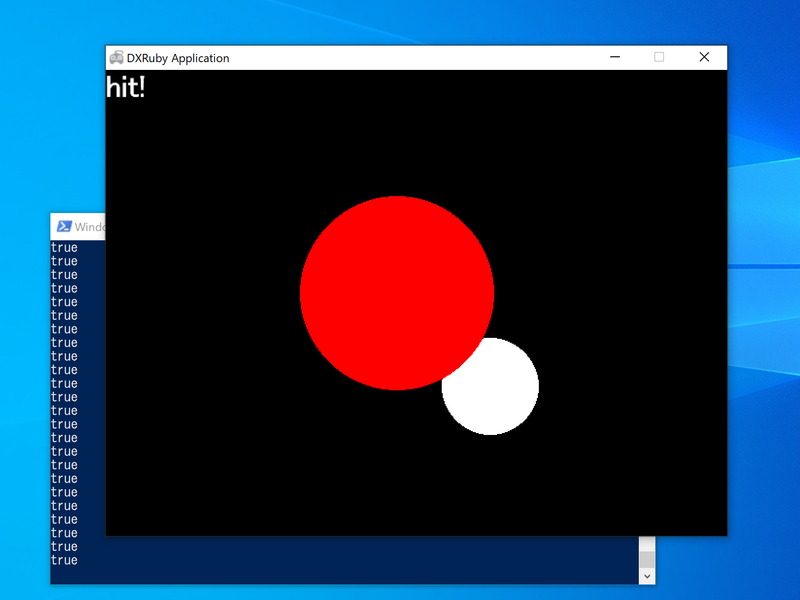
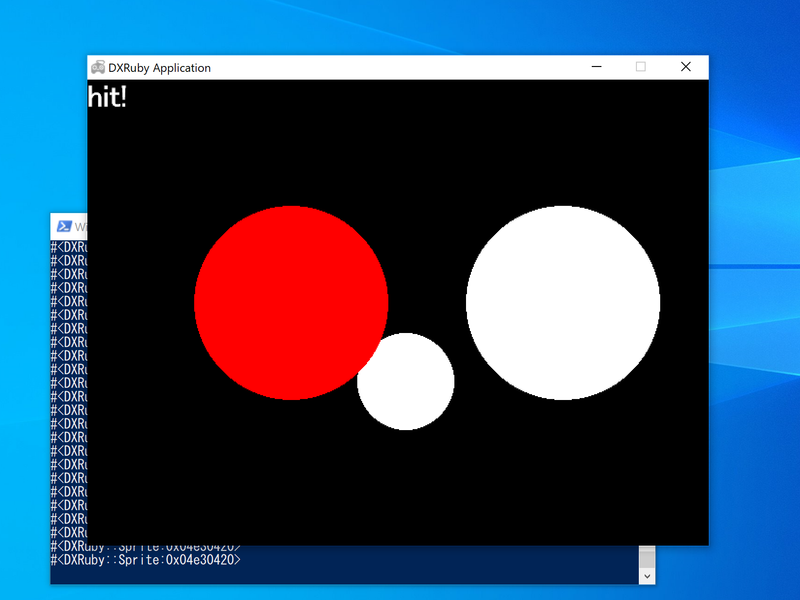
===を使った準備:判定相手が単独(atari_en0.rb)DXRubyのスプライトでは、
===を使うと、衝突の有/無でtrue/fasleを返します。
ball(小さい円)が、block(大きい円)と衝突しているかを===で判定します。
衝突/非衝突 の結果をターミナル(コマンドプロンプト)にtrue/falseで出力しつつ、blockの色も赤/白にします。
また、ウィンドウに衝突時はhit!の文字列を表示します。
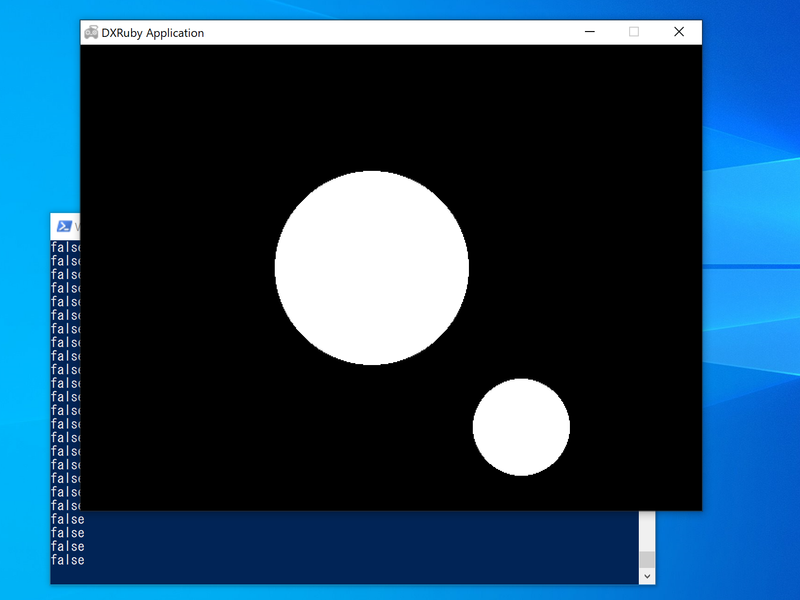
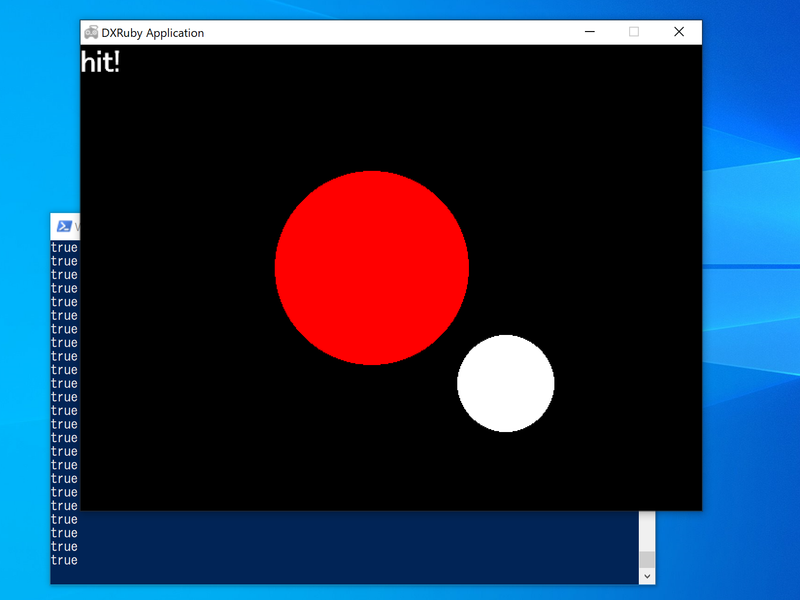
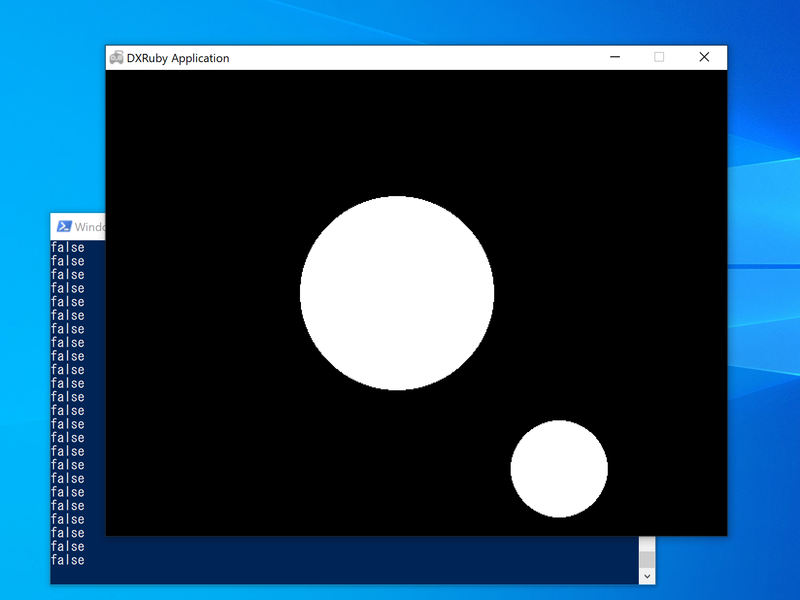
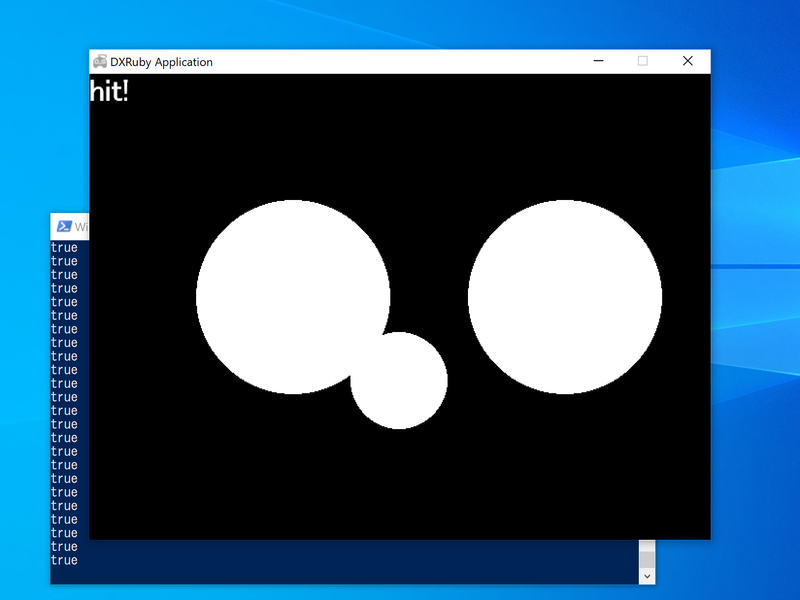
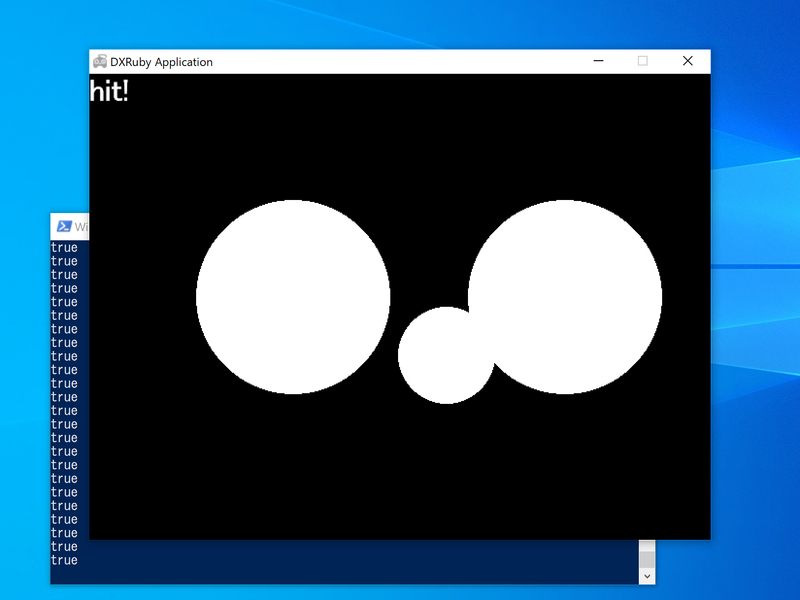
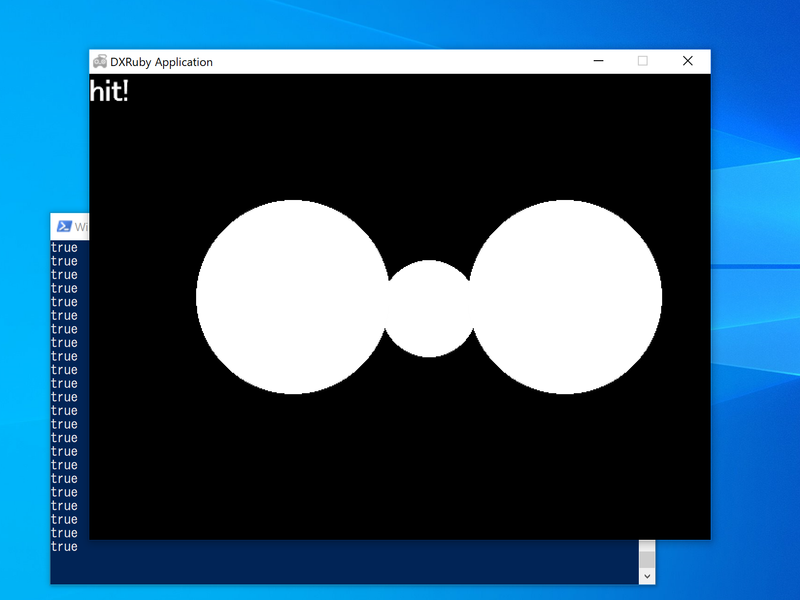
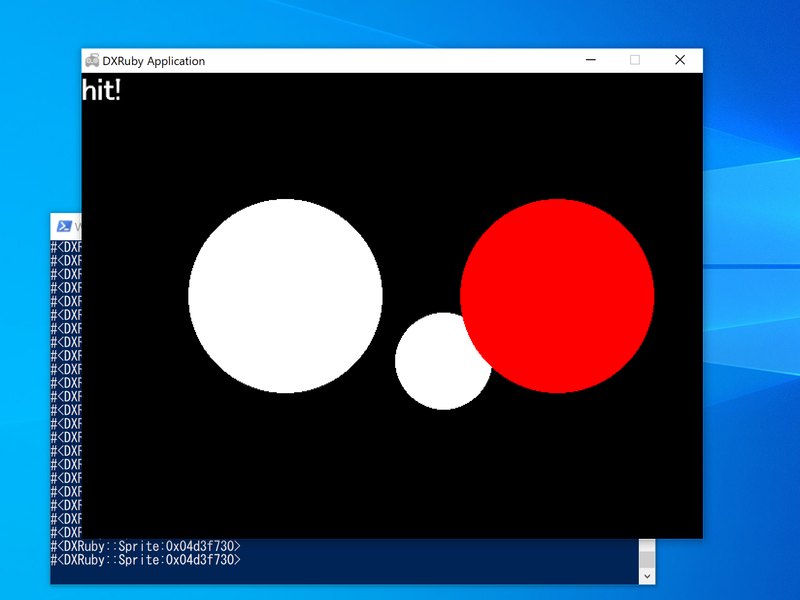
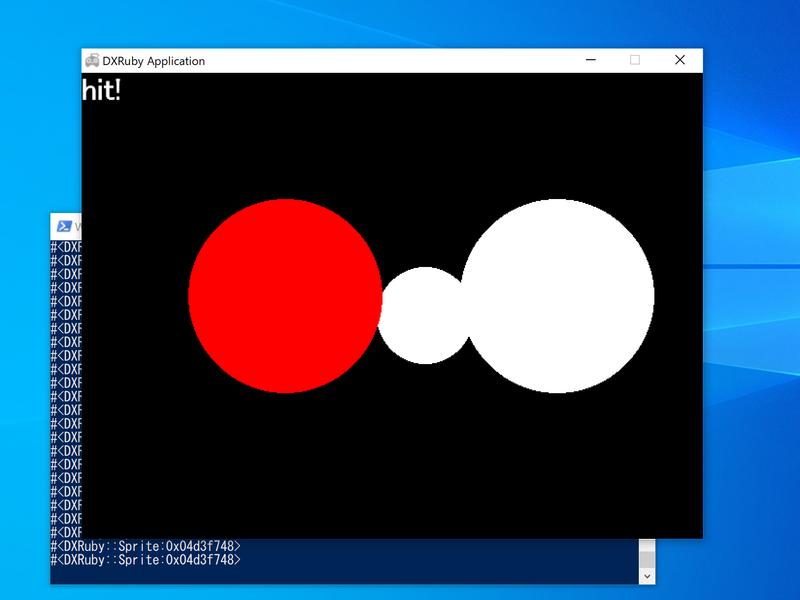
===はデフォルトでは四角形で衝突を判定するので、 このままでは円同士が接触する前に衝突と判定されています。atari_en0.rbrequire 'dxruby' image0 = Image.new(100, 100).circle_fill( 50, 50, 50, C_WHITE) image1 = Image.new(200, 200).circle_fill(100, 100, 100, C_WHITE) image2 = Image.new(200, 200).circle_fill(100, 100, 100, C_RED) ball = Sprite.new(300, 400, image0) block = Sprite.new(200, 130, image1) font = Font.new(32) Window.loop do ball.x = Input.mouse_pos_x ball.y = Input.mouse_pos_y ball.draw result = (ball === block) p result if result Window.draw_font(0, 0, "hit!", font) block.image = image2 else block.image = image1 end block.draw end
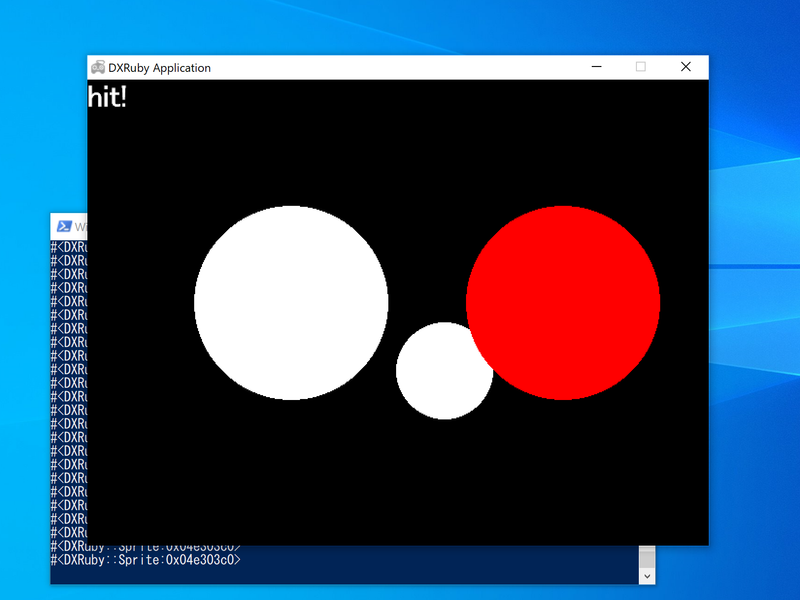
B-1b.
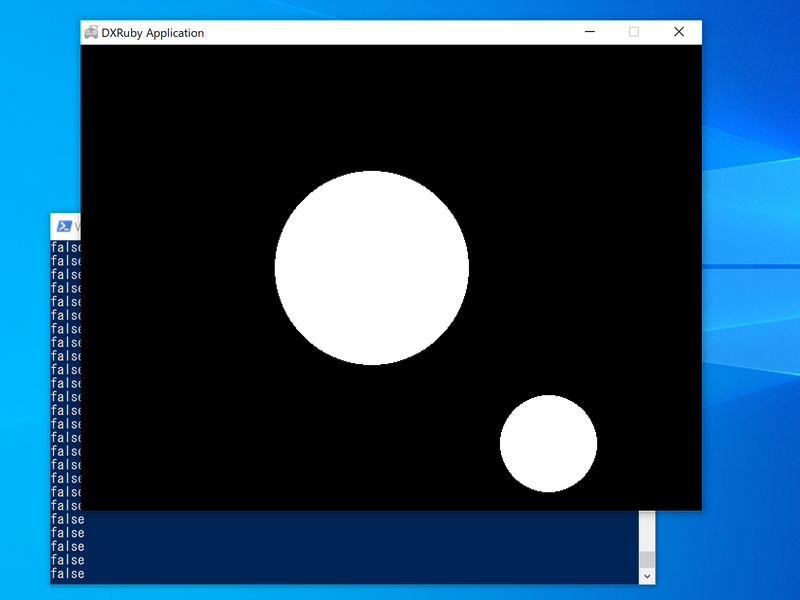
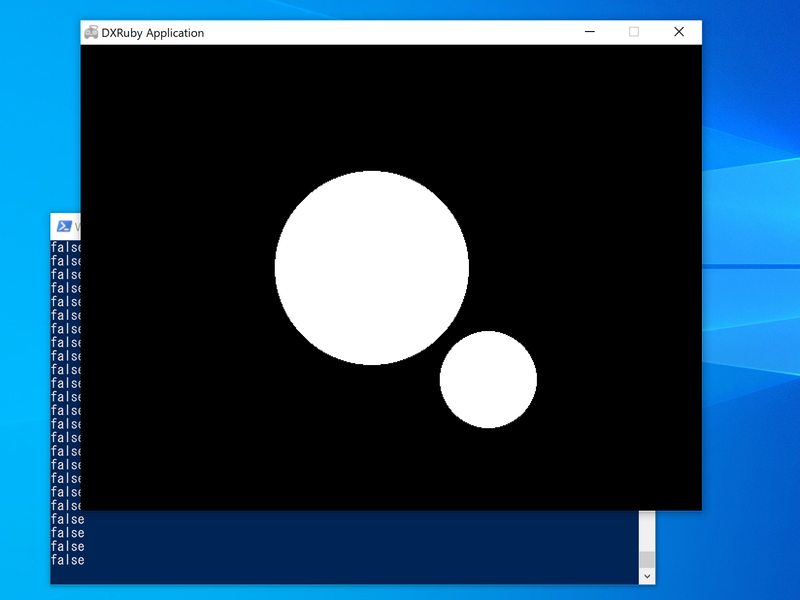
===を使った準備:衝突判定範囲を円に設定(atari_en1.rb)
スプライト.collision = [配列]で衝突範囲の設定ができます。配列に3つの要素を指定すると円で判定するようになります。
スプライト.collision = [x, y, r];中心(x, y)、半径rの円これで、円同士がぎりぎり接した時に
衝突と判定されるようになります。→ DXRubyリファレンス:API INDEX;Sprite#collision=
http://mirichi.github.io/dxruby-doc/api/Sprite_23collision_3D.html
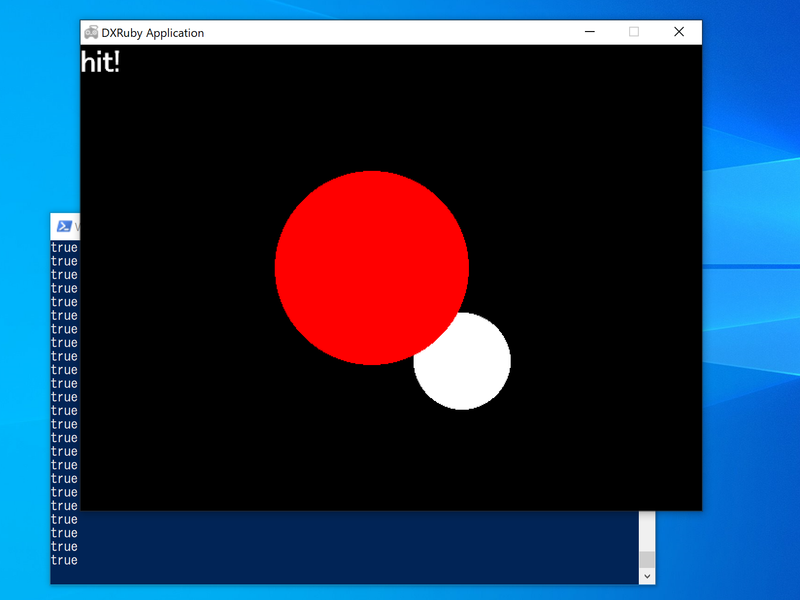
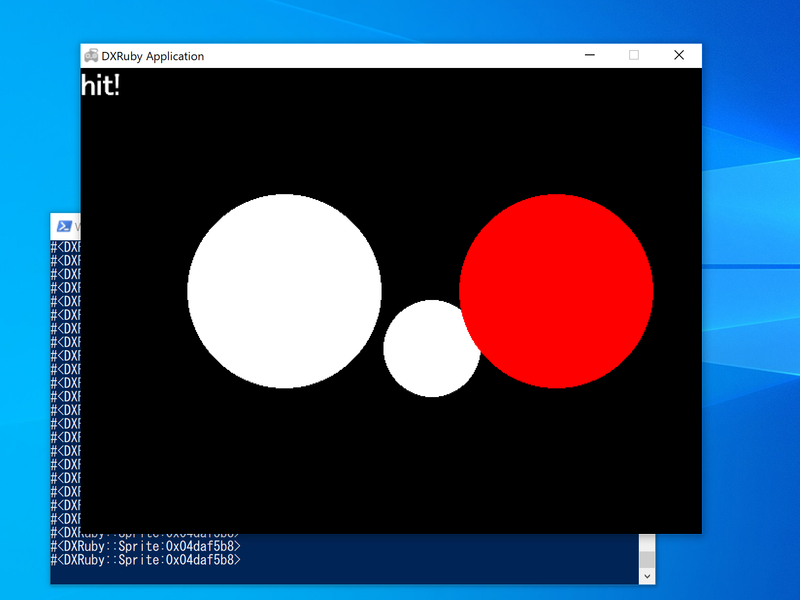
atari_en1.rbrequire 'dxruby' image0 = Image.new(100, 100).circle_fill( 50, 50, 50, C_WHITE) image1 = Image.new(200, 200).circle_fill(100, 100, 100, C_WHITE) image2 = Image.new(200, 200).circle_fill(100, 100, 100, C_RED) ball = Sprite.new(300, 400, image0) block = Sprite.new(200, 130, image1) ball.collision = [ 50, 50, 50] block.collision = [100, 100, 100] font = Font.new(32) Window.loop do ball.x = Input.mouse_pos_x ball.y = Input.mouse_pos_y ball.draw result = (ball === block) p result if result Window.draw_font(0, 0, "hit!", font) block.image = image2 else block.image = image1 end block.draw end
B-1c.
atari?を自作:判定相手が単独(atari_en2.rb)
atari?(jibun, aite)を作って、 衝突の有/無でtrue/fasleを返すようにします。判定方法は、互いの円の中心からの距離を比較します。
- それぞれを円と考えて半径を決める(長方形の長辺と短辺の平均を半径とする)
- 互いの半径を足した長さを求める
- それぞれの中心の座標を求める
- 互いの中心からの距離を求める
中心から中心の距離と半径の和を比較する# radius;半径 # center;中心 rad_x0 = jibun.image.width / 2 # jibunの横幅の 1/2 rad_y0 = jibun.image.height / 2 # jibunの縦幅の 1/2 (rad_x0 + rad_y0) / 2 # jibunの半径(長辺と短辺の平均で考える) x0 = jibun.x # jibunの左上隅のx座標 y0 = jibun.y # jibunの左上隅のy座標 cen_x0 = x0 + rad_x0 # jibunの中心のx座標 cen_y0 = y0 + rad_y0 # jibunの中心のy座標
中心から中心の距離の求め方は、直角三角形のピタゴラスの定理を使います。
距離**2 = 中心間のx座標の差**2 + 中心間のy座標の差**2(Rubyでは、
**2は 2乗の意味)実際は
距離の2乗同志で比較していますが、これは平方根sqrtより2乗**2の計算の方が高速なためです。それでは、自作した
atari?を使って、===を使ったコードを書き換えてみます。atari_en2.rbrequire 'dxruby' def atari?(jibun, aite) x0 = jibun.x rad_x0 = jibun.image.width / 2 cen_x0 = x0 + rad_x0 y0 = jibun.y rad_y0 = jibun.image.height / 2 cen_y0 = y0 + rad_y0 x1 = aite.x rad_x1 = aite.image.width / 2 cen_x1 = x1 + rad_x1 y1 = aite.y rad_y1 = aite.image.height / 2 cen_y1 = y1 + rad_y1 # 半径は長径と短径の1/2に設定 # 半径同士の和 cir_dis = (rad_x0 + rad_y0) / 2 + (rad_x1 + rad_y1) / 2 # 2乗で比較する cir_dis_2 = cir_dis **2 dist_2 = (cen_x0 - cen_x1) ** 2 + (cen_y0 - cen_y1) ** 2 cir_dis_2 >= dist_2 end image0 = Image.new(100, 100).circle_fill( 50, 50, 50, C_WHITE) image1 = Image.new(200, 200).circle_fill(100, 100, 100, C_WHITE) image2 = Image.new(200, 200).circle_fill(100, 100, 100, C_RED) ball = Sprite.new(300, 400, image0) block = Sprite.new(200, 200, image1) font = Font.new(32) Window.loop do ball.x = Input.mouse_pos_x ball.y = Input.mouse_pos_y ball.draw result = atari?(ball, block) p result if result Window.draw_font(0, 0, "hit!", font) block.image = image2 else block.image = image1 end block.draw end
B-2a.
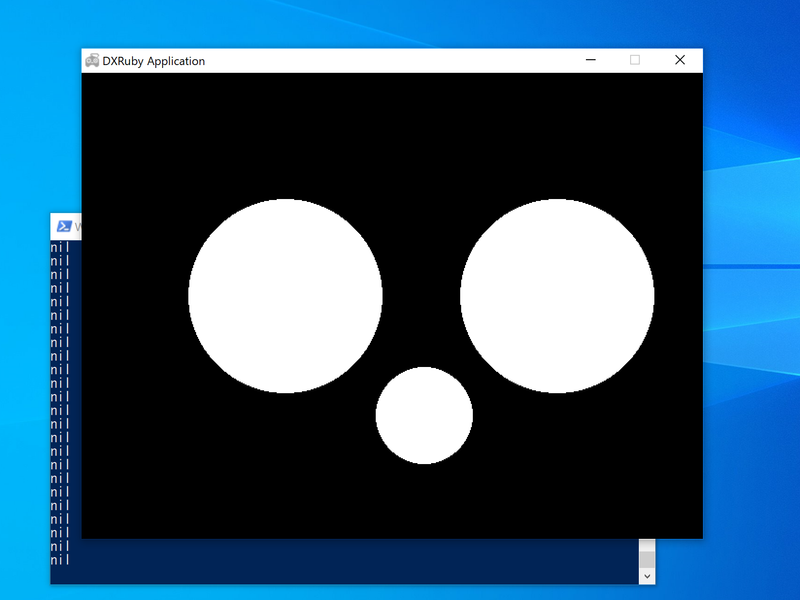
===を使った準備:判定相手が配列(atari_en3.rb)DXRubyのスプライトでは、
===は、相手がスプライトの配列でも、衝突の有/無でtrue/fasleを返します。
ballが、スプライトの配列blocksと衝突しているかを===で判定します。
blocksのいずれかと衝突していたら、ターミナル(コマンドプロンプト)にtrueで出力し、それ以外はfalseを出力します。
また、ウィンドウに衝突時はhit!の文字列を表示します。atari_en3.rbrequire 'dxruby' image0 = Image.new(100, 100).circle_fill( 50, 50, 50, C_WHITE) image1 = Image.new(200, 200).circle_fill(100, 100, 100, C_WHITE) image2 = Image.new(200, 200).circle_fill(100, 100, 100, C_RED) ball = Sprite.new(300, 400, image0) block1 = Sprite.new(110, 130, image1) block2 = Sprite.new(390, 130, image1) ball.collision = [ 50, 50, 50] block1.collision = [100, 100, 100] block2.collision = [100, 100, 100] blocks = [block1, block2] font = Font.new(32) Window.loop do ball.x = Input.mouse_pos_x ball.y = Input.mouse_pos_y ball.draw result = (ball === blocks) p result if result Window.draw_font(0, 0, "hit!", font) end Sprite.draw(blocks) end
B-2b.
atari_array?を自作:判定相手が配列(atari_en4.rb)
===の代わりに、atari_array?(jibun, array)を自作します。
判定相手の配列の要素を一つずつatari?で判定していきます。自作した
atari_array?を使って、コードを書き換えます。atari_en4.rbrequire 'dxruby' def atari?(jibun, aite) x0 = jibun.x rad_x0 = jibun.image.width / 2 cen_x0 = x0 + rad_x0 y0 = jibun.y rad_y0 = jibun.image.height / 2 cen_y0 = y0 + rad_y0 x1 = aite.x rad_x1 = aite.image.width / 2 cen_x1 = x1 + rad_x1 y1 = aite.y rad_y1 = aite.image.height / 2 cen_y1 = y1 + rad_y1 # 半径は長径と短径の1/2に設定 # 半径同士の和 cir_dis = (rad_x0 + rad_y0) / 2 + (rad_x1 + rad_y1) / 2 # 2乗で比較する cir_dis_2 = cir_dis **2 dist_2 = (cen_x0 - cen_x1) ** 2 + (cen_y0 - cen_y1) ** 2 cir_dis_2 >= dist_2 end def atari_array?(jibun, array) array.each do |a| if atari?(jibun, a) return true end end false end image0 = Image.new(100, 100).circle_fill( 50, 50, 50, C_WHITE) image1 = Image.new(200, 200).circle_fill(100, 100, 100, C_WHITE) image2 = Image.new(200, 200).circle_fill(100, 100, 100, C_RED) ball = Sprite.new(300, 400, image0) block1 = Sprite.new(110, 130, image1) block2 = Sprite.new(390, 130, image1) blocks = [block1, block2] font = Font.new(32) Window.loop do ball.x = Input.mouse_pos_x ball.y = Input.mouse_pos_y ball.draw result = atari_array?(ball, blocks) p result if result Window.draw_font(0, 0, "hit!", font) end Sprite.draw(blocks) end
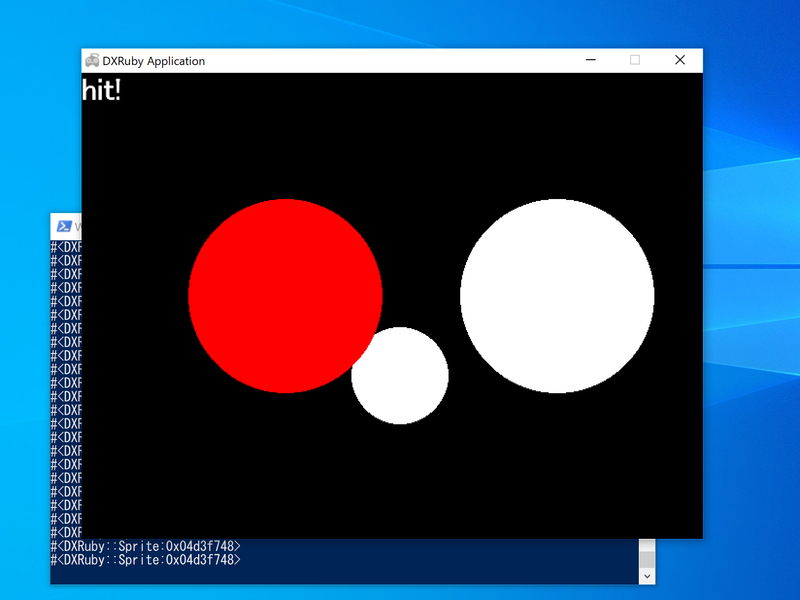
B-3a.
checkを使った準備(atari_en5.rb)DXRubyの
===や、自作したatari_array?では、どの相手に衝突したかは分かりませんでした。一方、DXRubyのスプライトでは
checkを使うと、衝突している相手すべてを配列に入れて返します。(衝突していない時は、何も入ってない配列を返す)この配列を
arrayとすると、0番目のarray.first(array[0]でも同じ)が最初に衝突した相手です。また、array.firstに何か入っていれば衝突している、空(nil)ならば衝突していないという、当たり判定にも使えます。→ DXRubyリファレンス:Spriteを使うためのチュートリアル;衝突したオブジェクトを取得する
http://mirichi.github.io/dxruby-doc/tutorial/sprite.html→ DXRubyリファレンス:API INDEX;Sprite;check
http://mirichi.github.io/dxruby-doc/api/Sprite_23check.htmlプログラムでは、
ballがblocksのどれに最初に衝突しているかをcheck.firstで判定します。
最初に衝突しているブロックをターミナル(コマンドプロンプト)に出力し、そのブロックを赤色にします。それ以外はnilを出力します。
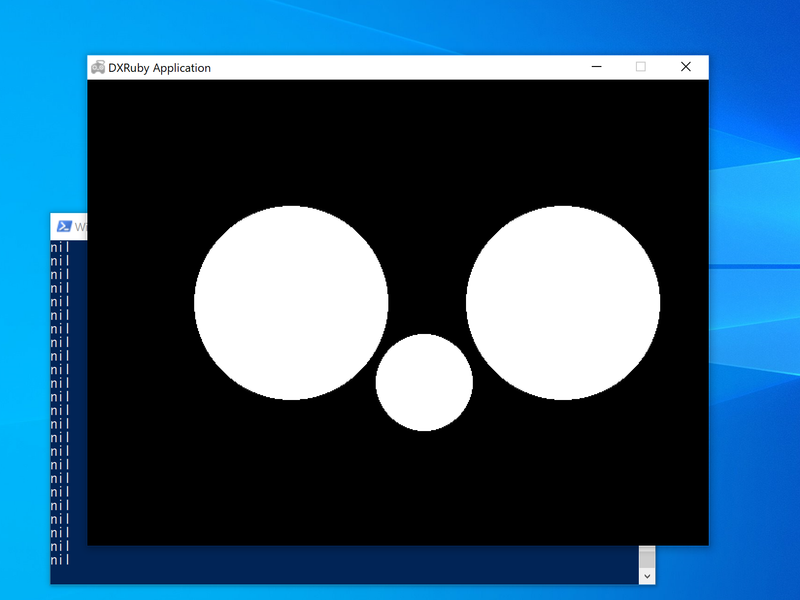
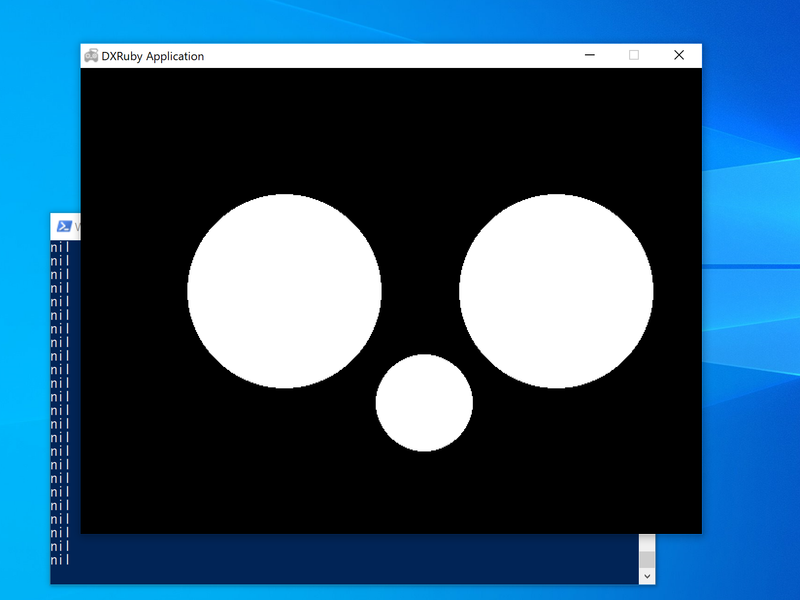
また、ウィンドウに衝突時はhit!の文字列を表示します。atari_en5.rbrequire 'dxruby' image0 = Image.new(100, 100).circle_fill( 50, 50, 50, C_WHITE) image1 = Image.new(200, 200).circle_fill(100, 100, 100, C_WHITE) image2 = Image.new(200, 200).circle_fill(100, 100, 100, C_RED) ball = Sprite.new(300, 400, image0) block1 = Sprite.new(110, 130, image1) block2 = Sprite.new(390, 130, image1) ball.collision = [ 50, 50, 50] block1.collision = [100, 100, 100] block2.collision = [100, 100, 100] blocks = [block1, block2] font = Font.new(32) Window.loop do ball.x = Input.mouse_pos_x ball.y = Input.mouse_pos_y ball.draw col = ball.check(blocks).first p col if col Window.draw_font(0, 0, "hit!", font) col.image = image2 Sprite.draw(blocks) col.image = image1 else Sprite.draw(blocks) end end
B-3b.
atari_arrayを自作(atari_en6.rb)ぶつかった相手は最初のものだけ分かればよいので、DXRubyの
check.first相当のatari_arrayを自作します。つまり、
atari_arrayは、衝突していないとnilを返し、衝突すると "ぶつかった最初のもの" を返します。方法は、判定相手の配列の要素を一つずつ
atari?で判定していき、最初に衝突している要素を返します。自作した
atari_arrayを使って、コードを書き換えます。atari_en6.rbrequire 'dxruby' def atari?(jibun, aite) x0 = jibun.x rad_x0 = jibun.image.width / 2 cen_x0 = x0 + rad_x0 y0 = jibun.y rad_y0 = jibun.image.height / 2 cen_y0 = y0 + rad_y0 x1 = aite.x rad_x1 = aite.image.width / 2 cen_x1 = x1 + rad_x1 y1 = aite.y rad_y1 = aite.image.height / 2 cen_y1 = y1 + rad_y1 # 半径は長径と短径の1/2に設定 # 半径同士の和 cir_dis = (rad_x0 + rad_y0) / 2 + (rad_x1 + rad_y1) / 2 # 2乗で比較する cir_dis_2 = cir_dis **2 dist_2 = (cen_x0 - cen_x1) ** 2 + (cen_y0 - cen_y1) ** 2 cir_dis_2 >= dist_2 end def atari_array(jibun, array) array.each do |a| if atari?(jibun, a) return a end end nil end image0 = Image.new(100, 100).circle_fill( 50, 50, 50, C_WHITE) image1 = Image.new(200, 200).circle_fill(100, 100, 100, C_WHITE) image2 = Image.new(200, 200).circle_fill(100, 100, 100, C_RED) ball = Sprite.new(300, 400, image0) block1 = Sprite.new(110, 130, image1) block2 = Sprite.new(390, 130, image1) blocks = [block1, block2] font = Font.new(32) Window.loop do ball.x = Input.mouse_pos_x ball.y = Input.mouse_pos_y ball.draw col = atari_array(ball, blocks) p col if col Window.draw_font(0, 0, "hit!", font) col.image = image2 Sprite.draw(blocks) col.image = image1 else Sprite.draw(blocks) end end
B-4. 自作の当たり判定(円)を
Spriteクラスのメソッドにする(atari_en7.rb)元の
===とcheckは、Spriteクラスのメソッド(命令)なので、書き方としては、ball.check(blocks)のようになります。自作の
atari_arrayも同じような書き方になるように、Spriteクラスのメソッドにしてみます。
クラスやメソッドについての説明はここでは説明を省きますので、詳しくはRubyのテキストを見てください。クラスメソッドを追加する方法は簡単で、以下のようにします。
class Sprite
  def 追加したいメソッド
    #追加したいメソッドの内容
  end
end
Spriteクラスにatari?とatari_array追加します。ちなみに、
jibun(自分)に相当するものは、selfと書きます。class Sprite def atari?(aite) x0 = self.x rad_x0 = self.image.width / 2 cen_x0 = x0 + rad_x0 y0 = self.y rad_y0 = self.image.height / 2 cen_y0 = y0 + rad_y0 x1 = aite.x rad_x1 = aite.image.width / 2 cen_x1 = x1 + rad_x1 y1 = aite.y rad_y1 = aite.image.height / 2 cen_y1 = y1 + rad_y1 # 半径は長径と短径の1/2に設定 # 半径同士の和 cir_dis = (rad_x0 + rad_y0) / 2 + (rad_x1 + rad_y1) / 2 # 2乗で比較する cir_dis_2 = cir_dis **2 dist_2 = (cen_x0 - cen_x1) ** 2 + (cen_y0 - cen_y1) ** 2 cir_dis_2 >= dist_2 end def atari_array(array) array.each do |a| if self.atari?(a) return a end end nil end endこれで、クラスメソッドになったので、今までの
atari_array(ball, blocks)という書き方ではなく、ball.atari_array(blocks)というように書くことができるようになりました。atari_en7.rbrequire 'dxruby' class Sprite def atari?(aite) x0 = self.x rad_x0 = self.image.width / 2 cen_x0 = x0 + rad_x0 y0 = self.y rad_y0 = self.image.height / 2 cen_y0 = y0 + rad_y0 x1 = aite.x rad_x1 = aite.image.width / 2 cen_x1 = x1 + rad_x1 y1 = aite.y rad_y1 = aite.image.height / 2 cen_y1 = y1 + rad_y1 # 半径は長径と短径の1/2に設定 # 半径同士の和 cir_dis = (rad_x0 + rad_y0) / 2 + (rad_x1 + rad_y1) / 2 # 2乗で比較する cir_dis_2 = cir_dis **2 dist_2 = (cen_x0 - cen_x1) ** 2 + (cen_y0 - cen_y1) ** 2 cir_dis_2 >= dist_2 end def atari_array(array) array.each do |a| if self.atari?(a) return a end end nil end end image0 = Image.new(100, 100).circle_fill( 50, 50, 50, C_WHITE) image1 = Image.new(200, 200).circle_fill(100, 100, 100, C_WHITE) image2 = Image.new(200, 200).circle_fill(100, 100, 100, C_RED) ball = Sprite.new(300, 400, image0) block1 = Sprite.new(110, 130, image1) block2 = Sprite.new(390, 130, image1) blocks = [block1, block2] font = Font.new(32) Window.loop do ball.x = Input.mouse_pos_x ball.y = Input.mouse_pos_y ball.draw col = ball.atari_array(blocks) p col if col Window.draw_font(0, 0, "hit!", font) col.image = image2 Sprite.draw(blocks) col.image = image1 else Sprite.draw(blocks) end end
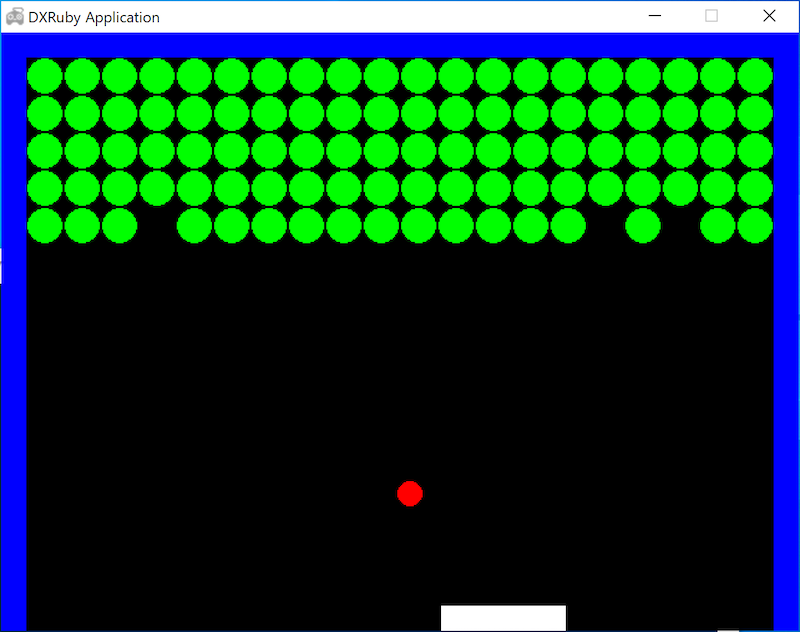
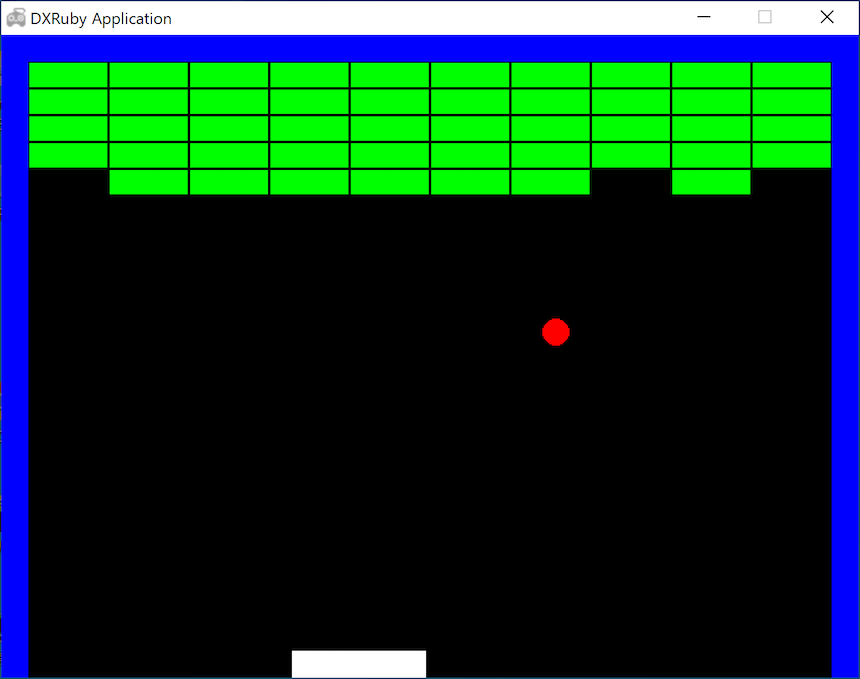
B-5. 自作の当たり判定(円)を使ったブロック崩し(atari_en8.rb)
「ブロック崩し」のプログラム
block28.rbのブロックを円に変えたものを、自作のatari_arrayに書き換えてみましょう。円にした
ブロックとボールの判定だけですが、元のcheck.firstを同じ動きをしているのがわかると思います。atari_en8.rbrequire 'dxruby' class Sprite def atari?(aite) x0 = self.x rad_x0 = self.image.width / 2 cen_x0 = x0 + rad_x0 y0 = self.y rad_y0 = self.image.height / 2 cen_y0 = y0 + rad_y0 x1 = aite.x rad_x1 = aite.image.width / 2 cen_x1 = x1 + rad_x1 y1 = aite.y rad_y1 = aite.image.height / 2 cen_y1 = y1 + rad_y1 # 半径は長径と短径の1/2に設定 # 半径同士の和 cir_dis = (rad_x0 + rad_y0) / 2 + (rad_x1 + rad_y1) / 2 # 2乗で比較する cir_dis_2 = cir_dis **2 dist_2 = (cen_x0 - cen_x1) ** 2 + (cen_y0 - cen_y1) ** 2 cir_dis_2 >= dist_2 end def atari_array(array) array.each do |a| if self.atari?(a) return a end end nil end end img_bar = Image.new(100, 20, C_WHITE) img_hwall = Image.new( 20, 480, C_BLUE) img_vwall = Image.new(640, 20, C_BLUE) img_ball = Image.new( 20, 20).circle_fill(10, 10, 10, C_RED) img_block = Image.new(28, 28).circle_fill(14, 14, 14, C_GREEN) # ブロックを円に img_block_y = Image.new(28, 28).circle_fill(14, 14, 14, C_YELLOW) # ブロックを円に bar = Sprite.new( 0, 460, img_bar) lwall = Sprite.new( 0, 0, img_hwall) rwall = Sprite.new(620, 0, img_hwall) twall = Sprite.new( 0, 0, img_vwall) walls = [bar, lwall, rwall, twall] ball = Sprite.new(300, 400, img_ball) dx = 2 dy = -2 def move(sprite, speed_x, speed_y) sprite.x += speed_x sprite.y += speed_y end blocks = [] 20.times do |x| # ブロックの組み方を少し変更 5.times do |y| blocks << Sprite.new(21 + 30 * x, 21 + 30 * y, img_block) end end Window.loop do bar.x = Input.mouse_pos_x Sprite.draw(walls) move(ball, dx, 0) if ball === walls ball.x -= dx dx = -dx end coll_x = ball.atari_array(blocks) if coll_x coll_x.image = img_block_y coll_x.draw #一瞬色が変わって表示 coll_x.vanish #消える ball.x -= dx dx = -dx end move(ball, 0, dy) if ball=== walls ball. y -= dy dy = -dy end coll_y = ball.atari_array(blocks) if coll_y coll_y.image = img_block_y coll_y.draw #一瞬色が変わって表示 coll_y.vanish #消える ball. y -= dy dy = -dy end ball.draw Sprite.draw(blocks) end
参考
プログラミング初心者向け:DXRubyで 1ステップずつ作っていく「ブロック崩し」 - Qiita
で作った「ブロック崩し」のプログラムです。
- block28.rb
block28.rbrequire 'dxruby' img_bar = Image.new(100, 20, C_WHITE) img_hwall = Image.new( 20, 480, C_BLUE) img_vwall = Image.new(640, 20, C_BLUE) img_ball = Image.new( 20, 20).circle_fill(10, 10, 10, C_RED) img_block = Image.new( 58, 18, C_GREEN) img_block_y = Image.new( 58, 18, C_YELLOW) bar = Sprite.new( 0, 460, img_bar) lwall = Sprite.new( 0, 0, img_hwall) rwall = Sprite.new(620, 0, img_hwall) twall = Sprite.new( 0, 0, img_vwall) walls = [bar, lwall, rwall, twall] ball = Sprite.new(300, 400, img_ball) dx = 2 dy = -2 def move(sprite, speed_x, speed_y) sprite.x += speed_x sprite.y += speed_y end blocks = [] 10.times do |x| 5.times do |y| blocks << Sprite.new(21 + 60 * x, 21 + 20 * y, img_block) end end Window.loop do bar.x = Input.mouse_pos_x Sprite.draw(walls) move(ball, dx, 0) if ball === walls ball.x -= dx dx = -dx end coll_x = ball.check(blocks) if coll_x[0] coll_x[0].image = img_block_y coll_x[0].draw #一瞬色が変わって表示 coll_x[0].vanish #消える ball.x -= dx dx = -dx end move(ball, 0, dy) if ball === walls ball. y -= dy dy = -dy end coll_y = ball.check(blocks) if coll_y[0] coll_y[0].image = img_block_y coll_y[0].draw #一瞬色が変わって表示 coll_y[0].vanish #消える ball. y -= dy dy = -dy end ball.draw Sprite.draw(blocks) end


- 投稿日:2020-02-17T11:43:42+09:00
Rails超絶初学者のためのデバッグ
Railsでのデバッグ
Railsを学習しはじめて2ヶ月くらいですがデバッグで困った点やありがちな点とその対象法をまとめます。
デバッグとはバグを見つけて解決することです。よく起こるエラー
Syntax error
- 書き方が間違っている時に起こるエラーです。
- よくある原因
- かっこを閉じていない
- 英語のスペルミス
- end を書いていない
No method error
- そんなメソッドは存在しないというエラーです。
- よくある原因 (eachのやつ自分でもめっちゃありました。)
- 英語のスペルミス
- eachを使っている時にeachで回したい内容が一つの情報しか入っていない (複数情報が前提のため)
argument error
- 引数の数が違うというエラーです。
- よくある原因
- 4つの引数を取り扱うメソッドで引数の数が5つ以上だったり、3つ以下だったり数があっていない
undefined local or method 'example' ~
- 定義されていない変数やメソッドがあるというエラーです。
- よくある原因
- コントローラーで定義したインスタンス変数とviewで使っているインスタンス変数が異なっている
- コントローラーでインスタンス変数を定義していないのにviewで使っている
Couldn't find example id = 1
- idが1のものが見つかりませんというエラーです。
- よくある原因
- 本当に存在していない
- 存在しているのに!という時はidが1の全く別のものを探してしまっている(Userのidが1の人を探しているつもりがBookのidが1のものを探してしまっているなど)
まとめ
少しでもこれから学習する人の学びになってくれればと思って作成しました。
- 投稿日:2020-02-17T11:23:27+09:00
rails consoleでLibrary not loaded: /usr/local/opt/readline/lib/libreadline.7.dylib (LoadError)ってエラーが出る件について
まずエラー載せますね。
参考になるかもしれないのでエラーログまるごと。YourName@YourName application_name % bundle exec rails c Traceback (most recent call last): 42: from bin/rails:4:in `<main>' 41: from /Users/YourName/.rbenv/versions/2.5.1/lib/ruby/gems/2.5.0/gems/activesupport-6.0.2.1/lib/active_support/dependencies.rb:325:in `require' 40: from /Users/YourName/.rbenv/versions/2.5.1/lib/ruby/gems/2.5.0/gems/activesupport-6.0.2.1/lib/active_support/dependencies.rb:291:in `load_dependency' 39: from /Users/YourName/.rbenv/versions/2.5.1/lib/ruby/gems/2.5.0/gems/activesupport-6.0.2.1/lib/active_support/dependencies.rb:325:in `block in require' 38: from /Users/YourName/.rbenv/versions/2.5.1/lib/ruby/gems/2.5.0/gems/bootsnap-1.4.5/lib/bootsnap/load_path_cache/core_ext/kernel_require.rb:30:in `require' 37: from /Users/YourName/.rbenv/versions/2.5.1/lib/ruby/gems/2.5.0/gems/bootsnap-1.4.5/lib/bootsnap/load_path_cache/core_ext/kernel_require.rb:21:in `require_with_bootsnap_lfi' 36: from /Users/YourName/.rbenv/versions/2.5.1/lib/ruby/gems/2.5.0/gems/bootsnap-1.4.5/lib/bootsnap/load_path_cache/loaded_features_index.rb:92:in `register' 35: from /Users/YourName/.rbenv/versions/2.5.1/lib/ruby/gems/2.5.0/gems/bootsnap-1.4.5/lib/bootsnap/load_path_cache/core_ext/kernel_require.rb:22:in `block in require_with_bootsnap_lfi' 34: from /Users/YourName/.rbenv/versions/2.5.1/lib/ruby/gems/2.5.0/gems/bootsnap-1.4.5/lib/bootsnap/load_path_cache/core_ext/kernel_require.rb:22:in `require' 33: from /Users/YourName/.rbenv/versions/2.5.1/lib/ruby/gems/2.5.0/gems/railties-6.0.2.1/lib/rails/commands.rb:18:in `<top (required)>' 32: from /Users/YourName/.rbenv/versions/2.5.1/lib/ruby/gems/2.5.0/gems/railties-6.0.2.1/lib/rails/command.rb:44:in `invoke' 31: from /Users/YourName/.rbenv/versions/2.5.1/lib/ruby/gems/2.5.0/gems/railties-6.0.2.1/lib/rails/command.rb:70:in `find_by_namespace' 30: from /Users/YourName/.rbenv/versions/2.5.1/lib/ruby/gems/2.5.0/gems/railties-6.0.2.1/lib/rails/command/behavior.rb:39:in `lookup' 29: from /Users/YourName/.rbenv/versions/2.5.1/lib/ruby/gems/2.5.0/gems/railties-6.0.2.1/lib/rails/command/behavior.rb:39:in `each' 28: from /Users/YourName/.rbenv/versions/2.5.1/lib/ruby/gems/2.5.0/gems/railties-6.0.2.1/lib/rails/command/behavior.rb:40:in `block in lookup' 27: from /Users/YourName/.rbenv/versions/2.5.1/lib/ruby/gems/2.5.0/gems/railties-6.0.2.1/lib/rails/command/behavior.rb:40:in `each' 26: from /Users/YourName/.rbenv/versions/2.5.1/lib/ruby/gems/2.5.0/gems/railties-6.0.2.1/lib/rails/command/behavior.rb:44:in `block (2 levels) in lookup' 25: from /Users/YourName/.rbenv/versions/2.5.1/lib/ruby/gems/2.5.0/gems/activesupport-6.0.2.1/lib/active_support/dependencies.rb:325:in `require' 24: from /Users/YourName/.rbenv/versions/2.5.1/lib/ruby/gems/2.5.0/gems/activesupport-6.0.2.1/lib/active_support/dependencies.rb:291:in `load_dependency' 23: from /Users/YourName/.rbenv/versions/2.5.1/lib/ruby/gems/2.5.0/gems/activesupport-6.0.2.1/lib/active_support/dependencies.rb:325:in `block in require' 22: from /Users/YourName/.rbenv/versions/2.5.1/lib/ruby/gems/2.5.0/gems/bootsnap-1.4.5/lib/bootsnap/load_path_cache/core_ext/kernel_require.rb:30:in `require' 21: from /Users/YourName/.rbenv/versions/2.5.1/lib/ruby/gems/2.5.0/gems/bootsnap-1.4.5/lib/bootsnap/load_path_cache/core_ext/kernel_require.rb:21:in `require_with_bootsnap_lfi' 20: from /Users/YourName/.rbenv/versions/2.5.1/lib/ruby/gems/2.5.0/gems/bootsnap-1.4.5/lib/bootsnap/load_path_cache/loaded_features_index.rb:92:in `register' 19: from /Users/YourName/.rbenv/versions/2.5.1/lib/ruby/gems/2.5.0/gems/bootsnap-1.4.5/lib/bootsnap/load_path_cache/core_ext/kernel_require.rb:22:in `block in require_with_bootsnap_lfi' 18: from /Users/YourName/.rbenv/versions/2.5.1/lib/ruby/gems/2.5.0/gems/bootsnap-1.4.5/lib/bootsnap/load_path_cache/core_ext/kernel_require.rb:22:in `require' 17: from /Users/YourName/.rbenv/versions/2.5.1/lib/ruby/gems/2.5.0/gems/railties-6.0.2.1/lib/rails/commands/console/console_command.rb:4:in `<top (required)>' 16: from /Users/YourName/.rbenv/versions/2.5.1/lib/ruby/gems/2.5.0/gems/activesupport-6.0.2.1/lib/active_support/dependencies.rb:325:in `require' 15: from /Users/YourName/.rbenv/versions/2.5.1/lib/ruby/gems/2.5.0/gems/activesupport-6.0.2.1/lib/active_support/dependencies.rb:291:in `load_dependency' 14: from /Users/YourName/.rbenv/versions/2.5.1/lib/ruby/gems/2.5.0/gems/activesupport-6.0.2.1/lib/active_support/dependencies.rb:325:in `block in require' 13: from /Users/YourName/.rbenv/versions/2.5.1/lib/ruby/gems/2.5.0/gems/bootsnap-1.4.5/lib/bootsnap/load_path_cache/core_ext/kernel_require.rb:30:in `require' 12: from /Users/YourName/.rbenv/versions/2.5.1/lib/ruby/gems/2.5.0/gems/bootsnap-1.4.5/lib/bootsnap/load_path_cache/core_ext/kernel_require.rb:21:in `require_with_bootsnap_lfi' 11: from /Users/YourName/.rbenv/versions/2.5.1/lib/ruby/gems/2.5.0/gems/bootsnap-1.4.5/lib/bootsnap/load_path_cache/loaded_features_index.rb:92:in `register' 10: from /Users/YourName/.rbenv/versions/2.5.1/lib/ruby/gems/2.5.0/gems/bootsnap-1.4.5/lib/bootsnap/load_path_cache/core_ext/kernel_require.rb:22:in `block in require_with_bootsnap_lfi' 9: from /Users/YourName/.rbenv/versions/2.5.1/lib/ruby/gems/2.5.0/gems/bootsnap-1.4.5/lib/bootsnap/load_path_cache/core_ext/kernel_require.rb:22:in `require' 8: from /Users/YourName/.rbenv/versions/2.5.1/lib/ruby/2.5.0/irb/completion.rb:10:in `<top (required)>' 7: from /Users/YourName/.rbenv/versions/2.5.1/lib/ruby/gems/2.5.0/gems/activesupport-6.0.2.1/lib/active_support/dependencies.rb:325:in `require' 6: from /Users/YourName/.rbenv/versions/2.5.1/lib/ruby/gems/2.5.0/gems/activesupport-6.0.2.1/lib/active_support/dependencies.rb:291:in `load_dependency' 5: from /Users/YourName/.rbenv/versions/2.5.1/lib/ruby/gems/2.5.0/gems/activesupport-6.0.2.1/lib/active_support/dependencies.rb:325:in `block in require' 4: from /Users/YourName/.rbenv/versions/2.5.1/lib/ruby/gems/2.5.0/gems/bootsnap-1.4.5/lib/bootsnap/load_path_cache/core_ext/kernel_require.rb:30:in `require' 3: from /Users/YourName/.rbenv/versions/2.5.1/lib/ruby/gems/2.5.0/gems/bootsnap-1.4.5/lib/bootsnap/load_path_cache/core_ext/kernel_require.rb:21:in `require_with_bootsnap_lfi' 2: from /Users/YourName/.rbenv/versions/2.5.1/lib/ruby/gems/2.5.0/gems/bootsnap-1.4.5/lib/bootsnap/load_path_cache/loaded_features_index.rb:92:in `register' 1: from /Users/YourName/.rbenv/versions/2.5.1/lib/ruby/gems/2.5.0/gems/bootsnap-1.4.5/lib/bootsnap/load_path_cache/core_ext/kernel_require.rb:22:in `block in require_with_bootsnap_lfi' /Users/YourName/.rbenv/versions/2.5.1/lib/ruby/gems/2.5.0/gems/bootsnap-1.4.5/lib/bootsnap/load_path_cache/core_ext/kernel_require.rb:22:in `require': dlopen(/Users/YourName/.rbenv/versions/2.5.1/lib/ruby/2.5.0/x86_64-darwin18/readline.bundle, 9): Library not loaded: /usr/local/opt/readline/lib/libreadline.7.dylib (LoadError) Referenced from: /Users/YourName/.rbenv/versions/2.5.1/lib/ruby/2.5.0/x86_64-darwin18/readline.bundle Reason: image not found - /Users/YourName/.rbenv/versions/2.5.1/lib/ruby/2.5.0/x86_64-darwin18/readline.bundleさて、これの解決方法について調べてみると、
/usr/local/opt/readline/lib に以下のファイルを、->のようにシンボリックリンクする
- libreadline.dylib -> libreadline.dylib
- libhistory.dylib -> libreadline.dylib
7系のreadlineを入れて、そちらを使用するようにする
rb-readlineを突っ込む
などが見受けられましたが、個人的には3が影響範囲小さくて良いなと思い、そちらを選択しました。
本当はもっとちゃんと調べたかったけど、rails consoleを使いたいだけなのに、ここに時間を取られるのもアホらしいなと思ったので雑に解決。おわりに
brew info readlineとかやっても7系のreadline出てこなかったんですが、もうインストールできないのだろうか?
- 投稿日:2020-02-17T11:17:36+09:00
Rails : turbolinksのせいでjQueryがリロードしないと動かない時の対処法
turbolinksとは
ページ遷移をAjax(非同期通信)に置き換え処理を高速化するgemです。
(Rails4からはデフォルトで入っているとのこと)jQueryとは
JavaScriptライブラリの一種です。
アニメーションを作り出すものです。turbolinksのせいでjQueryに支障が出る場合の対処法
application.js//= require rails-ujs //= require activestorage //= require turbolinks //= require jquery //= require bootstrap-sprockets //= require_tree . $(document).on('turbolinks:load', function() { //= この中にjQueryでの処理を書く }このように記述するとページを更新しなくても動くようになりました。
他にも同じような記事がいくつかあるかと思いますがシンプルにまとめました。
- 投稿日:2020-02-17T11:00:48+09:00
【Ruby3】 型プロファイラを試してみる
型プロファイラとは?
型プロファイラは、
型注釈がない素の Ruby プログラムを入力して、
型エラーの可能性を警告したり(Testing)、
型シグネチャのプロトタイプを生成したり(Understanding)
できるツールです※開発者である遠藤さんのブログ記事から引用
この機能は2020年にリリースが予定されている Ruby3 の新機能の中の静的解析の一要素となっています。
その他の静的解析の情報については Ruby の型関連の情報まとめ にまとめてあるので良ければ見てください。環境
- Ruby 2.7.0
セットアップ
$ mkdir ~/work
$ cd ~/work
$ git clone https://github.com/ruby/ruby-signature.git
$ git clone https://github.com/mame/ruby-type-profiler.git
$ cd ruby-type-profiler
$ bundle install
※上で
~/workを作っているのは、Gemfile にgem "ruby-signature", path: "~/work/ruby-signature"となっているため。(path を書き換えても動くかもしれないが試していない)
コマンド
基本は以下の2つ。
# プロファイラの実行
./run.sh path/to/src.eb
# テストの実行
./smoke.sh path/to/src.rb
デモ
README の DEMO と同じものを動かしてみる。
以下のコードをruby-type-profiler/tmp/test.rbとして保存。test.rbdef foo(x) if x > 10 x.to_s else x.boo() x + 42 end end foo(42)$ cd ~/work/ruby-type-profiler $ ./run.sh tmp/test.rb上記を実行すると、以下のように、定義が存在しない定義が検出される。また、推定された型シグネチャも出力されている。
# Errors
tmp/test.rb:6: [error] undefined method: Integer#boo

# Classes
class Object
  foo : (Integer) -> (Integer | String)
end
ここで
x.boo()の行をコメントアウトしてみると、予想通りエラーが消える。$ ./run.sh tmp/test.rb # Classes class Object foo : (Integer) -> (Integer | String) end次に、引数を文字列にしてみる。
test.rbdef foo(x) if x x + '42' else x + 42 end end foo('a')型プロファイラの実行結果は以下のようになる。
$ ./run.sh tmp/test.rb
# Errors
tmp/test.rb:6: [error] failed to resolve overload: String#+

# Classes
class Object
  foo : (String) -> (String | any)
end
x が文字列のとき、
x + 42を実行すると TypeError が発生するが、上のコードでは else ブロックに入らなくてもそれを検出できている。
引数を文字列にしたことで、推定される型が先程は Integer だったのが String に変わっている。サンプルコード
smoke/に大量のサンプルコードがあるので、これらで遊んでみると良さそう。$ ./run.sh smoke/demo.rb # Classes class Object foo : (FalseClass | TrueClass) -> (Integer | String) identity : (:sym | Integer | String) -> (:sym | Integer | String) fib : (Integer) -> Integer end class A foo : (Integer | String) -> NilClass bar : (Integer | String) -> NilClass end class B bar : (Integer | String) -> NilClass endテスト
./smoke.shを利用することでテストを実行できる。
OK の場合はそれ以外表示されず、NG の場合エラー内容が表示される。$ ./smoke.sh smoke/demo.rb # OK: smoke/demo.rb $ ./smoke.sh tmp/test.rb # NG: tmp/test.rb expected: actual: # Errors tmp/test.rb:6: [error] failed to resolve overload: String#+ # Classes class Object foo : (String) -> (String | any) end参考
type-profiler のレポジトリ
https://github.com/mame/ruby-type-profiler開発者である遠藤さんによる解説記事
https://techlife.cookpad.com/entry/2019/04/16/164858
- 投稿日:2020-02-17T10:31:31+09:00
Rails コーティング規約について 4
はじめに
Ruby、Railsの基礎を学習中の方に向けて記載致します。
Rubyのコーティング規約はコチラをクリック願います。
Railsのコーティング規約 2 はコチラをクリック願います。
私自身これからチーム開発を行う上で大事にしたい。知っておきたいことをOutputします。Routing
ActiveRecordのモデル間の関連を表現するには、入れ子型でルートを定義すると分かりやすい。
qiita.rb# 実践してみます。 class Post < ActiveRecord::Base has_many :comments end class Comments < ActiveRecord::Base belongs_to :post end # routes.rb resources :posts do resources :comments endBundler
開発およびテストでしか利用しない gem は、Gemfileにて利用する環境(developmentやtest)を指定すること。
有名で利用者の多い gem を利用すること。
- 無名の gem を利用しなければならない場合は、利用前にソースコードをよく確認する。
さいごに
当たり前のことですが、チーム開発で欠かせないことかと思いました。
皆様の復習等にご活用頂けますと幸いです。
- 投稿日:2020-02-17T09:49:17+09:00
「The name 'Todo' is either already used in your application or reserved by Ruby on Rails. Please choose an alternative and run this generator again.」エラー対処法
$ rails g model Todo item:text
Running via Spring preloader in process 83975
      invoke  active_record
The name 'Todo' is either already used in your application or reserved by Ruby on Rails. Please choose an alternative and run this generator again.
参考ページ
https://qiita.com/tu-kun/items/4fede82431e546abd941原因:今回作ろうとしてるRailsアプリケーションのモジュール名とモデル名が重複していたためエラーになった
1.モジュール名の変更 Todo → RailsTodo
config/application.rbrequire_relative 'boot' require 'rails/all' # Require the gems listed in Gemfile, including any gems # you've limited to :test, :development, or :production. Bundler.require(*Rails.groups) - module Todo + module RailsTodo class Application < Rails::Application # Initialize configuration defaults for originally generated Rails version. config.load_defaults 6.0 # Settings in config/environments/* take precedence over those specified here. # Application configuration can go into files in config/initializers # -- all .rb files in that directory are automatically loaded after loading # the framework and any gems in your application. end end2.モジュール名を変更したあと、フォルダ名を変更する todo → rails_todo
- フォルダ名はスネークケース(小文字で単語区切りが
_)- モジュール名はアッパーキャメルケース(単語区切りが大文字でそれ以外は小文字)
- Railsにおいてアプリケーション名を表す部分は
config/application.rbのモジュール名のことをいう参考ページ
https://designsupply-web.com/developmentlab/4052/エラー解消
$ rails g model Todo item:text completed:boolean
Running via Spring preloader in process 84393
      invoke  active_record
      create    db/migrate/20200216151440_create_todos.rb
      create    app/models/todo.rb
      invoke    test_unit
      create      test/models/todo_test.rb
      create      test/fixtures/todos.yml
$ rails db:migrate
== 20200216151440 CreateTodos: migrating ======================================
-- create_table(:todos)
   -> 0.0018s
== 20200216151440 CreateTodos: migrated (0.0018s) =============================
- 投稿日:2020-02-17T07:40:30+09:00
使えるようになって(いて)欲しいプログラミング言語
はじめに
私はすでに全く若手ではないのだが、個人的な意見として、また新たに入ってくる技術者に言っていることを書いてみる。勿論賛否あって良い。
何気に私はいわゆる組込み系の仕事をしているのだが、ソフトウェア・オリエンテッドであまり組込みっぽくない人種です。
使えるようになって(いて)欲しいプログラミング言語
概ね以下の3種類でそれぞれ1つずつ。
システム記述系
こういう括りが正しいかは別として、C/C++、Java、C#など。
プログラムの動きとか、コンピューターの動きとか、きちんと知るにはCが最適。アセンブラとは言わない。アセンブラでもいいけど、プロセッサごとに違うしね。概念は知ってると良い。
ただ、Cを実務で使うのはどうしても必要でなければ避けたいのが本音。スキルの差がモロに品質に直結するので。
後、オブジェクト指向しづらいし。それができるというのとはまた別。C++は好きだが、仕様がカオスになりすぎて完全にマニアの世界。Javaはできると実務でも使えて、オブジェクト指向にも慣れるので良いかもしれない。
C#も簡単で分かりやすかった。Windowsでしかいまいち使わないが。
スクリプト系
Ruby、Python、今更使わないがベテランはPerlか。何でも良い。何か使えれば考え方は大概一緒で応用が効くだろう。
スクリプト言語は超絶楽に何でもできる。製品開発だって個人的な業務効率化だっていける。なので、使えるようになっておくと様々な場面で重宝される。
JavaScript
というか、TypeScriptか。
クライアント系はもうこれ一択。組込み系だって最近はWebブラウザ内蔵してるし、UIやるには必需品。
デスクトップでも node.js で何でもできるし。
ただ、node.js はひとつのザ・ワールドになっていて全くライトな感じではないのがちょっと引っ掛かるが。
まとめ
上記は網羅的な形ではないが、上記の方針で取り組んでいれば、新たに何か学ばなくてはならなくなってもどこかのスキルがベースになって応用が効く。
どちらかというと言語そのものよりもライブラリやフレームワークのスキル習得のほうが重要になるが、それを使いこなす上での前提知識の習得に時間がかかるようでは心許ない所なので、ある程度応用が効く形でスキル習得していくのが良い。
その上で、技術は知識よりも実践(熟練)なので、沢山書く機会を作ることを意識してもらえれば、嬉しい。
- 投稿日:2020-02-17T00:36:19+09:00
ウィザード形式の新規登録を実装〜SMS認証を添えて〜
はじめに
ウィザード形式は、登録フォームをいくつかのページに分けて実装するやり方です。入力項目がたくさんあるサービスの場合に有効です。
ウィザード形式でのフォーム実装は既に色々な方が記事にしており、実装方法も十人十色です。sessionで値を保持したり、ページ毎にDBに値を格納したり。。
やり方としては数多く存在しますが、今回の記事では、そんなウィザード形式の実装方法の一つをご紹介できればと思います。ウィザード形式の実装をするに当たって、参考になった記事は下記に掲載しています。細かな導入方法(deviseの導入方法やTwilioの登録方法など)については本記事では割愛いたしますので、リンク先の記事をご確認くださいませ。。開発条件
- Ruby 2.5.1
- Rails 5.2.3
- Haml・Sass記法
- 'devise'のgemを使用
- Twilioの登録(SMS認証実装のため)
実装概要
- 1ページ目でuserテーブルに格納する値を入力してもらう
- 2ページ目でuser_addressテーブルのtelephoneだけ入力してもらう(任意)
- 3ページ目でSMS認証が可能(任意)
- 4ページ目でuser_addressテーブルの残りのカラムを入力してもらう
- 5ページ目で登録完了画面!
DB設計
ユーザ関係のDBは次のとおりです!
今回は2つのDBを用意して、それぞれに値を格納します。usersテーブル
Column Type Options nickname string null: false string null: false password string null: false password_confirmation string null: false last_name string null: false first_name string null: false last_name_kana string null: false first_name_kana string null: false birthday date null: false user_addressesテーブル
Column Type Options user_id references null: false, foreign_key: true last_name string null: false first_name string null: false last_name_kana string null: false first_name_kana string null: false postal_code integer null: false prefecture integer null: false city string null: false address string null: false building string telephone integer 実装コード!
完成したコードがこちらです!
routes
ルート設定は以下のとおり。もう少しスマートに書きたい。。
HTTPのメソッドとしては、最初に呼び出されるuser_infoと最後に表示されるuser_completeはGETで、2,3,4ページはPOSTで通信を行なっています。routes.rbRails.application.routes.draw do devise_for :users, controllers: { sessions: 'users/sessions', registrations: 'signup' } resources "signup", only: [:index, :create], path: "/signup" do collection do get 'user_info' # 1ページ目 post 'user_tel' # 2ページ目 post 'user_tel_verification' # 3ページ目 post 'user_address' # 4ページ目 get 'user_complete' # 登録完了後のページ end end endmodels
モデルも2つ用意しました!
バリデーションはお好みで実装できます。user.rbclass User < ApplicationRecord devise :database_authenticatable, :registerable, :recoverable, :rememberable, :validatable has_one :user_address accepts_nested_attributes_for :user_address enduser_address.rbclass UserAddress < ApplicationRecord belongs_to :user, inverse_of: :user_addresscontroller
before_actionが多くなってしまいましたが、取り敢えずはこんな感じに実装。
SMSに関する記述はコントローラーに書いてます。sessionはかなり苦戦した部分ではありますが、今では(気持ちの一方通行ではありますが)マブダチだと思っています!signup.controller.rbclass SignupController < ApplicationController #before_action多すぎ?? before_action :save_user_info_to_session, only: :user_tel before_action :save_user_tel_to_session, only: :user_tel_verification before_action :send_sms_code, only: :user_tel_verification before_action :check_sms_code, only: :user_address before_action :save_user_address_to_session, only: :create def user_info #1ページ目(userテーブル) @user = User.new @user.build_user_address end def save_user_info_to_session #1ページ目登録後に呼び出し、sessionに値を渡す session[:user_params] = user_params @user = User.new(session[:user_params]) # インスタンス作成時にsessionを引数として渡す render '/signup/user_info' unless @user.valid? end def user_tel #2ページ目(user_addressテーブル) @user = User.new @user.build_user_address end def save_user_tel_to_session #2ページ目登録後に呼び出し、sessionに値を渡す session[:user_address_attributes_after_user_tel] = user_params[:user_address_attributes] # この時点では[:user_address_attributes]にはtelephoneしか格納されていない @user = User.new(session[:user_params]) # ここでもsessionを渡す @user.build_user_address(session[:user_address_attributes_after_user_tel]) # インスタンス作成時にsessionを引数として渡す render '/signup/user_tel' unless @user.valid? end def send_sms_code #2ページ目で登録した携帯番号にSMSを飛ばす記述 @user = User.new @user.build_user_address send_phone_number = PhonyRails.normalize_number session[:user_address_attributes_after_user_tel][:telephone], country_code:'JP' #入力された携帯番号を変数に渡す session[:secure_code] = random_number_generator(4) #ランダムな4桁を生成するアクションに飛んだのち、sessionに渡す begin client = Twilio::REST::Client.new result = client.messages.create( from: ENV["TWILIO_PHONE_NUMBER"], #Twilioで取得した電話番号 to: send_phone_number, # 送り先 body: "認証番号:#{session[:secure_code]}" # 送る内容 ) rescue Twilio::REST::RestError => e #エラー時の処理 @messages = "エラーコード[#{e.code}] :”#{e.message}”" render '/signup/user_tel' end end def random_number_generator(n) #ランダムな4桁の番号を生成するアクション ''.tap { |s| n.times { s << rand(0..9).to_s } } end def user_tel_verification #3ページ目(SMSで送ったコードの確認ページ) @user = User.new @user.build_user_address end def check_sms_code #3ページ目で入力された認証コードを照らし合わせる session[:input_code] = user_params[:user_address_attributes] #入力されたコードをsessionに渡す @user = User.new @user.build_user_address redirect_to action: :user_tel_verification unless session[:input_code].present? #値が入力されているか確認 render '/signup/user_tel_verification' and return unless session[:secure_code] == session[:input_code][:telephone] #SMSで送ったコードと実際に入力されたコードの照合 end def user_address #4ページ目(user_addressテーブル) @user = User.new @user.build_user_address end def save_user_address_to_session #4ページ目登録後に呼び出し、sessionに値を渡す session[:user_address_attributes_after_user_address] = user_params[:user_address_attributes] session[:user_address_attributes_after_user_address].merge!(session[:user_address_attributes_after_user_tel]) # 4ページ目に登録したアドレスと2ページ目に登録した電話番号を結合 @user = User.new @user.build_user_address render '/signup/user_address' unless session[:user_address_attributes_after_user_address].present? #本来はここでバリデーションしたいが、上手く行かないため止むを得ずpresent? end def create #4ページ目までの登録が完了した時点で、一気にDBに突っ込む @user = User.new(session[:user_params]) @user.build_user_address(session[:user_address_attributes_after_user_address]) if @user.save sign_in User.find(@user.id) #ログイン状態を保持する記述 redirect_to user_complete_signup_index_path #登録完了画面にリダイレクト else render user_address_signup_index_path # ダメだった場合4ページ目にリダイレクト end end def user_complete #登録完了ページにて、sessionの削除(明示的に消さないとずっと残ってしまうため) session[:user_params].clear session[:secure_code].clear session[:input_code].clear session[:user_address_attributes_after_user_address].clear end private def user_params #ストロングパラメーターでユーザに関わる情報を保護 params.require(:user).permit( :nickname, :email, :password, :password_confirmation, :last_name, :first_name, :last_name_kana, :first_name_kana, :birthday, user_address_attributes: [:id, :last_name, :first_name, :last_name_kana, :first_name_kana, :postal_code, :prefecture, :city, :address, :building, :telephone] ) end endviews
全てのページの実装コードを記述してしまうと量が膨大になってしまうので省略。
form_forは非推奨なので、form_withに書き換えたほうが良いですね。。
そうなると、書き方としては、= form_with model: @user, url: ○○_path, local: true do |f|となると思います。user_address.html.haml.signup-panel %p.signup-panel__title 住所入力 = form_for @user, url: ○○○○_path, method: :post, html: {class: "inputForm"} do |f| = f.fields_for :user_address do |p| #user_addressテーブルと紐付ける .signup-form .field = p.label "お名前" %span.form-require = p.text_field :last_name, class: "field__input", placeholder: "例)山田" = p.text_field :first_name, class: "field__input", placeholder: "例)太郎" # ------------------------------------<中略>---------------------------------------------------- .signup-btn = f.submit "次へ進む"ちなみに。。
SMSで送った認証コードを入力してもらうフォームですが、labelやtext_fieldに:input_codeと指定することはできません。なので、取り敢えずは下記のように:telephoneを指定してあげるとエラーは起きません。DBには保存せず、sessionに渡してあげるだけなので、このような記載でも問題ないと思います!user_tel_verification.html.haml.signup-panel %p.signup-panel__title 電話番号認証 = form_for @user, url: ○○○○_path, method: :post, html: {class: "inputForm"} do |f| = f.fields_for :user_address do |p| .signup-form .field = p.label :telephone, "認証番号" %span.form-require = p.text_field :telephone, placeholder: "認証番号を入力"終わりに
今回、復習をかねての記事投稿でしたが、アウトプットするとやはり知識の定着度は違いますね!取り敢えずは動くようになりましたが、まだまだリファクタリングが必要な部分もあるかと思いますし、これからも勉強継続は必要だなと思います。文章書くのは苦手ですが、アウトプットもなんとか継続していきたいです笑
参考
ウィザード形式関係
ウィザードフォーム形式フォームの実装 -devise×session×データを複数テーブルに分けて保存 ver.- (rails)
[Rails]ウィザードフォーム実装でfields_forを使って複数のテーブルに保存するSMS認証関係
- 投稿日:2020-02-17T00:20:17+09:00
Rails モデルについて
モデルとはRailsの中でデータベースへのアクセスをはじめとする情報のやりとりに関する処理を行います。
モデルの作成
以下のコマンドで作成できる。
$ rails g model モデル名

#postモデルを作成する場合
$ rails g model post
成功すれば以下のような表示が出る
Running via Spring preloader in process 49331
      invoke  active_record
      create    db/migrate/20XXXXXXXXXXXX_create_posts.rb
      create    app/models/post.rb
      invoke    test_unit
      create      test/models/post_test.rb
      create      test/fixtures/posts.yml
app/models/post.rbが作成したpostモデルになる。また、マイグレーションファイルも作成される。
マイグレーションファイル
テーブルの設計図・仕様書のこと。どのようなテーブルにするかを記載していきます。
作成したばっかりのマイグレーションファイルは以下のようになっていると思います。class CreatePosts < ActiveRecord::Migration[5.2] def change create_table :posts do |t| t.timestamps end end endこれを以下のように編集
class CreatePosts < ActiveRecord::Migration[5.2]
  def change
    create_table :posts do |t|
      t.text :content
      t.timestamps
    end
  end
これでtext型のcontentカラムが追加される。
rails db:migrate コマンド
データベースの変更を実際にデータベースに適用するためのコマンド。