- 投稿日:2020-02-17T23:21:14+09:00
claspの導入でGoogle Apps Scriptのローカル開発&git管理を実現する
claspはいいぞ
久しぶりにGAS(Google Apps Script)を使ったミニマルなツールを作ったのですが、clasp導入のやり方を忘れていたので手順をメモしておきます。
GASはWeb上のスクリプトエディタでサクッと書けるメリットがある一方、エディタの使い勝手が微妙で、スクリプトの機能拡充や複数人開発などをやり始めると早々にしんどい事態に陥ります。
特に変更履歴で差分の判別ができないのは絶望的…
そんなGASのソースコードをローカル環境に落とし、自由度の高い開発スタイルを実現してくれるCLIツールがclaspです。
google/clasp: ? Command Line Apps Script ProjectsGoogle製だよ
claspの導入
というわけで、さっそく導入してみましょう。
npmコマンドでclaspをインストール
まずはclaspを
npm
コマンドでインストール。$ npm i @google/clasp -g /usr/local/bin/clasp -> /usr/local/lib/node_modules/@google/clasp/src/index.js npm WARN inquirer-autocomplete-prompt@1.0.1 requires a peer of inquirer@^5.0.0 || ^6.0.0 but none is installed. You must install peer dependencies yourself. + @google/clasp@2.3.0
npm
未導入の場合は、Homebrew経由でインストールするのがよろしいかと思います。Googleアカウント連携
続いてGoogleアカウントと連携します。
$ clasp login Warning: You seem to already be logged in *globally*. You have a ~/.clasprc.json Logging in globally... ? Authorize clasp by visiting this url: https://accounts.google.com/o/oauth2/v2/auth?access_type=offline&scope=xxxxxxxxxx
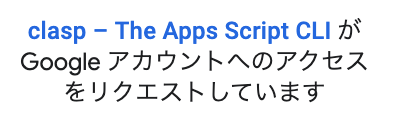
clasp login
コマンドを叩くとブラウザで認証画面が開くので
Googleアカウントへのアクセスを許可しましょう。
Authorization successful.
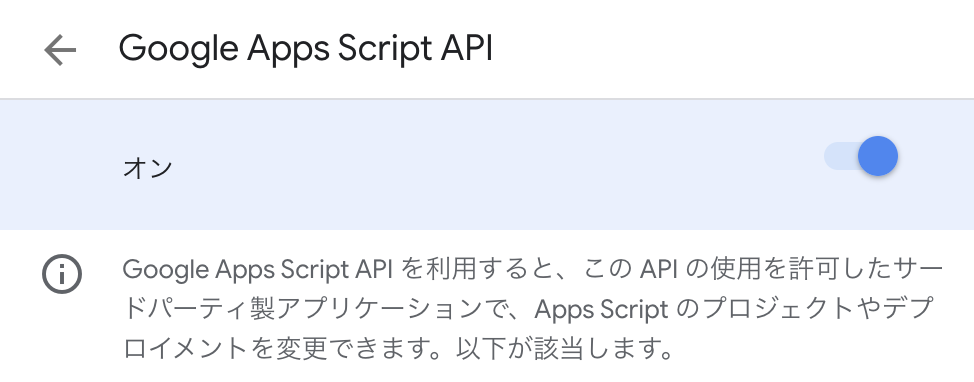
Google Apps Script APIを有効化する
これを忘れると後述の
clasp push
などでエラーが起きます。
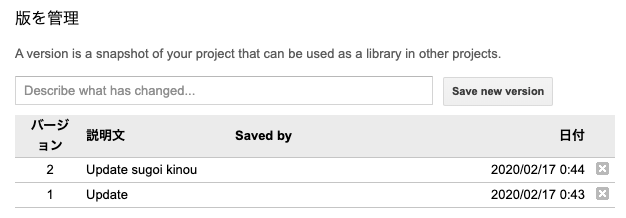
? Give a description: User has not enabled the Apps Script API. Enable it by visiting https://script.google.com/home/usersettings then retry. If you enabled this API recently, wait a few minutes for the action to propagate to our systems and retry.
Google Apps Scriptの「設定」画面へアクセスして
https://script.google.com/home/usersettingsオフになっている「Google Apps Script API」項目をクリック。
設定を「オン」にします。
以上でclaspの導入は完了です。
簡単ですね。よく使うコマンド
実際にGASプロジェクトをローカル環境に落とすなど、比較的よく使うコマンドを紹介しておきます。
Clone
すでに存在しているGASプロジェクトがある場合は、
clasp clone
でクローンできます。引数に対象のスクリプトIDを指定しましょう。$ clasp clone <SCRIPT_ID>これでGASプロジェクトのソースコードがローカル環境でいじれるようになりました。
Warning: files in subfolder are not accounted for unless you set a '.claspignore' file. Cloned 8 files. └─ character.js └─ main.js └─ menu.js └─ pr.js └─ random.js └─ appsscript.json └─ channel.js └─ reviewer.js Ignored files: └─ .clasp.json
使い勝手の微妙なスクリプトエディタとはおさらば。お好みのエディタで快適に開発できます。
もちろんgit管理なども自由自在。
新しいMacでGitHubのSSH接続をするまでの環境構築手順 - Qiitaやったぜ。
Push
ローカルに落としてきたファイルは
.js
ファイルになっていますが、clasp push
すると.gs
ファイルとして、Web上のApp Scriptプロジェクトにアップロードされます。$ clasp push
push
対象のファイルはclasp status
で確認できます。$ clasp status Not ignored files: └─ appsscript.json └─ channel.js └─ character.js └─ main.js └─ menu.js └─ pr.js └─ random.js └─ reviewer.js Ignored files: └─ .DS_Store └─ .clasp.json
git add
のように変更ファイルだけをインデックス(ステージング)領域に上げる機能は無さそうです。push
するとカレントディレクトリ内のファイル構成で、一括アップロード&上書きされるので注意してください。Pull
clasp pull
でApp Scriptプロジェクト上のソースコードをダウンロードできます。$ clasp pullローカルにある同一名ファイルは上書きされてしまうので、git管理しておくと良いでしょう。
Create
clasp create
でローカルからGASプロジェクトの新規作成もできます。$ clasp create sample_app ? Create which script? (Use arrow keys) ❯ standalone docs sheets slides forms webapp apiclasp 1.7.0から、
standalone
だけでなく、Spreadsheetに紐付いたスクリプトやwebapp
、api
など、作成するプロジェクトのタイプが選べるようになったようです。Created new standalone script: https://script.google.com/d/xxxxxxxxxx/edit Warning: files in subfolder are not accounted for unless you set a '.claspignore' file. Cloned 1 file. └─ appsscript.json
clasp create
で生成されるappsscript.json
は、Apps Scriptプロジェクトのマニフェストファイルです。
Manifests | Apps Script | Google Developersタイムゾーンやライブラリの設定などのプロパティがありますので、必要に応じて設定しましょう。
appsscript.json{ "timeZone": "America/New_York", "dependencies": { }, "exceptionLogging": "STACKDRIVER", "runtimeVersion": "V8" }Manifest structure | Apps Script | Google Developers
Open
clasp open
でスクリプトエディタにアクセスできます。コマンドを打つことでブラウザが開きます。$ clasp openスクリプトプロパティやトリガーをいじる際に使う。
Version
GASのバージョン管理もclaspでできます。
バージョン作成
clasp version
コマンドでバージョン作成が可能。引数でdescriptionをつけられます。$ clasp version "Update sugoi kinou" Created version 2.手元で作業中はgit管理ベースでブランチ切ったりコミットしたりして、デプロイする際に
clasp version
でバージョンインクリメントするような運用などが良さ気です。バージョン履歴確認
clasp versions
コマンドではバージョン履歴が確認できます。$ clasp versions ~ 3 Versions ~ 3 - Update sugoku sugoi kinou 2 - Update sugoi kinou 1 - Updateclaspで広がるGoogle Apps Scriptの世界
他にも様々なコマンドや機能があるので、公式リポジトリやドキュメントもご参照ください。
google/clasp: ? Command Line Apps Script Projects
Command Line Interface using clasp - Apps Script | Google Developers最近だとTypescriptで開発する人も多いみたいですね。
clasp が Typescript をサポートした! - Qiita自分はSpreadsheetと組み合わせてSlack bot作ったり、軽めのAPI作ったり程度しか経験ありませんが、極めればもっと色々なことができそうです
- 投稿日:2020-02-17T22:50:16+09:00
[git]git revert(あるコミットの内容を打ち消すコミットをする)
■もくじ
→https://qiita.com/tera1707/items/4fda73d86eded283ec4f■やりたいこと
gitで、間違えてコミットしてしまった内容を元に戻したい。
その際に、間違えてコミットしたこと、それを元に戻したことをログ上に残しておきたい。で、調べたところ、gitには
git revert
という便利なコマンドがあるようなのだが、自分が使っているTortoise Git
というgitのGUIツールではそんなコマンドがなさそうに見える。
(というか、TortoiseGit上にもrevert
という表示はあるが、なんかそれとはちがうことしてそう?な感じがする)TortoiseGit上で、本来の
git revert
をしたい。■やったこと
色々調べたところ、TortoiseGitではgitコマンドでいうところの
git revert
はできない様子。
TortoiseGitのrevert
は、gitコマンドでいうところのgit checkout
と同じらしい。(参照)
→ローカルで変更して、コミットする前の変更(作業ツリー上だけの変更)をなかったことにする、という意味で使っていた。
私はこれがrevert
だと思っていた。本来の
git revert
はそうではなく「打ち消しコミット」をするもののようで、まさにそれが今回やりたいことだった。
(ココ の 「git revert で取り消しコミットを作成する」)Windows上に作ったリポジトリでのgit revertのやり方
コマンドプロンプトを開いて、リポジトリのフォルダまで行って
revert
のコマンドを入れればよい。
具体的には、下記のようにした。
- エクスプローラで、リポジトリのフォルダ(=
.git
フォルダのあるところ)を開く- パスの窓に、
cmd
と入れてEnterを押し、コマンドプロンプトを開く。(これで、コマンドプロンプトでcd そのフォルダ
としたのと同じになる)- TortoiseGitでログを表示し、打ち消したいCommitのコミット番号を見る。
- 開いた黒窓に
git revert <コミット番号>
と入力し、Enterするこれで、revertが実行される。
実行された後にTortoiseGitでログを見ると、「revert <打ち消したコミットのコミットコメント>」と表示され、打ち消した内容がコミットされている。
これで打ち消しコミット完了。
余談
エクスプローラのアドレスバーで「cmd」と打ってEnterすると、コマンドプロンプトを開いてそのフォルダに
cd
したのと同じになる、というのも実は今回知った。■参照
TortoiseGitのrevertについて
http://kaepapa.hateblo.jp/entry/2013/04/17/131152git push の取り消し方法
http://www-creators.com/archives/2020
- 投稿日:2020-02-17T22:23:27+09:00
【Golang】テンプレートを簡単に使える外部ライブラリを見つけた (echo)
前提
- 言語は、Golang。フレームワークは echo を使用しております。
- templateをより簡単に使えるパッケージを紹介しています。
詳細
https://github.com/foolin/echo-templateDeprecated!!!
Please consider trying to migrate to Goview↓
https://github.com/foolin/goview
はじめ、前者の echo-template を発見しましたが、後者の goview に統合されたらしく、後者を使用しました。一応、 前者も使えます。
echo, Gin, Go-chi, go.rice 等にサポートしているらしいです。インストール
go get github.com/foolin/echo-template
↓
go get github.com/foolin/goview/supports/echoview-v4
diff
どれだけ簡略化されるのか。diff形式で。
diff(main.go)package main import ( - "html/template" - "github.com/labstack/echo" + "github.com/foolin/goview/supports/echoview" "net/http" ) -type Template struct { - templates *template.Template -} - -func (t *Template) Render(w io.Writer, name string, data interface{}, c echo.Context) error { - return t.templates.ExecuteTemplate(w, name, data) -} - func main() { // Echo instance e := echo.New() - t := &Template{ - templates: template.Must(template.ParseGlob("views/*.html")), - } - e.Renderer = t + e.Renderer = echoview.Default() e.GET("/page", func(c echo.Context) error { return c.Render(http.StatusOK, "page.html", echo.Map{"title": "Page file title!!"})diff元のソースコードは下に貼っておくので、気になったら見てください。
結果
コードを省略できる。
備考
呼び出しについて
.html
や.tpl
等、拡張子無しでRenderする場合は、/views/layouts/master.html
が呼び出される。ソースコード
通常
main.gopackage main import ( "html/template" "github.com/labstack/echo" "net/http" ) type Template struct { templates *template.Template } func (t *Template) Render(w io.Writer, name string, data interface{}, c echo.Context) error { return t.templates.ExecuteTemplate(w, name, data) } func main() { // Echo instance e := echo.New() t := &Template{ templates: template.Must(template.ParseGlob("views/*.html")), } e.Renderer = t e.GET("/page", func(c echo.Context) error { return c.Render(http.StatusOK, "page.html", echo.Map{"title": "Page file title!!"}) }) // Start server e.Logger.Fatal(e.Start(":9090")) }echoviewを用いた場合
main.go(echoview)package main import ( "github.com/labstack/echo" "github.com/foolin/goview/supports/echoview" "net/http" ) func main() { // Echo instance e := echo.New() e.Renderer = echoview.Default() e.GET("/page", func(c echo.Context) error { return c.Render(http.StatusOK, "page.html", echo.Map{"title": "Page file title!!"}) }) // Start server e.Logger.Fatal(e.Start(":9090")) }その他
マークダウンで ```diff ってやると、差分にちゃんと色が着くってことに驚いている。
- 投稿日:2020-02-17T11:54:14+09:00
Git cherry-pick 別ブランチの特定commitを取得する
git cherry-pickの使い方
cherry-pickとは
別ブランチの特定コミットのみを取得できるコマンド
単一のcommitを取り込む場合
$ git cherry-pick [取り込むコミットID]複数のcommitを取り込む場合
$ git cherry-pick [コミットID(A)]..[コミットID(B)]commit IDの調べ方
$ git log実行結果例
commit a2451cfa1d63caee155c7ea07061370ffd0fe3dc Merge: xxxxxxxxxxxxxxxxxx Author: xxxxxxxxxxxxxxxxxxxxxxxxxx Date: xxxxxxxxxxxxxxxxxxxx xxxxxxxxxxxxxxxxxxxxxxxx xxxxxxxxxxxxxxxxxx「a2451cfa1d63caee155c7ea07061370ffd0fe3dc」がcommit ID部分になります
コンフリクトが起きた時
git cherry-pick --continue「--continue」オプションをつけることで、コンフリクトで止まっていた、cherry-pickの処理を再開することができる
- 投稿日:2020-02-17T01:55:06+09:00
GitHubにpushするのに毎度パスワードを打ちたくない!
はじめに
開発用にUbuntu 18.04を導入しましたが、、、
GitHubにpushするときに、毎回認証情報(IDとパスワード)を入力させられて嫌になってしまいました。
Git credentialを安全にlinux上で使う方法を調べたのでメモしておきます。
環境
OS:Ubuntu 18.04.4 LTS
Git:version 2.17.1なお、この方法はGit versions 2.11以上でのみ可能です。
方法
Gitのインストール
apt
を使って入れてます。sudo apt install git
Libsecret
のインストール・設定Gitの
credential.helper
にlibsecret
を登録してあげることで、認証情報を暗号化してlocalに記憶できます。sudo apt-get install libsecret-1-0 libsecret-1-dev cd /usr/share/doc/git/contrib/credential/libsecret sudo make git config --global credential.helper /usr/share/doc/git/contrib/credential/libsecret/git-credential-libsecret
ただし、Xserverが必要という情報がありますので、GUIを使っていない方はもしかしたら使えないかもしれません。
認証を通す
適当なリポジトリで認証を通せば、その認証情報が保存されて次から聞かれなくなります。やったね!
おわりに
これにて、GitHub等にプッシュしまくれる環境が整いました。
さあ草を生やしましょう。参考
https://hawksnowlog.blogspot.com/2018/10/try-git-credential.html
https://www.softwaredeveloper.blog/git-credential-storage-libsecret
- 投稿日:2020-02-17T01:03:52+09:00
[command] Gitのコマンド一覧
はじめに
当記事はGitのコマンド一覧です。頻繁に使用すると考えられる、または実用的なコマンドを記載します。
随時更新する可能性有。コマンド一覧
初期設定
ユーザー名を設定$ git config --global user.name 'ユーザー名'メールアドレスを設定$ git config --global user.email 'メールアドレス'エディタを設定$ git config --global core.editor 'code --wait'マージツールを設定$ git config --global merge.tool 'code --wait "$MERGED"'pushする際の方式を設定$ git config --global push.default simpleリポジトリを一覧確認
Bash$ git remote -vリモートを追加
Bash$ git remote add {リモート名} {リポジトリのURL}リモートを消去
Bash$ git remote remove {リモート名} {リポジトリのURL}