- 投稿日:2020-02-17T14:31:30+09:00
ASP.NET Core MVCで確認画面を実装する。
環境
asp.net core 2.1
visual studio 2019
SQL Server Express LocalDB
bootstrap4はじめに
映画の新規登録時の確認画面を実装していきます。
タグヘルパーとフィルターを使用していますが、内容の説明を入れていないので分からない場合は調べてください。ASP.NET Core タグヘルパー
ASP.NET Core フィルター今回のサンプルプロジェクトはGitHubに置いてあります。
https://github.com/koro1129/ConfirmScreen1. タグヘルパーを自作して、独自の「確認」「戻る」「追加」ボタンを生成できるようにする。
1-1 プロジェクト直下に「TagHelpers」フォルダを作成する。
1-2 以下のクラスを追加する。
TagHelpers/ConfirmTagHelper.cs// 確認用ボタン public class ConfirmTagHelper : TagHelper { public override void Process(TagHelperContext context, TagHelperOutput output) { output.TagName = "input"; output.Attributes.Add("type","submit"); output.Attributes.Add("name", "__ConfirmButton"); //←ここが重要 } }TagHelpers/SubmitTagHelper.cs// 登録用ボタン public class SubmitTagHelper : TagHelper { public override void Process(TagHelperContext context, TagHelperOutput output) { output.TagName = "input"; output.Attributes.Add("type","submit"); output.Attributes.Add("name", "__SubmitButton"); //←ここが重要 } }TagHelpers/BackTagHelper.cs// 戻る用ボタン public class BackTagHelper : TagHelper { public override void Process(TagHelperContext context, TagHelperOutput output) { output.TagName = "input"; output.Attributes.Add("type", "submit"); output.Attributes.Add("name", "__BackButton"); //←ここが重要 } }1-3 Views/Shared/_ViewImports.cshtmlに設定を追加。
※Areaなどを使用してViewフォルダが複数ある場合は、使用するAreaの「_ViewImports.cshtml」に記載する。
Views/Shared/_ViewImports.cshtml@using ConfirmScreen @using ConfirmScreen.Models @addTagHelper *, Microsoft.AspNetCore.Mvc.TagHelpers @addTagHelper *,ConfirmScreen //← これを追加上記を追加することで「1-2」で作成したタグヘルパーをView内で使用できるようになります。
1-4 登録画面のform内に「確認」ボタンを配置する。
Views/Movies/Create.cshtml<form asp-action="Create"> <div asp-validation-summary="ModelOnly" class="text-danger"></div> <div class="form-group"> <label asp-for="Movie.Title" class="control-label"></label> <input asp-for="Movie.Title" class="form-control" /> <span asp-validation-for="Movie.Title" class="text-danger"></span> </div> <!--割愛--> <div class="form-group"> <confirm value="確認する" class="btn btn-default bg-primary"></confirm> //←これを追加 </div> </form>
- タグを入力する際は「confirm」とだけ打ってもインテリセンスに表示されないので、<confim>と打つといい。
- valueやclassやidはそのまま入力すればよい。
実際に表示される際は以下のタグで生成される。
2. 「1」で配置したボタン押下時の処理をFilterで定義する。
2-1 プロジェクト直下に「Filter」フォルダを作成する。
2-2 以下のクラスを追加する。
Filter/ConfirmAttribute.cs// 確認画面描画用のアクションフィルター public class ConfirmAttribute : ActionFilterAttribute { private const string SubmitButtonKey = "__SubmitButton"; // ←自作したタグヘルパーのname属性と同じであること。 private const string ConfirmButtonKey = "__ConfirmButton"; // ←自作したタグヘルパーのname属性と同じであること。 private const string BackButtonKey = "__BackButton"; // ←自作したタグヘルパーのname属性と同じであること。 private const string ViewSuffix = "Confirm"; // アクションメソッド実行前処理 public override void OnActionExecuting(ActionExecutingContext context) { var form = context.HttpContext.Request.Form; var factory = context.HttpContext.RequestServices.GetService(typeof(ITempDataDictionaryFactory)) as ITempDataDictionaryFactory; // ※Post先アクションメソッド(EditとかCreate)の第一引数と、確認画面で定義する「@model」は同じ型であること。※ var parameter = context.ActionArguments.FirstOrDefault(); // 登録ボタンが押された場合 if (form.Any(f => f.Key == SubmitButtonKey)) { // そのままアクションメソッドのpost処理を実行する。 return; } // 確認ボタンが押された場合 var viewName = (string)context.RouteData.Values["Action"]; if (form.Any(f => f.Key == ConfirmButtonKey)) { // モデルの検証でエラーが発生しているか調べる if (!context.ModelState.IsValid) { // Viewに戻りエラーを表示する return; } // 確認画面を表示するためにビュー名を変更 viewName += ViewSuffix; } var controller = context.Controller as Controller; // ビューを表示する(戻るボタンを押した場合は入力内容そのままで戻る) context.Result = new ViewResult { ViewName = viewName, // Viewにモデルの内容を渡すために必要。ViewのModelに値が入る。 ViewData = new ViewDataDictionary(controller.ViewData) { Model = parameter.Value } }; } // アクションメソッド実行後処理 public override void OnActionExecuted(ActionExecutedContext context) { } }2-3 post先のアクションメソッドに、作成したフィルターを適用する設定を追加する。
Controllers/MoviesController.cs// 登録処理 [HttpPost] [ValidateAntiForgeryToken] [ConfirmScreen.Filter.ConfirmAttribute] // ← これを追加 public async Task<IActionResult> Create(MoviewCreateViewModel createVM) { if (ModelState.IsValid) { _context.Add(createVM.Movie); await _context.SaveChangesAsync(); return RedirectToAction(nameof(Index)); } return View(createVM); }[ConfirmScreen.Filter.ConfirmAttribute] を追加することで、アクションメソッドが実行される前に定義したフィルターの処理を行うことができる。
3. 確認画面用のViewを作成する。
3-1 確認用のcshtmlファイルを作成して、「戻る」「登録」ボタンを配置する。
※Viewのファイル名は「アクションメソッド名+Confirm」にする。(今回は「CreateConfirm」となる)
Views/Movies/CreateConfirm.cshtml<form asp-action="Create"> <div class="form-group"> <label asp-for="Movie.Title" class="control-label"></label>: <input type="hidden" asp-for="Movie.Title" class="form-control" /> <span>@Model.Movie.Title</span> </div> <!-- 割愛 --> <div class="form-group"> <back value="戻る" class="btn btn-default bg-primary"></back> // ←これを追加 <submit value="登録" class="btn btn-default bg-primary"></submit> // ←これを追加 </div> </form>表示の内容は適当に整えてください。
ただ、inputタグを忘れると戻った際と登録時に内容が保持されないので注意してください。4. 実際に動かす
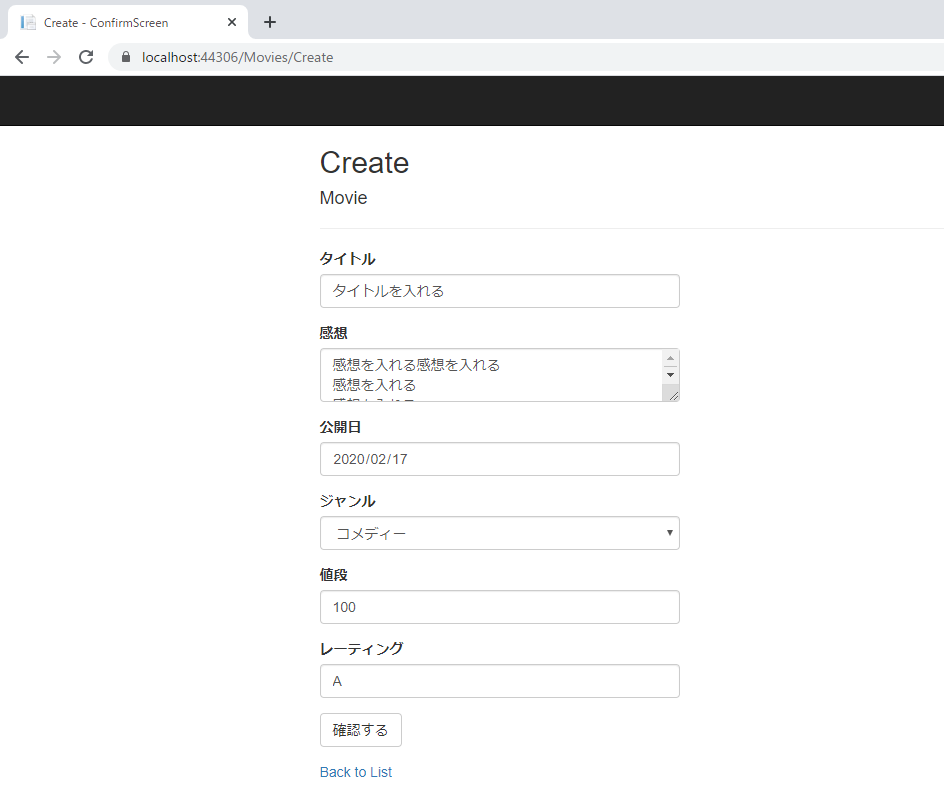
登録画面
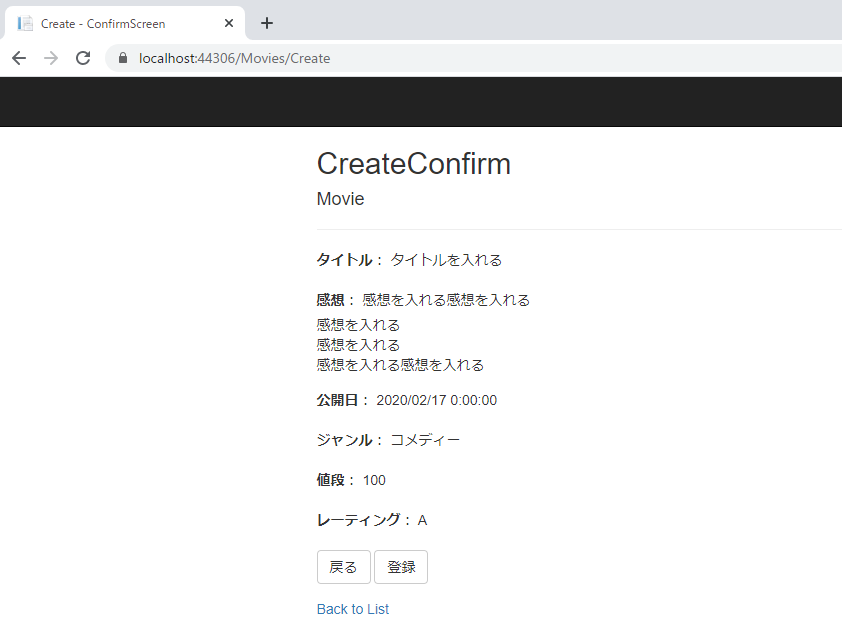
確認画面
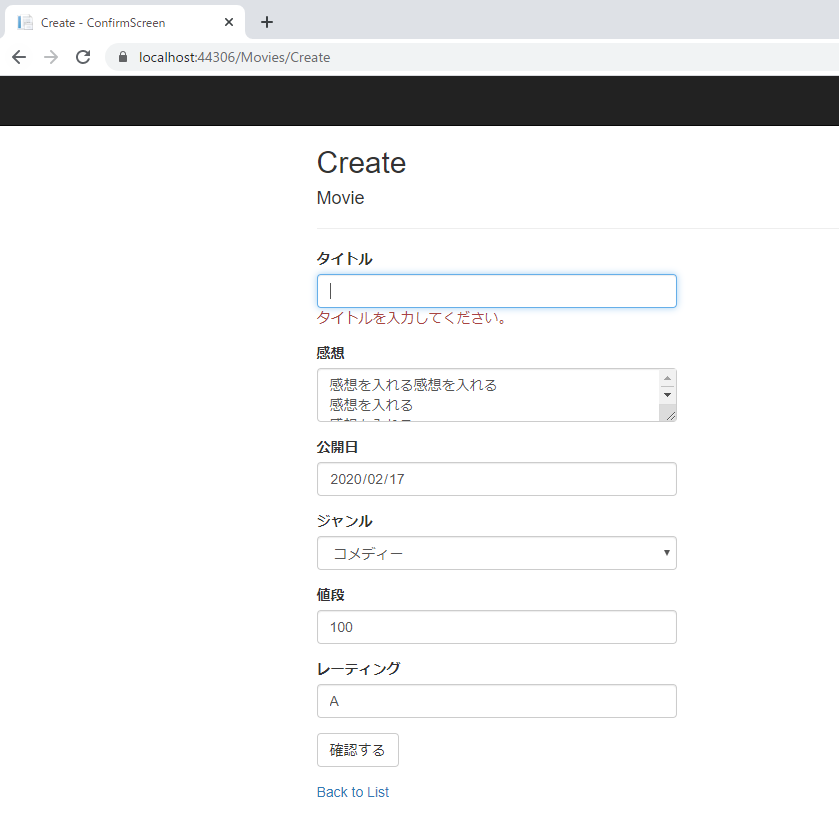
登録画面エラーあり
終わりに
確認項目が単純な場合は、手順がわかっていればすぐに確認画面ができるので楽です。
懸念すべきことは、「Filter/ConfirmAttribute.cs」内で「ITempDataDictionaryFactory」というのが使用されているので、ロードバランサーのようにアプリケーションサーバーが複数台ある場合はうまく動かなかったりするかもしれません。参考サイト
http://igatea.hatenablog.com/entry/2018/05/31/002648
https://blog.shibayan.jp/entry/20111010/1318258722
https://stackoverflow.com/questions/41200597/access-tempdata-in-executeresult-asp-net-mvc-core
https://forums.asp.net/t/2141597.aspx?Get+Controller+Name+From+Filter+Context
https://tutorialmore.com/questions-1553730.htm

- 投稿日:2020-02-17T14:31:30+09:00
ASP.NET Core MVCで確認画面を実装する
環境
asp.net core 2.1
visual studio 2019
SQL Server Express LocalDB
bootstrap4はじめに
映画の新規登録時の確認画面を実装していきます。
タグヘルパーとフィルターを使用していますが、内容の説明を入れていないので分からない場合は調べてください。ASP.NET Core タグヘルパー
ASP.NET Core フィルター今回のサンプルプロジェクトはGitHubに置いてあります。
https://github.com/koro1129/ConfirmScreen1. タグヘルパーを自作して、独自の「確認」「戻る」「追加」ボタンを生成できるようにする。
1-1 プロジェクト直下に「TagHelpers」フォルダを作成する。
1-2 以下のクラスを追加する。
TagHelpers/ConfirmTagHelper.cs// 確認用ボタン public class ConfirmTagHelper : TagHelper { public override void Process(TagHelperContext context, TagHelperOutput output) { output.TagName = "input"; output.Attributes.Add("type","submit"); output.Attributes.Add("name", "__ConfirmButton"); //←ここが重要 } }TagHelpers/SubmitTagHelper.cs// 登録用ボタン public class SubmitTagHelper : TagHelper { public override void Process(TagHelperContext context, TagHelperOutput output) { output.TagName = "input"; output.Attributes.Add("type","submit"); output.Attributes.Add("name", "__SubmitButton"); //←ここが重要 } }TagHelpers/BackTagHelper.cs// 戻る用ボタン public class BackTagHelper : TagHelper { public override void Process(TagHelperContext context, TagHelperOutput output) { output.TagName = "input"; output.Attributes.Add("type", "submit"); output.Attributes.Add("name", "__BackButton"); //←ここが重要 } }1-3 Views/Shared/_ViewImports.cshtmlに設定を追加。
※Areaなどを使用してViewフォルダが複数ある場合は、使用するAreaの「_ViewImports.cshtml」に記載する。
Views/Shared/_ViewImports.cshtml@using ConfirmScreen @using ConfirmScreen.Models @addTagHelper *, Microsoft.AspNetCore.Mvc.TagHelpers @addTagHelper *, [アセンブリ名] //← これを追加([アセンブリ名]には、基本的にプロジェクト名をいれればいいと思う)上記を追加することで「1-2」で作成したタグヘルパーをView内で使用できるようになります。
1-4 登録画面のform内に「確認」ボタンを配置する。
Views/Movies/Create.cshtml<form asp-action="Create"> <div asp-validation-summary="ModelOnly" class="text-danger"></div> <div class="form-group"> <label asp-for="Movie.Title" class="control-label"></label> <input asp-for="Movie.Title" class="form-control" /> <span asp-validation-for="Movie.Title" class="text-danger"></span> </div> <!--割愛--> <div class="form-group"> <confirm value="確認する" class="btn btn-default bg-primary"></confirm> //←これを追加 </div> </form>
- タグを入力する際は「confirm」とだけ打ってもインテリセンスに表示されないので、<confim>と打つといい。
- valueやclassやidはそのまま入力すればよい。
実際に表示される際は以下のタグで生成される。
2. 「1」で配置したボタン押下時の処理をFilterで定義する。
2-1 プロジェクト直下に「Filter」フォルダを作成する。
2-2 以下のクラスを追加する。
Filter/ConfirmAttribute.csnamespace MyNameSpace.Filter{ // 確認画面描画用のアクションフィルター public class ConfirmAttribute : ActionFilterAttribute { private const string SubmitButtonKey = "__SubmitButton"; // ←自作したタグヘルパーのname属性と同じであること。 private const string ConfirmButtonKey = "__ConfirmButton"; // ←自作したタグヘルパーのname属性と同じであること。 private const string BackButtonKey = "__BackButton"; // ←自作したタグヘルパーのname属性と同じであること。 private const string ViewSuffix = "Confirm"; // アクションメソッド実行前処理 public override void OnActionExecuting(ActionExecutingContext context) { var form = context.HttpContext.Request.Form; var factory = context.HttpContext.RequestServices.GetService(typeof(ITempDataDictionaryFactory)) as ITempDataDictionaryFactory; // ※Post先アクションメソッド(EditとかCreate)の第一引数と、確認画面で定義する「@model」は同じ型であること。※ var parameter = context.ActionArguments.FirstOrDefault(); // 登録ボタンが押された場合 if (form.Any(f => f.Key == SubmitButtonKey)) { // そのままアクションメソッドのpost処理を実行する。 return; } // 確認ボタンが押された場合 var viewName = (string)context.RouteData.Values["Action"]; if (form.Any(f => f.Key == ConfirmButtonKey)) { // モデルの検証でエラーが発生しているか調べる if (!context.ModelState.IsValid) { // Viewに戻りエラーを表示する return; } // 確認画面を表示するためにビュー名を変更 viewName += ViewSuffix; } var controller = context.Controller as Controller; // ビューを表示する(戻るボタンを押した場合は入力内容そのままで戻る) context.Result = new ViewResult { ViewName = viewName, // Viewにモデルの内容を渡すために必要。ViewのModelに値が入る。 ViewData = new ViewDataDictionary(controller.ViewData) { Model = parameter.Value } }; } // アクションメソッド実行後処理 public override void OnActionExecuted(ActionExecutedContext context) { } } }2-3 post先のアクションメソッドに、作成したフィルターを適用する設定を追加する。
Controllers/MoviesController.cs// 登録処理 [HttpPost] [ValidateAntiForgeryToken] [MyNameSpace.Filter.ConfirmAttribute] // ← これを追加(namespaceはプロジェクトごとに変更してください。) public async Task<IActionResult> Create(MoviewCreateViewModel createVM) { if (ModelState.IsValid) { _context.Add(createVM.Movie); await _context.SaveChangesAsync(); return RedirectToAction(nameof(Index)); } return View(createVM); }[MyNameSpace.Filter.ConfirmAttribute] を追加することで、アクションメソッドが実行される前に定義したフィルターの処理を行うことができる。
3. 確認画面用のViewを作成する。
3-1 確認用のcshtmlファイルを作成して、「戻る」「登録」ボタンを配置する。
※Viewのファイル名は「アクションメソッド名+Confirm」にする。(今回は「CreateConfirm」となる)
Views/Movies/CreateConfirm.cshtml<form asp-action="Create"> <div class="form-group"> <label asp-for="Movie.Title" class="control-label"></label>: <input type="hidden" asp-for="Movie.Title" class="form-control" /> <span>@Model.Movie.Title</span> </div> <!-- 割愛 --> <div class="form-group"> <back value="戻る" class="btn btn-default bg-primary"></back> // ←これを追加 <submit value="登録" class="btn btn-default bg-primary"></submit> // ←これを追加 </div> </form>表示の内容は適当に整えてください。
ただ、inputタグを忘れると戻った際と登録時に内容が保持されないので注意してください。4. 実際に動かす
登録画面
確認画面
登録画面エラーあり
終わりに
・確認項目が単純な場合は、手順がわかっていればすぐに確認画面ができるので楽です。
・懸念すべきことは、「Filter/ConfirmAttribute.cs」内で「ITempDataDictionaryFactory」というのが使用されているので、ロードバランサーのようにアプリケーションサーバーが複数台ある場合はうまく動かなかったりするかもしれません。参考サイト
http://igatea.hatenablog.com/entry/2018/05/31/002648
https://blog.shibayan.jp/entry/20111010/1318258722
https://stackoverflow.com/questions/41200597/access-tempdata-in-executeresult-asp-net-mvc-core
https://forums.asp.net/t/2141597.aspx?Get+Controller+Name+From+Filter+Context
https://tutorialmore.com/questions-1553730.htm
- 投稿日:2020-02-17T14:29:09+09:00
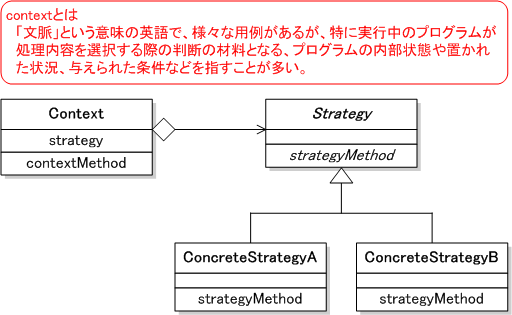
UnityエンジニアがStrategyPatternを調べるおすすめの学習過程
概要
自分がStrategyPaternを学習した軌跡のメモです。
また忘れたときに読む用ぐらいに書きましたが役に立てば幸いです。対象
StrategyPaternの記事が多すぎてどれからよめば良いかわからない方
UnityでC#かけるけど、デザインパターンわからんぐらいの人学習手順
①使わなかった場合の問題点把握
https://twitter.com/MinoDriven/status/1228896043435094016
https://speakerdeck.com/minodriven/kusokododong-hua-switchwen-jie-shuo
これめっちゃわかりやすいです。
Swich文をStrategyPaternにしたら仕様変更に対応できるよ~って内容の動画+スライドです②ざっくり把握 IT専科 Strategy パターン
http://www.itsenka.com/contents/development/designpattern/strategy.html
初めの抽象的に書いてる部分がすごいまとまってます。サンプルを複数見た後に読むとグッときます。
なのでここではまだ理解できないで大丈夫です。
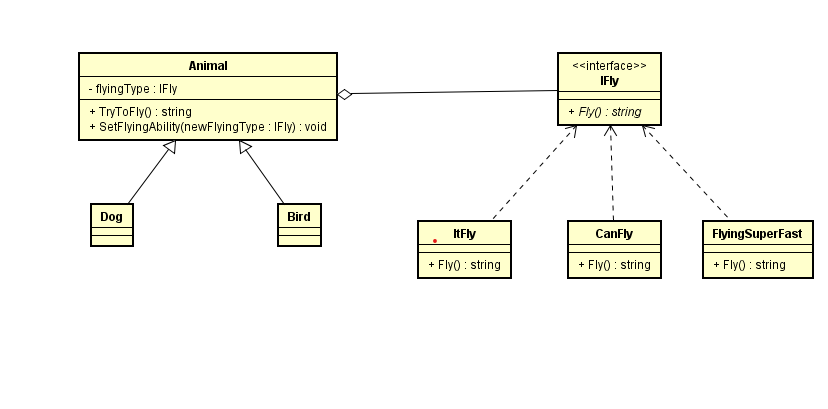
③Unityコードサンプルで把握
https://github.com/QianMo/Unity-Design-Pattern
サンプルが2つあります。
中のサンプル2を自作したクラス図です。
④UnityでまなぶStrategyPatern
https://techlife.supride.jp/archives/1411
ここまで読むとだいだい理解できます。⑤ もう一度②を読む
抽象的に書いてあるので、応用するときに気を付けなければいけない点がよくわかります。
StrategyPaternの使いどころ
抽象的に言うと
・アルゴリズム的な処理を入れ替えたいとき具体的に読みやすくしたいと考えるタイミングで言うと
・Swich文を読みやすいように変更もっと具体的にいうと
・映画館の価格表
・ポケモンの技みたいな分岐の実装
- 投稿日:2020-02-17T03:41:49+09:00
天体の位置を計算してみた
天体の位置を計算するための方法が、海上保安庁から提供されています。
計算してみましょう!!
今回は面倒なので太陽だけですが、太陽、金星、火星、木星、土星、月、といった、代表的な天体が含まれています。
天体の計算が、なぜ国立天文台ではなく、海上保安庁なのか?
GPSなんてものがなかった時代、広い海の上で自分の居場所を知るには、天測航法に頼る必要がありました。そのため、各国の海軍やそれに相当する機関が天文観測に注力していました。
測位は現在でこそGPS等の衛星ベースの技術にその座を奪われ、その運用も米では宇宙軍が、日本では内閣府が行っていますが、かつての航法システム、例えばオメガやロランといったシステムは、各国の海軍や沿岸警備隊、日本では海上保安庁といった、海に関わる機関が運用していました。ソースコード
class CelestialPositionCalculation
{
    public enum Type
    {
        SunRa,
        SunDec,
        SunAu
    }

    public struct Data
    {
        public int Year { get; set; }
        public int a { get; set; }
        public int b { get; set; }
        public double[] Value { get; set; }

        public Data(int Year, int a, int b, double[] Value)
        {
            this.Year = Year;
            this.a = a;
            this.b = b;
            this.Value = Value;
        }
    }

    private static readonly ReadOnlyDictionary<Type, Data[]> dataDic = generateValuesetDic();
    private static readonly ReadOnlyDictionary<int, int> deltaTDic = generateDeltaTdic();

    public static double Calc(DateTimeOffset Date, Type title)
    {
        double t = CalcT(Date);

        Data page;
        if (!searchPage(title, Date, t, out page))
        {
            return (double.NaN);
        }

        int a = page.a;
        int b = page.b;
        double theta = Math.Acos((2.0 * t - (a + b)) / (b - a));
        double f = page.Value.Select((tmp, i) => tmp * Math.Cos(i * theta)).Sum();

        return (f);
    }

    public static double CalcT(DateTimeOffset Date)
    {
        DateTime UTC = Date.UtcDateTime;

        int P = UTC.Month - 1;
        int Q = (int)Math.Floor((UTC.Month + 7) / 10.0);
        int Y = (int)Math.Floor(UTC.Year / 4.0 - Math.Floor(UTC.Year / 4.0) + 0.77);
        int S = (int)Math.Floor(P * 0.55 - 0.33);
        int T = 30 * P + Q * (S - Y) + P * (1 - Q) + UTC.Day;
        double F = UTC.Hour / 24.0 + UTC.Minute / 1440.0 + UTC.Second / 86400.0;
        double t = T + F + deltaTDic[UTC.Year] / 86400.0;

        return (t);
    }

    private static bool searchPage(Type title, DateTimeOffset Date, double t, out Data page)
    {
        if (dataDic.ContainsKey(title))
        {
            var tmp = dataDic[title].Where(a => a.Year == Date.UtcDateTime.Year && a.a <= t && t <= a.b);

            if (tmp.Any())
            {
                page = tmp.First();
                return (true);
            }
        }

        page = new Data();
        return (false);
    }

    private static ReadOnlyDictionary<Type, Data[]> generateValuesetDic()
    {
        return (
            new ReadOnlyDictionary<Type, Data[]>(new Dictionary<Type, Data[]>()
            {
                {
                    Type.SunRa, new Data[] {
                        new Data(2020, 0, 122, new[] {
                            22.71187, 3.929287, -0.104071, 0.035631, 0.006885,
                            -0.002385, 0.000138, 0.00005, -0.000056, 0.000014,
                            -0.000054, -0.000018, 0.000062, 0.000008, -0.000027,
                            -0.000002, 0.000003, 0, }),
                        new Data(2020, 121, 245, new[] {
                            6.6489, 4.134433, -0.04333, -0.04038, 0.005603,
                            0.003175, -0.000428, -0.000194, 0.000005, 0.000005,
                            -0.000046, 0.000041, 0.000056, -0.000028, -0.000029,
                            0.00001, 0.000007, -0.000004, }),
                        new Data(2020, 244, 367, new[] {
                            14.575618, 4.056804, 0.152148, 0.012255, -0.01366,
                            -0.002129, 0.000302, 0.000116, 0.000024, -0.000018,
                            0, 0.000069, 0.000002, -0.000045, -0.000002,
                            0.000014, -0.000001, -0.000005, }),
                    } },
                {
                    Type.SunDec, new Data[] {
                        new Data(2020, 0, 122, new [] {
                            -5.75369, 20.14227, 1.7549, -1.00916, 0.01301,
                            0.00848, -0.00361, 0.00073, 0.00003, -0.00011,
                            -0.00025, -0.00014, 0.00027, 0.00016, -0.00012,
                            -0.00008, 0.00001, 0.00002, }),
                        new Data(2020, 121, 245, new []
                        {
                            17.14314, -3.5435, -5.77996, 0.22272, 0.1592,
                            -0.01133, -0.00458, 0.00086, 0.00031, 0.00019,
                            -0.00009, -0.00001, -0.00003, -0.00011, 0.00004,
                            0.00007, -0.00001, -0.00004, }),
                        new Data(2020, 244, 367, new []
                        {
                            -10.75539, -16.72221, 3.56387, 0.97158, -0.02871,
                            -0.02364, -0.00538, 0.00036, 0.00024, 0.00008,
                            0.00011, -0.00034, -0.00003, 0.00028, -0.00001,
                            -0.00012, 0.00001, 0.00004, }),
                    } },
                {
                    Type.SunAu, new Data[] {
                        new Data(2020, 0, 122, new []
                        {
                            0.993193, 0.012806, 0.002311, -0.000662, -0.000048,
                            0.000004, 0.000002, -0.000014, -0.000002, -0.000004,
                            -0.000004, 0.000017, 0.000004, -0.000011, -0.000002,
                            0.000004, 0.000001, -0.000001, }),
                        new Data(2020, 121, 245, new []
                        {
                            1.012388, 0.000983, -0.004213, -0.000046, 0.000088,
                            -0.000009, -0.000003, -0.000012, 0.000006, -0.000001,
                            0.000007, 0.000015, -0.000009, -0.000011, 0.000004,
                            0.000004, -0.000002, -0.000001, }),
                        new Data(2020, 244, 367, new []
                        {
                            0.994543, -0.013788, 0.00185, 0.000719, -0.000052,
                            -0.000012, -0.000006, 0, 0.000009, 0,
                            0.000014, 0, -0.000017, 0, 0.000008,
                            0, -0.000002, 0, }),
                    } },
            }));
    }

    private static ReadOnlyDictionary<int, int> generateDeltaTdic()
    {
        return (new ReadOnlyDictionary<int, int>(new Dictionary<int, int>() {
                { 2020, 70 }
            }));
    }
}
定数をソースコードに埋め込んでいるため、そのあたりが複雑ですが、計算自体は結構簡単です。
使用例
Chartでグラフ化のサンプル
Font font = new Font("", 20, FontStyle.Bold, GraphicsUnit.Pixel);

DateTimeOffset start = new DateTimeOffset(new DateTime(2020, 1, 1), new TimeSpan());
DateTimeOffset end = new DateTimeOffset(new DateTime(2021, 1, 1), new TimeSpan());

Chart chart = new Chart();
chart.Size = new Size(1920, 1080);

ChartArea area = new ChartArea();
chart.ChartAreas.Add(area);

Legend legend = new Legend();
chart.Legends.Add(legend);
legend.Docking = Docking.Top;

Series marker = new Series();
chart.Series.Add(marker);
marker.IsVisibleInLegend = false;
marker.ChartType = SeriesChartType.Point;
marker.MarkerSize = 20;
marker.MarkerStyle = MarkerStyle.Circle;
marker.Font = font;
marker.LabelBackColor = Color.LightGray;

Series ra = new Series("R.A. [hour]");
chart.Series.Add(ra);
ra.ChartType = SeriesChartType.Line;
ra.BorderWidth = 3;

Series dec = new Series("Dec. [deg]");
chart.Series.Add(dec);
dec.ChartType = SeriesChartType.Line;
dec.BorderWidth = 3;

Series au = new Series("Dist. [AU]");
chart.Series.Add(au);
au.YAxisType = AxisType.Secondary;
au.ChartType = SeriesChartType.Line;
au.BorderWidth = 3;

area.AxisX.Minimum = start.UtcDateTime.ToOADate();
area.AxisX.Maximum = end.UtcDateTime.ToOADate();
area.AxisX.Title = "UTC";
area.AxisX.TitleFont = font;
area.AxisX.LabelStyle.Format = "yyyy/MM";
area.AxisX.IntervalType = DateTimeIntervalType.Months;
area.AxisX.Interval = 1;
area.AxisX.MinorGrid.Enabled = true;
area.AxisX.MinorGrid.IntervalType = DateTimeIntervalType.Weeks;
area.AxisX.MinorGrid.Interval = 1;
area.AxisX.MinorGrid.LineColor = Color.LightGray;

area.AxisY.Title = "[hour], [deg]";
area.AxisY.TitleFont = font;
area.AxisY.Minimum = -25;
area.AxisY.Maximum = +25;
area.AxisY.Interval = 5;
area.AxisY.MinorGrid.Enabled = true;
area.AxisY.MinorGrid.Interval = 1;
area.AxisY.MinorGrid.LineColor = Color.LightGray;

area.AxisY2.Title = "[AU]";
area.AxisY2.TitleFont = font;
area.AxisY2.Minimum = 0.98;
area.AxisY2.Maximum = 1.03;
area.AxisY2.Interval = 0.005;

for (DateTimeOffset date = start; date < end; date += new TimeSpan(1, 0, 0))
{
    double oad = date.UtcDateTime.ToOADate();

    ra.Points.AddXY(oad, CelestialPositionCalculation.Calc(date, CelestialPositionCalculation.Type.SunRa) % 24);
    dec.Points.AddXY(oad, CelestialPositionCalculation.Calc(date, CelestialPositionCalculation.Type.SunDec));
    au.Points.AddXY(oad, CelestialPositionCalculation.Calc(date, CelestialPositionCalculation.Type.SunAu));
}

{
    DateTimeOffset date;

    date = new DateTimeOffset(new DateTime(2020, 3, 20, 12, 50, 0));
    marker.Points.Add(new DataPoint(date.UtcDateTime.ToOADate(),
        CelestialPositionCalculation.Calc(date, CelestialPositionCalculation.Type.SunDec))
    { Label = "春分の日", });

    date = new DateTimeOffset(new DateTime(2020, 6, 21, 6, 44, 0));
    marker.Points.Add(new DataPoint(date.UtcDateTime.ToOADate(),
        CelestialPositionCalculation.Calc(date, CelestialPositionCalculation.Type.SunDec))
    { Label = "夏至", });

    date = new DateTimeOffset(new DateTime(2020, 9, 22, 22, 31, 0));
    marker.Points.Add(new DataPoint(date.UtcDateTime.ToOADate(),
        CelestialPositionCalculation.Calc(date, CelestialPositionCalculation.Type.SunDec))
    { Label = "秋分の日", });

    date = new DateTimeOffset(new DateTime(2020, 12, 21, 19, 2, 0));
    marker.Points.Add(new DataPoint(date.UtcDateTime.ToOADate(),
        CelestialPositionCalculation.Calc(date, CelestialPositionCalculation.Type.SunDec))
    { Label = "冬至", });
}

Bitmap bmp = new Bitmap(chart.Width, chart.Height);
chart.DrawToBitmap(bmp, new Rectangle() { Size = bmp.Size });
bmp.Save("log.png");
太陽の赤緯がゼロを通過してプラスに変わったところが春分、そのときの太陽の方向が赤経ゼロで、その日が春分の日です。同様に、赤緯がマイナスに変わる日が秋分の日です。
太陽の赤緯が最大になる日が夏至、最小になる日が冬至です。また、太陽と地球の距離は、1月上旬を最小とし、7月上旬を最大としています。
太陽から離れれば離れるほど、エネルギーは小さくなりますから、エネルギー的に言えば、実は夏より冬のほうが、太陽から受け取るエネルギーは大きいのです(エネルギーの比でおよそ7%程度)。そのため、人工衛星の太陽電池の能力は、夏至(ほぼ太陽から一番遠い時期)の発電量で表されていたりします。その他
ちょうど1年前にも同じようなエントリ書いてるんだな…… 書いてから気がついた。。。
