- 投稿日:2020-02-08T23:42:18+09:00
.NET Core 3.1でLog4netを使う
.NET Coreのアプリで、.NET Framework同様にlog4netを使いたかったのですが、多少迷うところがありました。
同様の情報は見つけられなかったので記しておきます。TL;DR
下記のようにアセンブリ属性を記載することにより
.NET Core 3.1でも楽にlog4netが利用できます。Program.csusing log4net; [assembly: log4net.Config.XmlConfigurator(ConfigFile="log4net.config",Watch=true)] namespace console1 { class Program { static ILog logger = LogManager.GetLogger(typeof(Program)); static void Main(string[] args) { logger.Info("Hello World!"); } } }log4net.config<?xml version="1.0" encoding="utf-8" ?> <configuration> <log4net> <appender name="ConsoleAppender" type="log4net.Appender.ConsoleAppender" > <layout type="log4net.Layout.PatternLayout"> <conversionPattern value="%date [%thread] %-5level %logger - %message%newline" /> </layout> </appender> <root> <level value="ALL" /> <appender-ref ref="ConsoleAppender" /> </root> </log4net> </configuration>環境
- .NET Core SDK 3.1.100
- Visual Studio Code 1.41.1
- C# Plugin
- log4net 2.0.8
- Windows 10 バージョン 2004 (OS ビルド 1941.21)
長文
ログが出力されない。
dotnet create consoleでプロジェクトを作成し、nugetでlog4netをインポートして、さっそくログを出力しようとしましたが、出力されません。
生成されたプロジェクトにはAssemblyInfo.csはなく、.NET Frameworkでlog4netを使うときに書くXmlConfigurator属性等の記載を行っていないのでそれが原因かと思われました。ワークアラウンドを探す。
Webでワークアラウンドを探しました。
過去の記事ですが、自前でXmlConfiguratorを利用し、Loggerのインスタンスをセットアップするパターンの情報が見つかりました。
このやり方は公式のマニュアルにも記載があります。
この方法で確かに動作しますが、log4netの普段の使い勝手と比べると納得できません。ワークアラウンド
Program.csusing log4net; namespace console1 { class Program { static ILog logger; static void Main(string[] args) { //log4net使う準備ここから XmlDocument log4netConfig = new XmlDocument(); log4netConfig.Load(File.OpenRead(LOG_CONFIG_FILE)); var repo = LogManager.CreateRepository( Assembly.GetEntryAssembly(), typeof(log4net.Repository.Hierarchy.Hierarchy)); log4net.Config.XmlConfigurator.Configure(repo, log4netConfig["log4net"]); logger = LogManager.GetLogger(type); //log4net使う準備ここまで logger.Info("Hello World!"); } } }参考
How to Configure log4net for .NET Core
How To Use Log4Net In ASP.NET Core Application
期待するコード
using log4net;

namespace console1
{
    class Program
    {
        static ILog logger = LogManager.GetLogger(typeof(Program));

        static void Main(string[] args)
        {
            logger.Info("Hello World!");
        }
    }
}
そもそも .NET Frameworkではlog4netはどうやって動いていた?
上記のワークアラウンドから推測すると、同等の処理をどこかでやっていたのではないかと思われます。
.NET Frameworkではどのようにlog4netをセットアップしているのか調べてみました。
結局 LogManager.GetLogger() からの呼び出して、アセンブリに付与した XmlConfiguratorAttribute に設定したファイルを見ていることがわかりました。
- LogManager.GetLogger(Type) -> LogManager.GetLogger(Assembly,String)
このリンクは2020/02/06時点のURLです。masterブランチが更新されると役に立たないリンクになります。
https://github.com/apache/logging-log4net/blob/master/src/LogManager.cs#L260
        /// <summary>
        /// Shorthand for <see cref="M:LogManager.GetLogger(string)"/>.
        /// </summary>
        /// <remarks>
        /// Get the logger for the fully qualified name of the type specified.
        /// </remarks>
        /// <param name="type">The full name of <paramref name="type"/> will be used as the name of the logger to retrieve.</param>
        /// <returns>The logger with the name specified.</returns>
        public static ILog GetLogger(Type type)
        {
#if NETSTANDARD1_3
            return GetLogger(type.GetTypeInfo().Assembly, type.FullName);
#else
            return GetLogger(Assembly.GetCallingAssembly(), type.FullName);
#endif
        }
- LogManager.GetLogger(Assembly,String) -> LoggerManager.GetLogger(Assembly, String)
https://github.com/apache/logging-log4net/blob/master/src/LogManager.cs#L244
        /// <summary>
        /// Retrieves or creates a named logger.
        /// </summary>
        /// <remarks>
        /// <para>
        /// Retrieve a logger named as the <paramref name="name"/>
        /// parameter. If the named logger already exists, then the
        /// existing instance will be returned. Otherwise, a new instance is
        /// created.
        /// </para>
        /// <para>
        /// By default, loggers do not have a set level but inherit
        /// it from the hierarchy. This is one of the central features of
        /// log4net.
        /// </para>
        /// </remarks>
        /// <param name="repositoryAssembly">The assembly to use to lookup the repository.</param>
        /// <param name="name">The name of the logger to retrieve.</param>
        /// <returns>The logger with the name specified.</returns>
        public static ILog GetLogger(Assembly repositoryAssembly, string name)
        {
            return WrapLogger(LoggerManager.GetLogger(repositoryAssembly, name));
        }
- LoggerManager.GetLogger(Assembly, String) -> RepositorySelector.GetRepository(Assembly)
https://github.com/apache/logging-log4net/blob/master/src/Core/LoggerManager.cs#L406
        /// <summary>
        /// Retrieves or creates a named logger.
        /// </summary>
        /// <param name="repositoryAssembly">The assembly to use to lookup the repository.</param>
        /// <param name="name">The name of the logger to retrieve.</param>
        /// <returns>The logger with the name specified.</returns>
        /// <remarks>
        /// <para>
        /// Retrieves a logger named as the <paramref name="name"/>
        /// parameter. If the named logger already exists, then the
        /// existing instance will be returned. Otherwise, a new instance is
        /// created.
        /// </para>
        /// <para>
        /// By default, loggers do not have a set level but inherit
        /// it from the hierarchy. This is one of the central features of
        /// log4net.
        /// </para>
        /// </remarks>
        public static ILogger GetLogger(Assembly repositoryAssembly, string name)
        {
            if (repositoryAssembly == null)
            {
                throw new ArgumentNullException("repositoryAssembly");
            }
            if (name == null)
            {
                throw new ArgumentNullException("name");
            }
            return RepositorySelector.GetRepository(repositoryAssembly).GetLogger(name);
        }
- RepositorySelector.GetRepository(Assembly) -> RepositorySelector.CreateRepository(Assembly, Type)
https://github.com/apache/logging-log4net/blob/master/src/Core/DefaultRepositorySelector.cs#L143
        /// <summary>
        /// Gets the <see cref="ILoggerRepository"/> for the specified assembly.
        /// </summary>
        /// <param name="repositoryAssembly">The assembly use to lookup the <see cref="ILoggerRepository"/>.</param>
        /// <remarks>
        /// <para>
        /// The type of the <see cref="ILoggerRepository"/> created and the repository
        /// to create can be overridden by specifying the <see cref="log4net.Config.RepositoryAttribute"/>
        /// attribute on the <paramref name="repositoryAssembly"/>.
        /// </para>
        /// <para>
        /// The default values are to use the <see cref="log4net.Repository.Hierarchy.Hierarchy"/>
        /// implementation of the <see cref="ILoggerRepository"/> interface and to use the
        /// <see cref="AssemblyName.Name"/> as the name of the repository.
        /// </para>
        /// <para>
        /// The <see cref="ILoggerRepository"/> created will be automatically configured using
        /// any <see cref="log4net.Config.ConfiguratorAttribute"/> attributes defined on
        /// the <paramref name="repositoryAssembly"/>.
        /// </para>
        /// </remarks>
        /// <returns>The <see cref="ILoggerRepository"/> for the assembly</returns>
        /// <exception cref="ArgumentNullException"><paramref name="repositoryAssembly"/> is <see langword="null" />.</exception>
        public ILoggerRepository GetRepository(Assembly repositoryAssembly)
        {
            if (repositoryAssembly == null)
            {
                throw new ArgumentNullException("repositoryAssembly");
            }
            return CreateRepository(repositoryAssembly, m_defaultRepositoryType);
        }
- RepositorySelector.CreateRepository(Assembly, Type) -> RepositorySelector.CreateRepository(Assembly, Type, string, bool)
https://github.com/apache/logging-log4net/blob/master/src/Core/DefaultRepositorySelector.cs#L220
        /// <summary>
        /// Create a new repository for the assembly specified
        /// </summary>
        /// <param name="repositoryAssembly">the assembly to use to create the repository to associate with the <see cref="ILoggerRepository"/>.</param>
        /// <param name="repositoryType">The type of repository to create, must implement <see cref="ILoggerRepository"/>.</param>
        /// <returns>The repository created.</returns>
        /// <remarks>
        /// <para>
        /// The <see cref="ILoggerRepository"/> created will be associated with the repository
        /// specified such that a call to <see cref="M:GetRepository(Assembly)"/> with the
        /// same assembly specified will return the same repository instance.
        /// </para>
        /// <para>
        /// The type of the <see cref="ILoggerRepository"/> created and
        /// the repository to create can be overridden by specifying the
        /// <see cref="log4net.Config.RepositoryAttribute"/> attribute on the
        /// <paramref name="repositoryAssembly"/>.  The default values are to use the
        /// <paramref name="repositoryType"/> implementation of the
        /// <see cref="ILoggerRepository"/> interface and to use the
        /// <see cref="AssemblyName.Name"/> as the name of the repository.
        /// </para>
        /// <para>
        /// The <see cref="ILoggerRepository"/> created will be automatically
        /// configured using any <see cref="log4net.Config.ConfiguratorAttribute"/>
        /// attributes defined on the <paramref name="repositoryAssembly"/>.
        /// </para>
        /// <para>
        /// If a repository for the <paramref name="repositoryAssembly"/> already exists
        /// that repository will be returned. An error will not be raised and that
        /// repository may be of a different type to that specified in <paramref name="repositoryType"/>.
        /// Also the <see cref="log4net.Config.RepositoryAttribute"/> attribute on the
        /// assembly may be used to override the repository type specified in
        /// <paramref name="repositoryType"/>.
        /// </para>
        /// </remarks>
        /// <exception cref="ArgumentNullException"><paramref name="repositoryAssembly"/> is <see langword="null" />.</exception>
        public ILoggerRepository CreateRepository(Assembly repositoryAssembly, Type repositoryType)
        {
            return CreateRepository(repositoryAssembly, repositoryType, DefaultRepositoryName, true);
        }
- RepositorySelector.CreateRepository(Assembly, Type, string, bool) -> RepositorySelector.ConfigureRepository(Assembly, ILoggerRepository)
https://github.com/apache/logging-log4net/blob/master/src/Core/DefaultRepositorySelector.cs#L313
        /// <summary>
        /// Creates a new repository for the assembly specified.
        /// </summary>
        /// <param name="repositoryAssembly">the assembly to use to create the repository to associate with the <see cref="ILoggerRepository"/>.</param>
        /// <param name="repositoryType">The type of repository to create, must implement <see cref="ILoggerRepository"/>.</param>
        /// <param name="repositoryName">The name to assign to the created repository</param>
        /// <param name="readAssemblyAttributes">Set to <c>true</c> to read and apply the assembly attributes</param>
        /// <returns>The repository created.</returns>
        /// <remarks>
        /// <para>
        /// The <see cref="ILoggerRepository"/> created will be associated with the repository
        /// specified such that a call to <see cref="M:GetRepository(Assembly)"/> with the
        /// same assembly specified will return the same repository instance.
        /// </para>
        /// <para>
        /// The type of the <see cref="ILoggerRepository"/> created and
        /// the repository to create can be overridden by specifying the
        /// <see cref="log4net.Config.RepositoryAttribute"/> attribute on the
        /// <paramref name="repositoryAssembly"/>.  The default values are to use the
        /// <paramref name="repositoryType"/> implementation of the
        /// <see cref="ILoggerRepository"/> interface and to use the
        /// <see cref="AssemblyName.Name"/> as the name of the repository.
        /// </para>
        /// <para>
        /// The <see cref="ILoggerRepository"/> created will be automatically
        /// configured using any <see cref="log4net.Config.ConfiguratorAttribute"/>
        /// attributes defined on the <paramref name="repositoryAssembly"/>.
        /// </para>
        /// <para>
        /// If a repository for the <paramref name="repositoryAssembly"/> already exists
        /// that repository will be returned. An error will not be raised and that
        /// repository may be of a different type to that specified in <paramref name="repositoryType"/>.
        /// Also the <see cref="log4net.Config.RepositoryAttribute"/> attribute on the
        /// assembly may be used to override the repository type specified in
        /// <paramref name="repositoryType"/>.
        /// </para>
        /// </remarks>
        /// <exception cref="ArgumentNullException"><paramref name="repositoryAssembly"/> is <see langword="null" />.</exception>
        public ILoggerRepository CreateRepository(Assembly repositoryAssembly, Type repositoryType, string repositoryName, bool readAssemblyAttributes)
        {
            if (repositoryAssembly == null)
            {
                throw new ArgumentNullException("repositoryAssembly");
            }

            // If the type is not set then use the default type
            if (repositoryType == null)
            {
                repositoryType = m_defaultRepositoryType;
            }

            lock(this)
            {
                // Lookup in map
                ILoggerRepository rep = m_assembly2repositoryMap[repositoryAssembly] as ILoggerRepository;
                if (rep == null)
                {
                    // Not found, therefore create
                    LogLog.Debug(declaringType, "Creating repository for assembly [" + repositoryAssembly + "]");

                    // Must specify defaults
                    string actualRepositoryName = repositoryName;
                    Type actualRepositoryType = repositoryType;

                    if (readAssemblyAttributes)
                    {
                        // Get the repository and type from the assembly attributes
                        GetInfoForAssembly(repositoryAssembly, ref actualRepositoryName, ref actualRepositoryType);
                    }

                    LogLog.Debug(declaringType, "Assembly [" + repositoryAssembly + "] using repository [" + actualRepositoryName + "] and repository type [" + actualRepositoryType + "]");

                    // Lookup the repository in the map (as this may already be defined)
                    rep = m_name2repositoryMap[actualRepositoryName] as ILoggerRepository;
                    if (rep == null)
                    {
                        // Create the repository
                        rep = CreateRepository(actualRepositoryName, actualRepositoryType);

                        if (readAssemblyAttributes)
                        {
                            try
                            {
                                // Look for aliasing attributes
                                LoadAliases(repositoryAssembly, rep);

                                // Look for plugins defined on the assembly
                                LoadPlugins(repositoryAssembly, rep);

                                // Configure the repository using the assembly attributes
                                ConfigureRepository(repositoryAssembly, rep);
                            }
                            catch (Exception ex)
                            {
                                LogLog.Error(declaringType, "Failed to configure repository [" + actualRepositoryName + "] from assembly attributes.", ex);
                            }
                        }
                    }
                    else
                    {
                        LogLog.Debug(declaringType, "repository [" + actualRepositoryName + "] already exists, using repository type [" + rep.GetType().FullName + "]");

                        if (readAssemblyAttributes)
                        {
                            try
                            {
                                // Look for plugins defined on the assembly
                                LoadPlugins(repositoryAssembly, rep);
                            }
                            catch (Exception ex)
                            {
                                LogLog.Error(declaringType, "Failed to configure repository [" + actualRepositoryName + "] from assembly attributes.", ex);
                            }
                        }
                    }
                    m_assembly2repositoryMap[repositoryAssembly] = rep;
                }
                return rep;
            }
        }
- RepositorySelector.ConfigureRepository(Assembly, ILoggerRepository) -> XmlConfiguratorAttribute.Configure(Assembly, ILoggerRepository)
https://github.com/apache/logging-log4net/blob/master/src/Core/DefaultRepositorySelector.cs#L683
        /// <summary>
        /// Configures the repository using information from the assembly.
        /// </summary>
        /// <param name="assembly">The assembly containing <see cref="log4net.Config.ConfiguratorAttribute"/>
        /// attributes which define the configuration for the repository.</param>
        /// <param name="repository">The repository to configure.</param>
        /// <exception cref="ArgumentNullException">
        /// <para><paramref name="assembly" /> is <see langword="null" />.</para>
        /// <para>-or-</para>
        /// <para><paramref name="repository" /> is <see langword="null" />.</para>
        /// </exception>
        private void ConfigureRepository(Assembly assembly, ILoggerRepository repository)
        {
            if (assembly == null)
            {
                throw new ArgumentNullException("assembly");
            }
            if (repository == null)
            {
                throw new ArgumentNullException("repository");
            }

            // Look for the Configurator attributes (e.g. XmlConfiguratorAttribute) on the assembly
#if NETSTANDARD1_3
            object[] configAttributes = assembly.GetCustomAttributes(typeof(log4net.Config.ConfiguratorAttribute)).ToArray();
#else
            object[] configAttributes = Attribute.GetCustomAttributes(assembly, typeof(log4net.Config.ConfiguratorAttribute), false);
#endif
            if (configAttributes != null && configAttributes.Length > 0)
            {
                // Sort the ConfiguratorAttributes in priority order
                Array.Sort(configAttributes);

                // Delegate to the attribute the job of configuring the repository
                foreach(log4net.Config.ConfiguratorAttribute configAttr in configAttributes)
                {
                    if (configAttr != null)
                    {
                        try
                        {
                            configAttr.Configure(assembly, repository);
                        }
                        catch (Exception ex)
                        {
                            LogLog.Error(declaringType, "Exception calling ["+configAttr.GetType().FullName+"] .Configure method.", ex);
                        }
                    }
                }
            }

            if (repository.Name == DefaultRepositoryName)
            {
                // Try to configure the default repository using an AppSettings specified config file
                // Do this even if the repository has been configured (or claims to be), this allows overriding
                // of the default config files etc, if that is required.

                string repositoryConfigFile = SystemInfo.GetAppSetting("log4net.Config");
                if (repositoryConfigFile != null && repositoryConfigFile.Length > 0)
                {
                    string applicationBaseDirectory = null;
                    try
                    {
                        applicationBaseDirectory = SystemInfo.ApplicationBaseDirectory;
                    }
                    catch(Exception ex)
                    {
                        LogLog.Warn(declaringType, "Exception getting ApplicationBaseDirectory. appSettings log4net.Config path ["+repositoryConfigFile+"] will be treated as an absolute URI", ex);
                    }

                    string repositoryConfigFilePath = repositoryConfigFile;
                    if (applicationBaseDirectory != null)
                    {
                        repositoryConfigFilePath = Path.Combine(applicationBaseDirectory, repositoryConfigFile);
                    }

                    // Determine whether to watch the file or not based on an app setting value:
                    bool watchRepositoryConfigFile = false;
#if NET_2_0 || MONO_2_0 || MONO_3_5 || MONO_4_0 || NETSTANDARD1_3
                    Boolean.TryParse(SystemInfo.GetAppSetting("log4net.Config.Watch"), out watchRepositoryConfigFile);
#else
                                    {
                                        string watch = SystemInfo.GetAppSetting("log4net.Config.Watch");
                                        if (watch != null && watch.Length > 0)
                                        {
                                            try
                                            {
                                                watchRepositoryConfigFile = Boolean.Parse(watch);
                                            }
                                            catch (FormatException)
                                            {
                                                // simply not a Boolean
                                            }
                                        }
                                    }
#endif

                    if (watchRepositoryConfigFile)
                    {
                        // As we are going to watch the config file it is required to resolve it as a
                        // physical file system path pass that in a FileInfo object to the Configurator
                        FileInfo repositoryConfigFileInfo = null;
                        try
                        {
                            repositoryConfigFileInfo = new FileInfo(repositoryConfigFilePath);
                        }
                        catch (Exception ex)
                        {
                            LogLog.Error(declaringType, "DefaultRepositorySelector: Exception while parsing log4net.Config file physical path [" + repositoryConfigFilePath + "]", ex);
                        }
                        try
                        {
                            LogLog.Debug(declaringType, "Loading and watching configuration for default repository from AppSettings specified Config path [" + repositoryConfigFilePath + "]");

                            XmlConfigurator.ConfigureAndWatch(repository, repositoryConfigFileInfo);
                        }
                        catch (Exception ex)
                        {
                            LogLog.Error(declaringType, "DefaultRepositorySelector: Exception calling XmlConfigurator.ConfigureAndWatch method with ConfigFilePath [" + repositoryConfigFilePath + "]", ex);
                        }
                    }
                    else
                    {
                    // As we are not going to watch the config file it is easiest to just resolve it as a
                    // URI and pass that to the Configurator
                    Uri repositoryConfigUri = null;
                    try
                    {
                        repositoryConfigUri = new Uri(repositoryConfigFilePath);
                    }
                    catch(Exception ex)
                    {
                        LogLog.Error(declaringType, "Exception while parsing log4net.Config file path ["+repositoryConfigFile+"]", ex);
                    }

                    if (repositoryConfigUri != null)
                    {
                        LogLog.Debug(declaringType, "Loading configuration for default repository from AppSettings specified Config URI ["+repositoryConfigUri.ToString()+"]");

                        try
                        {
                            // TODO: Support other types of configurator
                            XmlConfigurator.Configure(repository, repositoryConfigUri);
                        }
                        catch (Exception ex)
                        {
                            LogLog.Error(declaringType, "Exception calling XmlConfigurator.Configure method with ConfigUri ["+repositoryConfigUri+"]", ex);
                        }
                    }
                    }
                }
            }
        }
- XmlConfiguratorAttribute.Configure(Assembly, ILoggerRepository) -> XmlConfiguratorAttribute.ConfigureFromFile(Assembly, ILoggerRepository)
https://github.com/apache/logging-log4net/blob/master/src/Config/XmlConfiguratorAttribute.cs#L218
        #region Override ConfiguratorAttribute

        /// <summary>
        /// Configures the <see cref="ILoggerRepository"/> for the specified assembly.
        /// </summary>
        /// <param name="sourceAssembly">The assembly that this attribute was defined on.</param>
        /// <param name="targetRepository">The repository to configure.</param>
        /// <remarks>
        /// <para>
        /// Configure the repository using the <see cref="XmlConfigurator"/>.
        /// The <paramref name="targetRepository"/> specified must extend the <see cref="Hierarchy"/>
        /// class otherwise the <see cref="XmlConfigurator"/> will not be able to
        /// configure it.
        /// </para>
        /// </remarks>
        /// <exception cref="ArgumentOutOfRangeException">The <paramref name="targetRepository" /> does not extend <see cref="Hierarchy"/>.</exception>
        override public void Configure(Assembly sourceAssembly, ILoggerRepository targetRepository)
        {
            IList configurationMessages = new ArrayList();

            using (new LogLog.LogReceivedAdapter(configurationMessages))
            {
                string applicationBaseDirectory = null;
                try
                {
                    applicationBaseDirectory = SystemInfo.ApplicationBaseDirectory;
                }
                catch
                {
                    // Ignore this exception because it is only thrown when ApplicationBaseDirectory is a file
                    // and the application does not have PathDiscovery permission
                }

                if (applicationBaseDirectory == null || (new Uri(applicationBaseDirectory)).IsFile)
                {
                    ConfigureFromFile(sourceAssembly, targetRepository);
                }
                else
                {
                    ConfigureFromUri(sourceAssembly, targetRepository);
                }
            }

            targetRepository.ConfigurationMessages = configurationMessages;
        }

        #endregion
- XmlConfiguratorAttribute.ConfigureFromFile(Assembly, ILoggerRepository) -> ConfigureFromFile(ILoggerRepository, FileInfo)
https://github.com/apache/logging-log4net/blob/master/src/Config/XmlConfiguratorAttribute.cs#L305
        /// <summary>
        /// Attempt to load configuration from the local file system
        /// </summary>
        /// <param name="sourceAssembly">The assembly that this attribute was defined on.</param>
        /// <param name="targetRepository">The repository to configure.</param>
        private void ConfigureFromFile(Assembly sourceAssembly, ILoggerRepository targetRepository)
        {
            // Work out the full path to the config file
            string fullPath2ConfigFile = null;

            // Select the config file
            if (m_configFile == null || m_configFile.Length == 0)
            {
                if (m_configFileExtension == null || m_configFileExtension.Length == 0)
                {
                    // Use the default .config file for the AppDomain
                    try
                    {
                        fullPath2ConfigFile = SystemInfo.ConfigurationFileLocation;
                    }
                    catch(Exception ex)
                    {
                        LogLog.Error(declaringType, "XmlConfiguratorAttribute: Exception getting ConfigurationFileLocation. Must be able to resolve ConfigurationFileLocation when ConfigFile and ConfigFileExtension properties are not set.", ex);
                    }
                }
                else
                {
                    // Force the extension to start with a '.'
                    if (m_configFileExtension[0] != '.')
                    {
                        m_configFileExtension = "." + m_configFileExtension;
                    }

                    string applicationBaseDirectory = null;
                    try
                    {
                        applicationBaseDirectory = SystemInfo.ApplicationBaseDirectory;
                    }
                    catch(Exception ex)
                    {
                        LogLog.Error(declaringType, "Exception getting ApplicationBaseDirectory. Must be able to resolve ApplicationBaseDirectory and AssemblyFileName when ConfigFileExtension property is set.", ex);
                    }

                    if (applicationBaseDirectory != null)
                    {
                        fullPath2ConfigFile = Path.Combine(applicationBaseDirectory, SystemInfo.AssemblyFileName(sourceAssembly) + m_configFileExtension);
                    }
                }
            }
            else
            {
                string applicationBaseDirectory = null;
                try
                {
                    applicationBaseDirectory = SystemInfo.ApplicationBaseDirectory;
                }
                catch(Exception ex)
                {
                    LogLog.Warn(declaringType, "Exception getting ApplicationBaseDirectory. ConfigFile property path ["+m_configFile+"] will be treated as an absolute path.", ex);
                }

                if (applicationBaseDirectory != null)
                {
                    // Just the base dir + the config file
                    fullPath2ConfigFile = Path.Combine(applicationBaseDirectory, m_configFile);
                }
                else
                {
                    fullPath2ConfigFile = m_configFile;
                }
            }

            if (fullPath2ConfigFile != null)
            {
                ConfigureFromFile(targetRepository, new FileInfo(fullPath2ConfigFile));
            }
        }
- ConfigureFromFile(ILoggerRepository, FileInfo) -> XmlConfigurator.Configure(ILoggerRepository, FileInfo)
https://github.com/apache/logging-log4net/blob/master/src/Config/XmlConfiguratorAttribute.cs#L330
        /// <summary>
        /// Configure the specified repository using a <see cref="FileInfo"/>
        /// </summary>
        /// <param name="targetRepository">The repository to configure.</param>
        /// <param name="configFile">the FileInfo pointing to the config file</param>
        private void ConfigureFromFile(ILoggerRepository targetRepository, FileInfo configFile)
        {
#if (SSCLI)
            if (m_configureAndWatch)
            {
                LogLog.Warn(declaringType, "XmlConfiguratorAttribute: Unable to watch config file not supported on SSCLI");
            }
            XmlConfigurator.Configure(targetRepository, configFile);
#else
            // Do we configure just once or do we configure and then watch?
            if (m_configureAndWatch)
            {
                XmlConfigurator.ConfigureAndWatch(targetRepository, configFile);
            }
            else
            {
                XmlConfigurator.Configure(targetRepository, configFile);
            }
#endif
        }
XmlConfiguratorAttributeを定義したいが、.NET CoreのAssemblyInfo.csはどこへいった?結局のところ、
XmlConfigurator属性をアセンブリに付与することで.NET Coreでも動作するであろうことがわかりました。では、
.NET CoreではAssemblyInfo.csはどこへ行ったのでしょうか。
.NET Coreのドキュメントを見ると.NET Frameworkで、AssemblyInfo.csに記載していたような情報は、.NET Coreではビルド時に各所から情報を集めて自動生成されるようになったとのこと。参考:.NET Core の csproj 形式に追加されたもの
通常、AssemblyInfo ファイル内に存在していたアセンブリ属性は、プロパティから自動的に生成されるようになりました。
objフォルダ配下にAssemblyInfoという名前のファイルが生成されているのでそういうことなのだと理解しました。objファイル配下のファイル
└─obj
    │  console1.csproj.nuget.cache
    │  console1.csproj.nuget.dgspec.json
    │  console1.csproj.nuget.g.props
    │  console1.csproj.nuget.g.targets
    │  project.assets.json
    │
    └─Debug
        └─netcoreapp3.1
                console1.AssemblyInfo.cs
                console1.AssemblyInfoInputs.cache
                console1.assets.cache
                console1.csproj.CopyComplete
                console1.csproj.FileListAbsolute.txt
                console1.csprojAssemblyReference.cache
                console1.dll
                console1.exe
                console1.pdb
それでは、
.NET Coreではアセンブリ属性はどこに記載すればよいのか?
.NET Standardのドキュメントを見ると、結局のところコードで下記のように記載すればアセンブリ属性が定義できることがわかりました。特にAssemblyInfo.csに書く必要は無いようです。[assembly:AssemblyKeyFileAttribute("myKey.snk")]
[assembly:AssemblyDelaySignAttribute(true)]ドキュメントに倣い、プログラムを下記のように修正すると無事
log4netが動作するようになりました。
遠回りしたわりには答えは近くにありましたというオチでした。Program.csusing log4net; [assembly: log4net.Config.XmlConfigurator(ConfigFile="log4net.config",Watch=true)] namespace console1 { class Program { static ILog logger = LogManager.GetLogger(typeof(Program)); static void Main(string[] args) { logger.Info("Hello World!"); } } }実行結果
PS C:\projects\core_with_log4net\console1> dotnet run
2020-02-08 23:13:09,447 [1] INFO  console1.Program - Hello World!
PS C:\projects\core_with_log4net\console1>
- 投稿日:2020-02-08T18:25:23+09:00
【Unity】LESSON01.セリフの文字を一つひとつ表示させていって簡単にRPGチックにしちゃおう!【★★★✩✩】
入力した文字列をRPGのセリフ表示っぽくしよう
「UnderTale」や「ゼルダの伝説」のセリフって文字が一文字一文字テキストボックスに追加されて行きますよね?それを出来るだけ簡単に実装して行きます!
まずはUnityでやること
CanvasにTextを追加しよう
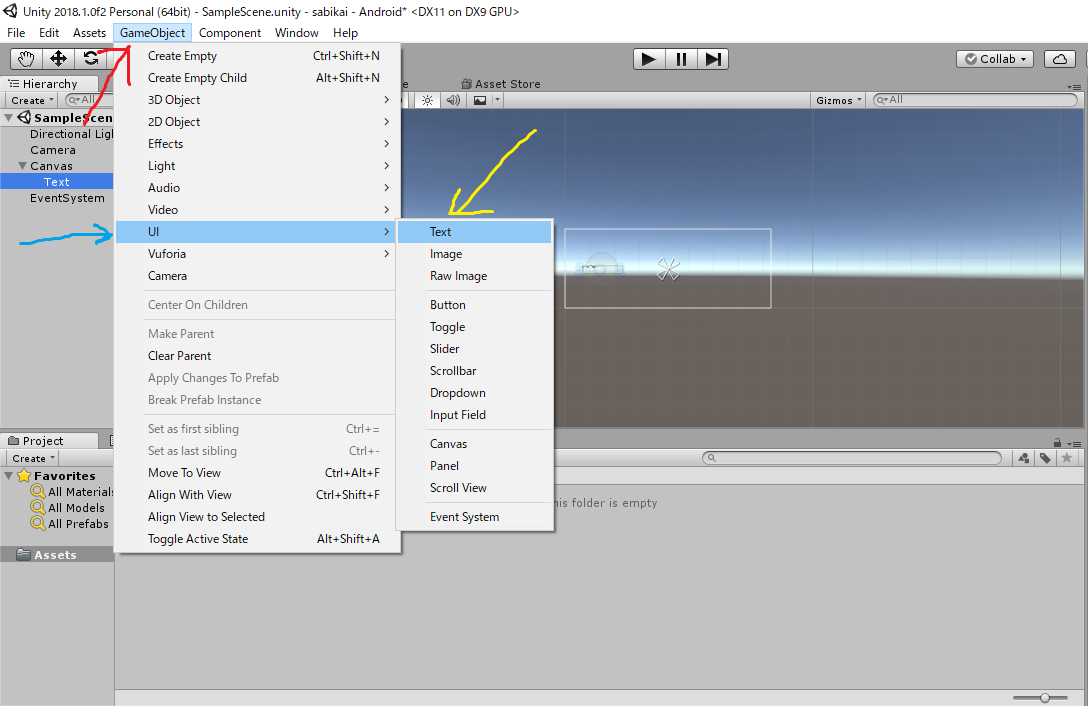
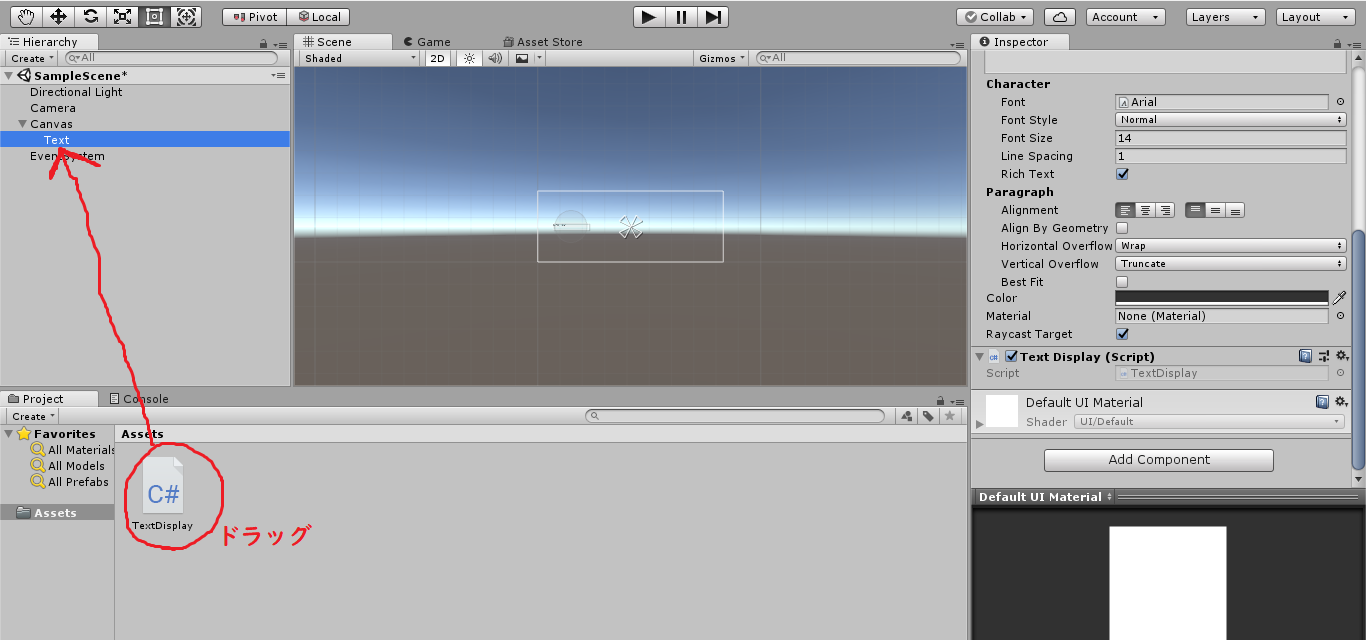
まずは文字を表示させる為にGameObject→UI→Textの順番でクリックしていき「Text」を出しましょう!
▼Canvas
Text
↑みたいになります!文字の大きさや、表示させたい位置を自分の好きな所に設定してね!
Textにスクリプトをアタッチしよう!
最初は「New Text」となってるはずなのでこれを変えます!Textに表示されてる文字列を変えるためのスクリプトの準備をします!
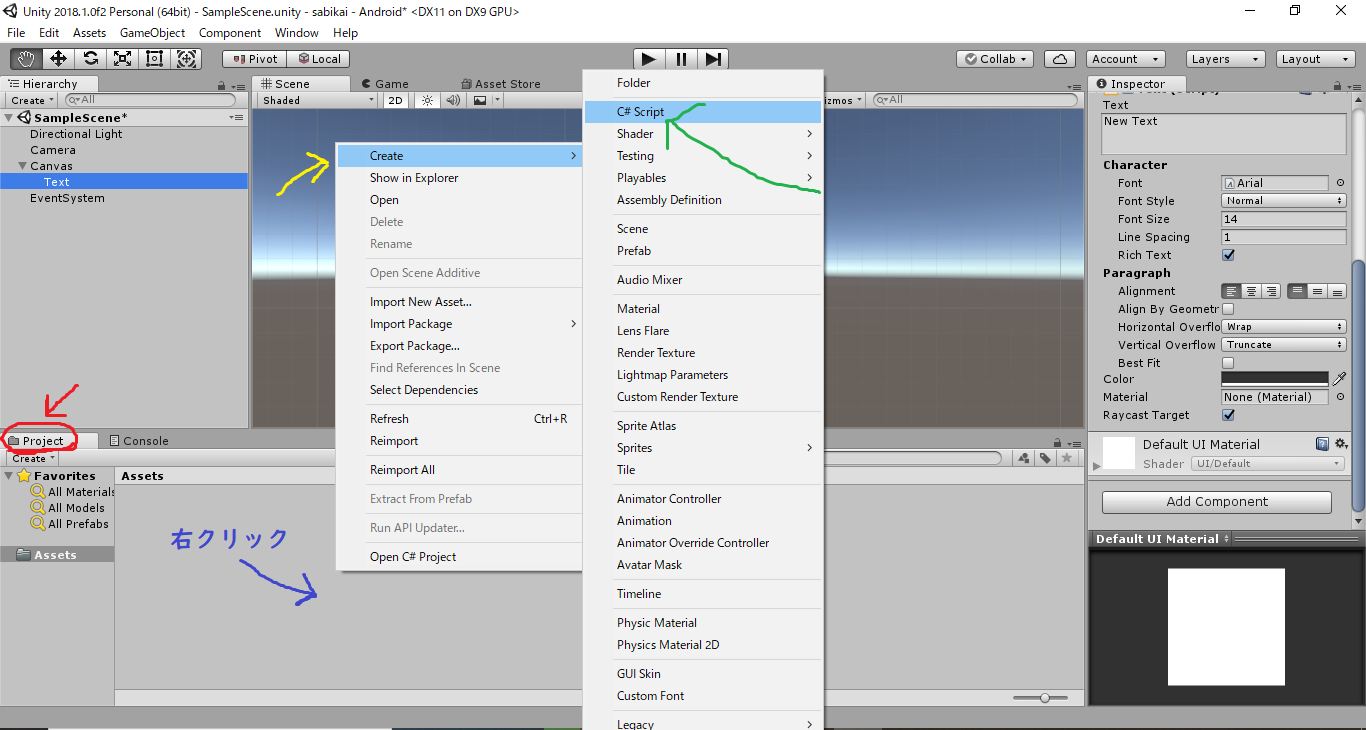
Projectのウィンドウで右クリック→Create→C# Scriptの順番に操作します!
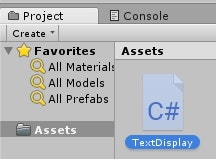
そうするとスクリプトが生成されます。そのスクリプトに適当な名前をつけます。今回は「TextDisplay」としましょう!(Displayは表示という意味)
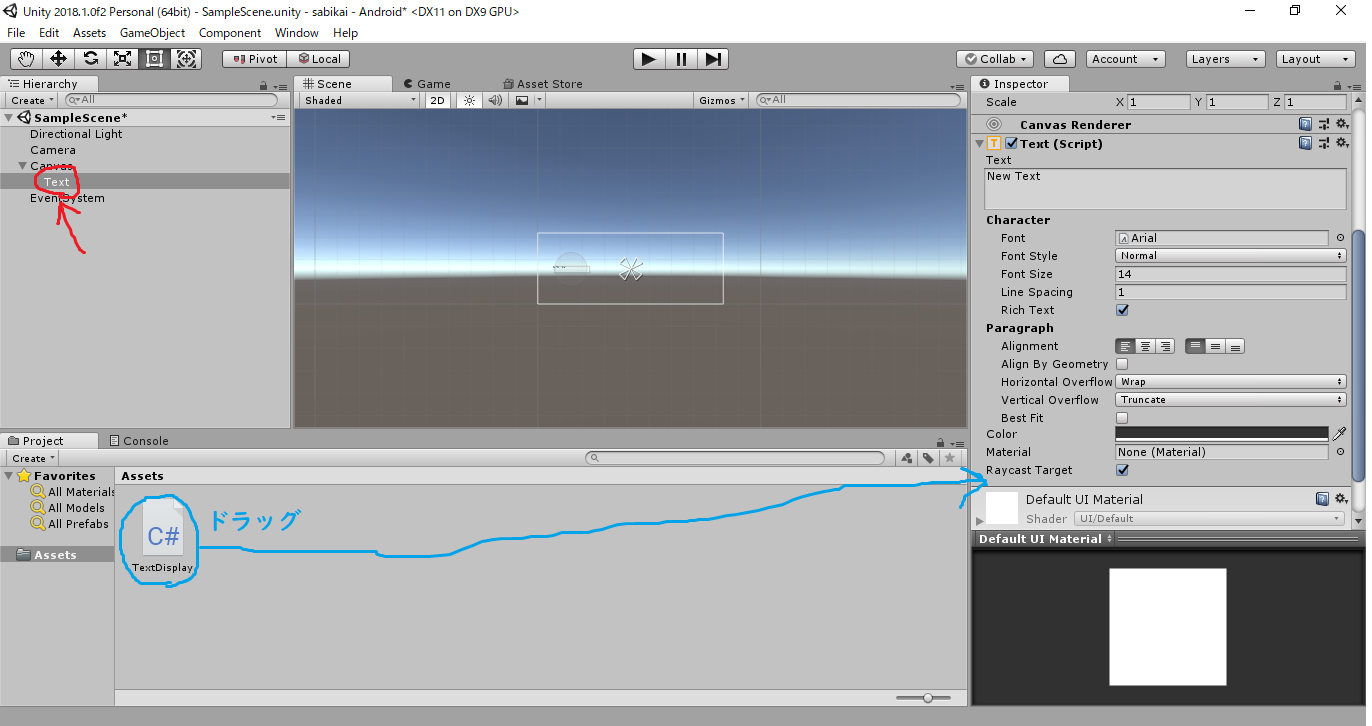
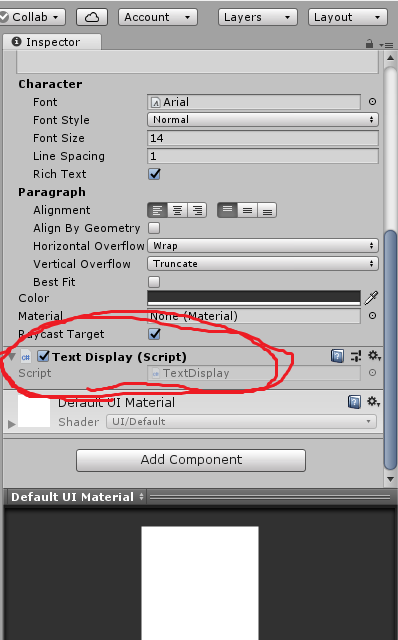
そうしたらTextDisplayスクリプトをTextにアタッチします。下の画像のどっちの操作でもアタッチできるので、好きな方のアタッチの方法でやってください!
アタッチ方法①
アタッチ方法②
(アタッチ方法①,②のどちらかやればいいよ!)
結果的に下の画像のように表示されたらオッケーです!
つぎはプログラミングの作業
では、TextDisplayスクリプトを開いてプログラミングの作業を始めます!ひとつひとつの機能を一緒に理解しながら作って行きましょう。
【注意!】プログラムに「 // 」←がついている行が新しい行です。その行を追加していってくださいね!スクリプトから文字を手動で変える
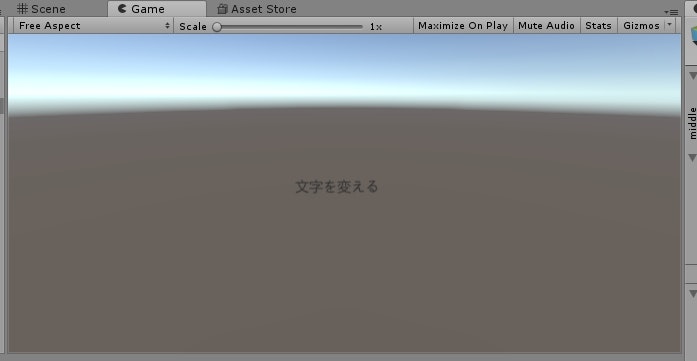
まずは簡単な方法で文字を変えます。
TextDisplay.csusing System.Collections; using System.Collections.Generic; using UnityEngine; using UnityEngine.UI;//←これを追加 public class TextDisplay : MonoBehaviour { void Start() { } void Update() { this.GetComponent<Text>().text = "文字を変える";//画面上にdisplayTextを表示 } }このプログラムを書くとUnity上で生成したTextの内容が 「 "" 」で挟まれた文字列の内容に変化します。
この機能を主に使ってシステムを作って行きます。
public変数を使ってUnityから文字入力
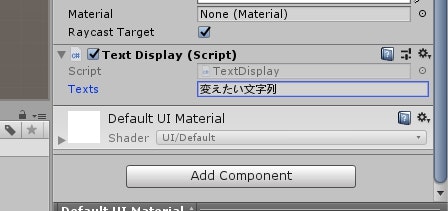
次はstring型の変数を使って文字列の内容を変えます。
TextDisplay.csusing System.Collections; using System.Collections.Generic; using UnityEngine; using UnityEngine.UI; public class TextDisplay : MonoBehaviour { public string texts;//変数宣言 void Start() { } void Update() { this.GetComponent<Text>().text = texts;//←変える } }書いたらUnity上ではこのように表示されるはずなので、ここに文字列の内容を書いてみましょう。
実行するとUnityで入力した文字列に変更されましたね?
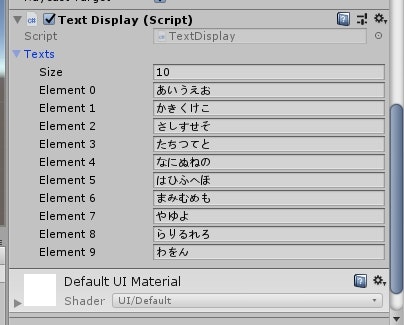
string型のpublic配列を作ろう
次はtextsを変数ではなく配列として宣言しましょう。
TextDisplay.csusing System.Collections; using System.Collections.Generic; using UnityEngine; using UnityEngine.UI; public class TextDisplay : MonoBehaviour { public string[] texts;//←変える void Start() { } void Update() { this.GetComponent<Text>().text = texts[0];//←変える } }このように記述すると、文字列を複数個入力できるようになりますね?
そして実行すると0番目に入力した文字列が表示されるようになったはずです。なぜかというと、
this.GetComponent<Text>().text = texts[0];の数の文字列を表示するプログラムになっているからです。ここの数字を変えれば文字列が順番に表示されるようになります。
texts[0]←ここの数字を変数を使って増やしていく
Unity上で入力した文字列の順番に変えていくプログラムを作ります。
TextDisplay.csusing System.Collections; using System.Collections.Generic; using UnityEngine; using UnityEngine.UI; public class TextDisplay : MonoBehaviour { public string[] texts; int textNumber;//追加 void Start() { } void Update() { this.GetComponent<Text>().text = texts[textNumber];//←変える textNumber = textNumber + 1;//追加 } }このように書くと内容が変わるようになりましたね?恐らくめちゃめちゃ速く。
このままだとまともにセリフが読めないので、クリックしたら変更するようにします。TextDisplay.csusing System.Collections; using System.Collections.Generic; using UnityEngine; using UnityEngine.UI; public class TextDisplay : MonoBehaviour { public string[] texts; int textNumber; void Start() { } void Update() { this.GetComponent<Text>().text = texts[textNumber]; if (Input.GetMouseButtonDown(0))//追加 {//追加 textNumber = textNumber + 1; }//追加 } }if文の条件をクリックしたら「(Input.GetMouseButtonDown(0))」にし、{}の中でtextNumberを1ずつ増やすプログラムにしました。これで好きなタイミングで変えることができるようになったはずです。
最後のセリフで止める
恐らく上のプログラムだと、クリックをし続けるとエラーが出てしまいますよね?それを防ぐプログラムを追加します。
TextDisplay.csusing System.Collections; using System.Collections.Generic; using UnityEngine; using UnityEngine.UI; public class TextDisplay : MonoBehaviour { public string[] texts; int textNumber; void Start() { } void Update() { this.GetComponent<Text>().text = texts[textNumber]; if (textNumber != texts.Length - 1)//追加 {//追加 if (Input.GetMouseButtonDown(0)) { textNumber = textNumber + 1; } }//追加 } }この様なif文を追加すると最後の文章で止まるようになります。具体的には、textNumberがtexts配列の数-1以外ならクリックしたらという条件を追加しました。
一文字ずつ表示させるプログラム
次は一文字一文字表示させるプログラムですが、新たに二つの変数を追加で宣言します。
TextDisplay.csusing System.Collections; using System.Collections.Generic; using UnityEngine; using UnityEngine.UI; public class TextDisplay : MonoBehaviour { public string[] texts; int textNumber; string displayText;//追加 int textCharNumber;//追加 void Start() { } void Update() { this.GetComponent<Text>().text = displayText;//変更 if (textNumber != texts.Length - 1) { if (Input.GetMouseButtonDown(0)) { textNumber = textNumber + 1; } } } }今後はstring型の変数displayTextを表示させていくことにします。では、displayTextに文字データを一文字一文字プログラミングで入力していきましょう。
TextDisplay.csusing System.Collections; using System.Collections.Generic; using UnityEngine; using UnityEngine.UI; public class TextDisplay : MonoBehaviour { public string[] texts; int textNumber; string displayText; int textCharNumber; void Start() { } void Update() { if (textCharNumber != texts[textNumber].Length) //追加 {//追加 displayText = displayText + texts[textNumber][textCharNumber];//追加 textCharNumber = textCharNumber + 1;//追加 }//追加 else//追加 {//追加 displayText = "";//追加 textCharNumber = 0;//追加 }//追加 this.GetComponent<Text>().text = displayText; if (textNumber != texts.Length - 1) { if (Input.GetMouseButtonDown(0)) { textNumber = textNumber + 1; } } } }displayText = displayText + texts[textNumber][textCharNumber];この一行の説明をします。
変数displayTextにtexts配列のtextNumber番目の文字列のtextCharNumber番目の文字を追加するというプログラムです。if (textCharNumber != texts[textNumber].Length) { textCharNumber = textCharNumber + 1; }このif文の意味は、もしtextCharNumberがtexts配列のtextNumber番目の一つ前の数じゃなければ、textCharNumberを1ずつ増やすというプログラムです。
このif文のあとにelse { displayText = ""; textCharNumber = 0; }を追加すると、もしtextCharNumberがtexts配列のtextNumber番目の一つ前の数のときに、displayTextを""にしたり、textCharNumberを0に戻したりするというプログラムになります。
このプログラムのおかげでtextCharNumberの数が文字列の数を超えた時バグらなくなります。今までのプログラムの統合
一文字ずつ表示させて、クリックしたら次のセリフに移行するプログラム
今までのプログラムを整理すると、
- displayTextにtexts配列のtextNumber番目の文字列のtextCharNumeber番目の文字を最後の文字まで追加していく。
- 最後の文字になった時に、追加する文字を最初にする。displayTextを " " に戻す。
- クリックされたら、次のtexts配列を次の文字列にする。
という単純なプログラムです。
これの2と3を混ぜるだけでRPGチックになります。TextDisplay.csusing System.Collections; using System.Collections.Generic; using UnityEngine; using UnityEngine.UI; public class TextDisplay : MonoBehaviour { public string[] texts; int textNumber; string displayText; int textCharNumber; void Start() { } void Update() { if (textCharNumber != texts[textNumber].Length) { displayText = displayText + texts[textNumber][textCharNumber]; textCharNumber = textCharNumber + 1; } else { if (textNumber != texts.Length - 1) { if (Input.GetMouseButtonDown(0))//移動 {//移動 displayText = "";//移動 textCharNumber = 0;//移動 textNumber = textNumber + 1;//移動 }//移動 } } this.GetComponent<Text>().text = displayText; } }うまくいきましたか?
Ex
文字表記をゆっくりに
文字表記をゆっくりにしたかったらこのようにすると文字のスピードが遅くなります。
TextDisplay.csusing System.Collections; using System.Collections.Generic; using UnityEngine; using UnityEngine.UI; public class TextDisplay : MonoBehaviour { public string[] texts; int textNumber; string displayText; int textCharNumber; int displayTextSpeed;//追加 bool click;//追加 void Start() { } void Update() { displayTextSpeed++; if (displayTextSpeed % 5 == 0)//追加 {//追加 if (textCharNumber != texts[textNumber].Length) { displayText = displayText + texts[textNumber][textCharNumber]; textCharNumber = textCharNumber + 1; } else { if (textNumber != texts.Length - 1) { if (click==true) { displayText = ""; textCharNumber = 0; textNumber = textNumber + 1; } } } this.GetComponent<Text>().text = displayText; click = false;//追加 }//追加 if (Input.GetMouseButton(0))//追加 {//追加 click = true;//追加 }//追加 } }最後のセリフでクリックしたら消したい
TextDisplay.csusing System.Collections; using System.Collections.Generic; using UnityEngine; using UnityEngine.UI; public class TextDisplay : MonoBehaviour { public string[] texts; int textNumber; string displayText; int textCharNumber; int displayTextSpeed; bool click; bool textStop;//追加 void Start() { } void Update() { if (textStop == false)//追加 {//追加 displayTextSpeed++; if (displayTextSpeed % 5 == 0) { if (textCharNumber != texts[textNumber].Length) { displayText = displayText + texts[textNumber][textCharNumber]; textCharNumber = textCharNumber + 1; } else { if (textNumber != texts.Length - 1) { if (click == true) { displayText = ""; textCharNumber = 0; textNumber = textNumber + 1; } } else//追加 {//追加 if (click == true)//追加 {//追加 displayText = "";//追加 textCharNumber = 0;//追加 textStop = true;//追加 }//追加 }//追加 } this.GetComponent<Text>().text = displayText; click = false; } if (Input.GetMouseButton(0)) { click = true; } }//追加 } }まず、textStopがfalseの時だけこのプログラムが動くようにプログラミングします。そして
もし最後のセリフの文字列になった時にクリックしたら、表示を " " にしてtextStopをtrueにすることで全てのプログラムを止められるようにします。
そうするとメッセージが止まったようになります。最後に全体のプログラム
TextDisplay.csTextDisplay.csusing System.Collections; using System.Collections.Generic; using UnityEngine; using UnityEngine.UI; public class TextDisplay : MonoBehaviour { public string[] texts;//Unity上で入力するstringの配列 string displayText;//表示させるstring int textDisplayCount;//全体のフレームレートを落とす変数 int textNumber;//何番目のtexts[]を表示させるか int textCharNumber;//何文字目をdisplayTextに追加するか int displaySpeed=5;//文字の表示スピード調整(0が最小) bool click;//クリック判定 bool textStop;//テキスト表示を始めるか void Start() { } void Update() { if (textStop == false)//テキストを表示させるif文 { textDisplayCount++; if (textDisplayCount % displaySpeed == 0)//displaySpeedに一回プログラムを実行するif文 {// ↑の「 % 」はあまりって意味。 例)10➗3= 3あまり1 → if(10 % 3 == 1){} if (textCharNumber != texts[textNumber].Length)//もしtext[textNumber]の文字列の文字が最後の文字じゃなければ {// ↑の「 != 」は「じゃない」っていう意味 displayText = displayText + texts[textNumber][textCharNumber];//displayTextに文字を追加していく textCharNumber++;//次の文字にする click = false;//クリックされたを解除 } else//もしtext[textNumber]の文字列の文字が最後の文字だったら { if (click == true)//クリックされた判定 { if (textNumber == texts.Length-1)//もしtexts[]が最後のセリフになったら { textStop = true;//セリフ表示を止める textNumber = 0;//texts[]を最初に戻す textCharNumber = 0;//文字の番号を最初にする displayText = "";//表示させる文字列も消す } else {//もしtexts[]が最後のセリフじゃないときは textNumber++;//次のセリフにする textCharNumber = 0;//文字の番号を最初にする displayText = "";//表示させる文字列も消す click = false;//クリックされた判定を解除 } } } if (Input.GetMouseButton(0))//マウスをクリックしたら { click = true;//次のセリフ表示 } } } if(Input.GetKey(KeyCode.A)){// 例)もしAキーを押したら次のセリフにする textStop = false;//テキスト表示開始 tekito();//新しいテキストを挿入 } this.GetComponent<Text>().text = displayText;//画面上にdisplayTextを表示 } void tekito(){//新しい文字列の配列宣言 texts = new string[5];//何行の文字列配列にするか texts[0] = "zzzzz"; texts[1] = "yyyyyyyyyy"; texts[2] = "xxxxxxxxxx"; texts[3] = "wwwww"; texts[4] = "vvvvvvvvvvvvvv"; } }
- 投稿日:2020-02-08T18:25:23+09:00
【Unity】LESSON01. 一文字ずつ進むセリフの表示をして簡単にRPGチックなテキストボックスにしちゃおう!(解説付き)【★★★✩✩】
入力した文字列をRPGのセリフ表示っぽくしよう
プログラミング初学者向きの記事となっています。
「UnderTale」や「ゼルダの伝説」のセリフって文字が一文字一文字テキストボックスに追加されて行きますよね?それを出来るだけ簡単に実装して行きます!①まずはUnity上での作業
CanvasにTextを追加しよう(1/2)
まずは文字を表示させる為にGameObject→UI→Textの順番でクリックしていき「Text」を出しましょう!
▼Canvas
Text
↑みたいになります!文字の大きさや、表示させたい位置を自分の好きな所に設定してね!
Textにスクリプトをアタッチしよう!(2/2)
最初は「New Text」となってるはずなのでこれを変えます!Textに表示されてる文字列を変えるためのスクリプトの準備をします!
Projectのウィンドウで右クリック→Create→C# Scriptの順番に操作します!
そうするとスクリプトが生成されます。そのスクリプトに適当な名前をつけます。今回は「TextDisplay」としましょう!(Displayは表示という意味)
そうしたらTextDisplayスクリプトをTextにアタッチします。下の画像のどっちの操作でもアタッチできるので、好きな方のアタッチの方法でやってください!
アタッチ方法①
アタッチ方法②
(アタッチ方法①,②のどちらかやればいいよ!)
結果的に下の画像のように表示されたらオッケーです!
②つぎはプログラミングの作業
では、TextDisplayスクリプトを開いてプログラミングの作業を始めます!ひとつひとつの機能を一緒に理解しながら作って行きましょう。
【注意!】プログラムに「 // 」←がついている行が新しい行です。その行を追加していってくださいね!スクリプトから文字を手動で変える(1/5)
まずは簡単な方法で文字を変えます。
TextDisplay.csusing System.Collections; using System.Collections.Generic; using UnityEngine; using UnityEngine.UI;//←これを追加 public class TextDisplay : MonoBehaviour { void Start() { } void Update() { this.GetComponent<Text>().text = "文字を変える";//画面上にdisplayTextを表示 } }このプログラムを書くとUnity上で生成したTextの内容が 「 "" 」で挟まれた文字列の内容に変化します。
この機能を主に使ってシステムを作って行きます。
public変数を使ってUnityから文字入力(2/5)
次はstring型の変数を使って文字列の内容を変えます。
TextDisplay.csusing System.Collections; using System.Collections.Generic; using UnityEngine; using UnityEngine.UI; public class TextDisplay : MonoBehaviour { public string texts;//変数宣言 void Start() { } void Update() { this.GetComponent<Text>().text = texts;//←変える } }書いたらUnity上ではこのように表示されるはずなので、ここに文字列の内容を書いてみましょう。
実行するとUnityで入力した文字列に変更されましたね?
string型のpublic配列を作ろう(3/5)
次はtextsを変数ではなく配列として宣言しましょう。
TextDisplay.csusing System.Collections; using System.Collections.Generic; using UnityEngine; using UnityEngine.UI; public class TextDisplay : MonoBehaviour { public string[] texts;//←変える void Start() { } void Update() { this.GetComponent<Text>().text = texts[0];//←変える } }このように記述すると、文字列を複数個入力できるようになりますね?
そして実行すると0番目に入力した文字列が表示されるようになったはずです。なぜかというと、
this.GetComponent<Text>().text = texts[0];の数の文字列を表示するプログラムになっているからです。ここの数字を変えれば文字列が順番に表示されるようになります。
texts[0]←ここの数字を変数を使って増やしていく(4/5)
Unity上で入力した文字列の順番に変えていくプログラムを作ります。
TextDisplay.csusing System.Collections; using System.Collections.Generic; using UnityEngine; using UnityEngine.UI; public class TextDisplay : MonoBehaviour { public string[] texts; int textNumber;//追加 void Start() { } void Update() { this.GetComponent<Text>().text = texts[textNumber];//←変える textNumber = textNumber + 1;//追加 } }このように書くと内容が変わるようになりましたね?恐らくめちゃめちゃ速く。
このままだとまともにセリフが読めないので、クリックしたら変更するようにします。TextDisplay.csusing System.Collections; using System.Collections.Generic; using UnityEngine; using UnityEngine.UI; public class TextDisplay : MonoBehaviour { public string[] texts; int textNumber; void Start() { } void Update() { this.GetComponent<Text>().text = texts[textNumber]; if (Input.GetMouseButtonDown(0))//追加 {//追加 textNumber = textNumber + 1; }//追加 } }if文の条件をクリックしたら「(Input.GetMouseButtonDown(0))」にし、{}の中でtextNumberを1ずつ増やすプログラムにしました。これで好きなタイミングで変えることができるようになったはずです。
最後のセリフで止める
恐らく上のプログラムだと、クリックをし続けるとエラーが出てしまいますよね?それを防ぐプログラムを追加します。
TextDisplay.csusing System.Collections; using System.Collections.Generic; using UnityEngine; using UnityEngine.UI; public class TextDisplay : MonoBehaviour { public string[] texts; int textNumber; void Start() { } void Update() { this.GetComponent<Text>().text = texts[textNumber]; if (textNumber != texts.Length - 1)//追加 {//追加 if (Input.GetMouseButtonDown(0)) { textNumber = textNumber + 1; } }//追加 } }この様なif文を追加すると最後の文章で止まるようになります。具体的には、textNumberがtexts配列の数-1以外ならクリックしたらという条件を追加しました。
一文字ずつ表示させるプログラム(5/5)
次は一文字一文字表示させるプログラムですが、新たに二つの変数を追加で宣言します。
TextDisplay.csusing System.Collections; using System.Collections.Generic; using UnityEngine; using UnityEngine.UI; public class TextDisplay : MonoBehaviour { public string[] texts; int textNumber; string displayText;//追加 int textCharNumber;//追加 void Start() { } void Update() { this.GetComponent<Text>().text = displayText;//変更 if (textNumber != texts.Length - 1) { if (Input.GetMouseButtonDown(0)) { textNumber = textNumber + 1; } } } }今後はstring型の変数displayTextを表示させていくことにします。では、displayTextに文字データを一文字一文字プログラミングで入力していきましょう。
TextDisplay.csusing System.Collections; using System.Collections.Generic; using UnityEngine; using UnityEngine.UI; public class TextDisplay : MonoBehaviour { public string[] texts; int textNumber; string displayText; int textCharNumber; void Start() { } void Update() { if (textCharNumber != texts[textNumber].Length) //追加 {//追加 displayText = displayText + texts[textNumber][textCharNumber];//追加 textCharNumber = textCharNumber + 1;//追加 }//追加 else//追加 {//追加 displayText = "";//追加 textCharNumber = 0;//追加 }//追加 this.GetComponent<Text>().text = displayText; if (textNumber != texts.Length - 1) { if (Input.GetMouseButtonDown(0)) { textNumber = textNumber + 1; } } } }displayText = displayText + texts[textNumber][textCharNumber];この一行の説明をします。
変数displayTextにtexts配列のtextNumber番目の文字列のtextCharNumber番目の文字を追加するというプログラムです。if (textCharNumber != texts[textNumber].Length) { textCharNumber = textCharNumber + 1; }このif文の意味は、もしtextCharNumberがtexts配列のtextNumber番目の一つ前の数じゃなければ、textCharNumberを1ずつ増やすというプログラムです。
このif文のあとにelse { displayText = ""; textCharNumber = 0; }を追加すると、もしtextCharNumberがtexts配列のtextNumber番目の一つ前の数のときに、displayTextを""にしたり、textCharNumberを0に戻したりするというプログラムになります。
このプログラムのおかげでtextCharNumberの数が文字列の数を超えた時バグらなくなります。③今までのプログラムの統合
一文字ずつ表示させて、クリックしたら次のセリフに移行するプログラム(1/1)
今までのプログラムを整理すると、
- displayTextにtexts配列のtextNumber番目の文字列のtextCharNumeber番目の文字を最後の文字まで追加していく。
- 最後の文字になった時に、追加する文字を最初にする。displayTextを " " に戻す。
- クリックされたら、次のtexts配列を次の文字列にする。
という単純なプログラムです。
これの2と3を混ぜるだけでRPGチックになります。TextDisplay.csusing System.Collections; using System.Collections.Generic; using UnityEngine; using UnityEngine.UI; public class TextDisplay : MonoBehaviour { public string[] texts; int textNumber; string displayText; int textCharNumber; void Start() { } void Update() { if (textCharNumber != texts[textNumber].Length) { displayText = displayText + texts[textNumber][textCharNumber]; textCharNumber = textCharNumber + 1; } else { if (textNumber != texts.Length - 1) { if (Input.GetMouseButtonDown(0))//移動 {//移動 displayText = "";//移動 textCharNumber = 0;//移動 textNumber = textNumber + 1;//移動 }//移動 } } this.GetComponent<Text>().text = displayText; } }うまくいきましたか?
Ex
文字表記をゆっくりに(1/2)
文字表記をゆっくりにしたかったらこのようにすると文字のスピードが遅くなります。
TextDisplay.csusing System.Collections; using System.Collections.Generic; using UnityEngine; using UnityEngine.UI; public class TextDisplay : MonoBehaviour { public string[] texts; int textNumber; string displayText; int textCharNumber; int displayTextSpeed;//追加 bool click;//追加 void Start() { } void Update() { displayTextSpeed++; if (displayTextSpeed % 5 == 0)//追加 {//追加 if (textCharNumber != texts[textNumber].Length) { displayText = displayText + texts[textNumber][textCharNumber]; textCharNumber = textCharNumber + 1; } else { if (textNumber != texts.Length - 1) { if (click==true) { displayText = ""; textCharNumber = 0; textNumber = textNumber + 1; } } } this.GetComponent<Text>().text = displayText; click = false;//追加 }//追加 if (Input.GetMouseButton(0))//追加 {//追加 click = true;//追加 }//追加 } }最後のセリフでクリックしたら消したい(2/2)
TextDisplay.csusing System.Collections; using System.Collections.Generic; using UnityEngine; using UnityEngine.UI; public class TextDisplay : MonoBehaviour { public string[] texts; int textNumber; string displayText; int textCharNumber; int displayTextSpeed; bool click; bool textStop;//追加 void Start() { } void Update() { if (textStop == false)//追加 {//追加 displayTextSpeed++; if (displayTextSpeed % 5 == 0) { if (textCharNumber != texts[textNumber].Length) { displayText = displayText + texts[textNumber][textCharNumber]; textCharNumber = textCharNumber + 1; } else { if (textNumber != texts.Length - 1) { if (click == true) { displayText = ""; textCharNumber = 0; textNumber = textNumber + 1; } } else//追加 {//追加 if (click == true)//追加 {//追加 displayText = "";//追加 textCharNumber = 0;//追加 textStop = true;//追加 }//追加 }//追加 } this.GetComponent<Text>().text = displayText; click = false; } if (Input.GetMouseButton(0)) { click = true; } }//追加 } }まず、textStopがfalseの時だけこのプログラムが動くようにプログラミングします。そして
もし最後のセリフの文字列になった時にクリックしたら、表示を " " にしてtextStopをtrueにすることで全てのプログラムを止められるようにします。
そうするとメッセージが止まったようになります。最後に全体のプログラム
最後に全ての行に意味をコメントアウトで書いときます
TextDisplay.csusing System.Collections; using System.Collections.Generic; using UnityEngine; using UnityEngine.UI; public class TextDisplay : MonoBehaviour { public string[] texts;//Unity上で入力するstringの配列 int textNumber;//何番目のtexts[]を表示させるか string displayText;//表示させるstring int textCharNumber;//何文字目をdisplayTextに追加するか int displayTextSpeed; //全体のフレームレートを落とす変数 bool click;//クリック判定 bool textStop; //テキスト表示を始めるか void Start() { } void Update() { if (textStop == false) //テキストを表示させるif文 { displayTextSpeed++; if (displayTextSpeed % 5 == 0)//5回に一回プログラムを実行するif文 { if (textCharNumber != texts[textNumber].Length)//もしtext[textNumber]の文字列の文字が最後の文字じゃなければ { displayText = displayText + texts[textNumber][textCharNumber];//displayTextに文字を追加していく textCharNumber = textCharNumber + 1;//次の文字にする } else//もしtext[textNumber]の文字列の文字が最後の文字だったら { if (textNumber != texts.Length - 1)//もしtexts[]が最後のセリフじゃないときは { if (click == true)//クリックされた判定 { displayText = "";//表示させる文字列を消す textCharNumber = 0;//文字の番号を最初にする textNumber = textNumber + 1;//次のセリフにする } } else //もしtexts[]が最後のセリフになったら { if (click == true) //クリックされた判定 { displayText = ""; //表示させる文字列も消す textCharNumber = 0; //文字の番号を最初にする textStop = true; //セリフ表示を止める } } } this.GetComponent<Text>().text = displayText;//画面上にdisplayTextを表示 click = false;//クリックされた判定を解除 } if (Input.GetMouseButton(0))//マウスをクリックしたら { click = true; //クリックされた判定にする } } } }あとは各々フォントなどをアレンジしてお好みのテキストボックスを作ってみてね!
- 投稿日:2020-02-08T18:25:23+09:00
【Unity】LESSON01.セリフ表示をRPGチックに【★★★✩✩】
入力した文字列をRPGのセリフ表示っぽくしよう
「UnderTale」や「ゼルダの伝説」のセリフって文字が一文字一文字テキストボックスに追加されて行きますよね?それを出来るだけ簡単に実装して行きます!
TextDisplay.csusing System.Collections; using System.Collections.Generic; using UnityEngine; using UnityEngine.UI; public class TextDisplay : MonoBehaviour { public string[] texts;//Unity上で入力するstringの配列 string displayText;//表示させるstring int textDisplayCount;//全体のフレームレートを落とす変数 int textNumber;//何番目のtexts[]を表示させるか int textCharNumber;//何文字目をdisplayTextに追加するか int displaySpeed=5;//文字の表示スピード調整(0が最小) bool click;//クリック判定 bool textStop;//テキスト表示を始めるか void Start() { } void Update() { if (textStop == false)//テキストを表示させるif文 { textDisplayCount++; if (textDisplayCount % displaySpeed == 0)//displaySpeedに一回プログラムを実行するif文 {// ↑の「 % 」はあまりって意味。 例)10➗3= 3あまり1 → if(10 % 3 == 1){} if (textCharNumber != texts[textNumber].Length)//もしtext[textNumber]の文字列の文字が最後の文字じゃなければ {// ↑の「 != 」は「じゃない」っていう意味 displayText = displayText + texts[textNumber][textCharNumber];//displayTextに文字を追加していく textCharNumber++;//次の文字にする click = false;//クリックされたを解除 } else//もしtext[textNumber]の文字列の文字が最後の文字だったら { if (click == true)//クリックされた判定 { if (textNumber == texts.Length-1)//もしtexts[]が最後のセリフになったら { textStop = true;//セリフ表示を止める textNumber = 0;//texts[]を最初に戻す textCharNumber = 0;//文字の番号を最初にする displayText = "";//表示させる文字列も消す } else {//もしtexts[]が最後のセリフじゃないときは textNumber++;//次のセリフにする textCharNumber = 0;//文字の番号を最初にする displayText = "";//表示させる文字列も消す click = false;//クリックされた判定を解除 } } } if (Input.GetMouseButton(0))//マウスをクリックしたら { click = true;//次のセリフ表示 } } } if(Input.GetKey(KeyCode.A)){// 例)もしAキーを押したら次のセリフにする textStop = false;//テキスト表示開始 tekito();//新しいテキストを挿入 } this.GetComponent<Text>().text = displayText;//画面上にdisplayTextを表示 } void tekito(){//新しい文字列の配列宣言 texts = new string[5];//何行の文字列配列にするか texts[0] = "zzzzz"; texts[1] = "yyyyyyyyyy"; texts[2] = "xxxxxxxxxx"; texts[3] = "wwwww"; texts[4] = "vvvvvvvvvvvvvv"; } }
- 投稿日:2020-02-08T17:09:17+09:00
An Introduction of a Microservices with ASP.net core 3x(Part-1)
This is an introduction about the Microservices architecture and we will discuss monolithic application/architecture and problems.
The goal is very clear & simple, to understand the Microservices Architecture and how to use it with the AWS component.
This is very important to understand that when it is good to use the microservices architecture or when it is not. Sometime it may be a backfire when it placed the wrong place. Microservices is not always a solution. So you have to think & identify, which architecture best fits your solution/application.
I am covering the below points in this article. I hope it will be helpful to you while developing a microservices application.
1・What is Monolithic applications?
2・Problems of Monolithic applications?
3・What is Microservices?
4・Benefits of Microservices over the Monolithic applications?
5・Architecture of Microservices with AWS(based on an application).
6・Team structure to develop the Microservices?
7・Evolution of a asp.net?
8・How you can implement it with asp.net core3x?Let's start.
1・What is Monolithic applications?
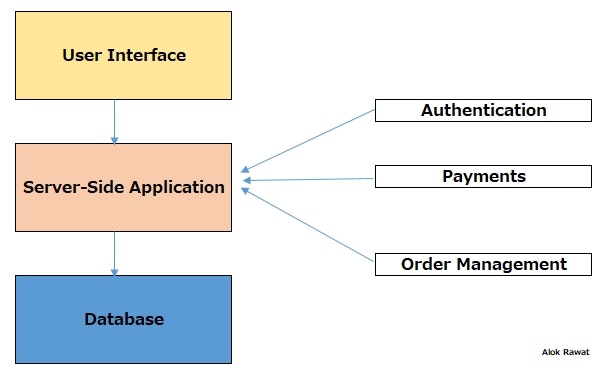
In software engineering, a monolithic application is designed without modularity.
Without modularity means, software/application is made of component or module that they can be easily replaced or that can be reused, but in a monolithic application, there is no modularity.
One application performs many tasks and includes multiple services.
A console application is a perfect example. All the logic/database and user interface within an application.
2・Problems of Monolithic applications?
1. Can turn to a big ball of mud quickly. No single developer knows the entire code.
2. Limited reuse.
3. Scaling can be a challenge and /or costly.
4. Continuous integration and development can become complex and time-consuming.
5. They are built with one framework or programming language.
6. It's hard for multiple teams to work on one code base(e.g. code conflicts).
7. Change in one part of the application requires full build, deployment, and test.3・What is Microservices?
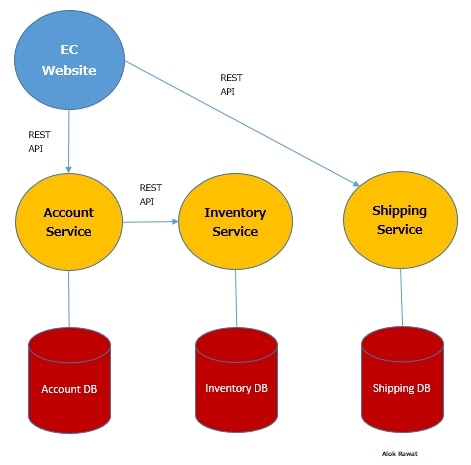
Microservices are an architectural style that develops a single application as a set of small services. Each service runs in its own process. The services communicate with clients, and often each other, using lightweight protocols, often over messaging or HTTP.Let's take an example of an e-shop.
4・Benefits of Microservices over the Monolithic applications?
There are many benefits to using microservices. Some of them are related to how they allow developers to write code.・Microservices are small applications that the development teams create independently. Since they communicate via messaging if at all, they’re not dependent on the same coding language. Developers can use the programming language that they’re most familiar with. This helps them come to work faster, with lower costs and fewer bugs.
・Since the teams are working on smaller applications and more focused problem domains, their projects tend to be more agile, too. They can iterate faster, address new features on a shorter schedule, and turn around bug fixes almost immediately. They often find more opportunities to reuse code, also.
・Microservices improve your architecture’s scalability, too.
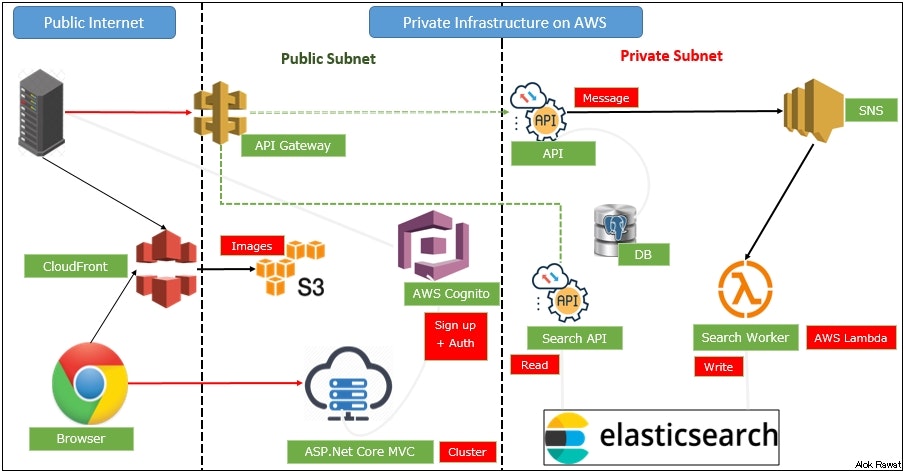
With monolithic systems, you usually end up “throwing more hardware” at the problem or purchasing expense and difficult-to-maintain enterprise software. With microservices, you can scale horizontally with standard solutions like load balancers and messaging.5・Architecture of Microservices with AWS.
Based on the attached architecture, we will develop an application in the next part.
The architecture divided into two parts.
1. Public Internet
2. Private Infrastructure on AWS(VPC)
this part also divided into two parts.
1. public subnet
2. private subnet
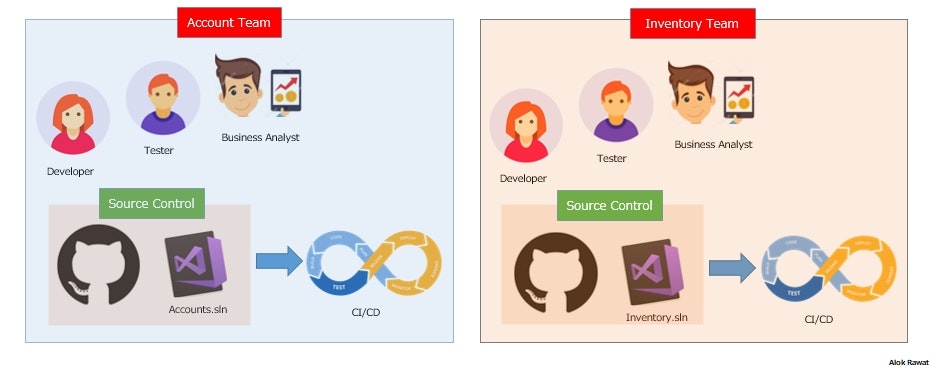
6・Team structure to develop the Microservices?
For Microservices development, it is better to create a vertical team.
Let say, Accounts Team developer completed his task then Inventory Team can assign some task to accounts team developer too. We can share the resources between the teams.And for the source control system,
should have own repo for a particular service. Do not add all services into one repo.
If the account team developer wants to help the inventory team, then he needs to take an own fork(a copy of the source code) from the git and need to submit the request to the inventory team and then someone from the inventory team will manage the request.
So that's how someone from the other team may help someone inside the other team and vice versa.
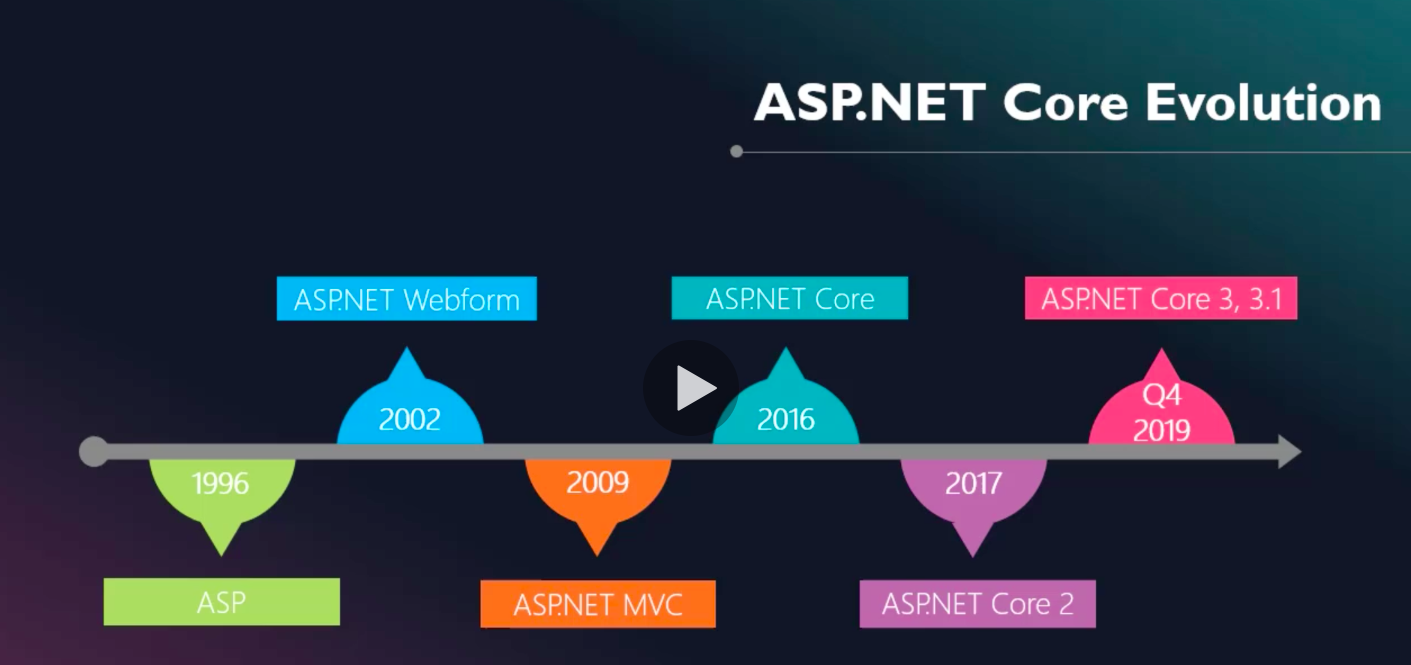
7・Evolution of a asp.net to asp.net core?
8・How you can implement it with asp.net core3x?
In the next part, we will go into the deep-diving(coding part).
till then stay tuned.If you find anything wrong then please let me correct.
Enjoy coding...
ref: https://stackify.com/what-are-microservices/
Thanks,
Alok Rawat
- 投稿日:2020-02-08T16:56:51+09:00
機械学習(AI)初学者のファーストステップ
機械学習(AI)初学者のファーストステップ
MicroSoft Azure Machine Learning を使ったGUIベースのAI作成します。
1.とりあえず環境を用意しよう!
2.とりあえず言われるままAIをつくってみよう!Azureの無料アカウントを作成
https://azure.microsoft.com/ja-jp/
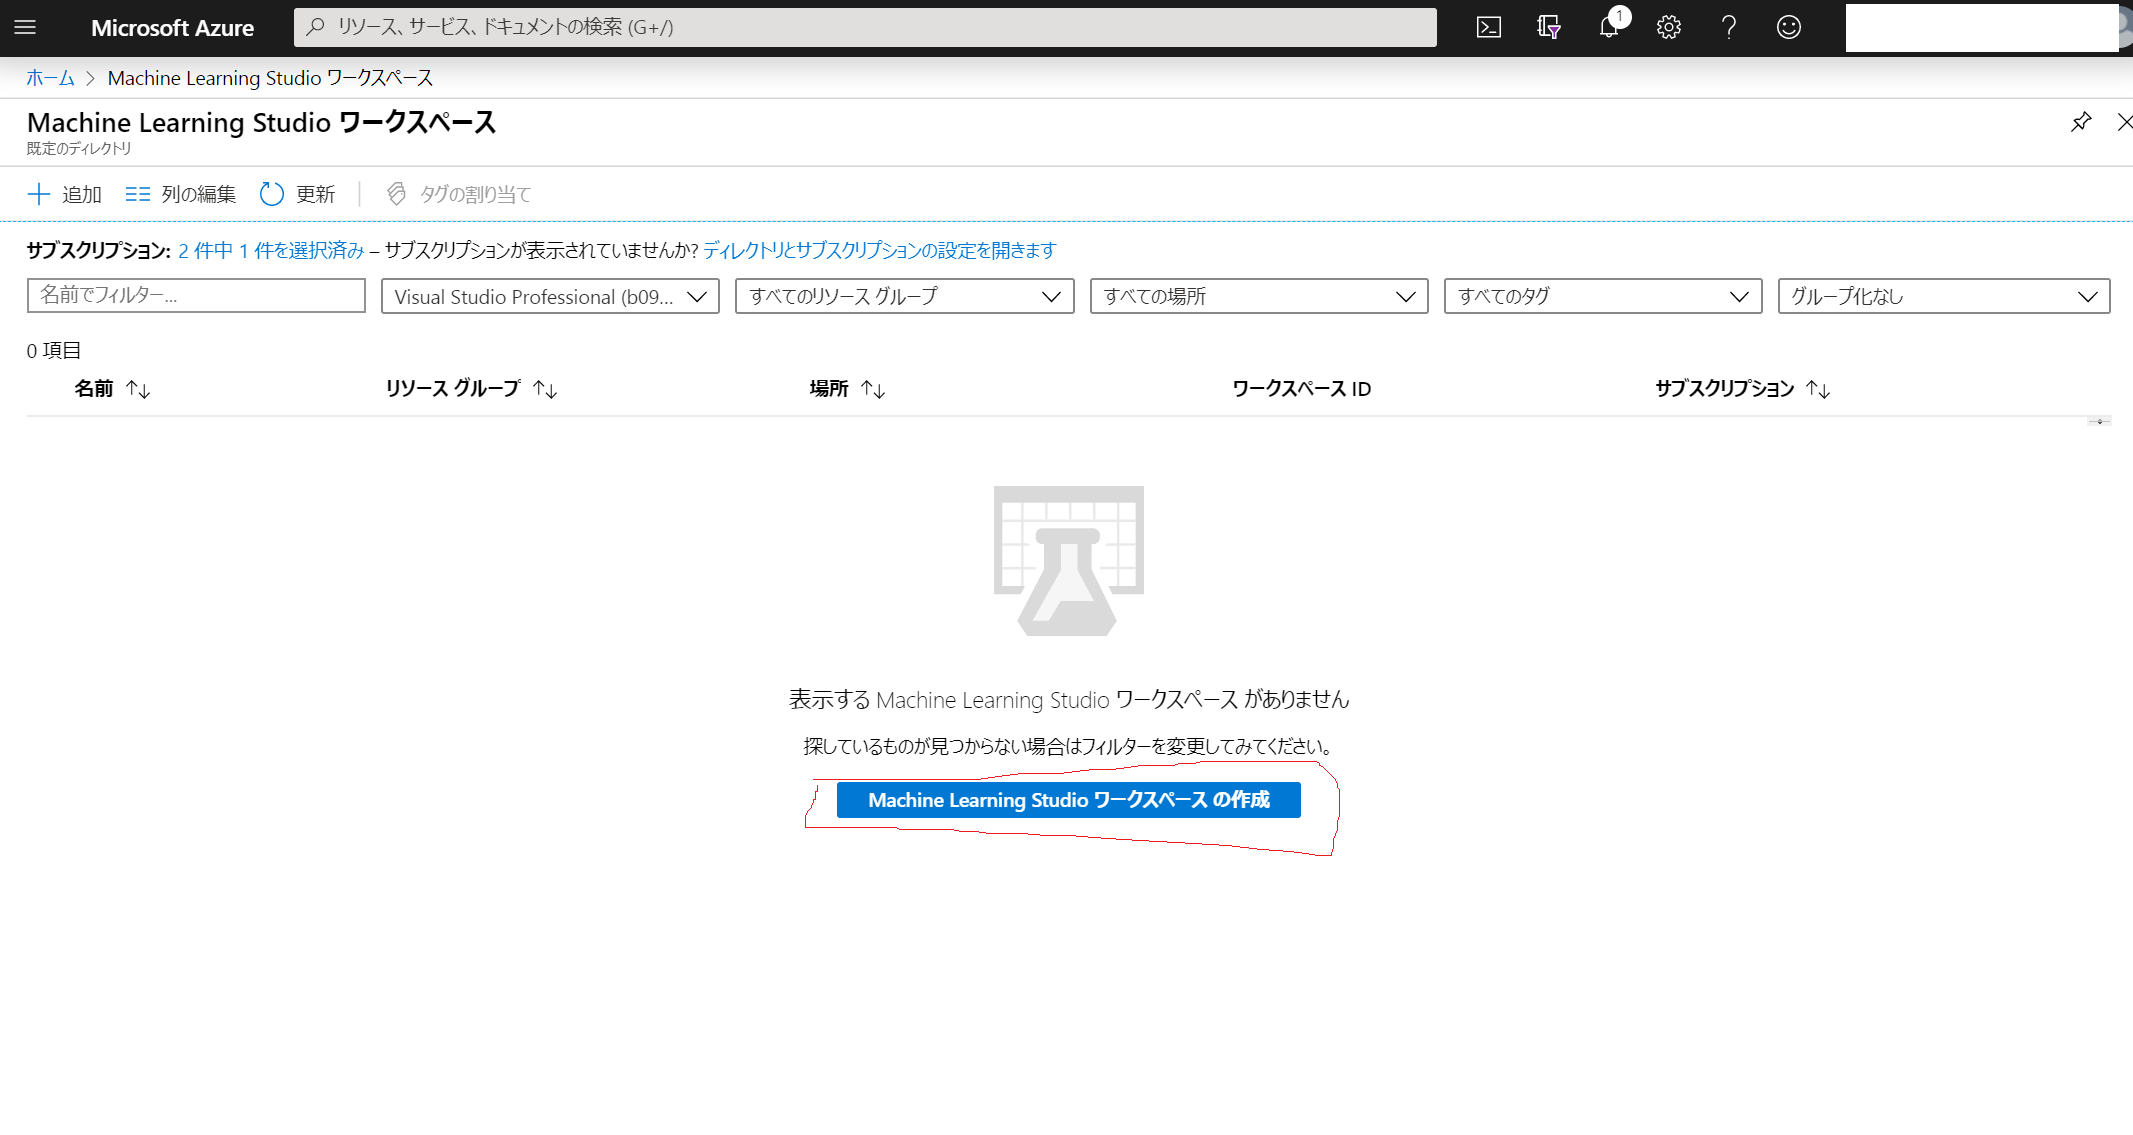
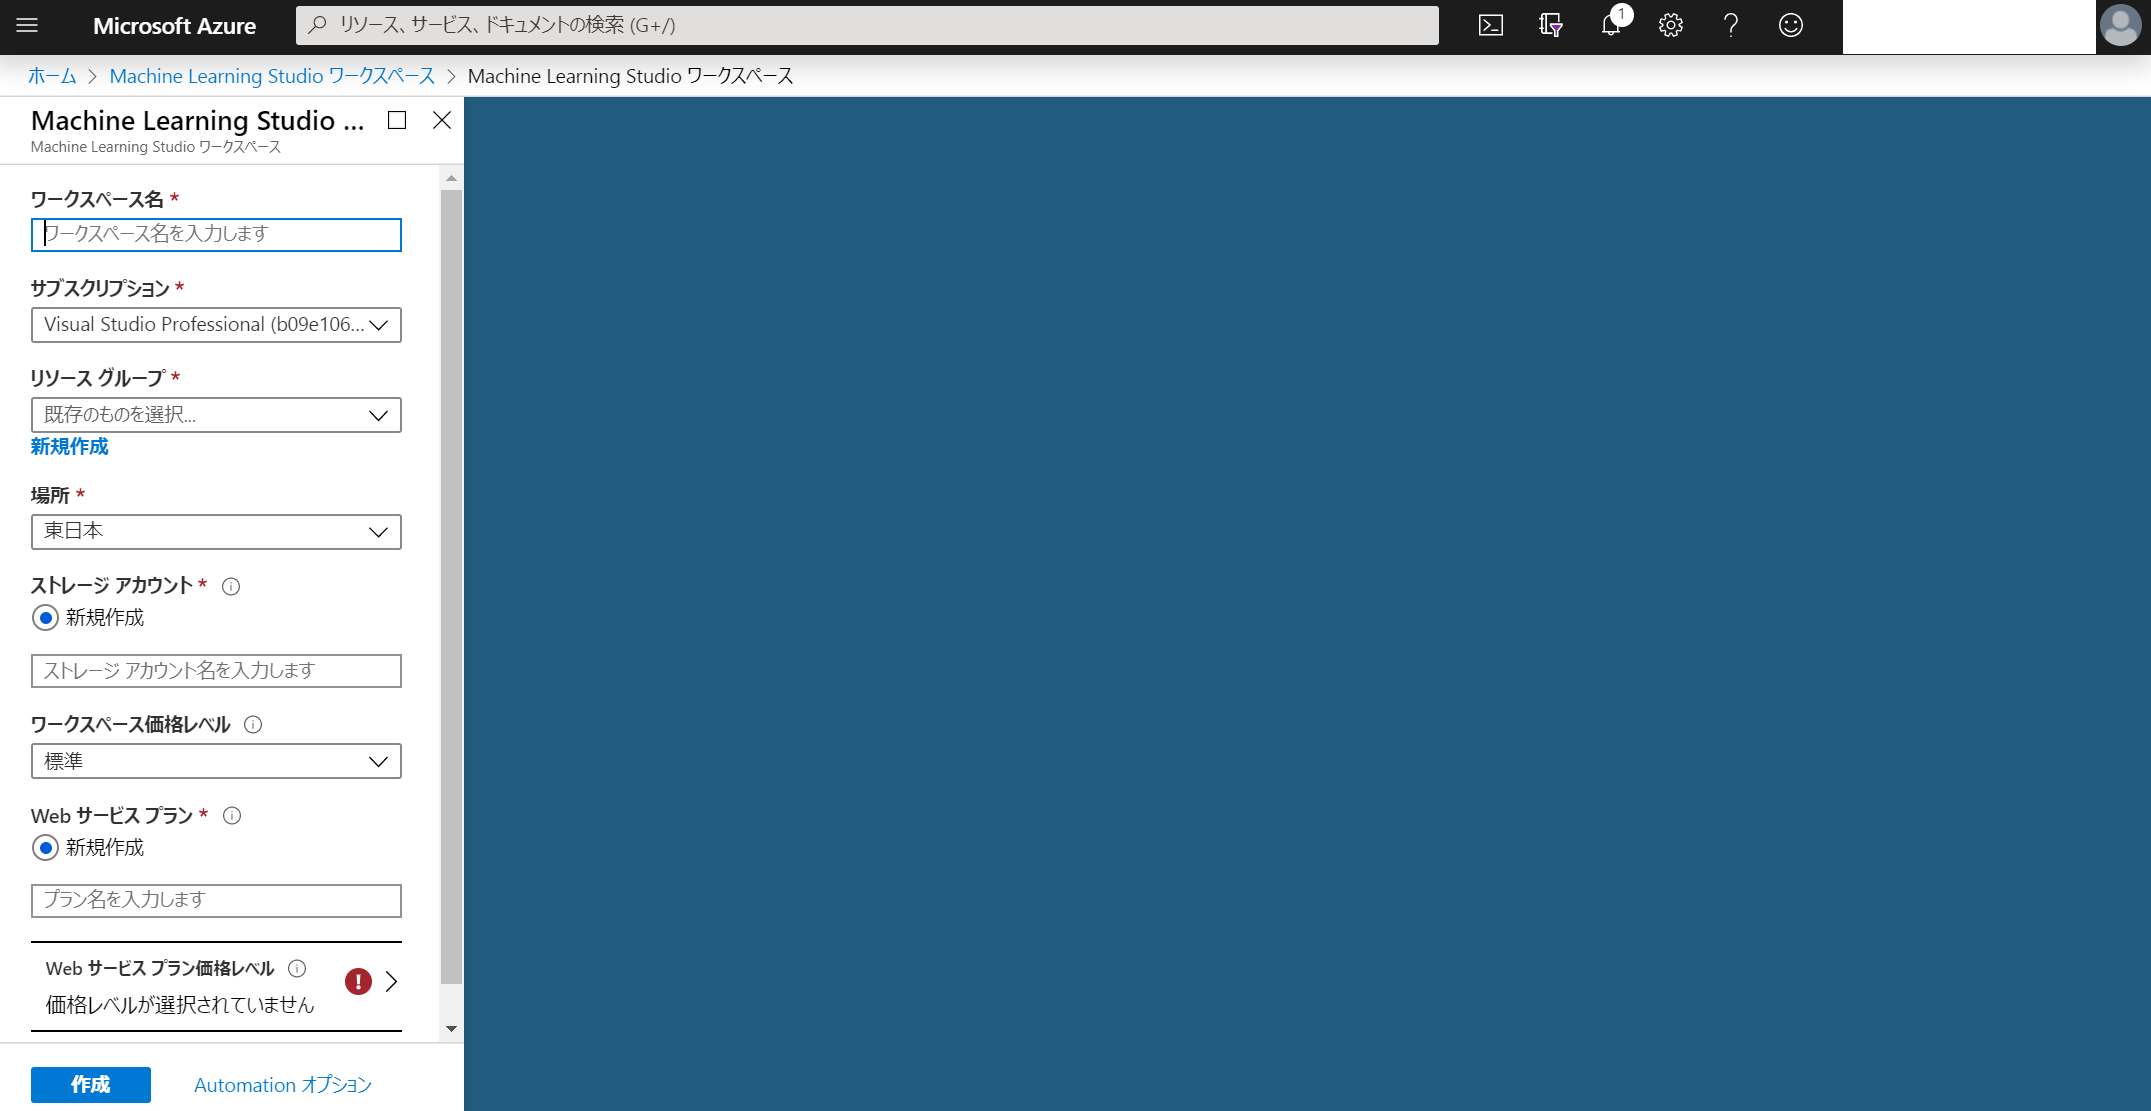
Azureにワークスペースを作成
※作成したワークスペースが気に入らなかったりして削除した場合はワークスペースだけ削除されるのでプランは前回と同じものを設定してください(無料プランは1個しか設定できない)(もしくはプランも消してください)
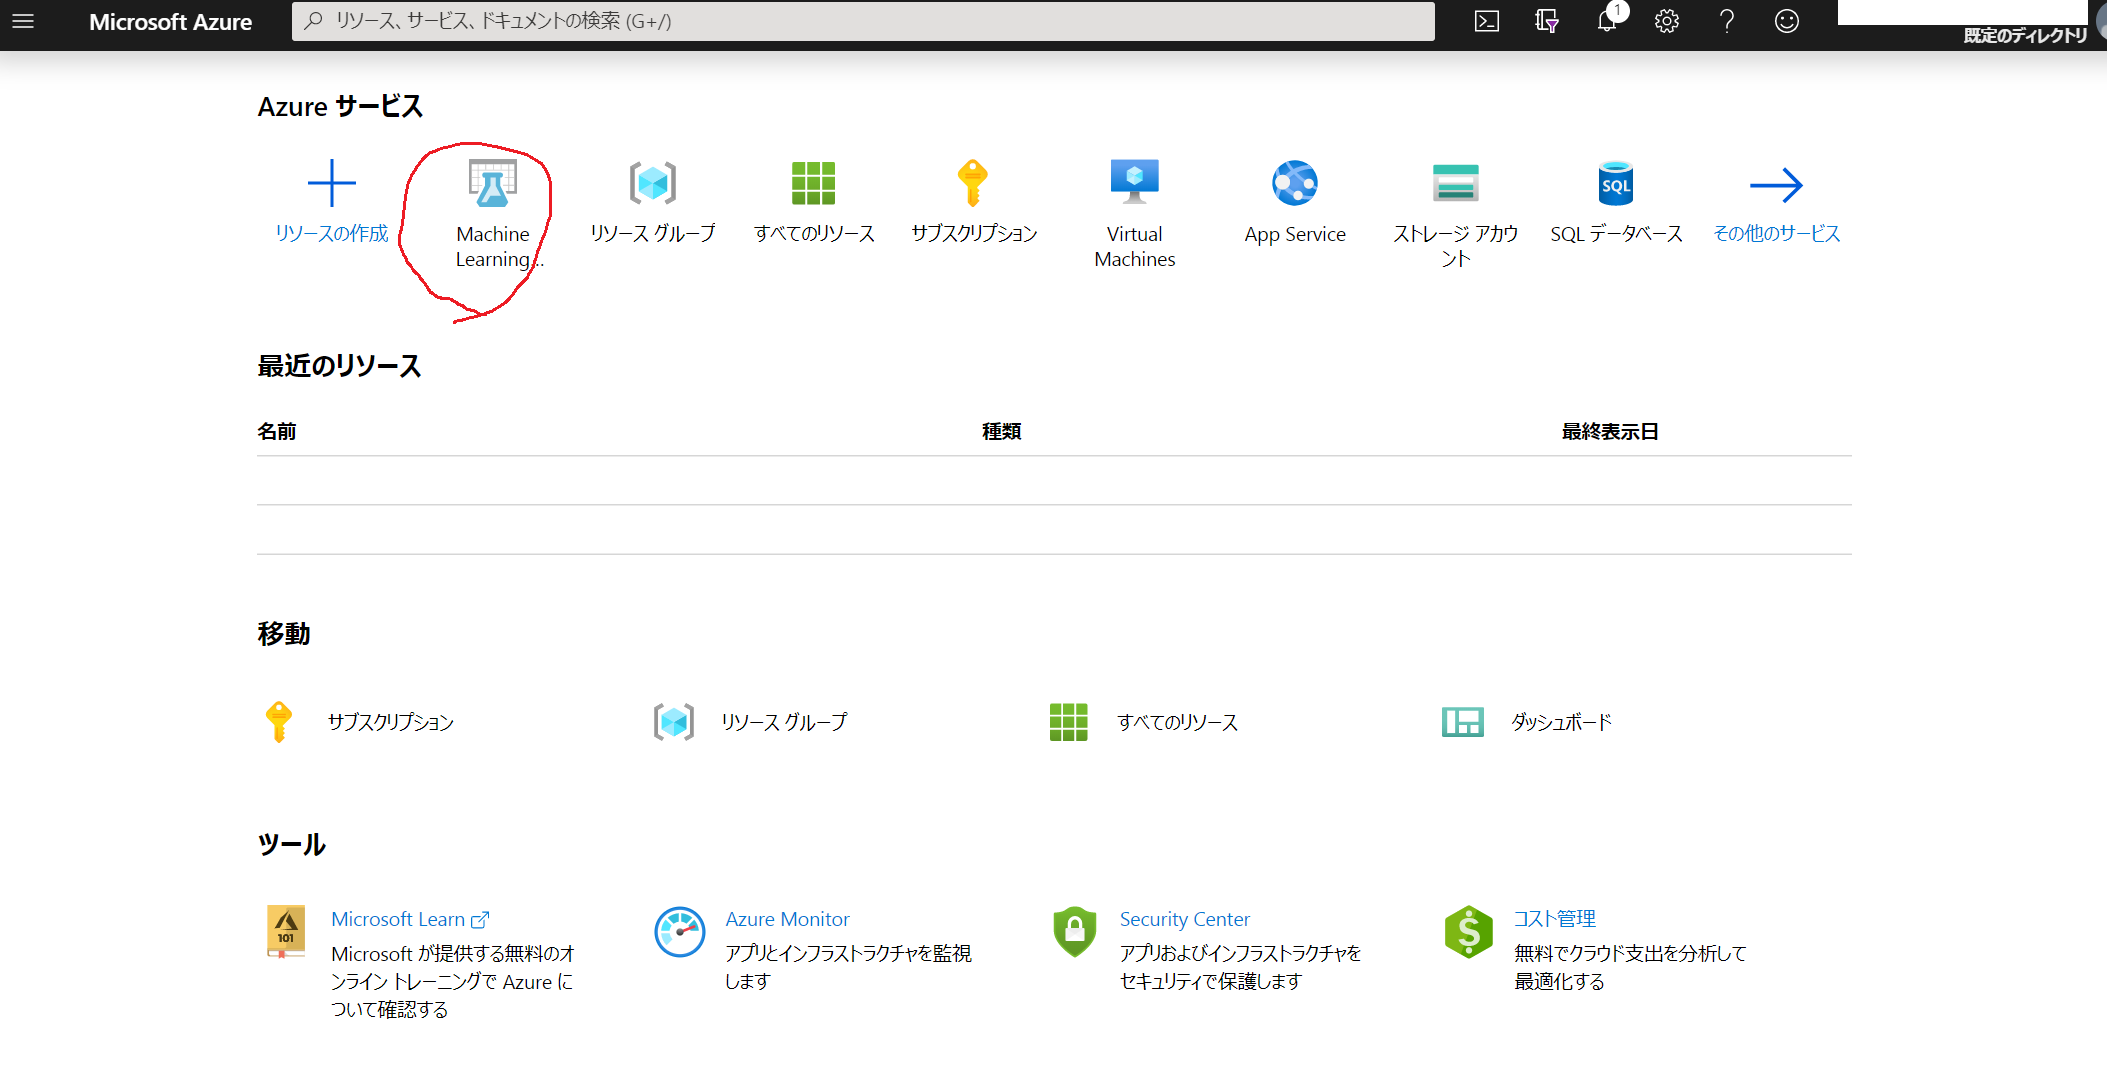
⇒(「リソースグループ」や「すべてのリソース」)で探すとよいです。Microsoft Azure Mechine Learningを起動する
Sign Inする(ワークスペース作成時にサインインしてるはずなので押せばログインできます。)試してみる
https://kinpatucom.tech/azure-ml-mnist/
ここが一番わかりやすかったので提示しておきます。


- 投稿日:2020-02-08T16:21:48+09:00
EntityFrameworkならプロジェクト作成後30秒でデータ表示ができるんだよ【C#】
事前準備
データベースの用意
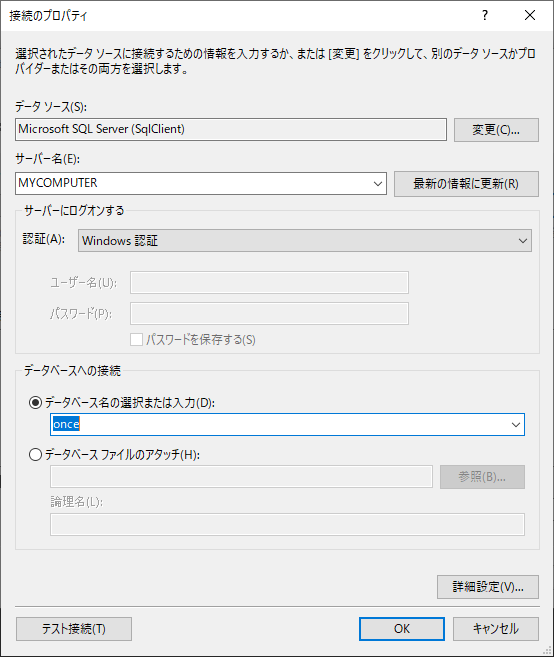
- SQLServerを使用します
サーバー名:MYCOMPUTER
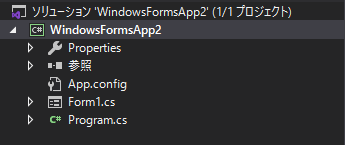
プロジェクトの作成
- WindowsFormアプリケーション
- VisualStudio2019Communitty
- .NetFramework4.7.2
本題
以下の順序で説明します。
- 1. NuGetでEntityFrameworkCoreを取得
- 2. EntityFrameworkCore付属のツールでDBモデルの自動生成
- 3. DB接続&データ取得及びデータ表示
最終結果
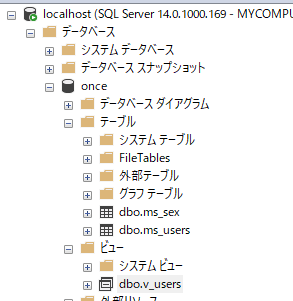
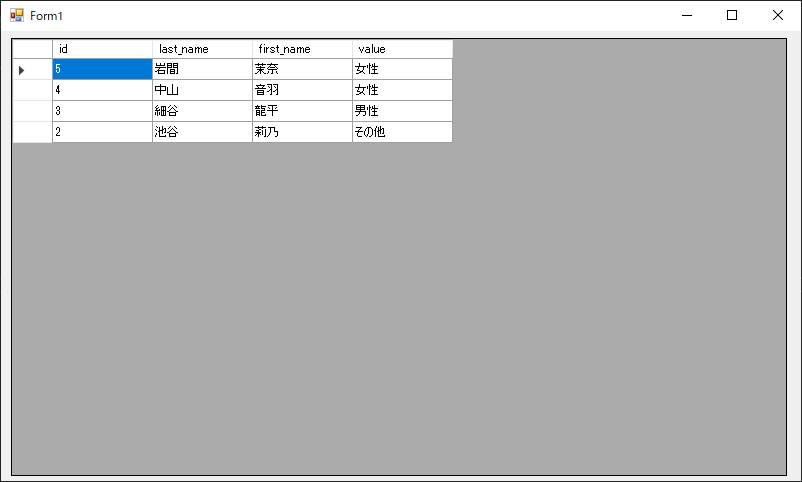
VIEW「v_users」のデータを全件取得・表示する。
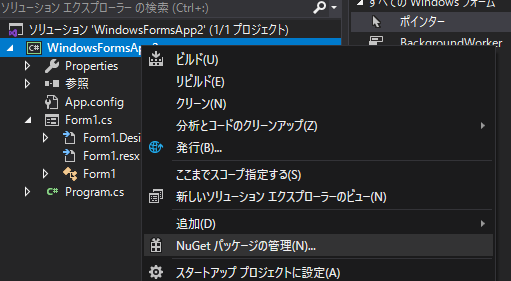
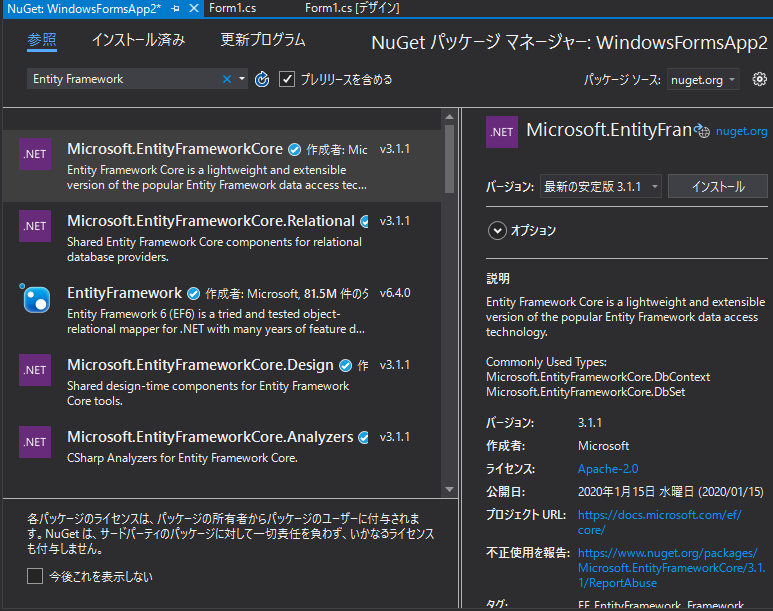
NuGetで「EntityFrameworkCore」をインストール(10秒)
「NuGetパッケージの管理」の「参照」タブに「EntityFrameworkCore」と入力して「インストール」を押下。
※「出力」ウィンドウのログがおとなしくなるまで待機
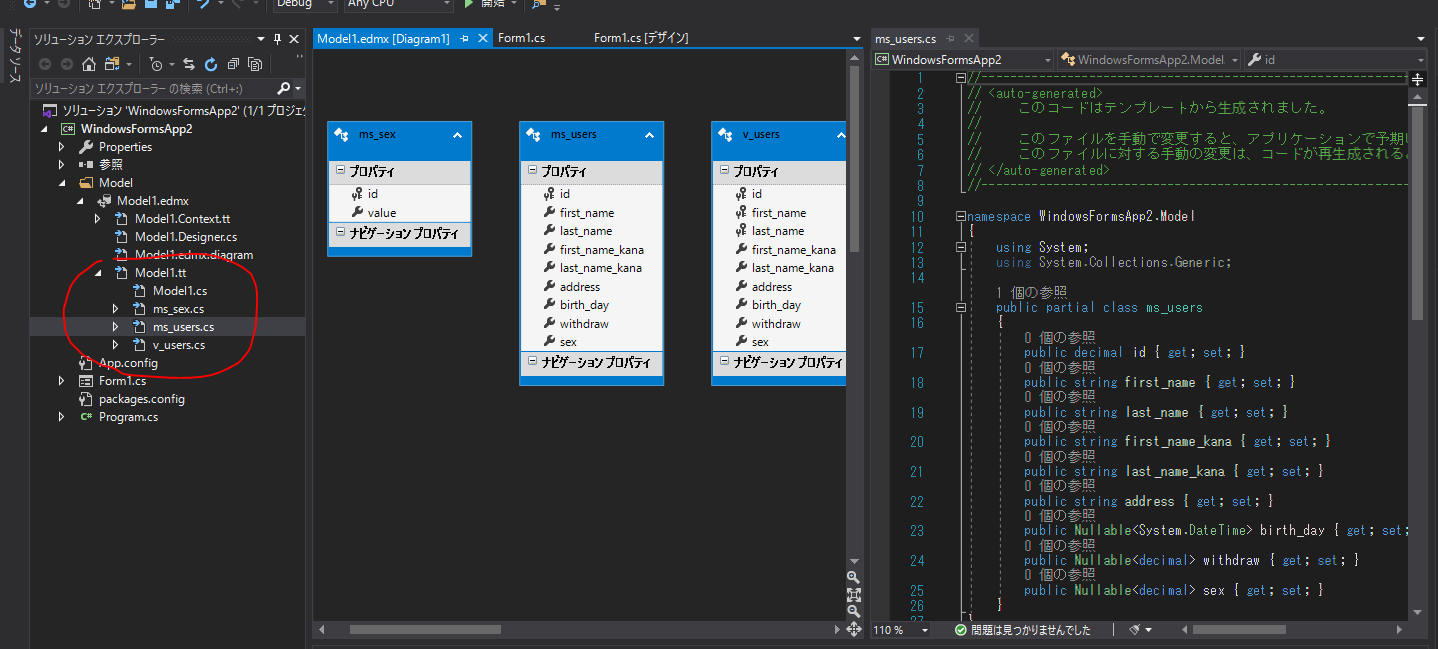
DBモデル(Entity?)の自動生成(10秒)
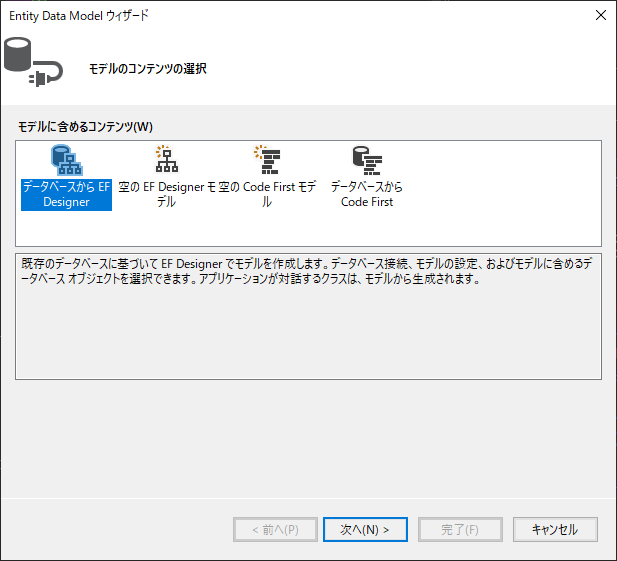
適当なフォルダを作成して右クリック→「新しい項目」「データ」「ADO.NET Entity DataModel」を選択。
データベースからEF Designerを選択
サーバ名にSQLServer名を入力→データベースを指定。
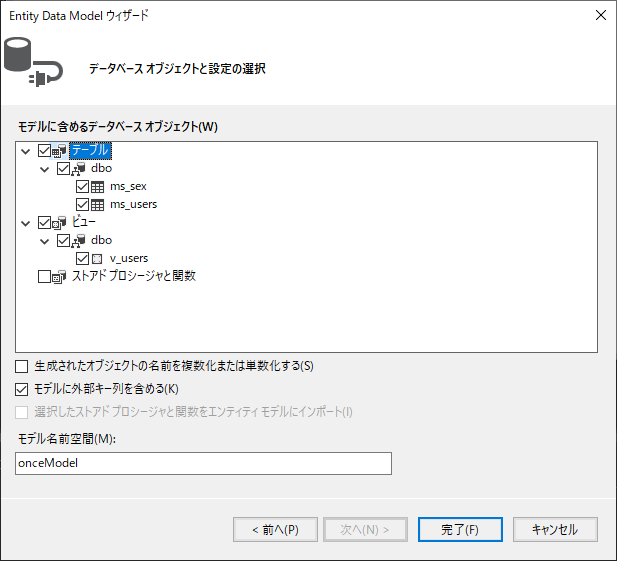
全テーブル&全ビューを指定
各テーブルのモデルが自動生成されます。
フォームのDBDataGridに表示(10秒)
Form1のLoadイベントにリスト取得用コードを記載
public partial class Form1 : Form
{
    public Form1()
    {
        InitializeComponent();
    }

    private void Form1_Load(object sender, EventArgs e)
    {
        using(var db = new onceEntities())
        {
            // VIEW(v_users)全件をリスト型でDataSourceに設定
            dataGridView1.DataSource = db.v_users.ToList();
        }
    }
}
実行。ね?簡単でしょ?
以上です
ちなみに・・・
Entityのプロパティ名であれこれできます。
private void Form1_Load(object sender, EventArgs e)
{
    using(var db = new onceEntities())
    {
        // VIEW(v_users)全件をリスト型でDataSourceに設定
        dataGridView1.DataSource = db.v_users
                                        .Where(s => 1 < s.id )  // IDが1より大きい
                                        .Select(s => new { s.id
                                                            , s.last_name
                                                            , s.first_name
                                                            , s.value })// 射影(?)
                                        .OrderByDescending(s => s.id)   // IDの降順
                                        .ToList();
    }
}
たった数行!直観的!
他にも同様のコード量でInsert, Update, Deleteできます。
使用しました
- 疑似個人情報ジェネレーター
https://hogehoge.tk/personal/generator/おわりに
30秒でできたよね。
EntityFrameworkをもっと業務で利用していきたいという思いで書きました。
読んでいただきありがとうございました。※今回、EntityFrameworkのデータベースファーストという方式で記事を書きました。
以上


- 投稿日:2020-02-08T16:02:13+09:00
【Unity(C#)】タップした画面の色を取得する方法(UniRx使用)
やりたいこと
やえがしさんのTwitterで
画面に映った色を取得してるのを見かけたので、
どうやればいいか調べてみました。
(ちょっとご本人にヒントももらいました。ありがとうございます)空間に落ちている色をパレットみたいに使ってコーディネートできたらいいなーと思ったので作ってみた!
— やえがし (@Gassy_kk) October 27, 2019
#withARハッカソン #空間 pic.twitter.com/tOluFOVHfqデモ
こんな感じで触った色が球体に反映されています。
今回はスマホの外部カメラの映像ではありませんが、
ARCoreなどのカメラをシーンに置けば
スマホの画面の映像から色を抽出できます。コード
もうほぼ答えですが、下記リンクを参考にしました。
【参考リンク】:Unityで、クリックしたピクセルの色を取得したい
リンク先にもありますが、描画処理が終わってからピクセルを取得する必要があるので、
WaitForEndOfFrameでそのフレームの最後に取得するようにしてます。適当なオブジェクトにアタッチusing UnityEngine; using UniRx; using UniRx.Triggers; using CustomInput; //自分で定義したやつ using System.Collections; public class GetPixelColor : MonoBehaviour { Coroutine runCoroutine; Texture2D screenTex; readonly public ColorReactiveProperty touchPosColorProperty = new ColorReactiveProperty(); void Start() { screenTex = new Texture2D(1,1, TextureFormat.RGB24, false); this.UpdateAsObservable() .Where(_ => SimpleInput.GetTouchDown()) .Subscribe(_ => { if(runCoroutine == null) { runCoroutine = StartCoroutine(GetColorTouchPos()); } }) .AddTo(this); } IEnumerator GetColorTouchPos() { yield return new WaitForEndOfFrame(); Vector2 touchPos = SimpleInput.GetTouchDownPos(); screenTex.ReadPixels(new Rect(touchPos.x, touchPos.y,1,1), 0, 0); touchPosColorProperty .Value= screenTex.GetPixel(0,0); Debug.Log(touchPosColorProperty.Value); runCoroutine = null; } }色が変化したことを検知するために
ReactivePropertyを利用しています。検知の監視側はこんな感じです。
色を変えたいオブジェクト(MeshRenderer有り)にアタッチusing UnityEngine; using UniRx; public class ChangeColor : MonoBehaviour { [SerializeField] GetPixelColor getPixelColor; MeshRenderer thisObjMeshRenderer; void Start() { thisObjMeshRenderer = this.gameObject.GetComponent<MeshRenderer>(); getPixelColor.touchPosColorProperty .SkipLatestValueOnSubscribe() .Subscribe(_ => { thisObjMeshRenderer.material.color = getPixelColor.touchPosColorProperty.Value; }) .AddTo(this); } }SkipLatestValueOnSubscribe
SkipLatestValueOnSubscribeは発行された最初の値を無視できるやつです。
ObserveEveryValueChangedやReactivePropertyを利用した際、
Subscribe(実行したい関数を登録)した時点で初期値が発行されてしまうようで、
始まっていきなりSubscribe内の登録した処理が走ってしまっていました。例として下記のようなコードで
ObserveEveryValueChangedで
Color型の変数を監視した場合、
Start関数内で初期値が発行されてしまい、
まだ色が変化してないにもかかわらず"Color Change"が表示されました。例)touchPosColorはただのColor型GetColor .ObserveEveryValueChanged(_ => _.touchPosColor) .Subscribe(_ => { Debug.Log("Color Change"); }) .AddTo(this);
SkipLatestValueOnSubscribeは
ReactivePropertyのオペレータとして用意されているので、
ObserveEveryValueChangedではなく、
Color型の変数をReactivePropertyに変えて利用しました。【参考リンク】:Unityにおけるコルーチンの省メモリと高速化について、或いはUniRx 5.3.0でのその反映
CustomInput
今回はInputがタッチなのでオレオレInputを定義してます。
タッチ系は毎回書くのが面倒なので、一回作って使い回すか
EventSystemを利用するのがセオリーっぽいです。
(もっと楽なのあったら教えてください)using UnityEngine; namespace CustomInput { /// <summary> /// Custom InputKey /// </summary> public static class SimpleInput { /// <summary> /// Being touched return true /// </summary> public static bool GetTouch() { if (0 < Input.touchCount) { Touch touch = Input.GetTouch(0); if (touch.phase == TouchPhase.Moved && touch.phase == TouchPhase.Stationary) { return true; } } return false; } /// <summary> /// Touching return true only 1 frame /// </summary> public static bool GetTouchDown() { if (0 < Input.touchCount) { Touch touch = Input.GetTouch(0); if (touch.phase == TouchPhase.Began) { return true; } } return false; } /// <summary> /// Releasing return true only 1 frame /// </summary> public static bool GetTouchUp() { if (0 < Input.touchCount) { Touch touch = Input.GetTouch(0); if (touch.phase == TouchPhase.Ended) { return true; } } return false; } /// <summary> /// Return touching position only 1 frame. Not being touched return Vector.zero /// </summary> public static Vector2 GetTouchDownPos() { if (0 < Input.touchCount) { Touch touch = Input.GetTouch(0); if (touch.phase == TouchPhase.Began) { return touch.position; } } return Vector3.zero; } } }100
やっと100記事書きました。
中身が微妙なので「だからなんやねん」って感じですが、
継続力だけは自分で自分を評価します。逆に言うと私のレベルで継続できなくなったらオワリなので
これからもノンストップ牛歩で頑張ります。
- 投稿日:2020-02-08T14:44:01+09:00
WPFでDataGridにデータ(DataTable,DataView)を表示して絞り込み表示したり数値順ソートしたりその他色々
WPFでリスト的なデータを表示するときに
DataGridを使うことがあると思いますが、その使い方について調べたことのメモです。開発環境
- Windows 10
- Visual Studio 2019
- Prism 7.2
DataGridにデータを表示する
データを
ItemsSourceプロパティにバインドします。
データとして今回はDataTableを使います。そして後々フィルタリングをしたいのでDataTableからDataViewをつくってバインドします。
列ヘッダの名前とかを指定したいので、AutoGenerateColumns=FalseにしてXAMLに列を定義します。ExampleViewModel.csprivate DataTable _data; public DataView Data { get; private set; } ... _data = new DataTable(); _data.Columns.Add("Name"); _data.Columns.Add("Price"); _data.Rows.Add("商品A", 500); _data.Rows.Add("商品B", 1200); _data.Rows.Add("商品C", 800); _data.Rows.Add("商品D", 2000); Data = new DataView(_data);ExampleView.xaml<DataGrid ItemsSource="{Binding Data}" AutoGenerateColumns="False"> <DataGrid.Columns> <DataGridTextColumn Header="商品名" Binding="{Binding Name}" /> <DataGridTextColumn Header="金額" Binding="{Binding Price}" /> </DataGrid.Columns> </DataGrid>絞り込み表示
DataView.RowFilterプロパティに条件式を設定します。ExampleViewModel.csData.RowFilter = "Price > 1000";列カラムクリック時のソートを数値順にしたい
列カラムをクリックしてソートしたとき、そのままでは辞書順のソートになってしまいます。数値でソートしたい場合は
DataColumnCollection.Addに型を指定します。ExampleViewModel.cs_data.Columns.Add("Name"); _data.Columns.Add("Price", typeof(int));列カラムクリック時のソートを〇〇にしたい
列カラムをクリックしたときにどうソートするか自分でかくことができます。調べたんですけど結局使いませんでした(私のアプリの場合は上の数値順にする方法で十分だった)。ですがせっかくなのでメモ程度に書き残しておきます。
流れとしては
- ビューでカラムクリック時に発生する Sorting イベントを補足し、ビューモデルにコマンドを送る
- EventArgs にクリックされた列ヘッダの文字列が入っているので、それに一致する列でデータを並び替える (
DataView.Sort)DataTableを作り直す (DataView.ToTable)- ビューで、
DataGridのソートしたカラムのSortDirectionを設定する(ソートマークを付ける)という感じだと思います。
参考
- https://oita.oika.me/2014/09/15/sorts-datagrid-on-mvvm/
- https://araramistudio.jimdo.com/2016/10/13/wpf%E3%81%AEdatagrid%E3%81%A7%E3%82%BD%E3%83%BC%E3%83%88%E3%82%92%E3%82%AB%E3%82%B9%E3%82%BF%E3%83%9E%E3%82%A4%E3%82%BA/
- http://final.hateblo.jp/entry/2015/09/22/115137
数値列で空白セルを表示したい
データに
DBNullを入れます。ExampleViewModel.cs_data.Rows.Add("商品A", 500); _data.Rows.Add("商品B", 1200); _data.Rows.Add("商品C", DBNull.Value); _data.Rows.Add("商品D", 2000);なお
BindingのTargetNullValueプロパティを設定することで、DBNullなセルに任意の文字列を表示することもできます。ExampleView.xaml<DataGridTextColumn Header="金額" Binding="{Binding Price, TargetNullValue='NULLだよ'}" />サンプルのソースコード
プロジェクト一式を GitHub に置いときます。
- 投稿日:2020-02-08T01:49:56+09:00
C#で日時と日時の期間を保持して比較したりするクラス
はじめに
開始日時~終了日時を保持しておこうとするとわりと面倒です。
期間を比較したりするとさらに面倒です。取り回しやすいように
DateTimePeriodクラスを作成したのでメモ代わりに残します。ついでに比較用の時刻の切り捨ても実装しています。
(秒単位で切り捨てて比較したい場合があった)使い方static void Main(string[] args) { DateTime now = DateTime.Now; DateTime after = now.AddMinutes(19); DateTime target = new DateTime(2020, 2, 20); // 期間を作成 DateTimePeriod period = new DateTimePeriod(now, after, TruncateLevel.Minute); DateTimePeriod period2 = new DateTimePeriod(after.AddHours(-10), after.AddHours(1), TruncateLevel.Minute); // periodの期間内にtargetの日付は含まれるか bool contains = period.Contains(target); // period1とperiod2に交差or内包する期間はあるか bool intersects = period.Intersects(period2); // 期間をそれぞれの単位で取得 double hours = period.Hours; // 時間 double minutes = period.Minutes; // 分 }DateTimePeriod.csusing System; using System.Diagnostics; namespace NameSpace { /// <summary> /// 期間を保持するクラス /// </summary> [DebuggerDisplay("{TruncatedSince.ToString(\"MM/dd HH:mm:ss\")} ~ {TruncatedUntil.ToString(\"MM/dd HH:mm:ss\")} [ {Level} ]")] public class DateTimePeriod { /// <summary>開始日時</summary> public DateTime Since { get; } /// <summary>終了日時</summary> public DateTime Until { get; } /// <summary>切り捨て粒度</summary> public TruncateLevel Level { get; } /// <summary>開始日時(切り捨て)</summary> public DateTime TruncatedSince { get => Truncate(Since, Level); } /// <summary>終了日時(切り捨て)</summary> public DateTime TruncatedUntil { get => Truncate(Until, Level); } /// <summary>期間(年)</summary> public double Years { get => (TruncatedUntil - TruncatedSince).TotalDays / 365; } /// <summary>期間(月)</summary> public double Monthes { get => (TruncatedUntil - TruncatedSince).TotalDays / 12; } /// <summary>期間(日)</summary> public double Days { get => (TruncatedUntil - TruncatedSince).TotalDays; } /// <summary>期間(時間)</summary> public double Hours { get => (TruncatedUntil - TruncatedSince).TotalHours; } /// <summary>期間(分)</summary> public double Minutes { get => (TruncatedUntil - TruncatedSince).TotalMinutes; } /// <summary>期間(秒)</summary> public double Seconds { get => (TruncatedUntil - TruncatedSince).TotalSeconds; } /// <summary>期間(ミリ秒)</summary> public double MilliSeconds { get => (TruncatedUntil - TruncatedSince).TotalMilliseconds; } /// <summary> /// コンストラクタ /// </summary> /// <param name="sinceDateTime">開始日時</param> /// <param name="untilDateTime">終了日時</param> /// <param name="truncateLevel">切り捨て粒度</param> public DateTimePeriod(DateTime sinceDateTime, DateTime untilDateTime, TruncateLevel truncateLevel = TruncateLevel.Full) { if (sinceDateTime > untilDateTime) throw new ArgumentException("無効な期間です"); Since = sinceDateTime; Until = untilDateTime; Level = truncateLevel; } /// <summary> /// 対象日時が期間に含まれているかを判定 /// </summary> /// <param name="targetDateTime">比較対象の日時</param> /// <param name="allowSameTime">同時刻でもtrueとするか</param> /// <returns></returns> public bool Contains(DateTime targetDateTime, bool allowSameTime = true) { if (targetDateTime == default || targetDateTime == DateTime.MinValue || targetDateTime == DateTime.MaxValue) return false; bool result = false; // 期間と比較対象日時を同じ粒度で切り捨ててから比較 DateTime truncatedTarget = Truncate(targetDateTime, Level); if ((allowSameTime && TruncatedSince <= truncatedTarget && truncatedTarget <= TruncatedUntil) || (!allowSameTime && TruncatedSince < truncatedTarget && truncatedTarget < TruncatedUntil)) { result = true; } return result; } /// <summary> /// 対象期間と交差するかを判定 /// </summary> /// <param name="targetPeriod"></param> /// <returns></returns> public bool Intersects(DateTimePeriod targetPeriod) { return Intersects(this, targetPeriod); } /// <summary> /// 期間同士が交差or内包するかを判定 /// </summary> /// <param name="period1">比較する期間1</param> /// <param name="period2">比較する期間2</param> /// <returns></returns> private static bool Intersects(DateTimePeriod period1, DateTimePeriod period2) { // 交差も内包もしないのは2パターンしかない /* * |---Period1---| * |---Period2---| * もしくは * |---Period1---| * |---Period2---| */ return !(period1.TruncatedUntil < period2.TruncatedSince || period2.TruncatedUntil < period1.TruncatedSince); } /// <summary> /// 時刻の切り捨て処理 /// 比較を正規化するためDateTime内部のTicksを切り捨てる /// </summary> /// <param name="targetDateTime">切り捨て対象の日時</param> /// <param name="truncateLevel">切り捨て粒度</param> /// <returns></returns> private static DateTime Truncate(DateTime targetDateTime, TruncateLevel truncateLevel) { if (targetDateTime == DateTime.MinValue || targetDateTime == DateTime.MaxValue || truncateLevel == TruncateLevel.Full) return targetDateTime; TimeSpan timeSpan = default; switch (truncateLevel) { case TruncateLevel.Day: timeSpan = TimeSpan.FromHours(1); break; case TruncateLevel.Hour: timeSpan = TimeSpan.FromMinutes(1); break; case TruncateLevel.Minute: timeSpan = TimeSpan.FromSeconds(1); break; case TruncateLevel.Second: timeSpan = TimeSpan.FromMilliseconds(1); break; case TruncateLevel.MilliSecond: timeSpan = TimeSpan.FromMilliseconds(1); break; default: break; } return targetDateTime.AddTicks(-(targetDateTime.Ticks % timeSpan.Ticks)); } } }TruncateLevel.csnamespace NameSpace { public enum TruncateLevel { Full, Day, Hour, Minute, Second, MilliSecond } }おまけ
DebuggerDisplayアトリビュートを設定しているのでデバッグ時には変数の中身が見やすくなります。
参考
