- 投稿日:2020-02-04T22:11:43+09:00
Tensorflow.Kerasモデルで TPU/GPU/CPU を自動的に切り替える
はじめに
この記事は、TensorFlow.kerasを使用していたとき、ハードウェア情報(主にColaboratoryのランタイム情報)を読み取って、TPUとGPU(一応CPUも)を自動的に切り替えて実行できるプログラムを書く方法をまとめています。
(手動でコメントアウトするのが面倒になってきたため)大体、公式サイト(Google Cloud, Cloud TPU Docs)掲載のKerasとTPUでMNISTを要約した内容です。tensorflow.kerasに慣れている方は、参照元を読んだほうがわかりやすいかもしれません。
補足・注意など
- 動作検証はColaboratory上で実施しています。
- たぶんtensorflow ver2にも対応しています。
- tensorflow.keras 用のコードです。(puer keras や tensoflow ではない)
- 記述(特に解説)に誤りがある可能性があります。
TPU/GPU/CPUを自動的に切り替えるコード
# ハードウェア情報取得
import tensorflow as tf

try:
  tpu = tf.distribute.cluster_resolver.TPUClusterResolver() # TPU detection
except ValueError:
  tpu = None
  gpus = tf.config.experimental.list_logical_devices("GPU")

if tpu:
  tf.tpu.experimental.initialize_tpu_system(tpu)
  strategy = tf.distribute.experimental.TPUStrategy(tpu, steps_per_run=128) # Going back and forth between TPU and host is expensive. Better to run 128 batches on the TPU before reporting back.
  print('Running on TPU ', tpu.cluster_spec().as_dict()['worker'])
elif len(gpus) > 1:
  strategy = tf.distribute.MirroredStrategy([gpu.name for gpu in gpus])
  print('Running on multiple GPUs ', [gpu.name for gpu in gpus])
elif len(gpus) == 1:
  strategy = tf.distribute.get_strategy() # default strategy that works on CPU and single GPU
  print('Running on single GPU ', gpus[0].name)
else:
  strategy = tf.distribute.get_strategy() # default strategy that works on CPU and single GPU
  print('Running on CPU')
print("Number of accelerators: ", strategy.num_replicas_in_sync)


# モデル作成やモデルロード、モデルコンパイル時に、with strategy.scope()で囲む
from tensorflow import keras
with strategy.scope():
    model = make_model()
特に難しいことは考えずに以下の2点を実行すれば、ハードウェアに応じて、TPU/GPU/CPUを勝手に切り替えてくれるようになります。
import tensorflow as tf〜print("Number of accelerators (略までをコピペで貼り付ける- モデル定義やモデル読み込み部分を
with strategy.scope():のスコープ内に入れる解説っぽいなにか
- 優先度
- プログラムのとおり「TPU > multi GPU > single GPU > CPU」の順で選択します。
tf.distribute.cluster_resolver.TPUClusterResolver()
- TPUのハードウェア情報を獲得します。TPUが利用できない環境ではエラーが発生します。
tf.config.experimental.list_logical_devices("GPU")
- GPUのハードウェア情報を獲得します。返り値はリストです。なお、"CPU"を与えれば、CPUの情報も取得できます。
if tpu:以降
- それぞれのデバイスの定義方法です。TPUとmultiGPUが特殊で、「こう書くものだ」と覚えてしまったほうが良いでしょう。
tf.distribute.get_strategy()
- ハードウェア情報を参照しているのではなく、インストールされているtensorflowがGPUに対応しているかを見ています。
- つまり、実行時でなく、tensorflowインストール時に決まる値です(のはずです)。
- GPUを搭載しているのに、上手く行かない場合はCUDAのインストール周りを見直しましょう(参考:GPU support)
おわりに
この記事では、tensorflow.keras で、ハードウェアの状況に応じて、TPU/GPU/CPUを自動的に切り替える方法を解説しました。
tensorflow.kerasでTPUを活用して、より良いディープラーニングライフを。
- 投稿日:2020-02-04T17:51:51+09:00
MobileNetV2-SSDLiteのPascal-VOCデータセットによる学習 [Docker版リメイク]
PINTO_model_zoo
1. Introduction
1年前に記事にしたMobileNetV2-SSDLiteのトレーニング環境構築記事を超簡易仕様にリメイクしました。 GPU対応版の最新のDockerが導入されている段階から作業に着手すると、15分ほどでトレーニングを開始できると思います。 ミスり要素はほぼ無いと思います。 学習が終わったらトレーニング済みモデル(.ckpt/.pb)の
Integer Quantizationを実施して Github へコミットする予定です。 トレーニング用データセットの前処理など、全ての処理はシェルスクリプト内に記載してありますので、気になる方はconstants.shあるいはprepare_checkpoint_and_dataset.shあるいはretrain_detection_model.shの内容をご覧ください。2. Environment
- Ubuntu 18.04 x86_64, RAM 16GB, Geforce GTX1070
- Tensorflow-GPU v1.15.2
- Docker 19.03.5
- Pascal VOC 2012/2007 Dataset
- MobileNetV2-SSDLite
3. Procedure
Creating_Docker_files$ DETECT_DIR=${HOME}/edgetpu/detection && mkdir -p $DETECT_DIR $ cd $DETECT_DIR && nano DockerfileDockerfile### Ubuntu 18.04 FROM tensorflow/tensorflow:1.15.2-gpu-py3 RUN apt-get update && \ DEBIAN_FRONTEND=noninteractive apt-get install -y \ protobuf-compiler python-pil python-lxml python-tk \ autoconf automake libtool curl make g++ unzip wget git nano \ libgflags-dev libgoogle-glog-dev liblmdb-dev libleveldb-dev \ libhdf5-serial-dev libhdf5-dev python3-opencv python-opencv \ python3-dev python3-numpy python3-skimage gfortran libturbojpeg \ python-dev python-numpy python-skimage python3-pip python-pip \ libboost-all-dev libopenblas-dev libsnappy-dev software-properties-common \ protobuf-compiler python-pil python-lxml python-tk libfreetype6-dev pkg-config \ libpng-dev libhdf5-100 libhdf5-cpp-100 # Get the tensorflow models research directory, and move it into tensorflow source folder to match recommendation of installation RUN git clone https://github.com/tensorflow/models.git && \ mkdir -p /tensorflow && \ mv models /tensorflow # Install the Tensorflow Object Detection API from here # https://github.com/tensorflow/models/blob/master/research/object_detection/g3doc/installation.md # Install object detection api dependencies RUN pip3 install Cython && \ pip3 install contextlib2 && \ pip3 install pillow && \ pip3 install lxml && \ pip3 install jupyter && \ pip3 install matplotlib && \ pip2 install Cython && \ pip2 install contextlib2 && \ pip2 install pillow && \ pip2 install lxml && \ pip2 install jupyter && \ pip2 install matplotlib # Get protoc 3.0.0, rather than the old version already in the container RUN curl -OL "https://github.com/google/protobuf/releases/download/v3.0.0/protoc-3.0.0-linux-x86_64.zip" && \ unzip protoc-3.0.0-linux-x86_64.zip -d proto3 && \ mv proto3/bin/* /usr/local/bin && \ mv proto3/include/* /usr/local/include && \ rm -rf proto3 protoc-3.0.0-linux-x86_64.zip # Install pycocoapi RUN git clone --depth 1 https://github.com/cocodataset/cocoapi.git && \ cd cocoapi/PythonAPI && \ make -j8 && \ cp -r pycocotools /tensorflow/models/research && \ cd ../../ && \ rm -rf cocoapi # Run protoc on the object detection repo RUN cd /tensorflow/models/research && \ protoc object_detection/protos/*.proto --python_out=. # Set the PYTHONPATH to finish installing the API ENV PYTHONPATH $PYTHONPATH:/tensorflow/models/research:/tensorflow/models/research/slim # Install wget (to make life easier below) and editors (to allow people to edit the files inside the container) RUN apt-get update && \ apt-get install -y wget nano ARG work_dir=/tensorflow/models/research # Get object detection transfer learning scripts. ARG scripts_link="http://storage.googleapis.com/cloud-iot-edge-pretrained-models/docker/obj_det_scripts.tgz" RUN cd ${work_dir} && \ wget -O obj_det_scripts.tgz ${scripts_link} && \ tar zxvf obj_det_scripts.tgz WORKDIR ${work_dir}Ctrl + O
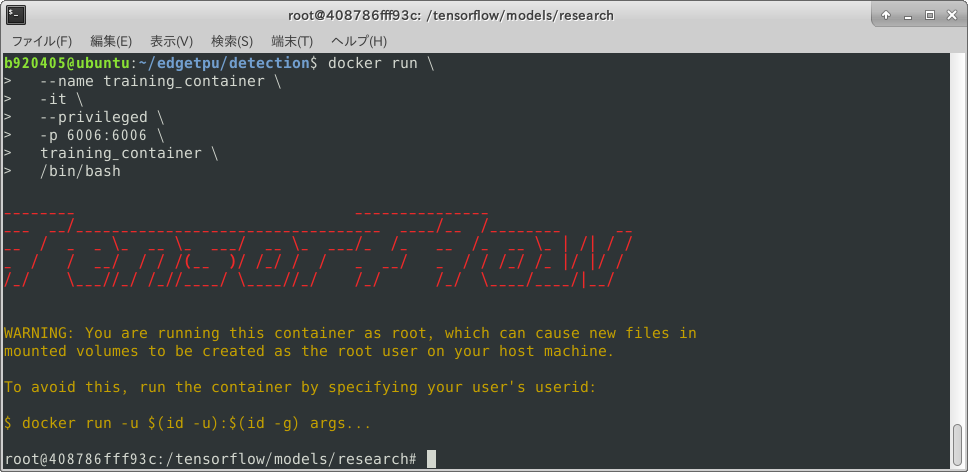
Ctrl + XBuild_a_Docker_image$ docker build - < Dockerfile --tag training_containerStart_Docker_container$ docker run \ --runtime=nvidia \ --name training_container \ -it \ --privileged \ -p 6006:6006 \ training_container \ /bin/bash
Download_training_shell_script### Download constants.sh $ curl -sc /tmp/cookie "https://drive.google.com/uc?export=download&id=1e74pfaoHqp6WiWwTGamzN7wNRTDoR3q3" > /dev/null $ CODE="$(awk '/_warning_/ {print $NF}' /tmp/cookie)" $ curl -Lb /tmp/cookie "https://drive.google.com/uc?export=download&confirm=${CODE}&id=1e74pfaoHqp6WiWwTGamzN7wNRTDoR3q3" -o constants.sh ### Download prepare_checkpoint_and_dataset.sh $ curl -sc /tmp/cookie "https://drive.google.com/uc?export=download&id=1Rk2VRGBwZnlcfl3DmryPMbNpICJ2R-vr" > /dev/null $ CODE="$(awk '/_warning_/ {print $NF}' /tmp/cookie)" $ curl -Lb /tmp/cookie "https://drive.google.com/uc?export=download&confirm=${CODE}&id=1Rk2VRGBwZnlcfl3DmryPMbNpICJ2R-vr" -o prepare_checkpoint_and_dataset.sh ### Download retrain_detection_model.sh $ curl -sc /tmp/cookie "https://drive.google.com/uc?export=download&id=1MbjoqxBG56aDyvGxBbJd1QCbGo4nDKnm" > /dev/null $ CODE="$(awk '/_warning_/ {print $NF}' /tmp/cookie)" $ curl -Lb /tmp/cookie "https://drive.google.com/uc?export=download&confirm=${CODE}&id=1MbjoqxBG56aDyvGxBbJd1QCbGo4nDKnm" -o retrain_detection_model.sh
constants.sh
constants.sh#!/bin/bash declare -A ckpt_link_map declare -A ckpt_name_map declare -A config_filename_map ckpt_link_map["mobilenet_v2_ssdlite"]="http://download.tensorflow.org/models/object_detection/ssdlite_mobilenet_v2_coco_2018_05_09.tar.gz" ckpt_name_map["mobilenet_v2_ssdlite"]="ssdlite_mobilenet_v2_coco_2018_05_09" config_filename_map["mobilenet_v2_ssdlite-true"]="pipeline_mobilenet_v2_ssdlite_retrain_whole_model.config" INPUT_TENSORS='normalized_input_image_tensor' OUTPUT_TENSORS='TFLite_Detection_PostProcess,TFLite_Detection_PostProcess:1,TFLite_Detection_PostProcess:2,TFLite_Detection_PostProcess:3' OBJ_DET_DIR="$PWD" #rm -rf "${OBJ_DET_DIR}/learn" mkdir -p "${OBJ_DET_DIR}/learn" LEARN_DIR="${OBJ_DET_DIR}/learn" #rm -rf "${LEARN_DIR}/data" #rm -rf "${LEARN_DIR}/ckpt" #rm -rf "${LEARN_DIR}/train" #rm -rf "${LEARN_DIR}/models" mkdir -p "${LEARN_DIR}/data" mkdir -p "${LEARN_DIR}/ckpt" mkdir -p "${LEARN_DIR}/train" mkdir -p "${LEARN_DIR}/models" DATASET_DIR="${LEARN_DIR}/data" CKPT_DIR="${LEARN_DIR}/ckpt" TRAIN_DIR="${LEARN_DIR}/train" OUTPUT_DIR="${LEARN_DIR}/models"
prepare_checkpoint_and_dataset.sh
prepare_checkpoint_and_dataset.sh#!/bin/bash # Exit script on error. set -e # Echo each command, easier for debugging. set -x usage() { cat << END_OF_USAGE Downloads checkpoint and dataset needed for the tutorial. --network_type Can be one of [mobilenet_v1_ssd, mobilenet_v2_ssd], mobilenet_v1_ssd by default. --train_whole_model Whether or not to train all layers of the model. false by default, in which only the last few layers are trained. --help Display this help. END_OF_USAGE } network_type="mobilenet_v2_ssdlite" train_whole_model="true" while [[ $# -gt 0 ]]; do case "$1" in --network_type) network_type=$2 shift 2 ;; --train_whole_model) train_whole_model=$2 shift 2;; --help) usage exit 0 ;; --*) echo "Unknown flag $1" usage exit 1 ;; esac done source "$PWD/constants.sh" echo "PREPARING checkpoint..." mkdir -p "${LEARN_DIR}" ckpt_link="${ckpt_link_map[${network_type}]}" ckpt_name="${ckpt_name_map[${network_type}]}" cd "${LEARN_DIR}" rm -rf "${CKPT_DIR}/${ckpt_name}" wget -O "${CKPT_DIR}/${ckpt_name}.tar.gz" "$ckpt_link" tar -zxvf "${CKPT_DIR}/${ckpt_name}.tar.gz" -C "${CKPT_DIR}" rm "${CKPT_DIR}/${ckpt_name}.tar.gz" rm -rf "${CKPT_DIR}/saved_model" cp -r ${CKPT_DIR}/${ckpt_name}/* "${CKPT_DIR}/" echo "CHOSING config file..." cd "${OBJ_DET_DIR}" curl -sc /tmp/cookie "https://drive.google.com/uc?export=download&id=1IoHkfxfkXSUM8nnevrb_dVct72fMJ7t2" > /dev/null CODE="$(awk '/_warning_/ {print $NF}' /tmp/cookie)" curl -Lb /tmp/cookie "https://drive.google.com/uc?export=download&confirm=${CODE}&id=1IoHkfxfkXSUM8nnevrb_dVct72fMJ7t2" -o pipeline.config mv pipeline.config "${CKPT_DIR}" echo "REPLACING variables in config file..." sed -i "s%PATH_TO_BE_CONFIGURED/model.ckpt%${CKPT_DIR}/model.ckpt%g" "${CKPT_DIR}/pipeline.config" sed -i "s%PATH_TO_BE_CONFIGURED/mscoco_label_map.pbtxt%${DATASET_DIR}/pascal_label_map.pbtxt%g" "${CKPT_DIR}/pipeline.config" sed -i "s%PATH_TO_BE_CONFIGURED/mscoco_train.record%${DATASET_DIR}/pascal_train.record%g" "${CKPT_DIR}/pipeline.config" sed -i "s%PATH_TO_BE_CONFIGURED/mscoco_val.record%${DATASET_DIR}/pascal_val.record%g" "${CKPT_DIR}/pipeline.config" echo "PREPARING dataset" rm -rf "${DATASET_DIR}" mkdir -p "${DATASET_DIR}" cd "${DATASET_DIR}" # VOCtrainval_11-May-2012.tar <--- 1.86GB curl -sc /tmp/cookie "https://drive.google.com/uc?export=download&id=1rATNHizJdVHnaJtt-hW9MOgjxoaajzdh" > /dev/null CODE="$(awk '/_warning_/ {print $NF}' /tmp/cookie)" curl -Lb /tmp/cookie "https://drive.google.com/uc?export=download&confirm=${CODE}&id=1rATNHizJdVHnaJtt-hW9MOgjxoaajzdh" -o VOCtrainval_11-May-2012.tar # VOCtrainval_06-Nov-2007.tar <--- 460MB curl -sc /tmp/cookie "https://drive.google.com/uc?export=download&id=1c8laJUn-aaWEhE5NlDwIdNv5ZdogUAcD" > /dev/null CODE="$(awk '/_warning_/ {print $NF}' /tmp/cookie)" curl -Lb /tmp/cookie "https://drive.google.com/uc?export=download&confirm=${CODE}&id=1c8laJUn-aaWEhE5NlDwIdNv5ZdogUAcD" -o VOCtrainval_06-Nov-2007.tar # Extract the data. tar -xvf VOCtrainval_11-May-2012.tar && rm VOCtrainval_11-May-2012.tar tar -xvf VOCtrainval_06-Nov-2007.tar && rm VOCtrainval_06-Nov-2007.tar echo "PREPARING label map..." cd "${OBJ_DET_DIR}" cp "object_detection/data/pascal_label_map.pbtxt" "${DATASET_DIR}" echo "CONVERTING dataset to TF Record..." protoc object_detection/protos/*.proto --python_out=. python3 object_detection/dataset_tools/create_pascal_tf_record.py \ --label_map_path="${DATASET_DIR}/pascal_label_map.pbtxt" \ --data_dir=${DATASET_DIR}/VOCdevkit \ --year=merged \ --set=train \ --output_path="${DATASET_DIR}/pascal_train.record" python3 object_detection/dataset_tools/create_pascal_tf_record.py \ --label_map_path="${DATASET_DIR}/pascal_label_map.pbtxt" \ --data_dir=${DATASET_DIR}/VOCdevkit \ --year=merged \ --set=val \ --output_path="${DATASET_DIR}/pascal_val.record"
retrain_detection_model.sh
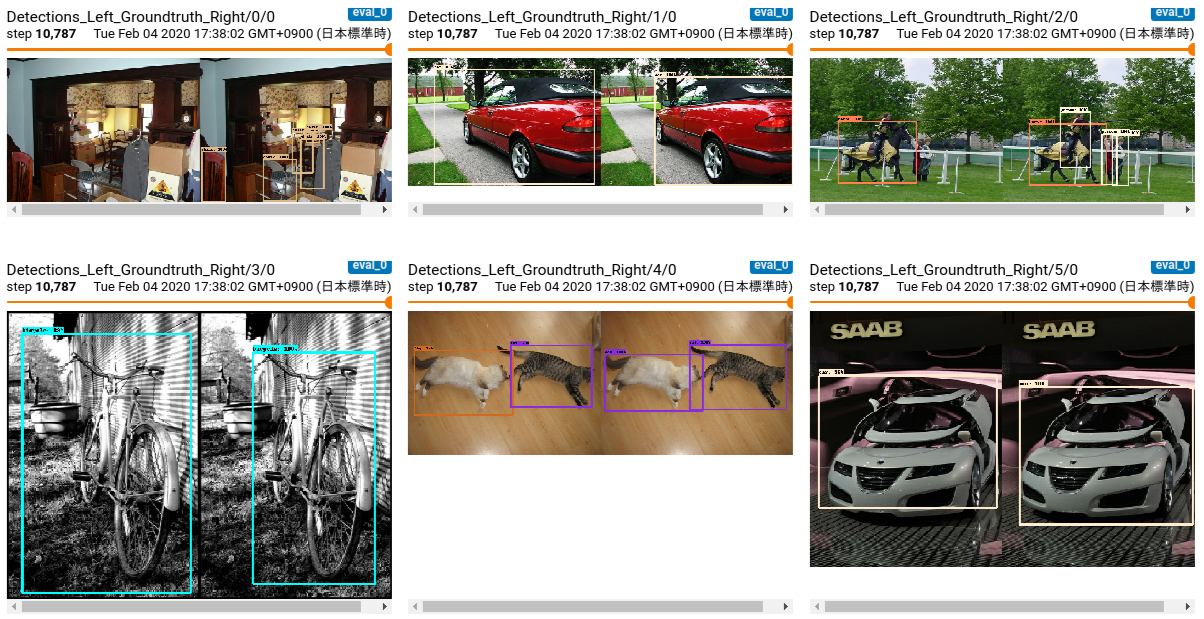
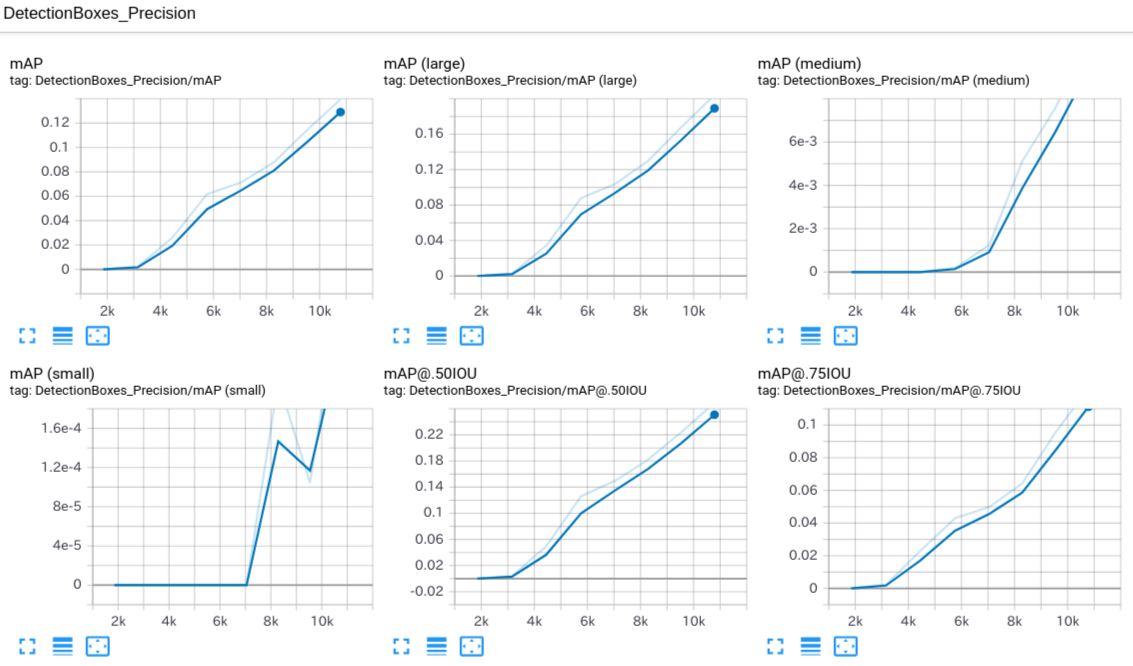
retrain_detection_model.sh#!/bin/bash # Exit script on error. set -e # Echo each command, easier for debugging. set -x usage() { cat << END_OF_USAGE Starts retraining detection model. --num_training_steps Number of training steps to run, 500 by default. --num_eval_steps Number of evaluation steps to run, 100 by default. --help Display this help. END_OF_USAGE } num_training_steps=200000 while [[ $# -gt 0 ]]; do case "$1" in --num_training_steps) num_training_steps=$2 shift 2 ;; --num_eval_steps) num_eval_steps=$2 shift 2 ;; --help) usage exit 0 ;; --*) echo "Unknown flag $1" usage exit 1 ;; esac done source "$PWD/constants.sh" python3 object_detection/model_main.py \ --pipeline_config_path="${CKPT_DIR}/pipeline.config" \ --model_dir="${TRAIN_DIR}" \ --num_train_steps="${num_training_steps}" \ --num_eval_steps="${num_eval_steps}"Granting_execution_authority_to_script_files$ chmod +x constants.sh $ chmod +x prepare_checkpoint_and_dataset.sh $ chmod +x retrain_detection_model.shData_preparation_and_Training### Data preparation $ ./prepare_checkpoint_and_dataset.sh ### Training $ NUM_TRAINING_STEPS=1000000 && \ NUM_EVAL_STEPS=100 && \ rm -rf learn/train && \ ./retrain_detection_model.sh \ --num_training_steps ${NUM_TRAINING_STEPS} \ --num_eval_steps ${NUM_EVAL_STEPS}check_the_progress_of_learning### Check learning status with Tensorboard $ docker exec -it training_container /bin/bash $ cd learn/train $ tensorboard --logdir=.<Progress of learning>
Extract_files_from_Docker_container$ docker cp 07a048c6b1b8:/tensorflow/models/research/learn/train/model.ckpt-7044.data-00000-of-00001 . $ docker cp 07a048c6b1b8:/tensorflow/models/research/learn/train/model.ckpt-7044.index . $ docker cp 07a048c6b1b8:/tensorflow/models/research/learn/train/model.ckpt-7044.meta . $ docker cp 07a048c6b1b8:/tensorflow/models/research/learn/train/graph.pbtxt . $ docker cp 07a048c6b1b8:/tensorflow/models/research/learn/train/checkpoint .

- 投稿日:2020-02-04T14:00:15+09:00
Windows10でTensorFlowとKerasの環境構築が簡単だった話
はじめに
Anacondaの導入が済んでいる方向けです
記事の最後でIDE(PyCharm)での動かし方を説明します筆者の環境
・Nvidia RTX2060
・Windows10 Home
・Anaconda 4.7.10仮想環境の構築
Anaconda Promptを管理者として実行します
conda info -e で現在の環境を確認します
*の位置が現在の環境です
(base)はデフォルトです
conda create -n myTensorFlow python=3.6で新たに環境を作成します
conda activate myTensorFlowで仮想環境を有効化できます仮想環境に正しく入れている場合(myTensorFlow)と表示されます
この状態で
conda install tensorflow-gpuと入力します
そうするとcudnnやcudatoolkitなどの必要なパッケージが自動的にインストールされますKerasの導入
conda install kerasでTensorFlow Backendのkerasが導入可能です
※この時管理者で実行していないとうまくいきませんPycharmでの実行
作成した仮想環境上で実行することができます
[File]-[Settings]-[Project interpreter]を選択
そして,作成した仮想環境を選択してください
Project Interpreterに表示される仮想環境を選択してください
もし表示されない場合は,歯車から[show all]を選択します
Project Interpretersからプラスマークを選択します
[Conda Environment]-[Existing Environment]と選択し,と書かれている場所に
先程作成した仮想環境のアドレスの中にある,python.exeを選択します
そうすることで,仮想環境上でpycharmを動かすことができます.


