- 投稿日:2020-02-04T23:25:11+09:00
Android-Codelabs-2.1: LinearLayoutとScrollViewの使い方
2019年にGoogleから,Web上でAndroidを学べるコースが提供されました.(Android Kotlin Fundamentals Course)
この記事では,そのコースを実際にやってみてアウトプットしてみるといった内容です.
何かツッコミなどあれば編集リクエストかコメントかTwitterでいただければ修正いたします今回学ぶこと
・LinearLayoutを使ってビューを整理する方法
・ViewGroupの使い方目指す成果物
今回は,AboutMeというアプリを作ってみます.
このアプリは,自分に関することを紹介したり友人,家族向けにカスタマイズしたりできます.
またこのアプリはこのような要素で構成されています.
・名前
・Doneボタン
・スターの画像
・スクロール可能なテキスト実際のAndroidアプリでは,画像やテキストを表示し,クリックイベントの形式でユーザーからの入力を受け入れる組み合わせで構成されています.
ステップ
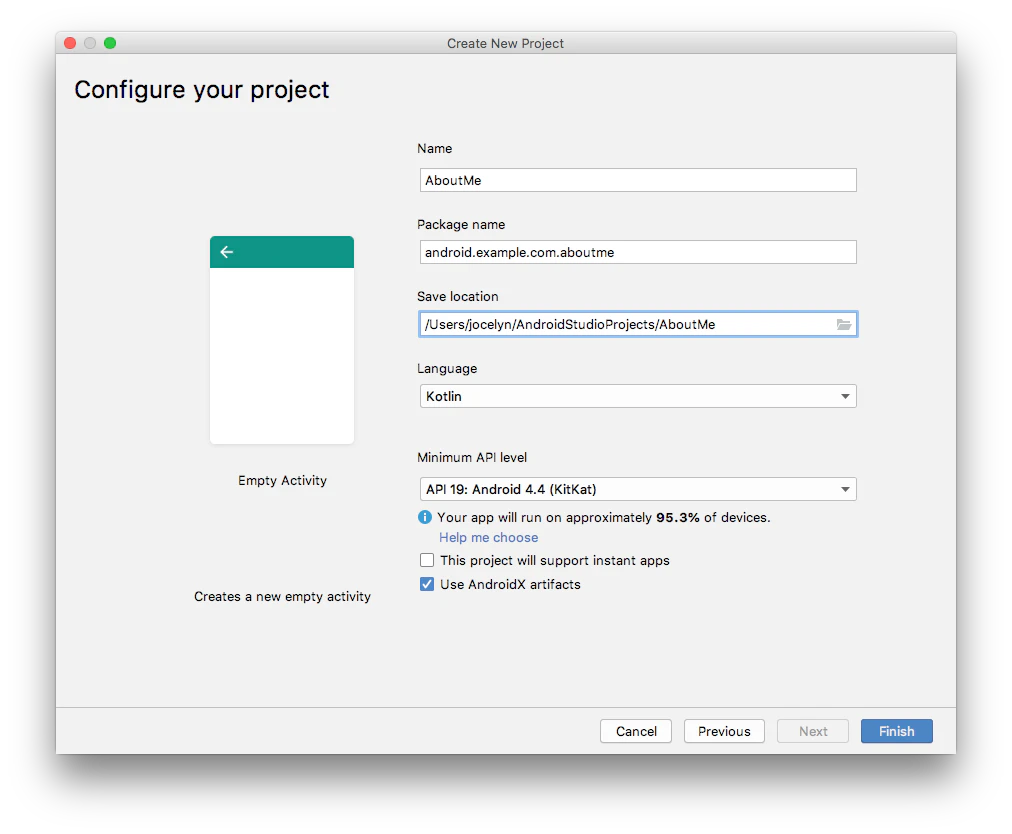
1. 「Hello World」という文字列が表示されるアプリを作ります
パラメータをこのように設定して.
アプリを実行します.
デフォルトだとViewGroupは
ConstraintLayoutで,その中にTextViewが配置されています.2. ルートレイアウトを変更して,LinearLayoutを使う
ここではルートのViewGroupを
LinearLayoutに変更します.
そしてUI要素を垂直に配置します.このように
LinearLayoutは,Vertial(垂直)かHorizonal(水平)に配置されます.
LinearLayoutを使うために,ルートレイアウトを変更していきます.
まず,
app>res>layoutから,activity_main.xmlファイルを開きます.次に
[Text]タブの,ルートのViewGroupをContraintLayoutをLinearLayoutに変更します.<androidx.constraintlayout.widget.ConstraintLayout xmlns:android="http://schemas.android.com/apk/res/android" xmlns:app="http://schemas.android.com/apk/res-auto" xmlns:tools="http://schemas.android.com/tools" android:layout_width="match_parent" android:layout_height="match_parent" tools:context=".MainActivity"> <TextView android:layout_width="wrap_content" android:layout_height="wrap_content" android:text="Hello World!" app:layout_constraintBottom_toBottomOf="parent" app:layout_constraintLeft_toLeftOf="parent" app:layout_constraintRight_toRightOf="parent" app:layout_constraintTop_toTopOf="parent" /> </androidx.constraintlayout.widget.ConstraintLayout>activity_main.xml<LinearLayout xmlns:android="http://schemas.android.com/apk/res/android" xmlns:tools="http://schemas.android.com/tools" xmlns:app="http://schemas.android.com/apk/res-auto" android:layout_width="match_parent" android:layout_height="match_parent" android:orientation="vertical" tools:context=".MainActivity”> <TextView android:layout_width="wrap_content" android:layout_height="wrap_content" android:text="Hello World!" app:layout_constraintBottom_toBottomOf="parent" app:layout_constraintLeft_toLeftOf="parent" app:layout_constraintRight_toRightOf="parent" app:layout_constraintTop_toTopOf="parent" /> </LinearLayout>
orientation要素を設定するとUI要素の配置を垂直や水平に変更できます.
今回の場合は,android:orientation=“vertical"なのでUI要素は垂直に配置します.3.
TextViewを修正するまず
TextViewの要素をこのように修正しましょう.ID name_text
text 自分の名前を設定します.(テキストはstring.xmlファイルで定義します)
textSize 20sp
textColor @android:color/black
layout_gravity centeractivity_main.xml<TextView android:layout_width="wrap_content" android:layout_height="wrap_content" android:id="@+id/name_text" android:text="@string/name" android:textSize="20sp" android:textColor="@android:color/black" android:layout_gravity="center"/>次に,MainActivity.ktを開き,onCreate関数にあるこのようなコードを探します.
setContentView(R.layout.activity_main)
setContentView()はレイアウトファイルをActivityに接続するための関数です.
・R.というのが,アプリないのリソース(レイアウトファイル,画像)を参照するためのもの
・layout.activity_mainはリソースがレイアウトであることを表しています.アプリを実行すると,
TextViewがこのように表示されます.
4. TextViewのスタイルの設定
ここでは,
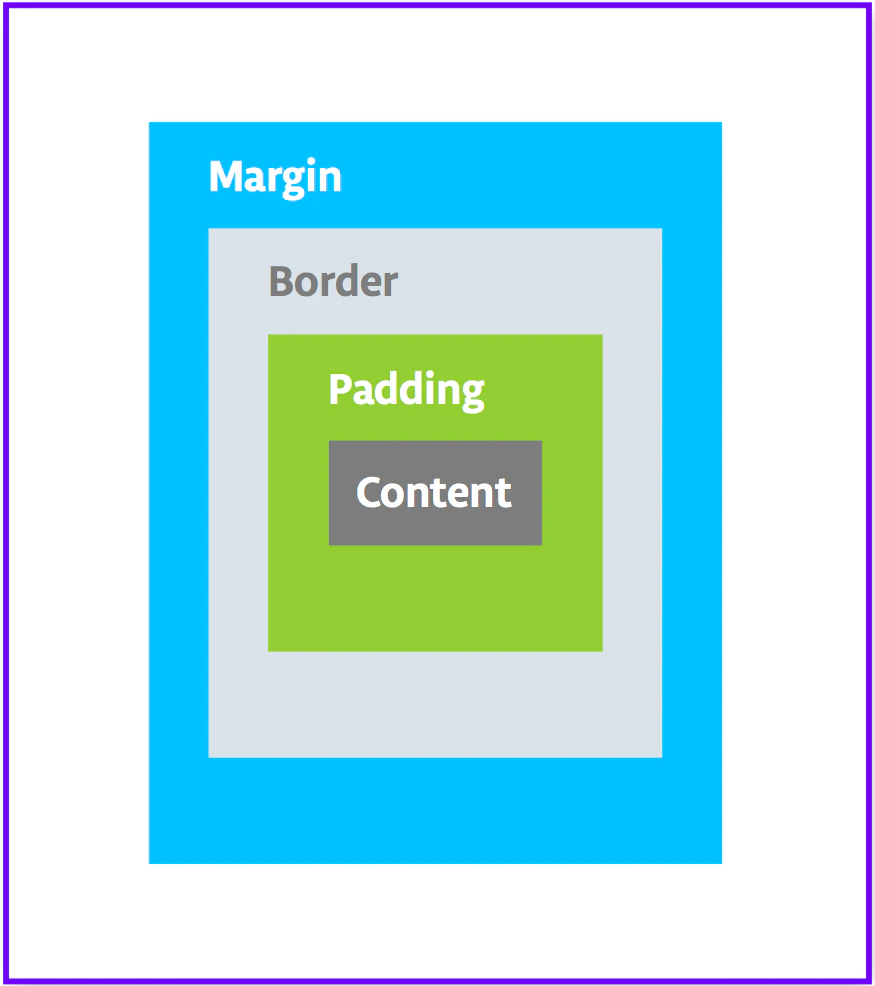
margin,paddingやフォントと呼ばれるスタイルというものの設定をしていきます.
paddingは,ビューの境界内のスペースのことで,ビューのサイズにはpaddingも含まれます.
一般的に使用されるpadding要素はこのようなものがあります.
android:paddingビューの4つの端すべてにパディングを指定します。
android:paddingTop上端のパディングを指定します。
android:paddingBottom下端のパディングを指定します。
android:paddingStartビューの「Start」のパディングを指定します。
android:paddingEndビューの「End」のパディングを指定します。
android:paddingLeft左端のパディングを指定します。
android:paddingRight右端のパディングを指定します。また
marginは,ビューの境界の外側に追加されるスペースのことです.
一般的に使用されるmargin要素はこのようなものがあります.
android:layout_marginビューの4つの側面すべてにマージンを指定します。
android:layout_marginBottomこのビューの下側の外側のスペースを指定します。
android:layout_marginStartこのビューの「Start」の外側のスペースを指定します。
android:layout_marginEndこのビューの端側のスペースを指定します。
android:layout_marginLeftこのビューの左側のスペースを指定します。
android:layout_marginRightこのビューの右側のスペースを指定します。※APIレベル17(android4.2)以上をターゲットにしている場合:
・「Left」,「Right」の代わりに「Start」,「End」を使用します.
・それより前のバージョンで動かしたい場合は,android:paddingLeftとandroid:paddingStartの両方を指定します.まず,
paddingを追加していきます.
上端にスペースを入れるにはこのようにします.activity_main.xml<TextView android:layout_width="wrap_content" android:layout_height="wrap_content" android:id="@+id/name_text" android:text="@string/name" android:textSize="20sp" android:textColor="@android:color/black" android:layout_gravity="center" android:paddingTop="8sp" />次に,
marginを追加していきます.activity_main.xml<TextView android:layout_width="wrap_content" android:layout_height="wrap_content" android:id="@+id/name_text" android:text="@string/name" android:textSize="20sp" android:textColor="@android:color/black" android:layout_gravity=“center" android:paddingTop="8sp" android:layout_marginTop=“16dp” />次に,フォントを変更していきます.
フォントを変更するにはfontFamily属性を使います.activity_main.xml<TextView android:layout_width="wrap_content" android:layout_height="wrap_content" android:id="@+id/name_text" android:text="@string/name" android:textSize="20sp" android:textColor="@android:color/black" android:layout_gravity="center" android:layout_marginTop="16dp" android:fontFamily="sans-serif"/>次に,スタイルを抽出をしていきます.
スタイルはビューのデザインと形式を指定する属性のコレクションのことでした.
(スタイルは,fontColor,fontSize,backgroundColor,padding,marginなどの属性のことです)これらのをまとめて抽出して,スタイルを再利用できるようにします.それがスタイルの抽出です.
・
Component TreeでTextViewをクリックし,[Refactor]>[Extract Style]を選択します.
・[Extract Android Style]ダイアログで,Style nameにNameStyleと入力しOKをクリックします.スタイルはリソースでもあるため,
res/values/フォルダー内の,styles.xmlに保存されています.styles.xml<resources> <!-- Base application theme. --> <style name="AppTheme" parent="Theme.AppCompat.Light.DarkActionBar"> <!-- Customize your theme here. --> <item name="colorPrimary">@color/colorPrimary</item> <item name="colorPrimaryDark">@color/colorPrimaryDark</item> <item name="colorAccent">@color/colorAccent</item> </style> <style name="NAmeStyle"> <item name="android:layout_width">wrap_content</item> <item name="android:layout_height">wrap_content</item> <item name="android:textSize">20sp</item> <item name="android:textColor">@android:color/black</item> <item name="android:layout_gravity">center</item> <item name="android:layout_marginTop">16dp</item> <item name="android:fontFamily">sans-serif</item> </style> </resources>
[Text]タブを開いて,style="@style/NameStyle”属性が追加されていることを確認してください.
5. ImageViewを追加する
ここでは画像を表示する,ビューを追加していきます.
TextViewの下にImageViewを配置します.<ImageView android:id="@+id/star_image" android:layout_width="wrap_content" android:layout_height="wrap_content" app:srcCompat="@android:drawable/btn_star_big_on" android:layout_gravity="center"/>6. ScrollViewを追加します
ScrollViewは,その中に配置されたテキストをスクロールできるようにするViewGroupのです.
通常は,子として一つのViewGroupやビューを含むことができます.
今回はこのように,
TextViewをScrollViewの中に配置させてみます.
コードはこちらになります.
activity_main.xml<ScrollView android:id="@+id/bio_scroll" android:layout_width="match_parent" android:layout_height="wrap_content"> <TextView android:id="@+id/bio_text" android:layout_width="match_parent" android:layout_height="match_parent"/> </ScrollView>次に,
ScrollView内の要素のTextViewのtextリソースを追加します.
string.xmlを開き,テキストを入力してください.
ここではサンプルを入力します.string.xml<string name="bio">Hi, my name is Aleks. \n\nI love fish. \n\nThe kind that is alive and swims around in an aquarium or river, or a lake, and definitely the ocean. \nFun fact is that I have several aquariums and also a river. \n\nI like eating fish, too. Raw fish. Grilled fish. Smoked fish. Poached fish - not so much. \nAnd sometimes I even go fishing. \nAnd even less sometimes, I actually catch something. \n\nOnce, when I was camping in Canada, and very hungry, I even caught a large salmon with my hands. \n\nI\'ll be happy to teach you how to make your own aquarium. \nYou should ask someone else about fishing, though.\n\n</string>※注意:
・\nで改行
・アポストロフィを使うには,\でエスケープする必要があります
・太文字のテキストを使いたい場合は,…
・斜体のテキストを使いたい場合は,…また行の間隔を指定するには,このように
android:lineSpacingMultiplier属性を使います.
これですべてのステップは終了です.
アプリを実行してみましょう.
まとめ
・LinearLayoutとScrollViewはViewGroup
・LinearLayoutは,子ビューを水平や垂直に配置できる
・ScrollViewの子ビューとして含めるのは一つだけなので,複数のビューを含みたいときはScrollViewの中にさらにViewGroupを作ることで実装できる
・スタイルは,ビューのデザインを指定する属性のコレクション(fontColor,fontSize,backgroundcolor,padding,margin)
・アプリのデザインを統一するには,スタイルを再利用する宿題
・ScrollView内で,TextViewの上にImageViewを配置してください
Hint: ScrollView内に含めることができる子ビューは一つのみです.うまくViewGroupを使って実装しましょう.
クイズ
1問目
ViewGroupは次のうちどれですか?▢ EditText
▢ LinearLayout
▢ TextView
▢ Button2問目
次のリストされたビュー階層のうち、無効なものはどれですか?▢
LinearLayout>TextView、TextView、ImageView
▢ScrollView>LinearLayout>TextView、Button、Button、ScrollView>TextView
▢TextView>TextView、ImageView、ScrollView3問目
スタイルは,styles.xmlで定義されたリソースです。スタイルを使用して、色、フォント、テキストサイズ、およびビューの他の多くの特性を定義できます。正しいか間違っているか?▢true
▢false4問目
ScrollViewは、任意の数のビューまたはビューグループを子として含むことができるビューグループです。正しいか間違っているか?▢true
▢false5問目
画像を表示するために使用できる,UI要素はどれですか?▢ TextView
▢ ImageView
▢ Button
▢ ScrollView参考資料
ソースコード
Github:
https://github.com/syuheifujita/android-codeLab-fundamental-2-1言葉の定義
・LinearLayout(リニアレイアウト)
ViewGroupの一つで,これを使うと簡単にUI要素を垂直や水平に並べて配置できる.・ViewGroup
ビューを一つにまとめることのできるもので,LinearLayout,ConstrainLayout,ScrollViewがある.CodeLabs by Google
https://codelabs.developers.google.com/android-kotlin-fundamentals/


- 投稿日:2020-02-04T22:42:35+09:00
アンドロイドアプリ開発時に自作したお気に入りシェルスクリプト
先日アンドロイドアプリをリリースしました。
エンジニア・デザイナが何か一緒に作ったり、勉強会開いたりを気軽に出来るコミュニティツールです。アプリを作る時に自作して、いい感じに動いていたツールというか、シェルスクリプトを公開します。なお、前提としてPCはLINUX(Manjaro)を使用していますが、Shell(とかadbとか)が動けば他のOSでも使えるはずです。
クライアント編 (adb)
- apkを端末にインストールする用のShell (install.sh)
#! /bin/bash

if [ $# == 0 ]; then
  adb install -t -r app-debug.apk
  exit 0
fi

if [ $1 = "-p" ]; then
  adb -s [自分のデバイス1] install -t -r app-debug.apk
elif [ $1 = "-t" ]; then
  adb -s [自分のデバイス2]  install -t -r app-debug.apk
elif [ $1 = "-e" ]; then
  adb -e install -t -r app-debug.apk
else
  echo "invalid option $1"
  echo "usage $0 [-p|-t|-e]"
  echo "no option: any conected device"
  echo "-p: pixel3"
  echo "-t: tablet"
  echo "-e: emulator"
fi
PCに接続されている端末(エミュレータ含む)が一つなら、カレントディレクトリにapp-debug.apkかそのシンボリックリンクを置いて、./install.shだけでインストール出来ます。PCに2つ以上の端末が刺さっている場合、./install.sh -pとか、-tとかで使い分けます。-pと-tは自分が持っている端末がたまたまピクセルとタブレットだったのでそうしていますが、そこは自分の環境に合わせて適当に変えるイメージです(galaxyなら-pを-gにしてデバイス名もgalaxyのにするとか)。-eはエミュレータの端末です。
デバイス名となっている所は、adb devicesを実行すると見える端末のデバイス名を入れます。
- apkを端末からアンインストールする用のシェル(uninstall.sh)
#! /bin/bash

if [ $# == 0 ]; then
  adb uninstall com.engineer_forum.engineer_forum
  exit 0
fi

if [ $1 = "-p" ]; then
  adb -s [自分のデバイス1] uninstall [アプリパッケージ名]
elif [ $1 = "-t" ]; then
  adb -s [自分のデバイス2]  uninstall [アプリパッケージ名]
elif [ $1 = "-e" ]; then
  adb -e uninstall [アプリパッケージ名]
else
  echo "invalid option $1"
  echo "usage $0 [-p|-t|-e]"
  echo "no option: any conected device"
  echo "-p: pixel3"
  echo "-t: tablet"
  echo "-e: emulator"
fi
使い方はインストール用とほぼ同じです。./uninstall.shとか、./uninstall.sh -pとかって使います。
ちなみに再インストール(一度削除してもう一度インストール)は、install.shとuninstall.shを組み合わせれば簡単に出来るので割愛します(再インストールシェルはめっちゃ使った)。あと、組み合わせれば繋がってる全ての端末でインストール・アンインストールみたいなことも出来ます。
- 端末のDBのファイルをPCにコピーする (pulldb.sh)
#! /bin/bash
if [ $# -eq 0 ];then
        echo "Usage ${0} [-p|-t|-e]"
        exit 1
fi

if [ $1 = "-p" ];then
        adb -s [自分のデバイス1] exec-out run-as [アプリパッケージ名] cat databases/[ローカルDB名] > "[ローカルDB名_1]"
elif [ $1 = "-t" ];then
        adb -s [自分のデバイス2] exec-out run-as [アプリパッケージ名] cat databases/[ローカルDB名] > "[ローカルDB名_2]"
elif [ $1 = "-e" ];then
        adb -e exec-out run-as [アプリパッケージ名] cat databases/[ローカルDB名] > "[ローカルDB名_3]"
else
        echo "Usage ${0} [-p|-t|-e]"
        exit 1
fi
これもinstall.shと使い方は同じ、ピクセルからDB取得したいときは./pulldb.sh -pとかって使います。一応保存する時のファイル名は変えておいた方が便利と思い変えてます。
- PCで加工等したDBファイルを端末側にコピーする (pushdb.sh)
#!/bin/bash
if [ $# != 1 ]; then
    echo "usage: $0 db_filename" 1>&2
    exit 0
fi

PKGNAME="[アプリのパッケージ名]"
DBFILENAME=$1

adb push ${DBFILENAME} /sdcard/
adb shell "run-as ${PKGNAME} cp /sdcard/${DBFILENAME} /data/data/${PKGNAME}/databases/[ローカルのDBファイル名]"
./pushdb.sh [DBファイル名]
として使います。あんまり使わないので-s対応しませんでしたが、install.sh等と同様に、シェルスクリプト中で-s [デバイス名]を追加すれば複数端末接続時に端末指定が出来ると思います。サーバ編 (curl)
- 任意のJSONをサーバにcurlで送りつけるシェル (send.sh)。JSONファイルは外出し
#! /bin/bash

errmsg="Usage: $0 [-l|-s] command"

if [ $# -ne 2 ]; then
        echo ${errmsg}
        exit 1
fi

host=""
if [ $1 = '-l' ]; then
        host='localhost:[ローカルサーバのポート番号]'
elif [ $1 = '-s' ]; then
        host='[リモートサーバのURL]'
else
        echo ${errmsg}
        exit 1
fi

command=$2

curl -X POST ${host}/${command}.js -H "Accept:application/json" -H "Content-type: application/json" -d @${command}.json
./send.sh [-l|-s] [Command名]として使います。JSONファイルにはCommand名.jsonと付けます。引数の-lは、ローカルPC上に立ち上げたダミーサーバにJSONを送りつけたい時に使います。-sはリモートサーバに送りつけたい時に使います。コマンド中の -d @~~~はファイル内容のデータを送信してくれるオプションです。
JSONファイルは例えばこんなのです。
member.json{ "ProductId":12345, "Color":"Black", "Category":[1,2,5], }./send.sh -s member.jsonとすれば、製品ID 12345、黒色、カテゴリー 1,2,5に属する製品、というデータがリモートサーバに飛ばせます。
上のコマンドを応用し、末尾に&を付けてバックグラウンド実行するのを1000回とか10000回とかループさせて、サーバが過負荷に耐えられるかの試験が出来たりします(リモートサーバーに対してやると怒られるのでローカルにダミーサーバを立ててテスト目的でやります)。
LINUXで開発効率化楽しい
こういう便利シェルみたいなのを作り出したりすると、開発そっちのけでシェル作る作業の方が楽しくなってしまって、費やす時間と効果のバランスがどうなんだって感じになってきちゃったりします、、、が、あまり気にしないことにしています。中には一回しかやらない作業なのにわざわざシェルとかawkとかでプログラム組んでスマートに解決しようとしたりしてしまいますが、最終的には全然スマートじゃないという...
しかし狙い通りに効率化が出来ると、一人でニヤニヤしてしまう性癖があります。こういうちょっとしたLINUXの「思い通りに動く感」って本当に好きです。

- 投稿日:2020-02-04T19:36:46+09:00
Androidアプリ1月目の練習成果
参考書
・Androidアプリ開発の教科書Kotlin対応
・Kotlinスタートブック作成しているアプリ
Androidアプリの勉強で今は、出勤管理アプリを作成しています。
今後
・Fragmentの使い方を学ぶ。現状使っていない。
・DB接続にRoomを用いているが、ViewModelは用いていないので、使う。
・お試しのため、画面からデータを取得しておらず、直接挿入している、画面かた取得して挿入するようにする。
・取得したデータが画面に表示さない。アドバイス助言お待ちしてます。
データ取得したリストがなぜ画面に表示できないか教えてください
現状できているコード
MainActivity.ktclass MainActivity : AppCompatActivity() { override fun onCreate(savedInstanceState: Bundle?) { super.onCreate(savedInstanceState) setContentView(R.layout.activity_main) //時刻取得 val date = Date() val format = SimpleDateFormat("yyyy/MM/dd HH:mm:ss", Locale.getDefault()) val input = findViewById<TextView>(R.id.nowTime) input.text = format.format(date) //退勤ボタンオブジェクト取得 val btLeave = findViewById<Button>(R.id.btLeave) //出勤ボタンオブジェクト取得 val btAttendance = findViewById<Button>(R.id.btAttendance) //実績ボタンオブジェクト取得 val buttonResult = findViewById<Button>(R.id.btResult) } override fun onStart() { super.onStart() } override fun onResume() { super.onResume() } //退勤ボタンがタップされた時の処理メソッド fun onLeaveClick(view: View){ //timeオブジェクト取得 val timer = findViewById<Chronometer>(R.id.chronometer) //resultTimeオブジェクト取得 val resulttime = findViewById<TextView>(R.id.resultTime) resulttime.setText(timer.text.toString()) timer.stop() //出勤ボタン押せるようにする btAttendance.isEnabled = true //退勤ボタン押せないようにすうる btLeave.isEnabled = false } //出勤ボタンがタップされた時の処理メソッド fun onAttendanceClick(view: View){ //退勤ボタン押せるようにする btLeave.isEnabled = true //timeオブジェクト取得 val timer = findViewById<Chronometer>(R.id.chronometer) //退勤ボタンを押せるようにする btLeave.isEnabled = true //出勤ボタン押せるようにする btAttendance.isEnabled = false //timeスタート timer.start() } //実績ボタンを押したら実績ページに遷移する fun onResultClick(view: View){ //インテントオブジェクトを生成 val intent = Intent(applicationContext, ResultActivity::class.java) //画面遷移 startActivity(intent) } override fun onDestroy() { super.onDestroy() } } } }ResultActivityでデータ取得を行います。
ResultActivity.ktclass ResultActivity : AppCompatActivity() { companion object { lateinit var database: ResultRoomDatabase } data class ViewHolder(val resultView: ListView) override fun onCreate(savedInstanceState: Bundle?) { super.onCreate(savedInstanceState) setContentView(R.layout.result) //戻るオブジェクト取得 val btBack = findViewById<Button>(R.id.btBack) } override fun onResume(){ super.onResume() //ListViewオブジェクト作成 val result = findViewById<ListView>(R.id.result) database = Room.databaseBuilder(this, ResultRoomDatabase::class.java, "kotlin_room_sumple.db").build() GlobalScope.launch(Dispatchers.Main) { val dao = database.resultDao() dao.delete(Result(40, "09:00", "17:30", 8, "2020/01/23", 2)) dao.insertAll(Result(40, "09:00", "17:30", 8, "2020/01/23", 2)) val id = dao.getId() val arrayAdapter: ArrayAdapter<Result> = ArrayAdapter(this@ResultActivity, android.R.layout.simple_list_item_1, id) result.adapter = arrayAdapter } } fun onBack(view: View){ finish() } override fun onDestroy() { super.onDestroy() } }ResultDao.kt@Dao interface ResultDao { @Query("select * from result") suspend fun getAll(): List<Result> @Insert suspend fun insertAll(results: Result) @Delete suspend fun delete(result: Result) @Query("select version from result") suspend fun getId(): Int }Result.kt@Entity(tableName = "result") data class Result ( @PrimaryKey val uid: Int, @ColumnInfo(name = "start-time") val startTime: String?, @ColumnInfo(name = "end-time") val endTime: String?, @ColumnInfo(name = "time") val time: Int?, @ColumnInfo(name = "date") val date: String?, @ColumnInfo(name = "version") val version: Int )AppDatabase.kt@Database(entities = arrayOf(Result::class), version = 1, exportSchema = false) public abstract class ResultRoomDatabase : RoomDatabase(){ abstract fun resultDao(): ResultDao companion object { @Volatile private var INSTANCE: ResultRoomDatabase? = null fun getDatabase(context: Context): ResultRoomDatabase{ val tempInstance = INSTANCE if(tempInstance != null){ return tempInstance } @UseExperimental(kotlinx.coroutines.InternalCoroutinesApi::class) synchronized(this) { val instance = Room.databaseBuilder( context.applicationContext, ResultRoomDatabase::class.java, "result_database").build() INSTANCE = instance return instance } } } }result.xml<androidx.constraintlayout.widget.ConstraintLayout xmlns:android="http://schemas.android.com/apk/res/android" xmlns:app="http://schemas.android.com/apk/res-auto" xmlns:tools="http://schemas.android.com/tools" android:layout_width="match_parent" android:layout_height="match_parent"> <Button android:id="@+id/btBack" android:layout_width="wrap_content" android:layout_height="wrap_content" android:layout_marginStart="54dp" android:layout_marginBottom="42dp" android:onClick="onBack" android:text="@string/bt_back" app:layout_constraintBottom_toBottomOf="parent" app:layout_constraintStart_toStartOf="parent" /> <TextView android:id="@+id/textView" android:layout_width="wrap_content" android:layout_height="wrap_content" android:layout_marginStart="29dp" android:layout_marginTop="24dp" android:text="今月の勤怠" app:layout_constraintStart_toStartOf="parent" app:layout_constraintTop_toTopOf="parent" /> <ListView android:id="@+id/result" android:layout_width="match_parent" android:layout_height="match_parent" android:layout_marginTop="132dp" android:layout_marginBottom="90dp" app:layout_constraintBottom_toTopOf="@+id/btBack" app:layout_constraintTop_toBottomOf="@+id/textView" android:textSize="40dp" android:layout_weight = "0.6"/> </androidx.constraintlayout.widget.ConstraintLayout>activity_main.xml<androidx.constraintlayout.widget.ConstraintLayout xmlns:android="http://schemas.android.com/apk/res/android" xmlns:app="http://schemas.android.com/apk/res-auto" xmlns:tools="http://schemas.android.com/tools" android:layout_width="match_parent" android:layout_height="match_parent" tools:context=".MainActivity"> <TextView android:id="@+id/nowTime" android:layout_width="wrap_content" android:layout_height="wrap_content" android:layout_marginTop="20dp" android:layout_marginEnd="35dp" android:text="@string/nowTime" app:layout_constraintEnd_toEndOf="parent" app:layout_constraintTop_toTopOf="parent" /> <Chronometer android:id="@+id/chronometer" android:layout_width="wrap_content" android:layout_height="wrap_content" android:layout_marginStart="182dp" android:layout_marginTop="206dp" android:layout_marginEnd="182dp" android:text="@string/chronometerText" android:textSize="36sp" app:layout_constraintEnd_toEndOf="parent" app:layout_constraintStart_toStartOf="parent" app:layout_constraintTop_toTopOf="parent" /> <Button android:id="@+id/btLeave" android:layout_width="wrap_content" android:layout_height="wrap_content" android:layout_marginStart="30dp" android:layout_marginTop="200dp" android:text="@string/bt_leave" app:layout_constraintEnd_toStartOf="@+id/btResult" app:layout_constraintHorizontal_bias="0.5" app:layout_constraintStart_toEndOf="@+id/btAttendance" app:layout_constraintTop_toBottomOf="@+id/chronometer" android:onClick="onLeaveClick" android:enabled="false"/> <Button android:id="@+id/btAttendance" android:layout_width="wrap_content" android:layout_height="wrap_content" android:layout_marginStart="16dp" android:layout_marginTop="200dp" android:onClick="onAttendanceClick" android:text="@string/bt_attendance" app:layout_constraintEnd_toStartOf="@+id/btLeave" app:layout_constraintHorizontal_bias="0.5" app:layout_constraintHorizontal_chainStyle="spread_inside" app:layout_constraintStart_toStartOf="parent" app:layout_constraintTop_toBottomOf="@+id/chronometer" /> <Button android:id="@+id/btResult" android:layout_width="wrap_content" android:layout_height="wrap_content" android:layout_marginStart="30dp" android:layout_marginTop="200dp" android:layout_marginEnd="71dp" android:text="@string/bt_result" app:layout_constraintEnd_toEndOf="parent" app:layout_constraintStart_toEndOf="@+id/btLeave" app:layout_constraintTop_toBottomOf="@+id/chronometer" android:onClick="onResultClick"/> <Button android:id="@+id/btRest" android:layout_width="wrap_content" android:layout_height="wrap_content" android:layout_marginStart="16dp" android:layout_marginTop="41dp" android:text="@string/bt_rest" app:layout_constraintEnd_toStartOf="@+id/btClear" app:layout_constraintHorizontal_bias="0.5" app:layout_constraintStart_toStartOf="parent" app:layout_constraintTop_toBottomOf="@+id/btAttendance" android:onClick="onResultViewClick"/> <Button android:id="@+id/btClear" android:layout_width="wrap_content" android:layout_height="wrap_content" android:layout_marginStart="30dp" android:layout_marginTop="41dp" android:text="@string/bt_clear" app:layout_constraintEnd_toEndOf="parent" app:layout_constraintHorizontal_bias="0.5" app:layout_constraintStart_toEndOf="@+id/btRest" app:layout_constraintTop_toBottomOf="@+id/btLeave" /> <TextView android:id="@+id/resultTime" android:layout_width="wrap_content" android:layout_height="wrap_content" android:layout_marginStart="32dp" android:layout_marginTop="131dp" android:text="@string/resultTimeText" app:layout_constraintStart_toStartOf="parent" app:layout_constraintTop_toTopOf="parent" /> <TextView android:id="@+id/resultView" android:layout_width="wrap_content" android:layout_height="wrap_content" android:layout_marginStart="44dp" android:layout_marginTop="86dp" android:text="@string/resultText" app:layout_constraintStart_toStartOf="parent" app:layout_constraintTop_toBottomOf="@+id/resultTime" /> </androidx.constraintlayout.widget.ConstraintLayout>実機操作
- 投稿日:2020-02-04T19:01:18+09:00
[kotlin]アンドロイドでViewにアニメーションを設定する
今回やること
TextViewにアニメーションを設定して「タップしてアニメーション発動 -> アニメーション終了時に画面遷移」の動きを実装する
公式ドキュメント :https://developer.android.com/guide/topics/resources/animation-resource
これ↓
実装
アニメーションの定義
流れ的にはアニメーションをxmlファイルで定義してそれをテキストビューに設定する
resフォルダ直下のanimフォルダ(デフォルトではないので新規追加する)にアニメーションを定義した以下のxmlファイルを置く
scale_down_up.xml<set xmlns:android="http://schemas.android.com/apk/res/android"> <scale android:duration="500" android:fillAfter="true" android:fromXScale="1.0" android:fromYScale="1.0" android:interpolator="@android:anim/accelerate_decelerate_interpolator" android:pivotX="50%" android:pivotY="50%" android:toXScale="0.7" android:toYScale="0.7" /> <alpha android:duration="500" android:fromAlpha="1.0" android:interpolator="@android:anim/linear_interpolator" android:toAlpha="0.7" /> <set> <scale android:duration="500" android:fillAfter="true" android:fromXScale="1.0" android:fromYScale="1.0" android:interpolator="@android:anim/linear_interpolator" android:pivotX="50%" android:pivotY="50%" android:startOffset="500" android:toXScale="1.43" android:toYScale="1.43" /> <alpha android:duration="500" android:fromAlpha="1.0" android:interpolator="@android:anim/linear_interpolator" android:startOffset="500" android:toAlpha="1.43" /> </set> </set>二つのアニメーションを定義してみた。1つ目の
scaleでサイズを小さくしてstartOffsetで1個めのアニメーション終了時に2個目のサイズを大きくするscaleを定義アニメーションをセット
レイアウトファイルに適当に
TextViewを配置する
activity_main.xml<androidx.constraintlayout.widget.ConstraintLayout xmlns:android="http://schemas.android.com/apk/res/android" xmlns:app="http://schemas.android.com/apk/res-auto" xmlns:tools="http://schemas.android.com/tools" android:layout_width="match_parent" android:layout_height="match_parent" tools:context=".MainActivity"> <TextView android:id="@+id/animText" android:layout_width="wrap_content" android:layout_height="wrap_content" android:background="@color/colorAccent" android:elevation="6dp" android:text="TextView" android:textSize="50sp" app:layout_constraintBottom_toBottomOf="parent" app:layout_constraintEnd_toEndOf="parent" app:layout_constraintStart_toStartOf="parent" app:layout_constraintTop_toTopOf="parent" /> </androidx.constraintlayout.widget.ConstraintLayout>
MainActivityでTextViewにアニメーションをセットする
テキストをクリックしたときにアニメーションが発動するようにするMainActivity.ktoverride fun onCreate(savedInstanceState: Bundle?) { super.onCreate(savedInstanceState) setContentView(R.layout.activity_main) animText.setOnClickListener{ // animation をつける AnimationUtils.loadAnimation(this.applicationContext, R.anim.scale_down_up).also{ animText.startAnimation(it) } // animationリスナーをセット animText.animation.setAnimationListener(object: Animation.AnimationListener{ override fun onAnimationRepeat(animation: Animation?) { } override fun onAnimationEnd(animation: Animation?) { //アニメーションが終わったら遷移 val intent = Intent(applicationContext, SubActivity::class.java) startActivity(intent) } override fun onAnimationStart(animation: Animation?) { } }) } }
AnimationListenerを使ってアニメーションが終了したときの処理を書くおわり


- 投稿日:2020-02-04T18:58:38+09:00
Androidアプリの時間指定公開のやり方と注意点【2020年2月4日時点】
Google Play Console で【時間指定公開】をする場合のやり方と注意点のメモです。
現状UI/UXともにかなり使いづらい点があるので、早く改善されることを祈ってます。内部テストを飛ばして【審査中】の時は、そもそも【時間指定公開】の設定ができない
内部テスト配信 → 本番の時間指定公開申請
内部テストおわったらすぐリリース準備しようとしたら、内部テストが【審査中】となった。
気にせず下記URLのヘルプの手順に従って本番の時間指定公開の設定をしようとしたところ、設定バーが表示されない事態に…。どうやら内部テストが審査中のステータスの時は、時間指定公開の設定はできないようです。
審査中のステータスが消えると、時間指定公開設定バーが表示されるようになるので、内部テストがリリースされてから時間指定公開の設定をするようにしましょう。
これはヘルプを見ても分からなかったので、要注意です。
Play Console ヘルプ 時間指定でアプリを公開する
時間指定公開とは?
時間指定公開と聞くと、日時を設定して、自動的にストアにリリースされるイメージですよね? でもここが違うんですよ・・・。
Androidアプリの時間指定公開とは、
先に申請をだして審査を完了させておき、後日公開したい日に開発者が手動でアプリをリリースする機能のこと。時間指定じゃないやん!って思いますよね…。
iosとは公開の概念が違うので要注意です。時間指定公開をonにする
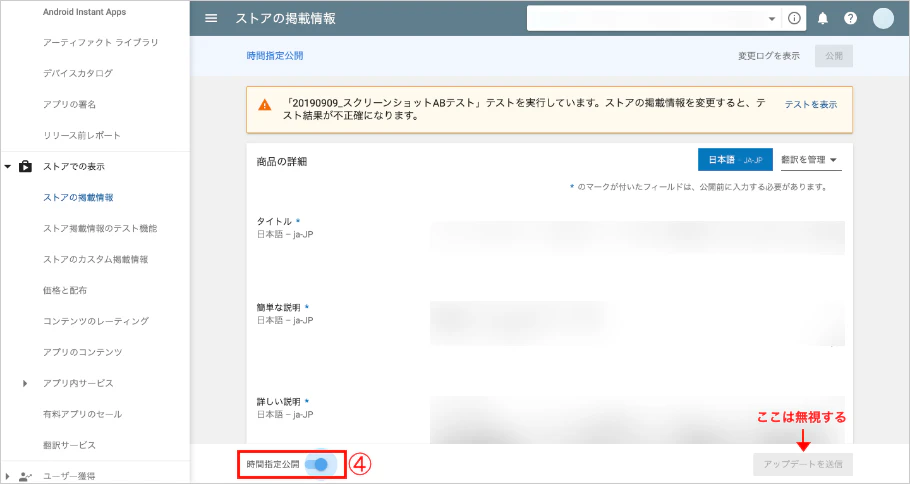
google play consoleの左メニューストアの掲載情報を選択し、右画面したに表示されている時間指定公開の
トグルをonにする時間指定公開のホップアップで【オンにする】を選択
トグルがonになっていることを確認する
トグルがonになっているのを確認して下さい。
この時、右側にあるボタン【アップデートを送信】は何も触らずに無視して下さい。通常の本番リリース手順と同じ操作をして最後に【製品版として公開を開始】ボタンを押す
通常の本番リリース手順はここでは省きますが、いつもどおりAPKを設定しリリースノートなど設定して下さい。添付画像のボタン押すとリリースされてしまうのでは?!
という恐怖心があるかとおもいますが、怖がらずに押しちゃって下さい。
これを押すと審査が始まります。また、審査が完了しても自動で公開されませんのでご安心下さい。審査は場合にもよりますが早ければ数時間以内、長ければ最大7日程かかる場合があるようです。
審査完了後は公開したい日時に画像のバーにある【公開】ボタンを押すとストアに公開される
ここまで来たら、あとは公開したい日に画像にある【公開】ボタンを押せばストアに公開されます。まとめ
時間指定公開でリリースをしたい場合、毎回このトグルをonにする作業からやる必要があります。
また、審査をしてもらうために「製品として公開を開始」という今にもリリースしてしまいそうな文言のボタンを勇気出して押さなくてはなりません。
初めて【時間指定公開】でアプリを更新するのにかなりこのフローはUXが悪かったので、
ご参考になれたら嬉しいです。現場からは以上ですm(_ _)m


- 投稿日:2020-02-04T18:44:00+09:00
adb接続できない端末でadbコマンドを実行する
特殊すぎる状況だと思います。普通に開発していれば知らなくて良い情報だと思いますが、同じ境遇に遭遇してしまった方へ哀悼の意を込めてこの記事を贈ります。
対象端末
私が出逢ってしまった子のスペックは、以下のとおりです。
- Android5.0
- WiFi接続は可能
- USB type-Aのポートはあるけど、ADB接続できなさそう
- USB type-Cはない
- micro USB Type-Bもない
つまりPCと接続できないため、adbコマンドが実行できないという特殊端末を想定します。
Wifi経由での接続方法もありますが、その場合もwifi経由での接続前にadb tcpipコマンドを打つ必要があるため、一度はPCとのadb接続しなくてはいけません。手順
(1)Android端末上でコマンドを打てるアプリをインストールする
Android端末上でadbコマンドを実行するため、アプリをインストールします。必要に応じて、ストアから、またはサイトからAPKを落としてきてUSBなどで転送することも可能です。
ここではAndroid Terminal Emulatorを紹介します。
PlayStoreから
サイトからAPKをDL(2)ADB接続
su 2000 -c 'setprop service.adb.tcp.port 2020'
su -c 'stop adbd && start adbd'
su -c adb connect localhost:2020
1行目
adb接続のためにlistenするポートを指定します。ここで、2020の部分はポートの指定ですが、1024以上ならOKとのことです。
2行目
adbを再起動します
3行目
localhostにadb接続します。このとき、1行目で指定したポート番号を指定します。こちらの記事を参考にしました。
以上で、PCとの接続なしでADBコマンドを端末から直接実行できます。
- 投稿日:2020-02-04T16:53:26+09:00
Flutterでパッケージ名(Package Name / Bundle Identifier)をiOS/Androidで修正する箇所まとめ
はじめに
flutterでプロジェクトを新しく作成するとき、
flutter create my_app_nameとすると、Package Name/Bundle Identifier は自動的に
com.example.my_app_nameのように指定されてしまいます。リリースに向けて開発を進めるのであればパッケージ名を正しく修正する必要があるので、その修正箇所をまとめておきます。Android
1. android/app/src/AndroidManifest.xml
- 3行目: package
- 8行目: android:label
<?xml version="1.0" encoding="utf-8"?>
<manifest xmlns:android="http://schemas.android.com/apk/res/android"
    package="com.your.orgname.my_app_name">

    <application
        android:name="io.flutter.app.FlutterApplication"
        android:icon="@mipmap/ic_launcher"
        android:label="My App Name">
2. android/app/src/debug/AndroidManifest.xml
- 2行目: package
<manifest xmlns:android="http://schemas.android.com/apk/res/android"
    package="com.your.orgname.my_app_name">
3. android/app/build.gradle
- 41行目付近: applicationId
    defaultConfig {
        applicationId "com.your.orgname.my_app_name"
        minSdkVersion 16
        targetSdkVersion 28
        versionCode flutterVersionCode.toInteger()
        versionName flutterVersionName
        testInstrumentationRunner "androidx.test.runner.AndroidJUnitRunner"
    }
4. MainActivity.kt
- 1行目: package
package com.your.orgname.my_app_name5. ディレクトリ変更
変更前android/app/src/main/java/com/example/my_app_name↓ packageに合わせたディレクトリに変更
変更後android/app/src/main/java/com/your/orgname/my_app_nameiOS
XcodeでBundle Identifierを修正するだけ。
(※アンダースコアが勝手にハイフンに自動変換がかかりました。Xcodeの仕様のようです。)
最初からorg名を指定するには
flutter create --org com.your.orgname my_app_name今度からはこのようにcreateしましょう。

- 投稿日:2020-02-04T16:53:26+09:00
Flutterでパッケージ名がcom.exampleになっているのをiOS/Androidで修正する箇所まとめ
はじめに
flutterでプロジェクトを新しく作成するとき、
flutter create my_app_nameとすると、Package Name/Bundle Identifier は自動的に
com.example.my_app_nameのように指定されてしまいます。リリースに向けて開発を進めるのであればパッケージ名を正しく修正する必要があるので、その修正箇所をまとめておきます。Android
1. android/app/src/AndroidManifest.xml
- 3行目: package
- 8行目: android:label
<?xml version="1.0" encoding="utf-8"?>
<manifest xmlns:android="http://schemas.android.com/apk/res/android"
    package="com.your.orgname.my_app_name">

    <application
        android:name="io.flutter.app.FlutterApplication"
        android:icon="@mipmap/ic_launcher"
        android:label="My App Name">
2. android/app/src/debug/AndroidManifest.xml
- 2行目: package
<manifest xmlns:android="http://schemas.android.com/apk/res/android"
    package="com.your.orgname.my_app_name">
3. android/app/src/profile/AndroidManifest.xml
- 2行目: package
<manifest xmlns:android="http://schemas.android.com/apk/res/android"
    package="com.your.orgname.my_app_name">
4. android/app/build.gradle
- 41行目付近: applicationId
    defaultConfig {
        applicationId "com.your.orgname.my_app_name"
        minSdkVersion 16
        targetSdkVersion 28
        versionCode flutterVersionCode.toInteger()
        versionName flutterVersionName
        testInstrumentationRunner "androidx.test.runner.AndroidJUnitRunner"
    }
5. MainActivity.kt
- 1行目: package
package com.your.orgname.my_app_name6. ディレクトリ変更
変更前android/app/src/main/java/com/example/my_app_name↓ packageに合わせたディレクトリに変更
変更後android/app/src/main/java/com/your/orgname/my_app_nameiOS
XcodeでBundle Identifierを修正するだけ。
(※アンダースコアが勝手にハイフンに自動変換がかかりました。Xcodeの仕様のようです。)
最初からorg名を指定するには
flutter create --org com.your.orgname my_app_name今度からはこのようにcreateしましょう。
- 投稿日:2020-02-04T15:08:57+09:00
[Android]リアルタイムデベロッパー通知をFirestoreに保存
少し前に、Androidのサブスクリプションについて、GooglePlayから更新情報を取得しFirestoreに保存する実装をしたので、思い出しながらまとめてみた。
前提
- Firebaseでプロジェクトを作成している
- FirebaseでCloud Functionsを編集できる権限を持つ
- Google Play Consoleで編集できる権限を持つ
- Cloud PubSubを設定する権限を持つ
実装手順
Cloud PubSubでトピックの作成
参考:トピック作成手順
- Cloud Pub/Sub設定ページに移動
- (必要であれば)プロジェクトを変更
- 「トピックを作成」を押すと、作成ダイアログが表示される
- トピックIDを入力
- 暗号化は「Googleが管理する鍵」 -「トピックを作成」を押す
Cloud PubSubでサブスクリプションの作成
参考:サブスクリプションの追加
- Cloud Pub/Sub設定ページに移動
- 対象のトピックのメニュー>サブスクリプションを作成
- サブスクリプションIDを入力
- 配信タイプはpull
- 「作成」を押す
Cloud PubSubで公開権限を付与
参考;公開権限を付与
- Cloud Pub/Sub設定ページに移動
- 対象のトピックのメニュー>権限の表示
- 「メンバーを追加」を押す
google-play-developer-notifications@system.gserviceaccount.comを入力- 役割は「Pub/Subパブリッシャー」を選択する
- 「追加」を押す
※Cloud Pub/Subの「トピックの名前」をコピーしておく。
GooglePlayConsoleでトピックの設定
参考:トピックの設定
- Consoleに移動する
- 該当のAndroid アプリを選択
- [開発ツール] > [サービスと API] ページに移動
- ページ下部の [リアルタイム デベロッパー通知] までスクロール
- Cloud Pub/Subの「トピックの名前」をコピーし、入力する
- 「保存」を押す
Cloud Functionの実装
参考:Firebase Cloud FunctionsとCloud Pub/Subの連携
Firebase Cloud Functionsを使い、Firestoreに保存する。コレクションの名前はgoogleplayとする。Cloud Functionsのindex.jsに以下を追加する。
//GooglePlayからの通知
exports.androidUpdateNotification = functions.pubsub.topic('[subscription]').onPublish((message) => {
  try {
    var json = message.json;
    json.timestamp = admin.firestore.FieldValue.serverTimestamp();
    json.date = new Date().getTime();

    let ref = admin.firestore().collection("googleplay").doc();
    ref.set(json).then(ref => {
      console.log("success to add");
    }).catch(error => {
      console.log(error);
    });

  } catch (e) {
    console.error('PubSub message was not JSON', e);
  }
});
[subscription]のところには、Cloud Pub/Subの
トピックID(トピック名でない)を入力する。
編集が終わったらDeployする。テスト
GooglePlayConsoleからテストの通知を送ることができます。
- Consoleに移動する
- 該当のAndroid アプリを選択
- [開発ツール] > [サービスと API] ページに移動
- ページ下部の [リアルタイム デベロッパー通知] までスクロール
- 「テスト通知を送信」を押す
終わりに
リアルタイムデベロッパー通知を利用し、Firestoreに保存するところまでできました。
これで、ユーザーのサブスクリプション状態の変更を受け取ることができます。
- 投稿日:2020-02-04T13:39:15+09:00
【Android】カメラ等の権限リクエスト実装方法まとめ
概要
自作のアプリでカメラやマイクを使いたい、位置情報を取得したい、などで、ユーザーに権限を許可してもらいたいときがあります。Android 6.0(API レベル 23)以降では、実行時に必要な権限を許可するようリクエストする必要があります(それ以前はアプリのインストール時にまとめてリクエストされる)。
権限リクエストの実装方法をまとめます。必要な権限はAndroidManifestに記述しておいてください。権限をリクエストする
以下ではカメラの権限をリクエストすることにします。
まず、現在のカメラのアクセス権限の状態を確認します。
checkSelfPermission()で特定の権限があるかどうかをチェックします。ある場合は0(PackageManager.PERMISSION_GRANTED)、ない場合は1(PackageManager.PERMISSION_DENIED)が返ります。val cameraPermission = ContextCompat.checkSelfPermission(context!!, Manifest.permission.CAMERA)(ここで既に権限がある(granted)場合は、そのままカメラ起動などの処理に進んでください
)
そして、カメラの権限をリクエストします。
requestPermissions()で特定の権限を許可するようにユーザーにリクエストします。第二引数で複数の権限を指定することで、まとめてリクエストできます。
ここで表示されるAndroid標準ダイアログはカスタマイズできません。if (cameraPermission != PackageManager.PERMISSION_GRANTED) { ActivityCompat.requestPermissions(activity!!, arrayOf(Manifest.permission.CAMERA), REQUEST_PERMISSION) // REQUEST_PERMISSION は定数 }これで単純な権限リクエストは完了です。
権限リクエストの説明を表示する
例えば、「この機能を使うにはカメラの権限を許可してください」のような権限リクエストについて説明を表示したいときがあります。許可されていない(denied)場合に毎回表示する方法の他に、
shouldShowRequestPermissionRationale()を使って、ユーザーがリクエストを許可しなかったことがある場合のみ表示する方法もあります。
shouldShowRequestPermissionRationale()は、以前ユーザーがリクエストを許可しなかった場合trueを返しますが、「今後表示しない」を選択していた場合はfalseを返します。ダイアログで「今後表示しない」が選択された後にリクエストが必要な場合
ユーザーがカメラの権限リクエストで「今後表示しない」を選択した後に、「やっぱりカメラ機能を使いたい……」と考えるかもしれません。その場合、デバイスの「設定」で権限を許可するしかなく、再び権限リクエストのダイアログを表示することはできません。
権限が許可されている場合、shouldShowRequestPermissionRationale()はfalseを返します。「今後表示しない」を選択していたときに何かアクションをしたい(「"設定"で許可してください」のような説明を表示するなど)場合は、checkSelfPermission()とshouldShowRequestPermissionRationale()の両方を確認する必要があります。val cameraPermission = ContextCompat.checkSelfPermission(context!!, Manifest.permission.CAMERA) val cameraRationale = ActivityCompat.shouldShowRequestPermissionRationale(activity!!, Manifest.permission.CAMERA) if (cameraPermission != PackageManager.PERMISSION_GRANTED) { if (cameraRationale) { ActivityCompat.requestPermissions(activity!!, arrayOf(Manifest.permission.CAMERA), REQUEST_PERMISSION) } else { AlertDialog.Builder(context!!) .setMessage("デバイスの「設定」でカメラの権限を許可してください。") .setPositiveButton("OK") { _, _ -> // OK button pressed } .create().show() } }上記のコード例で、PositiveButtonを押した後に設定画面を開くようにする場合は、こちらの記事もご覧ください: 【Android】アプリの権限を許可してもらうために「設定」を開きたい
参考
https://developer.android.com/training/permissions/requesting?hl=ja
- 投稿日:2020-02-04T11:49:26+09:00
[Unity] モバイル VR の APK 出力を Docker で構築するための手順
はじめに
最近 Go/GearVR 向けに作っていた VR アプリを Quest にも対応させる機会がありました

その際 Go/GearVR と Quest の APK をそれぞれ出力する時に、
Go/GearVR と Quest の設定を切り替える度にApplicationIDを変更したり、
外部サービスのコンフィグファイル差し替え作業等が必要になることが判明しました。。更に改修の度に検証やリリース用として、Go/GearVR と Quest 用含め、
計6つも APK を出力することが必要になりました。。
仕方なく最初は手作業で APK を 6つ出力していたのですが、
それだけで 20分近くも時間がかかるようになってしまいました。。
(しかも手作業だと誤った APK を出力してしまう時もあり、そうなるとやり直し。。
流石にこのままだとマズイと感じたため、まずは APK 出力を Docker で自動化しました

Docker を採用した理由は様々な CI 環境に乗せようと思った時に好都合だからです
最終的に 6つの APK 出力にかかる時間は 20分 -> 10分 で完了するようになり、
誤った内容の APK が出力されることも無くなりました
本記事では APK 出力を Docker で自動化するために行った対策手順について書いていきます

動作環境
- Unity 2018.4.9f1
- Docker 19.03.5
アプリケーションの設定値を GUI で変更出来るようにする
まずは自動化を進めるにあたって、
EditorWindowで GUI でアプリケーションの設定値が編集が出来るようにします。
GUI で設定した値はScriptableObjectで管理出来るようにします。
ScriptableObjectでアプリケーションの設定値を管理可能にする今回は下記をアプリケーションの設定値として定義します

- EnvironmentType (Enum):
STAGINGPRODUCTIONRELEASE- DeviceType (Enum):
GEAR_VR_AND_GOQUEST
EnvironmentTypeは実行環境 (検証 / 本番 / リリース) が指定できる項目となります。
DeviceTypeは実行端末 (GearVR or Go / Quest) が指定できる項目となります。実行環境や実行端末に応じて API のリクエスト先変更したり、
クレデンシャルを変更したり出来るようになる想定で用意しました
また、アプリケーションの設定値を保存する際は、
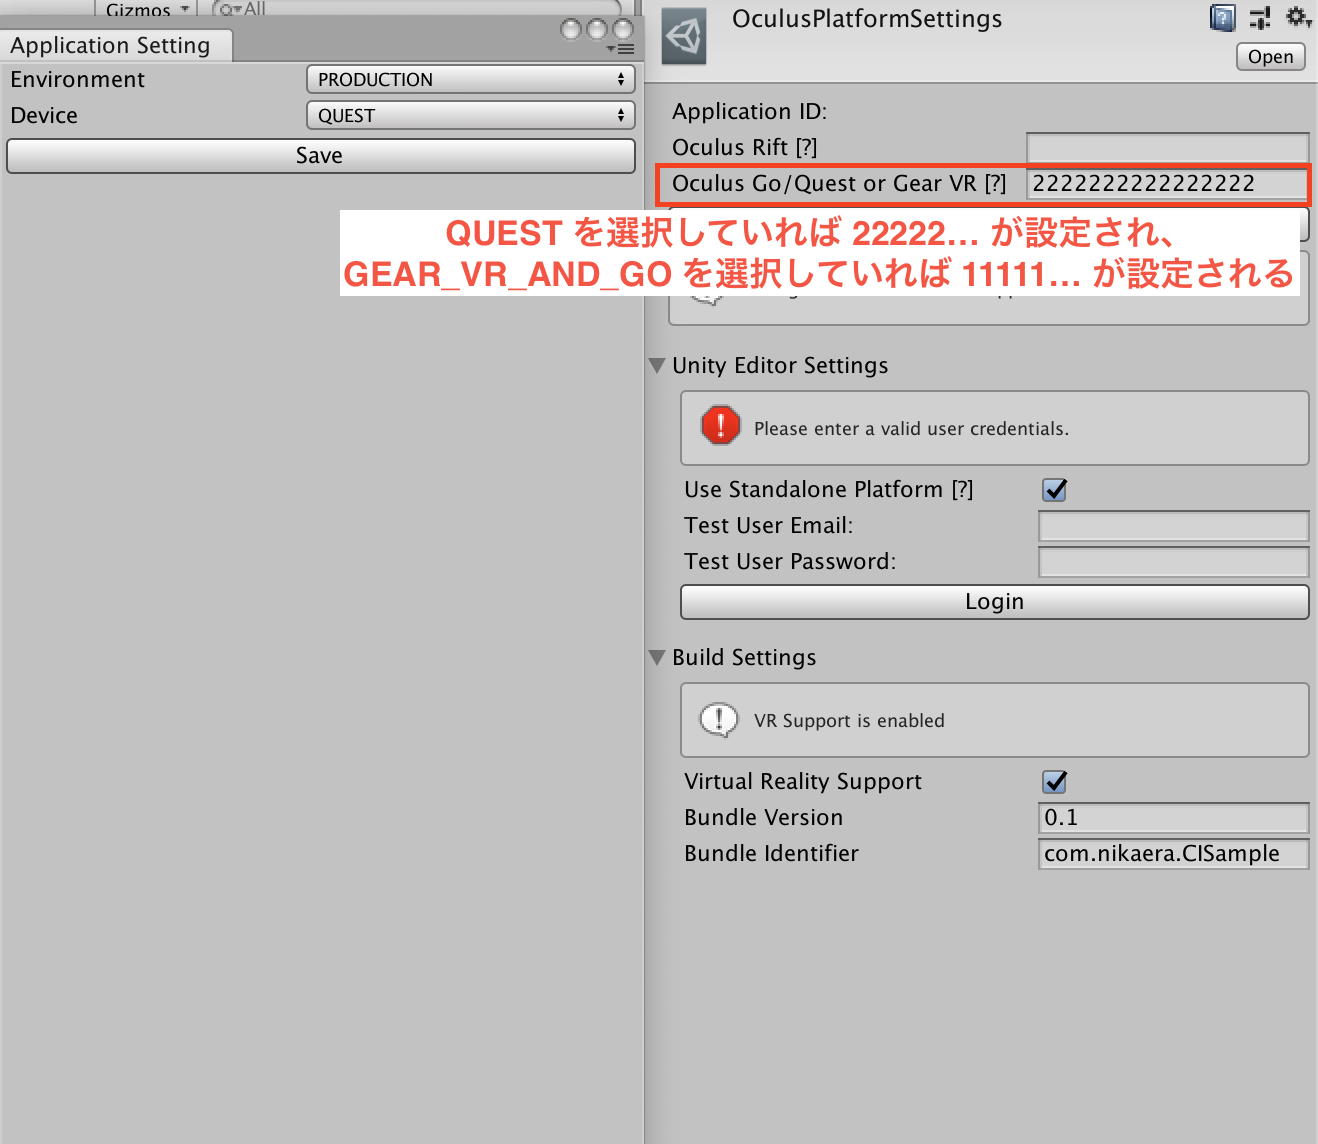
実行端末を表すDeviceTypeの値に応じて Oculus Platform の App ID も変更するようにします早速アプリケーション設定値を管理するための
ScriptableObjectを作成します Assets/Scripts/ApplicationSetting.csusing System.IO; using UnityEngine; using UnityEditor; // アプリケーションの設定値を管理するための ScriptableObject public class ApplicationSetting : ScriptableObject { // 実行端末 (GearVR or Go / Quest) の Enum public enum DeviceType { GEAR_VR_AND_GO, QUEST } // 実行環境 (検証 / 本番 / リリース) の Enum public enum EnvironmentType { STAGING, PRODUCTION, RELEASE } // 実行端末 (GearVR or Go / Quest) を設定するための変数 // 値の変更は Editor 上からのみ許可する [SerializeField] private DeviceType _device; public DeviceType Device { get { return _device; } #if UNITY_EDITOR set { _device = value; } #endif } // 実行環境 (検証 / 本番 / リリース) を設定するための変数 // 値の変更は Editor 上からのみ許可する [SerializeField] private EnvironmentType _environment; public EnvironmentType Environment { get { return _environment; } #if UNITY_EDITOR set { _environment = value; } #endif } // ========================================================== // Editor 内でしか利用しない定数や関数群 #if UNITY_EDITOR // アプリケーションの設定値の保存先 const string ASSET_FILE_PATH = "Assets/Resources/ApplicationSetting.asset"; // GearVR もしくは Oculus Go 用の App ID const string GEAR_VR_AND_GO_APPID = "1111111111111111"; // Quest 用の App ID const string QUEST_APPID = "2222222222222222"; public static ApplicationSetting ReadFromEditor() { return AssetDatabase.LoadAssetAtPath<ApplicationSetting>(ASSET_FILE_PATH); } // アプリケーションの設定値を保存するために使用する関数 public void Save() { // アプリケーション設定を保存するファイルが存在しなければ新たに生成する WriteFileIfNotExists(); // Device 変数の値を元に適切な AppID を Oculus Platform に設定する SetAppID(); // Unity の Inspector からの設定変更を許可しない this.hideFlags = HideFlags.NotEditable; // ScriptableObject に変更があったことを記録する EditorUtility.SetDirty(this); // ScriptableObject の変更内容を保存する AssetDatabase.SaveAssets(); // ScriptableObject をインポートし直す AssetDatabase.Refresh(); } // アプリケーションの設定値を保存するためのファイルを生成する関数 void WriteFileIfNotExists() { // 既にファイルが存在していれば処理を中断する if (File.Exists(ASSET_FILE_PATH)) return; // ASSET_FILE_PATH で指定された場所にファイルの実体を作成する string directory = Path.GetDirectoryName(ASSET_FILE_PATH); if (!Directory.Exists(directory)) { Directory.CreateDirectory(directory); } AssetDatabase.CreateAsset(this, ASSET_FILE_PATH); } // Device 変数の値を元に Oculus Platform の App ID の値を設定するために使用する関数 void SetAppID() { string appId = ""; switch (this.Device) { case DeviceType.GEAR_VR_AND_GO: appId = GEAR_VR_AND_GO_APPID; break; case DeviceType.QUEST: appId = QUEST_APPID; break; } Oculus.Platform.PlatformSettings.MobileAppID = appId; } #endif }
アプリケーションの設定値を管理するスクリプトが出来たので、
次はEditorWindowから設定が変更出来るようにします
EditorWindowを利用して GUI からアプリケーションの設定値を変更可能にする作成した
ScriptableObjectの値をEditorWindowから変更出来るようにします Assets/Editor/ApplicationSettingWindow.csusing UnityEngine; using UnityEditor; // アプリケーションの設定値を編集できる画面を EditorWindow で作成する public class ApplicationSettingWindow : EditorWindow { // アプリケーションの設定値を管理するための変数 private ApplicationSetting applicationSetting; // メニューの Window -> Application Setting からアクセス可能にする [MenuItem("Window/Application Setting")] public static void Create() { // アプリケーションの設定値を編集できる画面を作成する GetWindow<ApplicationSettingWindow>("Application Setting"); } private void OnEnable() { // 画面が有効化され次第、アプリケーション設定値をファイルから読み込む // ファイルから設定値が読み込めなかった場合は null が設定される applicationSetting = ApplicationSetting.ReadFromEditor(); } private void OnGUI() { // applicationSetting が正しく初期化されていなかったら、 // 新しくインスタンスを生成して applicationSetting に代入する if (applicationSetting == null) { applicationSetting = ScriptableObject.CreateInstance<ApplicationSetting>(); } // 画面に縦並びに実行環境設定用の選択リスト、実行端末設定用の選択リスト、Save ボタン (アプリケーション設定保存用ボタン) を配置する using (new GUILayout.VerticalScope()) { // 実行環境設定用の選択リストの値が変更される度に実行環境の値を設定する applicationSetting.Environment = (ApplicationSetting.EnvironmentType)EditorGUILayout.EnumPopup("Environment", applicationSetting.Environment); // 実行端末設定用の選択リストの値が変更される度に実行端末の値を設定する applicationSetting.Device = (ApplicationSetting.DeviceType)EditorGUILayout.EnumPopup("Device", applicationSetting.Device); // Save ボタンをクリックすることで、アプリケーションの設定値を保存 / 更新する if (GUILayout.Button("Save")) { applicationSetting.Save(); } } } }
上記スクリプトを
Assets/Editor/ApplicationSettingWindow.csに配置すると、
Unity メニューのWindow -> Application Settingから、
アプリケーション設定値の編集画面に遷移することが出来るようになっているはずです
また、編集画面に遷移後、
EnvironmentとDeviceを適当な値に設定してから
SaveボタンをクリックするとResourcesフォルダにアプリケーション設定値を保存するためのファイルが生成されます
アプリケーション設定値を保存するためのファイルが生成されたのを確認した後、
編集画面を開き直すと最後に更新した値が反映されていることが確認出来ます
更に Unity メニューの
Oculus -> Platform -> Edit SettingsのApplication IDを見ると、
設定したDeviceに応じて値が変化している様子が確認出来ます
Unity バッチモードで APK 出力が出来るようにする
次は Docker で APK 出力が出来るようにするために、
Unity バッチモード経由で APK 出力出来るようにします
APK の出力はプログラム経由でも実行することが可能です
Assets/Editor/ApkBuilder.csusing UnityEditor; using UnityEngine; using System.Collections.Generic; using System; using System.IO; public class ApkBuilder { // 第一引数で指定したコマンドライン引数の値の 1つ後ろの値を取得するための関数 // 例: "-device QUEST" というパラメータの QUEST を取得したい場合は key に "-device" 文字列を指定する。 static string GetValueFromCommandLineArgs(string key) { string[] args = System.Environment.GetCommandLineArgs(); for (int i = 0; i < args.Length; i++) { if (key == args[i]) return args[i + 1]; } return null; } public static void Build() { // Unity バッチモードで関数を実行する際は keystore の設定が無いので、 // コマンドライン引数から各種情報について渡すようにする必要がある if (PlayerSettings.Android.keystoreName.Length == 0 || PlayerSettings.Android.keystorePass.Length == 0 || PlayerSettings.Android.keyaliasName.Length == 0 || PlayerSettings.Android.keyaliasPass.Length == 0) { PlayerSettings.Android.keystoreName = GetValueFromCommandLineArgs("-keystoreName"); PlayerSettings.Android.keyaliasName = GetValueFromCommandLineArgs("-keyaliasName"); PlayerSettings.Android.keystorePass = GetValueFromCommandLineArgs("-keystorePass"); PlayerSettings.Android.keyaliasPass = PlayerSettings.Android.keystorePass; if (PlayerSettings.Android.keystoreName == null || PlayerSettings.Android.keyaliasName == null || PlayerSettings.Android.keystorePass == null) { Debug.LogError("Please set android keystore settings."); return; } } // Build Settings で設定シーンを全てビルドに含める EditorBuildSettingsScene[] scenes = EditorBuildSettings.scenes; List<string> scenePathList = new List<string>(); foreach (EditorBuildSettingsScene scene in scenes) { scenePathList.Add(scene.path); } var applicationSetting = ApplicationSetting.ReadFromEditor(); string device = applicationSetting.Device.ToString().ToLower(); string environment = applicationSetting.Environment.ToString().ToLower(); BuildPlayerOptions buildPlayerOptions = new BuildPlayerOptions(); buildPlayerOptions.scenes = scenePathList.ToArray(); // プロジェクト直下の build フォルダに quest_production_20200202.apk のようなファイル名の APK を出力する DateTime currentDate = DateTime.Now; string dateString = $"{currentDate.Year}{currentDate.Month}{currentDate.Day.ToString("D2")}"; string outputDirectory = "build"; if (!Directory.Exists(outputDirectory)) { Directory.CreateDirectory(outputDirectory); } buildPlayerOptions.locationPathName = $"{outputDirectory}/{device}_{environment}_{dateString}.apk"; buildPlayerOptions.target = BuildTarget.Android; buildPlayerOptions.options = BuildOptions.None; applicationSetting.Save(); BuildPipeline.BuildPlayer(buildPlayerOptions); } }
Assets/Editor/ApkBuilder.csスクリプト内のBuild関数は
キーストアが既に存在している前提の作りとなっているため、
まだキーストアを作っていない方は こちらの手順 に従って、
予めキーストアファイルとエイリアスの作成を行っておきましょうまた上記の
ApkBuilder.Build関数は Unity バッチモードからも実行出来ますが、
Editor 上からも実行出来るようになっています。Editor 上からも APK 出力が確認できるようになっていると、
本当に正確な APK 出力が行われるかデバッグを行う際に便利ですそこで、早速 Editor 上からも実行できるように、
Assets/Editor/ApplicationSettingWindow.csにBuildボタンを配置して、
ボタンをクリックしたら APK 出力出来るようにしてみましょう Assets/Editor/ApplicationSettingWindow.csusing UnityEngine; using UnityEditor; // アプリケーションの設定値を編集できる画面を EditorWindow で作成する public class ApplicationSettingWindow : EditorWindow { // アプリケーションの設定値を管理するための変数 private ApplicationSetting applicationSetting; // メニューの Window -> Application Setting からアクセス可能にする [MenuItem("Window/Application Setting")] public static void Create() { // アプリケーションの設定値を編集できる画面を作成する GetWindow<ApplicationSettingWindow>("Application Setting"); } private void OnEnable() { // 画面が有効化され次第、アプリケーション設定値をファイルから読み込む // ファイルから設定値が読み込めなかった場合は null が設定される applicationSetting = ApplicationSetting.ReadFromEditor(); } private void OnGUI() { // applicationSetting が正しく初期化されていなかったら、 // 新しくインスタンスを生成して applicationSetting に代入する if (applicationSetting == null) { applicationSetting = ScriptableObject.CreateInstance<ApplicationSetting>(); } // 画面に縦並びに実行環境設定用の選択リスト、実行端末設定用の選択リスト、Save ボタン (アプリケーション設定保存用ボタン) を配置する using (new GUILayout.VerticalScope()) { // 実行環境設定用の選択リストの値が変更される度に実行環境の値を設定する applicationSetting.Environment = (ApplicationSetting.EnvironmentType)EditorGUILayout.EnumPopup("Environment", applicationSetting.Environment); // 実行端末設定用の選択リストの値が変更される度に実行端末の値を設定する applicationSetting.Device = (ApplicationSetting.DeviceType)EditorGUILayout.EnumPopup("Device", applicationSetting.Device); // Save ボタンをクリックすることで、アプリケーションの設定値を保存 / 更新する if (GUILayout.Button("Save")) { // Unity の Inspector からの設定変更を許可しない applicationSetting.hideFlags = HideFlags.NotEditable; // ScriptableObject に変更があったことを記録する EditorUtility.SetDirty(applicationSetting); applicationSetting.Save(); } // Build ボタンをクリックし、ApkBuilder.Build 関数を実行することで、 // 現在のアプリケーション設定内容を元に APK をプロジェクト直下の build フォルダに生成する if (GUILayout.Button("Build")) { ApkBuilder.Build(); } } } }
これで Unity メニューの
Window -> Application Settingを開いた際に、
Buildボタンが画面の最下部に表示されるようになったはずです試しに
Buildボタンをクリックして APK 出力を行ってみましょう
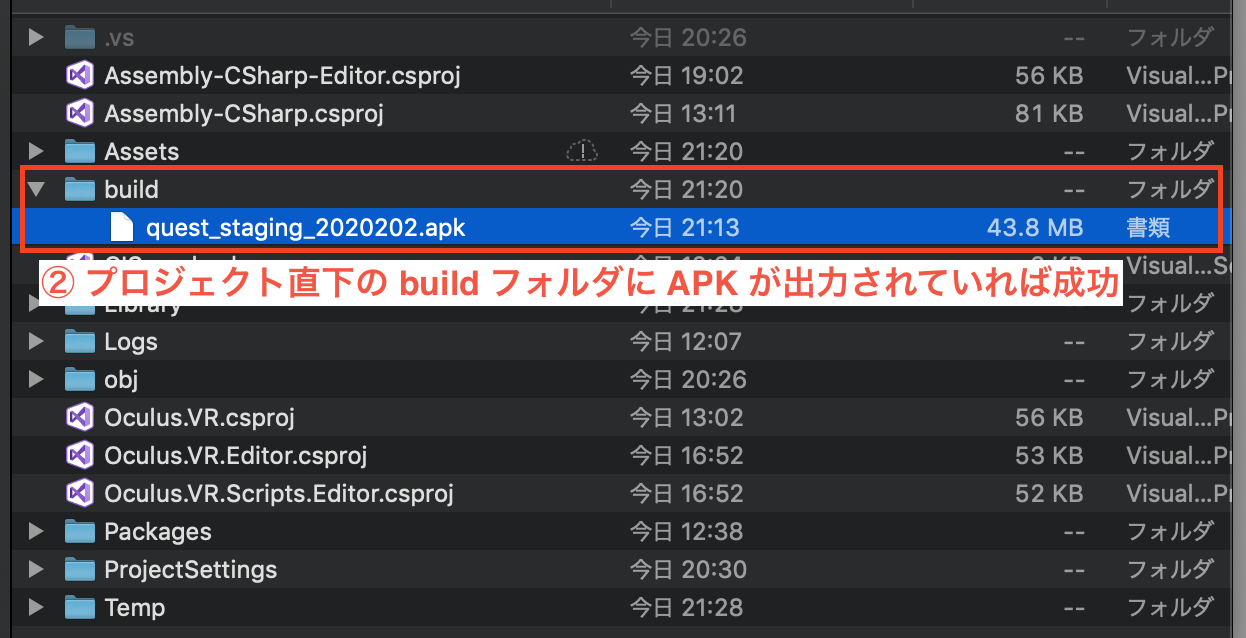
下記のコマンドをターミナルで入力すると、
buildフォルダ内に APK が再度出力されること確認出来ると思います
(APK ファイルが上書きされて更新日時が新しくなっているはず# Windows の場合 "C:\Program Files\Unity\Editor\Unity.exe" \ -quit -batchmode -projectPath ~/Desktop/CISample \ -executeMethod ApkBuilder.Build \ -keystoreName ~/Desktop/CISample.keystore -keyaliasName cisample \ -keystorePass CISample # Mac の場合 /Applications/Unity/Hub/Editor/2018.4.9f1/Unity.app/Contents/MacOS/Unity \ -quit -batchmode -projectPath ~/Desktop/CISample \ -executeMethod ApkBuilder.Build \ -keystoreName ~/Desktop/CISample.keystore -keyaliasName cisample \ -keystorePass CISampleあとは Unity バッチモード経由で様々な設定の APK 出力が出来るように、
Assets/Editor/ApkBuilder.csを改修していきます
Unity バッチモードで引数を元に APK 出力の設定が出来るようにする
具体的には
Assets/Editor/ApkBuilder.csに下記のような改修を行いますAssets/Editor/ApkBuilder.csusing UnityEditor; using UnityEngine; using System.Collections.Generic; using System; using System.IO; using DeviceType = ApplicationSetting.DeviceType; using EnvironmentType = ApplicationSetting.EnvironmentType; public class ApkBuilder { // 第一引数で指定したコマンドライン引数の値の 1つ後ろの値を取得するための関数 // 例: "-device QUEST" というパラメータの QUEST を取得したい場合は key に "-device" 文字列を指定する。 static string GetValueFromCommandLineArgs(string key) { string[] args = System.Environment.GetCommandLineArgs(); for (int i = 0; i < args.Length; i++) { if (key == args[i]) return args[i + 1]; } return null; } public static void Build() { var defaultApplicationSetting = ApplicationSetting.ReadFromEditor(); var applicationSetting = ApplicationSetting.ReadFromEditor(); // Unity バッチモードで実行時にコマンドライン引数の情報を元に // Device と Environment の設定を変更出来るようにする string deviceStringArg = GetValueFromCommandLineArgs("-device"); string environmentStringArg = GetValueFromCommandLineArgs("-environment"); if (deviceStringArg != null && environmentStringArg != null) { applicationSetting.Device = (DeviceType)Enum.Parse(typeof(DeviceType), deviceStringArg); applicationSetting.Environment = (EnvironmentType)Enum.Parse(typeof(EnvironmentType), environmentStringArg); } // Unity バッチモードで関数を実行する際は keystore の設定が無いので、 // コマンドライン引数から各種情報について渡すようにする必要がある if (PlayerSettings.Android.keystoreName.Length == 0 || PlayerSettings.Android.keystorePass.Length == 0 || PlayerSettings.Android.keyaliasName.Length == 0 || PlayerSettings.Android.keyaliasPass.Length == 0) { PlayerSettings.Android.keystoreName = GetValueFromCommandLineArgs("-keystoreName"); PlayerSettings.Android.keyaliasName = GetValueFromCommandLineArgs("-keyaliasName"); PlayerSettings.Android.keystorePass = GetValueFromCommandLineArgs("-keystorePass"); PlayerSettings.Android.keyaliasPass = PlayerSettings.Android.keystorePass; if (PlayerSettings.Android.keystoreName == null || PlayerSettings.Android.keyaliasName == null || PlayerSettings.Android.keystorePass == null) { Debug.LogError("Please set android keystore settings."); return; } } // Build Settings で設定シーンを全てビルドに含める EditorBuildSettingsScene[] scenes = EditorBuildSettings.scenes; List<string> scenePathList = new List<string>(); foreach (EditorBuildSettingsScene scene in scenes) { scenePathList.Add(scene.path); } BuildPlayerOptions buildPlayerOptions = new BuildPlayerOptions(); buildPlayerOptions.scenes = scenePathList.ToArray(); // プロジェクト直下の build フォルダに quest_production_20200202.apk のようなファイル名の APK を出力する DateTime currentDate = DateTime.Now; string dateString = $"{currentDate.Year}{currentDate.Month}{currentDate.Day.ToString("D2")}"; string outputDirectory = "build"; if (!Directory.Exists(outputDirectory)) { Directory.CreateDirectory(outputDirectory); } string device = applicationSetting.Device.ToString().ToLower(); string environment = applicationSetting.Environment.ToString().ToLower(); buildPlayerOptions.locationPathName = $"{outputDirectory}/{device}_{environment}_{dateString}.apk"; buildPlayerOptions.target = BuildTarget.Android; buildPlayerOptions.options = BuildOptions.None; applicationSetting.Save(); BuildPipeline.BuildPlayer(buildPlayerOptions); // Unity プロジェクトで元々設定していた内容にアプリケーション設定を戻す defaultApplicationSetting.Save(); } }これで Unity バッチモードで
ApkBuilder.Build関数実行時に、
-deviceと-environmentを指定した際に、
明示的にアプリケーション設定を指定した状態で APK を出力出来るようになりました試しに Unity バッチモードで
-deviceと-environmentも引数に指定して APK 出力を行います /Applications/Unity/Hub/Editor/2018.4.9f1/Unity.app/Contents/MacOS/Unity \ -quit -batchmode -projectPath ~/Desktop/CISample \ -executeMethod ApkBuilder.Build \ -keystoreName ~/Desktop/CISample.keystore -keyaliasName cisample \ -keystorePass CISample \ -device GEAR_VR_AND_GO -environment RELEASE
すると
-deviceと-environmentで指定した内容で APK が出力されているはずです
次は Docker コンテナで Unity バッチモードが実行できるようにします
Docker コンテナで Unity のバッチモード実行が出来るようにする
まずは Unity の Docker イメージを pull します
私は 2018.4.9f1 を使用していたので、tag が2018.4.9f1-androidのイメージを pull していますdocker pull gableroux/unity3d:2018.4.9f1-androidDocker イメージのダウンロードが完了した後は、
下記コマンドで Docker コンテナを立ち上げて対話モードを起動します # bash の場合 docker run -it --rm -e "UNITY_USERNAME=<Unity ID のユーザ名>" \ -e "UNITY_PASSWORD=<Unity ID のパスワード>" -e "TEST_PLATFORM=linux" \ -e "WORKDIR=/root/project" -e "$(pwd):/root/project" \ gableroux/unity3d:2018.4.9f1-android bash # fish の場合 eval docker run -it --rm -e "UNITY_USERNAME=<Unity ID のユーザ名>" \ -e "UNITY_PASSWORD=<Unity ID のパスワード>" -e "TEST_PLATFORM=linux" \ -e "WORKDIR=/root/project" -e "(pwd):/root/project" \ gableroux/unity3d:2018.4.9f1-android bash
対話モードが正常に起動できたら下記コマンドで、
ライセンスのアクティベーションを要求するための xml を出力します xvfb-run --auto-servernum --server-args='-screen 0 640x480x24' \ /opt/Unity/Editor/Unity -logFile -batchmode \ -username "$UNITY_USERNAME" -password "$UNITY_PASSWORD" # ... # 下記の Posting という出力の後ろにある xml を、 # Unity_v<バージョン>.alf という名前でファイルに保存する LICENSE SYSTEM [202022 9:57:44] Posting <?xml version="1.0" encoding="UTF-8"?><root><SystemInfo><IsoCode>en</IsoCode><UserName>(unset)</UserName><OperatingSystem>...</MachineBindings><UnityVersion Value="2018.4.9f1" /></License></root> # ...
私は Unity のバージョン
2018.4.9f1を使用しているので、
Unity_v2018.4.9f1.alfというファイル名で保存しました
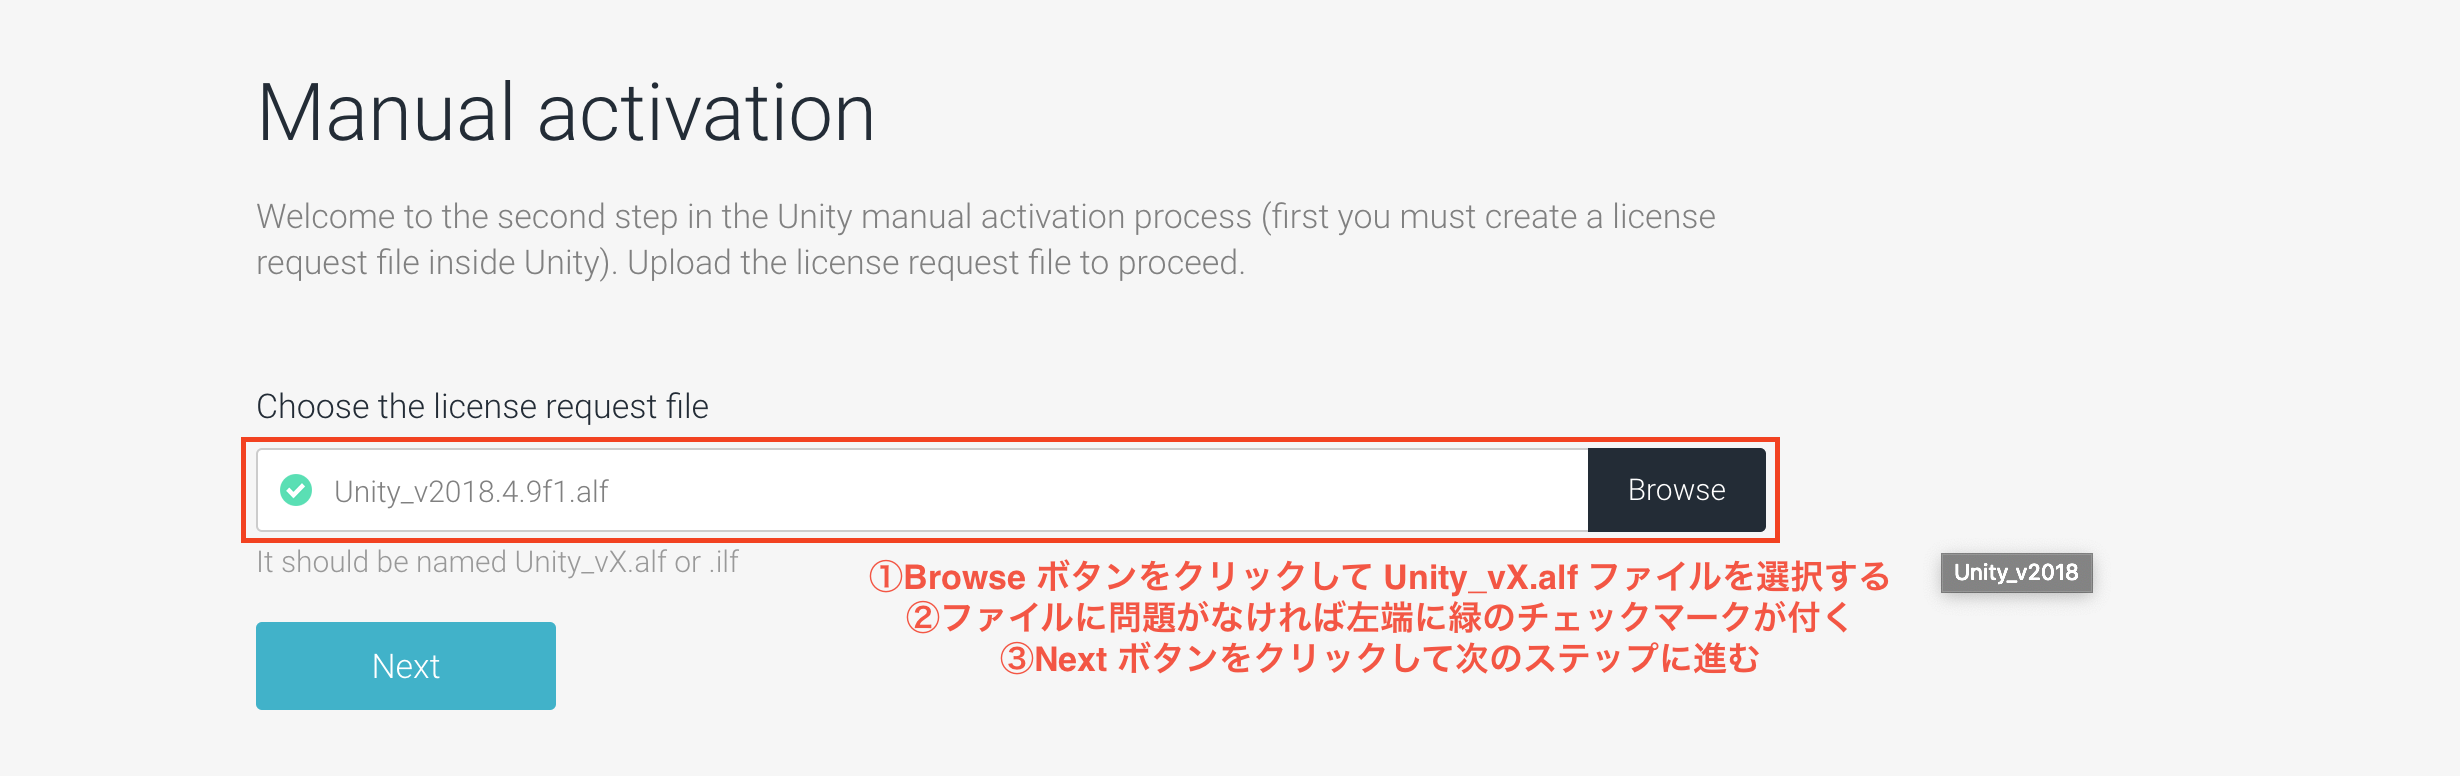
その後、https://license.unity3d.com/manual へアクセスします

するとライセンスのアクティベーションを要求するためにファイルをアップロードするよう促されるので、
先程保存したUnity_v2018.4.9f1.alfというファイルをアップロードします
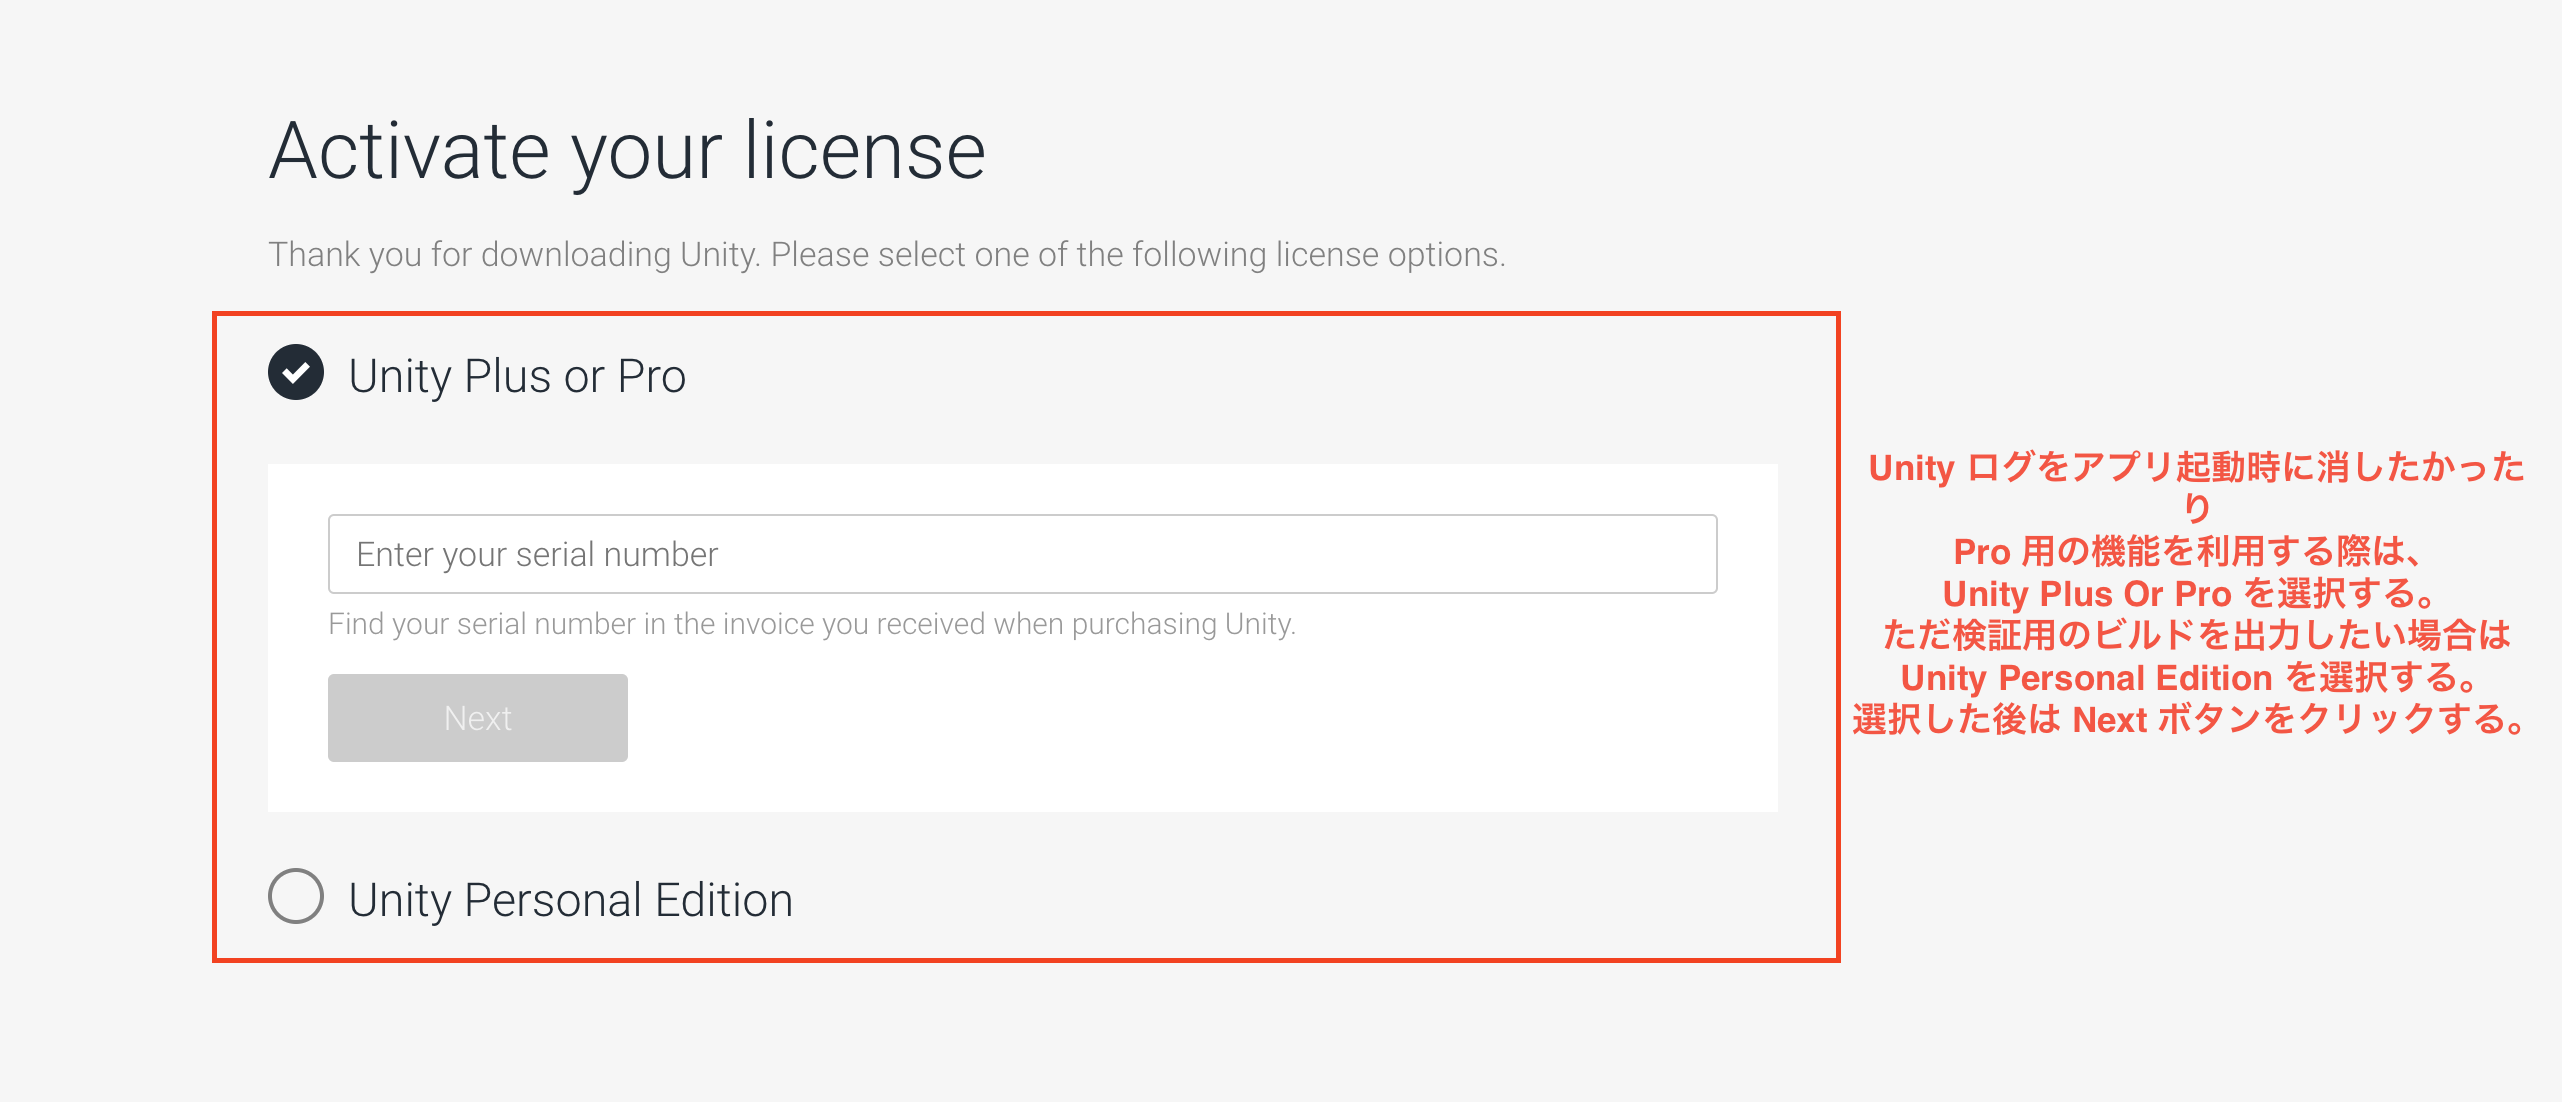
アップロードして無事にアクティベーションの要求が成功すると、
Unity Plus or ProとUnity Personal Editionのライセンス、
どちらをアクティベートするか聞かれるので選択して Next ボタンをクリックします
正常に認証が完了すれば、
Download license fileボタンが出てくるので、クリックしてライセンスファイルをダウンロードします。
ライセンスファイルはUnity_v2018.x.ulfという名前でダウンロードされますこれでようやく Docker コンテナ上で Unity バッチモードを実行する環境が整いました
早速 Unity プロジェクトビルド用のDockerfileを作成します# Unity プロジェクトのバージョンと合わせて Unity バージョンは 2018.4.9f1 を使用する # また Android プラットフォーム向けのビルドが行えるイメージを引っ張ってくる FROM gableroux/unity3d:2018.4.9f1-android LABEL maintainer="Admin <admin@nikaera.com>" # Unity ライセンスファイルやキーストア、プロジェクトファイルを Docker イメージに内包する COPY ./Unity_v2018.x.ulf /root/.local/share/unity3d/Unity/Unity_lic.ulf COPY ./CISample.keystore /root/CISample.keystore COPY ./unity /root/unity # APK 出力のための関数への引数として DEVICE と APP_ENV という環境変数で CMD /opt/Unity/Editor/Unity \ -quit -batchmode -nographics -logFile -projectPath /root/unity \ -executeMethod ApkBuilder.Build \ -keystoreName /root/CISample.keystore -keyaliasName cisample \ -keystorePass CISample \ -device $DEVICE -environment $APP_ENVまた Docker 導入にあたってプロジェクトのフォルダ構成は下記のようになっております
.
├── CISample.keystore # Android ビルド時に利用するキーストアファイル
├── Dockerfile        # Docker イメージをビルド際に使用するファイル
├── Unity_v2018.x.ulf # Unity のライセンスファイル
└── unity     # Unity プロジェクトフォルダを unity フォルダに移行する
    ├── Assembly-CSharp-Editor.csproj
    ├── Assembly-CSharp.csproj
    ├── Assets
    ├── CISample.sln
    ├── Library
    ├── Logs
    ├── Oculus.VR.Editor.csproj
    ├── Oculus.VR.Scripts.Editor.csproj
    ├── Oculus.VR.csproj
    ├── Packages
    ├── ProjectSettings
    ├── build
    └── obj
Dockerfileの内容を元にプロジェクトルートでターミナルから下記コマンドでイメージを作成しますdocker build -t nikaera/cisample .正常にイメージ作成出来たら試しに実際に Docker コンテナで APK を出力してみます
# APK 出力フォルダをホストと共有しておくことで出力した APK が参照出来るようにする
# 環境変数 DEVICE に QUEST、環境変数 APP_ENV に RELEASE を指定することで
# Quest のリリース版 APK を出力する。
docker run -v ~/Desktop/build:/root/unity/build --rm \
--env DEVICE=QUEST --env APP_ENV=RELEASE nikaera/cisample
正常に APK 出力出来ればデスクトップの build フォルダ内に
quest_release_<日付>.apkが出来ているはずです
Docker コンテナで全ての APK 出力を行う
ここまできたら後はスクリプト等で一気に全パターンの APK を出力します
まずは全 APK 出力を Docker コンテナで行うためのシェルスクリプトを作成しますbuild.sh#!/bin/bash docker run -v $1:/root/unity/build --rm --env DEVICE=GEAR_VR_AND_GO --env APP_ENV=STAGING nikaera/cisample docker run -v $1:/root/unity/build --rm --env DEVICE=GEAR_VR_AND_GO --env APP_ENV=PRODUCTION nikaera/cisample docker run -v $1:/root/unity/build --rm --env DEVICE=GEAR_VR_AND_GO --env APP_ENV=RELEASE nikaera/cisample docker run -v $1:/root/unity/build --rm --env DEVICE=QUEST --env APP_ENV=STAGING nikaera/cisample docker run -v $1:/root/unity/build --rm --env DEVICE=QUEST --env APP_ENV=PRODUCTION nikaera/cisample docker run -v $1:/root/unity/build --rm --env DEVICE=QUEST --env APP_ENV=RELEASE nikaera/cisampleシェルスクリプトを用意次第、下記コマンドで一気に APK を出力します
bash build.sh ~/Desktop/buildすると全実行環境及び全実行端末の APK が、
デスクトップのbuildフォルダに生成されていること確認できるはずですおわりに
今回は Docker コンテナで Unity バッチモードを動かして、
モバイル VR 向けの APK を一括で出力出来るようにしてみました。Docker コンテナ上で Unity を動かすための
ライセンス発行処理周りの作業が面倒なので出来れば自動化したい。。参考リンク
[Unity]KeyStore作成メモー
gableroux/unity3d
Unity の Android ビルドを CLI からおこなう
【Unity】GitHub Actions v2でUnity Test Runnerを走らせて、結果をSlackに報告する【入門】


- 投稿日:2020-02-04T10:06:34+09:00
AndroidでImageViewをソースコードで丸くしたい(Kotlin編)
今回はAndroidでImageViewをソースコードで丸くしたいなと思いまして、対応しました。
私のメモレベルです。
よかったら参考にしてもらえると幸いです。Javaの場合
Javaをご利用しているは、こちらを参考してください。
https://android.benigumo.com/20140324/imageview-%E3%82%92-%E7%B0%A1%E5%8D%98%E3%81%AB-%E8%A7%92%E4%B8%B8-%E3%81%AB%E3%81%99%E3%82%8B/Kotlinの場合
下記の関数を導入します。
fun getCroppedBitmap(bitmap: Bitmap): Bitmap? {
        val width = bitmap.width
        val height = bitmap.height
        val rect = Rect(0, 0, width, height)
        val rectf = RectF(0F, 0F, width.toFloat(), height.toFloat())
        val output = Bitmap.createBitmap(width, height, Bitmap.Config.ARGB_8888)
        val canvas = Canvas(output)
        val paint = Paint()
        paint.setAntiAlias(true)

     // ここで丸みをつけます。「2.toFloat()」の数字を大きくするほど、
        // 丸みが小さくなります。この状態だと円のように切り抜けます。
        canvas.drawRoundRect(rectf, width / 2.toFloat(), height / 2.toFloat(), paint)
        paint.setXfermode(PorterDuffXfermode(PorterDuff.Mode.SRC_IN))
        canvas.drawBitmap(bitmap, rect, rect, paint)
        return output
    }
これを実際に使う場合の例
var bmp = BitmapFactory.decodeByteArray(it, 0, it.count())
this.getCroppedBitmap(bmp)?.let {
  bmp = it
}
holder.writerImageView.setImageBitmap(
  Bitmap.createScaledBitmap(
    bmp, holder.writerImageView.getWidth(),
    holder.writerImageView.getHeight(), false
  )
)
以上になります。
12月ごろからAndroid開発もするようになりました。
こんな感じで今後もメモを残していきたいと思いますmm
- 投稿日:2020-02-04T01:25:21+09:00
Android-AndroidStudioのテンプレート「Basic Activity」の構成要素を調べる
Basic Activityのアーキテクチャ
① ステータスバー
Activityからステータスばーへアクセスすることができて,このバーを非表示にすることができる.
② アクションバー/アプリバー
このようにナビゲーションを提供します.
③ アプリ名
AndroidManifest.xmlというファイルから,android:label="@string/app_name"の要素から変更できます.
(@string/app_nameは,string.xmlのapp_nameの要素という意味)④ オプションメニュー
検索を配置するときもあります.
⑤ Coordinatorレイアウト
アプリのUIは,
content_main.xmlに定義されていて,ViewGroupのように相互に作用するものになっています.⑥ TextView
TextViewのようなアプリのUIとなるビューは,すべてcontent_main.xmlに定義されています.⑦ フローディングアクションボタン(FAB)
activity_main.xmlで定義され,FABのリスナーはMainActivity.ktのonCreate内で定義されます.アプリをカスタマイズする
Snackbarの表示を変更する
これを行うには,ボタンのリスナーを変更する必要があるので,
MainActivity.ktを開いてこのように修正してみましょう.fab.setOnClickListener { view -> Snackbar.make(view, "This FAB needs an action!", Snackbar.LENGTH_LONG) .setAction("Action", null).show() }FABのcolorを変更する
FABのcolorは,アクセントカラーを使用するため,アクセントカラーを変更してあげることが一つの方法です.
res>value>color.xmlより,ファイルを開き,colorAccent属性を変更します.<color name="colorAccent">#1DE9B6</color>
アプリを実行すると,SnackbarのテキストとFABのColorが変更されていることが確認できます.
参考資料
CodeLabs by Google
https://codelabs.developers.google.com/android-kotlin-fundamentals/


- 投稿日:2020-02-04T00:43:51+09:00
Android-CodeLab-1.4: アプリのアイコンをImageAssetを使って変更する
今回学ぶこと
アプリのランチャーアイコンを変更する方法
目指す成果物
まずシンプルなアプリを作成します.
そしてアプリのランチャーアイコンを,AndroidStudioで用意されているImageAsset(イメージアセット)に置き換えてみます.
ステップ
1. ランチャーアイコンの変更
ランチャーアイコンを変更するには,ImageAssetという機能が使われます.
まず,
resフォルダをCtrl+クリックします.
[New]>[ImageAsset]を選択するとこのようなダイアログが表示されます.
①Asset Typeを
Clip artを選択して,②Clip Artを選択します.
するとこのようなダイアログが表示されるので,ここでは適当なデザインを選択して,OKをクリックしましょう.
NEXTをクリックして,アイコンファイルが上書きされるファイルが表示されます.
Finishをクリックします.AVDエミュレーターまたはデバイスでアプリを実行してみましょう.
アプリが新しいアイコンになりました.
参考資料
CodeLabs by Google
https://codelabs.developers.google.com/android-kotlin-fundamentals/


- 投稿日:2020-02-04T00:43:51+09:00
Android-CodeLab-1.4: アプリのアイコンをImageAssetを使って変更する
2019年にGoogleから,Web上でAndroidを学べるコースが提供されました.(Android Kotlin Fundamentals Course)
この記事では,そのコースを実際にやってみてアウトプットしてみるといった内容です.
何かツッコミなどあれば編集リクエストかコメントかTwitterでいただければ修正いたします今回学ぶこと
アプリのランチャーアイコンを変更する方法
目指す成果物
まずシンプルなアプリを作成します.
そしてアプリのランチャーアイコンを,AndroidStudioで用意されているImageAsset(イメージアセット)に置き換えてみます.
ステップ
1. ランチャーアイコンの変更
ランチャーアイコンを変更するには,ImageAssetという機能が使われます.
まず,
resフォルダをCtrl+クリックします.
[New]>[ImageAsset]を選択するとこのようなダイアログが表示されます.
①Asset Typeを
Clip artを選択して,②Clip Artを選択します.
するとこのようなダイアログが表示されるので,ここでは適当なデザインを選択して,OKをクリックしましょう.
NEXTをクリックして,アイコンファイルが上書きされるファイルが表示されます.
Finishをクリックします.AVDエミュレーターまたはデバイスでアプリを実行してみましょう.
アプリが新しいアイコンになりました.
参考資料
CodeLabs by Google
https://codelabs.developers.google.com/android-kotlin-fundamentals/