- 投稿日:2020-01-20T23:39:54+09:00
JuliaのREPL(インタラクティブモード)の使い方
概要
Juliaの対話型コマンドライン REPL の使い方について、説明します。
REPLとは、 Read Eval Print Loopの略で、対話モードやインタラクティブモード等とも呼ばれます。こちらの内容は、公式解説から抜粋したものとなりますので、
更に詳細な情報は公式サイトをご確認ください。The Julia REPL · The Julia Language
https://docs.julialang.org/en/v1/stdlib/REPL/環境
確認した環境です。
若干動作が異なる部分があるかもしれませんが、WindowsやLinuxでも同様に利用できるかと思います。macOS:10.15.2 (Catalina)
Julia:1.3.1対話モードの種類
機能毎にいくつかのモードがあります。
ジュリアンモード
デフォルトの動作モードです。
julia>のとに式や関数を入力し、enterキーで実行します。
ヘルプモード
ジュリアモードの際に、
?を入力するとヘルプモードとなります。julia>?このモードでは、関数やマクロなどのドキュメントを確認できます。
例えば、
シェルモード
ジュリアモードの際に、
;を入力するとヘルプモードとなります。julia>;このモードでは、juliaを終了することなく、シェルコマンドの実行を行えます。
例えば、echo "Hello Julia!"と入力すると標準出力に、
Hello Julia!と出力されます。
検索モード
各モードの際に、
CTRL + Rを押すと、検索モードとなります。
このモードでは、過去に入力した文字を検索することができます。例えば、ジュリアンモードで
print("Hello Wolrld!")
と入力した後に、CTRL+Rを押して検索モードに入り、
pと入力すると、先程入力したprint("Hello Wolrld!")
が候補として表示されます。
タブ保管
入力中に
[TAB]を押すことで、文字の保管や参照などが行なえます。関数名の保管
関数を一部入力した状態で、
[TAB]を押すと、その時点までの文字で始まる関数の一覧を表示することができます。
例えばジュリアンモードでpr[TAB]と入力すると、次のように候補一覧が表示されます。
パスの保管
ダブルクォーテーションを入力した直後に
[TAB]を押すと、カレントディレクトリに存在するディレクトリやファイル名を参照することができます。
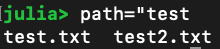
例えば、カレントディレクトリに、以下ファイルが有る状態でtest.txt test2.txt
path="te[TAB]
と入力すると
path="test
と、ファイル名の保管できる部分まで入力されます。
また、複数候補がある場合は、更に[TAB]を入力することで、
候補一覧が表示されます。
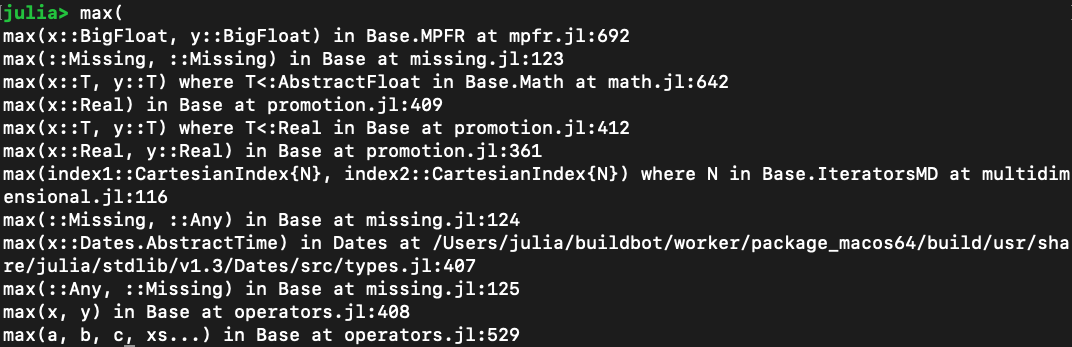
引数の確認
関数の
(まで入力した段階で[TAB]を入力すると、
使用可能なメソッドの一覧を表示します。
また、定義されている場所も同時に示されます。例えば
max([TAB]と入力すると次のように出力されます。
フィールドの確認
.を入力したあとに、[TAB]を入力する事で、フィールド情報の一覧を確認できます。例えば
UUIDsをインポートした後に、UUIDs.[TAB][TAB]と入力すると、
UUIDsのフィールド一覧が表示されます。
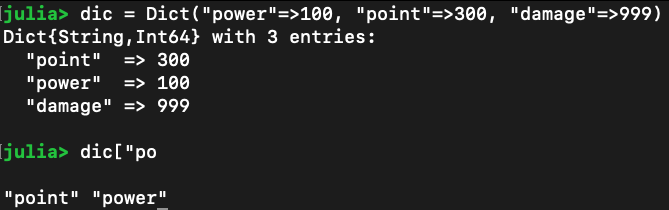
辞書キーの確認
辞書キーも同様に保管可能です。
辞書キーを途中まで入力した状態で[TAB][TAB]と入力すると、該当するキーを確認できます。
ショートカットキー
ボタンの組み合わせ等によって、キーに割り当てられた機能を利用できます。
プログラム制御
キー 説明 Ctrl + D Juliaの終了 Ctrl + C 処理の中断 Ctrl + L 画面をクリア カーソル移動
キー 説明 Ctrl + F カーソルを右に Ctrl + B カーソルを左に Ctrl + A 行頭 Ctrl + E 行末 option/alt + → 1単語右に option/alt + ← 1単語左に


- 投稿日:2020-01-20T11:48:05+09:00
Dockerコンテナ環境のMySQLデータベースがSequelProに反映されない
結論
・コンテナのMySQLのホストなどががローカル環境のMySQLと同じだった。
→SequelProにログインする際にローカルのMySQLがSequelProに反映されていたので
コンテナのMySQLデータベースが反映されなかった。なぜそうなったか
・ローカルのMySQLを自動起動に設定していたから。
対策
①以下の記事を参考に自動起動を停止
MySQLの自動起動を無効に自動起動を設定しているサービスのリストを確認
$ brew services list
Name         Status  User      Plist
redis        stopped
mysql        stopped
mysql@5.6    started username  /Users/username/Library/LaunchAgents/homebrew.mxcl.mysql@5.6.plist
chromedriver stopped
自動起動設定を無効にする
自動起動設定を無くしたいサービスの名前(今回は、mysql@5.6)を次のコマンドの最後に設定します。$ brew services stop mysql@5.6(この部分は止めたいサービス名を入力してください) ==> Successfully stopped `mysql@5.6` (label: homebrew.mxcl.mysql@5.6)きちんとできたか確認
$ brew services list
Name         Status  User      Plist
redis        stopped
mysql        stopped
mysql@5.6    stopped
chromedriver stopped
②コンテナの依存を更新して再度SequelProにログイン。
、、、、success!!
- 投稿日:2020-01-20T09:39:10+09:00
ArduinoでNintendo Switchの自動化環境作成する(Mac環境)
ポケモン剣盾か発売から2ヶ月ほど経ちましたが育成やっていますか
今作ではレイドバトルが導入され育成に必要なものが少し増えました。
ダイマックスレベルをあげるためのダイマックス飴が登場し、わざマシンはレコードという形で4世代までの消耗品扱いに逆戻りしてしまいました。剣盾では様々な効率化方法が公開されていますが、今回は自動ワット収集プログラムとArduinoを使って環境構築する手順を確認していきます。
Arduinoの環境周りはWindowsの情報が多いですが今回はMacを使用します。
ワット稼ぎだけならHomebrewを使ったソフトウェアのインストールだけなので、動作させるまではとても簡単です。
(Macはドライバ不要)目的
自動「ワット」収集プログラムをArduinoに書き込みSwitchを自動化プログラムを動かす。ArduinoをSwitchに挿すと自動化プログラムが動く仕組みを作ります。
チップにhexファイルを書き込むことで別の自動化プログラムを動作できる状態にします。無限ワットの裏技を使った方法なので剣盾本体が修正されるとできなくなる可能性があります。
環境・用意するもの
・Mac Mojave 10.14.6
・Arduino UNO R3
・Mac、Switchと接続するためのケーブルやハブ。どちらも繋げるTypeB-TypeCが便利。
・ジャンパワイヤ(メス-メス)あれば
下記のGitHubリポジトリや記事を参考にしています。
・GitHub -無限ワット自動化
・GitHub -ゼルダBoWの雪転がし
・GitHub -スプラトゥーン2自動ドット打ち
・Qiita -Splatoon2 イラスト投稿の自動ドット打ちをAruduino UNO R3 + macOS High Sierra環境でおこなう手順
・Qiita -Arduino Uno R3 で作るESC専用USBキーボード
・dfu-programmer で Arduino UNO の ATmega16U2 に Windows から書き込む手順
1.Arduino書き込み用ツールのインストール
Homebrewを使ってArduinoのツールをインストールします。
Homebrewが入っていない場合はここの手順でインストールします。brewコマンドでインストール状態を確認
Terminalbrew -v Homebrew 2.2.2Arduinoに書き込むためにcrosspack-avrをインストール
Terminalbrew cask install crosspack-avr export PATH=$PATH:/usr/local/CrossPack-AVR/bin/ # にパスを通すコマンドラインツールdfu-programmerをインストール
Terminalbrew install dfu-programmer2.ワット自動取得プログラムを取得
自動ワット収集リポジトリからzipファイルをダウンロードする。もうひとつlufaのリポジトリからも取得します。
自動ワット収集のディレクトリにlufaという空のフォルダがあるので、ダウンロードしたlufaのファイル一式をそこにコピーします。
ディレクトリ構造Config lufa -Bootloaders -BuildTests -Demos -LUFA ....makefileファイルのMCUの設定値をArduino UNO R3のチップ
atmega16u2に書き換えます。
始めからatmega16u2ならそのままで。makefileMCU = atmega16u2自動ワット収集リポジトリのディレクトリ(makefileが置いてある場所)に移動した後、makeコマンドでC言語ソースをビルドしJoystick.hexファイルを生成します。
このhexファイルをチップへと書き込むことでArduinoで動作するプログラムが変更します。Terminalmake3.チップへの書き込み
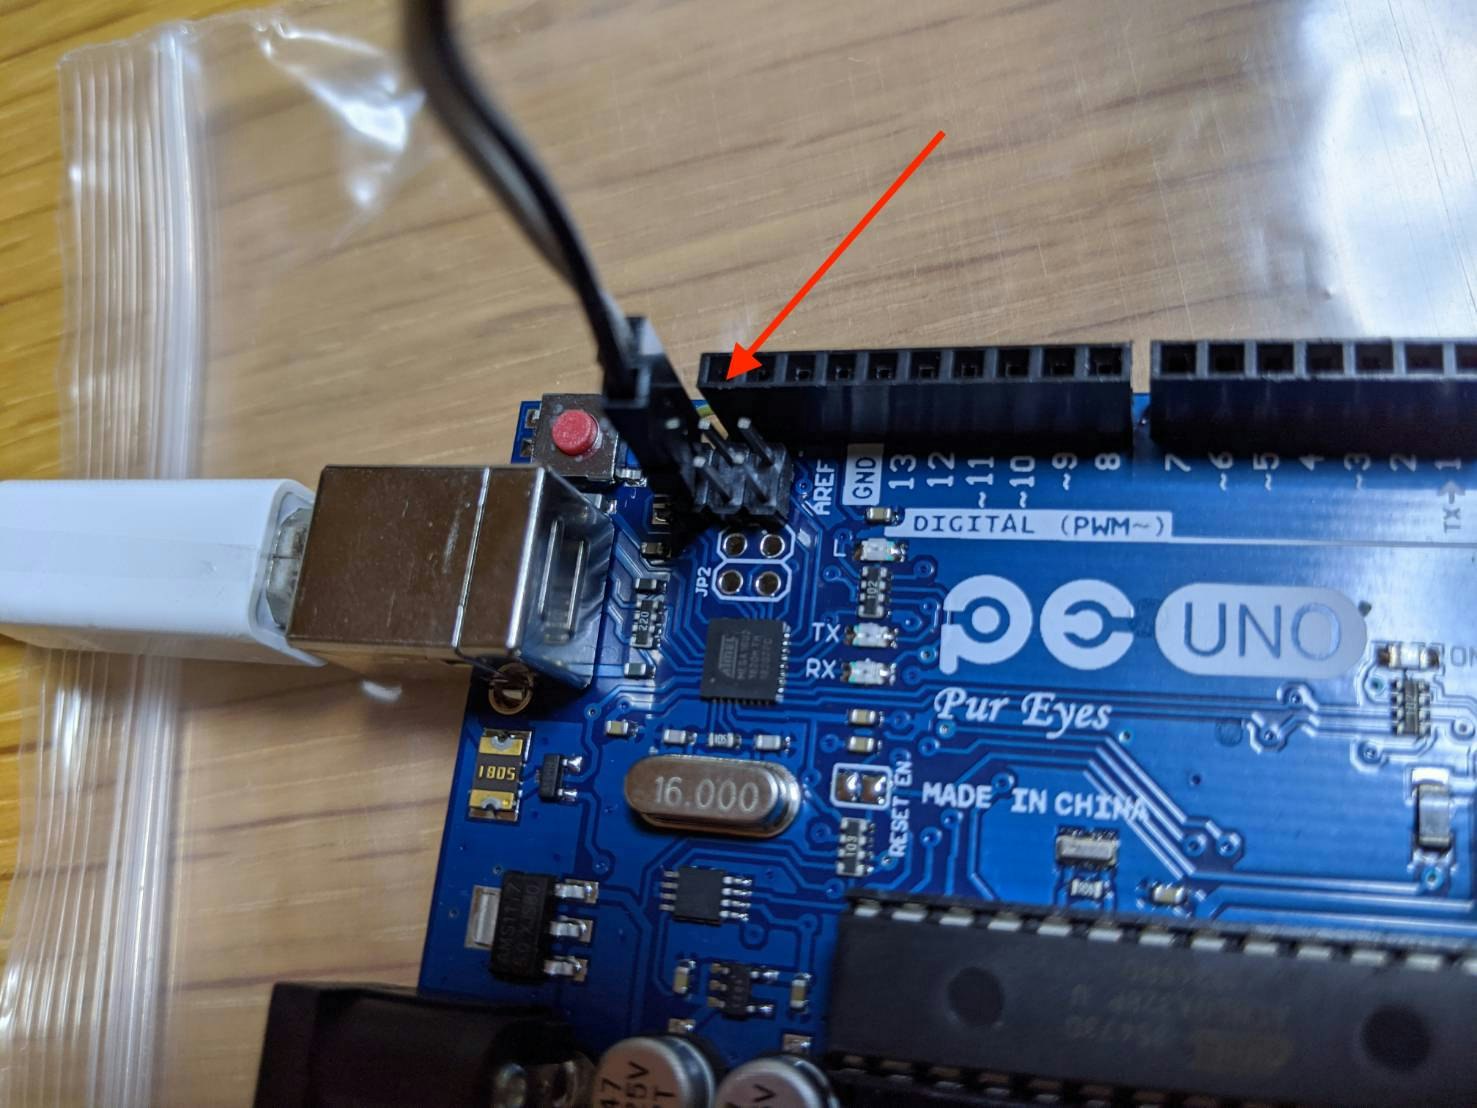
DFUモードにするため写真のようにArduinoをジャンパワイヤでショートさせた状態でPCと接続します。DFUモードとはチップのソフトウェアを書き込みできる状態のことです。
ジャンパワイヤがなければドライバー等で電気的に繋げてからPCと接続すればいけるはずです。
接続した後に点灯し始めるのでジャンプワイヤを抜きます。
これでDFUを使える状態になったのでターミナルのコマンドでチップにHexファイルを書き込んでいきます。まずは削除
Terminalsudo dfu-programmer atmega16u2 erase // 以下出力 Checking memory from 0x0 to 0x2FFF... Not blank at 0x1. Erasing flash... Success次に書き込み
Terminalsudo dfu-programmer atmega16u2 flash Joystick.hex // 以下出力 hecking memory from 0x0 to 0xF7F... Empty. Validating... Success 0xF80 bytes written into 0x3000 bytes memory (32.29%).そしてリセット
Terminalsudo dfu-programmer atmega16u2 resetこれで書き込みが完了しました。Switchに接続すれば自動でボタン入力が行われるはずです。
自動ワット収集リポジトリでは柱が出た状態の巣穴の前からスタートして無限にワットの自動回収を行います。動作を変更したい場合は、Cソースファイルを修正して、hexファイルを作って、チップに書き込めばOKです!IDくじの自動化とかはすぐできそうです。
スプラトゥーンの自動ドットは今回の手順に加えてPython3のインストールなどが必要です。こちら記事の通りにすれば動作しました。(Python2.x系と3.x系ではコマンドが違うので注意)
Qiita -Splatoon2 イラスト投稿の自動ドット打ちをAruduino UNO R3 + macOS High Sierra環境でおこなう手順先日発表されたPS5の新ロゴを自動でドット入力しているところ
今回はボタン入力を手順化しているだけなのでポケモンだけではなく他のソフトでも手順部分を変更すればすぐに対応可能です。
高度な自動化をしようとなると画像認識を使った方法がありますが別途キャプチャボードが必要です。
参考 -Switch版DEAD OR ALIVE Xtreme3 Scarlet (DOAX3S) 自動プレイ共に働くWebエンジニアを募集しています!
不動産SHOPナカジツでは自社サービスを作っていく仲間を募集しています。
詳しくはWantedlyからお問い合わせください。


- 投稿日:2020-01-20T08:13:13+09:00
Rails6 アプリからGmailのメールサーバからメールを送信する ローカル環境編
目的
- Rails6で作成したアプリからGmailのメールサーバを利用してメールを送信する方法をまとめる。
前提条件
- Googleのアカウントを持っていること。
- Googleの二段階認証の設定がなされていること。
- Googleのアプリケーション用パスワードを取得していること。
- 正常に動作しているRails6のアプリがあること。
- テストメールを送信できるアドレス(メールを送信しても迷惑にならないメールアドレス)を知っていること。
- 二段階認証、アプリケーション用パスワードを取得しているアカウントのメールアドレスでもOK(自分にテストメールを送信して確認する)
作業期待値
- とりあえず難しい処理は無しにしてRails6アプリケーションからのメールが送信できるようにする。
- Rails6のアプリケーションから何かのトリガーを用いてGmailのメールサーバからテストメールを送信する。
- 継承やその他詳しい話はせずとにかくメールを送信できるようにする。
- メーラーの詳しい話や処理方法は下記の本のメールについての記載を確認することをオススメする。(アフィリエイトリンクでは無いので安心してください。)
作業の前にちょっと聞いてほしいこと
- 筆者はこのメールの実装に非常に時間がかかった。
- データベースの内容をメールに添付しようとしたり、宛先を複数指定したりしたためミスが多くあった。
- 余計なことは考えずとにかくテストメールを送信できることを最優先に作業をした方が良い気がする。
作業概要
- メーラーの作成
- 送信アドレス設定
- メールサーバの設定
- 送信トリガーの設定
- テスト送信
作業詳細
メーラーの作成
下記コマンドを実行してメーラーを作成する。(notice greetingはクラス名とメソット名であるため任意のものでも構わない)
$ cd アプリ名フォルダ
$ rails g mailer notice greeting
先のコマンドを実行するとメーラーが作成される。メール送信に必要なファイル群が作成されると思っていただきたい。
送信アドレス設定
- 下記に存在する送信先を指定するファイル
notice_mailer.rbをエディタで開く
- アプリ名フォルダ/app/mailers
- notice_mailer.rb
ファイル
notice_mailer.rbの下記の部分を下記のように修正してテストメールを送信する先のアドレスを設定する。class NoticeMailer < ApplicationMailer # Subject can be set in your I18n file at config/locales/en.yml # with the following lookup: # # en.notice_mailer.greeting.subject # def greeting @greeting = "Hi" mail to: "to@example.org" end end↓修正
class NoticeMailer < ApplicationMailer

  # Subject can be set in your I18n file at config/locales/en.yml
  # with the following lookup:
  #
  #   en.notice_mailer.greeting.subject
  #
  def greeting
    @greeting = "Hi"

    mail to: "テストメール送信先アドレス"
  end
end
メールサーバの設定
- 下記に存在する送信先を指定するファイル
development.rbをエディタで開く
- アプリ名フォルダ/config/environments
- development.rb
ファイル
development.rbを下記のように修正してテストメールを送信するメールサーバを設定する。Rails.application.configure do # Settings specified here will take precedence over those in config/application.rb. # In the development environment your application's code is reloaded on # every request. This slows down response time but is perfect for development # since you don't have to restart the web server when you make code changes. config.cache_classes = false # Do not eager load code on boot. config.eager_load = false # Show full error reports. config.consider_all_requests_local = true # Enable/disable caching. By default caching is disabled. # Run rails dev:cache to toggle caching. if Rails.root.join('tmp', 'caching-dev.txt').exist? config.action_controller.perform_caching = true config.action_controller.enable_fragment_cache_logging = true config.cache_store = :memory_store config.public_file_server.headers = { 'Cache-Control' => "public, max-age=#{2.days.to_i}" } else config.action_controller.perform_caching = false config.cache_store = :null_store end # Store uploaded files on the local file system (see config/storage.yml for options). config.active_storage.service = :local # Don't care if the mailer can't send. config.action_mailer.raise_delivery_errors = false config.action_mailer.perform_caching = false # Print deprecation notices to the Rails logger. config.active_support.deprecation = :log # Raise an error on page load if there are pending migrations. config.active_record.migration_error = :page_load # Highlight code that triggered database queries in logs. config.active_record.verbose_query_logs = true # Debug mode disables concatenation and preprocessing of assets. # This option may cause significant delays in view rendering with a large # number of complex assets. config.assets.debug = true # Suppress logger output for asset requests. config.assets.quiet = true # Raises error for missing translations. # config.action_view.raise_on_missing_translations = true # Use an evented file watcher to asynchronously detect changes in source code, # routes, locales, etc. This feature depends on the listen gem. config.file_watcher = ActiveSupport::EventedFileUpdateChecker end↓修正
Rails.application.configure do
  # Settings specified here will take precedence over those in config/application.rb.

  # In the development environment your application's code is reloaded on
  # every request. This slows down response time but is perfect for development
  # since you don't have to restart the web server when you make code changes.
  config.cache_classes = false

  # Do not eager load code on boot.
  config.eager_load = false

  # Show full error reports.
  config.consider_all_requests_local = true

  # Enable/disable caching. By default caching is disabled.
  # Run rails dev:cache to toggle caching.
  if Rails.root.join('tmp', 'caching-dev.txt').exist?
    config.action_controller.perform_caching = true
    config.action_controller.enable_fragment_cache_logging = true

    config.cache_store = :memory_store
    config.public_file_server.headers = {
      'Cache-Control' => "public, max-age=#{2.days.to_i}"
    }
  else
    config.action_controller.perform_caching = false

    config.cache_store = :null_store
  end

  # Store uploaded files on the local file system (see config/storage.yml for options).
  config.active_storage.service = :local

  # Don't care if the mailer can't send.
  # config.action_mailer.perform_caching = false
  config.action_mailer.raise_delivery_errors = true
  config.action_mailer.delivery_method = :smtp
  config.action_mailer.smtp_settings = {
    :enable_starttls_auto => true,
    :address => 'smtp.gmail.com',
    :port => '587',
    :domain => 'smtp.gmail.com',
    :authentication => 'plain',
    :user_name => '二段階認証設定、アプリケーションパスワードを取得したアカウントのメールアドレス',
    :password => 'アプリケーションパスワード(表示された時は4文字で区切られていたがスペース入れず連続して記載)'
  }

  # Print deprecation notices to the Rails logger.
  config.active_support.deprecation = :log

  # Raise an error on page load if there are pending migrations.
  config.active_record.migration_error = :page_load

  # Highlight code that triggered database queries in logs.
  config.active_record.verbose_query_logs = true

  # Debug mode disables concatenation and preprocessing of assets.
  # This option may cause significant delays in view rendering with a large
  # number of complex assets.
  config.assets.debug = true

  # Suppress logger output for asset requests.
  config.assets.quiet = true

  # Raises error for missing translations.
  # config.action_view.raise_on_missing_translations = true

  # Use an evented file watcher to asynchronously detect changes in source code,
  # routes, locales, etc. This feature depends on the listen gem.
  config.file_watcher = ActiveSupport::EventedFileUpdateChecker
end
送信トリガーの設定(ここからは各個人のプロダクトにより若干方法が異なるが、単純に送信のきっかけを作っているだけなので難しく考えないでほしい)
- 送信のトリガーとなる処理(以降、メールトリガーコードと呼ぶ)を任意のコントローラファイルに記載する。
任意のコントローラのアクション内に下記メールトリガーコードを記載する。
- ※メーラーの作成時にクラス名、メソット名を独自の物にした人は若干異なるので注意
- ※難しく考えず、下記の処理を記載してコントローラ内で実行してあげればメールが送信されると考えると記載箇所の応用が効きやすいかもしれない
# メーラークラス名.メール送信メソット名.送信メソット名
NoticeMailer.greeting.deliver_now
前述の記載を任意のアクション内に記載するが、オススメは任意ページを表示するアクションに記載することである。
筆者は
http://localhost:3000/posts/index/:idにアクセスした時にテストメールが送られるように設定した。筆者のメールトリガーコードの記載例を下記に記載する。
post_controller.rbファイルのindexアクション内に下記を記載class PostsController < ApplicationController def index @posts = Post.where(user_id: @current_user.id) end↓メールトリガーコードを記載
class PostsController < ApplicationController
  def index
    NoticeMailer.greeting.deliver_now
    @posts = Post.where(user_id: @current_user.id)
  end
テスト送信
下記コマンドを実行してアプリケーションを起動する。
$ cd アプリ名フォルダ
$ rails s
アプリケーション内でメールトリガーコードを記載したコントローラのアクションが実行されるようにページ遷移する。
筆者の場合
http://localhost:3000/posts/index/:idにアクセスするとメールトリガーコードが実行されるため上記画面を表示した。メール確認
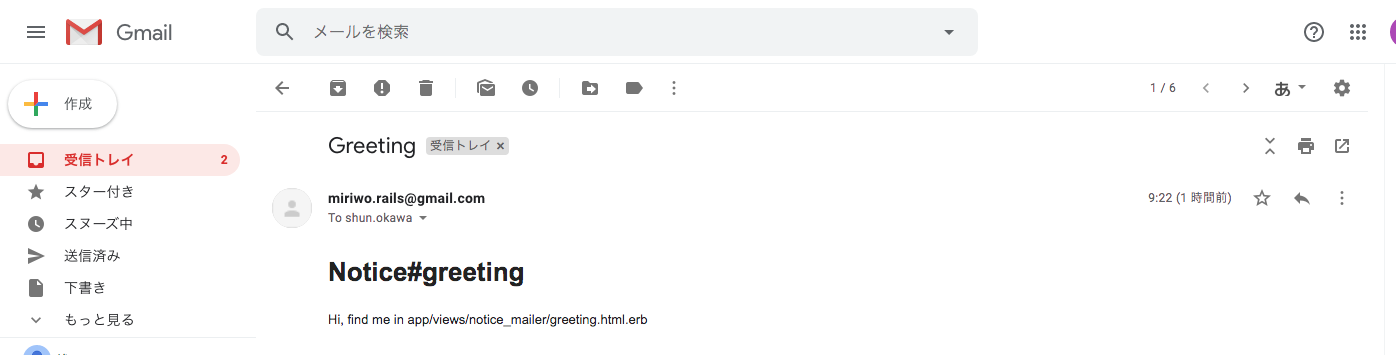
- 下記のようなメールが送信先アドレスに届いていれば実装完了である。
Net::SMTPAuthenticationErrorのエラー
- メールトリガーコードを記載したコントローラのアクションを実行したところエラー
Net::SMTPAuthenticationErrorが発生した。- これは二段階認証を使用してGmailのをメールサーバを使用した場合にアプリケーションパスワードが一致していない時に出るエラーらしい。
- 筆者のエラーメッセージ: 534-5.7.9 Application-specific password required. Learn more at
- ファイル
development.rbの二段階認証を行なったアカウントのメールアドレス、パスワードが間違えていないかもう一度確認しよう。- 正常に設定されているなら、railsアプリを終了し10分~20分ほど放置してから再トライしてみよう。
- サーバとのやりとりに時間がかかっており、ファイル
development.rbでパスワード設定直後だと接続がうまくいかない恐れがある。(筆者談、真意は不明)エラーは出てないがメールが来ない
- ファイル
notice_mailer.rbで指定している送信先のメールアドレスを入力していないかを確認してみよう。付録
- 筆者の環境でメール作成の実績がある各ファイルの内容を下記に記載する。
- パスワードはダミーを入力する。
今回説明に出てきていないメーラー作成コマンドで作成されたそのほかのファイルの記載状況もまとめる。
notice_mailer.rb
class NoticeMailer < ApplicationMailer

  # Subject can be set in your I18n file at config/locales/en.yml
  # with the following lookup:
  #
  #   en.notice_mailer.greeting.subject
  #
  def greeting
    @greeting = "Hi"

    mail to: "shun.okawa@gmail.com",
         cc: "miriwo.rails@gmail.com"
  end
end
- development.rb
Rails.application.configure do
  # Settings specified here will take precedence over those in config/application.rb.

  # In the development environment your application's code is reloaded on
  # every request. This slows down response time but is perfect for development
  # since you don't have to restart the web server when you make code changes.
  config.cache_classes = false

  # Do not eager load code on boot.
  config.eager_load = false

  # Show full error reports.
  config.consider_all_requests_local = true

  # Enable/disable caching. By default caching is disabled.
  # Run rails dev:cache to toggle caching.
  if Rails.root.join('tmp', 'caching-dev.txt').exist?
    config.action_controller.perform_caching = true
    config.action_controller.enable_fragment_cache_logging = true

    config.cache_store = :memory_store
    config.public_file_server.headers = {
      'Cache-Control' => "public, max-age=#{2.days.to_i}"
    }
  else
    config.action_controller.perform_caching = false

    config.cache_store = :null_store
  end

  # Store uploaded files on the local file system (see config/storage.yml for options).
  config.active_storage.service = :local

  # Don't care if the mailer can't send.
  # config.action_mailer.perform_caching = false
  config.action_mailer.raise_delivery_errors = true
  config.action_mailer.delivery_method = :smtp
  config.action_mailer.smtp_settings = {
    :enable_starttls_auto => true,
    :address => 'smtp.gmail.com',
    :port => '587',
    :domain => 'smtp.gmail.com',
    :authentication => 'plain',
    :user_name => 'miriwo.rails@gmail.com',
    :password => 'smppyvjbfzhweyxx'
  }

  # Print deprecation notices to the Rails logger.
  config.active_support.deprecation = :log

  # Raise an error on page load if there are pending migrations.
  config.active_record.migration_error = :page_load

  # Highlight code that triggered database queries in logs.
  config.active_record.verbose_query_logs = true

  # Debug mode disables concatenation and preprocessing of assets.
  # This option may cause significant delays in view rendering with a large
  # number of complex assets.
  config.assets.debug = true

  # Suppress logger output for asset requests.
  config.assets.quiet = true

  # Raises error for missing translations.
  # config.action_view.raise_on_missing_translations = true

  # Use an evented file watcher to asynchronously detect changes in source code,
  # routes, locales, etc. This feature depends on the listen gem.
  config.file_watcher = ActiveSupport::EventedFileUpdateChecker
end
- posts_controller.rb
class PostsController < ApplicationController
  def index
    NoticeMailer.greeting.deliver_now
    @posts = Post.where(user_id: @current_user.id)
  end

  def show
    @post = Post.find_by(id: params[:id])
  end

  def new
    @post = Post.new
  end

  def create
    @post = Post.new(content: params[:content], study_time: params[:'study_time'], today_study_time: params[:'study_time'], hash_tag: params[:hash_tag], user_id: @current_user.id)
    if @post.save
      # flash[:notice] = "保存完了"
      redirect_to("/posts/#{@post.id}")
    else
      # flash[:notice] = "保存失敗"
      render ("posts/new")
    end
  end

  def edit_form
    @post = Post.find_by(id: params[:id])
  end

  def edit
    @post = Post.find_by(id: params[:id])
    @post.content = params[:content]
    @post.hash_tag = params[:hash_tag]
    @post.save
    redirect_to("/posts/#{@post.id}")
  end

  def achievement
    @post = Post.find_by(id: params[:id])

  end

  def destroy
    @post = Post.find_by(id: params[:id])
    @post.destroy
    redirect_to("/posts/index/#{@post.user_id}")
  end

  def update
    @post = Post.find_by(id: params[:id])
    # 本当は下記見たいにしたいけどエラー出る。
    # 原因は@post.study_timeが数値でparams[:study_time]が文字列になってしまっているから
    @post.today_study_time = params[:study_time].to_f
    @post.save
    @post.study_time += @post.today_study_time
    @post.save
    redirect_to("/posts/#{@post.id}")
  end

  def tweet_content
    @post = Post.find_by(id: params[:id])
  end
end
アプリ名/app/mailersのapplication_mailer.rbclass ApplicationMailer < ActionMailer::Base default from: 'from@example.com' layout 'mailer' end
アプリ名/app/views/notice_mailerのgreeting.html.erb<h1>Notice#greeting</h1> <p> <%= @greeting %>, find me in app/views/notice_mailer/greeting.html.erb </p>
アプリ名/app/views/notice_mailerのgreeting.text.erbNotice#greeting <%= @greeting %>, find me in app/views/notice_mailer/greeting.text.erb
アプリ名/test/mailersのnotice_mailer_test.rbrequire 'test_helper' class NoticeMailerTest < ActionMailer::TestCase test "greeting" do mail = NoticeMailer.greeting assert_equal "Greeting", mail.subject assert_equal ["to@example.org"], mail.to assert_equal ["from@example.com"], mail.from assert_match "Hi", mail.body.encoded end end
アプリ名/test/mailers/previewsのnotice_mailer_preview.rb# Preview all emails at http://localhost:3000/rails/mailers/notice_mailer class NoticeMailerPreview < ActionMailer::Preview # Preview this email at http://localhost:3000/rails/mailers/notice_mailer/greeting def greeting NoticeMailer.greeting end end
- Gemfile
準備中
- 投稿日:2020-01-20T03:11:22+09:00
TSL/SSLがavailableでない状態からの import tk, matplotlib等ができないまでの対処
pip install ができない
osのアップデートがされてから,ライブラリのインストールをやっていなかったのでやろうとするとできなかった.
TSL/SSLが問題らしい.調べるとどうもpyenvがアップデートについていけて無い模様
以下エラー内容pip is configured with locations that require TLS/SSL, however the ssl module in Python is not available. Collecting numpy Retrying (Retry(total=4, connect=None, read=None, redirect=None, status=None)) after connection broken by 'SSLError("Can't connect to HTTPS URL because the SSL module is not available.")': /simple/numpy/ Retrying (Retry(total=3, connect=None, read=None, redirect=None, status=None)) after connection broken by 'SSLError("Can't connect to HTTPS URL because the SSL module is not available.")': /simple/numpy/ Retrying (Retry(total=2, connect=None, read=None, redirect=None, status=None)) after connection broken by 'SSLError("Can't connect to HTTPS URL because the SSL module is not available.")': /simple/numpy/ Retrying (Retry(total=1, connect=None, read=None, redirect=None, status=None)) after connection broken by 'SSLError("Can't connect to HTTPS URL because the SSL module is not available.")': /simple/numpy/ Retrying (Retry(total=0, connect=None, read=None, redirect=None, status=None)) after connection broken by 'SSLError("Can't connect to HTTPS URL because the SSL module is not available.")': /simple/numpy/ Could not fetch URL https://pypi.org/simple/numpy/: There was a problem confirming the ssl certificate: HTTPSConnectionPool(host='pypi.org', port=443): Max retries exceeded with url: /simple/numpy/ (Caused by SSLError("Can't connect to HTTPS URL because the SSL module is not available.")) - skipping Could not find a version that satisfies the requirement numpy (from versions: ) No matching distribution found for numpy pip is configured with locations that require TLS/SSL, however the ssl module in Python is not available. Could not fetch URL https://pypi.org/simple/pip/: There was a problem confirming the ssl certificate: HTTPSConnectionPool(host='pypi.org', port=443): Max retries exceeded with url: /simple/pip/ (Caused by SSLError("Can't connect to HTTPS URL because the SSL module is not available.")) - skipping策を一通り試したが,解決したものを載せる.
pyenvを削除するので,使っていたバージョンをメモしておく等しないと復元できないので注意$ pyenv uninstall 3.6.6 (your version) $ which python /Users/[user name]/.pyenv/shims/python $ rm -rf /Users/[user name]/.pyenv $ sudo brew uninstall pyenv $ brew install pyenv $ pyenv install 3.6.6 $ pip install [library] [library] .......これでTSL/SSLのエラーは治った.pythonの再インストールは面倒
import tk(matolotlib)ができない
また,問題発生.
import tkができない.matplotlibが使えない.困った.
_Tkinter moduleが無いらしい$ brew reinstall tcl-tkこれで解決と思いきやだめ.
https://ameblo.jp/oyasai10/entry-12526487609.htmlの通りにやったら解決した.$ pyenv uninstall 3.6.6 https://www.activestate.com/products/tcl/tcl-tk-modules/ ここで,active-tclをダウンロード Macの場合は,インストールしインストーラーがゴミ箱に入ったらOK 非常に楽これでtk周りは解決した.
後は再インストールしていくだけ.$ pyenv install 3.6.6 $ pyenv versions *system 3.6.6 $ pyenv global 3.6.6 $ pyenv local 3.6.6 $ pyenv versions system *3.6.6 $ pip install matplotlib $ python >> import matplotlib >>終了.
- 投稿日:2020-01-20T03:11:22+09:00
TSL/SSLがaverrableでない状態からの import tk, matplotlib等ができないまでの対処
pip install ができない
osのアップデートがされてから,ライブラリのインストールをやっていなかったのでやろうとするとできなかった.
TSL/SSLが問題らしい.調べるとどうもpyenvがアップデートについていけて無い模様
以下エラー内容pip is configured with locations that require TLS/SSL, however the ssl module in Python is not available. Collecting numpy Retrying (Retry(total=4, connect=None, read=None, redirect=None, status=None)) after connection broken by 'SSLError("Can't connect to HTTPS URL because the SSL module is not available.")': /simple/numpy/ Retrying (Retry(total=3, connect=None, read=None, redirect=None, status=None)) after connection broken by 'SSLError("Can't connect to HTTPS URL because the SSL module is not available.")': /simple/numpy/ Retrying (Retry(total=2, connect=None, read=None, redirect=None, status=None)) after connection broken by 'SSLError("Can't connect to HTTPS URL because the SSL module is not available.")': /simple/numpy/ Retrying (Retry(total=1, connect=None, read=None, redirect=None, status=None)) after connection broken by 'SSLError("Can't connect to HTTPS URL because the SSL module is not available.")': /simple/numpy/ Retrying (Retry(total=0, connect=None, read=None, redirect=None, status=None)) after connection broken by 'SSLError("Can't connect to HTTPS URL because the SSL module is not available.")': /simple/numpy/ Could not fetch URL https://pypi.org/simple/numpy/: There was a problem confirming the ssl certificate: HTTPSConnectionPool(host='pypi.org', port=443): Max retries exceeded with url: /simple/numpy/ (Caused by SSLError("Can't connect to HTTPS URL because the SSL module is not available.")) - skipping Could not find a version that satisfies the requirement numpy (from versions: ) No matching distribution found for numpy pip is configured with locations that require TLS/SSL, however the ssl module in Python is not available. Could not fetch URL https://pypi.org/simple/pip/: There was a problem confirming the ssl certificate: HTTPSConnectionPool(host='pypi.org', port=443): Max retries exceeded with url: /simple/pip/ (Caused by SSLError("Can't connect to HTTPS URL because the SSL module is not available.")) - skipping策を一通り試したが,解決したものを載せる.
pyenvを削除するので,使っていたバージョンをメモしておく等しないと復元できないので注意$ pyenv uninstall 3.6.6 (your version) $ which python /Users/[user name]/.pyenv/shims/python $ rm -rf /Users/[user name]/.pyenv $ sudo brew uninstall pyenv $ brew install pyenv $ pyenv install 3.6.6 $ pip install [library] [library] .......これでTSL/SSLのエラーは治った.pythonの再インストールは面倒
import tk(matolotlib)ができない
また,問題発生.
import tkができない.matplotlibが使えない.困った.
_Tkinter moduleが無いらしい$ brew reinstall tcl-tkこれで解決と思いきやだめ.
https://ameblo.jp/oyasai10/entry-12526487609.htmlの通りにやったら解決した.$ pyenv uninstall 3.6.6 https://www.activestate.com/products/tcl/tcl-tk-modules/ ここで,active-tclをダウンロード Macの場合は,インストールしインストーラーがゴミ箱に入ったらOK 非常に楽これでtk周りは解決した.
後は再インストールしていくだけ.$ pyenv install 3.6.6 $ pyenv versions *system 3.6.6 $ pyenv global 3.6.6 $ pyenv local 3.6.6 $ pyenv versions system *3.6.6 $ pip install matplotlib $ python >> import matplotlib >>終了.
- 投稿日:2020-01-20T01:15:15+09:00
macOS Catalinaの標準コマンドで画像変換(png->jpg)
iPhoneで撮った写真をAirDropでMacOSに転送したら
.png形式だったので、
MacOS標準コマンドで.jpg形式コンバートしてみた。
sips -s format jpeg hoge.png --out hoge.jpeg最初フォーマットに
jpgを指定したら怒られた。バージョン情報
% sips -v

sips-294