- 投稿日:2020-01-19T23:34:38+09:00
LINE風チャットWebアプリを作ってみる(初心者向け)
自己紹介
バックエンドエンジニアとして働いています!
仕事では主にJavaを使っていますが、趣味でGoやVueを触っています!最近は、flutterも触り始めました!twitterやgithubもやってます!お話ししましょうー成果物
最後にGithubのコードも上がっているので参考にしてください!
できること
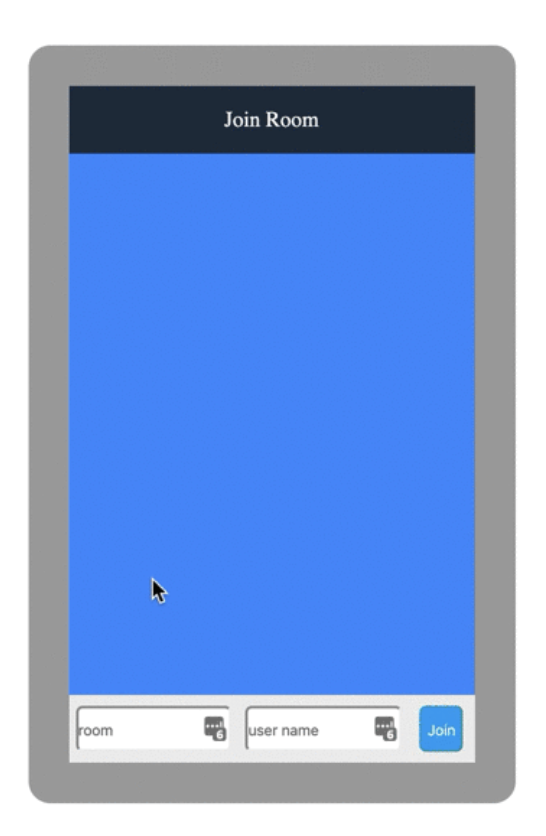
- ルーム名とユーザ名を指定してルームに入ることができます。
- そのルーム内でリアルタイムチャットができます。
内容はそこまで濃くはないのですが、
Webアプリをどういう風に作っていったかを見ていくことで
少しでもお役に立てればと思います。使用技術
websocket
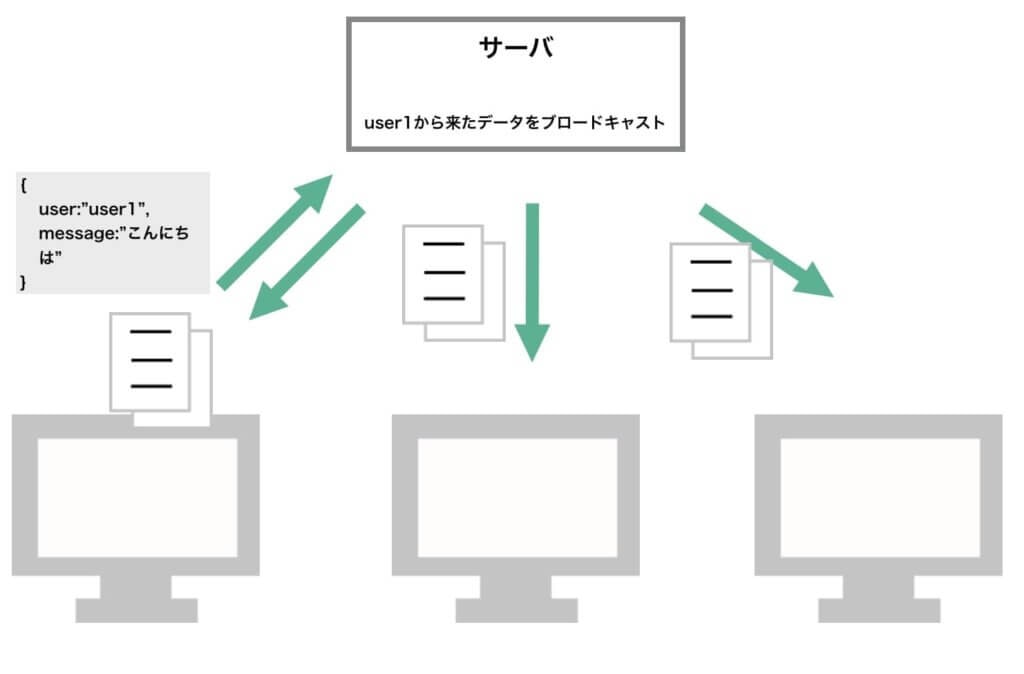
websocketはサーバとクライアントの間で双方向通信する仕組みです!リアルタイム通信で使われます。
今回はこの仕組みを用いて、ユーザの投稿を同じ部屋にいるユーザに対して送ってあげる処理を実現します。
解説
ディレクトリ
.(line-chat-go)
├── Makefile
├── README.md
├── cmd
│   └── main.go
├── go.mod
├── go.sum
├── router.go
└── view
    ├── index.html
    ├── room.html
    └── static
        ├── css
        │   └── common.css
        ├── img
        │   └── icon.png
        └── js
            └── index.js
プロジェクトを作成する
$ cd line-chat-go
$ go mod init chat
まず、Goでは(version 1.11以上から)
go mod init (モジュール名)でモジュールを生成します。このモージュル名は、importする際のルートの名前になります。
例えば、 上のディレクトリのmain.goを指す場合は
import "chat/cmd"となります。(今回はcmd以下がmainパッケージなので、importすることはありませんが。。。)
main.go を作る
cmd/main.gopackage main import ( "chat" ) func main() { chat.Run() }たったこれだけです。
では、Run()メソッドを実装しているrouter.goを見てみましょうrouter.go を作る
router.gopackage chat import ( "github.com/gin-gonic/gin" melody "gopkg.in/olahol/melody.v1" "net/http" ) func Run() { r := gin.Default() m := melody.New() r.Static("/static", "./view/static") r.LoadHTMLGlob("view/*.html") r.GET("/", func(c *gin.Context) { c.HTML(http.StatusOK, "index.html", gin.H{}) }) r.GET("/room/:name", func(c *gin.Context) { c.HTML(http.StatusOK, "room.html", gin.H{ "Name": c.Param("name"), }) }) r.GET("/room/:name/ws", func(c *gin.Context) { m.HandleRequest(c.Writer, c.Request) }) m.HandleMessage(func(s *melody.Session, msg []byte) { m.BroadcastFilter(msg, func(q *melody.Session) bool { return q.Request.URL.Path == s.Request.URL.Path }) }) r.Run(":8080") }まずimportを見てみましょう
ここでは
- ginというWebフレームワークを用いています。
- melodyは、WebSocketを簡単に利用することができるパッケージです。少しだけginの書いている所を解説していきます。
いくつか抜き出します。func Run() { r := gin.Default() r.Static("/static", "./view/static") r.LoadHTMLGlob("view/*.html") r.GET("/", func(c *gin.Context) { c.HTML(http.StatusOK, "index.html", gin.H{}) }) r.Run(":8080") }r := gin.Default()で、ginを初期化します。
r.Static("/static", "./view/static")は、view/staticフォルダ以下のファイルをhttp://xxxxx/static
に割り当てることができます
(サーバを実行した状態で
http://localhost:8080/static/img/icon.png
とブラウザに打つと、view/static/img/icon.pngを返してくれます)r.LoadHTMLGlob("view/*.html")は、HTMLファイルを読み込みます。
staticとの違いは、テンプレートとして利用できるようになります。
テンプレートはGoの仕組みで文字列を埋め込んだりすることができます。次に,ここがルーティングを設定します。
r.GET("/", func(c *gin.Context) {
        c.HTML(http.StatusOK, "index.html", gin.H{})
})
ルーム参加するためのページを表示する時、このページがリクエストされます。
urlで
http://xxxxx/
にGetアクセスが来たときに、index.htmlを返すという処理を書いています。
このindex.htmlはr.LoadHTMLGlob()でロードされているファイルから読みこみます。最後に
r.Run(":8080")
は、8080ポートで待ち受けるということです。
ポートは、ネットを繋ぐ時の穴の番号で、urlに表示されていない(省略されている)ときは、80か443です。次はginの応用編です。
r.GET("/room/:name", func(c *gin.Context) { c.HTML(http.StatusOK, "room.html", gin.H{ "Name": c.Param("name"), }) })/room/(名前)にリクエストが来たときに、room.htmlを返却するという意味です。
特定のルームに参加するときに、このページがリクエストされます。
この(名前)はc.Param("name")で動的に取得できます。
gin.H{}とは、テンプレートに渡す値を格納しておくものです。
今回だと"Name"というパラメータに:nameの値を代入しています。<body>{{.Name}}</body>と書いてあると、ginが自動的に名前を埋め込んでから、レスポンスを返してくれます。
残りはWebSocketの処理です。
m := melody.New()

r.GET("/room/:name/ws", func(c *gin.Context) {
    m.HandleRequest(c.Writer, c.Request)
})

m.HandleMessage(func(s *melody.Session, msg []byte) {
    m.BroadcastFilter(msg, func(q *melody.Session) bool {
        return q.Request.URL.Path == s.Request.URL.Path
    })
})
/room/:name/wsにリクエストが来たときは、webSocketの通信として、HandleMessageの処理を行います。
BroadcastFilter()は、ブロードキャストなので、クライアントから/room/:name/wsにリクエストが来ると、送られてきた値をサーバとつながっているクライアント全員に、送信します。
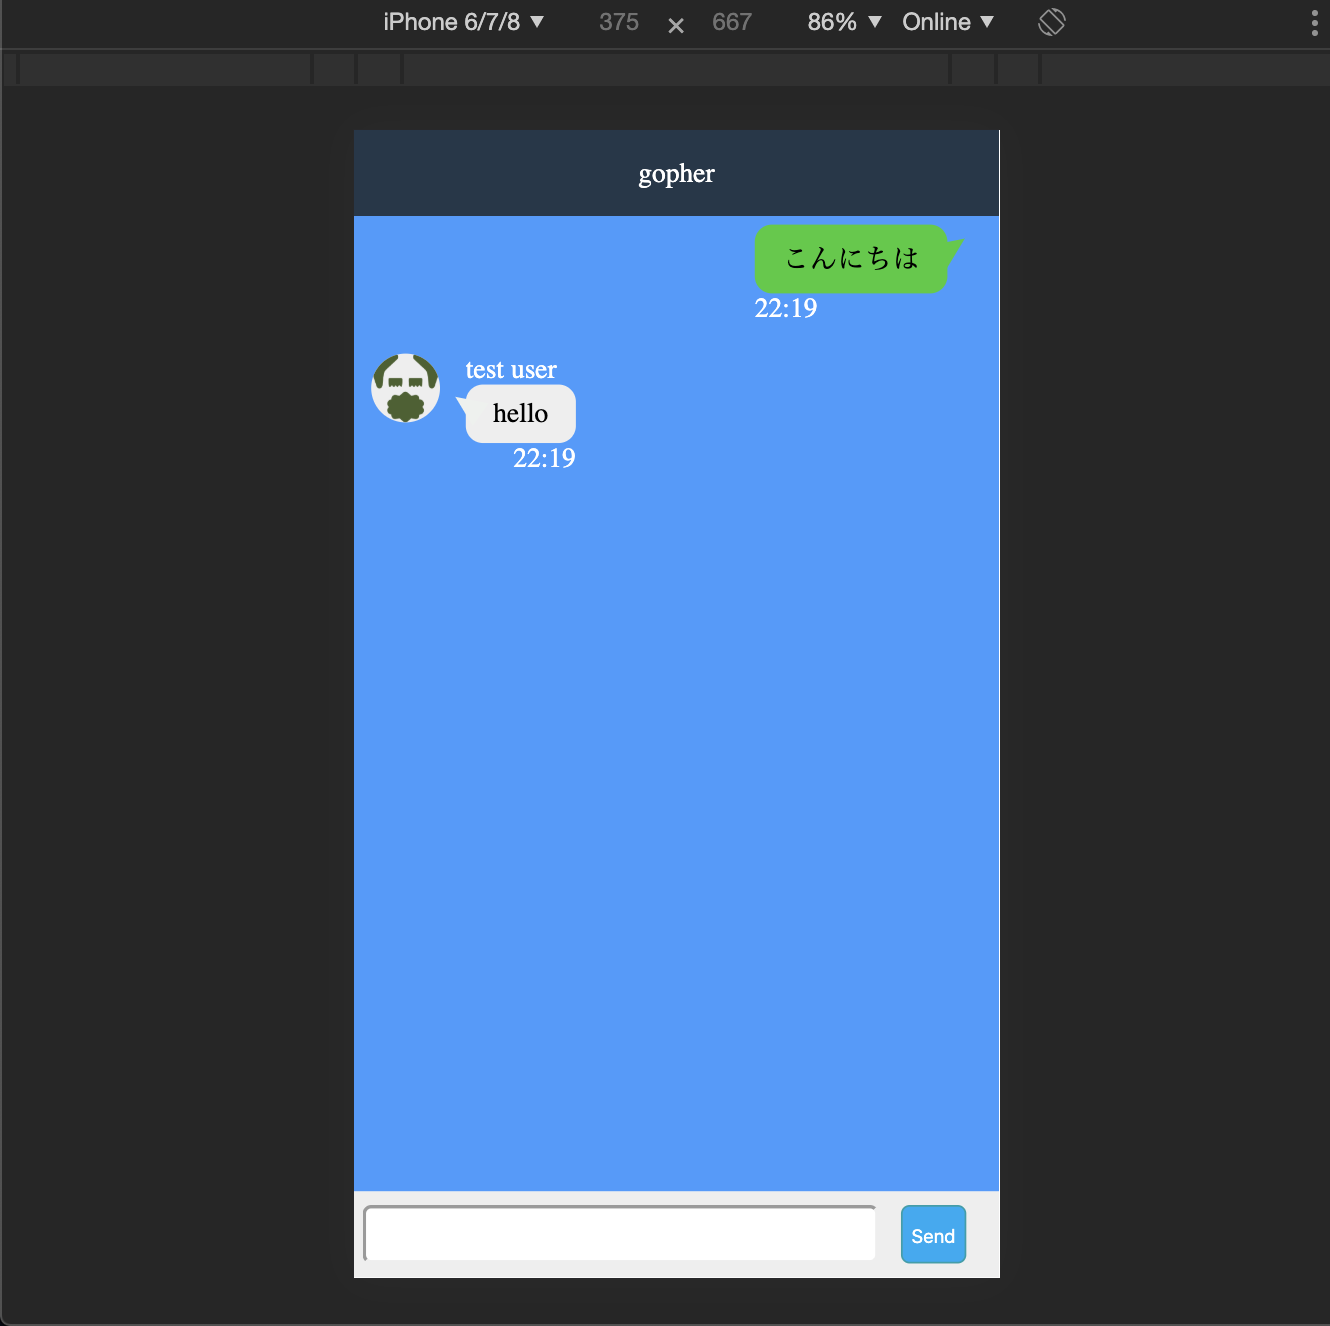
今回は、部屋名が同じクライアントのみに送りたいので、Filterをかけています。index.html
view/index.html<html> <head> <title>LINE</title> <link rel="stylesheet" href="/static/css/common.css"> </head> <body> <div class="line"> <div id="room" class="line-header">Join Room</div> <div id="chat" class="line-container"></div> <div class="line-form"> <input placeholder="room" id="channel" type="text"> <input placeholder="user name" id="user" type="text"> <button id="join" class="line-form-button" onclick="send_data()">Join</button> </div> </div> <script> const chan = document.getElementById("channel"); const join = document.getElementById("join"); const user = document.getElementById("user"); join.onclick = function () { if (chan.value != "") { localStorage.setItem("user",user.value) window.location = "/room/" + chan.value; } }; </script> </body> </html>jsを使った処理を書いていますが、
joinしたときに、ローカルストレージにuserの名前を保存しています。
ローカルストレージとは、ブラウザにあるキーバリュー形式の保存場所です。ページが切り替わっても保持されています。そのままだと見た目が悪いので、cssを追加しましょう
view/static/css/common.css* { margin: 0px; padding: 0px; } .line-header{ top:0; left: 0; height: 50px; width: 100vw; background-color:#253749; color:white; display: table-cell; text-align: center; vertical-align: middle; } .line-container{ background-color:#49F; height: calc(100% - 100px); overflow: scroll; } .line-form{ bottom: 0; left: 0; height: 50px; background-color: #eee; display:flex; } .line-form-button{ color: #FFF; background: #03A9F4;/*色*/ border: solid 1px #039fAA;/*線色*/ border-radius: 5px; margin:8px; padding:1px 5px; } input{ width: 80%; border-radius:5px; margin:8px 5px; } .line-right{ position: relative; margin-right: 5%; float: right; display: block; max-width: 75%; margin: 5px 30px; clear: both; } .line-right::after{ content: ""; position: absolute; top: 3px; right: -19px; border: 8px solid transparent; border-left: 18px solid #3c3; -webkit-transform: rotate(-35deg); transform: rotate(-35deg); } .line-right .line-right-text{ background: #3c3; border-radius: 10px; padding:0.5em 1em ; word-break: break-all; } .line-right-time{ color: white; size:0.2em; float: left; } .line-left{ position: relative; padding: 10px; float: left; display: flex; margin: 2px 0; max-width: 75%; clear: both; } .line-left-container{ margin-left:15px; overflow: hidden; } .line-left .line-left-text{ background: #eee; border-radius: 10px; padding:0.5em 1em ; word-break: break-all; } .line-left .line-left-text::after{ content: ""; display: block; position: absolute; top: 30px; left: 50px; border: 8px solid transparent; border-right: 18px solid #edf1ee; -webkit-transform: rotate(35deg); transform: rotate(35deg); } .line-left-time{ color: white; size:0.2em; float: right; } .line-left-name{ color: white; } .line-left img{ border-radius: 50%; width: 40px; height: 40px; border: #333; background-color: #eee; } @media screen and (max-width:600px){ .line{ height: 100%; } } @media screen and (min-width:601px){ .line { height: 500px; width: 300px; margin: calc((100vh - 500px)/2) auto; border: solid 30px #aaa; border-radius: 1em; } }すると
こんな感じになってます。
room.html
room.html<html> <head> <title>LINE</title> <meta name="viewport" content="width=device-width"> <link rel="stylesheet" href="/static/css/common.css"> </head> <body> <div class="line"> <div id="room" class="line-header">{{.Name}}</div> <div id="chat" class="line-container"></div> <div class="line-form"> <input id="text" type="text"> <button class="line-form-button" onclick="send_data()">Send</button> </div> </div> <script type="text/javascript" src="/static/js/index.js"></script> </body> </html>見た目は、index.htmlと同じです。
特徴としては、room.htmlはテンプレートとして読み込んでいるため、Goのサーバ側で{{.Name}}にルーム名が埋め込まれています。<div id="room" class="line-header">{{.Name}}</div>さらにここでは、webSocketでサーバと通信する必要があるため、その処理をjs/index.jsに記述していきます。
view/static/js/index.jsconst url = "ws://" + window.location.host + window.location.pathname + "/ws"; const ws = new WebSocket(url); const name = localStorage.getItem("user") const chat = document.getElementById("chat"); const text = document.getElementById("text"); ws.onmessage = function (msg) { let obj = JSON.parse(msg.data); obj.message = escape_html(obj.message); let line =""; if (obj.name==name){ line =`<div class='line-right'> <p class='line-right-text'>${obj.message} </p> <div class="line-right-time">${now()}</div> </div>` }else{ let image = '<img src="/static/img/icon.png"/>' line =`<div class='line-left'> ${image} <div class='line-left-container'> <p class='line-left-name'> ${obj.name} </p> <p class='line-left-text'> ${obj.message} </p> <div class='line-left-time'> ${now()} </div> </div> </div>` } chat.innerHTML += line; }; text.onkeydown = function (e) { if (e.keyCode === 13) { send_data(); } }; function send_data(){ if (text.value == "")return; text.value = escape_html(text.value); let sendData = `{"name":"${name}","message":"${text.value}"}`; ws.send(sendData); text.value = ""; } function now() { let date = new Date(); let min = (date.getMinutes()<10)?`0${date.getMinutes()}`:date.getMinutes(); let hour = (date.getHours()<10)?`0${date.getHours()}`:date.getHours(); return `${hour}:${min}` }; function escape_html (string) { if(typeof string !== 'string') { return string; } return string.replace(/[&'`"<>]/g, function(match) { return { '&': '&', "'": ''', '`': '`', '"': '"', '<': '<', '>': '>', }[match] }); }少し説明していきます。
const url = "ws://" + window.location.host + window.location.pathname + "/ws";
const ws = new WebSocket(url);
jsファイルが読み込まれるときに、websocketでサーバに通信しています。
ws.onmessage = function (msg) {
  let obj = JSON.parse(msg.data);
};
ここでは、Goのサーバからブロードキャストでデータが送られてきたときに実行されます。
function send_data(){
    if (text.value == "")return;
    text.value = escape_html(text.value);
    let sendData = `{"name":"${name}","message":"${text.value}"}`;
    ws.send(sendData);
    text.value = "";
}
逆にサーバに値を送るときは、ws.send()を利用して送信します。
{
    "name":"user",
    "message":"メッセージ"
}
基本的にデータ構造はjson型で以下のように送受信されています。
実行してみる
$ go run cmd/main.goブラウザで、http://localhost:8080/
とうって確認してみてください。
タブで二つ開いて、同じ部屋にJoinすると、LINEの見た目でリアルタイム通信ができるはずです。
これで以上です。
最後に
今回はWebSocketを使って、Line風チャットを作ってみました。
githubにコードをあげていますー!
https://github.com/ryomak/line-chat-go
少しでもWeb制作のお役に立てれば良いなと思います!Go生活楽しみましょー!


- 投稿日:2020-01-19T22:42:40+09:00
AtCoder Beginner Contest 152 参戦記
AtCoder Beginner Contest 152 参戦記
ABC152A - AC or WA
1分半で突破. 書くだけ.
N, M = map(int, input().split())

if N == M:
    print('Yes')
else:
    print('No')
ABC152B - Comparing Strings
2分で突破. 書くだけ.
a, b = map(int, input().split())

if a < b:
    print(str(a) * b)
else:
    print(str(b) * a)
ABC152C - Low Elements
5分で突破. 流石に二重ループは TLE なので、現時点の最小値を持ち回す必要あり. 題意を理解するのに少し時間を使った.
N = int(input())
P = list(map(int, input().split()))

result = 0
m = P[0]
for i in range(N):
    if P[i] <= m:
        result += 1
        m = P[i]
print(result)
ABC152D - Handstand 2
26分で突破. N回ループ回しても大丈夫だと見切れればさして難しくはない. 先頭と末尾の組み合わせで個数を集計すれば一発.
N = int(input())

t = [[0] * 10 for _ in range(10)]
for i in range(1, N + 1):
    s = str(i)
    t[int(s[0])][int(s[-1])] += 1

result = 0
for i in range(1, 10):
    for j in range(1, 10):
        result += t[i][j] * t[j][i]
print(result)
ABC152E - Flatten
敗退. 最小公倍数を求めて集計するナイーブな実装では TLE だった.
追記: 解説通り実装した.
package main

import (
    "bufio"
    "fmt"
    "os"
    "strconv"
)

func mpow(x int, n int) int {
    result := 1
    for n != 0 {
        if n&1 == 1 {
            result *= x
            result %= 1000000007
        }
        x *= x
        x %= 1000000007
        n >>= 1
    }
    return result
}

func main() {
    maxA := 1000000

    N := readInt()
    A := make([]int, N)
    for i := 0; i < N; i++ {
        A[i] = readInt()
    }

    sieve := make([]int, maxA+1)
    sieve[0] = -1
    sieve[1] = -1
    for i := 2; i <= maxA; i++ {
        if sieve[i] != 0 {
            continue
        }
        sieve[i] = i
        for j := i * i; j <= maxA; j += i {
            if sieve[j] == 0 {
                sieve[j] = i
            }
        }
    }

    lcmFactors := map[int]int{}
    for i := 0; i < N; i++ {
        t := map[int]int{}
        a := A[i]
        for a != 1 {
            t[sieve[a]]++
            a /= sieve[a]
        }
        for k, v := range t {
            if lcmFactors[k] < v {
                lcmFactors[k] = v
            }
        }
    }

    lcm := 1
    for k, v := range lcmFactors {
        for i := 0; i < v; i++ {
            lcm *= k
            lcm %= 1000000007
        }
    }

    result := 0
    for i := 0; i < N; i++ {
        result += lcm * mpow(A[i], 1000000007-2)
        result %= 1000000007
    }
    fmt.Println(result)
}

const (
    ioBufferSize = 1 * 1024 * 1024 // 1 MB
)

var stdinScanner = func() *bufio.Scanner {
    result := bufio.NewScanner(os.Stdin)
    result.Buffer(make([]byte, ioBufferSize), ioBufferSize)
    result.Split(bufio.ScanWords)
    return result
}()

func readString() string {
    stdinScanner.Scan()
    return stdinScanner.Text()
}

func readInt() int {
    result, err := strconv.Atoi(readString())
    if err != nil {
        panic(err)
    }
    return result
}
- 投稿日:2020-01-19T17:12:25+09:00
atomic, mutex どうなんだろう・・・ mutex が早いだと・・・ ニャ
所感
ちゃんと調べないとダメそう・・・
Lock 有りが何もしないより早いなんて・・・概要
var num int64
num++
単純な数字カウントアップ atomic が早そうだなーなのでベンチマーク撮ってみよ
- 何もせずに
num++mutex.Loc() num++ mutex.Unlock()atomic.AddInt64atomic.ValueのLoad(), Store()コード
カウントアップ
main.goimport ( "sync" "sync/atomic" ) var mutex sync.Mutex var value atomic.Value type Counter int64 func (c *Counter) Inc() { *c++ } func (c *Counter) AtomicInc() { atomic.AddInt64((*int64)(c), 1) } func (c *Counter) LockInc() { mutex.Lock() defer mutex.Unlock() *c++ } func incValue() { cnt := value.Load().(Counter) cnt++ value.Store(cnt) } func countup(inc func(), n int) { var wg sync.WaitGroup for i := 0; i < n; i++ { wg.Add(1) go func() { defer wg.Done() inc() }() } wg.Wait() }ベンチマーク
main_test.gopackage main // go test -bench . | grep 'ns/op' import ( "testing" ) func BenchmarkInc_Countup(b *testing.B) { var cnt Counter b.ResetTimer() countup(cnt.Inc, b.N) b.Logf("%d -> %d", b.N, cnt) } func BenchmarkLock_Countup(b *testing.B) { var cnt Counter b.ResetTimer() countup(cnt.LockInc, b.N) b.Logf("%d -> %d", b.N, cnt) } func BenchmarkAtomic_Countup(b *testing.B) { var cnt Counter b.ResetTimer() countup(cnt.AtomicInc, b.N) b.Logf("%d -> %d", b.N, cnt) } func BenchmarkAtomicValue_Countup(b *testing.B) { var cnt Counter value.Store(cnt) b.ResetTimer() countup(incValue, b.N) cnt = value.Load().(Counter) b.Logf("%d -> %d", b.N, cnt) }実行結果
go test -bench .
atomic.Valueが速い事は、いいとしてMutexがatomic.AddInt64より速いことが解せぬ- 何もしないとカウントアップの数合わないです(想定通り)他は大丈夫
$ go test -bench .
goos: linux
goarch: amd64
BenchmarkInc_Countup-4               2000000           957 ns/op
--- BENCH: BenchmarkInc_Countup-4
    acounter_test.go:13: 1 -> 1
    acounter_test.go:13: 100 -> 100
    acounter_test.go:13: 10000 -> 9752
    acounter_test.go:13: 1000000 -> 982973
    acounter_test.go:13: 2000000 -> 1962072
BenchmarkLock_Countup-4              2000000           936 ns/op
--- BENCH: BenchmarkLock_Countup-4
    acounter_test.go:20: 1 -> 1
    acounter_test.go:20: 100 -> 100
    acounter_test.go:20: 10000 -> 10000
    acounter_test.go:20: 1000000 -> 1000000
    acounter_test.go:20: 2000000 -> 2000000
BenchmarkAtomic_Countup-4            2000000           943 ns/op
--- BENCH: BenchmarkAtomic_Countup-4
    acounter_test.go:27: 1 -> 1
    acounter_test.go:27: 100 -> 100
    acounter_test.go:27: 10000 -> 10000
    acounter_test.go:27: 1000000 -> 1000000
    acounter_test.go:27: 2000000 -> 2000000
BenchmarkAtomicValue_Countup-4       2000000           904 ns/op
--- BENCH: BenchmarkAtomicValue_Countup-4
    acounter_test.go:36: 1 -> 1
    acounter_test.go:36: 100 -> 54
    acounter_test.go:36: 10000 -> 7125
    acounter_test.go:36: 1000000 -> 791697
    acounter_test.go:36: 2000000 -> 1586774
PASS
複数回の実行結果
複数回実行すれば・・・
atomic.AddInt早くなるはずでは・・・
atomic.Value>Mutex> なにもしない >atomic.AddIntこ、これは・・・詳細なチェックしないとフラグでは・・・$ for i in $(seq 1 3); do go test -bench . | grep 'ns/op'; done BenchmarkInc_Countup-4 2000000 998 ns/op BenchmarkInc_Countup-4 2000000 989 ns/op BenchmarkInc_Countup-4 1000000 1018 ns/op BenchmarkLock_Countup-4 1000000 1113 ns/op BenchmarkLock_Countup-4 2000000 986 ns/op BenchmarkLock_Countup-4 1000000 1311 ns/op BenchmarkAtomic_Countup-4 1000000 1010 ns/op BenchmarkAtomic_Countup-4 2000000 1130 ns/op BenchmarkAtomic_Countup-4 1000000 1051 ns/op BenchmarkAtomicValue_Countup-4 2000000 1013 ns/op BenchmarkAtomicValue_Countup-4 2000000 987 ns/op BenchmarkAtomicValue_Countup-4 1000000 1125 ns/opRecap
- 実装依存なら、コードを見て原因を探す
- OS依存なら Profile とかしながら、ググったりして原因を探す
- ハード依存なら・・・
- ドキュメントに書いてあるとうれしいな
参考
- 投稿日:2020-01-19T16:26:42+09:00
goroutineが難しい
結論
selectを忘れずにつける
目的
0.5秒ごとにカウント 0, 1, 2, ... を送るチャネルを取得するライブラリを作りたい。
実装1. 単純な実装
lib.gopackage main import "time" // 0.5秒ごとにカウントを送るチャネルを返す func NewInterval() <-chan int { ch := make(chan int) count := 0 go func() { for { time.Sleep(500 * time.Millisecond) ch <- count count++ } }() return ch }使用例
main.gopackage main import ( "fmt" ) func main() { ch := NewInterval() for { fmt.Println(<-ch) } }実装1の問題点
チャネルからのデータの受け取りをやめた後もNewInterval関数内のgoroutineが生き続け,メモリを圧迫する(goroutine リーク)。
main.gopackage main import ( "fmt" "runtime" ) // こんな感じで関数内で呼び出すと,goroutine リークがあることに気づきにくい func f() { ch := NewInterval() // 最初の3つだけ受け取る for i := 0; i < 3; i++ { fmt.Println(<-ch) } } func main() { // goroutineは1個 fmt.Printf("goroutineの数: %v\n", runtime.NumGoroutine()) f() // ここで何らかの処理をする... time.Sleep(500 * time.Millisecond) // goroutineは2個 ... goroutine リーク! fmt.Printf("goroutineの数: %v\n", runtime.NumGoroutine()) }実装2. goroutineをキャンセル可能にする
公式の A Tour of Go のコードと同様に
<-chan intを使って,goroutineをキャンセル可能にする。lib.gopackage main import "time" // 0.5秒ごとにカウントを送るチャネルを返す。quitにデータが送られたら終了する。 func NewInterval(quit <-chan int) <-chan int { ch := make(chan int) count := 0 go func() { for { // 0.5秒待つ。もし待っている間にquitからデータが送られてきたらgoroutineを終了する。 // ※ time.NewTimer(500 * time.Millisecond).C は0.5秒たつとデータが送られてくるチャネル。 select { case <-time.NewTimer(500 * time.Millisecond).C: case <-quit: return } ch <- count count++ } }() return ch }使用例
main.gopackage main import ( "fmt" "runtime" "time" ) func f() { quit := make(chan int) ch := NewInterval(quit) defer func() { // 関数fを抜けた時点で,NewInterval内のgoroutineを終了させる quit <- 0 }() // 最初の3つだけ受け取る for i := 0; i < 3; i++ { fmt.Println(<-ch) } } func main() { // goroutineは1個 fmt.Printf("goroutineの数: %v\n", runtime.NumGoroutine()) f() // ここで何らかの処理をする... time.Sleep(500 * time.Millisecond) // goroutineは1個 ... goroutine リークを防げた! fmt.Printf("goroutineの数: %v\n", runtime.NumGoroutine()) }実装2の問題点(1)
chからデータを受け取る間隔が長くなると,デッドロックが起きる。main.gopackage main import ( "fmt" "time" ) func main() { quit := make(chan int) ch := NewInterval(quit) fmt.Println(<-ch) // ここで0.5秒以上かかる処理をする(0.5秒だと長いが,たとえばNewIntervalの間隔が0.001秒とかに設定されていたら,容易に超える) time.Sleep(time.Second) // fatal error: all goroutines are asleep - deadlock! quit <- 0 }quitの容量を1以上にするとdead lockを防げるように見えるが,そうするとgoroutine リークが起きる。
package main

import (
    "fmt"
    "runtime"
    "time"
)

func main() {
    // goroutineの数: 1
    fmt.Printf("goroutineの数: %v\n", runtime.NumGoroutine())

    // quitの容量を1にした
    quit := make(chan int, 1)
    ch := NewInterval(quit)

    fmt.Println(<-ch)

    // 少し待つ
    time.Sleep(time.Second)

    quit <- 0

    // 少し待つ
    time.Sleep(time.Second)

    // goroutineの数: 2
    fmt.Printf("goroutineの数: %v\n", runtime.NumGoroutine())
}
実装3. データの送信にもselectをつける
すべてのチャネル操作をきちんとselectで囲む必要がある。
lib.gopackage main import "time" // 0.5秒ごとにカウントを送るチャネルを返す。quitにデータが送られたら終了する。 func NewInterval(quit <-chan int) <-chan int { ch := make(chan int) count := 0 go func() { for { // 0.5秒待つ。もし待っている間にquitからデータが送られてきたらgoroutineを終了する。 // ※ time.NewTimer(500 * time.Millisecond).C は0.5秒たつとデータが送られてくるチャネル。 select { case <-time.NewTimer(500 * time.Millisecond).C: case <-quit: return } // countを送信する。送信を試行している間にquitからデータが送られてきたらgoroutineを終了する。 select { case ch <- count: case <-quit: return } count++ } }() return ch }実装4. contextを使う
チャネルにデータを送ってgoroutineを終了させるのはわかりにくいため,contextを使うと良いかもしれない。contextは標準ライブラリに入っている。
lib.gopackage main import ( "context" "time" ) // 0.5秒ごとにカウントを送るチャネルを返す。quitにデータが送られたら終了する。 func NewInterval(ctx context.Context) <-chan int { ch := make(chan int) count := 0 go func() { for { // 0.5秒待つ。もし待っている間にquitからデータが送られてきたらgoroutineを終了する。 // ※ time.NewTimer(500 * time.Millisecond).C は0.5秒たつとデータが送られてくるチャネル。 select { case <-time.NewTimer(500 * time.Millisecond).C: case <-ctx.Done(): return } // countを送信する。送信を試行している間にquitからデータが送られてきたらgoroutineを終了する。 select { case ch <- count: case <-ctx.Done(): return } count++ } }() return ch }main.gopackage main import ( "context" "fmt" "runtime" "time" ) func f() { ctx, cancel := context.WithCancel(context.Background()) defer cancel() ch := NewInterval(ctx) fmt.Println(<-ch) } func main() { // goroutineの数: 1 fmt.Printf("goroutineの数: %v\n", runtime.NumGoroutine()) f() // 少し待つ time.Sleep(time.Second) // goroutineの数: 1 fmt.Printf("goroutineの数: %v\n", runtime.NumGoroutine()) }
- 投稿日:2020-01-19T16:07:16+09:00
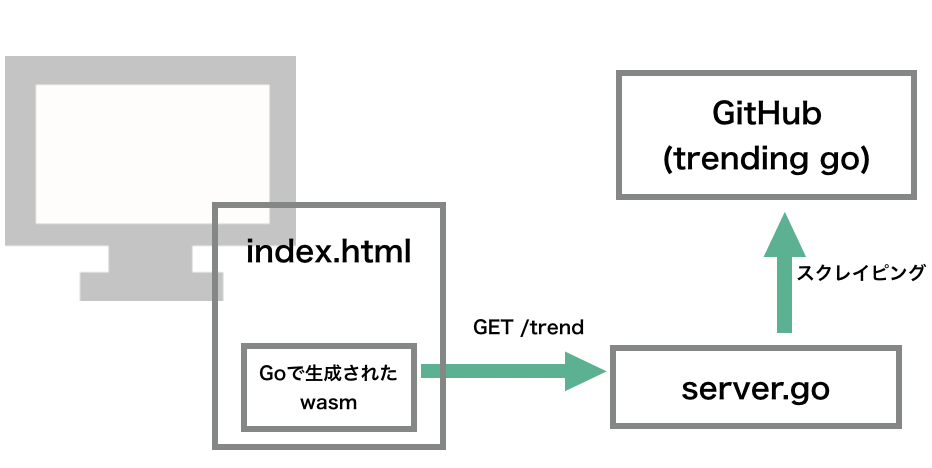
jsを書かずにGoだけでgithubのトレンドを表示するwebサイトをつくってみた(WebAssembly)
自己紹介
仕事では主にJavaを使っていますが、趣味でGoを触っています。
twitter:@kurisuuu3
github:ryomak成果物
WebAssemblyの勉強をする目的でしたが、どうせならとスローガンを掲げて作りました!
GoのGoによるGoのためのWebサイト
を掲げ、javascriptを書かずに
Goで書かれたGithubリポジトリのトレンドを表示するWebサイトを作りました。
(https://github.com/trending/go を見ればそもそもトレンド見れますw)
成果物のコード
どう実現するのか
WebAssembly
ブラウザからアセンブリを実行できるようにする技術です
モダンなWebブラウザは対応してるそうです!生まれた経緯は
WebAssemblyとは?〜実際にC言語をブラウザで動かす〜【2019年6月版】
がわかりやすかったです以下wasmとします。
構成
wasmファイルがJsと同様の処理を行います。今回はdom操作とhttp通信です。
※ 直接Githubにはアクセスできません。javascript等と同じで、ブラウザのCORSに引っかかります。
そのため、同じオリジンのapi経由で取得しにきます。動作環境
go1.12 darwin/amd64
Google Chrome バージョン: 79.0.3945.130(Official Build) (64 ビット)
です!
Go1.11からWebAssemblyが使えるのですが、Go1.12からいくつかの関数名が変わったりしているので、気をつけてください
今回はバージョンは影響する関数は用いていません。作る
ファイル構成
.
├── Makefile
├── README.md
├── common
│   └── trend.go
├── go.mod
├── go.sum
├── main.go
├── server.go
└── static
    ├── index.css
    ├── index.html
    ├── main.wasm
    └── wasm_exec.js
server.go(サーバを作る)
必要な機能は以下です。
- 静的ファイル(index.html...)用のファイルサーバ
- Githubからトレンドを取得する
- 取得したトレンドを返すAPI
静的ファイル(index.html...)用のファイルサーバ
server.gopackage main import( "net/http" ) func main() { http.Handle("/", http.FileServer(http.Dir("./static"))) http.ListenAndServe(":8080", nil) }これで、staticフォルダ以下のファイルをhttp://localhost.com:8080/
にマッピングできます。Githubからトレンドを取得する
Githubからスクレイピングで、トレンドを持ってきます。
トレンドをスクレイピングするパッケージを予め用意しておきました。
このパッケージを用いて、トレンドを取得します。
トレンドを今回のAPI用に構造体を作っておきます。common/trend.gopackage common type Repository struct{ Name string `json:"name"` User string `json:"user"` Star uint`json:"star"` URL string `json:"url"` Description string `json:"description"` } type Repositories []Repository
json:"hogehoge"
としておくことで、レスポンスのパラメータ名を設定できます取得したトレンドを返すAPI
server.gofunc trendHandler(w http.ResponseWriter, r *http.Request) { client := trending.NewClient() repos, err := client.GetRepository(trending.TIME_WEEK, "go") if err != nil { json.NewEncoder(w).Encode([]common.Repository{}) return } list := []common.Repository{} for _, repo := range repos { list = append(list, common.Repository{ Name: repo.Name, User: repo.Owner, URL: repo.URL, Star: repo.Star, Description: repo.Description, }) } w.Header().Set("Content-Type", "application/json") json.NewEncoder(w).Encode(list) return }最初にトレンドを取得してきてから、
先ほど作成したRepository構造体にデータを詰め込みます。
json.NewEncoder(w).Encode(list)でjson形式で返しています。server.go完成
server.gopackage main import( "net/http" "encoding/json" "example/common" trending "github.com/ryomak/go-trending" ) var client = trending.NewClient() func main() { http.HandleFunc("/trend", trendHandler) http.Handle("/", http.FileServer(http.Dir("./static"))) http.ListenAndServe(":8080", nil) } func trendHandler(w http.ResponseWriter, r *http.Request) { // Show projects of today repos, err := client.GetRepository(trending.TIME_WEEK, "go") if err != nil { json.NewEncoder(w).Encode([]common.Repository{}) return } list := []common.Repository{} for _, repo := range repos { list = append(list, common.Repository{ Name: repo.Name, User: repo.Owner, URL: repo.URL, Star: repo.Star, Description: repo.Description, }) } w.Header().Set("Content-Type", "application/json") json.NewEncoder(w).Encode(list) return }staticフォルダ以下の作成
server.goを作成したことで,staticフォルダ以下を配信できるようになりました。
まず、index.htmlファイルを見ていきますindex.html
<html>
    <head>
       <meta charset="utf-8">
       <meta name="viewport" content="width=device-width,initial-scale=1.0">
       <link rel="stylesheet" type="text/css" href="/index.css">
       <script src="wasm_exec.js"></script>
       <script>
         const go = new Go();
           WebAssembly.instantiateStreaming(fetch("main.wasm"), go.importObject).then((result) => {
               go.run(result.instance);
           });
       </script>
   </head>
    <body>
      <div id="app"></div>
    </body>
</html>
wasm_exec.js
<script src="wasm_exec.js"></script>wasmはwasm単体では動作しません。wasmはjsから読み込む処理が必要です。
読み込む処理をwasm_exec.jsが行います。このファイルは提供されてるので、ダウロードします$ cd static && curl -sO https://raw.githubusercontent.com/golang/go/release-branch.go1.12/misc/wasm/wasm_exec.jsscript処理
index.html<script> const go = new Go(); WebAssembly.instantiateStreaming(fetch("main.wasm"), go.importObject).then((result) => { go.run(result.instance); }); </script>ここでは、wasmファイルを取得して実行するところです。
index.css
スタイルを当てます
h1{
  text-align: center;
  font: #f1f1f1;
}

.trend{
    width:80vw;
  padding: 1em;
  margin:0 auto;
    display:flex;
  flex-wrap: wrap;
  justify-content:center;
}

.item {
  background: #f1f1f1;
  margin: .5em;
    width:100%;
}


@media (min-width: 801px) {
  .item {
    width: 30%;
  }
}

@media (min-width: 600px) and (max-width: 800px){
  .item {
    width: 40%;
  }
}

.item-title {
    font-size: 1.2em;
    background: #24292e;
    text-align: center;
    display: table-cell;
  vertical-align: middle;
    color: #fafafa;
    font-weight: bold;
  height: 100px;
  width:10%;
  padding:1em;
}

.item:hover .item-description {
  display: block;
}

.item:hover .item-title {
  display: none;
}

.item-description {
  display:none;
  color: #24292e;
    height: 100px;
  word-break : break-all;
    overflow: scroll;
}

a {
  text-decoration: none;
    color: #111;
}
a:hover {
  text-decoration: none;
}

/* loading */
.sk-chase {
  width: 100px;
  height: 100px;
  position: absolute;
  top: 45%;
  left: 45%;
  margin: :auto;
  animation: sk-chase 2.5s infinite linear both;
}

.sk-chase-dot {
  width: 100%;
  height: 100%;
  position: absolute;
  left: 0;
  top: 0;
  animation: sk-chase-dot 2.0s infinite ease-in-out both;
}

.sk-chase-dot:before {
  content: '';
  display: block;
  width: 25%;
  height: 25%;
  background-color: #3a5;
  border-radius: 100%;
  animation: sk-chase-dot-before 2.0s infinite ease-in-out both;
}

.sk-chase-dot:nth-child(1) { animation-delay: -1.1s; }
.sk-chase-dot:nth-child(2) { animation-delay: -1.0s; }
.sk-chase-dot:nth-child(3) { animation-delay: -0.9s; }
.sk-chase-dot:nth-child(4) { animation-delay: -0.8s; }
.sk-chase-dot:nth-child(5) { animation-delay: -0.7s; }
.sk-chase-dot:nth-child(6) { animation-delay: -0.6s; }
.sk-chase-dot:nth-child(1):before { animation-delay: -1.1s; }
.sk-chase-dot:nth-child(2):before { animation-delay: -1.0s; }
.sk-chase-dot:nth-child(3):before { animation-delay: -0.9s; }
.sk-chase-dot:nth-child(4):before { animation-delay: -0.8s; }
.sk-chase-dot:nth-child(5):before { animation-delay: -0.7s; }
.sk-chase-dot:nth-child(6):before { animation-delay: -0.6s; }

@keyframes sk-chase {
  100% { transform: rotate(360deg); }
}

@keyframes sk-chase-dot {
  80%, 100% { transform: rotate(360deg); }
}

@keyframes sk-chase-dot-before {
  50% {
    transform: scale(0.4);
  } 100%, 0% {
    transform: scale(1.0);
  }
}
main.wasm
goで書かれたwasmファイルです。
生成は後ほど説明します。wasmファイルの作成
ここから本題のwasmを作成していきます。
wasmはGoで書かれたファイルをbuildした生成物です。
GOOSとGOARCHをwasm用にする以外は通常のbuildと同じです。$ GOOS=js GOARCH=wasm go build -o static/main.wasm main.gomain.go
基本的にはjsで利用しているメソッドを使えるので、普段jsを書く人ならそこまで苦労しないかなと思いました。
(普段書かないので、手間取りました)package main import ( "encoding/json" "example/common" "fmt" "net/http" "syscall/js" ) var document = js.Global().Get("document") var app = js.Global().Get("document").Call("getElementById", "app") func main() { done := make(chan bool) go loading(done) title() go fetch(done) select {} } func title() { t := createElement("h1") t.Set("textContent", "go-trending in github") app.Call("appendChild", t) } func getTrend() (common.Repositories, error) { r, err := http.Get("/trend") defer r.Body.Close() if err != nil { return common.Repositories{}, err } repos := common.Repositories{} err = json.NewDecoder(r.Body).Decode(&repos) return repos, err } func fetch(done chan bool) { trendListDiv := createElement("div") class := trendListDiv.Get("classList") class.Call("add", "trend") app.Call("appendChild", trendListDiv) trends, _ := getTrend() done <- true for _, trend := range trends { trendListDiv.Call("appendChild", createItemByTrend(trend)) } } func createItemByTrend(repo common.Repository) js.Value { item := createElement("div") class := item.Get("classList") class.Call("add", "item") itemLink := createElement("a") itemLink.Set("href", repo.URL) itemTitle := createElement("div") itemTitle.Set("textContent", fmt.Sprintf("%s/%s (☆ %d)", repo.User, repo.Name, repo.Star)) class = itemTitle.Get("classList") class.Call("add", "item-title") itemDescription := createElement("div") itemDescription.Set("textContent", repo.Description) class = itemDescription.Get("classList") class.Call("add", "item-description") item.Call("appendChild", itemLink) itemLink.Call("appendChild", itemTitle) itemLink.Call("appendChild", itemDescription) return item } func loading(done chan bool) { chase := createElement("div") class := chase.Get("classList") class.Call("add", "sk-chase") app.Call("appendChild", chase) dots := []js.Value{} for i := 0; i < 6; i++ { chaseDot := createElement("div") class = chaseDot.Get("classList") class.Call("add", "sk-chase-dot") chase.Call("appendChild", chaseDot) dots = append(dots, chaseDot) } <-done style := chase.Get("style") style.Set("display", "none") } func createElement(elementName string) js.Value { return document.Call("createElement", elementName) }main処理
機能は、トレンドを取得する間ローディングを表示し、取得し終わるとトレンド一覧が出てきます。
func main() {
    done := make(chan bool)
    title()
    go loading(done)
    go fetch(done)
    select {}
}
- title()は、サイトタイトルを表示するための関数です。中では、h1タグを生成しています。
- fetch()はトレンドをサーバから取得して、一覧を表示します。中では、apiを叩き、domを生成していきます。
- loading()はトレンドを取得中にローディングを出します。
doneについて、
Go特有のチャネルを使って、fetch()の内部で、トレンドを取得し終わるのを監視して、終わったことをloading()に伝えます。
select{}を用いて、main関数の処理が終了するのをブロックしています。共通処理
先にこのコード内での共通処理を説明しておきます。
var document = js.Global().Get("document")
var app = js.Global().Get("document").Call("getElementById", "app")

func createElement(elementName string) js.Value {
    return document.Call("createElement", elementName)
}
- documentはjsのdocumentと同じです。
- appは、id=appのelementを取得しています。(getElementByIdはjsのメソッド名です)
- createElement(name)はdomを生成します。
title()
func title() {
    t := createElement("h1")
    t.Set("textContent", "go-trending in github")
    app.Call("appendChild", t)
}
h1タグを生成し、中に"go-trending in github"を挿入し、appの子要素として挿入します。
書き方は違いますが、jsと同じメソッド名で処理をしています。loading()
func loading(done chan bool) {
    chase := createElement("div")
    class := chase.Get("classList")
    class.Call("add", "sk-chase")
    app.Call("appendChild", chase)
    dots := []js.Value{}
    for i := 0; i < 6; i++ {
        chaseDot := createElement("div")
        class = chaseDot.Get("classList")
        class.Call("add", "sk-chase-dot")
        chase.Call("appendChild", chaseDot)
        dots = append(dots, chaseDot)
    }
    <-done
    style := chase.Get("style")
    style.Set("display", "none")

}
appの子要素に以下のようなelementを生成しています。
<div class="sk-chase">
    <div class="sk-chase-dot"></div>
    <div class="sk-chase-dot"></div>
    <div class="sk-chase-dot"></div>
    <div class="sk-chase-dot"></div>
    <div class="sk-chase-dot"></div>
    <div class="sk-chase-dot"></div>
</div>
特筆事項としては、
    <-done
    style := chase.Get("style")
    style.Set("display", "none")
doneチャネルに値が入ってくるまで<-doneでブロックし、値が入ってくると、style属性にdisplay:noneを追加し、見えないようにします・
fetch
func fetch(done chan bool) {
    trendListDiv := createElement("div")
    class := trendListDiv.Get("classList")
    class.Call("add", "trend")
    app.Call("appendChild", trendListDiv)

    trends, _ := getTrend()
    done <- true
    for _, trend := range trends {
        trendListDiv.Call("appendChild", createItemByTrend(trend))
    }

}

func getTrend() (common.Repositories, error) {
    r, err := http.Get("/trend")
    defer r.Body.Close()
    if err != nil {
        return common.Repositories{}, err
    }
    repos := common.Repositories{}
    err = json.NewDecoder(r.Body).Decode(&repos)
    return repos, err
}
getTrend()で、http通信でトレンドを取得し、構造体にマッピングしています。
取得したレポジトリ毎にdomを生成しています。
取得してから、doneチャネルにtrueという値を送信しています。
fetchでは、以下のようなElementを生成しています。<div class="trend"> <div class="item"> <a href=""> <div class="item-title"></div> <div class="item-description"></div> </a> </div> ... </div>実行
$ GOOS=js GOARCH=wasm go build -o static/main.wasm main.go
$ go run server.go
感想
共通処理が書ける
今回、common/trend.goをserverとwasm両方で利用しました。
そのためapiの通信の際、同じ構造体を利用できるので、マッピングが楽でした。
grpcと同じ感じがしました。Vugu
https://github.com/vugu/vugu
という、wasmでReactやVue風にUIを書くことができるパッケージがあるらしいので、そっちを使うと管理が楽っぽいです終わり
初めてwasmを触りましたが、wasmのファイルサイズが大きかったり、まだ課題はありそうですが、js以外にもウェブ制作の手段が広がったのは良いことだなと思いました。


- 投稿日:2020-01-19T16:07:16+09:00
jsを書かずにGoだけでwebサイトをつくってみた(WebAssembly)
自己紹介
バックエンドエンジニアとして働いています!
仕事では主にJavaを使っていますが、趣味でGoやVueを触っています!最近は、flutterも触り始めました!twitterやgithubもやってます!お話ししましょうー成果物
WebAssemblyの勉強をする目的でしたが、どうせならとスローガンを掲げて作りました!
GoのGoによるGoのためのWebサイト
を掲げ、javascriptを書かずに
Goで書かれたGithubリポジトリのトレンドを表示するWebサイトを作りました。
(https://github.com/trending/go を見ればそもそもトレンド見れますw)
成果物のコード
どう実現するのか
WebAssembly
ブラウザからアセンブリを実行できるようにする技術です
モダンなWebブラウザは対応してるそうです!生まれた経緯は
WebAssemblyとは?〜実際にC言語をブラウザで動かす〜【2019年6月版】
がわかりやすかったです以下wasmとします。
構成
wasmファイルがJsと同様の処理を行います。今回はdom操作とhttp通信です。
※ 直接Githubにはアクセスできません。javascript等と同じで、ブラウザのCORSに引っかかります。
そのため、同じオリジンのapi経由で取得しにきます。動作環境
go1.12 darwin/amd64
Google Chrome バージョン: 79.0.3945.130(Official Build) (64 ビット)
です!
Go1.11からWebAssemblyが使えるのですが、Go1.12からいくつかの関数名が変わったりしているので、気をつけてください
今回はバージョンは影響する関数は用いていません。作る
ファイル構成
.
├── Makefile
├── README.md
├── common
│   └── trend.go
├── go.mod
├── go.sum
├── main.go
├── server.go
└── static
    ├── index.css
    ├── index.html
    ├── main.wasm
    └── wasm_exec.js
server.go(サーバを作る)
必要な機能は以下です。
- 静的ファイル(index.html...)用のファイルサーバ
- Githubからトレンドを取得する
- 取得したトレンドを返すAPI
静的ファイル(index.html...)用のファイルサーバ
server.gopackage main import( "net/http" ) func main() { http.Handle("/", http.FileServer(http.Dir("./static"))) http.ListenAndServe(":8080", nil) }これで、staticフォルダ以下のファイルをhttp://localhost.com:8080/
にマッピングできます。Githubからトレンドを取得する
Githubからスクレイピングで、トレンドを持ってきます。
トレンドをスクレイピングするパッケージを予め用意しておきました。
このパッケージを用いて、トレンドを取得します。
トレンドを今回のAPI用に構造体を作っておきます。common/trend.gopackage common type Repository struct{ Name string `json:"name"` User string `json:"user"` Star uint`json:"star"` URL string `json:"url"` Description string `json:"description"` } type Repositories []Repository
json:"hogehoge"
としておくことで、レスポンスのパラメータ名を設定できます取得したトレンドを返すAPI
server.gofunc trendHandler(w http.ResponseWriter, r *http.Request) { client := trending.NewClient() repos, err := client.GetRepository(trending.TIME_WEEK, "go") if err != nil { json.NewEncoder(w).Encode([]common.Repository{}) return } list := []common.Repository{} for _, repo := range repos { list = append(list, common.Repository{ Name: repo.Name, User: repo.Owner, URL: repo.URL, Star: repo.Star, Description: repo.Description, }) } w.Header().Set("Content-Type", "application/json") json.NewEncoder(w).Encode(list) return }最初にトレンドを取得してきてから、
先ほど作成したRepository構造体にデータを詰め込みます。
json.NewEncoder(w).Encode(list)でjson形式で返しています。server.go完成
server.gopackage main import( "net/http" "encoding/json" "example/common" trending "github.com/ryomak/go-trending" ) var client = trending.NewClient() func main() { http.HandleFunc("/trend", trendHandler) http.Handle("/", http.FileServer(http.Dir("./static"))) http.ListenAndServe(":8080", nil) } func trendHandler(w http.ResponseWriter, r *http.Request) { // Show projects of today repos, err := client.GetRepository(trending.TIME_WEEK, "go") if err != nil { json.NewEncoder(w).Encode([]common.Repository{}) return } list := []common.Repository{} for _, repo := range repos { list = append(list, common.Repository{ Name: repo.Name, User: repo.Owner, URL: repo.URL, Star: repo.Star, Description: repo.Description, }) } w.Header().Set("Content-Type", "application/json") json.NewEncoder(w).Encode(list) return }staticフォルダ以下の作成
server.goを作成したことで,staticフォルダ以下を配信できるようになりました。
まず、index.htmlファイルを見ていきますindex.html
<html>
    <head>
       <meta charset="utf-8">
       <meta name="viewport" content="width=device-width,initial-scale=1.0">
       <link rel="stylesheet" type="text/css" href="/index.css">
       <script src="wasm_exec.js"></script>
       <script>
         const go = new Go();
           WebAssembly.instantiateStreaming(fetch("main.wasm"), go.importObject).then((result) => {
               go.run(result.instance);
           });
       </script>
   </head>
    <body>
      <div id="app"></div>
    </body>
</html>
wasm_exec.js
<script src="wasm_exec.js"></script>wasmはwasm単体では動作しません。wasmはjsから読み込む処理が必要です。
読み込む処理をwasm_exec.jsが行います。このファイルは提供されてるので、ダウロードします$ cd static && curl -sO https://raw.githubusercontent.com/golang/go/release-branch.go1.12/misc/wasm/wasm_exec.jsscript処理
index.html<script> const go = new Go(); WebAssembly.instantiateStreaming(fetch("main.wasm"), go.importObject).then((result) => { go.run(result.instance); }); </script>ここでは、wasmファイルを取得して実行するところです。
index.css
スタイルを当てます
h1{
  text-align: center;
  font: #f1f1f1;
}

.trend{
    width:80vw;
  padding: 1em;
  margin:0 auto;
    display:flex;
  flex-wrap: wrap;
  justify-content:center;
}

.item {
  background: #f1f1f1;
  margin: .5em;
    width:100%;
}


@media (min-width: 801px) {
  .item {
    width: 30%;
  }
}

@media (min-width: 600px) and (max-width: 800px){
  .item {
    width: 40%;
  }
}

.item-title {
    font-size: 1.2em;
    background: #24292e;
    text-align: center;
    display: table-cell;
  vertical-align: middle;
    color: #fafafa;
    font-weight: bold;
  height: 100px;
  width:10%;
  padding:1em;
}

.item:hover .item-description {
  display: block;
}

.item:hover .item-title {
  display: none;
}

.item-description {
  display:none;
  color: #24292e;
    height: 100px;
  word-break : break-all;
    overflow: scroll;
}

a {
  text-decoration: none;
    color: #111;
}
a:hover {
  text-decoration: none;
}

/* loading */
.sk-chase {
  width: 100px;
  height: 100px;
  position: absolute;
  top: 45%;
  left: 45%;
  margin: :auto;
  animation: sk-chase 2.5s infinite linear both;
}

.sk-chase-dot {
  width: 100%;
  height: 100%;
  position: absolute;
  left: 0;
  top: 0;
  animation: sk-chase-dot 2.0s infinite ease-in-out both;
}

.sk-chase-dot:before {
  content: '';
  display: block;
  width: 25%;
  height: 25%;
  background-color: #3a5;
  border-radius: 100%;
  animation: sk-chase-dot-before 2.0s infinite ease-in-out both;
}

.sk-chase-dot:nth-child(1) { animation-delay: -1.1s; }
.sk-chase-dot:nth-child(2) { animation-delay: -1.0s; }
.sk-chase-dot:nth-child(3) { animation-delay: -0.9s; }
.sk-chase-dot:nth-child(4) { animation-delay: -0.8s; }
.sk-chase-dot:nth-child(5) { animation-delay: -0.7s; }
.sk-chase-dot:nth-child(6) { animation-delay: -0.6s; }
.sk-chase-dot:nth-child(1):before { animation-delay: -1.1s; }
.sk-chase-dot:nth-child(2):before { animation-delay: -1.0s; }
.sk-chase-dot:nth-child(3):before { animation-delay: -0.9s; }
.sk-chase-dot:nth-child(4):before { animation-delay: -0.8s; }
.sk-chase-dot:nth-child(5):before { animation-delay: -0.7s; }
.sk-chase-dot:nth-child(6):before { animation-delay: -0.6s; }

@keyframes sk-chase {
  100% { transform: rotate(360deg); }
}

@keyframes sk-chase-dot {
  80%, 100% { transform: rotate(360deg); }
}

@keyframes sk-chase-dot-before {
  50% {
    transform: scale(0.4);
  } 100%, 0% {
    transform: scale(1.0);
  }
}
main.wasm
goで書かれたwasmファイルです。
生成は後ほど説明します。wasmファイルの作成
ここから本題のwasmを作成していきます。
wasmはGoで書かれたファイルをbuildした生成物です。
GOOSとGOARCHをwasm用にする以外は通常のbuildと同じです。$ GOOS=js GOARCH=wasm go build -o static/main.wasm main.gomain.go
基本的にはjsで利用しているメソッドを使えるので、普段jsを書く人ならそこまで苦労しないかなと思いました。
(普段書かないので、手間取りました)package main import ( "encoding/json" "example/common" "fmt" "net/http" "syscall/js" ) var document = js.Global().Get("document") var app = js.Global().Get("document").Call("getElementById", "app") func main() { done := make(chan bool) go loading(done) title() go fetch(done) select {} } func title() { t := createElement("h1") t.Set("textContent", "go-trending in github") app.Call("appendChild", t) } func getTrend() (common.Repositories, error) { r, err := http.Get("/trend") defer r.Body.Close() if err != nil { return common.Repositories{}, err } repos := common.Repositories{} err = json.NewDecoder(r.Body).Decode(&repos) return repos, err } func fetch(done chan bool) { trendListDiv := createElement("div") class := trendListDiv.Get("classList") class.Call("add", "trend") app.Call("appendChild", trendListDiv) trends, _ := getTrend() done <- true for _, trend := range trends { trendListDiv.Call("appendChild", createItemByTrend(trend)) } } func createItemByTrend(repo common.Repository) js.Value { item := createElement("div") class := item.Get("classList") class.Call("add", "item") itemLink := createElement("a") itemLink.Set("href", repo.URL) itemTitle := createElement("div") itemTitle.Set("textContent", fmt.Sprintf("%s/%s (☆ %d)", repo.User, repo.Name, repo.Star)) class = itemTitle.Get("classList") class.Call("add", "item-title") itemDescription := createElement("div") itemDescription.Set("textContent", repo.Description) class = itemDescription.Get("classList") class.Call("add", "item-description") item.Call("appendChild", itemLink) itemLink.Call("appendChild", itemTitle) itemLink.Call("appendChild", itemDescription) return item } func loading(done chan bool) { chase := createElement("div") class := chase.Get("classList") class.Call("add", "sk-chase") app.Call("appendChild", chase) dots := []js.Value{} for i := 0; i < 6; i++ { chaseDot := createElement("div") class = chaseDot.Get("classList") class.Call("add", "sk-chase-dot") chase.Call("appendChild", chaseDot) dots = append(dots, chaseDot) } <-done style := chase.Get("style") style.Set("display", "none") } func createElement(elementName string) js.Value { return document.Call("createElement", elementName) }main処理
機能は、トレンドを取得する間ローディングを表示し、取得し終わるとトレンド一覧が出てきます。
func main() {
    done := make(chan bool)
    title()
    go loading(done)
    go fetch(done)
    select {}
}
- title()は、サイトタイトルを表示するための関数です。中では、h1タグを生成しています。
- fetch()はトレンドをサーバから取得して、一覧を表示します。中では、apiを叩き、domを生成していきます。
- loading()はトレンドを取得中にローディングを出します。
doneについて、
Go特有のチャネルを使って、fetch()の内部で、トレンドを取得し終わるのを監視して、終わったことをloading()に伝えます。
select{}を用いて、main関数の処理が終了するのをブロックしています。共通処理
先にこのコード内での共通処理を説明しておきます。
var document = js.Global().Get("document")
var app = js.Global().Get("document").Call("getElementById", "app")

func createElement(elementName string) js.Value {
    return document.Call("createElement", elementName)
}
- documentはjsのdocumentと同じです。
- appは、id=appのelementを取得しています。(getElementByIdはjsのメソッド名です)
- createElement(name)はdomを生成します。
title()
func title() {
    t := createElement("h1")
    t.Set("textContent", "go-trending in github")
    app.Call("appendChild", t)
}
h1タグを生成し、中に"go-trending in github"を挿入し、appの子要素として挿入します。
書き方は違いますが、jsと同じメソッド名で処理をしています。loading()
func loading(done chan bool) {
    chase := createElement("div")
    class := chase.Get("classList")
    class.Call("add", "sk-chase")
    app.Call("appendChild", chase)
    dots := []js.Value{}
    for i := 0; i < 6; i++ {
        chaseDot := createElement("div")
        class = chaseDot.Get("classList")
        class.Call("add", "sk-chase-dot")
        chase.Call("appendChild", chaseDot)
        dots = append(dots, chaseDot)
    }
    <-done
    style := chase.Get("style")
    style.Set("display", "none")

}
appの子要素に以下のようなelementを生成しています。
<div class="sk-chase">
    <div class="sk-chase-dot"></div>
    <div class="sk-chase-dot"></div>
    <div class="sk-chase-dot"></div>
    <div class="sk-chase-dot"></div>
    <div class="sk-chase-dot"></div>
    <div class="sk-chase-dot"></div>
</div>
特筆事項としては、
    <-done
    style := chase.Get("style")
    style.Set("display", "none")
doneチャネルに値が入ってくるまで<-doneでブロックし、値が入ってくると、style属性にdisplay:noneを追加し、見えないようにします・
fetch
func fetch(done chan bool) {
    trendListDiv := createElement("div")
    class := trendListDiv.Get("classList")
    class.Call("add", "trend")
    app.Call("appendChild", trendListDiv)

    trends, _ := getTrend()
    done <- true
    for _, trend := range trends {
        trendListDiv.Call("appendChild", createItemByTrend(trend))
    }

}

func getTrend() (common.Repositories, error) {
    r, err := http.Get("/trend")
    defer r.Body.Close()
    if err != nil {
        return common.Repositories{}, err
    }
    repos := common.Repositories{}
    err = json.NewDecoder(r.Body).Decode(&repos)
    return repos, err
}
getTrend()で、http通信でトレンドを取得し、構造体にマッピングしています。
取得したレポジトリ毎にdomを生成しています。
取得してから、doneチャネルにtrueという値を送信しています。
fetchでは、以下のようなElementを生成しています。<div class="trend"> <div class="item"> <a href=""> <div class="item-title"></div> <div class="item-description"></div> </a> </div> ... </div>実行
$ GOOS=js GOARCH=wasm go build -o static/main.wasm main.go
$ go run server.go
感想
共通処理が書ける
今回、common/trend.goをserverとwasm両方で利用しました。
そのためapiの通信の際、同じ構造体を利用できるので、マッピングが楽でした。
grpcと同じ感じがしました。Vugu
https://github.com/vugu/vugu
という、wasmでReactやVue風にUIを書くことができるパッケージがあるらしいので、そっちを使うと管理が楽っぽいです終わり
初めてwasmを触りましたが、wasmのファイルサイズが大きかったり、まだ課題はありそうですが、js以外にもウェブ制作の手段が広がったのは良いことだなと思いました。
- 投稿日:2020-01-19T12:48:10+09:00
Goの勉強のため自分のグローバルIPを確認するコマンドを作った
$ whatsmyip --version _ _ _ _ ___ __ __ | |__ __ _ | |_ ( ) ___ _ __ ___ _ _ (_) _ __ |__ \ \ \ /\ / / | '_ \ / _` | | __| |/ / __| | '_ ` _ \ | | | | | | | '_ \ / / \ V V / | | | | | (_| | | |_ \__ \ | | | | | | | |_| | | | | |_) | |_| \_/\_/ |_| |_| \__,_| \__| |___/ |_| |_| |_| \__, | |_| | .__/ (_) |___/ |_| whatsmyip version v0.1.0 (build with go1.10.4)ときどき必要になるけど、控えておくのも面倒だし都度、「アクセス情報【使用中のIPアドレス確認】- cman.jp 」などのサイトを使って調べてたりしたけど、ちょうど良いので 先日書いたコードをベースにターミナルで直接実行可能なコマンドを作った。
インストール
go get github.com/snaka/whatsmyip実行例
$ whatsmyip
113.43.xxx.xxx
作ってみた感想
Goはコンパイラが早いので軽量スクリプト言語に近い感覚で実装できるし、lintとかtestとかいろいろ便利なしくみが最初からそろっているの良い。
非同期処理の待ちをゴルーチンとチャンネルの組み合わせで書いてみたけど、こんな使い方で良いのかよくわからない。
参考
- 投稿日:2020-01-19T01:25:01+09:00
grpcurlを使ってGitHub Actions上でgRPCなAPIのテストを実行する
はじめに
grpcurlというgRPCサーバをコマンドラインで叩けるツールを利用し、それをGitHub Actions上で動かしてひとまず正常動作確認まで試せたのでここに記録を残します。
環境
go version go1.13.1 darwin/amd64
grpcurl version: v1.4.0Main Contents
プロジェクト内のGo製ツールの管理はtools.goファイルを生やす
grpcurlはGo製のツールなので
go installでコマンドを落とすことができます。Go製のツールのバージョンもGo Moduleの
go.modにて管理するための方法を探しました。すると公式のGo Modulesに関するこちらのリンクにて言及があり、
tools.go(ファイル名は何でも良い)上でツールをimportすることが現状(2020年1月時点)のベストプラクティスとわかりました。公式での具体例がこちら、GitHubのIssueでの議論がこちらになります。
例として、
tools.goは以下のようになります。tools.go// +build tools package tools import ( _ "github.com/fullstorydev/grpcurl/cmd/grpcurl" _ "github.com/golang/mock/mockgen" _ "github.com/golang/protobuf/protoc-gen-go" _ "github.com/google/wire/cmd/wire" )ポイントは
+build toolsを付けることでプロダクションコードにはtools.goでimport記述されているライブラリコード分をコンパイル対象にさせないことです。そして今回、こちらの記事を参考に
Makefile上で上記ツールをインストールするコマンドを用意しました。Makefileの一部.PHONY: setup setup: install-tools @true .PHONY: install-tools install-tools: $(GOMOD) download @cat tools/tools.go | grep _ | awk -F'"' '{print $$2}' | xargs -tI % go install %
make install-toolsとすることでツールコマンドがインストールされ、そのバージョンがgo.modで管理されるようになります。grpcurlをローカルで試す
pgrpcurlのREADMEの例を見ながら検証しました。
デフォルトではgRPCのデバッグをするために利用するreflectionの機能が有効になっていることが想定されていますが、今回は
protoファイルを参照してクライアントコールする方法にしています。$ grpcurl -v -d @ -plaintext -proto pb/service.proto localhost:8081 pb.service.Method < test.json上記では
-d @でtest.jsonとしてgRPCクライアント側でテスト用に渡すJSONファイルを指定-protoオプションでprotoファイルを参照するよう指定しています。gRPCサーバを
8081ポートで動作させていれば以下のような結果が得られます。Resolved method descriptor: // A server-to-client streaming RPC. // // Comment rpc Method ( Args) returns ( stream .pb.ReturnType); Request metadata to send: (empty) Response headers received: content-type: application/grpc Response contents: { "userId": "ABCDE", .... }GitHub ActionsにてGo製ツールを使うためにGOPATHとPATH設定をする
GitHub Actionsの公式ランナーにてGOPATH設定しPATHを通すようにするには、現状(2020年1月時点)スマートな方法がまだないようです。
ここのIssueでの議論を参考に、以下のような設定をした上で
grpcurlコマンドでテストをしています。GitHubActionsのworkflowsファイル一部name: Test on: push jobs: integration: name: Integration test runs-on: ubuntu-latest steps: - name: Setup Go uses: actions/setup-go@v1 with: go-version: 1.13.1 - name: Setup GOPATH # temporary step to run grpcurl command in GOPATH # copied from https://github.com/actions/setup-go/issues/14#issuecomment-563273583 run: | echo "::set-env name=GOPATH::$(go env GOPATH)" echo "::add-path::$(go env GOPATH)/bin" shell: bash - name: Checkout code uses: actions/checkout@v2 - name: Install test tools run: make setup # gRPCサーバを立てる作業 - name: Run gRPC API test run: grpcurl -v -d @ -plaintext -proto pb/service.proto localhost:8081 pb.service.Method < test.jsongRPCサーバに異常があれば正常終了しないのでひとまず正常系のテストができるようになりました。
gRPCにはHTTPステータスコードとの互換を想定したコード定義が以下リンクのように公式で定められているので、今後これに対応するようにサーバ側を更新しテストを充実させていく予定です。
https://github.com/googleapis/googleapis/blob/master/google/rpc/code.proto参考