- 投稿日:2020-01-15T23:22:57+09:00
ログアウト、アカウント削除の実装 【初学者のReact×Railsアプリ開発 第13回】
やったこと
- ログアウトとアカウント削除の実装
- ログアウトでは、ブラウザのLocalStorageに保存してあるtokenなどの情報を消去している。
- アカウント削除はRailsでdestroy。
成果物
実装手順(Rails)
users_controller
- 消去するアカウントはログイン中のアカウントなので、current_userを使っている
users_controller.rbdef destroy @user = current_api_v1_user @user.destroy render json: { status: 'SUCCESS', message: 'Delete the user', data: @user} end実装手順(React)
Logout.js
- ログアウトといっても、LocalStorageの情報を消去するだけ。
- localStorage.clear();
Logout.jsclass Logout extends React.Component { constructor(props) { super(props); } Logout() { localStorage.clear(); window.location.href = process.env.REACT_APP_BASE_URL; } notLogout() { window.history.back() } render() { const { classes } = this.props; return ( <div> <h3>ログアウトしますか?</h3> <Button variant="contained" size="large" color="secondary" className={classes.button} onClick={this.Logout}> する </Button> <Button variant="contained" size="large" color="primary" className={classes.button} onClick={this.notLogout}> しない </Button> </div> ) } }DeleteAccount.js
- HTTPのDELETEメソッドを使って消去している
DeleteAccount.jsclass Deleteaccount extends React.Component { constructor(props) { super(props); this.Deleteaccount = this.Deleteaccount.bind(this); } Deleteaccount() { const { CurrentUserReducer } = this.props; const auth_token = localStorage.auth_token const client_id = localStorage.client_id const uid = localStorage.uid axios.delete(process.env.REACT_APP_API_URL + `/api/v1/users`, { headers: { 'access-token': auth_token, 'client': client_id, 'uid': uid } }) localStorage.clear(); window.location.href = process.env.REACT_APP_API_URL; } notDeleteaccount() { window.history.back() } render() { const { classes } = this.props; return ( <div> <h3>アカウントを削除しますか?</h3> <Button variant="contained" size="large" color="secondary" className={classes.button} onClick={this.Deleteaccount}> する </Button> <Button variant="contained" size="large" color="primary" className={classes.button} onClick={this.notDeleteaccount}> しない </Button> </div> ) } }
- 投稿日:2020-01-15T22:45:09+09:00
【React】Material UIのアイコンが表示されない
問題
- ReactのMaterial-UIのiconが表示されない。
XXX.jsimport Icon from '@material-ui/core/Icon'; <Icon>add_circle</Icon>
解決策
- index.htmlに下記の記述を追加
index.html<!DOCTYPE html> <html lang="en"> <head> <link rel="stylesheet" href="https://fonts.googleapis.com/icon?family=Material+Icons" /> </head>
表示された!地味に悩みました。設定方法をきちんと理解していませんでした。
index.htmlはノーマークだった...

- 投稿日:2020-01-15T22:37:41+09:00
[React]useStateで定義したstateを更新したのに再レンダーされない件(object / 配列)
少し詰まったので、書き記します。
newDataというstateを操作するfunction inputChange(e)を定義し、onChageイベントとして使ったが、再レンダーされず、入力値が変更できない。
jsconst [newData, setNewData] = useState({name:'', content:''}); function inputChange(e){ const key = e.target.name; const value = e.target.value; newData[key] = value; // newDataの値を更新 const data = newData //setNewDataするため、dataを定義 setNewData(data); }コードは問題なさそうと思って悩んでいましたが、公式に答えがありました。
https://ja.reactjs.org/docs/hooks-reference.html#bailing-out-of-a-state-update
現在値と同じ値で更新を行った場合、React は子のレンダーや副作用の実行を回避して処理を終了します。(React は Object.is による比較アルゴリズム を使用します)↓これで行けました
jsfunction inputChange(e){ const key = e.target.name; const value = e.target.value; newData[key] = value; let data = Object.assign({}, newData); //オブジェクトを新しく作り直す必要がある setNewData(data); }配列の場合はsplice()を使用して、新しい配列として、dataを定義します。
[学び] React.jsは公式が大事
- 投稿日:2020-01-15T20:10:39+09:00
【React】子コンポーネントにそのままPropsを渡すときの型定義【TypeScript】
概要
子コンポーネントにPropsをそのまま、もしくは少し変えて渡したいことが多々あります。
export const DeleteButton: React.FC<Props> = (props: Props) => (
  <IconButton icon={DeleteIcon} {...props}>
    削除
  </IconButton>
);
このとき型定義を力技で書いてしまうと、子コンポーネントのPropsに変更があった際に修正が波及してしまいます。
ということで、どうすれば上手く書けるの?ってお話です。型定義
ReactのComponentのpropsをそのまま参照したい場合、
['props']で使用することができます。type Props = IconButton['props'];もちろん
&で繋げれば、propsを増やすこともできます。type Props = Button['props'] & { label: string; } export const DeleteButton: React.FC<Props> = ({label, ...buttonProps}: Props) => (<Button {...props}>{label}</Button>);Omitを独自定義することで、簡単にpropsも減らせます。
propsの一部を固定化するラッパーコンポーネントで使用できますね。type Omit<T, K extends keyof T> = Pick<T, Exclude<keyof T, K>>; type Props = Omit<IconButton['props'], 'icon'>; export const DeleteButton: React.FC<Props> = (props: Props) => ( <IconButton icon={DeleteIcon} {...props}> 削除 </IconButton> );おまけ
Custom Hooksの戻り値をそのままPropsにしたい場合、
ReturnValueで取得できます。type Props = ReturnType<typeof useInput> export const NumberInput: React.FC<Props> = (props: Props) => ( <Input type="number" {...props}> )
- 投稿日:2020-01-15T20:10:39+09:00
【React TypeScript】子コンポーネントにそのままPropsを渡すときの型定義
概要
子コンポーネントにPropsをそのまま、もしくは少し変えて渡したいことが多々あります。
export const DeleteButton: React.FC<Props> = (props: Props) => ( <IconButton icon={DeleteIcon} {...props}> 削除 </IconButton> );このとき型定義を力技で書いてしまうと、子コンポーネントのPropsに変更があった際に修正が波及してしまいます。
ということで、どうすれば上手く書けるの?ってお話です。型定義
ReactのComponentのpropsをそのまま参照したい場合、
['props']でそのまま使用することができます。type Props = IconButton['props'];
&で繋げれば、propsを増やすこともできます。type Props = Button['props'] & { label: string; } export const DeleteButton: React.FC<Props> = ({label, ...buttonProps}: Props) => (<Button {...props}>{label}</Button>);Omitを独自定義することで、簡単にpropsも減らせます。
type Omit<T, K extends keyof T> = Pick<T, Exclude<keyof T, K>>;
type Props = Omit<IconButton['props'], 'icon'>;

export const DeleteButton: React.FC<Props> = (props: Props) => (
  <IconButton icon={DeleteIcon} {...props}>
    削除
  </IconButton>
);
- 投稿日:2020-01-15T19:49:19+09:00
Rails (with sorcery)+ React でOAuth認証を実装してみた
sorceryでRails +SPA構成のOauthサンプルがあまりなさそうなので
参考になれば。
環境
backend
- rails 6系
front
- react:16.12
- react-router: v5系
以下、sorceryのwikiに沿いつつ、SPA用でカスタムしたところを中心に記載
sorcery wiki今回はgithub と連携してみる
開発の概要
Backend(Rails)
- oauthからのcallbackを受け取り、ユーザー作成及びログイン処理
Front(React)
- githubAPIへQueryString形式でパラメーターをもたせてアクセス。
- 認証後callBackURLにリダイレクトし、Backendに取得したパラメーターを送信
Backend側開発
external module関連のセットアップ
# external moduleのインストール
bundle exec rails g sorcery:install external --only-submodules

# migration
bundle exec rails db:migrate

# 認証用モデル作成
bundle exec rails g model Authentication --migration=false
sorceryのgithub認証関連設定変更
認証用情報の取得
github側の認証設定は以下から行う
https://github.com/settings/developersinitializers/sorcery.rbRails.application.config.sorcery.submodules = [:external] #:external追加 Rails.application.config.sorcery.configure do |config| ... config.github.key = "your github key" config.github.secret = "your github secret" config.github.callback_url = "" config.github.user_info_mapping = {:email => "email" } config.github.scope = "user:email" end
Oauth用controllerの作成
oauths_controllerclass OauthsController < ApplicationController # Frontで取得したToken情報をもとにユーザー認証をするMethod def callback provider = params[:provider] # loginできた場合はここで200を返す if @user = login_from(provider) render json: { status: 'OK' } else begin # loginできない場合は送られてきた情報をもとにユーザー作成 @user = create_from(provider) reset_session auto_login(@user) render json: { status: 'OK' } rescue render json: { status: 'NG' }, status: 400 end end end end
ルーティングの設定
- wiki記載の内容と異なり、oauth用tokenが送信されてくるAPIのみでOK
config/routes.rbRails.application.routes.draw do ... post "oauth/callback" => "oauths#callback" end
Front側開発
関連するルーティングの定義
router.jsxconst AppRouter = () => ( <Router> <Switch> <Route path="/callback/:provider/" component={ExternalAuthCallback} /> <Route path="/sign_in" component={SignIn} /> <Route component={NotFound} /> </Switch> </Router> ); export default AppRouter;
サインインページ
- サインインページの1機能としてGithub認証があるイメージ
- 通常のRailsのOauthと異なり、callbackされるURLはReactで構成されたSPAのURL(=>"/callback/:provider/")が叩かれることに注意
SignIn.jsx// CONST.GITHUB.REDIRECT_URL = "http://localhost:3001/callback/github/" const GITHUB_AUTH_URL = `https://github.com/login/oauth/authorize?client_id=${CONST.GITHUB.APP_ID}&redirect_url=${CONST.GITHUB.REDIRECT_URL}&scope=user:email`; // ただ queryStringの付与したURLのリンクを踏ませるだけ const signInForm = () => ( <div className={styles.submitBox}> <Button href={GITHUB_AUTH_URL}>GITHUBで認証</Button> </div> ); export default signInForm;
CallbackURLコンポーネント
- callback時に叩かれるURLで利用するコンポーネント
- URLパラメーターでprovider名(今回は"github")を取得
- callbackURLのquesyStringに付与された認証情報(code=XXXX)を取得
- ReactからバックエンドAPIへPostする
oAuthCallback/index.jsximport React, { useState } from "react"; import queryString from "query-string"; import { useHistory } from "react-router"; import { useParams, useLocation } from "react-router-dom"; import { api } from "../../../modules/user"; import Circular from "../../atoms/circular"; const BEFORE = "BEFORE"; const DOING = "DOING"; const ExternalAuth = () => { const location = useLocation(); const history = useHistory(); const { code = "" } = queryString.parse(location.search); const { provider = "" } = useParams(); const [requestStatus, setRequestStatus] = useState(BEFORE); const request = () => { setRequestStatus(DOING); api.sendExternalAuthRequest({ code, provider }).then(isSuccess => { if (isSuccess) { history.push("/member/dashboard"); // login後ページ } else { history.push(PAGE_PATH.AUTH_SIGN_IN); //認証失敗した場合 } }); }; if (requestStatus === BEFORE) { request(); } return ( <div className={styles.container}> <Circular /> </div> ); }; export default ExternalAuth;
Rails APIへのリクエスト
api.jsexport const sendExternalAuthRequest = async ({ code, provider }) => { const requester = requestManager.get(); return requester .post( "/oauth/callback", { code, provider }, ) .then(() => true) .catch(() => false); };
- 投稿日:2020-01-15T19:44:20+09:00
検索画面の実装【初学者のReact✗Railsアプリ開発 第12回】
やったこと
- 投稿の検索画面を作成し、検索結果を表示できるようにした。
- reduxを利用して検索結果を管理。(ページを移動して戻ってくるときに、前の検索結果を表示させるようにしたかった)
- ページネーションの実装にkaminariを使っている
- フォームの実装はredux-form
成果物
実装手順(Rails API)
posts_controller
- 検索を行うコアとなる処理の記述を行っています。
- content LIKE?の使い方を初めて学びました。
- %をつけると、あいまい検索になる。無いと、完全一致。検索ワードはクエリでもらってる。
- ページネーションを使っているので、page_length(何ページまであるか)も返しています。
route.rb(ルートの編集)
- 追加します。
route.rbget 'search', to: 'posts#search'実装手順(React)
Search.js(render)
- 大きく分けて、3つの部品(検索フォーム、検索結果表示部分、ページネーション部分)に分けてレンダリングしている。
- 検索結果表示部分をthis.renderResults()で、初回訪問かどうか(doneFetch)、結果が存在しているかどうか(noResults)で制御している。
Search.jsclass SearchPage extends React.Component { render() { const { SearchResultsReducer } = this.props; const { classes } = this.props; return ( <div> <h3>テーマを検索する</h3> <SearchForm onSubmit={this.searchPost} /> {this.renderResults(SearchResultsReducer.noResults, SearchResultsReducer.doneFetch)} <MuiThemeProvider theme={pagitheme}> <CssBaseline /> <Pagination limit={10} offset={SearchResultsReducer.offset} total={SearchResultsReducer.page_length * 10} onClick={(e, offset) => this.handlePaginationClick(offset)} /> </MuiThemeProvider> </div> ) } }Search.js(function)
- doneFetchの取り扱いが頭を使いました。結局、reduxで管理するのが良いと思います。ページ遷移するだけではreduxのstateは変更されないから。
- 表示の制御は少し頭を使いました。
Search.jsclass SearchPage extends React.Component { constructor(props) { super(props); this.searchPost = this.searchPost.bind(this); } componentDidMount() { const { form } = this.props; const { SearchResultsReducer } = this.props; this.props.actions.getSearchResults(SearchResultsReducer.searchWord, SearchResultsReducer.offset, SearchResultsReducer.doneFetch); } searchPost = values => { const { form } = this.props; this.props.actions.getSearchResults(form.SearchForm.values.notes, 0, true); } handlePaginationClick(offset) { const { form } = this.props; this.props.actions.getSearchResults(form.SearchForm.values.notes, offset, true); } renderResults(noResults, doneFetch) { const { SearchResultsReducer } = this.props; const { classes } = this.props; if (!noResults && doneFetch) { return ( <ul className={classes.ul}> {SearchResultsReducer.items.map((post) => ( <Link className={classes.link} to={"/posts/" + post.id}> <li className={classes.li} key={post.id}> <div className={classes.licontent}> <h3 className={classes.lih3}>{post.content}</h3> </div> </li> </Link> ))} </ul> ) } else if (!doneFetch) { return ( <h3>検索ワードを入力してください</h3> ) } else { return ( <h3>検索結果はありません。</h3> ) } } } }SearchResultsReducer.js
- どのタイミングでdoneFetchとnoResultsの状態を変更するかでレンダリング結果が変わってきます。そこに頭を使いました。
SearchResultsReducer.jsconst initialState = { isFetching: false, items: [], offset: "", page_length: "", noResults: false, searchWord: "", doneFetch: false, }; const SearchResultsReducer = (state = initialState, action) => { switch (action.type) { case 'GET_SEARCHRESULTS_REQUEST': return { ...state, isFetching: true, }; case 'GET_SEARCHRESULTS_SUCCESS': if (action.items.length === 0) { return { ...state, isFetching: false, items: action.items, offset: action.offset, page_length: action.page_length, noResults: true, searchWord: action.searchWord, doneFetch: action.doneFetch, searchWord: action.searchWord, }; } else { return { ...state, isFetching: false, items: action.items, offset: action.offset, page_length: action.page_length, noResults: false, doneFetch: action.doneFetch, searchWord: action.searchWord, }; } case 'GET_SEARCHRESULTS_FAILURE': return { ...state, isFetching: false, error: action.error, searchWord: action.searchWord, doneFetch: action.doneFetch, }; default: return state; } }; export default SearchResultsReducer;actions/index.js
- 前に記述したときと大まかには変わりませんが、doneFetchとかsearchWordといった引数の数が増えているので、そこが注意ですかね。ページネーションと並び替えに対応した投稿一覧画面とAPIの実装【初学者のReact×Railsアプリ開発 第10回】
index.jsexport const getSearchResults = (keyword, offset, doneFetch) => { return (dispatch) => { dispatch(getSearchResultsRequest()) const auth_token = localStorage.auth_token const client_id = localStorage.client_id const uid = localStorage.uid const page_url = offset / 10 + 1 return axios.get(process.env.REACT_APP_API_URL + `/api/v1/search?q=${keyword}&page=${page_url}`, { headers: { 'access-token': auth_token, 'client': client_id, 'uid': uid } }) .then(response => dispatch(getSearchResultsSuccess(response.data.data.posts, keyword, offset, response.data.data.page_length, doneFetch))) .catch(error => dispatch(getSearchResultsFailure(error, keyword, doneFetch))) }; }; export const getSearchResultsRequest = () => ({ type: 'GET_SEARCHRESULTS_REQUEST', }) export const getSearchResultsSuccess = (json, keyword, offset, page_length, doneFetch) => ({ type: 'GET_SEARCHRESULTS_SUCCESS', items: json, offset: offset, page_length: page_length, searchWord: keyword, doneFetch: doneFetch, }) export const getSearchResultsFailure = (error, keyword, doneFetch) => ({ type: 'GET_SEARCHRESULTS_FAILURE', items: error, searchWord: keyword, doneFetch: doneFetch, })rootReducer.js, SearchForm.js

- 投稿日:2020-01-15T18:16:42+09:00
React Hooksでインスタンスメソッドを実装する
コンポーネントの特定の動作を外部から呼び出すための方法です。関数コンポーネントでも実装できました。もはやクラスではないのでインスタンスメソッドと呼ぶのは正確ではないかもしれませんが…。
propsの値変更で多くのことは実現できるので出番は限られてくると思いますが、入力フィールドにフォーカスする、CSSアニメーションを再生するといった場合には有効だと思います。クラスを使わずに実装する際の備忘録としてまとめました。
メソッドの実装(子コンポーネント)
useImperativeHandleフックとforwardRefを組み合わせて実装します。この例の場合、
インスタンス.doSomething()が呼ばれたタイミングでログが出力されます。import React, { useImperativeHandle, forwardRef } from 'react'; function MyComponent(props, ref) { useImperativeHandle(ref, () => ({ doSomething: () => { console.log('Do something'); } })); return <div>My Component</div>; } export default forwardRef(MyComponent);メソッドの呼び出し(親コンポーネント)
useRefフックとref属性によって子コンポーネントのインスタンスが参照できるようになります。
ref.current.メソッド()で先程のメソッドを呼び出します。import React, { useRef } from 'react'; import MyComponent from './MyComponent'; export default function App() { const myComponent = useRef(null); return ( <div> <MyComponent ref={myComponent} /> <button onClick={() => myComponent.current.doSomething()}> Click </button> </div> ); }
- 投稿日:2020-01-15T15:56:00+09:00
react+axiosで認証ページ制御を扱う
SPA環境におけるページ制御をreact, redux, saga, axiosで実装してみた
※Frontのみ扱います環境
- react:16.12
- react-redux: 7.1.3
- react-router-dom: 5.1.2
API仕様
- APIリクエスト時、認証失敗した場合は401を返す
できあがり要件
- メンバー用ページは認証成功したユーザーのみ表示可能
- ログイン後に認証が切れた場合、メンバー用ページが表示できないようにする
実装
あらすじ
- ページに基本となるルーティングを作成する
- 認証ルート配下はAuthコンポーネントで認証制御
- 認証状態はredux, redux-sagaを利用して管理
- requestモジュールから401を検知してreact-routerで遷移
ディレクトリ構成
user
├── api.ts  //api通信用
├── index.ts
├── redux.ts // いわゆるAction,Reducer等
└── saga.ts // Saga
ルーティング
router.tsximport React from "react"; import { BrowserRouter as Router, Route, Switch } from "react-router-dom"; const AppRouter: React.FC = () => ( <Router> <Switch> <Route exact path='/' component={Top} /> {/* 認証ルート */} <Route path='/member'> <Auth> <Switch> <Route path="/member/signed" component={Signed} /> <Route component={NotFound} /> </Switch> </Auth> </Route> <Route component={NotFound} /> </Switch> </Router> );Authモジュール
- 認証状態取得前なら取得取得するまでcircular表示。認証できない場合はサインインページへ遷移
auth.tsxconst Auth = ({ user: { isSignedIn, isFetched }, fetchInfo, children }) => { if (!isFetched) { fetchInfo(); } return ( <> {isFetched ? ( <Fetched isSignedIn={isSignedIn} children={children} /> ) : ( <Fetching /> )} </> ); }; const Fetching = () => ( <div className={styles.center}> <Circular /> </div> ); const Fetched = ({ isSignedIn, children }) => isSignedIn ? children : <Redirect to='/sign_in' />; export default connect(mapStateToProps, mapDispatchToProps)(Auth);redux, redux-saga関連
- 認証情報取得。認証通信がエラーの場合はSIGNED_IN = falseをkeepし、authモジュールによってページ遷移させる
redux.tsconst signedIn = () => { return { type: SIGNED_IN }; }; const signedOut = () => { return { type: SIGNED_OUT }; }; const signOut = () => ({ type: SIGN_OUT }); const fetched = () => ({ type: FETCHED }); const fetchInfo = payload => ({ type: FETCH_INFO, payload }); const resetState = () => ({ type: RESET_STATE });saga.tsfunction* fetchInfo() { const isSuccess = yield call(api.fetchInfo); if (isSuccess) { yield all([put({ type: SIGNED_IN }), put({ type: FETCHED })]); } else { yield all([put({ type: FETCHED }), put({ type: SIGNED_OUT })]); } }api.tsexport const fetchInfo = async () => { let isSignedIn = true; const requester = requestManager.get(); await requester.get(API_PATH.AUTH_INFO).catch(err => { isSignedIn = false; }); return isSignedIn; };その他通信時に認証が切れた場合のハンドリング
- axiosをwrapしたrequestモジュールを作成し、認証制御機能を組み込む
utils/request.tsimport axios, { AxiosRequestConfig, AxiosResponse, AxiosInstance } from "axios"; import { mapDispatchToProps as userActions } from "../modules/user"; import { AllState } from "../store"; class RequestManager { private store?: AllState; private requester?: AxiosInstance; setStore(store: AllState) { this.store = store; } getInstance(): AxiosInstance { if (!this.store) { throw new Error("store is not initialized"); } if (!this.requester) { this.requester = this._getBaseInstance(); } return this.requester; } private _getInstance(): AxiosInstance { const instance = axios.create({ baseURL: "http://localhost:3000", headers: { "content-type": "application/json" }, withCredentials: true }); instance.interceptors.response.use(response => { const { status } = response; if (status === 401) { this.store.dispatch(userActions.resetState()); } return response; }); return instance; } } export default new RequestManager();
このようにすれば、RequestManagerから生成されたaxiosインスタンス経由でリクエスト時に401の場合、isSignedIn: falseに変更され、認証ルート内の場合はサインインページへ遷移させられる
- 投稿日:2020-01-15T10:36:16+09:00
Typescript×React×Hooksで会員管理①Firebase Authで認証基盤外出し
業務で Typescript×React×Hooks を使ったフロントエンドのアプリケーションを開発しています。触り始めた当初はいろいろつまずきながら実装していて、自分が始める時にこんなサンプルアプリがあったら嬉しかったなというものを作ったので公開します。
本格的なアプリケーションにする骨組み(Boilerplate)としたく、長くなりそうなので全 3 回に分けます。
- Firebase Auth で認証基盤外出し
- Context でアプリの状態管理
- Formik と Yup でフォームバリデーション
利用している技術要素
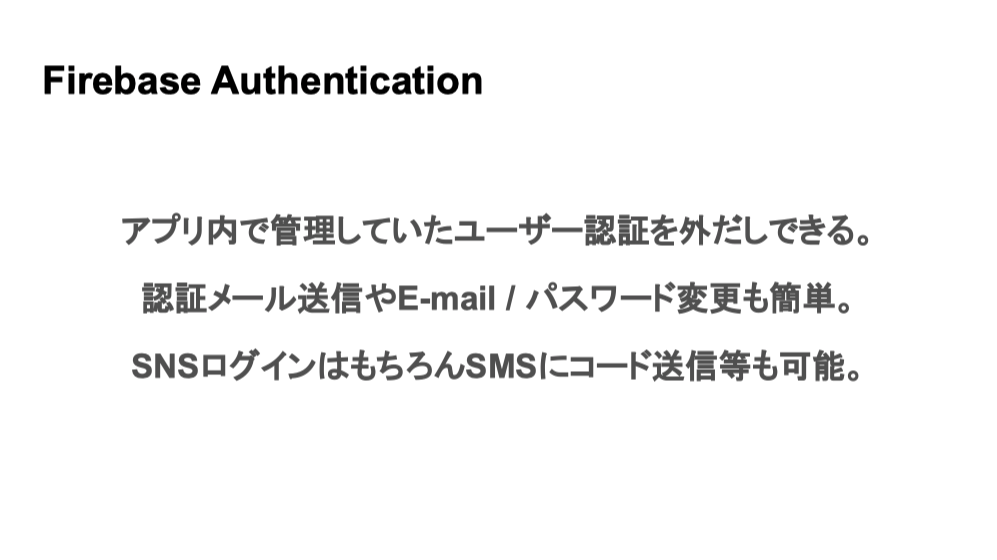
- Firebase Authentication
- Typescript
- React
- React Hooks
- Material UI
LT 資料
勉強会で Firebase Authentication の話をしたのでその時の資料を貼っておきます。
https://speakerdeck.com/motoitanigaki/about-firebase-authentication
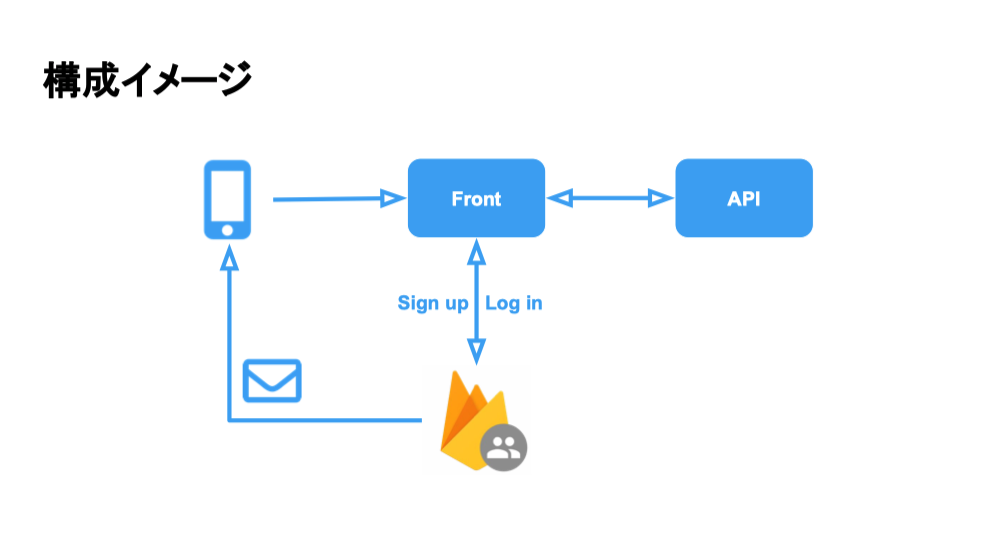
今回のサンプルアプリはこの図の
↔APIという部分以外を実装しています。ソースコード
- メールアドレスでの認証に対応しています
- 3 つの画面があります
- 会員登録
- ログイン
- ホーム
- ログイン状態に応じてリダイレクト/出し分けをします
- ログインしているとホーム画面へリダイレクト
- ログインしていないとログイン画面へリダイレクト
- ホーム画面では Firebase から取得したユーザー情報を表示
デモ
会員登録して登録されたユーザー情報を閲覧。ログアウトして再度ログインしています。
動かし方
- github からソース取得
- Firebase でプロジェクトを作成し、Authentication の設定を行う
- 作成した Firebase プロジェクトから config 情報を取得し、
./src/firebase.tsファイルを編集yarn startコマンドで React アプリを起動- http://localhost:3000/ へアクセス
Firebase プロジェクトの作成と React アプリでキーになるポイントを簡単に解説します。
Firebase プロジェクトの作成
- https://firebase.google.com/ にアクセスしてプロジェクトを作成
- 適当なプロジェクト名をつけて続行
- Google アナリティクスの設定は今回は関係無いのでどちらでも
- しばらくするとプロジェクトが出来上がる
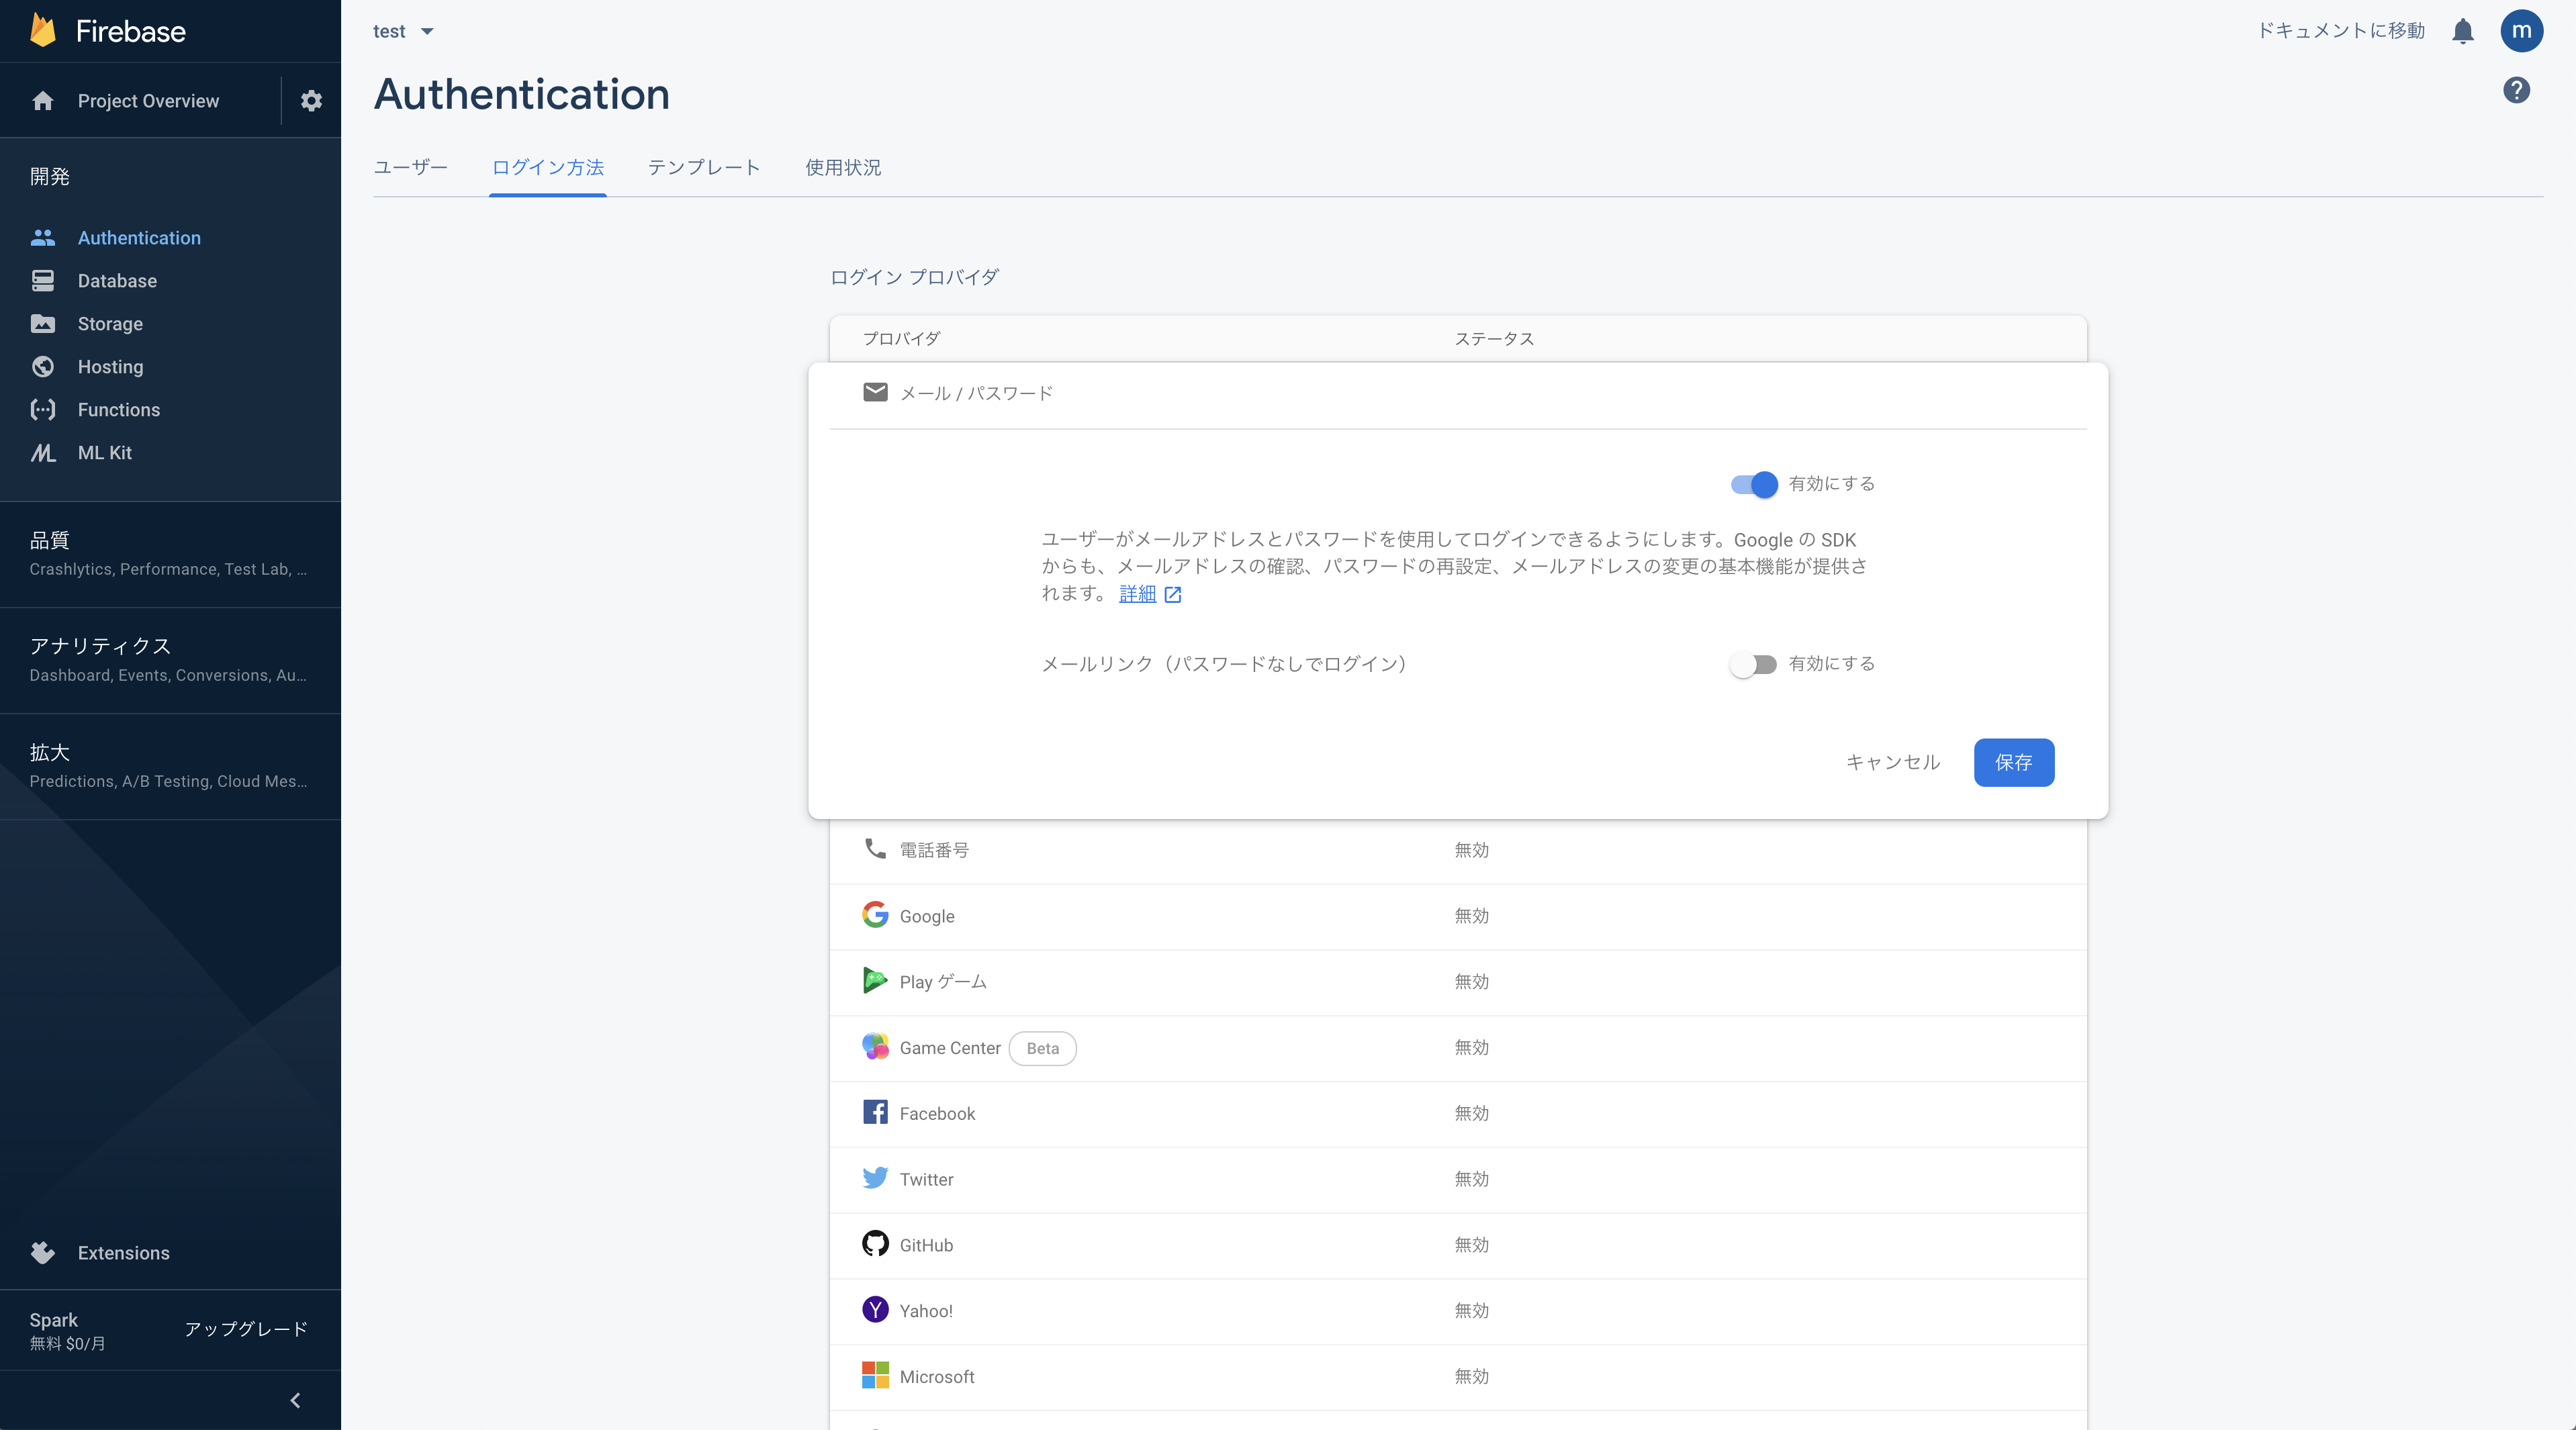
- メニュー > Authentication > ログイン方法
- メール / パスワード を有効にする
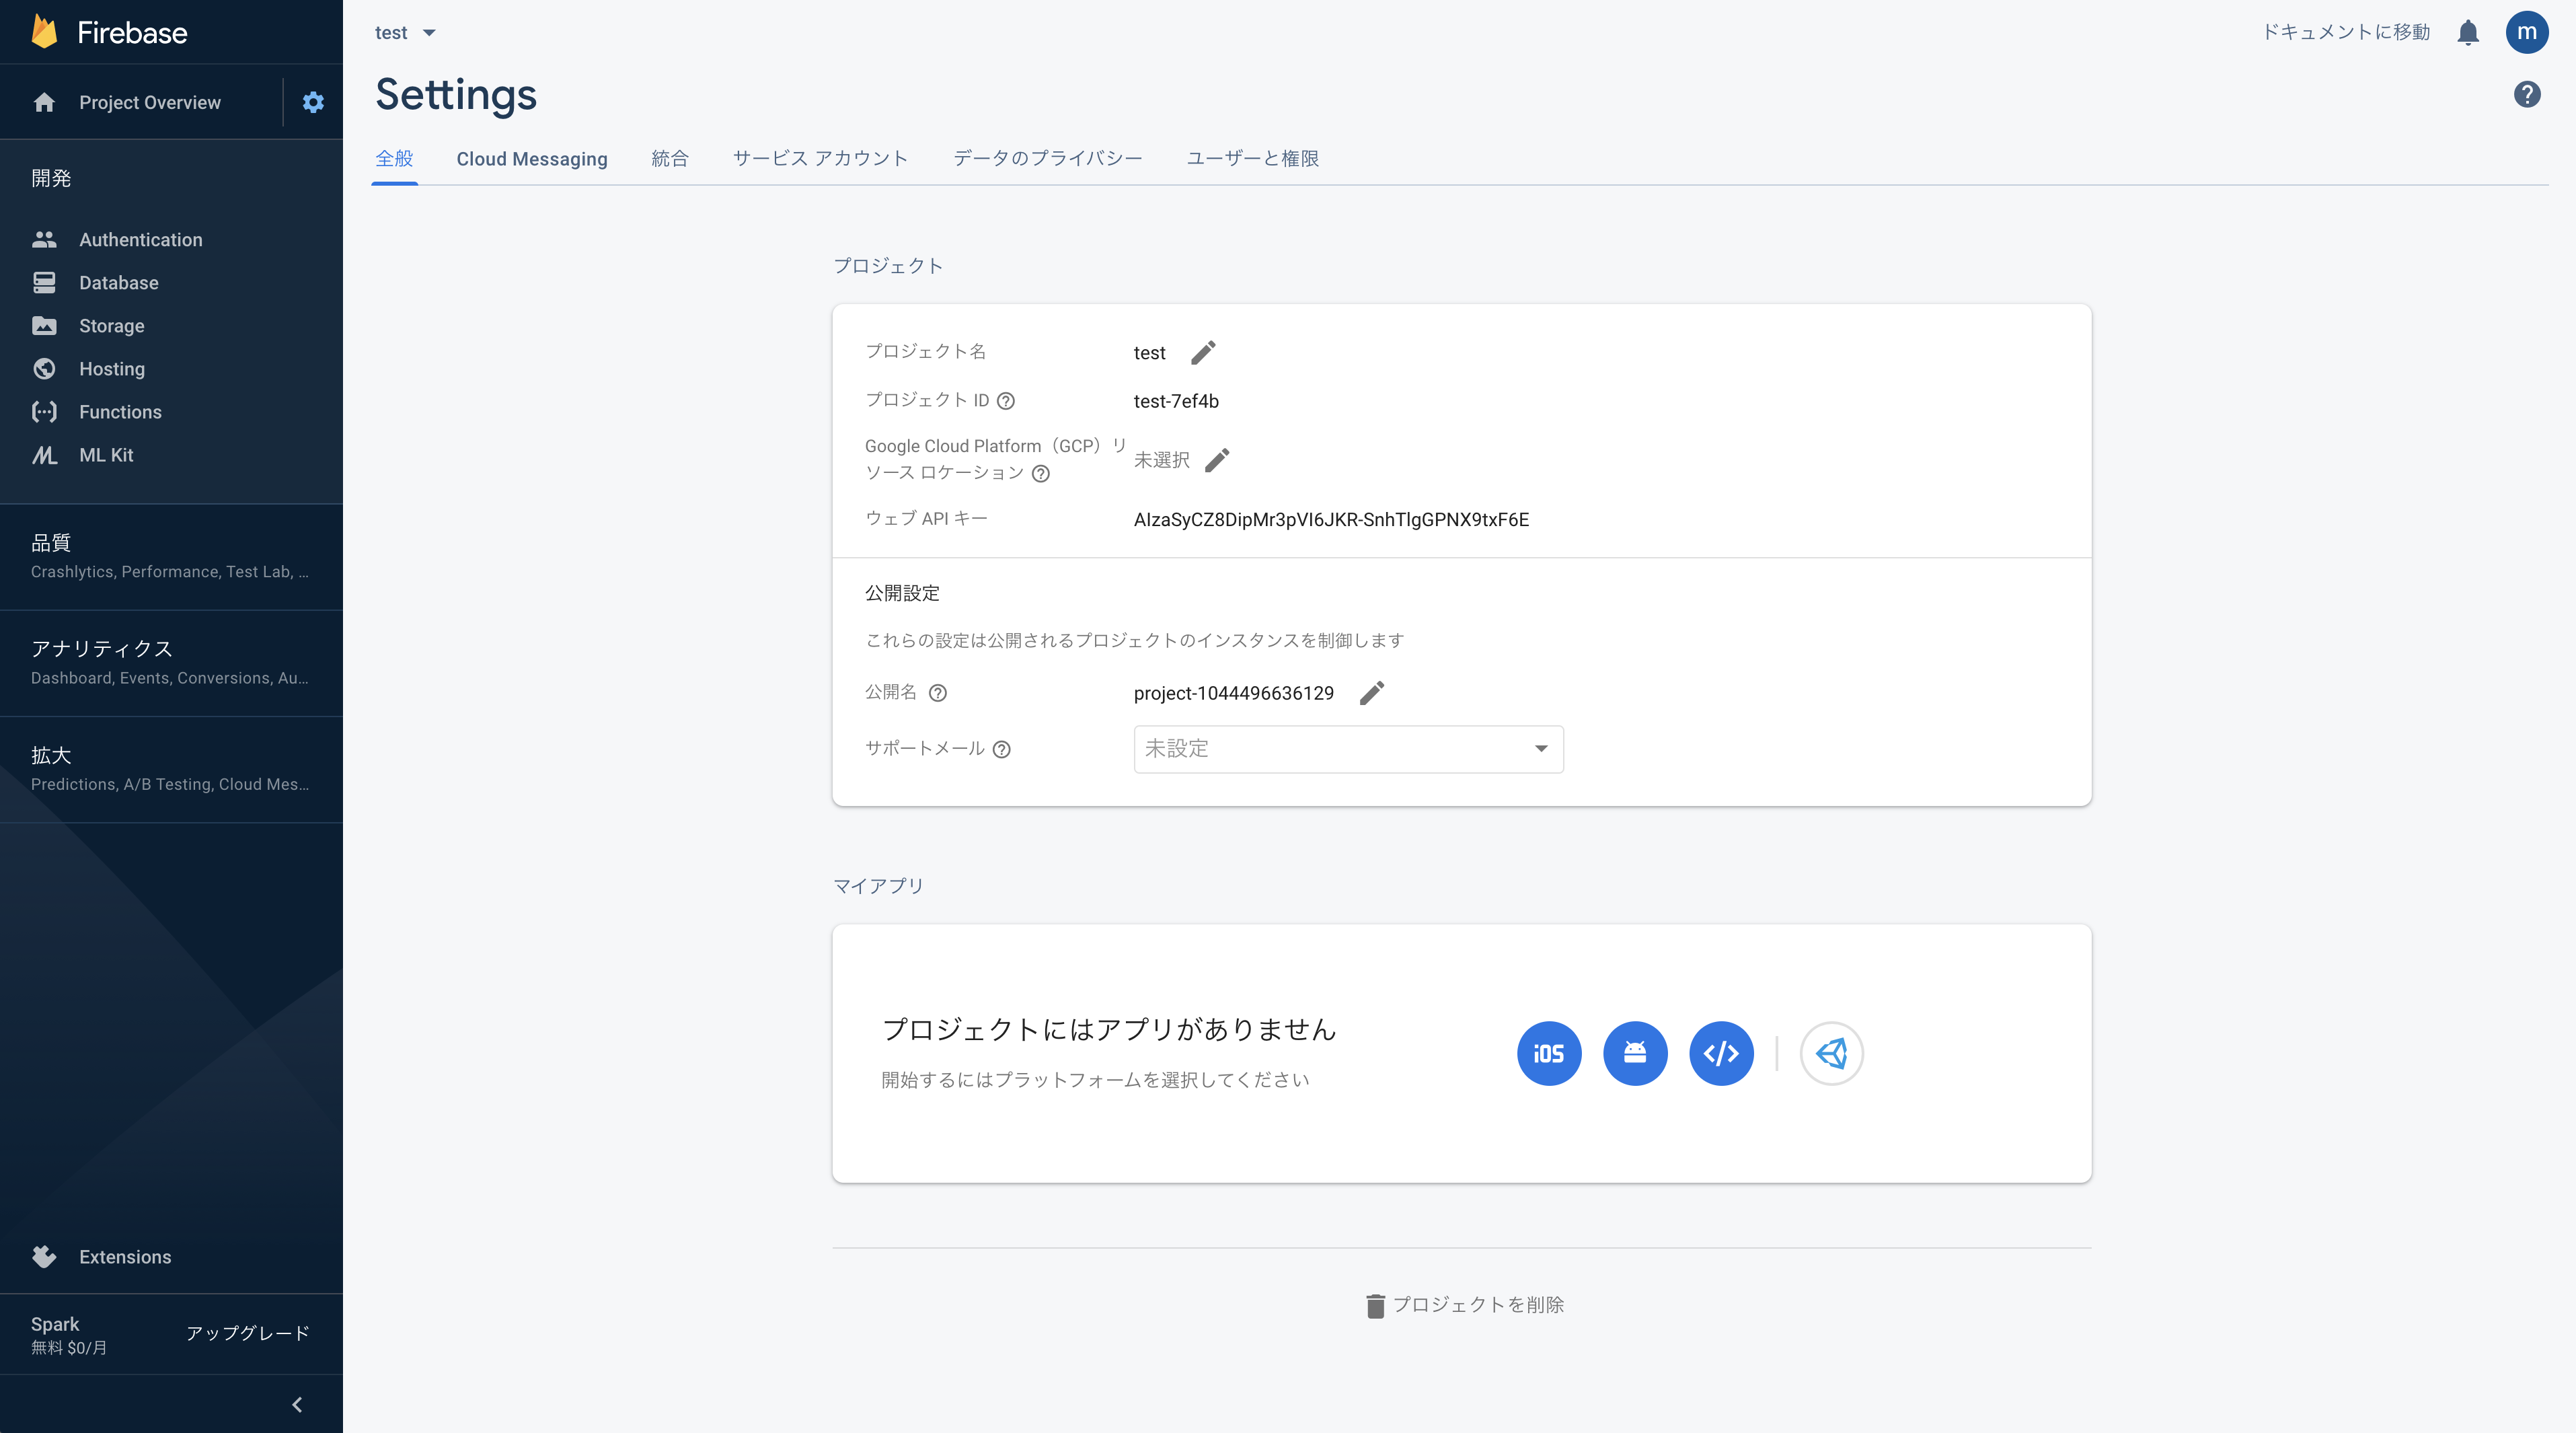
- 歯車アイコン > プロジェクトの設定 > 全般
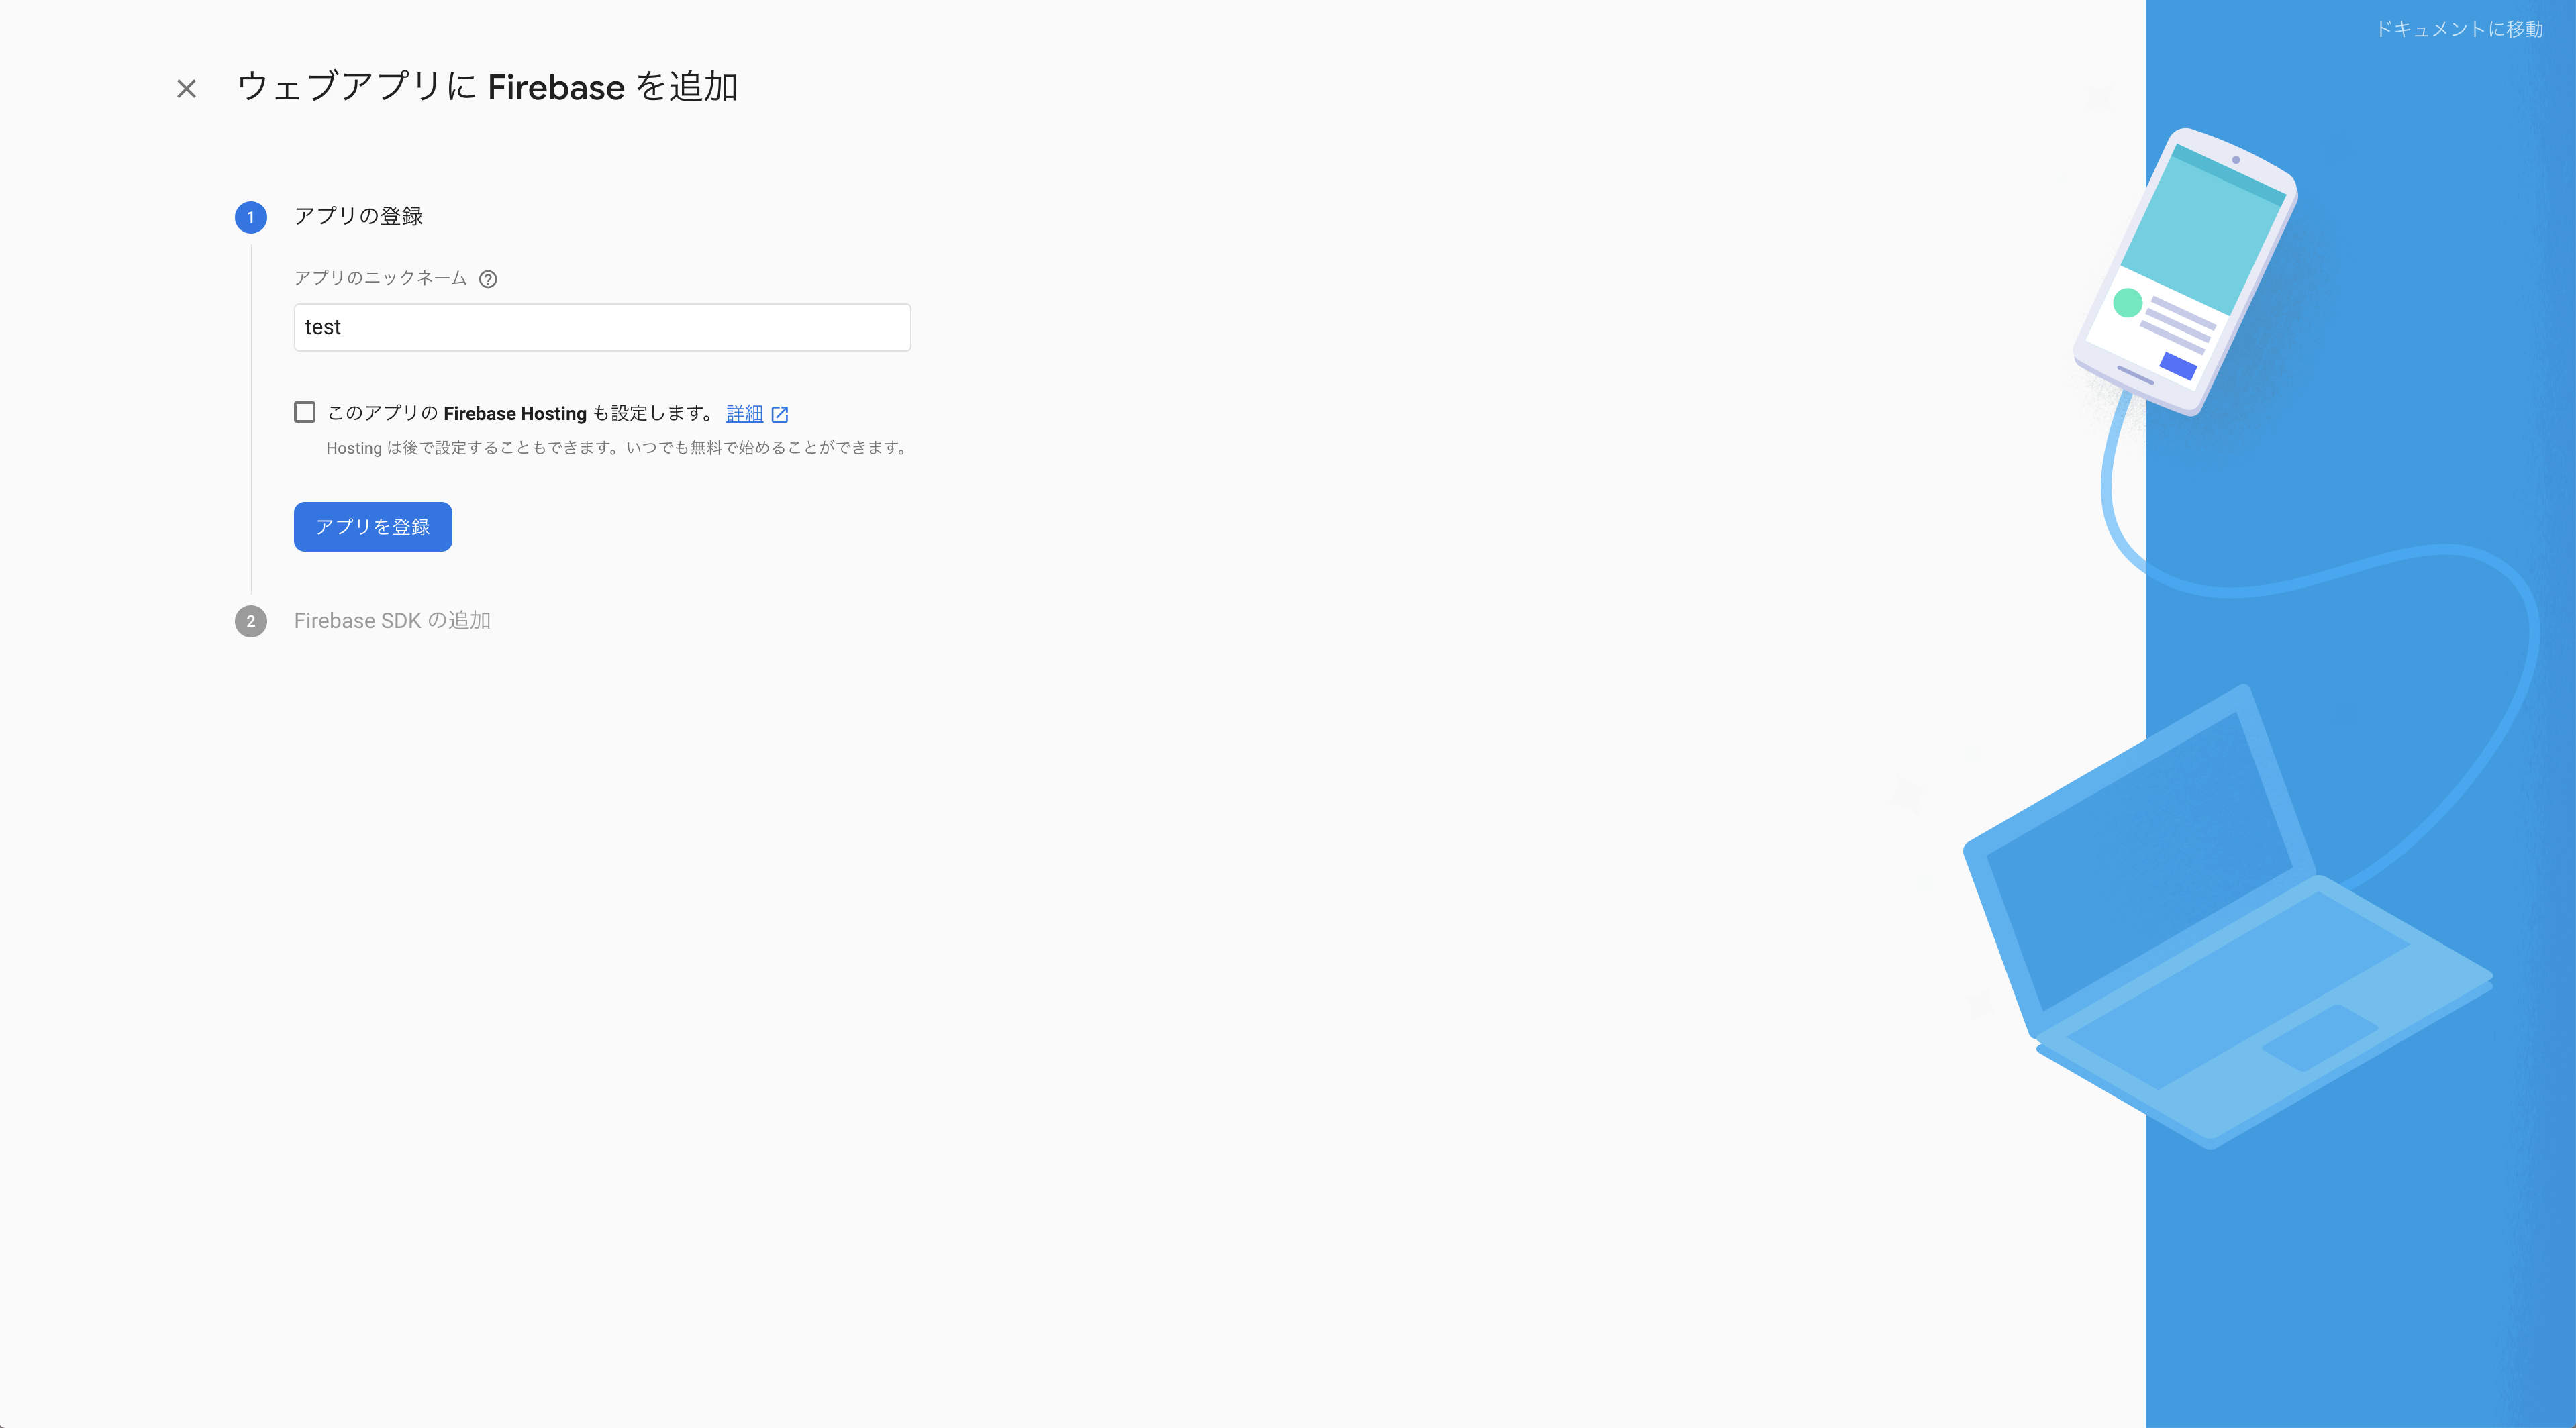
- マイアプリから Web アプリを追加
- 適当な名前をつけてアプリを登録
- React アプリから Firebase の API を叩くための接続情報が表示される
React アプリのポイント解説
今回作成したアプリケーションでいくつかポイントになる部分があるので簡単に解説します。
- github のコード をそのまま利用してもらえば動くので、Create React App コマンドによる React アプリ作成や各種ライブラリのインストール部分は端折っています
- Firebase Authentication の各機能(signup や login)はかなり簡単に利用できます
- React Hooks を利用しています。Hooks に慣れていなくてもなんとなくわかると思います
まず、Firebase の API を叩くために、先程 Firebase のコンソールで取得した接続情報を利用する部分です。
firebase.tsimport "firebase/auth"; import "firebase/firebase-firestore"; import firebase from "firebase"; // Firebaseの接続情報をconfigオブジェクトに保持 const config = { apiKey: "AIzaSyCZ8DipMr3pVI6JKR-SnhTlgGPNX9txF6E", authDomain: "test-7ef4b.firebaseapp.com", databaseURL: "https://test-7ef4b.firebaseio.com", projectId: "test-7ef4b", storageBucket: "test-7ef4b.appspot.com", messagingSenderId: "1044496636129", appId: "1:1044496636129:web:d21b7763773a509473ffa0" }; firebase.initializeApp(config); // Authサービスを作ってエクスポート。各画面でこれを利用する const auth = firebase.auth(); export default auth;続いて会員登録です。
Signup.tsximport React, { Fragment, useEffect, useState } from "react"; import { Button, Container, FormControl, Grid, Link, TextField, Typography } from "@material-ui/core"; // authサービスをインポート import auth from "../firebase"; const Signup = (props: any) => { // ここではuseStateというHooksの機能を利用している // フォームに入力された値を保持する変数を宣言する形 const [email, setEmail] = useState<string>(""); const [password, setPassword] = useState<string>(""); // useEffectもHooksの機能。ここではページがロードされたタイミングで // ログイン状態かどうかを判定するイベントを発動する useEffect(() => { auth.onAuthStateChanged(user => { // ログインしている場合、ホームへリダイレクト user && props.history.push("/"); }); }, []); return ( <Fragment> <Container> <Grid container> <Grid item md={4}></Grid> <Grid item md={4}> <FormControl margin="normal" fullWidth> <TextField style={{ marginTop: "0.5em", marginBottom: "0.5em" }} name="email" label="E-mail" fullWidth variant="outlined" value={email} onChange={(event: React.ChangeEvent<HTMLInputElement>) => { setEmail(event.target.value); }} /> </FormControl> <FormControl fullWidth> <TextField style={{ marginTop: "0.5em", marginBottom: "0.5em" }} name="password" label="Password" fullWidth variant="outlined" type="password" value={password} onChange={(event: React.ChangeEvent<HTMLInputElement>) => { setPassword(event.target.value); }} /> </FormControl> <FormControl fullWidth> <Button fullWidth onClick={async () => { try { // Firebaseにユーザーを作成する await auth.createUserWithEmailAndPassword(email, password); // sendSignInLinkToEmail() を利用すると、メールアドレス認証のためのメールを送信することも可能 props.history.push("/login"); } catch (error) { // ユーザー作成が失敗するとその内容をアラート表示 alert(error.message); } }} style={{ marginTop: "0.5em", marginBottom: "0.5em" }} > Sign up </Button> <Typography align="center"> <Link href="/login">to login</Link> </Typography> </FormControl> </Grid> <Grid item md={4}></Grid> </Grid> </Container> </Fragment> ); }; export default Signup;これだけでユーザーが作成できます。
ログイン画面も会員登録画面と似ているので、見ると何をしているかわかると思います。最後にホーム画面です。ログイン状態だとこの画面にリダイレクトされます。
Home.tsximport React, { Fragment, useEffect, useState } from "react"; import { Button, Container, Grid, Typography } from "@material-ui/core"; // authサービスをインポート import auth from "../firebase"; const Home = (props: any) => { const [currentUser, setCurrentUser] = useState<null | object>(null); useEffect(() => { auth.onAuthStateChanged(user => { // ログイン状態の場合、currentUserというステート(変数)にAPIから取得したuser情報を格納 // ログアウト状態の場合、ログインページへリダイレクト user ? setCurrentUser(user) : props.history.push("/login"); }); }, []); return ( <Fragment> <Container> <Grid container style={{ marginTop: "1em" }}> <Grid item md={4}></Grid> <Grid item md={4}> <Typography>Here is the user information</Typography> <Typography variant="caption" style={{ paddingTop: "2em", paddingBottom: "2em", whiteSpace: "pre" }} > // 格納されたuser情報を画面上に表示 {currentUser && JSON.stringify(currentUser, null, 4)} </Typography> <Button fullWidth onClick={async event => { try { // ログアウト処理。成功するとログイン画面へ遷移 await auth.signOut(); props.history.push("/login"); } catch (error) { alert(error.message); } }} style={{ marginTop: "0.5em", marginBottom: "0.5em" }} > Logout </Button> </Grid> <Grid item md={4}></Grid> </Grid> </Container> </Fragment> ); }; export default Home;次回予告
今回は紹介したものはわかりやすさのために最低限の実装しかしていません。
次回は Context を利用してアプリの状態管理ができるようにしていきます。


- 投稿日:2020-01-15T05:19:54+09:00
Rechartsを使って円グラフを表示させるポスト詳細画面の実装【初学者のReact×Railsアプリ開発 第11回】
やったこと
- Reactでポスト詳細画面を実装した。
- rechartsを用いて円グラフを表示させた。
- ログイン中のユーザー情報によって、表示をコントロールした。
- 詳細画面の中で、投票の変更を行えるようにした。
成果物
Rails実装手順
route.rb
route.rbRails.application.routes.draw do namespace :api, defaults: { format: :json } do namespace :v1 do delete 'posts/:id', to: 'posts#destroy' end end root 'home#about' endlikes_controller, posts_controller
すでに実装済み。
Ruby on Rails APIモードのCRUD実装 【初学者のReact✗Railsアプリ開発 第5回】
Ruby on Rails APIモードでいいね機能を実装する【初学者のReact×Railsアプリ開発 第6回】React実装手順
App.js(ルーティング)
App.jsimport PostsDetail from './containers/PostDetail'; <Auth> <Switch> <Route exact path="/" component={Home} /> <Route path='/create' component={Create} /> <Route path='/postslist' component={PostsList} /> <Route exact path="/posts/:id" component={PostsDetail} /> </Switch> </Auth>containers/PostDetail.js(render)
- 条件によって何を表示するかを分けています。
- renderGraphWithConditionでは、投票数が1票以上あるときと0票のときで表示内容を分けています。
- renderButtonWithConditionでは、ログイン中ユーザーのその投稿に対する投票情報で表示を分けています。
- renderDeleteButtonでは、自分が作成した投稿のとき削除ボタンを表示します。
- Scrollbars: react-custom-scrollbarsモジュールはめちゃ便利。
PostDetail.jsrender() { const { CurrentUserReducer } = this.props; const isloggedin = CurrentUserReducer.isLoggedin; const { classes } = this.props; return ( <Scrollbars> <div className={classes.textLeft}> {this.renderGraphWithCondition(this.state.all_count)} {this.renderButtonWithCondition(this.state.user_answer_suki)} {this.renderDeleteButton()} </div> </Scrollbars> ); }containers/PostDetail.js(function)
- 難しいことはやっていないけど、コードを書き切るのはなかなか大変でした。
- ボタンを押したときに呼び出す関数に引数を渡したい。記述例:
<Button onClick={() => this.ChangeLike(1)}>(【React】イベントハンドラで引数を使いたい【備忘録】)PostDetail.jsconstructor(props) { super(props); this.state = { user_answer_suki: [] }; const auth_token = localStorage.auth_token const client_id = localStorage.client_id const uid = localStorage.uid const { CurrentUserReducer } = this.props; axios.get(process.env.REACT_APP_API_URL + `/api/v1/posts/${this.props.match.params.id}`, { headers: { 'access-token': auth_token, 'client': client_id, 'uid': uid } }) .then((response) => { const postdata = response.data.data; this.setState({ suki_percent: postdata.post.suki_percent, kirai_percent: 100 - postdata.post.suki_percent, suki_count: postdata.post.suki_count, kirai_count: postdata.post.kirai_count, content: postdata.post.content, created_at: postdata.post.created_at, all_count: postdata.post.all_count, username: postdata.user.name }); }) .catch(() => { this.props.history.push('/') }); axios.get(process.env.REACT_APP_API_URL + `/api/v1/likes/post/${this.props.match.params.id}/user/${uid}`, { headers: { 'access-token': auth_token, 'client': client_id, 'uid': uid } }) .then((response) => { const answereddata = response.data.data; this.setState({ user_answer_suki: answereddata.suki, user_answer_updatedat: answereddata.updated_at, }) }) this.ChangeLike = this.ChangeLike.bind(this); this.DeletePost = this.DeletePost.bind(this); this.submitLike = this.submitLike.bind(this); } renderGraphWithCondition(all_count) { const { classes } = this.props; if (all_count != 0) { return ( <Paper className={classes.root} elevation={1}> <Typography variant="headline" component="h1" className={classes.content}> {this.state.content} </Typography> <Typography component="p" style={{ fontWeight: 'bold' }}> created by {this.state.username} </Typography> <PieChart suki_percent={this.state.suki_percent} kirai_percent={this.state.kirai_percent} /> <Typography component="p" style={{ fontWeight: 'bold', fontSize: '1.2rem' }}> スキ: {this.state.suki_percent}% ({this.state.suki_count}人) </Typography> <Typography component="p" style={{ fontWeight: 'bold', fontSize: '1.2rem' }}> キライ: {this.state.kirai_percent}% ({this.state.kirai_count}人) </Typography> <Typography component="p" style={{ fontWeight: 'bold' }}> 投票数: {this.state.all_count}人 </Typography> </Paper> ) } else { return ( <Paper className={classes.root} elevation={1}> <Typography variant="headline" component="h1" className={classes.content}> {this.state.content} </Typography> <Typography component="p" style={{ fontWeight: 'bold' }}> created by {this.state.username} </Typography> <Typography component="p" style={{ fontWeight: 'bold' }}> まだ誰も投票してません。 </Typography> <Typography component="p" style={{ fontWeight: 'bold' }}> 投票数: {this.state.all_count}人 </Typography> </Paper> ) } } renderButtonWithCondition(user_answer_suki) { const { classes } = this.props; if (user_answer_suki == 3) { return ( <Paper className={classes.root}> <Button variant="contained" size="large" color="secondary" className={classes.button} onClick={() => this.submitLike(1)}> スキ </Button> <Button variant="contained" size="large" color="primary" className={classes.button} onClick={() => this.submitLike(0)}> キライ </Button> </Paper> ) } else if (user_answer_suki == 2) { return ( <Paper className={classes.root}> <Button variant="contained" size="large" color="secondary" className={classes.button} onClick={() => this.ChangeLike(1)}> スキ </Button> <Button variant="contained" size="large" color="primary" className={classes.button} onClick={() => this.ChangeLike(0)}> キライ </Button> </Paper > ) } else if (user_answer_suki == 1) { return ( <Paper className={classes.root}> スキで回答済み。 <Button variant="contained" size="large" color="primary" className={classes.button} onClick={() => this.ChangeLike(0)}> キライに変更する </Button> </Paper> ) } else if (user_answer_suki == 0) { return ( <Paper className={classes.root}> キライで回答済み。 <Button variant="contained" size="large" color="primary" className={classes.button} onClick={() => this.ChangeLike(1)}> スキに変更する </Button> </Paper> ) } } renderDeleteButton() { const { CurrentUserReducer } = this.props; const { classes } = this.props; if (CurrentUserReducer.items.name === this.state.username) { return ( <Button variant="contained" size="large" color="primary" className={classes.button} onClick={this.DeletePost}> このテーマを削除する </Button> ) } else { } } ChangeLike(suki) { const auth_token = localStorage.auth_token const client_id = localStorage.client_id const uid = localStorage.uid axios.put(process.env.REACT_APP_API_URL + `/api/v1/likes/post/${this.props.match.params.id}`, { 'suki': suki }, { headers: { 'access-token': auth_token, 'client': client_id, 'uid': uid } }) .then((response) => { const postdata = response.data.data; this.setState({ suki_percent: postdata.post.suki_percent, kirai_percent: 100 - postdata.post.suki_percent, suki_count: postdata.post.suki_count, kirai_count: postdata.post.kirai_count, content: postdata.post.content, created_at: postdata.post.created_at, all_count: postdata.post.all_count, username: postdata.user.name }); const answereddata = response.data.data.like; this.setState({ user_answer_suki: answereddata.suki, user_answer_updatedat: answereddata.updated_at, }) }) } DeletePost() { const { CurrentUserReducer } = this.props; const auth_token = localStorage.auth_token const client_id = localStorage.client_id const uid = localStorage.uid axios.delete(process.env.REACT_APP_API_URL + `/api/v1/posts/${this.props.match.params.id}`, { headers: { 'access-token': auth_token, 'client': client_id, 'uid': uid } }) window.history.back(-2) } submitLike(suki) { const { CurrentUserReducer } = this.props; const auth_token = localStorage.auth_token const client_id = localStorage.client_id const uid = localStorage.uid const data = { user_id: CurrentUserReducer.items.id, post_id: this.props.match.params.id, suki: suki, } axios.post(process.env.REACT_APP_API_URL + '/api/v1/likes', data, { headers: { 'access-token': auth_token, 'client': client_id, 'uid': uid } }) .then((response) => { const postdata = response.data.data; this.setState({ suki_percent: postdata.post.suki_percent, kirai_percent: 100 - postdata.post.suki_percent, suki_count: postdata.post.suki_count, kirai_count: postdata.post.kirai_count, content: postdata.post.content, created_at: postdata.post.created_at, all_count: postdata.post.all_count, username: postdata.user.name }); const answereddata = response.data.data.like; this.setState({ user_answer_suki: answereddata.suki, user_answer_updatedat: answereddata.updated_at, }) }) }components/SimplePieChart.js
- 円グラフを表示させるモジュールとして、rechartsを用いました。
- rechartsのコードはこちらを参考にしました。http://recharts.org/en-US/examples/PieChartWithCustomizedLabel
SimplePieChart.jsimport React, { PureComponent } from 'react'; import { PieChart, Pie, Sector, Cell, } from 'recharts'; const COLORS = ['#FF8042', '#0088FE',]; const RADIAN = Math.PI / 180; const renderCustomizedLabel = ({ cx, cy, midAngle, innerRadius, outerRadius, percent, index, name }) => { const radius = innerRadius + (outerRadius - innerRadius) * 0.5; const x = cx + radius * Math.cos(-midAngle * RADIAN); const y = cy + radius * Math.sin(-midAngle * RADIAN); return ( <text x={x} y={y} fill="white" textAnchor={x > cx ? 'start' : 'end'} dominantBaseline="central" style={{ fontWeight: 'bold', whiteSpace: 'pre-line' }}> {`${(percent * 100).toFixed(0)}%`} </text> ); }; export default class SimplePieChart extends PureComponent { //static jsfiddleUrl = 'https://jsfiddle.net/alidingling/c9pL8k61/'; constructor(props) { super(props) } render() { const { suki_percent, kirai_percent } = this.props; const data = [ { name: 'スキ', value: suki_percent }, { name: 'キライ', value: kirai_percent }, ]; return ( <PieChart width={300} height={300}> <Pie startAngle={90} endAngle={-270} data={data} cx={120} cy={120} labelLine={false} label={renderCustomizedLabel} outerRadius={100} fill="#8884d8" dataKey="value" > { data.map((entry, index) => <Cell key={`cell-${index}`} fill={COLORS[index % COLORS.length]} />) } </Pie> </PieChart> ); } }
