- 投稿日:2020-01-15T20:29:14+09:00
ASP.NET CoreのDataAnotation
モデル値の検証に関する属性
StringLength 属性
[StringLength(50, ErrorMessage = "50文字以内で入力してください")]StringLength 属性は、データフィールドで使用できる最小文字長と最大文字長を指定します。上の例では、使用可能な文字数が 50 文字以下に制限されます。
ErrorMessageプロパティは、これ以外の検証属性でも利用できますが、これ以降は省略します。
以下のようにのように、MinimumLength を指定することで、文字列の最小長を設定することもできます。ただし、Required 属性も指定しないと、空文字を制限することはできません。
[StringLength(50, MinimumLength=2)]RegularExpression 属性
[RegularExpression(@"^[A-Z][a-zA-Z0-9]+$")]RegularExpression 属性は、正規表現を使った入力検証を行うことができます。
Required 属性
[Required]Required 属性は、必須フィールドを示す属性です。参照型のプロパティに指定します。
値型 (例: DateTime、int、double) などの null 非許容型では、Required 属性は必要ありません。 自動的に必須フィールドとして扱われます。以下のようにすることで、null は非許容だけど、空文字列をデータベースに入れることができます。
[Required(AllowEmptyStrings = true)]Range 属性
[Range(0, 5)]持ちうる値の範囲を指定します。double型を指定することも可能です。
また、以下のようにすれば、日付の範囲を指定することも可能です。
[Range(typeof(DateTime), "1/2/2004", "3/4/2004",Compare 属性
[Compare("Password", ErrorMessage = "パスワードが一致しません")]
public string PasswordConfirm { get; set; }
2つのプロパティが一致するかを検証します。上の例は、PasswordConfirmプロパティの値とPasswordプロパティの値が一致する必要があります。
EmailAddress 属性
[EmailAddress]電子メール アドレスであるかを検証します。
Phone 属性
[Phone]電話番号であるかを検証します。
CreditCard 属性
[CreditCard]クレジットカード番号であるかを検証します。
表示/入力に関する属性
Display 属性
[Display(Name = "Last Name")]Display属性は、ラベルのキャプションを指定する際に利用します。
DisplayFormat 属性
DisplayFormat属性は、書式を明示的に指定するために使用されます。
[DisplayFormat(DataFormatString = "{0:yyyy-MM-dd}", ApplyFormatInEditMode = true)]ApplyFormatInEditMode オプションは、書式設定を編集 UI にも適用する必要があることを指定します。
DisplayFormat 属性は単独で使用できます。 一般的には、DataType 属性を DisplayFormat 属性と一緒に使用することが推奨されています。
以下のように書けば、nullの時に表示する値を指定できます。
[DisplayFormat(NullDisplayText = "未指定")]次の例は、空の文字列値を null 値に変換せずに、空文字のまま扱うことを指定します。
[DisplayFormat(ConvertEmptyStringToNull = false)]DataType 属性
DataType 属性は、ビューエンジンに対して、データの書式設定のヒントを提供します。プロパティの型よりも詳しい型を指定したいときに利用します。検証は行われませんが、HTML5の機能により、結果的に検証と同等の働きが組み込まれることがあります。
[DataType(DataType.Date)]DataType 属性は、HTML 5 の data- (データ ダッシュと読みます) 属性が出力されます。 DataType 属性では検証は提供されません。
DataType 列挙型は、Date、Time、PhoneNumber、Currency、EmailAddress など、多くのデータ型のために用意されています。
次のような書けば、パスワードを入力するフィールドであることを指定できます。この場合は、入力タグヘルパーにより、
type="password"属性が付加されます。[DataType(DataType.Password)]HiddenInput属性
隠しフィールドであることを示します。入力タグヘルパーにより、
type="hidden"がinput要素に付加されます。[HiddenInput]データベースに関する属性
Column 属性
[Column("FirstName")]
public string FirstMidName { get; set; }
このように書けば、テーブルのカラム名をプロパティ名とは別のものに変更できる。
以下のように、データベースのカラムの詳細な型を指定することもできます。
[Column(TypeName = "decimal(18, 2)")]Key 属性
[Key][Key] 属性は、プロパティ名が
<classname>IdやId以外の時に、そのプロパティが主キー (PK) であることを示すために使用します。DatabaseGenerated 属性
[DatabaseGenerated(DatabaseGeneratedOption.None)]上のコードはPKの値をデータベースで自動生成するのではなく、アプリケーション側で指定することを示します。
TimeStamp 属性
[Timestamp]
public byte[] RowVersion { get; set; }
オプティミスティック コンカレンシーのチェックに利用されるフィールドであることを示します。
SQL Serverでは、rowversion型が割り当てられます。属性に関するその他の情報
以下のように、複数の属性を 1行に配置することができます。
[DataType(DataType.Date),Display(Name = "Hire Date"),DisplayFormat(DataFormatString = "{0:yyyy-MM-dd}", ApplyFormatInEditMode = true)]
- 投稿日:2020-01-15T17:26:30+09:00
[Blazor]コンポーネント間でのステータスのやり取り方法
悩んだこと
- アラート系のメッセージ処理を各ページでゴリゴリ書くのはイケてない
- 共通化して使いまわししたい
componentを作って使いまわすのにも限度があるし、MainLayout.razorで一括に処理できればいいよね- 親コンポーネントと子コンポーネント間のやりとりってどうやるの?
今回の解決策
State Containerを作成し、それを介すことで親子間のStatusのやり取りを行いました。Fluxの考え方に似た方法です。できたもの
IStateMessageService.csinterface IStateMessageService { string StateMessages { get; } event Action OnChange; void ClearStateMessages(); void SetStateMessages(string statusMessages); }StateMessageService.cspublic class StateMessageService : IStateMessageService { public string StateMessages { get; private set; } public event Action OnChange; public void SetStateMessages(IStatusMessages statusMessages) { StateMessages = statusMessages; NotifyStateChanged(); } public void ClearStateMessages() { StateMessages = null; NotifyStateChanged(); } private void NotifyStateChanged() => OnChange?.Invoke(); }Startup.cspublic class Startup { public void ConfigureServices(IServiceCollection services) { // 略 services.AddScoped<IStateMessageService, StateMessageService>(); // 追記 // 略 } }MainLayout.razor@inject IStateMessageService StateMessage @implements IDisposable <div class="sidebar"> <NavMenu /> </div> <div class="main"> <AlertMessage Message="StateMessage.StateMessages" /> <div class="content px-4 vh-100"> @Body </div> </div> @code { protected override void OnInitialized() { StateMessage.OnChange += StateHasChanged; } public void Dispose() { StateMessage.OnChange -= StateHasChanged; } }AlertMessage.razor@inject IStateMessageService StateMessage @if(!string.IsNullOrEmpty(Message)) { <div class="alert alert-success alert-dismissible @(IsVisible ? "show " : "")text-left shadow" role="alert"> <button type="button" class="close" data-dismiss="alert" aria-label="Close" @onclick="OnClickCloseButton"> <span aria-hidden="true">×</span> </button> <p class="m-0"> @Message </p> </div> } @code { [Parameter] public string Message { get; set; } = string.Empty; public bool IsVisible { get; set; } = true; private void OnClickCloseButton() { IsVisible = false; Task.Run(() => StateMessage.ClearStateMessages()); } }ChildComponent.razor@inject IStateMessageService StateMessage <button type="button" @onclick="OnClickButton">Show</button> @code { public void OnClickButton() { StateMessage.SetStateMessages("Hello world!"); } }解説
StateMessageService
DIして各コンポーネントで使っていくサービスです。
StateMessageService.SetStateMessagesを使い、表示するメッセージを追加します。内部ではメッセージの追加以外に、StateMessageService.OnChangeに登録されているActionを実行しています。後々出てきますが、この
ActionにStateHasChangedを追加することで、Messageの内容が変わるたびにDOM更新が走るといった算段です。Razor Component
フロント側では
@injectを使いIStateMessageServiceを受けます。MainLayout.razorにメッセージ表示用のAlertMessageを配置することでどの子コンポーネントでStateMessageService.SetStateMessagesを実行してもメッセージが表示されるようにします。
AlertMessage自体はBootstrapのAlertをラップしているコンポーネントです。Messageに表示したいメッセージを渡せばいい感じに表示してくれます。
AlertMessage.razorではクローズボタンが押された時の処理として、OnClickCloseButtonを定義しています。ここでStateMessageService.ClearStateMessagesを実行することで、非表示及びステートの初期化を行っています。いいところ
ページ遷移をしてもクローズボタンを押下されない限り表示され続けます。使いどころとしてはブラウザ上でのプッシュ通知などでしょうか? 私個人はAPIのレスポンスメッセージを表示させたりしています。
WASMでもServerSideでもどっちでも使えるところも良いですね。
javascriptを1つも書かずにここまでできるBlazorは本当にすごいと思います。革新的ですね。悪いところ
紹介したコードではメッセージが1つだけしか表示できません。トーストのようにスタックすることができないので、そういった用途には向かないでしょう。
参考
3 Ways to Communicate Between Components in Blazor
https://chrissainty.com/3-ways-to-communicate-between-components-in-blazor/環境
- Visual Studio 2019 ver 16.4.2
- TargetFramework > netstandard2.0
- LangVersion > 7.3
- RazorLangVersion > 3.0
- 投稿日:2020-01-15T17:14:51+09:00
.NET Core 3.1でAzure Active Directory認証を行う
.NET Core3.1でAzure Active Directory(=AAD)認証を行う方法についてです。
AngularでAzure Active Directory認証を行う の続きです。
クライアントアプリケーション(Angular)からのリクエストのヘッダーにはjwtがあるので、jwtによるAAD認証でWeb APIを保護します。
Startup.cs
using Microsoft.AspNetCore.Builder;
using Microsoft.AspNetCore.Hosting;
using Microsoft.AspNetCore.SpaServices.AngularCli;
using Microsoft.Extensions.Configuration;
using Microsoft.Extensions.DependencyInjection;
using Microsoft.Extensions.Hosting;
using Microsoft.AspNetCore.Authentication.AzureAD.UI;
using Microsoft.AspNetCore.Authentication;

namespace AadSample
{
    public class Startup
    {
        public Startup(IHostEnvironment env)
        {
            var builder = new ConfigurationBuilder()
                    .SetBasePath(env.ContentRootPath)
                    .AddJsonFile("appsettings.json", optional: false, reloadOnChange: true)
                    .AddJsonFile($"appsettings.{env.EnvironmentName}.json", optional: true)
                    .AddEnvironmentVariables();
            Configuration = builder.Build();
        }

        public IConfiguration Configuration { get; }

        // DIを定義
        public void ConfigureServices(IServiceCollection services)
        {
          // Azure ADのServiceをDIの定義を追加
          // Configuration.Bind("AzureAd", options)でappsettings.jsonから必要な接続情報を取得する
            services.AddAuthentication(AzureADDefaults.BearerAuthenticationScheme)
                .AddAzureADBearer(options => Configuration.Bind("AzureAd", options));
          // …他のDI
        }

        public void Configure(IApplicationBuilder app, IWebHostEnvironment env)
        {
            if (env.IsDevelopment())
            {
                app.UseDeveloperExceptionPage();
            }
            else
            {
                app.UseExceptionHandler("/Error");
                app.UseHsts();
            }

            app.UseHttpsRedirection();
            app.UseStaticFiles();
            if (!env.IsDevelopment())
            {
                app.UseSpaStaticFiles();
            }

            app.UseRouting();

            app.UseAuthentication(); // 追記
            app.UseAuthorization();  // 追記

            app.UseEndpoints(endpoints =>
            {
                endpoints.MapControllerRoute(
                    name: "default",
                    pattern: "{controller}/{action=Index}/{id?}");
            });

            app.UseSpa(spa =>
            {
                spa.Options.SourcePath = "ClientApp";

                if (env.IsDevelopment())
                {
                    spa.UseAngularCliServer(npmScript: "start");
                }
            });
        }
    }
}
appsettings.json
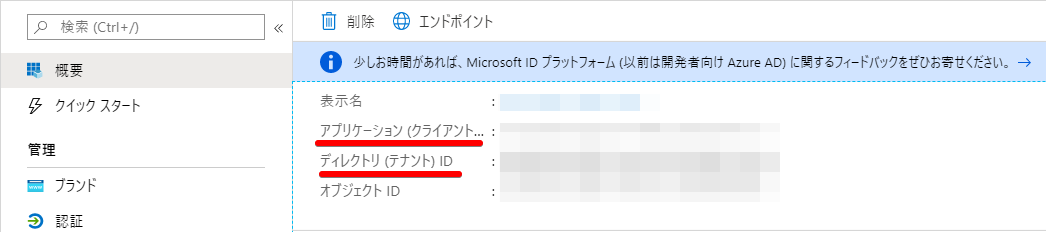
AzureAdスキーマにAzureポータルで作成したAADの設定情報を記載する
{
  "Logging": {
    "LogLevel": {
      "Default": "Information",
      "Microsoft": "Warning",
      "Microsoft.Hosting.Lifetime": "Information"
    }
  },
  "AzureAd": {
    "Instance": "https://login.microsoftonline.com/",
    "Domain": "{例:hogehoge}.onmicrosoft.com",
    "TenantId": "{ディレクトリ(テナント)ID}",
    "ClientId": "{アプリケーション(クライアント)ID}"
  },
  "AllowedHosts": "*"
}
HogeController
認証が必要なControllerに対し
[Authorize]属性を付与します。[HttpGet] [Route("GetWeatherForecast")] [Authorize] public IEnumerable<WeatherForecast> Get() { var rng = new Random(); return Enumerable.Range(1, 5).Select(index => new WeatherForecast { Date = DateTime.Now.AddDays(index), TemperatureC = rng.Next(-20, 55), Summary = Summaries[rng.Next(Summaries.Length)] }) .ToArray(); }CustomFilterAttributeを使って認証を行う場合は
IAuthorizationFilterを継承します。using Microsoft.AspNetCore.Mvc; using Microsoft.AspNetCore.Mvc.Filters; using System; namespace AadSample { /// <summary> /// 認証フィルター /// </summary> public class CustomAuthorize : Attribute, IAuthorizationFilter { /// <summary> /// 認証チェック /// </summary> /// <param name="context"></param> public void OnAuthorization(AuthorizationFilterContext context) { var user = context.HttpContext.User; if (user.Identity.IsAuthenticated) { return; // 認証済みならAPIを実行 } else { context.Result = new UnauthorizedResult(); // 未認証なら401を返す } } } }参考URL
保護された Web API アプリを構成する - Microsoft identity platform | Microsoft Docs
- 投稿日:2020-01-15T16:58:30+09:00
Unityでボタンを使ってシーンをロードする際に汎用性のあるプログラム
いちいちシーンロードするプログラムを書かなくても簡単にロードしたいシーンに移動できるプログラムを自分なりに考えてみました。
ぜひ、参考にしてみてください。using System.Collections; using System.Collections.Generic; using UnityEngine; using UnityEngine.SceneManagement; //シーン移動するために必要 using UnityEngine.UI; //UIを使う際に必要 public class LoadSceneButton : MonoBehaviour { //[SerializeField]を使うことでpraivateの状態で //publicと同じようにunityのInspectorで入力できる [SerializeField] string putsceneName = ""; public void LoadSceneButtonDown() { //Inspectorで入力された名前が(loadsceneName)に入り //そのシーンをロードする SceneManager.LoadScene(loadsceneName); } }上記のプログラムをボタンにアタッチしprefab化するとステージセレクトボタンを作る際に楽になると思います。
自分自身まだプログラムの経験が浅いためこのプログラムで大丈夫かが不安ですが役立つことができたら幸いです。
- 投稿日:2020-01-15T16:58:30+09:00
Unityでボタンを使ってシーンをロードする際のプログラム
いちいちシーンロードするプログラムを書かなくても簡単にロードしたいシーンに移動できるプログラムを自分なりに考えてみました。
ぜひ、参考にしてみてください。using System.Collections; using System.Collections.Generic; using UnityEngine; using UnityEngine.SceneManagement; //シーン移動するために必要 using UnityEngine.UI; //UIを使う際に必要 public class LoadSceneButton : MonoBehaviour { //[SerializeField]を使うことでpraivateの状態で //publicと同じようにunityのInspectorで入力できる [SerializeField] string putsceneName = ""; public void LoadSceneButtonDown() { //Inspectorで入力された名前が(loadsceneName)に入り //そのシーンをロードする SceneManager.LoadScene(loadsceneName); } }上記のプログラムをボタンにアタッチしprefab化するとステージセレクトボタンを作る際に楽になると思います。
自分自身まだプログラムの経験が浅いためこのプログラムで大丈夫かが不安ですが役立つことができたら幸いです。
- 投稿日:2020-01-15T16:38:11+09:00
【Unity】Jsonファイルとしてデータを保存する
はじめに
このアカウントは、プログラムについて勉強し始めて1年立たずの専門学校生によるものです。
新たに学んだ技術や知識をなるべくわかりやすくまとめておこうと思います。
アドバイス・ご指摘などありましたら、どうぞご遠慮無く。データの保存
ゲーム制作をしていると必ずぶつかる壁にデータの保存があると思います。
今回は、私がゲーム制作で使用した保存方法とスクリプトをご紹介します。Jsonファイルとしてデータを保存・読み書きする
データの保存方法にも何種類かありますが、今回はJsonファイルで保存する方法を使ってみました。
今回のスクリプトはこちらtitleの記事を参考にさせていただきました。
(kanのメモ帳-個人ゲーム開発者kan.kikuchiのメモ的技術ブログ-/クラスを丸ごと保存するデータ管理方法【Unity】)スクリプト
魚を取るゲームを制作していたので、所々魚関係の変数や名前が出てきます。
PlayerDataInstance.csusing System.Collections.Generic; using UnityEngine; using System; using System.IO; using System.Runtime.Serialization.Formatters.Binary; using UnityEditor; /// <summary> /// .jsonファイルでプレイヤーデータを保存する /// </summary> [Serializable] public class PlayerDataInstance : ISerializationCallbackReceiver { //プレイヤーデータの実態、初アクセス時にデータをロード private static PlayerDataInstance _instance = null; public static PlayerDataInstance Instance { get { if (_instance == null) { Load(); } return _instance; } } [SerializeField] private static string _jsonText = ""; //================================================ //保存されるデータ //================================================ [SerializeField] int money; // 所持金 [SerializeField] string lanceName; // 装備しているLanceStatusDataの名前 [SerializeField] private string _fishDictJson = ""; public Dictionary<string, Fish> FishDict = new Dictionary<string,Fish>();// 銛で突いた魚の名前と数を保存 //================================================ //シリアライズ、デシリアライズ時のコールバック //================================================ /// <summary> /// PlayerData->Jsonに変換される前に実行される。 /// </summary> public void OnBeforeSerialize() { //Dictionaryはそのまま保存されないので、個別にシリアライズしてテキストで保存 _fishDictJson = Serialize(FishDict); } /// <summary> /// Json->PlayerDataに変換された後に実行される。 /// </summary> public void OnAfterDeserialize() { //保存されているテキストがあればDictionaryにデシリアライズ if (!string.IsNullOrEmpty(_fishDictJson)) { FishDict = Deserialize<Dictionary<string, Fish>>(_fishDictJson); } } /// <summary> /// 引数のオブジェクトをシリアライズして返す /// </summary> /// <typeparam name="T"></typeparam> /// <param name="obj"></param> /// <returns></returns> private static string Serialize<T>(T obj) { BinaryFormatter binaryFormatter = new BinaryFormatter(); MemoryStream memoryStream = new MemoryStream(); binaryFormatter.Serialize(memoryStream, obj); return Convert.ToBase64String(memoryStream.GetBuffer()); } /// <summary> /// 引数のテキストを指定されたクラスにデシリアライズして返す。 /// </summary> /// <typeparam name="T"></typeparam> /// <param name="str"></param> /// <returns></returns> private static T Deserialize<T>(string str) { BinaryFormatter binaryFormatter = new BinaryFormatter(); MemoryStream memoryStream = new MemoryStream(Convert.FromBase64String(str)); return (T)binaryFormatter.Deserialize(memoryStream); } //================================================ //取得 //================================================ /// <summary> /// データを再読み込みする。 /// </summary> public void Reload() { JsonUtility.FromJsonOverwrite(GetJson(), this); } /// <summary> /// データを読み込む。 /// </summary> private static void Load() { _instance = JsonUtility.FromJson<PlayerDataInstance>(GetJson()); } private static string GetJson() { //既にJsonを取得している場合はそれを返す。 if (!string.IsNullOrEmpty(_jsonText)) { return _jsonText; } //Jsonを保存している場所のパスを取得 string filePath = GetSaveFilePath(); //Jsonが存在するか調べてから取得し変換する。存在しなければ新たなクラスを作成し、それをJsonに変換する。 if (File.Exists(filePath)) { _jsonText = File.ReadAllText(filePath); } else { _jsonText = JsonUtility.ToJson(new PlayerDataInstance()); } return _jsonText; } //================================================ //保存 //================================================ /// <summary> /// データをJsonにして保存する。 /// </summary> public void Save() { _jsonText = JsonUtility.ToJson(this); File.WriteAllText(GetSaveFilePath(), _jsonText); } //================================================ //削除 //================================================ /// <summary> /// データをすべて削除し、初期化する。 /// </summary> public void Delete() { _jsonText = JsonUtility.ToJson(new PlayerDataInstance()); Reload(); } //================================================ //保存先のパス //================================================ private static string GetSaveFilePath() { string filePath = "PlayerDataInstance"; //確認しやすいようにエディタではAssetsと同じ階層に保存 //それ以外ではApplication.persistentDataPath以下に保存するように。 #if UNITY_EDITOR filePath += ".json"; #else filePath = Application.persistentDataPath + "/" + filePath; #endif Debug.Log(filePath); return filePath; } //================================================ //PlayerDataUtility //================================================ /// <summary> /// 所持金を取得する。 /// </summary> /// <returns></returns> public int GetMoney() { return money; } /// <summary> /// 装備品の名前を取得する /// </summary> /// <returns></returns> public string GetLanceName() { return lanceName; } /// <summary> /// 銛で獲った魚の名前と数を取得する /// </summary> /// <returns></returns> public Dictionary<string,Fish> GetFish() { return FishDict; } /// <summary> /// 保存するデータを設定する。 /// </summary> /// <param name="data"></param> public void SetPlayerData(PlayerData data) { LanceStatusData _lsd = data.GetLance(); lanceName = _lsd.GetEquipmentName(); money = data.GetMoney(); FishDict = data.GetFish(); } }使用例
上のスクリプトを実際に使用したものを以下に記載します。
PlayerData.csusing System.Collections.Generic; using UnityEngine; using System; using System.IO; using System.Runtime.Serialization.Formatters.Binary; using UnityEditor; [Serializable] public class PlayerData : MonoBehaviour { //(中略) private void Start() { //保存しておいたデータを取得する //static変数を取得 PlayerDataInstance _pInstance = PlayerDataInstance.Instance; dataList = gameObject.GetComponent<DataList>(); //各データを保存していたファイルから取得 string lanceName = _pInstance.GetLanceName(); //初期状態だとlanceNameが""なので、初期装備を設定 //lanceNameが存在するなら該当する装備を取得 if (lanceName == "") { lance = dataList.GetLance("ボロのモリ"); lance.IsBought = true; } else { lance = dataList.GetLance(lanceName); } money = _pInstance.GetMoney(); fishes = _pInstance.GetFish(); } //以下省略 }このように、PlayerDataInstanceで設けたstatic変数を呼び出せば、保存していたデータを取得することができます。
データの上書き保存やデータ削除も同様に、static変数から“Save()”、“Delete()”を呼び出すことで可能になります。使用上の注意
ここでは実際に私が失敗したり悩んだ部分、ほかの使い方などを書いておきます。
InstanceDataのスクリプト(1つ目のスクリプト)はオブジェクトにアタッチできない
スクリプトの属性がMonoBehaviorではないため、オブジェクトにアタッチすることができません。
その代わり、オブジェクトにアタッチしなくても、スクリプトがプロジェクト内に存在すれば機能してくれます。InstanceDataのスクリプトのみで十分使用可能
作っていたゲームの構造上、プレイヤーデータ本体(2つ目のスクリプト)と保存部分(1つ目のスクリプト)を分けましたが、保存部分のみでも使用可能です。
例えば、ゲームを通して常にプレイヤーが存在する場合(RPGなど)はstatic変数を呼び出すことで問題なく動作するはずです。.jsonファイルは開発中はプロジェクトのフォルダ内に作成される
.jsonファイルはプロジェクトのフォルダ(Assetsなどと同じ)内に生成されます。
DataPathを見ていただければわかるかと思いますが、iOSのみ保存場所が異なります。まとめ
データの保存には、ほかにもいろいろな方法があります。
例えば、Unityに実装されているPlayerPrefsを利用する方法なんかが有名です。
また、改善点などありましたらコメントにてご教授いただけると、私のスキルアップにつながります。
ぜひよろしくお願いいたします。
- 投稿日:2020-01-15T14:11:04+09:00
C# XMLコメント チートシート
内容
たまにC#のコメント細かく書きたいときにどんなタグがあった思い出すために作成。
タグ 説明 例 <summary>型やメンバー関する情報を記述 <remark>型やメンバーに関する情報を補足する <returns>メソッドの戻り値 <value>プロパティに対して使用する。returnsと同じ <example>例を挿入する <code>を入れ子で使用する<example><code>...</code><example><para>書式設定タグ <remarks>や<returns>の内側で使用してテキストを段落に分割するときなど<c>書式設定タグテキストの一部をコードとしてマークする <code>のインライン用途<exception cref="Exception">メソッドでの例外されるスローを記述 <see cref="Math.Add(int, int)">別のコード要素のドキュメント ページへのクリック可能なリンクを作成 <seealso><see>と同じように使用<param>メソッドのパラメーターを記述 <typeparam>ジェネリック型またはメソッド宣言で、ジェネリック パラメーターを記述するために使用 各使用例は、参考URLが詳しいので以下を御覧ください。
参考URL
- 投稿日:2020-01-15T13:10:34+09:00
触れたらプレイヤーの重力を反転する
using System.Collections;
using System.Collections.Generic;
using UnityEngine;

public class Player : MonoBehaviour
{
    Rigidbody2D rigid2D;
    bool gravity;

    void Start()
    {
        this.rigid2D = GetComponent<Rigidbody2D>();
        gravity = false;
    }

    void Update()
    {
    }

  void OnTriggerEnter2D(Collider2D collision)
    {
        if (collision.gameObject.CompareTag("gravity"))//オブジェクトにgravityタグ
        {
            if (gravity == false)
                gravity = true;
            else
                gravity = false;
            rigid2D.gravityScale *= -1;
        }
    }
}
- 投稿日:2020-01-15T13:10:02+09:00
【Unity】Canvasを使ったUIを複数の解像度に対応させる方法
はじめに
このアカウントは、プログラムについて勉強し始めて1年立たずの専門学校生によるものです。
新たに学んだ技術や知識をなるべくわかりやすくまとめておこうと思います。
アドバイス・ご指摘などありましたら、どうぞご遠慮無く。解像度について
Unityに限らず、アプリケーションの開発、特にスマートフォン向けのものである場合には必ず直面する問題だと思います。
同じ規格、同じ解像度の端末をすべてのユーザーが使用していることは、基本的には存在しません。
したがって、複数の解像度に対応したアプリケーションの開発が必要になります。
ここで紹介するのはその方法の1つです。
処理速度などは考慮していませんのでご了承ください。では早速…
Canvasの設定
UnityのUIは”Canvas”によって作ることができます。
まずはCanvasの設定から始めましょう。今回は3Dのプロジェクトで説明します。
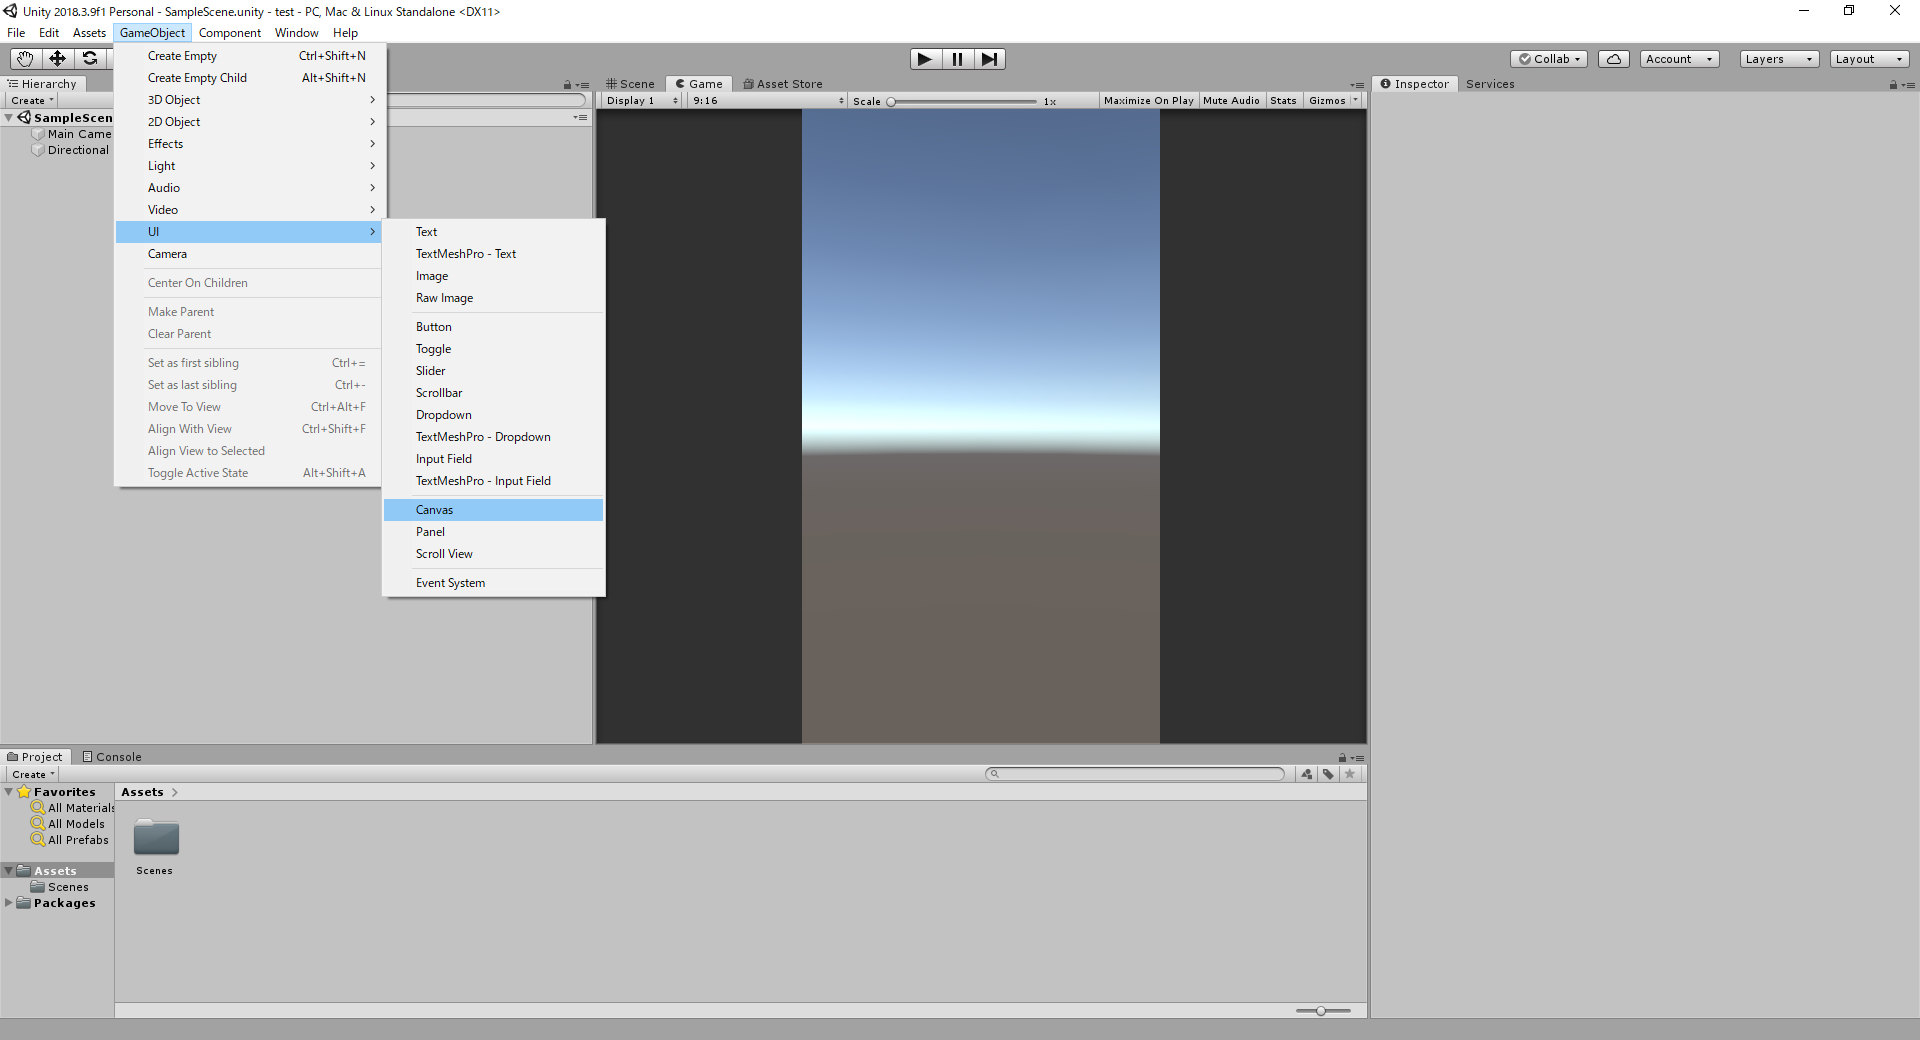
まずは、Canvasを出しましょう。
タスクバーから”GameObject/UI/Canvas”でCancasを出します。
続いて、Canvasの設定をしていきます。
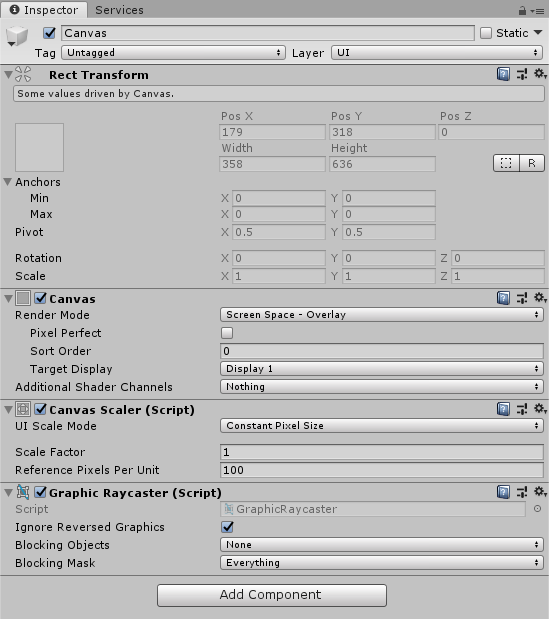
CanvasのInspectorを見ます。画面はこんな感じ。
設定するのは、”Canvas Scaler”の”UI Scale Mode”です。(下記画像の赤枠)
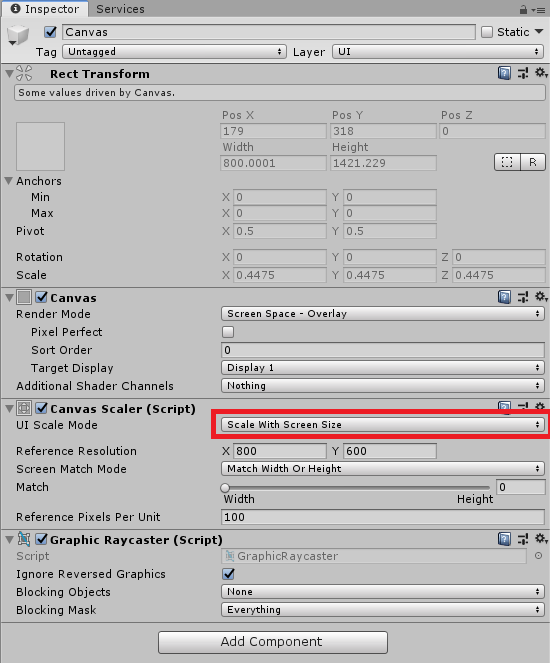
デフォルトでは”Constant Pixel Size”になっているので、”Scale with Screen Size”に変更します。
これで、Canvasの大きさが起動時の画面サイズと同じ大きさになります。UIオブジェクトの大きさ
Canvasの大きさが画面サイズに対応してもCanvas上のオブジェクトが対応しなければ意味がありません。
今回はオブジェクトにスクリプトをアタッチすることで対応させてみました。使用したスクリプトはこちら
SizeOptimise.rbusing UnityEngine; public class SizeOptimise : MonoBehaviour { public GameObject canvas; public bool horizontal = true; public bool vertical = true; void Start() { float width = gameObject.GetComponent<RectTransform>().sizeDelta.x; float height = gameObject.GetComponent<RectTransform>().sizeDelta.y; if (horizontal) { width = canvas.GetComponent<RectTransform>().sizeDelta.x; } if (vertical) { height = canvas.GetComponent<RectTransform>().sizeDelta.y; } gameObject.GetComponent<RectTransform>().sizeDelta = new Vector2(width, height); gameObject.GetComponent<RectTransform>().localPosition = new Vector3(0, 0, 0); } }bool型の変数を二つ用意して、縦と横のサイズ変更が別々にできるようにしました。
使い方は以下の通りです。
※public変数について
Canvas:このスクリプトをアタッチしたCanvasを選択。そのCanvasサイズがオブジェクトのサイズに対応します。
Horizontal:縦(垂直)方向のサイズを合わせるかどうか
Vertical:横(水平)方向のサイズを合わせるかどうかまとめ
かかった時間や手間はかなり少ないですが、しっかりと複数の解像度に対応させることができました。
困っていた人がいれば参考にしていただければ幸いです。
また、改善点などありましたらコメントにてご教授いただけると、私のスキルアップにつながります。
ぜひよろしくお願いいたします。

- 投稿日:2020-01-15T09:28:27+09:00
その配列操作、めんどくさくないですか?
C# における配列
その配列、無駄にリソースを使っていませんか?
無駄にコードの行数を増やして複雑にしていませんか?僕も、そんな時がありました。
こんな時や...
int[] hoge = { 1, 2, 3 };

//Aさん: 拡張したいなあ...

var newHoge = new int[6];
newHoge[0] = hoge[0];
newHoge[1] = hoge[1];
newHoge[2] = hoge[2];
newHoge[3] = 3;
newHoge[4] = 4;
newHoge[5] = 6;

//Aさん: これでよし。

------------------------------------------

//Bさん: いや、おらはもうちょっと賢いぞ。
Array.Copy(hoge, newHoge, 3);
newHoge[3] = 3;
newHoge[4] = 4;
newHoge[5] = 6;
こんな時。
//配列の特定の中身を置き換えたい。
int[] hoge = { 1, 2, 3, 4, 5 };

for(int n = 0; n < hoge.Length; n++)
{
    if(hoge[n] == 3)
    {
        hoge[n] = 999;
    }
}
いちいち書いてられません。
そんな時に「あったら便利」なクラスを作ってみました。
但し、参照を渡すので扱いには注意が必要です。Github: CSharp .NET ArrayUtil
使用例
ToArrayString
配列の中身をStringに変換します。
int[] hoge = { 1, 2, 3 };
Console.WriteLine(ArrayEx.ToArrayString(hoge));
//Output: (3) [ 1, 2, 3 ]
SelfAppend
自身の配列の末端に要素を追加します。
int[] hoge = { 1, 2, 3 };
ArrayEx.SelfAppend(ref hoge, 3);
//Output: (4) [ 1, 2, 3, 3 ]
SelfExtend
自身の配列を中身を保持して末端へ拡張します。
int[] hoge = { 1, 2, 3 };
ArrayEx.SelfExtend(ref hoge, 10);
//Output: (10) [ 1, 2, 3, 0, 0, 0, 0, 0, 0, 0, 0, 0, 0 ]
SelfConcat
自身の配列と別の配列を結合させます。
int[] hoge = { 1, 2, 3 };
int[] geho = { 4, 5, 6 };
ArrayEx.SelfConcat(ref hoge, geho);
//Output: (6) [ 1, 2, 3, 4, 5, 6 ]
SelfPrepend
自身に配列に対して要素を配列の先頭へ追加します。
int[] hoge = { 1, 2, 3 };
ArrayEx.SelfPrepend(ref hoge, 999);
//Output: (4) [ 999, 1, 2, 3 ]
SelfReverse
自身の配列をリバースします。
int[] hoge = { 1, 2, 3 };
ArrayEx.SelfReverse(ref hoge);
//Output: (3) [ 3, 2, 1 ]
SelfReplace
自身の配列内の特定の数を特定の数に置き換えます。
int[] hoge = { 1, 2, 3 };
ArrayEx.SelfReplace(ref hoge, 3, 999);
//Output: (3) [ 1, 2, 999 ]
SelfReplaceByIndex
自身の配列の特定のインデックスにある要素を置き換えます。
int[] hoge = { 1, 2, 3 };
ArrayEx.SelfReplaceByIndex(ref hoge, 999, 0);
//Output: (3) [ 999, 2, 3 ]

- 投稿日:2020-01-15T01:05:08+09:00
WPFで簡単に吹き出しを出すτ□
はじめに
私は勉強がてらGithubにてリンク:HandbrakeBatchRunnerという、オープンソースのHandbrakeを使った動画をバッチ変換を行うソフトを作っています。
その開発中に覚えたTips集などを、Qiitaで今後記事にしていきたいと思っています。
今回のはその第二弾となっています。環境
VisualStudio 2019
.NET Core 3.1
WPF(C#)今回のお話
「う~~~ん?ツールで補足説明を吹き出しっぽく出したいんだけどどう出せばいいんだ??」
WindowsFormなら
→ToolTipコントロールを配置してIsBalloon=tureすれば良いんだけど…WINDOWSAPIなら
→CreateWindowExで、tooltips_class32を引数に与えてウインドウを作ればいいんだけど…「WPFってどうしたらいいんだろう」
~ぐぐってみる~
「おっ?Expression Blendってのがあるらしいぞ」
「むきー!VisualStudio2019だと同梱されてない!」
「ならばNuget!!」
「…同じような名前のがいっぱいあるわ。どれなのよこれ…」「キー!もうアタイ自分で作っちゃうわよ!!」
解説
はい。
今回は簡単な自作吹出し表示を作ってみます。WPFはUI構造が非常によくできててライブラリに頼らなくても
標準コントロールに対してカスタマイズの設定をすれば
結構簡単に作ることができるんで、自作してやり方を記事にしていきます。
(なお、吹き出しの根本は固定です(;・∀・)それやりだすとカオス!)自分で記事を書こうと思ったのは、他記事では凝ったものが多かったりするし、そのためだけにライブラリを入れるのもな~
というのを今回思って、自作の吹き出しを採用しました。副産物的にコントロールのカスタマイズというのは色々なところで
分かっていると役に立ちそうなのでそこの学びになるといいなと思っています。早速作ってみよう
まずはそっけないTextBoxを2個配置したXAMLを書く。
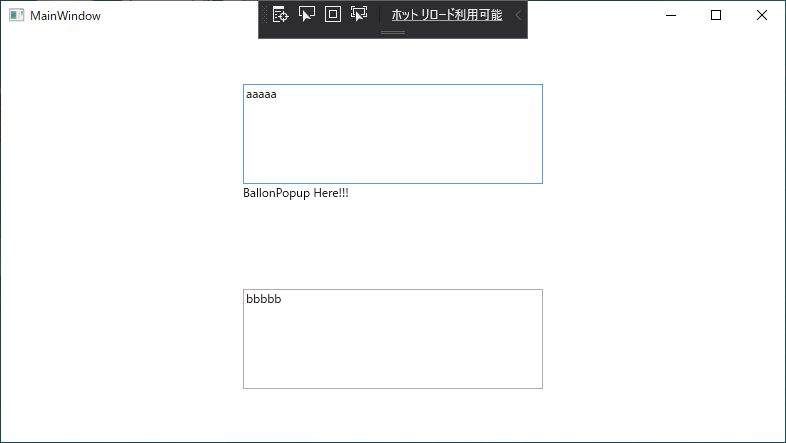
MainWindow.xaml<Window x:Class="WpfBallon.MainWindow" xmlns="http://schemas.microsoft.com/winfx/2006/xaml/presentation" xmlns:x="http://schemas.microsoft.com/winfx/2006/xaml" xmlns:d="http://schemas.microsoft.com/expression/blend/2008" xmlns:local="clr-namespace:WpfBallon" xmlns:mc="http://schemas.openxmlformats.org/markup-compatibility/2006" Title="MainWindow" Width="800" Height="450" mc:Ignorable="d"> <Grid> <Grid.RowDefinitions> <RowDefinition Height="*" /> <RowDefinition Height="*" /> </Grid.RowDefinitions> <TextBox Name="TextBoxA" Grid.Row="0" Width="300" Height="100" Text="aaaaa" /> <TextBox Name="TextBoxB" Grid.Row="1" Width="300" Height="100" Text="bbbbb" /> </Grid> </Window>んでとりあえずポップアップを作ってみる。
MainWindow.xaml<Popup Name="BallonPopup" AllowsTransparency="True" IsOpen="{Binding ElementName=TextBoxA, Path=IsFocused, Mode=OneWay}" PlacementTarget="{Binding ElementName=TextBoxA}"> <TextBlock>BallonPopup Here!!!</TextBlock> </Popup>TextBoxAにフォーカスがあたったときにだけポップアップが出るようにとりあえずしてみる。
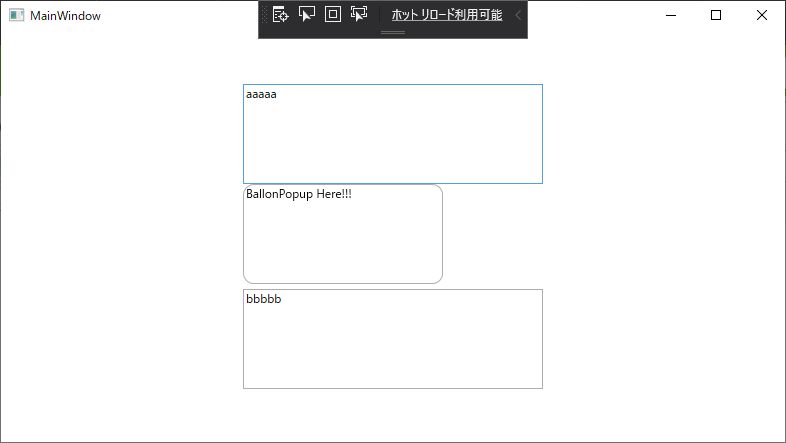
吹き出しなら枠が出て角は丸くないとね!
お次は吹き出しになるように角を丸める。
コピペもできるようにしたいのでTextboxにしちゃおう。MainWindow.xaml<Popup Name="BallonPopup" AllowsTransparency="True" IsOpen="{Binding ElementName=TextBoxA, Path=IsFocused, Mode=OneWay}" PlacementTarget="{Binding ElementName=TextBoxA}"> <TextBox Width="200" Height="100" Background="Transparent" IsReadOnly="True" Text="BallonPopup Here!!!"> <TextBox.Template> <ControlTemplate TargetType="{x:Type TextBoxBase}"> <Border x:Name="Bd" Background="{TemplateBinding Background}" BorderBrush="{TemplateBinding BorderBrush}" BorderThickness="{TemplateBinding BorderThickness}" CornerRadius="10"> <ScrollViewer x:Name="PART_ContentHost" /> </Border> </ControlTemplate> </TextBox.Template> </TextBox> </Popup>コントロールのTempleteを変更することで、なんと見た目の表示がかんたんに変えれる。
これまじでWPFすごいよね。エクセレント!
CornerRadiusで角丸めてるよ。
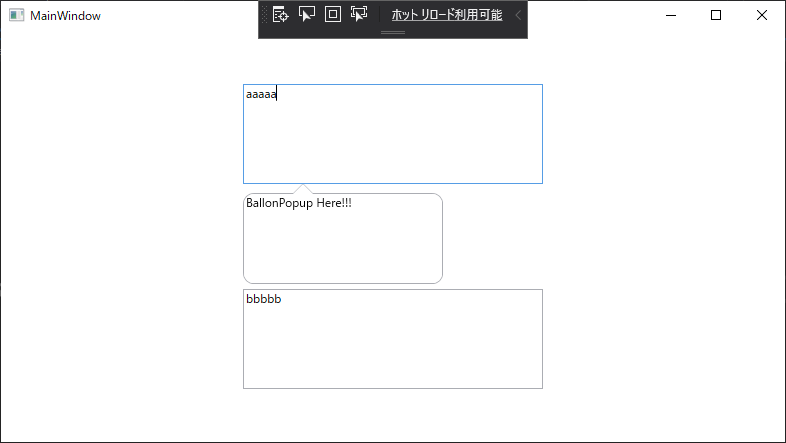
吹き出しの本丸。吹き出しの根本を作るぞ
ControlTemplateは中にコントロールを一つ置けるので
Gridも置くことができる。角を丸めたBorderの上に
吹き出しの角をくっつけるためグリッドで縦に並べる。MainWindow.xaml<TextBox Width="200" Height="100" Background="White" IsReadOnly="True" Text="BallonPopup Here!!!"> <TextBox.Template> <ControlTemplate TargetType="{x:Type TextBoxBase}"> <Grid Background="Transparent"> <Grid.RowDefinitions> <RowDefinition Height="10" /> <RowDefinition Height="*" /> </Grid.RowDefinitions> <Path Grid.Row="0" Data="M50,10 L60,0 70,10 " Stroke="{TemplateBinding BorderBrush}" /> <Polygon Grid.Row="0" Fill="{TemplateBinding Background}" Points="50,10 60,0 70,10" Panel.ZIndex="1" /> <Border Grid.Row="1" Background="{TemplateBinding Background}" BorderBrush="{TemplateBinding BorderBrush}" BorderThickness="{TemplateBinding BorderThickness}" CornerRadius="10" Margin="0,-1,0,0" > <ScrollViewer x:Name="PART_ContentHost" /> </Border> </Grid> </ControlTemplate> </TextBox.Template> </TextBox>Pathで線を引いて吹き出しの角を書いて、Polygonで吹き出しの中を塗りつぶして
角を丸めたテキストをくっつけると・・・吹き出しの完成!!!
すべて合わせるとこう
MainWindow.xaml<Window x:Class="WpfBallon.MainWindow" xmlns="http://schemas.microsoft.com/winfx/2006/xaml/presentation" xmlns:x="http://schemas.microsoft.com/winfx/2006/xaml" xmlns:d="http://schemas.microsoft.com/expression/blend/2008" xmlns:local="clr-namespace:WpfBallon" xmlns:mc="http://schemas.openxmlformats.org/markup-compatibility/2006" Title="MainWindow" Width="800" Height="450" mc:Ignorable="d"> <Grid> <Grid.RowDefinitions> <RowDefinition Height="*" /> <RowDefinition Height="*" /> </Grid.RowDefinitions> <TextBox Name="TextBoxA" Grid.Row="0" Width="300" Height="100" Text="aaaaa" /> <TextBox Name="TextBoxB" Grid.Row="1" Width="300" Height="100" Text="bbbbb" /> <Popup Name="BallonPopup" AllowsTransparency="True" IsOpen="{Binding ElementName=TextBoxA, Path=IsFocused, Mode=OneWay}" PlacementTarget="{Binding ElementName=TextBoxA}"> <TextBox Width="200" Height="100" Background="White" IsReadOnly="True" Text="BallonPopup Here!!!"> <TextBox.Template> <ControlTemplate TargetType="{x:Type TextBoxBase}"> <Grid Background="Transparent"> <Grid.RowDefinitions> <RowDefinition Height="10" /> <RowDefinition Height="*" /> </Grid.RowDefinitions> <Path Grid.Row="0" Data="M50,10 L60,0 70,10 " Stroke="{TemplateBinding BorderBrush}" /> <Polygon Grid.Row="0" Fill="{TemplateBinding Background}" Points="50,10 60,0 70,10" Panel.ZIndex="1" /> <Border Grid.Row="1" Background="{TemplateBinding Background}" BorderBrush="{TemplateBinding BorderBrush}" BorderThickness="{TemplateBinding BorderThickness}" CornerRadius="10" Margin="0,-1,0,0" > <ScrollViewer x:Name="PART_ContentHost" /> </Border> </Grid> </ControlTemplate> </TextBox.Template> </TextBox> </Popup> </Grid> </Window>まとめ
WPF難しそうで手を付けてなかったけど、バインディングやら
こういったビジュアルのカスタマイズやら、使い始めるとなにこれすごい便利。Enjoy C# and WPF and .NET Core
おわり。
PS:
記事タイトルの「τ□」は吹き出しを意識した絵文字を書いてみたんだけど、
エロと間違えられてないか心配になってきたwサンプルについて
GitHubに動かして試せるようにサンプルを入れました。
リンク:サンプルソース
02_WpfBallon.NET Core 3.1 + WPF C#で作っています。
※完成形としてHandBrakeBatchRunnerにもほぼ同じソースが載っています。
- 投稿日:2020-01-15T01:02:15+09:00
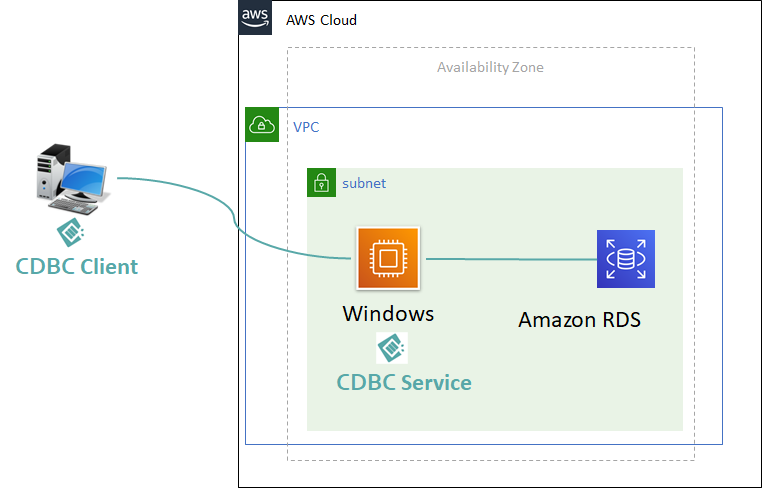
.net アプリケーションからAWS RDSへの接続 (CDBC使用)
概要
CDBCを使って.net アプリケーションからRDSへ接続の構築手順。今回はOracle Databaseへの接続例。
※Cdbc (Cloud Database Connectivity) は.net アプリケーションからCloud Databaseに接続するための.NETライブラリ。公式ページ:https://www.cdbc.cloud/構成図
構築手順
※Cdbcの構築設定手順を記述します、VPC,EC2,RDS,ACLなどの部分を割愛させてください。
1. Cdbc Service 構築
1.1 Install IIS
下記の公式資料を参照
https://www.cdbc.cloud/setupservice/installiis/WCF使用なので下記の作業必須です。
Step 7:
"WCF Services" - "HTTP activation" 有効化Step 9
"application development"の"ASP.NET 4.6" 有効化1.2 CDBCサービスをデプロイ
下記の公式資料を参照
https://www.cdbc.cloud/setupservice/deployservice/2. Cdbc Service 設定
最小限3箇所設定すれば Cdbc Service 動作します。
公式資料:
https://www.cdbc.cloud/setupservice/configservice/2.1 ユーザー認証関連設定 (userAuthentication)
2.1.1 authMethod
認証方法の設定。
authMethod 説明 None ユーザー認証なし。
※疎通テストやプライベート接続など以外の場合非推奨Basic IIS 基本認証使った場合Basicに設定。 UserPsk ユーザー事前共有キー方式認証。
※authenticatedUsersに定義してuserIdとuserPskのリストを使って認証2.1.2 authenticatedUsers
authenticatedUsersは、userIdとuserPskのペアのリスト。
※authMethod="UserPsk"の場合のみauthenticatedUsersを設定します。
各属性の説明:
https://www.cdbc.cloud/setupservice/configservice/#authenticatedusers2.1.3 設定例: (authMethod="UserPsk")
    <userAuthentication authMethod="UserPsk">
      <authenticatedUsers>
        <add userId="testuser" userPsk="xxC2FxmyF2rY2K8f" comment=""/>
      </authenticatedUsers>
  </userAuthentication>
2.2 アプリケーション認証関連設定 (clientApplicationAuthentication)
2.2.1 authMethod
アプリケーション認証方法の設定。
authMethod 説明 None アプリケーション認証なし。 ApplicationPsk アプリケーション事前共有キー方式認証。
※authenticatedApplicationsに定義してapplicationIdとapplicationPskのリストを使って認証2.2.2 authenticatedApplications
authenticatedApplicationsは、applicationIdとapplicationPskのペアのリスト。
※authMethod="ApplicationPsk"の場合のみauthenticatedApplicationsを設定します。
各属性の説明:
https://www.cdbc.cloud/setupservice/configservice/#authenticatedapplications2.2.3 設定例: (authMethod="ApplicationPsk")
<clientApplicationAuthentication authMethod="ApplicationPsk">
      <authenticatedApplications>
        <add applicationId="testappli" applicationPsk="EoQSKkfReZMO685E" comment="" />
      </authenticatedApplications>
</clientApplicationAuthentication>
2.3 接続文字列を設定 (connectionStrings)
接続するデータベースの接続文字列を設定。
例:
    <connectionStrings>
      <add name="oracletest"
           connectionString="Data Source=(DESCRIPTION =(ADDRESS_LIST =(ADDRESS = (PROTOCOL = TCP)(HOST =  dev01.********.ap-northeast-1.rds.amazonaws.com)(PORT = 1521)))(CONNECT_DATA =(SERVICE_NAME = ORCL)));Persist Security Info=True;User ID=****;Password=****;"
           providerName="Oracle.DataAccess.Client"/>
    </connectionStrings>
3. Clientアプリケーション作成
3.1 サンプルアプリ作成
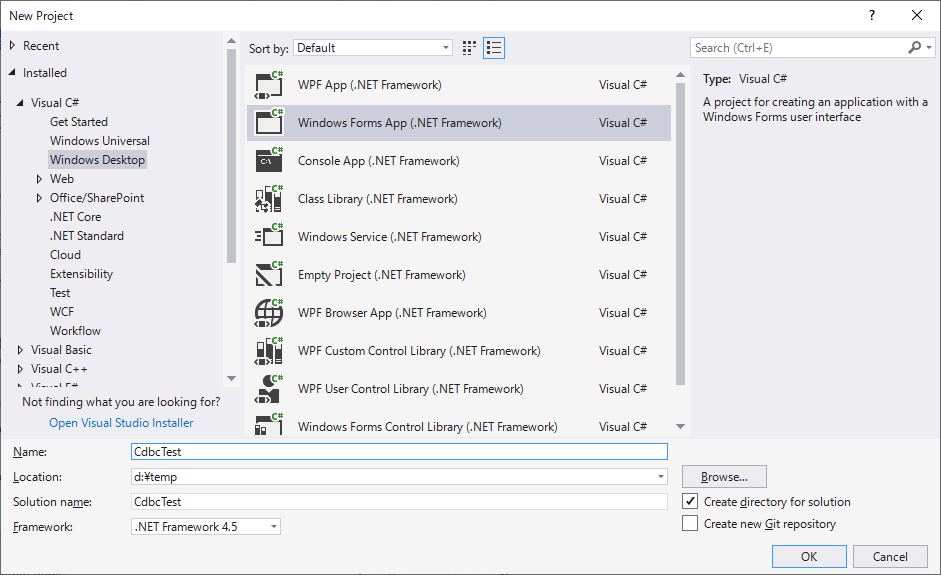
3.1.1 Visual Studio 起動、CdbcTest を作成 (Windows Form application)
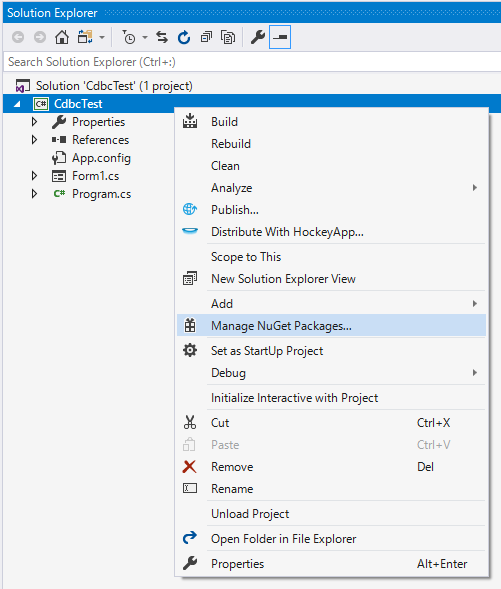
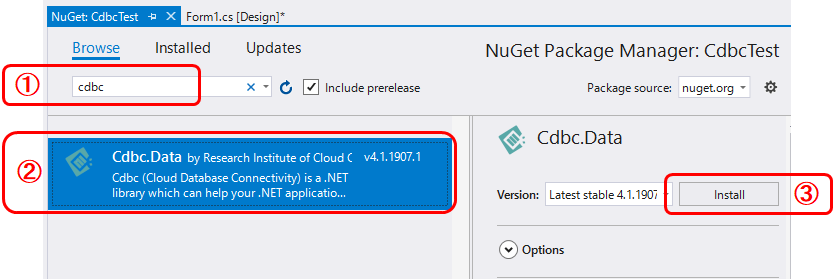
3.1.2 NugetからCdbc.Data最新版をインストール
3.2 サンプルアプリ設定
3.2.1 app.config 設定
app.configにsystem.serviceModelセッションを追加。
サンプル設定から変更する必要があるのはendpointのaddressだけ。
※今回IIS匿名認証、http接続のケースで設定する。そのたのケースのサンプルは下記のページを参照
IIS匿名認証:
https://www.cdbc.cloud/examples/configuration/anonymousauthconfig/
IIS基本認証:
https://www.cdbc.cloud/examples/configuration/basicauthconfig/サンプル
  <system.serviceModel>
    <bindings>
      <basicHttpBinding>
        <binding name="CdbcService" maxReceivedMessageSize="5798464" />
      </basicHttpBinding>
    </bindings>
    <client>
      <endpoint address="http://*************/CdbcService/CDBCService.svc"
                binding="basicHttpBinding"
                bindingConfiguration="CdbcService"
                contract="CdbcService.ICdbcService"
                name="CdbcService.ICdbcService"  />
    </client>
  </system.serviceModel>
3.3 動作確認
3.3.1 テスト用コード (c#)
           CdbcConnection conn = new CdbcConnection();

            conn.DatabaseProduct = Cdbc.Common.Data.Type.DatabaseProductType.Oracle;
            conn.ConnectionString = "oracletest";

            conn.UserId = "testuser";
            conn.UserPsk = "xxC2FxmyF2rY2K8f";

            conn.ApplicationId = "testappli";
            conn.ApplicationPsk = "EoQSKkfReZMO685E";

            conn.Open();

            CdbcCommand cmd = new CdbcCommand("select banner from v$version", conn);

            try
            {
                CdbcDataAdapter adap = new CdbcDataAdapter(cmd);
                DataSet ds = new DataSet();
                adap.Fill(ds);

                if (ds.Tables.Count > 0 && ds.Tables[0].Rows.Count > 0)
                {
                    for (int iRow=0;iRow< ds.Tables[0].Rows.Count; iRow++)
                    {
                        Console.WriteLine( ds.Tables[0].Rows[iRow][0]);
                    }
                }
            }
            catch (Exception ex)
            {
                Console.WriteLine("Exception:");
                Console.WriteLine(ex.Message);
            }
下記の属性をService側の設定に合わせる
属性 値 conn.DatabaseProduct Cdbc.Common.Data.Type.DatabaseProductType.Oracle conn.ConnectionString "oracletest" conn.UserId "testuser" conn.UserPsk "xxC2FxmyF2rY2K8f" conn.ApplicationId "testappli" conn.ApplicationPsk "EoQSKkfReZMO685E" 3.3.2 結果
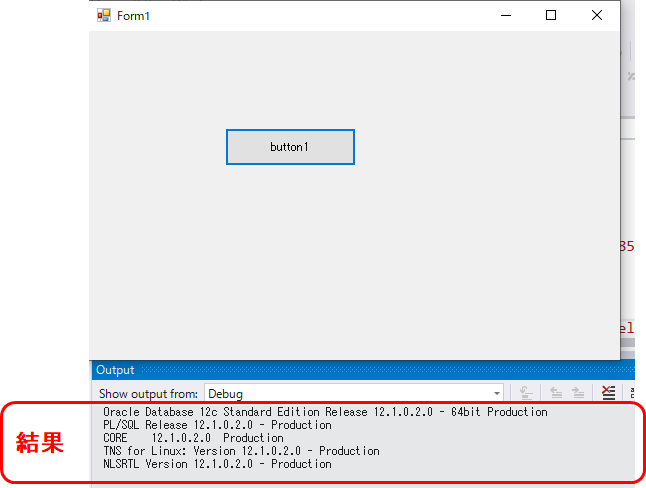
select banner from v$version の実行結果を表示されていること確認できました。
補足説明
- 投稿日:2020-01-15T01:02:15+09:00
.net ネイティブアプリケーションからRDSへの接続 (CDBC使用)
概要
CDBCを使って.net アプリケーションからRDSへ接続の構築手順。今回はOracle Databaseへの接続例。
※Cdbc (Cloud Database Connectivity) は.net アプリケーションからCloud Databaseに接続するための.NETライブラリ。公式ページ:https://www.cdbc.cloud/構成図
構築手順
1. Cdbc Service 構築
1.1 Install IIS
下記の公式資料を参照
https://www.cdbc.cloud/setupservice/installiis/WCF使用なので下記の作業必須です。
Step 7:
"WCF Services" - "HTTP activation" 有効化Step 9
"application development"の"ASP.NET 4.6" 有効化1.2 CDBCサービスをデプロイ
下記の公式資料を参照
https://www.cdbc.cloud/setupservice/deployservice/2. Cdbc Service 設定
最小限3箇所設定すれば Cdbc Service 動作します。
公式資料:
https://www.cdbc.cloud/setupservice/configservice/2.1 ユーザー認証関連設定 (userAuthentication)
2.1.1 authMethod
認証方法の設定。
authMethod 説明 None ユーザー認証なし。
※疎通テストやプライベート接続など以外の場合非推奨Basic IIS 基本認証使った場合Basicに設定。 UserPsk ユーザー事前共有キー方式認証。
※authenticatedUsersに定義してuserIdとuserPskのリストを使って認証2.1.2 authenticatedUsers
authenticatedUsersは、userIdとuserPskのペアのリスト。
※authMethod="UserPsk"の場合のみauthenticatedUsersを設定します。
各属性の説明:
https://www.cdbc.cloud/setupservice/configservice/#authenticatedusers2.1.3 設定例: (authMethod="UserPsk")
    <userAuthentication authMethod="UserPsk">
      <authenticatedUsers>
        <add userId="testuser" userPsk="xxC2FxmyF2rY2K8f" comment=""/>
      </authenticatedUsers>
  </userAuthentication>
2.2 アプリケーション認証関連設定 (clientApplicationAuthentication)
2.2.1 authMethod
アプリケーション認証方法の設定。
| authMethod | 説明|
| ---- | ---- |
| None| アプリケーション認証なし。|
| ApplicationPsk| アプリケーション事前共有キー方式認証。
※authenticatedApplicationsに定義してapplicationIdとapplicationPskのリストを使って認証 |2.2.2 authenticatedApplications
authenticatedApplicationsは、applicationIdとapplicationPskのペアのリスト。
※authMethod="ApplicationPsk"の場合のみauthenticatedApplicationsを設定します。
各属性の説明:
https://www.cdbc.cloud/setupservice/configservice/#authenticatedapplications2.2.3 設定例: (authMethod="ApplicationPsk")
<clientApplicationAuthentication authMethod="ApplicationPsk">
      <authenticatedApplications>
        <add applicationId="testappli" applicationPsk="EoQSKkfReZMO685E" comment="" />
      </authenticatedApplications>
</clientApplicationAuthentication>
2.3 接続文字列を設定 (connectionStrings)
接続するデータベースの接続文字列を設定。
例:
    <connectionStrings>
      <add name="oracletest"
           connectionString="Data Source=(DESCRIPTION =(ADDRESS_LIST =(ADDRESS = (PROTOCOL = TCP)(HOST =  dev01.********.ap-northeast-1.rds.amazonaws.com)(PORT = 1521)))(CONNECT_DATA =(SERVICE_NAME = ORCL)));Persist Security Info=True;User ID=****;Password=****;"
           providerName="Oracle.DataAccess.Client"/>
    </connectionStrings>
3. Clientアプリケーション作成
3.1 サンプルアプリ作成
3.1.1 Visual Studio 起動、CdbcTest を作成 (Windows Form application)
3.1.2 NugetからCdbc.Data最新版をインストール
3.2 サンプルアプリ設定
3.2.1 app.config 設定
app.configにsystem.serviceModelセッションを追加。
サンプル設定から変更する必要があるのはendpointのaddressだけ。
※今回IIS匿名認証、http接続のケースで設定する。そのたのケースのサンプルは下記のページを参照
IIS匿名認証:
https://www.cdbc.cloud/examples/configuration/anonymousauthconfig/
IIS基本認証:
https://www.cdbc.cloud/examples/configuration/basicauthconfig/サンプル
  <system.serviceModel>
    <bindings>
      <basicHttpBinding>
        <binding name="CdbcService" maxReceivedMessageSize="5798464" />
      </basicHttpBinding>
    </bindings>
    <client>
      <endpoint address="http://*************/CdbcService/CDBCService.svc"
                binding="basicHttpBinding"
                bindingConfiguration="CdbcService"
                contract="CdbcService.ICdbcService"
                name="CdbcService.ICdbcService"  />
    </client>
  </system.serviceModel>
3.3 動作確認
3.3.1 テスト用コード
           CdbcConnection conn = new CdbcConnection();

            conn.DatabaseProduct = Cdbc.Common.Data.Type.DatabaseProductType.Oracle;
            conn.ConnectionString = "oracletest";

            conn.UserId = "testuser";
            conn.UserPsk = "xxC2FxmyF2rY2K8f";

            conn.ApplicationId = "testappli";
            conn.ApplicationPsk = "EoQSKkfReZMO685E";

            conn.Open();

            CdbcCommand cmd = new CdbcCommand("select banner from v$version", conn);

            try
            {
                CdbcDataAdapter adap = new CdbcDataAdapter(cmd);
                DataSet ds = new DataSet();
                adap.Fill(ds);

                if (ds.Tables.Count > 0 && ds.Tables[0].Rows.Count > 0)
                {
                    for (int iRow=0;iRow< ds.Tables[0].Rows.Count; iRow++)
                    {
                        Console.WriteLine( ds.Tables[0].Rows[iRow][0]);
                    }
                }
            }
            catch (Exception ex)
            {
                Console.WriteLine("Exception:");
                Console.WriteLine(ex.Message);
            }
下記の属性をService側の設定に合わせる
属性 値 conn.DatabaseProduct Cdbc.Common.Data.Type.DatabaseProductType.Oracle conn.ConnectionString "oracletest" conn.UserId "testuser" conn.UserPsk "xxC2FxmyF2rY2K8f" conn.ApplicationId "testappli" conn.ApplicationPsk "EoQSKkfReZMO685E" 3.3.2 結果
select banner from v$version の実行結果を表示されていること確認できました。
補足説明
- 投稿日:2020-01-15T01:02:15+09:00
.net アプリケーションからRDSへの接続 (CDBC使用)
概要
CDBCを使って.net アプリケーションからRDSへ接続の構築手順。今回はOracle Databaseへの接続例。
※Cdbc (Cloud Database Connectivity) は.net アプリケーションからCloud Databaseに接続するための.NETライブラリ。公式ページ:https://www.cdbc.cloud/構成図
構築手順
※Cdbcの構築設定手順を記述します、VPC,EC2,RDS,ACLなどの部分を割愛させてください。
1. Cdbc Service 構築
1.1 Install IIS
下記の公式資料を参照
https://www.cdbc.cloud/setupservice/installiis/WCF使用なので下記の作業必須です。
Step 7:
"WCF Services" - "HTTP activation" 有効化Step 9
"application development"の"ASP.NET 4.6" 有効化1.2 CDBCサービスをデプロイ
下記の公式資料を参照
https://www.cdbc.cloud/setupservice/deployservice/2. Cdbc Service 設定
最小限3箇所設定すれば Cdbc Service 動作します。
公式資料:
https://www.cdbc.cloud/setupservice/configservice/2.1 ユーザー認証関連設定 (userAuthentication)
2.1.1 authMethod
認証方法の設定。
authMethod 説明 None ユーザー認証なし。
※疎通テストやプライベート接続など以外の場合非推奨Basic IIS 基本認証使った場合Basicに設定。 UserPsk ユーザー事前共有キー方式認証。
※authenticatedUsersに定義してuserIdとuserPskのリストを使って認証2.1.2 authenticatedUsers
authenticatedUsersは、userIdとuserPskのペアのリスト。
※authMethod="UserPsk"の場合のみauthenticatedUsersを設定します。
各属性の説明:
https://www.cdbc.cloud/setupservice/configservice/#authenticatedusers2.1.3 設定例: (authMethod="UserPsk")
    <userAuthentication authMethod="UserPsk">
      <authenticatedUsers>
        <add userId="testuser" userPsk="xxC2FxmyF2rY2K8f" comment=""/>
      </authenticatedUsers>
  </userAuthentication>
2.2 アプリケーション認証関連設定 (clientApplicationAuthentication)
2.2.1 authMethod
アプリケーション認証方法の設定。
| authMethod | 説明|
| ---- | ---- |
| None| アプリケーション認証なし。|
| ApplicationPsk| アプリケーション事前共有キー方式認証。
※authenticatedApplicationsに定義してapplicationIdとapplicationPskのリストを使って認証 |2.2.2 authenticatedApplications
authenticatedApplicationsは、applicationIdとapplicationPskのペアのリスト。
※authMethod="ApplicationPsk"の場合のみauthenticatedApplicationsを設定します。
各属性の説明:
https://www.cdbc.cloud/setupservice/configservice/#authenticatedapplications2.2.3 設定例: (authMethod="ApplicationPsk")
<clientApplicationAuthentication authMethod="ApplicationPsk">
      <authenticatedApplications>
        <add applicationId="testappli" applicationPsk="EoQSKkfReZMO685E" comment="" />
      </authenticatedApplications>
</clientApplicationAuthentication>
2.3 接続文字列を設定 (connectionStrings)
接続するデータベースの接続文字列を設定。
例:
    <connectionStrings>
      <add name="oracletest"
           connectionString="Data Source=(DESCRIPTION =(ADDRESS_LIST =(ADDRESS = (PROTOCOL = TCP)(HOST =  dev01.********.ap-northeast-1.rds.amazonaws.com)(PORT = 1521)))(CONNECT_DATA =(SERVICE_NAME = ORCL)));Persist Security Info=True;User ID=****;Password=****;"
           providerName="Oracle.DataAccess.Client"/>
    </connectionStrings>
3. Clientアプリケーション作成
3.1 サンプルアプリ作成
3.1.1 Visual Studio 起動、CdbcTest を作成 (Windows Form application)
3.1.2 NugetからCdbc.Data最新版をインストール
3.2 サンプルアプリ設定
3.2.1 app.config 設定
app.configにsystem.serviceModelセッションを追加。
サンプル設定から変更する必要があるのはendpointのaddressだけ。
※今回IIS匿名認証、http接続のケースで設定する。そのたのケースのサンプルは下記のページを参照
IIS匿名認証:
https://www.cdbc.cloud/examples/configuration/anonymousauthconfig/
IIS基本認証:
https://www.cdbc.cloud/examples/configuration/basicauthconfig/サンプル
  <system.serviceModel>
    <bindings>
      <basicHttpBinding>
        <binding name="CdbcService" maxReceivedMessageSize="5798464" />
      </basicHttpBinding>
    </bindings>
    <client>
      <endpoint address="http://*************/CdbcService/CDBCService.svc"
                binding="basicHttpBinding"
                bindingConfiguration="CdbcService"
                contract="CdbcService.ICdbcService"
                name="CdbcService.ICdbcService"  />
    </client>
  </system.serviceModel>
3.3 動作確認
3.3.1 テスト用コード
           CdbcConnection conn = new CdbcConnection();

            conn.DatabaseProduct = Cdbc.Common.Data.Type.DatabaseProductType.Oracle;
            conn.ConnectionString = "oracletest";

            conn.UserId = "testuser";
            conn.UserPsk = "xxC2FxmyF2rY2K8f";

            conn.ApplicationId = "testappli";
            conn.ApplicationPsk = "EoQSKkfReZMO685E";

            conn.Open();

            CdbcCommand cmd = new CdbcCommand("select banner from v$version", conn);

            try
            {
                CdbcDataAdapter adap = new CdbcDataAdapter(cmd);
                DataSet ds = new DataSet();
                adap.Fill(ds);

                if (ds.Tables.Count > 0 && ds.Tables[0].Rows.Count > 0)
                {
                    for (int iRow=0;iRow< ds.Tables[0].Rows.Count; iRow++)
                    {
                        Console.WriteLine( ds.Tables[0].Rows[iRow][0]);
                    }
                }
            }
            catch (Exception ex)
            {
                Console.WriteLine("Exception:");
                Console.WriteLine(ex.Message);
            }
下記の属性をService側の設定に合わせる
属性 値 conn.DatabaseProduct Cdbc.Common.Data.Type.DatabaseProductType.Oracle conn.ConnectionString "oracletest" conn.UserId "testuser" conn.UserPsk "xxC2FxmyF2rY2K8f" conn.ApplicationId "testappli" conn.ApplicationPsk "EoQSKkfReZMO685E" 3.3.2 結果
select banner from v$version の実行結果を表示されていること確認できました。
補足説明