- 投稿日:2019-07-24T19:10:33+09:00
[swift] DateFormatterのインスタンス生成は遅い
開発中のアプリのパフォーマンスの改善のために、Instrumentsで→↓→↓→↓→↓しているときに、
DateのExtensionの処理がちょくちょく出てきた。調べてた結果↓
Cache Formatters for Efficiency
Creating a date formatter is not a cheap operation. If you are likely to use a formatter frequently, it is typically more efficient to cache a single instance than to create and dispose of multiple instances. One approach is to use a static variable.
by Data Formatting Guide - developer.apple.com
DateFormatterのインスタンス生成は、軽い処理ではないため、何度も使われる箇所では単一のDateFormatterのインスタンスをキャッシュして使いまわそうとのこと。。。パフォーマンス計測
パフォーマンスコード
// DateFormatter ではなく ISO8601DateFormatter を使用 ?
extension Date {

    private struct Formatter {
        static let iso8601Formatter: ISO8601DateFormatter = ISO8601DateFormatter()
    }

    var ISO8601String: String {
        let formatter = ISO8601DateFormatter()
        return formatter.string(from: self)
    }

    var ISO8601StringWithCache: String {
        return Formatter.iso8601Formatter.string(from: self)
    }
}


let count = 10000
let date = ISO8601DateFormatter().date(from: "1990-01-01T00:00:00+0900")!

var start = Date()
(1...count).forEach { _ in
    _ = date.ISO8601String
}
print("毎回インスタンスを生成: \(Date().timeIntervalSince(start))")


start = Date()
(1...count).forEach { _ in
    _ = date.ISO8601StringWithCache
}

print("インスタンスを生成キャッシュ: \(Date().timeIntervalSince(start))")
結果
毎回インスタンスを生成: 3.0555260181427
インスタンスを生成キャッシュ: 0.5390740633010864
まとめ
- 定期的にパフォーマンス計測をして、アプリのパフォーマンス改善をしてみましょう
DateのExtensionを確認してみよう- むやみなFormatterのキャッシュは注意
参考
- https://blog.kishikawakatsumi.com/entry/20140214/1392372659
- https://stackoverflow.com/questions/38574569/performance-issues-while-parsing-dates
- https://developer.apple.com/library/archive/documentation/Cocoa/Conceptual/DataFormatting/Articles/dfDateFormatting10_4.html#//apple_ref/doc/uid/TP40002369-SW12
- https://tech-tokyobay.manju.tokyo/archives/87
- 投稿日:2019-07-24T11:14:35+09:00
デバッグ時だけログを吐き出す便利なラッパークラス
本記事を書く背景
QiitaでNSLogを使ったデバッグログの吐き方についての記事をみて、
本番ユーザさんにもNSLogだと参照される危険があるな〜と感じたので、
個人的に使っているデバッグ時にだけログを吐き出すログ用のラッパーを紹介します。環境
- Xcode 10.2
- Swift 5.0
実装
プリプロセッサマクロを利用してDEBUGに設定しているスキームのときだけログを吐き出すようなメソッドとなっています。
NSLogに差し替えても構いません。
通常エラーが発生してほしくない場合にログを吐き出す場合はerrorのメソッドを利用すると良いです。
発生した ファイル名、メソッド、行数を自動で吐き出します。以下、テンプレとしてお使いいただければと思います。
struct Logger {

  /// デバッグ時だけログを吐き出すメソッド
  static func debug(_ item: Any) {
    #if DEBUG
    print(item)
    #endif
  }

  /// エラーパターンに埋め込むメソッド
  static func error(file: String = #file, function: String = #function, line: Int = #line, _ message: String = "") {
    #if DEBUG
    let consolLog = "file: \(file)\n function: \(function)\n line: \(line)\n message: \(message)\n"
    print(consolLog)
    #endif
  }

}
最後に
もっとこうした方がいいよ、間違えている箇所あるよ
等はご指摘いただけると助かります!
- 投稿日:2019-07-24T10:06:18+09:00
iOSアプリの起動方法を判別する
概要
アプリがホーム画面から起動されたのか、スキーム起動されたのかなど起動時の状態をアプリで判別する方法
活用ケース
- ホーム画面からの起動の場合のみ何か処理を行う
- アプリの起動方法を厳密に判定して処理を行う
実装
AppDelegateのdidFinishLaunchingWithOptionsの引数であるlaunchOptionsにて判別を行います。
ホーム画面からアプリを起動した際にはnilとなっています。func application(_: UIApplication, didFinishLaunchingWithOptions launchOptions: [UIApplication.LaunchOptionsKey: Any]?) -> Bool { // launchOptionsで起動方法を判別する }See: https://developer.apple.com/documentation/uikit/uiapplicationdelegate/1622921-application
See: https://developer.apple.com/documentation/uikit/uiapplication/launchoptionskeySample
ホーム画面から起動した場合のlaunchOptions
nilSafariからスキーム起動した場合のlaunchOptions
[__C.UIApplicationLaunchOptionsKey(_rawValue: UIApplicationLaunchOptionsURLKey): hoge://fuga?a=b
 __C.UIApplicationLaunchOptionsKey(_rawValue: UIApplicationLaunchOptionsSourceApplicationKey): com.apple.mobilesafari]
補足
起動時の振る舞いとなるため、デバッグにはConsoleを用いる必要があります。
下記を参考ください。
https://qiita.com/m_orishi/items/c5593878e1ab55d5c3f2さいごに
ニーズがあるように感じたのですが、意外とまとまった記事がなく。
もっと良い判定方法があるよ!この方法だとこんな問題があるよ!など知見がありましたら教えて頂ければ嬉しいです。
- 投稿日:2019-07-24T06:42:31+09:00
チュートリアルから一歩踏み出したSwiftUIのCustom Viewの作り方ーその2(PreferenceKey編)
はじめに
前回のチュートリアルから一歩踏み出したSwiftUIのCustom Viewの作り方ーその1(GeometryReader編)から引き続きチュートリアルから一歩踏み出したSwiftUIのCustom Viewを作ってみたいと思います。
今回も右記の素晴らしいブログを参考にしています。GeometryReader to the Rescue
今回のCustom View
円をクリックすると円型の枠がオーバーレイのアニメーションをしながらクリックした側に移動します。
大雑把なしくみ
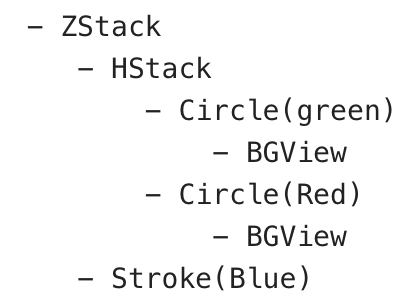
まずはViewの構造をみてみましょう。
緑と赤の円はHStack下にあって、それと円の周りを囲むアニメーションで移動するView(以下、円周View)がZStack下で重なっています。円周Viewトはクリックされた円の場所にオフセットを利用して移動します。
BGViewは円Viewのframe(サイズおよび位置)取得のための透明なViewでそれぞれの円Viewのbackgroundに設定されますそのためには、二つの円Viewの位置、サイズ情報(
frame)を取得し、円周Viewを移動させるために、その位置情報を親Viewからアクセス出来なければなりません。またその位置情報はデバイスが回転した場合には変化するので、自動で変化時には位置情報の書き換えをする必要があります。前回の記事を読んでいただいたはお分かりだと思いますが、
frameの取得にはGeometryReaderを使います。その情報の共有と更新には今回のメイントピックPreferenceKeyを使います。ちなみに、
@Bindingを使って親ViewとGeometryReaderで取得した位置、サイズ情報を共有すればシンプルなのでは?と思われるかもしれませんが、Modifying state during view update, this will cause undefined behavior.というエラーが出て上手くいきません。Binding.swiftDispatchQueue.main.async { self.rects[self.idx] = geometry.frame(in: .named("myCoordinate")) }のようにすれば一見うまくいくように見えますが、根本的な解決には至りません。
PreferenceKeyとは
ユーザーが作成したViewのデータ(Preference)を保持、親Viewからアクセスさせることを可能にするプロトコルです。下記を実装する必要があります。
-associatedtype Value
保持するPreferenceのタイプ
-static var defaultValue: Self.Value
そのPreferenceのデフォルト値
-static func reduce(value: inout Self.Value, nextValue: () -> Self.Value)
親Viewからアクセスする時に、Preferenceを持つ複数の子ViewのPreferenceをどのようにまとめ上げるか。valueは今までの値、nextValueは次の値。
例えば、Arrayでまとめ上げるとすると、valueは今までのPreferenceを要素として持つ配列、nextValueは次の値なので、このクロージャをvalue.append(contentsOf: nextValue())とすれば全てのこのPreferenceを配列の要素としてまとめ上げ、親Viewからアクセスできることになります。実装
では、早速今回のユーザーデータを作ってみましょう。Preferenceのデータとして使うにはEauatableである必要があります。中身はどの円Viewをタップしたか知るための番号(
idx)とframeを保持するためのCGRect型のrectです。PreferenceData.swiftstruct PreferenceData: Equatable { let idx: Int var rect: CGRect }次に独自のPreferenceKeyを実装します。上記で説明した3つを実装します。今回は複数の子Viewの
Preference(上記で作成したPreferenceDataタイプ)を保持したいので、配列としています。CirclePreferenceKey.swiftstruct CirclePreferenceKey: PreferenceKey { typealias Value = [PreferenceData] static var defaultValue: [PreferenceData] = [] static func reduce(value: inout [PreferenceData], nextValue: () -> [PreferenceData]) { value.append(contentsOf: nextValue()) } }上記で作成したPreferenceに円Viewの
frameを設定しています。このView円Viewのbackgroundで円Viewと同じframeを持つ透明なViewです。
GeometryReaderを使って取得したViewのframeと番号(idx)をpreferencemodifierによって先ほど作ったpreferenceDataとして設定しています。
[PreferenceData(idx: self.idx, rect: geometry.frame(in: .named("myCoordination")))])
frameの(in: .named("myCoordination"))は独自の座標系を設定しています。(後述)
これでpreferenceの値の設定が終わりました。BGView.swiftstruct BGView: View { let idx: Int var body: some View { GeometryReader { geometry in Circle() .fill(Color.clear) .preference(key: CirclePreferenceKey.self, value: [PreferenceData(idx: self.idx, rect: geometry.frame(in: .named("myCoordination")))]) } } }読出し部分ですがその前にそれぞれの円Viewのbackgroudに上記のBGViewを設定しています。
そして読み出した値を保持するための配列を作成しています。
@State private var rects: [CGRect] = Array<CGRect>(repeating: CGRect(), count: 2)
次に円View達の親ViewであるHStackにてonPreferenceChangemodifierを使ってpreferenceのデータを上記で作成した配列に突っ込みます。onPreferenceChangeはpreferencenのデータが変わるたびにコールされるので、例えば端末が回転して Viewの構成が変わった場合、自動的に値の更新が行われます。CirclePreferenceView.swift@State private var activeIdx: Int = 0 @State private var rects: [CGRect] = Array<CGRect>(repeating: CGRect(), count: 2) HStack { Circle() .fill(Color.green) .frame(width: 100, height: 100) .background(BGView(idx: 0)) .tapAction { self.activeIdx = 0 } .padding() Circle() .fill(Color.pink) .frame(width: 150, height: 150) .background(BGView(idx: 1)) .tapAction { self.activeIdx = 1 } .padding() } .onPreferenceChange(CirclePreferenceKey.self) { preference in for p in preference { self.rects[p.idx] = p.rect } }円Viewタップ時に、上記で取得した円Viewの
frame情報を元に円周Viewの位置、大きさを変更しアニメーションさせます。stroke.swiftCircle() .stroke(Color.blue, lineWidth: 10) .frame(width: rects[activeIdx].size.width, height: rects[activeIdx].size.height) .offset(x: rects[activeIdx].minX , y: rects[activeIdx].minY)全体のコード
詳しくは説明しませんが、座標系を統一するためにZStackに
.coordinateSpace(name: "myCoordination")で独自の座標系を設定し、frame取得時に利用しています。.swiftimport SwiftUI struct PreferenceData: Equatable { let idx: Int var rect: CGRect } struct CirclePreferenceKey: PreferenceKey { typealias Value = [PreferenceData] static var defaultValue: [PreferenceData] = [] static func reduce(value: inout [PreferenceData], nextValue: () -> [PreferenceData]) { value.append(contentsOf: nextValue()) } } struct CirclePreferenceView: View { @State private var activeIdx: Int = 0 @State private var rects: [CGRect] = Array<CGRect>(repeating: CGRect(), count: 2) @State var isStarted:Bool = false var body: some View { ZStack(alignment: .topLeading) { HStack { Circle() .fill(Color.green) .frame(width: 100, height: 100) .background(BGView(idx: 0)) .tapAction { self.isStarted = true self.activeIdx = 0 } .padding() Circle() .fill(Color.pink) .frame(width: 150, height: 150) .background(BGView(idx: 1)) .tapAction { self.isStarted = true self.activeIdx = 1 } .padding() } .onPreferenceChange(CirclePreferenceKey.self) { preference in for p in preference { self.rects[p.idx] = p.rect } } Circle() .stroke(Color.blue, lineWidth: 10) .frame(width: rects[activeIdx].size.width, height: rects[activeIdx].size.height) .offset(x: rects[activeIdx].minX , y: rects[activeIdx].minY) .animation(.linear(duration: isStarted ? 0.5 : 0)) }.coordinateSpace(name: "myCoordination") } } struct BGView: View { let idx: Int var body: some View { GeometryReader { geometry in Circle() .fill(Color.clear) .preference(key: CirclePreferenceKey.self, value: [PreferenceData(idx: self.idx, rect: geometry.frame(in: .named("myCoordination")))]) } } } #if DEBUG struct CirclePreferenceView_Previews: PreviewProvider { static var previews: some View { CirclePreferenceView() } } #endif最後に
PreferenceKey、ちょっと理解しづらいところもありますが、色々使えそうです。
座標系のせいか何故かLiveViewではエラーが出て表示できません。シミュレーターか実機で確認してください。
View名がContnetViewではないので、SceneDelegateのwindow.rootViewControllerの書き換えを忘れないように。(CirclePreferenceView)