- 投稿日:2019-05-26T23:46:08+09:00
【2分でイメージをつかむ】テンプレートエンジン・EJS(1/2)
あらすじ
- 別記事で、「HTMLファイルを読み込んで表示させる」 ということをESオブジェクトでやりました
- ただ、HTMLの中身(変数とか)を変更したりするのが面倒でした
- もっと簡単に変数とか埋め込みたい!と思っていたらテンプレートエンジンに出会いました。
- 色々使えそうなので、記事は2つにしようかと思います。
- 今回は基本編です
準備するもの
- npm で EJSをダウンロードしておいてください
- もしここでnpmって何だろうかと思った方は、この記事を読む前にnpmについての記事を読んでおくことをおススメします。
- うるせぇ! さっさとEJSダウンロードさせろ!という方は、下記コマンドでインストールできます
npm install ejs結局・・・EJSって何よ
<%= 値 %>
↑です。
HTMLファイルに変数渡すことができます!
hello.ejs<html> <body> <header> <h1 id="h1"><%= 値 %></h1> </header> </body> </html>↑こんな感じ
EJSは、
- HTMLファイルの中で「動的に値を変えたい」時に使えます
- ファイルは「.ejs」という拡張子になります
- このファイルは、「テンプレートファイル」と呼ばれます
- テンプレートファイル内にある、「<%- %>」タグなどの特殊なタグが実際に出力されるテキストに変換されます
サンプル
- hello.ejs
- ejs.js
hello.ejs<html lang="ja"> <body> <header> <h1 id="h1"><%=title %></h1> </header> <div role="main"> <p><%-content %></p> </div> </body> </html>ejs.jsvar http = require('http'); // ファイルの読み込み(は、fsオブジェクトが担当する) var fs = require('fs'); // テンプレートデータのレンダリング(は、ejsが担当する) var ejs = require('ejs'); // ここは同期処理で読み込みます! var hello = fs.readFileSync('./hello.ejs', 'utf8'); var server = http.createServer(); server.on('request', doRequest); server.listen(1234); console.log('Server running!'); // リクエストの処理 function doRequest(req, res) { // ここでejsオブジェクトが働きます var hello2 = ejs.render(hello, { title:"title", content:"This is made by sample", }); res.writeHead(200, {'Content-Type': 'text/html'}); res.write(hello2); res.end(); }
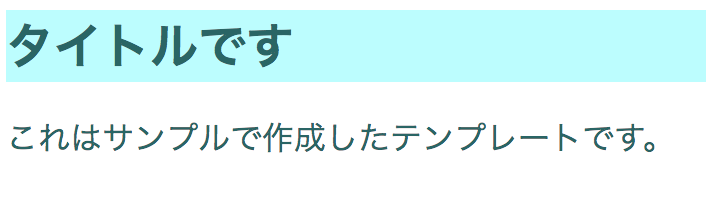
結果(ちょっとCSSとかで飾りつけしてます)
ポイント!
var hello2 = ejs.render(hello, { title:"タイトルです", content:"これはサンプルで作成したテンプレートです。", });ejs.render( テンプレートデータ , オプション );
- 第1引数――レンダリングする対象データ(=読み込んだテンプレートの文字列)を指定します。
- 第2引数――テンプレートに渡す変数などの情報を連想配列にまとめたものを指定します。
第2引数を連想配列(ここではオブジェクト)で渡してやることで、テンプレートファイルに変数を渡すことができます。
まとめ
EJSは、サーバサイド(js)からテンプレートファイル(html)に変数を渡すことができる!
次回に続く
- 投稿日:2019-05-26T22:22:23+09:00
【Nodejs】pm2で--expose-gcオプションをつける方法
こんにちは、ブログ「学生ブロックチェーンエンジニアのブログ」を運営しているアカネヤ(@ToshioAkaneya)です。
【Nodejs】pm2で--expose-gcオプションをつける方法
このよう
--node-argsに指定します。
pm2 start index.js --node-args="--expose-gc"pm2の公式クイックスタートドキュメントはこちら。
http://pm2.keymetrics.io/docs/usage/quick-start/この記事が参考になれば幸いです。それでは。
はてなブックマーク・Pocketはこちらから
- 投稿日:2019-05-26T20:23:06+09:00
Unity+Node.jsで1対1の簡単なオンラインシューティングゲームを作った話 Unity編
この記事に関わる記事一覧
はじめに
Node.jsを使ってみたく、実際に手を動かして何か作ってみるのが一番だと思い、
自分なりにプレイヤーのマッチングや同期の取り方を考えてやってみようと思いました。Node.js(サーバー側)よりもUnity(クライアント側)で苦戦しました...
私はNode.js,リアルタイム通信の知識がそこまであるわけではないので、
素人なりにどう考えて実装していったかの記録を残していきたいと思い記事を書き始めました。コードの書き方に正解はないと思うので、これから書いていく記事を通して
今回作成したゲームの作り方の概念だけ書いていこうかなと思います。成果物
今回作成したアプリはAndroid,iosでリリースしました。
AppStore
PlayStore
Mac版
Windows版
Android版は実機で動きを確認できていないので、動かなかったら申し訳ございません。動きを確認するためにはデバイスが二つ必要になります。(PCとスマホでも確認できます)
2019/5/11現在サーバー稼働中ですのでマッチング開始ボタンを押すと同時に押した人(5秒以内)とマッチングします。操作方法
ドラッグ:移動
タップ :自機が向いている方向に弾を発射スクリーンショット

UDPManager
まず、通信するクラスが必要だったので作成しました。
作成したクラスはJSONで送受信データを扱います。
シングルトンです。UDPManager.csusing System.Collections; using System.Collections.Generic; using UnityEngine; using System.Net; using System.Net.Sockets; using System.Text; using System.Threading; using MiniJSON; public class UDPManager : MonoBehaviour { private static UDPManager instance = null; public static UDPManager Instance { get { if (instance) { return instance; } else { instance = GameObject.FindObjectOfType<UDPManager>(); if (!instance) { var newObj = new GameObject(); newObj.name = "UDPManager"; newObj.AddComponent<UDPManager>(); Instantiate(newObj); instance = newObj.GetComponent<UDPManager>(); } return instance; } } } [SerializeField] string host = "localhost"; [SerializeField] int port = 33333; private UdpClient client; private Thread thread; public delegate void MessageReceived(JsonNode jsonNode, string jsonStr); public event MessageReceived messageReceived; private void Awake() { if (this != Instance) { Destroy(this.gameObject); return; } DontDestroyOnLoad(this.gameObject); } void Start() { client = new UdpClient(); client.Connect(host, port); thread = new Thread(new ThreadStart(ThreadMethod)); thread.Start(); } void Update() { } private void OnApplicationFocus(bool focus) { if (client == null) return; if(focus) { client.Connect(host, port); } } void OnApplicationQuit() { client.Close(); thread.Abort(); if (this == Instance) instance = null; } private void ThreadMethod() { while (true) { if (!client.Client.Connected) client.Connect(host, port); IPEndPoint remoteEP = null; byte[] data = client.Receive(ref remoteEP); string text = Encoding.UTF8.GetString(data); if (messageReceived != null) { JsonNode jsonNode = JsonNode.Parse(text); messageReceived(jsonNode, text); } Debug.Log("GET:" + text); } } public void SendJson(string jsonStr) { if(!client.Client.Connected) client.Connect(host, port); byte[] dgram = Encoding.UTF8.GetBytes(jsonStr); client.Send(dgram, dgram.Length); Debug.Log("SEND:" + jsonStr); } }hostにはサーバーのアドレスを入れます。
JSONを扱うためにMiniJsonとそのパラメーターを扱いやすくする、
Koki IbukuroさんのJsonNodeを使用させていただきました。シングルトンなので
UDPManager udpManager = UDPManager.Instance;でどこからでも取得できています。
オブジェクトとして生成されていなかったとしても、自動的に生成されるように実装されています。以下使い方です。
JSONの送信
string jsonStr = "{\"type\":\"greet\",\"msg\":\"hello\"}";
UDPManager.Instance.SendJson(jsonStr);
JSONの受信
//1.受信処理をするクラスを作成
void OnReceiveMessage(JsonNode jsonNode, string jsonStr)
{
 //処理
}

//2.関数をUDPManagerに登録
UDPManager.Instance.messageReceived += OnReceiveMessage;

//3.オブジェクトが破棄されたときに関数の登録を解除するようにしておく
//OnDestroyはMonoBehaviourが破棄されるときに自動的に呼ばれる関数
void OnDestroy()
{
 UDPManager.Instance.messageReceived -= OnReceiveMessage;
}
あとはUDPManagerがメッセージを受信するたびに、OnReceiveMessageを呼び出します。
注意しなければならないことが一つありまして、
OnReceiveMessage内はUnityのメインスレッドで実行されないので、
オブジェクトの生成や位置の変更などオブジェクトの操作ができなくなります。なので今回私は以下のようにして実行しました。
//処理を入れておくキューを生成しておく
Queue<Action> mainThreadQueue = new Queue<Action>();

//処理を追加
Action action = () => {
 //処理
};
mainThreadQueue.Enqueue(action);

//Update内で実行
void Update()
{
  while(mainThreadQueue.Count > 0)
  {
    Action action = mainThreadQueue.Dequeue();
    action();
  }
}
UDPManager.csは自己責任でご自由に使っていただいて大丈夫です。
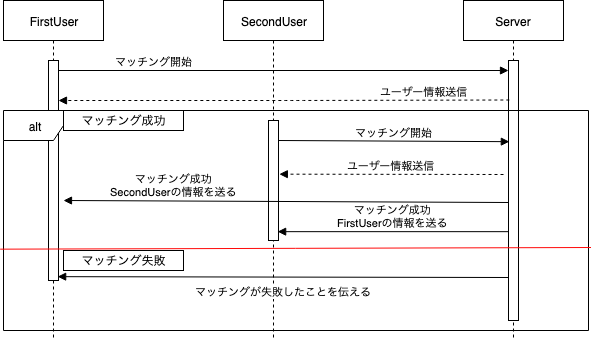
マッチング
マッチングは以下のようなシーケンスで実装しました。
draw.ioを使って書いてみました。
UML詳しくないので、書き方が間違っているかもしれませんが、
今回のゲームのマッチングの流れが伝われば幸いです。Unityで行なっている処理としては以下の流れです
1.マッチング開始したことをサーバーに伝える
2.サーバーから自分のユーザー情報を受け取る
3.マッチングが成立情報をサーバーから受け取りシーン遷移
3.マッチングが成立しなかった情報をサーバーから受け取る基本的にサーバーがマッチングの処理を行なってくれるので、
クライアント側ではメッセージの送受信ができれば実装できると思います。
サーバー側の処理についてはNode.js編をご参照ください。入力情報・位置・回転同期
この記事を書くために自分の書いたコードを見直してみましたが、
コードが汚い状態になっておりまとめるのが難しい状態であると感じました...自分の考えが整理されていることと、コードの綺麗さは比例するのかもしれませんね...
入力の同期だけでサンプルを作り、別の記事で詳しく説明したいと思います。最後に
肝心な部分が説明できない記事になってしまい申し訳ございません。
導入編
Node.js編
はスムーズに記事を書くことができたのですが、今回は何を書いて良いか分からなくなってしまいました。
ソースコードを全て載せたとしても説明が難しいです...
恐らくこれは自分の考えが整理されていないからだと思います。Node.jsとUnityを使ったチュートリアル的なサンプルを次回から作成して説明していきたいと思います。
今回の記事でUDPManagerの内容は参考になると思います。
それ以外の内容はあまり参考にならないと思いますが...これからも記事を書くことを習慣にしていきたいと思いますので、よろしくお願いいたします!!


- 投稿日:2019-05-26T19:16:36+09:00
herokuでrails + nodejs(puppeteer)のスクレイピングサイト構築
目的
herokuでテスト動作用に以下構成のスクレイピングサイトの構築を行う。
動作は1サーバ環境となるが、無料かつ迅速に、アルファ版等のテスト公開に用いることができる。
- Web公開用:ruby on rails
- スクレイピング用:nodejs (puppeteer)
- スクレイピングしたデータ格納用:postgresql
(自分メモ用を兼ねるので、前提に記載の設定事項は割愛します。)
前提
以下を行なっており、herokuでrails + postgresql環境が動いている状態であること。
- railsアプリをnewして作成
- herokuコマンドの導入
- herokuへのログイン&rails環境構築
- heroku postgresqlの起動&テーブル作成(以下手順では、testテーブルが作成されているとする)
手順
herokuにnode.jsとrailsの両方が動作する環境のパッケージを導入する
(※puppeteerに関わらず、これをしていないとnpmが動かない)$ heroku buildpacks:set heroku/nodejs $ heroku buildpacks:add --index 2 heroku/rubypuppeteer用の環境パッケージを導入する
$ heroku buildpacks:add https://github.com/CoffeeAndCode/puppeteer-heroku-buildpackjsライブラリを導入する
$ npm i puppeteer
$ npm i pg
railsアプリのルートフォルダにpuppeteer用のディレクトリを作成し、puppeteerが動作するスプリプトを配置する。
puppeteer/example.jsconst pg = require('pg'); const puppeteer = require('puppeteer'); // 接続先文字列(既にherokuの環境変数に設定されているdatabase情報を参照する) const connectionString = process.env.DATABASE_URL; console.log(`接続開始 : ${connectionString}`); const pool = new pg.Pool({ connectionString: connectionString }); // DBにSELECT してみる pool.query('SELECT * FROM test') .then((result) => { console.log('Success', result); // 結果データの表示 if(result.rows) { result.rows.forEach((row, index) => { console.log(index + 1, row); }); } }) .catch((error) => { console.log('Failure', error); }) .then(() => { console.log('切断'); pool.end(); }); //puppeteer起動 (async() => { const browser = await puppeteer.launch({ args: [ '--no-sandbox', '--disable-setuid-sandbox' ], slowMo: 50 }); const page = await browser.newPage(); await page.setViewport({ width: 1200, height: 800 }); const stockCode = 6670; await page.goto(`https://www.nikkei.com/nkd/company/?scode=${stockCode}`); //銘柄 const stockName = await page.evaluate(() => document.querySelector('h1.m-headlineLarge_text').textContent ); //株価 const stockPrice = await page.evaluate(() => document.querySelector('.m-stockPriceElm_value.now').textContent ); //結果の取得 console.log(`銘柄コード ${stockCode} (${stockName}) の株価は ${stockPrice} です。`); browser.close(); })();herokuにプッシュする
$ git push heroku masterherokuでpuppeteerの動作スクリプトを起動する
heroku run node puppeteer/example.js実行結果
DB情報と株価情報が取得できる。
接続開始 : postgres://...
Success Result {
  command: 'SELECT',
  rowCount: 1,
  oid: null,
  rows:
   [ { id: 1...} ],
  fields:
   [ Field {
       }
  ]...
切断
銘柄コード 6670 (MCJ) の株価は 671 円 です。
補足
以下を参考にすればスクリプトの定期実行(バッチ処理)とかもできるはず。
Herokuで単純なrubyスクリプトを定期的に実行する参考
- 投稿日:2019-05-26T19:16:36+09:00
herokuでRails + Node.js(puppeteer)のスクレイピングサイト構築
目的
herokuでテスト動作用に以下構成のスクレイピングサイトの構築を行う。
動作は1サーバ環境となるが、無料かつ迅速に、アルファ版等のテスト公開に用いることができる。
- Web公開用:Ruby on Rails
- スクレイピング用:Node.js (puppeteer)
- スクレイピングしたデータ格納用:postgresql
(自分メモ用を兼ねるので、前提に記載の設定事項は割愛します。)
前提
以下を行なっており、herokuでrails + postgresql環境が動いている状態であること。
- railsアプリをnewして作成
- herokuコマンドの導入
- herokuへのログイン&rails環境構築
- heroku postgresqlの起動&テーブル作成(以下手順では、testテーブルが作成されているとする)
手順
herokuにnode.jsとrailsの両方が動作する環境のパッケージを導入する
(※puppeteerに関わらず、これをしていないとnpmが動かない)$ heroku buildpacks:set heroku/nodejs $ heroku buildpacks:add --index 2 heroku/rubypuppeteer用の環境パッケージを導入する
$ heroku buildpacks:add https://github.com/CoffeeAndCode/puppeteer-heroku-buildpackjsライブラリを導入する
$ npm i puppeteer
$ npm i pg
railsアプリのルートフォルダにpuppeteer用のディレクトリを作成し、puppeteerが動作するスプリプトを配置する。
puppeteer/example.jsconst pg = require('pg'); const puppeteer = require('puppeteer'); // 接続先文字列(既にherokuの環境変数に設定されているdatabase情報を参照する) const connectionString = process.env.DATABASE_URL; console.log(`接続開始 : ${connectionString}`); const pool = new pg.Pool({ connectionString: connectionString }); // DBにSELECT してみる pool.query('SELECT * FROM test') .then((result) => { console.log('Success', result); // 結果データの表示 if(result.rows) { result.rows.forEach((row, index) => { console.log(index + 1, row); }); } }) .catch((error) => { console.log('Failure', error); }) .then(() => { console.log('切断'); pool.end(); }); //puppeteer起動 (async() => { const browser = await puppeteer.launch({ args: [ '--no-sandbox', '--disable-setuid-sandbox' ], slowMo: 50 }); const page = await browser.newPage(); await page.setViewport({ width: 1200, height: 800 }); const stockCode = 6670; await page.goto(`https://www.nikkei.com/nkd/company/?scode=${stockCode}`); //銘柄 const stockName = await page.evaluate(() => document.querySelector('h1.m-headlineLarge_text').textContent ); //株価 const stockPrice = await page.evaluate(() => document.querySelector('.m-stockPriceElm_value.now').textContent ); //結果の取得 console.log(`銘柄コード ${stockCode} (${stockName}) の株価は ${stockPrice} です。`); browser.close(); })();herokuにプッシュする
$ git push heroku masterherokuでpuppeteerの動作スクリプトを起動する
heroku run node puppeteer/example.js実行結果
DB情報と株価情報が取得できる。
接続開始 : postgres://...
Success Result {
  command: 'SELECT',
  rowCount: 1,
  oid: null,
  rows:
   [ { id: 1...} ],
  fields:
   [ Field {
       }
  ]...
切断
銘柄コード 6670 (MCJ) の株価は 671 円 です。
補足
以下を参考にすればスクリプトの定期実行(バッチ処理)とかもできるはず。
Herokuで単純なrubyスクリプトを定期的に実行する参考
- 投稿日:2019-05-26T15:27:12+09:00
GoogleスプレッドシートをNode.jsで操作する(クイックスタート)
はじめに
Googleスプレッドシートをプログラムから操作したくなったので、nodeから操作する方法を解説します。基本的にはGoogleが公開しているQuickStartの通りにやれば良いのですが、画面やコメント付で補足します。
QuickStart
https://developers.google.com/sheets/api/quickstart/nodejsできること
- SheetAPI経由でスプレッドシートにアクセスするために必要な権限設定の理解
できないこと
- 自分のGoogleドライブ上にスプレッドシートを新規作成し、プログラム経由で書き込み/読み取り
やること
以下で公開されているGoogleスプレッドシートから、A列
Student NameとE列Majorを抽出してコンソール(標準出力)に出力します。対象のスプレッドシートの参照と、列の抽出処理はサンプルファイル内に定義しているのでこのクイックスタートでユーザが意識することはありません。
https://docs.google.com/spreadsheets/d/1BxiMVs0XRA5nFMdKvBdBZjgmUUqptlbs74OgvE2upms/edit#gid=0実行環境
- macOS Mojave 10.14.4
$ node -v
v10.15.3
$ npm -v
6.9.0
STEP0 : 作業用ディレクトリの作成
- 作業用ディレクトリを作成
- 作成したディレクトリに移動
- node環境を初期化(package.jsonを作成)
$ mkdir sheets-node
$ cd sheets-node
$ npm init -y
$ ls
package.json
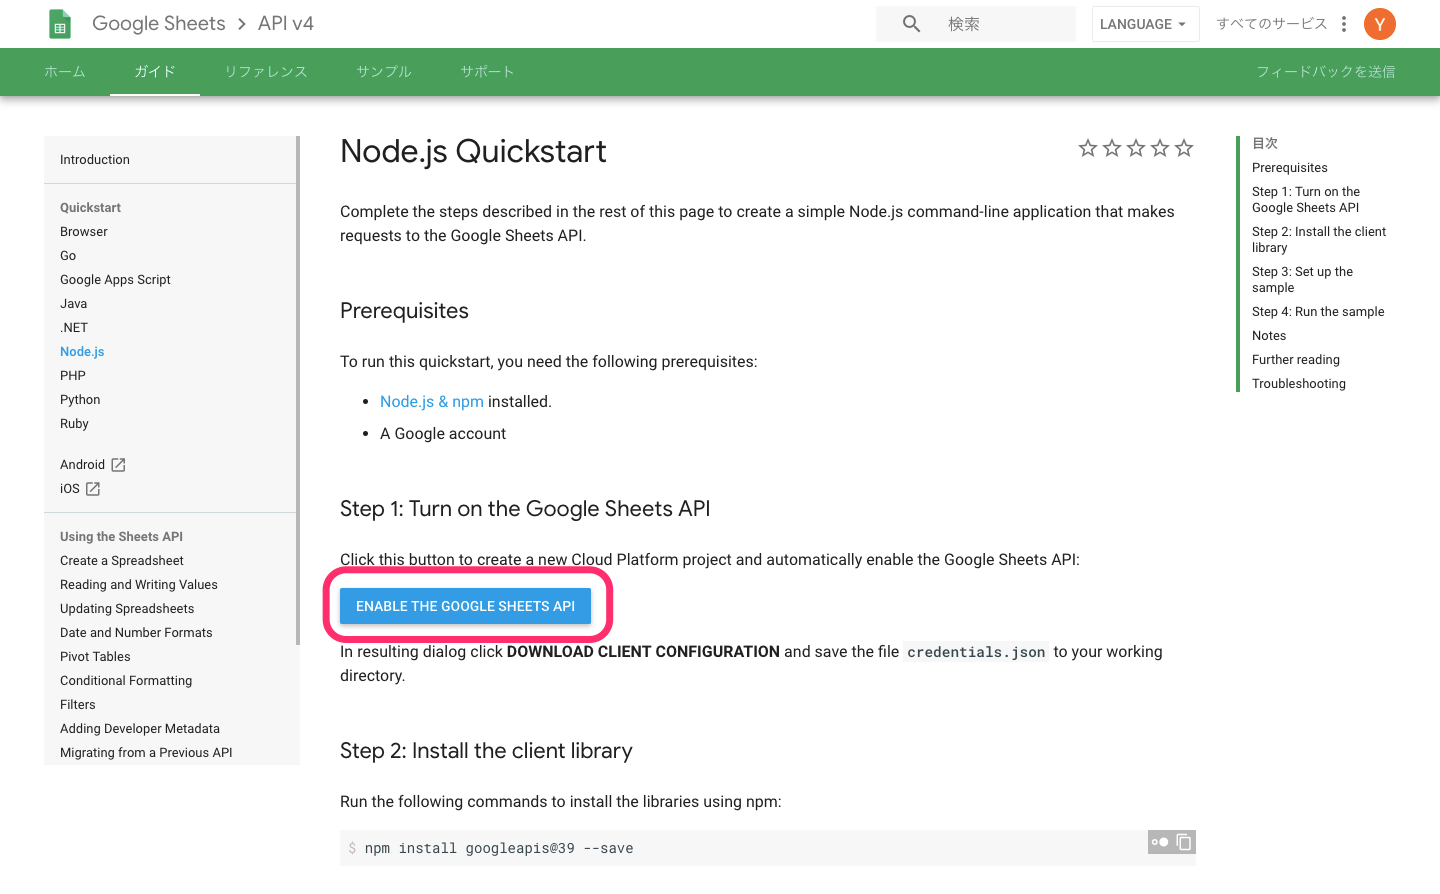
npm init -yは飛ばしても良いです。STEP1 : GoogleSheetsAPIの有効化
以下のURLの
ENABLE THE GOOGLE SHEETS APIボタンを押下https://developers.google.com/sheets/api/quickstart/nodejs
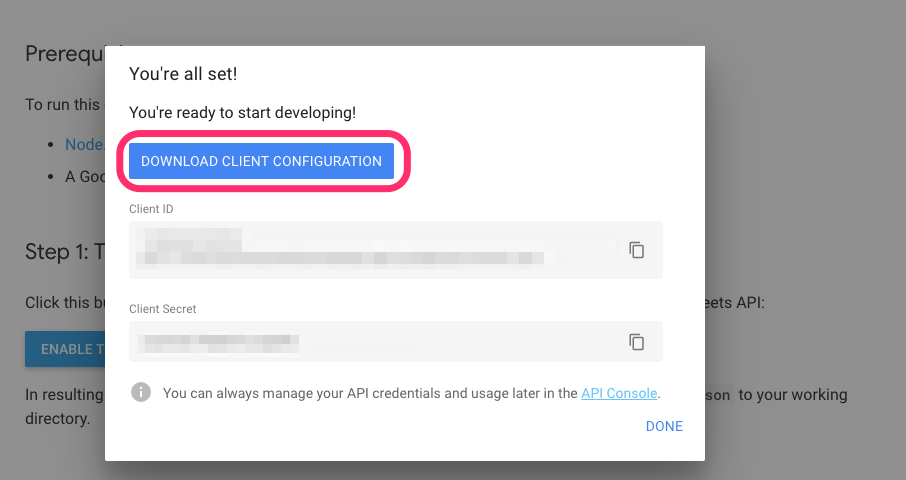
DOWNLOAD CLIENT CONFIGURATIONボタンを押下、token.jsonを作業用ディレクトリに保存する。
STEP2 : クライアントライブラリのインストール
googleapisをインストール
$ npm install googleapis@39 --save
$ ls
node_modules      package.json      package-lock.json
credentials.json
STEP3 : サンプルの作成
index.jsを作成
$ vi index.js以下からindex.jsをコピペ
https://developers.google.com/sheets/api/quickstart/nodejs#step_3_set_up_the_sampleindex.jsconst fs = require('fs'); const readline = require('readline'); const {google} = require('googleapis'); // If modifying these scopes, delete token.json. const SCOPES = ['https://www.googleapis.com/auth/spreadsheets.readonly']; // The file token.json stores the user's access and refresh tokens, and is // created automatically when the authorization flow completes for the first // time. const TOKEN_PATH = 'token.json'; // Load client secrets from a local file. fs.readFile('credentials.json', (err, content) => { if (err) return console.log('Error loading client secret file:', err); // Authorize a client with credentials, then call the Google Sheets API. authorize(JSON.parse(content), listMajors); }); /** * Create an OAuth2 client with the given credentials, and then execute the * given callback function. * @param {Object} credentials The authorization client credentials. * @param {function} callback The callback to call with the authorized client. */ function authorize(credentials, callback) { const {client_secret, client_id, redirect_uris} = credentials.installed; const oAuth2Client = new google.auth.OAuth2( client_id, client_secret, redirect_uris[0]); // Check if we have previously stored a token. fs.readFile(TOKEN_PATH, (err, token) => { if (err) return getNewToken(oAuth2Client, callback); oAuth2Client.setCredentials(JSON.parse(token)); callback(oAuth2Client); }); } /** * Get and store new token after prompting for user authorization, and then * execute the given callback with the authorized OAuth2 client. * @param {google.auth.OAuth2} oAuth2Client The OAuth2 client to get token for. * @param {getEventsCallback} callback The callback for the authorized client. */ function getNewToken(oAuth2Client, callback) { const authUrl = oAuth2Client.generateAuthUrl({ access_type: 'offline', scope: SCOPES, }); console.log('Authorize this app by visiting this url:', authUrl); const rl = readline.createInterface({ input: process.stdin, output: process.stdout, }); rl.question('Enter the code from that page here: ', (code) => { rl.close(); oAuth2Client.getToken(code, (err, token) => { if (err) return console.error('Error while trying to retrieve access token', err); oAuth2Client.setCredentials(token); // Store the token to disk for later program executions fs.writeFile(TOKEN_PATH, JSON.stringify(token), (err) => { if (err) return console.error(err); console.log('Token stored to', TOKEN_PATH); }); callback(oAuth2Client); }); }); } /** * Prints the names and majors of students in a sample spreadsheet: * @see https://docs.google.com/spreadsheets/d/1BxiMVs0XRA5nFMdKvBdBZjgmUUqptlbs74OgvE2upms/edit * @param {google.auth.OAuth2} auth The authenticated Google OAuth client. */ function listMajors(auth) { const sheets = google.sheets({version: 'v4', auth}); sheets.spreadsheets.values.get({ spreadsheetId: '1BxiMVs0XRA5nFMdKvBdBZjgmUUqptlbs74OgvE2upms', range: 'Class Data!A2:E', }, (err, res) => { if (err) return console.log('The API returned an error: ' + err); const rows = res.data.values; if (rows.length) { console.log('Name, Major:'); // Print columns A and E, which correspond to indices 0 and 4. rows.map((row) => { console.log(`${row[0]}, ${row[4]}`); }); } else { console.log('No data found.'); } }); }ファイル一覧
$ ls
credentials.json  node_modules      package.json
index.js          package-lock.json
STEP4 : サンプルを実行
nodeを実行
カレントディレクトリの
index.jsが実行される$ node . Authorize this app by visiting this url: https://accounts.google.com/o/oauth2/v2/auth?xxxxx Enter the code from that page here:URL
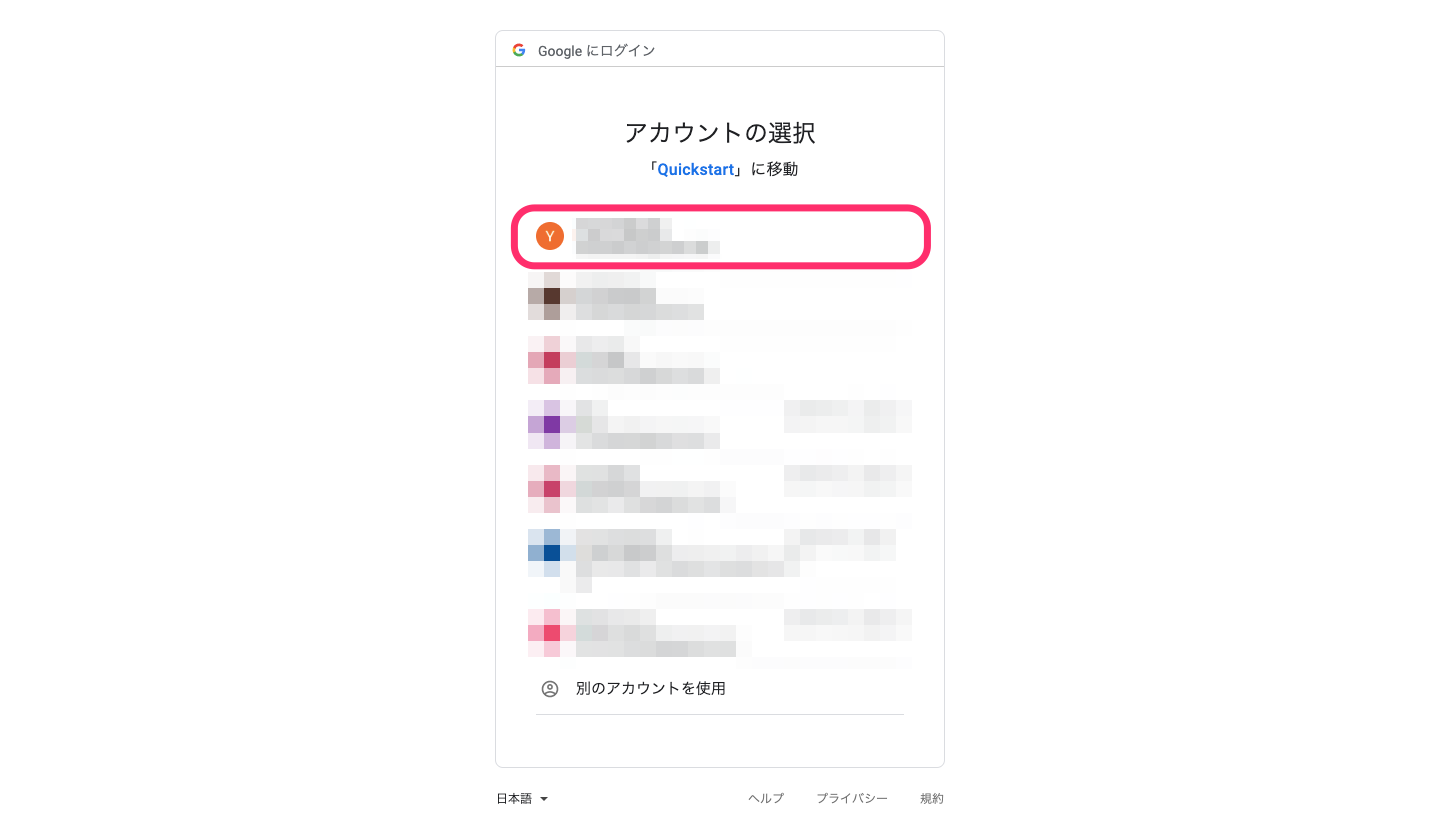
https://accounts.google.com/...が表示されると同時にコードを要求されるので、URLをブラウザにコピペしてアクセスアクセスを許可するGoogleアカウントを選択
Googleアカウントの登録状況により、選択画面が表示されないかもしれません。
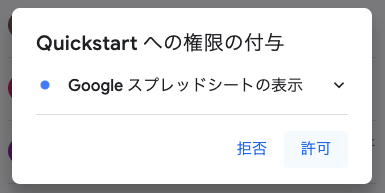
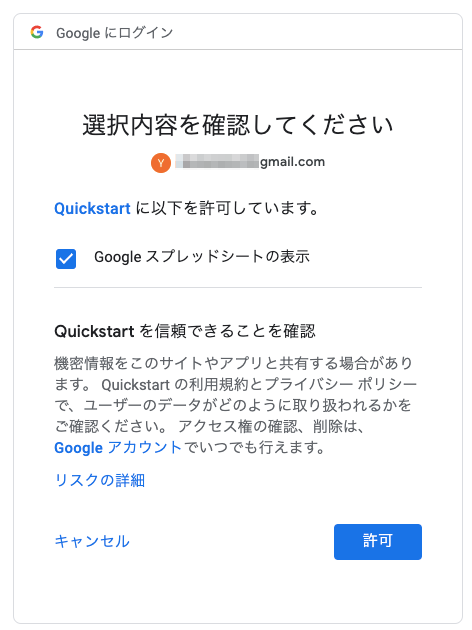
許可を選択
許可を選択
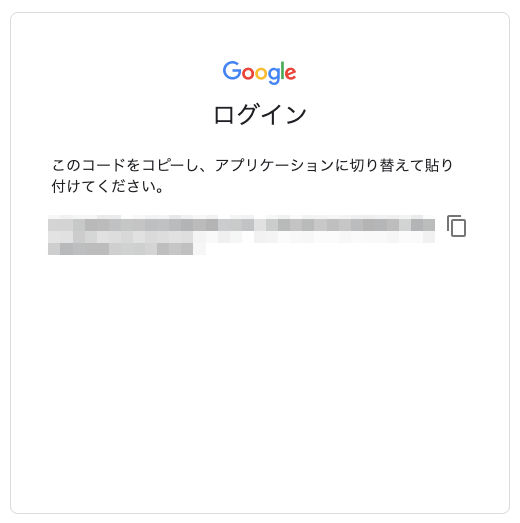
画面に表示されるコードをコピー
先ほどのコンソールにコードを貼り付けて
Enterこのタイミングで認証情報
token.jsonが作成され、以降の認証はtoken.jsonを使って自動的に実行されます。Enter the code from that page here: xxxxx Token stored to token.json Name, Major: Alexandra, English Andrew, Math Anna, English Becky, Art Benjamin, English Carl, Art Carrie, English Dorothy, Math Dylan, Math Edward, English Ellen, Physics Fiona, Art John, Physics Jonathan, Math Joseph, English Josephine, Math Karen, English Kevin, Physics Lisa, Art Mary, Physics Maureen, Physics Nick, Art Olivia, Physics Pamela, Math Patrick, Art Robert, English Sean, Physics Stacy, Math Thomas, Art Will, Mathサンプルコード
index.jsが実行され、Student Name列およびMajor列が一覧で表示されました。。
- 投稿日:2019-05-26T15:27:12+09:00
GoogleスプレッドシートのNode.jsクイックスタート
はじめに
Googleスプレッドシートをプログラムから操作したくなったので、Node.jsのクイックスタートをやってみました。基本的にはGoogleが公開しているQuickStartの通りにやれば良いのですが、画面やコメント付で補足します。
QuickStart
https://developers.google.com/sheets/api/quickstart/nodejsこのクイックスタートではGoogleが提供するサンプルを実行するだけで、権限設定などは実施しますが、ユーザがAPIのメソッドを意識することはありません=このクイックスタートだけやってもスプレッドシートの操作はできるようになりません。
やること
以下で公開されているGoogleスプレッドシートから、A列
Student NameとE列Majorを抽出してコンソール(標準出力)に出力します。対象のスプレッドシートの参照と、列の抽出処理はサンプルファイル内に定義しているのでこのクイックスタートでユーザが意識することはありません。
https://docs.google.com/spreadsheets/d/1BxiMVs0XRA5nFMdKvBdBZjgmUUqptlbs74OgvE2upms/edit#gid=0Googleのクイックスタートでは何をやっているのか説明がないのでわかりづらい。サンプルコードの中では説明しているけど。。。
実行環境
- macOS Mojave 10.14.4
$ node -v
v10.15.3
$ npm -v
6.9.0
STEP0 : 作業用ディレクトリの作成
- 作業用ディレクトリを作成
- 作成したディレクトリに移動
- node環境を初期化(package.jsonを作成)
$ mkdir sheets-node
$ cd sheets-node
$ npm init -y
$ ls
package.json
npm init -yは飛ばしても良いです。STEP1 : GoogleSheetsAPIの有効化
以下のURLの
ENABLE THE GOOGLE SHEETS APIボタンを押下https://developers.google.com/sheets/api/quickstart/nodejs
DOWNLOAD CLIENT CONFIGURATIONボタンを押下、token.jsonを作業用ディレクトリに保存する。
STEP2 : クライアントライブラリのインストール
googleapisをインストール
$ npm install googleapis@39 --save
$ ls
node_modules      package.json      package-lock.json
credentials.json
STEP3 : サンプルの作成
index.jsを作成
$ vi index.js以下からindex.jsをコピペ
https://developers.google.com/sheets/api/quickstart/nodejs#step_3_set_up_the_sampleindex.jsconst fs = require('fs'); const readline = require('readline'); const {google} = require('googleapis'); // If modifying these scopes, delete token.json. const SCOPES = ['https://www.googleapis.com/auth/spreadsheets.readonly']; // The file token.json stores the user's access and refresh tokens, and is // created automatically when the authorization flow completes for the first // time. const TOKEN_PATH = 'token.json'; // Load client secrets from a local file. fs.readFile('credentials.json', (err, content) => { if (err) return console.log('Error loading client secret file:', err); // Authorize a client with credentials, then call the Google Sheets API. authorize(JSON.parse(content), listMajors); }); /** * Create an OAuth2 client with the given credentials, and then execute the * given callback function. * @param {Object} credentials The authorization client credentials. * @param {function} callback The callback to call with the authorized client. */ function authorize(credentials, callback) { const {client_secret, client_id, redirect_uris} = credentials.installed; const oAuth2Client = new google.auth.OAuth2( client_id, client_secret, redirect_uris[0]); // Check if we have previously stored a token. fs.readFile(TOKEN_PATH, (err, token) => { if (err) return getNewToken(oAuth2Client, callback); oAuth2Client.setCredentials(JSON.parse(token)); callback(oAuth2Client); }); } /** * Get and store new token after prompting for user authorization, and then * execute the given callback with the authorized OAuth2 client. * @param {google.auth.OAuth2} oAuth2Client The OAuth2 client to get token for. * @param {getEventsCallback} callback The callback for the authorized client. */ function getNewToken(oAuth2Client, callback) { const authUrl = oAuth2Client.generateAuthUrl({ access_type: 'offline', scope: SCOPES, }); console.log('Authorize this app by visiting this url:', authUrl); const rl = readline.createInterface({ input: process.stdin, output: process.stdout, }); rl.question('Enter the code from that page here: ', (code) => { rl.close(); oAuth2Client.getToken(code, (err, token) => { if (err) return console.error('Error while trying to retrieve access token', err); oAuth2Client.setCredentials(token); // Store the token to disk for later program executions fs.writeFile(TOKEN_PATH, JSON.stringify(token), (err) => { if (err) return console.error(err); console.log('Token stored to', TOKEN_PATH); }); callback(oAuth2Client); }); }); } /** * Prints the names and majors of students in a sample spreadsheet: * @see https://docs.google.com/spreadsheets/d/1BxiMVs0XRA5nFMdKvBdBZjgmUUqptlbs74OgvE2upms/edit * @param {google.auth.OAuth2} auth The authenticated Google OAuth client. */ function listMajors(auth) { const sheets = google.sheets({version: 'v4', auth}); sheets.spreadsheets.values.get({ spreadsheetId: '1BxiMVs0XRA5nFMdKvBdBZjgmUUqptlbs74OgvE2upms', range: 'Class Data!A2:E', }, (err, res) => { if (err) return console.log('The API returned an error: ' + err); const rows = res.data.values; if (rows.length) { console.log('Name, Major:'); // Print columns A and E, which correspond to indices 0 and 4. rows.map((row) => { console.log(`${row[0]}, ${row[4]}`); }); } else { console.log('No data found.'); } }); }ファイル一覧
$ ls
credentials.json  node_modules      package.json
index.js          package-lock.json
STEP4 : サンプルを実行
nodeを実行。URL
https://accounts.google.com/...が表示されると同時にコードを要求されるので、URLをブラウザにコピペしてアクセス。
node .でカレントディレクトリのindex.jsが実行される。$ node . Authorize this app by visiting this url: https://accounts.google.com/o/oauth2/v2/auth?xxxxx Enter the code from that page here:ブラウザ上でアクセスを許可するGoogleアカウントを選択
Googleアカウントの登録状況により、選択画面が表示されないかもしれません。
許可を選択
許可を選択
画面に表示されるコードをコピー
先ほどのコンソールにコードを貼り付けて
Enterこのタイミングで認証情報
token.jsonが作成され、以降の認証はtoken.jsonを使って自動的に実行されます。Enter the code from that page here: xxxxx Token stored to token.json Name, Major: Alexandra, English Andrew, Math Anna, English Becky, Art Benjamin, English Carl, Art Carrie, English Dorothy, Math Dylan, Math Edward, English Ellen, Physics Fiona, Art John, Physics Jonathan, Math Joseph, English Josephine, Math Karen, English Kevin, Physics Lisa, Art Mary, Physics Maureen, Physics Nick, Art Olivia, Physics Pamela, Math Patrick, Art Robert, English Sean, Physics Stacy, Math Thomas, Art Will, Mathサンプルコード
index.jsが実行され、Student Name列およびMajor列が一覧で表示されました。
- 投稿日:2019-05-26T11:29:13+09:00
一億ループで携帯にワンギリ
CallToList = '+81'+'9000000000'
↓
CallToList = '+81'+'9099999999'080
070
で3億ループTwilio番号へ折り返し電話をさせるのが目的
他人の着信でtwimlを起動させる。
あ、ちょっと待てよ
1億回twimlが起動したら
1億円請求されるやんかCalltoNumheadList={
携帯1:+8190
携帯2:+8180
携帯3:+8170
IP1:+8150
固定1:+813
固定2:+815
}let NumBody = 1 to 1億
CalltoNum=NumHead+NumBody?1を1ではなく 00000001 で
表示させる方法を調べないとなgetdoubleDigestNumer(number) {
return ("0000000" + number).slice(-8)
}ループ変数に、0を7つ付加して、
最後に8桁分だけ抽出すりゃええか
- 投稿日:2019-05-26T11:29:13+09:00
一億総活躍 ほぼ無限ループで 日本の全携帯にワンギリ計画
CallToList = '+81'+'9000000000'
↓
CallToList = '+81'+'9099999999'080
070
で3億ループTwilio番号へ折り返し電話をさせるのが目的
他人の着信でtwimlを起動させる。
あ、ちょっと待てよ
1億回twimlが起動したら
1億円請求されるやんかCalltoNumheadList={
携帯1:+8190
携帯2:+8180
携帯3:+8170
IP1:+8150
固定1:+813
固定2:+815
}let NumBody = 1 to 1億
CalltoNum=NumHead+NumBody?1を1ではなく 00000001 で
表示させる方法を調べないとなgetdoubleDigestNumer(number) {
return ("0000000" + number).slice(-8)
}ループ変数に、0を7つ付加して、
最後に8桁分だけ抽出すりゃええか
ちょこちょこ直したら動作した。
頭番号は +8156626 と +8156623
16ループ
ログも正常
発信している。


- 投稿日:2019-05-26T02:28:23+09:00
Cloud Functionsのnodejs6をnodejs8に移行するとき、バックグラウンド関数を使っているときは引数を修正する
背景
以前よりアナウンスがありましたが、Cloud Functionsのnode.js6が非推奨となり、2019/4/1以降はnode.js8か10に移行する必要があります。
2019/4/1以前に作っていたnode.js6のCloud Functionsが動かなくなっていたので、node.js8に移行したのですが、その時にトリガーをStorage/PubSubにしていたFunctionsを修正するのに意外と時間が掛かったのでここに残します。
動かなかった時のエラーとしてStorageをトリガーとしていたFunctionsでは「ReferenceError: context is not defined」、PubSubをトリガーとしていたFunctionsでは「TypeError: First argument must be a string, Buffer, ArrayBuffer, Array, or array-like object.」が出力されました。
対応
結論ですが、以下のページに書いていることが全てでした。
Cloud Functions を新しい Node.js に移行するバックグラウンド関数のシグネチャが変更されているため、トリガーにStorageやPubSubを指定している場合は引数に修正が必要になります。
いずれも「(event, callback)」→「(data, context, callback)」に変更します。トリガーがStorageのときの例
nodejs6exports.sample = (event, callback) => { const file = event.data; const stringName = file.name; callback(); }nodejs8exports.sample = (data, context, callback) => { const stringName = data.name; callback(); }トリガーがPubSubの時の例
nodejs6exports.sample = (event, callback) => { const pubsubMessage = event.data; const Buffer = require('safe-buffer').Buffer; const textPayload = JSON.parse(Buffer.from(pubsubMessage.data, 'base64').toString()); callback(); }nodejs8exports.executeQuery = (data, context, callback) => { const pubsubMessage = data; const Buffer = require('safe-buffer').Buffer; const textPayload = JSON.parse(Buffer.from(pubsubMessage.data, 'base64').toString()); callback(); }