- 投稿日:2020-07-20T22:04:29+09:00
アプリ作成 コメント機能非同期化
非同期化記述解説
FormData
フォームのデータの送信に使用することができます。その他にも、キーのついたデータを伝送するためにフォームとは独立して使用することもできます。今回はコメントフォームがあるので、そのフォームの情報を取得するのに使います。
attrメソッド
要素が持つ指定属性の値を返します。
要素が指定属性を持っていない場合、関数はundefinedを返します。processDataオプション
デフォルトではtrueになっており、dataに指定したオブジェクトをクエリ文字列(例: msg.txt?b1=%E3%81%8B&b2=%E3%81%8D )に変換する役割があります。
クエリ文字列とは、WebブラウザなどがWebサーバに送信するデータをURLの末尾に特定の形式で表記したものの事です。contentTypeオプション
サーバにデータのファイル形式を伝えるヘッダです。こちらはデフォルトでは「text/xml」でコンテンツタイプをXMLとして返してきます。
ajaxのリクエストがFormDataのときはどちらの値も適切な状態で送ることが可能なため、falseにすることで設定が上書きされることを防ぎます。
この後、インクリメンタルサーチ機能をつけたいと思う。


- 投稿日:2020-07-20T22:00:42+09:00
railsで簡単に複数画像をアップロードする rails+carrierwave+cloudinary
1.概要
railsで画像投稿を利用したアプリを作りたいという時に、どうせなら複数枚を一度に投稿したいという人は多いのではないでしょうか。
今回は簡単なrails投稿アプリを開発しながら、複数画像投稿ができるように実装して行きます。
※今回の画像投稿は、cloudinaryを利用して行います。2.はじめに
開発環境
環境ruby 2.6.3 Rails 6.0.3完成予定
はじめる前に:Cloudinaryに登録
このリンクから登録をはじめましょう。
https://cloudinary.com/右上のsign up for freeを押すと、登録画面に飛びます。
諸々の情報を登録し仮登録を終えてから、最後にメールアドレス宛に送信されている本登録用のメッセージを開いて、本登録の完了までお願いします。3.複数画像投稿機能の実装
3.1.事前準備
まず複数画像投稿機能を実装するために、投稿するだけのサンプルアプリを作ります。
ターミナル$ cd $ cd desktop $ rails new ImageSample3.2.投稿周りの機能
投稿周りの機能はscaffoldを利用し作成します。その際、imageカラムを複数作成します。
今回は同時にimage1,image2の2枚投稿できるようにします。3枚以上同時に投稿したい場合は、image3,image4とカラムを増やしてみてください。ターミナル$ cd ImageSample $ rails g scaffold post body:text image1:string image2:string $ rails db:migrate3.3.viewの変更(新規投稿ページ)
新規投稿ページで画像を選択できるように、_form.html.erbを編集します。
posts/_form.html.erb# 変更前 <%= form.text_field :image1 %> # 変更後 <%= form.file_field :image1 %>image2についても同様の変更を行います。
3.4.viewの変更(投稿一覧ページ)
posts/index.html.erb# 変更前 <td><%= post.image1 %></td> # 変更後 <td><%= image_tag post.image1_url ,size: '200x150' %></td>image2についても同様の変更を行います。
,size: '200x150'に関しては、記述をしなくても問題ありませんが、画面いっぱいに画像が広がるのを防ぐために記述しました。3.5.viewの変更(投稿詳細ページ)
こちらも投稿一覧ページと基本的には同じです。
posts/show.html.erb# 変更前 <%= @post.image1 %> # 変更後 <%= image_tag @post.image1_url ,size: '200x150' %>image2についても同様の変更を行います。
3.6.gemの追加
Gemfilegem 'carrierwave' gem 'cloudinary' gem 'dotenv-rails'追加したら、
ターミナル$ bundle installをして反映させます。
3.7.アップローダー
アップローダーの作成
CarrierWaveのジェネレーターでアップローダーを作成します。
ターミナル$ rails g uploader Imageモデルの修正
app/models/post.rbを以下のように修正します。
app/models/post.rbclass Post < ApplicationRecord mount_uploader :image1, ImageUploader mount_uploader :image2, ImageUploader endアップローダの設定
app/uploaders/image_uploader.rbの6~8行目を変更します。
app/uploaders/image_uploader.rb# Choose what kind of storage to use for this uploader: storage :file # storage :fog上記を下図のように変えます。
app/uploader/image_uploader.rb# Choose what kind of storage to use for this uploader: if Rails.env.production? include Cloudinary::CarrierWave CarrierWave.configure do |config| config.cache_storage = :file end else storage :file end # storage :fog3.8.cloudinaryのAPIキー
.envファイル
.envというファイルをアプリケーションディレクトリ(appやdbやGemfileがあるディレクトリ)に自分で作成します。
次に作成した.envファイルに以下を入力します。.envCLOUD_NAME=q0w9e8r7t6yu5 #←この値は人によって違います!! CLOUDINARY_API_KEY=123456789012345 #←この値は人によって違います!! CLOUDINARY_API_SECRET=1a2s3d4f5g6h7j8k9l0a1s2d4f5g6h1q #←この値は人によって違います!!取得したCloudinaryのアカウントの、「Cloud name」、「API Key」、「API Secret」を利用します。
ここで「=」の後のそれぞれの値は先ほどのCloudinaryのマイページで取得したキーに書き換えてください(数字は個々人によって変わります).gitignore
アプリケーションディレクトリにある.gitignoreに下記を追加します。
.gitignore/.envcloudinary.yml
configフォルダにcloudinary.ymlファイルを作成してください。
config/cloudinary.ymlに以下のようにそのままコピペしてください。config/cloudinary.ymldevelopment: cloud_name: <%= ENV['CLOUD_NAME'] %> api_key: <%= ENV['CLOUDINARY_API_KEY'] %> api_secret: <%= ENV['CLOUDINARY_API_SECRET'] %> enhance_image_tag: true static_file_support: false production: cloud_name: <%= ENV['CLOUD_NAME'] %> api_key: <%= ENV['CLOUDINARY_API_KEY'] %> api_secret: <%= ENV['CLOUDINARY_API_SECRET'] %> enhance_image_tag: true static_file_support: false test: cloud_name: <%= ENV['CLOUD_NAME'] %> api_key: <%= ENV['CLOUDINARY_API_KEY'] %> api_secret: <%= ENV['CLOUDINARY_API_SECRET'] %> enhance_image_tag: true static_file_support: false4.終わりに
以上で複数画像投稿ができるようになったと思います。
説明が最小限で申し訳ないですが、もし良かったら参考にしてみてください!
最後まで読んでくださってありがとうございました!!

- 投稿日:2020-07-20T22:00:42+09:00
railsで簡単に複数画像投稿を実装する rails+carrierwave+cloudinary
1.概要
railsで画像投稿を利用したアプリを作りたいという時に、どうせなら複数枚を一度に投稿したいという人は多いのではないでしょうか。
今回は簡単なrails投稿アプリを開発しながら、複数画像投稿ができるように実装して行きます。
※今回の画像投稿は、cloudinaryを利用して行います。2.はじめに
開発環境
環境ruby 2.6.3 Rails 6.0.3完成予定
はじめる前に:Cloudinaryに登録
このリンクから登録をはじめましょう。
https://cloudinary.com/右上のsign up for freeを押すと、登録画面に飛びます。
諸々の情報を登録し仮登録を終えてから、最後にメールアドレス宛に送信されている本登録用のメッセージを開いて、本登録の完了までお願いします。3.複数画像投稿機能の実装
3.1.事前準備
まず複数画像投稿機能を実装するために、投稿するだけのサンプルアプリを作ります。
ターミナル$ cd $ cd desktop $ rails new ImageSample3.2.投稿周りの機能
投稿周りの機能はscaffoldを利用し作成します。その際、imageカラムを複数作成します。
今回は同時にimage1,image2の2枚投稿できるようにします。3枚以上同時に投稿したい場合は、image3,image4とカラムを増やしてみてください。ターミナル$ cd ImageSample $ rails g scaffold post body:text image1:string image2:string $ rails db:migrate3.3.viewの変更(新規投稿ページ)
新規投稿ページで画像を選択できるように、_form.html.erbを編集します。
posts/_form.html.erb# 変更前 <%= form.text_field :image1 %> # 変更後 <%= form.file_field :image1 %>image2についても同様の変更を行います。
3.4.viewの変更(投稿一覧ページ)
posts/index.html.erb# 変更前 <td><%= post.image1 %></td> # 変更後 <td><%= image_tag post.image1_url ,size: '200x150' %></td>image2についても同様の変更を行います。
,size: '200x150'に関しては、記述をしなくても問題ありませんが、画面いっぱいに画像が広がるのを防ぐために記述しました。3.5.viewの変更(投稿詳細ページ)
こちらも投稿一覧ページと基本的には同じです。
posts/show.html.erb# 変更前 <%= @post.image1 %> # 変更後 <%= image_tag @post.image1_url ,size: '200x150' %>image2についても同様の変更を行います。
3.6.gemの追加
Gemfilegem 'carrierwave' gem 'cloudinary' gem 'dotenv-rails'追加したら、
ターミナル$ bundle installをして反映させます。
3.7.アップローダー
アップローダーの作成
CarrierWaveのジェネレーターでアップローダーを作成します。
ターミナル$ rails g uploader Imageモデルの修正
app/models/post.rbを以下のように修正します。
app/models/post.rbclass Post < ApplicationRecord mount_uploader :image1, ImageUploader mount_uploader :image2, ImageUploader endアップローダの設定
app/uploaders/image_uploader.rbの6~8行目を変更します。
app/uploaders/image_uploader.rb# Choose what kind of storage to use for this uploader: storage :file # storage :fog上記を下図のように変えます。
app/uploader/image_uploader.rb# Choose what kind of storage to use for this uploader: if Rails.env.production? include Cloudinary::CarrierWave CarrierWave.configure do |config| config.cache_storage = :file end else storage :file end # storage :fog3.8.cloudinaryのAPIキー
.envファイル
.envというファイルをアプリケーションディレクトリ(appやdbやGemfileがあるディレクトリ)に自分で作成します。
次に作成した.envファイルに以下を入力します。.envCLOUD_NAME=q0w9e8r7t6yu5 #←この値は人によって違います!! CLOUDINARY_API_KEY=123456789012345 #←この値は人によって違います!! CLOUDINARY_API_SECRET=1a2s3d4f5g6h7j8k9l0a1s2d4f5g6h1q #←この値は人によって違います!!取得したCloudinaryのアカウントの、「Cloud name」、「API Key」、「API Secret」を利用します。
ここで「=」の後のそれぞれの値は先ほどのCloudinaryのマイページで取得したキーに書き換えてください(数字は個々人によって変わります).gitignore
アプリケーションディレクトリにある.gitignoreに下記を追加します。
.gitignore/.envcloudinary.yml
configフォルダにcloudinary.ymlファイルを作成してください。
config/cloudinary.ymlに以下のようにそのままコピペしてください。config/cloudinary.ymldevelopment: cloud_name: <%= ENV['CLOUD_NAME'] %> api_key: <%= ENV['CLOUDINARY_API_KEY'] %> api_secret: <%= ENV['CLOUDINARY_API_SECRET'] %> enhance_image_tag: true static_file_support: false production: cloud_name: <%= ENV['CLOUD_NAME'] %> api_key: <%= ENV['CLOUDINARY_API_KEY'] %> api_secret: <%= ENV['CLOUDINARY_API_SECRET'] %> enhance_image_tag: true static_file_support: false test: cloud_name: <%= ENV['CLOUD_NAME'] %> api_key: <%= ENV['CLOUDINARY_API_KEY'] %> api_secret: <%= ENV['CLOUDINARY_API_SECRET'] %> enhance_image_tag: true static_file_support: false4.終わりに
以上で複数画像投稿ができるようになったと思います。
説明が最小限で申し訳ないですが、もし良かったら参考にしてみてください!
最後まで読んでくださってありがとうございました!!
- 投稿日:2020-07-20T21:31:17+09:00
Rubyでちょっとずつポーカーを実装する その4
前回の記事
プレイヤーをn人が参加する
ゲームに何人参加するのかを管理するのは誰だろうか??ディーラーだろうか??
とりあえず、ゲームマスターというクラスを作成して任せてみることにする。勝敗を判定するのは誰か?
ディーラーが判定するのだろうか。さっき作ったゲームマスターだろうか??
とりあえず、ゲームの進行役的な存在のゲームマスターが勝敗は判定することにしよう。同じ役のときの勝敗は?
ワンペアvsワンペアのとき、カードの数値が大きい方が勝ち、同じ数値ならスートの強さを比較する。
いろいろと考えたけど難しいので次回にしよう。
とりあえず、最も強い役が複数いるときは引き分けとし、最も強い役が一人だけの場合は、その人を勝者としよう。流れ
<ゲーム開始>
プレイヤーがゲームの参加者が何人か入力する gamemaster.initialize(プレイヤー人数)
プレイヤー同士の勝敗を判定する gamemaster.judge
<ゲーム終了>コード
https://github.com/paraizo2424/poker_game/commit/b1becfe81a7b827302d0116562c8e57240e7b403
次回
その5(現在作成中)
- 投稿日:2020-07-20T20:46:34+09:00
Railsが自動でやってくれて助かるけどびっくりしたところ
TECH::CAMPで学習中に戸惑ったところをメモ。
公式リファレンスを読み込んだわけではないので間違っているところもあるかもしれない。tl; d
- index, show, new, editのアクションには何も書かなくてもいい。
- form_withはモデル名とカラム名で指定すればいい。
- link_toはPrefixでインスタンスを渡せばいい。
Railsが自動でやってくれる
index, show, new, editのアクションには何も書かなくてもいい
def index
end

def show
end

def new
end

def edit
end
7つのメソッドの中でも、この4つは最低限これだけ書けば動いてくれるみたいでびっくり。
ビュー側にデータを送るために、アクティブレコードメソッドを使って、インスタンス変数を宣言して……と基礎コースで勉強したみたいに用意していたのはなんだったの。
たしかに、これらのアクションはURLやPrefixでアクションを指定した時点で、該当するモデル(show, editの場合は加えてid)のインスタンス変数を用意するのはほぼ確定してる。
なので書かなくても自動でインスタンス変数も用意しておいてくれてるということか。ただし、表示順序を入れ替えるだったり、N+1問題を回避するためにincludeで関連モデルを読み込むだったり、JavaScriptと連携したり、などの場合は相応の記述をする必要がある。
form_withはモデル名とカラム名で指定すればいい。
html.erb<%= form_with(model: @tweet, local: true) do |form| %> <%= form.text_field :name, placeholder: "name" %> <%= form.text_area :text, placeholder: "text" , rows: "10" %> <%= form.submit "SEND" %> <% end %>渡されたインスタンスがレコード内にあるかを自動判定してくれるので、どのアクションに向けてデータを送るかのパスを書かなくていい。
こうすることで、newのビューとeditのビューでformのコードをそのまま使いまわせるという。
ただし、form_withにこれはnewのインスタンスですよ、と知らせるためにnewアクションでnewする必要があるみたい。
form.text_field :nameなどの個別の入力フォームを生成している部分では、カラム名を指定しておくと、どのカラムに保存するかも勝手にやってくれる。
しかも、このカラム名のシンボルがHTMLに変換された際にid = "name"の様に変換されるので、JavaScriptで使う用にidを設定しなくても、そのままdocument.getElementById("name")で指定できて便利。link_toはPrefixでインスタンスを渡せばいい。
html.erb<% rooms.each do |room|%> <%= link_to room.name, room_messages_path(room), method: :get%> <% end %>Prefixはインスタンスを指定できるのでいちいち
"rooms/destroy/#{room.id}"の様に数値に変換したり、式展開する必要もない。
URIパターンを定数化した様なものかな?と思っていたけど、引数っぽいのを指定できるPrefixって何者?メソッド?
- 投稿日:2020-07-20T20:37:23+09:00
Digdagを用いてRubyOnRails環境でバッチ実装
Digdagについて
Getting started
Architecture
Concepts
Workflow definition
Scheduling workflow
Operators
Command reference
Language API -Ruby
Digdagで環境毎に設定値を変える(RubyOnRails)
Digdagを用いてRubyOnRails環境でバッチ実装準備
Ruby on Rails チュートリアルのサンプルアプリケーションダウンロード
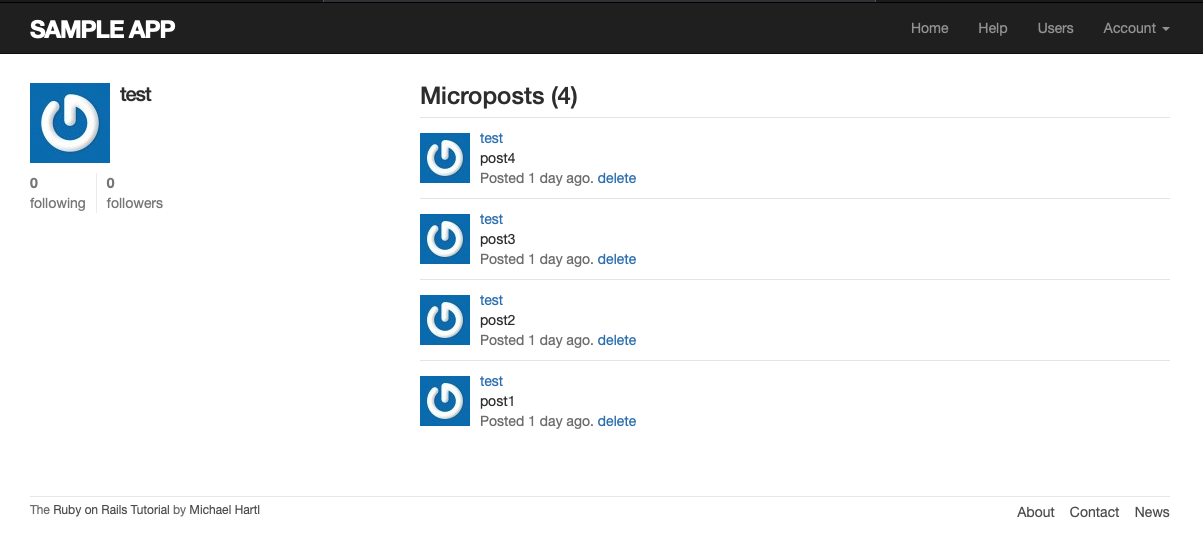
https://github.com/yasslab/sample_appRuby on Rails チュートリアルのサンプルアプリケーションを実行して、ユーザーとPostを登録。
ぼくはtestユーザーを作って4つの投稿を登録しました。
今回は、ユーザー名をパラメーターにして該当するユーザーの投稿数を出力する簡単なバッチを作ります。
バッチの実装・起動は二つの方法でやってみます。Railsでバッチ処理を書く際によく使われている以下の二つの方法をやってみます。
①rails runner:スクリプトとしてバッチを書く
②rake task:ビルドタスクとしてバッチを書くrails runnerで実行
パラメーター取得はOptionParserを使いました。
バッチ処理スクリプトを追加
/lib/scripts/の配下にバッチ処理スクリプトを追加lib/scripts/post_batch.rbrequire 'optparse' module Scripts class PostBatch def initialize @option = {} OptionParser.new do |opt| opt.on('-n VALUE', 'user name') { |v| @option[:name] = v} opt.parse!(ARGV) end end def count user = User.find_by(name: @option[:name]) puts "ID: #{user.id} 名前: #{user.name}" puts "投稿数: #{Micropost.where(user_id: user.id).count}" end end endlib配下のrubyファイルを自動ロードする
config/application.rbconfig.autoload_paths += %W(#{config.root}/lib)workflowsの配下にrails_runner.digを追加して以下の内容を追加
rails_runner.dig+task: sh>: bundle exe rails runner Scripts::PostBatch.new.count -n 'test'実行
testユーザーのID,名前、投稿数が出力されています。
実行結果$ digdag run rails_runner.dig --rerun 2020-07-20 19:38:39 +0900 [INFO] (0017@[0:default]+rails_runner+task): sh>: bundle exec rails runner Scripts::PostBatch.count 'test' ID: 5 名前: test 投稿数: 4rakeで実行
rakeタスク生成
$ rails g task task_post
Running via Spring preloader in process 4255
      create  lib/tasks/tast_post.rake
/lib/tasks/task_post.rakeファイルが生成されるので開いて以下のソースを追加lib/tasks/task_post.rakenamespace :task_post do desc "ユーザー投稿数を取得" task :count, ['name'] => :environment do |task, args| user = User.find_by(name: args.name) puts "ID: #{user.id} 名前: #{args.name}" puts "投稿数: #{Micropost.where(user_id: user.id).count}" end endWorkflow追加
rake.dig+task: sh>: bundle exec rake task_post:count[test4]実行
testユーザーのID,名前、投稿数が出力されています。
実行結果$ digdag run rake.dig --rerun 2020-07-20 20:04:16 +0900 [INFO] (0017@[0:default]+rake+task): sh>: bundle exec rake task_post:count[test] ID: 5 名前: test 投稿数: 4
- 投稿日:2020-07-20T19:59:27+09:00
シンボルと破壊的について Ruby
rubyの書き方
今回はシンボルと破壊的メソッドを言語化します。
シンボルについて
シンボル、書き方が多すぎるように見えて、何だかよくわからない。コロンが前だったり、後ろだったりで、どれもシンボル・・・統一感が無いようにしか見えなかった。読んだコードはいろんな書き方が散見され、メリットだったりもどれも判然としなかったからである。
しかし、そうではなかった。シンボルに書き方がいっぱいあるのではなく、ハッシュの書き方が様々なのだった。
シンボルは名前の前にコロンを置いた表記でしかなかった
:key
上記がシンボルである。
私が混乱したのは下記のように4パターンも書き方が存在し、それにシンボルに見えるような書き方とが入り混じっているせいで、これをシンボルと勘違いした事がそもそも理解の遅さに繋がってしまった。
日本語でもバリューにアクセスできるのはちょっと不思議な感じがします。
rubyのバージョンはruby 2.6.3p62 (2019-04-16 revision 67580) [universal.x86_64-darwin19]
です。
various_hash.rb#普通のハッシュ nomal_hash = { "Avdol" => "Magician's red", "Igy" => "the fool", } nomal_hash_two = { "空条承太郎" => "スタープラチナ", "花京院典明" => "ハイエロファントグリーン", } # シンボルをキーとして定義したハッシュ symbol_hash = { :Avdol => "Magician's red", :Igy => "the fool", } symbol_hash_two = { :空条承太郎 => "スタープラチナ", :花京院典明 => "ハイエロファントグリーン", } # シンボルがキーのとき、JSONのように略記することができる json_like_hash = { "Avdol": "Magician's red", "Igy": "the fool", } json_like_hash_two = { "空条太郎条": "スタープラチナ", "花京院典明": "ハイエロファントグリーン", } # ダブルクォートが要らない # これは JavaScript のオブジェクト記法と同じ no_double_quote_hash = { Avdol: "Magician's red", Igy: "the fool", } no_double_quote_hash_two = { 空条承太郎: "スタープラチナ", 花京院典明: "ハイエロファントグリーン", } #それぞれのアクセスの仕方 #ノーマルなハッシュは文字列キーを使う puts "Avdolのスタンドは #{nomal_hash["Avdol"]} です(文字列キー)" puts "空条承太郎のスタンドは #{nomal_hash_two["空条承太郎"]} です(文字列キー)" #シンボルで作られたハッシュはシンボルキーを使う puts "Avdolのスタンドは #{symbol_hash[:Avdol]} です(シンボルキー)" puts "空条承太郎のスタンドは #{symbol_hash_two[:空条承太郎]} です(シンボルキー)" #ジェイソン風に書いたハッシュもシンボルをキーにする puts "Igyのスタンドは #{json_like_hash[:Igy]} です(シンボルキー)" puts "花京院典明のスタンドは #{json_like_hash_two[:花京院典明]} です(シンボルキー)" #クォーとを必要としないハッシュもシンボルをキーにする puts "Igyのスタンドは #{no_double_quote_hash[:Igy]} 点です(シンボルキー)" puts "花京院典明のスタンドは #{no_double_quote_hash_two[:花京院典明]} 点です(シンボルキー)"出力結果
Avdolのスタンドは Magician's red です(文字列キー)
空条承太郎のスタンドは スタープラチナ です(文字列キー)
Avdolのスタンドは Magician's red です(シンボルキー)
空条承太郎のスタンドは スタープラチナ です(シンボルキー)
Igyのスタンドは the fool です(シンボルキー)
花京院典明のスタンドは ハイエロファントグリーン です(シンボルキー)
Igyのスタンドは the fool 点です(シンボルキー)
花京院典明のスタンドは ハイエロファントグリーン 点です(シンボルキー)
破壊的メソッド
参考文献
[Ruby]参照の値渡しと破壊的メソッド
値渡しと参照渡しと参照の値渡しと言う話ですね。
C言語のポインタの話に通じるものです。値渡しは、データ(オブジェクト)そのものを送り込む事です。x = 200なら、200というデータ(オブジェクト)そのものがコピーされて渡されていることを意味します。
参照渡しは、データ(オブジェクト)のある変数の場所を厳密には変数のために確保したメモリのアドレスを渡すことを意味します。x = 200の例で言い換えると、200というデータ(オブジェクト)はxという変数のxxxx番地にある、という情報が渡されるということになる・・・と言えると思います。
じゃ、参照の値渡しっていうのは何か・・・
新しく作成したデータ(オブジェクト)の場所を渡す
という事ができるはず・・・。
そこで出てくるのが破壊的メソッド
destroy_method.rb#代入 p story = "bakemonogatari" #代入の代入 x = story #破壊的メソッドに渡す p story.upcase! #全部同じになる p story p x p "##################################" #代入 p story_two = "tukimonogatari" #代入の代入 y = story_two #非破壊的メソッドに渡す p story_two.upcase #upcaseメソッドの影響を受けていない p story_two p y出力結果
"bakemonogatari"
"BAKEMONOGATARI"
"BAKEMONOGATARI"
"BAKEMONOGATARI"
"##################################"
"tukimonogatari"
"TUKIMONOGATARI"
"tukimonogatari"
"tukimonogatari"
!をつけると破壊的メソッドとなる。破壊的、というのはオブジェクトを編集するという能力を持つことを意味する。編集し、新しく作られたオブジェクトの場所を示しているので、storyもxも新しく作られたオブジェクトの値のある場所を参照しているので、大文字変換された文字列をputsしている。
逆に非破壊的メソッドは、オブジェクトを新しく作っても、新しいオブジェクトの参照部分を渡す事が無いので、upcaseメソッドの影響が無いように見える。
object_id.rb#代入 p story = "bakemonogatari" #代入の代入 x = story #破壊的メソッドに渡す p story.upcase!.object_id #全部同じになる p story.object_id p x.object_id p "##################################" #代入 p story_two = "tukimonogatari" #代入の代入 y = story_two #非破壊的メソッドに渡す p story_two.upcase.object_id #upcaseメソッドの影響を受けていない p story_two.object_id p y.object_id出力結果
#全部同じID
"bakemonogatari"
70291624072300
70291624072300
70291624072300
"##################################"
#作り直されたやつだけ違うオブジェクトID
"tukimonogatari"
70291624071720
70291624071800
70291624071800
破壊的と非破壊的でオブジェクトIDに違いがある。
まとめ
ややこしいけど、ようやく言語化できたと思います。間違っていたら指摘ください。
- 投稿日:2020-07-20T19:52:30+09:00
Rubyでハナチャン(非破壊配列操作)
出典: Learn You a Haskell for Great Good!
head
array.firstirb(main):005:0> a = [1, 2, 3] => [1, 2, 3] irb(main):007:0> a.first => 1 irb(main):008:0> a => [1, 2, 3]tail
array.drop(1)irb(main):005:0> a = [1, 2, 3] => [1, 2, 3] irb(main):009:0> a.drop(1) => [2, 3] irb(main):010:0> a => [1, 2, 3]init
array[0...-1]irb(main):010:0> a => [1, 2, 3] irb(main):011:0> a[0...-1] => [1, 2] irb(main):012:0> a => [1, 2, 3]last
array.lastirb(main):013:0> a => [1, 2, 3] irb(main):014:0> a.last => 3 irb(main):015:0> a => [1, 2, 3]

- 投稿日:2020-07-20T19:36:15+09:00
今日のメモ(バックスラッシュ記法)
バックスラッシュ記法
『\』に続けて文字を指定することで多様な使い方ができる
指定内容 生成される文字 \x xの文字そのものを生成 \n 改行 \r キャリッジターン \f 改ページ \a ベル \e エスケープ \s 空白 \b バックスペース \t タブ \v 垂直タブ ダブルクォート『""』で囲んだ時のみ適用され、シングルクォート『''』で囲むと単なる文字と認識される
\nなどを適用した結果を確認したい場合は、printかputsで出力。
出力メソッドの違い
メソッド 改行 出力内容の構築メソッド バックスラッシュ記法 p 引数ごとに改行 inspectメソッド そのまま出力 改行しない to_sメソッド 適用した結果を出力 puts 引数ごとに改行 to_sメソッド 適用した結果を出力
- 投稿日:2020-07-20T19:36:15+09:00
今日のメモ(バックスラッシュ記法、出力メソッド)
バックスラッシュ記法
『\』に続けて文字を指定することで多様な使い方ができる
指定内容 生成される文字 \x xの文字そのものを生成 \n 改行 \r キャリッジターン \f 改ページ \a ベル \e エスケープ \s 空白 \b バックスペース \t タブ \v 垂直タブ ※ダブルクォート『""』で囲んだ時のみ適用され、シングルクォート『''』で囲むと単なる文字と認識される
\nなどを適用した結果を確認したい場合は、printかputsで出力。
↓『pとprintとputsの出力違い』↓irb(main):012:0* p "a\nb" "a\nb" => "a\nb" irb(main):013:0> print "a\nb" a b=> nil irb(main):015:0* puts "a\nb" a b => nil出力メソッドの違い
メソッド 改行 出力内容の構築メソッド バックスラッシュ記法 p 引数ごとに改行 inspectメソッド そのまま出力 改行しない to_sメソッド 適用した結果を出力 puts 引数ごとに改行 to_sメソッド 適用した結果を出力
- 投稿日:2020-07-20T19:36:15+09:00
今日のメモ(バックスラッシュ記法、出力メソッド、ヒアドキュメント)
バックスラッシュ記法
『\』に続けて文字を指定することで多様な使い方ができる
指定内容 生成される文字 \x xの文字そのものを生成 \n 改行 \r キャリッジターン \f 改ページ \a ベル \e エスケープ \s 空白 \b バックスペース \t タブ \v 垂直タブ ※ダブルクォート『""』で囲んだ時のみ適用され、シングルクォート『''』で囲むと単なる文字と認識される
\nなどを適用した結果を確認したい場合は、printかputsで出力。
↓『pとprintとputsの出力違い』↓irb(main):012:0* p "a\nb" "a\nb" => "a\nb" irb(main):013:0> print "a\nb" a b=> nil irb(main):015:0* puts "a\nb" a b => nil出力メソッドの違い
メソッド 改行 出力内容の構築メソッド バックスラッシュ記法 p 引数ごとに改行 inspectメソッド そのまま出力 改行しない to_sメソッド 適用した結果を出力 puts 引数ごとに改行 to_sメソッド 適用した結果を出力 ヒアドキュメント
終端を示す識別子にTESTを使用しました。
その間に挟まれた2,3行目が文字列となる。hello = <<TEST ohayou gozaimasu TEST puts hello #=> ohayou gozaimasu -------------------------------------------------- def hello -<<TEST ohayou gozaimasu TEST end puts hello※終端を示す識別子の前にはスペース等を記述してはいけない
- 投稿日:2020-07-20T19:09:33+09:00
【ポートフォリオを作成する方へ】文字列を省略する方法
ポートフォリオを作成する際、長文を省略して「続きを読む」とか「...」と表示したいなと思い調べたのでこちらにまとめます。
結論
truncateメソッドを使います。
使い方
truncateは2種類あります。
String
string.rb"春はあけぼの。やうやう白くなりゆく山際、少し明かりて、紫だちたる雲の細くたなびきたる。".truncate(30) %> # "春はあけぼの。やうやう白くなりゆく山際、少し明かりて、..."
オプション 説明 デフォルト :omission 省略された文字列の後ろにつける文字列 ... :separator 区切り文字。中途半端なところで文字列が切れないようにする。日本語だとできない。 なし これらを使うと、
string.rb"春はあけぼの。やうやう白くなりゆく山際、少し明かりて、紫だちたる雲の細くたなびきたる。".truncate(30, omission: '...続きを読む', separator: ' ') # "春はあけぼの。やうやう白くなりゆく山際、少...続きを読む"TextHelper
texthelper.rbtruncate("春はあけぼの。やうやう白くなりゆく山際、少し明かりて、紫だちたる雲の細くたなびきたる。") # "春はあけぼの。やうやう白くなりゆく山際、少し明かりて、..."
オプション 説明 デフォルト :length 省略前の文字列長 30 :omission 省略された文字列の後ろにつける文字列 ... :separator 区切り文字。中途半端なところで文字列が切れないようにする。日本語だとできない。 なし :escape HTMLエスケープ(falseを指定するとエスケープしない) true 実際に使った結果
投稿をしてくれた人の内容を表示をする際に使いました。
<%= truncate(@post.content, length: 50) do %>
  <p><%= link_to '続きを読む', @post %></p>
<% end %>
週報入力をすると右側に投稿が表示され、投稿内容50文字表示したあと、続きを読むというリンクで詳細に飛ぶようになっています。参考
https://apidock.com/rails/String/truncate
https://apidock.com/rails/ActionView/Helpers/TextHelper/truncate

- 投稿日:2020-07-20T18:26:30+09:00
Tailwind on Rails
なぜTailwind on Rails?
- クラス名を決める必要がなくなる
- クラス名の衝突がなくなり、BEMやCSS設計から開放される
- デザインの修正により不要になったCSSが残ってしまうことがなくなる
- どの要素にどんなスタイルが当たっているかがすぐにわかる
- カラーコードやフォントサイズ、ブレイクポイント等の統一性を保ちやすい
- ネット上に転がっているサンプルコードを気軽に取り入れやすい(他の人が書いたコードでもカスタマイズが楽)
- スタイルの修正のたびに
app/assets/stylesheets/任意のフォルダ/任意のファイルを開く必要がなくなる環境
Rails 6.0.3
導入
$ yarn add tailwindcss $ yarn tailwindcss init $ mkdir app/javascript/css $ touch app/javascript/css/tailwind.cssapp/javascript/css/tailwind.css@import "tailwindcss/base"; @import "tailwindcss/components"; @import "tailwindcss/utilities";app/javascript/packs/application.jsimport '../css/tailwind.css';postcss.config.jsmodule.exports = { plugins: [ //... require("tailwindcss"), //追加 require("autoprefixer"), //追加 require("postcss-preset-env")({ autoprefixer: { flexbox: "no-2009", }, stage: 3, }), ], };動作確認
$ rails g controller test indexconfig/routes.rbroot to: 'tests#index'app/views/tests/index.html.erb<div class="max-w-sm mx-auto bg-white shadow-lg rounded-lg overflow-hidden"> <div class="sm:flex sm:items-center px-6 py-4"> <img class="block mx-auto sm:mx-0 sm:flex-shrink-0 h-16 sm:h-24 rounded-full" src="https://randomuser.me/api/portraits/women/17.jpg" alt="Woman's Face"> <div class="mt-4 sm:mt-0 sm:ml-4 text-center sm:text-left"> <p class="text-xl leading-tight">Erin Lindford</p> <p class="text-sm leading-tight text-gray-600">Customer Support Specialist</p> <div class="mt-4"> <button class="text-purple-500 hover:text-white hover:bg-purple-500 border border-purple-500 text-xs font-semibold rounded-full px-4 py-1 leading-normal">Message</button> </div> </div> </div> </div>applyを使う
Tailwind CSSにはapplyという機能があり、複数のクラスをまとめて適用することができます。例えば同じボタンがあらゆる箇所に出現する場合、毎回
font-bold py-2 px-4 rounded bg-red-500 text-white hover:bg-red-700などと書くのは大変なので、btnというクラスを指定するだけで上記のクラスを適用するためにapplyを使います。TailwindをRailsで利用する場合applyを使用するのが難しいので、helper関数で対応することにします。
(こちらの記事ではRailsでapplyを使っているようですが、この通り設定するとapplyを適用した箇所以外のスタイルが効かなくなってしまいました)
$ rails g helper tailwindapp/helpers/tailwind_helper.rbmodule TailwindHelper def btn 'fosnt-bold py-2 px-4 rounded bg-red-500 text-white hover:bg-red-700' end endapp/controllers/application_controller.rbclass ApplicationController < ActionController::Base helper TailwindHelper endapp/views/tests/index.html.erb<a href='#' class='<%= btn %>'>ボタン</btn>懸念点
TailwindCSSでは、想定されうるあらゆるユーティリティークラスが用意されているので、他のCSSフレームワークよりファイルサイズが大きいです。
この問題を、PurgeCSSという機能を使いビルド時に実際に使われているクラスに関するスタイルだけを抽出する方法で解決しています。しかしRails上でTailwindを使う場合、PurgeCSSが使えません。(正確には設定方法がわかりません。分かる方がいたら教えてください。)
そのため通常よりファイルサイズが大きくなってしまいます。当初この点を懸念して、Tailwind on Railsは無理ではないかと考えていました。
Tailwindの公式サイトを確認したところ
Using the default configuration, the development build of Tailwind CSS is 1996kb uncompressed, 144.6kb minified and compressed with Gzip, and 37.kb when compressed with Brotli.
とあり、要はminify&gzip済で
144.6kbとのこと。Bootstrapが22.1kbってことを考えるとまあ重いですが、許容範囲なんじゃないかと思っています。gzipの設定、ブラウザにキャッシュさせる期間の設定、CDNの活用とかをちゃんとやっていればクリティカルではないでしょう。
参考
- 投稿日:2020-07-20T16:21:47+09:00
【初心者】N+1問題を発見!Bulletの使い方
N+1問題とは
扱うデータの数に比例して発行されるSQLの数が増えること。
この問題はパフォーマンスに影響を与えるので解決したい問題。
よく聞く例えとして、買い物でたくさん商品を買った際にお会計を1点づつしかやってくれない状態がN+1問題です。bulletとは
「N+1問題」を見つけてくれるライブラリです。
導入方法
Gemfilegroup :development do gem 'bullet' endbundle installします。
設定します。config/environments/development.rbRails.application.configure do #途中省略 config.after_initialize do Bullet.enable = true #Bullet gemを有効 Bullet.alert = true #ブラウザにJavaScriptアラートをポップアップ Bullet.bullet_logger = true #Bulletログファイル(Rails.root/log/bullet.log)に記録 Bullet.console = true #警告をブラウザーのconsole.logに記録 Bullet.rails_logger = true #警告を直接Railsログに追加 end end解決方法
bulletを使うと警告画面とログが出てきます。
例えば、ユーザーと投稿の関係を1対多にします。
user.rbclass User < ApplicationRecord has_many :posts endpost.rbclass Post < ApplicationRecord belongs_to :user end全ての投稿に対するユーザー名を出力します。
Post.all.each do |post|
  puts post.user.name
end
USE eager loading detected Psot => [:user] Add to your finder::incluedes => [:user]このようなログや警告メッセージが出てきます。
そこで、Post.inculudes(:user).each do |post| puts post.user.name endとすればOKです。
- 投稿日:2020-07-20T16:13:05+09:00
ビューファイルにbinding.pryを使う方法
- 投稿日:2020-07-20T14:25:20+09:00
RailsでPostgreSQLのRow Level Security Policyを使ったマルチテナント
Clipkit(クリップキット) というSaaSを作っています。マルチスキーマ方式のマルチテナントシステムなのですが、テナント数が1,000近くなってきて辛さも出てきているので他の方式を検証中です。
LD;TR
PostgreSQLのRow Level Security Policyを利用したマルチテナントの実装を試してみました。
問題なく実装できてうまく動きそうでした。が、結局今回は採用を見送りました。RDBのマルチテナントの手法は一長一短で難しい。
個人的には最初はRLSではなくマルチスキーマ方式で始めれば良いのではないかと思いました。
はじめに
SaaS型のWebサービスでは、顧客ごとの独立したアプリケーションを、1つのシステムに同居させる方式があります。これをマルチテナントといいます。
RDBのマルチテナント方式
まず普通に考えると、テーブルに複数のテナントのデータを混在させる設計を思いつきます。しかしそれだとプログラムにバグがあった場合、他のテナントのデータが見えてしまうなど非常に大きなセキュリティ上の問題を起こしてしまう可能性があります。
なので、絶対に混線が起こらないようにテナントごとにデータをしっかり分離させる方法を考える必要があります。
RDBでマルチテナントを実現するには、ざっくり以下の3つの方法があります。
マルチインスタンス(サイロ)
テナントごとに独立したDBインスタンス(仮想マシンなど)を使用する。独立性が高いがコストや保守性のメリットが小さい。
シングルインスタンス・マルチスキーマ(ブリッジ)
単一のDBインスタンス内にテナントごとのスキーマを用意する。テナントごとに独立したテーブルを持つのでテーブル定義の管理が煩雑。
シングルスキーマ(プール)
単一のスキーマ内のテーブルにすべてのテナントのデータを混在させる。最もリソースの効率が良いがプログラムにバグが入ると他のテナントのデータが混線するなどの大きなリスクがある。
簡単に実現できるのはマルチスキーマ方式
RailsだとApartmentというgemがある。これで全テナントへの一斉マイグレーションなども勝手にやってくれます。
マルチスキーマ方式の欠点
テナントごとにスキーマを分けるということで、テーブルの構造を変更する際には、すべてのスキーマに対して同じようにマイグレーションを実行する必要があります。2〜3秒のマイグレーション処理だったとしても数千以上のテナント数になるとそれなりに厳しくなってくるでしょう。すべてのテナントでマイグレーションが確実に完了できるようにする管理コストも大きくなります。
なのでアクセス制御さえ確実にできれば、シングルスキーマ方式が理想のような気がしてきます。
Row Level Security Policyを利用したシングルスキーマ方式
概要
PostgeeSQL 9.5以降には「行セキュリティポリシー」(Row Level Security Policy :RLS)という機能があります。これはユーザーのロールや実行時パラメータに応じてあらかじめ指定された条件の行以外にはアクセスできないようにする機能です。
設定方法
具体的には次のように設定します。
例)usersテーブルのtenant_idカラムが特定の値のレコード以外は見えないようにしたい。
RLSを設定。(これは実行時パラメータに応じて制御する設定)
ALTER TABLE users ENABLE ROW LEVEL SECURITY;
CREATE POLICY user_isolation_policy ON users FOR ALL USING (tenant_id = current_setting('tenant.id')::BIGINT);
あとは実行時パラメータを次のように設定すると、以降、tenant_id=999のレコード以外にはアクセスできなくなります。
SET tenant.id = 999;Railsでの実装(案)
テナントを管理するtenantsテーブル(Tenantモデル)を作っておきます。(※ 説明用の例なのでテーブルの定義とかは省略します)
Tenant#switchメソッドでテナントを切り替えられるように実装します。さらにTenant.currentで現在のテナントを取得できるようにしておくと便利です。class Tenant < ApplicationRecord def switch ActiveRecord::Base.connection.execute("SET tenant.id = #{id}") end def self.current find(ActiveRecord::Base.connection.execute('SHOW tenant.id').getvalue(0, 0)) end end
ApplicationControllerのbefore_actionで、リクエストのドメインに応じてテナントが切り替わるようにします。class ApplicationController < ActionController::API before_action :switch_tenant def switch_tenant Tenant.find_by(domain: request.host).switch end end以上で自分のテナントのデータだけに触れるようになります。
ただしデータを追加するときはtenant_idを自分で入れなくてはいけません。これが面倒なので自動的に入るようにModelの基底クラス(
ApplicationRecord)に実装します。class ApplicationRecord < ActiveRecord::Base self.abstract_class = true after_initialize :set_tenant_id def set_tenant_id if new_record? if has_attribute?(:tenant_id) self.tenant_id = Tenant.current.id end end end endこれでほぼテナントを意識せず透過的にデータアクセスできるようになりました。
注意点
RLSは一般ユーザーにしか効かない
CREATE TABLEしたユーザーやSUPERUSERに対してはRLSの制限は無効となります。なので、migrationはSUPERUSERで実行、アプリは一般ユーザーで起動。などとする必要があります。
一般ユーザーには次のように必要な権限を与えておきましょう。
GRANT SELECT, UPDATE, INSERT, DELETE ON ALL TABLES IN SCHEMA public TO PUBLIC;
GRANT SELECT, UPDATE ON ALL SEQUENCES IN SCHEMA public TO PUBLIC;
UNIQUE制約に注意
UNIQUE制約はtenant_idとの複合インデックスにする必要があります。(アプリケーションからは見えないのでバリデーションについては複合条件にする必要はない)
INSERT時の注意
SELECTは透過的に制約されたレコードしか見えませんが、INSERTするときはtenant_idを自分でセットする必要があります。(前述の実装案ではModelの基底クラス
ApplicationRecordを使って自動的に入るようにした)マイグレーションの注意
テーブルを追加するときに必要になるCREATE POLICYは、マイグレーションでやりたくなりますが、その場合schema.rbに反映されないので、
db:reset/db:setupは使えません。(db:migrate:resetはok)デメリット
今回は実際にこの実装で運用したわけではないのですが、考えられるデメリットを上げてみます。
テーブルが肥大化する
RDBはレコード数が膨大になると取り扱いが大変になります。インデックスを設定していてもメモリに乗らず急激に重くなったり。
そこでパーティショニング(テーブル分割)機能の利用を検討することになります。カラムの値に応じて分割するリストパーティションという方法があるので、それを使うことになるでしょう。
tenant_idごとにテーブル分割する。という戦略を最初に思いつきますが、一般的にパーティショニングで100を超えるような子テーブルを作るのは想定されていないようで、パフォーマンスに問題がでるという報告も見られます(実際に試してはいませんが)。このアプローチはあまり現実的ではなさそうです。
データが増えたら臨機応変に手動で分割していく、といった戦略になりそう。めんどくさいですね。
テナントの削除が面倒
すべてのテーブルのレコードを消して回らないといけないので大変そう。マルチスキーマ方式の場合はスキーマを削除するだけなので簡単でした。
他の環境からのデータ移行が難しい
SaaS型のサービスだけどオンプレミスでも提供する。といった場合、オンプレミスからSaaSへのデータ移行が必要になったときに大変そう。各テーブルのidが変わってしまうためです。マルチスキーマ方式の場合はダンプ&リストアするだけで済みました。
RLSは見送ることにした
やはりテーブルの肥大化がつらそう。という懸念が払拭できませんでした。
マルチスキーマ方式でマイグレーションがつらい、というのはデプロイのときだけの問題であり、日常的にパフォーマンスを気にするよりずっとマシな気がします。
そのマイグレーションも数百程度のテナント数ならほとんど問題はないので、テナント数の想定にもよりますがスタートアップ段階ではマルチスキーマ方式でも良いのではないか? と思いました。
Apartmentはテナントに応じてDBサーバを変えられる機能などもあり、性能に関してはこちらのほうが安心感が大きいです。
他のソリューション
Citus
https://www.citusdata.com/マルチテナントをいい感じに実現してくれるPostgreSQLの拡張機能。
OSSなのでEC2にはインストールできますが、RDSでは使えないですね……
2016年〜 にAWS上でマネージドサービスを提供するCitus Cloudというサービスがあったようです。
ところが、2019年にMicrosoftがCitusを買収。Citus Cloudは終了。代わりにAzureで利用できるようなったようです。あ"〜
AWSはマストなので厳しい……
Apartmentの開発が停滞してる
よし、やっぱりこれからもApartmentで行くぞ! と思って新しいプロジェクト(Rails 6)で使おうとしたら動かなくてあれれとなりました。
結構メジャーなGemだと思うのですが、なんと今時点(2020年7月)でまだRails 6に対応していないのでした。
活発にメンテされているFork版があったのでとりあえずこちらを使えば大丈夫そうですが。
- 投稿日:2020-07-20T14:11:27+09:00
Deviseでログイン前のルーティングを設定する
やりたいこと
Devise導入した状態で、
ログイン前後のルーティングをカスタマイズする。前提
Deviseをインストールすると、デフォルトではルートパスが/users/sign_inとなっている。
そのため、ログインしていない状態でtopページへ行こうとするとdevise側で勝手にサインインページに飛んでしまう。方法
ログインしていない状態で特定のページへ遷移させたい場合は
before_action :authenticate_user!
を該当コントローラーに記述する必要があります。
全てのアクションについてログイン認証を必要とする場合はapplication_controllerに記述することで
各コントローラーに記述する手間を省けます。before_action :authenticate_user!とは
before_action :authenticate_user!はdeviseのヘルパーメソッドです。
これを記述することで認証ユーザーのみ各アクションを実行するようになります。特定のアクションのみ、ログインしていない状態で実行したい場合
例えば「topページとaboutページだけはログインしていなくても表示させたい…」という時は
下記のように、該当アクションを除外する形で指定します。
before_action :authenticate_user!, except: [:top, about]
こうすることでtopアクションとaboutアクションのみログアウト状態でも表示することができます。
その他のアクションはログインしていないとURL直打ちしても表示されなくなります。▼参考Devise authentication_user!
https://skillhub.jp/courses/137/lessons/978又、今回私はapplication_controllerに記述すると記載しましたが、
userコントローラー以外の他のコントローラーにログイン認証設定を加えたくない場合は
ディレクトリに階層を作り、そのディレクトリのみ適応されるコントローラーを作成する方法もあります。下記を参考にしてください。
▼参考
https://qiita.com/ryuuuuuuuuuu/items/bf7e2ea18ef29254b3dd
- 投稿日:2020-07-20T11:03:35+09:00
【Rails】docker-composeの速度を上げる方法
開発環境
・Docker: 19.03.8
・Docker-Compose: 1.25.5
・Ruby: 2.5.7
・Rails: 5.2.4
・Vagrant: 2.2.7
・VirtualBox: 6.1
・OS: macOS Catalina前提
下記実装済み。
原因
docker-compose実行時に、
temp、log、vendor、.git等の余計なファイルをマウントしてしまっている。解決方法
マウントする必要のないディレクトリのマウントを、別のvolumeで上書きします。
docker-compose.ymlを編集docker-compose.yml# 変更前 version: '3' services: db: image: postgres volumes: - ./tmp/db:/var/lib/postgresql/data environment: POSTGRES_PASSWORD: password web: build: . command: bash -c "rm -f tmp/pids/server.pid && bundle exec rails s -p 3000 -b '0.0.0.0'" volumes: - .:/myapp ports: - "3000:3000" depends_on: - db # 変更後 version: '3' services: db: image: postgres volumes: - ./tmp/db:/var/lib/postgresql/data environment: - POSTGRES_HOST_AUTH_METHOD=trust web: build: . command: bash -c "rm -f tmp/pids/server.pid && bundle exec rails s -p 3000 -b '0.0.0.0'" volumes: - .:/app:cached - /app/vendor - /app/tmp - /app/log - /app/.git ports: - '3000:3000' depends_on: - db
- 投稿日:2020-07-20T10:23:31+09:00
一からはじめるGCP on RoRでマイクロサービス
初めに
- 今回使用するGCPのサービスは、「GCE」、「Cloud DNS」、「VPCネットワークの静的IP」、「ファイアウォール」となります。
- インスタンスはAlwaysFreeを想定しています(が、DNSや静的IPなど、完全無料とはならない場合があります)
構成
- ディストリビューションセットアップ編
- Webアプリ環境セットアップ編
- アプリインストール編
手順
インスタンスセットアップ編
GCEインスタンスの作成
- 作成前にまずプロジェクトを作成します
プロジェクトの作成
- プロジェクト作成直後はインスタンスが作成できないため、少々待ちましょう
- 数分後には作成できる様になります
請求情報の設定
既存のプロジェクトがある場合、その設定から引き継ぐことができます。
また、AlwaysFreeの対象としたい場合、請求情報が必要となります。
インスタンスの作成
- 作成ボタンを押下し作成画面で設定します
デフォルトでは10GBとなっているため、AlwaysFree枠の30GBに設定しておきます
ポートの80,443を開放し、HTTPアクセスを許可します
- デフォルトのインスタンスはネットワークインターフェースの内部・外部IP共にエフェメラルの状態です
- エフェメラルのままにしておくと、インスタンスが立ち上がるたびに違うIPアドレスとなり、DNSレコードの再設定が必要になるなど面倒なため、固定IPを取得します
作成が完了しました
項目 設定値 備考 名前 web-app-1 - ラベル - - リージョン us-west1(オレゴン) - ゾーン us-west1-b オレゴンを選択した際の初期値 マシンファミリー 汎用 - シリーズ N1 - マシンタイプ f1-micro (1 vCPU、614MB メモリ) AlwaysFree対象 ブートディスク Debian GNU/Linux 9 (stretch)
標準の永続ディスク
30GBDebian GNU/Linux 10 (buster) 10GBが初期値となっているので、どちらでも良い サービスアカウント Compute Engine default service account 初期値 アクセススコープ デフォルトのアクセス権を許可 初期値 ファイアウォール HTTPトラフィックを許可する
HTTPSトラフィックを許可するwebアプリ用のインスタンスのため、許可しておく(ファイアウォール設定も含まれるため) 管理 削除からの保護の有効化 他初期値 セキュリティ セキュアブートをオンにする
vTPMをオンにする
整合性モニタリングを有効にするSSH認証鍵については後ほど追加します ディスク - 初期値 ネットワーキング 外部IP:作成 他初期値 単一テナンシー - 初期値 ディストリビューションセットアップ編
SSH接続ポートを変更
- well-knownポートの22番へのポートスキャンがある事やブルートフォースへの脆弱性にもなることから、ポートを変更します
ファイアウォールルールを作成 (allow)
VMインスタンスの画面下部のファイアウォールルールの設定を押下します
以下の内容で設定します
項目 設定値 備考 名前 custom-allow-ssh - 説明 具体的に何のルールかを記載する - ログ オフ Stackdriverコストが増える可能性がある為、オフ ネットワーク default - 優先度 1000 インスタンス作成時に設定されたルールの優先度よりも低い数値を指定する トラフィックの方向 上り 上り:受信トラフィック、下り:送信トラフィック 一致したときのアクション 許可 - ターゲット allow%port_number%-ssh - ソースフィルタ IP範囲 - ソースIPの範囲 0.0.0.0/0 全て対象 2番目のソースフィルタ なし - プロトコルとポート 指定したプロトコルとポート
tcp:%port_number%- ターゲットタグはallowかdisallowかを接頭辞に指定した上、ポートとプロトコルを指定しています
Cloud Shellアクセス
TerminalConnected, host fingerprint: ssh-rsa 0 DB:***** Linux web-app-1 4.9.0-12-amd64 #1 SMP Debian 4.9.210-1+deb9u1 (2020-06-07) x86_64 The programs included with the Debian GNU/Linux system are free software; the exact distribution terms for each program are described in the individual files in /usr/share/doc/*/copyright. Debian GNU/Linux comes with ABSOLUTELY NO WARRANTY, to the extent permitted by applicable law.sshd_configのポート番号を変更する
Terminaladministrator@web-app-1:~$ sudo su - root@web-app-1:~# grep Port /etc/ssh/sshd_config #Port 22 #GatewayPorts no root@web-app-1:~# vi /etc/ssh/sshd_config Port %port_number% root@web-app-1:~# grep Port /etc/ssh/sshd_config #Port 22 Port %port_number% #GatewayPorts no root@web-app-1:~# systemctl restart sshdファイアウォールルールを作成 (disallow)
項目 設定値 備考 名前 custom-disallow-ssh - 説明 具体的に何のルールかを記載する - ログ オフ Stackdriverコストが増える可能性がある為、オフ ネットワーク default - 優先度 1000 インスタンス作成時に設定されたルールの優先度よりも低い数値を指定する トラフィックの方向 上り 上り:受信トラフィック、下り:送信トラフィック 一致したときのアクション 拒否 - ターゲット disallow22-ssh - ソースフィルタ IP範囲 - ソースIPの範囲 0.0.0.0/0 全て対象 2番目のソースフィルタ なし - プロトコルとポート 指定したプロトコルとポート
tcp:22- ターゲットタグはallowかdisallowかを接頭辞に指定した上、ポートとプロトコルを指定しています
公開鍵認証設定
- インスタンス作成後、Cloud Shellでインスタンスにアクセスできますが、それだと管理コンソールからのアクセスで面倒なので公開鍵認証を設定して、ローカルマシンからアクセスできる様にします
公開鍵生成
Terminal$ ssh-keygen -t rsa -f ~/.ssh/gcp_key $ chmod 400 ~/.ssh/gcp_key $ cat ~/.ssh/gcp_key.pubVMインスタンスのSSH鍵認証設定
sshアクセスを試行する
Terminal$ ssh %user%@%static_ip% -p %port_number% -i ~/.ssh/gcp_keyRootログインの無効化
- 最新のインスタンスでは初期値がnoになっています
Terminalroot@web-app-1:~$ grep -E "PermitRootLogin|PasswordAuthentication|ChallengeResponseAuthentication" /etc/ssh/sshd_config PermitRootLogin no PasswordAuthentication no ChallengeResponseAuthentication no # be allowed through the ChallengeResponseAuthentication and # PasswordAuthentication. Depending on your PAM configuration, # PAM authentication via ChallengeResponseAuthentication may bypass # the setting of "PermitRootLogin without-password". # PAM authentication, then enable this but set PasswordAuthentication # and ChallengeResponseAuthentication to 'no'.パスワード認証の無効化
- 最新のインスタンスでは初期値がnoになっています
Terminalroot@web-app-1:~$ grep -E "PermitRootLogin|PasswordAuthentication|ChallengeResponseAuthentication" /etc/ssh/sshd_config PermitRootLogin no PasswordAuthentication no ChallengeResponseAuthentication no # be allowed through the ChallengeResponseAuthentication and # PasswordAuthentication. Depending on your PAM configuration, # PAM authentication via ChallengeResponseAuthentication may bypass # the setting of "PermitRootLogin without-password". # PAM authentication, then enable this but set PasswordAuthentication # and ChallengeResponseAuthentication to 'no'.SSHのプロトコルバージョンを変更
認証の試行回数を指定
Terminalroot@web-app-1:~# grep -E "Protocol|MaxAuthTries" /etc/ssh/sshd_config Protocol 1 #MaxAuthTries 6 root@web-app-1:~# vi /etc/ssh/sshd_config root@web-app-1:~# grep -E "Protocol|MaxAuthTries" /etc/ssh/sshd_config Protocol 2 #MaxAuthTries 6 MaxAuthTries 5 root@web-app-1:~# systemctl restart sshd22番ポートを拒否する
VMインスタンスのネットワークタグにターゲットで指定した名称(タグ)を指定します
Webアプリ環境セットアップ編
Nginxの設定
パッケージマネージャのパッケージ一覧を最新化
Terminalroot@web-app-1:~# apt update Get:1 http://security.debian.org stretch/updates InRelease [53.0 kB] Ign:2 http://deb.debian.org/debian stretch InRelease Get:3 http://deb.debian.org/debian stretch-updates InRelease [93.6 kB] Get:4 http://deb.debian.org/debian stretch-backports InRelease [91.8 kB] Get:5 http://deb.debian.org/debian stretch Release [118 kB] Get:6 http://deb.debian.org/debian stretch Release.gpg [2,410 B] Get:7 http://packages.cloud.google.com/apt cloud-sdk-stretch InRelease [6,389 B] Get:8 http://security.debian.org stretch/updates/main Sources [219 kB] Get:9 http://security.debian.org stretch/updates/main amd64 Packages [534 kB] Get:10 http://packages.cloud.google.com/apt google-compute-engine-stretch-stable InRelease [3,843 B] Get:11 http://security.debian.org stretch/updates/main Translation-en [235 kB] Get:12 http://packages.cloud.google.com/apt google-cloud-packages-archive-keyring-stretch InRelease [3,876 B] Get:13 http://deb.debian.org/debian stretch-updates/main Sources.diff/Index [14.5 kB] Get:14 http://deb.debian.org/debian stretch-updates/main amd64 Packages.diff/Index [14.5 kB] Get:15 http://deb.debian.org/debian stretch-updates/main Translation-en.diff/Index [8,116 B] Get:16 http://deb.debian.org/debian stretch-updates/main Sources 2020-07-16-2008.14.pdiff [28 B] Get:17 http://deb.debian.org/debian stretch-updates/main amd64 Packages 2020-07-16-2008.14.pdiff [30 B] Get:16 http://deb.debian.org/debian stretch-updates/main Sources 2020-07-16-2008.14.pdiff [28 B] Get:17 http://deb.debian.org/debian stretch-updates/main amd64 Packages 2020-07-16-2008.14.pdiff [30 B] Get:18 http://deb.debian.org/debian stretch-updates/main Translation-en 2020-07-16-2008.14.pdiff [30 B] Get:18 http://deb.debian.org/debian stretch-updates/main Translation-en 2020-07-16-2008.14.pdiff [30 B] Get:19 http://deb.debian.org/debian stretch/main Sources [6,736 kB] Get:20 http://deb.debian.org/debian stretch/main amd64 Packages [7,080 kB] Get:21 http://deb.debian.org/debian stretch/main Translation-en [5,377 kB] Fetched 20.6 MB in 4s (4,886 kB/s) Reading package lists... Done Building dependency tree Reading state information... Done 9 packages can be upgraded. Run 'apt list --upgradable' to see them.Nginxのインストール
Terminalroot@web-app-1:~# apt install nginx Reading package lists... Done Building dependency tree Reading state information... Done The following additional packages will be installed: fontconfig-config fonts-dejavu-core geoip-database libfontconfig1 libgd3 libgeoip1 libicu57 libjbig0 libjpeg62-turbo libnginx-mod-http-auth-pam libnginx-mod-http-dav-ext libnginx-mod-http-echo libnginx-mod-http-geoip libnginx-mod-http-image-filter libnginx-mod-http-subs-filter libnginx-mod-http-upstream-fair libnginx-mod-http-xslt-filter libnginx-mod-mail libnginx-mod-stream libtiff5 libwebp6 libx11-6 libx11-data libxau6 libxcb1 libxdmcp6 libxml2 libxpm4 libxslt1.1 nginx-common nginx-full user www-data; ssl_prefer_server_ciphers on; ## # Logging Settings ## access_log /var/log/nginx/access.log; error_log /var/log/nginx/error.log; ## # Gzip Settings ## gzip on; gzip_disable "msie6"; # gzip_vary on; # gzip_proxied any; # gzip_comp_level 6; # https://www.nginx.com/resources/wiki/start/topics/tutorials/config_pitfalls/ # gzip_buffers 16 8k; # gzip_http_version 1.1; # gzip_types text/plain text/css application/json application/javascript text/xml application/xml application/xml+rss text/javascript; ## # Virtual Host Configs ## include /etc/nginx/conf.d/*.conf; include /etc/nginx/sites-enabled/*; } #mail { # # See sample authentication script at: # # http://wiki.nginx.org/ImapAuthenticateWithApachePhpScript # # # auth_http localhost/auth.php; # # pop3_capabilities "TOP" "USER"; # # imap_capabilities "IMAP4rev1" "UIDPLUS"; # # server { # listen localhost:110; # protocol pop3; # proxy on; # } # # server { # listen localhost:143; # protocol imap; # proxy on; # } #}バージョン情報の秘匿化
Terminalroot@web-app-1:~# grep server_tokens /etc/nginx/nginx.conf # server_tokens off; root@web-app-1:~# vi /etc/nginx/nginx.conf root@web-app-1:~# grep server_tokens /etc/nginx/nginx.conf server_tokens off;リバースプロキシ設定
Terminalroot@web-app-1:~# grep -E "listen|server_name|location" /etc/nginx/sites-enabled/default listen 80 default_server; listen [::]:80 default_server; # listen 443 ssl default_server; # listen [::]:443 ssl default_server; server_name _; # This file will automatically load configuration files provided by other location / { #location ~ \.php$ { #location ~ /\.ht { # listen 80; # listen [::]:80; # server_name example.com; # location / { root@web-app-1:~# vi /etc/nginx/sites-enabled/default root@web-app-1:~# grep -E "listen|server_name|location|proxy_pass" /etc/nginx/sites-enabled/default listen 80 default_server; listen [::]:80 default_server; # listen 443 ssl default_server; # listen [::]:443 ssl default_server; # server_name _; server_name %domain_name%; location / { proxy_pass http://0.0.0.0:3000; #location ~ \.php$ { #location ~ /\.ht { # listen 80; # listen [::]:80; # server_name example.com; # location / { root@web-app-1:~# systemctl status nginx.service ● nginx.service - A high performance web server and a reverse proxy server Loaded: loaded (/lib/systemd/system/nginx.service; enabled; vendor preset: enabled) Active: active (running) (Result: exit-code) since Sat 2020-07-18 20:48:07 UTC; 12min ago Docs: man:nginx(8) Process: 2294 ExecReload=/usr/sbin/nginx -g daemon on; master_process on; -s reload (code=exited, status= 1/FAILURE) Process: 2272 ExecStart=/usr/sbin/nginx -g daemon on; master_process on; (code=exited, status=0/SUCCESS) Process: 2270 ExecStartPre=/usr/sbin/nginx -t -q -g daemon on; master_process on; (code=exited, status=0/SUCCESS) Main PID: 2274 (nginx) Tasks: 2 (limit: 4915) CGroup: /system.slice/nginx.service ├─2274 nginx: master process /usr/sbin/nginx -g daemon on; master_process on; └─2275 nginx: worker process Jul 18 20:57:54 web-app-1 systemd[1]: nginx.service: Control process exited, code=exited status=1 Jul 18 20:57:54 web-app-1 systemd[1]: Reload failed for A high performance web server and a reverse proxy s erver. root@web-app-1:~# systemctl reload nginx root@web-app-1:~# systemctl status nginx.service ● nginx.service - A high performance web server and a reverse proxy server Loaded: loaded (/lib/systemd/system/nginx.service; enabled; vendor preset: enabled) Active: active (running) (Result: exit-code) since Sat 2020-07-18 20:48:07 UTC; 12min ago Docs: man:nginx(8) Process: 2307 ExecReload=/usr/sbin/nginx -g daemon on; master_process on; -s reload (code=exited, status=0/SUCCES S) Process: 2272 ExecStart=/usr/sbin/nginx -g daemon on; master_process on; (code=exited, status=0/SUCCESS) Process: 2270 ExecStartPre=/usr/sbin/nginx -t -q -g daemon on; master_process on; (code=exited, status=0/SUCCESS) Main PID: 2274 (nginx) Tasks: 2 (limit: 4915) CGroup: /system.slice/nginx.service ├─2274 nginx: master process /usr/sbin/nginx -g daemon on; master_process on; └─2308 nginx: worker process Jul 18 20:57:54 web-app-1 systemd[1]: nginx.service: Control process exited, code=exited status=1 Jul 18 20:57:54 web-app-1 systemd[1]: Reload failed for A high performance web server and a reverse proxy s erver. Jul 18 21:00:55 web-app-1 systemd[1]: Reloading A high performance web server and a reverse proxy server. Jul 18 21:00:55 web-app-1 systemd[1]: Reloaded A high performance web server and a reverse proxy server.起動しない場合 (nginx.service failedとなる場合)
Terminalroot@web-app-1:~# systemctl reload nginx Job for nginx.service failed because the control process exited with error code. See "systemctl status nginx.service" and "journalctl -xe" for details. root@web-app-1:~# systemctl status nginx.service ● nginx.service - A high performance web server and a reverse proxy server Loaded: loaded (/lib/systemd/system/nginx.service; enabled; vendor preset: enabled) Active: active (running) (Result: exit-code) since Sat 2020-07-18 20:48:07 UTC; 10min ago Docs: man:nginx(8) Process: 2294 ExecReload=/usr/sbin/nginx -g daemon on; master_process on; -s reload (code=exited, status= 1/FAILURE) Process: 2272 ExecStart=/usr/sbin/nginx -g daemon on; master_process on; (code=exited, status=0/SUCCESS) Process: 2270 ExecStartPre=/usr/sbin/nginx -t -q -g daemon on; master_process on; (code=exited, status=0/SUCCESS) Main PID: 2274 (nginx) Tasks: 2 (limit: 4915) CGroup: /system.slice/nginx.service ├─2274 nginx: master process /usr/sbin/nginx -g daemon on; master_process on; └─2275 nginx: worker process Jul 18 20:57:54 web-app-1 nginx[2294]: nginx: [emerg] directive "server_name" is not terminated by ";" in /etc/ngin x/sites-enabled/default:50上記の様にstatusコマンドで確認するとエラーログが表示されます
Terminalroot@web-app-1:~# grep error_log /etc/nginx/nginx.conf error_log /var/log/nginx/error.log; root@web-app-1:~# tail -f /var/log/nginx/error.log 2020/07/18 20:57:54 [emerg] 2294#2294: directive "server_name" is not terminated by ";" in /etc/nginx/sites-enabled/default:50 ^Cまた、error_logの出力先にも同様のログが出力されますので、内容を確認しましょう
上記の場合は、文法エラー(EOL未指定)であることがわかりますTerminalroot@web-app-1:~# grep -E "listen|server_name|location" /etc/nginx/sites-enabled/default listen 80 default_server; listen [::]:80 default_server; # listen 443 ssl default_server; # listen [::]:443 ssl default_server; # server_name _; server_name %domain_name% # この場合、ここに;が指定されていませんでした location / { #location ~ \.php$ { #location ~ /\.ht { # listen 80; # listen [::]:80; # server_name example.com; # location / { root@web-app-1:~# vi /etc/nginx/sites-enabled/defaultSSLの設定
Debian backports リポジトリの有効化
Terminalroot@web-app-1:~# cd /etc/apt/ root@web-app-1:/etc/apt# grep "ftp.debian.org" sources.list root@web-app-1:/etc/apt# vi sources.list root@web-app-1:/etc/apt# apt -y update Ign:1 http://deb.debian.org/debian stretch InRelease Get:2 http://security.debian.org stretch/updates InRelease [53.0 kB] Get:3 http://deb.debian.org/debian stretch-updates InRelease [93.6 kB] Get:4 http://deb.debian.org/debian stretch-backports InRelease [91.8 kB] Hit:5 http://deb.debian.org/debian stretch Release Hit:6 http://packages.cloud.google.com/apt cloud-sdk-stretch InRelease Get:7 http://packages.cloud.google.com/apt google-compute-engine-stretch-stable InRelease [3,843 B] Hit:8 http://packages.cloud.google.com/apt google-cloud-packages-archive-keyring-stretch InRelease Get:9 http://ftp.debian.org/debian stretch-backports InRelease [91.8 kB] Get:11 http://ftp.debian.org/debian stretch-backports/main amd64 Packages [613 kB] Get:12 http://ftp.debian.org/debian stretch-backports/main Translation-en [469 kB] Fetched 1,416 kB in 1s (807 kB/s) Reading package lists... Done Building dependency tree Reading state information... Done 3 packages can be upgraded. Run 'apt list --upgradable' to see them.Certbotインストール
Terminalroot@web-app-1:/etc/apt# apt -y -t stretch-backports install certbot Reading package lists... Done Building dependency tree Reading state information... Done The following additional packages will be installed: python-pyicu python3-acme python3-asn1crypto python3-certbot python3-certifi python3-cffi-backend python3-chardet python3-configargparse python3-configobj python3-cryptography python3-future python3-idna python3-josepy python3-mock python3-openssl python3-parsedatetime python3-pbr python3-pkg-resources python3-requests python3-requests-toolbelt python3-rfc3339 python3-setuptools python3-six python3-tz python3-urllib3 python3-zope.component python3-zope.event python3-zope.hookable python3-zope.interface Suggested packages: python3-certbot-apache python3-certbot-nginx python-certbot-doc python-acme-doc python-configobj-doc python-cryptography-doc python3-cryptography-vectors python-future-doc python-mock-doc python-openssl-doc python3-openssl-dbg python3-socks python-setuptools-doc The following NEW packages will be installed: certbot python-pyicu python3-acme python3-asn1crypto python3-certbot python3-certifi python3-cffi-backend python3-chardet python3-configargparse python3-configobj python3-cryptography python3-future python3-idna python3-josepy python3-mock python3-openssl python3-parsedatetime python3-pbr python3-pkg-resources python3-requests python3-requests-toolbelt python3-rfc3339 python3-setuptools python3-six python3-tz python3-urllib3 python3-zope.component python3-zope.event python3-zope.hookable python3-zope.interface 0 upgraded, 30 newly installed, 0 to remove and 87 not upgraded. Need to get 2,527 kB of archives. After this operation, 12.6 MB of additional disk space will be used. Get:1 http://deb.debian.org/debian stretch/main amd64 python3-cffi-backend amd64 1.9.1-2 [70.1 kB] Get:2 http://deb.debian.org/debian stretch/main amd64 python3-six all 1.10.0-3 [14.4 kB] Get:3 http://deb.debian.org/debian stretch/main amd64 python3-openssl all 16.2.0-1 [43.8 kB] Get:4 http://deb.debian.org/debian stretch/main amd64 python3-pkg-resources all 33.1.1-1 [137 kB] Get:5 http://deb.debian.org/debian stretch/main amd64 python3-setuptools all 33.1.1-1 [215 kB] Get:6 http://deb.debian.org/debian stretch/main amd64 python3-mock all 2.0.0-3 [59.9 kB] Get:7 http://deb.debian.org/debian stretch/main amd64 python3-certifi all 2016.2.28-1 [172 kB] Get:8 http://deb.debian.org/debian stretch/main amd64 python3-requests-toolbelt all 0.7.0-1 [36.7 kB] Get:9 http://deb.debian.org/debian stretch/main amd64 python3-tz all 2016.7-0.3 [27.1 kB] Get:10 http://deb.debian.org/debian stretch/main amd64 python3-rfc3339 all 1.0-4 [6,282 B] Get:11 http://deb.debian.org/debian stretch/main amd64 python3-configargparse all 0.11.0-1 [22.3 kB] Get:12 http://deb.debian.org/debian stretch/main amd64 python3-configobj all 5.0.6-2 [35.2 kB] Get:13 http://deb.debian.org/debian stretch/main amd64 python3-future all 0.15.2-4 [346 kB] Get:14 http://deb.debian.org/debian stretch/main amd64 python3-zope.hookable amd64 4.0.4-4+b2 [10.3 kB] Get:15 http://deb.debian.org/debian stretch/main amd64 python3-zope.interface amd64 4.3.2-1 [89.8 kB] Get:16 http://deb.debian.org/debian stretch/main amd64 python3-zope.event all 4.2.0-1 [8,412 B] Get:17 http://deb.debian.org/debian stretch/main amd64 python3-zope.component all 4.3.0-1 [43.0 kB] Get:18 http://deb.debian.org/debian stretch/main amd64 python-pyicu amd64 1.9.5-1 [188 kB] Get:19 http://ftp.debian.org/debian stretch-backports/main amd64 python3-asn1crypto all 0.24.0-1~bpo9+1 [78.2 kB] Get:20 http://ftp.debian.org/debian stretch-backports/main amd64 python3-idna all 2.6-1~bpo9+1 [34.3 kB] Get:21 http://ftp.debian.org/debian stretch-backports/main amd64 python3-cryptography amd64 2.3-1~bpo9+1 [214 kB] Get:22 http://ftp.debian.org/debian stretch-backports/main amd64 python3-josepy all 1.1.0-2~bpo9+1 [27.8 kB] Get:23 http://ftp.debian.org/debian stretch-backports/main amd64 python3-pbr all 4.2.0-4~bpo9+2 [56.4 kB] Get:24 http://ftp.debian.org/debian stretch-backports/main amd64 python3-chardet all 3.0.4-1~bpo9+1 [80.4 kB] Get:25 http://ftp.debian.org/debian stretch-backports/main amd64 python3-urllib3 all 1.24.1-1~bpo9+1 [97.1 kB] Get:26 http://ftp.debian.org/debian stretch-backports/main amd64 python3-requests all 2.21.0-1~bpo9+1 [66.9 kB] Get:27 http://ftp.debian.org/debian stretch-backports/main amd64 python3-acme all 0.28.0-1~bpo9+1 [47.8 kB] Get:28 http://ftp.debian.org/debian stretch-backports/main amd64 python3-parsedatetime all 2.4-2~bpo9+1 [39.8 kB] Get:29 http://ftp.debian.org/debian stretch-backports/main amd64 python3-certbot all 0.28.0-1~bpo9+1 [222 kB] Get:30 http://ftp.debian.org/debian stretch-backports/main amd64 certbot all 0.28.0-1~bpo9+1 [37.3 kB] Fetched 2,527 kB in 1s (1,886 kB/s) Selecting previously unselected package python3-asn1crypto. (Reading database ... 71085 files and directories currently installed.) Preparing to unpack .../00-python3-asn1crypto_0.24.0-1~bpo9+1_all.deb ... Unpacking python3-asn1crypto (0.24.0-1~bpo9+1) ... Selecting previously unselected package python3-cffi-backend. Preparing to unpack .../01-python3-cffi-backend_1.9.1-2_amd64.deb ... Unpacking python3-cffi-backend (1.9.1-2) ... Selecting previously unselected package python3-idna. Preparing to unpack .../02-python3-idna_2.6-1~bpo9+1_all.deb ... Unpacking python3-idna (2.6-1~bpo9+1) ... Selecting previously unselected package python3-six. Preparing to unpack .../03-python3-six_1.10.0-3_all.deb ... Unpacking python3-six (1.10.0-3) ... Selecting previously unselected package python3-cryptography. Preparing to unpack .../04-python3-cryptography_2.3-1~bpo9+1_amd64.deb ... Unpacking python3-cryptography (2.3-1~bpo9+1) ... Selecting previously unselected package python3-openssl. Preparing to unpack .../05-python3-openssl_16.2.0-1_all.deb ... Unpacking python3-openssl (16.2.0-1) ... Selecting previously unselected package python3-pkg-resources. Preparing to unpack .../06-python3-pkg-resources_33.1.1-1_all.deb ... Unpacking python3-pkg-resources (33.1.1-1) ... Selecting previously unselected package python3-josepy. Preparing to unpack .../07-python3-josepy_1.1.0-2~bpo9+1_all.deb ... Unpacking python3-josepy (1.1.0-2~bpo9+1) ... Selecting previously unselected package python3-setuptools. Preparing to unpack .../08-python3-setuptools_33.1.1-1_all.deb ... Unpacking python3-setuptools (33.1.1-1) ... Selecting previously unselected package python3-pbr. Preparing to unpack .../09-python3-pbr_4.2.0-4~bpo9+2_all.deb ... Unpacking python3-pbr (4.2.0-4~bpo9+2) ... Selecting previously unselected package python3-mock. Preparing to unpack .../10-python3-mock_2.0.0-3_all.deb ... Unpacking python3-mock (2.0.0-3) ... Selecting previously unselected package python3-certifi. Preparing to unpack .../11-python3-certifi_2016.2.28-1_all.deb ... Unpacking python3-certifi (2016.2.28-1) ... Selecting previously unselected package python3-chardet. Preparing to unpack .../12-python3-chardet_3.0.4-1~bpo9+1_all.deb ... Unpacking python3-chardet (3.0.4-1~bpo9+1) ... Selecting previously unselected package python3-urllib3. Preparing to unpack .../13-python3-urllib3_1.24.1-1~bpo9+1_all.deb ... Unpacking python3-urllib3 (1.24.1-1~bpo9+1) ... Selecting previously unselected package python3-requests. Preparing to unpack .../14-python3-requests_2.21.0-1~bpo9+1_all.deb ... Unpacking python3-requests (2.21.0-1~bpo9+1) ... Selecting previously unselected package python3-requests-toolbelt. Preparing to unpack .../15-python3-requests-toolbelt_0.7.0-1_all.deb ... Unpacking python3-requests-toolbelt (0.7.0-1) ... Selecting previously unselected package python3-tz. Preparing to unpack .../16-python3-tz_2016.7-0.3_all.deb ... Unpacking python3-tz (2016.7-0.3) ... Selecting previously unselected package python3-rfc3339. Preparing to unpack .../17-python3-rfc3339_1.0-4_all.deb ... Unpacking python3-rfc3339 (1.0-4) ... Selecting previously unselected package python3-acme. Preparing to unpack .../18-python3-acme_0.28.0-1~bpo9+1_all.deb ... Unpacking python3-acme (0.28.0-1~bpo9+1) ... Selecting previously unselected package python3-configargparse. Preparing to unpack .../19-python3-configargparse_0.11.0-1_all.deb ... Unpacking python3-configargparse (0.11.0-1) ... Selecting previously unselected package python3-configobj. Preparing to unpack .../20-python3-configobj_5.0.6-2_all.deb ... Unpacking python3-configobj (5.0.6-2) ... Selecting previously unselected package python3-future. Preparing to unpack .../21-python3-future_0.15.2-4_all.deb ... Unpacking python3-future (0.15.2-4) ... Selecting previously unselected package python3-parsedatetime. Preparing to unpack .../22-python3-parsedatetime_2.4-2~bpo9+1_all.deb ... Unpacking python3-parsedatetime (2.4-2~bpo9+1) ... Selecting previously unselected package python3-zope.hookable. Preparing to unpack .../23-python3-zope.hookable_4.0.4-4+b2_amd64.deb ... Unpacking python3-zope.hookable (4.0.4-4+b2) ... Selecting previously unselected package python3-zope.interface. Preparing to unpack .../24-python3-zope.interface_4.3.2-1_amd64.deb ... Unpacking python3-zope.interface (4.3.2-1) ... Selecting previously unselected package python3-zope.event. Preparing to unpack .../25-python3-zope.event_4.2.0-1_all.deb ... Unpacking python3-zope.event (4.2.0-1) ... Selecting previously unselected package python3-zope.component. Preparing to unpack .../26-python3-zope.component_4.3.0-1_all.deb ... Unpacking python3-zope.component (4.3.0-1) ... Selecting previously unselected package python3-certbot. Preparing to unpack .../27-python3-certbot_0.28.0-1~bpo9+1_all.deb ... Unpacking python3-certbot (0.28.0-1~bpo9+1) ... Selecting previously unselected package certbot. Preparing to unpack .../28-certbot_0.28.0-1~bpo9+1_all.deb ... Unpacking certbot (0.28.0-1~bpo9+1) ... Selecting previously unselected package python-pyicu. Preparing to unpack .../29-python-pyicu_1.9.5-1_amd64.deb ... Unpacking python-pyicu (1.9.5-1) ... Setting up python3-cffi-backend (1.9.1-2) ... Setting up python3-idna (2.6-1~bpo9+1) ... Setting up python3-six (1.10.0-3) ... Setting up python3-certifi (2016.2.28-1) ... Setting up python3-pkg-resources (33.1.1-1) ... Setting up python3-asn1crypto (0.24.0-1~bpo9+1) ... Setting up python3-configargparse (0.11.0-1) ... Setting up python3-zope.hookable (4.0.4-4+b2) ... Setting up python3-future (0.15.2-4) ... update-alternatives: using /usr/bin/python3-futurize to provide /usr/bin/futurize (futurize) in auto mode update-alternatives: using /usr/bin/python3-pasteurize to provide /usr/bin/pasteurize (pasteurize) in auto mode Setting up python3-chardet (3.0.4-1~bpo9+1) ... Processing triggers for man-db (2.7.6.1-2) ... Setting up python3-urllib3 (1.24.1-1~bpo9+1) ... Setting up python3-configobj (5.0.6-2) ... Setting up python3-setuptools (33.1.1-1) ... Setting up python3-tz (2016.7-0.3) ... Setting up python-pyicu (1.9.5-1) ... Setting up python3-parsedatetime (2.4-2~bpo9+1) ... Setting up python3-cryptography (2.3-1~bpo9+1) ... Setting up python3-pbr (4.2.0-4~bpo9+2) ... update-alternatives: using /usr/bin/python3-pbr to provide /usr/bin/pbr (pbr) in auto mode Setting up python3-rfc3339 (1.0-4) ... Setting up python3-mock (2.0.0-3) ... Setting up python3-zope.event (4.2.0-1) ... Setting up python3-zope.interface (4.3.2-1) ... Setting up python3-requests (2.21.0-1~bpo9+1) ... Setting up python3-openssl (16.2.0-1) ... Setting up python3-josepy (1.1.0-2~bpo9+1) ... Setting up python3-requests-toolbelt (0.7.0-1) ... Setting up python3-zope.component (4.3.0-1) ... Setting up python3-acme (0.28.0-1~bpo9+1) ... Setting up python3-certbot (0.28.0-1~bpo9+1) ... Setting up certbot (0.28.0-1~bpo9+1) ... Created symlink /etc/systemd/system/timers.target.wants/certbot.timer → /lib/systemd/system/certbot.timer. root@web-app-1:/etc/apt#Webサーバー停止
- Certbot実行前にWebサーバーを停止する必要があるため、Webサーバーを停止します
Terminalroot@web-app-1:/etc/apt# systemctl stop nginx root@web-app-1:/etc/apt#
- 停止確認
Terminalroot@web-app-1:/etc/apt# systemctl status nginx ● nginx.service - A high performance web server and a reverse proxy server Loaded: loaded (/lib/systemd/system/nginx.service; enabled; vendor preset: enabled) Active: failed (Result: exit-code) since Sun 2020-07-19 17:22:33 UTC; 16s ago Docs: man:nginx(8) Process: 4126 ExecStop=/sbin/start-stop-daemon --quiet --stop --retry QUIT/5 --pidfile /run/nginx.pid (code=exited, status=0/SUCCESS) Main PID: 2274 (code=exited, status=0/SUCCESS)
- 何やら落ちているっぽいですが、一旦は無視します
Certbot実行
Terminalroot@web-app-1:/etc/apt# certbot certonly --standalone -d %domain_name% Saving debug log to /var/log/letsencrypt/letsencrypt.log Plugins selected: Authenticator standalone, Installer None Enter email address (used for urgent renewal and security notices) (Enter 'c' to cancel): %resitory_mail_address% - - - - - - - - - - - - - - - - - - - - - - - - - - - - - - - - - - - - - - - - Please read the Terms of Service at https://letsencrypt.org/documents/LE-SA-v1.2-November-15-2017.pdf. You must agree in order to register with the ACME server at https://acme-v02.api.letsencrypt.org/directory - - - - - - - - - - - - - - - - - - - - - - - - - - - - - - - - - - - - - - - - (A)gree/(C)ancel: a - - - - - - - - - - - - - - - - - - - - - - - - - - - - - - - - - - - - - - - - Would you be willing to share your email address with the Electronic Frontier Foundation, a founding partner of the Let's Encrypt project and the non-profit organization that develops Certbot? We'd like to send you email about our work encrypting the web, EFF news, campaigns, and ways to support digital freedom. - - - - - - - - - - - - - - - - - - - - - - - - - - - - - - - - - - - - - - - - (Y)es/(N)o: y Obtaining a new certificate Performing the following challenges: http-01 challenge for %domain_name% Waiting for verification... Cleaning up challenges IMPORTANT NOTES: - Congratulations! Your certificate and chain have been saved at: /etc/letsencrypt/live/%domain_name%/fullchain.pem Your key file has been saved at: /etc/letsencrypt/live/%domain_name%/privkey.pem Your cert will expire on 2020-10-17. To obtain a new or tweaked version of this certificate in the future, simply run certbot again. To non-interactively renew *all* of your certificates, run "certbot renew" - Your account credentials have been saved in your Certbot configuration directory at /etc/letsencrypt. You should make a secure backup of this folder now. This configuration directory will also contain certificates and private keys obtained by Certbot so making regular backups of this folder is ideal. - If you like Certbot, please consider supporting our work by: Donating to ISRG / Let's Encrypt: https://letsencrypt.org/donate Donating to EFF: https://eff.org/donate-le
- Congratulations! Your certificate and chain have been saved at: /etc/letsencrypt/live/%domain_name%/fullchain.pem* と表示されれば成功です
httpリクエストのリダイレクト設定
- httpアクセスがあった場合に、httpsにリダイレクトする様にnginxの設定を変更します
Terminalroot@web-app-1:/etc/apt# vi /etc/nginx/sites-enabled/default root@web-app-1:/etc/apt# vi /etc/nginx/sites-enabled/ssl/etc/nginx/sites-enabled/defaultserver { # Http configuration listen 80 default_server; listen [::]:80 default_server; # SSL configuration # # listen 443 ssl default_server; # listen [::]:443 ssl default_server; # # Note: You should disable gzip for SSL traffic. # See: https://bugs.debian.org/773332 # # Read up on ssl_ciphers to ensure a secure configuration. # See: https://bugs.debian.org/765782 # # Self signed certs generated by the ssl-cert package # Don't use them in a production server! # # include snippets/snakeoil.conf; root /var/www/html; # Add index.php to the list if you are using PHP index index.html index.htm index.nginx-debian.html; # server_name _; # Author root 2020/07/19 server_name %domain_name%; return 301 https://$host$request_uri; # リダイレクト設定を挟みます # Comment out Author root 2020/07/19 前回リバースプロキシで設定したhttp環境はコメントアウトします # location / { # First attempt to serve request as file, then # as directory, then fall back to displaying a 404. # try_files $uri $uri/ =404; # Author root 2020/07/19 # proxy_pass http://0.0.0.0:3000; # }/etc/nginx/sites-enabled/sslserver { listen 443 ssl default_server; listen [::]:443 ssl default_server; ssl on; ssl_protocols TLSv1 TLSv1.1 TLSv1.2; ssl_certificate /etc/letsencrypt/live/%domain_name%/fullchain.pem; ssl_certificate_key /etc/letsencrypt/live/%domain_name%/privkey.pem; server_name %domain_name%; location / { proxy_pass http://localhost:3000; } }nginxの起動
- restartを使うとinactiveなのにrestartするなと、言われますので、startを使います
- nginx.service is not active, cannot reload.
Terminalroot@web-app-1:/etc/apt# systemctl start nginx root@web-app-1:/etc/apt# systemctl status nginx ● nginx.service - A high performance web server and a reverse proxy server Loaded: loaded (/lib/systemd/system/nginx.service; enabled; vendor preset: enabled) Active: active (running) since Sun 2020-07-19 17:47:01 UTC; 1s ago Docs: man:nginx(8) Process: 4126 ExecStop=/sbin/start-stop-daemon --quiet --stop --retry QUIT/5 --pidfile /run/nginx.pid (code=exited, status=0/SUCCESS) Process: 4174 ExecStart=/usr/sbin/nginx -g daemon on; master_process on; (code=exited, status=0/SUCCESS) Process: 4172 ExecStartPre=/usr/sbin/nginx -t -q -g daemon on; master_process on; (code=exited, status=0/SUCCESS) Main PID: 4177 (nginx) Tasks: 2 (limit: 4915) CGroup: /system.slice/nginx.service ├─4177 nginx: master process /usr/sbin/nginx -g daemon on; master_process on; └─4178 nginx: worker process証明書自動更新の設定
/etc/cron.d/certbotSHELL=/bin/sh PATH=/usr/local/sbin:/usr/local/bin:/sbin:/bin:/usr/sbin:/usr/bin 0 */12 * * * root test -x /usr/bin/certbot -a \! -d /run/systemd/system && perl -e 'sleep int(rand(43200))' && certbot -q renewTerminalroot@web-app-1:/etc/apt# vi /etc/cron.d/certbot 0 */12 * * * root certbot -q renew --pre-hook "systemctl stop nginx" --post-hook "systemctl start nginx"アプリインストール編
Git設定
Gitインストール
Terminalroot@web-app-1:/var/www# apt-get install git-all Reading package lists... Done Building dependency tree Reading state information... Done The following additional packages will be installed: adwaita-icon-theme at-spi2-core cvs cvsps dbus dconf-gsettings-backend dconf-service emacs emacs24 emacs24-bin-common emacs24-common emacs24-el emacsen-common fontconfig fonts-droid-fallback fonts-noto-mono gawk gconf-service gconf2-common ghostscript git git-arch git-cvs git-daemon-run git-doc git-el git-email git-gui git-man git-mediawiki git-svn gitk gitweb glib-networking glib-networking-common glib-networking-services gnutls-bin gsettings-desktop-schemas gsfonts gtk-update-icon-cache hicolor-icon-theme imagemagick-6-common less libalgorithm-c3-perl libapr1 libaprutil1 libasound2 libasound2-data libatk-bridge2.0-0 libatk1.0-0 libatk1.0-data libatspi2.0-0 libauthen-sasl-perl libavahi-client3 libavahi-common-data libavahi-common3 libb-hooks-endofscope-perl libcairo-gobject2 libcairo2 libcgi-fast-perl libcgi-pm-perl libclass-c3-perl libclass-c3-xs-perl libclass-data-inheritable-perl libclass-factory-util-perl libclass-method-modifiers-perl libclass-singleton-perl libcolord2 libcommon-sense-perl libcroco3 libcups2 libcupsfilters1 libcupsimage2 libcurl3-gnutls libdata-optlist-perl libdatetime-format-builder-perl libdatetime-format-iso8601-perl libdatetime-format-strptime-perl libdatetime-locale-perl libdatetime-perl libdatetime-timezone-perl libdatrie1 libdbd-sqlite3-perl libdbi-perl libdbus-1-3 libdbus-glib-1-2 libdconf1 libdevel-caller-perl libdevel-lexalias-perl libdevel-stacktrace-perl libdigest-hmac-perl libdrm-amdgpu1 libdrm-intel1 libdrm-nouveau2 libdrm-radeon1 libdrm2 libegl1-mesa libemail-valid-perl libencode-locale-perl libepoxy0 liberror-perl libeval-closure-perl libexception-class-perl libfcgi-perl libfftw3-double3 libfile-listing-perl libfont-afm-perl libfontenc1 libfribidi0 libgbm1 libgconf-2-4 libgdk-pixbuf2.0-0 libgdk-pixbuf2.0-common libgif7 libgl1-mesa-dri libgl1-mesa-glx libglapi-mesa libglib2.0-0 libglib2.0-data libgnutls-dane0 libgnutls30 libgomp1 libgraphite2-3 libgs9 libgs9-common libgtk-3-0 libgtk-3-bin libgtk-3-common libharfbuzz0b libhtml-form-perl libhtml-format-perl libhtml-parser-perl libhtml-tagset-perl libhtml-tree-perl libhttp-cookies-perl libhttp-daemon-perl libhttp-date-perl libhttp-message-perl libhttp-negotiate-perl libice6 libijs-0.35 libio-html-perl libio-socket-inet6-perl libio-socket-ssl-perl libjbig2dec0 libjson-glib-1.0-0 libjson-glib-1.0-common libjson-perl libjson-xs-perl liblcms2-2 libllvm3.9 liblockfile-bin liblockfile1 liblqr-1-0 libltdl7 liblwp-mediatypes-perl liblwp-protocol-https-perl libm17n-0 libmagickcore-6.q16-3 libmagickwand-6.q16-3 libmailtools-perl libmediawiki-api-perl libmodule-implementation-perl libmodule-runtime-perl libmpfr4 libmro-compat-perl libnamespace-autoclean-perl libnamespace-clean-perl libnet-dns-perl libnet-domain-tld-perl libnet-http-perl libnet-ip-perl libnet-smtp-ssl-perl libnet-ssleay-perl libopenjp2-7 libotf0 libpackage-deprecationmanager-perl libpackage-stash-perl libpackage-stash-xs-perl libpadwalker-perl libpango-1.0-0 libpangocairo-1.0-0 libpangoft2-1.0-0 libpaper-utils libpaper1 libparams-classify-perl libparams-util-perl libparams-validate-perl libparams-validationcompiler-perl libpciaccess0 libperl5.24 libpixman-1-0 libproxy1v5 librest-0.7-0 librole-tiny-perl librsvg2-2 librsvg2-common libscalar-list-utils-perl libsensors4 libserf-1-1 libsigsegv2 libsm6 libsocket6-perl libsoup-gnome2.4-1 libsoup2.4-1 libspecio-perl libsub-exporter-perl libsub-exporter-progressive-perl libsub-identify-perl libsub-install-perl libsub-name-perl libsvn-perl libsvn1 libtcl8.6 libterm-readkey-perl libtest-fatal-perl libthai-data libthai0 libtimedate-perl libtk8.6 libtry-tiny-perl libtxc-dxtn-s2tc libtypes-serialiser-perl libunbound2 liburi-perl libutempter0 libvariable-magic-perl libwayland-client0 libwayland-cursor0 libwayland-egl1-mesa libwayland-server0 libwww-perl libwww-robotrules-perl libx11-xcb1 libxaw7 libxcb-dri2-0 libxcb-dri3-0 libxcb-glx0 libxcb-present0 libxcb-render0 libxcb-shape0 libxcb-shm0 libxcb-sync1 libxcb-xfixes0 libxcomposite1 libxcursor1 libxdamage1 libxext6 libxfixes3 libxft2 libxi6 libxinerama1 libxkbcommon0 libxmu6 libxmuu1 libxrandr2 libxrender1 libxshmfence1 libxss1 libxt6 libxtst6 libxv1 libxxf86dga1 libxxf86vm1 libyaml-libyaml-perl libyaml-perl m17n-db patch perl perl-base perl-modules-5.24 perl-openssl-defaults poppler-data rename rsync runit shared-mime-info tcl tcl8.6 tk tk8.6 tla tla-doc x11-common x11-utils xbitmaps xdg-user-dirs xkb-data xterm Suggested packages: mksh rcs default-dbus-session-bus | dbus-session-bus emacs24-common-non-dfsg ncurses-term fonts-noto gawk-doc ghostscript-x aspell mediawiki subversion libasound2-plugins alsa-utils libgssapi-perl colord cups-common libclone-perl libmldbm-perl libnet-daemon-perl libsql-statement-perl libfftw3-bin libfftw3-dev dns-root-data gvfs libdata-dump-perl liblcms2-utils libcrypt-ssleay-perl m17n-docs libmagickcore-6.q16-3-extra libscalar-number-perl pciutils librsvg2-bin lm-sensors libauthen-ntlm-perl libyaml-shell-perl ed diffutils-doc perl-doc libterm-readline-gnu-perl | libterm-readline-perl-perl make poppler-utils fonts-japanese-mincho | fonts-ipafont-mincho fonts-japanese-gothic | fonts-ipafont-gothic fonts-arphic-ukai fonts-arphic-uming fonts-nanum tcl-tclreadline mesa-utils xfonts-cyrillic The following NEW packages will be installed: adwaita-icon-theme at-spi2-core cvs cvsps dbus dconf-gsettings-backend dconf-service emacs emacs24 emacs24-bin-common emacs24-common emacs24-el emacsen-common fontconfig fonts-droid-fallback fonts-noto-mono gawk gconf-service gconf2-common ghostscript git git-all git-arch git-cvs git-daemon-run git-doc git-el git-email git-gui git-man git-mediawiki git-svn gitk gitweb glib-networking glib-networking-common glib-networking-services gnutls-bin gsettings-desktop-schemas gsfonts gtk-update-icon-cache hicolor-icon-theme imagemagick-6-common less libalgorithm-c3-perl libapr1 libaprutil1 libasound2 libasound2-data libatk-bridge2.0-0 libatk1.0-0 libatk1.0-data libatspi2.0-0 libauthen-sasl-perl libavahi-client3 libavahi-common-data libavahi-common3 libb-hooks-endofscope-perl libcairo-gobject2 libcairo2 libcgi-fast-perl libcgi-pm-perl libclass-c3-perl libclass-c3-xs-perl libclass-data-inheritable-perl libclass-factory-util-perl libclass-method-modifiers-perl libclass-singleton-perl libcolord2 libcommon-sense-perl libcroco3 libcups2 libcupsfilters1 libcupsimage2 libcurl3-gnutls libdata-optlist-perl libdatetime-format-builder-perl libdatetime-format-iso8601-perl libdatetime-format-strptime-perl libdatetime-locale-perl libdatetime-perl libdatetime-timezone-perl libdatrie1 libdbd-sqlite3-perl libdbi-perl libdbus-1-3 libdbus-glib-1-2 libdconf1 libdevel-caller-perl libdevel-lexalias-perl libdevel-stacktrace-perl libdigest-hmac-perl libdrm-amdgpu1 libdrm-intel1 libdrm-nouveau2 libdrm-radeon1 libdrm2 libegl1-mesa libemail-valid-perl libencode-locale-perl libepoxy0 liberror-perl libeval-closure-perl libexception-class-perl libfcgi-perl libfftw3-double3 libfile-listing-perl libfont-afm-perl libfontenc1 libfribidi0 libgbm1 libgconf-2-4 libgdk-pixbuf2.0-0 libgdk-pixbuf2.0-common libgif7 libgl1-mesa-dri libgl1-mesa-glx libglapi-mesa libglib2.0-0 libglib2.0-data libgnutls-dane0 libgomp1 libgraphite2-3 libgs9 libgs9-common libgtk-3-0 libgtk-3-bin libgtk-3-common libharfbuzz0b libhtml-form-perl libhtml-format-perl libhtml-parser-perl libhtml-tagset-perl libhtml-tree-perl libhttp-cookies-perl libhttp-daemon-perl libhttp-date-perl libhttp-message-perl libhttp-negotiate-perl libice6 libijs-0.35 libio-html-perl libio-socket-inet6-perl libio-socket-ssl-perl libjbig2dec0 libjson-glib-1.0-0 libjson-glib-1.0-common libjson-perl libjson-xs-perl liblcms2-2 libllvm3.9 liblockfile-bin liblockfile1 liblqr-1-0 libltdl7 liblwp-mediatypes-perl liblwp-protocol-https-perl libm17n-0 libmagickcore-6.q16-3 libmagickwand-6.q16-3 libmailtools-perl libmediawiki-api-perl libmodule-implementation-perl libmodule-runtime-perl libmpfr4 libmro-compat-perl libnamespace-autoclean-perl libnamespace-clean-perl libnet-dns-perl libnet-domain-tld-perl libnet-http-perl libnet-ip-perl libnet-smtp-ssl-perl libnet-ssleay-perl libopenjp2-7 libotf0 libpackage-deprecationmanager-perl libpackage-stash-perl libpackage-stash-xs-perl libpadwalker-perl libpango-1.0-0 libpangocairo-1.0-0 libpangoft2-1.0-0 libpaper-utils libpaper1 libparams-classify-perl libparams-util-perl libparams-validate-perl libparams-validationcompiler-perl libpciaccess0 libperl5.24 libpixman-1-0 libproxy1v5 librest-0.7-0 librole-tiny-perl librsvg2-2 librsvg2-common libscalar-list-utils-perl libsensors4 libserf-1-1 libsigsegv2 libsm6 libsocket6-perl libsoup-gnome2.4-1 libsoup2.4-1 libspecio-perl libsub-exporter-perl libsub-exporter-progressive-perl libsub-identify-perl libsub-install-perl libsub-name-perl libsvn-perl libsvn1 libtcl8.6 libterm-readkey-perl libtest-fatal-perl libthai-data libthai0 libtimedate-perl libtk8.6 libtry-tiny-perl libtxc-dxtn-s2tc libtypes-serialiser-perl libunbound2 liburi-perl libutempter0 libvariable-magic-perl libwayland-client0 libwayland-cursor0 libwayland-egl1-mesa libwayland-server0 libwww-perl libwww-robotrules-perl libx11-xcb1 libxaw7 libxcb-dri2-0 libxcb-dri3-0 libxcb-glx0 libxcb-present0 libxcb-render0 libxcb-shape0 libxcb-shm0 libxcb-sync1 libxcb-xfixes0 libxcomposite1 libxcursor1 libxdamage1 libxext6 libxfixes3 libxft2 libxi6 libxinerama1 libxkbcommon0 libxmu6 libxmuu1 libxrandr2 libxrender1 libxshmfence1 libxss1 libxt6 libxtst6 libxv1 libxxf86dga1 libxxf86vm1 libyaml-libyaml-perl libyaml-perl m17n-db patch perl perl-modules-5.24 perl-openssl-defaults poppler-data rename rsync runit shared-mime-info tcl tcl8.6 tk tk8.6 tla tla-doc x11-common x11-utils xbitmaps xdg-user-dirs xkb-data xterm The following packages will be upgraded: libgnutls30 perl-base 2 upgraded, 288 newly installed, 0 to remove and 7 not upgraded. Need to get 149 MB of archives. After this operation, 627 MB of additional disk space will be used. Do you want to continue? [Y/n] y Get:1 http://security.debian.org stretch/updates/main amd64 libopenjp2-7 amd64 2.1.2-1.1+deb9u5 [123 kB] Get:2 http://deb.debian.org/debian stretch/main amd64 perl-base amd64 5.24.1-3+deb9u7 [1,346 kB] Get:3 http://deb.debian.org/debian stretch/main amd64 liblockfile-bin amd64 1.14-1+b1 [19.1 kB] Get:4 http://deb.debian.org/debian stretch/main amd64 liblockfile1 amd64 1.14-1+b1 [15.7 kB] Get:5 http://deb.debian.org/debian stretch/main amd64 perl-modules-5.24 all 5.24.1-3+deb9u7 [2,723 kB] Get:6 http://deb.debian.org/debian stretch/main amd64 libperl5.24 amd64 5.24.1-3+deb9u7 [3,527 kB] Get:7 http://deb.debian.org/debian stretch/main amd64 perl amd64 5.24.1-3+deb9u7 [218 kB] Get:8 http://deb.debian.org/debian stretch/main amd64 fontconfig amd64 2.11.0-6.7+b1 [404 kB] Get:9 http://deb.debian.org/debian stretch/main amd64 fonts-droid-fallback all 1:6.0.1r16-1.1 [1,807 kB] Get:10 http://deb.debian.org/debian stretch/main amd64 libmpfr4 amd64 3.1.5-1 [556 kB] Get:11 http://deb.debian.org/debian stretch/main amd64 libsigsegv2 amd64 2.10-5 [28.9 kB] Get:12 http://deb.debian.org/debian stretch/main amd64 gawk amd64 1:4.1.4+dfsg-1 [571 kB] Get:13 http://deb.debian.org/debian stretch/main amd64 libgnutls30 amd64 3.5.8-5+deb9u5 [896 kB] Get:14 http://deb.debian.org/debian stretch/main amd64 libcurl3-gnutls amd64 7.52.1-5+deb9u10 [290 kB] Get:15 http://deb.debian.org/debian stretch/main amd64 liberror-perl all 0.17024-1 [26.9 kB] Get:16 http://deb.debian.org/debian stretch/main amd64 git-man all 1:2.11.0-3+deb9u7 [1,436 kB] Get:17 http://deb.debian.org/debian stretch/main amd64 git amd64 1:2.11.0-3+deb9u7 [4,170 kB] Get:18 http://deb.debian.org/debian stretch/main amd64 libglib2.0-0 amd64 2.50.3-2+deb9u2 [2,692 kB] Get:19 http://deb.debian.org/debian stretch/main amd64 liblqr-1-0 amd64 0.4.2-2+b2 [24.8 kB] Get:20 http://deb.debian.org/debian stretch/main amd64 libgomp1 amd64 6.3.0-18+deb9u1 [73.3 kB] Get:21 http://deb.debian.org/debian stretch/main amd64 libfftw3-double3 amd64 3.3.5-3 [731 kB] Get:22 http://deb.debian.org/debian stretch/main amd64 liblcms2-2 amd64 2.8-4+deb9u1 [143 kB] Get:23 http://deb.debian.org/debian stretch/main amd64 libltdl7 amd64 2.4.6-2 [389 kB] Get:24 http://deb.debian.org/debian stretch/main amd64 libxext6 amd64 2:1.3.3-1+b2 [52.5 kB] Get:25 http://deb.debian.org/debian stretch/main amd64 imagemagick-6-common all 8:6.9.7.4+dfsg-11+deb9u8 [185 kB] Get:26 http://deb.debian.org/debian stretch/main amd64 libmagickcore-6.q16-3 amd64 8:6.9.7.4+dfsg-11+deb9u8 [1,743 kB] Get:27 http://deb.debian.org/debian stretch/main amd64 libmagickwand-6.q16-3 amd64 8:6.9.7.4+dfsg-11+deb9u8 [423 kB] Get:28 http://deb.debian.org/debian stretch/main amd64 x11-common all 1:7.7+19 [251 kB] Get:29 http://deb.debian.org/debian stretch/main amd64 libxss1 amd64 1:1.2.2-1 [17.5 kB] Get:30 http://deb.debian.org/debian stretch/main amd64 poppler-data all 0.4.7-8 [1,451 kB] Get:31 http://deb.debian.org/debian stretch/main amd64 libdbus-1-3 amd64 1.10.32-0+deb9u1 [196 kB] Get:32 http://deb.debian.org/debian stretch/main amd64 dbus amd64 1.10.32-0+deb9u1 [213 kB] Get:33 http://deb.debian.org/debian stretch/main amd64 less amd64 481-2.1 [126 kB] Get:34 http://deb.debian.org/debian stretch/main amd64 hicolor-icon-theme all 0.15-1 [9,550 B] Get:35 http://deb.debian.org/debian stretch/main amd64 shared-mime-info amd64 1.8-1+deb9u1 [731 kB] Get:36 http://deb.debian.org/debian stretch/main amd64 libgdk-pixbuf2.0-common all 2.36.5-2+deb9u2 [311 kB] Get:37 http://deb.debian.org/debian stretch/main amd64 libgdk-pixbuf2.0-0 amd64 2.36.5-2+deb9u2 [170 kB] Get:38 http://deb.debian.org/debian stretch/main amd64 gtk-update-icon-cache amd64 3.22.11-1 [76.6 kB] Get:39 http://deb.debian.org/debian stretch/main amd64 libpixman-1-0 amd64 0.34.0-1 [530 kB] Get:40 http://deb.debian.org/debian stretch/main amd64 libxcb-render0 amd64 1.12-1 [105 kB] Get:41 http://deb.debian.org/debian stretch/main amd64 libxcb-shm0 amd64 1.12-1 [95.9 kB] Get:42 http://deb.debian.org/debian stretch/main amd64 libxrender1 amd64 1:0.9.10-1 [33.0 kB] Get:43 http://deb.debian.org/debian stretch/main amd64 libcairo2 amd64 1.14.8-1 [771 kB] Get:44 http://deb.debian.org/debian stretch/main amd64 libcroco3 amd64 0.6.11-3 [143 kB] Get:45 http://deb.debian.org/debian stretch/main amd64 libthai-data all 0.1.26-1 [166 kB] Get:46 http://deb.debian.org/debian stretch/main amd64 libdatrie1 amd64 0.2.10-4+b1 [36.4 kB] Get:47 http://deb.debian.org/debian stretch/main amd64 libthai0 amd64 0.1.26-1 [52.1 kB] Get:48 http://deb.debian.org/debian stretch/main amd64 libpango-1.0-0 amd64 1.40.5-1 [320 kB] Get:49 http://deb.debian.org/debian stretch/main amd64 libgraphite2-3 amd64 1.3.10-1 [84.2 kB] Get:50 http://deb.debian.org/debian stretch/main amd64 libharfbuzz0b amd64 1.4.2-1 [671 kB] ・・・省略・・・ Fetched 149 MB in 2s (49.8 MB/s) Extracting templates from packages: 100% Preconfiguring packages ... (Reading database ... 40243 files and directories currently installed.) Preparing to unpack .../perl-base_5.24.1-3+deb9u7_amd64.deb ... Unpacking perl-base (5.24.1-3+deb9u7) over (5.24.1-3+deb9u6) ... Setting up perl-base (5.24.1-3+deb9u7) ... Selecting previously unselected package liblockfile-bin. (Reading database ... 40243 files and directories currently installed.) Preparing to unpack .../0-liblockfile-bin_1.14-1+b1_amd64.deb ... Unpacking liblockfile-bin (1.14-1+b1) ... Selecting previously unselected package liblockfile1:amd64. Preparing to unpack .../1-liblockfile1_1.14-1+b1_amd64.deb ... Unpacking liblockfile1:amd64 (1.14-1+b1) ... Selecting previously unselected package perl-modules-5.24. Preparing to unpack .../2-perl-modules-5.24_5.24.1-3+deb9u7_all.deb ... Unpacking perl-modules-5.24 (5.24.1-3+deb9u7) ... Selecting previously unselected package libperl5.24:amd64. Preparing to unpack .../3-libperl5.24_5.24.1-3+deb9u7_amd64.deb ... Unpacking libperl5.24:amd64 (5.24.1-3+deb9u7) ... Selecting previously unselected package perl. Preparing to unpack .../4-perl_5.24.1-3+deb9u7_amd64.deb ... Unpacking perl (5.24.1-3+deb9u7) ... Selecting previously unselected package fontconfig. Preparing to unpack .../5-fontconfig_2.11.0-6.7+b1_amd64.deb ... Unpacking fontconfig (2.11.0-6.7+b1) ... Selecting previously unselected package fonts-droid-fallback. Preparing to unpack .../6-fonts-droid-fallback_1%3a6.0.1r16-1.1_all.deb ... Unpacking fonts-droid-fallback (1:6.0.1r16-1.1) ... Selecting previously unselected package libmpfr4:amd64. Preparing to unpack .../7-libmpfr4_3.1.5-1_amd64.deb ... Unpacking libmpfr4:amd64 (3.1.5-1) ... Selecting previously unselected package libsigsegv2:amd64. Preparing to unpack .../8-libsigsegv2_2.10-5_amd64.deb ... Unpacking libsigsegv2:amd64 (2.10-5) ... Setting up libmpfr4:amd64 (3.1.5-1) ... Setting up libsigsegv2:amd64 (2.10-5) ... ・・・省略・・・ Setting up libdatetime-format-strptime-perl (1.7200-1) ... Setting up libdatetime-format-builder-perl (0.8100-1) ... Setting up emacs (46.1) ... Setting up libdatetime-format-iso8601-perl (0.08-2) ... Setting up liblwp-protocol-https-perl (6.06-2) ... Setting up libwww-perl (6.15-1) ... Setting up libmediawiki-api-perl (0.41-1) ... Setting up git-mediawiki (1:2.11.0-3+deb9u7) ... Setting up git-all (1:2.11.0-3+deb9u7) ... Processing triggers for libc-bin (2.24-11+deb9u4) ... Processing triggers for systemd (232-25+deb9u12) ... Processing triggers for libgdk-pixbuf2.0-0:amd64 (2.36.5-2+deb9u2) ...Git clone
Terminalroot@web-app-1:/var/www# git clone https://github.com/webmaster-patche/%repository%.git %working_copy% Cloning into '%working_copy%'... Username for 'https://github.com': webmaster-patche Password for 'https://webmaster-patche@github.com': remote: Enumerating objects: 10092, done. remote: Counting objects: 100% (10092/10092), done. remote: Compressing objects: 100% (8481/8481), done. remote: Total 10092 (delta 1023), reused 10092 (delta 1023), pack-reused 0 Receiving objects: 100% (10092/10092), 33.82 MiB | 16.24 MiB/s, done. Resolving deltas: 100% (1023/1023), done.rbenv設定
依存するライブラリをインストール
Terminalroot@web-app-1:/var/www# apt-get install -y gcc libssl-dev libreadline-dev autoconf zlib1g-dev make bzip2 Reading package lists... Done Building dependency tree Reading state information... Done The following additional packages will be installed: automake autotools-dev binutils cpp cpp-6 gcc-6 libasan3 libatomic1 libc-dev-bin libc6-dev libcc1-0 libcilkrts5 libgcc-6-dev libisl15 libitm1 liblsan0 libmpc3 libmpx2 libquadmath0 libssl-doc libtinfo-dev libtsan0 libubsan0 linux-libc-dev m4 manpages manpages-dev Suggested packages: autoconf-archive gnu-standards autoconf-doc libtool gettext binutils-doc cpp-doc gcc-6-locales gcc-multilib flex bison gdb gcc-doc gcc-6-multilib gcc-6-doc libgcc1-dbg libgomp1-dbg libitm1-dbg libatomic1-dbg libasan3-dbg liblsan0-dbg libtsan0-dbg libubsan0-dbg libcilkrts5-dbg libmpx2-dbg libquadmath0-dbg glibc-doc readline-doc m4-doc make-doc The following NEW packages will be installed: autoconf automake autotools-dev binutils cpp cpp-6 gcc gcc-6 libasan3 libatomic1 libc-dev-bin libc6-dev libcc1-0 libcilkrts5 libgcc-6-dev libisl15 libitm1 liblsan0 libmpc3 libmpx2 libquadmath0 libreadline-dev libssl-dev libssl-doc libtinfo-dev libtsan0 libubsan0 linux-libc-dev m4 make manpages manpages-dev zlib1g-dev 0 upgraded, 33 newly installed, 0 to remove and 7 not upgraded. Need to get 33.9 MB of archives. After this operation, 137 MB of additional disk space will be used. Get:1 http://deb.debian.org/debian stretch/main amd64 manpages all 4.10-2 [1,222 kB] Get:2 http://deb.debian.org/debian stretch/main amd64 m4 amd64 1.4.18-1 [202 kB] Get:3 http://deb.debian.org/debian stretch/main amd64 autoconf all 2.69-10 [338 kB] Get:4 http://deb.debian.org/debian stretch/main amd64 autotools-dev all 20161112.1 [73.4 kB] Get:5 http://deb.debian.org/debian stretch/main amd64 automake all 1:1.15-6 [733 kB] Get:6 http://deb.debian.org/debian stretch/main amd64 binutils amd64 2.28-5 [3,770 kB] Get:7 http://deb.debian.org/debian stretch/main amd64 libisl15 amd64 0.18-1 [564 kB] Get:8 http://deb.debian.org/debian stretch/main amd64 libmpc3 amd64 1.0.3-1+b2 [39.9 kB] Get:9 http://deb.debian.org/debian stretch/main amd64 cpp-6 amd64 6.3.0-18+deb9u1 [6,584 kB] Get:10 http://deb.debian.org/debian stretch/main amd64 cpp amd64 4:6.3.0-4 [18.7 kB] Get:11 http://deb.debian.org/debian stretch/main amd64 libcc1-0 amd64 6.3.0-18+deb9u1 [30.6 kB] Get:12 http://deb.debian.org/debian stretch/main amd64 libitm1 amd64 6.3.0-18+deb9u1 [27.3 kB] Get:13 http://deb.debian.org/debian stretch/main amd64 libatomic1 amd64 6.3.0-18+deb9u1 [8,966 B] Get:14 http://deb.debian.org/debian stretch/main amd64 libasan3 amd64 6.3.0-18+deb9u1 [311 kB] Get:15 http://deb.debian.org/debian stretch/main amd64 liblsan0 amd64 6.3.0-18+deb9u1 [115 kB] Get:16 http://deb.debian.org/debian stretch/main amd64 libtsan0 amd64 6.3.0-18+deb9u1 [257 kB] Get:17 http://deb.debian.org/debian stretch/main amd64 libubsan0 amd64 6.3.0-18+deb9u1 [107 kB] Get:18 http://deb.debian.org/debian stretch/main amd64 libcilkrts5 amd64 6.3.0-18+deb9u1 [40.5 kB] Get:19 http://deb.debian.org/debian stretch/main amd64 libmpx2 amd64 6.3.0-18+deb9u1 [11.2 kB] Get:20 http://deb.debian.org/debian stretch/main amd64 libquadmath0 amd64 6.3.0-18+deb9u1 [131 kB] Get:21 http://deb.debian.org/debian stretch/main amd64 libgcc-6-dev amd64 6.3.0-18+deb9u1 [2,296 kB] Get:22 http://deb.debian.org/debian stretch/main amd64 gcc-6 amd64 6.3.0-18+deb9u1 [6,900 kB] Get:23 http://deb.debian.org/debian stretch/main amd64 gcc amd64 4:6.3.0-4 [5,196 B] Get:24 http://deb.debian.org/debian stretch/main amd64 libc-dev-bin amd64 2.24-11+deb9u4 [259 kB] Get:25 http://deb.debian.org/debian stretch/main amd64 linux-libc-dev amd64 4.9.228-1 [1,511 kB] Get:26 http://deb.debian.org/debian stretch/main amd64 libc6-dev amd64 2.24-11+deb9u4 [2,364 kB] Get:27 http://deb.debian.org/debian stretch/main amd64 libtinfo-dev amd64 6.0+20161126-1+deb9u2 [79.2 kB] Get:28 http://deb.debian.org/debian stretch/main amd64 libreadline-dev amd64 7.0-3 [132 kB] Get:29 http://deb.debian.org/debian stretch/main amd64 libssl-dev amd64 1.1.0l-1~deb9u1 [1,594 kB] Get:30 http://deb.debian.org/debian stretch/main amd64 libssl-doc all 1.1.0l-1~deb9u1 [1,480 kB] Get:31 http://deb.debian.org/debian stretch/main amd64 make amd64 4.1-9.1 [302 kB] Get:32 http://deb.debian.org/debian stretch/main amd64 manpages-dev all 4.10-2 [2,145 kB] Get:33 http://deb.debian.org/debian stretch/main amd64 zlib1g-dev amd64 1:1.2.8.dfsg-5 [205 kB] Fetched 33.9 MB in 0s (60.0 MB/s) Extracting templates from packages: 100% Selecting previously unselected package manpages. (Reading database ... 63067 files and directories currently installed.) Preparing to unpack .../00-manpages_4.10-2_all.deb ... Unpacking manpages (4.10-2) ... Selecting previously unselected package m4. Preparing to unpack .../01-m4_1.4.18-1_amd64.deb ... Unpacking m4 (1.4.18-1) ... ・・・省略・・・ Receiving objects: 100% (2852/2852), 550.44 KiB | 0 bytes/s, done. Resolving deltas: 100% (1781/1781), done.ちなみに、bzip2をインストールしていないと、rubyインストール時にエラーが発生します
tar (child): bzip2: Cannot exec: No such file or directoryrbenvのclone
Terminalroot@web-app-1:/var/www# git clone https://github.com/rbenv/rbenv.git ~/.rbenv Cloning into '/root/.rbenv'... remote: Enumerating objects: 5, done. remote: Counting objects: 100% (5/5), done. remote: Compressing objects: 100% (5/5), done. remote: Total 2852 (delta 0), reused 1 (delta 0), pack-reused 2847 Receiving objects: 100% (2852/2852), 550.44 KiB | 0 bytes/s, done. Resolving deltas: 100% (1781/1781), done.プロファイルにrbenv設定
Terminalroot@web-app-1:/var/www# echo 'export PATH="$HOME/.rbenv/bin:$PATH"' >> ~/.bashrc root@web-app-1:/var/www# echo 'eval "$(rbenv init -)"' >> ~/.bashrc root@web-app-1:/var/www# source ~/.bashrc root@web-app-1:/var/www# $(rbenv root) -su: /root/.rbenv: Is a directoryruby-buildのclone
Terminalroot@web-app-1:/var/www# mkdir -p "$(rbenv root)"/plugins root@web-app-1:/var/www# ls /root/.rbenv/plugins/ root@web-app-1:/var/www# git clone https://github.com/rbenv/ruby-build.git "$(rbenv root)"/plugins/ruby-build Cloning into '/root/.rbenv/plugins/ruby-build'... remote: Enumerating objects: 1, done. remote: Counting objects: 100% (1/1), done. remote: Total 10996 (delta 0), reused 0 (delta 0), pack-reused 10995 Receiving objects: 100% (10996/10996), 2.31 MiB | 0 bytes/s, done. Resolving deltas: 100% (7258/7258), done.インストール可能なrubyバージョンの確認
Terminalroot@web-app-1:/var/www# rbenv install --list 2.5.8 2.6.6 2.7.1 jruby-9.2.12.0 maglev-1.0.0 mruby-2.1.1 rbx-5.0 truffleruby-20.1.0 Only latest stable releases for each Ruby implementation are shown. Use 'rbenv install --list-all' to show all local versions.rubyインストール
Terminalroot@web-app-1:/var/www# rbenv install -v 2.6.6 /tmp/ruby-build.20200718225848.18288.AhoWq9 /var/www Downloading ruby-2.6.6.tar.bz2... -> https://cache.ruby-lang.org/pub/ruby/2.6/ruby-2.6.6.tar.bz2 Installing ruby-2.6.6... /tmp/ruby-build.20200718225848.18288.AhoWq9/ruby-2.6.6 /tmp/ruby-build.20200718225848.18288.AhoWq9 /var/www checking for ruby... false checking build system type... x86_64-pc-linux-gnu checking host system type... x86_64-pc-linux-gnu checking target system type... x86_64-pc-linux-gnu checking for gcc... gcc checking whether the C compiler works... yes checking for C compiler default output file name... a.out checking for suffix of executables... checking whether we are cross compiling... no checking for suffix of object files... o checking whether we are using the GNU C compiler... yes checking whether gcc accepts -g... yes checking for gcc option to accept ISO C89... none needed checking for g++... no checking for c++... no checking for gpp... no checking for aCC... no checking for CC... no checking for cxx... no checking for cc++... no checking for cl.exe... no ・・・省略・・・ installing default gems from lib: /root/.rbenv/versions/2.6.6/lib/ruby/gems/2.6.0 (build_info, cache, doc, extensions, gems, specifications) bundler 1.17.2 cmath 1.0.0 csv 3.0.9 e2mmap 0.1.0 fileutils 1.1.0 forwardable 1.2.0 ipaddr 1.2.2 irb 1.0.0 logger 1.3.0 matrix 0.1.0 mutex_m 0.1.0 ostruct 0.1.0 prime 0.1.0 rdoc 6.1.2 rexml 3.1.9 rss 0.2.7 scanf 1.0.0 shell 0.7 sync 0.5.0 thwait 0.1.0 tracer 0.1.0 webrick 1.4.2 installing default gems from ext: /root/.rbenv/versions/2.6.6/lib/ruby/gems/2.6.0 (build_info, cache, doc, extensions, gems, specifications) bigdecimal 1.4.1 date 2.0.0 etc 1.0.1 fcntl 1.0.0 fiddle 1.0.0 io-console 0.4.7 json 2.1.0 openssl 2.1.2 psych 3.1.0 sdbm 1.0.0 stringio 0.0.2 strscan 1.0.0 zlib 1.0.0 installing bundled gems: /root/.rbenv/versions/2.6.6/lib/ruby/gems/2.6.0 (build_info, cache, doc, extensions, gems, specifications) rake 12.3.3 did_you_mean 1.3.0 power_assert 1.1.3 minitest 5.11.3 xmlrpc 0.3.0 test-unit 3.2.9 net-telnet 0.2.0 installing rdoc: /root/.rbenv/versions/2.6.6/share/ri/2.6.0/system installing html-docs: /root/.rbenv/versions/2.6.6/share/doc/ruby installing capi-docs: /root/.rbenv/versions/2.6.6/share/doc/ruby Installed ruby-2.6.6 to /root/.rbenv/versions/2.6.6 /tmp/ruby-build.20200718225848.18288.AhoWq9 /var/www /var/www root@web-app-1:/var/www# ruby -v rbenv: ruby: command not found The `ruby' command exists in these Ruby versions: 2.6.6 root@web-app-1:/var/www# gem install bundler rbenv: gem: command not found The `gem' command exists in these Ruby versions: 2.6.6 root@web-app-1:/var/www# rbenv exec gem install bundler rbenv: gem: command not found The `gem' command exists in these Ruby versions: 2.6.6 root@web-app-1:~# rbenv global 2.6.6 root@web-app-1:~# rbenv init root@web-app-1:~# bundle -v Bundler version 1.17.3global設定しておかないとruby -vやbundlerでエラーになります
-bash: ruby: command not foundgem設定
gemのダウンロード
Terminalroot@web-app-1:~# wget https://rubygems.org/rubygems/rubygems-3.0.3.tgz --2020-07-18 23:41:13-- https://rubygems.org/rubygems/rubygems-3.0.3.tgz Resolving rubygems.org (rubygems.org)... 151.101.64.70, 151.101.128.70, 151.101.0.70, ... Connecting to rubygems.org (rubygems.org)|151.101.64.70|:443... connected. HTTP request sent, awaiting response... 200 OK Length: 904175 (883K) [application/x-tar] Saving to: ‘rubygems-3.0.3.tgz’ rubygems-3.0.3.tgz 100%[=============================================>] 882.98K --.-KB/s in 0.07s 2020-07-18 23:41:13 (11.9 MB/s) - ‘rubygems-3.0.3.tgz’ saved [904175/904175]gem解凍・インストール
Terminalroot@web-app-1:~# tar xvfz rubygems-3.0.3.tgz rubygems-3.0.3/ rubygems-3.0.3/CODE_OF_CONDUCT.md rubygems-3.0.3/hide_lib_for_update/ rubygems-3.0.3/hide_lib_for_update/note.txt rubygems-3.0.3/test/ rubygems-3.0.3/test/rubygems/ rubygems-3.0.3/test/rubygems/test_gem_validator.rb rubygems-3.0.3/test/rubygems/test_gem_commands_install_command.rb rubygems-3.0.3/test/rubygems/test_gem_security_signer.rb rubygems-3.0.3/test/rubygems/test_gem_request_set_lockfile.rb rubygems-3.0.3/test/rubygems/test_gem_name_tuple.rb rubygems-3.0.3/test/rubygems/test_gem_commands_signout_command.rb rubygems-3.0.3/test/rubygems/test_gem_resolver_git_set.rb rubygems-3.0.3/test/rubygems/test_gem_resolver_index_set.rb rubygems-3.0.3/test/rubygems/private_key.pem rubygems-3.0.3/test/rubygems/test_gem_resolver_conflict.rb rubygems-3.0.3/test/rubygems/test_gem_commands_setup_command.rb rubygems-3.0.3/test/rubygems/test_gem_package_tar_reader.rb rubygems-3.0.3/test/rubygems/test_gem_silent_ui.rb rubygems-3.0.3/test/rubygems/test_gem_version_option.rb rubygems-3.0.3/test/rubygems/test_gem_commands_fetch_command.rb rubygems-3.0.3/test/rubygems/test_gem_rdoc.rb ・・・省略・・・ rubygems-3.0.3/bundler/exe/bundle rubygems-3.0.3/bundler/exe/bundler root@web-app-1:~# ls -la total 920 drwx------ 4 root root 4096 Jul 18 23:41 . drwxr-xr-x 22 root root 4096 Jul 18 19:15 .. -rw-r--r-- 1 root root 630 Jul 18 21:58 .bashrc -rw-r--r-- 1 root root 148 Aug 17 2015 .profile drwxr-xr-x 13 root root 4096 Jul 18 22:53 .rbenv drwxr-xr-x 8 218038053 2033490572 4096 Mar 4 2019 rubygems-3.0.3 -rw-r--r-- 1 root root 904175 Mar 4 2019 rubygems-3.0.3.tgz -rw------- 1 root root 10130 Jul 18 21:51 .viminfo root@web-app-1:~# cd rubygems-3.0.3 root@web-app-1:~/rubygems-3.0.3# ls appveyor.yml CONTRIBUTING.md LICENSE.txt POLICIES.md setup.rb bin hide_lib_for_update MAINTAINERS.txt Rakefile test bundler History.txt Manifest.txt README.md UPGRADING.md CODE_OF_CONDUCT.md lib MIT.txt rubygems-update.gemspec util root@web-app-1:~/rubygems-3.0.3# cd ../ root@web-app-1:~# cd rubygems-3.0.3 root@web-app-1:~/rubygems-3.0.3# ruby setup.rb Bundler 1.17.3 installed RubyGems 3.0.3 installed Regenerating binstubs Parsing documentation for rubygems-3.0.3 Installing ri documentation for rubygems-3.0.3 === 3.0.2 / 2019-01-01 ・・・省略・・・ RubyGems installed the following executables: /root/.rbenv/versions/2.6.6/bin/gem /root/.rbenv/versions/2.6.6/bin/bundle Ruby Interactive (ri) documentation was installed. ri is kind of like man pages for Ruby libraries. You may access it like this: ri Classname ri Classname.class_method ri Classname#instance_method If you do not wish to install this documentation in the future, use the --no-document flag, or set it as the default in your ~/.gemrc file. See 'gem help env' for details. root@web-app-1:~/rubygems-3.0.3# gem -v 3.0.3アプリのサービス化
- インスタンス起動に合わせて、railsサーバーが起動する様にサービス化します
Terminalroot@web-app-1:/var/www# vi /etc/systemd/system/app_one_punch.service/etc/systemd/system/%app_service_name%.service[Unit] Description=App %working_copy% After=network.target [Service] Type=simple Restart=always WorkingDeirectory=/var/www/%working_copy% ExecStart=bundle exec rails s --environment production # railsは初期3000番である為、-p指定していない [Install] WantedBy=multi-user.target


- 投稿日:2020-07-20T10:16:00+09:00
【Rails】credentials.ymlでシークレットキーなどを管理する
はじめに
Rails 5系から登場したcredentialsについて備忘録的にまとめておきます。
credentialsって?
秘密鍵などを置いておくファイルです。
このファイルの中身はmaster.keyによって暗号化されているため、正しいmaster.keyを知らない人は中身を見ることができません。
credentialsの中身は、master.keyの情報があれば他のファイルの中で変数として呼び出せるため、このファイルの中にAPIキーなどを入れておくと便利だったりします。
master.keyとcredentialsファイルは
rails newしたときに自動で作られ、master.keyはデフォルトで.gitignoreに入っているので、githubから流出する心配もありません。事前準備
今回はVScodeを使うことを前提としています。
まずはVScodeで
command + shift + Pでパレットを開いてください。
次に検索ボックスにshellと入力してshellをインストールしてください。これでターミナルからcredentialsファイルの編集をVScodeでできるようになります。
設定の仕方
以下のコマンドでcredentialsファイルをVScodeで開きます。
ターミナル$ EDITOR='code --wait' rails credentials:editデフォルトで最初の3行に例がコメントアウトで書いてあるので、それを真似すればOKです。
xxxxx.credentials.ymlaws: access_key_id: 123 secret_access_key: 345q1行目はどんなグループなのか、2, 3行目はidやアクセスキーなどを書いてます。
グループの中身はインデントすることが必要です。一つだけではなく複数設定できるので試しに設定してみます。
xxxxx.credentials.ymlaws: access_key_id: 123 secret_access_key: 345q gmail: email: 'sample@gmail.com' password: 'sample1234'保存
credentialsファイルを保存するにはVScodeのタブを閉じる必要があります。
閉じて正しく保存されるとターミナルで以下のようにメッセージが表示されます。
New credentials encrypted and saved.呼び出し方
中身を呼び出すためには、rubyファイル内で以下のように書けばOKです。
Rails.application.credentials[:グループ名][:中身]今回の例では以下のように使えます。
Rails.application.credentials[:aws][:access_key_id]
Rails.application.credentials[:gmail][:email]
ターミナルからコンソールで確認できるので、credentialsファイルを編集したときは確認すると良いです。
rails cでコンソールを開いて確かめてみます。
ちゃんと呼び出せていますね。注意
チーム開発するときなどはmaster.keyを共有することで他の人もcredentialsの中身を見れたり編集したりできます。master.keyはメッセージアプリなんかで共有すると良いかと思います。
しかし、信頼している仲間であっても個人で持ってるawsのidとアクセスキーなんかはcredentialsでも共有すべきではないです。(クレジットカードの番号と認証コードを共有しているのと同じだと思ってください。)
共有すべき情報とそうではない情報は慎重に判断しましょう。
万が一裏切られてカイジのような展開になって後悔することのないように!笑

- 投稿日:2020-07-20T09:59:06+09:00
【Windows10+ESET】Railsアプリをlocalhost接続でiPhone実機確認する
経緯
windows10で開発したRailsアプリをiPhoneで動作確認したいと思いました。
ところが、ESETセキュリティソフトとWindowsファイアウォールに阻まれて接続できず。
しばらく調べてみるものの「MacOS環境やAndroid実機」の記事ばかり。
知りたいのはそうじゃない!!WindowsとiPhone環境なんだ!
というとで、かなり読者を限定した記事ですが、同じ環境で悩んでいる方の助けになれればと思い方法を記します。実行環境
Rails v6.0.3.2
OS:windows10 64bit
実機:iPhoneX
セキュリティソフト:eset Internet Security 13.1.21.0ESETのフィルタリング設定変更
「ルール付き自動モード(デフォ)」➡ 「対話モード」にしていきます。
ESETソフトを立ち上げて「設定」をクリック
「ネットワーク保護」をクリック
「ネットワーク攻撃保護(IDS)」の項の歯車をクリックし「対話モード」に変更
Railsサーバを立ち上げる
Railsアプリは指定が無いとポート3000番を解放しません。
オプション-b 0.0.0.0付きで起動し3000番を通します。rails s -b 0.0.0.0iPhoneからローカルホストへアクセスする
1. ローカルホストPCのIPアドレスを確認
コマンドプロンプトを開いて打ち込むとIP構成がずらーっと表示されます。
「IPv4アドレス」が自分のPCのIPになります。>ipconfig イーサネット アダプター イーサネット: 接続固有の DNS サフィックス . . . . .: IPv6 アドレス . . . . . . . . . . . .: xxxx:xxxx:xxxx:x:xxxx:xxx:xxxx:xxxx 一時 IPv6 アドレス. . . . . . . . . .: xxxx:xxxx:xxxx:x:xxxx:xxxx:xxxx:xxxx リンクローカル IPv6 アドレス. . . . .: xxxx::xxxx:xxx:xxxx:xxxxxxx IPv4 アドレス . . . . . . . . . . . .: 192.168.x.x サブネット マスク . . . . . . . . . .: 255.255.255.0 デフォルト ゲートウェイ . . . . . . .: xxxx::xxxx:xxxx:xxxx:xxxxxxx 192.168.x.x2. iPhoneからSafariでもChromeでもなんでも構わないのでブラウザを開く
先ほど調べたIPアドレスをアドレス欄に入力してアクセス。
この時、localhostのポートはデフォルトで3000なのでポート指定も忘れずに。例えば以下のようになります。
例:)192.168.x.x:30003. Rubyアプリからのアクセスを許可・保存する
「ルールを作成し、永久に記憶」にチェックを入れ「許可」をクリック
4. ESETのフィルタリング設定変更
接続が正しくできたことを確認し、
一番初めにやった手順で「対話モード」➡ 「ルール付き自動モード(デフォ)」に戻します。


