- 投稿日:2020-02-09T23:43:30+09:00
敢えてRubyで学ぶ「ゼロから作るDeep Learning」禁断のPyCallからのpickleファイルの取り込み
「ゼロから作るDeep Learning」の72p「3.6.2 ニューラルネットワークの推論処理」では、pythonのpickleファイルを呼び出している。このpickleファイルはraw binaryなので、簡単に呼び出せない。そこで、禁断のPyCallからpickleファイルを取り込んでみる。
環境構築
# pycallのインストール
$ gem install pycall
# pyenvの取り込み
$ git clone https://github.com/pyenv/pyenv.git ~/.pyenv
$ echo 'export PYENV_ROOT="$HOME/.pyenv"' >> ~/.bash_profile
$ echo 'export PATH="$PYENV_ROOT/bin:$PATH"' >> ~/.bash_profile
$ echo 'eval "$(pyenv init -)"' >> ~/.bash_profile
# .bash_profileの再取り込み
$ source ~/.bash_profile
# pythonのバージョン確認
$ python3 --version
3.7.3
# pyenvの共有ライブラリインストール
$ CONFIGURE_OPTS="--enable-shared" pyenv install 3.7.3
# numpyのインストール
$ pip install numpy
これで準備完了
取り込み方
require 'pycall/import'
include PyCall::Import

pyimport :numpy
pyimport :pickle
pkl = open("sample_weight.pkl", "rb")
network = pickle.load(pkl)
備考:ハマったこと
普通にpycallを呼び出すだけだと怒られた。
> require 'pycall/import'
true
> include PyCall::Import
Object
> hoge = PyCall.eval('0')
Traceback (most recent call last):
        9: from /usr/local/bin/irb:23:in `<main>'
        8: from /usr/local/bin/irb:23:in `load'
        7: from /usr/local/lib/ruby/gems/2.7.0/gems/irb-1.2.1/exe/irb:11:in `<top (required)>'
        6: from (irb):3
        5: from /usr/local/bundle/gems/pycall-1.3.0/lib/pycall.rb:39:in `eval'
        4: from /usr/local/bundle/gems/pycall-1.3.0/lib/pycall.rb:62:in `import_module'
        3: from /usr/local/bundle/gems/pycall-1.3.0/lib/pycall/init.rb:16:in `const_missing'
        2: from /usr/local/bundle/gems/pycall-1.3.0/lib/pycall/init.rb:35:in `init'
        1: from /usr/local/bundle/gems/pycall-1.3.0/lib/pycall/libpython/finder.rb:95:in `find_libpython'
PyCall::PythonNotFound (PyCall::PythonNotFound)
以下の記事を参考にpyenvの共有ライブラリインストールで解消できた
参考記事
pyenv と pyenv-virtualenv をインストールする
https://qiita.com/shigechioyo/items/198211e84f8e0e9a5c18
[Ruby] 機械学習①:Ruby入門
https://qiita.com/chamao/items/cd62715c6be2fad2f8e7
- 投稿日:2020-02-09T21:58:58+09:00
Ruby + Sinatra でテンプレートエンジンに Mustache (mustache-sinatra) を使う
概要
- Ruby + Sinatra でテンプレートエンジン Mustache を使ってシンプルな Web アプリケーションを動かす
構成
- macOS Catalina
- Ruby 2.7.0
- Sinatra 2.0.8.1
- Mustache (mustache 0.99.8 + mustache-sinatra 1.0.1)
- Puma 4.3.1
ソースコード
ファイル一覧
├── Gemfile
├── app.rb
├── config.ru
└── views
    ├── error.mustache
    └── hello.mustache
Gemfile
Sinatra で Mustache を使うために mustache-sinatra を導入する。
source 'https://rubygems.org'

gem 'puma'
gem 'sinatra'
gem 'mustache-sinatra'
app.rb
メイン処理をするファイル。
app.rbrequire 'sinatra' require 'mustache/sinatra' # 404 Not Found 時の処理 not_found do values = {:error_message => 'Page Not Found'} mustache :error, :layout => false, :locals => values end # エラー発生時の処理 error do values = {:error_message => env['sinatra.error'].message} mustache :error, :layout => false, :locals => values end # メッセージ表示ページの処理 get '/hello/:message' do # HTML に埋め込む値 values = { :message => params['message'], :ruby_desc => RUBY_DESCRIPTION } # HTML を表示 mustache :hello, :layout => false, :locals => values endconfig.ru
rackup コマンド用に config.ru を用意する。
config.rurequire './app' run Sinatra::Applicationviews/error.mustache
エラーページ用 HTML テンプレート。
<!DOCTYPE html>
<html>
<head>
<meta charset="utf-8">
<title>Error page</title>
</head>
<body>
<p>{{ error_message }}</p>
</body>
</html>
views/hello.mustache
ページ用 HTML テンプレート。
<!DOCTYPE html>
<html>
<head>
<meta charset="utf-8">
<title>Hello, World!</title>
</head>
<body>
<p>{{ message }}</p>
<p>{{ ruby_desc }}</p>
</body>
</html>
Web サーバを起動
bundle install で環境を構築
bundle install コマンドで Gemfile に記載してあるパッケージがインストールされて Gemfile.lock ファイルが生成される。
現時点(2020年2月9日現在)で生成される Gemfile.lock ファイルは以下のようになる。
GEM
  remote: https://rubygems.org/
  specs:
    mustache (0.99.8)
    mustache-sinatra (1.0.1)
      mustache (<= 0.99.8)
    mustermann (1.1.1)
      ruby2_keywords (~> 0.0.1)
    nio4r (2.5.2)
    puma (4.3.1)
      nio4r (~> 2.0)
    rack (2.2.1)
    rack-protection (2.0.8.1)
      rack
    ruby2_keywords (0.0.2)
    sinatra (2.0.8.1)
      mustermann (~> 1.0)
      rack (~> 2.0)
      rack-protection (= 2.0.8.1)
      tilt (~> 2.0)
    tilt (2.0.10)

PLATFORMS
  ruby

DEPENDENCIES
  mustache-sinatra
  puma
  sinatra

BUNDLED WITH
   2.1.4
mustache のバージョンが5年前という古いものになっている。
mustache の最新版は2019年12月にリリースされている。
しかし、mustache-sinatra の最新版は2015年1月にリリースされたバージョン 1.0.1 で、その依存関係で mustache は2014年12月にリリースされたバージョン 0.99.8 になっている。mustache-sinatra | RubyGems.org | コミュニティのGemホスティングサービス
1.0.1 - January 25, 2015 (9KB)
mustacheの全バージョン履歴 | RubyGems.org | コミュニティのGemホスティングサービス
1.1.1 - December 03, 2019 (41.5KB)
0.99.8 - December 01, 2014 (42.5KB)
サーバを起動
$ RACK_ENV=production bundle exec rackup -s Puma
Puma starting in single mode...
* Version 4.3.1 (ruby 2.7.0-p0), codename: Mysterious Traveller
* Min threads: 0, max threads: 16
* Environment: production
* Listening on tcp://0.0.0.0:9292
Use Ctrl-C to stop
curl でサーバにアクセス
curl でアクセスして動作確認をする。
$ curl -i "http://localhost:9292/hello/こんにちは世界&" HTTP/1.1 200 OK Content-Type: text/html;charset=utf-8 X-XSS-Protection: 1; mode=block X-Content-Type-Options: nosniff X-Frame-Options: SAMEORIGIN Content-Length: 219 <!DOCTYPE html> <html> <head> <meta charset="utf-8"> <title>Hello, World!</title> </head> <body> <p>こんにちは世界&</p> <p>ruby 2.7.0p0 (2019-12-25 revision 647ee6f091) [x86_64-darwin19]</p> </body> </html>参考資料
- 投稿日:2020-02-09T21:36:05+09:00
プログラミング初心者向け:DXRubyで 1ステップずつ作っていく「ブロック崩し」
概要
この記事は中高生向けプログラミング教室の教材として作ったものを一部改変したものです。
Rubyでプログラミングの初歩を学んだ次のステップとして、ゲームライブラリDXRubyを使って「ブロック崩し」ゲームを作っていきます。今回の記事は、
・Ruby用2Dゲームライブラリ DXRuby:使い方の初歩 - Qiita
の続編になっています。
Rubyを使って、0から少しずつ「ブロック崩し」を作っていきます。Rubyだと完成しても100行足らずで「ブロック崩し」ができてしまいます。
技術解説
使用ライブラリ
Windows向けRuby用2Dゲームライブラリ
DXRubyを使用します。
バージョン1.4.2以上を想定しています。
1.4.2より前のバージョンとの主な相違点
Window.loopが複数置けるマウス位置を取得する
Input.mouse_pos_x、Input.mouse_pos_yの新しい書き方として、Input.mouse_x、Input.mouse_yが追加→ DXRuby 1.4.6:更新履歴
http://mirichi.github.io/dxruby-doc/CHANGELOG.html
DXRubyインストールの注意点
→ DXRuby 1.4.6 をWindows10で使う時の注意点とインストール方法 - noanoa07 - Qiita
https://qiita.com/noanoa07/items/0ce14c2404df38de94b7参考サイト
DXRuby のホームページ
http://dxruby.osdn.jpDXRuby 1.4.6 リファレンスマニュアル
http://mirichi.github.io/dxruby-doc/index.html困ったときは、このページの「チュートリアル」と「マニュアル」にだいたい書いてあります。
- DXRuby 1.4.1 リファレンスマニュアル http://dxruby.osdn.jp/DXRubyReference/20095313382446.htm
古いバージョンのリファレンスも役に立つときがあります。
- DXRubyで 0から作る「ブロック崩し」 - noanoa 日々の日記 http://blog.livedoor.jp/noanoa07/archives/2045851.html
このテキストのブログ記事での解説です。
オリジナル
※「2014-03-17 松江Ruby会議05に参加してきた - mirichiの日記」より改変
http://d.hatena.ne.jp/mirichi/20140317/p1
ライセンス
ソースコード、本解説ともにパブリックドメイン
プログラム解説
1.DXRubyの練習
→ Ruby用2Dゲームライブラリ DXRuby:使い方の初歩 - Qiita
を見てください。2.「ブロック崩し」を作る
いよいよ「ブロック崩し」を作っていきます。
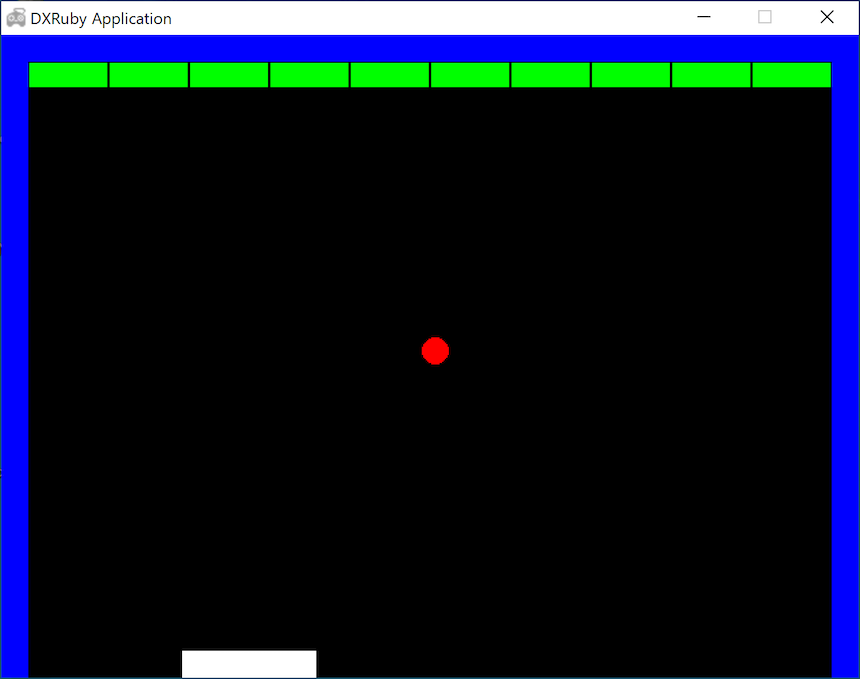
2-1. バーを出す(block01.rb)
横100、縦20大きさの白い長方形を、ボールを打ち返すバーとして作ります。
まず、
Image.newでイメージを作成します。さらに、ボールとの衝突判定をするためにSpite.newでスプライト化します。初期位置は、x = 0、y = 460にしますが、実際の描画ではxはマウスの横位置(mouse_pos_x)に追従するようにします。ウィンドウの初期サイズは、指定しないと横640、縦480になります。そのため、バーの縦位置
yはウィンドウの一番下480に合わせるため、バーの縦幅を引いた480 - 20 = 460にしています。バーを表示させるには、
Window.loop do 〜 endの中でdrawメソッド(命令)を使います。block01.rbrequire 'dxruby' img_bar = Image.new(100, 20, C_WHITE) bar = Sprite.new(0, 460, img_bar) Window.loop do bar.x = Input.mouse_pos_x bar.draw end
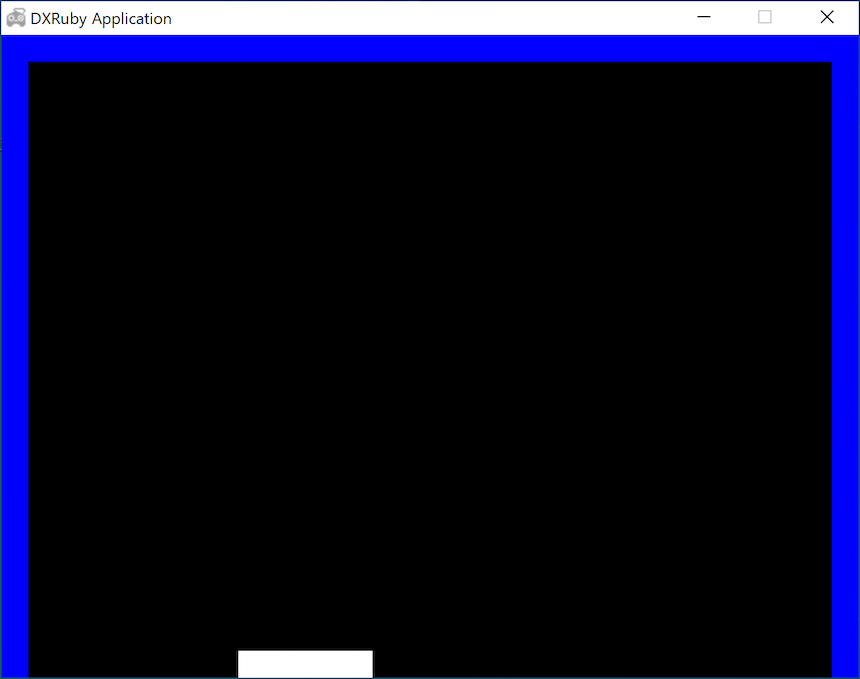
2-2. 壁を出す(左側)(block02.rb)
左側の縦の壁を作ります。まず、横20、縦は(ウィンドウの縦幅と同じ)640の大きさの青い長方形のイメージ
img_hwallを作ります。これを壁として、ボールとの衝突判定をするためにスプライト化します(
lwall)。位置は、左上隅(x = 0、y = 0)に配置します。block02.rbrequire 'dxruby' img_bar = Image.new(100, 20, C_WHITE) img_hwall = Image.new( 20, 480, C_BLUE) bar = Sprite.new(0, 460, img_bar) lwall = Sprite.new(0, 0, img_hwall) Window.loop do bar.x = Input.mouse_pos_x bar.draw lwall.draw end
2-3. 壁を出す(右側も)(block03.rb)
右側の縦の壁を作ります。左側の壁と同じ大きさなので、同じイメージ
img_hwallを使ってスプライト化し(rwall)、右上隅(x = 620、y = 0)に配置します。右壁の横位置
xはウィンドウ幅640からバーの縦幅20を引いた640 - 20 = 620にします。block03.rbrequire 'dxruby' img_bar = Image.new(100, 20, C_WHITE) img_hwall = Image.new( 20, 480, C_BLUE) bar = Sprite.new( 0, 460, img_bar) lwall = Sprite.new( 0, 0, img_hwall) rwall = Sprite.new(620, 0, img_hwall) Window.loop do bar.x = Input.mouse_pos_x bar.draw lwall.draw rwall.draw end
2-4. 壁を出す(上側も)(block04.rb)
上側の横の壁を作ります。まず、横は(ウィンドウの横幅と同じ)640、縦20の大きさの白い長方形のイメージ
img_vwallを作ります。これもボールとの衝突判定をするためにスプライト化します(
twall)。位置は、左上隅(x = 0、y = 0)に配置します。block04.rbrequire 'dxruby' img_bar = Image.new(100, 20, C_WHITE) img_hwall = Image.new( 20, 480, C_BLUE) img_vwall = Image.new(640, 20, C_BLUE) bar = Sprite.new( 0, 460, img_bar) lwall = Sprite.new( 0, 0, img_hwall) rwall = Sprite.new(620, 0, img_hwall) twall = Sprite.new( 0, 0, img_vwall) Window.loop do bar.x = Input.mouse_pos_x bar.draw lwall.draw rwall.draw twall.draw end
2-5. 壁とバーをまとめて描く:配列(block05.rb)
壁とバーの描画が4行と増えたので、まとめて描くようにします。
バーと壁をまとめて配列
wallsにします。そして、スプライトの配列をまとめて描画できるSprite.drawで一気に表示させます。block05.rbrequire 'dxruby' img_bar = Image.new(100, 20, C_WHITE) img_hwall = Image.new( 20, 480, C_BLUE) img_vwall = Image.new(640, 20, C_BLUE) bar = Sprite.new( 0, 460, img_bar) lwall = Sprite.new( 0, 0, img_hwall) rwall = Sprite.new(620, 0, img_hwall) twall = Sprite.new( 0, 0, img_vwall) walls = [bar, lwall, rwall, twall] Window.loop do bar.x = Input.mouse_pos_x Sprite.draw(walls) end
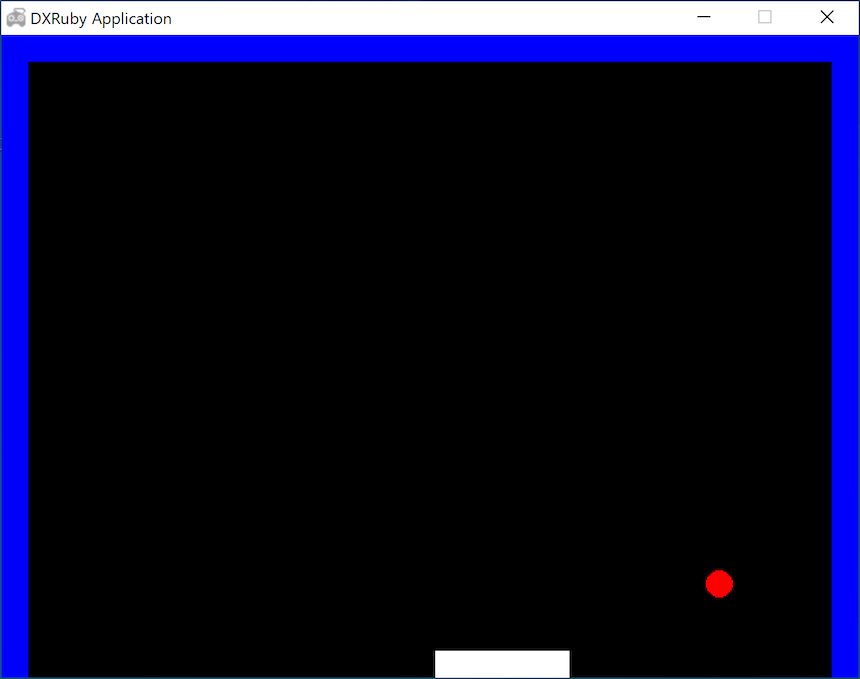
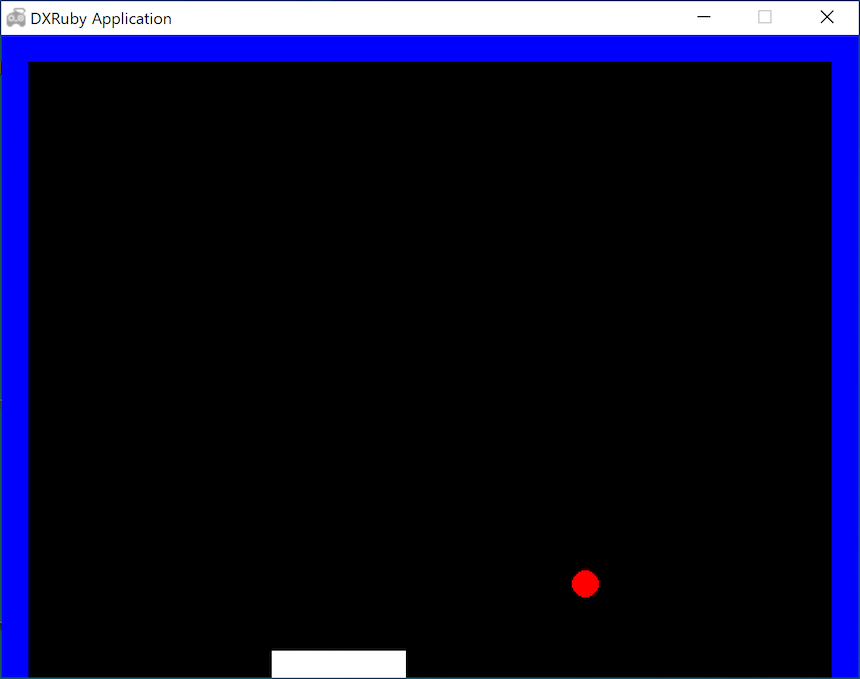
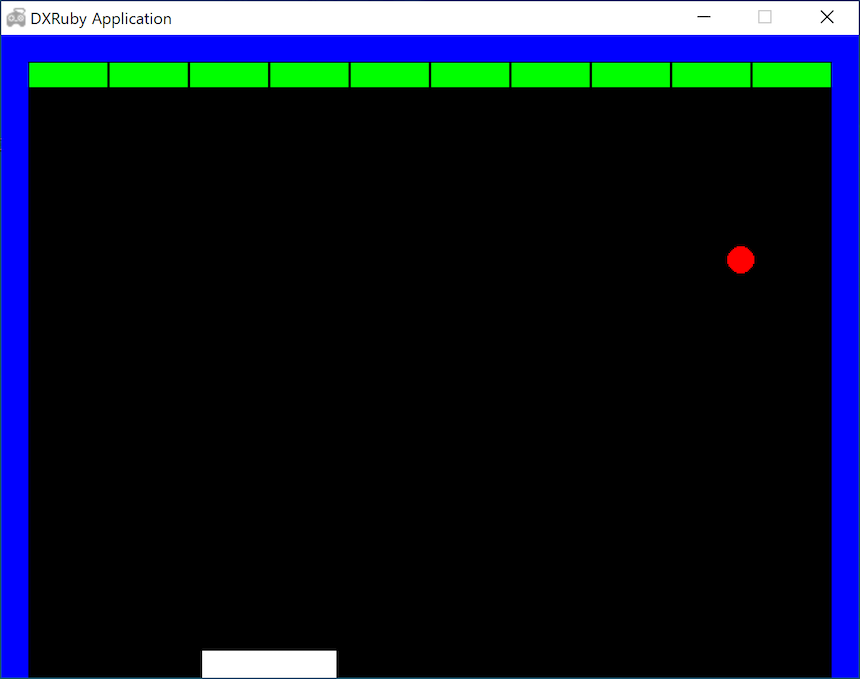
2-6. ボールを出す(block06.rb)
ボールを作ります。横20、縦20の正方形の中に、中心が x=10、y = 10、半径が10(つまり正方形目一杯)の赤い円のイメージ
img_ballを作ります。壁、バーと衝突判定するためにスプライト化します(
ball)。初期位置はとりあえず x = 300、y = 400 にして、表示します。block06.rbrequire 'dxruby' img_bar = Image.new(100, 20, C_WHITE) img_hwall = Image.new( 20, 480, C_BLUE) img_vwall = Image.new(640, 20, C_BLUE) img_ball = Image.new( 20, 20).circle_fill(10, 10, 10, C_RED) bar = Sprite.new( 0, 460, img_bar) lwall = Sprite.new( 0, 0, img_hwall) rwall = Sprite.new(620, 0, img_hwall) twall = Sprite.new( 0, 0, img_vwall) walls = [bar, lwall, rwall, twall] ball = Sprite.new(300, 400, img_ball) Window.loop do bar.x = Input.mouse_pos_x Sprite.draw(walls) ball.draw end
2-7. ボールを動かす(横方向)(block07.rb)
ボールを横方向(x方向)に動かします。(xは右がプラス方向)
スピード
dxを2として、ballのx位置にloopで回ってくる(1/60秒)毎にdx分を足していきます。block07.rbrequire 'dxruby' img_bar = Image.new(100, 20, C_WHITE) img_hwall = Image.new( 20, 480, C_BLUE) img_vwall = Image.new(640, 20, C_BLUE) img_ball = Image.new( 20, 20).circle_fill(10, 10, 10, C_RED) bar = Sprite.new( 0, 460, img_bar) lwall = Sprite.new( 0, 0, img_hwall) rwall = Sprite.new(620, 0, img_hwall) twall = Sprite.new( 0, 0, img_vwall) walls = [bar, lwall, rwall, twall] ball = Sprite.new(300, 400, img_ball) dx = 2 Window.loop do bar.x = Input.mouse_pos_x Sprite.draw(walls) ball.x = ball.x + dx ball.draw end
2-8. ボールを動かす(横方向):別の書き方(block08.rb)
ball.x = ball.x + dxを別の書き方である、
ball.x += dxに書き換えてみます。同じことですが、慣れればこちらの方が見やすいかも?block08.rbrequire 'dxruby' img_bar = Image.new(100, 20, C_WHITE) img_hwall = Image.new( 20, 480, C_BLUE) img_vwall = Image.new(640, 20, C_BLUE) img_ball = Image.new( 20, 20).circle_fill(10, 10, 10, C_RED) bar = Sprite.new( 0, 460, img_bar) lwall = Sprite.new( 0, 0, img_hwall) rwall = Sprite.new(620, 0, img_hwall) twall = Sprite.new( 0, 0, img_vwall) walls = [bar, lwall, rwall, twall] ball = Sprite.new(300, 400, img_ball) dx = 2 Window.loop do bar.x = Input.mouse_pos_x Sprite.draw(walls) ball.x += dx ball.draw end
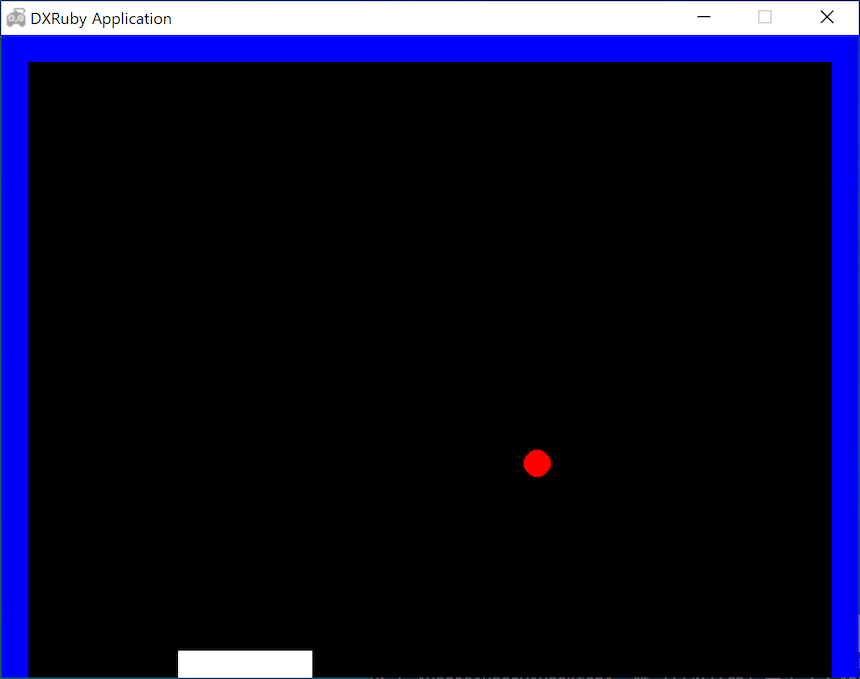
2-9. ボールを動かす(縦方向)(block09.rb)
今度は縦方向(y方向)に動かします。(yは下がプラス方向)
いったん横方向のスピード
dxは0にして、縦方向のスピードdyを-2にします。ballのy位置にloopで回ってくる毎にdy分を足していきます。block09.rbrequire 'dxruby' img_bar = Image.new(100, 20, C_WHITE) img_hwall = Image.new( 20, 480, C_BLUE) img_vwall = Image.new(640, 20, C_BLUE) img_ball = Image.new( 20, 20).circle_fill(10, 10, 10, C_RED) bar = Sprite.new( 0, 460, img_bar) lwall = Sprite.new( 0, 0, img_hwall) rwall = Sprite.new(620, 0, img_hwall) twall = Sprite.new( 0, 0, img_vwall) walls = [bar, lwall, rwall, twall] ball = Sprite.new(300, 400, img_ball) dx = 0 dy = -2 Window.loop do bar.x = Input.mouse_pos_x Sprite.draw(walls) ball.x += dx ball.y += dy ball.draw end
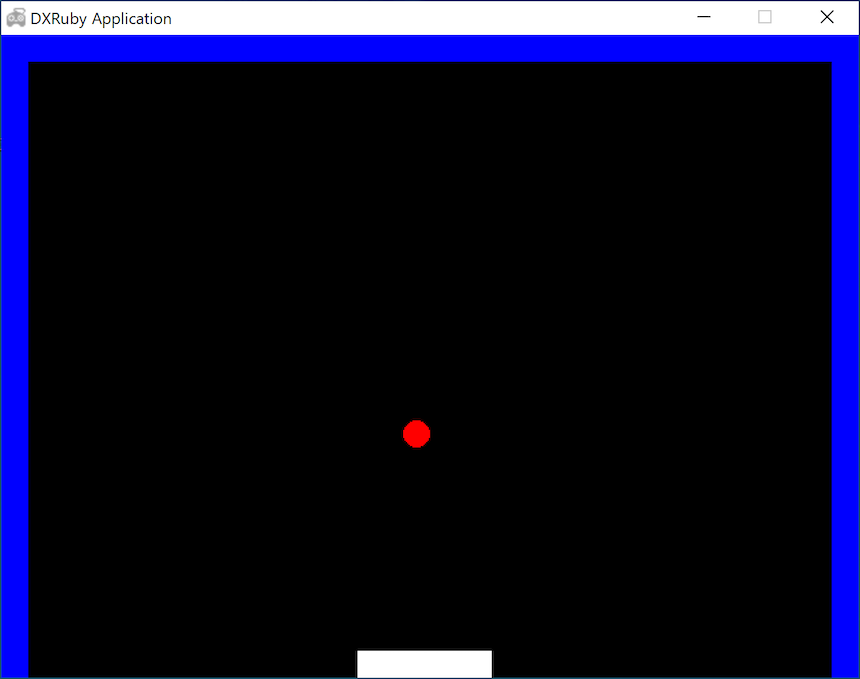
2-10. ボールを動かす(縦横方向)(block10.rb)
ボールの横方向のスピード
dxを2、縦方向のスピードdyを-2にすると、斜めに動いていきます。block10.rbrequire 'dxruby' img_bar = Image.new(100, 20, C_WHITE) img_hwall = Image.new( 20, 480, C_BLUE) img_vwall = Image.new(640, 20, C_BLUE) img_ball = Image.new( 20, 20).circle_fill(10, 10, 10, C_RED) bar = Sprite.new( 0, 460, img_bar) lwall = Sprite.new( 0, 0, img_hwall) rwall = Sprite.new(620, 0, img_hwall) twall = Sprite.new( 0, 0, img_vwall) walls = [bar, lwall, rwall, twall] ball = Sprite.new(300, 400, img_ball) dx = 2 dy = -2 Window.loop do bar.x = Input.mouse_pos_x Sprite.draw(walls) ball.x += dx ball.y += dy ball.draw end
2-11. 動かすをまとめる(block11.rb)
横に動かす
ball.x += dxと縦に動かすball.y += dyは、いつも一緒に使うので、まとめて書いてみます。ここでは
moveという命令を作ります(def 〜 endで定義)
。引数としては、ボールのような動かすもの(スプライト)、横方向(x方向)のスピード、縦方向(y方向)のスピードを指定します。block11.rbrequire 'dxruby' img_bar = Image.new(100, 20, C_WHITE) img_hwall = Image.new( 20, 480, C_BLUE) img_vwall = Image.new(640, 20, C_BLUE) img_ball = Image.new( 20, 20).circle_fill(10, 10, 10, C_RED) bar = Sprite.new( 0, 460, img_bar) lwall = Sprite.new( 0, 0, img_hwall) rwall = Sprite.new(620, 0, img_hwall) twall = Sprite.new( 0, 0, img_vwall) walls = [bar, lwall, rwall, twall] ball = Sprite.new(300, 400, img_ball) dx = 2 dy = -2 def move(sprite, speed_x, speed_y) sprite.x += speed_x sprite.y += speed_y end Window.loop do bar.x = Input.mouse_pos_x Sprite.draw(walls) move(ball, dx, dy) ball.draw end
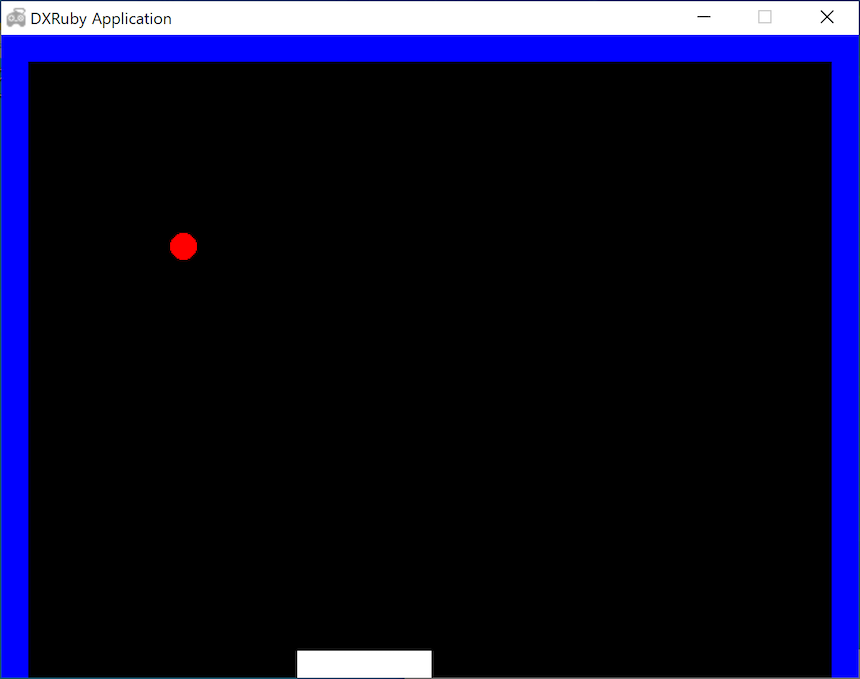
2-12. ボールが跳ね返る(横方向)(block12.rb)
ボールを跳ね返らせます。まずは、縦方向(y方向)のスピード
dyを0にして、横方向(x方向)だけ動かします。衝突判定には
===を使います。もし、ボールballと壁やバーwallsが衝突したら、ボールのx位置ball.xを衝突前の位置に戻し(ball.x -= dx)、ボールのx方向のスピードdxのプラス/マイナスを反対にして、逆方向に動くようにします。block12.rbrequire 'dxruby' img_bar = Image.new(100, 20, C_WHITE) img_hwall = Image.new( 20, 480, C_BLUE) img_vwall = Image.new(640, 20, C_BLUE) img_ball = Image.new( 20, 20).circle_fill(10, 10, 10, C_RED) bar = Sprite.new( 0, 460, img_bar) lwall = Sprite.new( 0, 0, img_hwall) rwall = Sprite.new(620, 0, img_hwall) twall = Sprite.new( 0, 0, img_vwall) walls = [bar, lwall, rwall, twall] ball = Sprite.new(300, 400, img_ball) dx = 2 dy = -2 def move(sprite, speed_x, speed_y) sprite.x += speed_x sprite.y += speed_y end Window.loop do bar.x = Input.mouse_pos_x Sprite.draw(walls) move(ball, dx, 0) #横方向だけ動かす if ball === walls ball.x -= dx dx = -dx end ball.draw end
2-13. ボールが跳ね返る(縦方向)(block13.rb)
今度は縦方向(y方向)だけ動かします。
block13.rbrequire 'dxruby' img_bar = Image.new(100, 20, C_WHITE) img_hwall = Image.new( 20, 480, C_BLUE) img_vwall = Image.new(640, 20, C_BLUE) img_ball = Image.new( 20, 20).circle_fill(10, 10, 10, C_RED) bar = Sprite.new( 0, 460, img_bar) lwall = Sprite.new( 0, 0, img_hwall) rwall = Sprite.new(620, 0, img_hwall) twall = Sprite.new( 0, 0, img_vwall) walls = [bar, lwall, rwall, twall] ball = Sprite.new(300, 400, img_ball) dx = 2 dy = -2 def move(sprite, speed_x, speed_y) sprite.x += speed_x sprite.y += speed_y end Window.loop do bar.x = Input.mouse_pos_x Sprite.draw(walls) move(ball, 0, 0) #縦方向だけ動かす if ball === walls ball.x -= dx dx = -dx end move(ball, 0, dy) #縦方向だけ動かす if ball === walls ball. y -= dy dy = -dy end ball.draw end
2-14. ボールが跳ね返る(縦横方向)(block14.rb)
縦横ともに動かして、衝突したら跳ね返らせます。ちょっと「ブロック崩し」の雰囲気が出てきましたね。
ここでは、まずx方向に動かして、ぶつかったらx方向だけ跳ね返って、次にy方向に動かして、ぶつかったらy方向だけ跳ね返る書き方をしています。
なぜ、x方向、y方向同時に動かして、ぶつかったら跳ね返る書き方にしていないのでしょうか?自分で試して考えてみてください。
block14.rbrequire 'dxruby' img_bar = Image.new(100, 20, C_WHITE) img_hwall = Image.new( 20, 480, C_BLUE) img_vwall = Image.new(640, 20, C_BLUE) img_ball = Image.new( 20, 20).circle_fill(10, 10, 10, C_RED) bar = Sprite.new( 0, 460, img_bar) lwall = Sprite.new( 0, 0, img_hwall) rwall = Sprite.new(620, 0, img_hwall) twall = Sprite.new( 0, 0, img_vwall) walls = [bar, lwall, rwall, twall] ball = Sprite.new(300, 400, img_ball) dx = 2 dy = -2 def move(sprite, speed_x, speed_y) sprite.x += speed_x sprite.y += speed_y end Window.loop do bar.x = Input.mouse_pos_x Sprite.draw(walls) move(ball, dx, 0) if ball === walls ball.x -= dx dx = -dx end move(ball, 0, dy) if ball === walls ball. y -= dy dy = -dy end ball.draw end
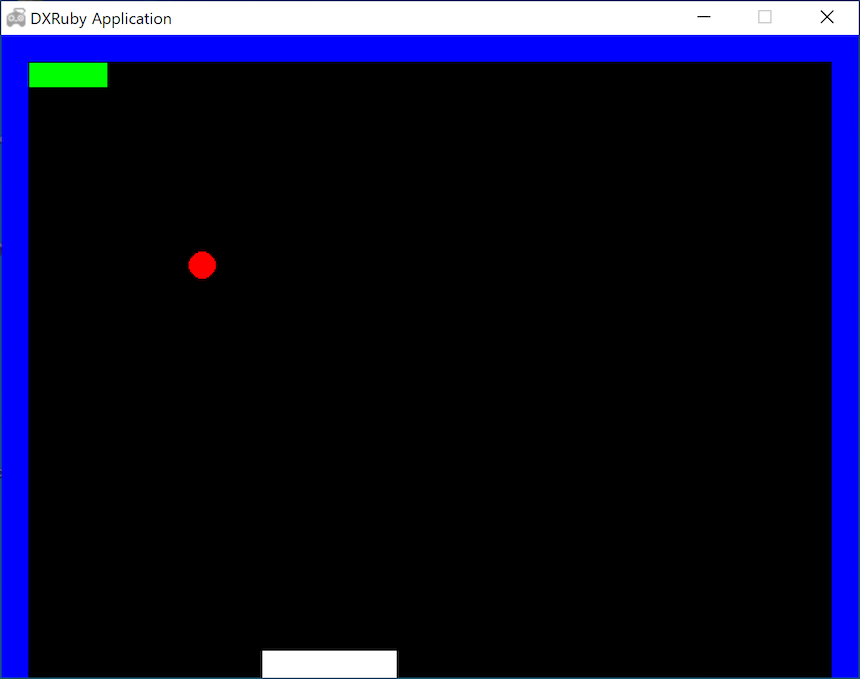
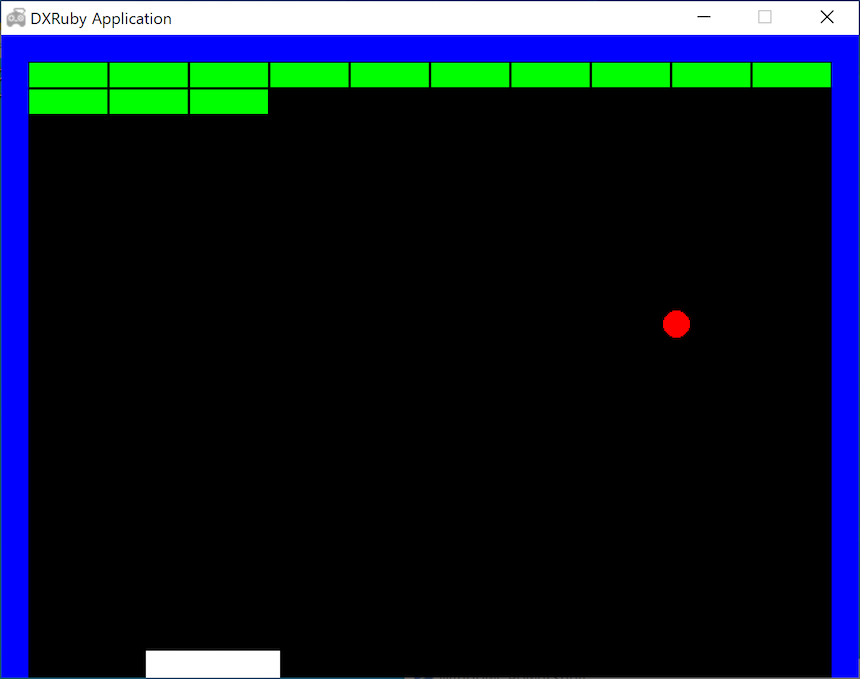
2-15. ブロックを出す(1個)(block15.rb)
ブロックを作っていきます。まずは1個。
ブロックは横58、縦18の大きさの緑の長方形のイメージ
img_blockを作ります。さらに、ボールとの衝突判定をするためにスプライト化します(block_00)。横の大きさは、横に10個置くことにして、(ウィンドウ横幅640 - 左右の壁の厚み 20 * 2) / 10 = 60 に、隣同士の隙間を左右 1ずつとって 58にしています。
位置は、左上の壁の内側(x = 20, y = 20)から横、縦とも 1だけ隙間を空けて、x = 21、y = 21に配置します。
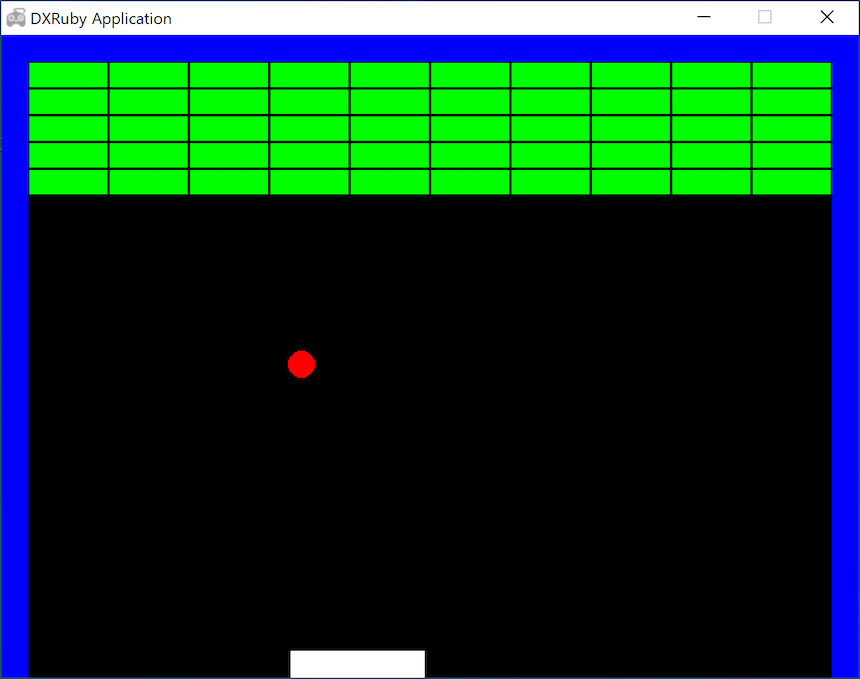
block15.rbrequire 'dxruby' img_bar = Image.new(100, 20, C_WHITE) img_hwall = Image.new( 20, 480, C_BLUE) img_vwall = Image.new(640, 20, C_BLUE) img_ball = Image.new( 20, 20).circle_fill(10, 10, 10, C_RED) img_block = Image.new( 58, 18, C_GREEN) bar = Sprite.new( 0, 460, img_bar) lwall = Sprite.new( 0, 0, img_hwall) rwall = Sprite.new(620, 0, img_hwall) twall = Sprite.new( 0, 0, img_vwall) walls = [bar, lwall, rwall, twall] ball = Sprite.new(300, 400, img_ball) dx = 2 dy = -2 def move(sprite, speed_x, speed_y) sprite.x += speed_x sprite.y += speed_y end block_00 = Sprite.new(21, 21, img_block) Window.loop do bar.x = Input.mouse_pos_x Sprite.draw(walls) move(ball, dx, 0) if ball === walls ball.x -= dx dx = -dx end move(ball, 0, dy) if ball === walls ball. y -= dy dy = -dy end ball.draw block_00.draw end
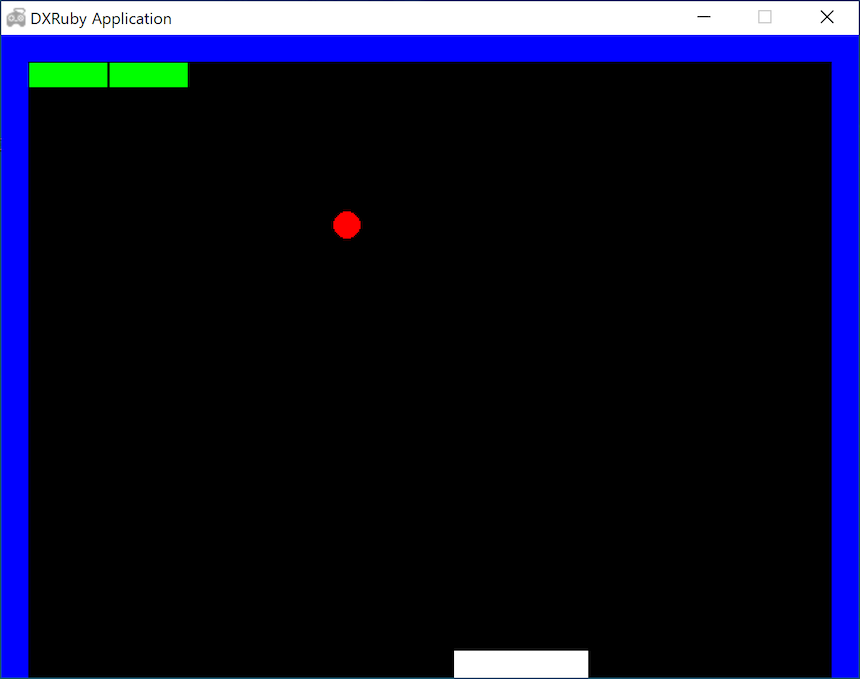
2-16. ブロックを出す(2個)(block16.rb)
2個目のブロックは、同じ大きさのブロックをxを60だけ右にずらした位置に置きます。(ブロックの横幅は58なので少し隙間が空きます。)
block16.rbrequire 'dxruby' img_bar = Image.new(100, 20, C_WHITE) img_hwall = Image.new( 20, 480, C_BLUE) img_vwall = Image.new(640, 20, C_BLUE) img_ball = Image.new( 20, 20).circle_fill(10, 10, 10, C_RED) img_block = Image.new( 58, 18, C_GREEN) bar = Sprite.new( 0, 460, img_bar) lwall = Sprite.new( 0, 0, img_hwall) rwall = Sprite.new(620, 0, img_hwall) twall = Sprite.new( 0, 0, img_vwall) walls = [bar, lwall, rwall, twall] ball = Sprite.new(300, 400, img_ball) dx = 2 dy = -2 def move(sprite, speed_x, speed_y) sprite.x += speed_x sprite.y += speed_y end block_00 = Sprite.new(21 , 21, img_block) block_01 = Sprite.new(21 + 60, 21, img_block) Window.loop do bar.x = Input.mouse_pos_x Sprite.draw(walls) move(ball, dx, 0) if ball === walls ball.x -= dx dx = -dx end move(ball, 0, dy) if ball === walls ball. y -= dy dy = -dy end ball.draw block_00.draw block_01.draw end
2-17. ブロックを出す(3個)(block17.rb)
同じく3個目のブロックを置きます。x位置は、ブロックの横幅58と隙間を見込んで60ずつずらしていきます。
block17.rbrequire 'dxruby' img_bar = Image.new(100, 20, C_WHITE) img_hwall = Image.new( 20, 480, C_BLUE) img_vwall = Image.new(640, 20, C_BLUE) img_ball = Image.new( 20, 20).circle_fill(10, 10, 10, C_RED) img_block = Image.new( 58, 18, C_GREEN) bar = Sprite.new( 0, 460, img_bar) lwall = Sprite.new( 0, 0, img_hwall) rwall = Sprite.new(620, 0, img_hwall) twall = Sprite.new( 0, 0, img_vwall) walls = [bar, lwall, rwall, twall] ball = Sprite.new(300, 400, img_ball) dx = 2 dy = -2 def move(sprite, speed_x, speed_y) sprite.x += speed_x sprite.y += speed_y end block_00 = Sprite.new(21 , 21, img_block) block_01 = Sprite.new(21 + 60 , 21, img_block) block_02 = Sprite.new(21 + 60 * 2, 21, img_block) Window.loop do bar.x = Input.mouse_pos_x Sprite.draw(walls) move(ball, dx, 0) if ball === walls ball.x -= dx dx = -dx end move(ball, 0, dy) if ball === walls ball. y -= dy dy = -dy end ball.draw block_00.draw block_01.draw block_02.draw end
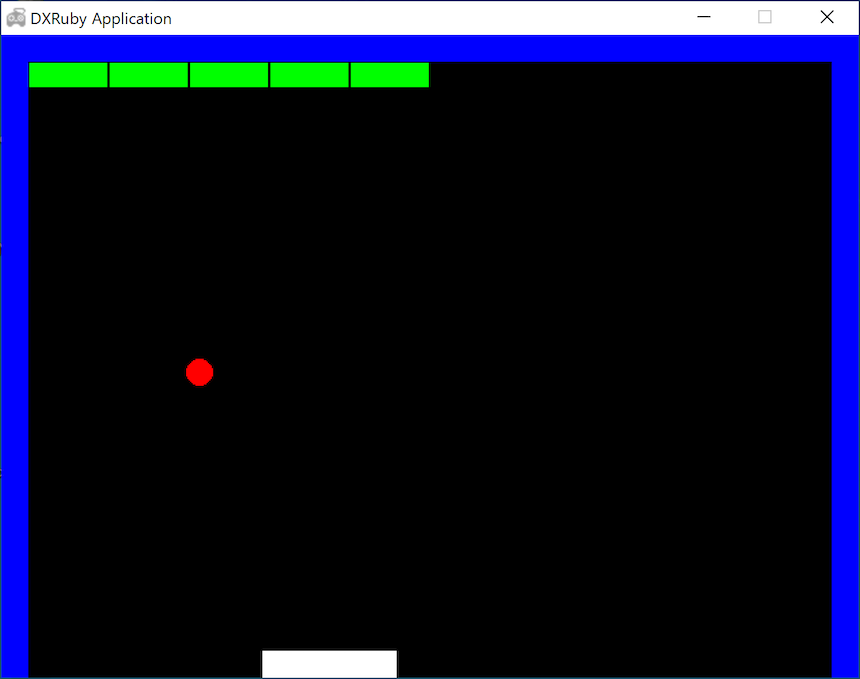
2-18. ブロックを出す(5個)(block18.rb)
5個まで同様にブロックを置きます。
block18.rbrequire 'dxruby' img_bar = Image.new(100, 20, C_WHITE) img_hwall = Image.new( 20, 480, C_BLUE) img_vwall = Image.new(640, 20, C_BLUE) img_ball = Image.new( 20, 20).circle_fill(10, 10, 10, C_RED) img_block = Image.new( 58, 18, C_GREEN) bar = Sprite.new( 0, 460, img_bar) lwall = Sprite.new( 0, 0, img_hwall) rwall = Sprite.new(620, 0, img_hwall) twall = Sprite.new( 0, 0, img_vwall) walls = [bar, lwall, rwall, twall] ball = Sprite.new(300, 400, img_ball) dx = 2 dy = -2 def move(sprite, speed_x, speed_y) sprite.x += speed_x sprite.y += speed_y end block_00 = Sprite.new(21 , 21, img_block) block_01 = Sprite.new(21 + 60 , 21, img_block) block_02 = Sprite.new(21 + 60 * 2, 21, img_block) block_03 = Sprite.new(21 + 60 * 3, 21, img_block) block_04 = Sprite.new(21 + 60 * 4, 21, img_block) Window.loop do bar.x = Input.mouse_pos_x Sprite.draw(walls) move(ball, dx, 0) if ball === walls ball.x -= dx dx = -dx end move(ball, 0, dy) if ball === walls ball. y -= dy dy = -dy end ball.draw block_00.draw block_01.draw block_02.draw block_03.draw block_04.draw end
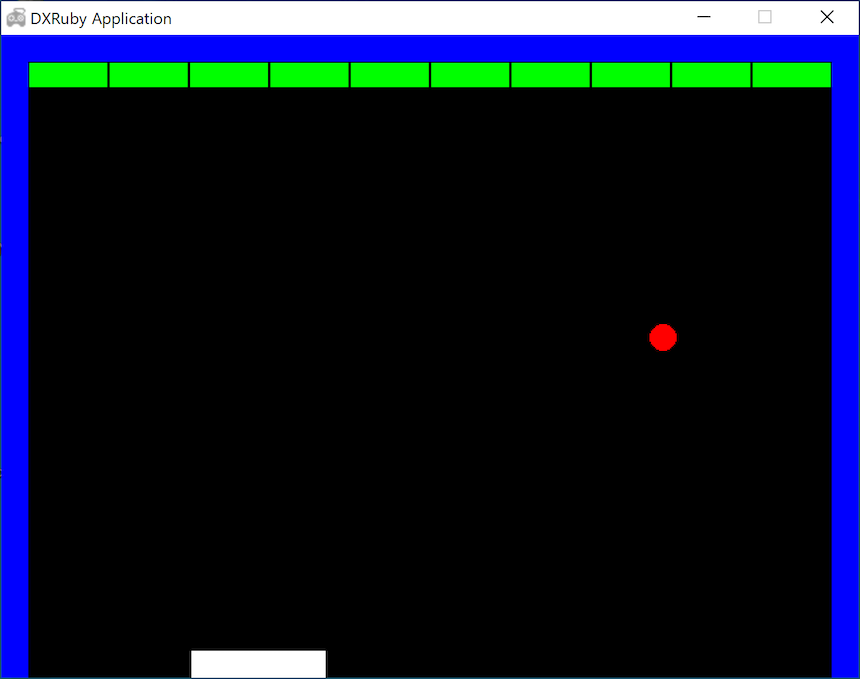
2-19. ブロックを出す(10個)(block19.rb)
横に10個置くとちょうどぴったりの幅です。
block19.rbrequire 'dxruby' img_bar = Image.new(100, 20, C_WHITE) img_hwall = Image.new( 20, 480, C_BLUE) img_vwall = Image.new(640, 20, C_BLUE) img_ball = Image.new( 20, 20).circle_fill(10, 10, 10, C_RED) img_block = Image.new( 58, 18, C_GREEN) bar = Sprite.new( 0, 460, img_bar) lwall = Sprite.new( 0, 0, img_hwall) rwall = Sprite.new(620, 0, img_hwall) twall = Sprite.new( 0, 0, img_vwall) walls = [bar, lwall, rwall, twall] ball = Sprite.new(300, 400, img_ball) dx = 2 dy = -2 def move(sprite, speed_x, speed_y) sprite.x += speed_x sprite.y += speed_y end block_00 = Sprite.new(21 , 21, img_block) block_01 = Sprite.new(21 + 60 , 21, img_block) block_02 = Sprite.new(21 + 60 * 2, 21, img_block) block_03 = Sprite.new(21 + 60 * 3, 21, img_block) block_04 = Sprite.new(21 + 60 * 4, 21, img_block) block_05 = Sprite.new(21 + 60 * 5, 21, img_block) block_06 = Sprite.new(21 + 60 * 6, 21, img_block) block_07 = Sprite.new(21 + 60 * 7, 21, img_block) block_08 = Sprite.new(21 + 60 * 8, 21, img_block) block_09 = Sprite.new(21 + 60 * 9, 21, img_block) Window.loop do bar.x = Input.mouse_pos_x Sprite.draw(walls) move(ball, dx, 0) if ball === walls ball.x -= dx dx = -dx end move(ball, 0, dy) if ball === walls ball. y -= dy dy = -dy end ball.draw block_00.draw block_01.draw block_02.draw block_03.draw block_04.draw block_05.draw block_06.draw block_07.draw block_08.draw block_09.draw end
2-20. ブロックを出す(まとめて表示する)(block20.rb)
ブロックを表示させる
drawが10行にもなったので、まとめて描くようにします。バーと壁を配列
wallsにまとめたように、10個のブロックを配列blocksにします。そして、Sprite.drawで一気に表示させます。block20.rbrequire 'dxruby' img_bar = Image.new(100, 20, C_WHITE) img_hwall = Image.new( 20, 480, C_BLUE) img_vwall = Image.new(640, 20, C_BLUE) img_ball = Image.new( 20, 20).circle_fill(10, 10, 10, C_RED) img_block = Image.new( 58, 18, C_GREEN) bar = Sprite.new( 0, 460, img_bar) lwall = Sprite.new( 0, 0, img_hwall) rwall = Sprite.new(620, 0, img_hwall) twall = Sprite.new( 0, 0, img_vwall) walls = [bar, lwall, rwall, twall] ball = Sprite.new(300, 400, img_ball) dx = 2 dy = -2 def move(sprite, speed_x, speed_y) sprite.x += speed_x sprite.y += speed_y end block_00 = Sprite.new(21 , 21, img_block) block_01 = Sprite.new(21 + 60 , 21, img_block) block_02 = Sprite.new(21 + 60 * 2, 21, img_block) block_03 = Sprite.new(21 + 60 * 3, 21, img_block) block_04 = Sprite.new(21 + 60 * 4, 21, img_block) block_05 = Sprite.new(21 + 60 * 5, 21, img_block) block_06 = Sprite.new(21 + 60 * 6, 21, img_block) block_07 = Sprite.new(21 + 60 * 7, 21, img_block) block_08 = Sprite.new(21 + 60 * 8, 21, img_block) block_09 = Sprite.new(21 + 60 * 9, 21, img_block) blocks = [block_00, block_01, block_02, block_03, block_04, block_05, block_06, block_07, block_08, block_09] Window.loop do bar.x = Input.mouse_pos_x Sprite.draw(walls) move(ball, dx, 0) if ball === walls ball.x -= dx dx = -dx end move(ball, 0, dy) if ball === walls ball. y -= dy dy = -dy end ball.draw Sprite.draw(blocks) end
2-21. ブロックを出す(まとめて作る)(block21.rb)
ブロックを作る方もまとめて一気に作るようにします。
まず、空の配列
blocksを作ります。配列に追加していく<<メソッドを使って、ブロックを1つ作っては配列blocksに追加していきます。10回繰り返すので、
10.times do 〜 endを使って、1回毎にxを増やすことで横位置をずらしたブロックを作ります。(xは 0, 1, 2, ... , 9 と変わっていく)block21.rbrequire 'dxruby' img_bar = Image.new(100, 20, C_WHITE) img_hwall = Image.new( 20, 480, C_BLUE) img_vwall = Image.new(640, 20, C_BLUE) img_ball = Image.new( 20, 20).circle_fill(10, 10, 10, C_RED) img_block = Image.new( 58, 18, C_GREEN) bar = Sprite.new( 0, 460, img_bar) lwall = Sprite.new( 0, 0, img_hwall) rwall = Sprite.new(620, 0, img_hwall) twall = Sprite.new( 0, 0, img_vwall) walls = [bar, lwall, rwall, twall] ball = Sprite.new(300, 400, img_ball) dx = 2 dy = -2 def move(sprite, speed_x, speed_y) sprite.x += speed_x sprite.y += speed_y end blocks = [] 10.times do |x| blocks << Sprite.new(21 + 60 * x, 21, img_block) end Window.loop do bar.x = Input.mouse_pos_x Sprite.draw(walls) move(ball, dx, 0) if ball === walls ball.x -= dx dx = -dx end move(ball, 0, dy) if ball === walls ball. y -= dy dy = -dy end ball.draw Sprite.draw(blocks) end
2-22. ブロックを出す(2段目も作る)(block22.rb)
2段目のブロックも作っていきます。2段目はyの位置を20大きくします。するとブロックの縦幅は18なので、少し隙間が空きます。
block22.rbrequire 'dxruby' img_bar = Image.new(100, 20, C_WHITE) img_hwall = Image.new( 20, 480, C_BLUE) img_vwall = Image.new(640, 20, C_BLUE) img_ball = Image.new( 20, 20).circle_fill(10, 10, 10, C_RED) img_block = Image.new( 58, 18, C_GREEN) bar = Sprite.new( 0, 460, img_bar) lwall = Sprite.new( 0, 0, img_hwall) rwall = Sprite.new(620, 0, img_hwall) twall = Sprite.new( 0, 0, img_vwall) walls = [bar, lwall, rwall, twall] ball = Sprite.new(300, 400, img_ball) dx = 2 dy = -2 def move(sprite, speed_x, speed_y) sprite.x += speed_x sprite.y += speed_y end blocks = [] 10.times do |x| blocks << Sprite.new(21 + 60 * x, 21, img_block) end blocks << Sprite.new(21 , 21 + 20, img_block) blocks << Sprite.new(21 + 60 * 1, 21 + 20, img_block) blocks << Sprite.new(21 + 60 * 2, 21 + 20, img_block) Window.loop do bar.x = Input.mouse_pos_x Sprite.draw(walls) move(ball, dx, 0) if ball === walls ball.x -= dx dx = -dx end move(ball, 0, dy) if ball === walls ball. y -= dy dy = -dy end ball.draw Sprite.draw(blocks) end
2-23. ブロックを出す(2段目もまとめて作る)(block23.rb)
2段目の作り方も、1段目と同じく
10.times do 〜 endを使って書きます。block23.rbrequire 'dxruby' img_bar = Image.new(100, 20, C_WHITE) img_hwall = Image.new( 20, 480, C_BLUE) img_vwall = Image.new(640, 20, C_BLUE) img_ball = Image.new( 20, 20).circle_fill(10, 10, 10, C_RED) img_block = Image.new( 58, 18, C_GREEN) bar = Sprite.new( 0, 460, img_bar) lwall = Sprite.new( 0, 0, img_hwall) rwall = Sprite.new(620, 0, img_hwall) twall = Sprite.new( 0, 0, img_vwall) walls = [bar, lwall, rwall, twall] ball = Sprite.new(300, 400, img_ball) dx = 2 dy = -2 def move(sprite, speed_x, speed_y) sprite.x += speed_x sprite.y += speed_y end blocks = [] 10.times do |x| blocks << Sprite.new(21 + 60 * x, 21, img_block) end 10.times do |x| blocks << Sprite.new(21 + 60 * x, 21 + 20, img_block) end Window.loop do bar.x = Input.mouse_pos_x Sprite.draw(walls) move(ball, dx, 0) if ball === walls ball.x -= dx dx = -dx end move(ball, 0, dy) if ball === walls ball. y -= dy dy = -dy end ball.draw Sprite.draw(blocks) end
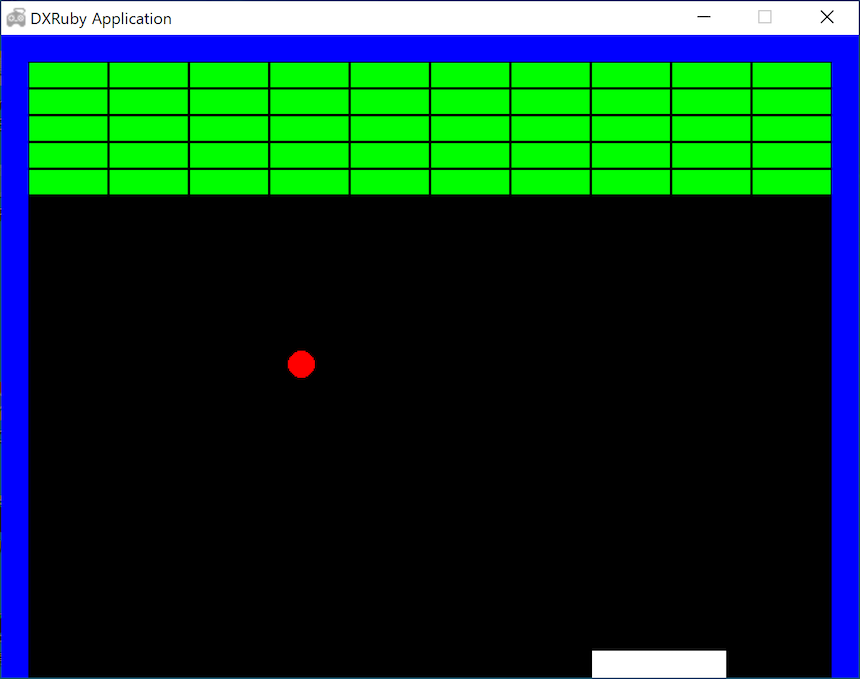
2-24. ブロックを出す(5段目まで作る)(block24.rb)
5段目まで作りました。
block24.rbrequire 'dxruby' img_bar = Image.new(100, 20, C_WHITE) img_hwall = Image.new( 20, 480, C_BLUE) img_vwall = Image.new(640, 20, C_BLUE) img_ball = Image.new( 20, 20).circle_fill(10, 10, 10, C_RED) img_block = Image.new( 58, 18, C_GREEN) bar = Sprite.new( 0, 460, img_bar) lwall = Sprite.new( 0, 0, img_hwall) rwall = Sprite.new(620, 0, img_hwall) twall = Sprite.new( 0, 0, img_vwall) walls = [bar, lwall, rwall, twall] ball = Sprite.new(300, 400, img_ball) dx = 2 dy = -2 def move(sprite, speed_x, speed_y) sprite.x += speed_x sprite.y += speed_y end blocks = [] 10.times do |x| blocks << Sprite.new(21 + 60 * x, 21, img_block) end 10.times do |x| blocks << Sprite.new(21 + 60 * x, 21 + 20, img_block) end 10.times do |x| blocks << Sprite.new(21 + 60 * x, 21 + 20 * 2, img_block) end 10.times do |x| blocks << Sprite.new(21 + 60 * x, 21 + 20 * 3, img_block) end 10.times do |x| blocks << Sprite.new(21 + 60 * x, 21 + 20 * 4, img_block) end Window.loop do bar.x = Input.mouse_pos_x Sprite.draw(walls) move(ball, dx, 0) if ball === walls ball.x -= dx dx = -dx end move(ball, 0, dy) if ball === walls ball. y -= dy dy = -dy end ball.draw Sprite.draw(blocks) end
2-25. ブロックを出す(5段目までまとめて作る)(block25.rb)
10.times do 〜 endが5回出てきたので、これをまとめてみます。
10.times do 〜 endの中に、5.times do 〜 endを入れて、2重の形にします。block25.rbrequire 'dxruby' img_bar = Image.new(100, 20, C_WHITE) img_hwall = Image.new( 20, 480, C_BLUE) img_vwall = Image.new(640, 20, C_BLUE) img_ball = Image.new( 20, 20).circle_fill(10, 10, 10, C_RED) img_block = Image.new( 58, 18, C_GREEN) bar = Sprite.new( 0, 460, img_bar) lwall = Sprite.new( 0, 0, img_hwall) rwall = Sprite.new(620, 0, img_hwall) twall = Sprite.new( 0, 0, img_vwall) walls = [bar, lwall, rwall, twall] ball = Sprite.new(300, 400, img_ball) dx = 2 dy = -2 def move(sprite, speed_x, speed_y) sprite.x += speed_x sprite.y += speed_y end blocks = [] 10.times do |x| 5.times do |y| blocks << Sprite.new(21 + 60 * x, 21 + 20 * y, img_block) end end Window.loop do bar.x = Input.mouse_pos_x Sprite.draw(walls) move(ball, dx, 0) if ball === walls ball.x -= dx dx = -dx end move(ball, 0, dy) if ball === walls ball. y -= dy dy = -dy end ball.draw Sprite.draw(blocks) end
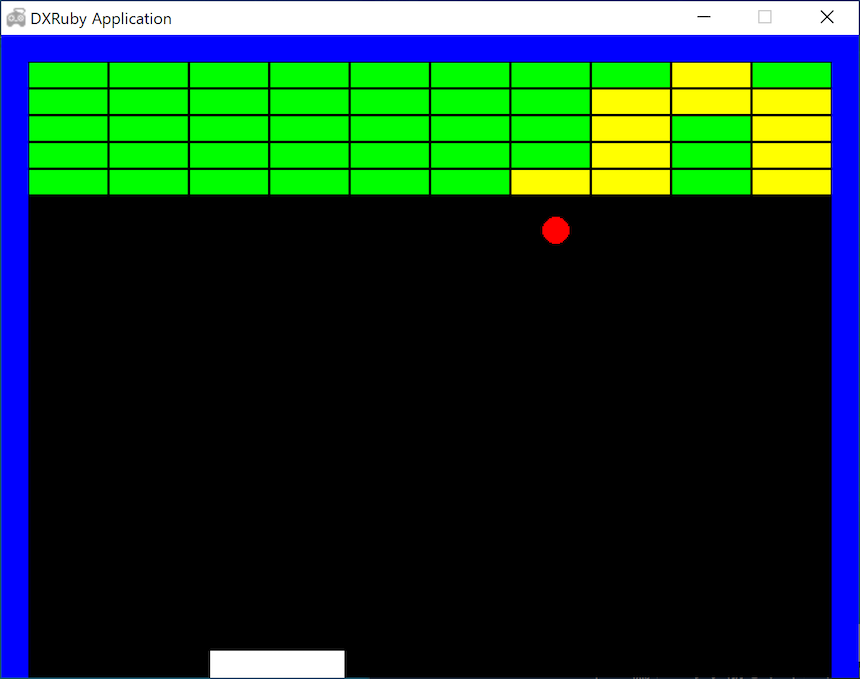
2-26. ブロックとの衝突判定(当たったらブロックは色が変わる)(block26.rb)
ボールとブロックの衝突判定をします。壁やバーと違って、ぶつかったブロックは消す必要があるので、どのブロックにぶつかったか知る必要があります。そこで、
===ではなくcheckを使います。
checkは、衝突判定するだけでなく、衝突したものを配列で返します。それを配列coll_xやcoll_yに代入すると、配列に1つでも要素が入っていたら衝突したと判定できます。(同時に複数衝突していたらその数だけ配列に入ります。)つまり、
coll_x[0]やcoll_y[0]に何か入っていたら、ブロックとぶつかっているし、それがぶつかった(0番目の)ブロックです。ここでは、ぶつかったブロックを黄色いブロックに変えることで分かりやすくしています。block26.rbrequire 'dxruby' img_bar = Image.new(100, 20, C_WHITE) img_hwall = Image.new( 20, 480, C_BLUE) img_vwall = Image.new(640, 20, C_BLUE) img_ball = Image.new( 20, 20).circle_fill(10, 10, 10, C_RED) img_block = Image.new( 58, 18, C_GREEN) img_block_y = Image.new( 58, 18, C_YELLOW) bar = Sprite.new( 0, 460, img_bar) lwall = Sprite.new( 0, 0, img_hwall) rwall = Sprite.new(620, 0, img_hwall) twall = Sprite.new( 0, 0, img_vwall) walls = [bar, lwall, rwall, twall] ball = Sprite.new(300, 400, img_ball) dx = 2 dy = -2 def move(sprite, speed_x, speed_y) sprite.x += speed_x sprite.y += speed_y end blocks = [] 10.times do |x| 5.times do |y| blocks << Sprite.new(21 + 60 * x, 21 + 20 * y, img_block) end end Window.loop do bar.x = Input.mouse_pos_x Sprite.draw(walls) move(ball, dx, 0) if ball === walls ball.x -= dx dx = -dx end coll_x = ball.check(blocks) if coll_x[0] coll_x[0].image = img_block_y end move(ball, 0, dy) if ball === walls ball. y -= dy dy = -dy end coll_y = ball.check(blocks) if coll_y[0] coll_y[0].image = img_block_y end ball.draw Sprite.draw(blocks) end
2-27. ブロックとの衝突判定(当たったブロックの色が変わり、跳ね返る)(block27.rb)
ブロックとぶつかったらボールが跳ね返るようにします。
block27.rbrequire 'dxruby' img_bar = Image.new(100, 20, C_WHITE) img_hwall = Image.new( 20, 480, C_BLUE) img_vwall = Image.new(640, 20, C_BLUE) img_ball = Image.new( 20, 20).circle_fill(10, 10, 10, C_RED) img_block = Image.new( 58, 18, C_GREEN) img_block_y = Image.new( 58, 18, C_YELLOW) bar = Sprite.new( 0, 460, img_bar) lwall = Sprite.new( 0, 0, img_hwall) rwall = Sprite.new(620, 0, img_hwall) twall = Sprite.new( 0, 0, img_vwall) walls = [bar, lwall, rwall, twall] ball = Sprite.new(300, 400, img_ball) dx = 2 dy = -2 def move(sprite, speed_x, speed_y) sprite.x += speed_x sprite.y += speed_y end blocks = [] 10.times do |x| 5.times do |y| blocks << Sprite.new(21 + 60 * x, 21 + 20 * y, img_block) end end Window.loop do bar.x = Input.mouse_pos_x Sprite.draw(walls) move(ball, dx, 0) if ball === walls ball.x -= dx dx = -dx end coll_x = ball.check(blocks) if coll_x[0] coll_x[0].image = img_block_y ball.x -= dx dx = -dx end move(ball, 0, dy) if ball === walls ball. y -= dy dy = -dy end coll_y = ball.check(blocks) if coll_y[0] coll_y[0].image = img_block_y ball. y -= dy dy = -dy end ball.draw Sprite.draw(blocks) end
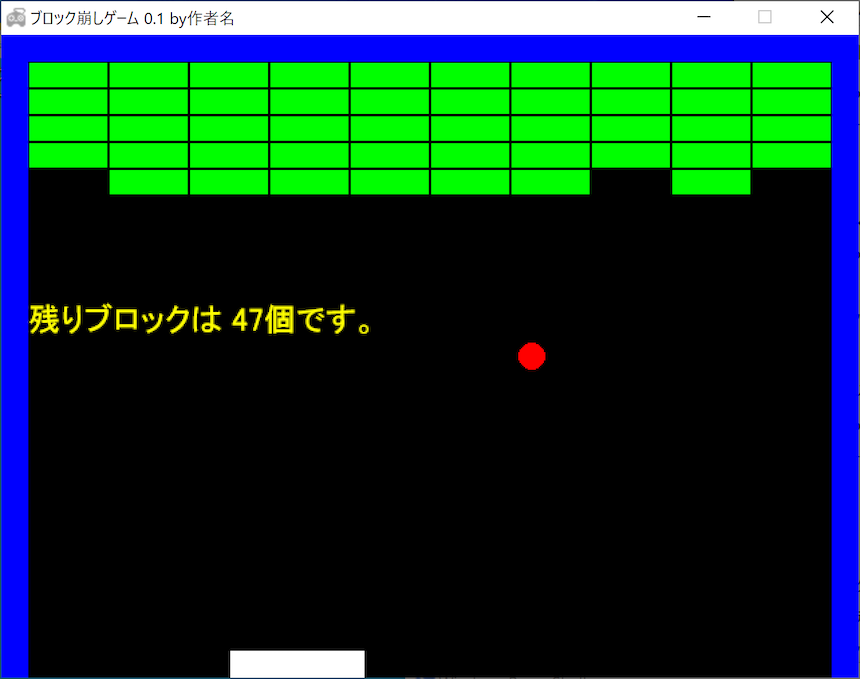
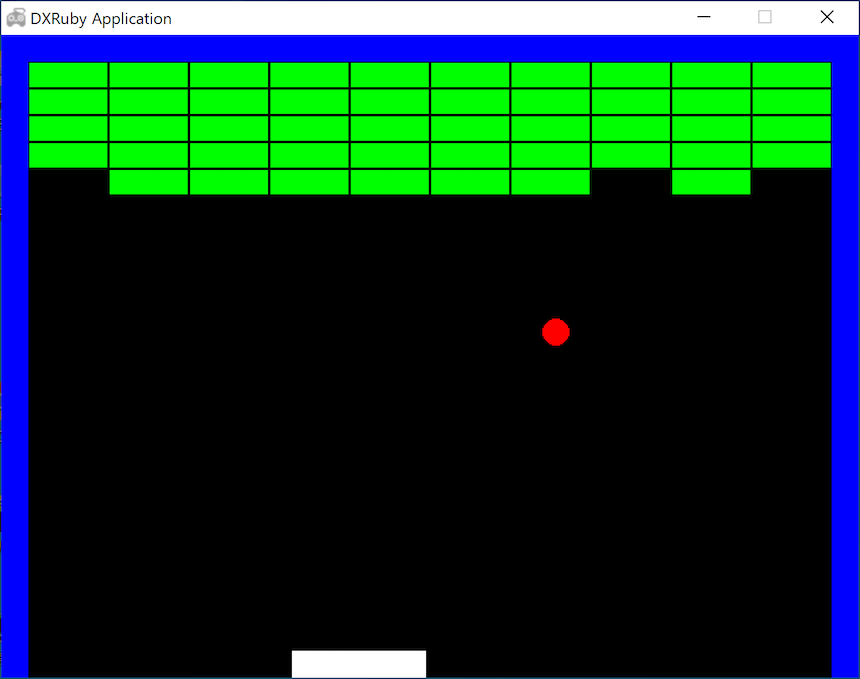
2-28. 当たったブロックは消える(一瞬色が変わる);一応完成(block28.rb)
ぶつかったブロックを消します。そのためには
vanishを使います。これで「ブロック崩し」は一応完成です!
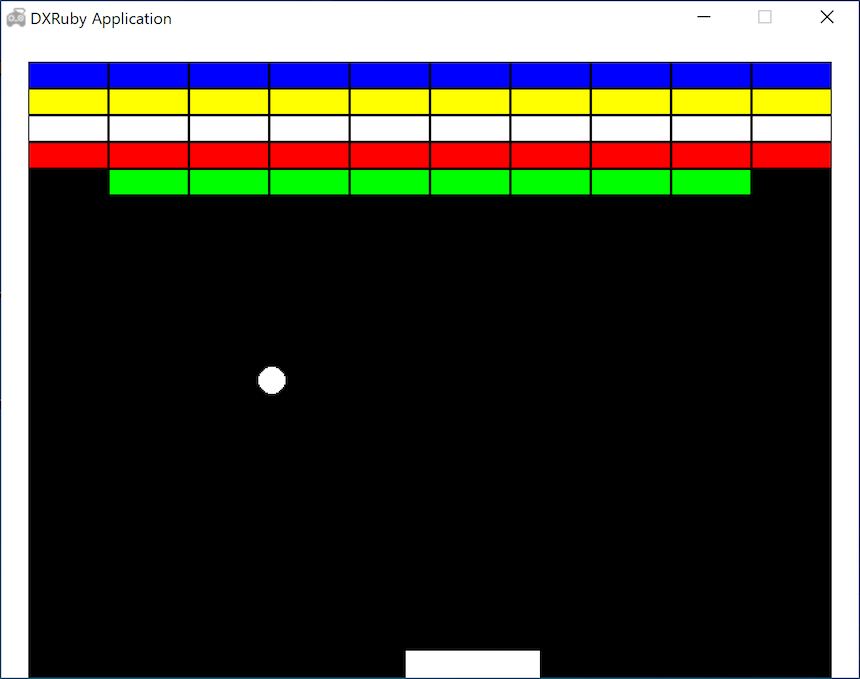
block28.rbrequire 'dxruby' img_bar = Image.new(100, 20, C_WHITE) img_hwall = Image.new( 20, 480, C_BLUE) img_vwall = Image.new(640, 20, C_BLUE) img_ball = Image.new( 20, 20).circle_fill(10, 10, 10, C_RED) img_block = Image.new( 58, 18, C_GREEN) img_block_y = Image.new( 58, 18, C_YELLOW) bar = Sprite.new( 0, 460, img_bar) lwall = Sprite.new( 0, 0, img_hwall) rwall = Sprite.new(620, 0, img_hwall) twall = Sprite.new( 0, 0, img_vwall) walls = [bar, lwall, rwall, twall] ball = Sprite.new(300, 400, img_ball) dx = 2 dy = -2 def move(sprite, speed_x, speed_y) sprite.x += speed_x sprite.y += speed_y end blocks = [] 10.times do |x| 5.times do |y| blocks << Sprite.new(21 + 60 * x, 21 + 20 * y, img_block) end end Window.loop do bar.x = Input.mouse_pos_x Sprite.draw(walls) move(ball, dx, 0) if ball === walls ball.x -= dx dx = -dx end coll_x = ball.check(blocks) if coll_x[0] coll_x[0].image = img_block_y coll_x[0].draw #一瞬色が変わって表示 coll_x[0].vanish #消える ball.x -= dx dx = -dx end move(ball, 0, dy) if ball === walls ball. y -= dy dy = -dy end coll_y = ball.check(blocks) if coll_y[0] coll_y[0].image = img_block_y coll_y[0].draw #一瞬色が変わって表示 coll_y[0].vanish #消える ball. y -= dy dy = -dy end ball.draw Sprite.draw(blocks) end
応用問題
追加の課題として、いくつか考えてみました。気になったものをやってみましょう。
- A. 「ブロック崩し」を改良・発展させてみよう
- B. クラス・オブジェクト指向を使ってみよう
- C. DXRubyの衝突判定を自作してみよう
- D. なるべく基本命令だけでブロック崩しを作ってみよう
→「ブロック崩し」の追加課題 - noanoa 日々の日記
http://blog.livedoor.jp/noanoa07/archives/2046181.htmlA. 「ブロック崩し」を改良・発展させてみよう
「ブロック崩し」を改良・発展させてみましょう。
以下はほんの一例です。各自、自由に発展させてみてください。
A-1. 動作を改善する
作った「ブロック崩し」を動かしてみて、動きが気になるところを直してみましょう。
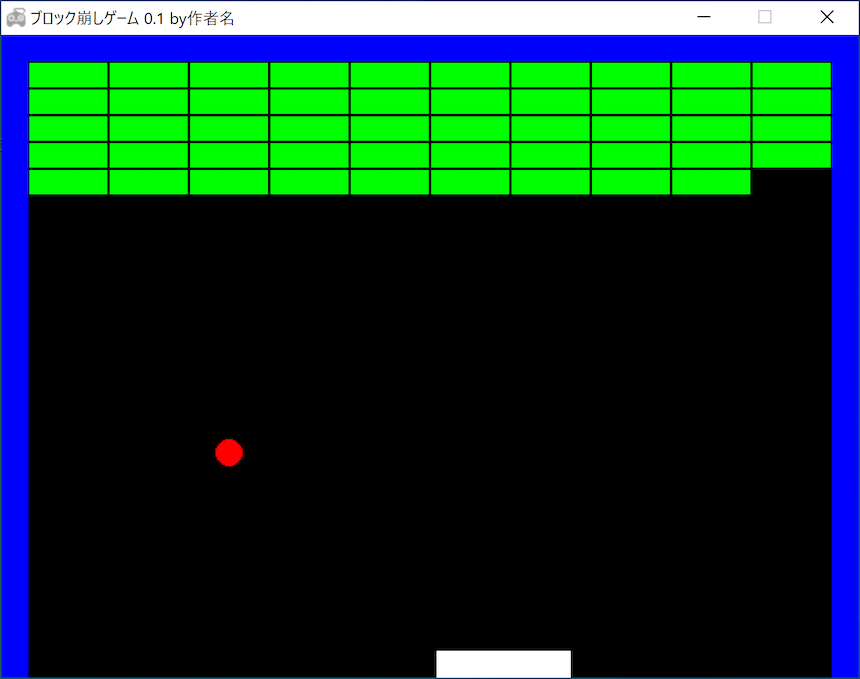
A-2. タイトルを表示する(block29.rb)
ウィンドウの左上にタイトルを表示してみます。
Window.caption =を使います。block29.rbrequire 'dxruby' GAME = "ブロック崩し" #定数 文字列 ver = 0.1 #変数 数 name = "作者名" #変数 文字列 Window.caption = GAME + "ゲーム #{ver} by" + name img_bar = Image.new(100, 20, C_WHITE) img_hwall = Image.new( 20, 480, C_BLUE) img_vwall = Image.new(640, 20, C_BLUE) img_ball = Image.new( 20, 20).circle_fill(10, 10, 10, C_RED) img_block = Image.new( 58, 18, C_GREEN) img_block_y = Image.new( 58, 18, C_YELLOW) bar = Sprite.new( 0, 460, img_bar) lwall = Sprite.new( 0, 0, img_hwall) rwall = Sprite.new(620, 0, img_hwall) twall = Sprite.new( 0, 0, img_vwall) walls = [bar, lwall, rwall, twall] ball = Sprite.new(300, 400, img_ball) dx = 2 dy = -2 def move(sprite, speed_x, speed_y) sprite.x += speed_x sprite.y += speed_y end blocks = [] 10.times do |x| 5.times do |y| blocks << Sprite.new(21 + 60 * x, 21 + 20 * y, img_block) end end Window.loop do bar.x = Input.mouse_pos_x Sprite.draw(walls) move(ball, dx, 0) if ball === walls ball.x -= dx dx = -dx end coll_x = ball.check(blocks) if coll_x[0] coll_x[0].image = img_block_y coll_x[0].draw #一瞬色が変わって表示 coll_x[0].vanish #消える ball.x -= dx dx = -dx end move(ball, 0, dy) if ball === walls ball. y -= dy dy = -dy end coll_y = ball.check(blocks) if coll_y[0] coll_y[0].image = img_block_y coll_y[0].draw #一瞬色が変わって表示 coll_y[0].vanish #消える ball. y -= dy dy = -dy end ball.draw Sprite.draw(blocks) end
A-3. 画面に文字を表示する(block30.rb)
画面に文字を表示してみましょう。
Window.draw_font(x位置, y位置, 文字列, font, {:color => 文字色)のように指定します。残りブロック数を知るには、ブロックの配列
blocksに.sizeします。ただし、blocks.sizeの前に、衝突して無効化されたブロックをSprite.cleanで削除しておかなくてはいけません。block30.rbrequire 'dxruby' GAME = "ブロック崩し" #定数 文字列 ver = 0.1 #変数 数 name = "作者名" #変数 文字列 Window.caption = GAME + "ゲーム #{ver} by" + name img_bar = Image.new(100, 20, C_WHITE) img_hwall = Image.new( 20, 480, C_BLUE) img_vwall = Image.new(640, 20, C_BLUE) img_ball = Image.new( 20, 20).circle_fill(10, 10, 10, C_RED) img_block = Image.new( 58, 18, C_GREEN) img_block_y = Image.new( 58, 18, C_YELLOW) bar = Sprite.new( 0, 460, img_bar) lwall = Sprite.new( 0, 0, img_hwall) rwall = Sprite.new(620, 0, img_hwall) twall = Sprite.new( 0, 0, img_vwall) walls = [bar, lwall, rwall, twall] ball = Sprite.new(300, 400, img_ball) dx = 2 dy = -2 def move(sprite, speed_x, speed_y) sprite.x += speed_x sprite.y += speed_y end blocks = [] 10.times do |x| 5.times do |y| blocks << Sprite.new(21 + 60 * x, 21 + 20 * y, img_block) end end font = Font.new(24) Window.loop do bar.x = Input.mouse_pos_x Sprite.draw(walls) move(ball, dx, 0) if ball === walls ball.x -= dx dx = -dx end coll_x = ball.check(blocks) if coll_x[0] coll_x[0].image = img_block_y coll_x[0].draw #一瞬色が変わって表示 coll_x[0].vanish #消える ball.x -= dx dx = -dx end move(ball, 0, dy) if ball === walls ball. y -= dy dy = -dy end coll_y = ball.check(blocks) if coll_y[0] coll_y[0].image = img_block_y coll_y[0].draw #一瞬色が変わって表示 coll_y[0].vanish #消える ball. y -= dy dy = -dy end ball.draw Sprite.draw(blocks) Sprite.clean(blocks) string = "残りブロックは #{blocks.size}個です。" puts string Window.draw_font(20, 200, string, font, {:color => C_YELLOW}) end
A-4. ゲームオーバー画面を追加する,ESCキーで終了(block31.rb)
ゲームオーバー画面を追加してみます。
ボールのy位置
ball_yが画面より下に行ってしまったら(ウィンドウの縦幅480より大きくなったら)、breakでWindow.loop do 〜 endから抜けます。そして、次のWindow.loop do 〜 endが始まり、ここでゲームオーバー画面を表示します。また、
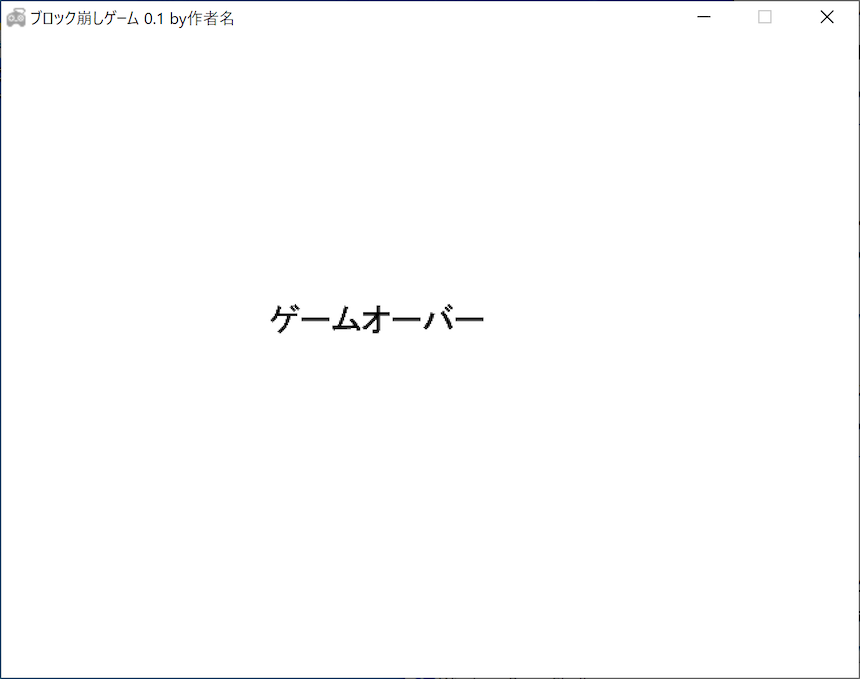
ESCキーが押されたらInput.key_down?(K_ESCAPE)で検出して、やはりbreakでWindow.loop do 〜 endを抜けることでプログラムを終了させるようにします。block31.rbrequire 'dxruby' GAME = "ブロック崩し" #定数 文字列 ver = 0.1 #変数 数 name = "作者名" #変数 文字列 Window.caption = GAME + "ゲーム #{ver} by" + name img_bar = Image.new(100, 20, C_WHITE) img_hwall = Image.new( 20, 480, C_BLUE) img_vwall = Image.new(640, 20, C_BLUE) img_ball = Image.new( 20, 20).circle_fill(10, 10, 10, C_RED) img_block = Image.new( 58, 18, C_GREEN) img_block_y = Image.new( 58, 18, C_YELLOW) bar = Sprite.new( 0, 460, img_bar) lwall = Sprite.new( 0, 0, img_hwall) rwall = Sprite.new(620, 0, img_hwall) twall = Sprite.new( 0, 0, img_vwall) walls = [bar, lwall, rwall, twall] ball = Sprite.new(300, 400, img_ball) dx = 2 dy = -2 def move(sprite, speed_x, speed_y) sprite.x += speed_x sprite.y += speed_y end blocks = [] 10.times do |x| 5.times do |y| blocks << Sprite.new(21 + 60 * x, 21 + 20 * y, img_block) end end font = Font.new(24) Window.loop do bar.x = Input.mouse_pos_x Sprite.draw(walls) move(ball, dx, 0) if ball === walls ball.x -= dx dx = -dx end coll_x = ball.check(blocks) if coll_x[0] coll_x[0].image = img_block_y coll_x[0].draw #一瞬色が変わって表示 coll_x[0].vanish #消える ball.x -= dx dx = -dx end move(ball, 0, dy) if ball === walls ball. y -= dy dy = -dy end coll_y = ball.check(blocks) if coll_y[0] coll_y[0].image = img_block_y coll_y[0].draw #一瞬色が変わって表示 coll_y[0].vanish #消える ball. y -= dy dy = -dy end ball.draw Sprite.draw(blocks) Sprite.clean(blocks) string = "残りブロックは #{blocks.size}個です。" Window.draw_font(20, 200, string, font, {:color => C_YELLOW}) puts ball.y if ball.y >= 480 break # breakで loopを抜ける end end Window.loop do Window.bgcolor= C_WHITE Window.draw_font(200, 200, "ゲームオーバー", font, {:color => C_BLACK}) Window.draw_font(2000, 230, "(ESCキーで終了)", font, {:color => C_BLACK}) if Input.key_down?(K_ESCAPE) exit # exit でプログラムを終了する end end
B. クラス・オブジェクト指向を使ってみよう(block_class_oo.rb)
クラスにまとめたり、オブジェクト指向を使った書き方に変えてみましょう。
クラスやオブジェクト指向については、ここでは説明をしませんが、プログラミングの重要な考え方なので、ぜひ勉強してみてください。
以下に、一例を示します。
→「ブロック崩し」追加課題3;クラス・オブジェクト指向を使ってみよう - noanoa 日々の日記
http://blog.livedoor.jp/noanoa07/archives/2051658.htmlblock_class_oo.rb# ブロッック崩し #-------------------------------------------------------------- # Sprite + Class版 #-------------------------------------------------------------- require 'dxruby' # 棒 class Bar < Sprite def initialize(x = 0, y = 460) self.x = x self.y = y self.image = Image.new(100, 20, C_WHITE) end def update self.x = Input.mouse_pos_x end end # 壁 class Walls < Array def initialize self << Wall.new( 0, 0, 20, 480) # 左側 self << Wall.new( 0, 0, 640, 20) # 上側 self << Wall.new(620, 0, 20, 480) # 右側 end def draw Sprite.draw(self) end end class Wall < Sprite def initialize(x, y, dx, dy) self.x = x self.y = y self.image = Image.new(dx, dy, C_WHITE) end end # ブロック class Blocks < Array def initialize colors = [C_BLUE, C_YELLOW, C_WHITE, C_RED, C_GREEN] 5.times do |y| 10.times do |x| self << Block.new(21 + 60 * x , 21 + 20 * y, colors[y]) end end end def draw self.each do |b| b.draw end end end class Block < Sprite def initialize(x, y, c) self.x = x self.y = y self.image = Image.new(58, 18, c) end end # ボール class Ball < Sprite def initialize(x = 300, y = 400) self.x = x self.y = y self.image = Image.new(20, 20).circle_fill(10, 10, 10, C_WHITE) @dx = 4 @dy = -4 end def update(walls, bar, blocks) # 横方向への移動 self.x += @dx # 壁または棒に衝突 if self === walls or self === bar self.x -= @dx @dx *= -1 end # ブロックに衝突 hit = self.check(blocks).first if hit != nil hit.vanish self.x -= @dx @dx *= -1 end # 縦方向への移動 self.y += @dy # 壁または棒に衝突 if self === walls or self === bar self.y -= @dy @dy *= -1 end # ブロックに衝突 hit = self.check(blocks).first if hit != nil hit.vanish self.y -= @dy @dy *= -1 end end end # ブロック崩しゲーム class Game def initialize @walls = Walls.new # 壁 @bar = Bar.new # 棒 @ball = Ball.new # ボール @blocks = Blocks.new # ブロック end def play Window.loop do @walls.draw @bar.update @bar.draw @ball.update(@walls, @bar, @blocks) @ball.draw @blocks.draw break if Input.key_push?(K_ESCAPE) end end end # # メイン # game = Game.new # ゲーム初期化 game.play # ゲーム開始
C. DXRubyの衝突判定を自作してみよう
今回作った「ブロック崩し」では、衝突判定に DXRuby の === や check を使いました。
とても便利な機能ですが、自分で作るとしたらどうしたらよいでしょうか?判定方法を考えてみましょう。
いろいろなやり方が考えられるでしょうが、すぐ思いつくのは以下の3通りです。
a)四角の四隅の座標で判定する
b)円の中心からの距離で判定する
c)色で判定する
これについては、長くなるので別の課題とします。
→「ブロック崩し」追加課題1;衝突判定を自作してみよう - noanoa 日々の日記
http://blog.livedoor.jp/noanoa07/archives/2046177.htmlD. なるべく基本命令だけでブロック崩しを作ってみよう
RubyやDXRubyは、衝突判定だけでなく、プログラミングに便利な数々の機能を持っています。そのため、わずか100行足らずで「ブロック崩し」ができてしまいました。
もし、それらの便利な機能をなるべく使わず、基本的な機能だけを使って「ブロック崩し」を作ってみるとどうなるでしょうか?
プログラミングの本当の力が試されることになります。
『プログラムはこうして作られる プログラマの頭の中をのぞいてみよう』
という本と、著者の平山尚さんの言葉に感銘を受けて、このような課題を考えてみました。
“ なんか動くもん作れていい気になってんだろうが、ライブラリを剥ぎ取ったおまえ自身の力はその程度だ。よく鏡を見ておけ ”
平山 尚 @hirasho”例えば、以下のような基本機能だけを使うとします。
- Rubyは、プログラミング言語として最低限の機能
- DXRubyは、ウィンドウの生成、座標(x,y)に点を描く、座標(x,y)の色を取得する、文字の表示、マウス/キー/カーソルキーの状態の取得
これについても、別の課題とします。
→ 「ブロック崩し」追加課題に向けて;コンピュータの世界の下側を見てみよう - noanoa 日々の日記
http://blog.livedoor.jp/noanoa07/archives/2048469.html→「ブロック崩し」追加課題2;なるべく基本命令だけで「ブロック崩し」を作ってみよう - noanoa 日々の日記
http://blog.livedoor.jp/noanoa07/archives/2050752.html


- 投稿日:2020-02-09T21:36:05+09:00
DXRubyで 1ステップずつ作っていく「ブロック崩し」
概要
この記事は中高生向けプログラミング教室の教材として作ったものを一部改変したものです。
Rubyでプログラミングの初歩を学んだ次のステップとして、ゲームライブラリDXRubyを使って「ブロック崩し」ゲームを作っていきます。今回の記事は、
・Ruby用2Dゲームライブラリ DXRuby:使い方の初歩 - Qiita
の続編になっています。
Rubyを使って、0から少しずつ「ブロック崩し」を作っていきます。Rubyだと完成しても100行足らずで「ブロック崩し」ができてしまいます。
技術解説
使用ライブラリ
Windows向けRuby用2Dゲームライブラリ
DXRubyを使用します。
バージョン1.4.2以上を想定しています。
1.4.2より前のバージョンとの主な相違点
Window.loopが複数置けるマウス位置を取得する
Input.mouse_pos_x、Input.mouse_pos_yの新しい書き方として、Input.mouse_x、Input.mouse_yが追加→ DXRuby 1.4.6:更新履歴
http://mirichi.github.io/dxruby-doc/CHANGELOG.html
DXRubyインストールの注意点
→ DXRuby 1.4.6 をWindows10で使う時の注意点とインストール方法 - noanoa07 - Qiita
https://qiita.com/noanoa07/items/0ce14c2404df38de94b7参考サイト
DXRuby のホームページ
http://dxruby.osdn.jpDXRuby 1.4.6 リファレンスマニュアル
http://mirichi.github.io/dxruby-doc/index.html困ったときは、このページの「チュートリアル」と「マニュアル」にだいたい書いてあります。
- DXRuby 1.4.1 リファレンスマニュアル http://dxruby.osdn.jp/DXRubyReference/20095313382446.htm
古いバージョンのリファレンスも役に立つときがあります。
- DXRubyで 0から作る「ブロック崩し」 - noanoa 日々の日記 http://blog.livedoor.jp/noanoa07/archives/2045851.html
このテキストのブログ記事での解説です。
オリジナル
※「2014-03-17 松江Ruby会議05に参加してきた - mirichiの日記」より改変
http://d.hatena.ne.jp/mirichi/20140317/p1
ライセンス
ソースコード、本解説ともにパブリックドメイン
プログラム解説
1.DXRubyの練習
→ Ruby用2Dゲームライブラリ DXRuby:使い方の初歩 - Qiita
を見てください。2.「ブロック崩し」を作る
いよいよ「ブロック崩し」を作っていきます。
2-1. バーを出す(block01.rb)
横100、縦20大きさの白い長方形を、ボールを打ち返すバーとして作ります。
まず、
Image.newでイメージを作成します。さらに、ボールとの衝突判定をするためにSpite.newでスプライト化します。初期位置は、x = 0、y = 460にしますが、実際の描画ではxはマウスの横位置(mouse_pos_x)に追従するようにします。ウィンドウの初期サイズは、指定しないと横640、縦480になります。そのため、バーの縦位置
yはウィンドウの一番下480に合わせるため、バーの縦幅を引いた480 - 20 = 460にしています。バーを表示させるには、
Window.loop do 〜 endの中でdrawメソッド(命令)を使います。block01.rbrequire 'dxruby' img_bar = Image.new(100, 20, C_WHITE) bar = Sprite.new(0, 460, img_bar) Window.loop do bar.x = Input.mouse_pos_x bar.draw end
2-2. 壁を出す(左側)(block02.rb)
左側の縦の壁を作ります。まず、横20、縦は(ウィンドウの縦幅と同じ)640の大きさの青い長方形のイメージ
img_hwallを作ります。これを壁として、ボールとの衝突判定をするためにスプライト化します(
lwall)。位置は、左上隅(x = 0、y = 0)に配置します。block02.rbrequire 'dxruby' img_bar = Image.new(100, 20, C_WHITE) img_hwall = Image.new( 20, 480, C_BLUE) bar = Sprite.new(0, 460, img_bar) lwall = Sprite.new(0, 0, img_hwall) Window.loop do bar.x = Input.mouse_pos_x bar.draw lwall.draw end
2-3. 壁を出す(右側も)(block03.rb)
右側の縦の壁を作ります。左側の壁と同じ大きさなので、同じイメージ
img_hwallを使ってスプライト化し(rwall)、右上隅(x = 620、y = 0)に配置します。右壁の横位置
xはウィンドウ幅640からバーの縦幅20を引いた640 - 20 = 620にします。block03.rbrequire 'dxruby' img_bar = Image.new(100, 20, C_WHITE) img_hwall = Image.new( 20, 480, C_BLUE) bar = Sprite.new( 0, 460, img_bar) lwall = Sprite.new( 0, 0, img_hwall) rwall = Sprite.new(620, 0, img_hwall) Window.loop do bar.x = Input.mouse_pos_x bar.draw lwall.draw rwall.draw end
2-4. 壁を出す(上側も)(block04.rb)
上側の横の壁を作ります。まず、横は(ウィンドウの横幅と同じ)640、縦20の大きさの白い長方形のイメージ
img_vwallを作ります。これもボールとの衝突判定をするためにスプライト化します(
twall)。位置は、左上隅(x = 0、y = 0)に配置します。block04.rbrequire 'dxruby' img_bar = Image.new(100, 20, C_WHITE) img_hwall = Image.new( 20, 480, C_BLUE) img_vwall = Image.new(640, 20, C_BLUE) bar = Sprite.new( 0, 460, img_bar) lwall = Sprite.new( 0, 0, img_hwall) rwall = Sprite.new(620, 0, img_hwall) twall = Sprite.new( 0, 0, img_vwall) Window.loop do bar.x = Input.mouse_pos_x bar.draw lwall.draw rwall.draw twall.draw end
2-5. 壁とバーをまとめて描く:配列(block05.rb)
壁とバーの描画が4行と増えたので、まとめて描くようにします。
バーと壁をまとめて配列
wallsにします。そして、スプライトの配列をまとめて描画できるSprite.drawで一気に表示させます。block05.rbrequire 'dxruby' img_bar = Image.new(100, 20, C_WHITE) img_hwall = Image.new( 20, 480, C_BLUE) img_vwall = Image.new(640, 20, C_BLUE) bar = Sprite.new( 0, 460, img_bar) lwall = Sprite.new( 0, 0, img_hwall) rwall = Sprite.new(620, 0, img_hwall) twall = Sprite.new( 0, 0, img_vwall) walls = [bar, lwall, rwall, twall] Window.loop do bar.x = Input.mouse_pos_x Sprite.draw(walls) end
2-6. ボールを出す(block06.rb)
ボールを作ります。横20、縦20の正方形の中に、中心が x=10、y = 10、半径が10(つまり正方形目一杯)の赤い円のイメージ
img_ballを作ります。壁、バーと衝突判定するためにスプライト化します(
ball)。初期位置はとりあえず x = 300、y = 400 にして、表示します。block06.rbrequire 'dxruby' img_bar = Image.new(100, 20, C_WHITE) img_hwall = Image.new( 20, 480, C_BLUE) img_vwall = Image.new(640, 20, C_BLUE) img_ball = Image.new( 20, 20).circle_fill(10, 10, 10, C_RED) bar = Sprite.new( 0, 460, img_bar) lwall = Sprite.new( 0, 0, img_hwall) rwall = Sprite.new(620, 0, img_hwall) twall = Sprite.new( 0, 0, img_vwall) walls = [bar, lwall, rwall, twall] ball = Sprite.new(300, 400, img_ball) Window.loop do bar.x = Input.mouse_pos_x Sprite.draw(walls) ball.draw end
2-7. ボールを動かす(横方向)(block07.rb)
ボールを横方向(x方向)に動かします。(xは右がプラス方向)
スピード
dxを2として、ballのx位置にloopで回ってくる(1/60秒)毎にdx分を足していきます。block07.rbrequire 'dxruby' img_bar = Image.new(100, 20, C_WHITE) img_hwall = Image.new( 20, 480, C_BLUE) img_vwall = Image.new(640, 20, C_BLUE) img_ball = Image.new( 20, 20).circle_fill(10, 10, 10, C_RED) bar = Sprite.new( 0, 460, img_bar) lwall = Sprite.new( 0, 0, img_hwall) rwall = Sprite.new(620, 0, img_hwall) twall = Sprite.new( 0, 0, img_vwall) walls = [bar, lwall, rwall, twall] ball = Sprite.new(300, 400, img_ball) dx = 2 Window.loop do bar.x = Input.mouse_pos_x Sprite.draw(walls) ball.x = ball.x + dx ball.draw end
2-8. ボールを動かす(横方向):別の書き方(block08.rb)
ball.x = ball.x + dxを別の書き方である、
ball.x += dxに書き換えてみます。同じことですが、慣れればこちらの方が見やすいかも?block08.rbrequire 'dxruby' img_bar = Image.new(100, 20, C_WHITE) img_hwall = Image.new( 20, 480, C_BLUE) img_vwall = Image.new(640, 20, C_BLUE) img_ball = Image.new( 20, 20).circle_fill(10, 10, 10, C_RED) bar = Sprite.new( 0, 460, img_bar) lwall = Sprite.new( 0, 0, img_hwall) rwall = Sprite.new(620, 0, img_hwall) twall = Sprite.new( 0, 0, img_vwall) walls = [bar, lwall, rwall, twall] ball = Sprite.new(300, 400, img_ball) dx = 2 Window.loop do bar.x = Input.mouse_pos_x Sprite.draw(walls) ball.x += dx ball.draw end
2-9. ボールを動かす(縦方向)(block09.rb)
今度は縦方向(y方向)に動かします。(yは下がプラス方向)
いったん横方向のスピード
dxは0にして、縦方向のスピードdyを-2にします。ballのy位置にloopで回ってくる毎にdy分を足していきます。block09.rbrequire 'dxruby' img_bar = Image.new(100, 20, C_WHITE) img_hwall = Image.new( 20, 480, C_BLUE) img_vwall = Image.new(640, 20, C_BLUE) img_ball = Image.new( 20, 20).circle_fill(10, 10, 10, C_RED) bar = Sprite.new( 0, 460, img_bar) lwall = Sprite.new( 0, 0, img_hwall) rwall = Sprite.new(620, 0, img_hwall) twall = Sprite.new( 0, 0, img_vwall) walls = [bar, lwall, rwall, twall] ball = Sprite.new(300, 400, img_ball) dx = 0 dy = -2 Window.loop do bar.x = Input.mouse_pos_x Sprite.draw(walls) ball.x += dx ball.y += dy ball.draw end
2-10. ボールを動かす(縦横方向)(block10.rb)
ボールの横方向のスピード
dxを2、縦方向のスピードdyを-2にすると、斜めに動いていきます。block10.rbrequire 'dxruby' img_bar = Image.new(100, 20, C_WHITE) img_hwall = Image.new( 20, 480, C_BLUE) img_vwall = Image.new(640, 20, C_BLUE) img_ball = Image.new( 20, 20).circle_fill(10, 10, 10, C_RED) bar = Sprite.new( 0, 460, img_bar) lwall = Sprite.new( 0, 0, img_hwall) rwall = Sprite.new(620, 0, img_hwall) twall = Sprite.new( 0, 0, img_vwall) walls = [bar, lwall, rwall, twall] ball = Sprite.new(300, 400, img_ball) dx = 2 dy = -2 Window.loop do bar.x = Input.mouse_pos_x Sprite.draw(walls) ball.x += dx ball.y += dy ball.draw end
2-11. 動かすをまとめる(block11.rb)
横に動かす
ball.x += dxと縦に動かすball.y += dyは、いつも一緒に使うので、まとめて書いてみます。ここでは
moveという命令を作ります(def 〜 endで定義)
。引数としては、ボールのような動かすもの(スプライト)、横方向(x方向)のスピード、縦方向(y方向)のスピードを指定します。block11.rbrequire 'dxruby' img_bar = Image.new(100, 20, C_WHITE) img_hwall = Image.new( 20, 480, C_BLUE) img_vwall = Image.new(640, 20, C_BLUE) img_ball = Image.new( 20, 20).circle_fill(10, 10, 10, C_RED) bar = Sprite.new( 0, 460, img_bar) lwall = Sprite.new( 0, 0, img_hwall) rwall = Sprite.new(620, 0, img_hwall) twall = Sprite.new( 0, 0, img_vwall) walls = [bar, lwall, rwall, twall] ball = Sprite.new(300, 400, img_ball) dx = 2 dy = -2 def move(sprite, speed_x, speed_y) sprite.x += speed_x sprite.y += speed_y end Window.loop do bar.x = Input.mouse_pos_x Sprite.draw(walls) move(ball, dx, dy) ball.draw end
2-12. ボールが跳ね返る(横方向)(block12.rb)
ボールを跳ね返らせます。まずは、縦方向(y方向)のスピード
dyを0にして、横方向(x方向)だけ動かします。衝突判定には
===を使います。もし、ボールballと壁やバーwallsが衝突したら、ボールのx位置ball.xを衝突前の位置に戻し(ball.x -= dx)、ボールのx方向のスピードdxのプラス/マイナスを反対にして、逆方向に動くようにします。block12.rbrequire 'dxruby' img_bar = Image.new(100, 20, C_WHITE) img_hwall = Image.new( 20, 480, C_BLUE) img_vwall = Image.new(640, 20, C_BLUE) img_ball = Image.new( 20, 20).circle_fill(10, 10, 10, C_RED) bar = Sprite.new( 0, 460, img_bar) lwall = Sprite.new( 0, 0, img_hwall) rwall = Sprite.new(620, 0, img_hwall) twall = Sprite.new( 0, 0, img_vwall) walls = [bar, lwall, rwall, twall] ball = Sprite.new(300, 400, img_ball) dx = 2 dy = -2 def move(sprite, speed_x, speed_y) sprite.x += speed_x sprite.y += speed_y end Window.loop do bar.x = Input.mouse_pos_x Sprite.draw(walls) move(ball, dx, 0) #横方向だけ動かす if ball === walls ball.x -= dx dx = -dx end ball.draw end
2-13. ボールが跳ね返る(縦方向)(block13.rb)
今度は縦方向(y方向)だけ動かします。
block13.rbrequire 'dxruby' img_bar = Image.new(100, 20, C_WHITE) img_hwall = Image.new( 20, 480, C_BLUE) img_vwall = Image.new(640, 20, C_BLUE) img_ball = Image.new( 20, 20).circle_fill(10, 10, 10, C_RED) bar = Sprite.new( 0, 460, img_bar) lwall = Sprite.new( 0, 0, img_hwall) rwall = Sprite.new(620, 0, img_hwall) twall = Sprite.new( 0, 0, img_vwall) walls = [bar, lwall, rwall, twall] ball = Sprite.new(300, 400, img_ball) dx = 2 dy = -2 def move(sprite, speed_x, speed_y) sprite.x += speed_x sprite.y += speed_y end Window.loop do bar.x = Input.mouse_pos_x Sprite.draw(walls) move(ball, 0, 0) #縦方向だけ動かす if ball === walls ball.x -= dx dx = -dx end move(ball, 0, dy) #縦方向だけ動かす if ball === walls ball. y -= dy dy = -dy end ball.draw end
2-14. ボールが跳ね返る(縦横方向)(block14.rb)
縦横ともに動かして、衝突したら跳ね返らせます。ちょっと「ブロック崩し」の雰囲気が出てきましたね。
ここでは、まずx方向に動かして、ぶつかったらx方向だけ跳ね返って、次にy方向に動かして、ぶつかったらy方向だけ跳ね返る書き方をしています。
なぜ、x方向、y方向同時に動かして、ぶつかったら跳ね返る書き方にしていないのでしょうか?自分で試して考えてみてください。
block14.rbrequire 'dxruby' img_bar = Image.new(100, 20, C_WHITE) img_hwall = Image.new( 20, 480, C_BLUE) img_vwall = Image.new(640, 20, C_BLUE) img_ball = Image.new( 20, 20).circle_fill(10, 10, 10, C_RED) bar = Sprite.new( 0, 460, img_bar) lwall = Sprite.new( 0, 0, img_hwall) rwall = Sprite.new(620, 0, img_hwall) twall = Sprite.new( 0, 0, img_vwall) walls = [bar, lwall, rwall, twall] ball = Sprite.new(300, 400, img_ball) dx = 2 dy = -2 def move(sprite, speed_x, speed_y) sprite.x += speed_x sprite.y += speed_y end Window.loop do bar.x = Input.mouse_pos_x Sprite.draw(walls) move(ball, dx, 0) if ball === walls ball.x -= dx dx = -dx end move(ball, 0, dy) if ball === walls ball. y -= dy dy = -dy end ball.draw end
2-15. ブロックを出す(1個)(block15.rb)
ブロックを作っていきます。まずは1個。
ブロックは横58、縦18の大きさの緑の長方形のイメージ
img_blockを作ります。さらに、ボールとの衝突判定をするためにスプライト化します(block_00)。横の大きさは、横に10個置くことにして、(ウィンドウ横幅640 - 左右の壁の厚み 20 * 2) / 10 = 60 に、隣同士の隙間を左右 1ずつとって 58にしています。
位置は、左上の壁の内側(x = 20, y = 20)から横、縦とも 1だけ隙間を空けて、x = 21、y = 21に配置します。
block15.rbrequire 'dxruby' img_bar = Image.new(100, 20, C_WHITE) img_hwall = Image.new( 20, 480, C_BLUE) img_vwall = Image.new(640, 20, C_BLUE) img_ball = Image.new( 20, 20).circle_fill(10, 10, 10, C_RED) img_block = Image.new( 58, 18, C_GREEN) bar = Sprite.new( 0, 460, img_bar) lwall = Sprite.new( 0, 0, img_hwall) rwall = Sprite.new(620, 0, img_hwall) twall = Sprite.new( 0, 0, img_vwall) walls = [bar, lwall, rwall, twall] ball = Sprite.new(300, 400, img_ball) dx = 2 dy = -2 def move(sprite, speed_x, speed_y) sprite.x += speed_x sprite.y += speed_y end block_00 = Sprite.new(21, 21, img_block) Window.loop do bar.x = Input.mouse_pos_x Sprite.draw(walls) move(ball, dx, 0) if ball === walls ball.x -= dx dx = -dx end move(ball, 0, dy) if ball === walls ball. y -= dy dy = -dy end ball.draw block_00.draw end
2-16. ブロックを出す(2個)(block16.rb)
2個目のブロックは、同じ大きさのブロックをxを60だけ右にずらした位置に置きます。(ブロックの横幅は58なので少し隙間が空きます。)
block16.rbrequire 'dxruby' img_bar = Image.new(100, 20, C_WHITE) img_hwall = Image.new( 20, 480, C_BLUE) img_vwall = Image.new(640, 20, C_BLUE) img_ball = Image.new( 20, 20).circle_fill(10, 10, 10, C_RED) img_block = Image.new( 58, 18, C_GREEN) bar = Sprite.new( 0, 460, img_bar) lwall = Sprite.new( 0, 0, img_hwall) rwall = Sprite.new(620, 0, img_hwall) twall = Sprite.new( 0, 0, img_vwall) walls = [bar, lwall, rwall, twall] ball = Sprite.new(300, 400, img_ball) dx = 2 dy = -2 def move(sprite, speed_x, speed_y) sprite.x += speed_x sprite.y += speed_y end block_00 = Sprite.new(21 , 21, img_block) block_01 = Sprite.new(21 + 60, 21, img_block) Window.loop do bar.x = Input.mouse_pos_x Sprite.draw(walls) move(ball, dx, 0) if ball === walls ball.x -= dx dx = -dx end move(ball, 0, dy) if ball === walls ball. y -= dy dy = -dy end ball.draw block_00.draw block_01.draw end
2-17. ブロックを出す(3個)(block17.rb)
同じく3個目のブロックを置きます。x位置は、ブロックの横幅58と隙間を見込んで60ずつずらしていきます。
block17.rbrequire 'dxruby' img_bar = Image.new(100, 20, C_WHITE) img_hwall = Image.new( 20, 480, C_BLUE) img_vwall = Image.new(640, 20, C_BLUE) img_ball = Image.new( 20, 20).circle_fill(10, 10, 10, C_RED) img_block = Image.new( 58, 18, C_GREEN) bar = Sprite.new( 0, 460, img_bar) lwall = Sprite.new( 0, 0, img_hwall) rwall = Sprite.new(620, 0, img_hwall) twall = Sprite.new( 0, 0, img_vwall) walls = [bar, lwall, rwall, twall] ball = Sprite.new(300, 400, img_ball) dx = 2 dy = -2 def move(sprite, speed_x, speed_y) sprite.x += speed_x sprite.y += speed_y end block_00 = Sprite.new(21 , 21, img_block) block_01 = Sprite.new(21 + 60 , 21, img_block) block_02 = Sprite.new(21 + 60 * 2, 21, img_block) Window.loop do bar.x = Input.mouse_pos_x Sprite.draw(walls) move(ball, dx, 0) if ball === walls ball.x -= dx dx = -dx end move(ball, 0, dy) if ball === walls ball. y -= dy dy = -dy end ball.draw block_00.draw block_01.draw block_02.draw end
2-18. ブロックを出す(5個)(block18.rb)
5個まで同様にブロックを置きます。
block18.rbrequire 'dxruby' img_bar = Image.new(100, 20, C_WHITE) img_hwall = Image.new( 20, 480, C_BLUE) img_vwall = Image.new(640, 20, C_BLUE) img_ball = Image.new( 20, 20).circle_fill(10, 10, 10, C_RED) img_block = Image.new( 58, 18, C_GREEN) bar = Sprite.new( 0, 460, img_bar) lwall = Sprite.new( 0, 0, img_hwall) rwall = Sprite.new(620, 0, img_hwall) twall = Sprite.new( 0, 0, img_vwall) walls = [bar, lwall, rwall, twall] ball = Sprite.new(300, 400, img_ball) dx = 2 dy = -2 def move(sprite, speed_x, speed_y) sprite.x += speed_x sprite.y += speed_y end block_00 = Sprite.new(21 , 21, img_block) block_01 = Sprite.new(21 + 60 , 21, img_block) block_02 = Sprite.new(21 + 60 * 2, 21, img_block) block_03 = Sprite.new(21 + 60 * 3, 21, img_block) block_04 = Sprite.new(21 + 60 * 4, 21, img_block) Window.loop do bar.x = Input.mouse_pos_x Sprite.draw(walls) move(ball, dx, 0) if ball === walls ball.x -= dx dx = -dx end move(ball, 0, dy) if ball === walls ball. y -= dy dy = -dy end ball.draw block_00.draw block_01.draw block_02.draw block_03.draw block_04.draw end
2-19. ブロックを出す(10個)(block19.rb)
横に10個置くとちょうどぴったりの幅です。
block19.rbrequire 'dxruby' img_bar = Image.new(100, 20, C_WHITE) img_hwall = Image.new( 20, 480, C_BLUE) img_vwall = Image.new(640, 20, C_BLUE) img_ball = Image.new( 20, 20).circle_fill(10, 10, 10, C_RED) img_block = Image.new( 58, 18, C_GREEN) bar = Sprite.new( 0, 460, img_bar) lwall = Sprite.new( 0, 0, img_hwall) rwall = Sprite.new(620, 0, img_hwall) twall = Sprite.new( 0, 0, img_vwall) walls = [bar, lwall, rwall, twall] ball = Sprite.new(300, 400, img_ball) dx = 2 dy = -2 def move(sprite, speed_x, speed_y) sprite.x += speed_x sprite.y += speed_y end block_00 = Sprite.new(21 , 21, img_block) block_01 = Sprite.new(21 + 60 , 21, img_block) block_02 = Sprite.new(21 + 60 * 2, 21, img_block) block_03 = Sprite.new(21 + 60 * 3, 21, img_block) block_04 = Sprite.new(21 + 60 * 4, 21, img_block) block_05 = Sprite.new(21 + 60 * 5, 21, img_block) block_06 = Sprite.new(21 + 60 * 6, 21, img_block) block_07 = Sprite.new(21 + 60 * 7, 21, img_block) block_08 = Sprite.new(21 + 60 * 8, 21, img_block) block_09 = Sprite.new(21 + 60 * 9, 21, img_block) Window.loop do bar.x = Input.mouse_pos_x Sprite.draw(walls) move(ball, dx, 0) if ball === walls ball.x -= dx dx = -dx end move(ball, 0, dy) if ball === walls ball. y -= dy dy = -dy end ball.draw block_00.draw block_01.draw block_02.draw block_03.draw block_04.draw block_05.draw block_06.draw block_07.draw block_08.draw block_09.draw end
2-20. ブロックを出す(まとめて表示する)(block20.rb)
ブロックを表示させる
drawが10行にもなったので、まとめて描くようにします。バーと壁を配列
wallsにまとめたように、10個のブロックを配列blocksにします。そして、Sprite.drawで一気に表示させます。block20.rbrequire 'dxruby' img_bar = Image.new(100, 20, C_WHITE) img_hwall = Image.new( 20, 480, C_BLUE) img_vwall = Image.new(640, 20, C_BLUE) img_ball = Image.new( 20, 20).circle_fill(10, 10, 10, C_RED) img_block = Image.new( 58, 18, C_GREEN) bar = Sprite.new( 0, 460, img_bar) lwall = Sprite.new( 0, 0, img_hwall) rwall = Sprite.new(620, 0, img_hwall) twall = Sprite.new( 0, 0, img_vwall) walls = [bar, lwall, rwall, twall] ball = Sprite.new(300, 400, img_ball) dx = 2 dy = -2 def move(sprite, speed_x, speed_y) sprite.x += speed_x sprite.y += speed_y end block_00 = Sprite.new(21 , 21, img_block) block_01 = Sprite.new(21 + 60 , 21, img_block) block_02 = Sprite.new(21 + 60 * 2, 21, img_block) block_03 = Sprite.new(21 + 60 * 3, 21, img_block) block_04 = Sprite.new(21 + 60 * 4, 21, img_block) block_05 = Sprite.new(21 + 60 * 5, 21, img_block) block_06 = Sprite.new(21 + 60 * 6, 21, img_block) block_07 = Sprite.new(21 + 60 * 7, 21, img_block) block_08 = Sprite.new(21 + 60 * 8, 21, img_block) block_09 = Sprite.new(21 + 60 * 9, 21, img_block) blocks = [block_00, block_01, block_02, block_03, block_04, block_05, block_06, block_07, block_08, block_09] Window.loop do bar.x = Input.mouse_pos_x Sprite.draw(walls) move(ball, dx, 0) if ball === walls ball.x -= dx dx = -dx end move(ball, 0, dy) if ball === walls ball. y -= dy dy = -dy end ball.draw Sprite.draw(blocks) end
2-21. ブロックを出す(まとめて作る)(block21.rb)
ブロックを作る方もまとめて一気に作るようにします。
まず、空の配列
blocksを作ります。配列に追加していく<<メソッドを使って、ブロックを1つ作っては配列blocksに追加していきます。10回繰り返すので、
10.times do 〜 endを使って、1回毎にxを増やすことで横位置をずらしたブロックを作ります。(xは 0, 1, 2, ... , 9 と変わっていく)block21.rbrequire 'dxruby' img_bar = Image.new(100, 20, C_WHITE) img_hwall = Image.new( 20, 480, C_BLUE) img_vwall = Image.new(640, 20, C_BLUE) img_ball = Image.new( 20, 20).circle_fill(10, 10, 10, C_RED) img_block = Image.new( 58, 18, C_GREEN) bar = Sprite.new( 0, 460, img_bar) lwall = Sprite.new( 0, 0, img_hwall) rwall = Sprite.new(620, 0, img_hwall) twall = Sprite.new( 0, 0, img_vwall) walls = [bar, lwall, rwall, twall] ball = Sprite.new(300, 400, img_ball) dx = 2 dy = -2 def move(sprite, speed_x, speed_y) sprite.x += speed_x sprite.y += speed_y end blocks = [] 10.times do |x| blocks << Sprite.new(21 + 60 * x, 21, img_block) end Window.loop do bar.x = Input.mouse_pos_x Sprite.draw(walls) move(ball, dx, 0) if ball === walls ball.x -= dx dx = -dx end move(ball, 0, dy) if ball === walls ball. y -= dy dy = -dy end ball.draw Sprite.draw(blocks) end
2-22. ブロックを出す(2段目も作る)(block22.rb)
2段目のブロックも作っていきます。2段目はyの位置を20大きくします。するとブロックの縦幅は18なので、少し隙間が空きます。
block22.rbrequire 'dxruby' img_bar = Image.new(100, 20, C_WHITE) img_hwall = Image.new( 20, 480, C_BLUE) img_vwall = Image.new(640, 20, C_BLUE) img_ball = Image.new( 20, 20).circle_fill(10, 10, 10, C_RED) img_block = Image.new( 58, 18, C_GREEN) bar = Sprite.new( 0, 460, img_bar) lwall = Sprite.new( 0, 0, img_hwall) rwall = Sprite.new(620, 0, img_hwall) twall = Sprite.new( 0, 0, img_vwall) walls = [bar, lwall, rwall, twall] ball = Sprite.new(300, 400, img_ball) dx = 2 dy = -2 def move(sprite, speed_x, speed_y) sprite.x += speed_x sprite.y += speed_y end blocks = [] 10.times do |x| blocks << Sprite.new(21 + 60 * x, 21, img_block) end blocks << Sprite.new(21 , 21 + 20, img_block) blocks << Sprite.new(21 + 60 * 1, 21 + 20, img_block) blocks << Sprite.new(21 + 60 * 2, 21 + 20, img_block) Window.loop do bar.x = Input.mouse_pos_x Sprite.draw(walls) move(ball, dx, 0) if ball === walls ball.x -= dx dx = -dx end move(ball, 0, dy) if ball === walls ball. y -= dy dy = -dy end ball.draw Sprite.draw(blocks) end
2-23. ブロックを出す(2段目もまとめて作る)(block23.rb)
2段目の作り方も、1段目と同じく
10.times do 〜 endを使って書きます。block23.rbrequire 'dxruby' img_bar = Image.new(100, 20, C_WHITE) img_hwall = Image.new( 20, 480, C_BLUE) img_vwall = Image.new(640, 20, C_BLUE) img_ball = Image.new( 20, 20).circle_fill(10, 10, 10, C_RED) img_block = Image.new( 58, 18, C_GREEN) bar = Sprite.new( 0, 460, img_bar) lwall = Sprite.new( 0, 0, img_hwall) rwall = Sprite.new(620, 0, img_hwall) twall = Sprite.new( 0, 0, img_vwall) walls = [bar, lwall, rwall, twall] ball = Sprite.new(300, 400, img_ball) dx = 2 dy = -2 def move(sprite, speed_x, speed_y) sprite.x += speed_x sprite.y += speed_y end blocks = [] 10.times do |x| blocks << Sprite.new(21 + 60 * x, 21, img_block) end 10.times do |x| blocks << Sprite.new(21 + 60 * x, 21 + 20, img_block) end Window.loop do bar.x = Input.mouse_pos_x Sprite.draw(walls) move(ball, dx, 0) if ball === walls ball.x -= dx dx = -dx end move(ball, 0, dy) if ball === walls ball. y -= dy dy = -dy end ball.draw Sprite.draw(blocks) end
2-24. ブロックを出す(5段目まで作る)(block24.rb)
5段目まで作りました。
block24.rbrequire 'dxruby' img_bar = Image.new(100, 20, C_WHITE) img_hwall = Image.new( 20, 480, C_BLUE) img_vwall = Image.new(640, 20, C_BLUE) img_ball = Image.new( 20, 20).circle_fill(10, 10, 10, C_RED) img_block = Image.new( 58, 18, C_GREEN) bar = Sprite.new( 0, 460, img_bar) lwall = Sprite.new( 0, 0, img_hwall) rwall = Sprite.new(620, 0, img_hwall) twall = Sprite.new( 0, 0, img_vwall) walls = [bar, lwall, rwall, twall] ball = Sprite.new(300, 400, img_ball) dx = 2 dy = -2 def move(sprite, speed_x, speed_y) sprite.x += speed_x sprite.y += speed_y end blocks = [] 10.times do |x| blocks << Sprite.new(21 + 60 * x, 21, img_block) end 10.times do |x| blocks << Sprite.new(21 + 60 * x, 21 + 20, img_block) end 10.times do |x| blocks << Sprite.new(21 + 60 * x, 21 + 20 * 2, img_block) end 10.times do |x| blocks << Sprite.new(21 + 60 * x, 21 + 20 * 3, img_block) end 10.times do |x| blocks << Sprite.new(21 + 60 * x, 21 + 20 * 4, img_block) end Window.loop do bar.x = Input.mouse_pos_x Sprite.draw(walls) move(ball, dx, 0) if ball === walls ball.x -= dx dx = -dx end move(ball, 0, dy) if ball === walls ball. y -= dy dy = -dy end ball.draw Sprite.draw(blocks) end
2-25. ブロックを出す(5段目までまとめて作る)(block25.rb)
10.times do 〜 endが5回出てきたので、これをまとめてみます。
10.times do 〜 endの中に、5.times do 〜 endを入れて、2重の形にします。block25.rbrequire 'dxruby' img_bar = Image.new(100, 20, C_WHITE) img_hwall = Image.new( 20, 480, C_BLUE) img_vwall = Image.new(640, 20, C_BLUE) img_ball = Image.new( 20, 20).circle_fill(10, 10, 10, C_RED) img_block = Image.new( 58, 18, C_GREEN) bar = Sprite.new( 0, 460, img_bar) lwall = Sprite.new( 0, 0, img_hwall) rwall = Sprite.new(620, 0, img_hwall) twall = Sprite.new( 0, 0, img_vwall) walls = [bar, lwall, rwall, twall] ball = Sprite.new(300, 400, img_ball) dx = 2 dy = -2 def move(sprite, speed_x, speed_y) sprite.x += speed_x sprite.y += speed_y end blocks = [] 10.times do |x| 5.times do |y| blocks << Sprite.new(21 + 60 * x, 21 + 20 * y, img_block) end end Window.loop do bar.x = Input.mouse_pos_x Sprite.draw(walls) move(ball, dx, 0) if ball === walls ball.x -= dx dx = -dx end move(ball, 0, dy) if ball === walls ball. y -= dy dy = -dy end ball.draw Sprite.draw(blocks) end
2-26. ブロックとの衝突判定(当たったらブロックは色が変わる)(block26.rb)
ボールとブロックの衝突判定をします。壁やバーと違って、ぶつかったブロックは消す必要があるので、どのブロックにぶつかったか知る必要があります。そこで、
===ではなくcheckを使います。
checkは、衝突判定するだけでなく、衝突したものを配列で返します。それを配列coll_xやcoll_yに代入すると、配列に1つでも要素が入っていたら衝突したと判定できます。(同時に複数衝突していたらその数だけ配列に入ります。)つまり、
coll_x[0]やcoll_y[0]に何か入っていたら、ブロックとぶつかっているし、それがぶつかった(0番目の)ブロックです。ここでは、ぶつかったブロックを黄色いブロックに変えることで分かりやすくしています。block26.rbrequire 'dxruby' img_bar = Image.new(100, 20, C_WHITE) img_hwall = Image.new( 20, 480, C_BLUE) img_vwall = Image.new(640, 20, C_BLUE) img_ball = Image.new( 20, 20).circle_fill(10, 10, 10, C_RED) img_block = Image.new( 58, 18, C_GREEN) img_block_y = Image.new( 58, 18, C_YELLOW) bar = Sprite.new( 0, 460, img_bar) lwall = Sprite.new( 0, 0, img_hwall) rwall = Sprite.new(620, 0, img_hwall) twall = Sprite.new( 0, 0, img_vwall) walls = [bar, lwall, rwall, twall] ball = Sprite.new(300, 400, img_ball) dx = 2 dy = -2 def move(sprite, speed_x, speed_y) sprite.x += speed_x sprite.y += speed_y end blocks = [] 10.times do |x| 5.times do |y| blocks << Sprite.new(21 + 60 * x, 21 + 20 * y, img_block) end end Window.loop do bar.x = Input.mouse_pos_x Sprite.draw(walls) move(ball, dx, 0) if ball === walls ball.x -= dx dx = -dx end coll_x = ball.check(blocks) if coll_x[0] coll_x[0].image = img_block_y end move(ball, 0, dy) if ball === walls ball. y -= dy dy = -dy end coll_y = ball.check(blocks) if coll_y[0] coll_y[0].image = img_block_y end ball.draw Sprite.draw(blocks) end
2-27. ブロックとの衝突判定(当たったブロックの色が変わり、跳ね返る)(block27.rb)
ブロックとぶつかったらボールが跳ね返るようにします。
block27.rbrequire 'dxruby' img_bar = Image.new(100, 20, C_WHITE) img_hwall = Image.new( 20, 480, C_BLUE) img_vwall = Image.new(640, 20, C_BLUE) img_ball = Image.new( 20, 20).circle_fill(10, 10, 10, C_RED) img_block = Image.new( 58, 18, C_GREEN) img_block_y = Image.new( 58, 18, C_YELLOW) bar = Sprite.new( 0, 460, img_bar) lwall = Sprite.new( 0, 0, img_hwall) rwall = Sprite.new(620, 0, img_hwall) twall = Sprite.new( 0, 0, img_vwall) walls = [bar, lwall, rwall, twall] ball = Sprite.new(300, 400, img_ball) dx = 2 dy = -2 def move(sprite, speed_x, speed_y) sprite.x += speed_x sprite.y += speed_y end blocks = [] 10.times do |x| 5.times do |y| blocks << Sprite.new(21 + 60 * x, 21 + 20 * y, img_block) end end Window.loop do bar.x = Input.mouse_pos_x Sprite.draw(walls) move(ball, dx, 0) if ball === walls ball.x -= dx dx = -dx end coll_x = ball.check(blocks) if coll_x[0] coll_x[0].image = img_block_y ball.x -= dx dx = -dx end move(ball, 0, dy) if ball === walls ball. y -= dy dy = -dy end coll_y = ball.check(blocks) if coll_y[0] coll_y[0].image = img_block_y ball. y -= dy dy = -dy end ball.draw Sprite.draw(blocks) end
2-28. 当たったブロックは消える(一瞬色が変わる);一応完成(block28.rb)
ぶつかったブロックを消します。そのためには
vanishを使います。これで「ブロック崩し」は一応完成です!
block28.rbrequire 'dxruby' img_bar = Image.new(100, 20, C_WHITE) img_hwall = Image.new( 20, 480, C_BLUE) img_vwall = Image.new(640, 20, C_BLUE) img_ball = Image.new( 20, 20).circle_fill(10, 10, 10, C_RED) img_block = Image.new( 58, 18, C_GREEN) img_block_y = Image.new( 58, 18, C_YELLOW) bar = Sprite.new( 0, 460, img_bar) lwall = Sprite.new( 0, 0, img_hwall) rwall = Sprite.new(620, 0, img_hwall) twall = Sprite.new( 0, 0, img_vwall) walls = [bar, lwall, rwall, twall] ball = Sprite.new(300, 400, img_ball) dx = 2 dy = -2 def move(sprite, speed_x, speed_y) sprite.x += speed_x sprite.y += speed_y end blocks = [] 10.times do |x| 5.times do |y| blocks << Sprite.new(21 + 60 * x, 21 + 20 * y, img_block) end end Window.loop do bar.x = Input.mouse_pos_x Sprite.draw(walls) move(ball, dx, 0) if ball === walls ball.x -= dx dx = -dx end coll_x = ball.check(blocks) if coll_x[0] coll_x[0].image = img_block_y coll_x[0].draw #一瞬色が変わって表示 coll_x[0].vanish #消える ball.x -= dx dx = -dx end move(ball, 0, dy) if ball === walls ball. y -= dy dy = -dy end coll_y = ball.check(blocks) if coll_y[0] coll_y[0].image = img_block_y coll_y[0].draw #一瞬色が変わって表示 coll_y[0].vanish #消える ball. y -= dy dy = -dy end ball.draw Sprite.draw(blocks) end
応用問題
追加の課題として、いくつか考えてみました。気になったものをやってみましょう。
- A. 「ブロック崩し」を改良・発展させてみよう
- B. クラス・オブジェクト指向を使ってみよう
- C. DXRubyの衝突判定を自作してみよう
- D. なるべく基本命令だけでブロック崩しを作ってみよう
→「ブロック崩し」の追加課題 - noanoa 日々の日記
http://blog.livedoor.jp/noanoa07/archives/2046181.htmlA. 「ブロック崩し」を改良・発展させてみよう
「ブロック崩し」を改良・発展させてみましょう。
以下はほんの一例です。各自、自由に発展させてみてください。
A-1. 動作を改善する
作った「ブロック崩し」を動かしてみて、動きが気になるところを直してみましょう。
A-2. タイトルを表示する(block29.rb)
ウィンドウの左上にタイトルを表示してみます。
Window.caption =を使います。block29.rbrequire 'dxruby' GAME = "ブロック崩し" #定数 文字列 ver = 0.1 #変数 数 name = "作者名" #変数 文字列 Window.caption = GAME + "ゲーム #{ver} by" + name img_bar = Image.new(100, 20, C_WHITE) img_hwall = Image.new( 20, 480, C_BLUE) img_vwall = Image.new(640, 20, C_BLUE) img_ball = Image.new( 20, 20).circle_fill(10, 10, 10, C_RED) img_block = Image.new( 58, 18, C_GREEN) img_block_y = Image.new( 58, 18, C_YELLOW) bar = Sprite.new( 0, 460, img_bar) lwall = Sprite.new( 0, 0, img_hwall) rwall = Sprite.new(620, 0, img_hwall) twall = Sprite.new( 0, 0, img_vwall) walls = [bar, lwall, rwall, twall] ball = Sprite.new(300, 400, img_ball) dx = 2 dy = -2 def move(sprite, speed_x, speed_y) sprite.x += speed_x sprite.y += speed_y end blocks = [] 10.times do |x| 5.times do |y| blocks << Sprite.new(21 + 60 * x, 21 + 20 * y, img_block) end end Window.loop do bar.x = Input.mouse_pos_x Sprite.draw(walls) move(ball, dx, 0) if ball === walls ball.x -= dx dx = -dx end coll_x = ball.check(blocks) if coll_x[0] coll_x[0].image = img_block_y coll_x[0].draw #一瞬色が変わって表示 coll_x[0].vanish #消える ball.x -= dx dx = -dx end move(ball, 0, dy) if ball === walls ball. y -= dy dy = -dy end coll_y = ball.check(blocks) if coll_y[0] coll_y[0].image = img_block_y coll_y[0].draw #一瞬色が変わって表示 coll_y[0].vanish #消える ball. y -= dy dy = -dy end ball.draw Sprite.draw(blocks) end
A-3. 画面に文字を表示する(block30.rb)
画面に文字を表示してみましょう。
Window.draw_font(x位置, y位置, 文字列, font, {:color => 文字色)のように指定します。残りブロック数を知るには、ブロックの配列
blocksに.sizeします。ただし、blocks.sizeの前に、衝突して無効化されたブロックをSprite.cleanで削除しておかなくてはいけません。block30.rbrequire 'dxruby' GAME = "ブロック崩し" #定数 文字列 ver = 0.1 #変数 数 name = "作者名" #変数 文字列 Window.caption = GAME + "ゲーム #{ver} by" + name img_bar = Image.new(100, 20, C_WHITE) img_hwall = Image.new( 20, 480, C_BLUE) img_vwall = Image.new(640, 20, C_BLUE) img_ball = Image.new( 20, 20).circle_fill(10, 10, 10, C_RED) img_block = Image.new( 58, 18, C_GREEN) img_block_y = Image.new( 58, 18, C_YELLOW) bar = Sprite.new( 0, 460, img_bar) lwall = Sprite.new( 0, 0, img_hwall) rwall = Sprite.new(620, 0, img_hwall) twall = Sprite.new( 0, 0, img_vwall) walls = [bar, lwall, rwall, twall] ball = Sprite.new(300, 400, img_ball) dx = 2 dy = -2 def move(sprite, speed_x, speed_y) sprite.x += speed_x sprite.y += speed_y end blocks = [] 10.times do |x| 5.times do |y| blocks << Sprite.new(21 + 60 * x, 21 + 20 * y, img_block) end end font = Font.new(24) Window.loop do bar.x = Input.mouse_pos_x Sprite.draw(walls) move(ball, dx, 0) if ball === walls ball.x -= dx dx = -dx end coll_x = ball.check(blocks) if coll_x[0] coll_x[0].image = img_block_y coll_x[0].draw #一瞬色が変わって表示 coll_x[0].vanish #消える ball.x -= dx dx = -dx end move(ball, 0, dy) if ball === walls ball. y -= dy dy = -dy end coll_y = ball.check(blocks) if coll_y[0] coll_y[0].image = img_block_y coll_y[0].draw #一瞬色が変わって表示 coll_y[0].vanish #消える ball. y -= dy dy = -dy end ball.draw Sprite.draw(blocks) Sprite.clean(blocks) string = "残りブロックは #{blocks.size}個です。" puts string Window.draw_font(20, 200, string, font, {:color => C_YELLOW}) end
A-4. ゲームオーバー画面を追加する,ESCキーで終了(block31.rb)
ゲームオーバー画面を追加してみます。
ボールのy位置
ball_yが画面より下に行ってしまったら(ウィンドウの縦幅480より大きくなったら)、breakでWindow.loop do 〜 endから抜けます。そして、次のWindow.loop do 〜 endが始まり、ここでゲームオーバー画面を表示します。また、
ESCキーが押されたらInput.key_down?(K_ESCAPE)で検出して、やはりbreakでWindow.loop do 〜 endを抜けることでプログラムを終了させるようにします。block31.rbrequire 'dxruby' GAME = "ブロック崩し" #定数 文字列 ver = 0.1 #変数 数 name = "作者名" #変数 文字列 Window.caption = GAME + "ゲーム #{ver} by" + name img_bar = Image.new(100, 20, C_WHITE) img_hwall = Image.new( 20, 480, C_BLUE) img_vwall = Image.new(640, 20, C_BLUE) img_ball = Image.new( 20, 20).circle_fill(10, 10, 10, C_RED) img_block = Image.new( 58, 18, C_GREEN) img_block_y = Image.new( 58, 18, C_YELLOW) bar = Sprite.new( 0, 460, img_bar) lwall = Sprite.new( 0, 0, img_hwall) rwall = Sprite.new(620, 0, img_hwall) twall = Sprite.new( 0, 0, img_vwall) walls = [bar, lwall, rwall, twall] ball = Sprite.new(300, 400, img_ball) dx = 2 dy = -2 def move(sprite, speed_x, speed_y) sprite.x += speed_x sprite.y += speed_y end blocks = [] 10.times do |x| 5.times do |y| blocks << Sprite.new(21 + 60 * x, 21 + 20 * y, img_block) end end font = Font.new(24) Window.loop do bar.x = Input.mouse_pos_x Sprite.draw(walls) move(ball, dx, 0) if ball === walls ball.x -= dx dx = -dx end coll_x = ball.check(blocks) if coll_x[0] coll_x[0].image = img_block_y coll_x[0].draw #一瞬色が変わって表示 coll_x[0].vanish #消える ball.x -= dx dx = -dx end move(ball, 0, dy) if ball === walls ball. y -= dy dy = -dy end coll_y = ball.check(blocks) if coll_y[0] coll_y[0].image = img_block_y coll_y[0].draw #一瞬色が変わって表示 coll_y[0].vanish #消える ball. y -= dy dy = -dy end ball.draw Sprite.draw(blocks) Sprite.clean(blocks) string = "残りブロックは #{blocks.size}個です。" Window.draw_font(20, 200, string, font, {:color => C_YELLOW}) puts ball.y if ball.y >= 480 break # breakで loopを抜ける end end Window.loop do Window.bgcolor= C_WHITE Window.draw_font(200, 200, "ゲームオーバー", font, {:color => C_BLACK}) Window.draw_font(2000, 230, "(ESCキーで終了)", font, {:color => C_BLACK}) if Input.key_down?(K_ESCAPE) exit # exit でプログラムを終了する end end
B. クラス・オブジェクト指向を使ってみよう(block_class_oo.rb)
クラスにまとめたり、オブジェクト指向を使った書き方に変えてみましょう。
クラスやオブジェクト指向については、ここでは説明をしませんが、プログラミングの重要な考え方なので、ぜひ勉強してみてください。
以下に、一例を示します。
→「ブロック崩し」追加課題3;クラス・オブジェクト指向を使ってみよう - noanoa 日々の日記
http://blog.livedoor.jp/noanoa07/archives/2051658.htmlblock_class_oo.rb# ブロッック崩し #-------------------------------------------------------------- # Sprite + Class版 #-------------------------------------------------------------- require 'dxruby' # 棒 class Bar < Sprite def initialize(x = 0, y = 460) self.x = x self.y = y self.image = Image.new(100, 20, C_WHITE) end def update self.x = Input.mouse_pos_x end end # 壁 class Walls < Array def initialize self << Wall.new( 0, 0, 20, 480) # 左側 self << Wall.new( 0, 0, 640, 20) # 上側 self << Wall.new(620, 0, 20, 480) # 右側 end def draw Sprite.draw(self) end end class Wall < Sprite def initialize(x, y, dx, dy) self.x = x self.y = y self.image = Image.new(dx, dy, C_WHITE) end end # ブロック class Blocks < Array def initialize colors = [C_BLUE, C_YELLOW, C_WHITE, C_RED, C_GREEN] 5.times do |y| 10.times do |x| self << Block.new(21 + 60 * x , 21 + 20 * y, colors[y]) end end end def draw self.each do |b| b.draw end end end class Block < Sprite def initialize(x, y, c) self.x = x self.y = y self.image = Image.new(58, 18, c) end end # ボール class Ball < Sprite def initialize(x = 300, y = 400) self.x = x self.y = y self.image = Image.new(20, 20).circle_fill(10, 10, 10, C_WHITE) @dx = 4 @dy = -4 end def update(walls, bar, blocks) # 横方向への移動 self.x += @dx # 壁または棒に衝突 if self === walls or self === bar self.x -= @dx @dx *= -1 end # ブロックに衝突 hit = self.check(blocks).first if hit != nil hit.vanish self.x -= @dx @dx *= -1 end # 縦方向への移動 self.y += @dy # 壁または棒に衝突 if self === walls or self === bar self.y -= @dy @dy *= -1 end # ブロックに衝突 hit = self.check(blocks).first if hit != nil hit.vanish self.y -= @dy @dy *= -1 end end end # ブロック崩しゲーム class Game def initialize @walls = Walls.new # 壁 @bar = Bar.new # 棒 @ball = Ball.new # ボール @blocks = Blocks.new # ブロック end def play Window.loop do @walls.draw @bar.update @bar.draw @ball.update(@walls, @bar, @blocks) @ball.draw @blocks.draw break if Input.key_push?(K_ESCAPE) end end end # # メイン # game = Game.new # ゲーム初期化 game.play # ゲーム開始
C. DXRubyの衝突判定を自作してみよう
今回作った「ブロック崩し」では、衝突判定に DXRuby の === や check を使いました。
とても便利な機能ですが、自分で作るとしたらどうしたらよいでしょうか?判定方法を考えてみましょう。
いろいろなやり方が考えられるでしょうが、すぐ思いつくのは以下の3通りです。
a)四角の四隅の座標で判定する
b)円の中心からの距離で判定する
c)色で判定する
これについては、長くなるので別の課題とします。
→ 「ブロック崩し」追加課題1;衝突判定を自作してみよう - noanoa 日々の日記
http://blog.livedoor.jp/noanoa07/archives/2046177.htmlD. なるべく基本命令だけでブロック崩しを作ってみよう
RubyやDXRubyは、衝突判定だけでなく、プログラミングに便利な数々の機能を持っています。そのため、わずか100行足らずで「ブロック崩し」ができてしまいました。
もし、それらの便利な機能をなるべく使わず、基本的な機能だけを使って「ブロック崩し」を作ってみるとどうなるでしょうか?
プログラミングの本当の力が試されることになります。
例えば、以下のような基本機能だけを使うとします。
- Rubyは、プログラミング言語として最低限の機能
- DXRubyは、ウィンドウの生成、座標(x,y)に点を描く、座標(x,y)の色を取得する、文字の表示、マウス/キー/カーソルキーの状態の取得
これについても、別の課題とします。
→ 「ブロック崩し」追加課題に向けて;コンピュータの世界の下側を見てみよう - noanoa 日々の日記
http://blog.livedoor.jp/noanoa07/archives/2048469.html→ 「ブロック崩し」追加課題2;なるべく基本命令だけで「ブロック崩し」を作ってみよう - noanoa 日々の日記
http://blog.livedoor.jp/noanoa07/archives/2050752.html
- 投稿日:2020-02-09T21:02:49+09:00
「localhostでリダイレクトが繰り返し行われました」の解決法 (ERR_TOO_MANY_REDIRECTS)
エラーの状況
簡易版twitterアプリを作成して、rails sで仮装サーバーを立ち上げ、localhost:3000にアクセルした時にでたエラーです。今まで遭遇したことがなかったエラーでしたので解決策について記述します。
エラー内容に対する仮説
エラー画面には「localhostでリダイレクトが繰り返し行われました」という記述があります。本来であればlocalhost:3000にアクセスすると、route.rbではtweetsコントローラーのindexアクションが実行されビューが表示されるはずです。
route.rbRails.application.routes.draw do root 'tweets#index' devise_for :users resources :tweets do resources :comments, only: :create end resources :users, only: :show endしかし今回の場合、本来はビューファイル(index.html.erb)を表示したいのに、読み込む段階でリダイレクトされてしまってるためのエラーとなっています。
ですのでコントローラーの表記によって起きているエラーと推測します。修正内容
では早速コントローラーの記述を確認します。
未ログインユーザーがindexにアクセスしようとするとmove_to_indexが実行され,indexアクションにリダイレクトされます。tweets_controller.rbclass TweetsController < ApplicationController before_action :move_to_index def index @tweets = Tweet.includes(:user).order('created_at DESC').page(params[:page]).per(2) end (省略) def move_to_index redirect_to action: :index unless user_signed_in? end endここで問題となるのが、リダイレクト前にmove_to_indexが呼ばれるため無限ループが起きてしまします。この問題によって今回のエラーは発生していました。
解決策
indexアクションにアクセスした時、indexアクションへのリダイレクトを繰り返すことにより無限ループが起こるので以下のように修正することでエラーを解決することができました。
before
tweets_controller.rbbefore_action :move_to_indexafter
tweets_controller.rbbefore_action :move_to_index,except: :index

- 投稿日:2020-02-09T19:30:25+09:00
octokitを使ってGithubリポジトリ情報を取得する
目的
octokitを使ってGithubリポジトリ情報を取得した際の備忘録です
octokitとは
octokit
Ruby toolkit for the GitHub API.準備
インストール
$ gem install octokitコード
以下を参考にIntelRealSenseGithubリポジトリの情報を取得します。
sample.rbyrequire 'octokit' # github user name @name = "IntelRealSense" options = { auto_paginate: true, access_token: nil, # 必要に応じて入力する } # Clientオブジェクトを生成 @client = Octokit::Client.new(options) # Repositories情報を取得 repos = @client.repositories(@name) # リポジトリ情報の出力 repos.each do |repo| puts "name: #{repo.name}, language: #{repo.language}" puts "url: #{repo.url}" # puts "repository info = #{repo.attrs}" puts "" endテスト
リポジトリ情報が取得できればOKです。
$ ruby sample.rby
ruby sample.rby
...
name: librealsense, language: C++
url: https://api.github.com/repos/IntelRealSense/librealsense
...
参考
GitHub/octokit
octokit.rbの使い方まとめ
Ruby で octokit と Slack の bot でインターン生が楽をする
Octokit | octokit によって API 経由で GitHub を利用する #octokit
octokit.rbを使って、githubの情報を見てみた
GitHub/IntelRealSense
- 投稿日:2020-02-09T17:59:32+09:00
cloud9でbundle installで再構築出来ず、gemfile.lockを削除とMysqlなのにPostgresqlインストールしたら解決した話。
EC2のインスタンスを、停止すべきところを間違って終了押してしまい、後の祭り。。
cloud9で再構築使用とgit cloneしたが、再構築しようとしたらいろいろハマったので忘備録として。You must use Bundler 2 or greater with this lockfile.gemfile.lockを削除して、Bundler2系をインストール出来るようにします。
bundle installYour Ruby version is 2.6.3, but your Gemfile specified 2.5.3またもエラー分が、今度はインストールするrubyバージョンが、君が使用しているバージョンとは違うよーとの事なので、直接修正。
bundle installまたエラー。。
An error occurred while installing pg (1.2.2), and Bundler cannot continue.
Make sure that `gem install pg -v '1.2.2' --source 'https://rubygems.org/'` succeeds before bundling.

In Gemfile:
  pg
エラー分にある通り、
$gem install pg -v '1.2.2'しましたが、エラーは変わらず。。
Mysqlを使ってましたが、どうやらPostgresqlがインストールされていないことが原因とのことらしく、
こちらの記事を参考にPostgresqlがインストールしました。
https://qiita.com/oke-py/items/75333cf564480d062006sudo yum install postgresql postgresql-server postgresql-devel postgresql-contribインストールが終わり、無事budle出来ました。
- 投稿日:2020-02-09T17:59:32+09:00
colud9でbundle installで再構築出来ず、gemfile.lockを削除とMysqlなのにPostgresqlインストールしたら解決した話。
EC2のインスタンスを、停止すべきところを間違って終了押してしまい、後の祭り。。
cloud9で再構築使用とgit cloneしたが、再構築しようとしたらいろいろハマったので忘備録として。You must use Bundler 2 or greater with this lockfile.gemfile.lockを削除して、Bundler2系をインストール出来るようにします。
bundle installYour Ruby version is 2.6.3, but your Gemfile specified 2.5.3またもエラー分が、今度はインストールするrubyバージョンが、君が使用しているバージョンとは違うよーとの事なので、直接修正。
bundle installまたエラー。。
An error occurred while installing pg (1.2.2), and Bundler cannot continue.
Make sure that `gem install pg -v '1.2.2' --source 'https://rubygems.org/'` succeeds before bundling.

In Gemfile:
  pg
エラー分にある通り、
$gem install pg -v '1.2.2'しましたが、エラーは変わらず。。
Mysqlを使ってましたが、どうやらPostgresqlがインストールされていないことが原因とのことらしく、
こちらの記事を参考にPostgresqlがインストールしました。
https://qiita.com/oke-py/items/75333cf564480d062006sudo yum install postgresql postgresql-server postgresql-devel postgresql-contribインストールが終わり、無事budle出来ました。
- 投稿日:2020-02-09T15:58:39+09:00
【Progate】Ruby on Rails環境構築でrails serverが立ち上がらないときの解決法
Progateのこちらの記事を参考にRuby on Rails5の環境構築をしたら
詰まったのでその備忘録を残しておきます前提
windows8
Ruby 2.5.1
Rails 5.2.4.1発生した問題
Progateのこちらの記事でRuby on Railsの環境構築中
Railsのインストールも完了し最後に
rails s
でサーバーを立ち上げようとしたところUsage:rails new APP_PATH [options] Options:[--skip-namespace], [--no-skip-namespace] # Skip namespace (aff ects only isolated applications) ~というオプションみたいなのが出てくるだけで立ち上がらない。
試しにブラウザで
localhost:3000
にアクセスしようとしたが、エラーが出る。解決方法
この質問の回答を試したところ解決しました。
フォルダ生成の段階で問題があったようで
rails new フォルダ名
ではなく、
rails new フォルダ名 --skip-git
としたあとに
cd フォルダ名
rails s
を実行したところ、無事サーバーが立ち上がりブラウザでアクセスもできました。解決に至った経緯と原因
はじめは"rails s できない"みたいな検索ワードで調べていました。
するとbinがどうこういってる記事が多く見つかって
bundle exec rake rails:update:bin
などなどやってみましたが、うまくいかず、、、そこで改めて生成したフォルダを見てみるとbinフォルダがそもそも存在しないことに気づき、
フォルダの生成の段階が上手くいってなかったんだと分かりました。
どうやらgitがインストールされてないことが原因で、rails newコマンドでサーバー立ち上げに必要なフォルダが生成されてなかったようです。
- 投稿日:2020-02-09T15:52:56+09:00
Railsのtestを速くする為に行った事
Railsのtestを速くする為に行った事
概要
開発期間が長ければ長いほどテストは増えていきます。
私の組んでいるシステムも、時間と共にテストが増加してじわじわと確実に遅くなっていきました。
その時に色々やったので備忘録として記録します。
(時間とかは記録していません。ごめんなさい。)無駄なテストデータの除去
まずは、比較的コストが安くて簡単なところに目をつけました。無駄なテストデータの除去です。
無駄なデータが多かったので、それを削る作業に移りました。
この作業をテストで使われている全モデルに対して適用しました。
簡単な事ではありますが、作られるデータ数が減るということで、それなりに効果はありました。
テストデータを作るプログラムが遅い
次に目をつけたのは、テストデータを作成している以下のようなプログラムのリファクタリングでした。
test_data.each do |e|
  Model.create!(e)
end
毎回バリデーションが走り、クエリを発行するので激遅です。
そこでActiverecord-importを使うように修正をかけました。Model.import(columns, test_data, validate: false)これによってテストデータの作成時間が短縮されました。
効率的にテストデータを作成する
Activerecord-importの活躍により、テストデータの作成時間が短縮されましたが、カラムの数分のテストデータを用意したり、リレーションの事を考えてメソッドを作らないといけないので、生のrubyプログラムを書き続けるのが辛くなってきました。
そこで、ymlファイル1枚でモデルのテストデータが管理できるような仕組みを設ける事にしました。
Activerecord-importを内部に取り入れたPokotarouという名前のGemを作成しました。
このGemはymlファイルで稼働させるSeederです。以下にymlファイルの設定例を載せておきます。
Pokotarouの設定例# AuthorモデルとBookモデルのテスト値を生成。 # Authorが3件。Bookが6件出来る。 # もちろん、rubyプログラム側でこの設定を動的に変えてから動かすことも可能。 Default: Author: loop: 3 col: name: ["A", "B", "C"] Book: loop: 6 col: author_id: F|Author他にも色々できるので、詳しくはdocumentを参照。
Pokotarouによって、一枚のymlで親子関係のあるテストデータを生成する事が出来、テストしないカラム値に対して値を設定する必要が無くなりました。全部自動でやってくれるからです。
これでテストデータを作る時のストレスが大分減りました。パラレルテストの実行
Pokotarouが産声を上げてから、さらに時間は経過し、今度はtestそのものを速くする必要が出てきました。
そこでテストのパラレル化を決意しました。
railsテストのパラレル化に関して調べるとparallel_testsといった名前の素晴らしいGemが転がっているのを発見できました。
しかし、複数DBの構成に対応されていなかったようなので(対応されていたらごめんなさい)、参考にしながらで以下のような感じのプログラムを自分で実装する事にしました。ENV['TEST_ENV_NUMBER'](環境変数。例えば、1プロセス目なら空白、2プロセス目なら2になる奴。詳しくは、parallel_testsを参照) を使ってパラレルテスト用のDBを作成して、作られたDBに対してマイグレーションを回す ↓ パラレルテストしたいテストファイルを全て抽出。シャッフルしてパラレルテスト用に用意されたディレクトリに配置していく。(シャッフルするのは重たいテストと軽いテストで偏りが出たため) ↓ ENV['TEST_ENV_NUMBER']、parallel gem、systemメソッドを使ってパラレルでtestを走らせる。 パラレルテスト用に用意されたディレクトリをrails tコマンドで指定、その時にENV['TEST_ENV_NUMBER']に番号を入れてパラレルで動かす。 ↓ テストが終了したらパラレルテスト用に用意されたディレクトリを消す4プロセスのパラレルテストが成功してテストの時間は半分ほどに短縮しました。
まだまだ改善できそうな所はある
少しずつ改善を行ってtestを速くしてきましたが、まだまだ改善できそうな箇所はあると思います。
今後も目を光らせてtestを速くしていこうと思います。


- 投稿日:2020-02-09T15:31:11+09:00
【Ruby on Rails チュートリアル】一度作成したherokuアプリを作り直すときの復旧手順
はじめに
Ruby on Rails チュートリアル を進めている最中、何らかの理由でherokuアプリを再作成したくなったとき(謎のエラーに苦しんだ時とか)の手順をまとめました
以下、筆者はリモートリポジトリとしてBitbucketではなくGithubを使用していますが、それ以外の開発環境はRails Tutorialに準拠しています。
既存のherokuアプリ名を確認
リモート先に設定しているURLから、アプリ名を確認します。
Console-input$ git remote -vConsole-resultheroku ssh://git@heroku.com/<アプリ名>.git (fetch) heroku ssh://git@heroku.com/<アプリ名>.git (push) origin git@github.com:<ユーザー名>/<リポジトリ名>.git (fetch) origin git@github.com:<ユーザー名>/<リポジトリ名>.git (push)リモートリポジトリとしてBitbucketを使用している人は、ここの表記が少し異なります。また、リモートの設定次第では、各URLの先頭が「https:~」で始まる人もいると思います。
いずれにせよ、heroku のリモート先に設定されているURL(上2行)のうち、「.git」の直前の文字列が<アプリ名>になりますので、これをコピーして控えておきましょう
既存のherokuアプリを削除
herokuの無料枠では、5つまでアプリをデプロイすることができます。
しかし、デプロイ枠が余っている場合でも、デプロイ先が複数存在してしまうことは初学者にとって思わぬ形での混乱を招きかねません。
そのため、既存のアプリは一旦消してしまうことをオススメします(余りの無料枠で新規作成する場合は、本章はスキップして頂いて構いません)
Console-input$ heroku apps:destroy --app <アプリ名>Console-result▸ WARNING: This will delete ⬢ <アプリ名> including all add-ons. ▸ To proceed, type <アプリ名> or re-run this command with --confirm <アプリ名><アプリ名>の箇所を、先ほどコピーしたアプリ名をに書き換えてください。
その後、上記のように「本当に消して良いですか?本当に消すなら、アプリ名をもう一回入力してね」という旨のメッセージがきますので、Consoleに<アプリ名>を再入力します
Console-input> <アプリ名>これで、一度デプロイしたherokuアプリを消せました。
新規herokuアプリの作成
Console-input$ heroku createここでアプリ名を指定することもできますが、デフォルトだとheroku側で空いているアプリ名を自動で生成してくれます。
console画面から、「https://git.heroku.com/<新規アプリ名>.git」をと書かれている箇所を見つけ、コピーして控えておきましょう
リモート先の再設定
旧アプリ自体は既に削除済みですが、gitのリモート先が旧アプリのURLのままなので、新アプリのURLに変更します。
Console-input$ git remote remove heroku $ git remote set-url heroku https://git.heroku.com/<新規アプリ名>.gitこれで、リモート先の再設定ができました。念のため確認しておきましょう
Console-input$ git remote -vConsole-outputheroku https://git.heroku.com/<新規アプリ名>.git (fetch) heroku https://git.heroku.com/<新規アプリ名>.git (push) origin git@github.com:<ユーザー名>/<リポジトリ名>.git (fetch) origin git@github.com:<ユーザー名>/<リポジトリ名>.git (push)herokuのリモート先のURLが、新規アプリ名のものになっていれば、OKです。
※任意ですが、リモートリポジトリにgithubを選択肢しており、herokuへのアクセスをHTTPS経由ではなくSSH経由にしたい場合は、リモート先の設定を下記のように描いてください
Console-input$ git remote set-url heroku ssh://git@heroku.com/<新規アプリ名>.git確認すると、
Console-input$ git remote -vConsole-outputheroku https://git.heroku.com/<新規アプリ名>.git (fetch) heroku https://git.heroku.com/<新規アプリ名>.git (push) origin git@github.com:<ユーザー名>/<リポジトリ名>.git (fetch) origin git@github.com:<ユーザー名>/<リポジトリ名>.git (push)これでSSH経由のURLになりました
本番環境でのメール設定
「第11章 アカウントの有効化」で「11.4 本番環境でのメール送信 」まで進んでいる人は、SendGridの再設定が必要です(第11章まで進んでいない人はスキップ)
まずは、SendGridのアドオンを再インストールします。
Console-input$ heroku addons:create sendgrid:starterその後、本番環境の設定ファイル内の「host = ~」の箇所が旧アプリのホストのままになっているので、修正します。
config/environments/production.rbRails.application.configure do . . . config.action_mailer.raise_delivery_errors = true config.action_mailer.delivery_method = :smtp host = '<新規アプリ名>.herokuapp.com' config.action_mailer.default_url_options = { host: host } ActionMailer::Base.smtp_settings = { :address => 'smtp.sendgrid.net', :port => '587', :authentication => :plain, :user_name => ENV['SENDGRID_USERNAME'], :password => ENV['SENDGRID_PASSWORD'], :domain => 'heroku.com', :enable_starttls_auto => true } . . . end最後に、heroku config内部における、SendGridのユーザー名とパスワードを更新して完了です。
Console-input$ heroku config:get SENDGRID_USERNAME $ heroku config:get SENDGRID_PASSWORD本番環境での画像アップロード
「第13章 ユーザーのマイクロポスト」内の、「13.4.4 本番環境での画像アップロード
」まで進めていた人は、heroku configにおけるS3に関する情報の再設定が必要です(第13章まで進んでいない人はスキップ)Console-input$ heroku config:set S3_ACCESS_KEY="Accessキーを入力" $ heroku config:set S3_SECRET_KEY="Secretキーを入力" $ heroku config:set S3_BUCKET="Bucketの名前を入力" $ heroku config:set S3_REGION="Regionの名前を入力"各パラメータ値を忘れてしまった場合は、【Railsチュートリアル】S3に画像をアップロードする設定【13章課題】を参考に、AWSコンソールより取得してください。
デプロイ
最後、新規URLへデプロイをして完了です。
Console-input$ rails test $ git add -A $ git commit -m "Recreate heroku app"まだ第11章まで進んでいなかった人は、今回の一連の作業の中でファイルを一切編集していないはずです。
そのため下記のように「ファイルの変更がないため、commitしません」と言う表示が出るかもしれません。
Console-resultOn branch master Your branch is up-to-date with 'origin/master'. nothing to commit, working tree cleanこの場合は、そのまま下へ進んでください。
Console-input$ git push $ git push heroku「第6章 ユーザーのモデルを作成する」まで進めている人は、heroku上でのmigrationも走らせておきましょう
Console-input$ heroku run rails db:migrate加えて、「第10章 ユーザーの更新・表示・削除」まで進めている人は、忘れずにseedファイルを本番環境に流し込んでおきましょう
Console-input$ heroku run rails db:seed $ heroku restartおわりに
以上で、完了です!予期せぬエラーが発生して抜け出せなくなった時は、アプリごと作り直すことでエラーが解消されるケースもあります。よければ参考にしてください。
- 投稿日:2020-02-09T14:37:37+09:00
【チェリー本】なぜ (~0b1010).to_s(2) #=> "-1011" なのか
はじめに
チェリー本の2章2.9.2のビット演算のところ、サラっと解説してありますけど、n進数の知識が曖昧な人が見ると結構理解が難しいと思うんですよね。特に次の部分。
『プロを目指す人のためのRuby入門』より抜粋# 以下はビット演算を行う例です(結果を2進数で確認できるように、to_s(2)を呼び出しています)。 (~0b1010).to_s(2) #=> "-1011"
“~”(チルダ)はビット反転を表すようです。ビット反転ってのは単純に2進数の01を反転させる操作なんで
(~0b1010).to_s(2)ときたら、"0101"になると思うじゃないですか!
しかし、irb上で実際に返ってくるのは"-1011"とのこと。初めてこれを見たときには頭を抱えましたが、色々調べてみる中でどういうことなのか理解しましたので、ここに記録を残しておきます。
ちなみに前提として、n進数に関する基本的な知識が必要です(基本情報処理技術者試験の参考書とかで勉強できます。)
(~0b1010)
まず、
(~0b1010).to_s(2)の(~0b1010)の部分ですが
こちら側は4桁の2進数を入力したつもりでも、コンピュータ上だと実際には0...0001010のような4桁以上のビット数の値として取り扱われていることを理解している必要があります。それを踏まえた上で
“~”(チルダ)に従い0...0001010をビット反転すると、1...1110101となります。
(※ 実際には irb 上だと0b表記の2進数は自動的に10進数に変換されるので、(~0b1010)は-11が返ってきます。しかし結局は-11 == 1...1110101ですし、ここでは2進数として考えたほうが都合が良いのでそうします。)つまり
(~0b1010).to_s(2)という式は
1...1110101に対してto_s(2)メソッドが呼ばれていると考えられますね。to_s(2)メソッド
ここでもう一つ大事なポイントは、
to_s(2)メソッドが
正負を符号ビットで表さない、つまり負の数をマイナス記号で表す2進数として数値を文字列に変換する点にあります。もっと別の言い回しがなかったかなと考えております。そして
1...1110101は2の補数表現(負の数)であります。つまり今回の場合、
to_s(2)メソッドは1...1110101を-XXXX (Xには0か1が入る)のようにマイナス記号がついた4ビットの2進数になるように変換します。要は
1...1110101を一度正の数に変換したあとマイナス記号をつける、という感じになりますね。よって "-1011"
1...1110101は2の補数表現(負の数)ですが、これに対して更に2の補数を求める操作を行えば、裏返って正の数になります。0...0001011です。そんで5桁目以降の0を省いて、元は負の数ですのでマイナス記号をつけ、さいごに文字列に変換してやれば....
_人人人人人人人人人_
> "-1011" <
 ̄Y^Y^Y^Y^Y^Y^Y^Y ̄以上です
以上です。なんか間違ってる部分あったらご指摘お願いします。
- 投稿日:2020-02-09T14:35:49+09:00
Ruby + Sinatra + Google App Engine スタンダード環境で Hello World
概要
- Google App Engine スタンダード環境で Ruby + Sinatra によるシンプルな Web アプリケーションを動かす
構成
- Google App Engine スタンダード環境
- Ruby 2.5
- Web アプリケーションフレームワーク: Sinatra 2.0.8
- テンプレートエンジン: Erb
- Web アプリケーションサーバ: Puma 4.3
Google App Engine スタンダード環境の Ruby はベータ版
現時点(2020年2月9日現在)ではまだベータ版の状態。
ベータ版になったのは2019年8月。Ruby support comes to App Engine standard environment | Google Cloud Blog
Ruby is now Beta on App Engine standard environment, in addition to being available on the App Engine flexible environment.
Google App Engine Ruby 2.5 Standard Environment documentation
ベータ版
この機能はプレリリース版の状態で、変更やサポート制限が行われる可能性があります。ソースコード
ファイル一覧
├── Gemfile
├── Gemfile.lock
├── app.rb
├── app.yaml
├── config.ru
├── public
│   └── images
│       └── icon.png
└── views
    ├── error.erb
    └── hello.erb
Gemfile
sinatra-contrib は Sinatra Reloader などを使うために必要。
source 'https://rubygems.org'

gem 'puma'
gem 'sinatra'
gem 'sinatra-contrib'
Gemfile.lock
bundle install で生成された Gemfile.lock ファイル。
GEM
  remote: https://rubygems.org/
  specs:
    backports (3.16.0)
    multi_json (1.14.1)
    mustermann (1.1.1)
      ruby2_keywords (~> 0.0.1)
    nio4r (2.5.2)
    puma (4.3.1)
      nio4r (~> 2.0)
    rack (2.1.2)
    rack-protection (2.0.8.1)
      rack
    ruby2_keywords (0.0.2)
    sinatra (2.0.8.1)
      mustermann (~> 1.0)
      rack (~> 2.0)
      rack-protection (= 2.0.8.1)
      tilt (~> 2.0)
    sinatra-contrib (2.0.8.1)
      backports (>= 2.8.2)
      multi_json
      mustermann (~> 1.0)
      rack-protection (= 2.0.8.1)
      sinatra (= 2.0.8.1)
      tilt (~> 2.0)
    tilt (2.0.10)

PLATFORMS
  ruby

DEPENDENCIES
  puma
  sinatra
  sinatra-contrib

BUNDLED WITH
   2.1.4
app.rb
メイン処理をするファイル。
app.rbrequire 'sinatra' require 'sinatra/reloader' if development? helpers do # HTML エスケープ用にエイリアスを作成 include Rack::Utils alias_method :h, :escape_html end # 404 Not Found 時 not_found do @error_message = 'Page Not Found' erb :error end # エラー発生時 error do @error_message = h env['sinatra.error'].message erb :error end # Hello メッセージ表示ページ get '/hello/:message?' do # q パラメータがあるときはエラーを発生させる raise params[:q] if params[:q] # Ruby のバージョンをセット @ruby_desc = RUBY_DESCRIPTION # メッセージをセット if params['message'] != nil @message = params['message'] else @message = 'Hello, world!' end # 環境情報を取得 env = { :dev => settings.development?, :prod => settings.production?, :test => settings.test? } # HTML を表示 erb :hello, :locals => env endapp.yaml
Google App Engine 用の設定ファイル。
Google App Engine スタンダード環境でサポートされている Ruby のバージョンは 2.5。app.yamlruntime: ruby25 # アプリケーション起動エントリポイント entrypoint: bundle exec rackup -s Puma -p $PORT # 第2世代ランタイム, インスタンスクラス F1, メモリ制限 256MB, CPU制限 600MHz instance_class: F1 # インスタンス数のオートスケール設定 automatic_scaling: min_idle_instances: automatic max_idle_instances: 1 min_pending_latency: 3s max_pending_latency: 5s max_concurrent_requests: 5 # 許容する同時リクエスト数(指定できる最大値は80) target_cpu_utilization: 0.95 # インスタンス立ち上げトリガーなCPU負荷率(0.5から0.95の間で指定) max_instances: 1 # 最大インスタンス数 # 環境変数 env_variables: RACK_ENV: production # 静的ファイル配信用設定 handlers: - url: /images static_dir: public/images secure: alwaysconfig.ru
rackup コマンド用に config.ru を用意する。
config.rurequire './app' run Sinatra::Applicationviews/error.erb
エラーページ用 HTML テンプレート。
<!DOCTYPE html>
<html>
<head>
<meta charset="utf-8">
<title>Error page</title>
</head>
<body>
<p><%= @error_message %></p>
</body>
</html>
views/hello.erb
ページ用 HTML テンプレート。
<!DOCTYPE html>
<html>
<head>
<meta charset="utf-8">
<title>Hello, World!</title>
</head>
<body>
<p><%= h @message %></p>
<p>Ruby: <%= h @ruby_desc %></p>
<p>development?: <%= dev  %></p>
<p>production?:  <%= prod %></p>
<p>test?:        <%= test %></p>
<p><img src="/images/icon.png" alt="icon" title="icon"></p>
</body>
</html>
ローカルでサーバを起動
bundle install で環境を構築
bundle install コマンドで Gemfile.lock または Gemfile に記載してあるパッケージがインストールされる。
development 環境
開発時に使う起動方法。
RACK_ENV=development を指定する。
エラーメッセージなどがわかりやすく Web ページ上に表示される。$ RACK_ENV=development bundle exec rackup -s Puma Puma starting in single mode... * Version 4.3.1 (ruby 2.5.7-p206), codename: Mysterious Traveller * Min threads: 0, max threads: 16 * Environment: development * Listening on tcp://127.0.0.1:9292 * Listening on tcp://[::1]:9292 Use Ctrl-C to stopproduction 環境
動作確認時に使う起動方法。
RACK_ENV=production を指定する。$ RACK_ENV=production bundle exec rackup -s Puma Puma starting in single mode... * Version 4.3.1 (ruby 2.5.7-p206), codename: Mysterious Traveller * Min threads: 0, max threads: 16 * Environment: production * Listening on tcp://0.0.0.0:9292 Use Ctrl-C to stopGoogle App Engine にデプロイ
事前にデプロイ先のプロジェクトの作成や gcloud コマンドでアカウント認証などをしておく(課金設定等のためCUIコマンドだけでは完結しないと思われる)。
参考: Quickstart for Ruby in the App Engine Standard Environment
$ gcloud auth login
$ gcloud projects create [YOUR_PROJECT_ID] --set-as-default
$ gcloud app create --project=[YOUR_PROJECT_ID]
$ gcloud config set project [YOUR_PROJECT_ID]
$ gcloud config list
gcloud app deploy コマンドで Google App Engine にデプロイする。
$ gcloud app deployGoogle App Engine のサーバにアクセス
200 OK
$ curl -i "https://simple-sample.appspot.com/hello/こんにちは世界<>\"'&" HTTP/2 200 content-type: text/html;charset=utf-8 vary: Accept-Encoding x-xss-protection: 1; mode=block x-content-type-options: nosniff x-frame-options: SAMEORIGIN x-cloud-trace-context: XXXXXXXXXXXXXXXXXXXXXXXXXXXXXXXX;o=1 date: Sun, 09 Feb 2020 04:20:35 GMT server: Google Frontend content-length: 379 alt-svc: quic=":443"; ma=2592000; v="46,43",h3-Q050=":443"; ma=2592000,h3-Q049=":443"; ma=2592000,h3-Q048=":443"; ma=2592000,h3-Q046=":443"; ma=2592000,h3-Q043=":443"; ma=2592000 <!DOCTYPE html> <html> <head> <meta charset="utf-8"> <title>Hello, World!</title> </head> <body> <p>こんにちは世界<>"'&</p> <p>Ruby: ruby 2.5.7p206 (2019-10-01 revision 67816) [x86_64-linux]</p> <p>development?: false</p> <p>production?: true</p> <p>test?: false</p> <p><img src="/images/icon.png" alt="icon" title="icon"></p> </body> </html>404 Not Found
$ curl -i https://simple-sample.appspot.com/
HTTP/2 404
content-type: text/html;charset=utf-8
vary: Accept-Encoding
x-cascade: pass
x-xss-protection: 1; mode=block
x-content-type-options: nosniff
x-frame-options: SAMEORIGIN
x-cloud-trace-context: XXXXXXXXXXXXXXXXXXXXXXXXXXXXXXXX
date: Sun, 09 Feb 2020 04:14:11 GMT
server: Google Frontend
content-length: 133
alt-svc: quic=":443"; ma=2592000; v="46,43",h3-Q050=":443"; ma=2592000,h3-Q049=":443"; ma=2592000,h3-Q048=":443"; ma=2592000,h3-Q046=":443"; ma=2592000,h3-Q043=":443"; ma=2592000

<!DOCTYPE html>
<html>
<head>
<meta charset="utf-8">
<title>Error page</title>
</head>
<body>
<p>Page Not Found</p>
</body>
</html>
500 Internal Server Error
$ curl -i https://simple-sample.appspot.com/hello/?q=テスト用エラー
HTTP/2 500
content-type: text/html;charset=utf-8
x-xss-protection: 1; mode=block
x-content-type-options: nosniff
x-frame-options: SAMEORIGIN
x-cloud-trace-context: XXXXXXXXXXXXXXXXXXXXXXXXXXXXXXXX;o=1
date: Sun, 09 Feb 2020 04:14:37 GMT
server: Google Frontend
content-length: 140
alt-svc: quic=":443"; ma=2592000; v="46,43",h3-Q050=":443"; ma=2592000,h3-Q049=":443"; ma=2592000,h3-Q048=":443"; ma=2592000,h3-Q046=":443"; ma=2592000,h3-Q043=":443"; ma=2592000

<!DOCTYPE html>
<html>
<head>
<meta charset="utf-8">
<title>Error page</title>
</head>
<body>
<p>テスト用エラー</p>
</body>
</html>
画像へのアクセス
app.yaml の handlers で静的配信指定しているのでレスポンスヘッダに Cache-Control や Expires が設定される。
$ curl -i https://simple-sample.appspot.com/images/icon.png
HTTP/2 200
date: Sun, 09 Feb 2020 04:14:50 GMT
expires: Sun, 09 Feb 2020 04:24:50 GMT
etag: "XXXXXX"
x-cloud-trace-context: XXXXXXXXXXXXXXXXXXXXXXXXXXXXXXXX
content-type: image/png
server: Google Frontend
cache-control: public, max-age=600
content-length: 18136
age: 0
alt-svc: quic=":443"; ma=2592000; v="46,43",h3-Q050=":443"; ma=2592000,h3-Q049=":443"; ma=2592000,h3-Q048=":443"; ma=2592000,h3-Q046=":443"; ma=2592000,h3-Q043=":443"; ma=2592000
参考資料
- 投稿日:2020-02-09T14:35:49+09:00
Ruby + Sinatra + Google App Engine スタンダード環境(ベータ版)で Hello World
概要
- Google App Engine スタンダード環境(ベータ版)で Ruby + Sinatra によるシンプルな Web アプリケーションを動かす
構成
- Google App Engine スタンダード環境 (ベータ版)
- Ruby 2.5
- Web アプリケーションフレームワーク: Sinatra 2.0.8
- テンプレートエンジン: Erb
- Web アプリケーションサーバ: Puma 4.3
Google App Engine スタンダード環境はベータ版
現時点(2020年2月9日現在)ではまだベータ版の状態。
ベータ版になったのは2019年8月。Ruby support comes to App Engine standard environment | Google Cloud Blog
Ruby is now Beta on App Engine standard environment, in addition to being available on the App Engine flexible environment.
Google App Engine Ruby 2.5 Standard Environment documentation
ベータ版
この機能はプレリリース版の状態で、変更やサポート制限が行われる可能性があります。ソースコード
ファイル一覧
├── Gemfile
├── Gemfile.lock
├── app.rb
├── app.yaml
├── config.ru
├── public
│   └── images
│       └── icon.png
└── views
    ├── error.erb
    └── hello.erb
Gemfile
sinatra-contrib は Sinatra Reloader などを使うために必要。
source 'https://rubygems.org'

gem 'puma'
gem 'sinatra'
gem 'sinatra-contrib'
Gemfile.lock
bundle install で生成された Gemfile.lock ファイル。
Gemfile.lock
GEM
  remote: https://rubygems.org/
  specs:
    backports (3.16.0)
    multi_json (1.14.1)
    mustermann (1.1.1)
      ruby2_keywords (~> 0.0.1)
    nio4r (2.5.2)
    puma (4.3.1)
      nio4r (~> 2.0)
    rack (2.1.2)
    rack-protection (2.0.8.1)
      rack
    ruby2_keywords (0.0.2)
    sinatra (2.0.8.1)
      mustermann (~> 1.0)
      rack (~> 2.0)
      rack-protection (= 2.0.8.1)
      tilt (~> 2.0)
    sinatra-contrib (2.0.8.1)
      backports (>= 2.8.2)
      multi_json
      mustermann (~> 1.0)
      rack-protection (= 2.0.8.1)
      sinatra (= 2.0.8.1)
      tilt (~> 2.0)
    tilt (2.0.10)

PLATFORMS
  ruby

DEPENDENCIES
  puma
  sinatra
  sinatra-contrib

BUNDLED WITH
   2.1.4
app.rb
メイン処理をするファイル。
app.rbrequire 'sinatra' require 'sinatra/reloader' if development? helpers do # HTML エスケープ用にエイリアスを作成 include Rack::Utils alias_method :h, :escape_html end # 404 Not Found 時 not_found do @error_message = 'Page Not Found' erb :error end # エラー発生時 error do @error_message = h env['sinatra.error'].message erb :error end # Hello メッセージ表示ページ get '/hello/:message?' do # q パラメータがあるときはエラーを発生させる raise params[:q] if params[:q] # Ruby のバージョンをセット @ruby_desc = RUBY_DESCRIPTION # メッセージをセット if params['message'] != nil @message = params['message'] else @message = 'Hello, world!' end # 環境情報を取得 env = { :dev => settings.development?, :prod => settings.production?, :test => settings.test? } # HTML を表示 erb :hello, :locals => env endapp.yaml
Google App Engine 用の設定ファイル。
Google App Engine スタンダード環境でサポートされている Ruby のバージョンは 2.5。app.yamlruntime: ruby25 # アプリケーション起動エントリポイント entrypoint: bundle exec rackup -s Puma -p $PORT # 第2世代ランタイム, インスタンスクラス F1, メモリ制限 256MB, CPU制限 600MHz instance_class: F1 # インスタンス数のオートスケール設定 automatic_scaling: min_idle_instances: automatic max_idle_instances: 1 min_pending_latency: 3s max_pending_latency: 5s max_concurrent_requests: 5 # 許容する同時リクエスト数(指定できる最大値は80) target_cpu_utilization: 0.95 # インスタンス立ち上げトリガーなCPU負荷率(0.5から0.95の間で指定) max_instances: 1 # 最大インスタンス数 # 環境変数 env_variables: RACK_ENV: production # 静的ファイル配信用設定 handlers: - url: /images static_dir: public/images secure: alwaysconfig.ru
rackup コマンド用に config.ru を用意する。
config.rurequire './app' run Sinatra::Applicationviews/error.erb
エラーページ用 HTML テンプレート。
<!DOCTYPE html>
<html>
<head>
<meta charset="utf-8">
<title>Error page</title>
</head>
<body>
<p><%= @error_message %></p>
</body>
</html>
views/hello.erb
ページ用 HTML テンプレート。
<!DOCTYPE html>
<html>
<head>
<meta charset="utf-8">
<title>Hello, World!</title>
</head>
<body>
<p><%= h @message %></p>
<p>Ruby: <%= h @ruby_desc %></p>
<p>development?: <%= dev  %></p>
<p>production?:  <%= prod %></p>
<p>test?:        <%= test %></p>
<p><img src="/images/icon.png" alt="icon" title="icon"></p>
</body>
</html>
ローカルでサーバを起動
bundle install で環境を構築
bundle install コマンドで Gemfile.lock または Gemfile に記載してあるパッケージがインストールされる。
development 環境
開発時に使う起動方法。
RACK_ENV=development を指定する。
エラーメッセージなどがわかりやすく Web ページ上に表示される。$ RACK_ENV=development bundle exec rackup -s Puma Puma starting in single mode... * Version 4.3.1 (ruby 2.5.7-p206), codename: Mysterious Traveller * Min threads: 0, max threads: 16 * Environment: development * Listening on tcp://127.0.0.1:9292 * Listening on tcp://[::1]:9292 Use Ctrl-C to stopproduction 環境
動作確認時に使う起動方法。
RACK_ENV=production を指定する。$ RACK_ENV=production bundle exec rackup -s Puma Puma starting in single mode... * Version 4.3.1 (ruby 2.5.7-p206), codename: Mysterious Traveller * Min threads: 0, max threads: 16 * Environment: production * Listening on tcp://0.0.0.0:9292 Use Ctrl-C to stopGoogle App Engine にデプロイ
事前にデプロイ先のプロジェクトの作成や gcloud コマンドでアカウント認証などをしておく(課金設定等のためCUIコマンドだけでは完結しないと思われる)。
参考: Quickstart for Ruby in the App Engine Standard Environment
$ gcloud auth login
$ gcloud projects create [YOUR_PROJECT_ID] --set-as-default
$ gcloud app create --project=[YOUR_PROJECT_ID]
$ gcloud config set project [YOUR_PROJECT_ID]
$ gcloud config list
gcloud app deploy コマンドで Google App Engine にデプロイする。
$ gcloud app deployGoogle App Engine のサーバにアクセス
200 OK
$ curl -i "https://simple-sample.appspot.com/hello/こんにちは世界<>\"'&" HTTP/2 200 content-type: text/html;charset=utf-8 vary: Accept-Encoding x-xss-protection: 1; mode=block x-content-type-options: nosniff x-frame-options: SAMEORIGIN x-cloud-trace-context: XXXXXXXXXXXXXXXXXXXXXXXXXXXXXXXX;o=1 date: Sun, 09 Feb 2020 04:20:35 GMT server: Google Frontend content-length: 379 alt-svc: quic=":443"; ma=2592000; v="46,43",h3-Q050=":443"; ma=2592000,h3-Q049=":443"; ma=2592000,h3-Q048=":443"; ma=2592000,h3-Q046=":443"; ma=2592000,h3-Q043=":443"; ma=2592000 <!DOCTYPE html> <html> <head> <meta charset="utf-8"> <title>Hello, World!</title> </head> <body> <p>こんにちは世界<>"'&</p> <p>Ruby: ruby 2.5.7p206 (2019-10-01 revision 67816) [x86_64-linux]</p> <p>development?: false</p> <p>production?: true</p> <p>test?: false</p> <p><img src="/images/icon.png" alt="icon" title="icon"></p> </body> </html>404 Not Found
$ curl -i https://simple-sample.appspot.com/
HTTP/2 404
content-type: text/html;charset=utf-8
vary: Accept-Encoding
x-cascade: pass
x-xss-protection: 1; mode=block
x-content-type-options: nosniff
x-frame-options: SAMEORIGIN
x-cloud-trace-context: XXXXXXXXXXXXXXXXXXXXXXXXXXXXXXXX
date: Sun, 09 Feb 2020 04:14:11 GMT
server: Google Frontend
content-length: 133
alt-svc: quic=":443"; ma=2592000; v="46,43",h3-Q050=":443"; ma=2592000,h3-Q049=":443"; ma=2592000,h3-Q048=":443"; ma=2592000,h3-Q046=":443"; ma=2592000,h3-Q043=":443"; ma=2592000

<!DOCTYPE html>
<html>
<head>
<meta charset="utf-8">
<title>Error page</title>
</head>
<body>
<p>Page Not Found</p>
</body>
</html>
500 Internal Server Error
$ curl -i https://simple-sample.appspot.com/hello/?q=テスト用エラー
HTTP/2 500
content-type: text/html;charset=utf-8
x-xss-protection: 1; mode=block
x-content-type-options: nosniff
x-frame-options: SAMEORIGIN
x-cloud-trace-context: XXXXXXXXXXXXXXXXXXXXXXXXXXXXXXXX;o=1
date: Sun, 09 Feb 2020 04:14:37 GMT
server: Google Frontend
content-length: 140
alt-svc: quic=":443"; ma=2592000; v="46,43",h3-Q050=":443"; ma=2592000,h3-Q049=":443"; ma=2592000,h3-Q048=":443"; ma=2592000,h3-Q046=":443"; ma=2592000,h3-Q043=":443"; ma=2592000

<!DOCTYPE html>
<html>
<head>
<meta charset="utf-8">
<title>Error page</title>
</head>
<body>
<p>テスト用エラー</p>
</body>
</html>
画像へのアクセス
app.yaml の handlers で静的配信指定しているのでレスポンスヘッダに Cache-Control や Expires が設定される。
$ curl -i https://simple-sample.appspot.com/images/icon.png
HTTP/2 200
date: Sun, 09 Feb 2020 04:14:50 GMT
expires: Sun, 09 Feb 2020 04:24:50 GMT
etag: "XXXXXX"
x-cloud-trace-context: XXXXXXXXXXXXXXXXXXXXXXXXXXXXXXXX
content-type: image/png
server: Google Frontend
cache-control: public, max-age=600
content-length: 18136
age: 0
alt-svc: quic=":443"; ma=2592000; v="46,43",h3-Q050=":443"; ma=2592000,h3-Q049=":443"; ma=2592000,h3-Q048=":443"; ma=2592000,h3-Q046=":443"; ma=2592000,h3-Q043=":443"; ma=2592000
参考資料
- 投稿日:2020-02-09T14:21:09+09:00
Railsで新しくテーブルを作成するときの基本的な流れ
Railsで新しくモデルを作成するときの備忘メモ
マイグレーションファイルを作成
$ rails g model Testマイグレーションファイルの編集
マイグレーションファイルを「rails g model Test」で作成すると、次のようなファイルが作成される。
yyyymmddHHMMSS_create_tests.rbclass CreateQuestions < ActiveRecord::Migration[5.2] def change create_table :tests do |t| t.timestamps end end end基本としては、create_table :tests do |t| から end の間に追加したいカラムの情報をつけていく。
ここでは、string型のtitleカラムと、inter型の No というカラムを追加させる。
なお、255文字以下の文字列ならば string 型、それ以上であれば text 型を使います。yyyymmddHHMMSS_create_tests.rbclass CreateQuestions < ActiveRecord::Migration[5.2] def change create_table :tests do |t| t.string :title t.integer :No t.timestamps end end endこれであとは「rails db:migrate」:を実行すれば、titleカラムとNoカラムとtimestampsカラムを持つ「Test」というテーブル(表のようなもの)が作成される。
マイグレーションファイルをデータベースに反映
$ rails db:migrateモデルに制約をつけていく
通常、作成したモデルに入れる情報(ここではテーブルに入るデータのようなイメージ)には、好き勝手な情報を入れられないように制約(validates)をつけてあげます。
ちなみにモデルファイルを編集したあとは、特にコマンドを実行する必要はありません。次の例は、空のタイトルが入力されないように Test モデルに制約(バリデーションといいます)をつける例です。
¥app¥models¥test.rbclass Question < ApplicationRecord validates :title, presence: true endなお、複数のバリデーションをもたせることもできます。
例えばタイトルの長さを100文字以下にしてほしい場合は次のように記述します。¥app¥models¥test.rbclass Question < ApplicationRecord validates :title, presence: true, length: { maximum: 100 } end以下ではよく使うバリデーションを整理
空の値ではないこと
validates :title, presence: true一意性(かぶらないようにしたいとき)
validates :title, uniqueness: true長さ
validates :title,    length: { minimum: 10 }       # 「10文字以上」
validates :title,    length: { maximum: 100 }      # 「100文字以下」
validates :title,    length: { in: 10..100 }        # 「10文字以上100文字以下」
validates :title, length: { is: 8 }            # 「8文字のみ」
数値であること
例えばinteger型で書いてほしいとき
validates :No, numericality: trueメールアドレス形式
正規表現を駆使していて少し難しいと思うので、コピペが楽
VALID_EMAIL_REGEX = /\A[\w+\-.]+@[a-z\d\-.]+\.[a-z]+\z/i
validates :email, presence: true, uniqueness: true, format: { with: VALID_EMAIL_REGEX }
これで「@が入っているか」「一意性があるか」「空ではないか」といった、メールアドレスのデータとして必要な要件を包含できているので便利です。
- 投稿日:2020-02-09T13:55:19+09:00
Rails Tutorilaで躓いた所の対処法
はじめに
OS: windows 10
問題と解決法だけ記載します。
現在、第4章をやっている最中なので随時更新します。第4章
リスト4-7
rails tを実行したら以下のエラーが出てきた。Could not find gem 'guard (= 2.13.0) x64-mingw32' in any of the gem sources listed in your Gemfile. Run `bundle install` to install missing gems.解決策
Gemfileに記載されているgemを最新に書き換えてアップデートする。
gemのバージョンについてはこちらを参考にした。参考文献
bundle install すると Could not find xxx in any of the sources と怒られる場合の対処法
- 投稿日:2020-02-09T13:50:02+09:00
Railsの環境構築時にLibrary not loaded: /usr/local/opt/openssl/lib/libssl.1.0.0.dylib (LoadError)で苦しんだ
Railsの環境構築時に表題のエラーで苦しんだ
おなじみのopensslのエラー。どうせすぐ解決できるやろって思ってたら意外とハマったので備忘録として残しておきます。
bundleを叩くとコケる
諸々の環境構築終了後によしローカルサーバー立ち上げるぞ!と意気揚々と
$ bundle exec rails sを叩くと
Library not loaded: /usr/local/opt/openssl/lib/libssl.1.0.0.dylib (LoadError)
  Referenced from: /usr/local/opt/mysql@5.6/lib/libmysqlclient.18.dylib
  Reason: image not found - /Users/~~/~~/~~/vendor/bundle/ruby/2.5.0/gems/mysql2-0.4.10/lib/mysql2/mysql2.bundle
あれ、opensslで怒られてるぞ…
https://qiita.com/YoshiyukiKato/items/e4f67c588d2943c1253d
この方の記事の通り、$ brew install openssl $ brew link openssl --force $ rbenv uninstall 2.5.5 $ rbenv install 2.5.5とかでいけるやろ… いけー!!
Library not loaded: /usr/local/opt/openssl/lib/libssl.1.0.0.dylib (LoadError)
  Referenced from: /usr/local/opt/mysql@5.6/lib/libmysqlclient.18.dylib
  Reason: image not found - /Users/~~/~~/~~/vendor/bundle/ruby/2.5.0/gems/mysql2-0.4.10/lib/mysql2/mysql2.bundle
え…同じじゃん…
というわけで少しハマってしまいました…
解決法
https://qiita.com/utsu_jimmy/items/a35437faea1c0d2f357d
この方の記事も参考にしながら、rbenvでrubyごと再インストールしたり、brew upgrade試したり一通りはやったのですが、エラー内容は変わらず…もしかしてopensslのversionがおかしい?と思って、
$ brew switch openssl ~~みたいにopensslのversionを切り替えようとすると
Error: openssl does not have a version ~~ in the Cellar.
openssl's installed versions: 1.0.2s
あ、~~なんてversionなかった。。。じゃあ1.0.2s指定したったらどうなるんやろ
$ brew switch openssl 1.0.2sを実行すると、、
Cleaning /usr/local/Cellar/openssl/1.0.2s
Opt link created for /usr/local/Cellar/openssl/1.0.2s
ん?もしかしてうまくいった?
じゃあこれで$ bundle exec rails s実行すると
=> Booting WEBrick
=> Rails 5.1.7 application starting in development on http://localhost:3000
=> Run `rails server -h` for more startup options
ふつうに立ち上がったあああ!
結局opensslのversionが問題だったようです…
記事にするとしょうもないけど、ハマるときはハマりますよね…
この記事が誰かの役に立てば幸いです
- 投稿日:2020-02-09T13:41:41+09:00
anyenvでrubyの環境構築
anyenvでrubyをセットアップしたときのメモです。
インストール
#インストール
$ brew install anyenv
$ anyenv install --init
$ code ~/.bash_profile
設定
.bash_profileに以下を追加
# anyenv
export PATH="$HOME/.anyenv/bin:$PATH"
eval "$(anyenv init -)"
追加内容を反映する
$ source ~/.bash_profile動作確認
anyenv install -lはこのanyenvインストールできる*envの一覧を表示するコマンド$ anyenv install -l Renv crenv denv erlenv exenv goenv hsenv jenv luaenv nodenv phpenv plenv pyenv rbenv sbtenv scalaenv swiftenv tfenvanyenvでrbenvを入れる
$ anyenv install rbenv
$ source .bash_profile
$ rbenv install -l
1.8.5-p52
1.8.5-p113
1.8.5-p114
1.8.5-p115
1.8.5-p231
1.8.6
1.8.6-p36
...
rubyをinstall
今回は、バージョン
2.7.0を入れます。$ rbenv install 2.7.0 $ rbenv global 2.7.0 $ ruby -v ruby 2.7.0p0 (2019-12-25 revision 647ee6f091) [x86_64-darwin19]
- 投稿日:2020-02-09T13:11:02+09:00
Railsアプリをherokuにデプロイするまでの大まかな流れとハマったところ
Railsで簡単なセリフ検索アプリを作りました。
昔から『おおきく振りかぶって』という漫画が大好きで考察もしていたのでその効率化のためにも作ったアプリです。
https://oofurisearch.herokuapp.com/初めての公開なのでherokuを使ったのですが、結構時間がかかってしまったのでデプロイまでの流れと初心者がハマりやすいところをメモしときたいと思います。
前提条件
- railsアプリがすでにできている
- herokuの登録は完了している
- herokuコマンドが使える
環境
- Mac
- docker
- MySQL
herokuにファイルをアップロードする
herokuにアプリをアップロードするためにはgitを使います。
まずはターミナルでherokuにログイン。
heroku loginEnterを押すと勝手にブラウザが開くのでloginボタンを押します。
ログインできたら次はアプリを作ります。
heroku create アプリ名アプリ名を入力しなかったら勝手に名前がつきます。
また、同じ名前のアプリ名があるとエラーが出ます。アプリを作ったらgitでファイルをアップしましょう。
git init
git add .
git commit -am "first commit"
git push heroku master
これでファイルのアップロードはおkです。
DB周辺の設定
DB設定が結構ハマるポイントだと思いますので丁寧に進めていくことをおすすめします。
MySQLを利用したいので、まずはherokuでクレジットカード情報を登録しときます。お金はかかりません。登録ができたら以下を実行。
$ heroku addons:create cleardb:igniteこれでMySQLの設定はできましたが、railsはmysql2を利用していると思うので(gemファイルで確認できます)mysql2にも繋ぎます。
heroku config

CREATE_DATABASE_URL:   mysql://~~~~~~~
「heroku config」で出たURL(上みたいなやつ)をmysql2に設定します。
heroku config:add DATABASE_URL=mysql2://~~~~~~~~

heroku config:set DATABASE_URL='mysql2://~~~~~~~~'
これでmysql2にも設定できました。
最後に、
heroku run rake db:migrateしたらおk。
これであとは「OPENAPP」押したら(コマンドならheroku open)アプリは立ち上がります。ここまでは特に問題ないのですが、めんどくさいのが初期データを投入する場合です。
初期データを投入するときは、まずアプリに以下のファイルを作り記述を行います。
lib/tasks/seed.rbDir.glob(File.join(Rails.root, 'db', 'seeds', '*.rb')).each do |file| desc "Load the seed data from db/seeds/#{File.basename(file)}." task "db:seed:#{File.basename(file).gsub(/\..+$/, '')}" => :environment do load(file) end enddb/seeds.rbUser.create!([ {name: "test", email: "sample@email.com",password:"testtesttest"} ])初期データを記入したらherokuにpushしときます。そのあとに以下のコマンドを打つと初期データが投入されます。
heroku run rake db:seedただここで気をつけないといけないのは、例えばログイン機能などをControllerを経由して入るように設定していると入れません。
どうやら初期データはControllerを経由しないらしく、ただデータベースに放り込まれるだけらしいのでそれでログインはできません。なので、ユーザー情報とかはアプリで新規登録するのがいいと思います。また、複数の同じモデルのデータを投入したい場合はvalidatesをかけてると一番上のデータ以降読み込んでくれなくなってしまうので外しときましょう。
ちなみに、複数の別のモデルを投入したい場合は以下のようにファイルを分けたらいいと思います。
db/seeds/users.rbUser.create!([ {name: "test", email: "sample@email.com",password:"testtesttest"} ])db/seeds/items.rbItem.create!([ {item:"*********"} ])db/seeds.rbrequire './db/seeds/users.rb' require './db/seeds/items.rb'これで複数モデルを読み込むことができます。
まとめ
これでherokuへのデプロイができます。私みたいな初心者が躓きやすそうなところなので参考になれば嬉しいです。
- 投稿日:2020-02-09T12:01:18+09:00
DangerでPRの差分コードにインラインコメントをつける
概要
GitHub上で「PRの変更内容に特定のキーワードが含まれていたら、変更された箇所にコメントをつける。」というのを調べてやり方がわかったのでメモとして書いていきます。
GitHubActionsやDanger Pluginについて知っている方は「PRのコードにインラインコメントをつける」まで飛ばしてください。
サンプル
Rubyは不慣れなのであまり良いコードではないですが確認サンプルを作ってあります。
リポジトリ: https://github.com/rnishimu22001/DangerPlayground
動作のサンプルPR: https://github.com/rnishimu22001/DangerPlayground/pull/2利用環境
「GitHub.com + GitHubActions + Danger」
DangerはRuby版です。
GitHubActionsの設定
こちらの記事を参考にさせていただきました

https://qiita.com/tarumzu/items/87e4d9801d0a413c80f1https://github.com/rnishimu22001/DangerPlayground/blob/master/.github/workflows/danger.yml
PRを作成したときにGitHubActionsが実行されるように作っています。
# どのタイミングで実行するか?今回はPRがopenされたときにこのActionを実行させる。
on: pull_request

jobs:
  build:

    runs-on: ubuntu-latest

    steps:
    # Actionsで必要なセットアップをしていく
    - uses: actions/checkout@v1
    - name: Setup Ruby for use with actions
      uses: actions/setup-ruby@v1.0.0
      with:
        version: '2.6'
    - name: Install Danger
      run: |
          gem install bundler
          bundle install
    # Dangerの実行
    - name: Run Danger
      env:
          # Dangerがコメントするために必要?
          GITHUB_TOKEN: ${{ secrets.GITHUB_TOKEN }}
      run: danger
Danger Pluginを作成する
Danger Pluginとしてclassを作成すればDangerの機能をあまり考ずに使えそうなので今回はDanger Pluginで作成しました。
module Danger
    class CodeReview < Plugin
変更されたファイルパスを取得する
リファレンスによると
git.added_filesなどで追加されたファイル、修正されたファイルのパスが取れます。Paths for files that were added during the diff
added_files FileList
Paths for files that were removed during the diff
deleted_files FileList
Paths for files that changed during the diff
modified_files FileListhttps://danger.systems/reference.html
各ファイルを取得して変更されたファイルリストを作っていきます。
# gitモジュールから変更されたファイルパスを取得する
file_paths = git.modified_files + git.added_files
https://github.com/rnishimu22001/DangerPlayground/blob/master/code_review.rb#L10
gitの変更情報を取得する
今回はあくまで動作確認のためなのでコード差分の情報を抜き出す簡易なものを作っていきます。
ライブラリとかあればそっちを使うほうが賢いです。今回はDangerが提供してくれている
diff_for_fileを使って作っていきます。
1ファイルずつのdiffを見れるので制御がしやすいです。Details for a specific file in this diff
diff_for_file Git::Diff::DiffFilehttps://danger.systems/reference.html
git diffの中身をパースする
ファイルの差分情報の
git.diff_for_file(変更のあったファイルパス).patchを見てみると以下のようになります。diff --git a/hello.rb b/hello.rb index 15aaec7..2e57c3c 100644 --- a/hello.rb +++ b/hello.rb @@ -1 +1,2 @@ -puts "hello world" +# TODO: 後で直す +puts "hello world!!!"余談ですがいつも見てるこの
git diffのフォーマットはUnified Formatというらしいです。
https://www.gnu.org/software/diffutils/manual/html_node/Unified-Format.html
行の種類 対応しそうな正規表現 ファイルの変更情報 ^@@ 追加された or 修正された行 ^+ 削除された or 修正前の行 ^- 以上の内容を元に愚直にパースして変更行の情報を抜き出していきます。
https://github.com/rnishimu22001/DangerPlayground/blob/master/code_review.rb#L26-L65パースをする際に手こずったことですが、
DangerからPRにコメントをつける場合に削除された行につけれませんでした。
PRで削除された行は行としてカウントされないようなので気をつけてください。https://github.com/rnishimu22001/DangerPlayground/blob/master/code_review.rb#L50
削除行にコメントつける方法があれば教えて欲しいです

PRのコードにインラインコメントをつける
知らなかったんですがDangerを使う際によく使う
warnやmessageなどには引数が追加できるようです
https://github.com/danger/danger/blob/master/lib/danger/danger_core/plugins/dangerfile_messaging_plugin.rb#L63
file_path: コメントしたいファイルのパス
line: コメントを残したい行# 指定したファイルの行にコメントを残す warn("コメントしたいメッセージ", file: "./hogehoge.rb", line: 1)https://github.com/rnishimu22001/DangerPlayground/blob/master/code_review.rb#L23
これを実際に実行をしてみてコメントをつけることができました

https://github.com/rnishimu22001/DangerPlayground/pull/2#discussion_r375328482
やりのこしたこと
以下のパターンだとクラッシュしてしまうので変更情報のバリデーションを追加する必要があります。
- 画像などの形式の違うファイル
- リネームのみで変更情報しかないファイル
ほかにもgit diffの中身をパースするで記載したパターンだとObjective-Cのクラスメソッドも引っかかったりとたくさん穴がありそうなのでライブラリを使うのが良さそうです。
また、自前で作らなくてもキーワード検知のDanger Pluginは探せばありそうな気がしています。

- 投稿日:2020-02-09T12:01:18+09:00
DangerでPRのコード差分にインラインでコメントをつける
概要
GitHub上で「PRの変更内容に特定のキーワードが含まれていたら、変更された箇所にコメントをつける」
というのを調べてやり方がわかったのでメモとして書いていきます。
GitHubActionsやDanger Pluginについて知っているかたは、
「PRのコードにインラインコメントをつける」まで飛ばしてください。サンプル
Rubyは不慣れなのであまり良いコードではないですが確認サンプルを作ってあります。
リポジトリ: https://github.com/rnishimu22001/DangerPlayground
動作のサンプルPR: https://github.com/rnishimu22001/DangerPlayground/pull/2利用環境
「GitHub.com + GitHubActions + Danger」
DangerはRuby版です。
GitHubActionsの設定
こちらの記事を参考にさせていただきました
https://qiita.com/tarumzu/items/87e4d9801d0a413c80f1https://github.com/rnishimu22001/DangerPlayground/blob/master/.github/workflows/danger.yml
PRを作成したときにGitHubActionsが実行されるように作っています。
# どのタイミングで実行するか?今回はPRがopenされたときにこのActionを実行させる。
on: pull_request

jobs:
  build:

    runs-on: ubuntu-latest

    steps:
    # Actionsで必要なセットアップをしていく
    - uses: actions/checkout@v1
    - name: Setup Ruby for use with actions
      uses: actions/setup-ruby@v1.0.0
      with:
        version: '2.6'
    - name: Install Danger
      run: |
          gem install bundler
          bundle install
    # Dangerの実行
    - name: Run Danger
      env:
          # Dangerがコメントするために必要?
          GITHUB_TOKEN: ${{ secrets.GITHUB_TOKEN }}
      run: danger
Danger Pluginを作成する
Danger Pluginとしてclassを作成すればDangerの機能をあまり考ずに使えそうなので今回はDanger Pluginで作成しました。
module Danger
    class CodeReview < Plugin
変更されたファイルパスを取得する
リファレンスによると
git.added_filesなどで追加されたファイル、修正されたファイルのパスが取れます。Paths for files that were added during the diff
added_files FileList
Paths for files that were removed during the diff
deleted_files FileList
Paths for files that changed during the diff
modified_files FileListhttps://danger.systems/reference.html
各ファイルを取得して変更されたファイルリストを作っていきます。
# gitモジュールから変更されたファイルパスを取得する
file_paths = git.modified_files + git.added_files
https://github.com/rnishimu22001/DangerPlayground/blob/master/code_review.rb#L10
gitの変更情報を取得する
今回はあくまで動作確認のためなのでコード差分の情報を抜き出す簡易なものを作っていきます。
ライブラリとかあればそっちを使うほうが賢いです。今回はDangerが提供してくれている
diff_for_fileを使って作っていきます。
1ファイルずつのdiffを見れるので制御がしやすいです。Details for a specific file in this diff
diff_for_file Git::Diff::DiffFilehttps://danger.systems/reference.html
git diffの中身をパースする
ファイルの差分情報の
git.diff_for_file(変更のあったファイルパス).patchを見てみると以下のようになります。diff --git a/hello.rb b/hello.rb index 15aaec7..2e57c3c 100644 --- a/hello.rb +++ b/hello.rb @@ -1 +1,2 @@ -puts "hello world" +# TODO: 後で直す +puts "hello world!!!"余談ですがいつも見てるこの
git diffのフォーマットはUnified Formatというらしいです。
https://www.gnu.org/software/diffutils/manual/html_node/Unified-Format.html
行の種類 対応しそうな正規表現 ファイルの変更情報 ^@@ 追加された or 修正された行 ^+ 削除された or 修正前の行 ^- 以上の内容を元に愚直にパースして変更行の情報を抜き出していきます。
https://github.com/rnishimu22001/DangerPlayground/blob/master/code_review.rb#L26-L65パースをする際に手こずったことですが、
DangerからPRにコメントをつける場合に削除された行につけれませんでした。
PRで削除された行は行としてカウントされないようなので気をつけてください。https://github.com/rnishimu22001/DangerPlayground/blob/master/code_review.rb#L50
削除行にコメントつける方法があれば教えて欲しいです
PRのコードにインラインコメントをつける
知らなかったんですがDangerを使う際によく使う
warnやmessageなどには引数が追加できるようです
https://github.com/danger/danger/blob/master/lib/danger/danger_core/plugins/dangerfile_messaging_plugin.rb#L63
file_path: コメントしたいファイルのパス
line: コメントを残したい行# 指定したファイルの行にコメントを残す warn("コメントしたいメッセージ", file: "./hogehoge.rb", line: 1)https://github.com/rnishimu22001/DangerPlayground/blob/master/code_review.rb#L23
これを実際に実行をしてみてコメントをつけることができました
https://github.com/rnishimu22001/DangerPlayground/pull/2#discussion_r375328482
やりのこしたこと
以下のパターンだとクラッシュしてしまうので変更情報のバリデーションを追加する必要があります。
- 画像などの形式の違うファイル
- リネームのみで変更情報しかないファイル
ほかにもgit diffの中身をパースするで記載したパターンだとObjective-Cのクラスメソッドも引っかかったりとたくさん穴がありそうなのでライブラリを使うのが良さそうです。
また、自前で作らなくてもキーワード検知のDanger Pluginは探せばありそうな気がしています。
- 投稿日:2020-02-09T11:10:26+09:00
Ruby 基礎文法 解いてみた編 1
はじめに
Rubyの基礎を学習中の方に向けて記載致します。
実際に問題を解いた内容をOutputします。
省略方法やご参考になる記事等ございましたら、ご教授頂けますと幸いです。While文からfor文への変換
qiita.rb#while文 num = 0 while num < 100 do puts num num += 1 end #for文 for num in 0..99 do puts num endハッシュから値だけを取り出し、配列にする。
ただし、hashクラスのvaluesメソッドは利用しないこと。
qiita.rb# ハッシュ attr = {name: "田中", age: 27, height: 180, weight: 75} #回答 values = [] attr.each do |key, value| values << value endさいごに
日々勉強中ですので、随時更新します。
皆様の復習にご活用頂けますと幸いです。
- 投稿日:2020-02-09T08:31:03+09:00
「Ruby での Cloud Storage の使用」をやってみた
Ruby での Cloud Storage の使用 を実施する中で苦労した点を書きます。
環境
- Windows
- Ruby
>ruby --version
ruby 2.4.9p362 (2019-10-02 revision 67824) [x64-mingw32]
WindowsでRubyを使おうとするから苦労するのだと思う。。。
コマンドが実行できない
このコマンドが実行できませんでした。
× bundle exec ruby buckets.rb create my-awesome-bucketWindowsなので拡張子まで書きましょう。
○ bundle exec ruby.exe buckets.rb create my-awesome-bucket認証が通らない
このページの範囲では認証についての記載を見つけられませんでしたが、次の流れで認証を通せました。
1. 「IAMと管理」よりサービスアカウントを作成する
https://console.cloud.google.com/iam-admin/ からサービスアカウントを追加する。
作成したら、「キーを生成」から、JSONで秘密鍵を含むファイルをダウンロードする。
2. 環境変数の設定
set GOOGLE_APPLICATION_CREDENTIALS=/PATH/TO/project-id-XXXX.jsonWindowsでの?ポイント:フォルダ区切り文字は「\」→「/」にする。パスはクオートで囲わない。
3. Google Cloud Storage APIの有効化
https://console.developers.google.com/apis/api/storage-api.googleapis.com からAPIを有効化する。
- 投稿日:2020-02-09T07:29:29+09:00
Choices.js + fetchAPIでフィルタ付き動的セレクトボックス [脱jQuery]
概要
件名のモノが必要になった時
ググって出てきたのはajaxやcoffee script、select2にchosenと
内容が古かったり環境制約で使えないものだったりで苦しめられたので
rails6とpure javascriptで動くサンプルを遺します↓
親カテゴリの選択に応じて動的に子の選択肢をセットする
フィルタ検索機能
Sample app source code
- Ruby 2.7.0
- Rails 6.0.2.1
- Choices.js
- Fetch API
Choices.js
素のjavascriptで書かれた軽量custom select box
jQueryに依存せずにselect2やchosenのようなフィルタ機能を実現します
option設定やメソッドの詳細はGitHubで確認出来ます
公式動作デモ
Fetch API
Webブラウザの
新しめの標準APIで、非同期通信処理をカンタンに書けます
従来のjQuery.ajax、XHR(XMLHttpRequest)を代替するとかしないとか。
How does it work?
大まかな処理の流れは以下になります
- ユーザが親select boxからカテゴリを選択する
- 親select boxのchangeイベントが発火
- javascriptがfetchでserverのtile一覧apiを叩く
- serverがtile一覧をjsonで返す
- javascriptがjsonを受け取る
- javascriptがchoicesメソッドを経由して子select boxにjsonの内容をセットする
以下具体的なコードです
javascript
/javascript/tiles.jsdocument.addEventListener('DOMContentLoaded', function() { /* apply choices to select boxes */ const choicesOptions = { shouldSort: false, removeItemButton: true, searchResultLimit: 9, // default: 4 searchFields: ['label'] // default: ['label', 'value'] }; const selects = document.querySelectorAll('select'); selects.forEach(function(select) { select.choices = new Choices(select, choicesOptions); }); /* add event listener to first select */ const firstSelect = document.getElementById('first_select') if (firstSelect != null) { firstSelect.addEventListener('change', setSecondChoices); // type: 'input' is not effective. } /* get tiles json by fetch api */ async function getTiles(tile_category_id) { const params = new URLSearchParams(); params.set('tile_category_id', tile_category_id); const apiURL = `/api/tiles?${params}`; const response = await fetch(apiURL); const json = await response.json(); return json; } /* set values to second select */ function setSecondChoices() { const secondSelect = document.getElementById('second_select'); const choices = secondSelect.choices; /* clear current values & selected item */ choices.clearStore(); const tile_category_id = firstSelect.value; getTiles(tile_category_id).then(json => { // setChoices(choices, value, label, replaceChoices); choices.setChoices(json, 'index', 'display_name', true); }); } });
要点を抜粋解説します
序盤の以下の部分で素のselect要素に対してchoicesを適用しています
const selects = document.querySelectorAll('select');
selects.forEach(function(select) {
  select.choices = new Choices(select, choicesOptions);
});
choices適用後はカスタムタグが挿入されて見た目が変わり、フィルタが使えるようになります
select boxに対する項目の追加や削除はchoicesメソッドを通す必要があるので注意して下さい
続くaddEventListenerで親select boxのchangeイベントを拾い、setSecondChoices()を呼びます
firstSelect.addEventListener('change', setSecondChoices);
setSecondChoices()内
choices適用時にselect.choices = new Choices...という風に書いたので
以下のようにselect boxのchoicesにアクセス出来ますconst choices = secondSelect.choices;
親カテゴリが変更された時、変更前に選んだ子が残っていると宜しくないのでクリアします
choices.clearStore();
getTiles()は非同期処理で
/api/tiles?を叩きます
async/await+fetchAPIを使用します/* get tiles json by fetch api */ async function getTiles(tile_category_id) { const params = new URLSearchParams(); params.set('tile_category_id', tile_category_id); const apiURL = `/api/tiles?${params}`; const response = await fetch(apiURL); const json = await response.json(); return json; }
ES6縛りでasync/await記法が使えない場合は以下をお使い下さい
/* set values to second select */
function setSecondChoices() {
  const secondSelect = document.getElementById('second_select');
  const choices = secondSelect.choices;
  /* clear current values & selected item */
  choices.clearStore();
  const tile_category_id = firstSelect.value;
  const params = new URLSearchParams();
  params.set('tile_category_id', tile_category_id);
  const url = `/api/tiles?${params}`;
  /* get tiles JSON by fetch api */
  fetch(url).then(function(response) {
    return response.json();
  }).then(function(json) {
    // setChoices(choices, value, label, replaceChoices);
    choices.setChoices(json, 'index', 'display_name', true);
  });
}
apiを叩いて返ってくるjsonの構造は以下のような形式です
[
  {"display_name":"白","index":41},
  {"display_name":"發","index":42},
  {"display_name":"中","index":43}
]
setChoices()の第二, 第三引数で
choicesのvalueとlabelに対応するjson中のhashのkeyを指定します(value, labelの順)// setChoices(choices, value, label, replaceChoices); choices.setChoices(json, 'index', 'display_name', true);これで子select boxの選択肢が書き換わります
/javascript/packs/application.js
webpackerにpackしてもらう為、↑のtiles.jsをimportしてるだけimport '../tiles.js'
routes.rb
- select boxesを表示:
/(root)- カテゴリ毎のtile一覧を取得するapi:
/api/tiles?tile_category_id=xxxRails.application.routes.draw do root controller: :top_page, action: :show namespace :api do resources :tiles, only: [:index] end end
model
Model定義と一覧取得は今回の本筋ではないのでhashでベタ書きしました (DB不要です)
RailsユーザならActiveRecordに置き換えるのは造作も無い事でしょう
indexは各牌識別用の通し番号です
rubyのsymbolって漢字使えたんですね…
/models/concerns/tiles_identifiable.rbmodule TilesIdentifiable extend ActiveSupport::Concern included do def get_tiles(tile_category_id:) tile_category = tile_categories.key(tile_category_id) case tile_category when :萬子 then characters when :筒子 then dots when :索子 then bamboos when :風牌 then winds when :三元牌 then dragons else all_tiles end end def tile_categories { 萬子: 0, 筒子: 1, 索子: 2, 風牌: 3, 三元牌: 4, } end def numbers 1..9 end def chinese_numerals ['一', '二', '三', '四', '五', '六', '七', '八', '九'] end def to_chinese_numerals(number) chinese_numerals[number - 1] end # tile: { display_name:, index: } def characters(base_index: 10 * 0) numbers.map { | number | { display_name: "#{to_chinese_numerals(number)}萬", index: base_index + number } } end def dots(base_index: 10 * 1) numbers.map { | number | { display_name: "#{to_chinese_numerals(number)}筒", index: base_index + number } } end def bamboos(base_index: 10 * 2) numbers.map { | number | { display_name: "#{to_chinese_numerals(number)}索", index: base_index + number } } end def winds(base_index: 10 * 3) ['東', '南', '西', '北'].map.with_index(1) { | wind, index | { display_name: wind, index: base_index + index } } end def dragons(base_index: 10 * 4) ['白', '發', '中'].map.with_index(1) { | dragon, index | { display_name: dragon, index: base_index + index } } end def all_tiles characters | dots | bamboos | winds | dragons end end end
controller
controllers/top_page_controller.rbclass TopPageController < ApplicationController include TilesIdentifiable before_action :set_values private def set_values @first_choices = tile_categories.to_a end end
controllers/api/tiles_controller.rb
指定されたカテゴリに対応する牌一覧をjsonで返すapiclass Api::TilesController < ApplicationController include TilesIdentifiable def index tile_category_id = params[:tile_category_id] if tile_category_id.blank? render json: all_tiles else render json: get_tiles(tile_category_id: tile_category_id.to_i) end end end
view
素のerbです
views/top_page/show.html.erb<div class='form_wrapper'> <%= form_with do | form | %> <%= form.label 'tile categories' %> <%= form.select :first_select, @first_choices, { include_blank: true }, {} %> <%= form.label 'tiles' %> <%= form.select :second_select, [], { include_blank: true }, {} %> <% end %> </div>
views/layouts/application.html.erb
choicesのjsとcss、whatwg-fetchのjsをCDNでお手軽導入<head> ... <!-- Include Choices CSS --> <link rel='stylesheet' href='https://cdn.jsdelivr.net/npm/choices.js/public/assets/styles/choices.min.css'/> <!-- Include Choices JavaScript (latest) --> <script src='https://cdn.jsdelivr.net/npm/choices.js/public/assets/scripts/choices.min.js'></script> <!-- Include whatwg-fetch --> <script src='https://cdn.jsdelivr.net/npm/whatwg-fetch@3.0.0/dist/fetch.umd.min.js'></script> </head>
最後に
誰かの何らかの助けになれば幸いです
フィルタの日本語動作の確認で漢字を使う麻雀牌(Tile)にしてみたけど
牌一覧用意するのが無駄に面倒でもうやらないと思います
- 投稿日:2020-02-09T03:55:48+09:00
centosでgemがタイムアウトになる現象の解決方法
概要
- CentOS 8でredmineをインストールしようとしたときに、bundleがインストールできなかった。
gem install bundlerと何度入力してもタイムアウト- IPv6を無効化したらあっさり解消
方法
/etc/sysctl.confを書き換える。# vi /etc/sysctl.conf ・・・ net.ipv6.conf.all.disable_ipv6 = 1 net.ipv6.conf.default.disable_ipv6 = 1 ・・・ # sysctl -p ・・・ net.ipv6.conf.all.disable_ipv6 = 1 net.ipv6.conf.default.disable_ipv6 = 1 # nmcli c mod eth0 ipv6.method ignoreこれで解消しました。
参考
https://server.etutsplus.com/centos-7-network-configuration/2/
- 投稿日:2020-02-09T00:28:34+09:00
敢えてRubyで学ぶ「ゼロから作るDeep Learning」MNISTデータセット編
「ゼロから作るDeep Learning」の72p「3.6 手書き数字認識」では、MNISTの文字のデータセットを取ってくる。読み込ませる独自のpythonのコードがモリモリ出てきて、Rubyで簡単にコード変換できない。そこで外部Gemを頼りつつ、MNISTのデータを読み込ませてみた。
Red Datasets を使う
Rubyから、機械学習の定番データセットを作ってくれるGem。MNISTの手書き数字も大量に入っている。
install
$ gem install red-datasetsついでに画像処理用のmini_magickも入れておく
$ gem install mini_magick中身を確認
require 'numo/narray'
require 'numo/gnuplot'
require 'datasets'
require 'mini_magick'

minst = Datasets::MNIST.new

# 1つ表示
pixels = minst.first.pixels
pixels = Numo::NArray.concatenate(pixels)
pixels = pixels.reshape(28,28)
str = Numo::UInt8.cast(pixels).to_string
img = MiniMagick::Image.import_pixels(str, 28, 28, 8, 'gray', 'png')
img.write('output.png')
出力結果
ついでに200個ならべて表示してみる
x = minst.take(200)
pixels = Numo::NArray.concatenate(Array.new(200) { |i| x[i].pixels })
pixels = pixels.reshape(10, 20, 28, 28).transpose(0, 2, 1, 3)
str = Numo::UInt8.cast(pixels).to_string

img = MiniMagick::Image.import_pixels(str, 560, 280, 8, 'gray', 'png')
img.write('output.png')
訓練データとテスト画像の生成
mnist_train = Datasets::MNIST.new(type: :train)
mnist_test = Datasets::MNIST.new(type: :test)


- 投稿日:2020-02-09T00:21:05+09:00
初めてのWebアプリ制作 - ruby on rail - 4日目
はじめに
せき風邪をひいて4日程寝込んでおり、更新が止まってしまってしまいました・・・(´・ω・`)
新型コロナが流行ってる最中なので、病院ヘはいかず自宅療養してました
皆様も今の風邪にはご注意ください!4日目
それでは、4日目についてまとめて行こうと思います。
まず最初に、風邪で寝込んでる最中もスマホを使って、
rails関連の記事などを読んでいました。
そんな中で下記記事に行きつき、衝撃を受けます・・・。Herokuで画像アップロード機能を備えたWebアプリをデプロイした場合、
画像の保存自体はできるが、一定時間で消えてしまうという内容の記事でした。Herokuで画像アップロード機能を利用したWebアプリをデプロイする場合は、
画像をクラウドストレージなどを利用する必要があるそうです。そのため、画像アップロード機能自体を見直すことになりました。
画像アップロード機能の見直し
まず、Herokuに画像アップロード機能を備えたWebアプリをデプロイする場合、
画像アップロードする方法については、以下の2つの選択肢があるようです。①クラウドストレージ(AWS S3 / Cloudinary など)にアップロードし、
データベース上には、アップロード先のURLを保存する方法②画像データをバイナリ化して、データベースに保存する方法
結論としては、今回は①の方法を選択。
クラウドストレージには、AWS S3を利用する事にしました。理由としては、以下の通り。
画像バイナリ化については、メリットが少なくデメリットが多い事
(下記リンクの回答がすごい参考になりました)
データベースに画像を保存するのはありでしょうか?クラウドストレージは今後も利用する場面が多くありそうと感じた
使用するGem
クラウドストレージを使うにあたっては、参考記事が多かった下記Gemを利用しようと思います。
・carrierwave
・Fogまだ、利用方法がよくわかっていないので、今日の残りの時間と、明日の時間を利用して、
実際にアップロード機能の実装を適当なプロジェクトを作成して試してみようと思います。風邪に続いてメインの実装部分が止まってしまいますが、何とか1日使って覚えようと思います!
5日目の目標
5日目の目標については、以下の通り!
-テストアプリを作成し、carrierwave + fog を利用したクラウドストレージへの画像アップロード機能の実装4日目の目標だった以下については、まんま6日目の目標へ
-ログイン機能の実装
-セッションコントローラの作成
-イメージポストモデルの作成
-画像投稿機能の実装正直、どんどん先延ばしになっていってる感じが否めないですが、
とにかく完成に向かって頑張ろうと思います・・・!