- 投稿日:2019-12-30T20:25:59+09:00
「リファクタリング 第2版」Swiftでコーディング その5
11頁 第1章 play変数の削除 「問い合わせによる一時変数の置き換え(p.185)」
Swift版 main.swift
データ生成、結果表示付き。
import Foundation

makeData()

func playFor(aPerformance:Performance, plays:Dictionary<String, Play>) -> Play {
    return plays[aPerformance.playID]!
}

func statement(invoice:Invoice, plays:Dictionary<String, Play>) -> String {
    var volumeCredits = 0
    var totalAmount = 0
    var result = "Statement for \(invoice.customer)\n"
    let format = NumberFormatter()
    format.numberStyle = .currency
    format.locale = Locale(identifier: "en_US")

    for perf in invoice.performances {
        let play = playFor(aPerformance: perf, plays: plays)
        let thisAcmount = amountFor(aPerformance: perf, play: play)

        volumeCredits += max(perf.audience - 30, 0)
        if "comedy" == play.type {
            volumeCredits += Int(perf.audience / 5)
        }
        result += "  \(play.name): " + format.string(from: NSNumber(value: thisAcmount / 100))! + " (\(perf.audience) seats)\n"
        totalAmount += thisAcmount
    }
    result += "Amount owed is " + format.string(from: NSNumber(value: totalAmount / 100))! + "\n"
    result += "You earned \(volumeCredits) credits\n"
    return result
}

func amountFor(aPerformance:Performance, play:Play) -> Int {
    var result = 0

    switch play.type {
    case "tragedy":
        result = 40000
        if aPerformance.audience > 30 {
            result += 1000 * (aPerformance.audience - 30)
        }
    case "comedy":
        result = 30000
        if aPerformance.audience > 20 {
            result += 10000 + 500 * (aPerformance.audience - 20)
        }
        result += 300 * aPerformance.audience
    default:
        print("error")
    }
    return result
}

let result = statement(invoice: invoices[0], plays: plays)
print(result)
- 投稿日:2019-12-30T20:24:41+09:00
「リファクタリング 第2版」Swiftでコーディング その4
10頁 第1章 amountFor関数
Swift版 main.swift
データ生成、結果表示付き。
import Foundation

makeData()

func statement(invoice:Invoice, plays:Dictionary<String, Play>) -> String {
    var volumeCredits = 0
    var totalAmount = 0
    var result = "Statement for \(invoice.customer)\n"
    let format = NumberFormatter()
    format.numberStyle = .currency
    format.locale = Locale(identifier: "en_US")

    for perf in invoice.performances {
        let play = plays[perf.playID]!
        let thisAcmount = amountFor(aPerformance: perf, play: play)

        volumeCredits += max(perf.audience - 30, 0)
        if "comedy" == play.type {
            volumeCredits += Int(perf.audience / 5)
        }
        result += "  \(play.name): " + format.string(from: NSNumber(value: thisAcmount / 100))! + " (\(perf.audience) seats)\n"
        totalAmount += thisAcmount
    }
    result += "Amount owed is " + format.string(from: NSNumber(value: totalAmount / 100))! + "\n"
    result += "You earned \(volumeCredits) credits\n"
    return result
}

func amountFor(aPerformance:Performance, play:Play) -> Int {
    var result = 0

    switch play.type {
    case "tragedy":
        result = 40000
        if aPerformance.audience > 30 {
            result += 1000 * (aPerformance.audience - 30)
        }
    case "comedy":
        result = 30000
        if aPerformance.audience > 20 {
            result += 10000 + 500 * (aPerformance.audience - 20)
        }
        result += 300 * aPerformance.audience
    default:
        print("error")
    }
    return result
}

let result = statement(invoice: invoices[0], plays: plays)
print(result)
- 投稿日:2019-12-30T16:29:10+09:00
【iOS】Swiftファイルのヘッダーコメントをカスタマイズする
概要
iOSの開発をする際にXcodeでファイルを追加すると、ファイルのヘッダーに以下のようなコメントが入るかと思います。
Sample.swift// // Sample.swift // SampleProject // // Created by ~~~ on 2020/12/30 // Copyright © 2020 ~~~. All rights reserved. //複数人で開発をする際に、上記コメントを合わせたかったので、コメントのカスタマイズする方法についてまとめてみました。
環境
Xcode: 11.2.1
Swift: Swift5手順1
「IDETemplateMacros.plist」を生成します
手順2
手順1で生成したファイルに以下を追加します。
(サンプルでは作成者・作成元を非表示としました)IDETemplateMacros.plist<?xml version="1.0" encoding="UTF-8"?> <!DOCTYPE plist PUBLIC "-//Apple//DTD PLIST 1.0//EN" "http://www.apple.com/DTDs/PropertyList-1.0.dtd"> <plist version="1.0"> <dict> <key>FILEHEADER</key> <string> // ___FILENAME___ // ___TARGETNAME___ //</string> </dict> </plist>手順3
出来上がった「IDETemplateMacros.plist」をプロジェクトに追加します。
今回は複数人で開発することを想定し、Gitの管理下となるよう以下のディレクトリにファイルを追加しました。
<ProjectName>.xcodeproj/xcshareddata/IDETemplateMacros.plist
※「/xcshareddata」は「.gitignore」に入れていない前提です!確認
Xcodeからファイルを追加し、以下のようになっていれば設定完了です。
Sample.swift// // Sample.swift // SampleProject //参考
https://dev.classmethod.jp/etc/ios-xcode%E3%81%AE%E3%83%87%E3%83%95%E3%82%A9%E3%83%AB%E3%83%88%E3%81%AE%E3%83%98%E3%83%83%E3%83%80%E3%83%BC%E3%82%B3%E3%83%A1%E3%83%B3%E3%83%88%E3%81%AE%E3%83%86%E3%83%B3%E3%83%97%E3%83%AC%E3%83%BC/
https://help.apple.com/xcode/mac/9.0/index.html?localePath=en.lproj#/dev91a7a31fc
- 投稿日:2019-12-30T13:11:20+09:00
全身3Dスキャンで"フリー素材"化した自分とARで共演してみた話(完全版)
自分自身をアニメーション付きの3Dモデルデータにし、ARKitでARコンテンツ化してみた記録です(ブログにて2回に分けて書いていた記事をまとめて再構成してみました)。
まず完成したものがこちら。
そしてソースコードはこちらです。
https://github.com/miyabi/dancing-ar全身3Dスキャナー「3D GATEWAY」
去る9月25・26日に開催されたUnite Tokyo 2019のブース展示で、Digital Artisanさんが全身3Dスキャナー「3D GATEWAY」を展示、3Dスキャン体験をおこなっていたので、スキャンしてもらってきました(3Dスキャン体験は他のイベントなどでも実施されているようです)。
3D GATEWAYで3Dスキャナー体験ができます!スキャンデータは後日sketchfabに公開し、自由に3Dデータをダウンロードできるとのこと。 #UniteTokyo pic.twitter.com/Ag8odd1sTY
— ユニティ・テクノロジーズ・ジャパン (@unity_japan) September 25, 2019スキャン自体は一瞬(1/200秒)で終わり、約10分で3Dモデルデータを作成できるそうです。ただし当日はイベントで多数の方がスキャンされていたため、夕方スキャンして翌朝モデルデータが完成しました。モデルデータはSketchfab上で公開され、FBXかglTFでダウンロードが可能です。
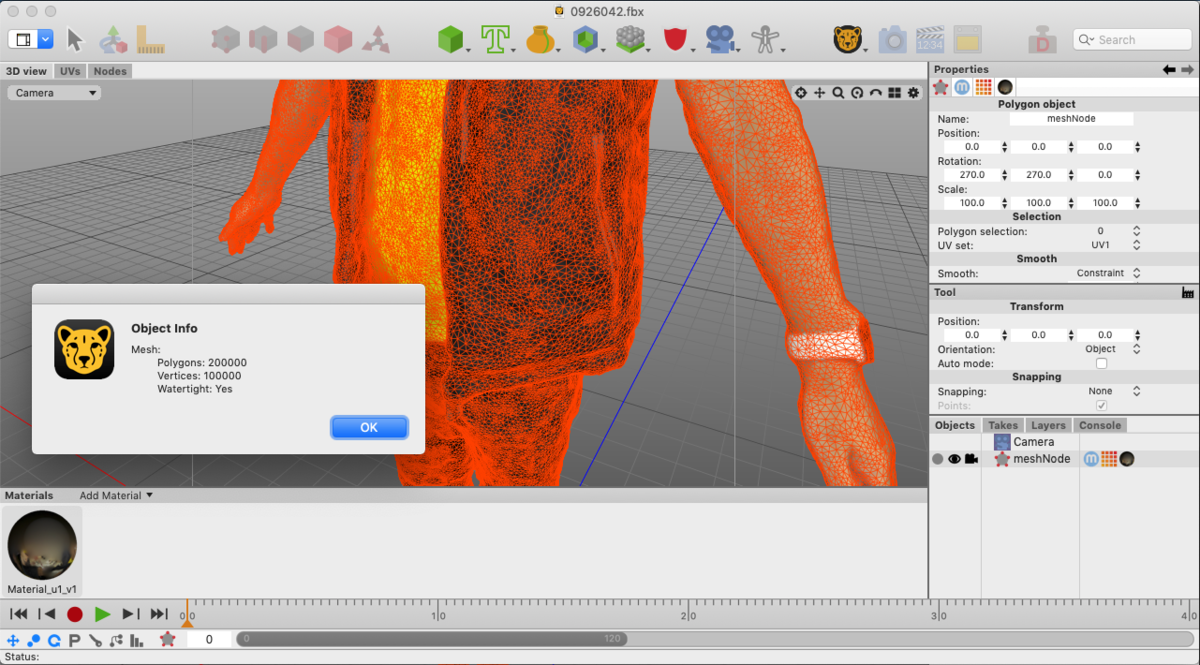
https://sketchfab.com/3d-models/0926042-0f1953978d5a412bb5dace2e2d84feb5モデルデータをFBXでダウンロードして手持ちの3Dツール、Cheetah 3Dで確認したところ、ポリゴン数は20万でした。
mixamoでリギング
せっかくなので動かしてみたいと思い、Adobeのmixamoでリギングしてみました。リギングとは、3Dモデルをアニメーションで動かすための設定を施すことです。
元のFBXをそのままmixamoにアップロードしたらエラーになってしまいました。どうもポリゴン数が多すぎるようなので、減らしてみます。
Cheetah 3DのTools→Polygon→Simplifyで試してみましたが微妙な感じだったので、一旦OBJに変換してMeshmixerを使うことにしました。
Selectから全部選択してEdit→Reduce、デフォルトで50%になっているのでそのままAccept、再びOBJでエクスポートします。
これをマテリアル、テクスチャーと一式zipにしてmixamoにアップロードしてみました。今度はエラーにはならないものの、モデルが真っ黒になってしまいました。
Cheetah 3DでOBJファイルを開いてみると余計なマテリアルがあったので、これを削除したあと再びzipにしてアップロードすると、今度はうまくいきました。
mixamoでは手首、肘など8箇所をマークするだけで、自動的にリギングしてくれます。とっても簡単!
リギングしたモデルには、2,000以上あるアニメーションを割り当ててその場でプレビューできます。これで色々試しているだけでもだいぶ楽しいです。
ARKitでARコンテンツ化
さて、ここからが本編。アニメーション付きの3Dモデルデータが得られたので、ARKit 3を使ってARコンテンツ化してみます。
やりたいこと
ARKitで3Dオブジェクトを描画するには、SceneKit、SpriteKit、iOS 13から追加されたRealityKitを使うか、あるいはMetalを使って独自に描画します。今回は手軽にARコンテンツを作成するために、SceneKitを使用します。
また、画面のタップした位置に3Dモデルを配置する仕様にします。リアルな3DモデルなのでARで表示するときもリアルに表示したいと思い、以下の実装もおこないます。
- 3Dモデルに当たる照明と実際の照明をなじませる(Light estimation)
- 影を描画する
- 3Dモデルで手前の人物が隠れてしまうのを防ぐ(People occlusion)
準備
mixamoでアニメーションを付けた3DモデルはFBX(.fbx)かCollada(.dae)形式でダウンロードできます。.dae形式は特別なライブラリが不要で、Xcodeがビルド時に自動的にSceneKitで扱える形式に変換してくれるので、この形式でダウンロードしておきます。
XcodeのNewメニュー→Projectから「Augmented Reality App」を選択し、Content Technologyを「SceneKit」にします。
以下、コードはすべてViewController.swiftに実装しています。モデルの配置
.dae形式の3Dモデル(とテクスチャー)をリソースとしてプロジェクトに追加します。viewDidLoadで3Dモデルを読み込みますが、あとで画面のタップした位置に配置したいのでシーンには追加せずにSceneKitのノードとして保持しておきます。
var baseNode: SCNNode!

override func viewDidLoad() {
    // ...

    baseNode = SCNScene(named: "Samba Dancing.dae")!.rootNode.childNode(withName: "Base", recursively: true)
}
ARWorldTrackingConfiguration.planeDetectionに.horizontalを指定して、平面を検出できるようにします。
override func viewWillAppear(_ animated: Bool) {
    // ...

    configuration.planeDetection = [.horizontal]

    // ...
}
Main.storyboardにTap Gesture Recognizerを追加し、画面のタップを受け取るアクションを追加します。
タップした位置に対応する現実空間の座標を取得するにはARFrame.hitTestを使用しますが、今回はiOS 13から追加されたARSCNView.raycastQueryとARSession.raycastを使って実装します。
@IBAction func screenDidTap(_ sender: UITapGestureRecognizer) {
    guard let view = sender.view else { return }

    if sender.state == .ended {
        let location = sender.location(in: view)
        guard let raycastQuery = sceneView.raycastQuery(from: location, allowing: .estimatedPlane, alignment: .horizontal) else { return }
        guard let raycastResult = sceneView.session.raycast(raycastQuery).first else { return }

        let position = SCNVector3Make(
            raycastResult.worldTransform.columns.3.x,
            raycastResult.worldTransform.columns.3.y,
            raycastResult.worldTransform.columns.3.z
        )

        let newBaseNode = baseNode.clone()
        newBaseNode.position = position
        sceneView.scene.rootNode.addChildNode(newBaseNode)
    }
}
まずraycastQueryにSCNView上での座標、raycastをヒットさせる対象とそのalignment(今回は検出された水平面にするのでそれぞれ.estimatedPlaneと.horizontal)を指定してクエリを作ります。そのクエリをARSession.raycastに渡すことによって、現実空間の座標を取得できます。ただしsimd_float4x4なので、これをSCNVector3に変換します。
保持しておいた3Dモデルのノードをcloneして、得られた座標を設定し、シーンに追加します。
Light estimation
Light estimationはキャプチャしたシーンの画像から照明を推定する機能で、初期のARKitから利用可能です。
まず、Light estimationを反映させるための環境光を追加します。
var ambientLightNode: SCNNode!

override func viewDidLoad() {
    // ...

    let ambientLight = SCNLight()
    ambientLight.type = .ambient
    ambientLight.shadowMode = .deferred
    ambientLightNode = SCNNode()
    ambientLightNode.light = ambientLight
    scene.rootNode.addChildNode(ambientLightNode)
}
ARWorldTrackingConfigurationのisLightEstimationEnabledとenvironmentTexturingを有効にします。
override func viewWillAppear(_ animated: Bool) {
    // ...

    configuration.isLightEstimationEnabled = true
    configuration.environmentTexturing = .automatic

    // ...
}
ARSCNViewを使用している場合、これだけで現実空間の照明の変化は自動的にシーンの照明に反映されます。
影の描画
単に3Dモデルを表示するだけでは"浮いて"見えてしまいます。そこで影を描画します。
まず、光源となるDirectional lightを追加します。この照明で影を描画するのでcastsShadowをtrueにします。また、レンダリングパスの最後に描画するのでshadowModeを.defferedに、shadowColorは半透明の黒にします。
少し影をぼかしてよりリアルにするため、shadowSampleCountとshadowRadiusの値を8に設定します。
最後に、Light estimationでは光源の方向を推定できないため、真上から光が当たるようにして、シーンに追加します。
var directionalLightNode: SCNNode!

override func viewDidLoad() {
    // ...

    let directionalLight = SCNLight()
    directionalLight.type = .directional
    directionalLight.intensity = 1000
    directionalLight.castsShadow = true
    directionalLight.shadowMode = .deferred
    directionalLight.shadowColor = UIColor.black.withAlphaComponent(0.5)
    directionalLight.shadowSampleCount = 8
    directionalLight.shadowRadius = 8
    directionalLightNode = SCNNode()
    directionalLightNode.light = directionalLight
    directionalLightNode.rotation = SCNVector4Make(1.0, 0.0, 0.0, -Float.pi / 2.0)
    scene.rootNode.addChildNode(directionalLightNode)
}
このままでは影が投影される平面がシーン上にないので、検出した現実空間の平面のジオメトリから作ります。このジオメトリのマテリアルのcolorBufferWriteMaskを空にしておくことで、透明で影だけ投影できる平面が作れます。
func renderer(_ renderer: SCNSceneRenderer, didUpdate node: SCNNode, for anchor: ARAnchor) {
    guard let planeAnchor = anchor as? ARPlaneAnchor else { return }

    let device = MTLCreateSystemDefaultDevice()!
    let planeGeometry = ARSCNPlaneGeometry(device: device)!
    planeGeometry.update(from: planeAnchor.geometry)
    planeGeometry.firstMaterial?.colorBufferWriteMask = []
    node.geometry = planeGeometry
}
People occlusion
通常ARコンテンツにおける3Dモデルは、現実空間をキャプチャした画像の上に描画されるため、手前にある現実の物体の奥に3Dモデルを表示することができず、違和感の元となっていました。
iOS 13から使用可能になったPeople occlusionによって、手前の人物をマスクすることができるようになり、この違和感を低減させることができます。
Occluding Virtual Content with People | Apple Developer Documentation
ただし、この機能にはA12 Bionic以降に搭載されている8コアのニューラルエンジンが必要なため、すべてのデバイスで使用することはできません。対応しているデバイスは、XR以降のiPhoneと、第3世代以降の12.9インチまたは11インチのiPad Pro、第3世代以降のiPad Air、第5世代以降のiPad miniとなっています。
People occlusionを有効にするには、ARWorldTrackingConfiguration.supportsFrameSemanticsで対応しているデバイスか確認したあと、ARWorldTrackingConfiguration.frameSemanticsに.personSegmentationWithDepthを設定します。
override func viewWillAppear(_ animated: Bool) {
    // ...

    if ARWorldTrackingConfiguration.supportsFrameSemantics(.personSegmentationWithDepth) {
        configuration.frameSemantics.insert(.personSegmentationWithDepth)
    }

    // ...
}
ARSCNViewを使用している場合は、これで3Dモデルより手前の人物がマスクされます。
ARCoachingOverlayView
最後に本筋ではありませんがiOS 13で追加されたARCoachingOverlayViewを実装しておきます。
ARCoachingOverlayView - ARKit | Apple Developer Documentation
デバイスに現実空間を認識させるためには、その仕組み上、デバイスを少し動かすなど一定の手順があります。これまでは開発者自身がそれをユーザーに伝える工夫をする必要がありましたが、それがOSの標準機能で可能になりました。
実装はこんな感じです。sessionに使用するARSession、goalに.horizontalPlaneを設定して(今回は水平面の検出なので)、ARSCNViewに追加します。
var coachingOverlayView: ARCoachingOverlayView!

override func viewDidLoad() {
    // ...

    coachingOverlayView = ARCoachingOverlayView()
    coachingOverlayView.session = sceneView.session
    coachingOverlayView.delegate = self
    coachingOverlayView.activatesAutomatically = true
    coachingOverlayView.goal = .horizontalPlane

    sceneView.addSubview(coachingOverlayView)

    coachingOverlayView.translatesAutoresizingMaskIntoConstraints = false
    NSLayoutConstraint.activate([
        coachingOverlayView.centerXAnchor.constraint(equalTo: view.centerXAnchor),
        coachingOverlayView.centerYAnchor.constraint(equalTo: view.centerYAnchor),
        coachingOverlayView.widthAnchor.constraint(equalTo: view.widthAnchor),
        coachingOverlayView.heightAnchor.constraint(equalTo: view.heightAnchor),
    ])
}
最後に
実際のプロジェクトでは、スケールを設定するスライダーとPeople occlusionの有効/無効を切り替えるスイッチを実装しています。
スケールを小さくしてたくさん3Dモデルを配置するとわらわらして楽しい感じになります。
スイッチの方は、People occlusionを有効にすると(ARWorldTrackingConfiguration.frameSemanticsに.personSegmentationWithDepthを設定すると)、なぜか平面に影が描画されないという現象があったので実装しました。
3Dモデル上には影が投影されているので、colorBufferWriteMaskあたりの問題なのかなあとは思っています。こちらからは以上です。
参考記事


- 投稿日:2019-12-30T13:01:36+09:00
アダプターをSwift5で実装する
※この記事は「全デザインパターンをSwift5で実装する」https://qiita.com/satoru_pripara/items/3aa80dab8e80052796c6 の一部です。
The Adapter(アダプター)
0. アダプターの意義
レガシーコード(古いコード)や、他者製のコード(外部ライブラリなど)を使う際、自分の書いたコードと実装形式などが違う事がある。そういったコードを用いる際、いちいち自分のコードと適合する形に直さなければならないとすると非常に手間がかかる。
アダプターパターンはそういったコードを自分のコードから扱いやすい形に修正してくれるデザインパターンである。
元のコードがどういった実装をしていたか? などをいちいち意識する事なく自分のコードに適合させられるため、時間と労力の節約につながる。
注意点としては、外部のコード等がもともと期待する機能を持っていないのにアダプターパターンを使って無理に他のコードと統合しようとしてはいけないという事である。それはアダプターの能力を超えている。そういったケースは単純に外部のコードの選定ミスなので、違うライブラリなど目的にあったコードを選ぶようにする。
1.アダプターを用いない場合
- プロトコル
PaymentGatewayに準拠している自前のクラスPayPalとStripePayment.swiftimport Foundation public protocol PaymentGateway { func receivePayment(amount: Double) var totalPayments: Double {get} } public class PayPal: PaymentGateway { private var total = 0.0 public func receivePayment(amount: Double) { self.total += amount } public var totalPayments: Double { print("Total payments received via PayPal: \(self.total)") return self.total } public init() {} } public class Stripe: PaymentGateway { private var total = 0.0 public func receivePayment(amount: Double) { self.total += amount } public var totalPayments: Double { print("Total payments received via Venmo: \(self.total)") return self.total } public init() {} }
PaymentGatewayに準拠していない外部のコード由来(という設定)のAmazonPaymentsクラスThirdPartyPayment.swiftimport Foundation //Third-party class that does not conform to PaymentGateway protocol. public class AmazonPayments { public var payments = 0.0 public func paid(value: Double, currency: String) { self.payments += value print("Paid \(currency)\(value) via Amazon Payments") } public func fulfilledTransactions() -> Double { return self.payments } public init() {} }
AmazonPaymentsクラスだけは、他のクラスと一緒に処理する事ができないPaymentGateways.playgorundlet paypal = PayPal() paypal.receivePayment(amount: 100) paypal.receivePayment(amount: 200) paypal.receivePayment(amount: 499) let stripe = Stripe() stripe.receivePayment(amount: 5.99) stripe.receivePayment(amount: 25) stripe.receivePayment(amount: 9.99) let amazonPayments = AmazonPayments() amazonPayments.paid(value: 120, currency: "USD") amazonPayments.paid(value: 74.99, currency: "USD") var paymentGateways: [PaymentGateway] = [paypal, stripe]//AmazonPaymentsクラスは配列に追加する事ができない var total = 0.0 paymentGateways.forEach {total += $0.totalPayments} print(total)2. アダプターの実装
PaymentGatewayプロトコルに準拠したAmazonPaymentsAdapterクラスを作成し、AmazonPaymentsクラスを処理させるAdapter.swiftimport Foundation public class AmazonPaymentsAdapter: PaymentGateway { public func receivePayment(amount: Double) { self.amazonPayments.paid(value: amount, currency: "USD") } public var totalPayments: Double { let total = self.amazonPayments.payments print("Total payments received via Amazon Payments: \(total)") return total } //AmazonPaymentsクラスを変数として持ち、扱いやすいように処理する。 //外部からのアクセスを防ぐため、private修飾子をつける。 private let amazonPayments = AmazonPayments() public init() {} }
- 使用例
PaymentGateways.playgroundlet paypal = PayPal() paypal.receivePayment(amount: 100) paypal.receivePayment(amount: 200) paypal.receivePayment(amount: 499) let stripe = Stripe() stripe.receivePayment(amount: 5.99) stripe.receivePayment(amount: 25) stripe.receivePayment(amount: 9.99) //アダプターを使用する事で、AmazonPaymentsクラスには直接触らなくて済む let amazonPaymentsAdapter = AmazonPaymentsAdapter() amazonPaymentsAdapter.receivePayment(amount: 120) amazonPaymentsAdapter.receivePayment(amount: 74.99) var paymentGateways: [PaymentGateway] = [paypal, stripe, amazonPaymentsAdapter]//アダプターを介して、AmazonPaymentsクラスを自作クラスと同じ型として扱えるようになった。3. extensionを用いたアダプター
Swiftの機能としてextensionというものがある。これは、既存のクラスに自作の変数や関数などを追加できるというSwiftの機能である。
※詳細は
https://www.sejuku.net/blog/33334
https://docs.swift.org/swift-book/LanguageGuide/Extensions.html
などを参照さらには、extensionを使って、今まで準拠していなかったプロトコルに準拠させるということもできる。
アダプターパターンの実現に当たって、より直感的な実装が可能となる。
本プログラムにおいては、
PaymentGatewayプロトコルに準拠していなかったため扱いづらかったAmazonPaymentsクラスを、extensionにより準拠させる事ができる。
AmazonPaymentsAdapterというアダプタークラスを別に作る必要がないため、非常に便利と言える。ThirdPartyPayment.swift//extensionによりPaymentGatewayプロトコルに準拠させる。 extension AmazonPayments: PaymentGateway { public func receivePayment(amount: Double) { self.paid(value: amount, currency: "USD") } public var totalPayments: Double { let total = self.payments print("Total payments received via Amazon Payments: \(total)") return total } }PaymentGatewayslet paypal = PayPal() paypal.receivePayment(amount: 100) paypal.receivePayment(amount: 200) paypal.receivePayment(amount: 499) let stripe = Stripe() stripe.receivePayment(amount: 5.99) stripe.receivePayment(amount: 25) stripe.receivePayment(amount: 9.99) let amazonPayments = AmazonPayments() amazonPayments.receivePayment(amount: 120) amazonPayments.receivePayment(amount: 74.99) //AmazonPayments型を自作クラスと同じ型の配列に入れられるようになった var paymentGateways: [PaymentGateway] = [paypal, stripe, amazonPayments]https://github.com/Satoru-PriChan/AdapterPaymentGatewayDemo
参考文献: https://www.amazon.com/Design-Patterns-Swift-implement-Improve-ebook/dp/B07MDD3FQJ
- 投稿日:2019-12-30T09:36:46+09:00
[iOS/Swift] アプリ開発の実務的アプローチで学ぶデザインパターン ~Facade~
この記事シリーズは、iOS/Swiftエンジニアである執筆者個人が、
ごく普通のiOSアプリ開発でよくある状況や
Swiftのコアライブラリやフレームワークで使われているパターンに
着目してデザインパターンを学び直してみた記録です。関連記事一覧
[iOS/Swift] アプリ開発の実務的アプローチで学ぶデザインパターンFacadeパターン概要
- 煩雑なモノの窓口(=Facade、ファサード)を作ることでシンプルに扱えるようにするパターンです。
- Facadeクラスは複雑な実装は持たず、(大抵は複数の)モジュールに対する問合せ窓口としての機能だけを提供します。
- GoFのデザインパターンでは構造に関するパターンに分類されます。
使い所
アプリ開発の実務で適用できるケースはたくさんあると思いますが、例えば
- UserDefaultsの読み込み・書き込み とか
- KeyChainの読み込み・書き込み とか
サンプルコード
Swiftバージョンは 5.1 です。
// Example
final class Defaults {

    private let defaults: UserDefaults

    init(defaults: UserDefaults = .standard) {
        self.defaults = defaults
    }

    subscript(key: String) -> String? {
        get {
            return defaults.string(forKey: key)
        }

        set {
            defaults.set(newValue, forKey: key)
        }
    }
}

// Usage
let storage = Defaults()

// Store
storage["Bishop"] = "Disconnect me. I’d rather be nothing"

// Read
storage["Bishop"]
引用:
https://github.com/ochococo/Design-Patterns-In-Swift#-fa%C3%A7ade
- 投稿日:2019-12-30T09:36:32+09:00
[iOS/Swift] アプリ開発の実務的アプローチで学ぶデザインパターン ~Abstract Factory~
この記事シリーズは、iOS/Swiftエンジニアである執筆者個人が、
ごく普通のiOSアプリ開発でよくある状況や
Swiftのコアライブラリやフレームワークで使われているパターンに
着目してデザインパターンを学び直してみた記録です。関連記事一覧
[iOS/Swift] アプリ開発の実務的アプローチで学ぶデザインパターンAbstract Factoryパターン概要
- オブジェクトの生成を抽象化することにより、関連/依存する複数のオブジェクト生成を一括して提供するためのパターンです。
- Factory Methodと類似していますが、主な相違点は上記の太字部分です。
- オブジェクト生成の責務を担う側を「抽象的な工場」に見立てて、Abstract Factoryと呼びます。
- 利用側は「工場」に対して生成条件を提示するわけですが、Swiftの場合はenumを上手く使うと良さそうです。
- GoFのデザインパターンでは生成に関するパターンに分類されます。
使い所
- テスト時はDBの処理をモック化するとか
- (iOSアプリではあまりないと思いますが)マルチデータベース対応 とか
サンプルコード
Swiftバージョンは 5.0 です。
// Protocols
protocol DatabaseConnection {
    var connection: String { get }
}

protocol DatabaseAccessible {
    func select()
    func insert()
    func delete()
    func update()
}

protocol DatabaseProvider {
    func makeConnection() -> DatabaseConnection
    func makeAccessor() -> DatabaseAccessible
}

// Class
final class MockConnection: DatabaseConnection {
    let connection = "MockConnection"
}

final class MockAccessor: DatabaseAccessible {
    func select() { print("ダミーを返す") }
    func insert() { print("何もしない") }
    func delete() { print("何もしない") }
    func update() { print("何もしない") }
}

final class ProductionConnection: DatabaseConnection {
    let connection = "ProductionConnection"
}

final class ProductionAccessor: DatabaseAccessible {
    func select() { print("実際に読み込む") }
    func insert() { print("実際に追加する") }
    func delete() { print("実際に削除する") }
    func update() { print("実際に更新する") }
}

// Abstract factory
enum DatabaseFactoryType: DatabaseProvider {
    case mock
    case production

    func makeConnection() -> DatabaseConnection {
        switch self {
        case .mock:
            return MockConnection()
        case .production:
            return ProductionConnection()
        }
    }

    func makeAccessor() -> DatabaseAccessible {
        switch self {
        case .mock:
            return MockAccessor()
        case .production:
            return ProductionAccessor()
        }
    }
}

// Usage
let mockFactory = DatabaseFactoryType.mock
let mockConnection = mockFactory.makeConnection()
print(mockConnection.connection)   // "MockConnection"
let mockAccessor = mockFactory.makeAccessor()
mockAccessor.select()  // "ダミーを返す"

let productionFactory = DatabaseFactoryType.production
let productionConnection = productionFactory.makeConnection()
print(productionConnection.connection)   // "ProductionConnection"
let productionAccessor = productionFactory.makeAccessor()
productionAccessor.select()  // "実際に読み込む"
- 投稿日:2019-12-30T09:35:51+09:00
[iOS/Swift] アプリ開発の実務的アプローチで学ぶデザインパターン ~Factory Method~
Factory Methodパターン概要
- 生成するインスタンスを条件に応じて柔軟に切り替えるためのパターンです。
- Javaなどの場合は抽象クラスで振る舞いとインスタンス生成の雛形を定義し、サブクラスでそれらをオーバーライドします。(参照:Wikipedia)
- Swiftの場合は抽象クラスという概念がありませんし、enumの表現力が強力なので、enumをうまく使うと良さそうです。
- GoFのデザインパターンでは生成に関するパターンに分類されます。
使い所
アプリ開発の実務で適用できるケースはたくさんあると思いますが、例えば
- 料金体系の違う「通常会員」と「優待会員」のオブジェクト生成を切り替える、とか
- テスト用targetの場合はモックオブジェクトを生成する、とか
サンプルコード
Swiftバージョンは 5.0 です。
protocol CurrencyDescribing {
    var symbol: String { get }
    var code: String { get }
}

final class Euro: CurrencyDescribing {
    var symbol: String {
        return "€"
    }

    var code: String {
        return "EUR"
    }
}

final class UnitedStatesDolar: CurrencyDescribing {
    var symbol: String {
        return "$"
    }

    var code: String {
        return "USD"
    }
}

enum Country {
    case unitedStates
    case spain
    case uk
    case greece
}

enum CurrencyFactory {
    static func currency(for country: Country) -> CurrencyDescribing? {
        switch country {
            case .spain, .greece:
                return Euro()
            case .unitedStates:
                return UnitedStatesDolar()
            default:
                return nil
        }
    }
}

// Usage
print(CurrencyFactory.currency(for: .greece)?.symbol ?? "")   // "€"
print(CurrencyFactory.currency(for: .spain)?.symbol ?? "")    // "€"
print(CurrencyFactory.currency(for: .unitedStates)?.symbol ?? "") // "$"
引用:
https://github.com/ochococo/Design-Patterns-In-Swift#-factory-method