- 投稿日:2019-10-01T22:36:31+09:00
SceneDelegateのせいでiOS12以下のビルドが通らない
はじめに
SwiftUIが登場して話題になっているXCode11
そんな中に埋もれていたSceneDelegateが地味に厄介だったので対処法を書き置きします。SceneDelegateって?
正直何者なのかは分かっていませんが、アプリを複数表示させるためにSceneという概念が導入されてそれがゴニョゴニョしてるみたいなことなのでしょうか
詳しいことは参考にさせていただいた記事に書いてありますので、そちらか別の記事を見てください
参考はこちら対処法
プロジェクトを新規で作成し、targetのOSをiOS12以下にすると、大量にエラーが出るかと思います。
大体は、↓のようなavailableの設定をしろ的なのがSceneDelegate.swiftとAppDelegate.swiftに表示されました。'ConnectionOptions' is only available in iOS 13.0 or newer 'UIScene' is only available in iOS 13.0 or newerというわけで、SceneDelegateにはクラスごと、AppDelegateには
UISceneSession LifecycleのMARKコメントが付けられている箇所から下のメソッドにavailableを付与します。AppDelegate.swift// MARK: UISceneSession Lifecycle @available(iOS 13.0, *) func application(_ application: UIApplication, configurationForConnecting connectingSceneSession: UISceneSession, options: UIScene.ConnectionOptions) -> UISceneConfiguration { // Called when a new scene session is being created. // Use this method to select a configuration to create the new scene with. return UISceneConfiguration(name: "Default Configuration", sessionRole: connectingSceneSession.role) } @available(iOS 13.0, *) func application(_ application: UIApplication, didDiscardSceneSessions sceneSessions: Set<UISceneSession>) { // Called when the user discards a scene session. // If any sessions were discarded while the application was not running, this will be called shortly after application:didFinishLaunchingWithOptions. // Use this method to release any resources that were specific to the discarded scenes, as they will not return. }SceneDelegate.swift@available(iOS 13.0, *) class SceneDelegate: UIResponder, UIWindowSceneDelegate { var window: UIWindow? func scene(_ scene: UIScene, willConnectTo session: UISceneSession, options connectionOptions: UIScene.ConnectionOptions) { // Use this method to optionally configure and attach the UIWindow `window` to the provided UIWindowScene `scene`. // If using a storyboard, the `window` property will automatically be initialized and attached to the scene. // This delegate does not imply the connecting scene or session are new (see `application:configurationForConnectingSceneSession` instead). guard let _ = (scene as? UIWindowScene) else { return } } ~ 以下略 ~さあこれでエラーもなくなったし大丈夫!
iOS12の実機で確認だ!っと意気込んで実行すると、なんと画面が真っ暗のまま動きませんどうしたのでしょうかとコンソールを覗いてみると、こんなメッセージが表示されていました
[Application] The app delegate must implement the window property if it wants to use a main storyboard file.

(翻訳)
[Application]Main.storyboardを使用する場合、AppDelegateはwindowプロパティを実装する必要があります。
なんのこっちゃ!ということで調べてみると、どうやら今まであったwindowプロパティが作られなくなっていたようで、それが原因で表示されないみたいでした。
というわけで、過去のプロジェクトを参考に、下記のように修正
AppDelegate.swift@UIApplicationMain class AppDelegate: UIResponder, UIApplicationDelegate { var window: UIWindow? // これを追加 func application(_ application: UIApplication, didFinishLaunchingWithOptions launchOptions: [UIApplication.LaunchOptionsKey: Any]?) -> Bool { // Override point for customization after application launch. return true }これでXcode11で作成したプロジェクトもiOS12以下でビルドが通るようになります!
終わりに
SwiftUIも出てXCodeを使う人が増えればな〜と思いますが、こんな序盤でつまずきポイントがあったとは...
この記事をみて解決した方は、今後の励みになりますので、ぜひいいねを押していただけると嬉しいです!
- 投稿日:2019-10-01T19:26:32+09:00
xibとColor Assetの組み合わせはヤバイ
はじめに
xibで
Viewなどの色にColor Assetの色を指定している場合、コードで色を変更すると想定外の挙動をすることがあります。環境
- Xcode 10.3
- swift 5.0
準備
- Assets.xcassetsにColor Assetを作成する
適当に下記のように色を作成。
- xibでViewControllerを作成し、Color Assetの色を指定する
下記のように作成(赤色がColor Asset)。Labelの背景色はwhiteを指定。


- xibでTableViewCellを作成し、Color Assetの色を指定する
Labelを一つ置き、textColorにColor Assetを指定。

- コードで色を変更する
下記のようにviewDidloadとcellForRowAtで色を変更。
override func viewDidLoad() {
  super.viewDidLoad()

  // Do any additional setup after loading the view.
  label.textColor = .blue
  colorView.backgroundColor = .blue
  label.backgroundColor = .green
}

func tableView(_ tableView: UITableView, cellForRowAt indexPath: IndexPath) -> UITableViewCell {
  let cell = tableView.dequeueReusableCell(withIdentifier: "ColorTableViewCell", for: indexPath) as! ColorTableViewCell
  cell.label.text = "Test \(indexPath.row)"
  cell.label.textColor = .blue
  cell.label.backgroundColor = .green
  return cell
}
問題点
上記の準備をしたものを実行する。
期待値
結果
しかし、結果は下記のような表示。
Color Assetの色を指定していないLabelの背景色は変更されていますが、Color Assetの色を指定した部分は色が変わっていない!!解決策
無難な解決策としてはxibの色指定をColor Assetをやめて
Customを設定すること!!Color Assetの色を指定しているとxibが読み込まれた後に再度色が設定されるらしい...
とりあえず
viewDidloadviewWillAppearはダメでviewDidAppearで設定すると期待通り設定できました。
セルの場合awakeFromNibで設定してもダメでした。さいごに
セルのラベルの色を条件によって変えようと思ったら初期表示のときに色が変わらない!!というのに直面し色々調べた結果、Color Assetが原因なのに気づきました。
Color Assetは便利だけど思わぬ挙動があるので気をつけましょう
- 投稿日:2019-10-01T17:58:50+09:00
Swiftで変数名に&をつけるとポインタとして使える
知らなかったので、メモしておきます。
Swiftでポインタを使う?
とある本を読んでたら、
「変数名の前に&をつけることで、その変数のためにメモリ上で確保された領域の開始位置が取得できます」
と書いてありました。C言語じゃあるまいし、そんなことできんの? と思って調べてみたら、できるようになってました。
Swiftの設計思想的にどうなの?
Swiftの言語設計として、「静的型付け言語である」という点があげられます。
これにより、コンパイル時に変数の型は保証されており、
変数の型が合わないことによるエラーはコンパイラが発見できるので、安心! 嬉しい! というわけなのですが、
ポインタを使うと、正直なんでもできちゃうから危なくね? と思ったわけです。実際言語として、プログラマーに低レイヤの処理を一切やらせない設計にすることも可能だとは思うんですが、
それをやってしまうと、ホントにメモリ上を操作しないといけないような処理ができず、言語の制約になってしまいます。そこでUnsafePointer<T>
Swiftはそれを解決するために、UnsafePointer<T>という型を用意しています。
「Unsafe」と書いてあるので、未熟なプログラマーでもひと目で「こいつは危ない!」とわかりますね。低レイヤの話なので、文章だとちょっと難しいですが、
UnsafeMutablePointerの説明にあったサンプルコードが直感的でした。サンプルコードvar bytes: [UInt8] = [39, 77, 111, 111, 102, 33, 39, 0] let uint8Pointer = UnsafeMutablePointer<UInt8>.allocate(capacity: 8) uint8Pointer.initialize(from: &bytes, count: 8)たった3行のコードで、&を使ったポインタの使用例が説明できます。
やってることは、配列の先頭を指定したUnsafeMutablePointerオブジェクトを作っているだけです。bytesという8Byte符号なしInt型の配列があります。
これは何の変哲もない配列です。
2行目は、UnsafeMutablePointerオブジェクトを生成しています。
この時点ではこのオブジェクトはinitializeおらず、どこのアドレスも指していません。
これをinitializeしているのが、3行目です。
関数定義はこんなん。initialize(fromfunc initialize(from source: UnsafePointer<Pointee>, count: Int)引数のfromで、UnsafePointerを指定します。
MutableがついていないUnsafePointer型です。
countは要素数を入れます。
これで配列のアドレスを好き勝手指定できるポインタが生成できました! おめでとう!ユースケース
サンプルコードだと、普通に配列のsubscript使っても同じことできます。
あくまでサンプルはポインタの生成をわかりやすく説明するためのコードなので、実用性はなさそうです。実際ポインタを使うのは、Objective-Cからのコード移植とか、
あと画像の色要素を細かくいじるときとか、ユースケースは限られるとは思います。僕が今回出会ったのは色要素を指定する処理でした。
もっと詳しく
素晴らしいSwiftのポインタ型の解説
このあたりがいいかと。
- 投稿日:2019-10-01T11:53:18+09:00
iOS13でモーダルを重ねたときのナビゲーションバーの高さがおかしい問題
仕事で作っている多店舗チェーン店のコミュニケーションを解決するアプリ「売場ノート」をiOS13に対応しました。
ご存知のとおり、iOS13になるとモーダル表示する画面はiPhoneの全画面にモーダル表示されるのではなく、下の画面の上に若干小さくなって重なる表示になります。
この挙動は、Segue のPresentation のデフォルト値が FullScreen から Automatic に変わったためなので、iOS12以前と同じ表示にしたければこれを FullScreen にすればいいのですが、下へのスワイプで画面を閉じるジェスチャーがあまりにも便利なので Automatic に対応することにしました。
モーダルを重ねるとナビゲーションバーの高さが変になる
作ってみると、モーダルからさらにモーダルを開くシーンで、2枚目のモーダルの UINavigationBar の高さが以下のように小さく表示されてしまいます。
解決方法
モーダルで表示される側のビューの、
viewWillAppear(_ animated: Bool)において、ナビゲーションバーを非表示にしてすぐに表示すると直ります。override func viewWillAppear(_ animated: Bool) { super.viewWillAppear(animated) // [HACK] // iOS13 iPhone でふたつめのモーダルとして重なると // UINavigationBar のサイズ計算がおかしく、バーの下に隙間が空いて描画される。 // このタイミングで非表示・表示を繰り返すと直せるのでこの処理を追加。 if #available(iOS 13.0, *) { self.navigationController?.isNavigationBarHidden = true DispatchQueue.main.async { [weak self] in if let wself = self { wself.navigationController?.isNavigationBarHidden = false } } } }他にも、ダークモードにも対応したり、iPadOS の Safari の User-Agent 文字列が macOS の Safari とまったく同じになったりと今回のアップデートはいろいろと勉強させてもらいました。
Happy hacking life!
- 投稿日:2019-10-01T09:29:16+09:00
【Swift5】Bluetoothクラス実装の備忘録
はじめに
iOSでBluetooth接続処理を実装したときの備忘録です。
環境
- Xcode10.3
- Swift5
概要
import CoreBluetooth端末検索〜接続、操作までCoreBluetoothで全て実装することができました。
主役となるManagerクラス
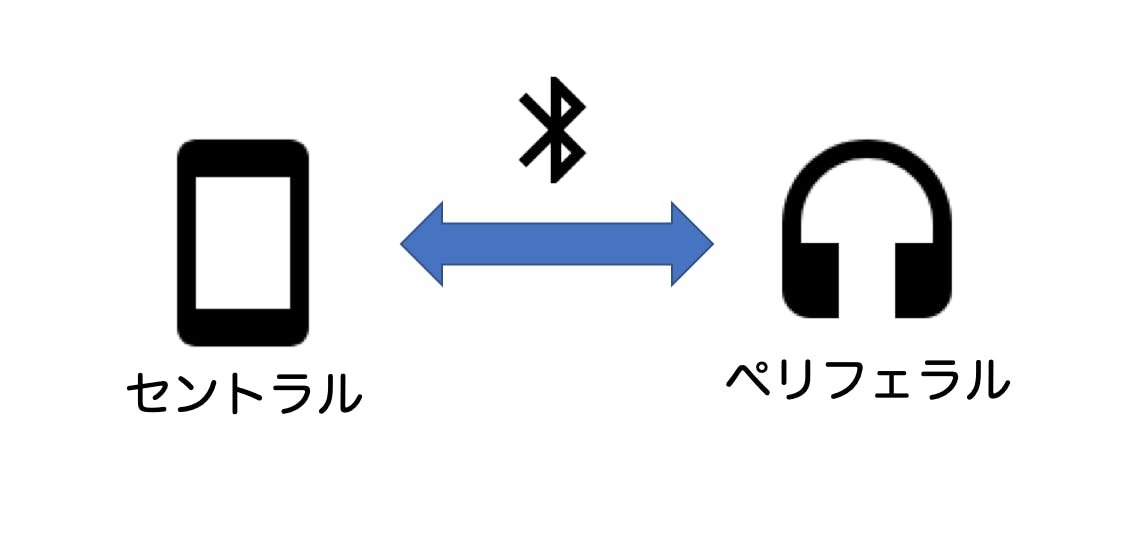
CBCentralManager・・・アドバタイズされた周辺機器のスキャン、検出、接続や、検出または接続されたリモート周辺機器の管理に使用されます。
CBPeripheralManager・・・ローカル周辺機器のGeneric Attribute Profile(GATT)データベース内で公開されたサービスを管理し、これらのサービスをアドバタイズするために使用されます。
なお、Bluetoothの操作は、主に以下のデリゲートメソッドを使用して行います。
実装フロー
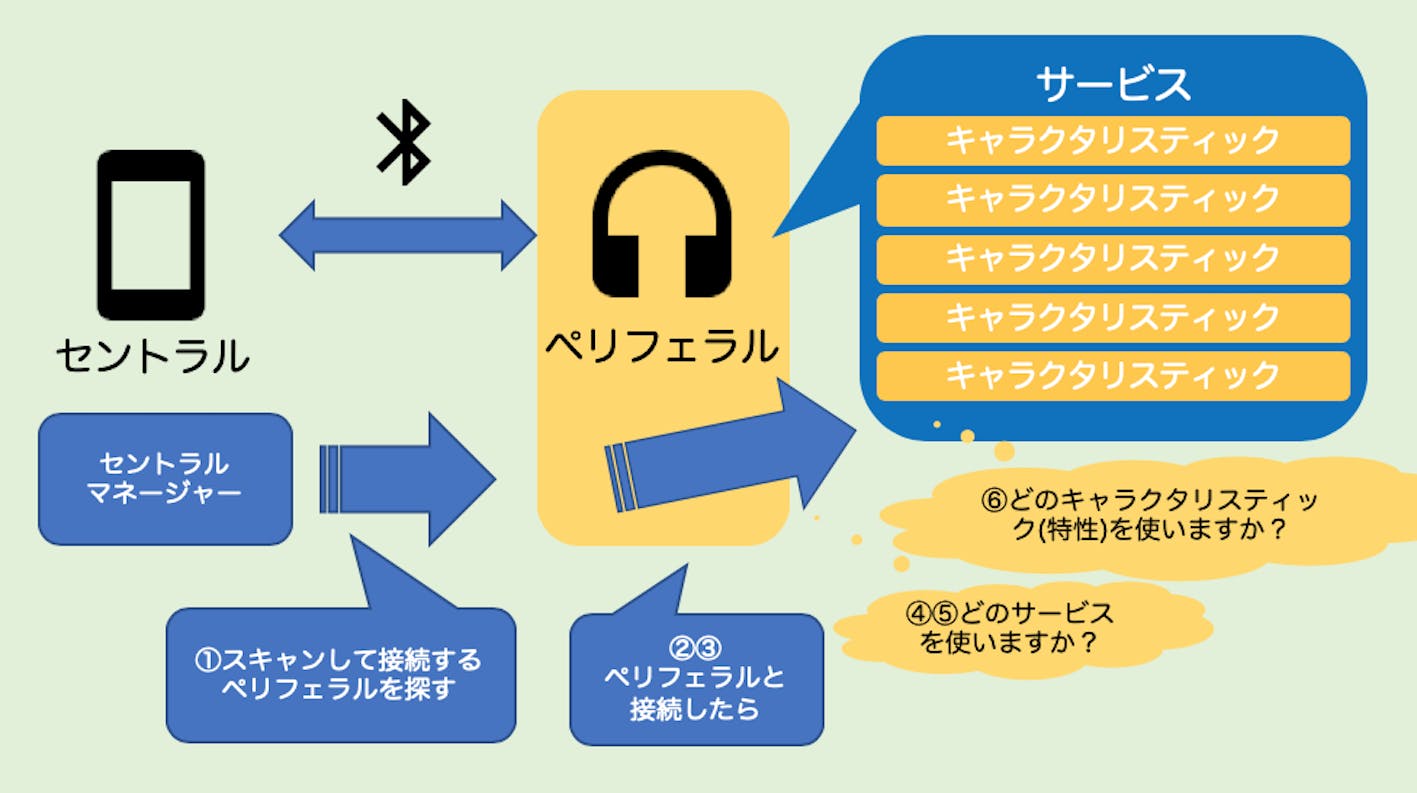
①セントラルマネージャーを起動する。
②ペリフェラルを検出する。
③ペリフェラルと接続する。
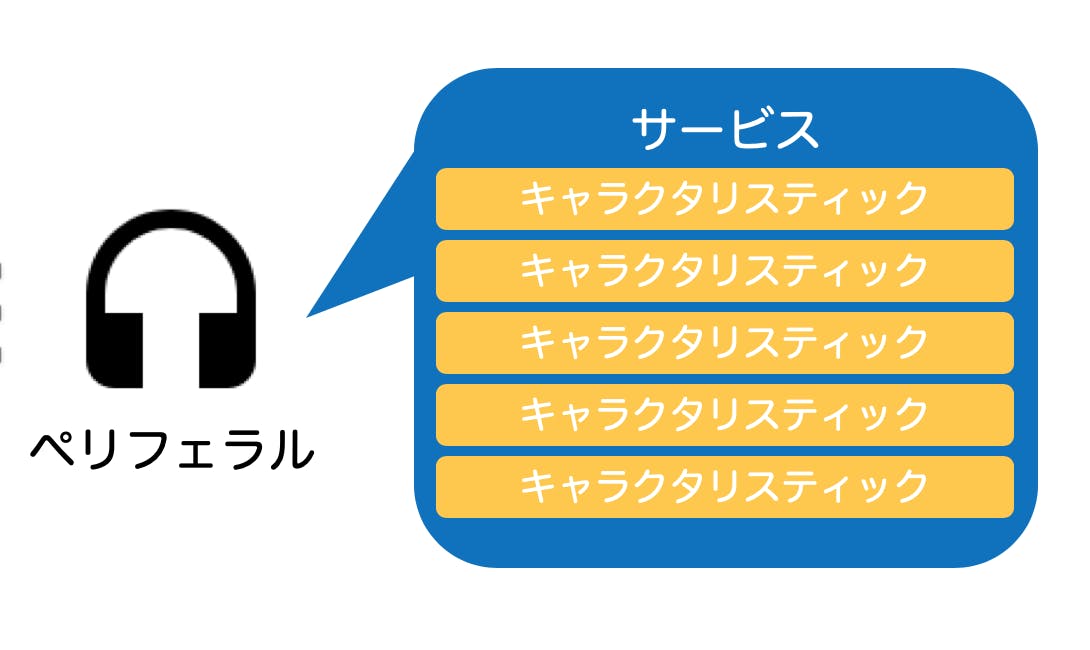
④ペリフェラルのサービスを検出する。
⑤サービス特性を検出する。
⑥サービス特性の値を取得する。
引用:iOS SwiftでBLEのサンプルを動かしてみるBluetoothServiceクラスの実装
今回は、Constに使用するサービスのUUIDを定義し、
スキャン時には、タイムアウトエラー実装用に、タイマーを設定するようにしました。
なお、対象のペリフェラルの検出には、ペリフェラルの名前を指定するようにしています。Const.swiftstruct Const { struct Bluetooth { /// サービスのUUID struct Service { static let kUUID: String = "cd000000-1234-1234-1234-hogehogehoge" } /// サービスのキャラクタリスティックのUUID struct Characteristic { static let kUUID01 = "cd100001-1234-1234-1234-hogehogehoge" static let kUUID02 = "cd100002-1234-1234-1234-hogehogehoge" } static let kPeripheralName = "Hoge Bluetooth" } }BluetoothService.swiftfinal class BluetoothService: NSObject { /// 接続先の機器 private var connectPeripheral: CBPeripheral? = nil /// 対象のキャラクタリスティック private var writeCharacteristic: CBCharacteristic? = nil override init() { self.centralManager = CBCentralManager() self.peripheralManager = CBPeripheralManager() } // MARK: - Public Methods /// Bluetooth接続のセットアップ func setupBluetoothService() { self.centralManager = CBCentralManager(delegate: self, queue: nil) self.peripheralManager = CBPeripheralManager(delegate: self, queue: nil) } /// スキャン開始 func startBluetoothScan() { print("スキャン開始") // タイマーを設定する self.scanTimer = Timer.scheduledTimer(timeInterval: TimeInterval(10), target: self, selector: #selector(self.timeOutScanning), userInfo: nil, repeats: false) // 機器を検出 if self.centralManager.isScanning == false { self.centralManager.scanForPeripherals(withServices: nil, options: nil) } } /// スキャン停止 func stopBluetoothScan() { self.centralManager.stopScan() // Timerを削除 self.scanTimer?.invalidate() self.scanTimer = nil } /// 機器に接続 func connectPeripheral() { guard let connectPeripheral = self.connectPeripheral else { // 失敗処理 return } self.centralManager.connect(connectPeripheral, options: nil) } }CBCentralManagerDelegate
BluetoothService.swift// MARK: CBCentralManagerDelegate extension BluetoothService: CBCentralManagerDelegate { /// Bluetoothのステータスを取得する(CBCentralManagerの状態が変わる度に呼び出される) /// /// - Parameter central: CBCentralManager func centralManagerDidUpdateState(_ central: CBCentralManager) { switch central.state { case .poweredOff: print("Bluetooth PoweredOff") break case .poweredOn: print("Bluetooth poweredOn") break case .resetting: print("Bluetooth resetting") break case .unauthorized: print("Bluetooth unauthorized") break case .unknown: print("Bluetooth unknown") break case .unsupported: print("Bluetooth unsupported") break } } /// スキャン結果取得 /// /// - Parameters: /// - central: CBCentralManager /// - peripheral: CBPeripheral /// - advertisementData: アドバタイズしたデータを含む辞書型 /// - RSSI: 周辺機器の現在の受信信号強度インジケータ(RSSI)(デシベル単位) func centralManager(_ central: CBCentralManager, didDiscover peripheral: CBPeripheral, advertisementData: [String : Any], rssi RSSI: NSNumber) { // 対象機器のみ保持する if let peripheralName = peripheral.name, peripheralName.contains(Const.Bluetooth.kPeripheralName) { // 対象機器のみ保持する self.connectPeripheral = peripheral // 機器に接続 print("機器に接続:\(String(describing: peripheral.name))") self.centralManager.connect(peripheral, options: nil) } } /// 接続成功時 /// /// - Parameters: /// - central: CBCentralManager /// - peripheral: CBPeripheral func centralManager(_ central: CBCentralManager, didConnect peripheral: CBPeripheral) { print("接続成功") self.connectPeripheral = peripheral self.connectPeripheral?.delegate = self // 指定のサービスを探索 if let peripheral = self.connectPeripheral { peripheral.discoverServices([CBUUID(string: Const.Bluetooth.Service.kUUID)]) } // スキャン停止処理 self.stopBluetoothScan() } /// 接続失敗時 /// /// - Parameters: /// - central: CBCentralManager /// - peripheral: CBPeripheral /// - error: Error func centralManager(_ central: CBCentralManager, didFailToConnect peripheral: CBPeripheral, error: Error?) { print("接続失敗:\(String(describing: error))") } /// 接続切断時 /// /// - Parameters: /// - central: CBCentralManager /// - peripheral: CBPeripheral /// - error: Error func centralManager(_ central: CBCentralManager, didDisconnectPeripheral peripheral: CBPeripheral, error: Error?) { print("接続切断:\(String(describing: error))") } }CBPeripheralDelegate
BluetoothService.swift// MARK: CBPeripheralDelegate extension WearBluetoothService: CBPeripheralDelegate { /// キャラクタリスティック探索時(機器接続直後に呼ばれる) /// /// - Parameters: /// - peripheral: CBPeripheral /// - error: Error func peripheral(_ peripheral: CBPeripheral, didDiscoverServices error: Error?) { guard error == nil else { // スキャン停止処理 self.stopScan() // 失敗処理 return } if let peripheralServices = peripheral.services { for service in peripheralServices where service.uuid == CBUUID(string: Const.Bluetooth.Service.kUUID) { print("キャラクタリスティック探索") // キャラクタリスティック探索開始 let characteristicUUIDArray: [CBUUID] = [CBUUID(string: Const.Bluetooth.Characteristic.kUUID01), CBUUID(string: Const.Bluetooth.Characteristic.kUUID02)] peripheral.discoverCharacteristics(characteristicUUIDArray, for: service) } } } }CBPeripheralManagerDelegate
BluetoothService.swift// MARK: CBPeripheralManagerDelegate extension WearBluetoothService: CBPeripheralManagerDelegate { /// 端末のBluetooth設定を取得(WearBluetoothServiceの使用開始時、端末のBluetooth設定変更時に呼ばれる) /// /// - Parameter peripheral: CBPeripheralManager func peripheralManagerDidUpdateState(_ peripheral: CBPeripheralManager) { if peripheral.state == .poweredOn { // サービスを登録 let service = CBMutableService(type: CBUUID(string: Const.Bluetooth.Service.kUUID), primary: true) self.peripheralManager.add(service) } } /// キャラクタリスティック発見時(機器接続直後に呼ばれる) /// /// - Parameters: /// - peripheral: CBPeripheral /// - service: CBService /// - error: Error func peripheral(_ peripheral: CBPeripheral, didDiscoverCharacteristicsFor service: CBService, error: Error?) { guard error == nil else { // スキャン停止処理 self.stopScan() print("キャラクタリスティック発見時:\(String(describing: error))") // エラー処理 return } guard let serviceCharacteristics = service.characteristics else { // スキャン停止処理 self.stopScan() // エラー処理 return } // キャラクタリスティック別の処理 for characreristic in serviceCharacteristics { if characreristic.uuid == CBUUID(string: Const.Bluetooth.Characteristic.kUUID01) { // データ書き込み用のキャラクタリスティックを保持 self.writeCharacteristic = characreristic print("Write 01") } if characreristic.uuid == CBUUID(string: Const.Bluetooth.Characteristic.kUUID02) { isNotDiscoverCharacteristic02 = false peripheral.setNotifyValue(true, for: characreristic) print("Notify 02") } } } /// キャラクタリスティックにデータ書き込み時(コマンド送信時に呼ばれる) /// /// - Parameters: /// - peripheral: CBPeripheral /// - characteristic: CBCharacteristic /// - error: Error func peripheral(_ peripheral: CBPeripheral, didWriteValueFor characteristic: CBCharacteristic, error: Error?) { guard error == nil else { print("キャラクタリスティックデータ書き込み時エラー:\(String(describing: error))") // 失敗処理 return } // 読み込み開始 peripheral.readValue(for: characteristic) } /// キャラクタリスティック値取得・変更時(コマンド送信後、受信時に呼ばれる) /// /// - Parameters: /// - peripheral: CBPeripheral /// - characteristic: CBCharacteristic /// - error: Error func peripheral(_ peripheral: CBPeripheral, didUpdateValueFor characteristic: CBCharacteristic, error: Error?) { guard error == nil else { print("キャラクタリスティック値取得・変更時エラー:\(String(describing: error))") // 失敗処理 return } guard let data = characteristic.value else { // 失敗処理 return } // データが渡ってくる print(data) } }まとめ
Dalegateメソッドの呼ばれ順(実際処理のフロー)は、docになるべく記載するようにしました。
CoreBluetoothを扱うに当たって、Dataの変換周りに関しても勉強になったので、近々まとめられたらと思います。参考
- 投稿日:2019-10-01T00:43:06+09:00
⭐️ARKitでプラネタリウムを作りたい(1)
タイトル通りなので、作っていく!
type-c lightning の変換がなくて実機に入る前までを作る(AR要素はない)
後半でも書いたが、星の位置計算が難しくて、計算にいたるまでの準備をしていく星のデータ
- 星はめっちゃあるので今回は1等星に絞る
- 欲しい要素は↓
- 番号:一意の番号
- 名前:星の名前(多分英語)
- 視等級:明るいほど小さい(地球から見たときの明るさ)
- 赤経:天体の位置(時分秒で表される)
- 赤緯:天体の位置(+90 ~ -90)
- 星表はヒッパルコス星表を使用した
StarData.csvhip_number,name,right_ascension,declination,visual_magnitude 32349,Sirius,6.4509,-16.4247,-1.44 30438,Canopus,6.2357,-52.4144,-0.62 69673,Arcturus,14.1540,19.1114,-0.05 71683,Rigil Kent,14.3940,-60.5006,-0.01 91262,Vega,18.3656,38.4658,0.03 24608,Capella,5.1641,45.5956,0.08 24436,Rigel,5.1432,-08.1205,0.18 37279,Procyon,7.3918,5.1339,0.4 7588,Achernar,1.3742,-57.1411,0.45 27989,Betelgeuse,5.5510,7.2425,0.45 68702,Agena,14.0349,-60.2222,0.61 97649,Altair,19.5046,8.5202,0.76 60718,Acrux,12.2635,-63.0556,0.77 21421,Aldebaran,4.3555,16.3035,0.87 65474,Spica,13.2511,-11.0940,0.98 80763,Antares,16.2924,-26.2555,1.06 37826,Pollux,7.4519,28.0134,1.16 113368,Fomalhaut,22.5738,-29.3718,1.17 62434,Becrux,12.4743,-59.4119,1.25 102098,Deneb,20.4125,45.1649,1.25 49669,Regulus,10.0822,11.5801,1.36csvファイルを読み込み
用意したcsvファイルを取得して、使いやすいように整形(配列に格納)していく
ViewController.swift// cavファイル読み込み var csvArray = [String]() guard let csvPath = Bundle.main.path(forResource: "StarData", ofType: "csv") else { return } do { let csvString = try String(contentsOfFile: csvPath, encoding: String.Encoding.utf8) csvArray = csvString.components(separatedBy: "\n") // 最後の改行を削除 csvArray.removeLast() } catch _ as NSError { return } for star in csvArray { let starDetail = star.components(separatedBy: ",") print("HIP番号: \(starDetail[0])\n名前: \(starDetail[1])\n赤経: \(starDetail[2])\n赤緯: \(starDetail[3])\n視等級: \(starDatail[4])\n") }これで星の方の準備は完了
現在地取得
星の位置は地球のどこにいるかで変わるので、のちの計算のために取得
ほぼコピペなので割愛
時刻取得
星はの位置は時刻によって変わr(略
VierController.swift// 時刻を取得 let date = Date() let format = DateFormatter() format.dateFormat = "yyyy,MM,dd,HH,mm,ss" format.timeZone = TimeZone(identifier: "Asia/Tokyo") let currentTime = format.string(from: date).split(separator: ",") print("現在時刻: \(currentTime[0])/\(currentTime[1])/\(currentTime[2]) \(currentTime[3]):\(currentTime[4]):\(currentTime[5])")現在時刻: 2019/09/09 02:11:58星の位置を計算
- 求めたい値は2つ
- 方位(東西南北360°のどこにあるか)
- 高度(0° ~ 90°のどの高さにあるか)
計算に入る前に、年月日を準ユリウス日(?)に変換しないといけないらしい
そこからどうやらいろんな値をかけたり足したり引いたり割ったり・・・
ちょっと難しそうだった・・・一旦区切りをいれて次回計算編?


