- 投稿日:2019-09-09T23:43:44+09:00
How to integrate Apple Pay in your mobile app?
How to integrate Apple Pay in your mobile app?
These days Apple Pay represents 70% of the world's card installment volume. So that, Apple is a must-have for your app. In addition, it enables you to acknowledge installment abroad as this service works in 20 nations.
How to execute Apple Pay in your IOS application? Let me explain to you in the article.
Why do you need to use Apple Pay?
Apple Pay is the main service on the credit card payments market. If you integrate it, you`ll see how loyal can be your customers. Apple Pay is really a perfect and easy way of payment.
Do you know the revenue of Apple in 2019? Q3 reports say it's almost 54$ billions! That's the best reason for you to make a decision. And there`re a few more ones below:
1. Apple Pay is standard. Nowadays 90% of all contactless payments in the USA are made with this feature.
2. In 2019 there were about 10 billion of contactless payments made using this payment method.
3. 253 million people use Apple Pay.Profits for your users
Secureness will be guaranteed. Do you know that 50% of users care about the reliability of service and secureness of their personal data? It’s a great reason to integrate Apple Pay in your app! Apple Pay uses a device unique specific number and code, so it's safe and almost impossible to copy.
You`ll take care about UX. I am sure, that smooth one-click payment is much better than empty text inputs to enter credit card data. Especially, when there is a need to save it on a website to go one-click payment next time. In 2019 it’s essential to implement the best features even in your MVP. Because user expectations got higher.
Nobody likes to enter credit card data in empty text inputs and save data on a website. Apple pay is an easy one-click payment and due to this fact, your customers' satisfaction will instantly grow.
Guidance on how to actually integrate Apple Pay in your application
Create an account to enable Apple Pay in your mobile application. Follow the official setup steps at official documentation
Next set up your server, not forgetting to first check out the official requirements atofficial documentation
In the server configuration file you will need to add one of the possible Cipher Suite referenced above. Take a look at our example configuration for nginx.
Next you need to set up your work environment. As always, check the official requirements first.
Here is an example of how to add the Apple Pay payment button.
Using the v-if directive you can check whether you have successfully installed Apple Pay sessions and whether users can now make payments using Apple Pay.
Now let's create a certSigninRequest.certSigninRequest:
After Signing in you can register for your Apple Pay Developer account at the official website
- Go to menu “Certificates, IDs & Profiles”.
- Click on the button ‘Add new certificate’.
- Then choose the option Apple Pay Merchant Identity Certificate.
- Now choose the required Merchant from the list of those currently available.
- Go to menu “Identifiers” and filter by Merchant IDs.
Choose the previously created Merchant.
- Next create an Apple Pay Payment Processing Certificate.
- After creation of certificate, you will need to upload the .csr extension which is an ECC encrypted file. We receive this file from our payment system (in our example we work with bank, so screen made there)
- Add and verify the domain, following the instructions on the screen. Pay attention every time you renew an SSL Certificate, as you will need to verify the domain each time.
If you missed step 5 go back and take a look at how to create a certSigninRequest.certSigninRequest. If you haven't created one yet, now is the time using encryption RSA:2048.
Download your previously created certSigninRequest.certSigninRequest and then download merchant_id.cer.
Import received merchant_id.cer in Keychain (it required to export file in .p12).
In category Certificates in Keychain you need to export certificate using format .p12.
Generate merchantIdentityCert from the received file using the command below:
```
openssl pkcs12 -in your_cer_name.p12 -out you_key_cert_name.pem -clcerts
- Enter the password that was entered during export merchant_id.cer in .p12.
- Enter Enter PEM pass phrase - this will be the key to the generated merchantIdentityCert.
- Put the generated merchantIdentityCert in project’s folder.
- Use merchantIdentityCert in the body of the request for validation Apple Pay Session.
- Example of the request:
where we see: appleValidationUrl - it is url that is obtained when calling onvalidatemerchantevent appleMerchantId - it is identificator of Merchant in Apple Pay displayName - it is the name of seller.- Use answer to complete Merchant validation. Take a look:
Create the Apple Pay button in accordance with the requirements on this page in section “Display an Apple Pay button”
- Code listing in Apple Pay using Payment Request API
sendCreateOrderRequest: async function () {
if (!window.PaymentRequest)
return;
const applePayMethod = {
supportedMethods: ["https://apple.com/apple-pay"],
data: {
version: 3,
merchantIdentifier: "your_merchant_identifier",
merchantCapabilities: ["supports3DS", "supportsCredit", "supportsDebit"],
supportedNetworks: ["mastercard", "visa"],
countryCode: "put there your country code",
currencyCode: "put there code of currency you will use",
domainName: "your_domain_name"
},
};
const paymentDetails = {
total: {
label: this.product.name,
type: "final",
amount: {value: th
};
const request = new PaymentRequest([applePayMethod], paymentDetails);
request.onmerchantvalidation = function(event) {
console.log(event);
var data = JSON.stringify(
{
appleValidationUrl: event.validationURL,
appleMerchantId:"your_merchant_identifier",
displayName: "your_merchant_name"
});
fetch("url_to_validate_merchant", {
body: data,
headers: {'content-type': 'application/json'},
method: "POST",
}).then(response => {
event.complete(response.json())
});
};
const response = await request.show();
response.complete('success');},
}Guys thanks for reading! I hope the guidance on how to implement Apple Pay was useful. If there are any questions left feel free to contact me any time. Looking forward your feedback!
Originally it was posted here: SpdLoad


- 投稿日:2019-09-09T23:27:18+09:00
Laravel Nuxt StripeでCheckout決済機能を実装する
概要
ざっくりした実装手順は下記になります。
かなり手軽に実装できました。①Stripeのアカウントを作成
②Laravel側のStripeライブラリをインストール
③APIの決済処理を実装
④フロント側の実装処理フロー
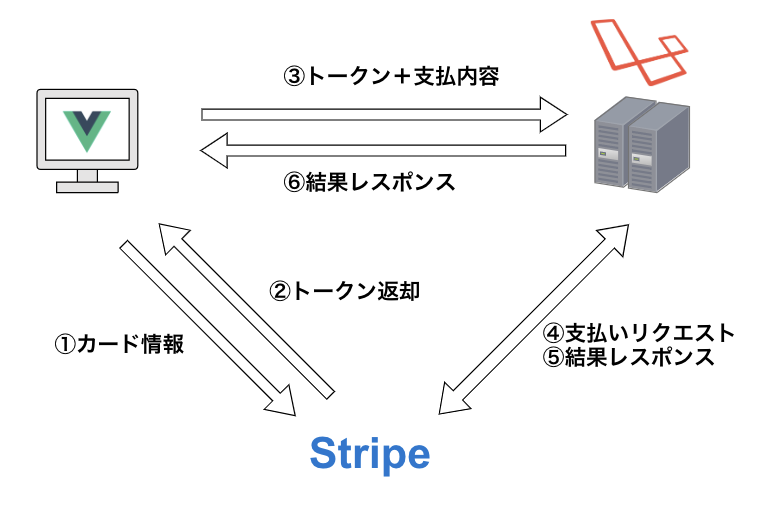
Stripe側にまずはカード情報を送信し、返却されたトークンと支払内容をAPIにリクエストを投げ
決済処理を実施し、処理結果を返却するという流れを行うことで
サーバ側にカード情報を持たずに決済処理を行えます。
参考
StripeCheckoutのモジュールを使用している
vue-stripe-checkout【簡単・オシャレ】PHPでstripeの決済を導入する手順【決済システム導入】
手順
1. アカウント作成
作成するとテスト用で
公開可能キーとシークレットキーが発行されるのでAPI側でシークレットキーでVue側で公開可能キーを使用します。2. StripeAPIライブラリをインストール
composer require stripe/stripe-php3. API側の実装
Vue側でクレジットカード情報を入力し、クレジット情報が正しい場合
tokenを発行されるので
API側でそのtokenを使用して決済処理を実行するpublic function pay(Request $request) { // Set your secret key: remember to change this to your live secret key in production // See your keys here: https://dashboard.stripe.com/account/apikeys Stripe::setApiKey('sk_test_XXXXXXXXXXXXXXXXXXXXXXXX'); try { // Token is created using Checkout or Elements! // Get the payment token ID submitted by the form: $token = $request->input('stripeToken'); $charge = Charge::create([ 'amount' => $request->input('amount'), 'currency' => 'jpy', 'description' => 'Example charge', 'source' => $token, ]); }catch (Stripe\Error\Card $e){ // 決済に失敗したらエラーメッセージを返す return response()->json([ 'success' => false, 'errors' => $e->getMessage() ], 422); } $user_wallet = $this->exchange->cashExchange($request); return response()->json([ 'success' => true, 'data' => $user_wallet, 'message' => '現金からポイントに換金が完了しました' ], 200); }4. フロント側の実装
vue-stripe-checkoutをインストール
※現在(2019/9/1時点)最新でベータ版がリリースされてるが任意の金額でチェックアウトする機能がまだ未実装のため下記のバージョンを指定しているまたアップデート版で金額指定できるようになったら記事にしたいと思います。
npm install vue-stripe-checkout@1.2.6 --saveプラグインを作成する
stripe-checkout.jsimport Vue from 'vue' import VueStripeCheckout from 'vue-stripe-checkout' Vue.use(VueStripeCheckout, process.env.STRIPE_PUBLIC_KEY)Vueのテンプレート側
クレジット決済したい画面で
<vue-stripe-checkout><template> <div class="container"> <h2 class="title is-4">クレジットで換金</h2> <!-- 入金額 --> <div class="field"> <p class="control has-icons-left has-icons-right"> <input v-model.number="amount" class="input is-medium" :class="{ 'is-danger': errors.amount }" type="number" placeholder="入金額" /> <span class="icon is-small is-left"> <i class="fas fa-yen-sign"></i> </span> </p> <div class="help is-danger"> <ul v-if="errors.amount"> <li v-for="msg in errors.amount" :key="msg"> {{ msg }} </li> </ul> </div> </div> <div class="field"> <b-field label=""> <p>{{ current_time }} 現在</p> </b-field> </div> <div class="field"> <b-field label="換金レート"> <p> 1000円 ⇔ {{ Math.floor( 1000 * currency_date.credit_payment * currency_date.cash_rate * currency_date.cash_exchange ) }}ポイント </p> </b-field> </div> <div class="field"> <b-field label="購入ポイント"> <p> {{ Math.floor( amount * currency_date.credit_payment * currency_date.cash_rate * currency_date.cash_exchange ) }}ポイントへ変換 </p> </b-field> </div> <vue-stripe-checkout ref="checkoutRef" :name="name" :description="description" :currency="currency" :amount="amount" :locale="locale" :panel-label="label" :allow-remember-me="true" @done="done" @opened="opened" @closed="closed" @canceled="canceled" ></vue-stripe-checkout> <div class="field-button"> <input class="button is-blue is-large is-fullwidth" value="OK" @click="stripeCheckout" /> </div> </div> </template>スクリプト側
vue-stripe-checkout側でクレジット情報を入力し、成功したらtokenが発行されるので
それをAPI側にリクエストを投げます。data() { return { name: 'Guild', description: 'カード情報を入力してください。', currency: 'JPY', label: 'カード支払い', locale: 'ja', amount: 0, current_time: this.$moment().format('YYYY/MM/DD HH:mm:ss'), currency_date: {}, form: { user_id: '', currency_id: '', payment: 0, stripeToken: '' } } }, async asyncData({ app, store }) { const { data } = await app.$axios.get( `/api/user/currency/${store.getters['event_info/currency']}` ) return { currency_date: data.data[0] } }, methods: { async stripeCheckout() { // this.$checkout.close() // is also available. // token - is the token object // args - is an object containing the billing and shipping address if enabled await this.$refs.checkoutRef.open() }, async done({ token, args }) { // token - is the token object // args - is an object containing the billing and shipping address if enabled // do stuff... this.form.user_id = this.$nuxt.$auth.user.id this.form.currency_id = this.currencyId this.form.payment = this.amount this.form.stripeToken = token.id await this.$axios .$post('/api/user/wallet/pay', this.form) .then(data => { this.$router.push('/client/payment/thanks') }) .catch(errors => { alert(JSON.stringify(errors)) }) }, opened() { // do stuff }, closed() { // do stuff }, canceled() { // do stuff } }
- 投稿日:2019-09-09T16:32:14+09:00
Composerでエラーが出たらdiagnoseで診断してみよう
Laravelプロジェクトの開発環境構築をやってて、「composer install」したところ、下記のようなエラーが出たので、解決手段をメモ。
vagrant@homestead:~/code/qlara$ composer install
Loading composer repositories with package information
Installing dependencies (including require-dev) from lock file
Nothing to install or update
Generating optimized autoload files

  [RuntimeException]
  Could not scan for classes inside "/home/vagrant/code/qlara/vendor/sebastian/object-enumerator/src/" which does not appear to be a file nor a folder

install [--prefer-source] [--prefer-dist] [--dry-run] [--dev] [--no-dev] [--no-custom-installers] [--no-autoloader] [--no-scripts] [--no-progress] [--no-suggest] [-v|vv|vvv|--verbose] [-o|--optimize-autoloader] [-a|--classmap-authoritative] [--apcu-autoloader] [--ignore-platform-reqs] [--] [<packages>]...
エラーの内容からは原因がよくわかりませんね・・・
composer diagnose
composer diagnoseで診断してみます。
Checking pubkeysがFAILになってますね。
解決策を提示してくれているので言われた通りに…composer self-update --update-keysすると、Public KeyとTags Public Keyを聞かれるので、下記のページからコピペします。
https://composer.github.io/pubkeys.html
※-----も含めテキストエリアの中身を全部コピーします。その後、再度composer installしたところ、また同じエラーが出たのですが、
vendorディレクトリを一旦削除、キャッシュクリア(composer clear-cache)したらうまくいきました。

- 投稿日:2019-09-09T08:05:11+09:00
超カンタン!CSSで画像を自在に切り抜く方法
どうも!Hiroyukiです!
今日は、
「CSSで画像を自在に切り抜く方法」
をご紹介しますっ!
つまり、
好きな位置で画像を切り抜いて表示できるっ!
という、素ん晴らしぃ〜ものです(^o^)
僕もやってみたら、超カンタンで驚きでした(笑)
実際の利用例は、下記の通りです。
元となる画像のアップロード機能
切り抜き後の画像表示 ※切り抜き高さを「任意」で指定できますっ!
元となる画像アップロード機能を実装
HTML
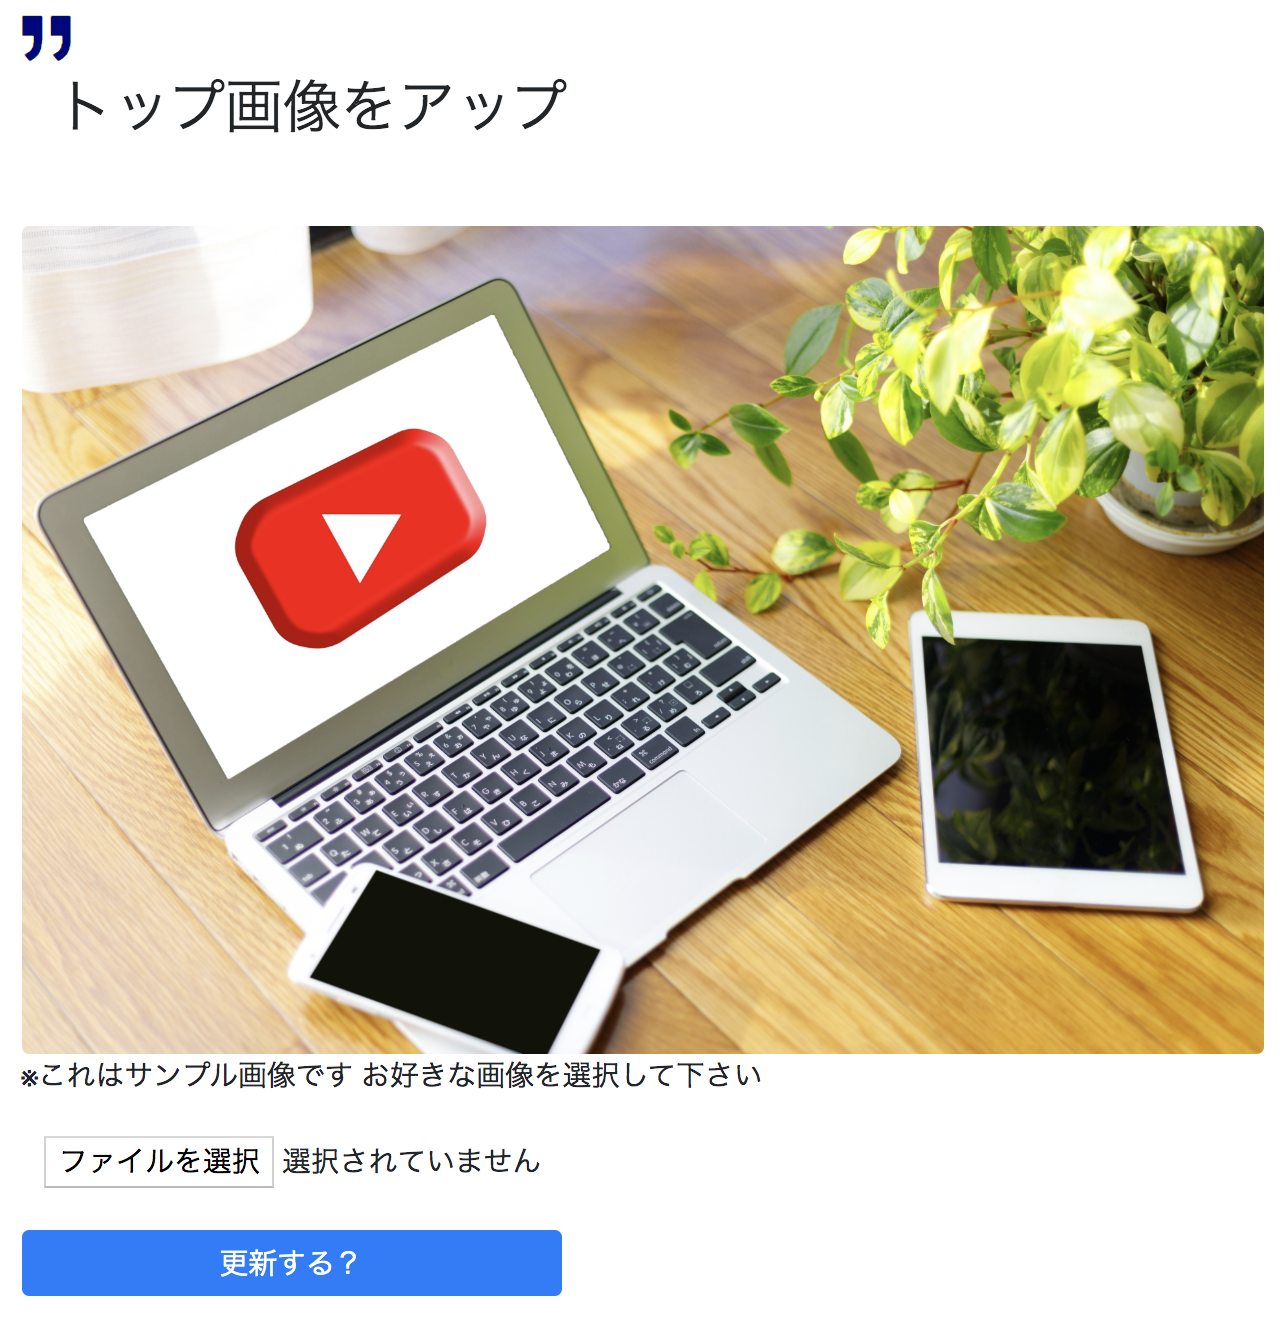
<h2>トップ画像をアップ</h2>

<figure>

        <img class="rounded" src="{{ Storage::disk('s3')->url(Auth::user()->top_image_url) }}">
        <figcaption>現在のチャンネルトップ画像(編集前)</figcaption>

</figure>

<form method="POST" action="/storeTop" enctype="multipart/form-data">

         {{ csrf_field() }}

         <input type="file" name="photo" class="btn">

     <input type="submit" value="更新する?" class="button btn btn-primary">

</form>
コードだとこんな感じです。
アップした画像を表示させる imgタグ の src = "〜〜" の中身は、当然自由なパスを入れて下さい!
ここでは、PHP/Laravelを使って、S3というAWSのストレージ機能のパスを示しているんですが、
ご自身が画像を保存する先のパスを入れて貰えれば、OK!!CSSを使って画像を切り抜く!
はい、ここから本題ですね!
HTML
<h2>トップ画像を編集</h2>

<figure>

        <img class="rounded" src="{{ Storage::disk('s3')->url(Auth::user()->top_image_url) }}" style="width:1200px; height:200px; object-fit:cover; object-position:0% {{ $user->top_trim }}%;">
        <figcaption>現在のチャンネルトップ画像(編集済)</figcaption>

</figure>

<form method="POST" action="/topTrim">
   <div class="form-group">
     <label>切り取る位置(高さ)を 0 ~ 100 の数値で入力</label>
     <div>
          <input type="number" name="top_trim" required>
          <div>例)画像の一番上を切り取る : 0 を入力</div>
          <div>  画像の一番下を切り取る : 100 を入力</div>

     </div>
   </div>

   <input type="submit" value="更新する?" class="btn btn-primary">

</form>
imgタグ の src = "〜〜" で、上のアップした画像を表示させるものと「同じパス」を持ってきて、
それを切り抜きます!ボクのページの場合、Twitterのマイページのトップ画像みたいに、横に細長〜く切り抜きたいので、
(上記コードも横に細長〜いため、右にスクロールしないと分かりづらいかも知れませんが(笑))
imgタグに
style="width:1200px; height:200px; object-fit:cover; object-position:0% {{ $user->top_trim }}%;"width:1200px; height:200px" と、任意で「表示させたい画像幅・高さ」を書いています!
で、ここからがポイント!
"object-fit:cover;"と記載することで、
「画像のタテヨコ比を保持したまま、トリミングが可能となりますっ!!」
初めてできたとき、「スッゲぇ〜〜」ってなりました(笑)
更に、
"object-position: 横の位置% 縦の位置%;"と追記すれば、
「横の位置=一番左から○%の位置で切り取る」
「縦の位置=一番上から○%の位置で切り取る」
なんていう、すごく融通が効く、、、ステキすぎることが出来ちゃいま〜す!!(感涙)
このCSSの設定方法も、なかなか奥が深いので、ボクが書いたものじゃございませんが
下記のサイトも参考にしてみて下さい〜1行追加でOK!CSSだけで画像をトリミングできる「object-fit」プロパティー
https://www.webcreatorbox.com/tech/object-fit
で、ボクのページでは、上記機能を更に少し発展させて、
画像を切り取る高さ(縦の位置○%)をユーザーが好きな高さに設定できるようにしてます^^
つまり、コードをみて頂ければ分かりますが、
object-position:0% {{ $user->top_trim }}%;という風に、
「%」の前の数値を変数として、任意の値(高さのパーセンテージ)を
持ってこれるようにしています!!
ここでは、Laravelの変数で表現していますが、当然JavaScriptの変数など、他の変数でもOKですよ〜!
実際のサービス上で、上記機能を試して確認して頂くのが一番分かりやすい
と思いますんで、下記にボクのサービスのリンクを載せておきまーす
ボクが作ったオリジナルWebサービス(下記リンク)
http://youtubematome.herokuapp.com
新規ユーザ登録 → チャンネル設定 → ページ真ん中らへんの「トップ画像を編集」
で実際に使ってみることが出来まっす!!
宜しければどうぞ〜〜

- 投稿日:2019-09-09T01:45:35+09:00
Laravel Vapor を使って Severless な Laravel アプリケーションをデプロイする
Laravel Vapor とは
Serverless を AWS Lambda 上で動作させることができる 有料 のツールで、
Serverless な Laravel アプリケーションを構築することができ、
さらには、S3、RDS、ALB、 等のWebアプリケーションに必要な各種AWSのサービスと連携することができます。Laravel Vapor は現在早期アクセス中で、以下のサイトから利用を申し込むことができます。
https://vapor.laravel.com利用料金は以下のようになっています。
ダッシュボード
構築について
基本的には公式からドキュメントが提供されているので、その手順に沿って今回アプリケーションをデプロイしました。
有料のため様子見てる方や、どのように使うのか気になる方向けに構築手順を記載します。環境
Vapor requires that your application be compatible with PHP 7.3+ and Laravel 6.0+.
上記が公式が要求する必要環境で、 PHP7.3以上、Laravel6.0を必要とします。今回自分が構築に使用した環境は以下です。
php : 7.3.9
composer : 1.8.0
Laravel : 6.0事前準備
事前に、Vapor への登録と、AWSのIAMユーザーの作成が必要となります。
公式からは、複数のAWSサービスを扱うため、IAMユーザーのポリシーを、AdministratorAccessで作成することを推奨しています。作成した、AWSのIAMユーザーを、 Vaporの TEAM SETTING1 に追加します。
Laravel プロジェクトの作成
Vapor にてデプロイするプロジェクトを作成します。
composer を使って、Laravel のプロジェクトを作成します。
composer create-project --prefer-dist laravel/laravel SampleProject作成の際は必ず、
Laravel6.0を使用してください。
(今回は特に設定の変更や、機能追加はせずそのままデプロイしますのでプロジェクトの作成だけします。)Vaporのツールをインストール
作成した、Laravel プロジェクトのディレクトリの直下にて、
デプロイ時に使用するのVaporCLIをComposer でインストールします。$ composer require laravel/vapor-cli $ composer global require laravel/vapor-cli※ php vendor/bin/vapor で、 VaporCLIを実行できますが、長いので、
以下の説明では、vapor='php vendor/bin/vapor' でaliasを作っています。インストール完了後、以下のコマンドでVaporにログインします。
$ vapor loginVaporのコアパッケージをインストールします。
$ composer require laravel/vapor-coreVapor プロジェクト の作成
作成した、Laravel プロジェクトのディレクトリの直下にて、コマンドを実行しVapor プロジェクトを作成します。
$ vapor init実行中、プロジェクト名とデプロイするAWSのリージョン情報を求められるので入力します。
環境の作成
環境用の設定を追加するため、以下のコマンドを実行します。
$ vapor env my-environment
$ vapor env:pull production
Vapor.yml が以下のような状態になります(あくまで例)
Vapor.ymlid: 2 name: vapor-laravel-app environments: production: build: - 'composer install --no-dev --classmap-authoritative' my-environment: build: - 'composer install --no-dev --classmap-authoritative'デプロイ
VaporCLIを使って、Laravelのプロジェクトをデプロイします。(先程作成した
production環境設定を使います)$ vapor deploy production結果
Project deployed successfully. (3m12s)

 =============== =====================================================
  Deployment ID   Environment URL (Copied To Clipboard)
 =============== =====================================================
  5079            https://xxxxx-xxxx-xxxxxxx.vapor-farm-xxx.com
 =============== =====================================================
確認
作成したアプリケーションを確認するには、作成時にできたURLを確認します。
Vaporのダッシュボードからも作成したプロジェクトが確認できます。
AWSのコンソールから作成されたLambda関数も確認できます。
まとめ
個人的には、とても簡単にアプリケーションのデプロイができてすごい!
とテンションが上がりました!
(Lambda上でLaravelを動かそうとして断念した過去があるからななおさら)
現在早期アクセス段階で、商用利用にはもう少しかかるかなという感じですがとても便利なツールだと思いました。
他のAWSのサービス(S3,RDS,etc) にもつなげるようなので、今後がとても楽しみなプロジェクトです。この記事を見て、使って見ようとか、興味を持っていただけたら幸いです。
注釈
クライアントまたはトピックごとにプロジェクトを整理するの方法です、Vapor作成時に自動的い作成されます。 ↩


- 投稿日:2019-09-09T01:45:35+09:00
Laravel Vapor を使って Serverlessな Laravel アプリケーションをデプロイする
Laravel Vapor とは
Serverless を AWS Lambda 上で動作させることができる 有料 のツールで、
Serverless な Laravel アプリケーションを構築することができ、
さらには、S3、RDS、ALB、 等のWebアプリケーションに必要な各種AWSのサービスと連携することができます。Laravel Vapor は現在早期アクセス中で、以下のサイトから利用を申し込むことができます。
利用料金は以下のようになっています。
https://vapor.laravel.com
ダッシュボード
構築について
基本的には公式からドキュメントが提供されているので、その手順を参考に今回アプリケーションをデプロイしました。
有料のため様子見てる方や、どのように使うのか気になる方向けに構築手順を記載します。環境
Vapor requires that your application be compatible with PHP 7.3+ and Laravel 6.0+.
上記が公式が要求する必要環境で、 PHP7.3以上、Laravel6.0を必要とします。今回自分が構築に使用した環境は以下です。
php : 7.3.9
composer : 1.8.0
Laravel : 6.0事前準備
事前に、Vapor への登録と、AWSのIAMユーザーの作成が必要となります。
作成した、AWSのIAMユーザーを、 Vaporの TEAM SETTING1 に追加します。
公式からは、複数のAWSサービスを扱うため、IAMユーザーのポリシーを、AdministratorAccessで作成することを推奨しています。
Laravel プロジェクトの作成
Vapor にてデプロイするプロジェクトを作成します。
composer を使って、Laravel のプロジェクトを作成します。
composer create-project --prefer-dist laravel/laravel SampleProject作成の際は必ず、
Laravel6.0を使用してください。
(今回は特に設定の変更や、機能追加はせずそのままデプロイしますのでプロジェクトの作成だけします。)Vaporのツールをインストール
作成した、Laravel プロジェクトのディレクトリの直下にて、
デプロイ時に使用するのVaporCLIをComposer でインストールします。$ composer require laravel/vapor-cli $ composer global require laravel/vapor-cli※ php vendor/bin/vapor で、 VaporCLIを実行できますが、長いので、
以下の説明では、vapor='php vendor/bin/vapor' でaliasを作っています。インストール完了後、以下のコマンドでVaporにログインします。
$ vapor loginVaporのコアパッケージをインストールします。
$ composer require laravel/vapor-coreVapor プロジェクト の作成
作成した、Laravel プロジェクトのディレクトリの直下にて、コマンドを実行しVapor プロジェクトを作成します。
$ vapor init実行中、プロジェクト名とデプロイするAWSのリージョン情報を求められるので入力します。
環境の作成
環境用の設定を追加するため、以下のコマンドを実行します。
$ vapor env my-environment
$ vapor env:pull production
Vapor.yml が以下のような状態になります(あくまで例)
Vapor.ymlid: 2 name: vapor-laravel-app environments: production: build: - 'composer install --no-dev --classmap-authoritative' my-environment: build: - 'composer install --no-dev --classmap-authoritative'デプロイ
VaporCLIを使って、Laravelのプロジェクトをデプロイします。(先程作成した
production環境設定を使います)$ vapor deploy production結果
Project deployed successfully. (3m12s)

 =============== =====================================================
  Deployment ID   Environment URL (Copied To Clipboard)
 =============== =====================================================
  5079            https://xxxxx-xxxx-xxxxxxx.vapor-farm-xxx.com
 =============== =====================================================
確認
作成したアプリケーションを確認するには、作成時にできたURLを確認します。
Vaporのダッシュボードからも作成したプロジェクトが確認できます。
AWSのコンソールから作成されたLambda関数も確認できます。
まとめ
個人的には、とても簡単にアプリケーションのデプロイができてすごい!
とテンションが上がりました!
(Lambda上でLaravelを動かそうとして断念した過去があるからななおさら)
現在早期アクセス段階で、商用利用にはもう少しかかるかなという感じですがとても便利なツールだと思いました。
他のAWSのサービス(S3,RDS,etc) にもつなげるようなので、今後がとても楽しみなプロジェクトです。この記事を見て、使って見ようとか、興味を持っていただけたら幸いです。
注釈
クライアントまたはトピックごとにプロジェクトを整理するの方法です、Vapor作成時に自動的に作成されます。 ↩


- 投稿日:2019-09-09T01:45:35+09:00
Laravel Vapor を使って Serverless な Laravel アプリケーションをデプロイする
Laravel Vapor とは
Serverless を AWS Lambda 上で動作させることができる 有料 のツールで、
Serverless な Laravel アプリケーションを構築することができ、
さらには、S3、RDS、ALB、 等のWebアプリケーションに必要な各種AWSのサービスと連携することができます。Laravel Vapor は現在早期アクセス中で、以下のサイトから利用を申し込むことができます。
利用料金は以下のようになっています。
https://vapor.laravel.com
ダッシュボード
構築について
基本的には公式からドキュメントが提供されているので、その手順を参考に今回アプリケーションをデプロイしました。
有料のため様子見てる方や、どのように使うのか気になる方向けに構築手順を記載します。環境
Vapor requires that your application be compatible with PHP 7.3+ and Laravel 6.0+.
上記が公式が要求する必要環境で、 PHP7.3以上、Laravel6.0を必要とします。今回自分が構築に使用した環境は以下です。
php : 7.3.9
composer : 1.8.0
Laravel : 6.0事前準備
事前に、Vapor への登録と、AWSのIAMユーザーの作成が必要となります。
作成した、AWSのIAMユーザーを、 Vaporの TEAM SETTING1 に追加します。
公式からは、複数のAWSサービスを扱うため、IAMユーザーのポリシーを、AdministratorAccessで作成することを推奨しています。
Laravel プロジェクトの作成
Vapor にてデプロイするプロジェクトを作成します。
composer を使って、Laravel のプロジェクトを作成します。
composer create-project --prefer-dist laravel/laravel SampleProject作成の際は必ず、
Laravel6.0を使用してください。
(今回は特に設定の変更や、機能追加はせずそのままデプロイしますのでプロジェクトの作成だけします。)Vaporのツールをインストール
作成した、Laravel プロジェクトのディレクトリの直下にて、
デプロイ時に使用するのVaporCLIをComposer でインストールします。$ composer require laravel/vapor-cli $ composer global require laravel/vapor-cli※ php vendor/bin/vapor で、 VaporCLIを実行できますが、長いので、
以下の説明では、vapor='php vendor/bin/vapor' でaliasを作っています。インストール完了後、以下のコマンドでVaporにログインします。
$ vapor loginVaporのコアパッケージをインストールします。
$ composer require laravel/vapor-coreVapor プロジェクト の作成
作成した、Laravel プロジェクトのディレクトリの直下にて、コマンドを実行しVapor プロジェクトを作成します。
$ vapor init実行中、プロジェクト名とデプロイするAWSのリージョン情報を求められるので入力します。
環境の作成
環境用の設定を追加するため、以下のコマンドを実行します。
$ vapor env my-environment
$ vapor env:pull production
Vapor.yml が以下のような状態になります(あくまで例)
Vapor.ymlid: 2 name: vapor-laravel-app environments: production: build: - 'composer install --no-dev --classmap-authoritative' my-environment: build: - 'composer install --no-dev --classmap-authoritative'デプロイ
VaporCLIを使って、Laravelのプロジェクトをデプロイします。(先程作成した
production環境設定を使います)$ vapor deploy production結果
Project deployed successfully. (3m12s)

 =============== =====================================================
  Deployment ID   Environment URL (Copied To Clipboard)
 =============== =====================================================
  5079            https://xxxxx-xxxx-xxxxxxx.vapor-farm-xxx.com
 =============== =====================================================
確認
作成したアプリケーションを確認するには、作成時にできたURLを確認します。
Vaporのダッシュボードからも作成したプロジェクトが確認できます。
AWSのコンソールから作成されたLambda関数も確認できます。
まとめ
個人的には、とても簡単にアプリケーションのデプロイができてすごい!
とテンションが上がりました!
(Lambda上でLaravelを動かそうとして断念した過去があるからななおさら)
現在早期アクセス段階で、商用利用にはもう少しかかるかなという感じですがとても便利なツールだと思いました。
他のAWSのサービス(S3,RDS,etc) にもつなげるようなので、今後がとても楽しみなプロジェクトです。この記事を見て、使って見ようとか、興味を持っていただけたら幸いです。
注釈
クライアントまたはトピックごとにプロジェクトを整理するの方法です、Vapor作成時に自動的に作成されます。 ↩
- 投稿日:2019-09-09T01:19:39+09:00
Laravelのユニットテストでサービスコンテナに入れるrequestを作る方法
背景
Request::path()でその時のリクエストを元に処理をするような機能をテストをしようとした時に、FacadeのMockeryの機能を使ってExample.phpuse Request; ... $request = Request::shouldReceive('path')->andReturn({欲しいパス}); app()->instance('request', $request);という感じでサービスコンテナに突っ込もうとしたら、以下のように怒られた。
BadMethodCallException: Method Mockery_1_Illuminate_Http_Request::setUserResolver() does not exist on this mock object正直なところよく分からないが、どうやらサービスコンテナにrequestを突っ込むためには
setUserResolver()というメソッドも定義してあげないといけないらしい。
そんなところまで定義しなきゃいけないとかmockを使うメリットが無くなるので普通にrequestインスタンスを作ってサービスコンテナに入れる方法にしたというもの。結論
ExampleTest.phpuse Symfony\Component\HttpFoundation\Request as SymfonyRequest; use Illuminate\Http\Request; ... $symfonyRequest = SymfonyRequest::create($uri); $request = Request::createFromBase($symfonyRequest); app()->instance('request', $request);解説
Laravel APIをみた限りでは、特にコンストラクタは無く、サーバー変数から作成する方法か、SymfonyRequestから作成する方法くらいしか見つからなかった。
サーバー変数をユニットテストでいじるのは違う気がしたので後者を選択。
SymfonyRequestはコンストラクタでインスタンスを作れるので、これで作れば良い。