- 投稿日:2019-09-09T23:50:37+09:00
Node.jsでもUNIXドメインソケットを使いたい
はじめに
Node.jsで使うことのできる通信方式としては、TCPソケット、ストリーミングIPCエンドポイント、そしてHTTPインターフェースです。HTTPインターフェースに関しては、実際にはTCPソケットとして動いているので、実質前の2つになります。
では、TCPソケットとストリーミングIPCエンドポイントの違いは何でしょうか?TCPソケットは、TCP/IPの上でソケットを用いて行う通信方式です。
一方のストリーミングIPCエンドポイントは、IPC(Inter-Process Communication)の下、同一マシーン内でプロセス間通信をストリーミングで行う通信方式です。このストリーミングIPCエンドポイントをUNIX上で実現されている技術が、『 Unix domain sockets 』です。
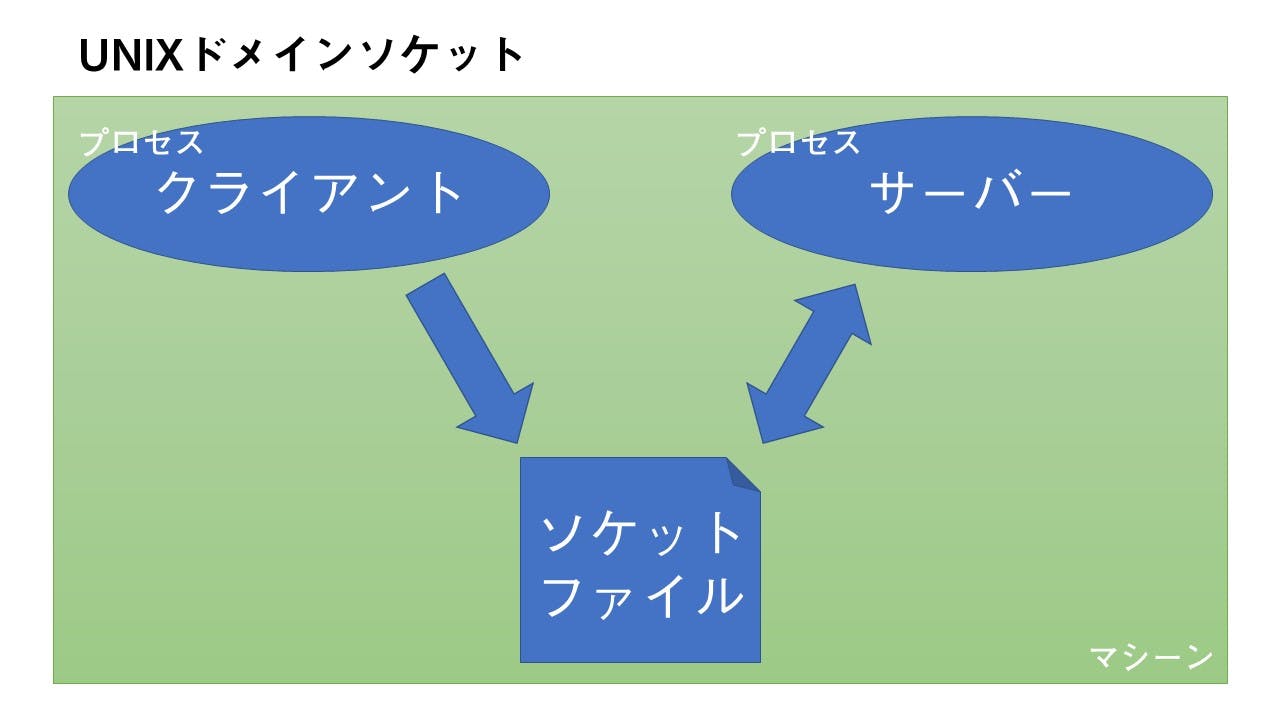
UNIXドメインソケットとは?
ローカルで開かれたソケットファイルを通じて、サーバー側とクライアント側とで通信を行う方法です。
Node.jsでは適用されていませんが、一般的にはunix://でURLが始まります。TCPで行う通信と異なり、ローカルファイルを指定して通信を行うため、ドメインの解決や外部通信をしません。
そのため、TCPに比べ速いです。
その検証に関しては、 Performance Analysis of Various Mechanisms for Inter-process Communication をご覧ください。
使ってみよう!
この記事のサンプルプログラムは unix-domain-socket にあります。
UNIXドメインソケットは、Node.jsのビルドインモジュールの
netの中で提供されています。
そのため、この記事ではnetを主に用いてプログラムを書いていきます。
Net | Node.js送信側
以下のようなプログラムを作成しました。
import net from 'net';

// UNIXドメインソケットのコネクションを作成する
// net.createConnectionの引数にファイルを指定するとUNIXドメインソケットで繋がる
const client = net.createConnection('/tmp/unix.sock');
client.on('connect', () => {
  console.log('connected.');
});
client.on('data', (data) => {
  console.log(data.toString());
});
client.on('end', () => {
  console.log('disconnected.');
});
client.on('error', (err) => {
  console.error(err.message);
});
client.write('hello');
受信側
以下のようなプログラムを作成しました。
import net from 'net';
import fs from 'fs';

// サーバーを設定
const server = net.createServer((connection) => {
  console.log('connected.');
  connection.on('close', () => {
    console.log('disconnected.');
  });
  connection.on('data', (data) => {
    console.log(data.toString());
  });
  connection.on('error', (err) => {
    console.error(err.message);
  });
  connection.write('unix domain socket');
  connection.end();
});

// ソケットファイルを削除(存在するとlistenできない)
try {
  fs.unlinkSync('/tmp/unix.sock');
} catch (error) {}

// UNIXドメインソケットでlistenする
server.listen('/tmp/unix.sock');
実行してみる
ともに同じ仮想サーバー内で実行しています。
左側は送信側で、右側は受信側です。
おわりに
このUNIXドメインソケットは、ローカルマシーン内でプロセス間で通信を行う場合に効果を発揮します。
例えば、KubernetesのPod内のコンテナ間で通信を行う場合に使うことができます。ボリュームを共有してマウントすることで通信ができるので、ドメインの名前解決に縛られることが無くなります。
ポートで通信を行う場合と比べて制限を受けない部分もあるので、一度使ってみてはどうですか?

- 投稿日:2019-09-09T22:41:55+09:00
WSLのUbuntuでPC内の音楽データをGoogleHomeで操作する(shuffle再生)
はじめに
「WSLのUbuntuでPC内の音楽データをGoogleHomeで操作する」のshuffle再生バージョンです。
プログラム(node.js)
●grep検索で抽出した音楽データのプレイリストを作成する。
●mplayerのオプションでshuffle再生する。(mplayer -shuffle -playlist)
●音楽データのリストを予めフリーソフトで作成してください。(list.txt)
/mnt/j/music/松任谷由実/日本の恋と、ユーミン/01 やさしさに包まれたな.mp3
/mnt/j/music/松任谷由実/日本の恋と、ユーミン/01 リフレインが叫んでる.mp3
/mnt/j/music/松任谷由実/日本の恋と、ユーミン/01 真珠のピアス.mp3
ダブルクオーテーションは不要です。var firebase = require("/home/ユーザ名/node_modules/firebase"); require("/home/ユーザ名/node_modules/firebase"); var iconv = require('/home/ユーザ名/node_modules/iconv-lite'); var value1 ; //firebase config var config = { apiKey: "xxxxxxxxxxxxxxxxxxxxxxxxxxxxxxxxx", authDomain: "xxxxxxxxxx.firebaseapp.com", databaseURL: "https://xxxxxxxxxx.firebaseio.com", projectId: "xxxxxxxxxx", storageBucket: "xxxxxxxxxx.appspot.com", messagingSenderId: "xxxxxxxxxxxxxx" }; function sleep(time) { return new Promise((resolve, reject) => { setTimeout(() => { resolve(); }, time); }); } firebase.initializeApp(config); //jsonからvalueに一致する値取得 const getJsonData = (value, json) => { for (var word in json) if (value == word) return json[word] return json["default"] } //database更新時 const path = "/googlehome5" const key = "word" const db = firebase.database() db.ref(path).on("value", function(changedSnapshot) { //値取得 let value = changedSnapshot.child(key).val() if (!value) return console.log(value) var value1 = value.replace(/ /g,""); //コマンド const STOP = "pkill mplayer"; if(value === "停止"){ command = STOP } else if(value === "止め て"){ command = STOP } else { command = "未定義" } console.log(command) //コマンド実行 var exec = require('child_process').exec; exec(STOP, {maxBuffer: 1000*1024}, function(error, stdout, stderr) { if (error !== null) { console.log('Exec error: ' + error); } }); sleep(2000); if(command === "未定義") { command = 'cat /mnt/j/music/list.txt | grep "' + value1 + '"'; var exec = require('child_process').exec; exec(command, {maxBuffer: 40000*1024}, function(error, stdout, stderr) { if (error !== null) { console.log('指定された曲はありません'); } else { console.log(stdout); } }); command = 'cat /mnt/j/music/list.txt | grep "' + value1 + '">/mnt/j/music/playlist'; console.log(command) var exec = require('child_process').exec; exec(command, {maxBuffer: 40000*1024}, function(error, stdout, stderr) { if (error !== null) { console.log('Exec error: ' + error); } }); command = 'mplayer -shuffle -playlist /mnt/j/music/playlist'; console.log(command) var exec = require('child_process').exec; exec(command, {maxBuffer: 40000*1024}, function(error, stdout, stderr) { if (error !== null) { console.log('Exec error: ' + error); } }); } //firebase clear db.ref(path).set({[key]: ""}); })
- 投稿日:2019-09-09T21:01:41+09:00
【Mac】ReactでVR!? React 360を使用して、パノラマ画像を表示させる手順方法。
はじめに
セブ島もくもく会の中で、初学者を対象にしたVR開発入門講義を行いました。
環境構築から、パノラマ画像を表示させるまでの手順をこちらに残しておきます。やること
タイトル通りです。
ただし、各用語の解説はいたしません。手順のみです。
ご了承ください。React 360って?
Facebook社製のVR専用アプリケーションフレームワークです。
実はReactの書き方で、VRアプリも開発できます!
https://facebook.github.io/react-360/
開発環境(筆者の環境です。)
- macOS Mojave 10.14.5
- Node.js 12.6
- npm 6.9
Node.jsのインストール方法はこちらから。
https://qiita.com/AwesomeArsAcademia/items/4f685e2f46bab122f6cf必要なツールはこちらから。
開発環境を整える
react-360-cliをインストールhttps://facebook.github.io/react-360/docs/setup.html
公式ドキュメントを参考に、開発環境を構築していきます。npmを使って、
react-360-cliをインストールします。$ npm install -g react-360-cliアプリを立ち上げる
下記のコマンドを打つとフォルダが作成されます。
$ react-360 init Hello360
Creating new React 360 project...
Project directory created at Hello360

~省略~

success Saved lockfile.
✨  Done in 21.60s.
Done!
  Now enter the new project directory by running `cd Hello360`
  Run `npm start` to initialize the development server
  From there, browse to http://localhost:8081/index.html
  Open `index.js` to begin editing your app.

$ ls
Hello360
上記の指示通り、Hello360に移動して
npm startを実行します。http://localhost:8081/index.html$ cd Hello360 $ npm start
上記のURLにアクセスしてみましょう。ロードに時間がかかると思いますが、しばらくすると下記のような表示が出るかと思います。
Welcome to React 360からHello Worldに変えてみる。(index.js)エディタを開きます。
index.jsを開くと下記が記載されているかと思います。ここで、15行目のindex.jsimport React from 'react'; import { AppRegistry, StyleSheet, Text, View, } from 'react-360'; export default class Hello360 extends React.Component { render() { return ( <View style={styles.panel}> <View style={styles.greetingBox}> <Text style={styles.greeting}> Welcome to React 360 </Text> </View> </View> ); } }; const styles = StyleSheet.create({ panel: { // Fill the entire surface width: 1000, height: 600, backgroundColor: 'rgba(255, 255, 255, 0.4)', justifyContent: 'center', alignItems: 'center', }, greetingBox: { padding: 20, backgroundColor: '#000000', borderColor: '#639dda', borderWidth: 2, }, greeting: { fontSize: 30, }, }); AppRegistry.registerComponent('Hello360', () => Hello360);
Welcome to React 360をHello Worldに書き換えます。
ファイルを保存して、ブラウザを更新しましょう。
下記のように表示されれば成功です!
パノラマ画像を表示させる。
パノラマ画像のフリー素材ですが、僕は下記のURLからダウンロードしました。
http://panoroman.nao3.net/ダウンロードしたら、
static_assetsのフォルダの配下に移動します。
名前も変更しましょう。
※今回はp1.jpgで進めていきます。背景の画像を変更する際は
client.jsのファイルを編集します。client.js// This file contains the boilerplate to execute your React app. // If you want to modify your application's content, start in "index.js" import {ReactInstance} from 'react-360-web'; function init(bundle, parent, options = {}) { const r360 = new ReactInstance(bundle, parent, { // Add custom options here fullScreen: true, ...options, }); // Render your app content to the default cylinder surface r360.renderToSurface( r360.createRoot('Hello360', { /* initial props */ }), r360.getDefaultSurface() ); // Load the initial environment r360.compositor.setBackground(r360.getAssetURL('360_world.jpg')); } window.React360 = {init};20行目にある
こちらのr360.compositor.setBackground(r360.getAssetURL('360_world.jpg'));360_world.jpgを先ほどダウンロードしたファイル名に書き換えます。
今回はp1.jpgに変更します。
保存して、ブラウザを更新しましょう。
下記の表示になれば成功です!
マウスでグリグリ動かしてみましょう。
最後に
解説が欲しい方は下記の記事がおすすめです。
https://qiita.com/shiruco/items/3e77babe80a373c71fd5
https://qiita.com/bayarea-techblog/items/46531e0a64ffa1c0d181


- 投稿日:2019-09-09T15:40:50+09:00
大量商用ページの表示結果を比較するために試行錯誤した(2)
大人の事情で公開していなかった部分を含めて、全てみせます。
自分の記録の意味も含めて。screenshotDiff.js/*------------------------------------------------------------ 大量ページを逐次表示、スクリーンショットをとり ペアページ同士で比較差分を表示する。 制限事項: 自動アクセス防止ヒューリスティックを採用して いるサイトは アクセス権限無し(403)を返すため比較差分を することができない。 node v8.4.0 puppeteer-core v1.8.0 looks-same v4.0.0 @I.Times 2018/9/25 --------------------------------------------------------------*/ /*------------------------------------------------------------ 2018/9/24 I.Times Haranaga puppeteer によるスクリーンショットの工夫 (1) ページ表示後にスクリーンショットを取らず一度リロードを してからスクリーンショットをとる。 リロード後のほうがページ描画が安定するため。 --------------------------------------------------------------*/ /*------------------------------------------------------------ 2018/9/24 I.Times Haranaga looks-sameには独自修正を加えている。 (1) createDiff実行時に 差分ピクセル数を返すようCallBackを修正 (2) 差分箇所のみに点を描画する画像ファイルを追加作成する。 --------------------------------------------------------------*/ const puppeteer = require('puppeteer-core'); const async = require('async'); const delay = require('delay'); const fs = require('fs'); const che = require('cheerio'); var looksSame = require('looks-same'); var os = require('os'); // 数値を前ゼロ埋めする。 function zeroPadding(num,length){ var ZERO = '0000000000000000'; if(length){ if(length > ZERO.length){ return (ZERO + num).slice(ZERO.length*(-1)); }else if(length > 0){ return (ZERO + num).slice(-length); }else{ return num; } }else{ return (ZERO + num).slice(ZERO.length*(-1)); } } const headless = true; const browserExecutablePath = 'C:\\Program Files (x86)\\Google\\Chrome\\Application\\chrome.exe'; const userAgent = 'Mozilla/5.0 (Windows NT 10.0; Win64; x64) AppleWebKit/537.36 (KHTML, like Gecko) Chrome/70.0.3538.102 Safari/537.36'; //const userAgent = 'BOT/5.0 (Windows NT 10.0; Win64; x64) AppleWebKit/537.36 (KHTML, like Gecko) Chrome/70.0.3538.102 Safari/537.36'; const WindowWidth = 1920; const WindowHeight = 1080; const viewPort = { width: WindowWidth, height: WindowHeight, deviceScaleFactor:0.85, isMobile:false, Mobile:false, hasTouch:false, isLandscape:false, }; const NO_SANDBOX = '--no-sandbox'; const _browserOptions = { headless: headless, ignoreHTTPSErrors: true, executablePath: browserExecutablePath, defaultViewport:viewPort, args: ['--window-size='+WindowWidth+','+WindowHeight,'--window-position=0,0',NO_SANDBOX], }; var browseOptions = _browserOptions; // Async-Awaitの中の例外をキャッチする仕組み process.on('unhandledRejection', console.dir); const DIRNAME = __dirname; (async () => { // URL一覧を読み込む。 var elements = []; var elementList = async () => { var xml_data = await fs.readFileSync("data.xml", "utf-8"); $ = che.load(xml_data); $("element").each(function(i0, el0) { var elem = {}; var actualElem = {}; var actual = $(this).children("actual"); actualElem['url'] = actual.children("url").text(); actualElem['networkidle'] = $(actual).children("networkidle").text(); actualElem['delay'] = $(actual).children("delay").text(); elem['actual'] = actualElem; var targetElem = {}; var target = $(this).children("target"); targetElem['url'] = target.children("url").text() targetElem['networkidle'] = target.children("networkidle").text() targetElem['delay'] = target.children("delay").text() elem['target'] = targetElem; elem['tolerance'] = $(this).children('tolerance').text(); elements.push(elem); }); }; elementList(); // スクリーンショットFunction定義:ページを表示,スクリーンショットを取る。 var screenShot = async (element, shotPath) =>{ await page.setUserAgent(userAgent); await page.goto(element.url, {waitUntil: element.networkidle}) .then( async function(response){ // ReLoadする理由 // ReLoad再描画が時間が掛からず、ScreenShotタイミングを取りやすいため await page.reload({waitUntil: element.networkidle}).then( async function(response) { if(element.delay>0){ await delay(element.delay); } await page.screenshot( {path: DIRNAME+'\\'+shotPath, fullPage: true}); }); } ); }; // 配列要素を処理するAsync Function定義 var eachProcess = async (element, callback) => { var index = elements.indexOf( element ); var count = index + 1; var path = { imageA: 'imageA\\shotA_'+zeroPadding(count,5)+'.png', imageB: 'imageB\\shotB_'+zeroPadding(count,5)+'.png' }; // Actual スクリーンショット await screenShot(element.actual, path.imageA); // Target スクリーンショット await screenShot(element.target, path.imageB); // Actual<=>Targetの比較 var looksSameOption = {}; looksSameOption.reference = path.imageA; looksSameOption.current = path.imageB; looksSameOption.diff = 'diff\\diff_'+zeroPadding(count,5)+'_1.png'; looksSameOption.diff2 = 'diff\\diff_'+zeroPadding(count,5)+'_2.png'; // 独自追加オプション looksSameOption.highlightColor = '#ff00ff'; //color to highlight the differences looksSameOption.defaultColor = '#ffffff'; // 独自追加オプション looksSameOption.strict = true; //strict comparsion looksSameOption.writeOriginalDiff = true; // 独自追加オプション looksSame.createDiff(looksSameOption // このパラメータFunctionは独自追加です。 ,function(unmatch){ console.log("No.["+zeroPadding(count,5)+"] UnMatch["+zeroPadding(unmatch)+"]:"+element.actual.url); // 必ずここのfunctionを一度呼びだすので、ここで forEachSeries のcallbackを呼び出す。 callback(); // このパラメータFunctionは独自追加です。 }, function(err){ if(err){ console.log(err); throw err; } }, function(err){ if(err){ console.log(err); throw err; } } ); // looksSame 終わり }; // ブラウザを起動する。 var browser = await puppeteer.launch( _browserOptions ); const page = await browser.newPage(); await page.setJavaScriptEnabled(true); //await page.evaluate('navigator.userAgent'); // キャッシュ無効にする(効果は未確認) const client = await page.target().createCDPSession(); await client.send( 'Network.setCacheDisabled', { 'cacheDisabled' : true } ); await page.setCacheEnabled( false ); // 配列(elements)の要素をAsync順次処理する。 async.forEachSeries( // 第一パラメータ:配列 elements, // 第二パラメータ:要素を処理するAsync Function (async function(element, callback){ await eachProcess(element, callback); }), // 第三パラメータ: 最後に呼び出されるCallBack async function(err){ if(err) throw err; await browser.close(); console.log('##browser close'); } ); // async.forEachSeries終わり })();data.xml(例)<element> <actual> <url>https://www.naro.affrc.go.jp/nivfs/index.html</url> <networkidle>networkidle0</networkidle> <delay>0</delay> </actual> <target> <url>https://www.naro.affrc.go.jp/nivfs/index.html</url> <networkidle>networkidle0</networkidle> <delay>0</delay> </target> <tolerance>0</tolerance> </element> <element> <actual> <url>https://www.paxcompy.co.jp/</url> <networkidle>networkidle0</networkidle> <delay>0</delay> </actual> <target> <url>https://www.paxcompy.co.jp/</url> <networkidle>networkidle0</networkidle> <delay>0</delay> </target> <tolerance>0</tolerance> </element> <element> <actual> <url>http://www.machidukuri-nagano.jp/</url> <networkidle>networkidle0</networkidle> <delay>0</delay> </actual> <target> <url>http://www.machidukuri-nagano.jp/</url> <networkidle>networkidle0</networkidle> <delay>0</delay> </target> <tolerance>0</tolerance> </element>node_modules\looks-same\index.js'use strict'; const _ = require('lodash'); const parseColor = require('parse-color'); const colorDiff = require('color-diff'); const png = require('./lib/png'); const areColorsSame = require('./lib/same-colors'); const AntialiasingComparator = require('./lib/antialiasing-comparator'); const IgnoreCaretComparator = require('./lib/ignore-caret-comparator'); const utils = require('./lib/utils'); const readPair = utils.readPair; const getDiffPixelsCoords = utils.getDiffPixelsCoords; const JND = 2.3; // Just noticeable difference if ciede2000 >= JND then colors difference is noticeable by human eye const getDiffArea = (diffPixelsCoords) => { const xs = []; const ys = []; diffPixelsCoords.forEach((coords) => { xs.push(coords[0]); ys.push(coords[1]); }); const top = Math.min.apply(Math, ys); const bottom = Math.max.apply(Math, ys); const left = Math.min.apply(Math, xs); const right = Math.max.apply(Math, xs); const width = (right - left) + 1; const height = (bottom - top) + 1; return {left, top, width, height}; }; const makeAntialiasingComparator = (comparator, png1, png2, opts) => { const antialiasingComparator = new AntialiasingComparator(comparator, png1, png2, opts); return (data) => antialiasingComparator.compare(data); }; const makeNoCaretColorComparator = (comparator, pixelRatio) => { const caretComparator = new IgnoreCaretComparator(comparator, pixelRatio); return (data) => caretComparator.compare(data); }; function makeCIEDE2000Comparator(tolerance) { return function doColorsLookSame(data) { if (areColorsSame(data)) { return true; } /*jshint camelcase:false*/ const lab1 = colorDiff.rgb_to_lab(data.color1); const lab2 = colorDiff.rgb_to_lab(data.color2); return colorDiff.diff(lab1, lab2) < tolerance; }; } const createComparator = (png1, png2, opts) => { let comparator = opts.strict ? areColorsSame : makeCIEDE2000Comparator(opts.tolerance); if (opts.ignoreAntialiasing) { comparator = makeAntialiasingComparator(comparator, png1, png2, opts); } if (opts.ignoreCaret) { comparator = makeNoCaretColorComparator(comparator, opts.pixelRatio); } return comparator; }; const iterateRect = (width, height, callback, endCallback) => { const processRow = (y) => { setImmediate(() => { for (let x = 0; x < width; x++) { callback(x, y); } y++; if (y < height) { processRow(y); } else { endCallback(); } }); }; processRow(0); }; const buildDiffImage = (png1, png2, options, callback) => { const width = Math.max(png1.width, png2.width); const height = Math.max(png1.height, png2.height); const minWidth = Math.min(png1.width, png2.width); const minHeight = Math.min(png1.height, png2.height); const highlightColor = options.highlightColor; const result = png.empty(width, height); // ###### ここを変えた ######## // -- add start --- const result2 = (options.writeOriginalDiff)? png.empty(width, height): null; var unmatch = 0; // -- add end --- iterateRect(width, height, (x, y) => { if (x >= minWidth || y >= minHeight) { result.setPixel(x, y, highlightColor); // ###### ここを変えた ######## // -- add start --- unmatch += 1; // -- add end --- return; } const color1 = png1.getPixel(x, y); const color2 = png2.getPixel(x, y); if (!options.comparator({color1, color2})) { result.setPixel(x, y, highlightColor); // ###### ここを変えた ######## // -- add start --- unmatch += 1; if(options.writeOriginalDiff){ result2.setPixel(x, y, options.highlightColor); } // -- add end --- } else { result.setPixel(x, y, color1); // ###### ここを変えた ######## // add start if(options.writeOriginalDiff){ result2.setPixel(x, y, options.defaultColor); } // add end } // ###### ここを変えた ######## //}, () => callback(result)); }, () => callback(result, result2, unmatch)); }; const parseColorString = (str) => { const parsed = parseColor(str); return { R: parsed.rgb[0], G: parsed.rgb[1], B: parsed.rgb[2] }; }; const getToleranceFromOpts = (opts) => { if (!_.hasIn(opts, 'tolerance')) { return JND; } if (opts.strict) { throw new TypeError('Unable to use "strict" and "tolerance" options together'); } return opts.tolerance; }; const prepareOpts = (opts) => { opts.tolerance = getToleranceFromOpts(opts); _.defaults(opts, { ignoreAntialiasing: true, antialiasingTolerance: 0 }); }; module.exports = exports = function looksSame(reference, image, opts, callback) { if (!callback) { callback = opts; opts = {}; } prepareOpts(opts); readPair(reference, image, (error, pair) => { if (error) { return callback(error); } const first = pair.first; const second = pair.second; if (first.width !== second.width || first.height !== second.height) { return process.nextTick(() => callback(null, false)); } const comparator = createComparator(first, second, opts); getDiffPixelsCoords(first, second, comparator, {stopOnFirstFail: true}, (result) => { callback(null, result.length === 0); }); }); }; exports.getDiffArea = function(reference, image, opts, callback) { if (!callback) { callback = opts; opts = {}; } prepareOpts(opts); readPair(reference, image, (error, pair) => { if (error) { return callback(error); } const first = pair.first; const second = pair.second; if (first.width !== second.width || first.height !== second.height) { return process.nextTick(() => callback(null, { width: Math.max(first.width, second.width), height: Math.max(first.height, second.height), top: 0, left: 0 })); } const comparator = createComparator(first, second, opts); getDiffPixelsCoords(first, second, comparator, (result) => { if (!result.length) { return callback(null, null); } callback(null, getDiffArea(result)); }); }); }; //### ここ変えた! //exports.createDiff = function saveDiff(opts, callback) { exports.createDiff = function saveDiff(opts, callback, callback2, callback3) { const tolerance = getToleranceFromOpts(opts); readPair(opts.reference, opts.current, (error, result) => { if (error) { return callback(error); } const diffOptions = { highlightColor: parseColorString(opts.highlightColor), // ### 下記1行追加 defaultColor : parseColorString(opts.defaultColor), writeOriginalDiff: opts.writeOriginalDiff, comparator: opts.strict ? areColorsSame : makeCIEDE2000Comparator(tolerance) }; // ### ここ変えた!! //buildDiffImage(result.first, result.second, diffOptions, (result) => { buildDiffImage(result.first, result.second, diffOptions, (result, result2, unmatch) => { // ### ここ変えた!! //if (opts.diff === undefined) { // result.createBuffer(callback); //} else { // result.save(opts.diff, callback); //} if (opts.diff === undefined) { result.createBuffer(callback2); } else { result.save(opts.diff, callback2); if(opts.diff2 && result2){ result2.save(opts.diff2, callback3); } callback(unmatch); } }); }); }; exports.colors = (color1, color2, opts) => { opts = opts || {}; if (opts.tolerance === undefined) { opts.tolerance = JND; } const comparator = makeCIEDE2000Comparator(opts.tolerance); return comparator({color1, color2}); };
- 投稿日:2019-09-09T14:23:08+09:00
Resemble.jsをとにかく使う
とにかくResemble.jsを使ってみたかったので、最短で動かす方法を調べました。
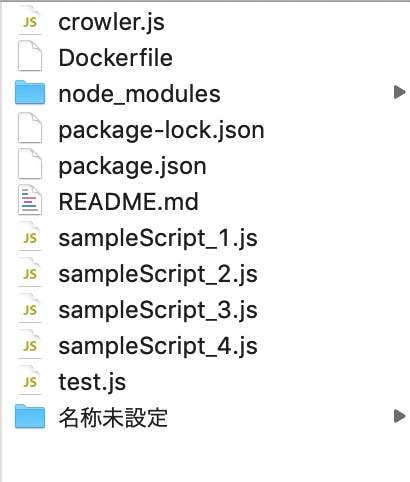
比較する画像
a.jpg
b.jpg
名称未設定のフォルダの有無です。
環境設定
$ node -v
v8.11.3
$ npm -v
6.4.1
$ npm i resemblejs
$ npm i fs
nodeとnpmが入っている環境に、resemblejsとfsをinstallする。
実行ソース
【Ionic + Electron】Resemble.jsを使って画像比較を行うデスクトップアプリを作成
を参考に、以下のソースで実行const fs = require('fs'); const resemble = require('resemblejs'); // 比較したい画像のパスを指定 const image1 = fs.readFileSync("a.jpg"); const image2 = fs.readFileSync("b.jpg"); resemble(image1).compareTo(image2).onComplete(data => { if (data.misMatchPercentage >= 0.01) { console.log('差分を検知しました。'); fs.writeFileSync("./diff_image.jpg", data.getBuffer()); }else{ console.log("差分なし"); } });
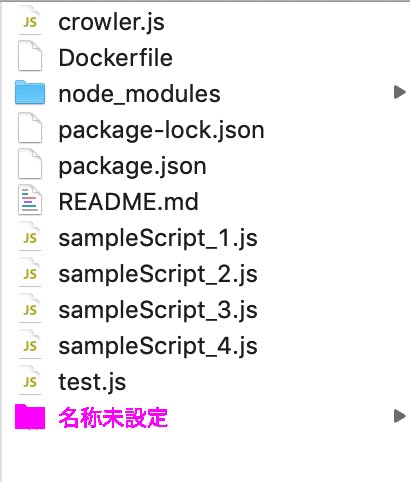
出力結果
結果、以下の画像が作成された。
diff_image.jpg
これで動作確認完了!

- 投稿日:2019-09-09T10:41:11+09:00
RESTfulな「axios-mock-server」の使い方
axios-mock-serverとは
フロントエンドの開発体験を向上させ、生産性を格段に高めるために作られたTypeScript製のモックサーバーです。
axios専用ではあるものの、JSON Serverよりも遥かに手軽にRESTfulなモック環境を構築出来ます。
- GET/POST/PUT/DELETEのAPIエンドポイントを数行で作成できる
- サーバーを立てないので静的なJSファイルとしてSPA上でも動かせる
- TypeScript対応
- Node環境のaxiosでも動く
- Nuxt.js同様のオートルーティング機能でパス記述が不要
この記事はやたら長いので以下の入門記事から読むのをおススメします。
秒でaxiosをモックするnpmモジュールの入門サンプル【ES6/JavaScript編】開発の背景
JS製のモックとしてデファクトスタンダードっぽいJSON Serverが使いづらいなーと思ったのがきっかけ。
GETだけなら簡単なんだけど、POSTやDELETEをデータに反映させようとするとExpressサーバー丸ごと書くのと同じような作業が必要で気軽には扱えない。そこで、昨年末くらいから私が設計したプロジェクトそれぞれにカスタムして組み込んでいたaxios専用のモックサーバーをOSSとして公開しました。
axios-mock-adapterとNuxt.jsから実装のヒントを得ています。使い方 (JavaScript + ES6 modules)
インストール
$ npm install --save-dev axios-mock-serverAPI作成
Nodeプロジェクトのルートに
mocksディレクトリを作成します。
Nuxt.jsのオートルーティングと同じ命名規則でjsファイルを作成します。
以下の例だと/v1/users/:userIdのエンドポイントにGETとPOSTのモックAPIが作成されます。
メソッドが受け取る引数は{ values, params, data, config }(valuesはパスのアンダースコア部分、paramsはURLクエリパラメータ(>= v0.10.0)、dataはPOSTなどで送信したデータ、configはaxiosのリクエストconfig)で、返り値は[HTTPステータス, データ, ヘッダー]です。(必須要素はHTTPステータスのみ)
async/awaitも使用可能です。mocks/v1/users/_userId.jsconst users = [ { id: 0, name: 'taro' }, { id: 1, name: 'hanako' } ] export default { get({ values }) { return [200, users.find(user => user.id === values.userId)] }, post({ data }) { users.push({ id: users.length, name: data.name }) return [201] } }axiosとの接続
npmスクリプトでビルドすると
mocks/$route.jsが生成されます。
以下の方法でaxiosの接続先がモックサーバーに変わります。src/index.jsimport axios from 'axios' import mockServer from 'axios-mock-server' import route from '../mocks/$route' mockServer(route) axios.get('https://google.com/v1/users/1').then((user) => { console.log(user) // { id: 1, name: 'hanako' } })axiosのinstanceをモックしたい場合は初期化時に引数で渡します。
src/index.jsimport axios from 'axios' import mockServer from 'axios-mock-server' import route from '../mocks/$route' const client = axios.create({ baseURL: 'https://google.com/v1' }) mockServer(route, client) client.get('/users/1').then((user) => { console.log(user) // { id: 1, name: 'hanako' } }) axios.get('https://google.com/v1/users/1').catch((e) => { console.log(e.response.status) // 404 (axios本体はモックされてない) })npmスクリプト
mocks/$route.jsを1回ビルドするのが-b
ファイルが変更されるたびにビルドするのが-w
設定ファイルの場所を変えたい場合は-c <file path>package.json{ "scripts": { "mock:build": "axios-mock-server -b", "mock:watch": "axios-mock-server -w", "mock:config": "axios-mock-server -b -c settings/.mockserverrc" } }NeDBで永続化
DBガッツリ使うとモックの意義が薄れるのですが、とはいえデータの変更を保持しておきたい場面もあるわけです。
そこでNeDBというJavaScriptのみで書かれたDBを紹介します。
MongoDBライクにテーブル定義や設定せずにすぐ使えるので今回のような用途にピッタリです。
静的ファイルだけのSPAでも動作するのが素晴らしい・・・動作環境に応じて最適なデータの保存先を自動決定してくれます。
Node.jsならファイルに、ブラウザならIndexedDB、なければlocalStorageになるようです。
とはいえNeDBは非同期メソッドがコールバック方式で扱いづらいのでラッパーライブラリのNeDB-promisesを使うのが良さそうです。
(単数形のNeDB-promiseは更新が止まっているのとTSの型定義ファイルがない別物ので注意)NeDB-promisesインストール
$ npm install --save-dev nedb-promisesNeDB-promises + JavaScript
mocks/v1/users/_userId.jsimport Datastore from 'nedb-promises' const datastore = Datastore.create('dbname') export default { async get({ values }) { return [200, await datastore.find({ id: values.userId })] }, async post({ values, data }) { return [ 201, await datastore.insert({ id: values.userId, name: data.name }) ] } } // 以下のように書いても等価です // asyncData(HTTPステータス, データを返すPromise, ヘッダー) import { asyncResponse } from 'axios-mock-server' import Datastore from 'nedb-promises' const datastore = Datastore.create('dbname') export default { get: ({ values }) => asyncResponse(200, datastore.find({ id: values.userId })), post: ({ values, data }) => asyncResponse(201, datastore.insert({ id: values.userId, name: data.name })) }multipart-formdata対応
サーバーを立てずにモックしているため、通常の方法では画像をPOSTしたあとにimgタグで表示する方法がありません。
AWS S3など外部に保存するのも手間がかかりすぎるので、ここではdataURIを使う方法を紹介します。mocks/v1/images/index.jsexport const images = [] export default { post: ({ data }) => new Promise((resolve) => { const file = data.get('file') // FormData#get const reader = new FileReader() reader.onload = () => { const image = { id: images.length, url: reader.result } images.push(image) resolve([200, image]) } reader.readAsDataURL(file) }) }mocks/v1/images/_imageId.jsimport { images } from './index' export default { get({ values }) { return [200, images.find(image => image.id === values.imageId)] } }src/index.jsconst inputElm = document.getElementsByTagName('input')[0] inputElm.addEventListener('change', async (e) => { const formData = new FormData() formData.append('file', e.target.files[0]) const { data: { id }} = await axios.post('/v1/images', formData, { headers: { 'content-type': 'multipart/form-data' } }) const { data: { url }} = await axios.get(`/v1/images/${id}`) console.log(url) // data:image/jpg;base64,.. const img = new Image() img.src = url document.body.appendChild(img) }, false)@nuxtjs/axiosとの連携
Axios Moduleのセットアップが完了している前提で解説します。
create-nuxt-appを使うとaxios込みでNuxt.jsのインストールがラクです。plugins/mock.jsimport mockServer from 'axios-mock-server' import route from '~/mocks/$route' export default ({ app }) => { mockServer(route, app.$axios) }nuxt.config.jsexport default { plugins: ['~/plugins/mock.js'] }mocks/users/_userId.jsconst users = [ { id: 0, name: 'taro' }, { id: 1, name: 'hanako' } ] export default { get({ values }) { return [200, users.find(user => user.id === values.userId)] } }pages/index.vue<template> <div /> </template> <script> export default { async mounted() { console.log( await this.$axios.$get('/users/1') ) // { id: 1, name: 'hanako' } } } </script>package.json{ "scripts": { "dev": "axios-mock-server -w | nuxt", "build": "axios-mock-server -b & nuxt build", "start": "axios-mock-server -b & nuxt start", "generate": "axios-mock-server -b & nuxt generate" }, "dependencies": { "@nuxtjs/axios": "^5.3.6", "axios-mock-server": "^0.8.1", "nuxt": "^2.0.0" } }レスポンス時間を遅延
デフォルト設定だとレスポンスは非同期ではあるものの即座に返されます。
ネットワークの遅延をシミュレートしたい場合はsetDelayTimeを使います。src/index.jsimport axios from 'axios' import mockServer from 'axios-mock-server' import route from '../mocks/$route' mockServer(route).setDelayTime(500) // ms console.time() axios.get('/v1/users/1').then(() => { console.timeEnd() // default: 501.565185546875ms })リクエストログを出力 (>= v0.10.0)
enableLogを呼び出すと、コンソールにリクエストのHTTPメソッドとルート絶対パスが出力されます。src/index.jsimport axios from 'axios' import mockServer from 'axios-mock-server' import route from '../mocks/$route' const client = axios.create({ baseURL: 'https://google.com/v1' }) const mock = mockServer(route, client).enableLog() client.get('/users/1?aa=123', { params: { bb: 'hoge' }}) // [mock] get: /v1/users/1?aa=123&bb=hogeログ出力を止めるには
disableLogを呼び出します。src/index.jsmock.disableLog()使い方 (TypeScript + ES6 modules)
Nodeプロジェクトのルートに
.mockserverrcという名前の設定ファイルを作成。
outputExtでビルド時に生成されるmocks/$route.jsの拡張子をtsに変更します。.mockserverrc{ "outputExt": "ts" }非同期で値を返す場合、型の不一致でTypeScriptがエラーを吐くので
MockResponseをアサーションしてください。mocks/v1/users/_userId.tsimport { MockMethods, MockResponse } from 'axios-mock-server' export type User = { id: number name: string } const users: User[] = [ { id: 0, name: 'taro' }, { id: 1, name: 'hanako' } ] const sleep = (ms: number) => new Promise(resolve => setTimeout(resolve, ms) const methods: MockMethods = { async get({ values }) { await sleep(100) return [200, users.find(user => user.id === values.userId)] as MockResponse } } export default methodssrc/index.tsimport axios from 'axios' import mockServer from 'axios-mock-server' import route from '../mocks/$route' import { User } from '../mocks/v1/users/_userId' mockServer(route) axios.get<User>('https://google.com/v1/users/1').then((user) => { console.log(user) // { id: 1, name: 'hanako' } })v0.10.0から、返り値を連想配列
{ status, data, headers }にすることで非同期メソッドでもアサーションが不要になります。mocks/v1/users/_userId.tsimport { MockMethods } from 'axios-mock-server' export type User = { id: number, name: string } const users: User[] = [ { id: 0, name: 'taro' }, { id: 1, name: 'hanako' } ] const sleep = (ms: number) => new Promise(resolve => setTimeout(resolve, ms) const methods: MockMethods = { async get({ values }) { await sleep(100) return { status: 200, data: users.find(user => user.id === values.userId) } } } export default methods使い方 (Node.js + CommonJS modules)
設定ファイルで
targetをcjsに変更し、CommonJS形式でexportします。(デフォルトはes6).mockserverrc{ "target": "cjs" }mocks/v1/users/_userId.jsconst users = [ { id: 0, name: 'taro' }, { id: 1, name: 'hanako' } ] module.exports = { get({ values }) { return [200, users.find(user => user.id === values.userId)] } }src/index.jsconst axios = require('axios') const mockServer = require('axios-mock-server') const route = require('../mocks/$route') mockServer(route) axios.get('https://google.com/v1/users/1').then(function(user) { console.log(user) // { id: 1, name: 'hanako' } })インプットディレクトリの変更
API定義のスクリプトファイルを置いておくディレクトリをデフォルトの
mocksから変えることが出来ます。
設定ファイルのinputという項目にディレクトリの相対パスを指定できます。.mockserverrc{ "input": "server/api" }配列で複数ディレクトリを指定することも可能です。
.mockserverrc{ "input": ["server/api1", "server/api2"] }src/index.jsimport axios from 'axios' import mockServer from 'axios-mock-server' import route1 from '../server/api1/$route' import route2 from '../server/api2/$route' const client1 = axios.create({ baseURL: 'https://google.com/v1' }) const client2 = axios.create({ baseURL: 'https://google.com/v2' }) mockServer(route1, client1).enableLog() mockServer(route2, client2).enableLog() client1.get('/users/1?aa=123', { params: { bb: 'hoge' }}) // [mock] get: /v1/users/1?aa=123&bb=hoge client2.get('/users/1?aa=123', { params: { bb: 'hoge' }}) // [mock] get: /v2/users/1?aa=123&bb=hogeまとめ
サーバーの実装を待たずにフロントが先行して開発を進めるとか、フロントチームだけでプロトタイプを作るのにも相当役立つはずです。
HTTPクライアント界隈では最近kyがアツい感じなのでaxiosがいつまでスタンダードであり続けるかは気になるところですが。バグ報告や使い方の質問は気軽にいただけると嬉しいです。
- 投稿日:2019-09-09T08:38:43+09:00
expressフレームワークで作るnode.jsサーバー
フォーム用のアプリケーションサーバーを用意する必要ができた
というわけで、とりあえずなんか簡単にアプリケーションサーバーになるものはないかと考え、node.jsで作ってみることにしました。初めてやったので、色々手順やら何やらをおさらいしておきます。
node.jsってなんだ
node.jsはサーバーサイドのjavascriptの実行環境ということです。言語そのものを指しているわけではなく、実行環境のことをnode.jsと指します。処理するための言語としてjavascriptを採用されています。
nodebrewを用意する
macでインストールする場合、homebrewを使ってインストールしてきます。
$ brew install nodebrewパスを通します。私はzshを使っているので.zshrcに書いています。
export PATH=$PATH:/Users/user-name/.nodebrew/current/binzshを読み込ませたら、バージョンを確認ができると思います。
$ nodebrew -v
nodebrew 1.0.1
このようにversionを確認できたらインストール完了です。
node.jsをインストール
$ nodebrew install stable今回は安定板をインストールしています。因みにnode.jsをインストールすると、合わせてnpmもインストールされます。
$ nodebrew list
v11.13.0
v12.9.0

current: none
インストールされたnodeをlistでみることができます。
nodebrew use stablecurrentがnoneであったので、useを使ってnode.jsのバージョン管理がこれでできる。
nodebrew list
v11.13.0
v12.9.0

current: v12.9.0
もう一度listを打ってみると、これでcurrentがstableのnode.jsになっていることが分かります。
expressをインストール
expressはnode.jsのモジュールを統合したフレームワークです。独自サーバー開発のためのリクエスト処理などを簡単な記述で実現できるようになります。
$ mkdir test-server
$ cd test-server
$ npm init
$ npm install express
npm initのコマンドは、初期化処理です。この初期化処理を行うことによってpackage.jsonが作成されます。このファイルはjson形式でインストールされたパッケージを管理するために記述されているものです。プロジェクトのnode.jsの初期環境をこれで決められます。npm installでexpressをインストールします。--saveオプションをつけている人も結構いますが、npmバージョン5.0.0以降は不要になったようです。--saveをつけなくても、package.jsonに追加されています。
サーバーを立てるためのコードを書いてみる
index.js/*expressモジュールを読み込んでインスタンス化して、変数へ代入*/ var express = require('express'); var app = express(); /*corsモジュールを読み込む*/ var cors = require('cors' ); /*expressのミドルウェア関数を利用できるようにし、corsモジュールを実行できるようにする*/ app.use(cors()); /*クライアントにアクセスさせたいディレクトリを設定。所謂ひとつのドキュメントルート*/ app.use(express.static('public')); /*クライアントのgetリクエストがあった時のレスポンス*/ app.get('/', (req, res) => { res.send('wlcome to node server!!'); }); /*httpサーバーを運用*/ app.listen(3000, () => { console.log('HTTP Server(3000) is running.') }); /*httpsサーバーを運用*/ var https = require('https'); var fs = require('fs'); var options = { key: fs.readFileSync('cert.ca.key'); cert: fs.readFileSync('cert/ca.crt'); }; var server = https.createServer(options, app); server.listen(3001, () => { console.log(HTTPS Server(3001) is running.'); });ソースコード上で使われている技術についてのメモ
コメントアウトでは長すぎて説明できないため、別個にこちらで説明します。
CORSとは?
cors = Cross-Origin Resource Sharing
ブラウザがオリジン(HTMLを読み込んだサーバのこと)以外のサーバからデータを取得する仕組みで、XMLHttpRequestでクロスドメインアクセスを実現するための仕様です。
ブラウザでAjax通信を行う際には、同一生成元ポリシー(Same Origin Policy)によってWebページを生成したドメイン以外へのHTTPリクエスト(クロスドメイン通信)がブラウザ側の仕様でできません(これをクロスドメイン制約と呼ぶ)。これは、クロスサイトスクリプティングを防止するためですが、Ajax通信で異なるドメインのリソースにアクセスしたいというニーズは常にあるので、CORSはそれを可能にするためのものです。
httpサーバーとhttpsサーバーを簡単に立てられる
上記の記述だけで簡単なサーバーを立てられます。
$ node index.js
HTTP Server(3000) is running.
HTTPS Server(3001) is running.
と出てくると思うので、localhostで両方接続してみてください。https接続に関しては、鍵をオレオレ認証で別途作ってください。
expressの様々なメソッド
urlencoded
このメソッドは、Content-Typeヘッダーがtypeオプションと一致するリクエストのみを調べるミドルウェアを返します。
app.use(express.urlencoded({extended: true}));ここでいうミドルウェアとは?
ミドルウェアとは、簡単に言うとルーティングで振り分けた先の処理の事です。
extended
このオプションを使用すると、URLエンコードされたデータを、クエリ文字列ライブラリ(falseの場合)またはqsライブラリ(trueの場合)で解析することを選択できます。
Content-Typeとは?
ContentタイプはHTTPヘッダのフィールド名です。MIMEタイプを指定するために使用される。
じゃ、MIMEタイプって何よ
サーバーから送られてきたデータの種類のことを指す。
以下のようなリクエストヘッダになる
Content-Type: text/html; charset=utf-8jsonメソッド
リクエストをjsonにパースするメソッド
app.use(express.json());以上の2つのメソッドを利用することで、リクエストヘッダーのなかにContent-Typeを正しくjosnで表示させることができる。
この上記2つのメソッドを調べていると、記事としてはbody-parserのモジュールを読み込ませて使っているものが多く、v4.16.0以降のexpressを使った表現があまり見られなかった。
.envから読み込ませる
例えば、ポート番号何番で接続しているかをクライアント側に見られてはいけない。
app.listen(process.env.SERVER_LISTEN_PORT);同一階層のパスに.envファイルを作成する。
SERVER_LISTEN_PORT=3000独自ファイルを読み込ませる
app.use('/', require('指定したいファイルパス'));参考文献
- 投稿日:2019-09-09T02:24:54+09:00
【メモ】DockerでNode.jsが使えるコンテナの一覧を見たいときに便利なリンク
非常に便利なページなのですが、ブックマークが見られない環境のためにここに書いておきます。
このページは簡単に言うと、
nodejsがもともと入ってる、Docker公式のDockerfileリンク一覧
ってことになります(ちなみにリンク先はGithubで管理されてるDockerfile)。
あとは、このページに書かれているリンクをDockerfileのFROM文として追加すればOKです。
FROM 12.10.0-alpineこれであとはDokcer本やDockerサイトを参考に環境を整えられればと思います。
おまけ
中にはDBが欲しいという方もいらっしゃいますので、その時のためにMySQLとPostgreSQLのリンク集も載せておきます。
- 投稿日:2019-09-09T00:16:15+09:00
Node.jsでREST APIを連続実行するプログラムを組んでみる(Google Sheet APIを利用)
1.はじめに
業務で以下のような簡易プログラムが欲しくて作りたいので、下調べのためお試し版を作ってみたので記載する。
(1) REST API (HTTPメソッド:GET) を実行
(2) (1)で取得したデータを元にリクエストボディ作成
(3) REST API (HTTPメソッド:POST or PUT or DELETE) を実行使用するREST APIはなんでも良かったため、メジャーかつ使用するのに敷居が高くなさそうなのが良いと思い、Google Sheet APIを使用した。
実際は、REST APIを実行するために必要なアクセストークンの生成に必要な手順等で多少詰まったので、それもまとめておく。2. Google API OAuth2.0 のトークン取得
(1) Googleアカウント作成
アカウントがなければ。または、Google API用に別アカウントを作るのであれば
(2) Google Developers Consoleで新規プロジェクト作成
Google Developers Console にアクセス
画面上部「Google APIs」のロゴの隣にあるプロジェクトの選択の部分から新しいプロジェクトを作成
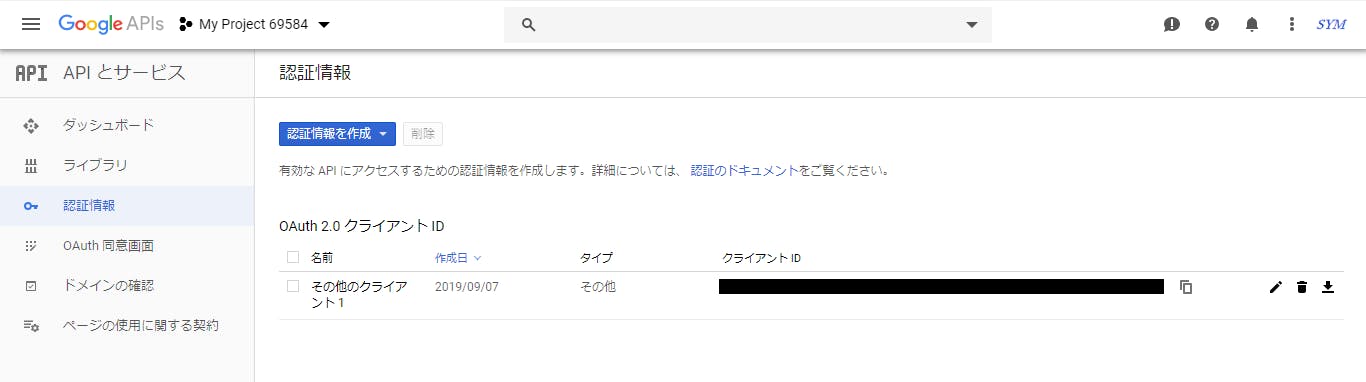
(3) Oauth Client ID 作成
認証情報からクライアントIDを作成する
作成したクライアントIDの右端のダウンロードボタンをクリックしてクライアントID等の情報が入ったJSONを取得する。
JSONの中身は以下のようになっている。{ "installed": { "client_id": "XXXXXXXXXXXXXXXXXXXXXX.apps.googleusercontent.com", "project_id": "dependable-aloe-XXXXX", "auth_uri": "https://accounts.google.com/o/oauth2/auth", "token_uri": "https://oauth2.googleapis.com/token", "auth_provider_x509_cert_url": "https://www.googleapis.com/oauth2/v1/certs", "client_secret": "XXXXXXXXXXXXXXXXXXXX", "redirect_uris": [ "urn:ietf:wg:oauth:2.0:oob", "http://localhost" ] } }(4) 認可画面を開いて認証
(3)で取得したJSONを元に以下URLのクエリパラメータを編集してアクセスする。
https://accounts.google.com/o/oauth2/v2/auth?response_type=code&client_id={client_id}&redirect_uri=urn:ietf:wg:oauth:2.0:oob&scope=https://www.googleapis.com/auth/spreadsheets%20https://www.googleapis.com/auth/drive&access_type=offline※scopeには使用したいAPIを指定する。以下のページからコピペ要
https://developers.google.com/identity/protocols/googlescopes※Google Sheet API を使用したい場合は、scopeにGoogle Drive APIも一緒に指定しないとAccessToken取得時にinvalid_grantエラーになるので注意
上記URLにアクセスして、scopeに指定したAPIを認証すると以下画面に「認証コード(Authorization Code)」が表示される
(5) Access Token 取得
(3)(4)で取得した情報を元に以下curlコマンドを組み立てて実行
※{authorization_code}は(4)の認証コード、{client_id},{clietn_secret}は(3)のJSONの値に置き換えcurl --data "code={authorization_code}" --data "client_id={client_id}" --data "client_secret={clietn_secret}" --data "redirect_uri=urn:ietf:wg:oauth:2.0:oob" --data "grant_type=authorization_code" --data "access_type=offline" https://www.googleapis.com/oauth2/v4/token(おまけ) Refresh Token で Access Token を再取得
(5)で取得した Access Tokenには有効期限があるため、一定時間経つと使用できなくなる。
以下curlコマンドでAccess Tokenの再取得が可能curl --data "refresh_token={refresh_token}" --data "client_id={client_id}" --data "client_secret={client_secret}" --data "grant_type=refresh_token" https://www.googleapis.com/oauth2/v4/token3. Node.jsによるRest API 連続実行
3.1. 下準備
(1) Node.js環境構築
$ npm init -y
$ npm install request -- save
$ npm install googleapis --save
$ npm install fs --save
(2) JavaScriptソースファイル(index.js等)を作成
(3) cledentials.json と token.json を用意
cledentials.jsonは2章(3)で取得したJSON
cledentials.json{ "installed": { "client_id": "XXXXXXXXXXXXXXXXXXXXXX.apps.googleusercontent.com", "project_id": "dependable-aloe-XXXXX", "auth_uri": "https://accounts.google.com/o/oauth2/auth", "token_uri": "https://oauth2.googleapis.com/token", "auth_provider_x509_cert_url": "https://www.googleapis.com/oauth2/v1/certs", "client_secret": "XXXXXXXXXXXXXXXXXXXX", "redirect_uris": [ "urn:ietf:wg:oauth:2.0:oob", "http://localhost" ] } }token.jsonは2章(5)のレスポンス
token.json{ "access_token":"XXXXXXXXXXXXXXXXX", "expires_in":3600, "refresh_token":"XXXXXXXXXXXXXXXXX", "scope":"https://www.googleapis.com/auth/spreadsheets https://www.googleapis.com/auth/drive", "token_type":"Bearer" }(4) 以下公式のサンプルコードを改造して作成するので理解する
https://developers.google.com/sheets/api/quickstart/nodejs
※上記サンプルコードで、2章(4),(5)は半自動で実施可能。実行にはcledentials.jsonが必須。
3.2. 実際に作ったプログラム
(題材はなんでも良かったが)ポケモンの種族値から実際のステータス値を算出/出力するプログラムを作ってみた(真面目にやると複数の変動値を考慮する必要があるのでその辺は固定値にした)。
1回の実行で、ソース内で指定しているGoogleスプレッドシートに対して、REST API(Google Sheet API)を連続で実行して以下を行う。
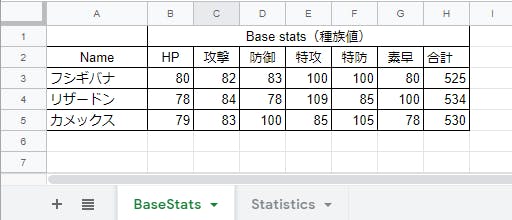
(1) BaseStatsシートのB3~G5の範囲のデータ(種族値)取得
ソース上の対応メソッド:getSpreadSheetData()
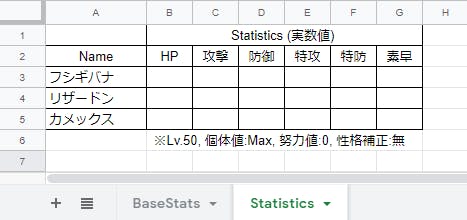
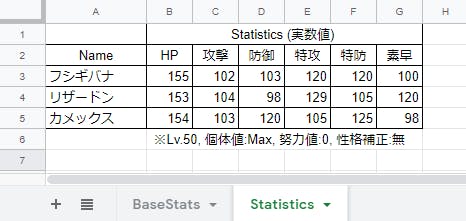
(2) StatisticsシートのB3~G5の範囲にデータ(計算結果の実数値)書き込み
ソース上の対応メソッド:writeSpreadSheet()
↓
(3) REST API実行時にAccess Tokenの有効期限切れのエラーとなった場合はAccess Tokenを再取得して1回だけ再実行する。
ソース上の対応メソッド:retryCall()
・ソースコード
※authorize(), getNewToken()は参考サイト( https://developers.google.com/sheets/api/quickstart/nodejs )とほぼ同じ
※google.sheetsを使用すればわざわざURL指定をする必要ないが、今回の趣旨に反するためあえて使用していない。
※readFile()やrequest.get(), request.post()等は非同期実行なので注意するindex.jsconst request = require('request'); const { google } = require('googleapis'); const fs = require('fs'); // constant const CLEDENT_PATH = 'credentials.json'; const TOKEN_PATH = 'token.json'; const READ_SHEET_URL = 'https://sheets.googleapis.com/v4/spreadsheets/1zi8P6wQujXtLvPriViF9Z82-6VlDrBUvUdb_dlgSwnA/values/BaseStats!B3:G5'; const WRITE_SHEET_URL = 'https://sheets.googleapis.com/v4/spreadsheets/1zi8P6wQujXtLvPriViF9Z82-6VlDrBUvUdb_dlgSwnA/values/Statistics!B3:G5'; const REFRESH_URL = 'https://www.googleapis.com/oauth2/v4/token'; // get Access Token fs.readFile(CLEDENT_PATH, (err, content) => { if (err) return console.log('Error loading client secret file:', err); // Authorize a client with credentials, then call the Google Sheets API. authorize(JSON.parse(content), getSpreadSheetData); }); function authorize(credentials, callback) { const { client_secret, client_id, redirect_uris } = credentials.installed; const oAuth2Client = new google.auth.OAuth2( client_id, client_secret, redirect_uris[0]); // Check if we have previously stored a token. fs.readFile(TOKEN_PATH, (err, token) => { if (err) return getNewToken(oAuth2Client, callback); oAuth2Client.setCredentials(JSON.parse(token)); callback(oAuth2Client, false); }); } function getNewToken(oAuth2Client, callback) { const authUrl = oAuth2Client.generateAuthUrl({ access_type: 'offline', scope: SCOPES, }); console.log('Authorize this app by visiting this url:', authUrl); const rl = readline.createInterface({ input: process.stdin, output: process.stdout, }); rl.question('Enter the code from that page here: ', (code) => { rl.close(); oAuth2Client.getToken(code, (err, token) => { if (err) return console.error('Error while trying to retrieve access token', err); oAuth2Client.setCredentials(token); // Store the token to disk for later program executions fs.writeFile(TOKEN_PATH, JSON.stringify(token), (err) => { if (err) return console.error(err); console.log('Token stored to', TOKEN_PATH); }); callback(oAuth2Client, false); }); }); } // read Spread Sheet function getSpreadSheetData(outh2Client, isRetry) { request.get({ uri: READ_SHEET_URL, headers: { 'Content-type': 'application/json' }, qs: { access_token: outh2Client.credentials.access_token, }, json: true }, function (err, req, data) { if (data.error) { retryCall(data.error, outh2Client, getSpreadSheetData, isRetry) } else { console.log("--- Result Sheet Reading ---\n" + JSON.stringify(data)); let writeValues = generateStats(data.values); writeSpreadSheet(outh2Client, writeValues, false); } }); } // write Spread Sheet function writeSpreadSheet(outh2Client, writeValues, isRetry) { request.put({ uri: WRITE_SHEET_URL, headers: { 'Content-type': 'application/json' }, qs: { access_token: outh2Client.credentials.access_token, valueInputOption: "USER_ENTERED" }, json: { "range": "Statistics!B3:G5", "majorDimension": "ROWS", "values": writeValues } }, function (err, req, data) { if (data.error) { retryCall(data.error, outh2Client, writeSpreadSheet, isRetry) } else { console.log("--- Result Sheet Writing ---\n" + JSON.stringify(data)); console.log("writeData: " + JSON.stringify(writeValues)); } }); } // retry rest api execute function retryCall(error, outh2Client, callback, isRetry) { if (!isRetry && error.code === 401 && error.status === "UNAUTHENTICATED") { refreshToken(outh2Client, callback); } else { console.log("[api error]"); console.log(data); return; } } // refresh Access Token function refreshToken(outh2Client, callback) { request.post(REFRESH_URL, { form: { grant_type: 'refresh_token', refresh_token: outh2Client.credentials.refresh_token, client_id: outh2Client._clientId, client_secret: outh2Client._clientSecret } }, function (err, res, data) { data = JSON.parse(data); if (data.error) { console.log("[error refresh failure]"); console.log(data); } else { outh2Client.credentials.access_token = data.access_token; fs.writeFile(TOKEN_PATH, JSON.stringify(outh2Client.credentials), (err) => { if (err) return console.error(err); console.log('Token stored to', TOKEN_PATH); }); callback(outh2Client, true); } }); } // calculate pokemon Statistics function generateStats(baseStatsList) { let statsList = []; for (baseStats of baseStatsList) { let stats = []; stats.push(calculateHP(baseStats[0])); for (let i = 1; i < baseStats.length; i++) { stats.push(calculateOther(baseStats[i])); } statsList.push(stats); } return statsList; } const level = 50; const individualValue = 31; const effortValue = 0; const natureCorrectionRate = 1; function calculateHP(baseStat) { let stat = parseInt((baseStat * 2 + individualValue + effortValue / 4) * (level / 100)) + 10 + level; return stat; } function calculateOther(baseStat) { let stat = parseInt((parseInt((baseStat * 2 + individualValue + effortValue / 4) * (level / 100)) + 5) * natureCorrectionRate); return stat; }・実行後のターミナル出力結果(例)
PS C:\developments\vsCode\restNodeJs> node index.js
--- Result Sheet Reading ---
{"range":"BaseStats!B3:G5","majorDimension":"ROWS","values":[["80","82","83","100","100","80"],["78","84","78","109","85","100"],["79","83","100","85","105","78"]]}
--- Result Sheet Writing ---
{"spreadsheetId":"1zi8P6wQujXtLvPriViF9Z82-6VlDrBUvUdb_dlgSwnA","updatedRange":"Statistics!B3:G5","updatedRows":3,"updatedColumns":6,"updatedCells":18}
writeData: [[155,102,103,120,120,100],[153,104,98,129,105,120],[154,103,120,105,125,98]]
参考サイト
・Google APIのAccess Tokenをお手軽に取得する
https://qiita.com/shin1ogawa/items/49a076f62e5f17f18fe5・Google APIを使用するためにGoogle OAuth認証をしようよ
https://himakan.net/websites/how_to_google_oauth・【Google API入門(1)】Google OAuthでAccess Tokenを取得してみる
https://poppingcarp.com/google-api_get_access_token/・Node.jsでGoogle APIをOAuth2.0認証してAPIを使う方法
https://photo-tea.com/p/17/nodejs-google-api-oauth/・Node.jsからWebAPIを叩く
https://qiita.com/yuta0801/items/ff7f314f45c4f8dc8a48・node.js – Google OAuthがリフレッシュトークンを使用して新しいアクセストークンを取得する
https://codeday.me/jp/qa/20190625/1095976.html・Google Sheet API v4 ガイド
https://developers.google.com/sheets/api/quickstart/nodejs・Google Sheet API v4 サンプル
https://developers.google.com/sheets/api/samples/